
:max_bytes(150000):strip_icc():format(webp)/camera-56e0976d3df78c5ba0566b37.jpg)
New Secret Tips & Tricks to Use in Filmora for 2024
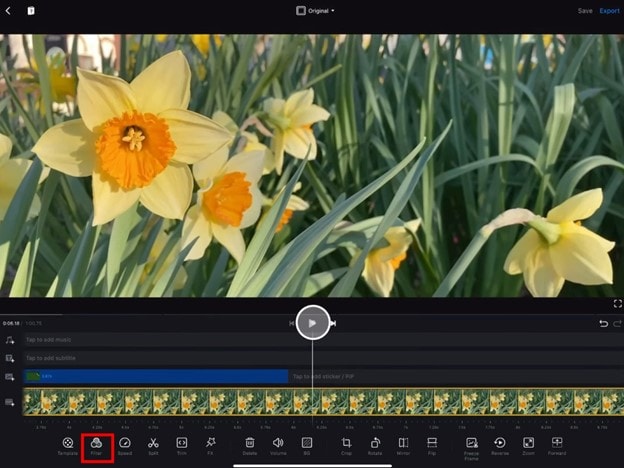
Secret Tips & Tricks to Use in Filmora
Wondershare Filmora is a great video editing software with millions of users worldwide. It has many features that it provides to its users. However, there are some other features hidden up its sleeve.
This article will share some “secrets” of Wondershare Filmora features you may not know that they exist in Filmora. Scroll below to see the features that level up your editing skills.
Part 1. Shared Media Folder
You might have had the hassle of importing the same videos for a considerable time in a different project. It can become a problem for you. It may be fine if you have organized your videos from the start.
Shared Media Folder in Filmora, now called the Global Media Folder, can store video and audio that you’ve imported for future projects. So you don’t have to keep re-importing your media for future videos.

Moreover, when you have imported files into the Shared Media Folder, you can create new Sub-Folders. You can name these folders according to the types of media you are going to use.
Suppose you are a content creator and want to spice up your content with memes. You can create a meme folder to import recent memes into your videos.
Once you have imported them into the Wondershare Filmora’s Shared Media Folder, you can access them anytime. Doing so will allow you to save time and build a base for your future projects.
Free Download For Win 7 or later(64-bit)
Free Download For macOS 10.14 or later
Part 2. Customize Proxy Files
Before understanding the custom proxy settings, let us know what proxy files are.
Proxy Files
Proxy files in Wondershare Filmora allow you to render and edit 4K and other higher-resolution videos easily, regardless of your computer’s processing power.
No one wants to compromise PC performance when editing videos. But if you are importing a video with a higher resolution than your PC, you can only play it sometimes. Other than that, your PC might get stuck and slow down.
If your PC has a built-in resolution of 1080p, but the video you are going to import is 2160p, you can encounter rendering and performance problems. But in the case of Wondershare Filmora Proxy files, you can smoothly edit your videos without any trouble.
How to Customize Proxy Files in Filmora
Although Wondershare Filmora automatically creates proxy files when it encounters resolutions more significant than the PC performance. But you can also set them to your preference.
And customize your proxy files takes some simple and easy steps. But first, follow the steps mentioned below.
Step1 Find the File option on the top left corner of the Wonderhsare Filmora home interface.
Step2 Click on Files and go to Preferences.
Step3 A window will pop up, and here you can see multiple options.
Step4 Go to the performance.
Step5 In the performance tab, scroll down till your see Proxy.
Step6 Here check the box that says, “Automatically create proxies when resolution higher than:”

Step7 Below you can see multiple options. In these options, select the resolution that you want.
Step8 You can also click on the box below to automatically delete the proxies when you close your project.
Now, whenever you encounter a resolution of a higher video than the one you selected, Wondershare Filmora will do its magic.
Part 3. Delete Project Render Cache
Another hack you can use to save space on your hard drive is Deleting the Render cache. But before we do that, let us understand what Render cache is!
What is Render Cache?
Rendering can be a giant leap to give you a smooth performance experience. However, when you import your videos into the timeline, you can always render to have an uninterrupted playback experience.
Doing so will allow you to work in your zone quickly and efficiently. You can do a manual rendering before you begin the editing process. Or you can also opt to choose automatic rendering. In the automatic rendering option, you can continue your editing process. In the meantime, your timeline will be rendered.
How to Delete Render Cache in Filmora
To save up storage space on your computer, you can delete your render cache by following the steps.
Step1 Click on files in the top left corner of the Wondershare Filmora home interface.
Step2 Go to Preferences.
Step3 A window will pop up and go to Performance.
Step4 In the performance tab, scroll down below to the Preview Render.
Step5 Check the box saying, “Automatically delete render files when a project is closed.”

Step6 Click on OK to save your changes.
Now, whenever you close your project, your render cache will be deleted and would have given you extra space on your computer.
Part 4. Remove Split Button on Playhead
In some instances, when you are moving the playhead on the timelines, it can distract you from doing your editing. Or even more, you can mistakenly click on the Split button to split the clips you don’t want them to.
Well, no worries at all! Wondershare Filmora takes care of that for you. You can hide or remove the Split button on the playhead. It only takes a few simple and easy steps. Follow the steps mentioned below to remove the Split button:
Step1 You will notice the File option on the top left corner of the Wonderhsare Filmora home interface.
Step2 Click on Files and go to Preferences.
Step3 A window will pop up, and here you can see multiple options.
Step4 Go to the editing
Step5 In the editing tab, scroll down till your see the Split button.

Step6 Check the box. Then, click OK to save your changes.
Doing so would have removed the Split button from your playhead. So now you can edit your videos without any distractions.
Part 5. Copy and Paste Effects
Copy and paste are one of the oldest tricks in editing procedures. Wondershare Filmora comes with a range of commands and features that allow you to save time and be reliable.
Suppose you want to add an effect to a video clip in the timeline. Then, after adding the effect to your video, make custom changes to make it look more closely to the style you want. You can now use the copy-and-paste function to add the same effect to another clip. That helps you save a lot of time from tedious and time-consuming work.
How to Copy and Paste Effects
While editing, you will need to ensure that your editing process is as clean as possible and that you have all the time on hand.
But there is a solution! You can easily copy and paste the effects you placed on one video clip to another. Just follow the steps mentioned, and you will be good to go:
Step1 Right-click on the video to you added the effects too.
Step2 A drop-down column will pop up.
Step3 In the options below, you will notice an option called “Copy Effects.”
Step4 Click on the “Copy Effects” option.
Step5 Now move the playhead to the video clip on which you want to paste the effects.
Step6 Right-click on the video that you want to place the effect on.
Step7 In the pop-up column, select the Paste Effect
Step8 It adjusts the video clip according to the changes of the prior one.
You can save editing time by simply copying and pasting video effects.

Part 6. Timeline Snap
You might have added multiple videos in the same timeline track. If you removed the video ahead of the video clip, you have to close the gap in between.
So, arranging and moving clips in the timeline are hectic and time-consuming. However, that is the case without timeline snapping.
How to Apply Timeline Snap in Filmora
Timeline snapping will allow you to arrange video clips side by side without any breaks and cut-offs. Also, it will enable you to place it precisely above other video and audio gaps in the timeline.
In most cases, Timeline snapping is enabled from the start. But if you are encountering some problems managing your videos. Or if you want to remove the Timeline snap feature. Follow the steps mentioned below:
Step1 Right-click on the Timeline.
Step2 A pop will open up, giving you multiple options.
Step3 Click on timeline Snapping to either enable it or disable it.

Now you can easily enable and disable timeline snapping according to your choice!
Part 7. Color Code Video Clips
When editing footage from multiple cameras, you might want to organize which media is from which source in the timeline. You can do this by color coding your clips.
Steps to Color Code Your Videos
Color coding allows you to edit all the clips marked with a particular color to be selected simultaneously without selecting them manually in the timeline.
To color code a video, follow the steps as mentioned:
Step1 Select the clips you want to color code, right-click, and choose from the available colors.
Step2 Once you’ve color coded your clips, you can right-click on the clip again and choose to select all clips from the color mark option.
Step3 And all the clips marked with that color will be selected.

Part 8. Group Clips Together
Now in an editing timeline, you might encounter a situation where you want to arrange a video clip with specific audio. Again, it allows you to stay organized and save up a lot of time.
Grouping clips together can also be helpful when you want to edit multiple clips in the timeline but want to maintain a particular order. The group will remain in its place and allow you to edit your other video clips quickly.
Stepwise Guide to Grouping the Clips in Filmora
You can group video and audio clips in straightforward steps. Just follow the actions ahead, and you will be good to go:
Step1 Hold Left-click and drag across the clips that you want to select.
Step2 When you are done, Right-click on the clip to open the options tab.
Step3 Scroll down, and you will see a “” option.
Step4 Select Group, and that’s done.

Your whole group will be selected whenever you select a video clip or an audio clip.
Part 9. Pan and Zoom Shortcut
Editing shortcuts are excellent. They allow you to save up a lot of time. Some people prefer to use a mouse only to edit their videos, but professionals always use a keyboard.
But there are some other shortcuts too! In these shortcuts, you would not necessarily need a keyboard; only a mouse will work and give a good outcome.
You might have seen those videos in which a specific screen ratio moves over a picture. Or, in some cases when you have to pan and zoom to create a flow effect.
Instead of manually adjusting the ratio of your videos and photos, Pan and Zoom shortcuts will allow you to use multiple features. These features allow you to select where your video or photo will start, zoom, and end.
These shortcuts are so easy to apply. Just go through the steps below, and you will accomplish the following:
Step1 Right-click on a photo or a video clip.
Step2 Go to the crop and zoom tab above the timeline.
Step3 In the window that opens up, you will see a pan and zoom option in the top left corner. Click on it.
Step4 And on the bottom right corner of the window, you can see the pan and zoom shortcuts available.
Step5 Please select any of them you want and then click on OK.

Part 10. New Feature Request
One of the significant features of Wondershare Filmora that sets it among the best is its capability to listen to the users. When you have been using Wondershare Filmora for a long time, there will come a time when you wish for a feature. You can also do so in a few simple steps. Just follow the steps mentioned:
Step1 Multiple options are available on the top left corner of the Wondershare Filmora home interface. Click on help.
Step2 A drop-down box will open up.
Step3 In the options offered to you, select suggest a feature.

Step4 It automatically directs you to your default browser, where you can see the multiple feature requests.
Step5 You can vote for a feature you want in the next update.
Step6 Or you can also create a request for another particular feature.

Summing Up
Wondershare Filmora is the best in the business regarding editing your videos. It has such creative and easy-to-use software that even a beginner efficiently edits videos.
There are a lot of features that Wondershare Filmora provides. But now, with these secret and hidden tips, you can edit your videos more creatively.
Free Download For macOS 10.14 or later
Part 2. Customize Proxy Files
Before understanding the custom proxy settings, let us know what proxy files are.
Proxy Files
Proxy files in Wondershare Filmora allow you to render and edit 4K and other higher-resolution videos easily, regardless of your computer’s processing power.
No one wants to compromise PC performance when editing videos. But if you are importing a video with a higher resolution than your PC, you can only play it sometimes. Other than that, your PC might get stuck and slow down.
If your PC has a built-in resolution of 1080p, but the video you are going to import is 2160p, you can encounter rendering and performance problems. But in the case of Wondershare Filmora Proxy files, you can smoothly edit your videos without any trouble.
How to Customize Proxy Files in Filmora
Although Wondershare Filmora automatically creates proxy files when it encounters resolutions more significant than the PC performance. But you can also set them to your preference.
And customize your proxy files takes some simple and easy steps. But first, follow the steps mentioned below.
Step1 Find the File option on the top left corner of the Wonderhsare Filmora home interface.
Step2 Click on Files and go to Preferences.
Step3 A window will pop up, and here you can see multiple options.
Step4 Go to the performance.
Step5 In the performance tab, scroll down till your see Proxy.
Step6 Here check the box that says, “Automatically create proxies when resolution higher than:”
Step7 Below you can see multiple options. In these options, select the resolution that you want.
Step8 You can also click on the box below to automatically delete the proxies when you close your project.
Now, whenever you encounter a resolution of a higher video than the one you selected, Wondershare Filmora will do its magic.
Part 3. Delete Project Render Cache
Another hack you can use to save space on your hard drive is Deleting the Render cache. But before we do that, let us understand what Render cache is!
What is Render Cache?
Rendering can be a giant leap to give you a smooth performance experience. However, when you import your videos into the timeline, you can always render to have an uninterrupted playback experience.
Doing so will allow you to work in your zone quickly and efficiently. You can do a manual rendering before you begin the editing process. Or you can also opt to choose automatic rendering. In the automatic rendering option, you can continue your editing process. In the meantime, your timeline will be rendered.
How to Delete Render Cache in Filmora
To save up storage space on your computer, you can delete your render cache by following the steps.
Step1 Click on files in the top left corner of the Wondershare Filmora home interface.
Step2 Go to Preferences.
Step3 A window will pop up and go to Performance.
Step4 In the performance tab, scroll down below to the Preview Render.
Step5 Check the box saying, “Automatically delete render files when a project is closed.”
Step6 Click on OK to save your changes.
Now, whenever you close your project, your render cache will be deleted and would have given you extra space on your computer.
Part 4. Remove Split Button on Playhead
In some instances, when you are moving the playhead on the timelines, it can distract you from doing your editing. Or even more, you can mistakenly click on the Split button to split the clips you don’t want them to.
Well, no worries at all! Wondershare Filmora takes care of that for you. You can hide or remove the Split button on the playhead. It only takes a few simple and easy steps. Follow the steps mentioned below to remove the Split button:
Step1 You will notice the File option on the top left corner of the Wonderhsare Filmora home interface.
Step2 Click on Files and go to Preferences.
Step3 A window will pop up, and here you can see multiple options.
Step4 Go to the editing
Step5 In the editing tab, scroll down till your see the Split button.
Step6 Check the box. Then, click OK to save your changes.
Doing so would have removed the Split button from your playhead. So now you can edit your videos without any distractions.
Part 5. Copy and Paste Effects
Copy and paste are one of the oldest tricks in editing procedures. Wondershare Filmora comes with a range of commands and features that allow you to save time and be reliable.
Suppose you want to add an effect to a video clip in the timeline. Then, after adding the effect to your video, make custom changes to make it look more closely to the style you want. You can now use the copy-and-paste function to add the same effect to another clip. That helps you save a lot of time from tedious and time-consuming work.
How to Copy and Paste Effects
While editing, you will need to ensure that your editing process is as clean as possible and that you have all the time on hand.
But there is a solution! You can easily copy and paste the effects you placed on one video clip to another. Just follow the steps mentioned, and you will be good to go:
Step1 Right-click on the video to you added the effects too.
Step2 A drop-down column will pop up.
Step3 In the options below, you will notice an option called “Copy Effects.”
Step4 Click on the “Copy Effects” option.
Step5 Now move the playhead to the video clip on which you want to paste the effects.
Step6 Right-click on the video that you want to place the effect on.
Step7 In the pop-up column, select the Paste Effect
Step8 It adjusts the video clip according to the changes of the prior one.
You can save editing time by simply copying and pasting video effects.
Part 6. Timeline Snap
You might have added multiple videos in the same timeline track. If you removed the video ahead of the video clip, you have to close the gap in between.
So, arranging and moving clips in the timeline are hectic and time-consuming. However, that is the case without timeline snapping.
How to Apply Timeline Snap in Filmora
Timeline snapping will allow you to arrange video clips side by side without any breaks and cut-offs. Also, it will enable you to place it precisely above other video and audio gaps in the timeline.
In most cases, Timeline snapping is enabled from the start. But if you are encountering some problems managing your videos. Or if you want to remove the Timeline snap feature. Follow the steps mentioned below:
Step1 Right-click on the Timeline.
Step2 A pop will open up, giving you multiple options.
Step3 Click on timeline Snapping to either enable it or disable it.
Now you can easily enable and disable timeline snapping according to your choice!
Part 7. Color Code Video Clips
When editing footage from multiple cameras, you might want to organize which media is from which source in the timeline. You can do this by color coding your clips.
Steps to Color Code Your Videos
Color coding allows you to edit all the clips marked with a particular color to be selected simultaneously without selecting them manually in the timeline.
To color code a video, follow the steps as mentioned:
Step1 Select the clips you want to color code, right-click, and choose from the available colors.
Step2 Once you’ve color coded your clips, you can right-click on the clip again and choose to select all clips from the color mark option.
Step3 And all the clips marked with that color will be selected.
Part 8. Group Clips Together
Now in an editing timeline, you might encounter a situation where you want to arrange a video clip with specific audio. Again, it allows you to stay organized and save up a lot of time.
Grouping clips together can also be helpful when you want to edit multiple clips in the timeline but want to maintain a particular order. The group will remain in its place and allow you to edit your other video clips quickly.
Stepwise Guide to Grouping the Clips in Filmora
You can group video and audio clips in straightforward steps. Just follow the actions ahead, and you will be good to go:
Step1 Hold Left-click and drag across the clips that you want to select.
Step2 When you are done, Right-click on the clip to open the options tab.
Step3 Scroll down, and you will see a “” option.
Step4 Select Group, and that’s done.
Your whole group will be selected whenever you select a video clip or an audio clip.
Part 9. Pan and Zoom Shortcut
Editing shortcuts are excellent. They allow you to save up a lot of time. Some people prefer to use a mouse only to edit their videos, but professionals always use a keyboard.
But there are some other shortcuts too! In these shortcuts, you would not necessarily need a keyboard; only a mouse will work and give a good outcome.
You might have seen those videos in which a specific screen ratio moves over a picture. Or, in some cases when you have to pan and zoom to create a flow effect.
Instead of manually adjusting the ratio of your videos and photos, Pan and Zoom shortcuts will allow you to use multiple features. These features allow you to select where your video or photo will start, zoom, and end.
These shortcuts are so easy to apply. Just go through the steps below, and you will accomplish the following:
Step1 Right-click on a photo or a video clip.
Step2 Go to the crop and zoom tab above the timeline.
Step3 In the window that opens up, you will see a pan and zoom option in the top left corner. Click on it.
Step4 And on the bottom right corner of the window, you can see the pan and zoom shortcuts available.
Step5 Please select any of them you want and then click on OK.
Part 10. New Feature Request
One of the significant features of Wondershare Filmora that sets it among the best is its capability to listen to the users. When you have been using Wondershare Filmora for a long time, there will come a time when you wish for a feature. You can also do so in a few simple steps. Just follow the steps mentioned:
Step1 Multiple options are available on the top left corner of the Wondershare Filmora home interface. Click on help.
Step2 A drop-down box will open up.
Step3 In the options offered to you, select suggest a feature.
Step4 It automatically directs you to your default browser, where you can see the multiple feature requests.
Step5 You can vote for a feature you want in the next update.
Step6 Or you can also create a request for another particular feature.
Summing Up
Wondershare Filmora is the best in the business regarding editing your videos. It has such creative and easy-to-use software that even a beginner efficiently edits videos.
There are a lot of features that Wondershare Filmora provides. But now, with these secret and hidden tips, you can edit your videos more creatively.
A Complete Overview of VSCO Video Editor
VSCO video editor is a professional video editing software for windows and mac that is used to create professional videos like the ones found in museums, on tv, in advertisements, and more.
In addition, VSCO is a free app for your phone, tablet, and desktop that lets you edit, adjust, and share your photos.
VSCO Video Editor is one of the best video editing apps on Android and iOS. It has an amazing user interface, which makes it extremely easy to use.
This article will show you how to use VSCO video editor and what it offers. First, here’s a complete overview of the VSCO video editor.
Part 1. Key features of VSCO video editor
VSCO video editor is an advanced video editor designed for home users. It provides features and effects that are not present in other editing programs.
This program has a straightforward interface and can be used easily by beginners and experienced editors who want to create high-quality videos like music videos and short films.VSCO video editor has an all-in-one video editing platform that lets you quickly make beautiful videos and share them with your friends.
The app has a simple user interface with four main sections: edit, create, share, and view.
Edit: Here, you can quickly edit your photos and videos by cropping, rotating, and adjusting the brightness and contrast. You can also add stickers to your photos or trim the length of your videos.
Create: This section lets you add music to your projects by importing audio files from your library or making new ones from scratch. Several filters are available for adding effects like black & white or sepia tone to your photos or videos.
Share: This section lets you upload your creations to social media accounts such as Facebook, Instagram, or YouTube for easy sharing with friends and family members who aren’t using VSCO Video Editor themselves!
View: Once you’ve created something new in this section it will appear on the top bar at the bottom of the screen so that you can watch it again later on without having to open up any other app.
Part 2. Using VSCO Video Editor
VSCO is a video editor that allows you to apply different special effects, filters, and other visual elements. If you have been looking for a new video editor, it might be worth checking out this software.
We will give you some details about what it can do and how you can use it to create beautiful videos on your computer.
Step-By-Step Guide for Using VSCO Video Editor
Step1 Download the VSCO video editor from the Google Play or Apple store .
Step2 Open the app and select “Create Video,” then choose a template for your first video.
Step3 Now, you are ready to create a new video by adding music, text, and effects on top of your footage. VSCO has a ton of pre-made templates that you can use as inspiration for your projects.
Step4 Once you have created your video and edited it, you can share it on Instagram, Facebook, and Twitter.
Useful Tips for Using VSCO Video Editor
The best part of this app is that it supports all file formats, so you do not have to worry about converting any file format into another one. You can easily export your work into different formats.
The app also allows users to create music videos from their photos without prior knowledge of audio editing or music composition.
The first thing you need to do is download the VSCO Video Editor app on your device. Once you have downloaded the app, open it and sign up for a free account. Once you have created an account, log in using your Facebook or email ID.
Go to Settings > General > Update Center and tap on the ‘Check for Updates button. The update center will show a list of available updates for your device. Tap on the update that interests you most and wait for it to install on your device.
Once done installing the new version of VSCO Video Editor, open it and start using it immediately!
Part 3. Best Alternative to VSCO Video Editor
Filmora
Regarding video editing software, Filmora is about as versatile as it gets. Although Filmora is Wondershare’s standard, straightforward, and high-quality video editing program, it also comes in Filmora and Filmora Scrn versions (for screen recording and editing).

Features
- A small collection of royalty-free music
- Transitions
- Motion elements
- Filters
- Overlays
Download this app here: Apple store and Google play store .
How to edit videos with Filmora
This is a step-by-step procedure you can follow on how to edit your videos with Filmora:
Step1 You import a new video by clicking new project or open a recent project, then you can enter the following work area.

Step2 Edit your video as creatively as you like, we have a large number of templates, filters and stickers.

Step3 Choose the right music for your video. Not only do we have a wealth of built-in music resources, you can also link to iTunes, allowing Filmora to gain access to your iTunes library. Of course, Filmora also supports extracting the audio within the video.

Step4 After you finish editing, click export to export your video. In the export settings, you can change the resolution as well as the sharpness of the video. You can also share it to common social media platforms with one click.

FAQs About Vsco Video Editor
How to put Vsco in your Instagram bio?
Put your VSCO link in your Instagram bio now that you have one. In your profile settings, you can do the following:
- Toggle your profile picture.
- Decide on Edit profile.
- In the Website field, paste the link.
- By tapping the tick, you can save the changes.

Can I publish videos to my VSCO profile or save them to my studio?
Videos you edit in VSCO can either be published to VSCO or saved to your Camera Roll/Gallery.
You must edit a video before exporting it by tapping “Next” in the top right corner of the screen to save it to your Camera Roll or Gallery.
Tap the + Import icon in your Studio, select the “Videos” section to find your video, and then tap “Post” in the bottom right corner to upload it to VSCO.
Conclusion
VSCO was one of the first video editing applications to feature non-destructive editing. Now VSCO Video also has a companion iPad app that you can use to edit while you’re on-the-go as well.
The app connects to your mobile device using the Adobe Creative Cloud and allows you to edit in real-time while simultaneously sharing your progress with friends and other members of the VSCO community.
Part 1. Key features of VSCO video editor
VSCO video editor is an advanced video editor designed for home users. It provides features and effects that are not present in other editing programs.
This program has a straightforward interface and can be used easily by beginners and experienced editors who want to create high-quality videos like music videos and short films.VSCO video editor has an all-in-one video editing platform that lets you quickly make beautiful videos and share them with your friends.
The app has a simple user interface with four main sections: edit, create, share, and view.
Edit: Here, you can quickly edit your photos and videos by cropping, rotating, and adjusting the brightness and contrast. You can also add stickers to your photos or trim the length of your videos.
Create: This section lets you add music to your projects by importing audio files from your library or making new ones from scratch. Several filters are available for adding effects like black & white or sepia tone to your photos or videos.
Share: This section lets you upload your creations to social media accounts such as Facebook, Instagram, or YouTube for easy sharing with friends and family members who aren’t using VSCO Video Editor themselves!
View: Once you’ve created something new in this section it will appear on the top bar at the bottom of the screen so that you can watch it again later on without having to open up any other app.
Part 2. Using VSCO Video Editor
VSCO is a video editor that allows you to apply different special effects, filters, and other visual elements. If you have been looking for a new video editor, it might be worth checking out this software.
We will give you some details about what it can do and how you can use it to create beautiful videos on your computer.
Step-By-Step Guide for Using VSCO Video Editor
Step1 Download the VSCO video editor from the Google Play or Apple store .
Step2 Open the app and select “Create Video,” then choose a template for your first video.
Step3 Now, you are ready to create a new video by adding music, text, and effects on top of your footage. VSCO has a ton of pre-made templates that you can use as inspiration for your projects.
Step4 Once you have created your video and edited it, you can share it on Instagram, Facebook, and Twitter.
Useful Tips for Using VSCO Video Editor
The best part of this app is that it supports all file formats, so you do not have to worry about converting any file format into another one. You can easily export your work into different formats.
The app also allows users to create music videos from their photos without prior knowledge of audio editing or music composition.
The first thing you need to do is download the VSCO Video Editor app on your device. Once you have downloaded the app, open it and sign up for a free account. Once you have created an account, log in using your Facebook or email ID.
Go to Settings > General > Update Center and tap on the ‘Check for Updates button. The update center will show a list of available updates for your device. Tap on the update that interests you most and wait for it to install on your device.
Once done installing the new version of VSCO Video Editor, open it and start using it immediately!
Part 3. Best Alternative to VSCO Video Editor
Filmora
Regarding video editing software, Filmora is about as versatile as it gets. Although Filmora is Wondershare’s standard, straightforward, and high-quality video editing program, it also comes in Filmora and Filmora Scrn versions (for screen recording and editing).
Features
- A small collection of royalty-free music
- Transitions
- Motion elements
- Filters
- Overlays
Download this app here: Apple store and Google play store .
How to edit videos with Filmora
This is a step-by-step procedure you can follow on how to edit your videos with Filmora:
Step1 You import a new video by clicking new project or open a recent project, then you can enter the following work area.
Step2 Edit your video as creatively as you like, we have a large number of templates, filters and stickers.
Step3 Choose the right music for your video. Not only do we have a wealth of built-in music resources, you can also link to iTunes, allowing Filmora to gain access to your iTunes library. Of course, Filmora also supports extracting the audio within the video.
Step4 After you finish editing, click export to export your video. In the export settings, you can change the resolution as well as the sharpness of the video. You can also share it to common social media platforms with one click.
FAQs About Vsco Video Editor
How to put Vsco in your Instagram bio?
Put your VSCO link in your Instagram bio now that you have one. In your profile settings, you can do the following:
- Toggle your profile picture.
- Decide on Edit profile.
- In the Website field, paste the link.
- By tapping the tick, you can save the changes.
Can I publish videos to my VSCO profile or save them to my studio?
Videos you edit in VSCO can either be published to VSCO or saved to your Camera Roll/Gallery.
You must edit a video before exporting it by tapping “Next” in the top right corner of the screen to save it to your Camera Roll or Gallery.
Tap the + Import icon in your Studio, select the “Videos” section to find your video, and then tap “Post” in the bottom right corner to upload it to VSCO.
Conclusion
VSCO was one of the first video editing applications to feature non-destructive editing. Now VSCO Video also has a companion iPad app that you can use to edit while you’re on-the-go as well.
The app connects to your mobile device using the Adobe Creative Cloud and allows you to edit in real-time while simultaneously sharing your progress with friends and other members of the VSCO community.
Best Photo Video Maker Apps with Song [PC, Mobile, Online]
Versatile Video Editor - Wondershare Filmora
An easy yet powerful editor
Numerous effects to choose from
The official channel provides detailed tutorials
Surplus photo video maker applications are available in the digital space to assist users with professional edits on their videos. This article will teach you how to use the photo video maker with song and customize the video content precisely. Take a quick look at these applications and select those that match your needs. Every application is unique and gives you great in-built features to personalize the video content in an interactive form.

In this article
01 [Photo video maker with a song for PC](#Part 1)
02 [Photo video maker app with song in mobile](#Part 2)
03 [Photo to video maker with song online](#Part 3)
Part 1 Photo video maker with a song for PC
This section discusses the photo video maker with a song exclusively designed to implement using the PC. Then, after thoroughly surfing its features, choose the perfect apps that give you awesome outcomes.
Software 1: Filmora
The Filmora is a mind-blowing application that helps video editors precisely make the best out of the video. You can use Filmora to perform professional edits on the video content and effortlessly add desired songs to the video.
The remarkable features of Filmora Video editor

Wondershare Filmora - Best Video Editor for Mac/Windows
Build unique custom animations without breaking a sweat.
Focus on creating epic stories and leave the details to Filmora’s auto features.
Start a creative adventure with drag & drop effects and endless possibilities.
Filmora simplifies advanced features to save you time and effort.
Filmora cuts out repetition so you can move on to your next creative breakthrough.
Software 2: LightMV video edit
The LightMV has a simple user interface, and the newbie users can master this program effortlessly. However, first-time editors can go for it without any hesitation. There are in-built templates and vast collections of music files to add to your videos flawlessly. You can handle multiple video edits precisely and create an interactive video for your needs. Moreover, you can use this video editor for PC to share them on any social media with a single click.

Software 3: Easy Video Maker
Here comes another video maker that is especially available for PC. This Easy Video Maker seems compatible with a wide range of file formats. Drag and drop the pictures into this timeline and perform the desired edits in no time. You can create shortcut keys for editing functions. There are options to add titles and subtitles to your video content. Use the recording functions to enhance the overall performance of the media files.

The above-discussed applications are exclusively compatible with the PC platform. You can download the program from its official webpage according to your system features and launch the tools to make desired edits to your videos. It is high time to build videos from photos and the soundtrack to excite the audience during special occasions.
Part 2 Photo video maker app with song in mobile
Here, you will be learning about the mobile compatible applications of photo video makers with songs. You can select the desired programs that meet your needs without any compromises.
App 1: Filmr app
It is an easy-to-use mobile compatible program that precisely supports Android and iPhone. Beginners can use this application effortlessly due to its simple environment. You can edit videos and create videos using the images. This app is super cool and builds videos using 20 million royalty-free songs from its library. There are options to insert filters and transitions per your desires while customizing the video content.

App 2: Quik
The exciting video maker uses the captured images on your device. You can add transitions and special effects to your videos and personalize them to persuade the users. This app allows you to insert more than 75 images while creating a video. During the video creation process, you can add songs along with the edits by accessing the music files at its in-built library.

App 3: KineMaster
Here comes the full-features stunning video maker that creates miracles with your photos. Add sound effects, background music, and voice-over content while making the videos for your needs. Use the blend mode to insert a beautiful impact on the video file. Then, directly share the edited content on social media platforms like YouTube, Facebook, and Dropbox.

These three mobile-compatible video makers are reliable, and you can build any number of videos from the images free of cost. Use the templates and edit tools to customize the created videos in an attractive format.
Part 3 Photo to video maker with song online
It is high time to check out reliable video-makers using photos with songs in the online mode.
Online video maker 1: Veed
The Veed program helps you convert your photos to video mode, and you do not require any experience to carry out this edit. It is a simple tool, and you can upload the pictures to its platform effortlessly. This online program is compatible with all file formats, and you can perform a wide range of edits by tapping the suitable options on the screen. Insert special effects, songs, transitions, split the videos, fill with stickers, and merge the images using this sophisticated online application. Customize it extraordinarily and personalize the videos like a professional editor with the help of this excellent program.

Online video maker 2: Smile Box
This online video maker provides you with in-built templates to create customized videos with songs using memorable clicks for occasions. In this Smile Box, you can effortlessly create videos in an online mode. First, step into its official webpage and select the templates as per your needs from its collections. Then, add photos to the templates to build a video and customize them by changing the color and background music to excite the viewers.

Online video maker 3: Animaker
It is a free video maker with loads of in-built features that astonishes the users quickly. You do not require special skills to create incredible videos using your memorable captures. You can create videos from images and add desired songs with the help of its in-built music library. Customize the templates according to the requirement and edit them by merging selected soundtracks. You can change the color, add special effects, and enhance its overall appearance innovatively. Finally, there are options to share the edited content directly to any social media platform without data loss.

These online video makers help you to build creative videos from the images. You can also add desired soundtracks to the videos according to the occasion.
Conclusion
Thus, this article has given sufficient insights on the photo video maker with song. The above discussion reveals the reliable application that works best on PC, mobile and online platforms. According to your requirements, choose the one that meets your needs without compromising any factors. Use Filmora video editor and make the best out of your pictures by adding value to them in building them as a video to entertain the audience for special events. Connect with this article to discover the in-built features of the video makers that are available for free download from the online space.
Surplus photo video maker applications are available in the digital space to assist users with professional edits on their videos. This article will teach you how to use the photo video maker with song and customize the video content precisely. Take a quick look at these applications and select those that match your needs. Every application is unique and gives you great in-built features to personalize the video content in an interactive form.
In this article
01 [Photo video maker with a song for PC](#Part 1)
02 [Photo video maker app with song in mobile](#Part 2)
03 [Photo to video maker with song online](#Part 3)
Part 1 Photo video maker with a song for PC
This section discusses the photo video maker with a song exclusively designed to implement using the PC. Then, after thoroughly surfing its features, choose the perfect apps that give you awesome outcomes.
Software 1: Filmora
The Filmora is a mind-blowing application that helps video editors precisely make the best out of the video. You can use Filmora to perform professional edits on the video content and effortlessly add desired songs to the video.
The remarkable features of Filmora Video editor
Wondershare Filmora - Best Video Editor for Mac/Windows
Build unique custom animations without breaking a sweat.
Focus on creating epic stories and leave the details to Filmora’s auto features.
Start a creative adventure with drag & drop effects and endless possibilities.
Filmora simplifies advanced features to save you time and effort.
Filmora cuts out repetition so you can move on to your next creative breakthrough.
Software 2: LightMV video edit
The LightMV has a simple user interface, and the newbie users can master this program effortlessly. However, first-time editors can go for it without any hesitation. There are in-built templates and vast collections of music files to add to your videos flawlessly. You can handle multiple video edits precisely and create an interactive video for your needs. Moreover, you can use this video editor for PC to share them on any social media with a single click.
Software 3: Easy Video Maker
Here comes another video maker that is especially available for PC. This Easy Video Maker seems compatible with a wide range of file formats. Drag and drop the pictures into this timeline and perform the desired edits in no time. You can create shortcut keys for editing functions. There are options to add titles and subtitles to your video content. Use the recording functions to enhance the overall performance of the media files.
The above-discussed applications are exclusively compatible with the PC platform. You can download the program from its official webpage according to your system features and launch the tools to make desired edits to your videos. It is high time to build videos from photos and the soundtrack to excite the audience during special occasions.
Part 2 Photo video maker app with song in mobile
Here, you will be learning about the mobile compatible applications of photo video makers with songs. You can select the desired programs that meet your needs without any compromises.
App 1: Filmr app
It is an easy-to-use mobile compatible program that precisely supports Android and iPhone. Beginners can use this application effortlessly due to its simple environment. You can edit videos and create videos using the images. This app is super cool and builds videos using 20 million royalty-free songs from its library. There are options to insert filters and transitions per your desires while customizing the video content.
App 2: Quik
The exciting video maker uses the captured images on your device. You can add transitions and special effects to your videos and personalize them to persuade the users. This app allows you to insert more than 75 images while creating a video. During the video creation process, you can add songs along with the edits by accessing the music files at its in-built library.
App 3: KineMaster
Here comes the full-features stunning video maker that creates miracles with your photos. Add sound effects, background music, and voice-over content while making the videos for your needs. Use the blend mode to insert a beautiful impact on the video file. Then, directly share the edited content on social media platforms like YouTube, Facebook, and Dropbox.
These three mobile-compatible video makers are reliable, and you can build any number of videos from the images free of cost. Use the templates and edit tools to customize the created videos in an attractive format.
Part 3 Photo to video maker with song online
It is high time to check out reliable video-makers using photos with songs in the online mode.
Online video maker 1: Veed
The Veed program helps you convert your photos to video mode, and you do not require any experience to carry out this edit. It is a simple tool, and you can upload the pictures to its platform effortlessly. This online program is compatible with all file formats, and you can perform a wide range of edits by tapping the suitable options on the screen. Insert special effects, songs, transitions, split the videos, fill with stickers, and merge the images using this sophisticated online application. Customize it extraordinarily and personalize the videos like a professional editor with the help of this excellent program.
Online video maker 2: Smile Box
This online video maker provides you with in-built templates to create customized videos with songs using memorable clicks for occasions. In this Smile Box, you can effortlessly create videos in an online mode. First, step into its official webpage and select the templates as per your needs from its collections. Then, add photos to the templates to build a video and customize them by changing the color and background music to excite the viewers.
Online video maker 3: Animaker
It is a free video maker with loads of in-built features that astonishes the users quickly. You do not require special skills to create incredible videos using your memorable captures. You can create videos from images and add desired songs with the help of its in-built music library. Customize the templates according to the requirement and edit them by merging selected soundtracks. You can change the color, add special effects, and enhance its overall appearance innovatively. Finally, there are options to share the edited content directly to any social media platform without data loss.
These online video makers help you to build creative videos from the images. You can also add desired soundtracks to the videos according to the occasion.
Conclusion
Thus, this article has given sufficient insights on the photo video maker with song. The above discussion reveals the reliable application that works best on PC, mobile and online platforms. According to your requirements, choose the one that meets your needs without compromising any factors. Use Filmora video editor and make the best out of your pictures by adding value to them in building them as a video to entertain the audience for special events. Connect with this article to discover the in-built features of the video makers that are available for free download from the online space.
How to Use LUTs in VN Editor – Complete Guide and Best LUTs Download
Hello and welcome to another article full of information and excitement. The topic of this article is LUT for the VN editor. So it will be exciting for those who want to use LUTs in their video to make them look nice and well. As we will discuss today that what is VN editor and how you can add LUTs to your videos using it on the devices it is compatible for. Moreover, where you can download some fantastic LUTs like moody LUTs, which help your videos to look nice, and which software you should use for this purpose if you are running a device on which the VN editor is not compatible. So let’s begin!
Part 1. What is VN editor?
VN editor is one of the best choices for video editing on mobiles and Mac. Fast editing, transitions, effects, filters, colors, subtitles, music, and many other features make the VN video editing app a great tool for producing and editing videos. It aims to make editing shorter and more feature-rich, empowering everyone to take control of their own lives. You cannot only produce great videos but good films as well. In the following, we will discuss how you can add LUTs to your videos using it.

Part 2. How to use LUTs in VN editor?
First, we must know that it is compatible with which platforms. So, it is now available for Android, iOS, and Mac OS only. However, you can also use it on Windows with some Android or iOS emulators, but it is not a very continent way in our suggestions. Even after doing this, it does not work well on your Windows. Maybe you will face some glitches or malfunctioning problems. So it is better to use it on only those platforms for which it is primarily available. Please read the instructions below since we will go through how to use LUTs in it later on.
On Mac:
First of all, we will learn how you can do it on Mac:
- Download the VN Editor for Mac and open it.
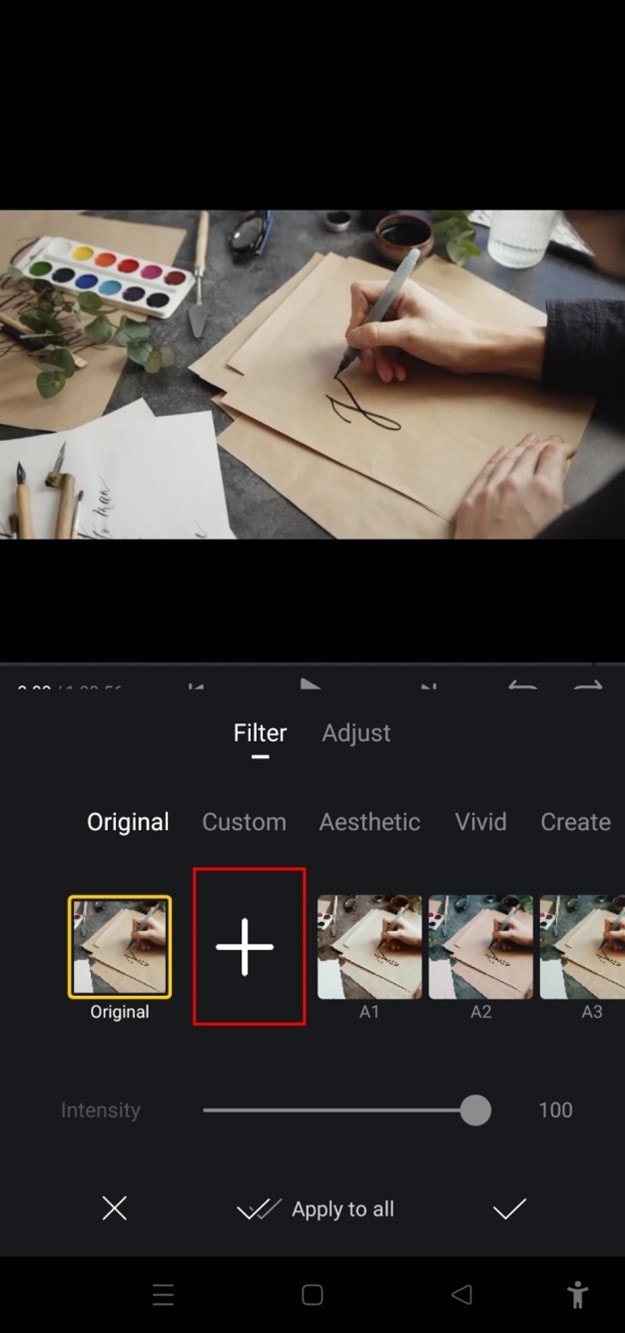
- Add your video and then tap the filters option.
- Now choose custom filters and then select the LUTs pack.

- Select the desired LUT and apply.
On Mobile:
Secondly, we will discuss how we can do this on our mobiles (Android or iOS). The procedure on both devices (Android or iOS) is almost comparable. Therefore, we will discuss the steps from the perspective of both of these here:
- First, download the VN editor from your mobile app store (Android or iOS) and the LUTs pack you want to use in your video.
- After downloading them on your mobile, open the VN editor application.
- Create a new project and add your video to it.

- Then click on the Filters option and select add external or custom filters option next to the existing filters.
- It will take you to the File manager of your mobile, from which you have to find the folder in which you have stored your LUTs.
- After finding them, you can select those LUTs you want to use in your video and then click on the done or select button.
- Your downloaded LUTs start showing in the VN editor, and you can use them in your videos as you want.
Part 3. Best LUTs resource for VN video editor
1. Presets Store
Presets Store is an online platform that helps you with various Filters, LUTs, and other presets. So you can download LUTs for your videos for the VN editor using it. However, it’s not a free service. You have to pay for the LUTs you want to download from here. You can visit their YouTube channel to follow the latest LUTs, Filters and other presets on this platform.
2. Apna Editz
Apna Editz is another online platform you can use for this purpose. It also provides you with a fantastic variety of Presets like LUTs, Filters, and many other similar effects, which you can use in your video using the VN editor. The main Pros of this recommendation are that it’s a free website. So you can download LUTs for your videos from it for free. Keep an eye on their YouTube channel to be updated about the latest LUTs.
3. Lut Preset
Lut Preset is another alternative to all the above ones. You can get almost all your favorite LUTs for VN editor for free here and then use them in your videos as you want. They also share the latest LUTs on their YouTube Channel.
4. Pencil Hub
Pencil Hub is also a good option in this concern. However, it does not have too much variety of VN LUTs, but you can still use it to download some of the best LUTs for VN editors. To get informed of their every new effect and LUTs, their YouTube channel is the primary source.
5. YRP EDITZ
YRP ETIDZ is another good option if you are still looking for some fantastic VN LUTs. They, too not have a large variety of presets and LUTs. However, if you want some most commonly used LUTs for VN Editor, then they are a good option. You’ll notify of their most website updates by checking their YouTube channel.
Part 4. How to add LUTs to the best alternative to the VN editor?
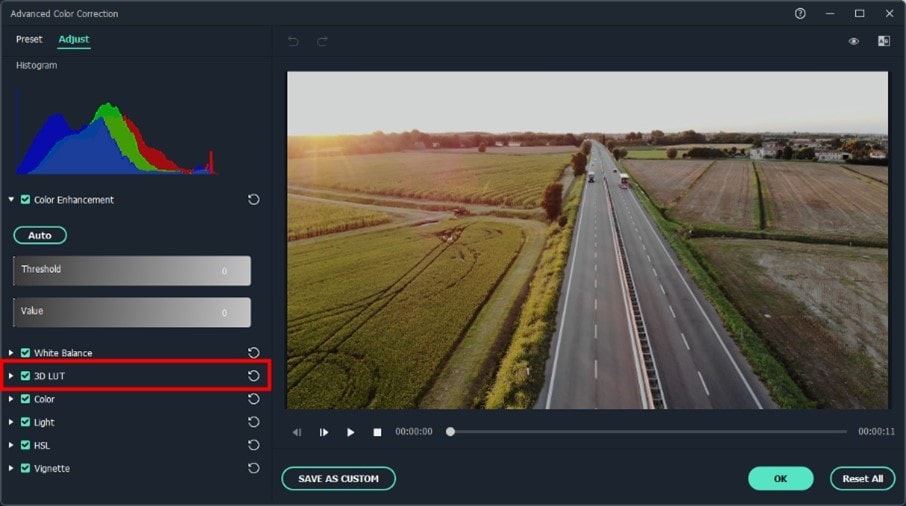
VN Editor is undoubtedly an excellent choice to add LUTs to your videos. However, the VN editor is best suitable for mobile devices. To enhance your LUTs and effects, it would be great if you used some desktop software. Wondershare Filmora offers a great variety of built-in LUTs to choose from. Let’s look at how we can use Filmora to add LUTs:
- Add your video and tap the tools, then click the Color option.
- Now select the Color Correction option and then choose 3D LUT.
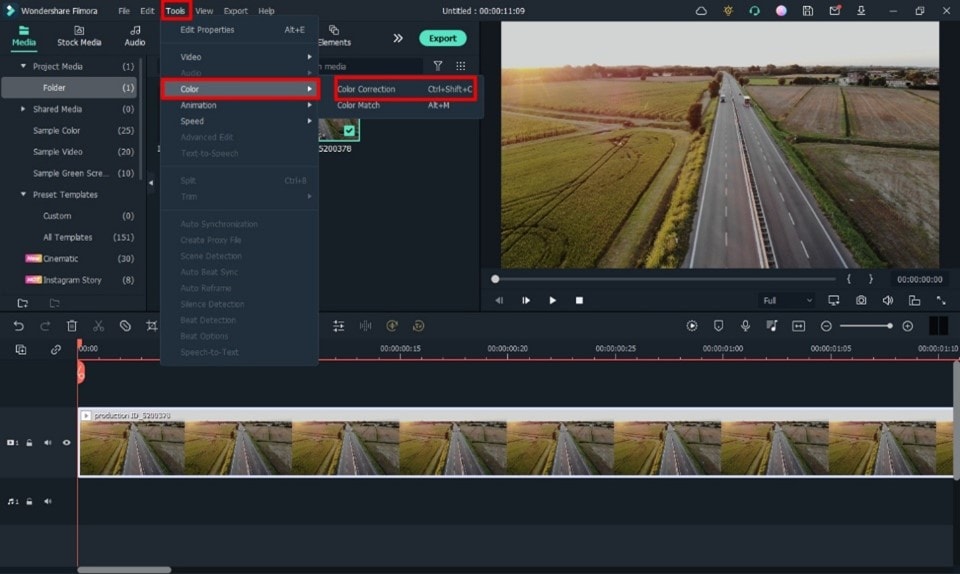
- Click the drop-down menu and select the Load new LUT option. Here you can import other downloaded preset LUTs to use
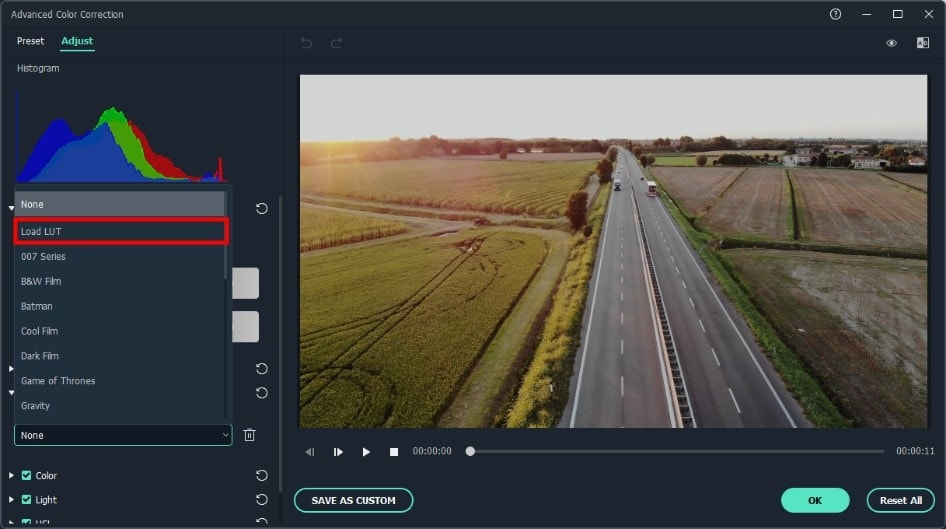
- Choose the LUT and click OK. Your new fantastic video is ready now.

Closing Thoughts
This post recommends several lut resources and demonstrates how to import them if you are a devoted user of VN editor and want to learn how to utilize it for video color grading. The more potent desktop editor Wondershare Filmora, which offers a range of built-in LUT sources and supports color grading settings, is of course recommended if you want to take your videos to the next level. Thanks for reading.
Free Download For Win 7 or later(64-bit)
Free Download For macOS 10.14 or later
2. Apna Editz
Apna Editz is another online platform you can use for this purpose. It also provides you with a fantastic variety of Presets like LUTs, Filters, and many other similar effects, which you can use in your video using the VN editor. The main Pros of this recommendation are that it’s a free website. So you can download LUTs for your videos from it for free. Keep an eye on their YouTube channel to be updated about the latest LUTs.
3. Lut Preset
Lut Preset is another alternative to all the above ones. You can get almost all your favorite LUTs for VN editor for free here and then use them in your videos as you want. They also share the latest LUTs on their YouTube Channel.
4. Pencil Hub
Pencil Hub is also a good option in this concern. However, it does not have too much variety of VN LUTs, but you can still use it to download some of the best LUTs for VN editors. To get informed of their every new effect and LUTs, their YouTube channel is the primary source.
5. YRP EDITZ
YRP ETIDZ is another good option if you are still looking for some fantastic VN LUTs. They, too not have a large variety of presets and LUTs. However, if you want some most commonly used LUTs for VN Editor, then they are a good option. You’ll notify of their most website updates by checking their YouTube channel.
Part 4. How to add LUTs to the best alternative to the VN editor?
VN Editor is undoubtedly an excellent choice to add LUTs to your videos. However, the VN editor is best suitable for mobile devices. To enhance your LUTs and effects, it would be great if you used some desktop software. Wondershare Filmora offers a great variety of built-in LUTs to choose from. Let’s look at how we can use Filmora to add LUTs:
- Add your video and tap the tools, then click the Color option.
- Now select the Color Correction option and then choose 3D LUT.
- Click the drop-down menu and select the Load new LUT option. Here you can import other downloaded preset LUTs to use
- Choose the LUT and click OK. Your new fantastic video is ready now.
Closing Thoughts
This post recommends several lut resources and demonstrates how to import them if you are a devoted user of VN editor and want to learn how to utilize it for video color grading. The more potent desktop editor Wondershare Filmora, which offers a range of built-in LUT sources and supports color grading settings, is of course recommended if you want to take your videos to the next level. Thanks for reading.
Free Download For Win 7 or later(64-bit)
Free Download For macOS 10.14 or later
Also read:
- Updated In 2024, Best Phantom Slow-Mo Camera For Recording Slow Motion Videos
- Updated 2024 Approved Guide To Cropping and Combining Content in Wondershare Filmora Latest
- New In 2024, Best GIF to Video Converters
- New In 2024, How to Export Video From iMovie
- Updated Vlogs and Travel Content Are Incomplete without a Fast-Motion Effect. Learn Step-by-Step How to Make Fast Motion Video on an iPhone in This Article for 2024
- New In 2024, How to Denoise in After Effects – Audio and Video Noise Removal
- New In 2024, | Live Stream on YouTube Using Zoom
- 2024 Approved How to Make Discord GIF Avatar in Depth Guide
- How To Add Scrolling Text Effect
- New Learn Eight Simple Steps that Will Allow You to Create a Stunning Text Reveal Animation in Filmora. Simple yet Very Professional for 2024
- List of Supported iPhone Video Formats and Best iPhone Video Editor for 2024
- Updated How Long Does It Take To Edit Videos for 2024
- Blender - A Video Editor for Every Professional for 2024
- How to Slow-Mo YouTube Videos
- New In 2024, How To Create A Green Screen Video In After Effects
- How to Use Renderforest Intro Video Maker
- 2024 Approved Find Out The Best Dark Moody LUTs During Editing
- New Easy Way to Create a DIY Green Screen Video Effect for 2024
- Updated 2024 Approved How to Take Slow Motion Videos
- Updated In 2024, To Determine or Change the Video Aspect Ratio Online. Use a Ratio Calculator to Calculate Pixel Dimensions and Aspect Ratios of Images or Videos
- 2024 Approved How Can You Deny These Top 10 Free Speech to Text Software
- 2024 Approved How To Use Virtual Green Screen to Shoot Video
- In 2024, Replacing Sky Background Using Adobe Photoshop A Comprehensive Guide
- In 2024, 10 Matching Color Combination That Works Together
- New 2024 Approved How to Create A Freeze Frame Sequence in Video
- New In 2024, 10 Best Innovative AR Video Effects to Check Out
- New 2024 Approved How to Add Transitions in Adobe Premiere Pro
- New 2024 Approved Complete Guide to Change Video Resolution in Filmora
- New 2024 Approved Want to Add an Exciting Countdown Timer to Your Wedding, Product Launch or Any Other Video Using After Effects or an Alternative Tool? This Article Will Help You Learn All About After Effects Countdown and the Procedure
- Updated In 2024, Techniques You Never Heard of for Learning YouTube AI Marketing
- Updated How to Record Super Slow Motion Videos on Your Phone, In 2024
- New Add Amazing Filters and Effects for Fun to Watch GIFs Using Adobe After Effects. Read on to Discover an Easy-to-Learn After Effects Alternative
- New In 2024, Top 10 Audio Visualizers Windows, Mac, Android, iPhone & Online
- Top 10 iPad Slideshow Apps to Create a Slideshow
- New 2024 Approved Top Free LUTs To Use in Shotcut An Overview
- 2024 Approved Top Best Free LUTs For Premiere Pro
- In 2024, Ways to stop parent tracking your Xiaomi Mix Fold 3 | Dr.fone
- How To Bypass Activation Lock On Apple Watch Or iPhone 14 Plus?
- In 2024, How to use Snapchat Location Spoofer to Protect Your Privacy On Vivo X Flip? | Dr.fone
- In 2024, Can You Unlock Apple iPhone SE (2022) After Forgetting the Passcode? | Dr.fone
- Is pgsharp legal when you are playing pokemon On Vivo Y78 5G? | Dr.fone
- Fix Cant Take Screenshot Due to Security Policy on Asus ROG Phone 8 | Dr.fone
- Undelete lost messages from Xiaomi 13T
- In 2024, The Best Android Unlock Software For Lava Blaze 2 Device Top 5 Picks to Remove Android Locks
- Updated 2024 Approved What Is Talking Avatar? | Wondershare Virbo Glossary
- How To Upgrade or Downgrade iPhone 12 Pro Without iTunes? | Dr.fone
- Quick Fixes for Why Is My Lava Blaze Curve 5G Black and White | Dr.fone
- How to Unlock iPhone SE with a Mask On
- Recover your photos after Realme C67 5G has been deleted.
- 8 Quick Fixes Unfortunately, Snapchat has Stopped on Infinix Hot 30 5G | Dr.fone
- Title: New Secret Tips & Tricks to Use in Filmora for 2024
- Author: Morgan
- Created at : 2024-04-24 01:03:30
- Updated at : 2024-04-25 01:03:30
- Link: https://ai-video-editing.techidaily.com/new-secret-tips-and-tricks-to-use-in-filmora-for-2024/
- License: This work is licensed under CC BY-NC-SA 4.0.
