:max_bytes(150000):strip_icc():format(webp)/young-muslim-woman-using-phone-1137305438-75947aa7fb484506bf9da8c38fc68a03.jpg)
New Step by Step to Add Border to Video Using Premiere Pro

Step by Step to Add Border to Video Using Premiere Pro
The border is really important as it frames up all the video. It makes the video eye-catching and gives a vivid effect. It also fixes the automated cropping issues, especially on Instagram. Along with this, it helps the viewers to watch the video as you can add effects about fun, travel, guides and etc. accordingly. Adding a border is super easy and it’s not more than fun!
So let’s start…
How to Add Borders to Videos in Premiere Pro
Today we are going to discuss how to add borders to the video clips or images in premiere pro. It’s pretty simple to make borders of different colors and sizes for your video clips.
So, here are the two different ways we can use to add borders to our videos or images.
- Adding a border to the video using a grid effect
- Adding a border to the video using the essential graphics panel
Way 1. Using a Grid Effect
While working on the project, make sure the aspect ratio of the video is 16:9, and project settings are HD (1080P) and UHD 4K in premiere pro.
Let’s start step by step.
Drag all the video clips by stacking them on video tracks in the timeline.
Hit the Effects tab and write the grid in the search panel.
Simply drag the grid option into the timeline of the videos.
Select the anchor value to 0 for the x and y.
Change the size to width and height slider.
Change the width to 1920 and height to 1080.
Now we have borders added as you can see below.
You can also change the width of the borders.
- Change the width to 30.
You have the option to change the color of the border.
- Select the blending mode to normal.
- Select the color picker tool and change the color of your desire.
Way 2. Using the Essential Graphics Panel
First of all, you wanna be in your premium pro graphics workspace. This will pull off your graphics panel on your right. The good thing about the essential graphics panel is, that it is vector-based. So the different video clips with different resolutions will not pixelate.
Let’s dive in…
Now, to use the graphics panel you need to perform the following steps.
Import the videos and drag them into the timeline.
Select the effects
Find “alpha adjust” and drag it into the effects control.
Create a 4-point polygon mask.
A rectangular mask will be created. You can edit it according to the frame requirement.
Go to the corner of the mask border and press the shift key. Drag the border to resize and scale it proportionally.
Again go to effect controls, under opacity hit invert alpha.
Under mask hit inverted.
Go to motion settings, change the position, and
Go to Alpha adjust and set the mask feathering to 0.
Now go back to the effects panel and search the paint bucket.
Under effects controls, hit the alpha channel under the fill selector
Then hit stroke under the stroke
You can turn up the stroke width to make it a bit thicker.
Hit the color tab to change the color of the border as desired.
An Easier Way to Add Borders to Videos on Computer
Filmora Video Editor is one of the best and most efficient video editing applications. It is not only very easy to use but it provides a professional interface for users to make the videos stand out. It can be used for both Windows and Mac.
For Win 7 or later (64-bit)
For macOS 10.14 or later
Let’s learn three different ways to add borders to the video/image using Wondershare Filmora 11.
- Using the Borders Preset
- Using overlay preset
- Using Human Border
1. Using the Borders Preset
- Download Wonder Share Filmora 11 on your device.
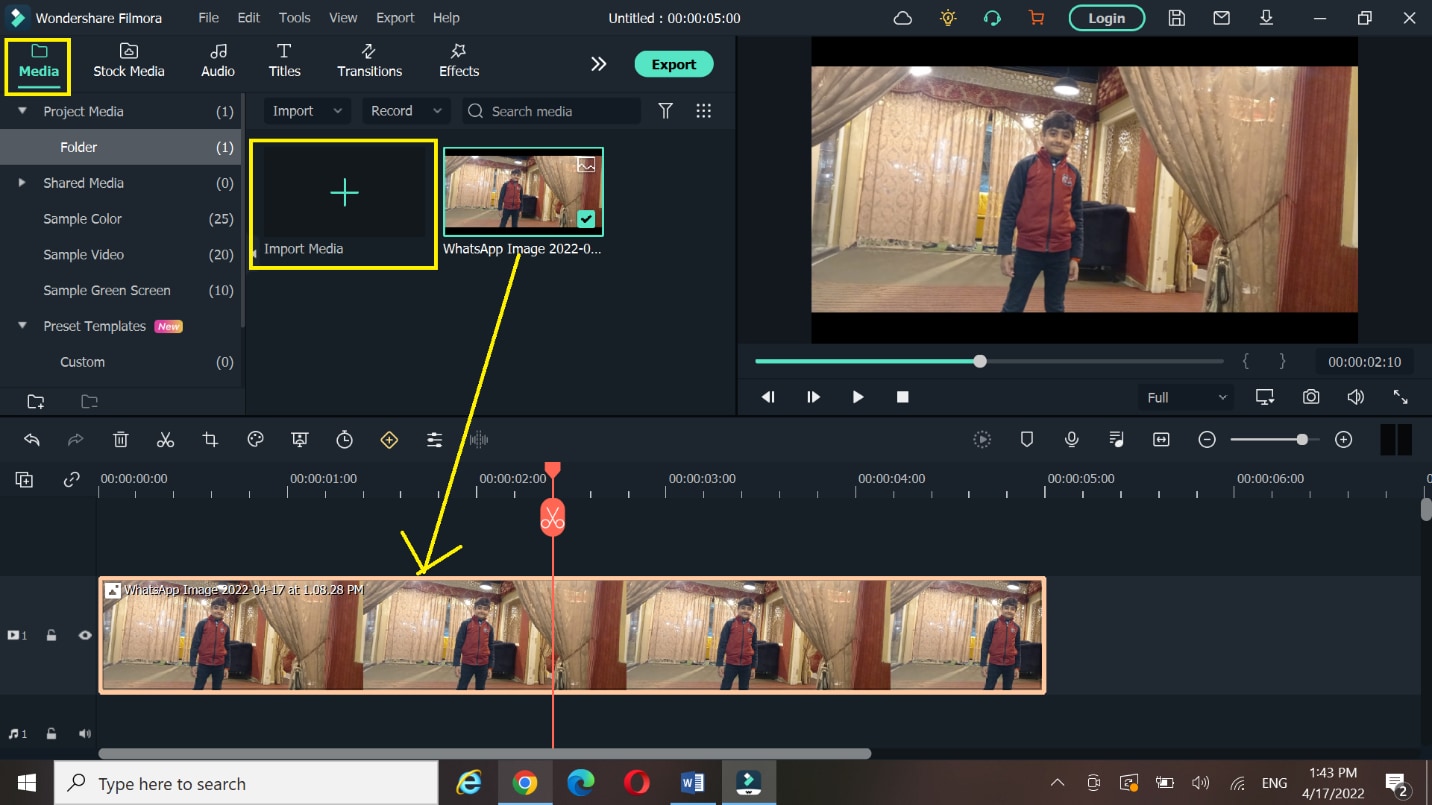
- Open the software and hit the import media under the media
- Select the desired media from the storage of your device.
- Drag and drop the selected video/image into the timeline.
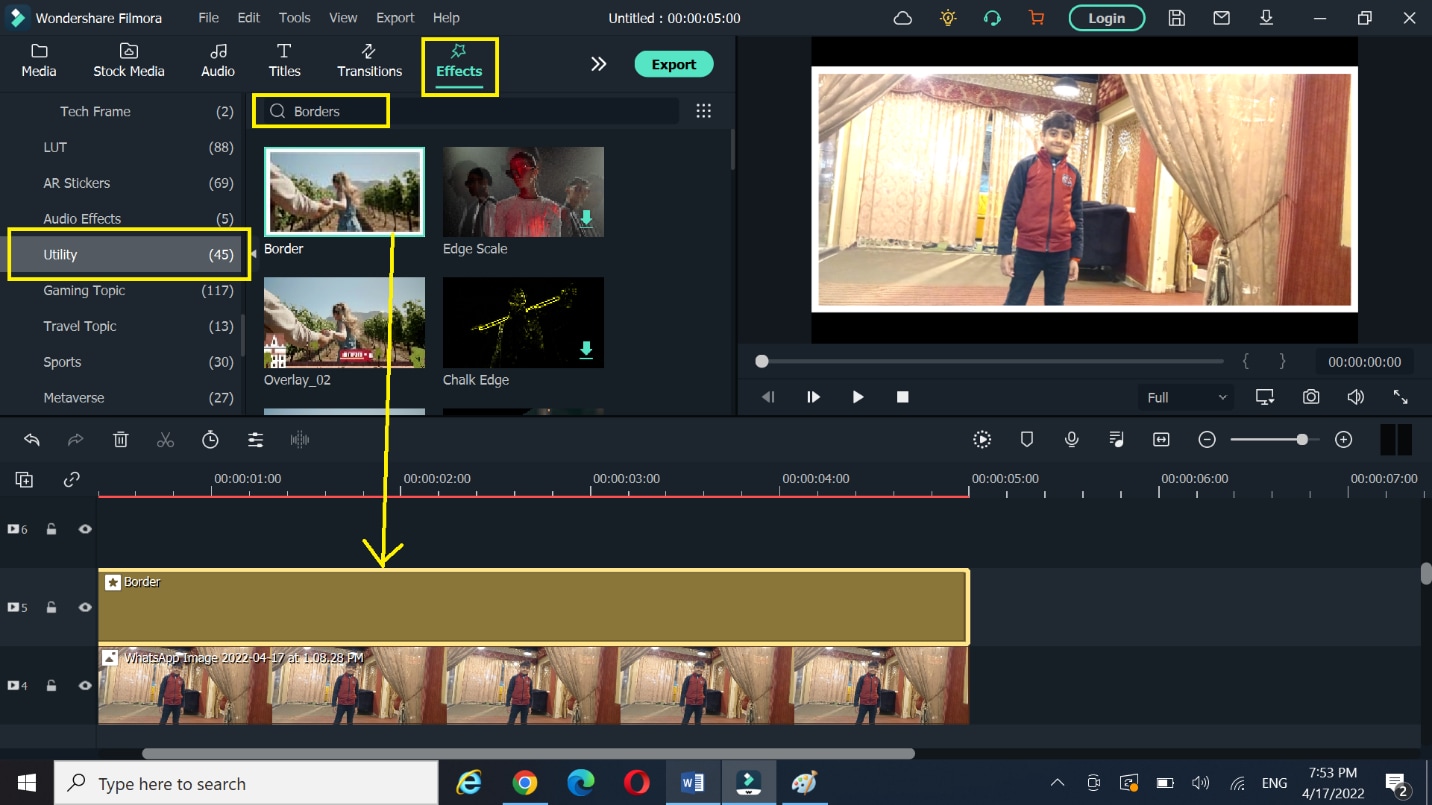
- Select the effects tab and hit the utility
- You can search the borders in the search engine and use a border of your choice given in the panel.
- Select the border and hit the + button on the bottom right corner of the border.
- You can drag and drop the border into the timeline.
- You can see the border below.
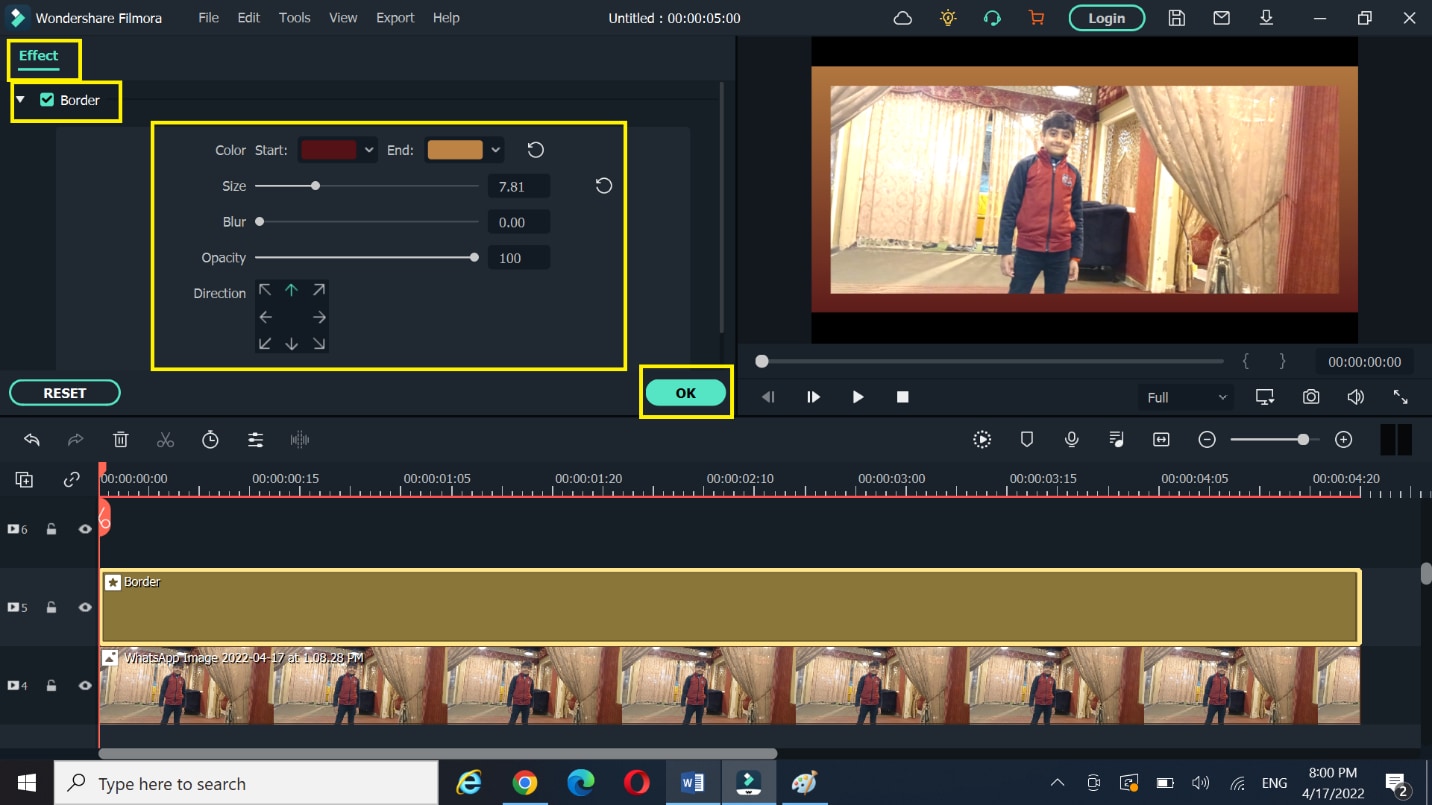
- You can edit the border by double-clicking the border layer or directly clicking on the border in the preview area.
- The Effects controls will be opened.
- You can change the size, color and opacity of the border, by moving the slider.
- Hit OK
2. Using overlay preset
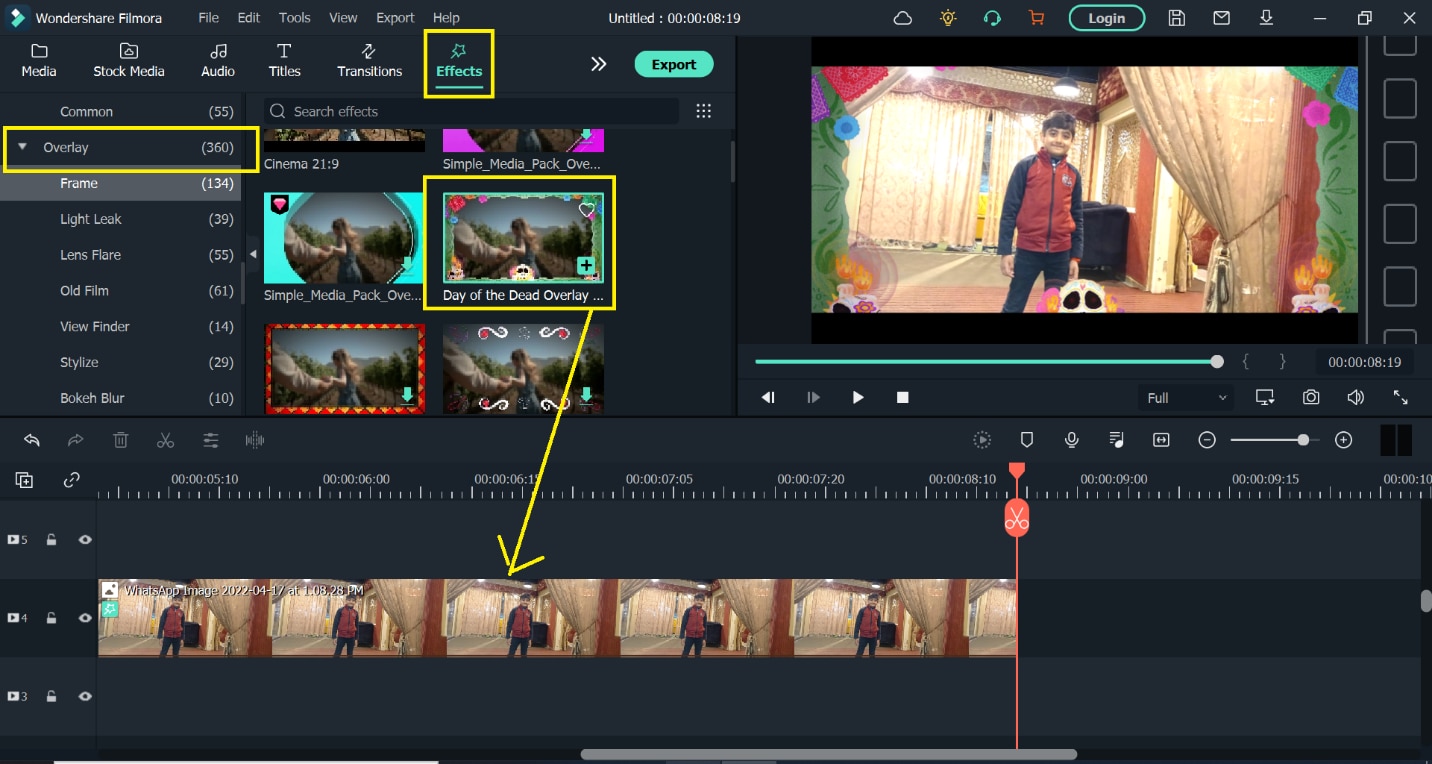
- Select the video/image layer and hit the effects
- Select overlay from the panel on the left side by scrolling down.
- You can choose the overlay of your choice by clicking on the + tab or simply dragging and dropping it into the timeline.
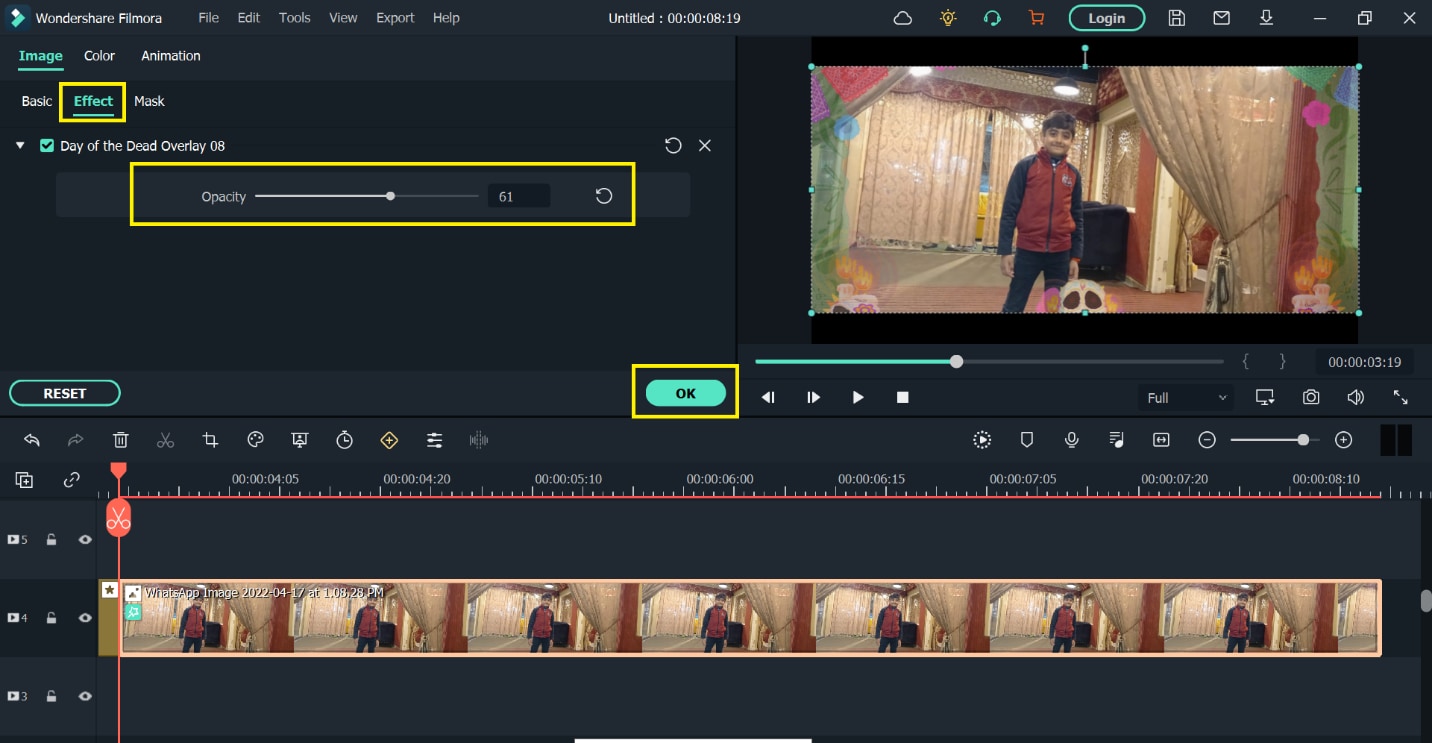
- Double click on the image/video with overlay effect.
- Select the effects tab under the image
- You can adjust the shadow of overlay by moving the slider of opacity.
- Hit Ok
3. Using Human Border
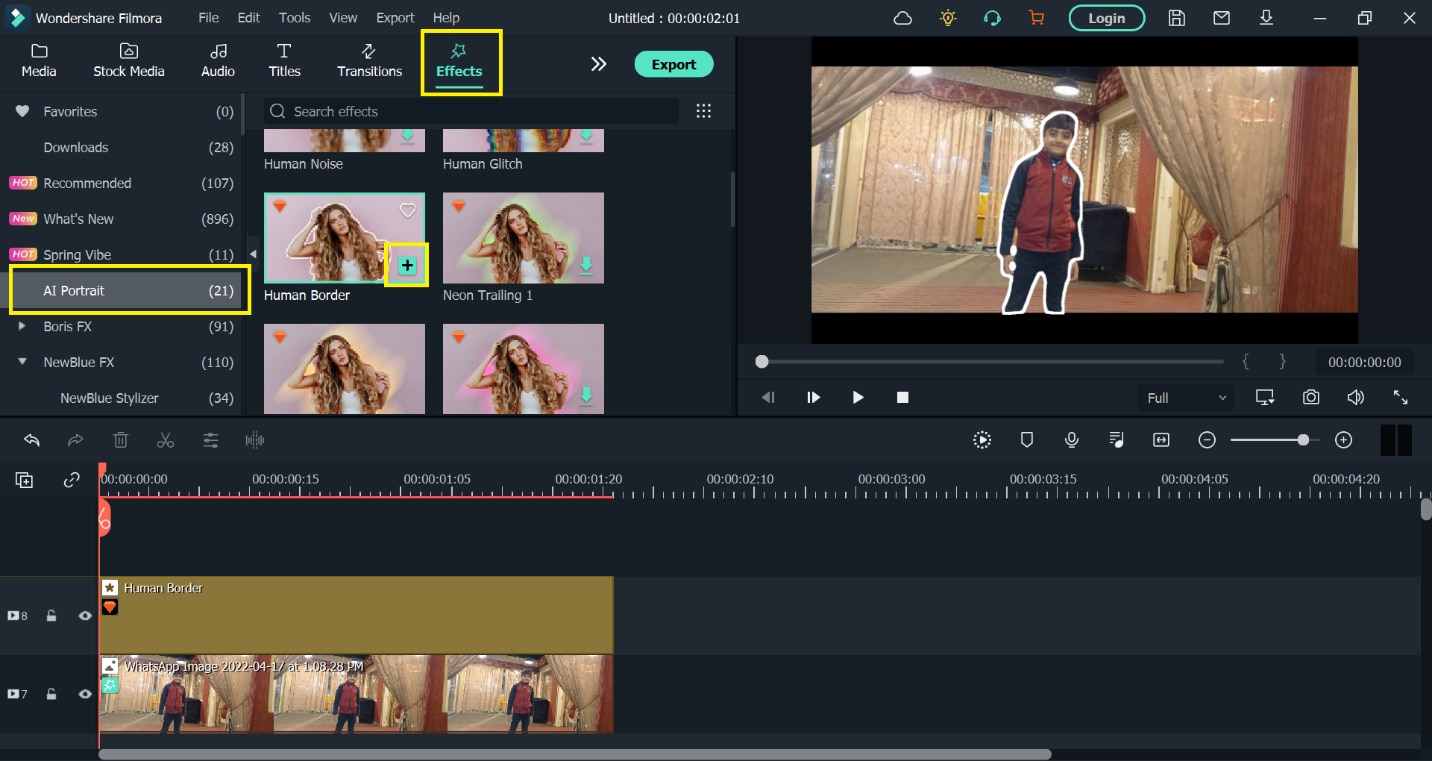
- Select the video/image and hit the effects
- Select AI Portrait from the panel.
- Select the desired human border.
- Hit the + tab or you can drag and drop into the timeline.
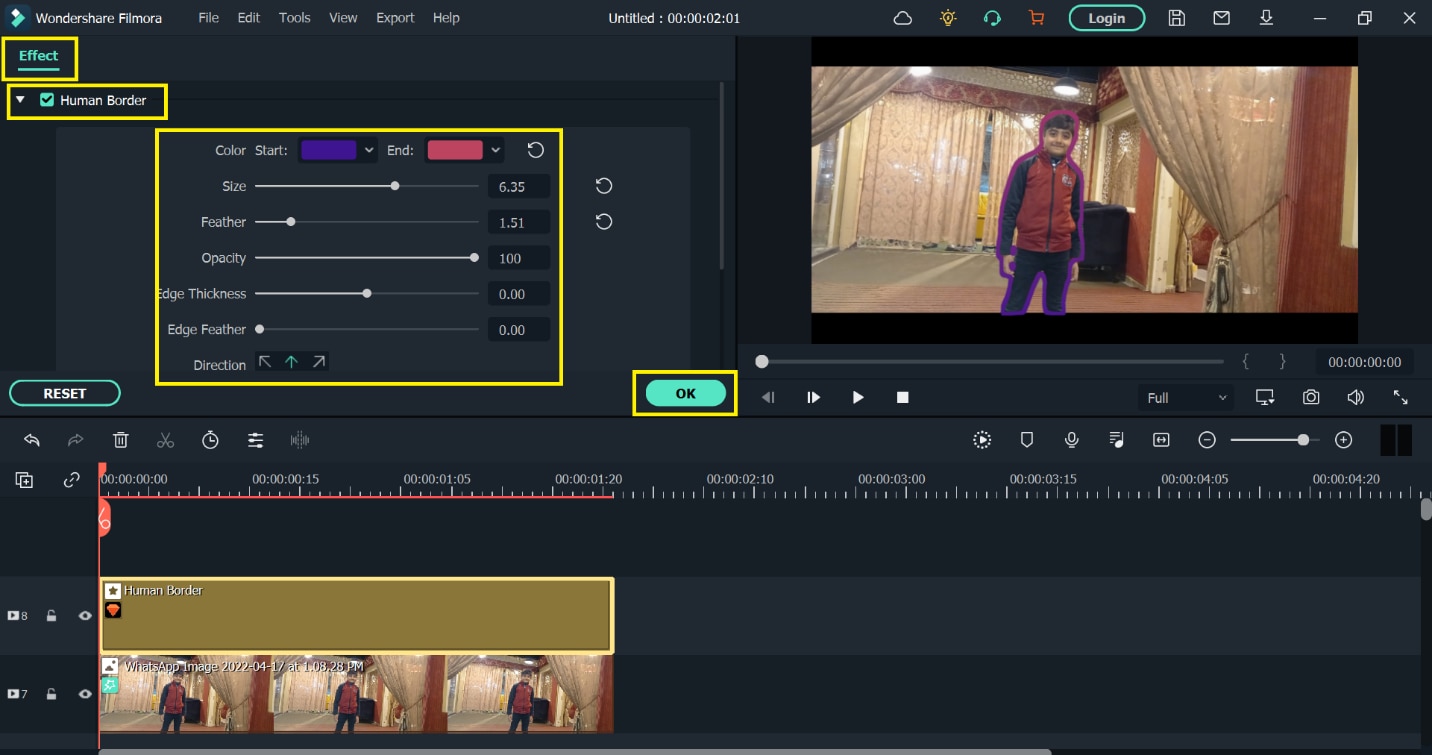
- Double-click on the human border layer, expand the human border controls panel under the effects
- You can change the color, size, thickness, opacity, etc.
- Hit Ok
How to Add a Border to the Video Online
You can also add borders to your videos/images online. All you need is, have a good internet connection and a browser.
Here is a guide for you to add frames to your video online.
Using Kapwing
- Open the browser and write the “Kapwing video maker”.
- You need to sign in the Kapwing to make an account
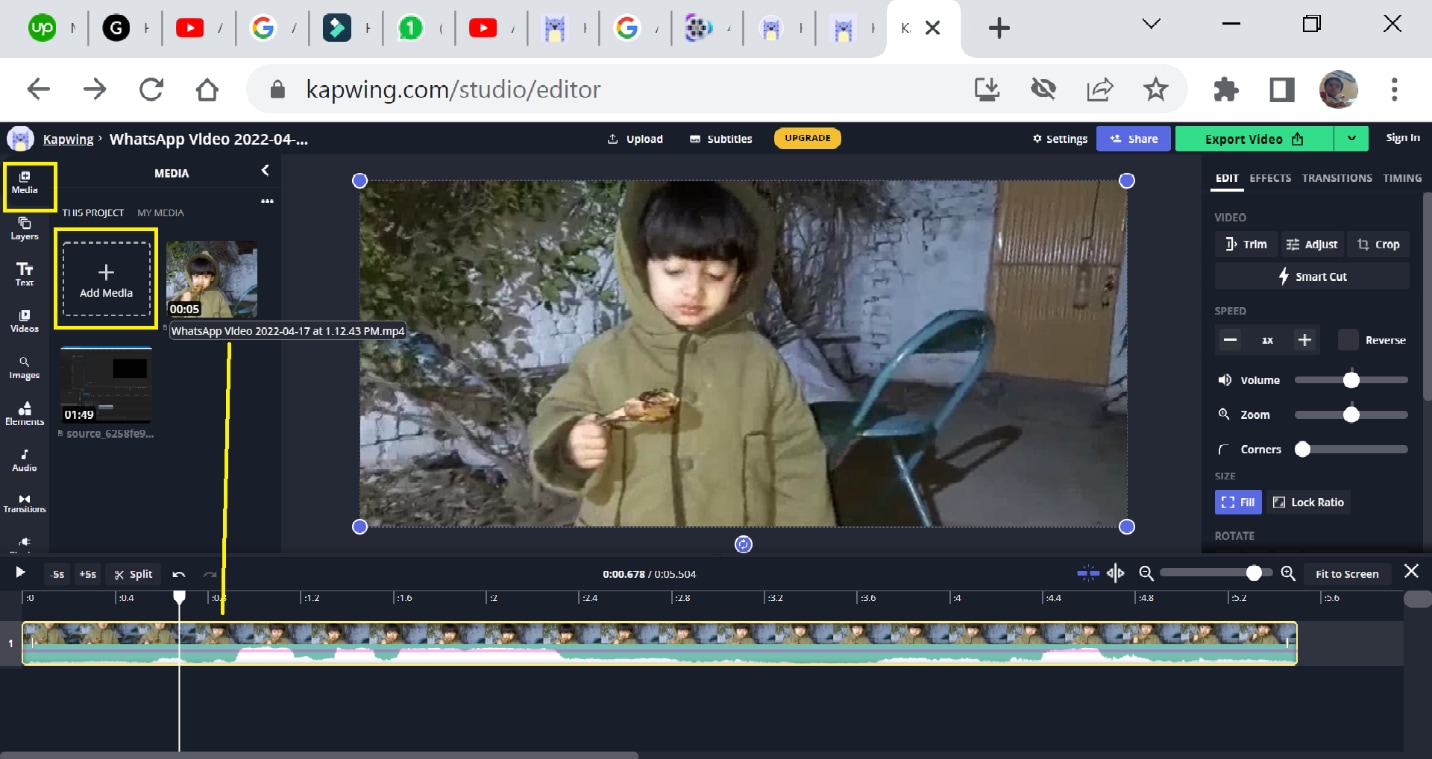
- An editing interphase will be opened as below.
- Hit on media and import media by clicking on +
- Drag and drop the video into the timeline.
1st Method
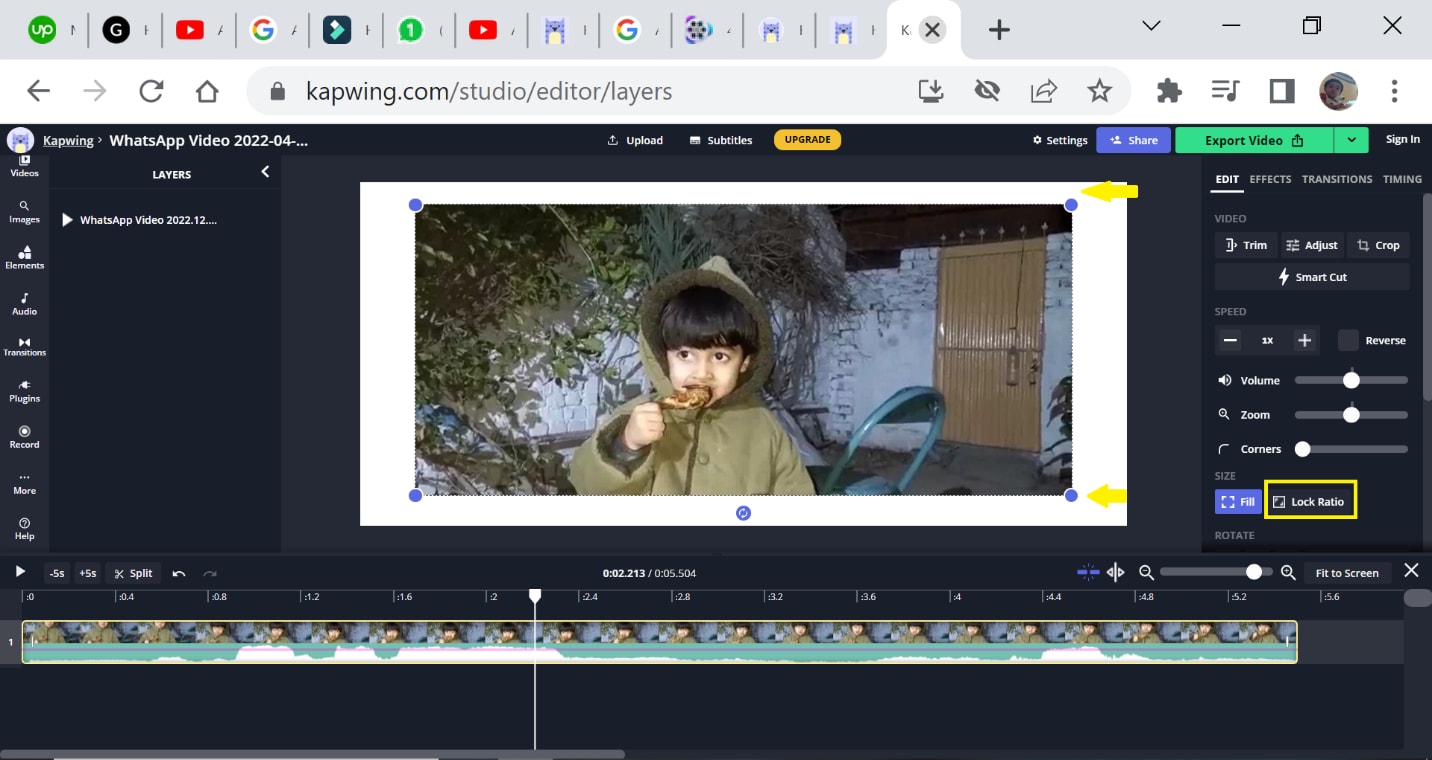
- Double click on the video in the preview window.
- 4 dots will appear on the corner of the video.
- You can drag the blue dots to make a frame and resize the image/video.
- Hit on lock ratio tab to maintain the pixels of the video.
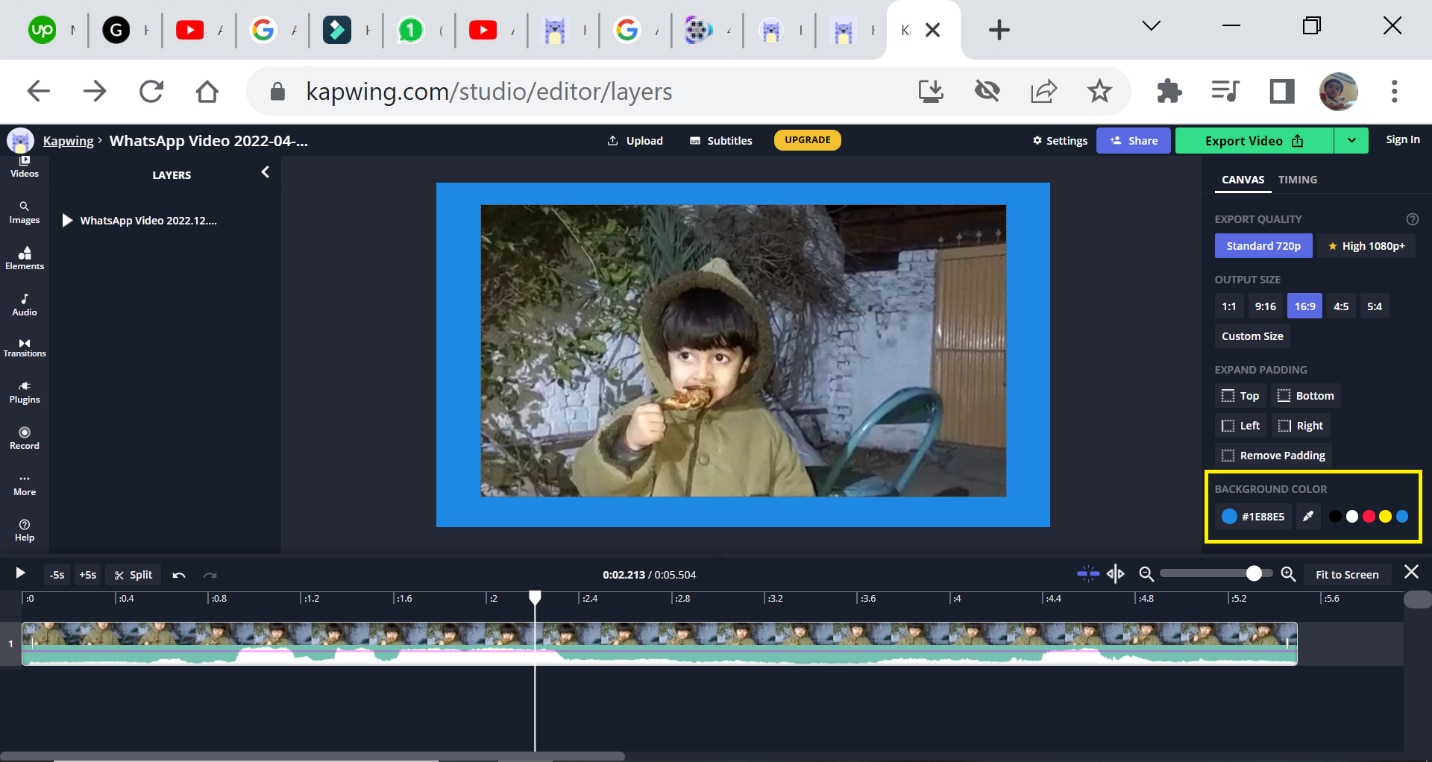
- Double-click on the border area.
- You can change the color of the border.
- You can also resize the length and width of the border.
2nd Method
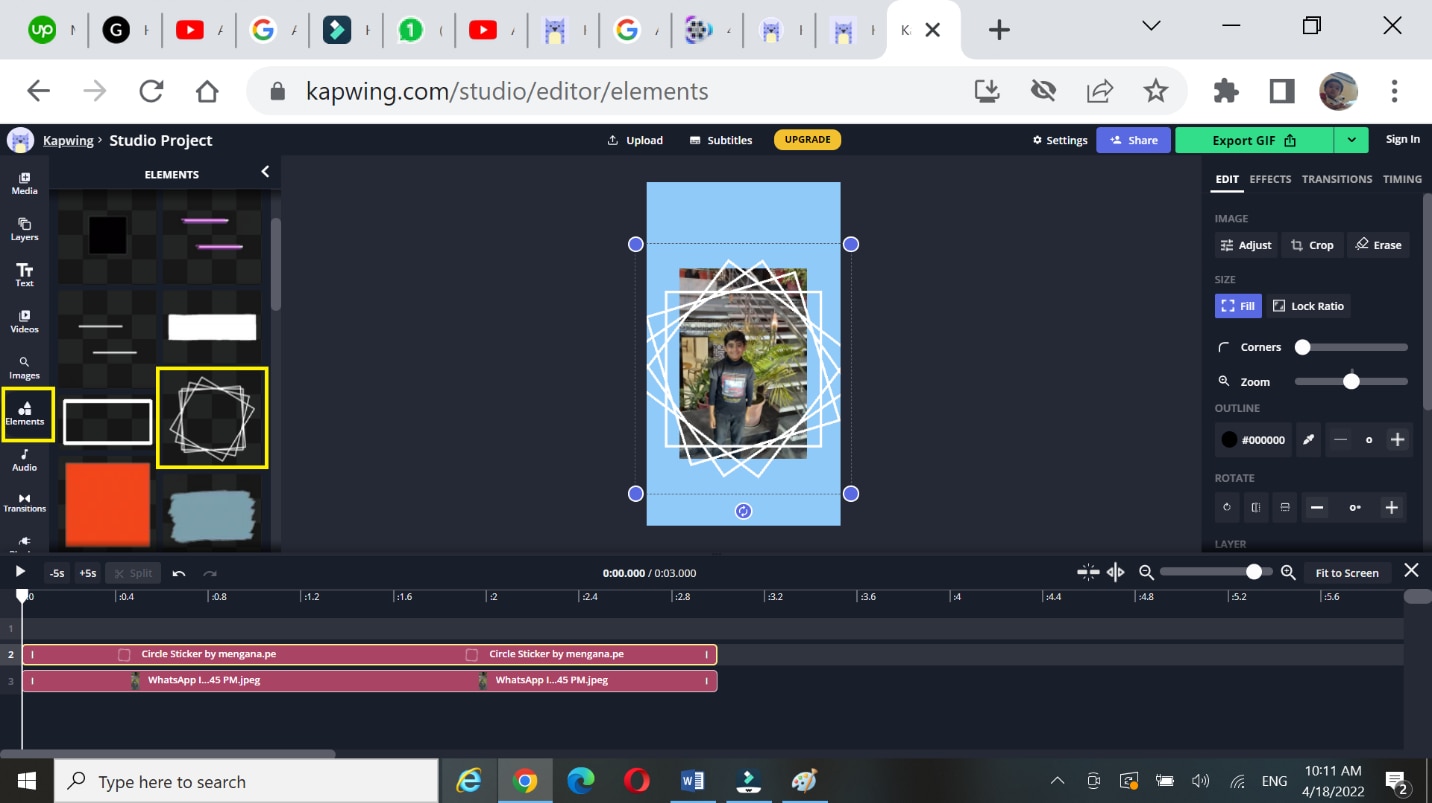
- Hit the elements and select the frames from the panel.
Here you can take square frames, circle frames, shapes, emoji’s and a lot of more frames.
3rd Method
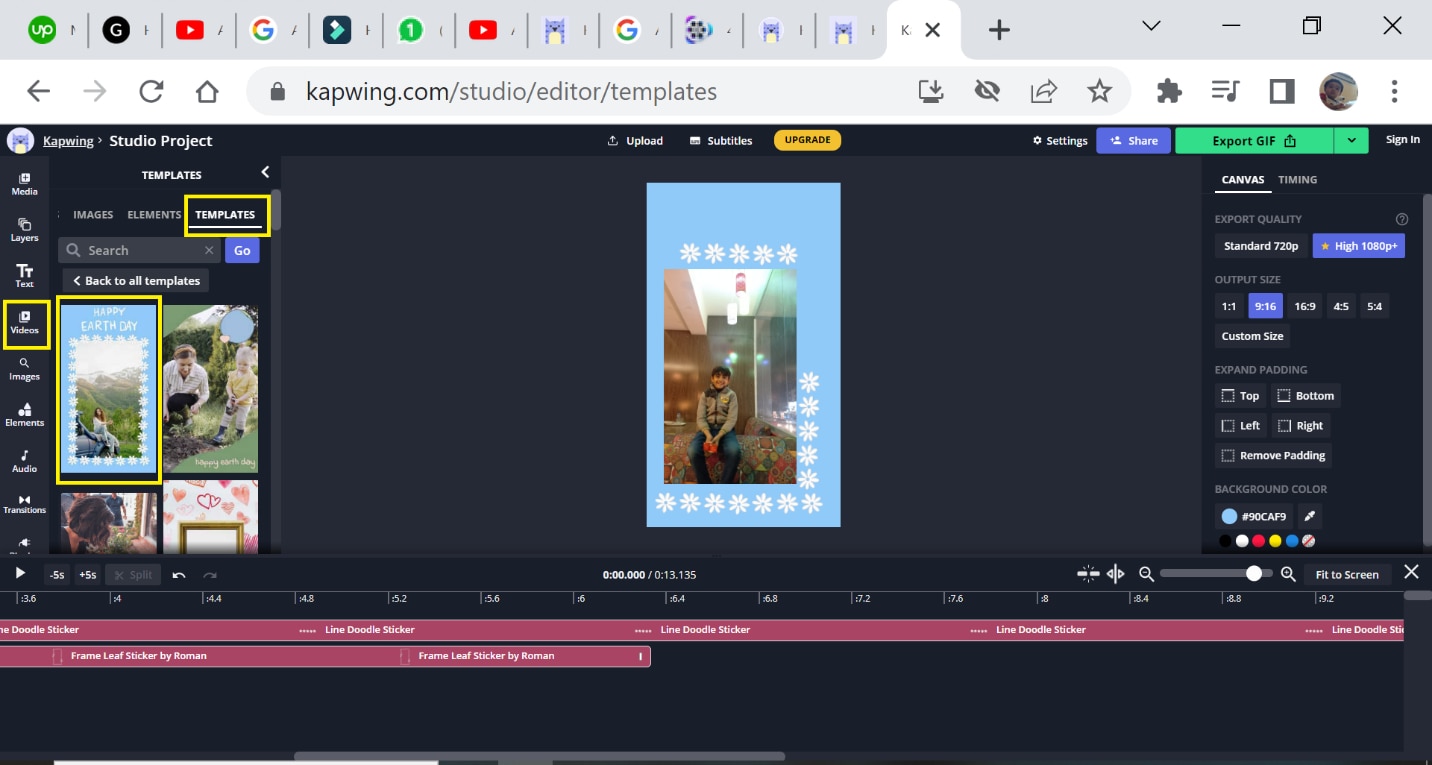
- Hit the videos
- Select templates, a list of templates will be shown in this panel.
- Select the desired template and drag it into the timeline.
Conclusion
We have discussed different software to add borders. All the software and tools are free to use. Similarly, they can be used on both Mac as well as Windows. They are user-friendly and provide full control over borders. You can use any one of them to make your borders and can easily engage viewers in your videos.
In all of the above applications, I recommend you to use Wondershare filmora 11. It is the most professional software and makes your video stand out.
Way 1. Using a Grid Effect
While working on the project, make sure the aspect ratio of the video is 16:9, and project settings are HD (1080P) and UHD 4K in premiere pro.
Let’s start step by step.
Drag all the video clips by stacking them on video tracks in the timeline.
Hit the Effects tab and write the grid in the search panel.
Simply drag the grid option into the timeline of the videos.
Select the anchor value to 0 for the x and y.
Change the size to width and height slider.
Change the width to 1920 and height to 1080.
Now we have borders added as you can see below.
You can also change the width of the borders.
- Change the width to 30.
You have the option to change the color of the border.
- Select the blending mode to normal.
- Select the color picker tool and change the color of your desire.
Way 2. Using the Essential Graphics Panel
First of all, you wanna be in your premium pro graphics workspace. This will pull off your graphics panel on your right. The good thing about the essential graphics panel is, that it is vector-based. So the different video clips with different resolutions will not pixelate.
Let’s dive in…
Now, to use the graphics panel you need to perform the following steps.
Import the videos and drag them into the timeline.
Select the effects
Find “alpha adjust” and drag it into the effects control.
Create a 4-point polygon mask.
A rectangular mask will be created. You can edit it according to the frame requirement.
Go to the corner of the mask border and press the shift key. Drag the border to resize and scale it proportionally.
Again go to effect controls, under opacity hit invert alpha.
Under mask hit inverted.
Go to motion settings, change the position, and
Go to Alpha adjust and set the mask feathering to 0.
Now go back to the effects panel and search the paint bucket.
Under effects controls, hit the alpha channel under the fill selector
Then hit stroke under the stroke
You can turn up the stroke width to make it a bit thicker.
Hit the color tab to change the color of the border as desired.
An Easier Way to Add Borders to Videos on Computer
Filmora Video Editor is one of the best and most efficient video editing applications. It is not only very easy to use but it provides a professional interface for users to make the videos stand out. It can be used for both Windows and Mac.
For Win 7 or later (64-bit)
For macOS 10.14 or later
Let’s learn three different ways to add borders to the video/image using Wondershare Filmora 11.
- Using the Borders Preset
- Using overlay preset
- Using Human Border
1. Using the Borders Preset
- Download Wonder Share Filmora 11 on your device.
- Open the software and hit the import media under the media
- Select the desired media from the storage of your device.
- Drag and drop the selected video/image into the timeline.

- Select the effects tab and hit the utility
- You can search the borders in the search engine and use a border of your choice given in the panel.
- Select the border and hit the + button on the bottom right corner of the border.
- You can drag and drop the border into the timeline.
- You can see the border below.

- You can edit the border by double-clicking the border layer or directly clicking on the border in the preview area.
- The Effects controls will be opened.
- You can change the size, color and opacity of the border, by moving the slider.
- Hit OK

2. Using overlay preset
- Select the video/image layer and hit the effects
- Select overlay from the panel on the left side by scrolling down.
- You can choose the overlay of your choice by clicking on the + tab or simply dragging and dropping it into the timeline.

- Double click on the image/video with overlay effect.
- Select the effects tab under the image
- You can adjust the shadow of overlay by moving the slider of opacity.
- Hit Ok

3. Using Human Border
- Select the video/image and hit the effects
- Select AI Portrait from the panel.
- Select the desired human border.
- Hit the + tab or you can drag and drop into the timeline.

- Double-click on the human border layer, expand the human border controls panel under the effects
- You can change the color, size, thickness, opacity, etc.
- Hit Ok

How to Add a Border to the Video Online
You can also add borders to your videos/images online. All you need is, have a good internet connection and a browser.
Here is a guide for you to add frames to your video online.
Using Kapwing
- Open the browser and write the “Kapwing video maker”.
- You need to sign in the Kapwing to make an account
- An editing interphase will be opened as below.
- Hit on media and import media by clicking on +
- Drag and drop the video into the timeline.

1st Method
- Double click on the video in the preview window.
- 4 dots will appear on the corner of the video.
- You can drag the blue dots to make a frame and resize the image/video.
- Hit on lock ratio tab to maintain the pixels of the video.

- Double-click on the border area.
- You can change the color of the border.
- You can also resize the length and width of the border.

2nd Method
- Hit the elements and select the frames from the panel.
Here you can take square frames, circle frames, shapes, emoji’s and a lot of more frames.

3rd Method
- Hit the videos
- Select templates, a list of templates will be shown in this panel.
- Select the desired template and drag it into the timeline.

Conclusion
We have discussed different software to add borders. All the software and tools are free to use. Similarly, they can be used on both Mac as well as Windows. They are user-friendly and provide full control over borders. You can use any one of them to make your borders and can easily engage viewers in your videos.
In all of the above applications, I recommend you to use Wondershare filmora 11. It is the most professional software and makes your video stand out.
Way 1. Using a Grid Effect
While working on the project, make sure the aspect ratio of the video is 16:9, and project settings are HD (1080P) and UHD 4K in premiere pro.
Let’s start step by step.
Drag all the video clips by stacking them on video tracks in the timeline.
Hit the Effects tab and write the grid in the search panel.
Simply drag the grid option into the timeline of the videos.
Select the anchor value to 0 for the x and y.
Change the size to width and height slider.
Change the width to 1920 and height to 1080.
Now we have borders added as you can see below.
You can also change the width of the borders.
- Change the width to 30.
You have the option to change the color of the border.
- Select the blending mode to normal.
- Select the color picker tool and change the color of your desire.
Way 2. Using the Essential Graphics Panel
First of all, you wanna be in your premium pro graphics workspace. This will pull off your graphics panel on your right. The good thing about the essential graphics panel is, that it is vector-based. So the different video clips with different resolutions will not pixelate.
Let’s dive in…
Now, to use the graphics panel you need to perform the following steps.
Import the videos and drag them into the timeline.
Select the effects
Find “alpha adjust” and drag it into the effects control.
Create a 4-point polygon mask.
A rectangular mask will be created. You can edit it according to the frame requirement.
Go to the corner of the mask border and press the shift key. Drag the border to resize and scale it proportionally.
Again go to effect controls, under opacity hit invert alpha.
Under mask hit inverted.
Go to motion settings, change the position, and
Go to Alpha adjust and set the mask feathering to 0.
Now go back to the effects panel and search the paint bucket.
Under effects controls, hit the alpha channel under the fill selector
Then hit stroke under the stroke
You can turn up the stroke width to make it a bit thicker.
Hit the color tab to change the color of the border as desired.
An Easier Way to Add Borders to Videos on Computer
Filmora Video Editor is one of the best and most efficient video editing applications. It is not only very easy to use but it provides a professional interface for users to make the videos stand out. It can be used for both Windows and Mac.
For Win 7 or later (64-bit)
For macOS 10.14 or later
Let’s learn three different ways to add borders to the video/image using Wondershare Filmora 11.
- Using the Borders Preset
- Using overlay preset
- Using Human Border
1. Using the Borders Preset
- Download Wonder Share Filmora 11 on your device.
- Open the software and hit the import media under the media
- Select the desired media from the storage of your device.
- Drag and drop the selected video/image into the timeline.

- Select the effects tab and hit the utility
- You can search the borders in the search engine and use a border of your choice given in the panel.
- Select the border and hit the + button on the bottom right corner of the border.
- You can drag and drop the border into the timeline.
- You can see the border below.

- You can edit the border by double-clicking the border layer or directly clicking on the border in the preview area.
- The Effects controls will be opened.
- You can change the size, color and opacity of the border, by moving the slider.
- Hit OK

2. Using overlay preset
- Select the video/image layer and hit the effects
- Select overlay from the panel on the left side by scrolling down.
- You can choose the overlay of your choice by clicking on the + tab or simply dragging and dropping it into the timeline.

- Double click on the image/video with overlay effect.
- Select the effects tab under the image
- You can adjust the shadow of overlay by moving the slider of opacity.
- Hit Ok

3. Using Human Border
- Select the video/image and hit the effects
- Select AI Portrait from the panel.
- Select the desired human border.
- Hit the + tab or you can drag and drop into the timeline.

- Double-click on the human border layer, expand the human border controls panel under the effects
- You can change the color, size, thickness, opacity, etc.
- Hit Ok

How to Add a Border to the Video Online
You can also add borders to your videos/images online. All you need is, have a good internet connection and a browser.
Here is a guide for you to add frames to your video online.
Using Kapwing
- Open the browser and write the “Kapwing video maker”.
- You need to sign in the Kapwing to make an account
- An editing interphase will be opened as below.
- Hit on media and import media by clicking on +
- Drag and drop the video into the timeline.

1st Method
- Double click on the video in the preview window.
- 4 dots will appear on the corner of the video.
- You can drag the blue dots to make a frame and resize the image/video.
- Hit on lock ratio tab to maintain the pixels of the video.

- Double-click on the border area.
- You can change the color of the border.
- You can also resize the length and width of the border.

2nd Method
- Hit the elements and select the frames from the panel.
Here you can take square frames, circle frames, shapes, emoji’s and a lot of more frames.

3rd Method
- Hit the videos
- Select templates, a list of templates will be shown in this panel.
- Select the desired template and drag it into the timeline.

Conclusion
We have discussed different software to add borders. All the software and tools are free to use. Similarly, they can be used on both Mac as well as Windows. They are user-friendly and provide full control over borders. You can use any one of them to make your borders and can easily engage viewers in your videos.
In all of the above applications, I recommend you to use Wondershare filmora 11. It is the most professional software and makes your video stand out.
Way 1. Using a Grid Effect
While working on the project, make sure the aspect ratio of the video is 16:9, and project settings are HD (1080P) and UHD 4K in premiere pro.
Let’s start step by step.
Drag all the video clips by stacking them on video tracks in the timeline.
Hit the Effects tab and write the grid in the search panel.
Simply drag the grid option into the timeline of the videos.
Select the anchor value to 0 for the x and y.
Change the size to width and height slider.
Change the width to 1920 and height to 1080.
Now we have borders added as you can see below.
You can also change the width of the borders.
- Change the width to 30.
You have the option to change the color of the border.
- Select the blending mode to normal.
- Select the color picker tool and change the color of your desire.
Way 2. Using the Essential Graphics Panel
First of all, you wanna be in your premium pro graphics workspace. This will pull off your graphics panel on your right. The good thing about the essential graphics panel is, that it is vector-based. So the different video clips with different resolutions will not pixelate.
Let’s dive in…
Now, to use the graphics panel you need to perform the following steps.
Import the videos and drag them into the timeline.
Select the effects
Find “alpha adjust” and drag it into the effects control.
Create a 4-point polygon mask.
A rectangular mask will be created. You can edit it according to the frame requirement.
Go to the corner of the mask border and press the shift key. Drag the border to resize and scale it proportionally.
Again go to effect controls, under opacity hit invert alpha.
Under mask hit inverted.
Go to motion settings, change the position, and
Go to Alpha adjust and set the mask feathering to 0.
Now go back to the effects panel and search the paint bucket.
Under effects controls, hit the alpha channel under the fill selector
Then hit stroke under the stroke
You can turn up the stroke width to make it a bit thicker.
Hit the color tab to change the color of the border as desired.
An Easier Way to Add Borders to Videos on Computer
Filmora Video Editor is one of the best and most efficient video editing applications. It is not only very easy to use but it provides a professional interface for users to make the videos stand out. It can be used for both Windows and Mac.
For Win 7 or later (64-bit)
For macOS 10.14 or later
Let’s learn three different ways to add borders to the video/image using Wondershare Filmora 11.
- Using the Borders Preset
- Using overlay preset
- Using Human Border
1. Using the Borders Preset
- Download Wonder Share Filmora 11 on your device.
- Open the software and hit the import media under the media
- Select the desired media from the storage of your device.
- Drag and drop the selected video/image into the timeline.

- Select the effects tab and hit the utility
- You can search the borders in the search engine and use a border of your choice given in the panel.
- Select the border and hit the + button on the bottom right corner of the border.
- You can drag and drop the border into the timeline.
- You can see the border below.

- You can edit the border by double-clicking the border layer or directly clicking on the border in the preview area.
- The Effects controls will be opened.
- You can change the size, color and opacity of the border, by moving the slider.
- Hit OK

2. Using overlay preset
- Select the video/image layer and hit the effects
- Select overlay from the panel on the left side by scrolling down.
- You can choose the overlay of your choice by clicking on the + tab or simply dragging and dropping it into the timeline.

- Double click on the image/video with overlay effect.
- Select the effects tab under the image
- You can adjust the shadow of overlay by moving the slider of opacity.
- Hit Ok

3. Using Human Border
- Select the video/image and hit the effects
- Select AI Portrait from the panel.
- Select the desired human border.
- Hit the + tab or you can drag and drop into the timeline.

- Double-click on the human border layer, expand the human border controls panel under the effects
- You can change the color, size, thickness, opacity, etc.
- Hit Ok

How to Add a Border to the Video Online
You can also add borders to your videos/images online. All you need is, have a good internet connection and a browser.
Here is a guide for you to add frames to your video online.
Using Kapwing
- Open the browser and write the “Kapwing video maker”.
- You need to sign in the Kapwing to make an account
- An editing interphase will be opened as below.
- Hit on media and import media by clicking on +
- Drag and drop the video into the timeline.

1st Method
- Double click on the video in the preview window.
- 4 dots will appear on the corner of the video.
- You can drag the blue dots to make a frame and resize the image/video.
- Hit on lock ratio tab to maintain the pixels of the video.

- Double-click on the border area.
- You can change the color of the border.
- You can also resize the length and width of the border.

2nd Method
- Hit the elements and select the frames from the panel.
Here you can take square frames, circle frames, shapes, emoji’s and a lot of more frames.

3rd Method
- Hit the videos
- Select templates, a list of templates will be shown in this panel.
- Select the desired template and drag it into the timeline.

Conclusion
We have discussed different software to add borders. All the software and tools are free to use. Similarly, they can be used on both Mac as well as Windows. They are user-friendly and provide full control over borders. You can use any one of them to make your borders and can easily engage viewers in your videos.
In all of the above applications, I recommend you to use Wondershare filmora 11. It is the most professional software and makes your video stand out.
Complete Guide to Make a Super Easy Rotating Video Effect
Controlling camera direction to the subject’s hands and filming is trending nowadays. Create this effect by using easy film hacks, as shown in this article.
Many users make rotating illusion videos for TikTok or any branding video. The foremost items to record are explained in this article with detailed instructions. The best editing tool is also clarified below for instant results. So keep reading to get a hand with filming and editing a professional rotating transition video!
Part 1. What is a Rotating Video Illusion/Effect
Rotating transition video is a trending feature used by models and influencers. The brands also use this style to record the model’s videos in advertisements. It could be any makeup transition or clothing transition video.

It helps to indulge the audience with your content and show the after and before transitions. You can try this with any object or any character. But first, let’s figure out the requirements for rotating effects.
Part 2. Prerequisites to Make a Rotating Video Effect
You will need a few items to create a rotating transition video. First, look at the fundamental priorities for creating this feature.
The Subject Matters
To record a successful rotating video, you need a person or a subject to perform in front of the camera. It can be a model hired by a brand, a social influencer, or maybe it’s you. Keep in mind the following things before recording:
- The person should get two different costumes.
- All the actions need to be rehearsed before shooting
- Show affinity and control of the camera.

Shotting Equipment
To record a professional video, you need a good camera. You can use a smartphone to record this footage. There is no need to have a tripod stand or any gear to hold the camera because the camera will be in a rotating position, the same as the subject’s hand.
For this, you need a filmmaker or any person living with you. Just give instructions as shown below to him to record a perfect video for yourself:
- Record the whole video in just one direction.
- Don’t shake the camera because it gives blurry footage.
- Ensure to focus on the subject during recording.
- Don’t zoom in or out while recording the video.
- Keep the subject in the middle of the frame during the recording process.
- The hand rotation timing is the same as the camera’s rotation.
![]()
Note: Ensure to record one footage multiple times so that you can choose the perfect one later for editing.

Filming of the First Footage
To make the footage for the rotating video illusion, we have to record it at least twice to get crystal clear and high-resolution results. Therefore, ensure that we have camera movement in the same direction during all recording times.
![]()
Note: You can film the video either in the vertical format of the camera or in horizontal format. It all depends upon your script!
Follow the below-mentioned steps to record the first footage for the video:
- Hold the camera in a perfect format, whatever you choose.
- Let the subject stand or sit in the middle of the frame.
- The filmmaker can rotate the camera when the subject’s hand rotates.
- Try your best to rotate the camera 180 degrees.
- Ensure that the camera lens faces the ground at the end of the rotation.

After filming the first footage for the video, it’s time to record the second footage to transition between the two.
Filming of the Second Footage
To create a second shot, you have to remember that the costume and location of the filming are different from the first footage. Follow the below steps to record it:
- The first step is to hold the camera in the same direction as the first footage.
- When editing, make sure the subject’s position matches the first footage.
- Make sure the subject’s hand movement is in the opposite direction from the first shot.

Now you have both scenes and footage ready. Next, you have to edit them by inserting them into editing software. Follow the step guides below to perform this action!
Part 3. Step-by-Step Guide to Edit on Filmora
To create a professional rotating video illusion, Wondershare Filmora is an ideal tool. Even beginners can quickly get the hang of it due to its highly engaging system user interface (UI). You will discover how to create a rotating video effect in a few clicks.
Free Download For Win 7 or later(64-bit)
Free Download For macOS 10.14 or later

Step1 Download Wondershare Filmora
To edit your video like a pro, download the most recent version of Wondershare Filmora.
- Download and open Wondershare Filmora on your PC or Mac.
Step2 Import the Footage
Import recorded footage to start the editing process. It is better to have all your footage in one folder before importing all the clips. The main import window locates in the upper left corner when it is first launched.
- Click on the Import icon in the import window’s center.
- Wondershare Filmora will then immediately point you toward your PC
- Navigate to the location where your preferred Videos and Photos are kept.
- Choose every footage you wish to import.
- Once you click Open, the files will import.

It’s time to prepare the footage for editing after inserting it into the Filmora. Follow the next steps to do this!
Step3 Add Footage to the Timeline
The videos you’ve imported will be added to the timeline after that. You can import both footages at once and put them all at once into the timeline.
Alternatively, you can add them one at a time as needed. Follow the procedures as shown to add an item to your timeline.
- To choose a photo or movie, use the right-click
- Holding the Right-click, and move it to the timeline from the bottom.

Your images and videos have been imported into the timeline; now it’s time to trim them according to requirements.
Step4 Trim the Clips
To insert transition effects, you must trim the clip at a specific point and speed up the clip at the required duration. For this, follow the next actions as shown below:
- Playback clips and stop the playhead where you want by pressing the Space button from the Keyboard.
- Then, click on the Split icon present on the playhead.
- It will trim the clip from that point and separate it from its former one.

After splitting or trimming the clips, you now have to adjust the speed of the clips, as shown below!
Step5 Adjust Speed and Duration
There is a need to increase the speed of some scenes where the transition starts or ends. For this, follow the below actions:
- Find the section which needs to speed up, such as in the last half of each rotation.
- Right-click on the section of the clip in the timeline.
- Then, select the Speed option as shown in the icon of the timer present on the upper tab of the timeline.
- Select the Fast option, and if you want to lower the speed, select the Slow option**.**
- Choose the speed range according to your requirement.
- Select that required option and play it back to check if it is correct.

The video is all set; give it the final touches by following the last step, as shown below!
Step6 Playback the Video
After adding and adjusting all the features, double-check the video by playback. If you find any duration issue, review it and adjust it according to your requirement.
You can playback the video by clicking on the Play button. Perform this a few more times to ensure the speed looks okay and adjust if it is too slow or too fast.

You can also view it in full screen by selecting the last option on the tab. If there is no problem, you can export it locally or directly share it on TikTok or anywhere you want to gain views and attract an audience. You can also use it as a magic trick to inspire other people or as a transition for videos!
Conclusion
Keep creating and experimenting with other features on Wondershare Filmora. For example, you can use different effects, try on stock media, and then create or film your own. In this way, you’ll get professional results.
If you are showing new strategies daily to your viewers, they will hook up with you, and it’ll assist in the algorithm working by your side. That’s why keep doing it and enjoying the rest!

Filming of the First Footage
To make the footage for the rotating video illusion, we have to record it at least twice to get crystal clear and high-resolution results. Therefore, ensure that we have camera movement in the same direction during all recording times.
![]()
Note: You can film the video either in the vertical format of the camera or in horizontal format. It all depends upon your script!
Follow the below-mentioned steps to record the first footage for the video:
- Hold the camera in a perfect format, whatever you choose.
- Let the subject stand or sit in the middle of the frame.
- The filmmaker can rotate the camera when the subject’s hand rotates.
- Try your best to rotate the camera 180 degrees.
- Ensure that the camera lens faces the ground at the end of the rotation.

After filming the first footage for the video, it’s time to record the second footage to transition between the two.
Filming of the Second Footage
To create a second shot, you have to remember that the costume and location of the filming are different from the first footage. Follow the below steps to record it:
- The first step is to hold the camera in the same direction as the first footage.
- When editing, make sure the subject’s position matches the first footage.
- Make sure the subject’s hand movement is in the opposite direction from the first shot.

Now you have both scenes and footage ready. Next, you have to edit them by inserting them into editing software. Follow the step guides below to perform this action!
Part 3. Step-by-Step Guide to Edit on Filmora
To create a professional rotating video illusion, Wondershare Filmora is an ideal tool. Even beginners can quickly get the hang of it due to its highly engaging system user interface (UI). You will discover how to create a rotating video effect in a few clicks.
Free Download For Win 7 or later(64-bit)
Free Download For macOS 10.14 or later

Step1 Download Wondershare Filmora
To edit your video like a pro, download the most recent version of Wondershare Filmora.
- Download and open Wondershare Filmora on your PC or Mac.
Step2 Import the Footage
Import recorded footage to start the editing process. It is better to have all your footage in one folder before importing all the clips. The main import window locates in the upper left corner when it is first launched.
- Click on the Import icon in the import window’s center.
- Wondershare Filmora will then immediately point you toward your PC
- Navigate to the location where your preferred Videos and Photos are kept.
- Choose every footage you wish to import.
- Once you click Open, the files will import.

It’s time to prepare the footage for editing after inserting it into the Filmora. Follow the next steps to do this!
Step3 Add Footage to the Timeline
The videos you’ve imported will be added to the timeline after that. You can import both footages at once and put them all at once into the timeline.
Alternatively, you can add them one at a time as needed. Follow the procedures as shown to add an item to your timeline.
- To choose a photo or movie, use the right-click
- Holding the Right-click, and move it to the timeline from the bottom.

Your images and videos have been imported into the timeline; now it’s time to trim them according to requirements.
Step4 Trim the Clips
To insert transition effects, you must trim the clip at a specific point and speed up the clip at the required duration. For this, follow the next actions as shown below:
- Playback clips and stop the playhead where you want by pressing the Space button from the Keyboard.
- Then, click on the Split icon present on the playhead.
- It will trim the clip from that point and separate it from its former one.

After splitting or trimming the clips, you now have to adjust the speed of the clips, as shown below!
Step5 Adjust Speed and Duration
There is a need to increase the speed of some scenes where the transition starts or ends. For this, follow the below actions:
- Find the section which needs to speed up, such as in the last half of each rotation.
- Right-click on the section of the clip in the timeline.
- Then, select the Speed option as shown in the icon of the timer present on the upper tab of the timeline.
- Select the Fast option, and if you want to lower the speed, select the Slow option**.**
- Choose the speed range according to your requirement.
- Select that required option and play it back to check if it is correct.

The video is all set; give it the final touches by following the last step, as shown below!
Step6 Playback the Video
After adding and adjusting all the features, double-check the video by playback. If you find any duration issue, review it and adjust it according to your requirement.
You can playback the video by clicking on the Play button. Perform this a few more times to ensure the speed looks okay and adjust if it is too slow or too fast.

You can also view it in full screen by selecting the last option on the tab. If there is no problem, you can export it locally or directly share it on TikTok or anywhere you want to gain views and attract an audience. You can also use it as a magic trick to inspire other people or as a transition for videos!
Conclusion
Keep creating and experimenting with other features on Wondershare Filmora. For example, you can use different effects, try on stock media, and then create or film your own. In this way, you’ll get professional results.
If you are showing new strategies daily to your viewers, they will hook up with you, and it’ll assist in the algorithm working by your side. That’s why keep doing it and enjoying the rest!
Detailed Guide to Merge Videos in VLC Media Player
Sometimes, when working on a project, we really need to combine several videos - this way some content needs to be conveyed, there are shots that, when neatly sorted and merged together, really create visual and content value which we aspire to make; The process becomes more enjoyable if we work on the videos produced by ourselves, or if the work is to be done for our side project. People always take special care of their own work, and the same can be emphasized freely about the editing as well - about the packaging with which we have to deliver our videos to the audience. Even in the absence of an audience, maybe we want to make a kind of video collage for ourselves, our children, or in general, for the family to make delightful memories?
Of course, not everyone who has taken a camera or a mobile phone to take videos at least one time, even so, for family and friends, has the experience of editing and making various manipulations. However, the function of merging videos in various editing programs or on online platforms is so simple that it can be learned in just a few minutes, without the help of other people, and with a kind of small, though very useful result at the same time.
One of the programs where videos can be uploaded is VLC Media Player, which is a free-to-use, robust, and feature-packed software that plays a wide range of audio, image, and video files. It can play multimedia files directly from extractable devices or the PC. The program is unique, as it can stream from popular websites like Disney +, Hulu, Gaia, and Netflix. VLC Multimedia Player also accepts live video from PlayStation Live, Xbox Live, Facebook, Twitter, and YouTube. While most competing programs display advertisements, VLC Player does not, as it receives support from a non-profit organization.

Interestingly, we can, as though with the help of a magic wand, turn this particular video player into video editing software. When one computer program delivers too many functions, it might make us think of the situation where one person claims to serve ten professions at the same time - there is a mood that they will not be good in any of them. It’s not true with VLC Player, which, from experience, seems to be both a good “player” as well as a fairly user-friendly editing software with many interesting features and functions.
Before we move on to video streaming, let’s look at two features that we can use in VLC player:
In the player, right when our video clip starts to play, we may find that the footage is taken vertically instead of horizontally! This is not a nightmare just for video enthusiasts. If you don’t know how to rotate the video, then you have to rotate your head 90 degrees, and at this time you can not even get pleasure from watching, not to mention that it can even cause your neck to lock up. VLC Player took care of that - in the top panel, just click on Tools, then select Effects & Filters. In the opened window, we find Video Effects, select Geometry and check the Rotate option - so, the whole 360 degrees are at our disposal!
Sometimes it happens that we watch the video, we are crazy about one part of it, and the other part of it seems to spoil everything! Even if we are ready to publish the raw material on social media or just save it for ourselves, we just don’t want some parts of the video to be there. So, it can be said - we are not satisfied with the full version and we wish to cut our clip and/or reduce its timeframe. VLC Player solves this problem “without any problem” - we find the View in the top panel, then we demand the cursor to aim for Advanced Controls button. As a result, a sort of video editor will appear, with its red record button on which we will click and the video will play until we reach the point where we want to split the footage. The cut video will be automatically saved in My Computer’s My Video folder.
How to Merge Multiple Videos in VLC Media Player
Here we are, now the main topic of interest of this article - how to put together several videos so that they become one? This case, unlike other possibilities we discussed above, is more complicated, so we will study this feature step by step .
Technique one:
- Step one:
Open VLC media player.

Probably, you have already decided exactly which files you want to merge, so choose Open Multiple Files…

In the opened window, click on Add in the File tab.

Select the desired clips from the newly opened window (selecting order matters, because it dictates which clips will come first and which ones will be next in the finished version), then click Open.

- Step two:
The selected videos are shown in the File Selection list. At the bottom of the window, click the Arrow button next to the Play button, where you need to select Convert.

In the Profile, it is desirable to specify the following format: Video - + MP3 (MP4), and below you can choose the Destination file - the location where you want to save the merged video. Also, to find the edited video easily, check the following: Append ‘-converted’ to file name. Click on Start. Wait until it is done - then you can play the video.

Technique two:
- Create a New Folder and move the videos that you would like to merge Rename the videos (e.g. to 1, 2 etc.).

- Create a new text file. Copy and paste this line below:
vlc_location video1.mp4 video2.mp4 –sout “#gather:std{access=file,dst=final_file_name.mp4}” –sout-keep

- Type VLC in the taskbar search and right-click on the app. Choose Open File location.

Right-click on the app and choose Properties. A new window will be opened, where you need to go to Target. Select and copy the line.

Go to the text document file. Remove vlc_location and paste the copied text instead. Change the names of the video to match the names in the folder.

- Open the folder with videos. Click on the address line. Type cmd and press Enter.

sA new window will open. Cope the line from the text file and paste it into cmd window; then, click on Enter.

- VLC player will open and will play the merged video file.

An Easier Way to Merge Videos in A Few Clicks
It’s true that merging videos in VLC Media Player takes quite a few steps, so to speak. But is this the only editing program in which a similar operation can be performed? Of course not. Therefore, in our article, we decided to offer you an alternative, where you can also easily merge the videos. This is the famous Filmora Video Editor , a software that is one of the easiest and most convenient to work with, especially for those who want to edit videos without having much experience in “complicated” software before. So again, step by step guideline on how to put together our video clips in Wondershare Filmora.
For Win 7 or later (64-bit)
For macOS 10.14 or later
- Open the program.
- Choose Import Media Files Here.

- Choose your

- We can click and drag, essentially, “insert” a video in a sequence below. The Linear Timeline allows us to understand exactly when a video clip ends and when a new one starts.

- Accordingly, we can make one video “sit” next to another. If we want or need it, we will add the third video clip, fourth, and so on.

- We can view the entire video and save the video afterwards.
- Start to save video - we make sure the result is exactly what we wanted, find the Export button above the timeline and click on it.

- In the opened window, on the left side, to be precise, if we observe well, we can already choose in which format we want to save our clip. On the right we can indicate what name we want to give to our video; The location where we want to store it; Also, we see the resolution (which we can modify freely after clicking on Settings); Size; Duration.

- In Settings, we can decide how much quality the video should have, how many kbps will be the Bit Rate, how many fps the Frame Rate should be, etc., but most likely, beginners will not need to change all this.

- After selecting everything, right-click on the Export button in the lower right corner of the window and the program will start saving the material.


Filmora 9, though, works a little differently.
- In the Import dropdown menu, select Import with instant cutting tool…

This will open the Filmora Instant Cutter window with two options - Trim and Merge. Since we need Merge in this case, this is what we choose.

- Then Open File, which will allow you to select multiple clips. Select the desired video clips and to Import, click Open.

- The window will show the files we selected and the entire video, and to save it, we click on Export.

- Specify File name, Save to (location), When done - the latter is what the program should do after the material is exported, e.g. open the containing folder. The export window also shows the approximate size of the footage.

- After hitting on Ok, the project will be saved, which will happen very quickly, since the program does not decode and encode the material.


That’s it! In this article, we have tried to teach you how to use VLC Media Player as a video editor software, what features we can use and, most importantly, how to merge multiple videos in this dual program; We also learned an alternative way of how we can combine different video clips with the help of Wondershare Filmora. The choice is yours, the main thing is to know all the alternatives and find the most time and energy saving, preferable option for you personally!
Interestingly, we can, as though with the help of a magic wand, turn this particular video player into video editing software. When one computer program delivers too many functions, it might make us think of the situation where one person claims to serve ten professions at the same time - there is a mood that they will not be good in any of them. It’s not true with VLC Player, which, from experience, seems to be both a good “player” as well as a fairly user-friendly editing software with many interesting features and functions.
Before we move on to video streaming, let’s look at two features that we can use in VLC player:
In the player, right when our video clip starts to play, we may find that the footage is taken vertically instead of horizontally! This is not a nightmare just for video enthusiasts. If you don’t know how to rotate the video, then you have to rotate your head 90 degrees, and at this time you can not even get pleasure from watching, not to mention that it can even cause your neck to lock up. VLC Player took care of that - in the top panel, just click on Tools, then select Effects & Filters. In the opened window, we find Video Effects, select Geometry and check the Rotate option - so, the whole 360 degrees are at our disposal!
Sometimes it happens that we watch the video, we are crazy about one part of it, and the other part of it seems to spoil everything! Even if we are ready to publish the raw material on social media or just save it for ourselves, we just don’t want some parts of the video to be there. So, it can be said - we are not satisfied with the full version and we wish to cut our clip and/or reduce its timeframe. VLC Player solves this problem “without any problem” - we find the View in the top panel, then we demand the cursor to aim for Advanced Controls button. As a result, a sort of video editor will appear, with its red record button on which we will click and the video will play until we reach the point where we want to split the footage. The cut video will be automatically saved in My Computer’s My Video folder.
How to Merge Multiple Videos in VLC Media Player
Here we are, now the main topic of interest of this article - how to put together several videos so that they become one? This case, unlike other possibilities we discussed above, is more complicated, so we will study this feature step by step .
Technique one:
- Step one:
Open VLC media player.

Probably, you have already decided exactly which files you want to merge, so choose Open Multiple Files…

In the opened window, click on Add in the File tab.

Select the desired clips from the newly opened window (selecting order matters, because it dictates which clips will come first and which ones will be next in the finished version), then click Open.

- Step two:
The selected videos are shown in the File Selection list. At the bottom of the window, click the Arrow button next to the Play button, where you need to select Convert.

In the Profile, it is desirable to specify the following format: Video - + MP3 (MP4), and below you can choose the Destination file - the location where you want to save the merged video. Also, to find the edited video easily, check the following: Append ‘-converted’ to file name. Click on Start. Wait until it is done - then you can play the video.

Technique two:
- Create a New Folder and move the videos that you would like to merge Rename the videos (e.g. to 1, 2 etc.).

- Create a new text file. Copy and paste this line below:
vlc_location video1.mp4 video2.mp4 –sout “#gather:std{access=file,dst=final_file_name.mp4}” –sout-keep

- Type VLC in the taskbar search and right-click on the app. Choose Open File location.

Right-click on the app and choose Properties. A new window will be opened, where you need to go to Target. Select and copy the line.

Go to the text document file. Remove vlc_location and paste the copied text instead. Change the names of the video to match the names in the folder.

- Open the folder with videos. Click on the address line. Type cmd and press Enter.

sA new window will open. Cope the line from the text file and paste it into cmd window; then, click on Enter.

- VLC player will open and will play the merged video file.

An Easier Way to Merge Videos in A Few Clicks
It’s true that merging videos in VLC Media Player takes quite a few steps, so to speak. But is this the only editing program in which a similar operation can be performed? Of course not. Therefore, in our article, we decided to offer you an alternative, where you can also easily merge the videos. This is the famous Filmora Video Editor , a software that is one of the easiest and most convenient to work with, especially for those who want to edit videos without having much experience in “complicated” software before. So again, step by step guideline on how to put together our video clips in Wondershare Filmora.
For Win 7 or later (64-bit)
For macOS 10.14 or later
- Open the program.
- Choose Import Media Files Here.

- Choose your

- We can click and drag, essentially, “insert” a video in a sequence below. The Linear Timeline allows us to understand exactly when a video clip ends and when a new one starts.

- Accordingly, we can make one video “sit” next to another. If we want or need it, we will add the third video clip, fourth, and so on.

- We can view the entire video and save the video afterwards.
- Start to save video - we make sure the result is exactly what we wanted, find the Export button above the timeline and click on it.

- In the opened window, on the left side, to be precise, if we observe well, we can already choose in which format we want to save our clip. On the right we can indicate what name we want to give to our video; The location where we want to store it; Also, we see the resolution (which we can modify freely after clicking on Settings); Size; Duration.

- In Settings, we can decide how much quality the video should have, how many kbps will be the Bit Rate, how many fps the Frame Rate should be, etc., but most likely, beginners will not need to change all this.

- After selecting everything, right-click on the Export button in the lower right corner of the window and the program will start saving the material.


Filmora 9, though, works a little differently.
- In the Import dropdown menu, select Import with instant cutting tool…

This will open the Filmora Instant Cutter window with two options - Trim and Merge. Since we need Merge in this case, this is what we choose.

- Then Open File, which will allow you to select multiple clips. Select the desired video clips and to Import, click Open.

- The window will show the files we selected and the entire video, and to save it, we click on Export.

- Specify File name, Save to (location), When done - the latter is what the program should do after the material is exported, e.g. open the containing folder. The export window also shows the approximate size of the footage.

- After hitting on Ok, the project will be saved, which will happen very quickly, since the program does not decode and encode the material.


That’s it! In this article, we have tried to teach you how to use VLC Media Player as a video editor software, what features we can use and, most importantly, how to merge multiple videos in this dual program; We also learned an alternative way of how we can combine different video clips with the help of Wondershare Filmora. The choice is yours, the main thing is to know all the alternatives and find the most time and energy saving, preferable option for you personally!
Interestingly, we can, as though with the help of a magic wand, turn this particular video player into video editing software. When one computer program delivers too many functions, it might make us think of the situation where one person claims to serve ten professions at the same time - there is a mood that they will not be good in any of them. It’s not true with VLC Player, which, from experience, seems to be both a good “player” as well as a fairly user-friendly editing software with many interesting features and functions.
Before we move on to video streaming, let’s look at two features that we can use in VLC player:
In the player, right when our video clip starts to play, we may find that the footage is taken vertically instead of horizontally! This is not a nightmare just for video enthusiasts. If you don’t know how to rotate the video, then you have to rotate your head 90 degrees, and at this time you can not even get pleasure from watching, not to mention that it can even cause your neck to lock up. VLC Player took care of that - in the top panel, just click on Tools, then select Effects & Filters. In the opened window, we find Video Effects, select Geometry and check the Rotate option - so, the whole 360 degrees are at our disposal!
Sometimes it happens that we watch the video, we are crazy about one part of it, and the other part of it seems to spoil everything! Even if we are ready to publish the raw material on social media or just save it for ourselves, we just don’t want some parts of the video to be there. So, it can be said - we are not satisfied with the full version and we wish to cut our clip and/or reduce its timeframe. VLC Player solves this problem “without any problem” - we find the View in the top panel, then we demand the cursor to aim for Advanced Controls button. As a result, a sort of video editor will appear, with its red record button on which we will click and the video will play until we reach the point where we want to split the footage. The cut video will be automatically saved in My Computer’s My Video folder.
How to Merge Multiple Videos in VLC Media Player
Here we are, now the main topic of interest of this article - how to put together several videos so that they become one? This case, unlike other possibilities we discussed above, is more complicated, so we will study this feature step by step .
Technique one:
- Step one:
Open VLC media player.

Probably, you have already decided exactly which files you want to merge, so choose Open Multiple Files…

In the opened window, click on Add in the File tab.

Select the desired clips from the newly opened window (selecting order matters, because it dictates which clips will come first and which ones will be next in the finished version), then click Open.

- Step two:
The selected videos are shown in the File Selection list. At the bottom of the window, click the Arrow button next to the Play button, where you need to select Convert.

In the Profile, it is desirable to specify the following format: Video - + MP3 (MP4), and below you can choose the Destination file - the location where you want to save the merged video. Also, to find the edited video easily, check the following: Append ‘-converted’ to file name. Click on Start. Wait until it is done - then you can play the video.

Technique two:
- Create a New Folder and move the videos that you would like to merge Rename the videos (e.g. to 1, 2 etc.).

- Create a new text file. Copy and paste this line below:
vlc_location video1.mp4 video2.mp4 –sout “#gather:std{access=file,dst=final_file_name.mp4}” –sout-keep

- Type VLC in the taskbar search and right-click on the app. Choose Open File location.

Right-click on the app and choose Properties. A new window will be opened, where you need to go to Target. Select and copy the line.

Go to the text document file. Remove vlc_location and paste the copied text instead. Change the names of the video to match the names in the folder.

- Open the folder with videos. Click on the address line. Type cmd and press Enter.

sA new window will open. Cope the line from the text file and paste it into cmd window; then, click on Enter.

- VLC player will open and will play the merged video file.

An Easier Way to Merge Videos in A Few Clicks
It’s true that merging videos in VLC Media Player takes quite a few steps, so to speak. But is this the only editing program in which a similar operation can be performed? Of course not. Therefore, in our article, we decided to offer you an alternative, where you can also easily merge the videos. This is the famous Filmora Video Editor , a software that is one of the easiest and most convenient to work with, especially for those who want to edit videos without having much experience in “complicated” software before. So again, step by step guideline on how to put together our video clips in Wondershare Filmora.
For Win 7 or later (64-bit)
For macOS 10.14 or later
- Open the program.
- Choose Import Media Files Here.

- Choose your

- We can click and drag, essentially, “insert” a video in a sequence below. The Linear Timeline allows us to understand exactly when a video clip ends and when a new one starts.

- Accordingly, we can make one video “sit” next to another. If we want or need it, we will add the third video clip, fourth, and so on.

- We can view the entire video and save the video afterwards.
- Start to save video - we make sure the result is exactly what we wanted, find the Export button above the timeline and click on it.

- In the opened window, on the left side, to be precise, if we observe well, we can already choose in which format we want to save our clip. On the right we can indicate what name we want to give to our video; The location where we want to store it; Also, we see the resolution (which we can modify freely after clicking on Settings); Size; Duration.

- In Settings, we can decide how much quality the video should have, how many kbps will be the Bit Rate, how many fps the Frame Rate should be, etc., but most likely, beginners will not need to change all this.

- After selecting everything, right-click on the Export button in the lower right corner of the window and the program will start saving the material.


Filmora 9, though, works a little differently.
- In the Import dropdown menu, select Import with instant cutting tool…

This will open the Filmora Instant Cutter window with two options - Trim and Merge. Since we need Merge in this case, this is what we choose.

- Then Open File, which will allow you to select multiple clips. Select the desired video clips and to Import, click Open.

- The window will show the files we selected and the entire video, and to save it, we click on Export.

- Specify File name, Save to (location), When done - the latter is what the program should do after the material is exported, e.g. open the containing folder. The export window also shows the approximate size of the footage.

- After hitting on Ok, the project will be saved, which will happen very quickly, since the program does not decode and encode the material.


That’s it! In this article, we have tried to teach you how to use VLC Media Player as a video editor software, what features we can use and, most importantly, how to merge multiple videos in this dual program; We also learned an alternative way of how we can combine different video clips with the help of Wondershare Filmora. The choice is yours, the main thing is to know all the alternatives and find the most time and energy saving, preferable option for you personally!
Interestingly, we can, as though with the help of a magic wand, turn this particular video player into video editing software. When one computer program delivers too many functions, it might make us think of the situation where one person claims to serve ten professions at the same time - there is a mood that they will not be good in any of them. It’s not true with VLC Player, which, from experience, seems to be both a good “player” as well as a fairly user-friendly editing software with many interesting features and functions.
Before we move on to video streaming, let’s look at two features that we can use in VLC player:
In the player, right when our video clip starts to play, we may find that the footage is taken vertically instead of horizontally! This is not a nightmare just for video enthusiasts. If you don’t know how to rotate the video, then you have to rotate your head 90 degrees, and at this time you can not even get pleasure from watching, not to mention that it can even cause your neck to lock up. VLC Player took care of that - in the top panel, just click on Tools, then select Effects & Filters. In the opened window, we find Video Effects, select Geometry and check the Rotate option - so, the whole 360 degrees are at our disposal!
Sometimes it happens that we watch the video, we are crazy about one part of it, and the other part of it seems to spoil everything! Even if we are ready to publish the raw material on social media or just save it for ourselves, we just don’t want some parts of the video to be there. So, it can be said - we are not satisfied with the full version and we wish to cut our clip and/or reduce its timeframe. VLC Player solves this problem “without any problem” - we find the View in the top panel, then we demand the cursor to aim for Advanced Controls button. As a result, a sort of video editor will appear, with its red record button on which we will click and the video will play until we reach the point where we want to split the footage. The cut video will be automatically saved in My Computer’s My Video folder.
How to Merge Multiple Videos in VLC Media Player
Here we are, now the main topic of interest of this article - how to put together several videos so that they become one? This case, unlike other possibilities we discussed above, is more complicated, so we will study this feature step by step .
Technique one:
- Step one:
Open VLC media player.

Probably, you have already decided exactly which files you want to merge, so choose Open Multiple Files…

In the opened window, click on Add in the File tab.

Select the desired clips from the newly opened window (selecting order matters, because it dictates which clips will come first and which ones will be next in the finished version), then click Open.

- Step two:
The selected videos are shown in the File Selection list. At the bottom of the window, click the Arrow button next to the Play button, where you need to select Convert.

In the Profile, it is desirable to specify the following format: Video - + MP3 (MP4), and below you can choose the Destination file - the location where you want to save the merged video. Also, to find the edited video easily, check the following: Append ‘-converted’ to file name. Click on Start. Wait until it is done - then you can play the video.

Technique two:
- Create a New Folder and move the videos that you would like to merge Rename the videos (e.g. to 1, 2 etc.).

- Create a new text file. Copy and paste this line below:
vlc_location video1.mp4 video2.mp4 –sout “#gather:std{access=file,dst=final_file_name.mp4}” –sout-keep

- Type VLC in the taskbar search and right-click on the app. Choose Open File location.

Right-click on the app and choose Properties. A new window will be opened, where you need to go to Target. Select and copy the line.

Go to the text document file. Remove vlc_location and paste the copied text instead. Change the names of the video to match the names in the folder.

- Open the folder with videos. Click on the address line. Type cmd and press Enter.

sA new window will open. Cope the line from the text file and paste it into cmd window; then, click on Enter.

- VLC player will open and will play the merged video file.

An Easier Way to Merge Videos in A Few Clicks
It’s true that merging videos in VLC Media Player takes quite a few steps, so to speak. But is this the only editing program in which a similar operation can be performed? Of course not. Therefore, in our article, we decided to offer you an alternative, where you can also easily merge the videos. This is the famous Filmora Video Editor , a software that is one of the easiest and most convenient to work with, especially for those who want to edit videos without having much experience in “complicated” software before. So again, step by step guideline on how to put together our video clips in Wondershare Filmora.
For Win 7 or later (64-bit)
For macOS 10.14 or later
- Open the program.
- Choose Import Media Files Here.

- Choose your

- We can click and drag, essentially, “insert” a video in a sequence below. The Linear Timeline allows us to understand exactly when a video clip ends and when a new one starts.

- Accordingly, we can make one video “sit” next to another. If we want or need it, we will add the third video clip, fourth, and so on.

- We can view the entire video and save the video afterwards.
- Start to save video - we make sure the result is exactly what we wanted, find the Export button above the timeline and click on it.

- In the opened window, on the left side, to be precise, if we observe well, we can already choose in which format we want to save our clip. On the right we can indicate what name we want to give to our video; The location where we want to store it; Also, we see the resolution (which we can modify freely after clicking on Settings); Size; Duration.

- In Settings, we can decide how much quality the video should have, how many kbps will be the Bit Rate, how many fps the Frame Rate should be, etc., but most likely, beginners will not need to change all this.

- After selecting everything, right-click on the Export button in the lower right corner of the window and the program will start saving the material.


Filmora 9, though, works a little differently.
- In the Import dropdown menu, select Import with instant cutting tool…

This will open the Filmora Instant Cutter window with two options - Trim and Merge. Since we need Merge in this case, this is what we choose.

- Then Open File, which will allow you to select multiple clips. Select the desired video clips and to Import, click Open.

- The window will show the files we selected and the entire video, and to save it, we click on Export.

- Specify File name, Save to (location), When done - the latter is what the program should do after the material is exported, e.g. open the containing folder. The export window also shows the approximate size of the footage.

- After hitting on Ok, the project will be saved, which will happen very quickly, since the program does not decode and encode the material.


That’s it! In this article, we have tried to teach you how to use VLC Media Player as a video editor software, what features we can use and, most importantly, how to merge multiple videos in this dual program; We also learned an alternative way of how we can combine different video clips with the help of Wondershare Filmora. The choice is yours, the main thing is to know all the alternatives and find the most time and energy saving, preferable option for you personally!
Add Subtitles To Videos With Kapwing [Step by Step]
Content creators always prefer to add subtitles to their videos for better comprehension. The reason is that some people cannot understand your language and needs subtitles to understand the content. Moreover, if your viewer is facing an audio problem and won’t be able to hear your voice, subtitles can help there. In this article, we will introduce the Kapwing subtitle maker, through which you can add subtitles in many ways.
There are some drawbacks to using online tools, such as file size restrictions or internet availability. Yet, with the Kapwing tool, you won’t get disappointed. Kapwing is an online tool that offers various options to edit videos. One of the great features of Kapwing is its subtitle maker, which can help you in adding subtitles to your videos easily. To learn how to use the Kapwing subtitles feature, continue reading this article.
Part 1: Upload the Subtitle File to Kapwing
If you have a subtitle file for your video, Kapwing can help you. If you have a subtitle file for your video, Kapwing can help you. Without creating a user account, you can upload the subtitle file on this tool. With this subtitle editor, you can upload video files from your computer or cloud storage platforms. Moreover, it supports the subtitle files of SRT and VVT format. To use Kapwing subtitle maker for uploading a subtitle file, read the below steps:
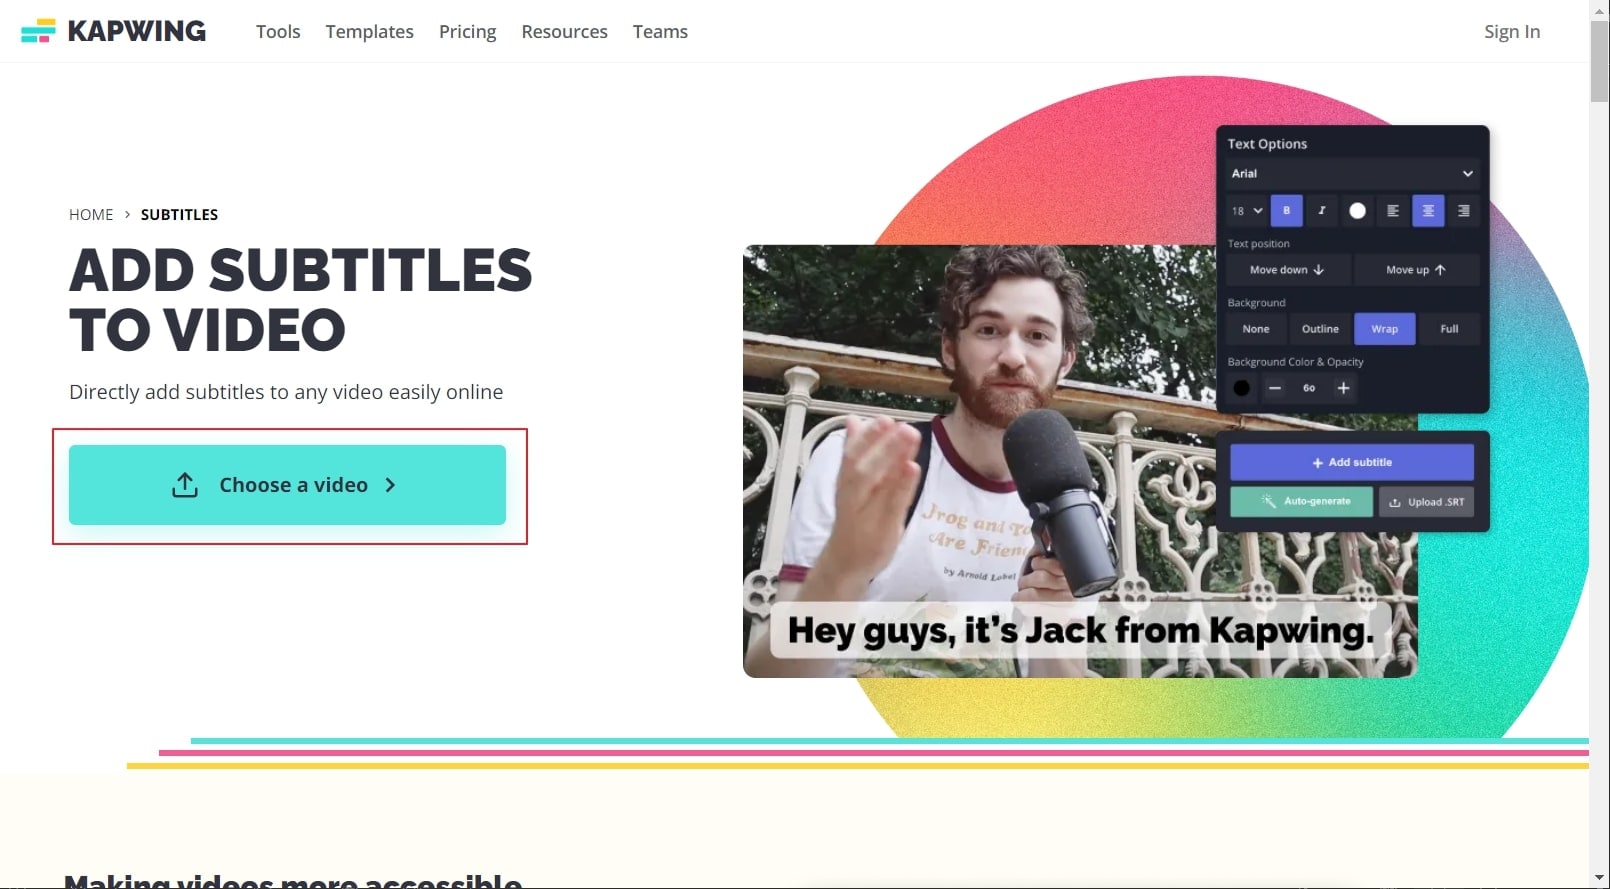
Step 1 Navigate to the official site of Kapwing and select its “Subtitles” tool. Afterward, click on “Choose a video,” which will open a new window on your screen.

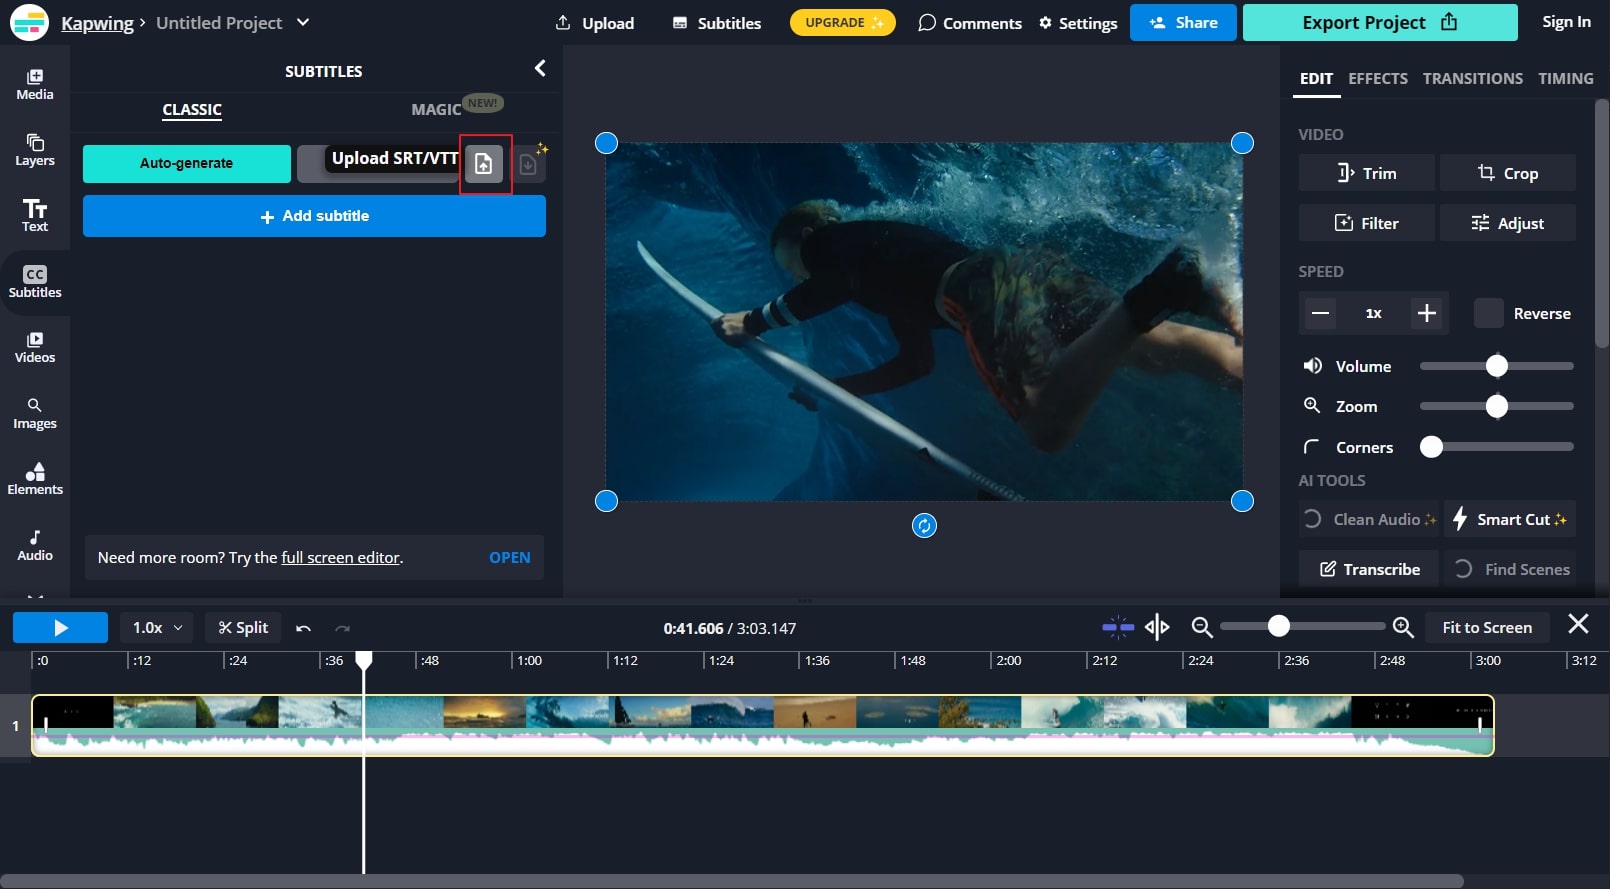
Step 2 Click on the “Upload” button given on top to import your video file on this tool. Once done, click on the “Subtitle” option displayed on the left side. On the subtitles window, click on the “Upload SRT/VVT” button to import your subtitle file.
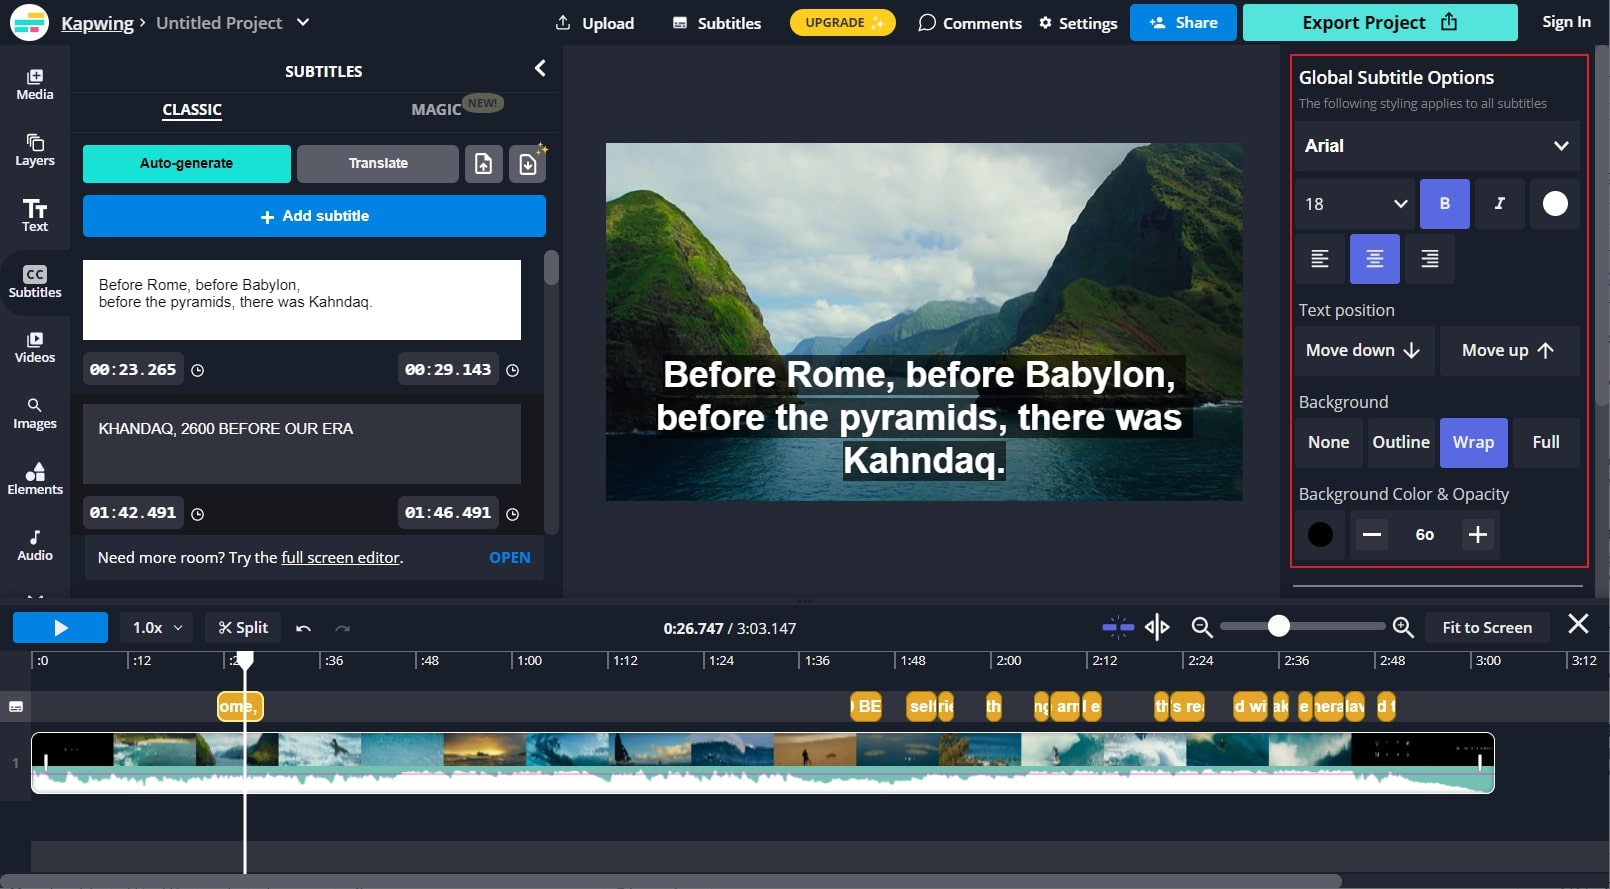
Step 3 After uploading the file, your subtitles will sync with your video. To edit your subtitles, navigate to the right panel. From that, you can select text position, background color, opacity, font, and alignment.
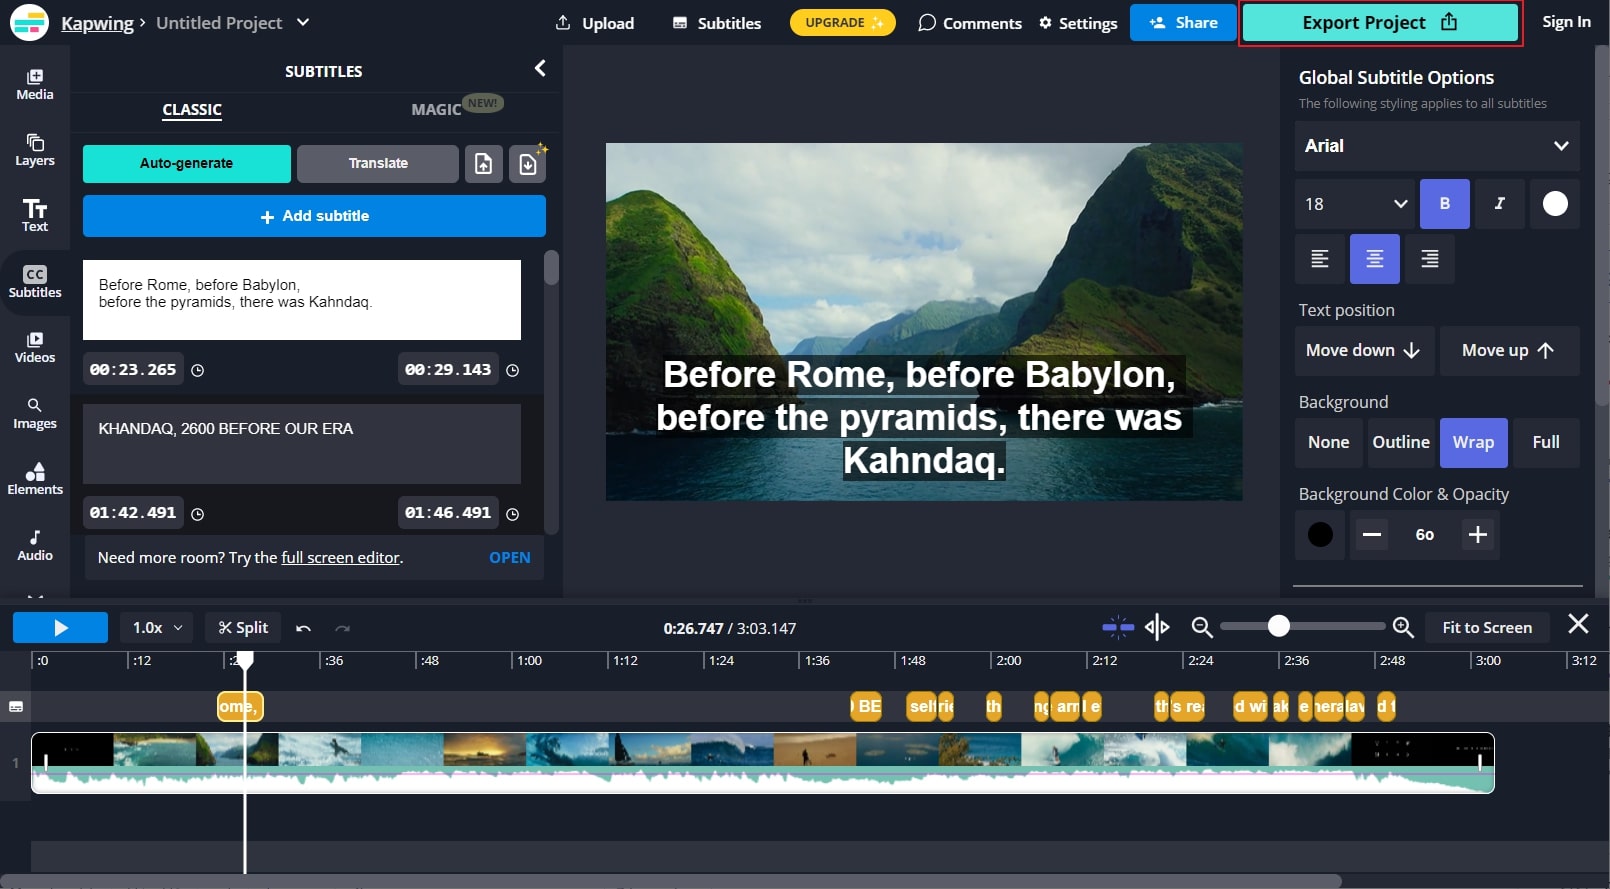
Step 4 Once done with making the changes on added subtitles, you can click on the “Export Project” button to save or share the file.
Part 2: Automatically Generate your Subtitle on Kapwing
Do you want to generate subtitles for your video instantly? Kapwing subtitle maker offers an Auto-Subtitle Generator that converts your voice into subtitles. This feature supports many languages so that anyone across the world can utilize this tool. Moreover, it also offers a translating feature that can help you in converting your subtitles into another language.
However, to use this feature, you must create your user account. Also, you should upgrade your account to fully use this feature without any restrictions. If you don’t have an upgraded account, you can only auto-generate subtitles for the 7 minutes video. To use the auto-subtitle generator of Kapwing, check the below steps:
Step 1 Begin by accessing the website of the Kapwing tool. Click on “Subtitles” from the “Tools” tab and then tap on the “Choose a video” button. Upload the video file on which you want to add subtitles from your PC.

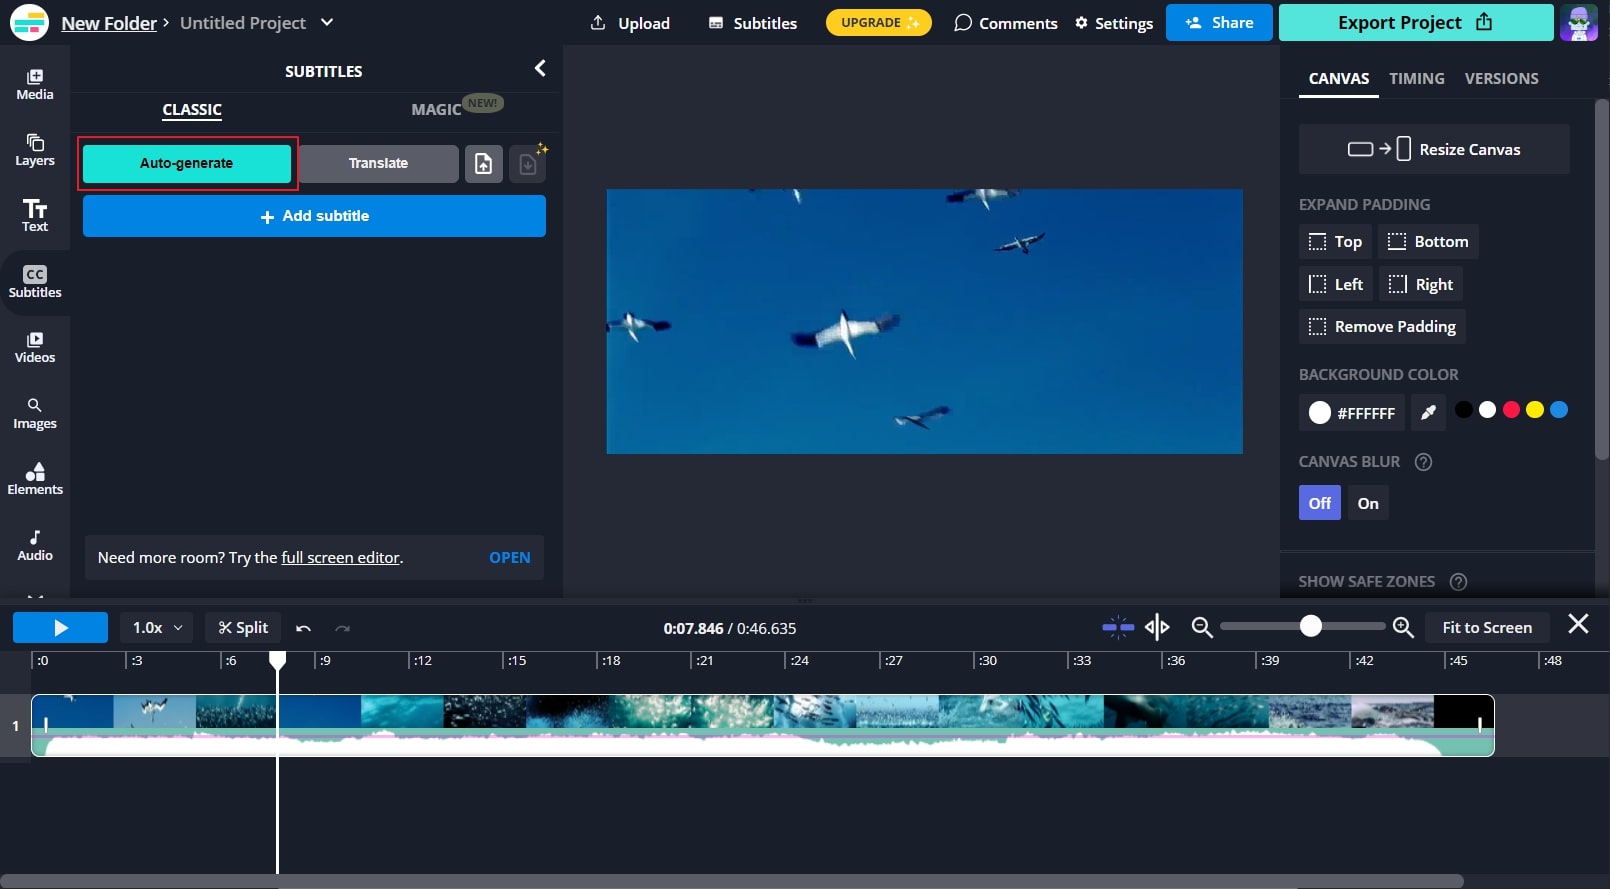
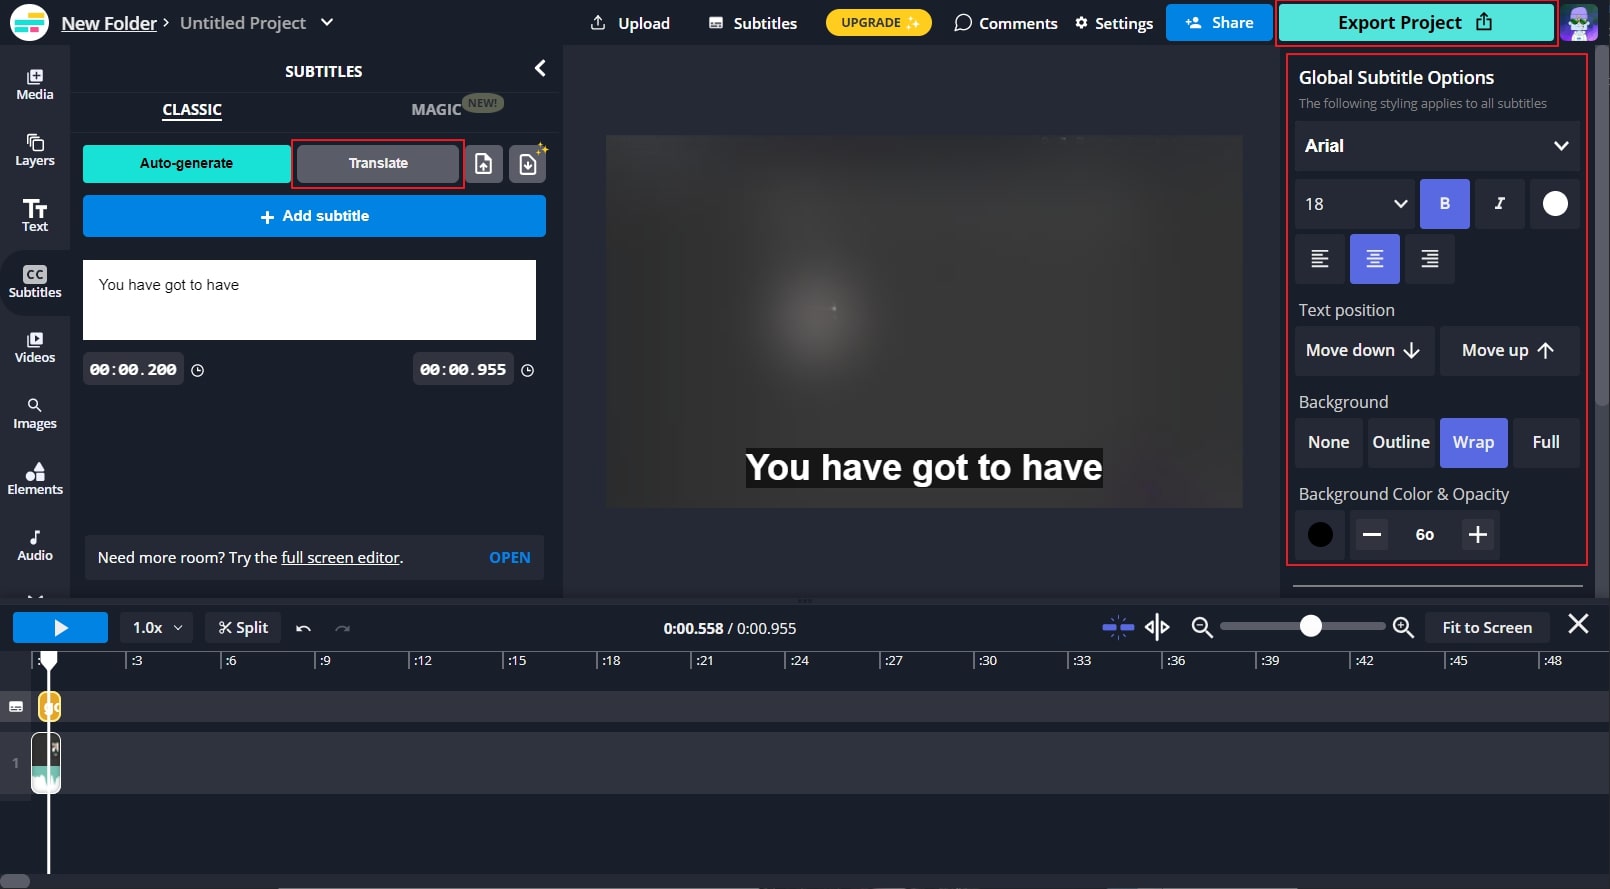
Step 2 Once done with importing the video, click on “Subtitles” from the left section. From the new window, click on “Auto-generate.” The tool will automatically create subtitles for your video by detecting the language.
Step 3 Once you created the subtitles through this feature, go to the “Translate” tab to translate subtitles into your preferred language. You can also edit the subtitles to change their background, opacity, text font, and size. Once done, click on the “Export Project” button.
Part 3: Manually Add Subtitles to the Video on Kapwing
If you don’t want to use the auto-generator and do not have a subtitle file, you can use the manual option. Kapwing allows you to add subtitles manually in its friendly user interface. After adding Kapwing captions, you can choose your preferred font and style for further enhancement.
Step 1 After accessing the website of Kapwing, select the “Subtitles” tool to proceed. Now select the “Choose a video” button to open the Kapwing editor window.
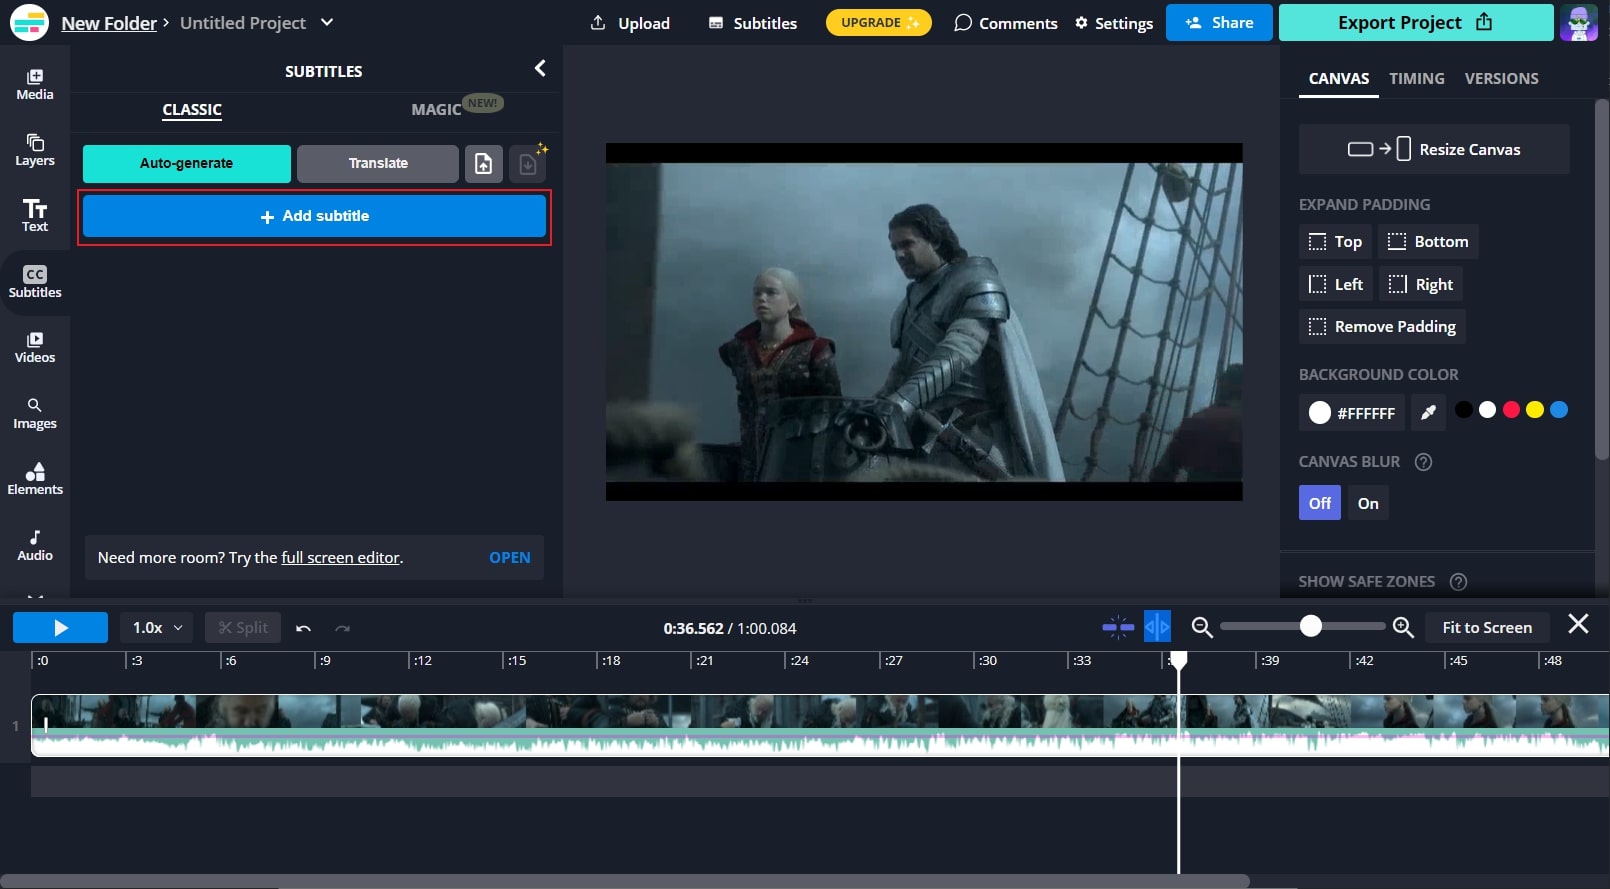
Step 2 Import your video file by tapping on the “Upload” button. Afterward, go to the “Subtitles” section and click on the “Add Subtitle” button. On the typing space, enter your subtitles. You can also choose the duration for your subtitles from the same window. To add subtitles further, you can click on the “Add Subtitles” button again.
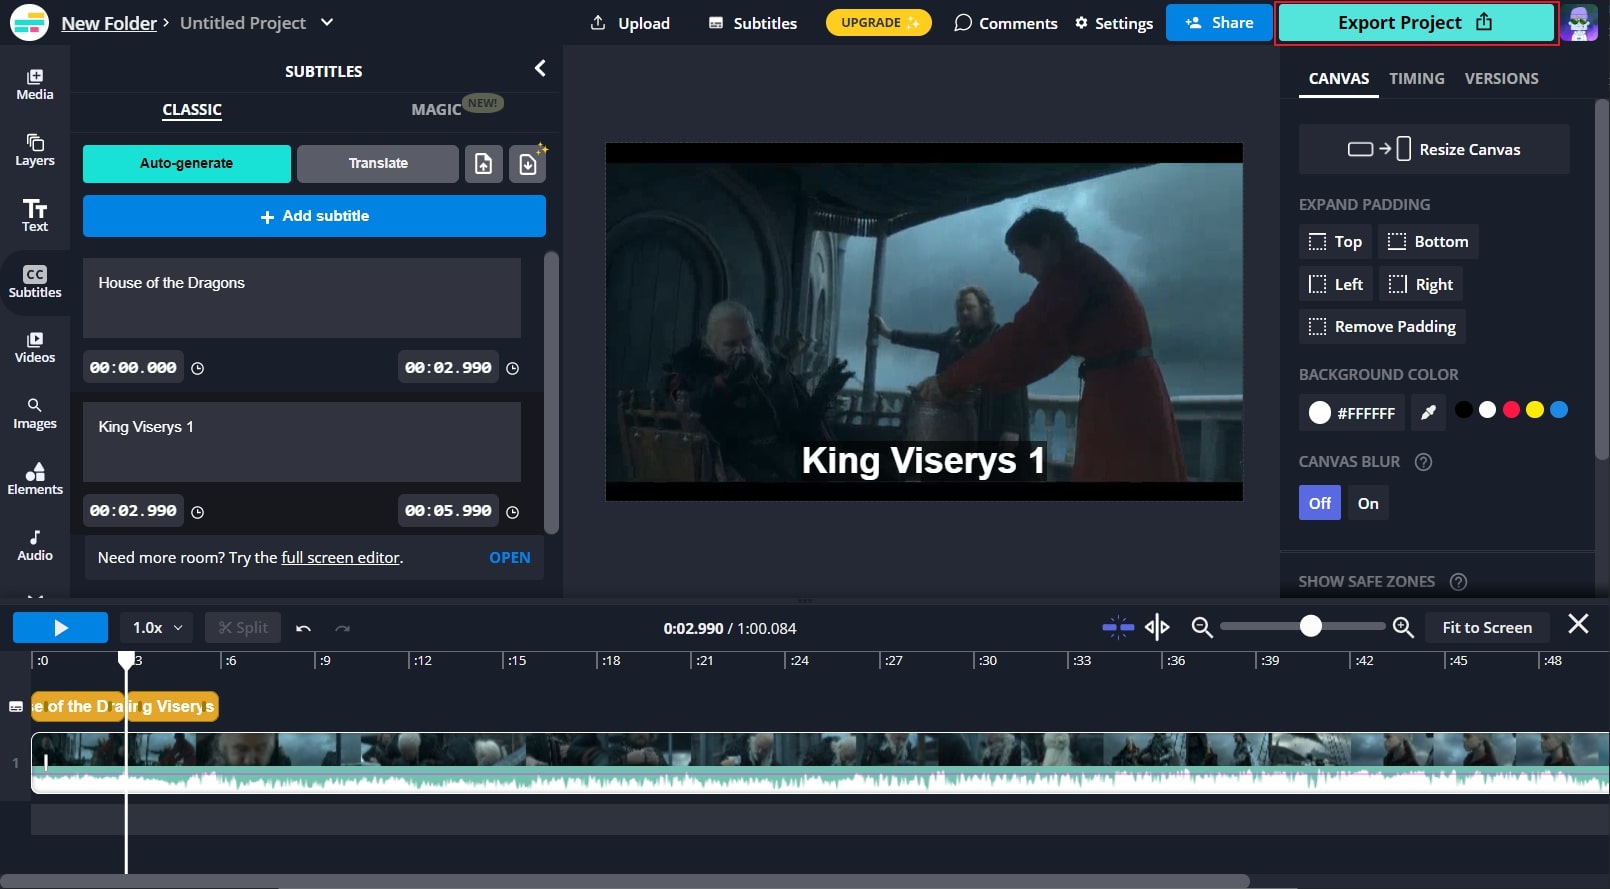
Step 3 After adding the complete subtitles, you can choose their font, style, color, and opacity from the right panel. Once done, hit the “Export Project” button.
Part 4: How to Add Subtitles to Videos with the Best Alternative of Kapwing
If you are not satisfied with the performance of the Kapwing subtitle maker, you can try the Wondershare Filmora tool. As Kapwing is an online tool, it does come with certain restrictions. For example, the time to upload video files on this tool can be time-consuming. Moreover, you would need a strong internet connection throughout. But, with Filmora, you can add subtitles to your video files without facing file size restrictions.
Free Download For Win 7 or later(64-bit)
Free Download For macOS 10.14 or later
Filmora has an easy-to-use interface that offers multiple options to edit and alter video files. This platform is compatible with a mainstream operating system such as Windows. It provides a “Speech to Text” feature that enables you to create subtitles for your video automatically. With a single tap, you can add subtitles to your video without any hassle. To use the Speech to Text feature, check the below steps:
Step 1 Import Video File from the PC
Launch Filmora on your PC and click on the “Create New Project” button to open the Filmora editor on your device. To import your video file from your PC, tap on the “Arrow” icon. After uploading the file, drag it to the timeline.

Step 2 Enable Speech to Text Feature
From the timeline, locate the feature of “Speech to Text.” Now choose the language in which you want to create the subtitles and specify the other settings as well. Afterward, tap on the “OK” button to begin the process.

Step 3 Customize Subtitles and Save the Changes
After the conversion, you can double-click the added subtitles to make modifications. After making the adjustments, hit the “OK” button. Now go to the “Export” button and select the video format in which you want to export the video, or you can also share it on social media platforms.

Conclusion
By adding subtitles to your video, you can enhance your targeted audience and can also engage with them. It also helps in making your video content diverse for people across the globe. There are various online subtitle generators like Kapwing that can help you in adding subtitles, as described in this article. However, there are some drawbacks to using the Kapwing subtitle maker that can disrupt your work. If you want to use a proficient subtitle maker, you can use Wondershare Filmora to get the best results.
Free Download For macOS 10.14 or later
Filmora has an easy-to-use interface that offers multiple options to edit and alter video files. This platform is compatible with a mainstream operating system such as Windows. It provides a “Speech to Text” feature that enables you to create subtitles for your video automatically. With a single tap, you can add subtitles to your video without any hassle. To use the Speech to Text feature, check the below steps:
Step 1 Import Video File from the PC
Launch Filmora on your PC and click on the “Create New Project” button to open the Filmora editor on your device. To import your video file from your PC, tap on the “Arrow” icon. After uploading the file, drag it to the timeline.

Step 2 Enable Speech to Text Feature
From the timeline, locate the feature of “Speech to Text.” Now choose the language in which you want to create the subtitles and specify the other settings as well. Afterward, tap on the “OK” button to begin the process.

Step 3 Customize Subtitles and Save the Changes
After the conversion, you can double-click the added subtitles to make modifications. After making the adjustments, hit the “OK” button. Now go to the “Export” button and select the video format in which you want to export the video, or you can also share it on social media platforms.

Conclusion
By adding subtitles to your video, you can enhance your targeted audience and can also engage with them. It also helps in making your video content diverse for people across the globe. There are various online subtitle generators like Kapwing that can help you in adding subtitles, as described in this article. However, there are some drawbacks to using the Kapwing subtitle maker that can disrupt your work. If you want to use a proficient subtitle maker, you can use Wondershare Filmora to get the best results.
Also read:
- New 10 Top Free GIF Background Remover for PC and Online for 2024
- New 4 Ways to Add White Borders on Mobile and Desktop
- Updated In 2024, Know How to Make a Video Background Transparent? Export Transparent Background Video After Adding Effects. Steps to Remove White Background From Video
- Updated 2024 Approved Easy Way to Add Effects to Art Video
- New In 2024, Know How to Create OBS Slideshow. Creating OBS Slideshow in Simple Steps; Application for Creating OBS Slideshow. Make OBS Slideshow Online
- Do You Want to Know How to Remove Audio From a Video without a Watermark? Keep Reading This Article Since We Have the Answers for You. Complete with the Guide on How to Do It for 2024
- New In 2024, Top 15 Slow Motion CapCut Templates to Work With
- In 2024, How To Edit Youtube Videos In Easy Steps
- Best Free LUTs to Use for 2024
- Updated How to Create a Smooth Cut Transition Effect, In 2024
- Progressive Solutions to Adding VHS Effects to Video with Ease for 2024
- New 2024 Approved How to Make First Impression Review Video
- New Do You Often Feel Fascinated to Try Hands at Anime Character Design to Spark up Your Editing Skills, or Just for a Fun-Filled Activity? Stay Here for the Best Inspirations You Can Ever Get
- New In 2024, Shotcut Review – Is It The Best Free Video Editor?
- Simple Step by Step Tutorial on Creating a Lightroom Collage
- In 2024, How to Uue Adobe Lightroom Color Grading
- Updated In 2024, The Best GIF Editors Weve Tested Heres What We Learned
- Updated In 2024, How to Make Censor Effects with Filmora
- New 2024 Approved How to Make OBS Slideshow
- Updated Best Phantom Slow-Mo Camera For Recording Slow Motion Videos for 2024
- In 2024, Create Slide Masking Effect Intro【Filmora】
- Updated 2024 Approved Can You Enhance Your Drone Footage with Cinematic Drone LUTs? This Article Discusses Top Drone LUTs Recommendations to Simplify Video Editing
- New In 2024, 11 Tips to Make Product Ad Videos
- New In 2024, If You Want to Know How to Live Stream Pre-Recorded Video, You Are in the Right Place. We Will Give You a Complete Guide on 8 Ways You Can Live Stream Pre-Recorded Videos Successfully
- New 2024 Approved Making a Countdown Timer Video Like a Pro Isnt a Problem Anymore. Follow the Steps Mentioned in This Guide and Create an Impressive Countdown Timer for Your Videos
- New Looking for the Ways by Which Subtitles Can Be Extracted From Your MKV Files without Affecting the File Quality? Look No Further as We Are Here to Help You Know the Best Tools that Can Easily Extract SRT From MKV
- New In 2024, Top 10 Free Spanish Text To Speech Converter Websites
- New Stop Worrying if Your Adobe Premiere Playback Slows Down. This Guide Will Show You the Best Solutions to Resolve This Issue and a Perfect Alternative
- 3 Best Effects to Appear on Camera for 2024
- Updated How to Convert Videos to Slow Motion for 2024
- New In 2024, 5 Tools to Create a Time-Lapse Video Online
- Updated 2024 Approved How to Livestream Zoom on Facebook?
- Updated Video Course and Online Learning Are Very Popular Nowadays. Here We Are Going to Recommend some of the Best Video Websites for Teachers to Use for 2024
- New Add Subtitles To Videos With Kapwing Step by Step
- Updated Best 12 Best Freeze Frame Video Editing Examples
- Updated 2024 Approved Top 7 Best GoPro Video Editors for Mac
- New In 2024, How to Make a Gaming Montage - Guide & Tips
- New 2024 Approved IMovie Review – Is It The Best Video Editor for Mac Users
- Updated 2024 Approved An Intro Video Describing You and Your Content Is the First and the Foremost Thing Which a Viewer Sees. Thinking of How to Make an Interesting Intro Video, This Blog Is Surely a Supportive Guide for You. Learn More Here
- New This Article Talks in Detail About How to Convert Time-Lapse to Normal Video Using Certain Methods on iPhone, Online Tools, and so On. It Further Discusses Converting Time-Lapse Video to Normal on the Computer. Check Out
- New The Best Jump Cut Editing Tricks Make Your Videos Snappy! For 2024
- New 2024 Approved Easily Combine Videos and Audios with 5 Simple Online Tools
- Are You Looking for an Ideal Halloween Countdown Video Clip for Your Video? This Article Will Walk You Through the Best Ones You Can Use to Get the Job Done Perfectly for 2024
- Updated Best Ways to Blur Zoom Background for Free for 2024
- Updated How to Zoom in Discord
- Updated Do You Want to Make TikTok Videos More Elemental by Using Countdown but Dont Know How to Do This? Here We Will Thoroughly Guide You About This for 2024
- 2024 Approved Useful Guide to Speed Up/Down Videos in VLC
- New In 2024, How To Change Text Color In Premiere Pro
- Updated How to Select and Use The Best BRAW LUTs for 2024
- In 2024, How Can I Catch the Regional Pokémon without Traveling On Oppo F23 5G | Dr.fone
- Where Is the Best Place to Catch Dratini On Nubia Red Magic 9 Pro+ | Dr.fone
- How to Change Spotify Location After Moving to Another Country On Xiaomi Redmi K70 | Dr.fone
- How To Activate and Use Life360 Ghost Mode On Vivo S17e | Dr.fone
- In 2024, How to Transfer Contacts from Samsung Galaxy A34 5G to iPhone XS/11 | Dr.fone
- 8 Safe and Effective Methods to Unlock Your Apple iPhone 8 Plus Without a Passcode
- Repair broken or corrupt video files of Poco
- How To Restore Missing Pictures Files from Samsung Galaxy A05.
- Unlock iPhone 6s Plus without Passcode
- Ways on How to Liven Up Your Animate Website on Scroll for 2024
- How To Stream Anything From Xiaomi Redmi Note 12 5G to Apple TV | Dr.fone
- Ultimate Guide to Free PPTP VPN For Beginners On Samsung Galaxy A34 5G | Dr.fone
- In 2024, Top 15 Augmented Reality Games Like Pokémon GO To Play On Apple iPhone 12 | Dr.fone
- How Do You Unlock your Apple iPhone 11? Learn All 4 Methods
- 4 Ways to Sync Contacts from Apple iPhone 12 Pro to iPad Easily | Dr.fone
- In 2024, Everything You Need to Know about Lock Screen Settings on your Vivo Y56 5G
- How to Change/Fake Your Xiaomi Redmi Note 12 Pro+ 5G Location on Viber | Dr.fone
- Updated In 2024, Recognizing The Top Deepfake Voice App and Software in the Market
- In 2024, Unova Stone Pokémon Go Evolution List and How Catch Them For Oppo Find N3 | Dr.fone
- In 2024, Is pgsharp legal when you are playing pokemon On Samsung Galaxy A15 4G? | Dr.fone
- How To Update or Downgrade Apple iPhone 6 Without Losing Data? | Dr.fone
- Reasons why Pokémon GPS does not Work On Poco M6 5G? | Dr.fone
- 4 Easy Ways for Your Vivo Y02T Hard Reset | Dr.fone
- Bypass iCloud Activation Lock with IMEI Code On iPhone 6s
- Recover your photos after Samsung Galaxy A05 has been deleted.
- In 2024, How To Remove iCloud From Apple iPhone 15 Pro Max Smoothly
- How to Use Pokémon Emerald Master Ball Cheat On Tecno Camon 20 Premier 5G | Dr.fone
- In 2024, 3 Things You Must Know about Fake Snapchat Location On Honor X9b | Dr.fone
- Detailed guide of ispoofer for pogo installation On Samsung Galaxy S21 FE 5G (2023) | Dr.fone
- How to Fix My Realme 12 Pro 5G Location Is Wrong | Dr.fone
- In 2024, How To Stream Anything From Oppo Reno 10 Pro 5G to Apple TV | Dr.fone
- In 2024, Recommended Best Applications for Mirroring Your Infinix Note 30 VIP Racing Edition Screen | Dr.fone
- In 2024, New Guide How To Check iCloud Activation Lock Status From Your iPhone 15 Plus
- How to Change/Add Location Filters on Snapchat For your Honor Magic5 Ultimate | Dr.fone
- How to get back lost contacts from Galaxy M14 5G.
- Updated How to Generate Videos From Text with AI
- In 2024, A Guide Infinix Hot 40 Pro Wireless and Wired Screen Mirroring | Dr.fone
- Undelete lost messages from Tecno Spark 20 Pro+
- How to retrieve lost files from OnePlus Nord CE 3 5G?
- Will the iPogo Get You Banned and How to Solve It On Apple iPhone 13 mini | Dr.fone
- In 2024, Top 7 Phone Number Locators To Track Nokia C22 Location | Dr.fone
- Best Pokemons for PVP Matches in Pokemon Go For Tecno Spark Go (2024) | Dr.fone
- Updated 2024 Approved YouTube Live Selling Boost Your Sales With These Tips
- In 2024, Dose Life360 Notify Me When Someone Checks My Location On Oppo Find N3? | Dr.fone
- In 2024, Double Location Dongle All to Know About Apple iPhone 12 Pro/iPad GPS Spoofing | Dr.fone
- Title: New Step by Step to Add Border to Video Using Premiere Pro
- Author: Morgan
- Created at : 2024-05-19 05:11:49
- Updated at : 2024-05-20 05:11:49
- Link: https://ai-video-editing.techidaily.com/new-step-by-step-to-add-border-to-video-using-premiere-pro/
- License: This work is licensed under CC BY-NC-SA 4.0.

