:max_bytes(150000):strip_icc():format(webp)/coverjointwitter-6f13b51d1be04d8bb3f5221ef5a057c7.jpg)
New Step by Step to Rotate Videos in Davinci Resolve

Step by Step to Rotate Videos in Davinci Resolve
The first video editing machine in 1924 (Moviola) left an indelible print on the minds of the media industry. It was a maiden attempt to make edits while simultaneously viewing the film. Over time, editing videos followed the trajectory of various transitions letting the imagination run wild. According to a survey, the video editing software market will grow to 932.7 million U.S. dollars by 2025.
As video editing has become a pillar stone in post-production work, you might need to upgrade your knowledge about it. In this article, you will learn how to rotate the video.
Whether your video has an issue in the aspect ratio or you want the desired output in the mirror or flipped version, you need not panic. By exploring different options of Davinci Resolve and Filmora, you can easily change the orientation of your video.
You’ll see a complete picture guide of the above-mentioned softwares.
Changing the orientation of video by Davinci Resolve
Davinci Resolve is a comprehensive video editing software. It performs functions from colour grading to auto-enhancement for the post-production work. Though, professionals usually use this and pitch it as comparatively complex. But even novices need not worry. It comes with features that can change the entire output of the video. One of such functions is the rotation of the videos. You can give a professional and top-notch touch to your post-production work by changing the orientation of the videos. That will bring a new dimension to your project. The flipped version of videos can make the output more prompt and subtle as they stitch different videos scenes together.
Here is the step by step guide for rotating the video
Step 1: Entering the Edit Mode
Set DaVinci Resolve to Edit mode and in the upper-right corner of your workspace, select the Inspector tab.
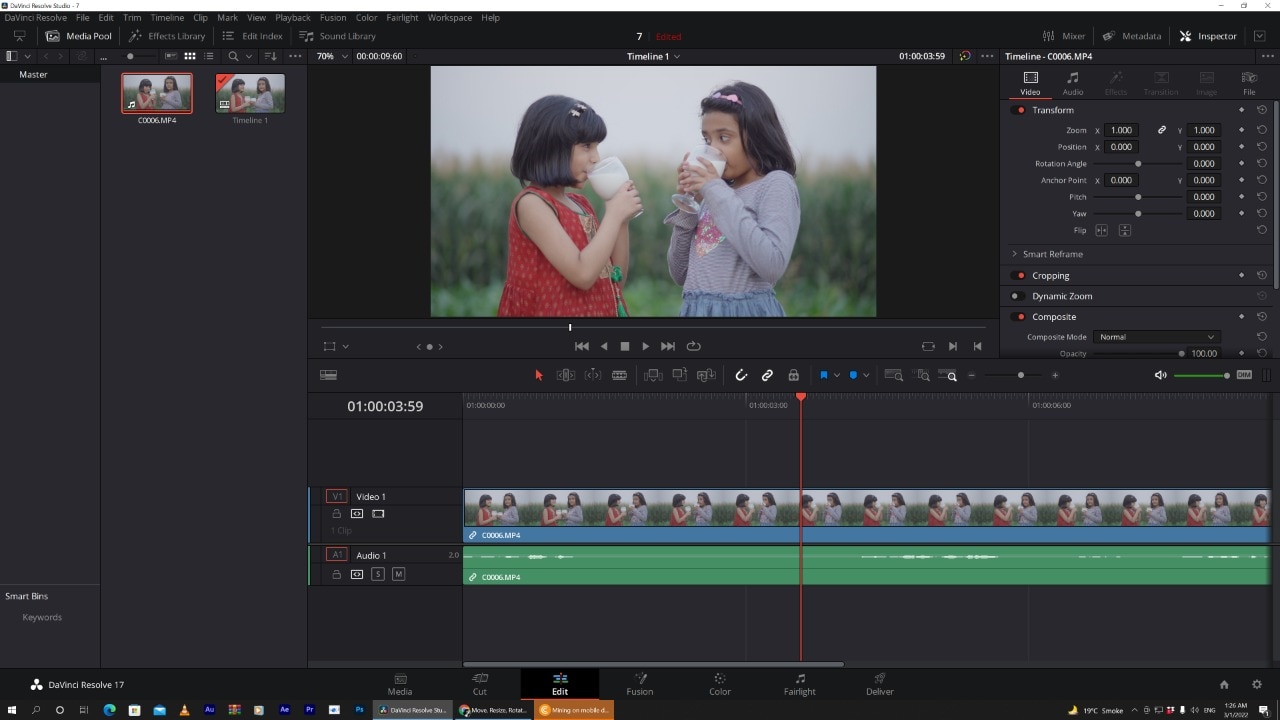
The drop-down menu with different options will appear. Search for the Transform section. There you have to select the **Rotation Angle.**You can also enter the value of rotation.After entering the value, you will notice that your vidoe is rotated.
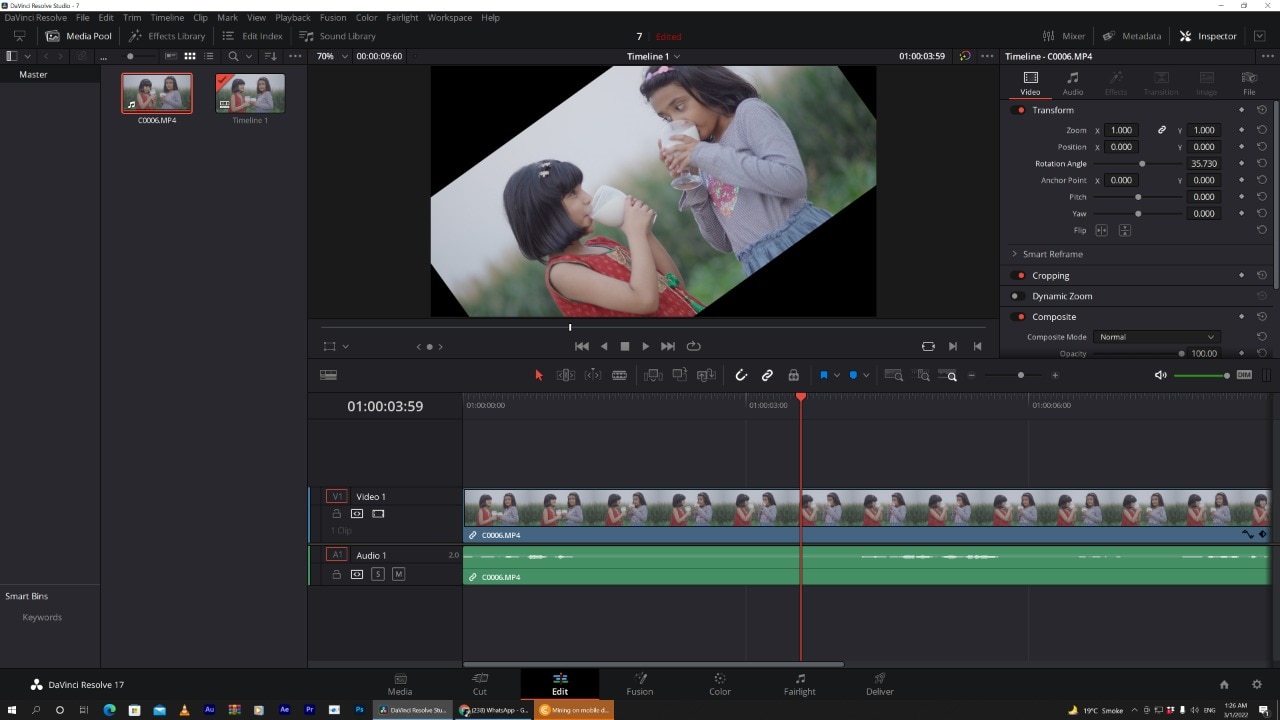
Tip: By pressing Ctrl + R, you can rotate the video 90 degrees clockwise.
Editing a portrait video in DaVinci Resolve
The Transform Panel has the XY Zoom fields. You can use this to scale your video to fit the vertical frame by increasing the size to ~1.750.
Voilà, you now have a vertical video you can edit and export.
Horizontal and Vertical Flip in DaVinci Resolve
You want to create a mirror effect for your video. Flipp it. You would love the results.
You can edit it by going to the same Inspector drop-down menu.
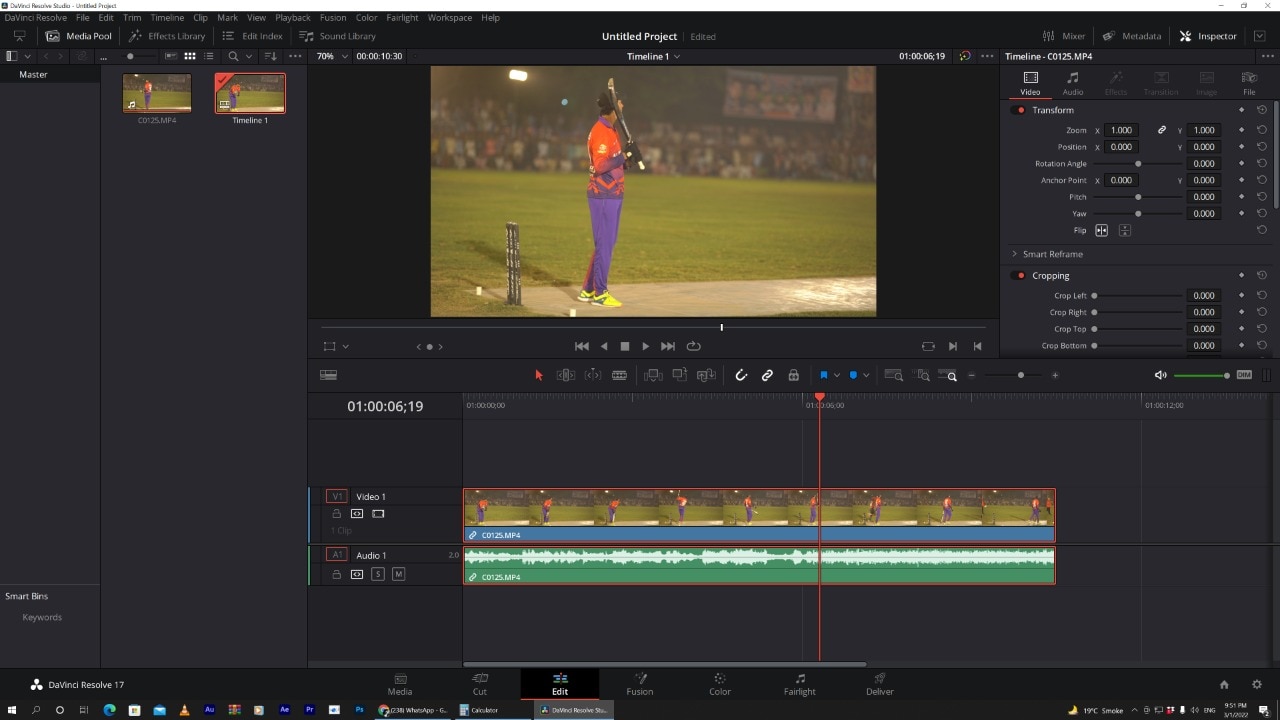
Select the kind of flip you want at the bottom of the Transform section. It can be horizontal or vertical.
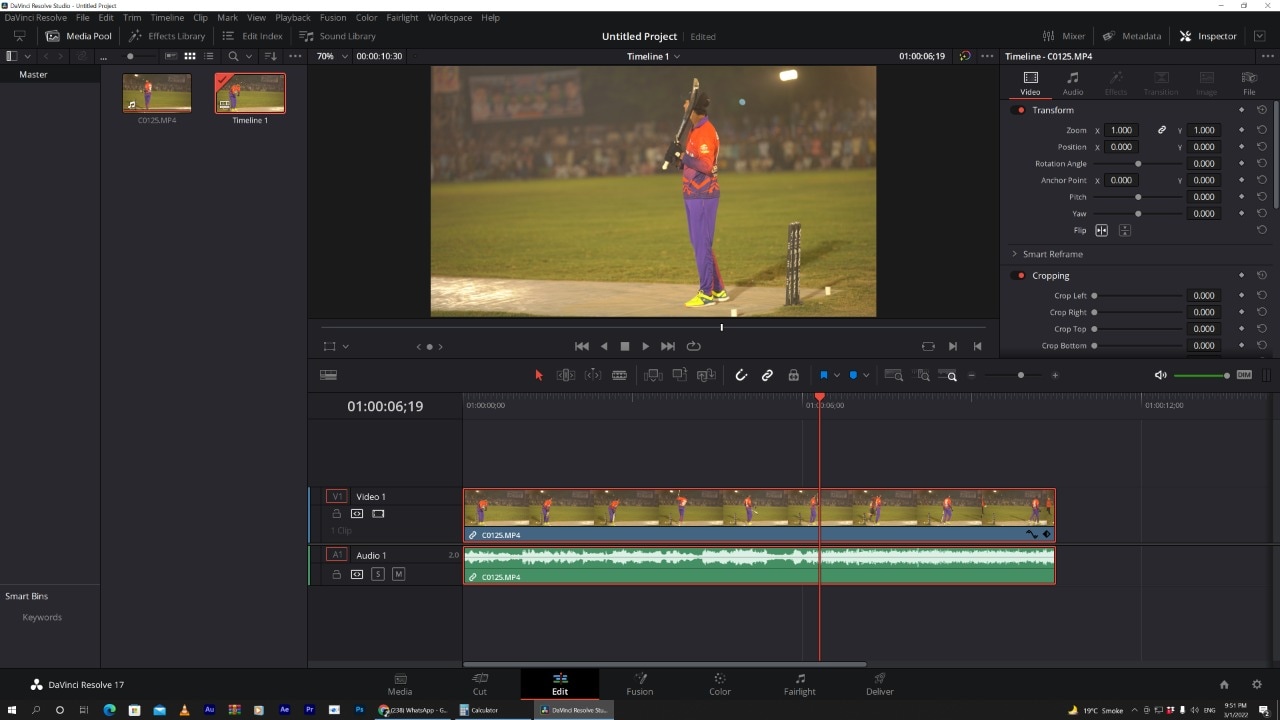
How to change the direction of animation in the DaVinci Resolve?
Keyframes are an essential part of video animations. Davinci Resolve facilitates you to play a little with its keyframes parameters.
The keyframe system is not that complex.
All you need to do is select a region on your Timeline. Choose the parameters that need animation by clicking the small diamond. You can see the small diamond next to each parameter’s value.
Apart from Davinci Resolve, there is also an alternate software which has this versatility.You can also use Filmora Wonder for rotation of your vidoes
Changing the direction of video using Filmora Wondershare
If you have mistakenly taken a video at the wrong angle and don’t want to lose it. Filmora Video Editor is there to keep you out of trouble. It comes with the option of changing the orientation of your videos in your desired way. You can even zoom in or crop the unwanted parts in the videos. Adding more to it, it offers you preset ratios (16:9, 9:16; 4:5, 1:1) to find the perfect aspect ratio for YuoTube, Instagram, etc.
For Win 7 or later (64-bit)
For macOS 10.14 or later
Here is the step-by-step guide to rotating the direction of the video by using it.
Step 1: Drag and Drop
It starts with importing the desired file you wish to edit. Afterwards, you have to drag-drop it to the timeline.
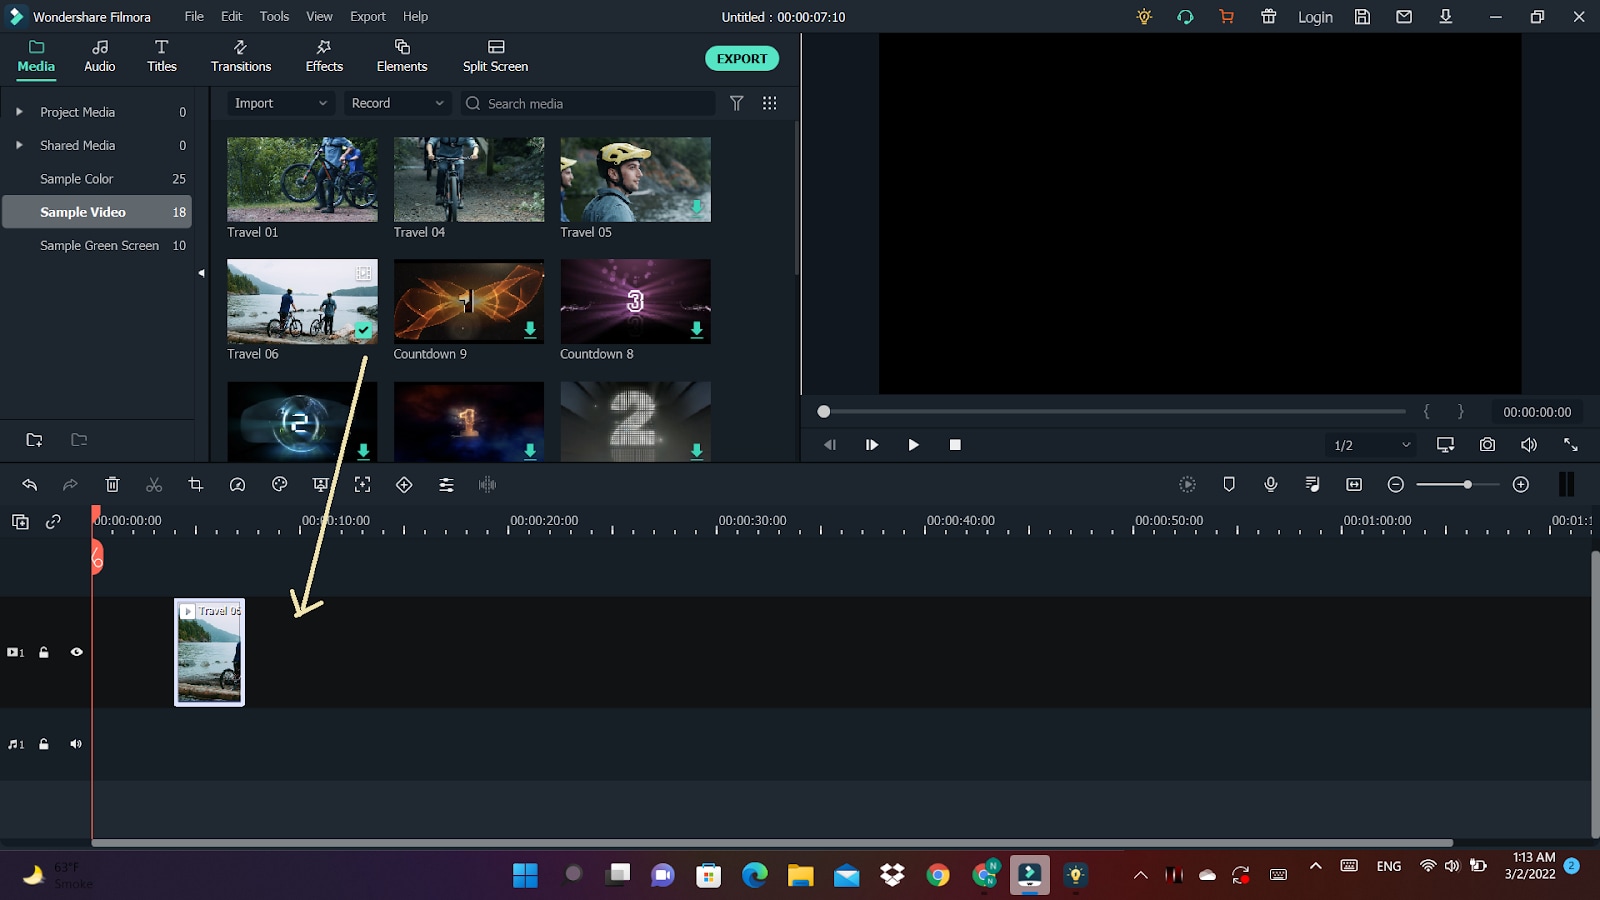
Step 2: Enter the video-editing Panel
To start editing, you need to double-click on the video clip in the timeline. You’ll see various tabs above the timeline header from transformation to auto-enhance.
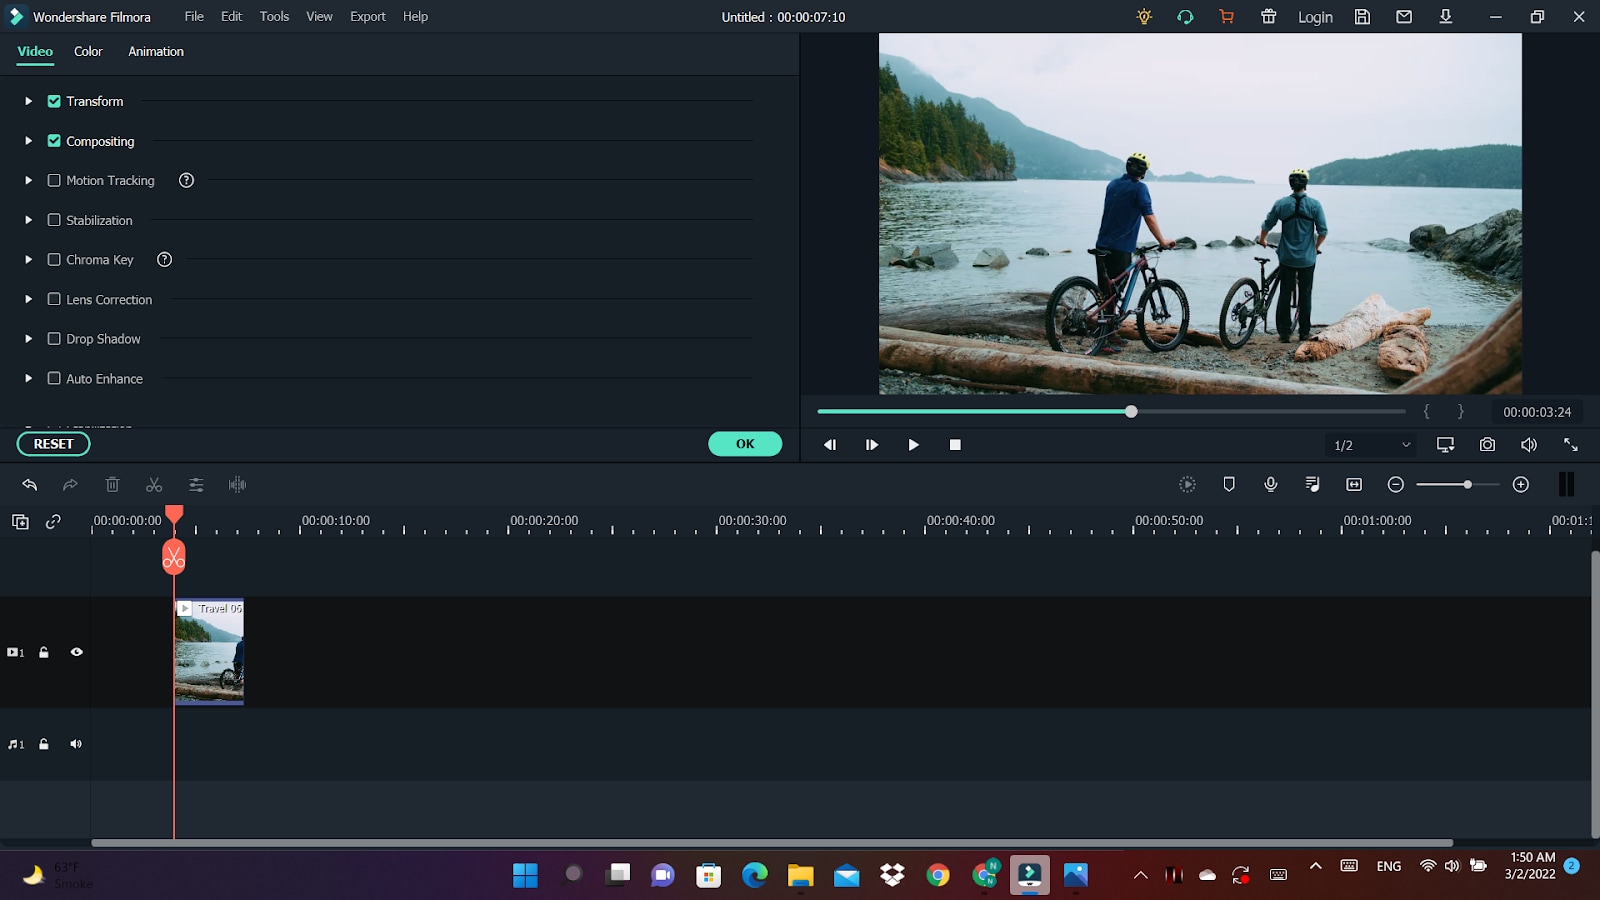
Step 3: Explore your options
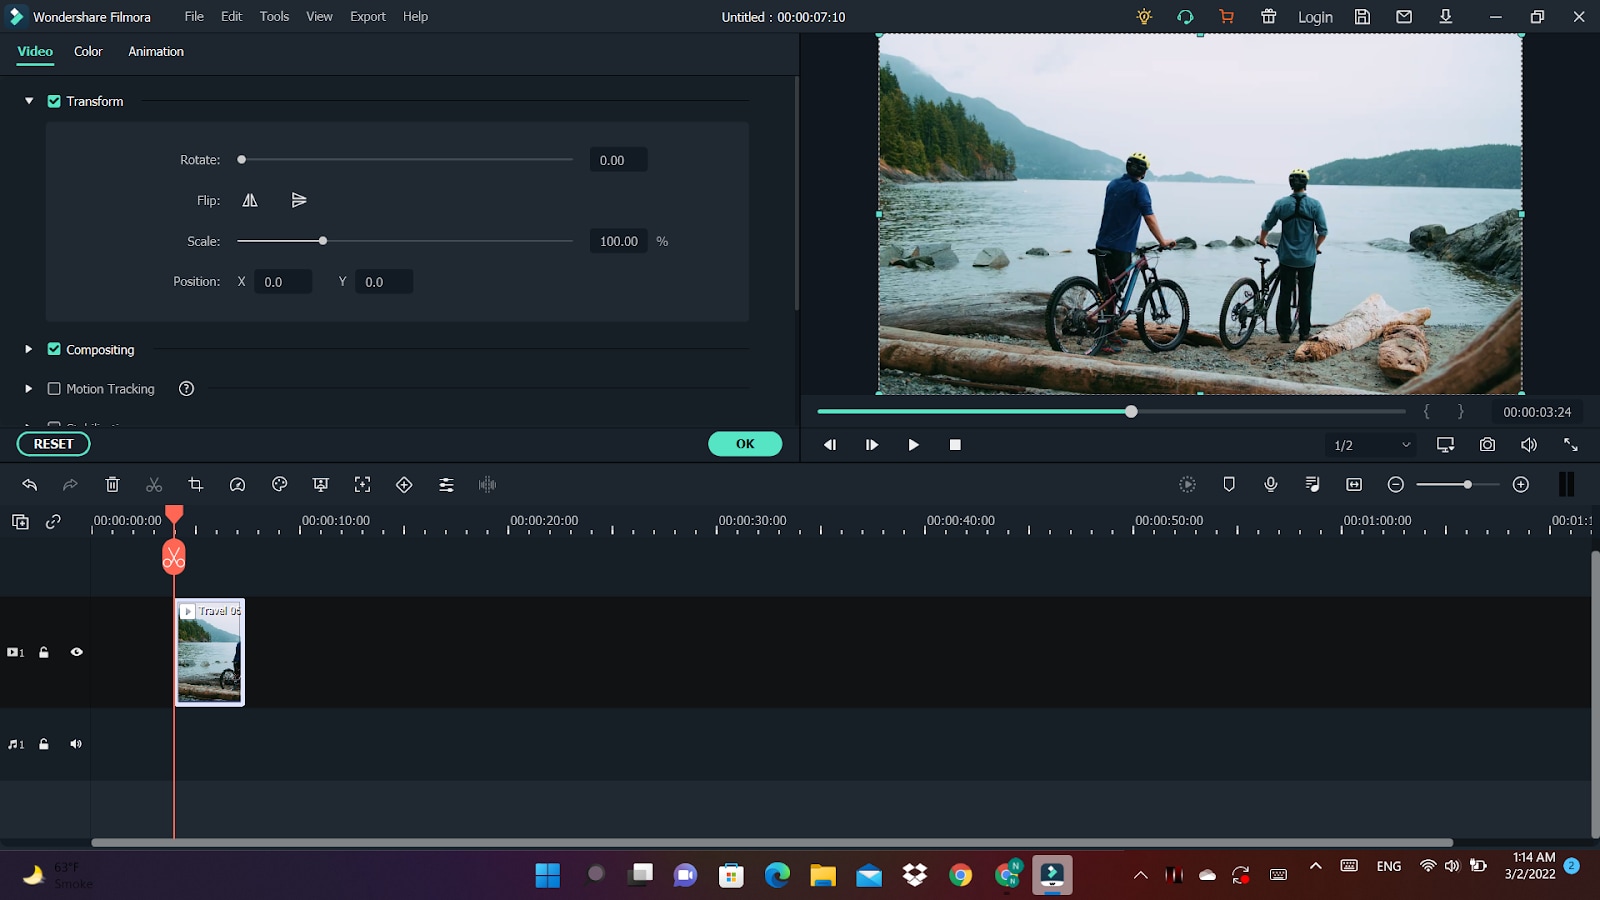
Click on the Transform menu. It will display various options from rotation to scaling. You’ll find the “Rotate” option.
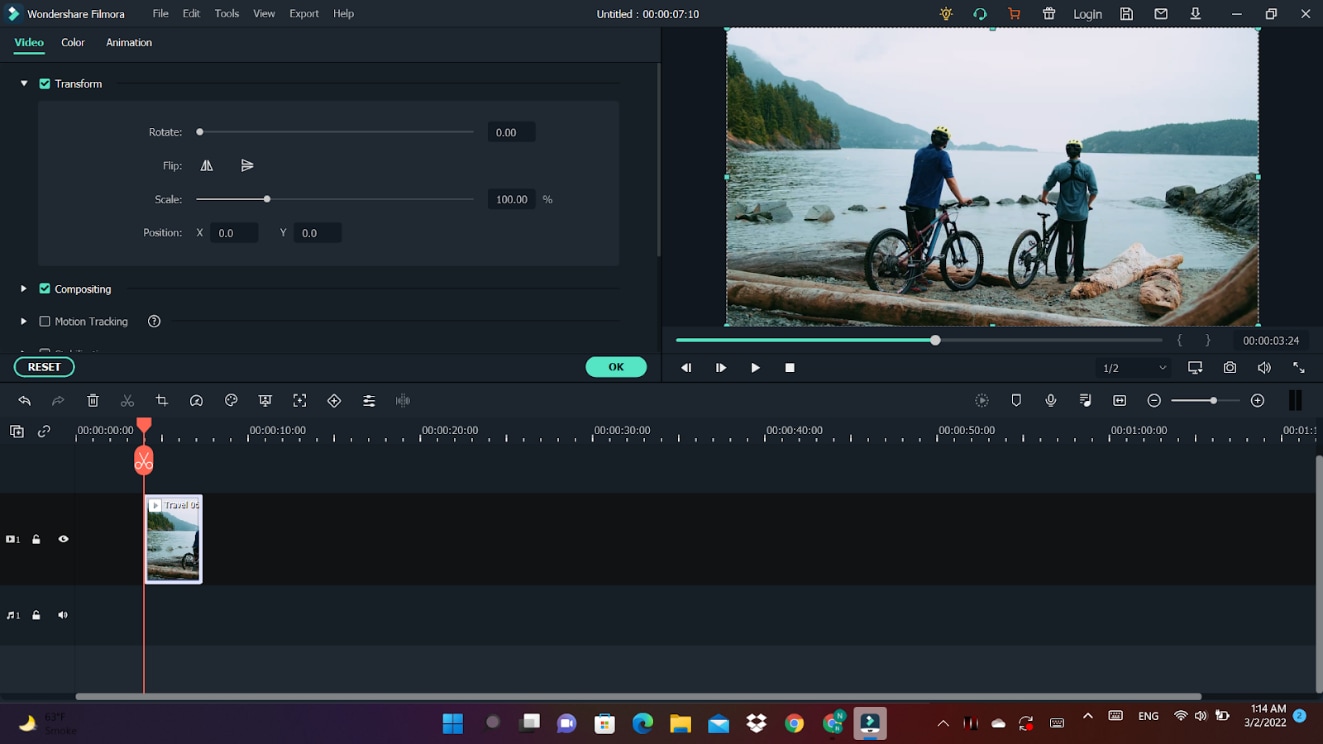
Either you can drag the slider or enter the specific value to adjust to the desired rotation.
For example, if you want to rotate this clip 170 degrees, enter the value in the box.
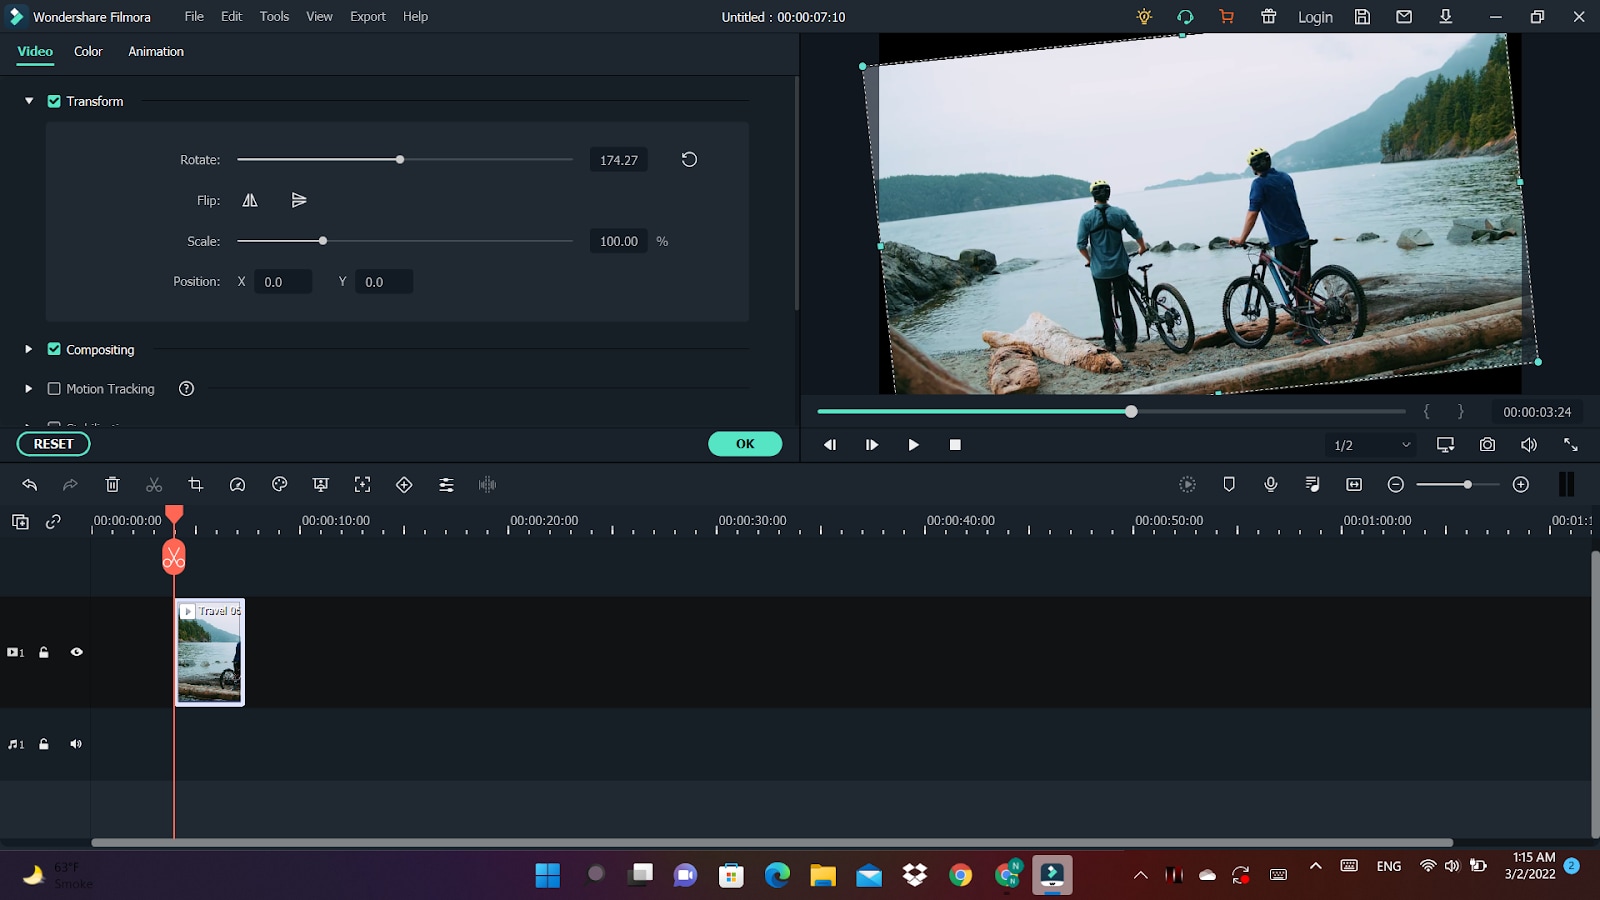
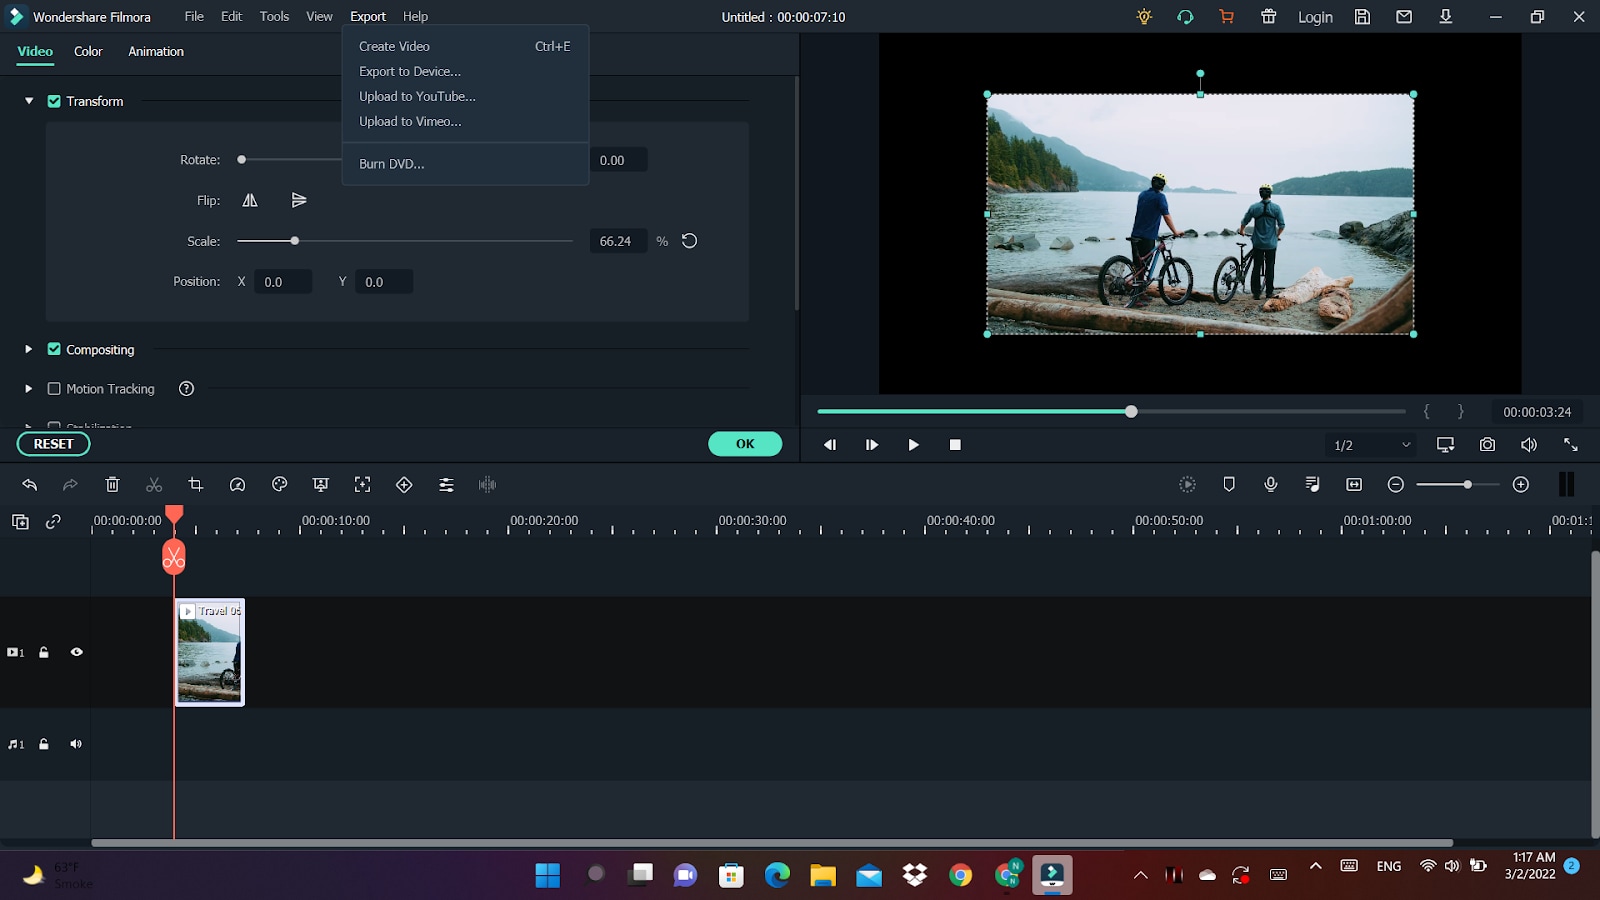
Moreover, you can adjust the scale. You have to drag the Scale slider to have a full-screen image. You can also edit the shape, size and position in the Viewer Panel.
Step 4:Ready to Export
Now, you have achieved the desired rotation for your video. You can export it and select the option that you want.
You can flip the direction of your video in a jiff by following these simple steps.
Conclusion
Stitching different scenes by video rotation has brought video editing to a new dimension altogether. Creating transitions in the videos has become easy more than ever. By adding effects in video editing, you can achieve your editing goals. Hence, you can have that “wow part of editing” without breaking a sweat. When the scenes with different directions are combined, they help in creating the subtle mood prompts for creating the desired flow. You can even adjust the angle of your video if you captured it at the wrong angle.
There are a variety of softwares in the digital world for this purpose. Davinci Resolve and Filmora Wondershare come with dynamic options for your post-production work. Owing to their versatility, these also have the feature of rotating your videos. Their user-friendly interface has made the entire experience of post-production work enjoyable.
The drop-down menu with different options will appear. Search for the Transform section. There you have to select the **Rotation Angle.**You can also enter the value of rotation.After entering the value, you will notice that your vidoe is rotated.

Tip: By pressing Ctrl + R, you can rotate the video 90 degrees clockwise.
Editing a portrait video in DaVinci Resolve
The Transform Panel has the XY Zoom fields. You can use this to scale your video to fit the vertical frame by increasing the size to ~1.750.
Voilà, you now have a vertical video you can edit and export.
Horizontal and Vertical Flip in DaVinci Resolve
You want to create a mirror effect for your video. Flipp it. You would love the results.
You can edit it by going to the same Inspector drop-down menu.

Select the kind of flip you want at the bottom of the Transform section. It can be horizontal or vertical.

How to change the direction of animation in the DaVinci Resolve?
Keyframes are an essential part of video animations. Davinci Resolve facilitates you to play a little with its keyframes parameters.
The keyframe system is not that complex.
All you need to do is select a region on your Timeline. Choose the parameters that need animation by clicking the small diamond. You can see the small diamond next to each parameter’s value.
Apart from Davinci Resolve, there is also an alternate software which has this versatility.You can also use Filmora Wonder for rotation of your vidoes
Changing the direction of video using Filmora Wondershare
If you have mistakenly taken a video at the wrong angle and don’t want to lose it. Filmora Video Editor is there to keep you out of trouble. It comes with the option of changing the orientation of your videos in your desired way. You can even zoom in or crop the unwanted parts in the videos. Adding more to it, it offers you preset ratios (16:9, 9:16; 4:5, 1:1) to find the perfect aspect ratio for YuoTube, Instagram, etc.
For Win 7 or later (64-bit)
For macOS 10.14 or later
Here is the step-by-step guide to rotating the direction of the video by using it.
Step 1: Drag and Drop
It starts with importing the desired file you wish to edit. Afterwards, you have to drag-drop it to the timeline.

Step 2: Enter the video-editing Panel
To start editing, you need to double-click on the video clip in the timeline. You’ll see various tabs above the timeline header from transformation to auto-enhance.

Step 3: Explore your options
Click on the Transform menu. It will display various options from rotation to scaling. You’ll find the “Rotate” option.

Either you can drag the slider or enter the specific value to adjust to the desired rotation.
For example, if you want to rotate this clip 170 degrees, enter the value in the box.

Moreover, you can adjust the scale. You have to drag the Scale slider to have a full-screen image. You can also edit the shape, size and position in the Viewer Panel.

Step 4:Ready to Export
Now, you have achieved the desired rotation for your video. You can export it and select the option that you want.

You can flip the direction of your video in a jiff by following these simple steps.
Conclusion
Stitching different scenes by video rotation has brought video editing to a new dimension altogether. Creating transitions in the videos has become easy more than ever. By adding effects in video editing, you can achieve your editing goals. Hence, you can have that “wow part of editing” without breaking a sweat. When the scenes with different directions are combined, they help in creating the subtle mood prompts for creating the desired flow. You can even adjust the angle of your video if you captured it at the wrong angle.
There are a variety of softwares in the digital world for this purpose. Davinci Resolve and Filmora Wondershare come with dynamic options for your post-production work. Owing to their versatility, these also have the feature of rotating your videos. Their user-friendly interface has made the entire experience of post-production work enjoyable.
The drop-down menu with different options will appear. Search for the Transform section. There you have to select the **Rotation Angle.**You can also enter the value of rotation.After entering the value, you will notice that your vidoe is rotated.

Tip: By pressing Ctrl + R, you can rotate the video 90 degrees clockwise.
Editing a portrait video in DaVinci Resolve
The Transform Panel has the XY Zoom fields. You can use this to scale your video to fit the vertical frame by increasing the size to ~1.750.
Voilà, you now have a vertical video you can edit and export.
Horizontal and Vertical Flip in DaVinci Resolve
You want to create a mirror effect for your video. Flipp it. You would love the results.
You can edit it by going to the same Inspector drop-down menu.

Select the kind of flip you want at the bottom of the Transform section. It can be horizontal or vertical.

How to change the direction of animation in the DaVinci Resolve?
Keyframes are an essential part of video animations. Davinci Resolve facilitates you to play a little with its keyframes parameters.
The keyframe system is not that complex.
All you need to do is select a region on your Timeline. Choose the parameters that need animation by clicking the small diamond. You can see the small diamond next to each parameter’s value.
Apart from Davinci Resolve, there is also an alternate software which has this versatility.You can also use Filmora Wonder for rotation of your vidoes
Changing the direction of video using Filmora Wondershare
If you have mistakenly taken a video at the wrong angle and don’t want to lose it. Filmora Video Editor is there to keep you out of trouble. It comes with the option of changing the orientation of your videos in your desired way. You can even zoom in or crop the unwanted parts in the videos. Adding more to it, it offers you preset ratios (16:9, 9:16; 4:5, 1:1) to find the perfect aspect ratio for YuoTube, Instagram, etc.
For Win 7 or later (64-bit)
For macOS 10.14 or later
Here is the step-by-step guide to rotating the direction of the video by using it.
Step 1: Drag and Drop
It starts with importing the desired file you wish to edit. Afterwards, you have to drag-drop it to the timeline.

Step 2: Enter the video-editing Panel
To start editing, you need to double-click on the video clip in the timeline. You’ll see various tabs above the timeline header from transformation to auto-enhance.

Step 3: Explore your options
Click on the Transform menu. It will display various options from rotation to scaling. You’ll find the “Rotate” option.

Either you can drag the slider or enter the specific value to adjust to the desired rotation.
For example, if you want to rotate this clip 170 degrees, enter the value in the box.

Moreover, you can adjust the scale. You have to drag the Scale slider to have a full-screen image. You can also edit the shape, size and position in the Viewer Panel.

Step 4:Ready to Export
Now, you have achieved the desired rotation for your video. You can export it and select the option that you want.

You can flip the direction of your video in a jiff by following these simple steps.
Conclusion
Stitching different scenes by video rotation has brought video editing to a new dimension altogether. Creating transitions in the videos has become easy more than ever. By adding effects in video editing, you can achieve your editing goals. Hence, you can have that “wow part of editing” without breaking a sweat. When the scenes with different directions are combined, they help in creating the subtle mood prompts for creating the desired flow. You can even adjust the angle of your video if you captured it at the wrong angle.
There are a variety of softwares in the digital world for this purpose. Davinci Resolve and Filmora Wondershare come with dynamic options for your post-production work. Owing to their versatility, these also have the feature of rotating your videos. Their user-friendly interface has made the entire experience of post-production work enjoyable.
The drop-down menu with different options will appear. Search for the Transform section. There you have to select the **Rotation Angle.**You can also enter the value of rotation.After entering the value, you will notice that your vidoe is rotated.

Tip: By pressing Ctrl + R, you can rotate the video 90 degrees clockwise.
Editing a portrait video in DaVinci Resolve
The Transform Panel has the XY Zoom fields. You can use this to scale your video to fit the vertical frame by increasing the size to ~1.750.
Voilà, you now have a vertical video you can edit and export.
Horizontal and Vertical Flip in DaVinci Resolve
You want to create a mirror effect for your video. Flipp it. You would love the results.
You can edit it by going to the same Inspector drop-down menu.

Select the kind of flip you want at the bottom of the Transform section. It can be horizontal or vertical.

How to change the direction of animation in the DaVinci Resolve?
Keyframes are an essential part of video animations. Davinci Resolve facilitates you to play a little with its keyframes parameters.
The keyframe system is not that complex.
All you need to do is select a region on your Timeline. Choose the parameters that need animation by clicking the small diamond. You can see the small diamond next to each parameter’s value.
Apart from Davinci Resolve, there is also an alternate software which has this versatility.You can also use Filmora Wonder for rotation of your vidoes
Changing the direction of video using Filmora Wondershare
If you have mistakenly taken a video at the wrong angle and don’t want to lose it. Filmora Video Editor is there to keep you out of trouble. It comes with the option of changing the orientation of your videos in your desired way. You can even zoom in or crop the unwanted parts in the videos. Adding more to it, it offers you preset ratios (16:9, 9:16; 4:5, 1:1) to find the perfect aspect ratio for YuoTube, Instagram, etc.
For Win 7 or later (64-bit)
For macOS 10.14 or later
Here is the step-by-step guide to rotating the direction of the video by using it.
Step 1: Drag and Drop
It starts with importing the desired file you wish to edit. Afterwards, you have to drag-drop it to the timeline.

Step 2: Enter the video-editing Panel
To start editing, you need to double-click on the video clip in the timeline. You’ll see various tabs above the timeline header from transformation to auto-enhance.

Step 3: Explore your options
Click on the Transform menu. It will display various options from rotation to scaling. You’ll find the “Rotate” option.

Either you can drag the slider or enter the specific value to adjust to the desired rotation.
For example, if you want to rotate this clip 170 degrees, enter the value in the box.

Moreover, you can adjust the scale. You have to drag the Scale slider to have a full-screen image. You can also edit the shape, size and position in the Viewer Panel.

Step 4:Ready to Export
Now, you have achieved the desired rotation for your video. You can export it and select the option that you want.

You can flip the direction of your video in a jiff by following these simple steps.
Conclusion
Stitching different scenes by video rotation has brought video editing to a new dimension altogether. Creating transitions in the videos has become easy more than ever. By adding effects in video editing, you can achieve your editing goals. Hence, you can have that “wow part of editing” without breaking a sweat. When the scenes with different directions are combined, they help in creating the subtle mood prompts for creating the desired flow. You can even adjust the angle of your video if you captured it at the wrong angle.
There are a variety of softwares in the digital world for this purpose. Davinci Resolve and Filmora Wondershare come with dynamic options for your post-production work. Owing to their versatility, these also have the feature of rotating your videos. Their user-friendly interface has made the entire experience of post-production work enjoyable.
Knowing All Ways To Slow Down Video With Adobe Premiere Pro
Play with time and craft an epic action sequence in videos. Speed ramping is a technique that video editors use for this purpose. You might be thinking that it’s a simple slow-motion effect, but it’s slightly different. In reality, speed ramping is the process of ensuring a smoother transition in speed of scenes. Countless movies and sports videos use slow and fast motion for several reasons.
Premiere Pro Slow Motion allows creative expression in videos. To do so, editors rely on Adobe Premiere Pro software for well-crafted videos. Careful editing is required to maintain continuity and cohesiveness in clips through motion Adobe. This article will guide you on how to use slow motion on Adobe Premiere. Explore this feature and all the necessary details for a polished video outlook.
Slow Motion Video Maker Slow your video’s speed with better control of your keyframes to create unique cinematic effects!
Make A Slow Motion Video Make A Slow Motion Video More Features

Part 1: Explaining the Slow-Motion Feature of Adobe Premiere Pro
Adobe Premiere Pro is a video editing software part of Adobe Creative Suite. Professional editors and beginners both use this tool to make their content creative. Whether you are reworking a previous art piece or a new project, it can alter colors for good. You can insert background music, animations, and other forms of multimedia using Adobe.
Among its limitless features is a speed-ramping or slow-motion function. To unlock Adobe Premiere slow-motion in detail, you can head into the below details:
- Using this option, you can adjust the speed of the video as required. For instance, if you set it to 50%, your video will play at half speed compared to the original clips.
- Apart from the speed, users can adjust the duration of slow motion. This adjustment delivers a stylized and customized look to your clips.
- Make the slow-motion transition smoother with the optical flow feature. It can intelligently generate new frames to make your clips look like shots at a higher frame rate.
- Not all clips are worth slowing down, so there are many frame rates to do this. You can set the frame rate from 30fps, 120fps, 240fps, and 960fps.
Part 2: Understanding the Operations of Performing Slow Motion on Adobe Premiere Pro
If you want to perform speed ramping in videos, first access Adobe Premiere Pro. Many users find video editing difficult in Adobe. For their ease, this section will explain the slow-mo Adobe Premiere in simple steps:
Step 1
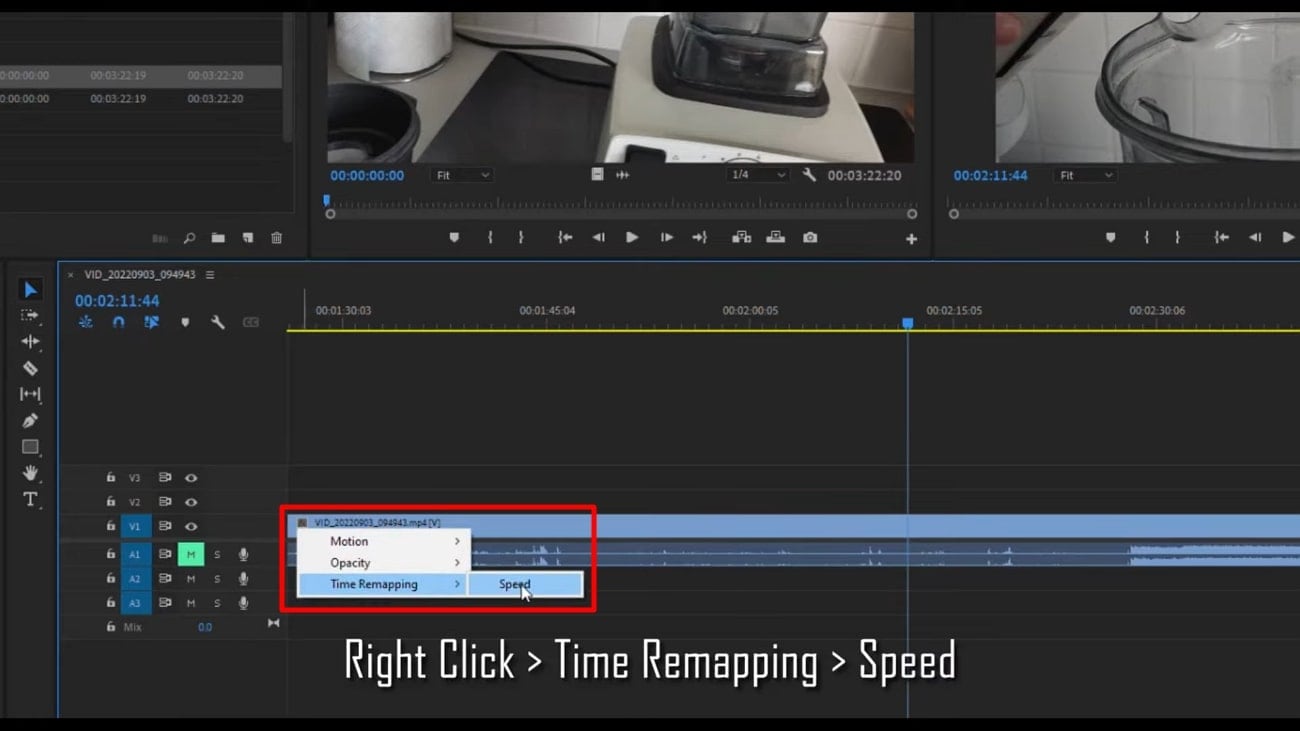
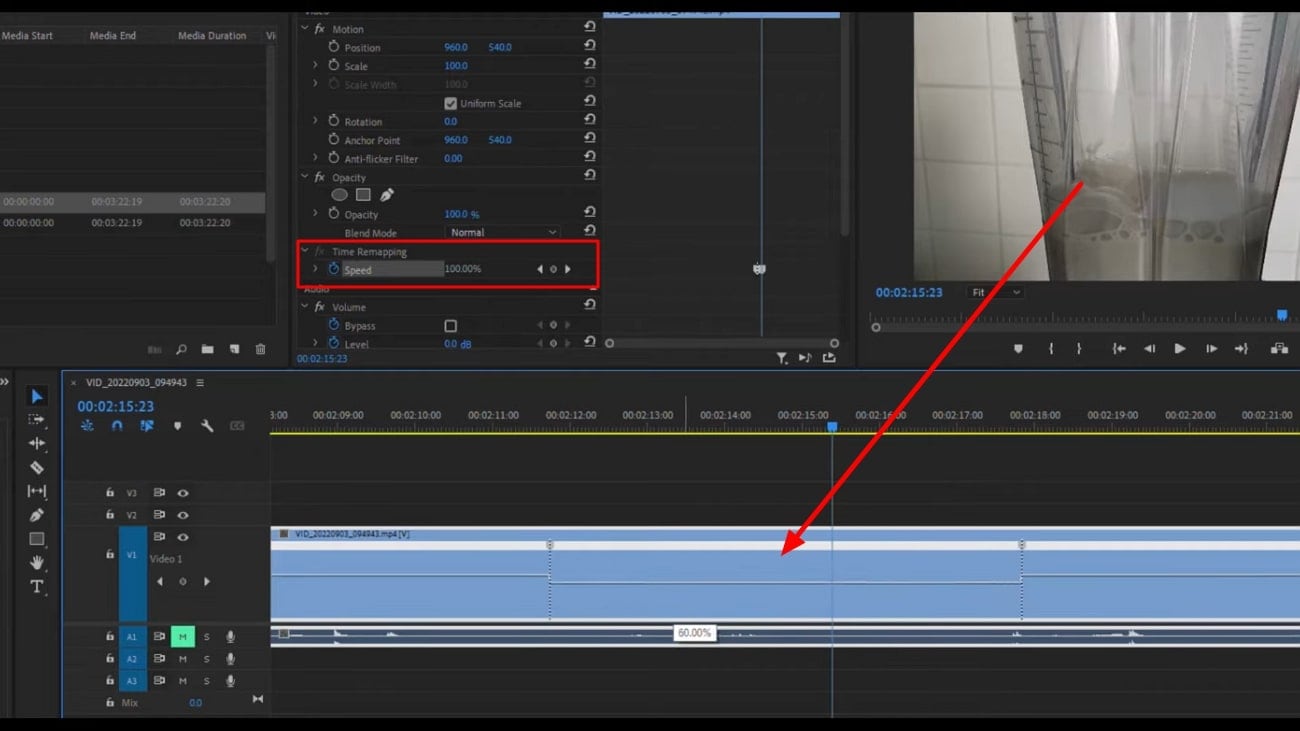
After getting into the Adobe Premiere Pro, enter to its editing screen. Import your video clip and move towards its timeline section. There, right-click on the FX icon and choose “Time Remapping” to go to “Speed.” Now, you can see the white speed ramping line.
Step 2
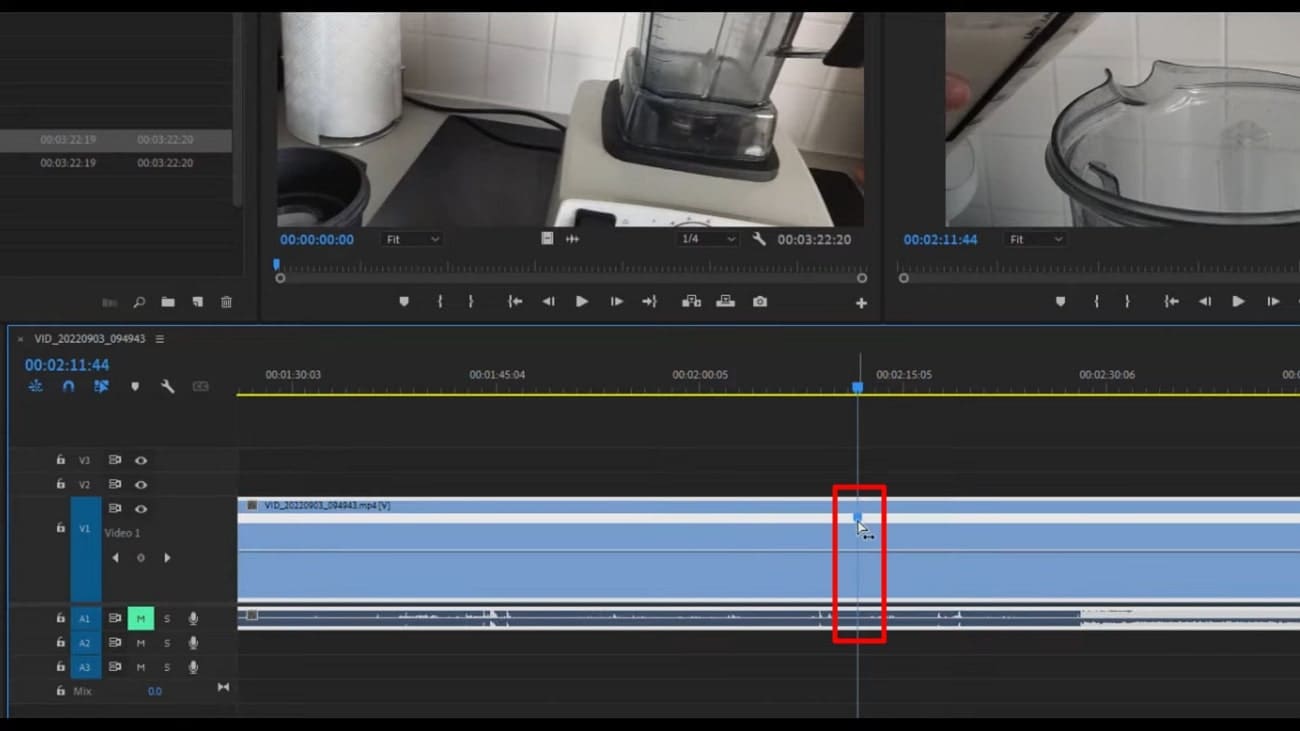
Add the keyframe by clicking the left-side circle icon next to the speed ramping line. Zoom in the section and add another keyframe.
Step 3
Click on the middle of the keyframe and pull it down slowly. To add a slow ramp instead of an abrupt change in speed, hit on the start and drag towards the right. Repeat the same to the other end of the keyframe. You can see a slow shift in speed. Later, you can adjust the speed and the ramp.
Part 3: What Are Some Potential Disadvantages of Using Adobe Premiere Pro for Performing Such Operations?
Many people might initially find the above steps intense and difficult to understand. Slow motion in Premiere Pro is useful in speed ramping, but you can face some issues using it. As everything has some bad side, this operation also does. You should read forward and know such disadvantages to avoid any inconvenience:
- Playback Lagging: Adobe causes lagging and major issues in playback. If you don’t use optical flow and render frames freeze, you cannot make any speed ramps.
- System Compatibility Issues: Speed ramping requires a system with a good GPU. Otherwise, problems might occur when it doesn’t interact well with the computer’s GPU.
- Complex Processing: This feature will interrupt your workflow if you are not a professional editor. As you will have to watch several tutorial videos to use just one feature.
- Frame Rate Adjustment Problems: Premiere Pro can show bugs if you use a high frame rate. It will start troubling when you use 120fps slow motion in clips.
Generally, it also requires strong computer specs and uses RAM of at least 8GB. The majority of editors look for an alternative due to its high learning curve and system requirements.
Part 5: Wondershare Filmora: Comprehending the Best Ways to Slow Down Videos
In search of a substitute, there could be many options on the internet. If someone is looking for easy-to-use software, they should use Wondershare Filmora . This video editor is the real game changer in adjusting speed ramping without laggings. Surprisingly, it does not require system requirements, and you can quickly launch it.
Filmora uses AI for a smooth optical flow compared with Adobe Premiere slow motion. It also ensures high quality and optimization of videos. With new AI features, you don’t need any help from experts, as AI can do it for you.
Free Download For Win 7 or later(64-bit)
Free Download For macOS 10.14 or later
Step-by-Step Guide to Slow Down Video Using Filmora
If you want more creative slow-motion videos, then keep reading. Here, you will find the easiest way to slow down videos in Filmora:
Step 1Install Filmora and Import Your Project in the Timeline
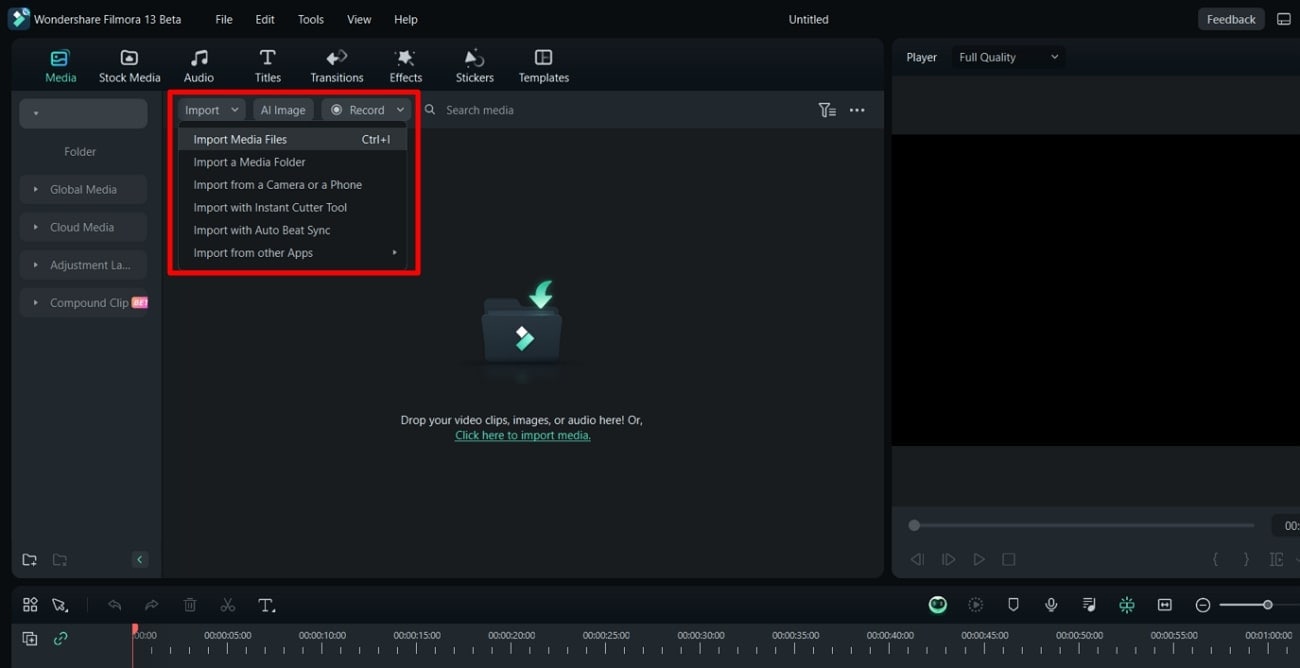
Launch the Filmora 13 in your system within simple steps. Access its main interface and hit the “New Project” button. Enter the editing window and import your project. Press the “Ctrl + I” keys from your keyboard to import the video. Browse the video and click “Open” to bring the video to Filmora. Then, drag and drop the video in the timeline section.
Step 2Explore Speed Ramping to Make Videos Super Slow
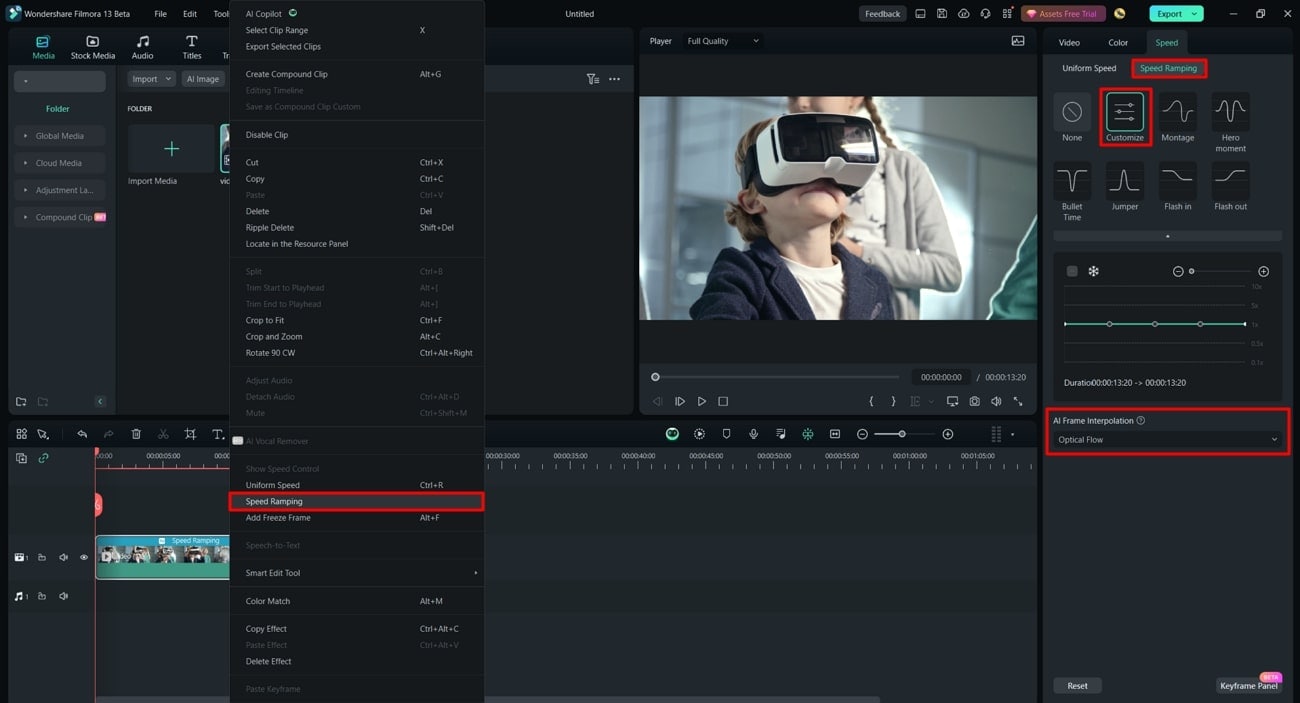
Place your cursor on the video and right-click on it. From the list, choose “Speed Ramping” and navigate toward the right-side panel. There, tap on “Customize” to open the further settings. Look for the “AI Frame Interpolation” and expand it to choose the “Optical Flow” option. You can adjust the speed manually from the graphical section on the right.
Step 3Get Render Review and Look for Export Button
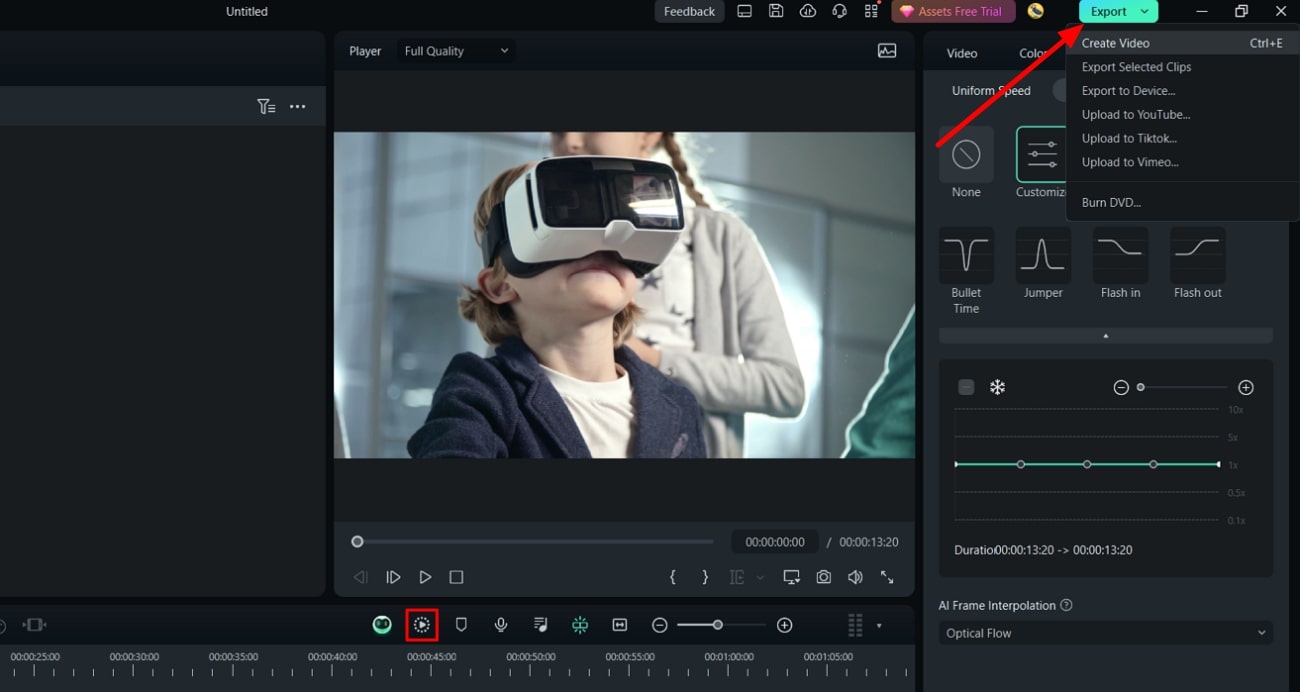
Go to the timeline section toolbar for a smoother playback. Explore the “Render Preview” icon next to a green robotic icon. Finally, you can click the “Export” button at the top right corner to shift the video to your computer.
Conclusion
To conclude, speed ramping is a unique way to slow down video scenes. In this regard, professional video editors prefer Adobe Premiere Pro Slow Motion. On the contrary, this software is not a good choice for beginners and non-tech persons. That’s where Wondershare Filmora can make the process easier for all users. The plus point is it ensures quality with dedicated customization.
Make A Slow Motion Video Make A Slow Motion Video More Features

Part 1: Explaining the Slow-Motion Feature of Adobe Premiere Pro
Adobe Premiere Pro is a video editing software part of Adobe Creative Suite. Professional editors and beginners both use this tool to make their content creative. Whether you are reworking a previous art piece or a new project, it can alter colors for good. You can insert background music, animations, and other forms of multimedia using Adobe.
Among its limitless features is a speed-ramping or slow-motion function. To unlock Adobe Premiere slow-motion in detail, you can head into the below details:
- Using this option, you can adjust the speed of the video as required. For instance, if you set it to 50%, your video will play at half speed compared to the original clips.
- Apart from the speed, users can adjust the duration of slow motion. This adjustment delivers a stylized and customized look to your clips.
- Make the slow-motion transition smoother with the optical flow feature. It can intelligently generate new frames to make your clips look like shots at a higher frame rate.
- Not all clips are worth slowing down, so there are many frame rates to do this. You can set the frame rate from 30fps, 120fps, 240fps, and 960fps.
Part 2: Understanding the Operations of Performing Slow Motion on Adobe Premiere Pro
If you want to perform speed ramping in videos, first access Adobe Premiere Pro. Many users find video editing difficult in Adobe. For their ease, this section will explain the slow-mo Adobe Premiere in simple steps:
Step 1
After getting into the Adobe Premiere Pro, enter to its editing screen. Import your video clip and move towards its timeline section. There, right-click on the FX icon and choose “Time Remapping” to go to “Speed.” Now, you can see the white speed ramping line.

Step 2
Add the keyframe by clicking the left-side circle icon next to the speed ramping line. Zoom in the section and add another keyframe.

Step 3
Click on the middle of the keyframe and pull it down slowly. To add a slow ramp instead of an abrupt change in speed, hit on the start and drag towards the right. Repeat the same to the other end of the keyframe. You can see a slow shift in speed. Later, you can adjust the speed and the ramp.

Part 3: What Are Some Potential Disadvantages of Using Adobe Premiere Pro for Performing Such Operations?
Many people might initially find the above steps intense and difficult to understand. Slow motion in Premiere Pro is useful in speed ramping, but you can face some issues using it. As everything has some bad side, this operation also does. You should read forward and know such disadvantages to avoid any inconvenience:
- Playback Lagging: Adobe causes lagging and major issues in playback. If you don’t use optical flow and render frames freeze, you cannot make any speed ramps.
- System Compatibility Issues: Speed ramping requires a system with a good GPU. Otherwise, problems might occur when it doesn’t interact well with the computer’s GPU.
- Complex Processing: This feature will interrupt your workflow if you are not a professional editor. As you will have to watch several tutorial videos to use just one feature.
- Frame Rate Adjustment Problems: Premiere Pro can show bugs if you use a high frame rate. It will start troubling when you use 120fps slow motion in clips.
Generally, it also requires strong computer specs and uses RAM of at least 8GB. The majority of editors look for an alternative due to its high learning curve and system requirements.
Part 5: Wondershare Filmora: Comprehending the Best Ways to Slow Down Videos
In search of a substitute, there could be many options on the internet. If someone is looking for easy-to-use software, they should use Wondershare Filmora . This video editor is the real game changer in adjusting speed ramping without laggings. Surprisingly, it does not require system requirements, and you can quickly launch it.
Filmora uses AI for a smooth optical flow compared with Adobe Premiere slow motion. It also ensures high quality and optimization of videos. With new AI features, you don’t need any help from experts, as AI can do it for you.
Free Download For Win 7 or later(64-bit)
Free Download For macOS 10.14 or later
Step-by-Step Guide to Slow Down Video Using Filmora
If you want more creative slow-motion videos, then keep reading. Here, you will find the easiest way to slow down videos in Filmora:
Step 1Install Filmora and Import Your Project in the Timeline
Launch the Filmora 13 in your system within simple steps. Access its main interface and hit the “New Project” button. Enter the editing window and import your project. Press the “Ctrl + I” keys from your keyboard to import the video. Browse the video and click “Open” to bring the video to Filmora. Then, drag and drop the video in the timeline section.

Step 2Explore Speed Ramping to Make Videos Super Slow
Place your cursor on the video and right-click on it. From the list, choose “Speed Ramping” and navigate toward the right-side panel. There, tap on “Customize” to open the further settings. Look for the “AI Frame Interpolation” and expand it to choose the “Optical Flow” option. You can adjust the speed manually from the graphical section on the right.

Step 3Get Render Review and Look for Export Button
Go to the timeline section toolbar for a smoother playback. Explore the “Render Preview” icon next to a green robotic icon. Finally, you can click the “Export” button at the top right corner to shift the video to your computer.

Conclusion
To conclude, speed ramping is a unique way to slow down video scenes. In this regard, professional video editors prefer Adobe Premiere Pro Slow Motion. On the contrary, this software is not a good choice for beginners and non-tech persons. That’s where Wondershare Filmora can make the process easier for all users. The plus point is it ensures quality with dedicated customization.
Best 10 Tools to Convert a GIF Into a PDF
Professionals are always on the lookout to create engaging and interesting presentations and documents. For this, many choose to convert GIF into PDF since they are animated images that can express the emotions of the brand or sender efficiently. GIF to PDF converter options is available to add these in-motion images into presentations.
They are small in size, can add a humorous tone, hold viewers’ attention, and even highlight specific points in the content. If you are interested in using GIFs in your PDF documents but do not know how- worry not. This guide details all usable GIF to PDF converters available.
- Adobe Acrobat
- Online2Pdf
- Soda PDF
- Ezgif.com
- FreeConvert.com
- CloudConvert
- JPG to PDF
- PDFelement
- OnlineConvert
- Smallpdf.com
Top 10GIF to PDF converters [Including Free Software]
There are multiple top-notch software options available when it comes to choosing the best GIF to PDF converter. We took the time to check out many of these tools to narrow down our favorite ones with the best performance. Here, we present them to you, listing their features, benefits, and uses.
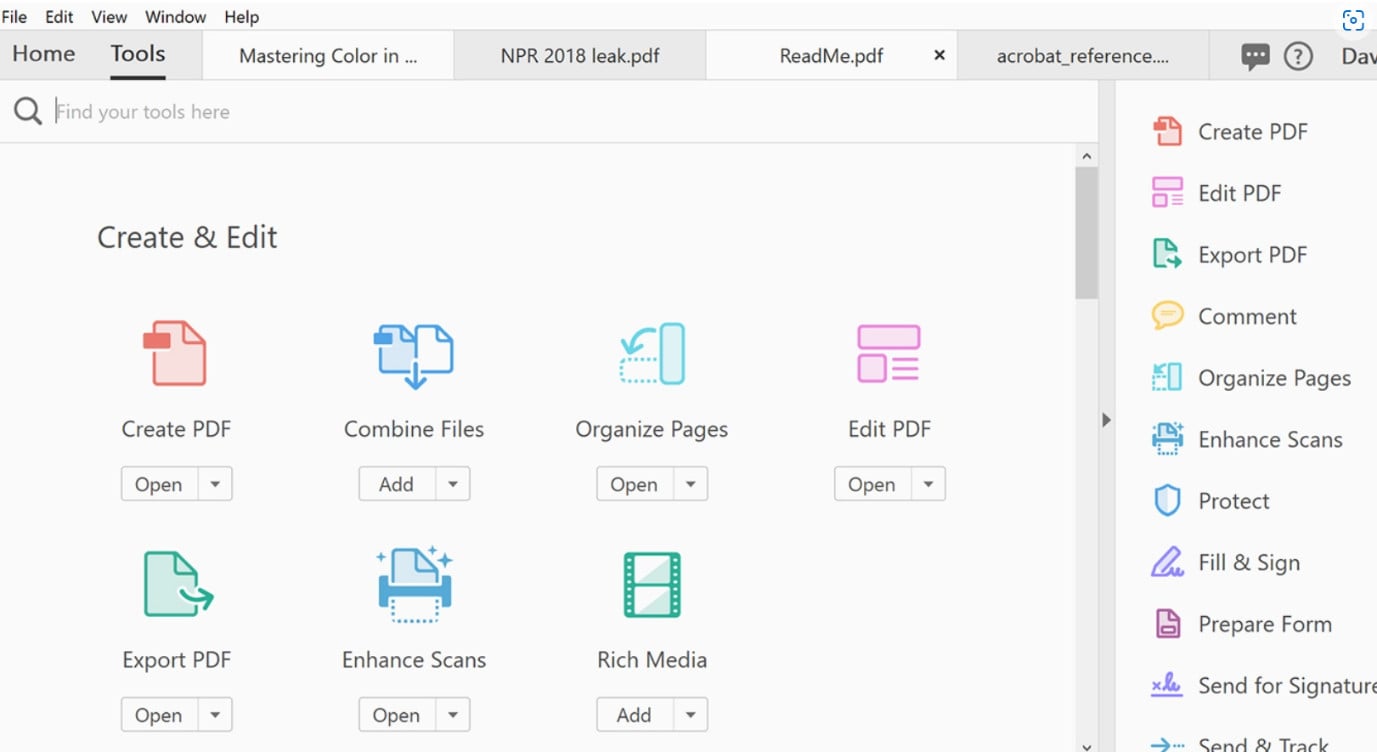
1. Adobe Acrobat
Adobe Acrobat is one of the best PDF to GIF converter software and vice versa. It supports the editing and creation of new PDFs and allows users to convert files. You need to subscribe to the software to get a premium experience.
How to Download: Website , Chrome extension
Rating: 3.7 stars of 5 (Chrome WebStore)
Supported OS: Windows, Mac, Linux.
Price: Standard- USD 13.14/month, Pro- USD 15.16/month
Features:
- The alignment and formattingdo not alter during conversion.
- Share across platforms and devices.
- Store files in the cloud.
- Edit and compress files easily.
Pros
- Supports multiple format types for conversion.
- Add comments or feedback for engagement.
- Quick conversion speed.
Cons
- Complex to use for total beginners.
- No plans are free to use.
Best for Users: Businesses and home users want an all-in-one conversion/editing/compressing software.
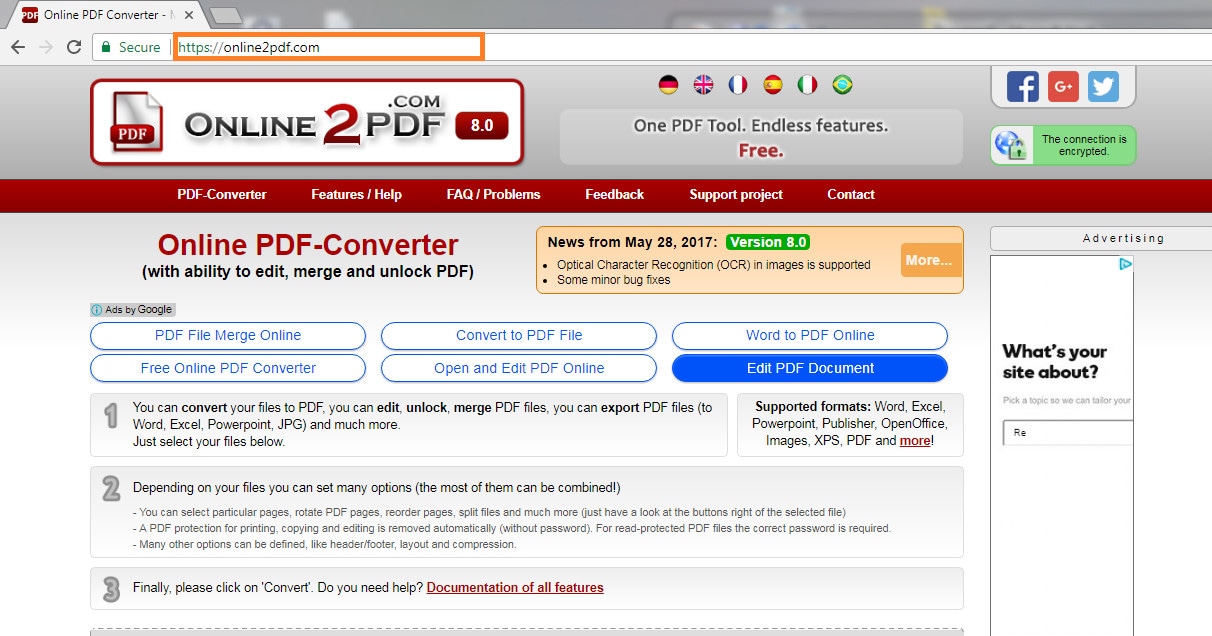
2. Online2Pdf
Online2Pdf allows users to convert files like GIF into PDF format. Other uses here include merging, unlocking, and editing the files. You can make changes like splitting and rotating the pages and editing password-protected PDFs.
How to Download: Online .
Rating: 100 out of 100 (Scam Detector)
Supported OS: Web-based.
Price: Free
Features:
- Select around 20 files at a time.
- Maximum 100 MB allowed as file size limitation of GIFs.
- Define elements like layout, header/footer, and compression.
- 150 MB size is supported for batch GIF conversion in total.
Pros
- Press Ctrl on the keyboard to select multiple files.
- Export in multiple formats.
- Easy drag-and-drop function is available.
Cons
- You have to change settings to “Convert files separately” to avoid all files merging.
- All form fields get deleted after each conversion.
Best for Users: Professionals who want to convert multiple small files at a time or all in one file can use this.
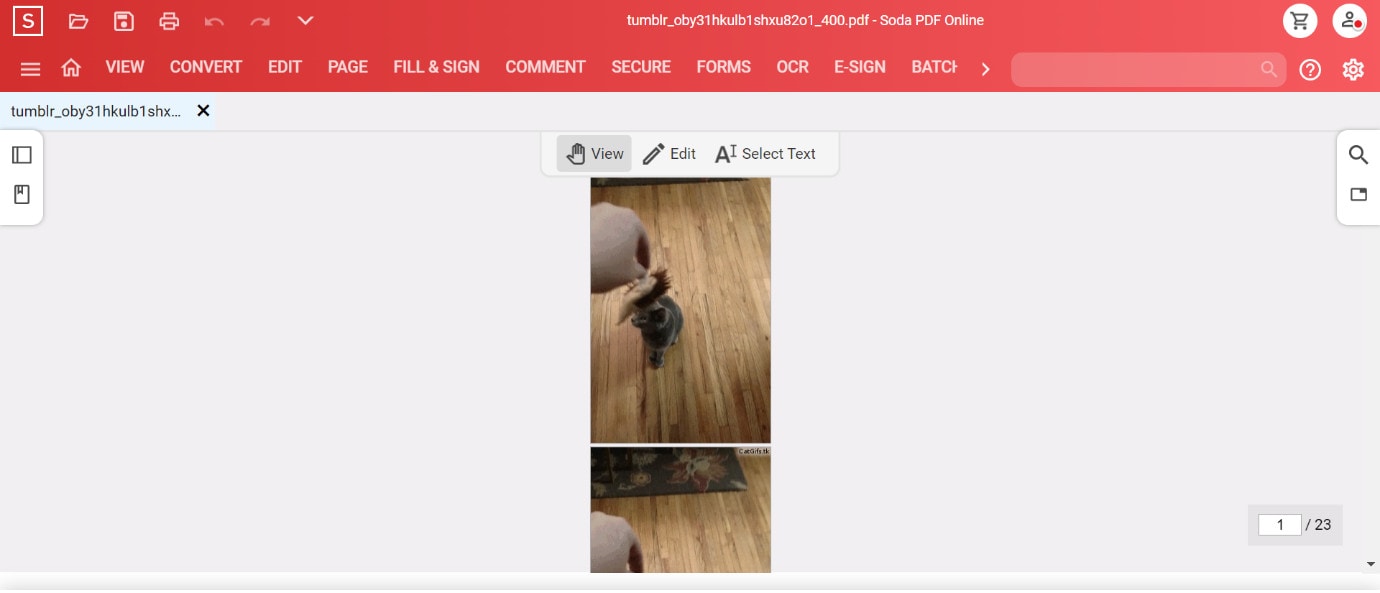
3. Soda PDF
One can use this simple online converter to create interesting PDF presentations or files from image files, like GIFs. Multiple tools are available for specific functions on this tool, like a convert, compress, etc.
How to Download: Online , website
Rating: 3.4 stars of 5 (Capterra)
Supported OS: Web-based, Windows, Linux, Mac, etc.
Price:Standard- USD 6.73/month, Pro- USD 8.23/month, Business- USD 16.63/month
Features:
- Edit and merge files into PDF format.
- Access files from an online, blank file, or a device.
- Remote e-signing is available.
- Quick availability of new updates.
Pros
- Easy to convert or create any file into PDF.
- Only 3 devices can use one paid plan.
- Batch processing is available.
Cons
- Software-based usage is not available for Standard subscribers.
- Multiple cookies are created.
Best for Users: Professionals and teams who want an all-in-one PDF-based editing and conversion software can use this.
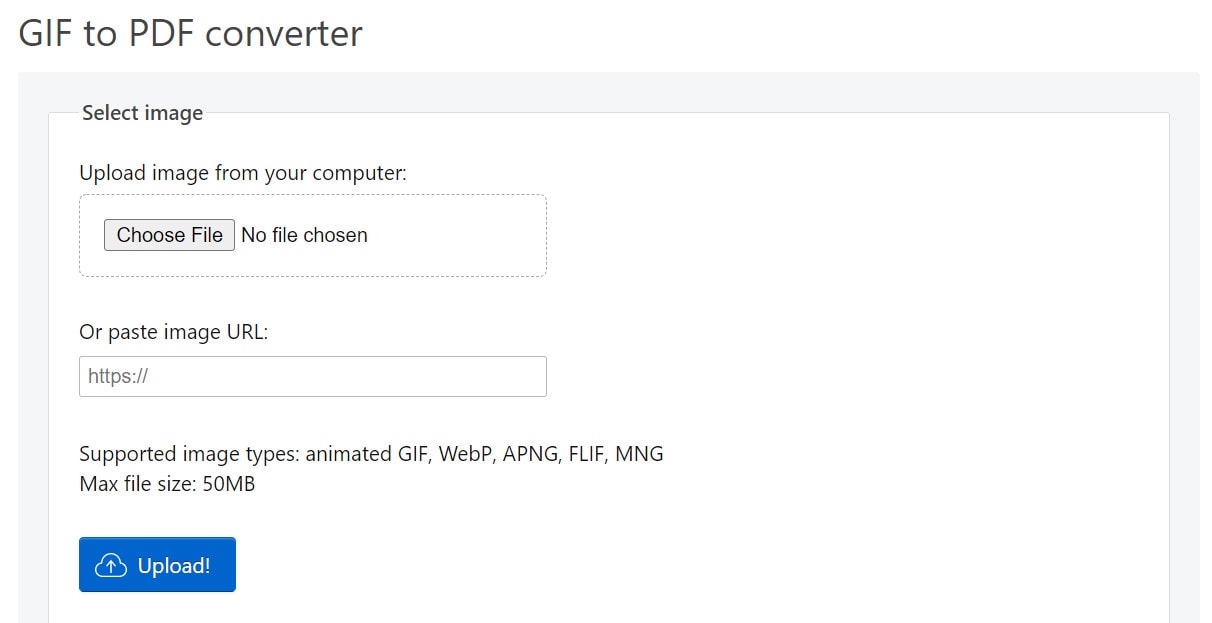
4. Ezgif.com
Ezgif is one of the best GIF-centric editor and converter tools available online. Users can make many adjustments to their files and even customize them with speed, reverse, compress, and other settings.
How to Download: Online
Rating: 100 out of 100 (Scam Detector)
Supported OS: Web-based.
Price: Free.
Features:
- Decide the number of frames per page.
- Do customizations like adding effects, censors, split, etc.
- Reverse the animated GIF.
- Change the speed.
Pros
- Also works with WebP, APNG, and MNG files.
- Choose the output style of the PDF.
- Quick conversion.
Cons
- Only supports files with 50 MB size or lower.
- Convert one file at a time.
Best for Users: People who want a simple online PDF to GIF converterand vice versa.
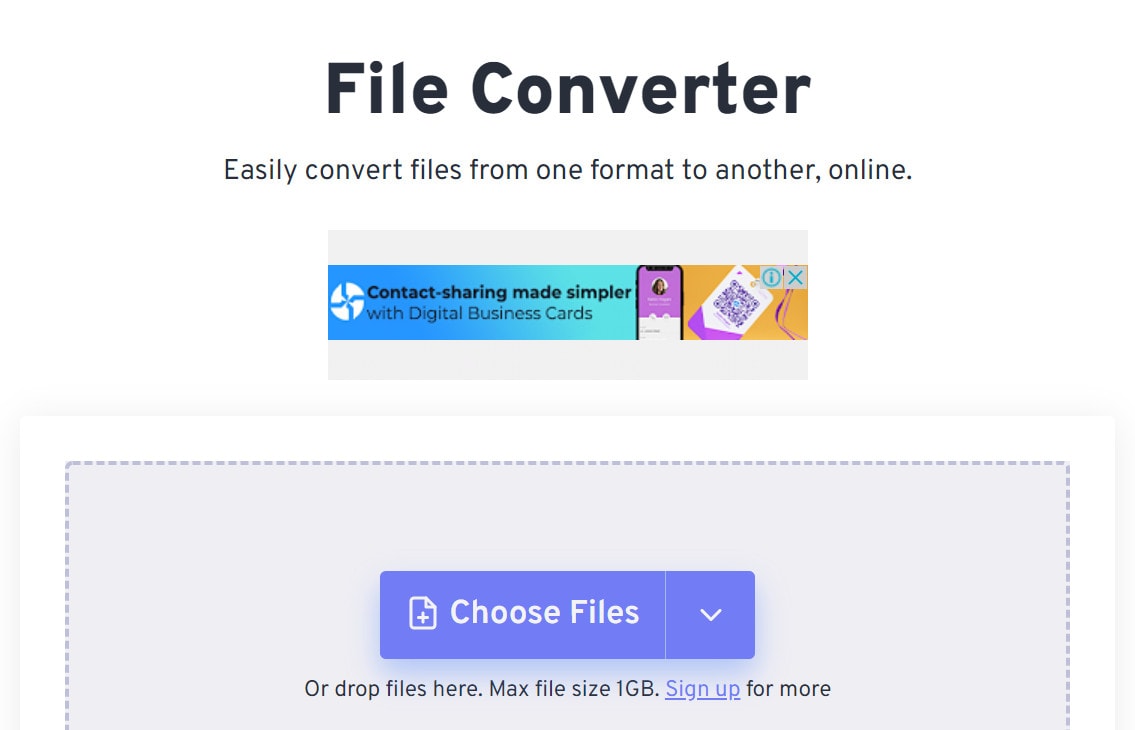
5. FreeConvert.com
It is a simple tool for converting GIF files into PDF or any other format style you prefer. The app allows the insertion of small to huge files and offers strong priority customer support to users.
How to Download: Online , Chrome extension
Rating: 58.40 out of 100 (Scam Detector)
Supported OS: Windows, Mac, Linux
Price: 24-hour Pass- USD 12.99, Pro- USD 25.99/month, Basic- USD 9.99/month, Standard- USD 14.99/month.
Features:
- Drag and drop the file or add it from the device/cloud.
- Choose the preferred format to convert.
- Add files upto 1.5 GB in size or higher.
- Free users get 25 conversions each day in an online converter.
Pros
- Protected with 256-bit SSL encryption.
- Easy to add files and choose conversion format.
- Ticketing-based customer support is available.
Cons
- Free conversion allows a 1 GB maximum size limit only.
- Not many customizations are allowed.
Best for Users: People who want the simple and quick conversion of big files can use this.
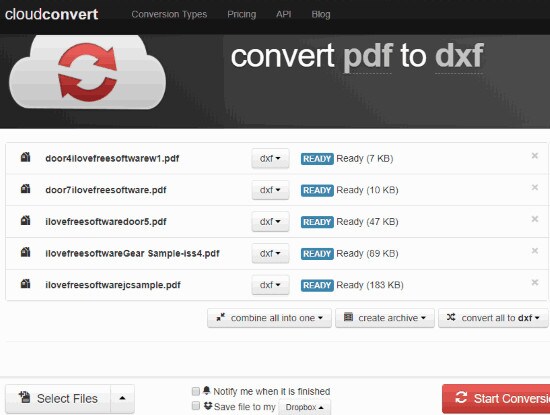
6. CloudConvert
CloudConvert is the best GIF to PDF converterfor online-based users. Using this, one can also convert other types of files, like ebooks, images, spreadsheets, archives, videos, and audio files. You can also directly convert the files into presentation format using this.
How to Download: Online
Rating: 4.5 stars of 5 (Capterra)
Supported OS: Web-based.
Price: Subscriptions- USD 8- 2314 per month, Packages- USD 8- 3283 per month
Features:
- Filters are available to make conversion adjustments.
- Over 200 file format types are supported.
- Add a file from your Dropbox, Google Drive, URL, device, or OneDrive.
- Convert files of any size.
Pros
- Comes with Amazon S3 and other API integrations.
- Open-source benefits.
- No installation is needed.
Cons
- You have to pay for doing over 25 conversions daily.
- Cost based on conversion numbers per minute.
Best for Users: People who want to do a huge volume of file conversions together.
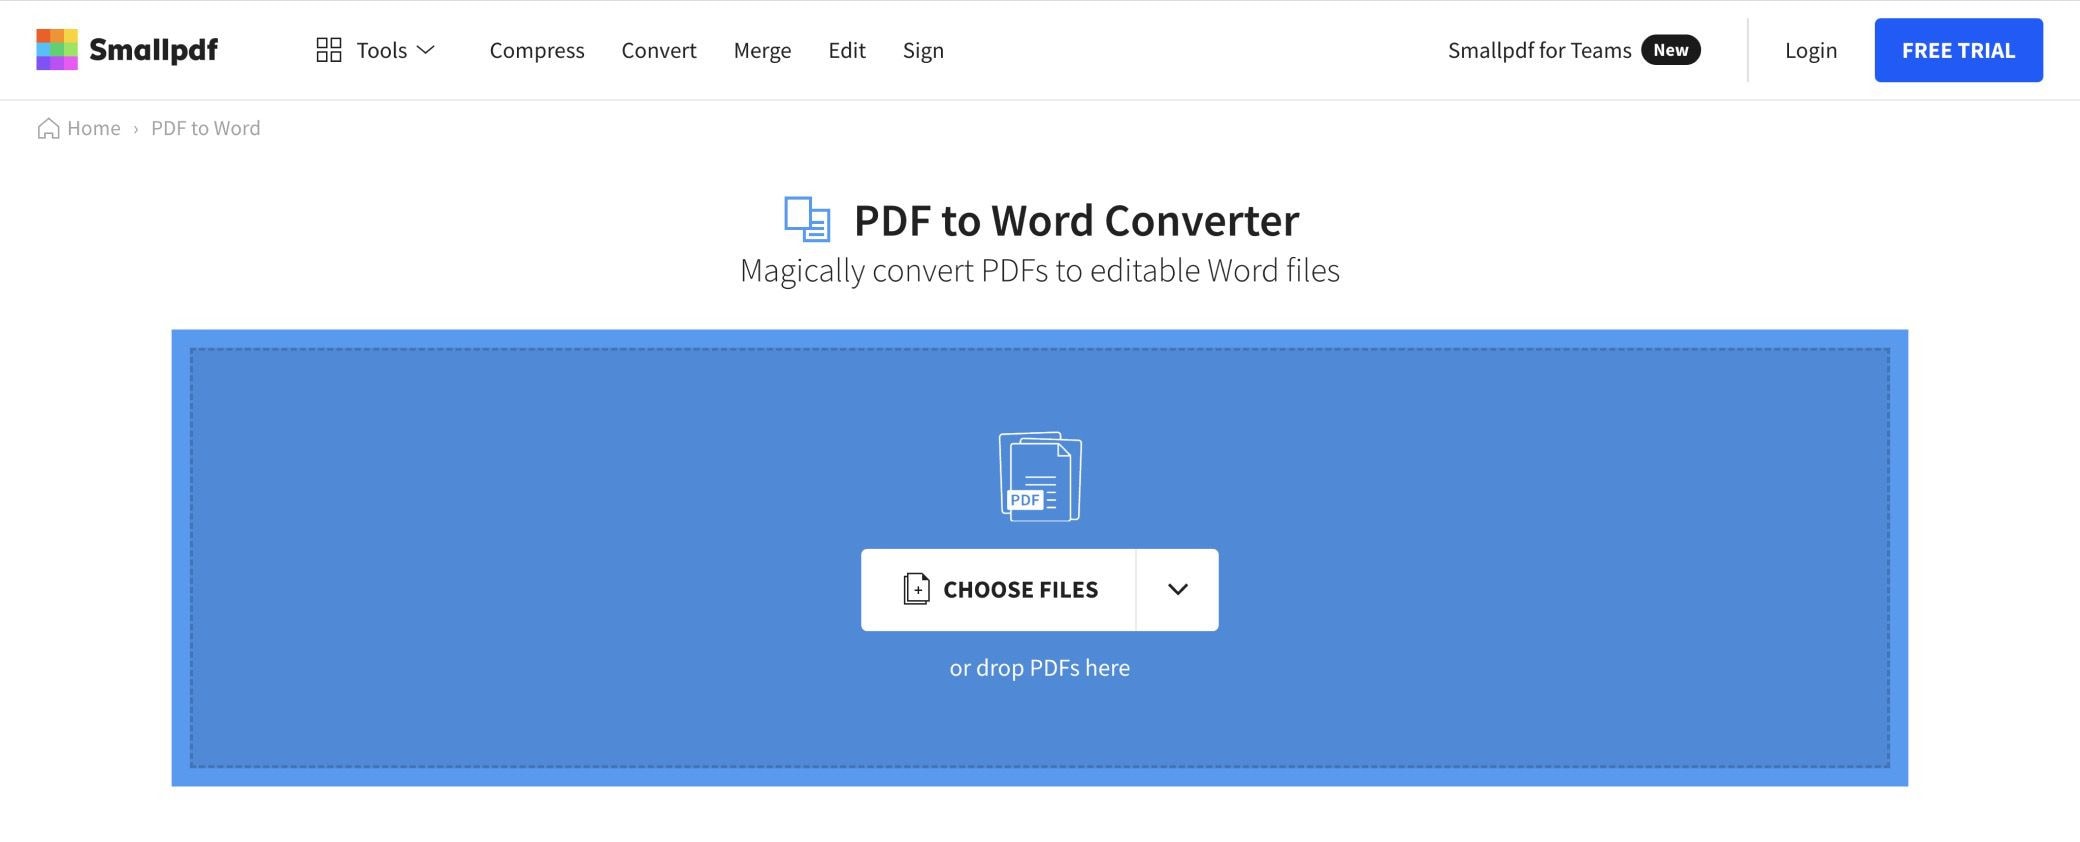
7. JPG to PDF
The GIF to PDF converter allows the alteration of different image formats in the JPG to PDF tool. You can add the file and make certain configurations about the conversion. The process takes some seconds to complete.
How to Download: Online , Microsoft Store , Google PlayStore , Apple AppStore
Rating: 4.7 stars of 5 (Google)
Supported OS: Windows, Mac, Linux, Android, iOS
Price:Pro- USD 9 per month, Team- USD 7 per user + month, Business- Custom
Features:
- Directly add image files, like GIF, JPG, PNG, etc., to convert into PDF.
- Save the file in the device/cloud.
- Choose between Portrait/Landscape orientation.
- Choose paper type- A4, Letter, etc.
Pros
- SSL protection is available.
- All-in-one tool for converting different image types into PDF.
- Adjust the margin of the document for conversion.
Cons
- Maximum benefits and filters require payment first.
- Users can convert 1 file per day with a free online converter.
Best for Users: People who want to choose the specifications of the image/download can benefit from this.
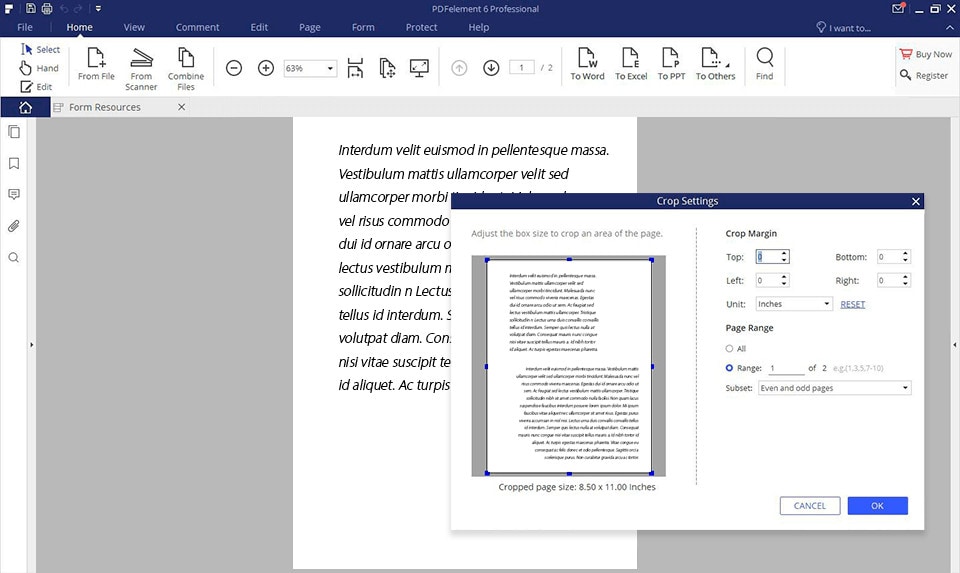
8. PDFelement
Companies who want an all-in-one converter that works on different operating systems can benefit from PDFelement. The app can easily convert multiple GIFs into PDF format, highlight elements, add notes, and more.
How to Download: Microsoft Store , Mac AppStore , Google PlayStore , Apple AppStore
Rating: 4.6 stars of 5 (iOS)
Supported OS: Windows, Mac, iOS, Android
Price: Standard- USD 6.99/month, Professional- USD 9.99/month
Features:
- Convert images in formats like GIF into PDF.
- Insert links and watermark in the files.
- Comment, highlight, underline, draw, add shapes, etc., on this software.
- Batch conversion is available.
Pros
- 100 GB of cloud storage is available for the Cloud version.
- E-signature-based access is allowed.
- Edit the font style, size, and color.
Cons
- No cloud support for mobile apps.
- Editing not allowed in the Cloud version.
Best for Users: Professionals and regular users can operate this on different devices for multiple conversions.
9. OnlineConvert
This is one of the best apps for GIF into PDF conversion, among other format-to-format methods. You can easily add different files into the conversion tool online or in the native app version and get quick results.
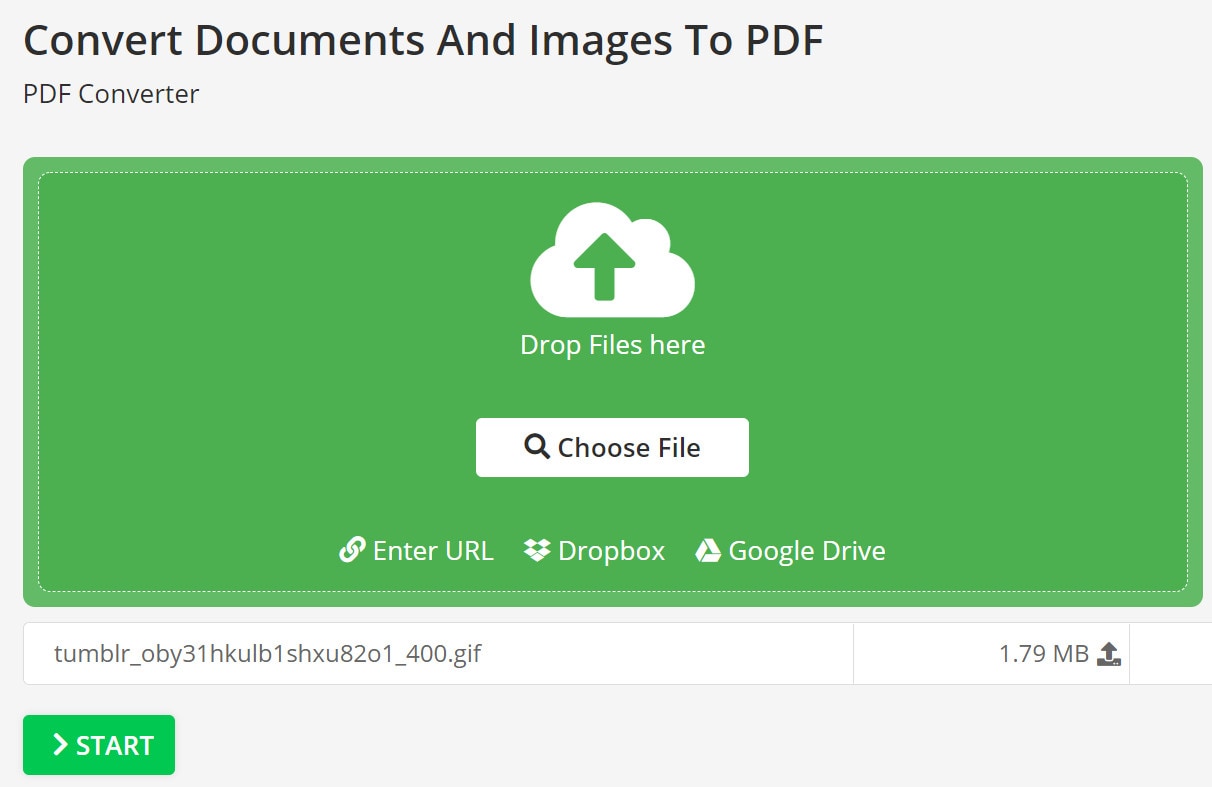
How to Download: Online tool , Firefox extension , Chrome extension , Apple AppStore , Google PlayStore
Rating: 3.7stars of 5 (Google)
Supported OS: Online, Android, iOS, Chromebook
Price: Free, 24-hour Pass- USD 8.99, Monthly- USD 8, Annual- USD 77
Features:
- You can expect a limit of 250 conversions per day.
- Batch convert 200 files per conversion maximum.
- Subscribers get priority speed for their work.
- A money-back guarantee is provided.
Pros
- Allows file sizes upto 8 GB.
- The speed of conversion is not extremely long.
- The free option allows all-time validity.
Cons
- Many ads would come up in the free version.
- Only 3 conversions are allowed each day when using the free plan.
Best for Users:People who want to conduct conversion of huge files can use this.
10. Smallpdf.com
This software is a suitable PDF to GIF converter, and vice versa, allowing users to manage, create, and edit various documents. You can directly work on the files and add elements like shapes, texts, and freehand annotations.
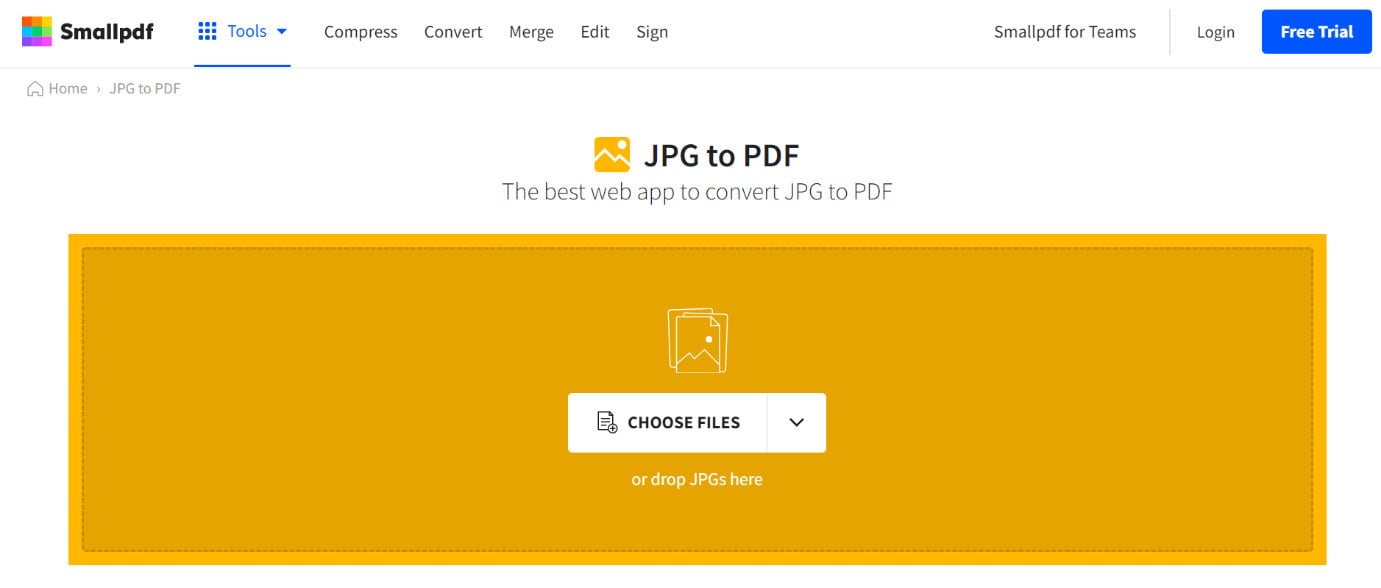
How to Download: Google PlayStore , Apple AppStore
Rating: 4.9 stars of 5 (iOS)
Supported OS: Windows, Android, iOS
Price: Pro- USD 9 per month, Team- USD 7 per user and month
Features:
- Share across different devices.
- Manage all documents and PDFs in one location.
- Split/merge the files easily.
- Remove extra pages.
Pros
- Highly secure app with CCPA compliance.
- Data security is guaranteed with 256-bit TLS encryption.
- Customer support is 24x7.
Cons
- There is a minimum age limit of 16 years.
- The free trial period lasts only for 7 days.
Best for Users: Professionals who want strong and secure PDF conversion/editing software.
How to Convert GIF Files (Images) to PDF?
Now that you know the best tools to convert GIF into PDF, you should learn the process behind it. Here are the steps you should take to turn the format using SmallPDF.
Step1Drag the GIF file to the editor or click on the Choose File button to add it from the device
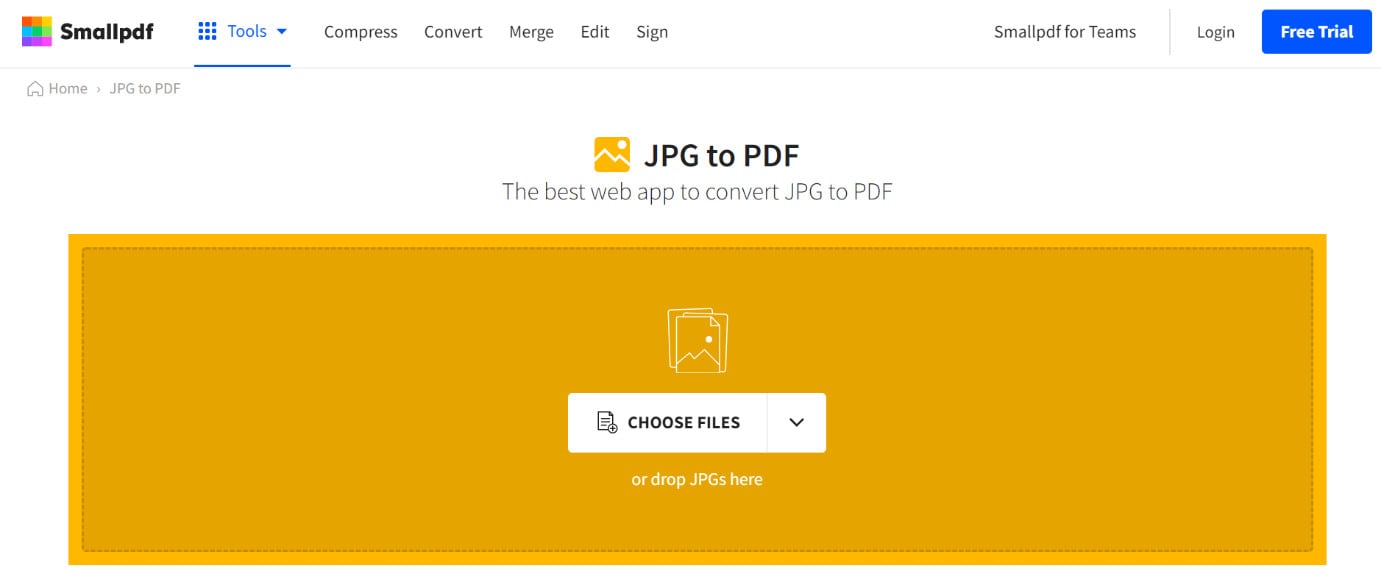
Step2Make changes like the alignment, page type, and margin
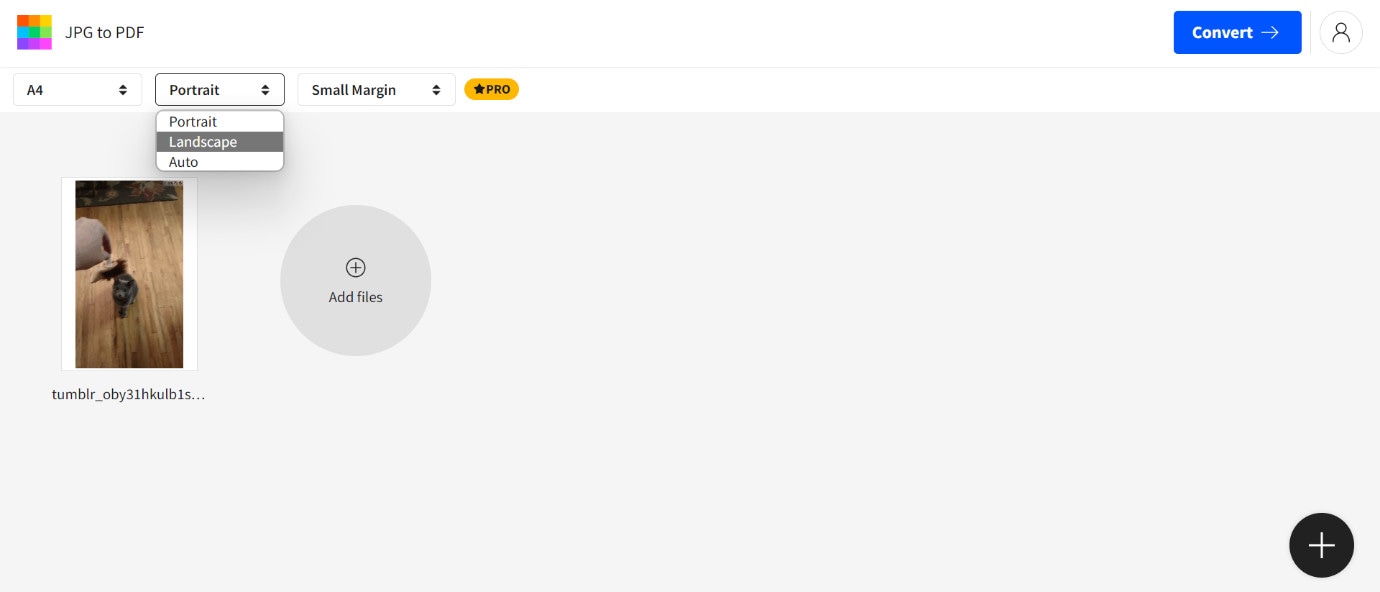
Step3Click on the Convert button at the top right
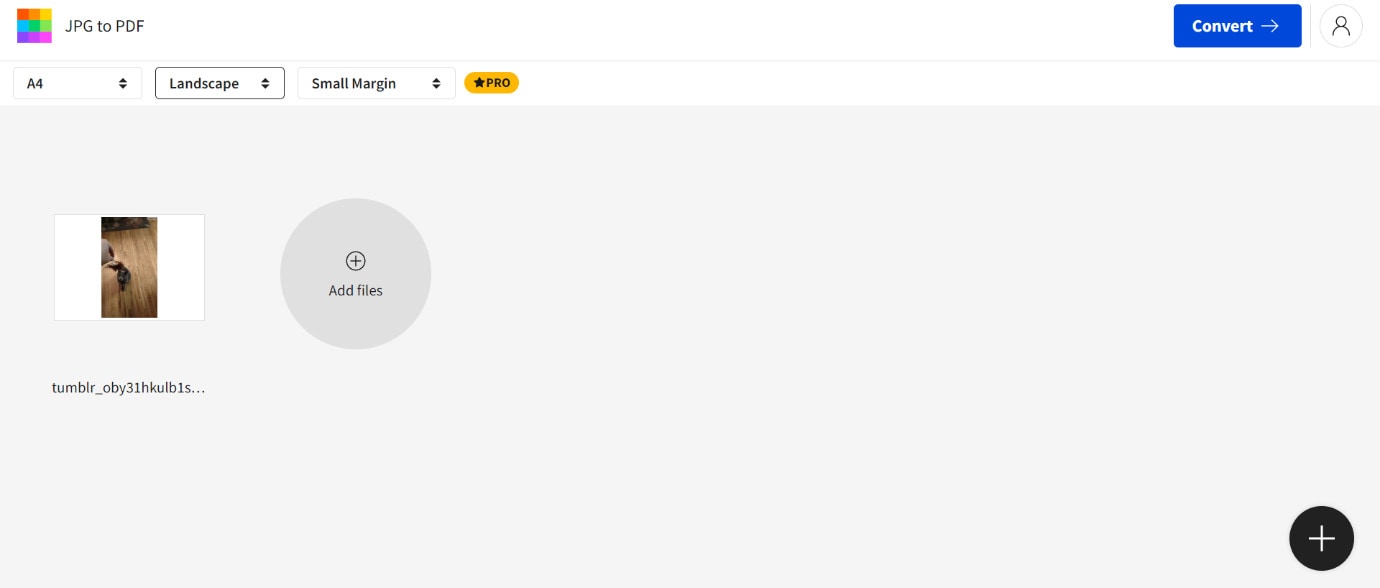
Step4Open the “Export as” setting and choose PDF format. Then, press the Download button
Final Words
In the end, you should make your preferred choice based on your particular needs. If usability is a concern for you, EZGif is the best option. Online2PDF, on the other hand, is usable on different devices completely for free. Adobe Acrobat has rich additional features like PDF-editing, while SmallPDF is a comprehensive converter with the best of all benefits, in our opinion.
Choose your final option after trying them all out at least once each.
Top 10GIF to PDF converters [Including Free Software]
There are multiple top-notch software options available when it comes to choosing the best GIF to PDF converter. We took the time to check out many of these tools to narrow down our favorite ones with the best performance. Here, we present them to you, listing their features, benefits, and uses.
1. Adobe Acrobat
Adobe Acrobat is one of the best PDF to GIF converter software and vice versa. It supports the editing and creation of new PDFs and allows users to convert files. You need to subscribe to the software to get a premium experience.

How to Download: Website , Chrome extension
Rating: 3.7 stars of 5 (Chrome WebStore)
Supported OS: Windows, Mac, Linux.
Price: Standard- USD 13.14/month, Pro- USD 15.16/month
Features:
- The alignment and formattingdo not alter during conversion.
- Share across platforms and devices.
- Store files in the cloud.
- Edit and compress files easily.
Pros
- Supports multiple format types for conversion.
- Add comments or feedback for engagement.
- Quick conversion speed.
Cons
- Complex to use for total beginners.
- No plans are free to use.
Best for Users: Businesses and home users want an all-in-one conversion/editing/compressing software.
2. Online2Pdf
Online2Pdf allows users to convert files like GIF into PDF format. Other uses here include merging, unlocking, and editing the files. You can make changes like splitting and rotating the pages and editing password-protected PDFs.

How to Download: Online .
Rating: 100 out of 100 (Scam Detector)
Supported OS: Web-based.
Price: Free
Features:
- Select around 20 files at a time.
- Maximum 100 MB allowed as file size limitation of GIFs.
- Define elements like layout, header/footer, and compression.
- 150 MB size is supported for batch GIF conversion in total.
Pros
- Press Ctrl on the keyboard to select multiple files.
- Export in multiple formats.
- Easy drag-and-drop function is available.
Cons
- You have to change settings to “Convert files separately” to avoid all files merging.
- All form fields get deleted after each conversion.
Best for Users: Professionals who want to convert multiple small files at a time or all in one file can use this.
3. Soda PDF
One can use this simple online converter to create interesting PDF presentations or files from image files, like GIFs. Multiple tools are available for specific functions on this tool, like a convert, compress, etc.

How to Download: Online , website
Rating: 3.4 stars of 5 (Capterra)
Supported OS: Web-based, Windows, Linux, Mac, etc.
Price:Standard- USD 6.73/month, Pro- USD 8.23/month, Business- USD 16.63/month
Features:
- Edit and merge files into PDF format.
- Access files from an online, blank file, or a device.
- Remote e-signing is available.
- Quick availability of new updates.
Pros
- Easy to convert or create any file into PDF.
- Only 3 devices can use one paid plan.
- Batch processing is available.
Cons
- Software-based usage is not available for Standard subscribers.
- Multiple cookies are created.
Best for Users: Professionals and teams who want an all-in-one PDF-based editing and conversion software can use this.
4. Ezgif.com
Ezgif is one of the best GIF-centric editor and converter tools available online. Users can make many adjustments to their files and even customize them with speed, reverse, compress, and other settings.

How to Download: Online
Rating: 100 out of 100 (Scam Detector)
Supported OS: Web-based.
Price: Free.
Features:
- Decide the number of frames per page.
- Do customizations like adding effects, censors, split, etc.
- Reverse the animated GIF.
- Change the speed.
Pros
- Also works with WebP, APNG, and MNG files.
- Choose the output style of the PDF.
- Quick conversion.
Cons
- Only supports files with 50 MB size or lower.
- Convert one file at a time.
Best for Users: People who want a simple online PDF to GIF converterand vice versa.
5. FreeConvert.com
It is a simple tool for converting GIF files into PDF or any other format style you prefer. The app allows the insertion of small to huge files and offers strong priority customer support to users.

How to Download: Online , Chrome extension
Rating: 58.40 out of 100 (Scam Detector)
Supported OS: Windows, Mac, Linux
Price: 24-hour Pass- USD 12.99, Pro- USD 25.99/month, Basic- USD 9.99/month, Standard- USD 14.99/month.
Features:
- Drag and drop the file or add it from the device/cloud.
- Choose the preferred format to convert.
- Add files upto 1.5 GB in size or higher.
- Free users get 25 conversions each day in an online converter.
Pros
- Protected with 256-bit SSL encryption.
- Easy to add files and choose conversion format.
- Ticketing-based customer support is available.
Cons
- Free conversion allows a 1 GB maximum size limit only.
- Not many customizations are allowed.
Best for Users: People who want the simple and quick conversion of big files can use this.
6. CloudConvert
CloudConvert is the best GIF to PDF converterfor online-based users. Using this, one can also convert other types of files, like ebooks, images, spreadsheets, archives, videos, and audio files. You can also directly convert the files into presentation format using this.

How to Download: Online
Rating: 4.5 stars of 5 (Capterra)
Supported OS: Web-based.
Price: Subscriptions- USD 8- 2314 per month, Packages- USD 8- 3283 per month
Features:
- Filters are available to make conversion adjustments.
- Over 200 file format types are supported.
- Add a file from your Dropbox, Google Drive, URL, device, or OneDrive.
- Convert files of any size.
Pros
- Comes with Amazon S3 and other API integrations.
- Open-source benefits.
- No installation is needed.
Cons
- You have to pay for doing over 25 conversions daily.
- Cost based on conversion numbers per minute.
Best for Users: People who want to do a huge volume of file conversions together.
7. JPG to PDF
The GIF to PDF converter allows the alteration of different image formats in the JPG to PDF tool. You can add the file and make certain configurations about the conversion. The process takes some seconds to complete.

How to Download: Online , Microsoft Store , Google PlayStore , Apple AppStore
Rating: 4.7 stars of 5 (Google)
Supported OS: Windows, Mac, Linux, Android, iOS
Price:Pro- USD 9 per month, Team- USD 7 per user + month, Business- Custom
Features:
- Directly add image files, like GIF, JPG, PNG, etc., to convert into PDF.
- Save the file in the device/cloud.
- Choose between Portrait/Landscape orientation.
- Choose paper type- A4, Letter, etc.
Pros
- SSL protection is available.
- All-in-one tool for converting different image types into PDF.
- Adjust the margin of the document for conversion.
Cons
- Maximum benefits and filters require payment first.
- Users can convert 1 file per day with a free online converter.
Best for Users: People who want to choose the specifications of the image/download can benefit from this.
8. PDFelement
Companies who want an all-in-one converter that works on different operating systems can benefit from PDFelement. The app can easily convert multiple GIFs into PDF format, highlight elements, add notes, and more.

How to Download: Microsoft Store , Mac AppStore , Google PlayStore , Apple AppStore
Rating: 4.6 stars of 5 (iOS)
Supported OS: Windows, Mac, iOS, Android
Price: Standard- USD 6.99/month, Professional- USD 9.99/month
Features:
- Convert images in formats like GIF into PDF.
- Insert links and watermark in the files.
- Comment, highlight, underline, draw, add shapes, etc., on this software.
- Batch conversion is available.
Pros
- 100 GB of cloud storage is available for the Cloud version.
- E-signature-based access is allowed.
- Edit the font style, size, and color.
Cons
- No cloud support for mobile apps.
- Editing not allowed in the Cloud version.
Best for Users: Professionals and regular users can operate this on different devices for multiple conversions.
9. OnlineConvert
This is one of the best apps for GIF into PDF conversion, among other format-to-format methods. You can easily add different files into the conversion tool online or in the native app version and get quick results.

How to Download: Online tool , Firefox extension , Chrome extension , Apple AppStore , Google PlayStore
Rating: 3.7stars of 5 (Google)
Supported OS: Online, Android, iOS, Chromebook
Price: Free, 24-hour Pass- USD 8.99, Monthly- USD 8, Annual- USD 77
Features:
- You can expect a limit of 250 conversions per day.
- Batch convert 200 files per conversion maximum.
- Subscribers get priority speed for their work.
- A money-back guarantee is provided.
Pros
- Allows file sizes upto 8 GB.
- The speed of conversion is not extremely long.
- The free option allows all-time validity.
Cons
- Many ads would come up in the free version.
- Only 3 conversions are allowed each day when using the free plan.
Best for Users:People who want to conduct conversion of huge files can use this.
10. Smallpdf.com
This software is a suitable PDF to GIF converter, and vice versa, allowing users to manage, create, and edit various documents. You can directly work on the files and add elements like shapes, texts, and freehand annotations.

How to Download: Google PlayStore , Apple AppStore
Rating: 4.9 stars of 5 (iOS)
Supported OS: Windows, Android, iOS
Price: Pro- USD 9 per month, Team- USD 7 per user and month
Features:
- Share across different devices.
- Manage all documents and PDFs in one location.
- Split/merge the files easily.
- Remove extra pages.
Pros
- Highly secure app with CCPA compliance.
- Data security is guaranteed with 256-bit TLS encryption.
- Customer support is 24x7.
Cons
- There is a minimum age limit of 16 years.
- The free trial period lasts only for 7 days.
Best for Users: Professionals who want strong and secure PDF conversion/editing software.
How to Convert GIF Files (Images) to PDF?
Now that you know the best tools to convert GIF into PDF, you should learn the process behind it. Here are the steps you should take to turn the format using SmallPDF.
Step1Drag the GIF file to the editor or click on the Choose File button to add it from the device

Step2Make changes like the alignment, page type, and margin

Step3Click on the Convert button at the top right

Step4Open the “Export as” setting and choose PDF format. Then, press the Download button
Final Words
In the end, you should make your preferred choice based on your particular needs. If usability is a concern for you, EZGif is the best option. Online2PDF, on the other hand, is usable on different devices completely for free. Adobe Acrobat has rich additional features like PDF-editing, while SmallPDF is a comprehensive converter with the best of all benefits, in our opinion.
Choose your final option after trying them all out at least once each.
Finding the Best Game Recorder for PC
You’re likely familiar with recording gameplays if you’re involved in the gaming community. The desire to share our gameplay adventures has never been more widely spread. YouTube and Twitch serve as popular hubs for gamers to showcase their skills and build communities.
However, with various game recorders, finding the perfect fit for your next gameplay recording can be challenging. We’ve tested many options to ease your search and made a list to enhance your gaming experience.
In this article
- Part 1. Discussing the Advancements in Game Recording in the Digital Realm
- Part 2. Top Best Game Recorders To Consider for Efficient Recording
- Part 3. Make Screen Recording Simple and Easy: Wondershare Filmora
- Conclusion
Part 1: Discussing the Advancements in Game Recording in the Digital Realm
Game recording has evolved from basic methods to sophisticated tools. In the past, gamers used VHS recorders connected to consoles. Moreover, screen capture software like Fraps became popular in the early 2000s. Afterward, built-in recording features within PlayStation 4 and Xbox One simplified the process.
Platforms like Twitch emerged for live streaming in the late 2010s. Cloud gaming services have revolutionized recording by allowing gameplay on remote servers. Finally, modern game recorders emerged to provide instant replay and webcam integration.
Chronological Understanding of the Advancements in Game Recordings
- Users can now capture gameplay in stunning 4K resolution for top-notch visual quality.
- Frame rate settings ensure smooth playback of recorded videos.
- Bitrate settings let you control recording quality and file size.
- Players can use GPU power for faster and more efficient video encoding.
- Multi-channel audio recording lets you record gameplay audio, microphone input, and other sources. Also, it separates tracks for easy editing and control.
- An infusion of overlays in the webcam adds a personalized touch to gameplay videos, building competition in quality offering.
- Network switching within software is possible without any cross-platform shift, from recording to live streaming.
Example
PewDiePie is one of the leading stars in YouTube stardom. His game screen recording is proof of how online entertainment has changed. He earned his initial fame by playing horror games with funny commentary. People loved his infectious personality and unique style. Furthermore, he expanded his content to include games, vlogs, and entertaining stuff. Now, he has a fan base of 111M, positioning him as the most influential figure in online gaming.
Part 2: Top Best Game Recorders To Consider for Efficient Recording
Most of us play games for fun while wanting to share the gameplay with friends. The game screen recorder helps you share the screen with others to enjoy with them. Let’s go through the options of tools that can record gameplay screens efficiently:
Best Game Recorders for PC
1.Movavi
2.OBS
3.Bandicam
4.XSplit
5.Aqua Demo
6.GoPlay
7.Action! Game Recorder
8.Wondershare DemoCreator
1.Movavi
Movavi lets you do full-screen or custom area recording with various functionalities. Using this tool, you can annotate the screen while recording for real-time experience. For improving viewer’s attention, you can also illuminate mouse cursor and keystrokes within the recording screen. It also features a noise reduction feature to get rid of intrusive voices. Movavi can take scrolling screenshots to capture content that doesn’t fit on one screen.

Pros
- This game screen recording tool has a user-friendly interface and is easy to use without the need for training.
- The tool allows you to capture audio and video simultaneously and separately.
Con
- It offers limited features when it comes to video manipulation while recording games.
2.OBS Studio
Open Broadcaster Software is the best screen recorder for games when it comes to finding open-source recorders. This recorder enables you to record multiple scenes at a time. It offers seamless transitions to switch between the scenes. Users can use the audio mixer feature of the tool for noise suppression and gain. The tool also provides the configuration option to add new sources and replace existing ones.

Pros
- You can capture multiple windows simultaneously with the help of this tool, giving diversified opportunities.
- This screen recorder allows you to preview sources and scenes before live streaming.
Con
- OBS is challenging for beginners due to its steep learning curve.
3.Bandicam
Gamers can record high-resolution gameplay in 4K UHD and 480FPS with Bandicam. Upon utilizing this tool, they record gameplay and voice to share with friends on YouTube. This Lolio game recorder uses a webcam and mic to record gameplay with the player’s live face and voice. Plus, you can also save the audio track of the gameplay record in separate WAV files.

Pros
- This game recorder compresses high-quality video to save space.
- Bandicam supports the latest hardware acceleration from AMD, Intel, and NVIDIA.
Con
- It only works on Windows and does not support Mac, Android, or Linux.
4.XSplit
Content creators and game players can use this all-in-one streaming and recording tool. This video game recorder allows you to switch from a solo camera to a podcast easily. You can start streaming to any broadcast platform with the native plugin of the tool. XSplit Broadcaster enables you to add multiple animation and broadcast effects to your scenes.

Pros
- Users can record multiple scenes at the same time with this screen recorder. This helps you in covering more content in similar timeframes.
- You can do custom transitions of various scenes with the help of this tool.
Con
- Installing XSplit Broadcaster in your system slows down the running of the PC dramatically.
5.Aqua Demo
Aqua Demo is the best way to record gameplay on a PC to produce high-quality video. You can easily record gameplay as the interface of the tool is intuitive and easy to use. It supports various video formats, including AVI, MP4, and MOV, to save the recordings. Users can do editing while recording to make it engaging and interactive.

Image Name: best-game-recorder-for-pc-2024-5.jpg
Image Alt:
Pros
- This tool allows you to record video using the sound of a PC, microphone, or both.
- You can easily schedule when video recording should take place with this tool.
Con
- AceThinker Aqua Demo offers a limited trial version to its users for screen recording.
6.GoPlay
GoPlay is the best software to record gameplay as it allows you to record yourself while gaming. With the help of this software, users can do basic editing of the video before live streaming. Plus, it allows you to record fast-paced games up to 60fps for smooth results. The software offers the feature to remove unwanted noise in the video.

Pros
- This screen recorder offers you the option to dub your own voice within the video recording.
- It helps to adjust the audio of each track on the timeline.
Con
- Unlike other screen recorders, it has a small number of transitions and effects.
7.Action! – Game Recorder
Action! stands out as one of the best screen recorder for games, as it uses low CPU space. Gamers can record smooth HD video of gameplay up to 120fps. You can make 20 times smaller video recordings with the help of this tool. Also, users are able to apply different editing effects to the recorder clips. This tool even enables you to control video recording with a smartphone.

Image Name: best-game-recorder-for-pc-2024-7.jpg
Image Alt:
Pros
- Action supports the webcam and microphone commentary during recording.
- It displays current and average FPS while playing games and saves benchmark results.
Con
- People face usability issues like problems with frame rate drops while recording.
8.Wondershare DemoCreator
Users can use DemoCreator on Windows and Mac to record the screen of gameplay. No doubt, it is a cool game recording software available to users. It also offers lag-free recording for uninterrupted gameplay records. You can plan and automate recording sessions with the help of this software. This game recorder provides a dynamic cursor effect for a visual guide of your audience.

Pros
- Wondershare DemoCreator offers dual monitor recording for an expanded view.
- User can create their own virtual avatars for presenting the content through video.
Con
- The tool has limited functionality in the free version, so you have to buy its premium subscription.
10+ Screen Recorder without Watermark
https://www.youtube.com/watch?v=CVmVxhxfnlU
Part 3: Make Screen Recording Simple and Easy: Wondershare Filmora
Gaming has made a significant impact on people as the associated industry keep producing new games with the latest technology. Moreover, the popularity of streaming games online has also increased. In this case, gamers need an effective game recorder software. Wondershare Filmora is the most efficient solution to effective screen recording. This video game recorder tool can capture any area of your selection.
Filmora also has various built-in editing tools and recording effects. You can also customize the ratio and size of your recording screen by changing the height and width. This tool records the screen and captures the audio from your microphone at the same time. Gamers can schedule their recording with the Record Timer feature. Moreover, you can customize your keystrokes and make hotkey combinations.
Other Features of Wondershare Filmora
- Split Screen: The Split Screen feature has up to 250+ pre-made templates that help you create animated video collages. You can have up to 6 screens for gameplaying or live chat channels on your screen. There are thousands of effects and filters you add to each of the screens.

- AI Thumbnail Creator: Filmora provides a Thumbnail feature that can generate exclusive thumbnails for your videos. It supports advanced text and image editing tools with 58+ templates. You can get stunning thumbnails for your gameplay in seconds with the help of AI.

- AI Vocal Remover: If you are having trouble with unnecessary background noise, remove it with the AI vocal remover feature. Streamers can separate the vocals from their microphone and gameplay. Also, you can dub videos freely without losing audio quality.

Steps-by-Step Guide to Screen Record With Wondershare Filmora
Wondershare Filmora provides the best way to record gameplay on your PC, as it gives you the necessary features. So, let’s discuss the steps on how to record a professional gameplay recording. The following are the steps to record gameplay with Filmora:
Step 1 Launch and Create a New Project on Filmora
After downloading Filmora on your PC and launching the software, go to the “Create Project” tab on the left-side panel. Here, you can click the “New Project” option to open the main editing interface.

Step 2 Record Gameplay on Your PC
On the main interface, click the “Record” option above the media panel. From the drop-down panel, select the “Record PC Screen” option. After that, a small panel screen with the name “Wondershare Screen Recorder” will appear on your PC.

Step 3 Adjust Recording Settings for Gaming
Now, adjust the screen recording settings according to your preference. You can change the screen’s dimensions from full screen to target window. Also, choose to turn on the microphone, audio, and camera by clicking on their icons. Now, hit the dropdown menu of “Settings,” and change the frame rate and other video options. Once you are satisfied with the settings, hit the “Start Recording” button to start.

Conclusion
Gamers need to find the best tool to share their gaming moments in 2024. Filmora is a standout choice among the game recording software for PCs. The software is reliable and enriched with features that are easy to use. You can record, edit, and share your exciting gameplay adventures with the audience. If you’re on the lookout for the best game recorder for your PC, Filmora is a solid recommendation.
- Part 2. Top Best Game Recorders To Consider for Efficient Recording
- Part 3. Make Screen Recording Simple and Easy: Wondershare Filmora
- Conclusion
Part 1: Discussing the Advancements in Game Recording in the Digital Realm
Game recording has evolved from basic methods to sophisticated tools. In the past, gamers used VHS recorders connected to consoles. Moreover, screen capture software like Fraps became popular in the early 2000s. Afterward, built-in recording features within PlayStation 4 and Xbox One simplified the process.
Platforms like Twitch emerged for live streaming in the late 2010s. Cloud gaming services have revolutionized recording by allowing gameplay on remote servers. Finally, modern game recorders emerged to provide instant replay and webcam integration.
Chronological Understanding of the Advancements in Game Recordings
- Users can now capture gameplay in stunning 4K resolution for top-notch visual quality.
- Frame rate settings ensure smooth playback of recorded videos.
- Bitrate settings let you control recording quality and file size.
- Players can use GPU power for faster and more efficient video encoding.
- Multi-channel audio recording lets you record gameplay audio, microphone input, and other sources. Also, it separates tracks for easy editing and control.
- An infusion of overlays in the webcam adds a personalized touch to gameplay videos, building competition in quality offering.
- Network switching within software is possible without any cross-platform shift, from recording to live streaming.
Example
PewDiePie is one of the leading stars in YouTube stardom. His game screen recording is proof of how online entertainment has changed. He earned his initial fame by playing horror games with funny commentary. People loved his infectious personality and unique style. Furthermore, he expanded his content to include games, vlogs, and entertaining stuff. Now, he has a fan base of 111M, positioning him as the most influential figure in online gaming.
Part 2: Top Best Game Recorders To Consider for Efficient Recording
Most of us play games for fun while wanting to share the gameplay with friends. The game screen recorder helps you share the screen with others to enjoy with them. Let’s go through the options of tools that can record gameplay screens efficiently:
Best Game Recorders for PC
1.Movavi
2.OBS
3.Bandicam
4.XSplit
5.Aqua Demo
6.GoPlay
7.Action! Game Recorder
8.Wondershare DemoCreator
1.Movavi
Movavi lets you do full-screen or custom area recording with various functionalities. Using this tool, you can annotate the screen while recording for real-time experience. For improving viewer’s attention, you can also illuminate mouse cursor and keystrokes within the recording screen. It also features a noise reduction feature to get rid of intrusive voices. Movavi can take scrolling screenshots to capture content that doesn’t fit on one screen.

Pros
- This game screen recording tool has a user-friendly interface and is easy to use without the need for training.
- The tool allows you to capture audio and video simultaneously and separately.
Con
- It offers limited features when it comes to video manipulation while recording games.
2.OBS Studio
Open Broadcaster Software is the best screen recorder for games when it comes to finding open-source recorders. This recorder enables you to record multiple scenes at a time. It offers seamless transitions to switch between the scenes. Users can use the audio mixer feature of the tool for noise suppression and gain. The tool also provides the configuration option to add new sources and replace existing ones.

Pros
- You can capture multiple windows simultaneously with the help of this tool, giving diversified opportunities.
- This screen recorder allows you to preview sources and scenes before live streaming.
Con
- OBS is challenging for beginners due to its steep learning curve.
3.Bandicam
Gamers can record high-resolution gameplay in 4K UHD and 480FPS with Bandicam. Upon utilizing this tool, they record gameplay and voice to share with friends on YouTube. This Lolio game recorder uses a webcam and mic to record gameplay with the player’s live face and voice. Plus, you can also save the audio track of the gameplay record in separate WAV files.

Pros
- This game recorder compresses high-quality video to save space.
- Bandicam supports the latest hardware acceleration from AMD, Intel, and NVIDIA.
Con
- It only works on Windows and does not support Mac, Android, or Linux.
4.XSplit
Content creators and game players can use this all-in-one streaming and recording tool. This video game recorder allows you to switch from a solo camera to a podcast easily. You can start streaming to any broadcast platform with the native plugin of the tool. XSplit Broadcaster enables you to add multiple animation and broadcast effects to your scenes.

Pros
- Users can record multiple scenes at the same time with this screen recorder. This helps you in covering more content in similar timeframes.
- You can do custom transitions of various scenes with the help of this tool.
Con
- Installing XSplit Broadcaster in your system slows down the running of the PC dramatically.
5.Aqua Demo
Aqua Demo is the best way to record gameplay on a PC to produce high-quality video. You can easily record gameplay as the interface of the tool is intuitive and easy to use. It supports various video formats, including AVI, MP4, and MOV, to save the recordings. Users can do editing while recording to make it engaging and interactive.

Image Name: best-game-recorder-for-pc-2024-5.jpg
Image Alt:
Pros
- This tool allows you to record video using the sound of a PC, microphone, or both.
- You can easily schedule when video recording should take place with this tool.
Con
- AceThinker Aqua Demo offers a limited trial version to its users for screen recording.
6.GoPlay
GoPlay is the best software to record gameplay as it allows you to record yourself while gaming. With the help of this software, users can do basic editing of the video before live streaming. Plus, it allows you to record fast-paced games up to 60fps for smooth results. The software offers the feature to remove unwanted noise in the video.

Pros
- This screen recorder offers you the option to dub your own voice within the video recording.
- It helps to adjust the audio of each track on the timeline.
Con
- Unlike other screen recorders, it has a small number of transitions and effects.
7.Action! – Game Recorder
Action! stands out as one of the best screen recorder for games, as it uses low CPU space. Gamers can record smooth HD video of gameplay up to 120fps. You can make 20 times smaller video recordings with the help of this tool. Also, users are able to apply different editing effects to the recorder clips. This tool even enables you to control video recording with a smartphone.

Image Name: best-game-recorder-for-pc-2024-7.jpg
Image Alt:
Pros
- Action supports the webcam and microphone commentary during recording.
- It displays current and average FPS while playing games and saves benchmark results.
Con
- People face usability issues like problems with frame rate drops while recording.
8.Wondershare DemoCreator
Users can use DemoCreator on Windows and Mac to record the screen of gameplay. No doubt, it is a cool game recording software available to users. It also offers lag-free recording for uninterrupted gameplay records. You can plan and automate recording sessions with the help of this software. This game recorder provides a dynamic cursor effect for a visual guide of your audience.

Pros
- Wondershare DemoCreator offers dual monitor recording for an expanded view.
- User can create their own virtual avatars for presenting the content through video.
Con
- The tool has limited functionality in the free version, so you have to buy its premium subscription.
10+ Screen Recorder without Watermark
https://www.youtube.com/watch?v=CVmVxhxfnlU
Part 3: Make Screen Recording Simple and Easy: Wondershare Filmora
Gaming has made a significant impact on people as the associated industry keep producing new games with the latest technology. Moreover, the popularity of streaming games online has also increased. In this case, gamers need an effective game recorder software. Wondershare Filmora is the most efficient solution to effective screen recording. This video game recorder tool can capture any area of your selection.
Filmora also has various built-in editing tools and recording effects. You can also customize the ratio and size of your recording screen by changing the height and width. This tool records the screen and captures the audio from your microphone at the same time. Gamers can schedule their recording with the Record Timer feature. Moreover, you can customize your keystrokes and make hotkey combinations.
Other Features of Wondershare Filmora
- Split Screen: The Split Screen feature has up to 250+ pre-made templates that help you create animated video collages. You can have up to 6 screens for gameplaying or live chat channels on your screen. There are thousands of effects and filters you add to each of the screens.

- AI Thumbnail Creator: Filmora provides a Thumbnail feature that can generate exclusive thumbnails for your videos. It supports advanced text and image editing tools with 58+ templates. You can get stunning thumbnails for your gameplay in seconds with the help of AI.

- AI Vocal Remover: If you are having trouble with unnecessary background noise, remove it with the AI vocal remover feature. Streamers can separate the vocals from their microphone and gameplay. Also, you can dub videos freely without losing audio quality.

Steps-by-Step Guide to Screen Record With Wondershare Filmora
Wondershare Filmora provides the best way to record gameplay on your PC, as it gives you the necessary features. So, let’s discuss the steps on how to record a professional gameplay recording. The following are the steps to record gameplay with Filmora:
Step 1 Launch and Create a New Project on Filmora
After downloading Filmora on your PC and launching the software, go to the “Create Project” tab on the left-side panel. Here, you can click the “New Project” option to open the main editing interface.

Step 2 Record Gameplay on Your PC
On the main interface, click the “Record” option above the media panel. From the drop-down panel, select the “Record PC Screen” option. After that, a small panel screen with the name “Wondershare Screen Recorder” will appear on your PC.

Step 3 Adjust Recording Settings for Gaming
Now, adjust the screen recording settings according to your preference. You can change the screen’s dimensions from full screen to target window. Also, choose to turn on the microphone, audio, and camera by clicking on their icons. Now, hit the dropdown menu of “Settings,” and change the frame rate and other video options. Once you are satisfied with the settings, hit the “Start Recording” button to start.

Conclusion
Gamers need to find the best tool to share their gaming moments in 2024. Filmora is a standout choice among the game recording software for PCs. The software is reliable and enriched with features that are easy to use. You can record, edit, and share your exciting gameplay adventures with the audience. If you’re on the lookout for the best game recorder for your PC, Filmora is a solid recommendation.
- Part 2. Top Best Game Recorders To Consider for Efficient Recording
- Part 3. Make Screen Recording Simple and Easy: Wondershare Filmora
- Conclusion
Part 1: Discussing the Advancements in Game Recording in the Digital Realm
Game recording has evolved from basic methods to sophisticated tools. In the past, gamers used VHS recorders connected to consoles. Moreover, screen capture software like Fraps became popular in the early 2000s. Afterward, built-in recording features within PlayStation 4 and Xbox One simplified the process.
Platforms like Twitch emerged for live streaming in the late 2010s. Cloud gaming services have revolutionized recording by allowing gameplay on remote servers. Finally, modern game recorders emerged to provide instant replay and webcam integration.
Chronological Understanding of the Advancements in Game Recordings
- Users can now capture gameplay in stunning 4K resolution for top-notch visual quality.
- Frame rate settings ensure smooth playback of recorded videos.
- Bitrate settings let you control recording quality and file size.
- Players can use GPU power for faster and more efficient video encoding.
- Multi-channel audio recording lets you record gameplay audio, microphone input, and other sources. Also, it separates tracks for easy editing and control.
- An infusion of overlays in the webcam adds a personalized touch to gameplay videos, building competition in quality offering.
- Network switching within software is possible without any cross-platform shift, from recording to live streaming.
Example
PewDiePie is one of the leading stars in YouTube stardom. His game screen recording is proof of how online entertainment has changed. He earned his initial fame by playing horror games with funny commentary. People loved his infectious personality and unique style. Furthermore, he expanded his content to include games, vlogs, and entertaining stuff. Now, he has a fan base of 111M, positioning him as the most influential figure in online gaming.
Part 2: Top Best Game Recorders To Consider for Efficient Recording
Most of us play games for fun while wanting to share the gameplay with friends. The game screen recorder helps you share the screen with others to enjoy with them. Let’s go through the options of tools that can record gameplay screens efficiently:
Best Game Recorders for PC
1.Movavi
2.OBS
3.Bandicam
4.XSplit
5.Aqua Demo
6.GoPlay
7.Action! Game Recorder
8.Wondershare DemoCreator
1.Movavi
Movavi lets you do full-screen or custom area recording with various functionalities. Using this tool, you can annotate the screen while recording for real-time experience. For improving viewer’s attention, you can also illuminate mouse cursor and keystrokes within the recording screen. It also features a noise reduction feature to get rid of intrusive voices. Movavi can take scrolling screenshots to capture content that doesn’t fit on one screen.

Pros
- This game screen recording tool has a user-friendly interface and is easy to use without the need for training.
- The tool allows you to capture audio and video simultaneously and separately.
Con
- It offers limited features when it comes to video manipulation while recording games.
2.OBS Studio
Open Broadcaster Software is the best screen recorder for games when it comes to finding open-source recorders. This recorder enables you to record multiple scenes at a time. It offers seamless transitions to switch between the scenes. Users can use the audio mixer feature of the tool for noise suppression and gain. The tool also provides the configuration option to add new sources and replace existing ones.

Pros
- You can capture multiple windows simultaneously with the help of this tool, giving diversified opportunities.
- This screen recorder allows you to preview sources and scenes before live streaming.
Con
- OBS is challenging for beginners due to its steep learning curve.
3.Bandicam
Gamers can record high-resolution gameplay in 4K UHD and 480FPS with Bandicam. Upon utilizing this tool, they record gameplay and voice to share with friends on YouTube. This Lolio game recorder uses a webcam and mic to record gameplay with the player’s live face and voice. Plus, you can also save the audio track of the gameplay record in separate WAV files.

Pros
- This game recorder compresses high-quality video to save space.
- Bandicam supports the latest hardware acceleration from AMD, Intel, and NVIDIA.
Con
- It only works on Windows and does not support Mac, Android, or Linux.
4.XSplit
Content creators and game players can use this all-in-one streaming and recording tool. This video game recorder allows you to switch from a solo camera to a podcast easily. You can start streaming to any broadcast platform with the native plugin of the tool. XSplit Broadcaster enables you to add multiple animation and broadcast effects to your scenes.

Pros
- Users can record multiple scenes at the same time with this screen recorder. This helps you in covering more content in similar timeframes.
- You can do custom transitions of various scenes with the help of this tool.
Con
- Installing XSplit Broadcaster in your system slows down the running of the PC dramatically.
5.Aqua Demo
Aqua Demo is the best way to record gameplay on a PC to produce high-quality video. You can easily record gameplay as the interface of the tool is intuitive and easy to use. It supports various video formats, including AVI, MP4, and MOV, to save the recordings. Users can do editing while recording to make it engaging and interactive.

Image Name: best-game-recorder-for-pc-2024-5.jpg
Image Alt:
Pros
- This tool allows you to record video using the sound of a PC, microphone, or both.
- You can easily schedule when video recording should take place with this tool.
Con
- AceThinker Aqua Demo offers a limited trial version to its users for screen recording.
6.GoPlay
GoPlay is the best software to record gameplay as it allows you to record yourself while gaming. With the help of this software, users can do basic editing of the video before live streaming. Plus, it allows you to record fast-paced games up to 60fps for smooth results. The software offers the feature to remove unwanted noise in the video.

Pros
- This screen recorder offers you the option to dub your own voice within the video recording.
- It helps to adjust the audio of each track on the timeline.
Con
- Unlike other screen recorders, it has a small number of transitions and effects.
7.Action! – Game Recorder
Action! stands out as one of the best screen recorder for games, as it uses low CPU space. Gamers can record smooth HD video of gameplay up to 120fps. You can make 20 times smaller video recordings with the help of this tool. Also, users are able to apply different editing effects to the recorder clips. This tool even enables you to control video recording with a smartphone.

Image Name: best-game-recorder-for-pc-2024-7.jpg
Image Alt:
Pros
- Action supports the webcam and microphone commentary during recording.
- It displays current and average FPS while playing games and saves benchmark results.
Con
- People face usability issues like problems with frame rate drops while recording.
8.Wondershare DemoCreator
Users can use DemoCreator on Windows and Mac to record the screen of gameplay. No doubt, it is a cool game recording software available to users. It also offers lag-free recording for uninterrupted gameplay records. You can plan and automate recording sessions with the help of this software. This game recorder provides a dynamic cursor effect for a visual guide of your audience.

Pros
- Wondershare DemoCreator offers dual monitor recording for an expanded view.
- User can create their own virtual avatars for presenting the content through video.
Con
- The tool has limited functionality in the free version, so you have to buy its premium subscription.
10+ Screen Recorder without Watermark
https://www.youtube.com/watch?v=CVmVxhxfnlU
Part 3: Make Screen Recording Simple and Easy: Wondershare Filmora
Gaming has made a significant impact on people as the associated industry keep producing new games with the latest technology. Moreover, the popularity of streaming games online has also increased. In this case, gamers need an effective game recorder software. Wondershare Filmora is the most efficient solution to effective screen recording. This video game recorder tool can capture any area of your selection.
Filmora also has various built-in editing tools and recording effects. You can also customize the ratio and size of your recording screen by changing the height and width. This tool records the screen and captures the audio from your microphone at the same time. Gamers can schedule their recording with the Record Timer feature. Moreover, you can customize your keystrokes and make hotkey combinations.
Other Features of Wondershare Filmora
- Split Screen: The Split Screen feature has up to 250+ pre-made templates that help you create animated video collages. You can have up to 6 screens for gameplaying or live chat channels on your screen. There are thousands of effects and filters you add to each of the screens.

- AI Thumbnail Creator: Filmora provides a Thumbnail feature that can generate exclusive thumbnails for your videos. It supports advanced text and image editing tools with 58+ templates. You can get stunning thumbnails for your gameplay in seconds with the help of AI.

- AI Vocal Remover: If you are having trouble with unnecessary background noise, remove it with the AI vocal remover feature. Streamers can separate the vocals from their microphone and gameplay. Also, you can dub videos freely without losing audio quality.

Steps-by-Step Guide to Screen Record With Wondershare Filmora
Wondershare Filmora provides the best way to record gameplay on your PC, as it gives you the necessary features. So, let’s discuss the steps on how to record a professional gameplay recording. The following are the steps to record gameplay with Filmora:
Step 1 Launch and Create a New Project on Filmora
After downloading Filmora on your PC and launching the software, go to the “Create Project” tab on the left-side panel. Here, you can click the “New Project” option to open the main editing interface.

Step 2 Record Gameplay on Your PC
On the main interface, click the “Record” option above the media panel. From the drop-down panel, select the “Record PC Screen” option. After that, a small panel screen with the name “Wondershare Screen Recorder” will appear on your PC.

Step 3 Adjust Recording Settings for Gaming
Now, adjust the screen recording settings according to your preference. You can change the screen’s dimensions from full screen to target window. Also, choose to turn on the microphone, audio, and camera by clicking on their icons. Now, hit the dropdown menu of “Settings,” and change the frame rate and other video options. Once you are satisfied with the settings, hit the “Start Recording” button to start.

Conclusion
Gamers need to find the best tool to share their gaming moments in 2024. Filmora is a standout choice among the game recording software for PCs. The software is reliable and enriched with features that are easy to use. You can record, edit, and share your exciting gameplay adventures with the audience. If you’re on the lookout for the best game recorder for your PC, Filmora is a solid recommendation.
- Part 2. Top Best Game Recorders To Consider for Efficient Recording
- Part 3. Make Screen Recording Simple and Easy: Wondershare Filmora
- Conclusion
Part 1: Discussing the Advancements in Game Recording in the Digital Realm
Game recording has evolved from basic methods to sophisticated tools. In the past, gamers used VHS recorders connected to consoles. Moreover, screen capture software like Fraps became popular in the early 2000s. Afterward, built-in recording features within PlayStation 4 and Xbox One simplified the process.
Platforms like Twitch emerged for live streaming in the late 2010s. Cloud gaming services have revolutionized recording by allowing gameplay on remote servers. Finally, modern game recorders emerged to provide instant replay and webcam integration.
Chronological Understanding of the Advancements in Game Recordings
- Users can now capture gameplay in stunning 4K resolution for top-notch visual quality.
- Frame rate settings ensure smooth playback of recorded videos.
- Bitrate settings let you control recording quality and file size.
- Players can use GPU power for faster and more efficient video encoding.
- Multi-channel audio recording lets you record gameplay audio, microphone input, and other sources. Also, it separates tracks for easy editing and control.
- An infusion of overlays in the webcam adds a personalized touch to gameplay videos, building competition in quality offering.
- Network switching within software is possible without any cross-platform shift, from recording to live streaming.
Example
PewDiePie is one of the leading stars in YouTube stardom. His game screen recording is proof of how online entertainment has changed. He earned his initial fame by playing horror games with funny commentary. People loved his infectious personality and unique style. Furthermore, he expanded his content to include games, vlogs, and entertaining stuff. Now, he has a fan base of 111M, positioning him as the most influential figure in online gaming.
Part 2: Top Best Game Recorders To Consider for Efficient Recording
Most of us play games for fun while wanting to share the gameplay with friends. The game screen recorder helps you share the screen with others to enjoy with them. Let’s go through the options of tools that can record gameplay screens efficiently:
Best Game Recorders for PC
1.Movavi
2.OBS
3.Bandicam
4.XSplit
5.Aqua Demo
6.GoPlay
7.Action! Game Recorder
8.Wondershare DemoCreator
1.Movavi
Movavi lets you do full-screen or custom area recording with various functionalities. Using this tool, you can annotate the screen while recording for real-time experience. For improving viewer’s attention, you can also illuminate mouse cursor and keystrokes within the recording screen. It also features a noise reduction feature to get rid of intrusive voices. Movavi can take scrolling screenshots to capture content that doesn’t fit on one screen.

Pros
- This game screen recording tool has a user-friendly interface and is easy to use without the need for training.
- The tool allows you to capture audio and video simultaneously and separately.
Con
- It offers limited features when it comes to video manipulation while recording games.
2.OBS Studio
Open Broadcaster Software is the best screen recorder for games when it comes to finding open-source recorders. This recorder enables you to record multiple scenes at a time. It offers seamless transitions to switch between the scenes. Users can use the audio mixer feature of the tool for noise suppression and gain. The tool also provides the configuration option to add new sources and replace existing ones.

Pros
- You can capture multiple windows simultaneously with the help of this tool, giving diversified opportunities.
- This screen recorder allows you to preview sources and scenes before live streaming.
Con
- OBS is challenging for beginners due to its steep learning curve.
3.Bandicam
Gamers can record high-resolution gameplay in 4K UHD and 480FPS with Bandicam. Upon utilizing this tool, they record gameplay and voice to share with friends on YouTube. This Lolio game recorder uses a webcam and mic to record gameplay with the player’s live face and voice. Plus, you can also save the audio track of the gameplay record in separate WAV files.

Pros
- This game recorder compresses high-quality video to save space.
- Bandicam supports the latest hardware acceleration from AMD, Intel, and NVIDIA.
Con
- It only works on Windows and does not support Mac, Android, or Linux.
4.XSplit
Content creators and game players can use this all-in-one streaming and recording tool. This video game recorder allows you to switch from a solo camera to a podcast easily. You can start streaming to any broadcast platform with the native plugin of the tool. XSplit Broadcaster enables you to add multiple animation and broadcast effects to your scenes.

Pros
- Users can record multiple scenes at the same time with this screen recorder. This helps you in covering more content in similar timeframes.
- You can do custom transitions of various scenes with the help of this tool.
Con
- Installing XSplit Broadcaster in your system slows down the running of the PC dramatically.
5.Aqua Demo
Aqua Demo is the best way to record gameplay on a PC to produce high-quality video. You can easily record gameplay as the interface of the tool is intuitive and easy to use. It supports various video formats, including AVI, MP4, and MOV, to save the recordings. Users can do editing while recording to make it engaging and interactive.

Image Name: best-game-recorder-for-pc-2024-5.jpg
Image Alt:
Pros
- This tool allows you to record video using the sound of a PC, microphone, or both.
- You can easily schedule when video recording should take place with this tool.
Con
- AceThinker Aqua Demo offers a limited trial version to its users for screen recording.
6.GoPlay
GoPlay is the best software to record gameplay as it allows you to record yourself while gaming. With the help of this software, users can do basic editing of the video before live streaming. Plus, it allows you to record fast-paced games up to 60fps for smooth results. The software offers the feature to remove unwanted noise in the video.

Pros
- This screen recorder offers you the option to dub your own voice within the video recording.
- It helps to adjust the audio of each track on the timeline.
Con
- Unlike other screen recorders, it has a small number of transitions and effects.
7.Action! – Game Recorder
Action! stands out as one of the best screen recorder for games, as it uses low CPU space. Gamers can record smooth HD video of gameplay up to 120fps. You can make 20 times smaller video recordings with the help of this tool. Also, users are able to apply different editing effects to the recorder clips. This tool even enables you to control video recording with a smartphone.

Image Name: best-game-recorder-for-pc-2024-7.jpg
Image Alt:
Pros
- Action supports the webcam and microphone commentary during recording.
- It displays current and average FPS while playing games and saves benchmark results.
Con
- People face usability issues like problems with frame rate drops while recording.
8.Wondershare DemoCreator
Users can use DemoCreator on Windows and Mac to record the screen of gameplay. No doubt, it is a cool game recording software available to users. It also offers lag-free recording for uninterrupted gameplay records. You can plan and automate recording sessions with the help of this software. This game recorder provides a dynamic cursor effect for a visual guide of your audience.

Pros
- Wondershare DemoCreator offers dual monitor recording for an expanded view.
- User can create their own virtual avatars for presenting the content through video.
Con
- The tool has limited functionality in the free version, so you have to buy its premium subscription.
10+ Screen Recorder without Watermark
https://www.youtube.com/watch?v=CVmVxhxfnlU
Part 3: Make Screen Recording Simple and Easy: Wondershare Filmora
Gaming has made a significant impact on people as the associated industry keep producing new games with the latest technology. Moreover, the popularity of streaming games online has also increased. In this case, gamers need an effective game recorder software. Wondershare Filmora is the most efficient solution to effective screen recording. This video game recorder tool can capture any area of your selection.
Filmora also has various built-in editing tools and recording effects. You can also customize the ratio and size of your recording screen by changing the height and width. This tool records the screen and captures the audio from your microphone at the same time. Gamers can schedule their recording with the Record Timer feature. Moreover, you can customize your keystrokes and make hotkey combinations.
Other Features of Wondershare Filmora
- Split Screen: The Split Screen feature has up to 250+ pre-made templates that help you create animated video collages. You can have up to 6 screens for gameplaying or live chat channels on your screen. There are thousands of effects and filters you add to each of the screens.

- AI Thumbnail Creator: Filmora provides a Thumbnail feature that can generate exclusive thumbnails for your videos. It supports advanced text and image editing tools with 58+ templates. You can get stunning thumbnails for your gameplay in seconds with the help of AI.

- AI Vocal Remover: If you are having trouble with unnecessary background noise, remove it with the AI vocal remover feature. Streamers can separate the vocals from their microphone and gameplay. Also, you can dub videos freely without losing audio quality.

Steps-by-Step Guide to Screen Record With Wondershare Filmora
Wondershare Filmora provides the best way to record gameplay on your PC, as it gives you the necessary features. So, let’s discuss the steps on how to record a professional gameplay recording. The following are the steps to record gameplay with Filmora:
Step 1 Launch and Create a New Project on Filmora
After downloading Filmora on your PC and launching the software, go to the “Create Project” tab on the left-side panel. Here, you can click the “New Project” option to open the main editing interface.

Step 2 Record Gameplay on Your PC
On the main interface, click the “Record” option above the media panel. From the drop-down panel, select the “Record PC Screen” option. After that, a small panel screen with the name “Wondershare Screen Recorder” will appear on your PC.

Step 3 Adjust Recording Settings for Gaming
Now, adjust the screen recording settings according to your preference. You can change the screen’s dimensions from full screen to target window. Also, choose to turn on the microphone, audio, and camera by clicking on their icons. Now, hit the dropdown menu of “Settings,” and change the frame rate and other video options. Once you are satisfied with the settings, hit the “Start Recording” button to start.

Conclusion
Gamers need to find the best tool to share their gaming moments in 2024. Filmora is a standout choice among the game recording software for PCs. The software is reliable and enriched with features that are easy to use. You can record, edit, and share your exciting gameplay adventures with the audience. If you’re on the lookout for the best game recorder for your PC, Filmora is a solid recommendation.
Also read:
- New 10 Matching Color Combination That Works Together for 2024
- 10 Top Free GIF Background Remover for PC and Online
- Customize PowerPoint Slideshow Icon in 8 Simple Ways
- New 2024 Approved Change Speed of a Video on iPhone
- 2024 Approved Start Your Creative Journey Now. Follow This Step-by-Step Guide on How to Add Double Exposure Effects to Your Personal Videos by Using the Filmora Video Editor
- Splitting Audio From a Video in Sony Vegas Step by Step for 2024
- New Do You Wish to Create High-Quality Videos and Experience Effective Videos with Editing? No Problem at All because the Keyboard Shortcuts Listed Here Will Assist You for 2024
- 2024 Approved If You Want to Keep Your Memories in Form of Video or Slideshow Then Keynote Is Great App for You. It Has Amazing and Powerful Tools Which Give Your Slideshow a Great and Beautiful Look
- 2024 Approved Are You Seeking Free Lumetri Presets to Enhance Your Videos? Find Out All About Lumetri Color Presets and How to Use Them in Presenting Proper Color Grading
- New Do You Want to Excel at Using Adobe Premiere Pro Software for Splitting Videos and Audio? Learn About Splitting a Video and Audio Using Different Tools and Add a New Skill to Your Skillset with a Step-by-Step Guide in This Article for 2024
- New 2024 Approved Find Out How to Create Your Own Custom Motion Graphics in Filmora. Add Unique Objects, Manipulate Text, and Animate Anything You Want
- Updated In 2024, How to Add Transitions in Adobe Premiere Pro
- Getting Into The Details A Review of Kodak LUTs for 2024
- In 2024, 4 Ways for Rotating Your GoPro Videos Professionally
- Updated Are You Wondering How to Slow Down Videos or Speed Them up, Here Are Three Ways to Do It. Speed up or Slow Down Your Videos on PC, Online, and Phone for 2024
- Thousands Already Know Ezgif and So Can You
- New 2024 Approved Whats The Best Laptops For Video Editing
- Updated Whatsapp Video converterKeywords Convert Video for Whatsapp 6600; Video Converter for Whatsapp 6600; Reduce Video Size for Whatsapp 1600; Whatsapp Supported Video Formats 720; Convert Video to Whatsapp Format 590 for 2024
- In 2024, Change Location on Yik Yak For your Motorola Edge 40 to Enjoy More Fun | Dr.fone
- 7 Ways to Unlock a Locked Motorola Moto G13 Phone
- Full Guide to Catch 100 IV Pokémon Using a Map On Apple iPhone XS Max | Dr.fone
- Full Solutions to Fix Error Code 920 In Google Play on Xiaomi Redmi Note 12 5G | Dr.fone
- In 2024, How to Remove and Reset Face ID on Apple iPhone 7 Plus
- In 2024, Complete Tutorial to Use VPNa to Fake GPS Location On Motorola Edge 2023 | Dr.fone
- How to Track WhatsApp Messages on Samsung Galaxy S23 Tactical Edition Without Them Knowing? | Dr.fone
- How to use iSpoofer on Nokia G42 5G? | Dr.fone
- Here are Some Pro Tips for Pokemon Go PvP Battles On Apple iPhone 8 | Dr.fone
- Why Is My Tecno Pova 5 Offline? Troubleshooting Guide | Dr.fone
- Title: New Step by Step to Rotate Videos in Davinci Resolve
- Author: Morgan
- Created at : 2024-05-19 05:12:06
- Updated at : 2024-05-20 05:12:06
- Link: https://ai-video-editing.techidaily.com/new-step-by-step-to-rotate-videos-in-davinci-resolve/
- License: This work is licensed under CC BY-NC-SA 4.0.

