:max_bytes(150000):strip_icc():format(webp)/woman-with-remote-cropped-getty-169707531-5b2ebd5943a1030036b1eb56.jpg)
New The Best 10 GIF to JPGPNG Converters

The Best 10 GIF to JPGPNG Converters
A GIF to JPG converter software is responsible for altering files in the animated GIF format to static JPG or PNG image format. Since GIFs are not compatible with some sites, platforms, or documentation types, this is a safer alternative.
JPG, PNG, and even APNG formats are easier to download, work on most device/OS types, and are simpler to print. They have a lesser size as well.
If you are looking for a stable converter, we present the top tools for that here, no matter what kind of devices you use! Read to know which ones you can use based on their features, usability, and support.
10 Best Tools to convert GIF into JPG/PNG/APNG
The following are the best converters for turning GIF into JPG, APNG, or PNG formats.
1. OnlineConvert
One of the simplest GIF to JPG converter types is OnlineConvert. It has diverse customization settings. For example, you can choose the image size and quality or use AI-powered optimization support.

How to download: iOS , Android , Online tool , Chrome extension , Firefox extension
Rating: 3.7 stars out of 5 (Google Play Store)
Compatible OS: web-based, iOS, Android
Price: Free
Main Features:
- Advanced features like Equalize, Stabilize, etc.
- Decide the black/white threshold limits.
- Activate AI enable for optimized conversion.
- Set cropping limits.
Pros
- Decide the image quality.
- Choose image width/height.
- Add an example file.
Cons
- The maximum size of the file is 100 MB.
- It cannot convert encrypted files.
2. Ezgif
Ezgif is another simple-to-use online tool with substantial image conversion benefits. You can add your GIF files from the Cloud account or computer and directly get JPG files. PNG does not have a direct conversion here, though.
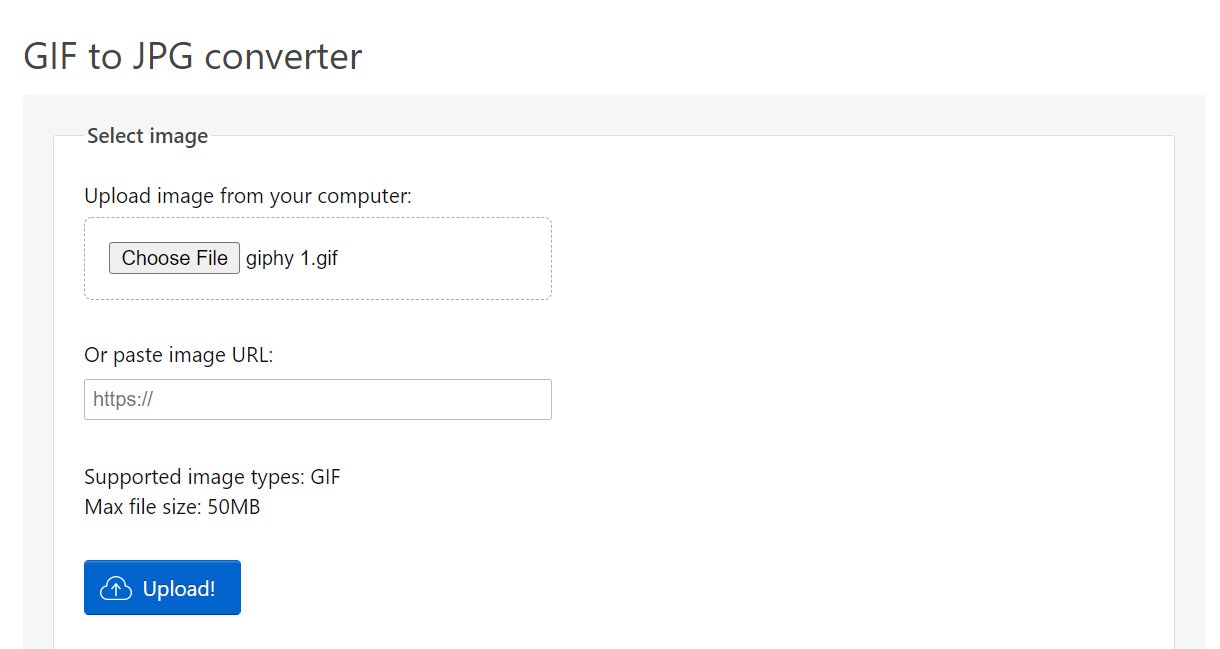
How to download: Online tool
Rating: 100 out of 100 (Scam Detector)
Compatible OS: web-based browsers
Price: Free
Main Features:
- Support a maximum of 50 MB file size for images.
- Direct converter to JPG.
- Set background color to white.
- Add URL link of online GIF files.
Pros
- Instant conversion.
- No changes to original file quality.
- Add from the device.
Cons
- Upload and convert files one by one.
- No cloud support.
3. CloudConvert
CloudConvert is a high-quality online GIF to PNG converter that people can use to convert high-quality image files with no quality loss. First, choose your files, go for settings, and then the converting will be finished in minutes.
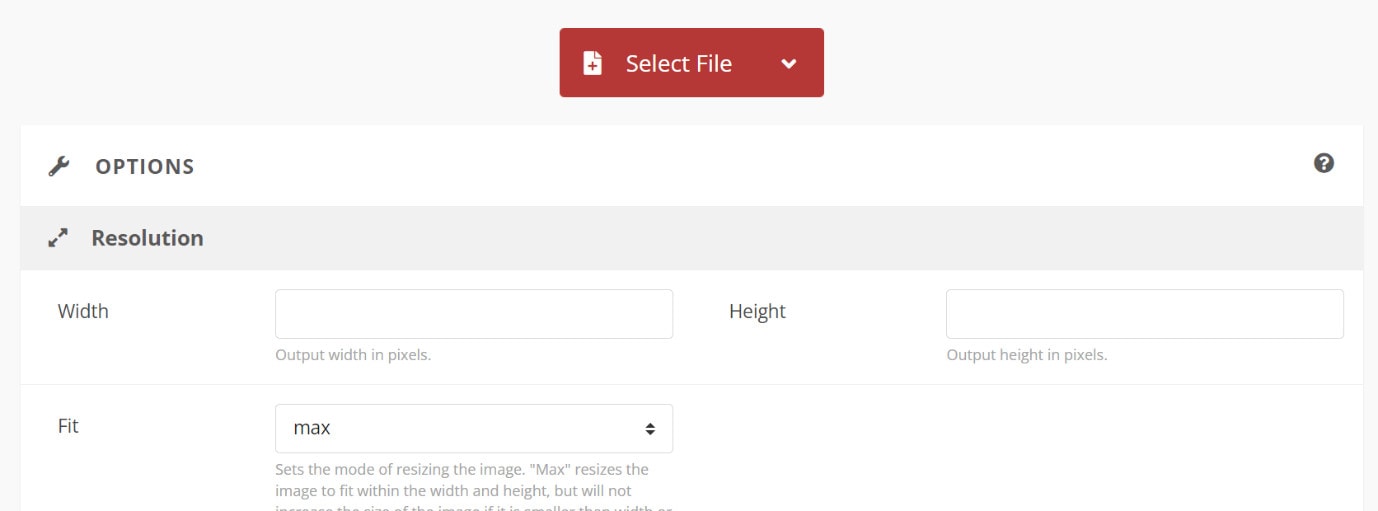
How to download: Online tool
Rating: 4.5 stars of 5 (Capterra)
Compatible OS: web-based
Price: Packages/Subscriptions- Costs start at USD 8 per conversion minute.
Main Features:
- Select a file from various formats, like URL, Device, or cloud accounts.
- Set crop/scape adjustments.
- Note image width and height.
- Select to strip or vice versa.
Pros
- Customize output file type.
- Support watermark security feature. It protects your images and graphic files from being stolen, used, or altered without the owner’s permission.
- High-quality image resolution is available.
Cons
- Slightly complex for beginners to understand or use initially.
- Bigger files take a longer time to load.
4. Convertio
Convertio is another top-grade GIF to JPGF converter which people can utilize to prepare high-definition image files from animated pictures. You can make multiple conversions and get high-priority customer support.

How to download: Online tool
Rating: 4.9 stars of 5 (Capterra)
Compatible OS: web-based
Price: Light- USD 9.99/month, Basic- USD 14.99/month, Unlimited- USD 25.99/month
Main Features:
- Get at least 25 concurrent conversion benefits with paid plans.
- Adfree pages.
- Unlimited conversions are only supported by the highest-paid plan.
- Unlimited allowed conversion minutes for users daily.
Pros
- The drag and drop function is smooth to use.
- Add files with at least 100 MB file size.
- Multiple formats are supported.
Cons
- Signup is necessary for a higher file size allowance.
- More limited service for free.
5. Soda PDF
This GIF to PNG converter is top-notch and used for changing big and small-sized GIF files into static PNG or JPG formats. However, no issues with image quality would be noticeable. You can use it for multiple conversions.

How to download: Online tool
Rating: 3.4 stars of 5 (Capterra)
Compatible OS: Online, Mac, Windows, Linux
Price: Standard- USD 6.73/month, Pro- USD 8.23/month, Business- USD 16.63/month
Main Features:
- Add GIF files from the computer, Dropbox, or Google Drive.
- Files are stored for a full day.
- Direct download button available.
- Redo conversion in case of issues.
Pros
- A desktop version with offline usage is available.
- The drag and drop function makes the converting process more convenient.
- Quick file saving.
Cons
- Cannot access old converted files from servers.
- Ads are available.
6. FreeConvert.com
FreeConvert is operable for multiple types of file conversions. In addition, you can store your files in the cloud and handle various tasks simultaneously, depending on your plan.
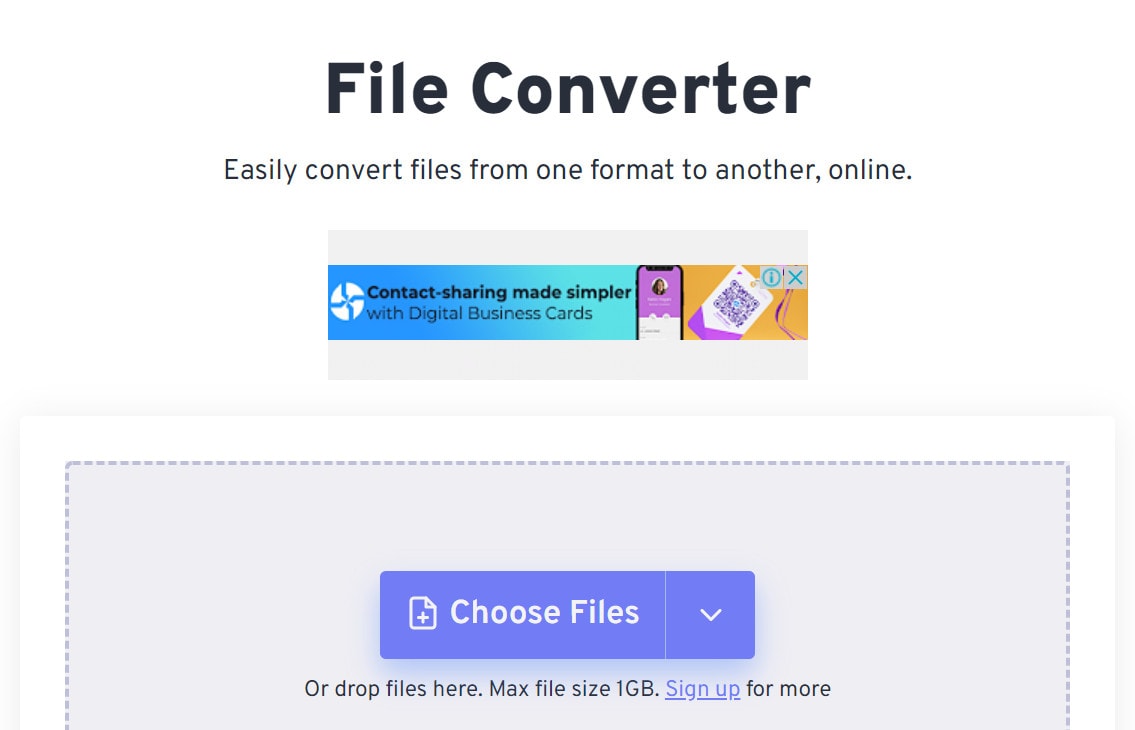
How to download: Online tool , Chrome extension
Rating: 58.40 out of 100 (Scam Detector)
Compatible OS: Windows, Mac, Linux
Price: 24-hour Pass- USD 12.99, Pro- USD 25.99/month, Basic- USD 9.99/month, Standard- USD 14.99/month.
Main Features:
- Max 1GB of size allows for free conversion.
- Auto-orientation setting available.
- Choose to compress the file or not.
- Insert from device or cloud.
Pros
- You can add files from the computer, Dropbox, Google Drive, or URL.
- It enables you to strip attached metadata.
- Adjust image size freely.
Cons
- Limited customizations.
- No free plan.
7. Zamzar
You can efficiently utilize this online tool to convert different file formats into another, like GIF into PNG. You can access the files you created for at least 24 hours after the conversion. For more time, upgrade your account.
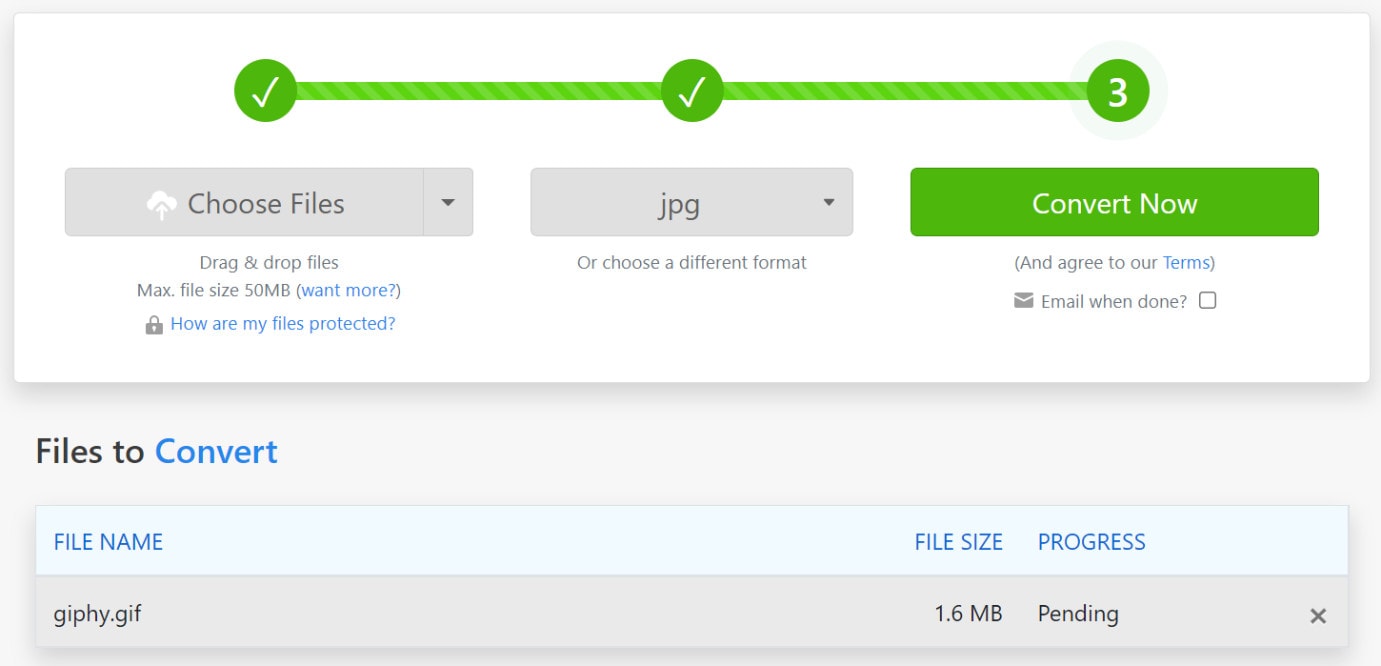
How to download: Online tool
Rating: 4.5 stars out of 5 (Capterra)
Compatible OS: web-based
Price: Basic- USD 8.60/month, Pro- USD 15.18/month, Business- USD 24.04/month
Main Features:
- It supports multiple file formats for converting.
- Add a file from the device or cloud.
- Insert online URL of files.
- 50 MB is the maximum file size.
Pros
- All saved files for free users can be saved for 24 hours.
- Paid users can decide to remove files from storage.
- Email notification for downloading is possible.
Cons
- Convert/save only two files per day for free.
- You need to register an account when using.
8. Browserling
Browserling is one of the most accessible and high-quality conversion tools for turning GIFs into PNG, JPG, or any other format. The settings are simple to understand and use, and one can convert multiple files.

How to download: Online tool
Rating: 4 stars out of 5 (G2)
Compatible OS: web-based, Windows/Android devices.
Price: Free, Developer- USD 19/month, Team- USD 29+/month
Main Features:
- Insert from the device.
- You can add GIFs of any size.
- Drag and drop functionality is available.
- Automatically saves to the device.
Pros
- Quick conversion.
- Zero complex steps.
- Easy to use for all users at different stages.
Cons
- No batch processing is allowed.
- The free version is only web-based and not compatible with most OS/devices/browsers.
9. iLoveIMG
Another top-notch online GIF to PNG converter is iLoveIMG, with which you can add and alter multiple GIF files simultaneously. Then, after the conversion, share to social media accounts from Facebook or others easily.
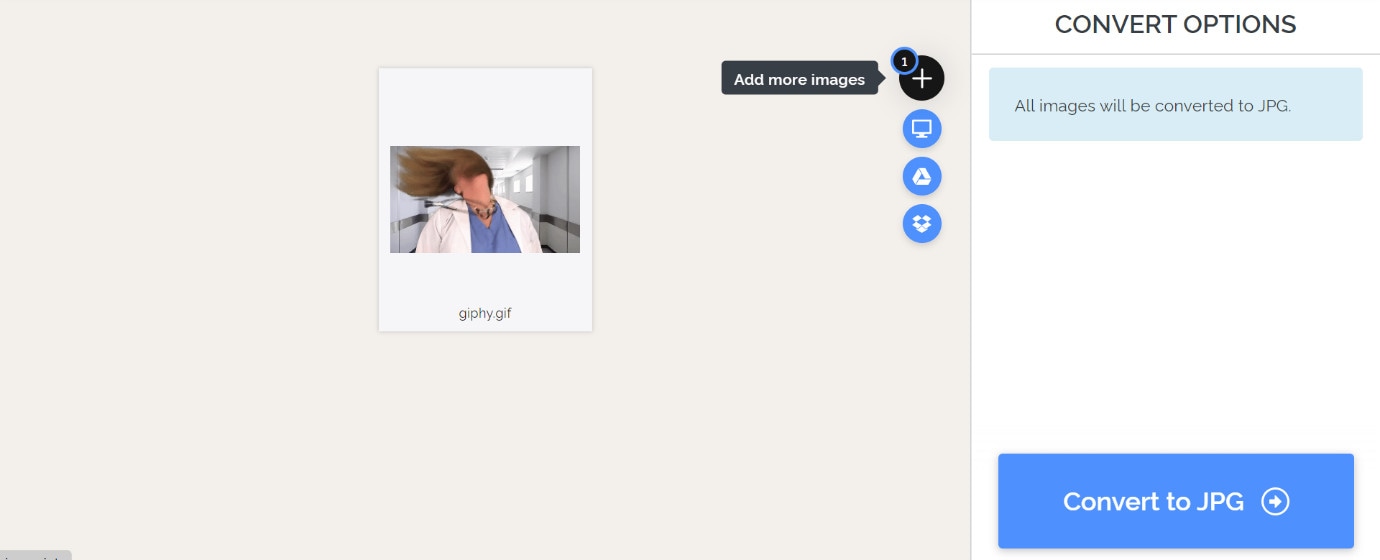
How to download: Online tool
Rating: 3.6 stars out of 5 (TrustPilot)
Compatible OS: web-based
Price: Free, Business- custom price, Premium- USD 3.79
Main Features:
- Insert from a folder, Dropbox, or Google Drive.
- Add multiple images.
- Rotate the files.
- Share to social media.
Pros
- Add from the device.
- Cloud support is available.
- Align files alphabetically.
Cons
- Does not work offline.
- Limited batch process for free users.
10. Convertfiles
This online tool can easily include and change GIFs into PNG files. The conversions occur quickly, and you can add your email account to get quick alerts for the completion of the process.

How to download: Online tool
Rating: 4.6 stars out of 5 (mywot.com)
Compatible OS: web-based
Price: Free
Main Features:
- Add specific input format.
- Include the preferred output format.
- Insert email for notifications.
- Support files to be added from the device library.
Pros
- Quicker process of conversion.
- A variety of file formats are compatible.
- Categorized list of formats like documents, images, videos, etc.
Cons
- Can include third-party unauthorized sites that transfer users to other pages.
- No video formats for output.
Pro Tips: How to Convert GIF to Video for Free?
Besides utilizing suitable tools to convert GIFs into PNG or other image files, you can also use the best GIF to video converters. For example, with Wondershare Filmora , you can easily convert GIFs or other image files into video files. In addition, some editing options, like GIFs, allow users to create videos after merging image files.
Free Download For Win 7 or later(64-bit)
Free Download For macOS 10.14 or later
Step1Launch the Filmora software.
Step2Press the “New Project” section and then access “Click to import media files.”

Add the image files, like GIFs, into the editor.
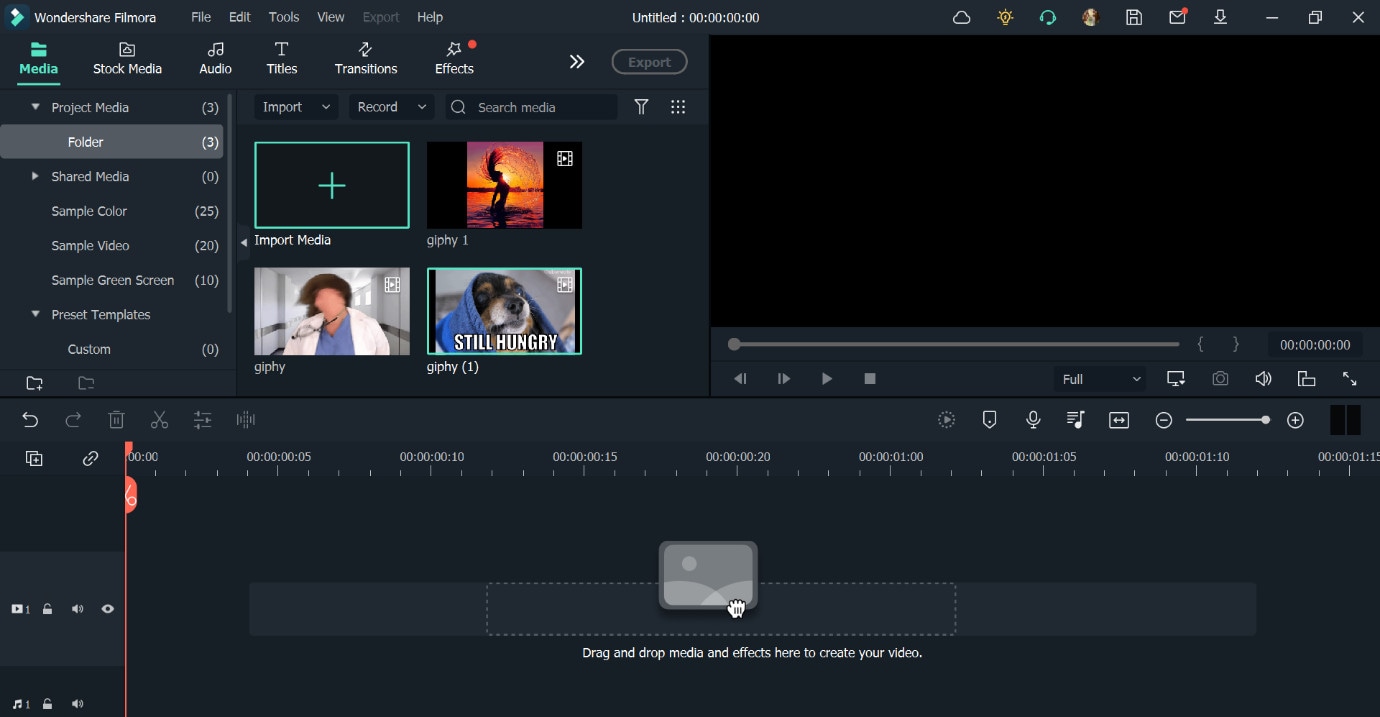
Step3Drag the files to the editing timeline. Use customization settings like Speed, Animation, Audio, Effects, etc., to edit the file.
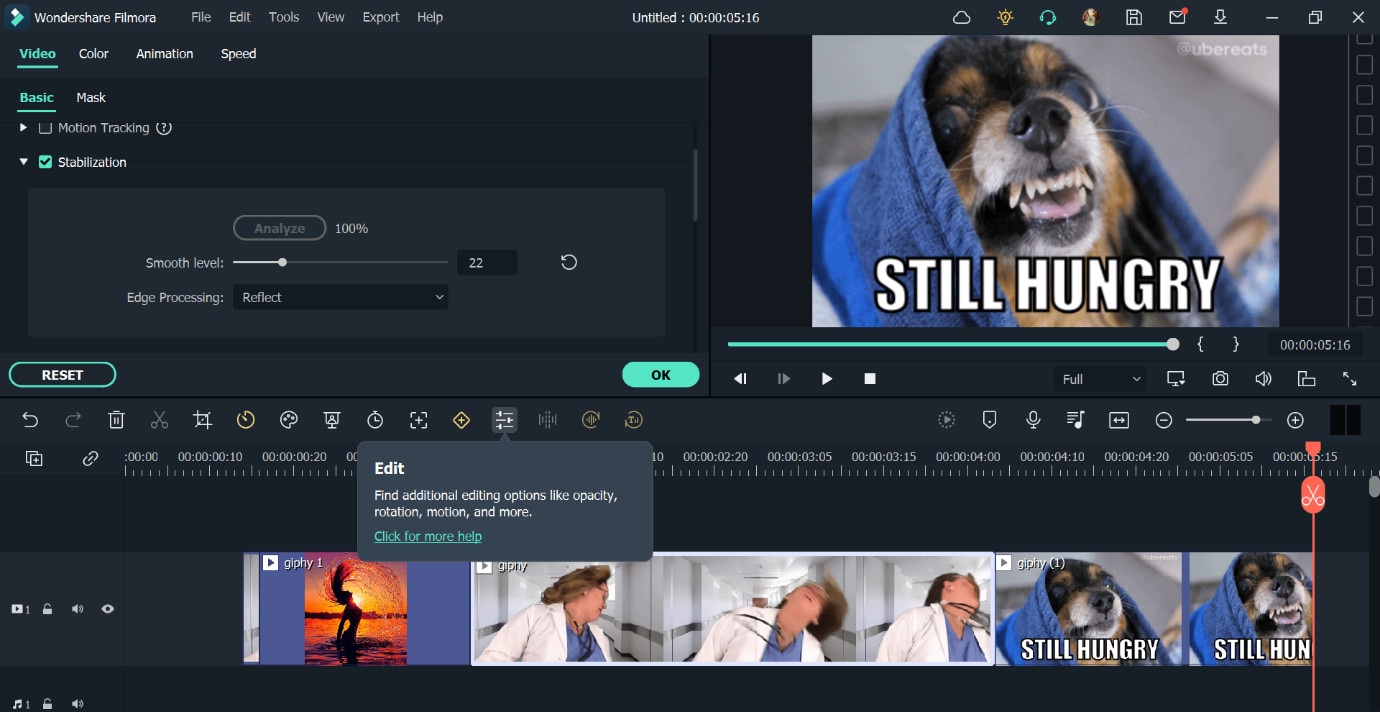
Step4Click on Export > Local > Mp4. You can choose other video formats too.
Step5Add file information like saving location, name, and formatting specification.
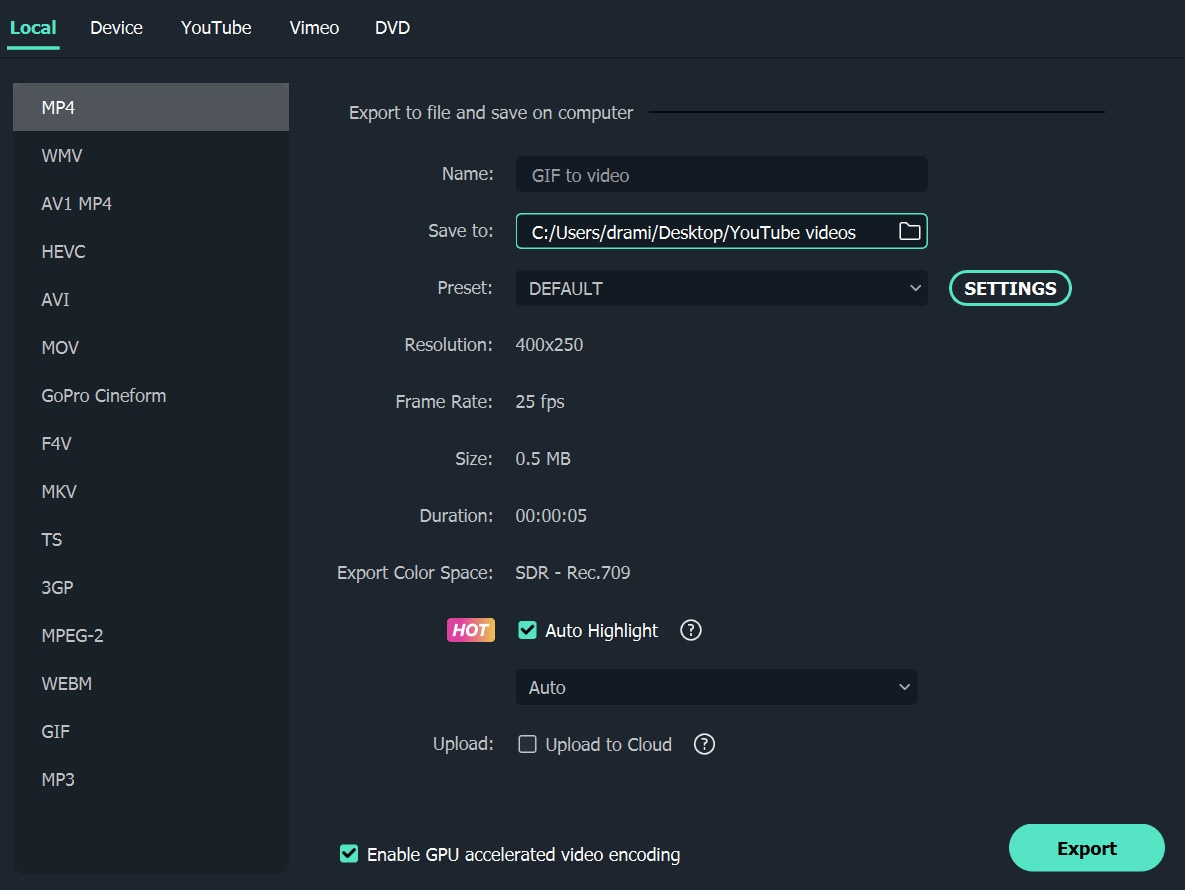
Step6Click on the Export button.
Final Words
You can easily use one of the given tools to convert GIF files into varying image file types. There are fully online options like CloudConvert, and certain choices with a software version, like Online Convert. Try each at least once for the best results to know which fits your needs perfectly.
2. Ezgif
Ezgif is another simple-to-use online tool with substantial image conversion benefits. You can add your GIF files from the Cloud account or computer and directly get JPG files. PNG does not have a direct conversion here, though.

How to download: Online tool
Rating: 100 out of 100 (Scam Detector)
Compatible OS: web-based browsers
Price: Free
Main Features:
- Support a maximum of 50 MB file size for images.
- Direct converter to JPG.
- Set background color to white.
- Add URL link of online GIF files.
Pros
- Instant conversion.
- No changes to original file quality.
- Add from the device.
Cons
- Upload and convert files one by one.
- No cloud support.
3. CloudConvert
CloudConvert is a high-quality online GIF to PNG converter that people can use to convert high-quality image files with no quality loss. First, choose your files, go for settings, and then the converting will be finished in minutes.

How to download: Online tool
Rating: 4.5 stars of 5 (Capterra)
Compatible OS: web-based
Price: Packages/Subscriptions- Costs start at USD 8 per conversion minute.
Main Features:
- Select a file from various formats, like URL, Device, or cloud accounts.
- Set crop/scape adjustments.
- Note image width and height.
- Select to strip or vice versa.
Pros
- Customize output file type.
- Support watermark security feature. It protects your images and graphic files from being stolen, used, or altered without the owner’s permission.
- High-quality image resolution is available.
Cons
- Slightly complex for beginners to understand or use initially.
- Bigger files take a longer time to load.
4. Convertio
Convertio is another top-grade GIF to JPGF converter which people can utilize to prepare high-definition image files from animated pictures. You can make multiple conversions and get high-priority customer support.

How to download: Online tool
Rating: 4.9 stars of 5 (Capterra)
Compatible OS: web-based
Price: Light- USD 9.99/month, Basic- USD 14.99/month, Unlimited- USD 25.99/month
Main Features:
- Get at least 25 concurrent conversion benefits with paid plans.
- Adfree pages.
- Unlimited conversions are only supported by the highest-paid plan.
- Unlimited allowed conversion minutes for users daily.
Pros
- The drag and drop function is smooth to use.
- Add files with at least 100 MB file size.
- Multiple formats are supported.
Cons
- Signup is necessary for a higher file size allowance.
- More limited service for free.
5. Soda PDF
This GIF to PNG converter is top-notch and used for changing big and small-sized GIF files into static PNG or JPG formats. However, no issues with image quality would be noticeable. You can use it for multiple conversions.

How to download: Online tool
Rating: 3.4 stars of 5 (Capterra)
Compatible OS: Online, Mac, Windows, Linux
Price: Standard- USD 6.73/month, Pro- USD 8.23/month, Business- USD 16.63/month
Main Features:
- Add GIF files from the computer, Dropbox, or Google Drive.
- Files are stored for a full day.
- Direct download button available.
- Redo conversion in case of issues.
Pros
- A desktop version with offline usage is available.
- The drag and drop function makes the converting process more convenient.
- Quick file saving.
Cons
- Cannot access old converted files from servers.
- Ads are available.
6. FreeConvert.com
FreeConvert is operable for multiple types of file conversions. In addition, you can store your files in the cloud and handle various tasks simultaneously, depending on your plan.

How to download: Online tool , Chrome extension
Rating: 58.40 out of 100 (Scam Detector)
Compatible OS: Windows, Mac, Linux
Price: 24-hour Pass- USD 12.99, Pro- USD 25.99/month, Basic- USD 9.99/month, Standard- USD 14.99/month.
Main Features:
- Max 1GB of size allows for free conversion.
- Auto-orientation setting available.
- Choose to compress the file or not.
- Insert from device or cloud.
Pros
- You can add files from the computer, Dropbox, Google Drive, or URL.
- It enables you to strip attached metadata.
- Adjust image size freely.
Cons
- Limited customizations.
- No free plan.
7. Zamzar
You can efficiently utilize this online tool to convert different file formats into another, like GIF into PNG. You can access the files you created for at least 24 hours after the conversion. For more time, upgrade your account.

How to download: Online tool
Rating: 4.5 stars out of 5 (Capterra)
Compatible OS: web-based
Price: Basic- USD 8.60/month, Pro- USD 15.18/month, Business- USD 24.04/month
Main Features:
- It supports multiple file formats for converting.
- Add a file from the device or cloud.
- Insert online URL of files.
- 50 MB is the maximum file size.
Pros
- All saved files for free users can be saved for 24 hours.
- Paid users can decide to remove files from storage.
- Email notification for downloading is possible.
Cons
- Convert/save only two files per day for free.
- You need to register an account when using.
8. Browserling
Browserling is one of the most accessible and high-quality conversion tools for turning GIFs into PNG, JPG, or any other format. The settings are simple to understand and use, and one can convert multiple files.

How to download: Online tool
Rating: 4 stars out of 5 (G2)
Compatible OS: web-based, Windows/Android devices.
Price: Free, Developer- USD 19/month, Team- USD 29+/month
Main Features:
- Insert from the device.
- You can add GIFs of any size.
- Drag and drop functionality is available.
- Automatically saves to the device.
Pros
- Quick conversion.
- Zero complex steps.
- Easy to use for all users at different stages.
Cons
- No batch processing is allowed.
- The free version is only web-based and not compatible with most OS/devices/browsers.
9. iLoveIMG
Another top-notch online GIF to PNG converter is iLoveIMG, with which you can add and alter multiple GIF files simultaneously. Then, after the conversion, share to social media accounts from Facebook or others easily.

How to download: Online tool
Rating: 3.6 stars out of 5 (TrustPilot)
Compatible OS: web-based
Price: Free, Business- custom price, Premium- USD 3.79
Main Features:
- Insert from a folder, Dropbox, or Google Drive.
- Add multiple images.
- Rotate the files.
- Share to social media.
Pros
- Add from the device.
- Cloud support is available.
- Align files alphabetically.
Cons
- Does not work offline.
- Limited batch process for free users.
10. Convertfiles
This online tool can easily include and change GIFs into PNG files. The conversions occur quickly, and you can add your email account to get quick alerts for the completion of the process.

How to download: Online tool
Rating: 4.6 stars out of 5 (mywot.com)
Compatible OS: web-based
Price: Free
Main Features:
- Add specific input format.
- Include the preferred output format.
- Insert email for notifications.
- Support files to be added from the device library.
Pros
- Quicker process of conversion.
- A variety of file formats are compatible.
- Categorized list of formats like documents, images, videos, etc.
Cons
- Can include third-party unauthorized sites that transfer users to other pages.
- No video formats for output.
Pro Tips: How to Convert GIF to Video for Free?
Besides utilizing suitable tools to convert GIFs into PNG or other image files, you can also use the best GIF to video converters. For example, with Wondershare Filmora , you can easily convert GIFs or other image files into video files. In addition, some editing options, like GIFs, allow users to create videos after merging image files.
Free Download For Win 7 or later(64-bit)
Free Download For macOS 10.14 or later
Step1Launch the Filmora software.
Step2Press the “New Project” section and then access “Click to import media files.”

Add the image files, like GIFs, into the editor.

Step3Drag the files to the editing timeline. Use customization settings like Speed, Animation, Audio, Effects, etc., to edit the file.

Step4Click on Export > Local > Mp4. You can choose other video formats too.
Step5Add file information like saving location, name, and formatting specification.

Step6Click on the Export button.
Final Words
You can easily use one of the given tools to convert GIF files into varying image file types. There are fully online options like CloudConvert, and certain choices with a software version, like Online Convert. Try each at least once for the best results to know which fits your needs perfectly.
Things You Need to Know About Color Grading in Photography
Create High-Quality Video - Wondershare Filmora
An easy and powerful YouTube video editor
Numerous video and audio effects to choose from
Detailed tutorials provided by the official channel
Have you recognized how flat your images look when you take them with your camera? While the scenery may be beautiful and your photography skills may be amazing, there’s always something missing. That “thing” is color grading, and that may be why your favorite superstar’s pictures appear better than yours. You can color grade your videos to produce the same effect too.
Color grading photography refers to a post-production process that improves your images by altering their color. The result of an excellent color grading process is an image that looks more appealing and refined. It’s what gives a picture some professional touch.
If you want to learn more about color grading photography, this article will let you in on all you need to know. From essential color grading steps to terms, tools, etc., you can begin your journey to cool and exciting images after reading.
In this article
01 Don’t Confuse Color Grading With Color Correction
03 Common Steps To Color Grade a Photo
04 Tips For Color Grading Photography
Don’t Confuse Color Grading With Color Correction
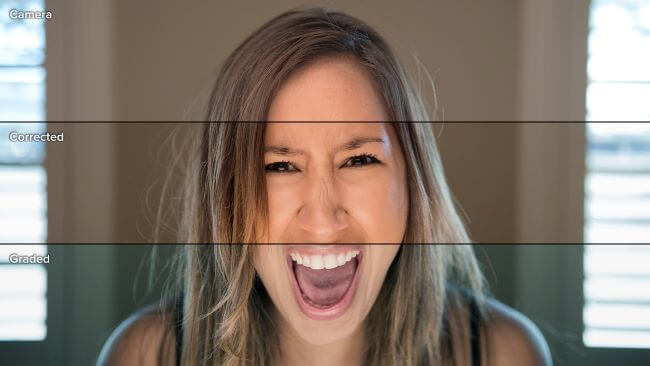
The first way to fully appreciate color grading is by differentiating it from its closest term—color correction. Many people use both of them interchangeably, and that’s wrong. Although color grading and color correction are post-production processes that enhance image colors, they perform different roles.
Here’s how to differentiate color grading from color correction:
| Differentiating Factor | Color Grading ; | Color Correction |
|---|---|---|
| Definition | Color grading is a process that enhances an image’s color by stylizing or giving it a cinematic appearance. | Color correction is a process that adjusts color mistakes in an image by giving it a consistent appearance. This process balances colors by adjusting whites and blacks. |
| Purpose | The primary aim of color grading an image is to evoke specific emotions in the viewers. Color grading leverages the emotional and psychological effects of colors to manipulate the viewers’ moods. You can use color grading to give your images different tones or themes like fear, femininity, youthfulness, passion, anger, sadness, etc. | Unlike color grading, the color correction does very little in setting the tone or mood that an image carries. Instead, it corrects specific mistakes in the image to make it look as natural to the human eyes as possible. Generally, camera lenses and the human eyes view pictures differently. Color correction changes a photo’s look to make it more appealing to humans than the camera. It makes black colors appear darker and adds more white to whites to create the desired effect. |
| Stage in the production process | Color grading typically comes after color correction in the post-production process. That’s because the effects of color grading are more appealing on a color-corrected picture. | Color correction comes before color grading. This process does the major work of balancing colors and correcting errors. Color grading only fine-tunes what color correction has done, giving it a professional finish. |
| Example | One of the most obvious examples of color grading is in motion pictures. For example, Sci-Fi movies typically have a very saturated blue color. However, you will notice a little redder in romantic movies. Note that filmmakers can use different color grades in movies to draw attention to specific details or represent changes in the storyline. Color grading produces the same effects in pictures. | Color correction is most prominent in documentaries to make pictures and videos look more real to the human eye. Other times, color corrections just adjust one color to merge the rest of the image or video. |
Terms and Tools Used In Color Grading
These are the most common terminologies photo editors use when color grading an image:
● Hue
Hue is the general name for describing pure color. That means it defines color without alluding to its brightness, vividness, etc. It describes a color’s position in the color wheel.
● Saturation
When a photo editor talks about saturation, they refer to the hue concentration that defines a specific color. Saturation describes color shades and focuses on how colorful they are. Examples of colors with zero saturation are white, black, and grey.
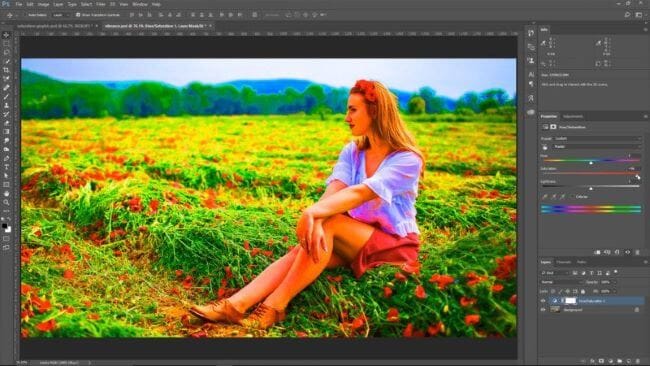
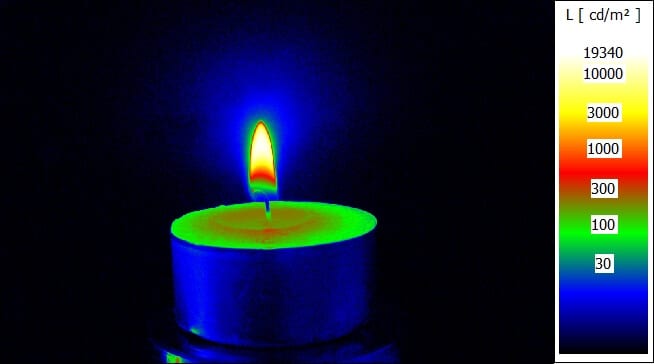
● Luminance
Luminous describes how bright, well-lighted or dark a color is. Highlights, mids, and shadows can influence luminance.
● Additive Color
Additive colors are non-primary colors. However, they typically result from mixing primary colors (blue, red, green).
● Color Cast
Color cast means that the image’s coloring doesn’t look as natural as it should be. This usually happens when different light sources get mixed.
● Temperature
Temperature defines how cool or warm a color is. Cool temperatures typically describe blues and purples, while orange and red represent the warmth.
The essential tools for color grading include
● White Balance
White balance helps to make your photos look more natural by correcting color cast issues. After using white balance, the result is that the whites in your pictures would look exactly like the human eye will perceive it. White balance adjusts your image’s color cast to make them look warmer or cooler.
● Brightness and Contrast
Brightness and contrast are essential in color grading and are among the most used photo editing tools. Different sliders control brightness and contrast during editing. It’s important to note that your image’s brightness will affect the contrast and vice-versa. That’s why they usually appear together, even if they refer to different tools.
● The Three-Way Color Corrector
Many photographers refer to the three-way corrector as the color correction’s workhorse. That’s because this tool adjusts hue, saturation, brightness, and contrast in a single interface. The three-way corrector performs the job of three tools in one interface. Using the three-way corrector ensures that you work faster than usual.
● The Fast Color Corrector
The fast color corrector is like the three-way corrector. However, there are many limitations with the number of potential looks you can achieve with this tool. The fast color corrector primarily focuses on adjusting tint and saturation. Its major advantage over the three-way corrector is its user-friendliness and simplicity.
● Curves
While using curves is pretty complicated, the tool offers impressive functionality that you can’t refuse. Curves are very powerful and precise. Their main function is to overhaul or remove your image’s brightness altogether to give it a distinctive look.
● The Unsharp Mask and Sharpening Tools
With the unsharp mask and sharpening tools, you can give your picture’s edges a sharp illusion by modifying the contrast. This is typically useful for images that you shoot in dark conditions.
Sharp pictures are always a lovely sight. However, these tools can’t correct pictures taken out of focus. To get the best results from these tools. Then you can start moving them back till you get your desired sharpness.
● Color Match
As the make implies, color match tools modify a target picture’s colors to fit the reference image. This is an automatic process and helps to save time.
Common Steps To Color Grade a Photo
These are the essential stages for color grading your images:
● Step 1:
The first step in color grading is deciding how warm or cool you want your image to look. Then, modify the white balance to suit your desired warmth or coolness.
● Step 2:
After adjusting the white balance, the next step is to adjust saturation or hue.
● Step 3:
The next step is to focus on the histogram. A histogram is a common feature in many photo editing software that informs you of your image’s tonal values. The goal in this stage is to ensure equal color distribution. Keep adjusting your image till the colors are even.
● Step 4:
Work on your highlights and shadows by modifying the green, red, and blue curves. Also, adjust your vibrancy setting for a good effect.
● Step 5:
Explore split toning. Split toning is a process that involves adding colors to highlight and shadows independently. Learning how to split tone can make a difference in your photo editing.
Tips For Color Grading Photography
The following best practices will enhance your color grading:
- About oversaturation or under-saturation. Your saturation should be just right to produce the perfect result. So, always be sure to pay maximum attention to this process. This tip is particularly useful when working with portraits.
- Remember that color grading doesn’t fix a bad shot. So, be sure to improve your photography skills and take the best shots for excellent color grading results.
- Shoot your images in RAW. Doing this guarantees more control over your pictures’ colors.
- Always experiment with different looks until you get your precise effect. Lightroom is one of the best color grading apps to use.
- Exercise maximum caution when manipulating backgrounds. Don’t do too much, especially when you’re taking an indoor shot. That’s because manipulating indoor backgrounds too much can mismatch the foreground and background, making your portrait look weird.
Conclusion
● While your photography skills are essential in influencing your image’s outcome; your color grading skills will take it to another level. It’s one of the fastest ways to make a budding photo editor look like a pro.
● After reading this article, you can be sure that you have the basic information you need to achieve your editing goals. However, you mustn’t stop here. Continuous learning, especially through constant practice, is the way to go. You can visit Filmora today for the best color grading packages and tools.
Have you recognized how flat your images look when you take them with your camera? While the scenery may be beautiful and your photography skills may be amazing, there’s always something missing. That “thing” is color grading, and that may be why your favorite superstar’s pictures appear better than yours. You can color grade your videos to produce the same effect too.
Color grading photography refers to a post-production process that improves your images by altering their color. The result of an excellent color grading process is an image that looks more appealing and refined. It’s what gives a picture some professional touch.
If you want to learn more about color grading photography, this article will let you in on all you need to know. From essential color grading steps to terms, tools, etc., you can begin your journey to cool and exciting images after reading.
In this article
01 Don’t Confuse Color Grading With Color Correction
03 Common Steps To Color Grade a Photo
04 Tips For Color Grading Photography
Don’t Confuse Color Grading With Color Correction
The first way to fully appreciate color grading is by differentiating it from its closest term—color correction. Many people use both of them interchangeably, and that’s wrong. Although color grading and color correction are post-production processes that enhance image colors, they perform different roles.
Here’s how to differentiate color grading from color correction:
| Differentiating Factor | Color Grading ; | Color Correction |
|---|---|---|
| Definition | Color grading is a process that enhances an image’s color by stylizing or giving it a cinematic appearance. | Color correction is a process that adjusts color mistakes in an image by giving it a consistent appearance. This process balances colors by adjusting whites and blacks. |
| Purpose | The primary aim of color grading an image is to evoke specific emotions in the viewers. Color grading leverages the emotional and psychological effects of colors to manipulate the viewers’ moods. You can use color grading to give your images different tones or themes like fear, femininity, youthfulness, passion, anger, sadness, etc. | Unlike color grading, the color correction does very little in setting the tone or mood that an image carries. Instead, it corrects specific mistakes in the image to make it look as natural to the human eyes as possible. Generally, camera lenses and the human eyes view pictures differently. Color correction changes a photo’s look to make it more appealing to humans than the camera. It makes black colors appear darker and adds more white to whites to create the desired effect. |
| Stage in the production process | Color grading typically comes after color correction in the post-production process. That’s because the effects of color grading are more appealing on a color-corrected picture. | Color correction comes before color grading. This process does the major work of balancing colors and correcting errors. Color grading only fine-tunes what color correction has done, giving it a professional finish. |
| Example | One of the most obvious examples of color grading is in motion pictures. For example, Sci-Fi movies typically have a very saturated blue color. However, you will notice a little redder in romantic movies. Note that filmmakers can use different color grades in movies to draw attention to specific details or represent changes in the storyline. Color grading produces the same effects in pictures. | Color correction is most prominent in documentaries to make pictures and videos look more real to the human eye. Other times, color corrections just adjust one color to merge the rest of the image or video. |

Terms and Tools Used In Color Grading
These are the most common terminologies photo editors use when color grading an image:
● Hue
Hue is the general name for describing pure color. That means it defines color without alluding to its brightness, vividness, etc. It describes a color’s position in the color wheel.
● Saturation
When a photo editor talks about saturation, they refer to the hue concentration that defines a specific color. Saturation describes color shades and focuses on how colorful they are. Examples of colors with zero saturation are white, black, and grey.

● Luminance
Luminous describes how bright, well-lighted or dark a color is. Highlights, mids, and shadows can influence luminance.

● Additive Color
Additive colors are non-primary colors. However, they typically result from mixing primary colors (blue, red, green).
● Color Cast
Color cast means that the image’s coloring doesn’t look as natural as it should be. This usually happens when different light sources get mixed.
● Temperature
Temperature defines how cool or warm a color is. Cool temperatures typically describe blues and purples, while orange and red represent the warmth.
The essential tools for color grading include
● White Balance
White balance helps to make your photos look more natural by correcting color cast issues. After using white balance, the result is that the whites in your pictures would look exactly like the human eye will perceive it. White balance adjusts your image’s color cast to make them look warmer or cooler.
● Brightness and Contrast
Brightness and contrast are essential in color grading and are among the most used photo editing tools. Different sliders control brightness and contrast during editing. It’s important to note that your image’s brightness will affect the contrast and vice-versa. That’s why they usually appear together, even if they refer to different tools.
● The Three-Way Color Corrector
Many photographers refer to the three-way corrector as the color correction’s workhorse. That’s because this tool adjusts hue, saturation, brightness, and contrast in a single interface. The three-way corrector performs the job of three tools in one interface. Using the three-way corrector ensures that you work faster than usual.
● The Fast Color Corrector
The fast color corrector is like the three-way corrector. However, there are many limitations with the number of potential looks you can achieve with this tool. The fast color corrector primarily focuses on adjusting tint and saturation. Its major advantage over the three-way corrector is its user-friendliness and simplicity.
● Curves
While using curves is pretty complicated, the tool offers impressive functionality that you can’t refuse. Curves are very powerful and precise. Their main function is to overhaul or remove your image’s brightness altogether to give it a distinctive look.
● The Unsharp Mask and Sharpening Tools
With the unsharp mask and sharpening tools, you can give your picture’s edges a sharp illusion by modifying the contrast. This is typically useful for images that you shoot in dark conditions.
Sharp pictures are always a lovely sight. However, these tools can’t correct pictures taken out of focus. To get the best results from these tools. Then you can start moving them back till you get your desired sharpness.
● Color Match
As the make implies, color match tools modify a target picture’s colors to fit the reference image. This is an automatic process and helps to save time.
Common Steps To Color Grade a Photo
These are the essential stages for color grading your images:
● Step 1:
The first step in color grading is deciding how warm or cool you want your image to look. Then, modify the white balance to suit your desired warmth or coolness.
● Step 2:
After adjusting the white balance, the next step is to adjust saturation or hue.
● Step 3:
The next step is to focus on the histogram. A histogram is a common feature in many photo editing software that informs you of your image’s tonal values. The goal in this stage is to ensure equal color distribution. Keep adjusting your image till the colors are even.
● Step 4:
Work on your highlights and shadows by modifying the green, red, and blue curves. Also, adjust your vibrancy setting for a good effect.
● Step 5:
Explore split toning. Split toning is a process that involves adding colors to highlight and shadows independently. Learning how to split tone can make a difference in your photo editing.
Tips For Color Grading Photography
The following best practices will enhance your color grading:
- About oversaturation or under-saturation. Your saturation should be just right to produce the perfect result. So, always be sure to pay maximum attention to this process. This tip is particularly useful when working with portraits.
- Remember that color grading doesn’t fix a bad shot. So, be sure to improve your photography skills and take the best shots for excellent color grading results.
- Shoot your images in RAW. Doing this guarantees more control over your pictures’ colors.
- Always experiment with different looks until you get your precise effect. Lightroom is one of the best color grading apps to use.
- Exercise maximum caution when manipulating backgrounds. Don’t do too much, especially when you’re taking an indoor shot. That’s because manipulating indoor backgrounds too much can mismatch the foreground and background, making your portrait look weird.
Conclusion
● While your photography skills are essential in influencing your image’s outcome; your color grading skills will take it to another level. It’s one of the fastest ways to make a budding photo editor look like a pro.
● After reading this article, you can be sure that you have the basic information you need to achieve your editing goals. However, you mustn’t stop here. Continuous learning, especially through constant practice, is the way to go. You can visit Filmora today for the best color grading packages and tools.
Have you recognized how flat your images look when you take them with your camera? While the scenery may be beautiful and your photography skills may be amazing, there’s always something missing. That “thing” is color grading, and that may be why your favorite superstar’s pictures appear better than yours. You can color grade your videos to produce the same effect too.
Color grading photography refers to a post-production process that improves your images by altering their color. The result of an excellent color grading process is an image that looks more appealing and refined. It’s what gives a picture some professional touch.
If you want to learn more about color grading photography, this article will let you in on all you need to know. From essential color grading steps to terms, tools, etc., you can begin your journey to cool and exciting images after reading.
In this article
01 Don’t Confuse Color Grading With Color Correction
03 Common Steps To Color Grade a Photo
04 Tips For Color Grading Photography
Don’t Confuse Color Grading With Color Correction
The first way to fully appreciate color grading is by differentiating it from its closest term—color correction. Many people use both of them interchangeably, and that’s wrong. Although color grading and color correction are post-production processes that enhance image colors, they perform different roles.
Here’s how to differentiate color grading from color correction:
| Differentiating Factor | Color Grading ; | Color Correction |
|---|---|---|
| Definition | Color grading is a process that enhances an image’s color by stylizing or giving it a cinematic appearance. | Color correction is a process that adjusts color mistakes in an image by giving it a consistent appearance. This process balances colors by adjusting whites and blacks. |
| Purpose | The primary aim of color grading an image is to evoke specific emotions in the viewers. Color grading leverages the emotional and psychological effects of colors to manipulate the viewers’ moods. You can use color grading to give your images different tones or themes like fear, femininity, youthfulness, passion, anger, sadness, etc. | Unlike color grading, the color correction does very little in setting the tone or mood that an image carries. Instead, it corrects specific mistakes in the image to make it look as natural to the human eyes as possible. Generally, camera lenses and the human eyes view pictures differently. Color correction changes a photo’s look to make it more appealing to humans than the camera. It makes black colors appear darker and adds more white to whites to create the desired effect. |
| Stage in the production process | Color grading typically comes after color correction in the post-production process. That’s because the effects of color grading are more appealing on a color-corrected picture. | Color correction comes before color grading. This process does the major work of balancing colors and correcting errors. Color grading only fine-tunes what color correction has done, giving it a professional finish. |
| Example | One of the most obvious examples of color grading is in motion pictures. For example, Sci-Fi movies typically have a very saturated blue color. However, you will notice a little redder in romantic movies. Note that filmmakers can use different color grades in movies to draw attention to specific details or represent changes in the storyline. Color grading produces the same effects in pictures. | Color correction is most prominent in documentaries to make pictures and videos look more real to the human eye. Other times, color corrections just adjust one color to merge the rest of the image or video. |

Terms and Tools Used In Color Grading
These are the most common terminologies photo editors use when color grading an image:
● Hue
Hue is the general name for describing pure color. That means it defines color without alluding to its brightness, vividness, etc. It describes a color’s position in the color wheel.
● Saturation
When a photo editor talks about saturation, they refer to the hue concentration that defines a specific color. Saturation describes color shades and focuses on how colorful they are. Examples of colors with zero saturation are white, black, and grey.

● Luminance
Luminous describes how bright, well-lighted or dark a color is. Highlights, mids, and shadows can influence luminance.

● Additive Color
Additive colors are non-primary colors. However, they typically result from mixing primary colors (blue, red, green).
● Color Cast
Color cast means that the image’s coloring doesn’t look as natural as it should be. This usually happens when different light sources get mixed.
● Temperature
Temperature defines how cool or warm a color is. Cool temperatures typically describe blues and purples, while orange and red represent the warmth.
The essential tools for color grading include
● White Balance
White balance helps to make your photos look more natural by correcting color cast issues. After using white balance, the result is that the whites in your pictures would look exactly like the human eye will perceive it. White balance adjusts your image’s color cast to make them look warmer or cooler.
● Brightness and Contrast
Brightness and contrast are essential in color grading and are among the most used photo editing tools. Different sliders control brightness and contrast during editing. It’s important to note that your image’s brightness will affect the contrast and vice-versa. That’s why they usually appear together, even if they refer to different tools.
● The Three-Way Color Corrector
Many photographers refer to the three-way corrector as the color correction’s workhorse. That’s because this tool adjusts hue, saturation, brightness, and contrast in a single interface. The three-way corrector performs the job of three tools in one interface. Using the three-way corrector ensures that you work faster than usual.
● The Fast Color Corrector
The fast color corrector is like the three-way corrector. However, there are many limitations with the number of potential looks you can achieve with this tool. The fast color corrector primarily focuses on adjusting tint and saturation. Its major advantage over the three-way corrector is its user-friendliness and simplicity.
● Curves
While using curves is pretty complicated, the tool offers impressive functionality that you can’t refuse. Curves are very powerful and precise. Their main function is to overhaul or remove your image’s brightness altogether to give it a distinctive look.
● The Unsharp Mask and Sharpening Tools
With the unsharp mask and sharpening tools, you can give your picture’s edges a sharp illusion by modifying the contrast. This is typically useful for images that you shoot in dark conditions.
Sharp pictures are always a lovely sight. However, these tools can’t correct pictures taken out of focus. To get the best results from these tools. Then you can start moving them back till you get your desired sharpness.
● Color Match
As the make implies, color match tools modify a target picture’s colors to fit the reference image. This is an automatic process and helps to save time.
Common Steps To Color Grade a Photo
These are the essential stages for color grading your images:
● Step 1:
The first step in color grading is deciding how warm or cool you want your image to look. Then, modify the white balance to suit your desired warmth or coolness.
● Step 2:
After adjusting the white balance, the next step is to adjust saturation or hue.
● Step 3:
The next step is to focus on the histogram. A histogram is a common feature in many photo editing software that informs you of your image’s tonal values. The goal in this stage is to ensure equal color distribution. Keep adjusting your image till the colors are even.
● Step 4:
Work on your highlights and shadows by modifying the green, red, and blue curves. Also, adjust your vibrancy setting for a good effect.
● Step 5:
Explore split toning. Split toning is a process that involves adding colors to highlight and shadows independently. Learning how to split tone can make a difference in your photo editing.
Tips For Color Grading Photography
The following best practices will enhance your color grading:
- About oversaturation or under-saturation. Your saturation should be just right to produce the perfect result. So, always be sure to pay maximum attention to this process. This tip is particularly useful when working with portraits.
- Remember that color grading doesn’t fix a bad shot. So, be sure to improve your photography skills and take the best shots for excellent color grading results.
- Shoot your images in RAW. Doing this guarantees more control over your pictures’ colors.
- Always experiment with different looks until you get your precise effect. Lightroom is one of the best color grading apps to use.
- Exercise maximum caution when manipulating backgrounds. Don’t do too much, especially when you’re taking an indoor shot. That’s because manipulating indoor backgrounds too much can mismatch the foreground and background, making your portrait look weird.
Conclusion
● While your photography skills are essential in influencing your image’s outcome; your color grading skills will take it to another level. It’s one of the fastest ways to make a budding photo editor look like a pro.
● After reading this article, you can be sure that you have the basic information you need to achieve your editing goals. However, you mustn’t stop here. Continuous learning, especially through constant practice, is the way to go. You can visit Filmora today for the best color grading packages and tools.
Have you recognized how flat your images look when you take them with your camera? While the scenery may be beautiful and your photography skills may be amazing, there’s always something missing. That “thing” is color grading, and that may be why your favorite superstar’s pictures appear better than yours. You can color grade your videos to produce the same effect too.
Color grading photography refers to a post-production process that improves your images by altering their color. The result of an excellent color grading process is an image that looks more appealing and refined. It’s what gives a picture some professional touch.
If you want to learn more about color grading photography, this article will let you in on all you need to know. From essential color grading steps to terms, tools, etc., you can begin your journey to cool and exciting images after reading.
In this article
01 Don’t Confuse Color Grading With Color Correction
03 Common Steps To Color Grade a Photo
04 Tips For Color Grading Photography
Don’t Confuse Color Grading With Color Correction
The first way to fully appreciate color grading is by differentiating it from its closest term—color correction. Many people use both of them interchangeably, and that’s wrong. Although color grading and color correction are post-production processes that enhance image colors, they perform different roles.
Here’s how to differentiate color grading from color correction:
| Differentiating Factor | Color Grading ; | Color Correction |
|---|---|---|
| Definition | Color grading is a process that enhances an image’s color by stylizing or giving it a cinematic appearance. | Color correction is a process that adjusts color mistakes in an image by giving it a consistent appearance. This process balances colors by adjusting whites and blacks. |
| Purpose | The primary aim of color grading an image is to evoke specific emotions in the viewers. Color grading leverages the emotional and psychological effects of colors to manipulate the viewers’ moods. You can use color grading to give your images different tones or themes like fear, femininity, youthfulness, passion, anger, sadness, etc. | Unlike color grading, the color correction does very little in setting the tone or mood that an image carries. Instead, it corrects specific mistakes in the image to make it look as natural to the human eyes as possible. Generally, camera lenses and the human eyes view pictures differently. Color correction changes a photo’s look to make it more appealing to humans than the camera. It makes black colors appear darker and adds more white to whites to create the desired effect. |
| Stage in the production process | Color grading typically comes after color correction in the post-production process. That’s because the effects of color grading are more appealing on a color-corrected picture. | Color correction comes before color grading. This process does the major work of balancing colors and correcting errors. Color grading only fine-tunes what color correction has done, giving it a professional finish. |
| Example | One of the most obvious examples of color grading is in motion pictures. For example, Sci-Fi movies typically have a very saturated blue color. However, you will notice a little redder in romantic movies. Note that filmmakers can use different color grades in movies to draw attention to specific details or represent changes in the storyline. Color grading produces the same effects in pictures. | Color correction is most prominent in documentaries to make pictures and videos look more real to the human eye. Other times, color corrections just adjust one color to merge the rest of the image or video. |

Terms and Tools Used In Color Grading
These are the most common terminologies photo editors use when color grading an image:
● Hue
Hue is the general name for describing pure color. That means it defines color without alluding to its brightness, vividness, etc. It describes a color’s position in the color wheel.
● Saturation
When a photo editor talks about saturation, they refer to the hue concentration that defines a specific color. Saturation describes color shades and focuses on how colorful they are. Examples of colors with zero saturation are white, black, and grey.

● Luminance
Luminous describes how bright, well-lighted or dark a color is. Highlights, mids, and shadows can influence luminance.

● Additive Color
Additive colors are non-primary colors. However, they typically result from mixing primary colors (blue, red, green).
● Color Cast
Color cast means that the image’s coloring doesn’t look as natural as it should be. This usually happens when different light sources get mixed.
● Temperature
Temperature defines how cool or warm a color is. Cool temperatures typically describe blues and purples, while orange and red represent the warmth.
The essential tools for color grading include
● White Balance
White balance helps to make your photos look more natural by correcting color cast issues. After using white balance, the result is that the whites in your pictures would look exactly like the human eye will perceive it. White balance adjusts your image’s color cast to make them look warmer or cooler.
● Brightness and Contrast
Brightness and contrast are essential in color grading and are among the most used photo editing tools. Different sliders control brightness and contrast during editing. It’s important to note that your image’s brightness will affect the contrast and vice-versa. That’s why they usually appear together, even if they refer to different tools.
● The Three-Way Color Corrector
Many photographers refer to the three-way corrector as the color correction’s workhorse. That’s because this tool adjusts hue, saturation, brightness, and contrast in a single interface. The three-way corrector performs the job of three tools in one interface. Using the three-way corrector ensures that you work faster than usual.
● The Fast Color Corrector
The fast color corrector is like the three-way corrector. However, there are many limitations with the number of potential looks you can achieve with this tool. The fast color corrector primarily focuses on adjusting tint and saturation. Its major advantage over the three-way corrector is its user-friendliness and simplicity.
● Curves
While using curves is pretty complicated, the tool offers impressive functionality that you can’t refuse. Curves are very powerful and precise. Their main function is to overhaul or remove your image’s brightness altogether to give it a distinctive look.
● The Unsharp Mask and Sharpening Tools
With the unsharp mask and sharpening tools, you can give your picture’s edges a sharp illusion by modifying the contrast. This is typically useful for images that you shoot in dark conditions.
Sharp pictures are always a lovely sight. However, these tools can’t correct pictures taken out of focus. To get the best results from these tools. Then you can start moving them back till you get your desired sharpness.
● Color Match
As the make implies, color match tools modify a target picture’s colors to fit the reference image. This is an automatic process and helps to save time.
Common Steps To Color Grade a Photo
These are the essential stages for color grading your images:
● Step 1:
The first step in color grading is deciding how warm or cool you want your image to look. Then, modify the white balance to suit your desired warmth or coolness.
● Step 2:
After adjusting the white balance, the next step is to adjust saturation or hue.
● Step 3:
The next step is to focus on the histogram. A histogram is a common feature in many photo editing software that informs you of your image’s tonal values. The goal in this stage is to ensure equal color distribution. Keep adjusting your image till the colors are even.
● Step 4:
Work on your highlights and shadows by modifying the green, red, and blue curves. Also, adjust your vibrancy setting for a good effect.
● Step 5:
Explore split toning. Split toning is a process that involves adding colors to highlight and shadows independently. Learning how to split tone can make a difference in your photo editing.
Tips For Color Grading Photography
The following best practices will enhance your color grading:
- About oversaturation or under-saturation. Your saturation should be just right to produce the perfect result. So, always be sure to pay maximum attention to this process. This tip is particularly useful when working with portraits.
- Remember that color grading doesn’t fix a bad shot. So, be sure to improve your photography skills and take the best shots for excellent color grading results.
- Shoot your images in RAW. Doing this guarantees more control over your pictures’ colors.
- Always experiment with different looks until you get your precise effect. Lightroom is one of the best color grading apps to use.
- Exercise maximum caution when manipulating backgrounds. Don’t do too much, especially when you’re taking an indoor shot. That’s because manipulating indoor backgrounds too much can mismatch the foreground and background, making your portrait look weird.
Conclusion
● While your photography skills are essential in influencing your image’s outcome; your color grading skills will take it to another level. It’s one of the fastest ways to make a budding photo editor look like a pro.
● After reading this article, you can be sure that you have the basic information you need to achieve your editing goals. However, you mustn’t stop here. Continuous learning, especially through constant practice, is the way to go. You can visit Filmora today for the best color grading packages and tools.
How to Make Fortnite Thumbnail with Motion Blur?
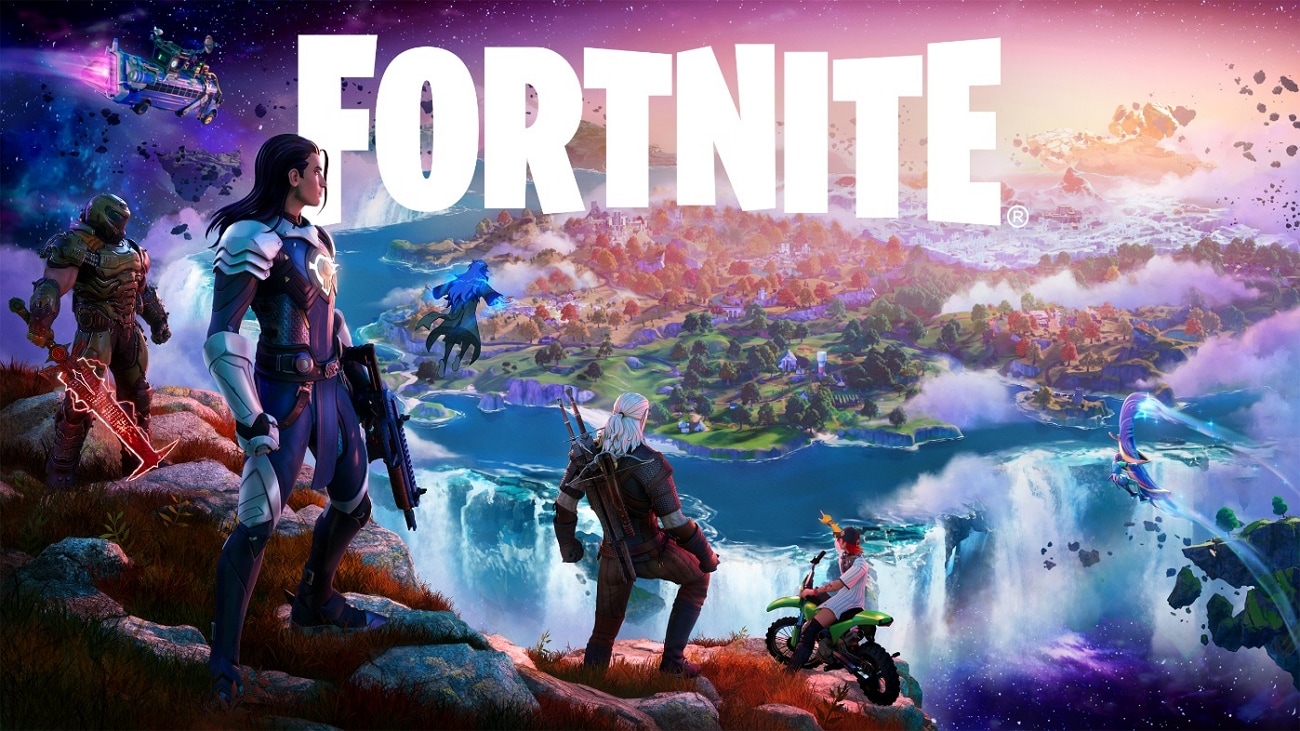
Motion blur has been a provocative effect used in filming and video making. The effect has made a popular mark globally for its realistic base. This is why motion blur is integrated into every other platform directed at creativity. The motion blur effect in creating thumbnails is another highlight of this effect. While many tools provide this service, finding the best one is essential.
In this article, we will work on the best methods to make a Fortnite motion blur thumbnail. With the help of these methods, you will be able to design the perfect Fortnite thumbnail for your video.
Part 1: How to Add Motion Blur to Fortnite Thumbnail?
There are many ways to add motion blur to Fortnite thumbnails, as stated above. In this article, we will be providing appropriate methods for users of all types. From smartphone to online and desktop solutions, this article has it all.
Way 1: Make Motion Blur Fortnite Thumbnail with Picsart (Smartphone)
For the first method, we will be discussing an appropriate way that can be used to make motion blur in Fortnite thumbnails. Picsart is a known mobile application providing unique photo editing services. This photo editor is a complete package containing some of the best tools. Integrated with artificial intelligence, this tool presents a perfect platform to perform motion blur on Fortnite thumbnails.
Steps to Perform Motion Blur on Fortnite Thumbnail with Picsart
We will proceed to observe the step-by-step guide on performing motion blur on Fortnite thumbnails with the help of Picsart:
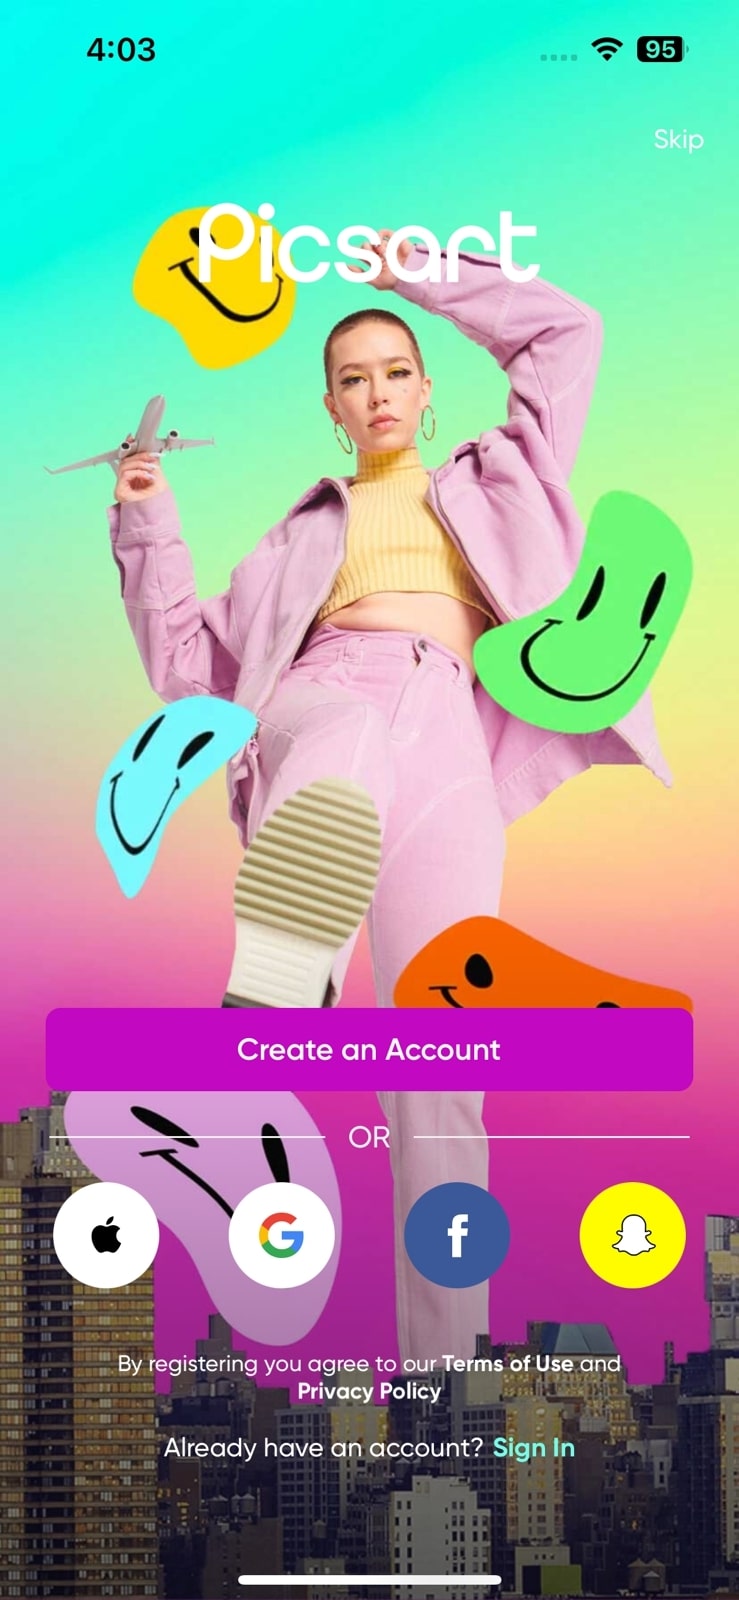
Step1 Launch Picsart on Smartphone
Download and install Picsart on your phone and proceed to launch it. As it opens, sign in to the tool, if required, and redirect to the next screen.
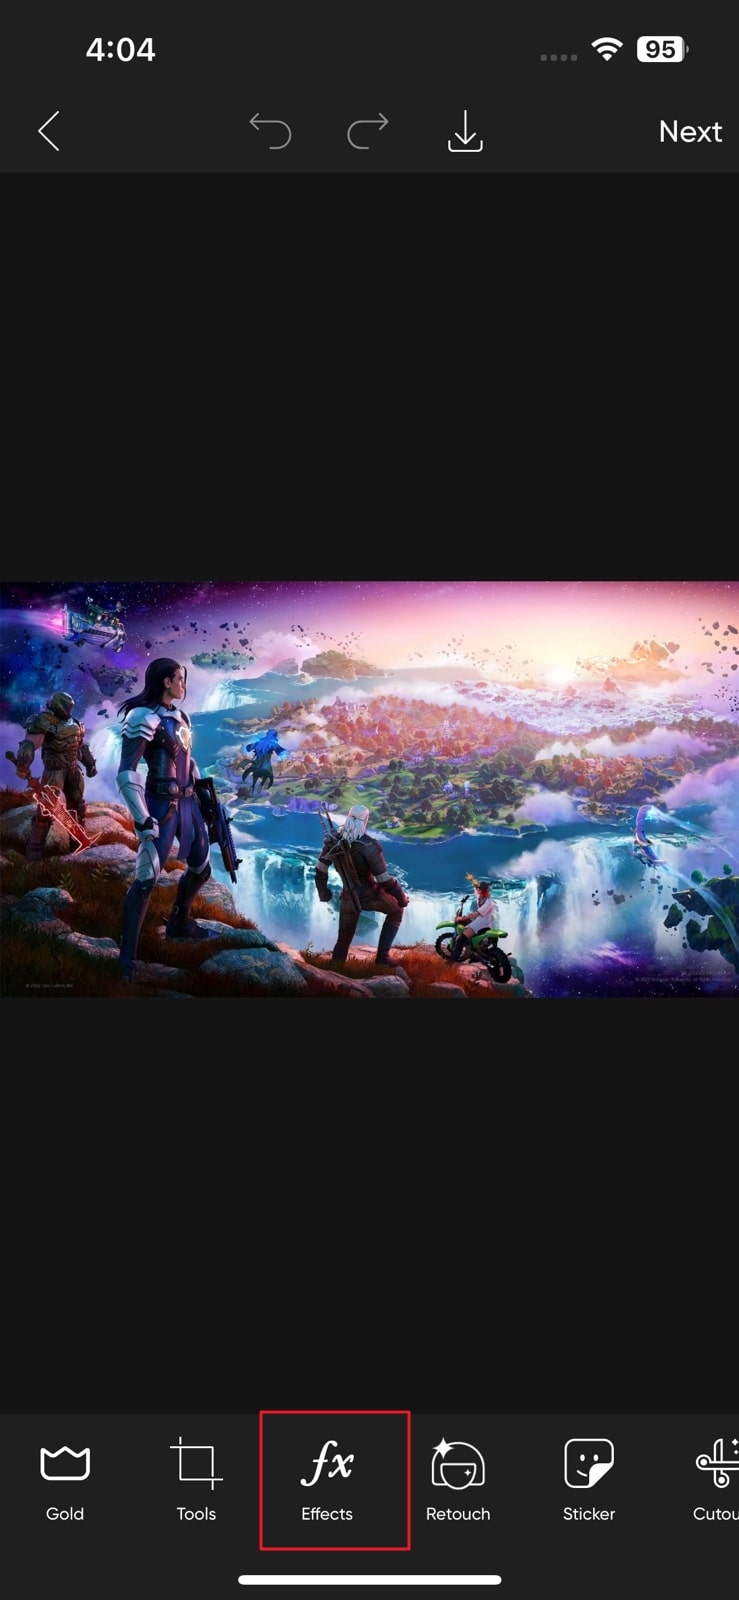
Step2 Proceed to Effects Tab After Importing Thumbnail
You will have to import the created Fortnite thumbnail that is to be edited. After importing the thumbnail, select “Effects” from the bottom panel of the application.
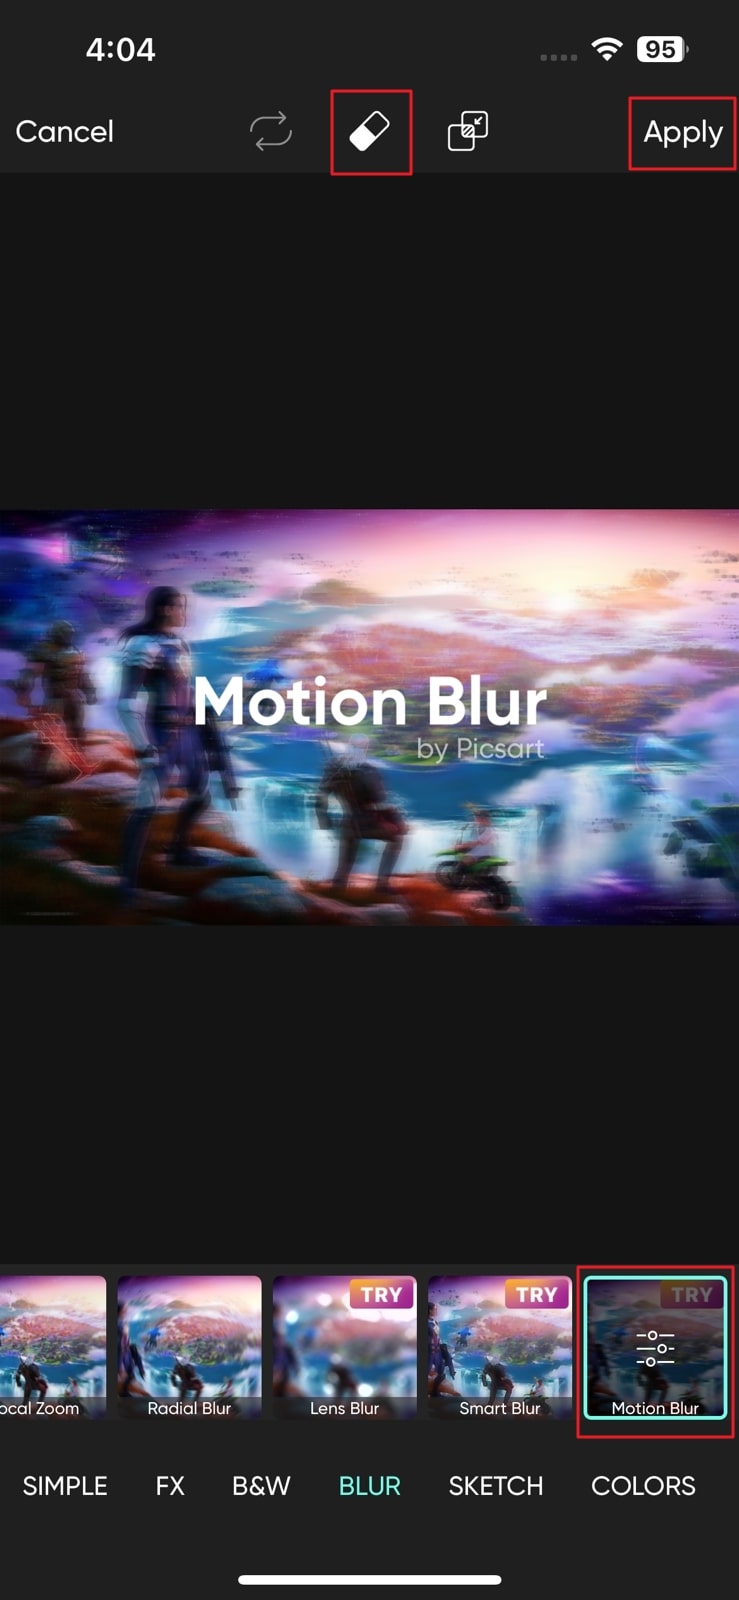
Step3 Add Motion Blur and Export
On the next screen, look for the “Blur” section from the bottom and find the “Motion Blur” effect. As it is added, you can use the “Erase” button on the top to adjust the motion blur effect on the image according to the objects. Once done, tap on the “Apply” button to conclude by adding motion blur.
Way 2: Make Motion Blur Fortnite Thumbnail with Fotor (Online)
If you are not a fan of smartphone applications, you can consider opting for online methods. While these platforms do not require installing anything on your desktop, they are easy to manage. Fotor is a great online photo editor featuring exceptional services for enhancing photos. It allows you to make all appropriate edits by including effects, transitions, and other photo enhancements. You can also find its designer for improving your Fortnite thumbnails.
Steps to Add Motion Blur on Fortnite Thumbnail with Fotor
For those who want to know how to create the Fortnite thumbnail motion blur effect with Fotor. The following steps are proper directions for them to follow:
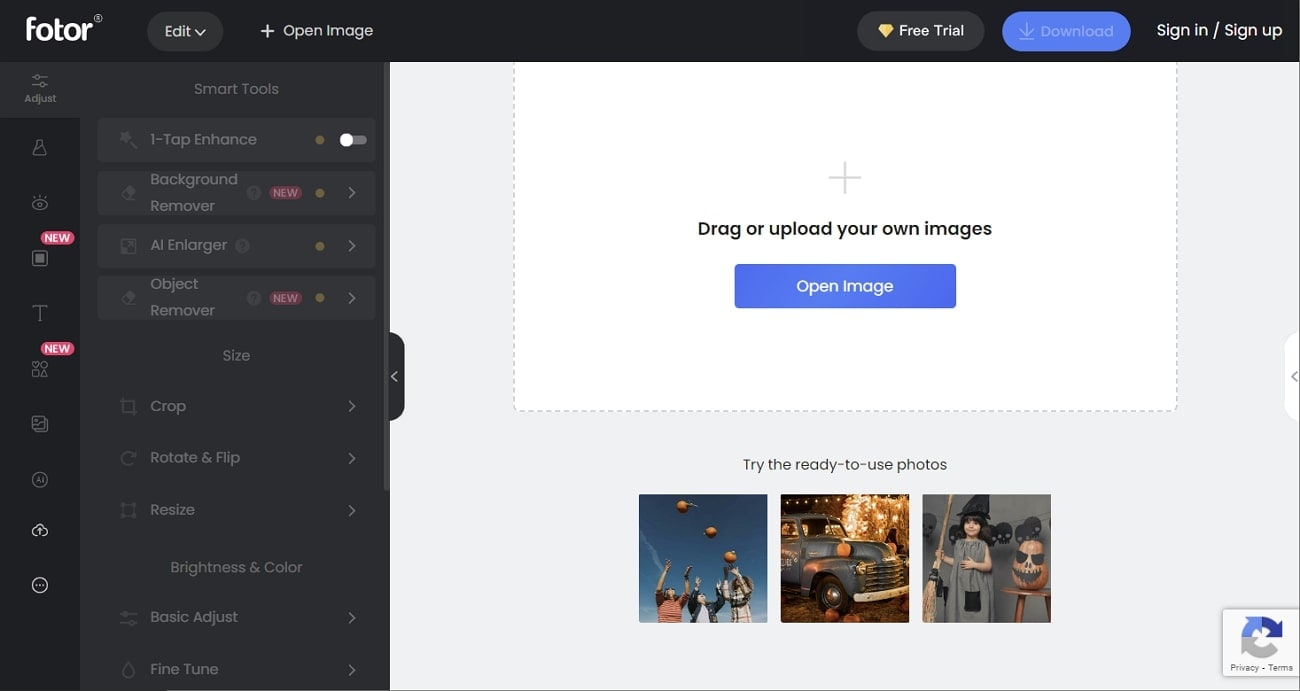
Step1 Open Fotor on the Web
You must open the Fotor Photo Editor on your web browser. Then, proceed to import the thumbnail template that you want to edit.
Step2 Add Motion Blur on Photo
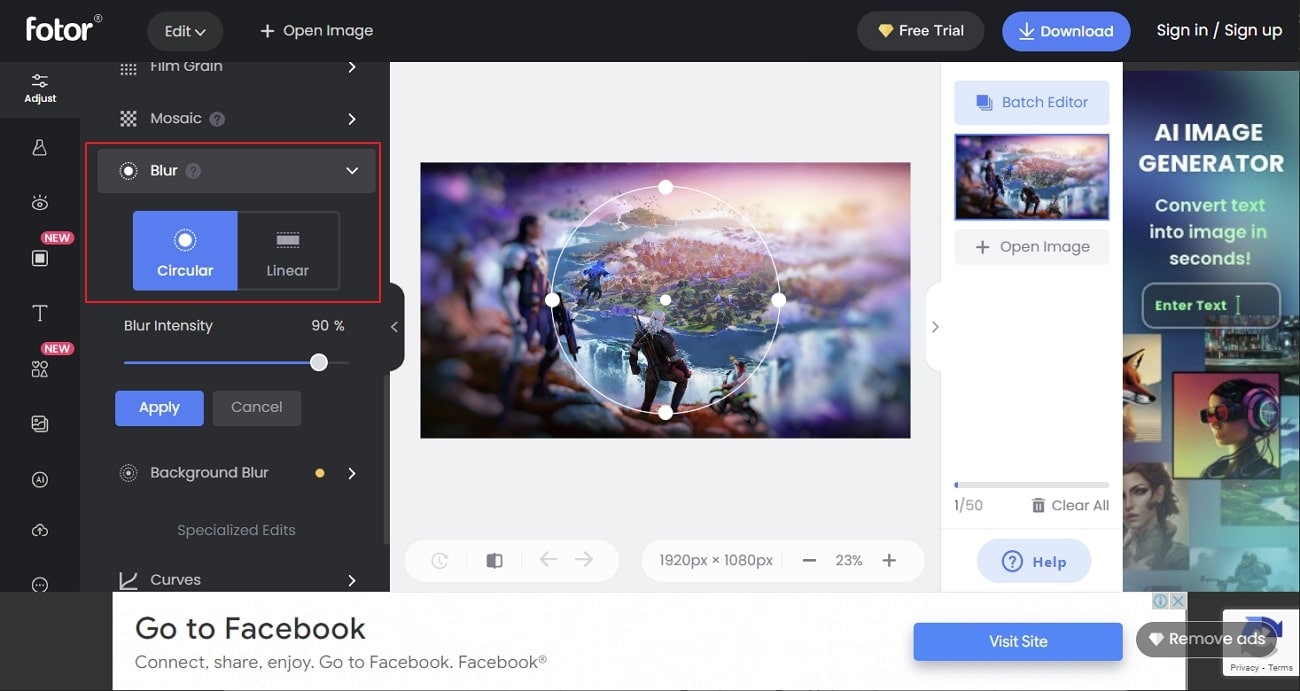
In the “Adjust” tab, look for the “Blur” option for including motion blur within the photo. You can select “Circular” or “Linear” blur, per the requirements.
Step3 Manage Intensity and Download
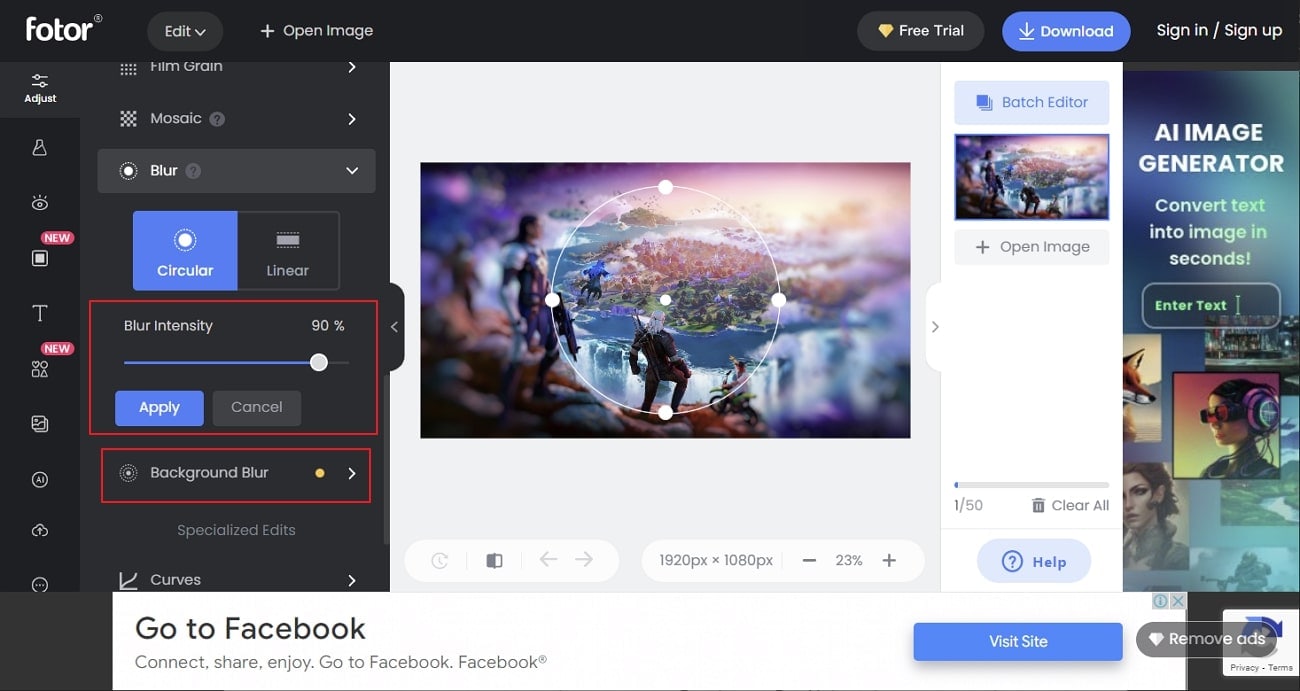
Continue to set the “Blur Intensity” and make changes by clicking “Apply.” If you wish to blur your background, consider using the “Background Blur” option in the list. Once the editing completes, click “Download” to export the Fortnite thumbnail.
Way 3: Make Motion Blur Fortnite Thumbnail with Photoshop (Desktop)
Adobe Photoshop stands among one of the best and most professional tools designed to enhance the quality of your photos. Although it is based on users who are professionals in editing, it gives a detailed set of options to make the most creative idea out of a photo. While adjusting the blur effect, it offers multiple settings for highlighting the image’s objects and colors.
Steps to Implement Motion Blur Effect on Fortnite Thumbnail with Photoshop
You might have come to know much about Photoshop. We will now see a guide explaining how to add a Fortnite motion blur thumbnail using Photoshop:
Step1 Start Adobe Photoshop and Add Thumbnail
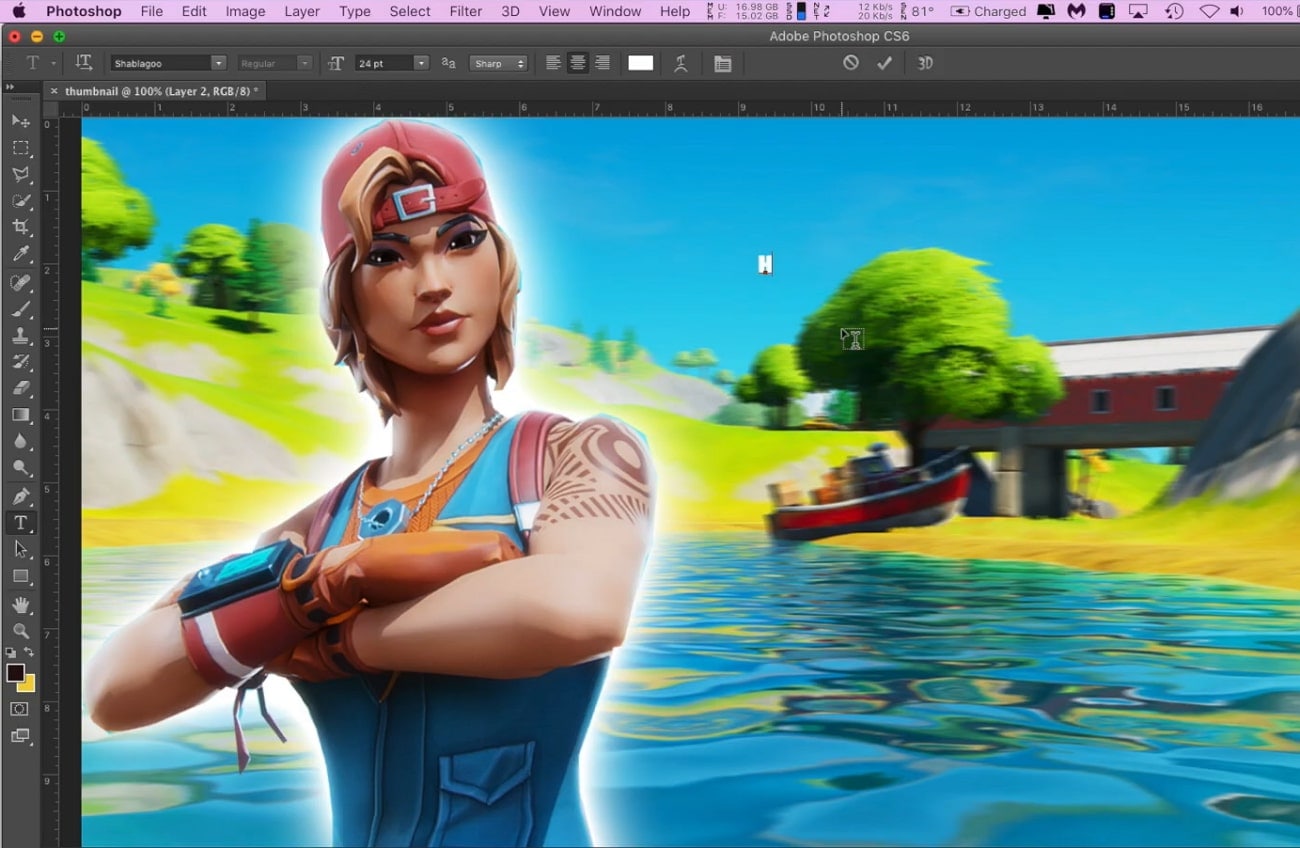
You must start Adobe Photoshop on your desktop after downloading and installing it. Proceed to import the thumbnail that you wish to edit. Make the initial adjustments on the photo to continue adding motion blur.
Step2 Create a Separate Object Layer
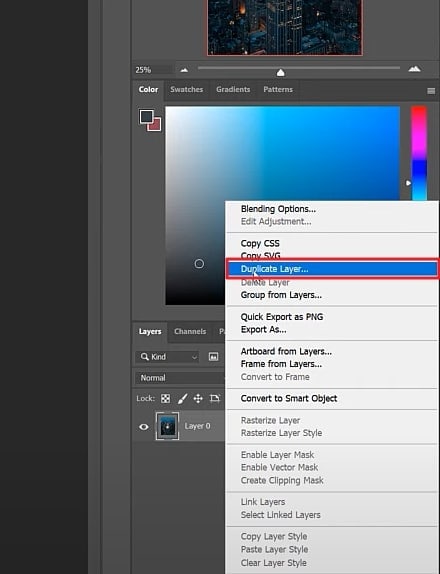
To start with the process, right-click and create a duplicate layer by selecting the respective option from the drop-down menu. Use the “Polygonal Lasso” tool to mark the object you want to exempt from the motion blur. Once done, use the “Layer Mask” button to isolate the object.
Step3 Add Motion Blur to Object
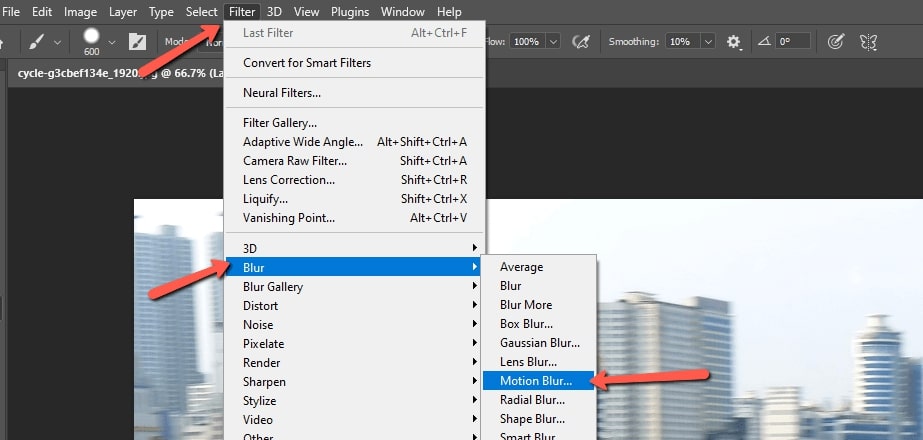
Create another duplicate layer and proceed to the “Filter” tab. Look for “Blur Gallery” in the options and select “Motion Blur” from the following menu. You must set the “Angle,” “Distance,” and other appropriate settings to continue. Once done, save the Fortnite thumbnail with the added motion blur.
Last Words
Many tools can be used to add motion blur within photos and videos. As you create a thumbnail for Fortnite, you will need a proper tool to help you add motion blur. We have discussed several tools in this article for adding motion blur.
Also, these applications serve their purpose for a respective device or platform. This is why they can be considered the best way to add a Fortnite motion blur thumbnail. You can select any option to add the respective effect for perfect results.
Motion blur has been a provocative effect used in filming and video making. The effect has made a popular mark globally for its realistic base. This is why motion blur is integrated into every other platform directed at creativity. The motion blur effect in creating thumbnails is another highlight of this effect. While many tools provide this service, finding the best one is essential.
In this article, we will work on the best methods to make a Fortnite motion blur thumbnail. With the help of these methods, you will be able to design the perfect Fortnite thumbnail for your video.

Part 1: How to Add Motion Blur to Fortnite Thumbnail?
There are many ways to add motion blur to Fortnite thumbnails, as stated above. In this article, we will be providing appropriate methods for users of all types. From smartphone to online and desktop solutions, this article has it all.
Way 1: Make Motion Blur Fortnite Thumbnail with Picsart (Smartphone)
For the first method, we will be discussing an appropriate way that can be used to make motion blur in Fortnite thumbnails. Picsart is a known mobile application providing unique photo editing services. This photo editor is a complete package containing some of the best tools. Integrated with artificial intelligence, this tool presents a perfect platform to perform motion blur on Fortnite thumbnails.
Steps to Perform Motion Blur on Fortnite Thumbnail with Picsart
We will proceed to observe the step-by-step guide on performing motion blur on Fortnite thumbnails with the help of Picsart:
Step1 Launch Picsart on Smartphone
Download and install Picsart on your phone and proceed to launch it. As it opens, sign in to the tool, if required, and redirect to the next screen.

Step2 Proceed to Effects Tab After Importing Thumbnail
You will have to import the created Fortnite thumbnail that is to be edited. After importing the thumbnail, select “Effects” from the bottom panel of the application.

Step3 Add Motion Blur and Export
On the next screen, look for the “Blur” section from the bottom and find the “Motion Blur” effect. As it is added, you can use the “Erase” button on the top to adjust the motion blur effect on the image according to the objects. Once done, tap on the “Apply” button to conclude by adding motion blur.

Way 2: Make Motion Blur Fortnite Thumbnail with Fotor (Online)
If you are not a fan of smartphone applications, you can consider opting for online methods. While these platforms do not require installing anything on your desktop, they are easy to manage. Fotor is a great online photo editor featuring exceptional services for enhancing photos. It allows you to make all appropriate edits by including effects, transitions, and other photo enhancements. You can also find its designer for improving your Fortnite thumbnails.
Steps to Add Motion Blur on Fortnite Thumbnail with Fotor
For those who want to know how to create the Fortnite thumbnail motion blur effect with Fotor. The following steps are proper directions for them to follow:
Step1 Open Fotor on the Web
You must open the Fotor Photo Editor on your web browser. Then, proceed to import the thumbnail template that you want to edit.

Step2 Add Motion Blur on Photo
In the “Adjust” tab, look for the “Blur” option for including motion blur within the photo. You can select “Circular” or “Linear” blur, per the requirements.

Step3 Manage Intensity and Download
Continue to set the “Blur Intensity” and make changes by clicking “Apply.” If you wish to blur your background, consider using the “Background Blur” option in the list. Once the editing completes, click “Download” to export the Fortnite thumbnail.

Way 3: Make Motion Blur Fortnite Thumbnail with Photoshop (Desktop)
Adobe Photoshop stands among one of the best and most professional tools designed to enhance the quality of your photos. Although it is based on users who are professionals in editing, it gives a detailed set of options to make the most creative idea out of a photo. While adjusting the blur effect, it offers multiple settings for highlighting the image’s objects and colors.
Steps to Implement Motion Blur Effect on Fortnite Thumbnail with Photoshop
You might have come to know much about Photoshop. We will now see a guide explaining how to add a Fortnite motion blur thumbnail using Photoshop:
Step1 Start Adobe Photoshop and Add Thumbnail
You must start Adobe Photoshop on your desktop after downloading and installing it. Proceed to import the thumbnail that you wish to edit. Make the initial adjustments on the photo to continue adding motion blur.

Step2 Create a Separate Object Layer
To start with the process, right-click and create a duplicate layer by selecting the respective option from the drop-down menu. Use the “Polygonal Lasso” tool to mark the object you want to exempt from the motion blur. Once done, use the “Layer Mask” button to isolate the object.

Step3 Add Motion Blur to Object
Create another duplicate layer and proceed to the “Filter” tab. Look for “Blur Gallery” in the options and select “Motion Blur” from the following menu. You must set the “Angle,” “Distance,” and other appropriate settings to continue. Once done, save the Fortnite thumbnail with the added motion blur.

Last Words
Many tools can be used to add motion blur within photos and videos. As you create a thumbnail for Fortnite, you will need a proper tool to help you add motion blur. We have discussed several tools in this article for adding motion blur.
Also, these applications serve their purpose for a respective device or platform. This is why they can be considered the best way to add a Fortnite motion blur thumbnail. You can select any option to add the respective effect for perfect results.
Using Montage In Movies | Learn to Use Montage With Movies
As with many new things in life, Montage isn’t your best friend right off the bat. So, if you want to learn to use montages with movies, they need to be the right ones. If you don’t know what Montage is, it is a way of compressing an action or series of actions into a short amount of time. We look at movies because they are a common type of entertainment everyone has seen before, which makes them easier to understand as a concept.
Using Montage is a great way to create engaging video content. There are many people interested in the topic of Montage, so if you get that video out there, you can easily find an audience. When used in conjunction with YouTube advertising, creating videos about Montage could be an excellent business idea for you.
Learning how to use Montage properly can be challenging. The process isn’t intuitive, and using it can feel like hiding random pieces around your page. But, when you watch the right movies, they can help you understand how to use this tool effectively. So, take some time, check out these movies, and learn how to get the most out of Montage!
What Is A Montage?
The definition of a montage is a “series of short scenes or episodes forming a unified whole.” That definition can lead to different interpretations of a montage and can be applied to any art medium. A “montage” isn’t just for movies. Music artists use montages to tell stories that often describe their emotions and experiences; writers create poetry and prose contained in such an artistic form, and painters often use this art form. However, many people are most familiar with the term associated with movies: a montage is essentially a collection of images or scenes that populate a movie with music.
If you’ve seen any blockbuster Hollywood films in the last ten years, you’ve probably seen some Montage. The Montage is a sequence that takes place over a set period and shows us how the lead character goes from being an ordinary person to an extraordinary one. The difference between these two states is dramatic, so we see so many montages in movies. They are meant to grab your attention and excitingly introduce a character.
Purpose of Montage
Montage movies are made up of a compilation of short yet powerful scenes put together to make one movie or project. Even though these types of movies have become a common genre, there’s a list of reasons why this is popular in movies today.
- Montage has several uses in movies. Of course, Montage can be used to show events such as battles or dancing. It can also describe emotions, including sadness, happiness, and sarcasm. These different uses of Montage do come with their styles, but they all share a few common traits.
- They’re often used to condense periods of storytime into much smaller but more entertaining segments. The word montage is French for “to construct from many parts .”Montages can now be seen everywhere in film and television, from silent films to blockbuster action movies.
- This is frequently used in narratives when the story needs to advance quickly. The characters are going somewhere or doing something else not within the context of the moment in time that represents them. A great example of a montage was used in Rocky when Rocky was training for his fight with Apollo Creed.
- A montage allows filmmakers to explore a theme using several sequential shots that can’t be covered in a single shot.
Learn To Use Montage With These Movies
1. Rocky (1976)
The training montage is popular in cinema. A montage like this helps us follow how the protagonist prepares himself for a life-threatening fight and claims honor in society. Sylvester Stallone plays Robert “Rocky” Balboa, going through the rigorous preparations for his fight. A song by Bill Conti called “Gonna Fly Now” is playing in the background, contributing to the scene’s energy.
Rocky (1976)
2. Scarface (1983)
A fictional Cuban Tony (Al Pacino) becomes a gangster in Brian De Palma’s 1983 film Scarface against the backdrop of the cocaine boom of the 1980s. He is portrayed as a criminal rising to the echelons of the underworld and slowly falling. In this montage sequence, Tony becomes the biggest drug lord in Miami and controls nearly all the cocaine that comes through the city.
Scarface (1983)
3. Goodfellas (1990)
Martin Scorsese’s Goodfellas is a gangster film set in 1950s New York City, one of the best. In it, Irish-Italian Henry Hill (Ray Liotta) is portrayed as he rises through the ranks of the crime branch of his Brooklyn neighborhood. As we watch this Montage, we see Henry and his gang members viciously murdering anyone who stands in their path. This edit is beautifully complemented by Eric Clapton’s “Layla.” voice-over.
Goodfellas (1990)
4. Trainspotting (1996)
Ewan McGregor stars in Danny Boyle’s black comedy, which tells the tale of drug addict Mark Renton (Danny Boyle). Mark tries to get clean and get back on his feet. Despite this, drug enticements and friend influence are major deterrents. Through this introductory Montage, we are introduced to the protagonist’s lifestyle. In addition, the film explores the themes of drug abuse, addiction, and nihilism.
Trainspotting (1996)
5. Run Lola Run (1998)
In his movie Run Lola Run (1998), Tom Tykwer tells the story of Lola (Franka Potente) and Mani (Moritz Bleibtreu) as they face the different possibilities that arise from a single event in their lives. This Montage shows Lola bumping into various people as she begins to sprint. Her encounter has a profound impact on their lives. Through Montage, the film is given a sense of exhilarating pace and multi-layered visual design.
Run Lola Run (1998)
6. Requiem for a Dream (2000)
Hubert Selby Jr.’s titular novel is the source material for Darren Aronofsky’s psychological drama. Four people trapped by their addictions are the focus of the narrative. By watching this Montage, a viewer can get a better sense of the world or the film’s characters. As a result of their drug addictions, four ambitious people will eventually have their dreams dashed. As a result, we gain insight into how addiction takes hold of the characters’ minds and bodies.
Requiem for a Dream (2000)
7. Swades (2004)
Songs have played an integral role in bringing the story of the film to life in the hands of some of India’s most thoughtful filmmakers. Among them is Ashutosh Gowariker. Montage techniques are used to create the title song sequence of his film Swades. The fictional Indian village of Charanpur, where the protagonist Mohan Bhargava (Shahrukh Khan) has lived, is a source of great trauma for the protagonist. As he ends up returning to India, the song signifies his development psychologically.
Swades (2004)
8. Whiplash (2014)
Miles Teller plays Andrew Neiman, a promising young drummer who enrolls in a tough music conservatory. Damien Chazelle directs the film. Terence Fletcher (J. K. Simmons) mentors him, and he is determined to see his students’ dreams come true. Neiman pushes himself to his limits in this Montage, suffering a breakdown as a result. Edited shots and tempo match the visual images to accentuate the protagonist’s mental state.
Whiplash (2014)
9. Gone Girl (2014)
Gillian Flynn’s eponymous novel is the basis for David Fincher’s psychological crime drama. On their fifth wedding anniversary, Amy Elliott Dunne (Rosamund Pike) disappears, and Nicholas Dunne (Ben Affleck) becomes the prime suspect. Amy carefully crafts her new identity in this Montage as we learn she is alive. The Montage ends as Amy sets up her cabin and begins purchasing supplies. After hitting herself with a hammer, the sequence ends.
Whiplash (2014)
10. Parasite (2019)
In Bong Joon-ho’s Oscar-winning dark comedy thriller, the Kim family lives on the edge of poverty. They are suddenly thrown into a world of affluence when a family member gets a job at an affluent family. Moon-Gwang (Lee Jung-Eun) is a long-time housekeeper for the Kim family. The family comes up with a cunning plan to exploit her allergy to peaches. In the closing montage, they convince Mrs. Park (Cho Yeo-Jeong) that Moon-Gwang has tuberculosis.
Whiplash (2014)
Wondershare Filmora11 Express Better
Achieve More
Grow Together
Free Download Free Download Learn More

Summarize:
If you’re thinking about using Montage, check out movies and trailers in the Action and Comedy genres. Keep in mind that finding material that works well with montages is no accident. They are filled with some of the best soundtracks, action scenes, and comedy routines that can help guide your project through its rough spots. Montage can do amazing things for any movie, so it’s important to learn when and where it should be used.
Rocky (1976)
2. Scarface (1983)
A fictional Cuban Tony (Al Pacino) becomes a gangster in Brian De Palma’s 1983 film Scarface against the backdrop of the cocaine boom of the 1980s. He is portrayed as a criminal rising to the echelons of the underworld and slowly falling. In this montage sequence, Tony becomes the biggest drug lord in Miami and controls nearly all the cocaine that comes through the city.
Scarface (1983)
3. Goodfellas (1990)
Martin Scorsese’s Goodfellas is a gangster film set in 1950s New York City, one of the best. In it, Irish-Italian Henry Hill (Ray Liotta) is portrayed as he rises through the ranks of the crime branch of his Brooklyn neighborhood. As we watch this Montage, we see Henry and his gang members viciously murdering anyone who stands in their path. This edit is beautifully complemented by Eric Clapton’s “Layla.” voice-over.
Goodfellas (1990)
4. Trainspotting (1996)
Ewan McGregor stars in Danny Boyle’s black comedy, which tells the tale of drug addict Mark Renton (Danny Boyle). Mark tries to get clean and get back on his feet. Despite this, drug enticements and friend influence are major deterrents. Through this introductory Montage, we are introduced to the protagonist’s lifestyle. In addition, the film explores the themes of drug abuse, addiction, and nihilism.
Trainspotting (1996)
5. Run Lola Run (1998)
In his movie Run Lola Run (1998), Tom Tykwer tells the story of Lola (Franka Potente) and Mani (Moritz Bleibtreu) as they face the different possibilities that arise from a single event in their lives. This Montage shows Lola bumping into various people as she begins to sprint. Her encounter has a profound impact on their lives. Through Montage, the film is given a sense of exhilarating pace and multi-layered visual design.
Run Lola Run (1998)
6. Requiem for a Dream (2000)
Hubert Selby Jr.’s titular novel is the source material for Darren Aronofsky’s psychological drama. Four people trapped by their addictions are the focus of the narrative. By watching this Montage, a viewer can get a better sense of the world or the film’s characters. As a result of their drug addictions, four ambitious people will eventually have their dreams dashed. As a result, we gain insight into how addiction takes hold of the characters’ minds and bodies.
Requiem for a Dream (2000)
7. Swades (2004)
Songs have played an integral role in bringing the story of the film to life in the hands of some of India’s most thoughtful filmmakers. Among them is Ashutosh Gowariker. Montage techniques are used to create the title song sequence of his film Swades. The fictional Indian village of Charanpur, where the protagonist Mohan Bhargava (Shahrukh Khan) has lived, is a source of great trauma for the protagonist. As he ends up returning to India, the song signifies his development psychologically.
Swades (2004)
8. Whiplash (2014)
Miles Teller plays Andrew Neiman, a promising young drummer who enrolls in a tough music conservatory. Damien Chazelle directs the film. Terence Fletcher (J. K. Simmons) mentors him, and he is determined to see his students’ dreams come true. Neiman pushes himself to his limits in this Montage, suffering a breakdown as a result. Edited shots and tempo match the visual images to accentuate the protagonist’s mental state.
Whiplash (2014)
9. Gone Girl (2014)
Gillian Flynn’s eponymous novel is the basis for David Fincher’s psychological crime drama. On their fifth wedding anniversary, Amy Elliott Dunne (Rosamund Pike) disappears, and Nicholas Dunne (Ben Affleck) becomes the prime suspect. Amy carefully crafts her new identity in this Montage as we learn she is alive. The Montage ends as Amy sets up her cabin and begins purchasing supplies. After hitting herself with a hammer, the sequence ends.
Whiplash (2014)
10. Parasite (2019)
In Bong Joon-ho’s Oscar-winning dark comedy thriller, the Kim family lives on the edge of poverty. They are suddenly thrown into a world of affluence when a family member gets a job at an affluent family. Moon-Gwang (Lee Jung-Eun) is a long-time housekeeper for the Kim family. The family comes up with a cunning plan to exploit her allergy to peaches. In the closing montage, they convince Mrs. Park (Cho Yeo-Jeong) that Moon-Gwang has tuberculosis.
Whiplash (2014)
Wondershare Filmora11 Express Better
Achieve More
Grow Together
Free Download Free Download Learn More

Summarize:
If you’re thinking about using Montage, check out movies and trailers in the Action and Comedy genres. Keep in mind that finding material that works well with montages is no accident. They are filled with some of the best soundtracks, action scenes, and comedy routines that can help guide your project through its rough spots. Montage can do amazing things for any movie, so it’s important to learn when and where it should be used.
Also read:
- New Detailed Tutorial to Crop a Video Using Openshot, In 2024
- Updated In 2024, Top 5 Ways To Convert Hdr To Sdr Videos
- How To Use Slow Zoom Effect in Your Video?
- 2024 Approved Top 10 Anime Movies of All Time
- Updated Thousands Already Know What Ezgif Is and So Can You
- New 2024 Approved This Article Describes Different Ways for Removing Gif Backgrounds, How We Can Use Them, and How This Way Differs From One Another
- New 2024 Approved How to Use LUTs in Lumafusion & Free LUTs Resource
- 2024 Approved Splitting a Video Into Frames with the FFmpeg Step by Step
- New This Article Provides Helpful Tips for Creating Better Film Footage in Public Places. Learn How to Choose the Right Angle and Re-Record the Audio with Filmora
- New In 2024, Best 8 Online MPEG to GIF Converters
- In 2024, Step by Step to Rotate Videos Using OBS
- New What Slideshow Templates Can Teach You About Aesthetic for 2024
- New How to Change Video Thumbnail in Google Drive
- Keyframes Interval Everything You Need To Know | Filmora
- Premiere Pro Best Slow Motion Effects To Use
- 8 Quick Fixes Unfortunately, Snapchat has Stopped on Nubia Red Magic 8S Pro | Dr.fone
- iPhone XS Max Asking for Passcode after iOS 17/14 Update, What to Do? | Dr.fone
- In 2024, iPhone XS Max Asking for Passcode after iOS 17/14 Update, What to Do?
- Detailed Review of doctorSIM Unlock Service For Apple iPhone 14 Pro
- In 2024, Top IMEI Unlokers for Your Xiaomi Redmi Note 12 4G Phone
- In 2024, Complete Guide For iPhone 12 mini Lock Screen
- In 2024, iSpoofer is not working On Poco M6 Pro 5G? Fixed | Dr.fone
- In 2024, How Can We Bypass Vivo Y100 FRP?
- In 2024, How to Track a Lost Vivo S18e for Free? | Dr.fone
- In 2024, How to Share/Fake Location on WhatsApp for Oppo A2 | Dr.fone
- In 2024, 8 Ways to Transfer Photos from Samsung Galaxy S23 Ultra to iPhone Easily | Dr.fone
- AI Translation | Wondershare Virbo Online
- Hassle-Free Ways to Remove FRP Lock on Honor X9a Phones with/without a PC
- In 2024, Pokemon Go No GPS Signal? Heres Every Possible Solution On Realme Narzo N53 | Dr.fone
- In 2024, The Ultimate Guide to Get the Rare Candy on Pokemon Go Fire Red On Lenovo ThinkPhone | Dr.fone
- Title: New The Best 10 GIF to JPGPNG Converters
- Author: Morgan
- Created at : 2024-05-19 05:12:07
- Updated at : 2024-05-20 05:12:07
- Link: https://ai-video-editing.techidaily.com/new-the-best-10-gif-to-jpgpng-converters/
- License: This work is licensed under CC BY-NC-SA 4.0.


