
:max_bytes(150000):strip_icc():format(webp)/homepod-hero-5a79bc226bf06900378a7e1a.jpg)
New Tips That Show Anybody How To Make Youtube Slideshow – Guaranteed for 2024
Tips That Show Anybody How To Make Youtube Slideshow – Guaranteed
Tips That Show Anybody How to Make Youtube Slideshow – Guaranteed
An easy yet powerful editor
Numerous effects to choose from
Detailed tutorials provided by the official channel
Making a slideshow on YouTube is quite easy. You can make your slideshow look more beautiful by adding amazing transitions and effects. Also you can add music to your slideshow.
In this article
01 [How to Make a Slideshow for YouTube (with Pictures and Music)](#Part 1)
02 [Best Six YouTube Slideshow Creator](#Part 2)
03 [Five Best Slideshow Video Templates](#Part 3)
04 [FAQ of Making YouTube Slideshow](#Part 4)
Part 1 How to Make a Slideshow for YouTube (with pictures and music)
If you want to make an attractive photo video slideshow for YouTube, you can make it by using SmartSHOW 3D software. It is a slideshow maker from which you can make 3D movies as well. You can create animated slideshow with photos and videos by using its amazing templates and effects. Make your slideshow more attractive by adding music, voice over, title clips and a lot more. Here are steps to make a photo video slideshow using SmartSHOW 3D.
Step 1: Decide on the Project Type
SmartSHOW 3D comes with two choices of projects. It has variety of premade templates in which you just have to insert your images and now your professionally looking slideshow is ready in no time. If you have any concept of making a slideshow, then you can go to New Project option where you can create everything from the starting.

Step 2: Add Pictures and Videos
Select your pictures and videos and drag and drop them in timeline. You can add many images but don’t try to pack a lot of images otherwise your slideshow will not be interesting. You can set the images in the order you want them, depending on the concept.

Step 3: Add Music
You can add music of your own choice which will suit your photo video slideshow perfectly. So, add a music which will make your slideshow more interesting. SmartSHOW 3D comes with a vast library of 200+ sound tracks and with amazing sound effects. The categories and genres are divided so it will make it easy for you to choose from it.

Step 4: Add Effects
Do you want that your video look alluring and interesting from others? Add transitions according to the slide of the video with a huge library, like gradient, 3D, mosaics and curtain swipes etc. You can put in a little bit of magic using nature effects like, snow falling, bubbles, cherry blossom and leaves. You can also use animation effects if you want to make your slide more interesting like fade in, fade out, zoom in, zoom out, pan left, rotate or flip.

Step 5: Make your YouTube Slideshow
Now you have successfully completed all the process and your photo video slideshow is ready. SmartSHOW 3D is very easy to use as you can create a slideshow with your best images, add the music of your own but it should comply with YouTube’s licensed regulations. Also you add transitions and effects to make your photo video slideshow much more interesting.

Part 2 Best Six YouTube Slideshow Creator
01Movavi Slideshow
Movavi is an amazing slideshow maker. If you want to make an alluring slideshow with pictures, videos and add some music to it, you can simply use Movavi slideshow maker. It provides you a vast variety of features with 150+ amazing effects and filters. If you are a beginner or don’t know how to use this software don’t be afraid, you can easily use this to make amazing slideshows.
Movavi allows you to save your photo or your video slideshow in all formats and allows you straight to upload it on YouTube or Google Drive.

02Focusky Presentation Maker
Focusky presentation maker is a free slideshow maker with customizable templates. It has its own media gallery which helps you to make amazing slideshows online as well as offline. It allows you to make zestful presentations that can be shared with anyone. It also has outstanding web work environment.

03Microsoft PowerPoint
Create your own well – designed slides with the help of PowerPoint. PowerPoint has ready to use templates with customizable themes, amazing transitions and effects. It also has 3D object support. You can create your outstanding presentations with PowerPoint. Now, you can also share it on YouTube. The best thing is that it is easy to use due to its simple interface.

04PixTeller Slideshow Maker
PixTeller allows you to create amazing small slideshows and videos in a few minutes. With the availability of so many options like customizable templates, unique text properties, transitions and effects, you can easily, render, save and share the slideshow directly on your social media. You can also download it in any format like JPG, PNG or PDF on your system.

05Promo
This is a web slideshow creator which you can use if you don’t have enough time. You can work on it online there is no need to download the file. You can easily share the slideshows on it. It has huge collection of templates using which you can create Promo videos and ads for your social media platforms. There is also a vast music library available that allows bringing customization in the slideshow. You can also promote your business or event through a Promo video..

06Slide Maker
Using Slide Maker you can create a beautiful photos video using different filters. You can add music using the built-in music library along with stylish transitions. For your instagram, it can adjust the length of the slideshow. After successfully creating your slideshow you can post it on your YouTube.

Part 3 Five Best Slideshow Video Templates
01Floral Photo Gallery Template
You can create an aesthetic look to your video slideshows with Floral Photo Gallery Template. Create a beautiful slideshow by adding images or videos to it. The template has a lot of floral patterns from which you can choose floral templates with particular flower designing only at the borders, or fully covered with flowers. It totally depends on which one you prefer for yourself.
02Award Show Package
Using this template you can create amazing and glamorous videos in a few minutes. It allows you to customize the videos using different color scheme, add videos and photos. This template will give a feel of reputed award shows like Oscars to your video with its sharp transitions and particle effects. It is best for introductions, invitations and announcements. The best thing is that it is available for free.
03Real Estate Template
You can use real estate template to present the houses, apartments, and commercial buildings. This template can be used by real estate companies, agencies or brokers to present their properties. They can also make a video presentation. You can promote your business simply using this template. Just write the text, add pictures and then render it. Now, your photo video presentation is ready.
04 Happy Birthday Template
You can surprise your loved ones by simply congratulating them with the birthday slideshow using happy birthday template. It will make it easy for you to create the slideshow using the template. Add photos and text to the template and in few minutes your photo video slideshow is ready. Your friends and relatives are definitely going to love it.
05Lovely Couple Template
You can make a photo video slideshow using lovely couple template to keep your precious moments in a video. Choose the images or video parts which you want, write romantic quotes and make a slideshow. Your couple slideshow is ready using the lovely couple template. It is perfect for love confessions, family and marriage proposals. Make your partner feel more special by creating a beautiful slideshow using this template.
Part 4 FAQ’S of Making YouTube Slideshow
How can you make a photo video slideshow?
A. If you want to spread your project, the best way to do it is to compile all the images and videos, add related content to it and make a photo video slideshow. Now, you can upload your slideshow as it was a video.
What are the best YouTube slideshow makers?
A. There are a lot of options available online from which you can choose the best for you. Here are some of them:
● SmartSHOW 3D
● Wondershare Filmora Video Editor
● Movavi Slideshow
● Microsoft PowerPoint
● Promo
● Videoshop
● Focusky Presentation Maker
What will be the best templates for making the slideshow on YouTube?
For Win 7 or later (64-bit)
For macOS 10.12 or later
A. There are a lot of templates from which you can choose according to the theme of your slideshow. Here are some of them:
● Happy birthday template
● Lovely couple template
● Real estate template
● Award show template
● Floral photo template
How can you share a slideshow on YouTube?
A. After creating your slideshow in a video format, click on the upload option in YouTube. Select the video which you want to upload and do adjustments in the privacy settings. After the video is being uploaded, click on the publish button to make it visible to the viewers.
How can you make an impactful slideshow on YouTube?
A. Things that make your presentation more impactful are:
● Focus on what the audience wants to see
● Make it simple and concise
● Use attractive templates
● Try to tell a story
FILMORA
Making a photo video slideshow on YouTube is a great choice but still you have an alternate option like Filmora. You can make a slideshow with Filmora as it has amazing features like adding text, adding music to it from its own in-built gallery. It also has a feature of audio mixer. It has 4K format support. It has amazing transitions and effects which will make your slideshow look more professional and attractive.
● Ending Thoughts →
● Making a photo video YouTube slideshow is a quite easy to create using SmartSHOW 3D, Promo, and others apps.
● Creating as YouTube slideshow using these apps is simple as you just have to put images, add text, and music and yes your slideshow is ready in few minutes.
● You can consider Filmora for making a photo video slideshow as it has amazing features like transitions, effects, music from its own in-built soundtrack.
Making a slideshow on YouTube is quite easy. You can make your slideshow look more beautiful by adding amazing transitions and effects. Also you can add music to your slideshow.
In this article
01 [How to Make a Slideshow for YouTube (with Pictures and Music)](#Part 1)
02 [Best Six YouTube Slideshow Creator](#Part 2)
03 [Five Best Slideshow Video Templates](#Part 3)
04 [FAQ of Making YouTube Slideshow](#Part 4)
Part 1 How to Make a Slideshow for YouTube (with pictures and music)
If you want to make an attractive photo video slideshow for YouTube, you can make it by using SmartSHOW 3D software. It is a slideshow maker from which you can make 3D movies as well. You can create animated slideshow with photos and videos by using its amazing templates and effects. Make your slideshow more attractive by adding music, voice over, title clips and a lot more. Here are steps to make a photo video slideshow using SmartSHOW 3D.
Step 1: Decide on the Project Type
SmartSHOW 3D comes with two choices of projects. It has variety of premade templates in which you just have to insert your images and now your professionally looking slideshow is ready in no time. If you have any concept of making a slideshow, then you can go to New Project option where you can create everything from the starting.
Step 2: Add Pictures and Videos
Select your pictures and videos and drag and drop them in timeline. You can add many images but don’t try to pack a lot of images otherwise your slideshow will not be interesting. You can set the images in the order you want them, depending on the concept.
Step 3: Add Music
You can add music of your own choice which will suit your photo video slideshow perfectly. So, add a music which will make your slideshow more interesting. SmartSHOW 3D comes with a vast library of 200+ sound tracks and with amazing sound effects. The categories and genres are divided so it will make it easy for you to choose from it.
Step 4: Add Effects
Do you want that your video look alluring and interesting from others? Add transitions according to the slide of the video with a huge library, like gradient, 3D, mosaics and curtain swipes etc. You can put in a little bit of magic using nature effects like, snow falling, bubbles, cherry blossom and leaves. You can also use animation effects if you want to make your slide more interesting like fade in, fade out, zoom in, zoom out, pan left, rotate or flip.
Step 5: Make your YouTube Slideshow
Now you have successfully completed all the process and your photo video slideshow is ready. SmartSHOW 3D is very easy to use as you can create a slideshow with your best images, add the music of your own but it should comply with YouTube’s licensed regulations. Also you add transitions and effects to make your photo video slideshow much more interesting.
Part 2 Best Six YouTube Slideshow Creator
01Movavi Slideshow
Movavi is an amazing slideshow maker. If you want to make an alluring slideshow with pictures, videos and add some music to it, you can simply use Movavi slideshow maker. It provides you a vast variety of features with 150+ amazing effects and filters. If you are a beginner or don’t know how to use this software don’t be afraid, you can easily use this to make amazing slideshows.
Movavi allows you to save your photo or your video slideshow in all formats and allows you straight to upload it on YouTube or Google Drive.
02Focusky Presentation Maker
Focusky presentation maker is a free slideshow maker with customizable templates. It has its own media gallery which helps you to make amazing slideshows online as well as offline. It allows you to make zestful presentations that can be shared with anyone. It also has outstanding web work environment.
03Microsoft PowerPoint
Create your own well – designed slides with the help of PowerPoint. PowerPoint has ready to use templates with customizable themes, amazing transitions and effects. It also has 3D object support. You can create your outstanding presentations with PowerPoint. Now, you can also share it on YouTube. The best thing is that it is easy to use due to its simple interface.
04PixTeller Slideshow Maker
PixTeller allows you to create amazing small slideshows and videos in a few minutes. With the availability of so many options like customizable templates, unique text properties, transitions and effects, you can easily, render, save and share the slideshow directly on your social media. You can also download it in any format like JPG, PNG or PDF on your system.
05Promo
This is a web slideshow creator which you can use if you don’t have enough time. You can work on it online there is no need to download the file. You can easily share the slideshows on it. It has huge collection of templates using which you can create Promo videos and ads for your social media platforms. There is also a vast music library available that allows bringing customization in the slideshow. You can also promote your business or event through a Promo video..
06Slide Maker
Using Slide Maker you can create a beautiful photos video using different filters. You can add music using the built-in music library along with stylish transitions. For your instagram, it can adjust the length of the slideshow. After successfully creating your slideshow you can post it on your YouTube.
Part 3 Five Best Slideshow Video Templates
01Floral Photo Gallery Template
You can create an aesthetic look to your video slideshows with Floral Photo Gallery Template. Create a beautiful slideshow by adding images or videos to it. The template has a lot of floral patterns from which you can choose floral templates with particular flower designing only at the borders, or fully covered with flowers. It totally depends on which one you prefer for yourself.
02Award Show Package
Using this template you can create amazing and glamorous videos in a few minutes. It allows you to customize the videos using different color scheme, add videos and photos. This template will give a feel of reputed award shows like Oscars to your video with its sharp transitions and particle effects. It is best for introductions, invitations and announcements. The best thing is that it is available for free.
03Real Estate Template
You can use real estate template to present the houses, apartments, and commercial buildings. This template can be used by real estate companies, agencies or brokers to present their properties. They can also make a video presentation. You can promote your business simply using this template. Just write the text, add pictures and then render it. Now, your photo video presentation is ready.
04 Happy Birthday Template
You can surprise your loved ones by simply congratulating them with the birthday slideshow using happy birthday template. It will make it easy for you to create the slideshow using the template. Add photos and text to the template and in few minutes your photo video slideshow is ready. Your friends and relatives are definitely going to love it.
05Lovely Couple Template
You can make a photo video slideshow using lovely couple template to keep your precious moments in a video. Choose the images or video parts which you want, write romantic quotes and make a slideshow. Your couple slideshow is ready using the lovely couple template. It is perfect for love confessions, family and marriage proposals. Make your partner feel more special by creating a beautiful slideshow using this template.
Part 4 FAQ’S of Making YouTube Slideshow
How can you make a photo video slideshow?
A. If you want to spread your project, the best way to do it is to compile all the images and videos, add related content to it and make a photo video slideshow. Now, you can upload your slideshow as it was a video.
What are the best YouTube slideshow makers?
A. There are a lot of options available online from which you can choose the best for you. Here are some of them:
● SmartSHOW 3D
● Wondershare Filmora Video Editor
● Movavi Slideshow
● Microsoft PowerPoint
● Promo
● Videoshop
● Focusky Presentation Maker
What will be the best templates for making the slideshow on YouTube?
For Win 7 or later (64-bit)
For macOS 10.12 or later
A. There are a lot of templates from which you can choose according to the theme of your slideshow. Here are some of them:
● Happy birthday template
● Lovely couple template
● Real estate template
● Award show template
● Floral photo template
How can you share a slideshow on YouTube?
A. After creating your slideshow in a video format, click on the upload option in YouTube. Select the video which you want to upload and do adjustments in the privacy settings. After the video is being uploaded, click on the publish button to make it visible to the viewers.
How can you make an impactful slideshow on YouTube?
A. Things that make your presentation more impactful are:
● Focus on what the audience wants to see
● Make it simple and concise
● Use attractive templates
● Try to tell a story
FILMORA
Making a photo video slideshow on YouTube is a great choice but still you have an alternate option like Filmora. You can make a slideshow with Filmora as it has amazing features like adding text, adding music to it from its own in-built gallery. It also has a feature of audio mixer. It has 4K format support. It has amazing transitions and effects which will make your slideshow look more professional and attractive.
● Ending Thoughts →
● Making a photo video YouTube slideshow is a quite easy to create using SmartSHOW 3D, Promo, and others apps.
● Creating as YouTube slideshow using these apps is simple as you just have to put images, add text, and music and yes your slideshow is ready in few minutes.
● You can consider Filmora for making a photo video slideshow as it has amazing features like transitions, effects, music from its own in-built soundtrack.
How to Split Videos in Final Cut Pro
If you are looking for a video splitting ad merging software and you want someone to recommend you, it is more likely that they will consider referring Final Cut Pro. People, especially video editors prefer using Final Cut Pro for multiple reasons. Final Cut Pro features the most advanced organizing tools out of all the professional video editing software. Create Smart Collections that automatically compile content based on a set of specified criteria and tag entire clips or clip ranges with metadata for searching.
Considering its importance, this guide is to introduce different ways to split and merge video and answer the question that has been raised in your mind about whether there is any other software program that can be used as a Final Cut Pro alternative.
Part 1. How to split a clip in Final Cut Pro?
A great video editor, Final Cut Pro (or Final Cut Pro X), offers a variety of capabilities to enhance videos and supports a wide range of video formats. You may create post-production video editing from a variety of angles thanks to it.
One of the most fundamental video editing skills you’ll need to master is how to split clips in Final Cut Pro. After being divided in two, you can modify or reorganize one half of your clip without affecting the other.
Way 1: Split a Clip in the Timeline (shortcut: Command+B)
You can follow these steps to split a clip in the timeline:
Step1The blade can be selected in Final Cut Pro by clicking the Tools pop-up menu in the timeline’s upper left corner (or press B).

Step2Then click and move the skimmer to the frame in the video you wish to cut from.

Step3You can split the video by following these two methods:
- Choose Trim > Join Clips after selecting one or both sides of the edit point (or press Delete).
- Choose Trim > Join Clips after selecting the clips on either side of the edit.

Way 2. Split several clips at the same time
You can follow these steps to split several clips at the same time:
Step1Move the skimmer to the desired cutting frame in the Final Cut Pro timeline.

Step2Deciding on Trim > Blade All (or press Shift+Command+B). At the skimmer position, all clips are removed.
Way 3. Split all clips at once
The Blade command allows you to simultaneously cut selected core storyline segments and related clips.
You can follow these steps to split all clips at once:
Step1Choose the videos you wish to cut from the timeline in Final Cut Pro.
Step2The skimmer should be moved to the desired cutting frame.

Step3Click Trim > Blade (or press Command+B). The skimmer position is used to cut the chosen clips.

Tips: How to heal the sliced clips?
How should I recover if there is an error in the edited video? Here are 3 methods for you.
Way 1: Delete the cut point (by pressing Delete)
You can follow these steps to merge 2 clips by clicking delete:
Step1Move the mouse over the time point you want to remove, then select Delete directly to restore the original full video.

Way 2: Undo the action (by pressing Command + Z)
You can either click “Command + Z” to reverse the process if you want to link the clips back together to repair a clip in the timeline.
Way 3: merge 2 clips (by clicking " Join Clips")
Choose two neighboring portions, then select “Join Clips” from the drop-down option under “Trim” to join the individual clips together into one.

Tips: These 3 ways only work if the two clips come from the same clip.
Part 2. How to split a clip in alternative to Final Cut Pro?
Final Cut Pro is a more complex user to understand; It can sometimes corrupt your file if it isn’t saved properly, leading to all your work becoming lost. To save your work, you should do this every 5 minutes to ensure that your work doesn’t corrupt. There are limited export settings; you are limited in the formats and sizes you can export from FCPX; whereas before, you could export many codecs and formats out of FCP, you must complete more specific encoding in a compressor.
Therefore, the alternative to Final Cut Pro is Filmora because it allows you to edit, split or merge clips in one go.
Split a clip in the best alternative to FCP - Wondershare Filmora
Wondershare Filmora is a video editing program with a delightfully user-friendly interface that enables anyone to become an excellent video editor. With the help of a variety of strong editing tools and Wondershare Filmora, users may quickly and easily make outstanding videos.
To split audio and video without any problem, just follow these steps:
Step1To add video files to the Timeline for trimming, first click “Import“ on the main windows and choose the video files you want from your computer. You can also just drag and drop movies into the Media Library.

Step2Move the playhead over the unwanted section, then click the trash can symbol.

Step3Click “Export“ after you’re done trimming, then choose where you want to save the edited video.
Conclusion
We hope this article can help you learn how to split videos with Final Cut Pro, however, we still recommend more users choose Filmora . It is one of the widely preferred and commonly used video editing software programs as it introduces you to a world of editing tools allowing you in creating high-quality content. Although some of the features require in-app purchases, still Filmora provides access to a wide range of tools in the free version.
Free Download For Win 7 or later(64-bit)
Free Download For macOS 10.14 or later
Free Download For macOS 10.14 or later
How to Create Chroma Key Written Text Effects in Filmora
Did you know it only takes a few clicks to key out the color in Filmora? It means that you can add green screen effects to many other objects. This article will show a cool chroma key effect you can try using written text.
Part 1. What Is Chroma Key Text Effect?
Composing of the chroma key effect is widely used in the gaming and newscasting industries. In this technique, you can make layering images and videos for the text together based on color hues.

Video editors can eliminate the basis from a picture by automatically choosing a certain hue in post-production. An interactive animation results by adding different color schemes; it’s an easy way to make 3D motion videos.
To make the effects on text, we have to film the subject writing on white paper. For this, follow the below instructions:
Part 2. Filming Tips for Written Texts
To write a key text before adding the chroma effect, we have to film the writing process to understand your next project better. You can create your own by following these tips. We are just concluding a single example here.
Tip 1. A Pen and a White Paper
We need blank white paper with no boundaries and lines for writing a text. Because the chroma effect will embellish the other lines if present on paper. Make sure to choose a prominent color for writing a text.
We are using a purple color pen here for writing an essential text to make it more prominent, as shown below:

It all depends upon the contrast, and you can choose another color too but ensure that it’s more apparent during filming.
Tip 2. Different Color Paper
There are many chances that you don’t have only white paper in your studio, or your requirement is not going with a blank white sheet. Then you don’t need to worry because you can use different color papers too.
But always try to use clearer paper and a prominent pen or highlighter. See the below example of a different color paper with a different highlighter.

![]()
Note: Ensure that the colored pens have good contrast with colored paper. Don’t use dull color pens with bright color paper.
Tip 3. Camera Angles
While filming a writing process for a video, you have to take care of the alignment of the camera. First, ensure the camera is at a suitable angle so it will not block the writing letters from the left side.
Sometimes, the writer’s hand blocks the letters on the left side during writing. Take note of this tip during filming a professional video, as shown below.

After checking the alignment of the camera, it’s time to look at what size we have to use for writing!
Tip 4. Larger Size of Letters
As we already said about the prominence of written text, we have to follow one more instruction related to the structure of the letters. Use the larger size and bold words when writing from a highlighter.
It is because the effect we insert during editing will be more standing and give a professional look to the video.

![]()
Note: You can create more shots till you get the right angle for a final video. Just focus on the camera alignment and highlighted words, then it will be all set.
After filming all the clips, you must edit those shots on the Filmora to get the chroma effect. Scroll more to get the step-by-step process!
Part 3. Editing the Chroma Key Text With Filmora
We need software that will give great setting choices and stock videos for a more professional look. For this, Wondershare Filmora will work more than a robot and give high-resolution results. To do the editing process on Filmora, follow the steps below and enjoy yourself with your followers.
Free Download For Win 7 or later(64-bit)
Free Download For macOS 10.14 or later
Step1 Download and install Wondershare Filmora
Launch Wondershare Filmora on your PC or Mac after downloading.
![]()
Note: If you want to enjoy its unlimited effect, you get its premium version quickly.

Step2 Import the clips to the Filmora
First, import the best footage into the filmora which you have shot. Ensure that the clip should have the best recording angle and that every word will be prominent on the page.
For this, click on Import Media and choose from the PC library what you want to edit.

Step3 Drag the clip to the timeline
Drag and drop the clip into the timeline from the import section. If you have more clips, choose first according to your script.
Add the text-written clip into the second video track because we have to insert the background into the first video track later.

After inserting the clip into the timeline, it’s time to edit it. For this, keep following the below-mentioned steps!
Step4 Chroma key settings
To edit the chroma key, you need to open the settings. For this, follow the below instructions:
- First, double-click on the clip in the timeline of the Filmora.
- Then, the setting section of the video will pop up at the top left side.
- Mark the tick in front of the Chroma Key section, and it will show the list of different features as shown below.

Step5 Color key out
To key out the specific color for changing its background, you have to perform the following actions:
- First, find the Select color option in the settings of the clip.
- Then click on the color dropper in front of the color tab.
- After that, pick the color dropper and move it on the video to select the color from the text.
![]()
Note: Ensure to select the color from the middle of the text for better key-out accuracy.

You have to adjust the size and thickness after selecting the key-out. For this, follow the next step!
Step6 Adjust the settings
To adjust the Chroma Key’s settings, set the offset, tolerance, edge thickness, and edge feather. Increase or decrease according to your range and that suits you the best.
Then click on Alpha Channel to mark the tick in front of the option. It is due to that chroma key effects will be more clearly shown.

Now, it’s time to set the background after fixing all the settings of the chroma key effect. To perform this, scroll more to get to the next step.
Step7 Import background clips
You have to add an excellent motion background in the handwritten text video. For this, you must first import the background clip into the filmora. Then, click on Import Media and choose what you want from your PC.

Step8 Add a background clip to the timeline
After importing the background clip, now drag and drop the clip into the timeline. Finally, add the background clip to the first video track at the bottom.

Step9 Turn off the alpha channel
The last step is merging the background clip with the first clip. For this, follow the below guidelines:
- First, double-click on the handwritten text video.
- It will show the settings section at the top left corner.
- Find the chroma key section and turn Alpha Channel

Final Results
You have all done with the steps and got such a fascinating result. Following the above tricks, you can easily make your vlogs and daily videos more professional and creative. Make sure to add a great and colorful background clip.

You can also use any other motion video of scenes rather than colorful videos to give a striking look.
Conclusion
Create more attractive looks and share them with your subscribers. Mainly, vloggers can attract many viewers by making the introductory part with this effect. Then, choose hundreds of other videos from the stock media and create different looks daily.
See how you can get editing tricks on Wondershare Filmora and use them in a few clicks to get an attractive look!
Tip 3. Camera Angles
While filming a writing process for a video, you have to take care of the alignment of the camera. First, ensure the camera is at a suitable angle so it will not block the writing letters from the left side.
Sometimes, the writer’s hand blocks the letters on the left side during writing. Take note of this tip during filming a professional video, as shown below.
After checking the alignment of the camera, it’s time to look at what size we have to use for writing!
Tip 4. Larger Size of Letters
As we already said about the prominence of written text, we have to follow one more instruction related to the structure of the letters. Use the larger size and bold words when writing from a highlighter.
It is because the effect we insert during editing will be more standing and give a professional look to the video.
![]()
Note: You can create more shots till you get the right angle for a final video. Just focus on the camera alignment and highlighted words, then it will be all set.
After filming all the clips, you must edit those shots on the Filmora to get the chroma effect. Scroll more to get the step-by-step process!
Part 3. Editing the Chroma Key Text With Filmora
We need software that will give great setting choices and stock videos for a more professional look. For this, Wondershare Filmora will work more than a robot and give high-resolution results. To do the editing process on Filmora, follow the steps below and enjoy yourself with your followers.
Free Download For Win 7 or later(64-bit)
Free Download For macOS 10.14 or later
Step1 Download and install Wondershare Filmora
Launch Wondershare Filmora on your PC or Mac after downloading.
![]()
Note: If you want to enjoy its unlimited effect, you get its premium version quickly.
Step2 Import the clips to the Filmora
First, import the best footage into the filmora which you have shot. Ensure that the clip should have the best recording angle and that every word will be prominent on the page.
For this, click on Import Media and choose from the PC library what you want to edit.
Step3 Drag the clip to the timeline
Drag and drop the clip into the timeline from the import section. If you have more clips, choose first according to your script.
Add the text-written clip into the second video track because we have to insert the background into the first video track later.
After inserting the clip into the timeline, it’s time to edit it. For this, keep following the below-mentioned steps!
Step4 Chroma key settings
To edit the chroma key, you need to open the settings. For this, follow the below instructions:
- First, double-click on the clip in the timeline of the Filmora.
- Then, the setting section of the video will pop up at the top left side.
- Mark the tick in front of the Chroma Key section, and it will show the list of different features as shown below.
Step5 Color key out
To key out the specific color for changing its background, you have to perform the following actions:
- First, find the Select color option in the settings of the clip.
- Then click on the color dropper in front of the color tab.
- After that, pick the color dropper and move it on the video to select the color from the text.
![]()
Note: Ensure to select the color from the middle of the text for better key-out accuracy.
You have to adjust the size and thickness after selecting the key-out. For this, follow the next step!
Step6 Adjust the settings
To adjust the Chroma Key’s settings, set the offset, tolerance, edge thickness, and edge feather. Increase or decrease according to your range and that suits you the best.
Then click on Alpha Channel to mark the tick in front of the option. It is due to that chroma key effects will be more clearly shown.
Now, it’s time to set the background after fixing all the settings of the chroma key effect. To perform this, scroll more to get to the next step.
Step7 Import background clips
You have to add an excellent motion background in the handwritten text video. For this, you must first import the background clip into the filmora. Then, click on Import Media and choose what you want from your PC.
Step8 Add a background clip to the timeline
After importing the background clip, now drag and drop the clip into the timeline. Finally, add the background clip to the first video track at the bottom.
Step9 Turn off the alpha channel
The last step is merging the background clip with the first clip. For this, follow the below guidelines:
- First, double-click on the handwritten text video.
- It will show the settings section at the top left corner.
- Find the chroma key section and turn Alpha Channel
Final Results
You have all done with the steps and got such a fascinating result. Following the above tricks, you can easily make your vlogs and daily videos more professional and creative. Make sure to add a great and colorful background clip.
You can also use any other motion video of scenes rather than colorful videos to give a striking look.
Conclusion
Create more attractive looks and share them with your subscribers. Mainly, vloggers can attract many viewers by making the introductory part with this effect. Then, choose hundreds of other videos from the stock media and create different looks daily.
See how you can get editing tricks on Wondershare Filmora and use them in a few clicks to get an attractive look!
How to Zoom Picture in Picture [Easy Solution]
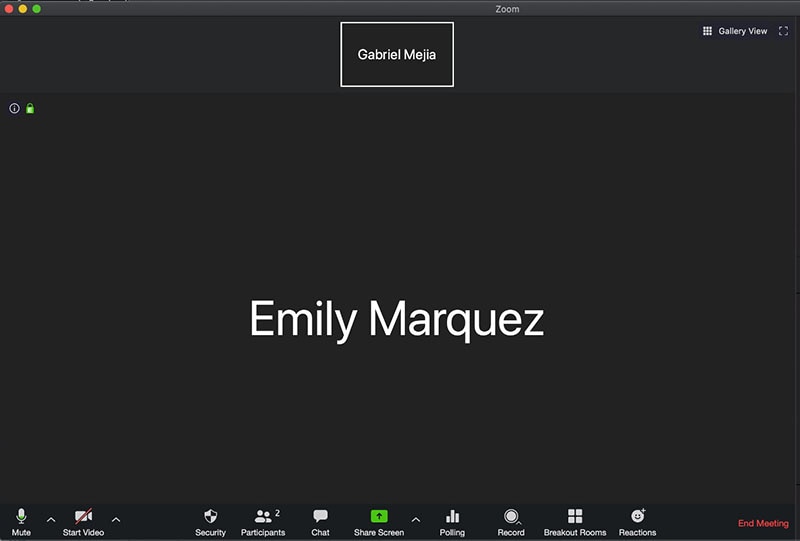
Zoom is one of the greatest options on the market for video conferencing. It doesn’t matter whether you use it at home or in an office environment; it will quickly link the team members. One of the most popular video conferencing programs is Zoom. When in-person meetings aren’t feasible, it enables you to communicate electronically with employees, and it’s been a major popularity for social occasions as well. In case you’re not acquainted, picture-in-picture mode enables you to watch videos from one app while using your PC normally. The movie will keep playing in a tiny thumbnail window so that two applications may work simultaneously on your smartphone.
You may create virtual audio and video conferences, webinars, live chats, screen sharing, and other collaboration tools with Zoom, a cloud-based video communications solution. Zoom’s most recent iPhone apps let you dismiss a Zoom Meeting while keeping the Zoom video call open in a picture-in-picture mode. To join a Zoom conference, you don’t need an account, and because the software works with Mac, Windows, Linux, iOS, and Android devices, nearly anybody can use it. Since using Zoom’s picture-in-picture mode is the same as using it with other applications, you shouldn’t have any trouble if you often use PiP mode. Here are the top 4 methods you can refer to picture in picture in Zoom.
Method 1: Swap Shared Screen with Video
You may move the Zoom Meeting PiP window across the screen, change the thumbnail’s size, and utilize other applications while it remains open, just like any other picture-in-picture window. Before leaving the meeting if you’re not giving a presentation or speaking, you should definitely mute Zoom on your iPhone to prevent noises from your typing or other activities from entering the conversation. Additionally, keep in mind to switch off the camera if you’re engaged in something distracting, at least for the duration of your activity. To reopen the Zoom Meeting and go back to the Zoom app, touch the Picture-in-Picture mode pane. Here are some actions to keep in mind:
Steps to Swap Shared Screen for Zoom Picture in Picture
Step1Launch or enter a Zoom meeting. Keep the video on your main screen at all times, closing the chat and participant list as necessary.
Step2Tap the Home button or swipe up from the bottom of the screen.
Step3Picture-in-picture mode should be activated automatically throughout the meeting.
Method 2: Use Ecamm Live
Live streaming is a fantastic way to provide original content and stand out from the crowd. To prevent any operational difficulties, a more sophisticated virtual camera is absolutely necessary. You now have magical abilities thanks to Ecamm virtual cam, including the ability to add text, animations, observe a live stream, post viewer comments, play music, share your screen, use sound effects, and many more. It offers the Ecamm live virtual camera zoom function for video conferences so you may improve your Zoom discussions by sending output to other PC programs. You could see a quality difference between what you view in Ecamm Live and what your Zoom visitors see while utilizing virtual camera with Zoom. The quality of a Zoom video stream cannot be improved using Ecamm Live. Simply broadcast the Zoom app using Ecamm Live’s Screen Share mode to utilize Ecamm Live for picture-in-picture virtual presentations on Zoom.
Steps to Use Ecamm Live for Zoom Picture in Picture
Step1Download the Ecamm Application
Install Ecamm Live on your computer, then choose the center button in the source switcher at the top of the main window to enter Screen Share mode.
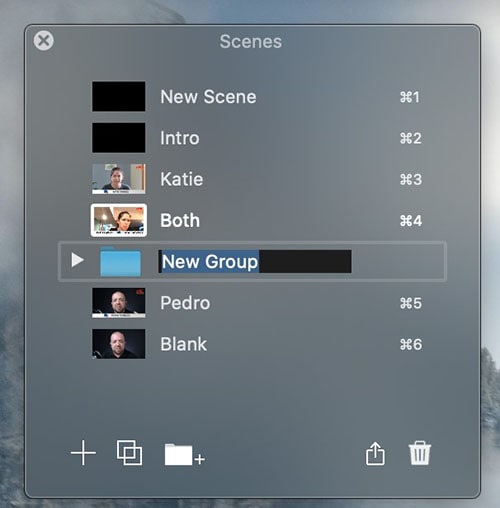
Step2Create Scenes
With the use of Ecamm Live’s Virtual Camera and Virtual Mic capabilities, you may transfer Ecamm Live’s output to almost any other Mac software, including Zoom. After setting, create the scenes in the program to quickly switch between various cameras.
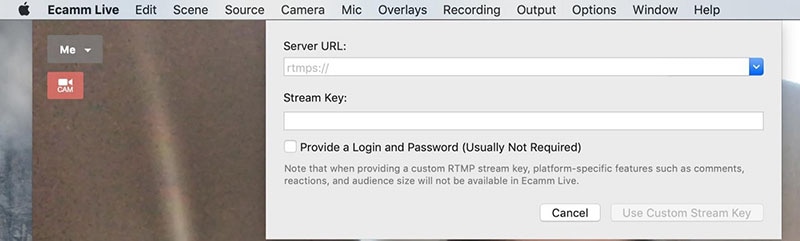
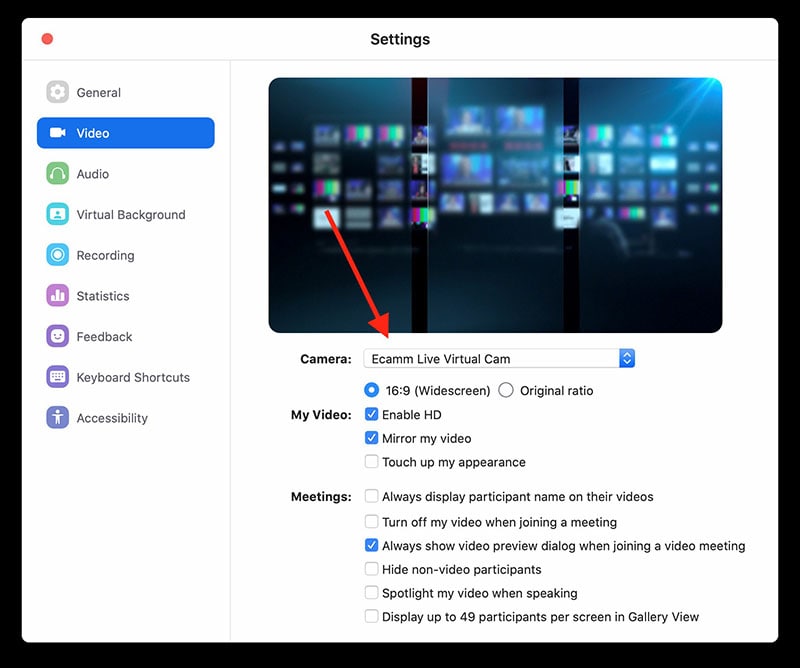
Step3Select Ecamm on Zoom
You may also utilize Ecamm Live’s Sharing Window capability to feed Ecamm Live output into Zoom. Simply activate the virtual camera, and then, as seen below, choose Ecamm Live Virtual Camera in Zoom’s video settings:
Step4Begin Your Presentation
Finally, click the PC share option to show your Zoom app to your audience. To conceal a picture-in-picture window that displays your camera image while live streaming, click the PIP button.
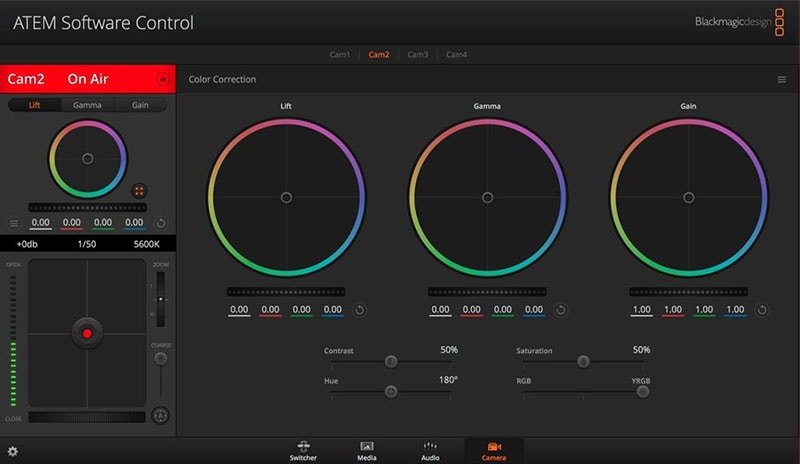
Method 3: Use Filmora as A Switcher
Zoom has solutions that will make your meetings simple and secure. It gives your remote staff a secure setting to interact and share crucial information. Ideal control over your film and configuration options to make them aesthetically pleasing is something Zoom lacks. To overcome the drawbacks and improve the quality of your online meetings, you may take use of the capabilities of Zoom in conjunction with Filmora. Filmora was developed with the intention of easing user burden and supporting applications. Though complicated, the program is simple to use. The perhaps most popular web information that may be saved on your computer can be easily captured by just angling your screen. For more information on how to record and save your Zoom for picture in picture, see the guide here.
To broadcast a variety of situations in a grid style, you may also combine inputs from your camera, microphone, computer screen, and web conferencing software. Wondershare -the finest desktop application for recording a Zoom Picture in Picture meeting- is Filmora. With the majority of cameras, this app’s screen recording capability is both user-friendly and feature-rich. Here, users may either choose a particular region to record or record their zoom meetings in Fullscreen mode. Additionally, you may choose the camera and input microphone that will be used while recording a video overlay. The addition of relevant comments like phrases, lines, drawings, symbols, etc. is also possible by users. The detailed procedure for recording a Zoom Picture-in-Picture meeting using a Filmora recorder is given below:
Free Download For Win 7 or later(64-bit)
Free Download For macOS 10.14 or later
Step1Download and Install Filmora Zoom Recorder
You may find both types, i.e., the most recent Windows and Mac versions, by first visiting the usual website and then using this Zoom. Install the program on your computer once you download it to get started.

Step2Initiate Filmora Recorder
After finishing the installation process for this Reside Zoom recorder, launch it from the main menus and choose “New Task” when prompted. It will take you to Filmora’s streamlined user interface where you can immediately start filming. Then, as seen in the picture below, you may adjust the screen recording using your preferred camera, microphone, and system settings:

Step3Begin/End the Recording
When you are through configuring this Zoom picture in picture recorder, click the Record button, and it will immediately begin recording your customized screen. Similar to that, after you’re done recording, click Stop, which will take you inside the video editor where you may edit your recorded information.

Step4Share Recordings
When you have everything ready, export your recording right away. After you’re done with the editing part, you do have a lot of options to choose from when displaying your screen capture and webcam stories. To do so, click the Export button in the item user interface’s top-right corner as shown below:
You may easily choose your preferred way to share from there if you choose to upload your work of zoom picture in picture recordings straight to the YouTube or other reputable websites right now. Simply refer to the Sharing plug-ins in the Export window to find out more.
Method 4: Use Hardware Switcher ATEM Mini Pro
Particularly on Zoom, the ATEM Mini is excellent for video conferences. The Blackmagic ATEM Mini is a USB video interface and HDMI switcher. Four HDMI inputs, or four cameras that can produce an HDMI video stream, may be switched between live. This device integrates Zoom meetings fast and makes it incredibly simple to set up your audio, a sometimes-forgotten aspect of video broadcasting. This sophisticated video switcher promises to offer broadcast-quality multi-camera footage with ease and is targeted at gamers, streamers, and online reviewers. It connects to a computer via a USB-C to USB-A connection. The video feed may then be sent to distant colleagues via a number of well-liked videos streaming services, including Zoom.
Step1The ATEM Mini Pro is a basic control switcher with pro-broadcast performance. Your ATEM Mini Pro is really simple to set up. You can connect a full setup with several cameras and microphones in around 30 minutes.
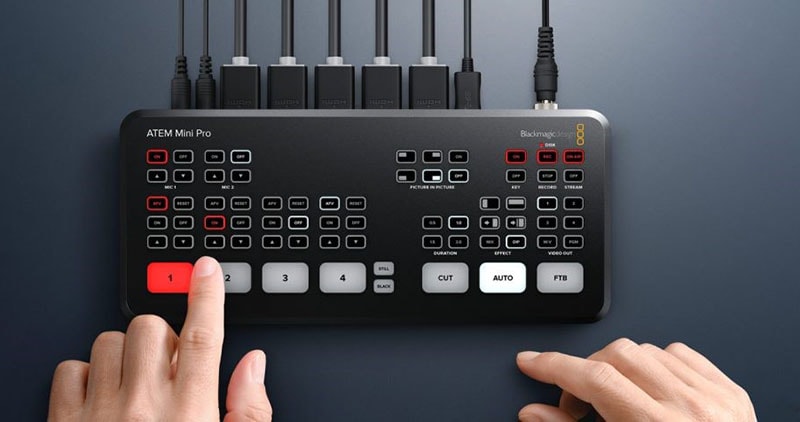
Step2You may connect several camera sources to the inputs of the ATEM Mini Pro. The 4 HDMI inputs each have a separate standards converter built in. As a result, the ATEM Mini can automatically convert inputs that are 1080p, 1080i, or 720p to the switcher’s video standard. You may make quick changes between inputs with no latency or disruption to your video output by using the ergonomic buttons.
Step3As a third option, Zoom offers ATEM Mini, which enables you to switch between several inputs, add custom visuals, and adjust audio levels all from a single interface. To improve the quality of your production, you may even use smooth transitions like wipes or fades. You can even test any input stream before making it live.
Conclusion
When you are doing a Zoom Meeting and share your screen, only to discover that what the other attendees see is a split screen with your material and the other Attendee cams, it is highly annoying. You may move the Zoom Meeting PiP window across the screen, change the thumbnail’s size, and utilize other applications while it remains open, just like any other picture-in-picture window. Someone must be sharing information in the Zoom conference for the Picture in Picture, or “Split Screen” option, to be active. We’ve listed the top techniques for doing it effectively above. To do this work without difficulty, use them as your guide.
Free Download For macOS 10.14 or later
Step1Download and Install Filmora Zoom Recorder
You may find both types, i.e., the most recent Windows and Mac versions, by first visiting the usual website and then using this Zoom. Install the program on your computer once you download it to get started.
Step2Initiate Filmora Recorder
After finishing the installation process for this Reside Zoom recorder, launch it from the main menus and choose “New Task” when prompted. It will take you to Filmora’s streamlined user interface where you can immediately start filming. Then, as seen in the picture below, you may adjust the screen recording using your preferred camera, microphone, and system settings:
Step3Begin/End the Recording
When you are through configuring this Zoom picture in picture recorder, click the Record button, and it will immediately begin recording your customized screen. Similar to that, after you’re done recording, click Stop, which will take you inside the video editor where you may edit your recorded information.
Step4Share Recordings
When you have everything ready, export your recording right away. After you’re done with the editing part, you do have a lot of options to choose from when displaying your screen capture and webcam stories. To do so, click the Export button in the item user interface’s top-right corner as shown below:
You may easily choose your preferred way to share from there if you choose to upload your work of zoom picture in picture recordings straight to the YouTube or other reputable websites right now. Simply refer to the Sharing plug-ins in the Export window to find out more.
Method 4: Use Hardware Switcher ATEM Mini Pro
Particularly on Zoom, the ATEM Mini is excellent for video conferences. The Blackmagic ATEM Mini is a USB video interface and HDMI switcher. Four HDMI inputs, or four cameras that can produce an HDMI video stream, may be switched between live. This device integrates Zoom meetings fast and makes it incredibly simple to set up your audio, a sometimes-forgotten aspect of video broadcasting. This sophisticated video switcher promises to offer broadcast-quality multi-camera footage with ease and is targeted at gamers, streamers, and online reviewers. It connects to a computer via a USB-C to USB-A connection. The video feed may then be sent to distant colleagues via a number of well-liked videos streaming services, including Zoom.
Step1The ATEM Mini Pro is a basic control switcher with pro-broadcast performance. Your ATEM Mini Pro is really simple to set up. You can connect a full setup with several cameras and microphones in around 30 minutes.
Step2You may connect several camera sources to the inputs of the ATEM Mini Pro. The 4 HDMI inputs each have a separate standards converter built in. As a result, the ATEM Mini can automatically convert inputs that are 1080p, 1080i, or 720p to the switcher’s video standard. You may make quick changes between inputs with no latency or disruption to your video output by using the ergonomic buttons.
Step3As a third option, Zoom offers ATEM Mini, which enables you to switch between several inputs, add custom visuals, and adjust audio levels all from a single interface. To improve the quality of your production, you may even use smooth transitions like wipes or fades. You can even test any input stream before making it live.
Conclusion
When you are doing a Zoom Meeting and share your screen, only to discover that what the other attendees see is a split screen with your material and the other Attendee cams, it is highly annoying. You may move the Zoom Meeting PiP window across the screen, change the thumbnail’s size, and utilize other applications while it remains open, just like any other picture-in-picture window. Someone must be sharing information in the Zoom conference for the Picture in Picture, or “Split Screen” option, to be active. We’ve listed the top techniques for doing it effectively above. To do this work without difficulty, use them as your guide.
Also read:
- The Background in Your Footage Might Be Bland or Unpleasant. This Article Will Discuss Video Background Templates You Can Use to Spice Things up and Make Your Videos Go Viral for 2024
- Updated 2024 Approved How to Loop a Video with iMovie on Mac and iPhone
- New 2024 Approved Color Finale Is a Color Grading Plugin for Final Cur Pro. It Allows Users to Make Cinematic Looking Video Scenes by Adjusting the Color. Here Well Share You some Basic Information About This Plugin
- New Top 11 Best Video Editing Apps for iPhone
- 2024 Approved Do You Want to Create Adjustment Layers in Final Cut Pro? This Article Will Discuss a Simple yet Efficient Method to Generate Adjustment Layers in Final Cut Pro
- New 2024 Approved Want to Add an Exciting Countdown Timer to Your Wedding, Product Launch or Any Other Video Using After Effects or an Alternative Tool? This Article Will Help You Learn All About After Effects Countdown and the Procedure
- In 2024, How to Remove Motion Blur In Photoshop
- Updated 2024 Approved Create True 3D Text Effects Using After Effects
- Updated Before & After Editing Trick - Filmora
- Updated How to Save As MP4 File on Windows Movie Maker?
- Updated How to Spruce Up Your Telegram Profile for 2024
- New Lets Learn How to Convert a Normal Video Into a Film Shot in the 1920S with Wondershare Filmora for 2024
- In 2024, How Does Sonys S&Q Feature Help Recording Slow-Motion Video
- Updated 2024 Approved Are You Looking for a Video Format Converter Free? We Will Introduce the 5 Best Online Converters and Also the 5 Best Video Format Converters for PC
- How to Create Sports Intro and Outro for YouTube Video for 2024
- New 2024 Approved How to Create Chroma Key Written Text Effects in Filmora
- New Twitch Green Screen Guide
- New 2024 Approved DVD Slideshow Builder Review and Tutorial
- How to Animate Your Designs With Canva GIF
- 10 BEST TEXT TO SPEECH VIDEO MAKERS
- New Sometimes, when It Comes to Editing a Video, We Dont Even Know Where to Start, because There Are Too Many Options –Online Platforms Which Instantly Help Us Edit Our Clips, without Lengthy Process of Downloading and Installing Computer Programs for 2024
- Updated 4 Solutions to Resize a WebM File
- In 2024, Do You Want to Add a Motion Blur Effect in Valorant? Read This Guide to Find Out How to Create a Motion Blur Effect in Valorant without Any Hassle
- Updated How to Make Dynamic Video Collages, In 2024
- Updated 2024 Approved Ideas That Will Help You Out in Converting AVI to GIF
- Updated Want to Capture Captivating, Detailed Videos? If Yes, Then You Need to Learn the Recording of Super Slow Motion Videos. In This Article, I Will Show You How to Record a Super Slow-Motion Video on Your Android and iPhone
- Updated Have You Ever Created a Slow Motion Video on Your Phonr or Camera? This Article Will Show You some Knowledge About Slow Motion Photography for 2024
- New In 2024, | Change Speed of a Video on iPhone
- Updated You Must Be Wondering Which the Best Online Transparent Image-Maker Is! Well, There Is No Need to Get Confused as Here; You Will Get a Curated List for the Same
- New Do You Want to Add a Motion Blur Effect in Valorant? Read This Guide to Find Out How to Create a Motion Blur Effect in Valorant without Any Hassle
- Synchronizing Videos Can Be Hectic, but Do You Wish to Know a Good Tool for This Purpose? This Article Will Discuss Wondershare Filmora, Which Is Perfect for This
- How to Make Video Slow Motion for 2024
- Updated 2024 Approved How to Create Vintage Film Effect 1920S
- In 2024, Top 5 Online Video Converter for Instagram
- New Are You Trying to Create a Stunning Intro for Your Video for Free? This Article Will Show You How to Make an Intro Video Using InVideo in a Few Simple Steps
- 2024 Approved To Determine or Change the Video Aspect Ratio Online. Use a Ratio Calculator to Calculate Pixel Dimensions and Aspect Ratios of Images or Videos
- New In 2024, 4 Solutions to Crop a Video on Android Easily
- Updated Transforming a Slow-Motion Video to Normal Mastering the Skill
- Updated In 2024, Having Difficulty in Choosing the Most Affordable 3D Slideshow Software? Stay Here for the Best Application Choices of All Times to Create the Most Stunning Slideshows Ever
- Top 10 Free Spanish Text To Speech Converter Websites
- New You May Want to Change the Speed of Certain Portions of Your Video. This Article Enlightens You on How to Splice and Speed up the Video in Simple Ways for 2024
- Updated 7 Solutions to Edit GoPro Video on Mac for 2024
- Updated In 2024, Want to Apply a Filter on Your Video Using Your iPhone or Mac? Here Are the Simple Steps to Put Add Filters on iMovie. Find Out a Better iMovie Alternative with More Filters
- New If You Are a Free Video Editor Being a Windows User, VSDC Free Video Editor Is a Great Choice. But Is It the Best Video Editor You Should Use? Find Out From Our VSDC Free Video Editor Review
- Updated In 2024, Do You Want to Apply BRAW LUTs to Your Pictures and Video Footage? Here We Will Discuss some of the Best Options Available to Help You Choose the Right One
- | Best WMV to GIF Converters for 2024
- Updated How To Change Text In Premiere Pro for 2024
- 2024 Approved 4 Methods to Merge MP4 and MP3
- Updated In 2024, Want to Save Your Edited Video File in MP4 Format in Windows Movie Maker? Here Are the Simple Steps Along with a Better Alternative
- In 2024, What Is a SIM Network Unlock PIN? Get Your Samsung Galaxy M14 4G Phone Network-Ready
- In 2024, Best Pokemons for PVP Matches in Pokemon Go For Motorola Moto G14 | Dr.fone
- Edit and Send Fake Location on Telegram For your Vivo V29 in 3 Ways | Dr.fone
- Recommended Best Applications for Mirroring Your Honor Magic5 Ultimate Screen | Dr.fone
- How To Unlock Samsung Galaxy A23 5G Phone Without Password?
- How to Change Lock Screen Wallpaper on Samsung Galaxy S23
- Super Easy Ways To Deal with Poco C55 Unresponsive Screen | Dr.fone
- In 2024, How To Fix Apple ID Verification Code Not Working On iPhone SE (2022)
- Guide to Mirror Your Tecno Spark 10C to Other Android devices | Dr.fone
- Simple Solutions to Fix Android SystemUI Has Stopped Error For Realme 11X 5G | Dr.fone
- In 2024, Apple ID Unlock From Apple iPhone 15? How to Fix it?
- In 2024, Top 3 Sites to Find Free Lenovo Unlock Codes to Unlock Your Lenovo Phone
- Can Life360 Track Or See Text Messages? What Can You Do with Life360 On Realme Narzo 60 5G? | Dr.fone
- Complete Tutorial to Use VPNa to Fake GPS Location On Motorola Razr 40 | Dr.fone
- In 2024, Full Tutorial to Bypass Your Xiaomi Mix Fold 3 Face Lock?
- Remove Google FRP lock on Galaxy A14 4G
- How to Change Motorola Moto G24 Location on Skout | Dr.fone
- Updated In 2024, 10 Classical Animated Cartoon Types With Examples
- How to Transfer Data from Oppo Find X7 to Samsung Phone | Dr.fone
- Top 5 Nokia C210 Bypass FRP Tools for PC That Actually Work
- How to Rescue Lost Photos from 12 Pro+ 5G?
- Reasons why Pokémon GPS does not Work On Realme Narzo N55? | Dr.fone
- How to Bypass iPhone 11 Pro Max Passcode Easily Video Inside | Dr.fone
- Honor Magic5 Ultimate support - Forgotten screen lock.
- In 2024, Easy Steps on How To Create a New Apple ID Account On iPhone 6 Plus | Dr.fone
- In 2024, What Is a SIM Network Unlock PIN? Get Your Vivo Y36 Phone Network-Ready
- Title: New Tips That Show Anybody How To Make Youtube Slideshow – Guaranteed for 2024
- Author: Morgan
- Created at : 2024-04-24 01:03:51
- Updated at : 2024-04-25 01:03:51
- Link: https://ai-video-editing.techidaily.com/new-tips-that-show-anybody-how-to-make-youtube-slideshow-guaranteed-for-2024/
- License: This work is licensed under CC BY-NC-SA 4.0.
