
New Use Path Blur In Photoshop To Create Motion Effect

Use Path Blur In Photoshop To Create Motion Effect
There are different kinds of blur effects that redefine the movement and intensity of an image. By applying a suitable blur effect, you can increase the visual appeal of your still photo by emphasizing a certain motion. Path blur is one of the trending motion blur effects that people use to enhance their photos instantly. Through this article, you can learn how to use path blur in Photoshop conveniently.
Part 1: What is Path Blur and How Does It Work?
Path blur is a kind of motion blur that highlights a motion and speed in a certain direction. It helps to create a sense of movement by adjusting the blur intensity and central point. If you want to display a stimulating motion in an image, path blur can assist you in this regard.
Path blur works by adjusting two variables: Speed and Taper. By adjusting the speed slider, you can specify the amount of path blur. In addition to speed, you can adjust the taper value accordingly to determine the blur trail.

This effect can instantly add new dimensions to your captured photo. For instance, if you have captured a photo of a racing car, you can add a path blur effect to give a sense of speed to it. You can easily find this special effect in Adobe Photoshop. By using the selection tools, you can effectively add a path blur effect to your image in the selected area. To know more about path blur in Photoshop, continue reading this article.
Part 2: How to Use Path Blur in Photoshop?
Photoshop is undoubtedly the most commonly used tool to edit pictures with great configuration options. After uploading the image, you can quickly transform it by adding new effects, filters, and layers. You can retouch your photography efficiently through this tool by increasing the quality of pictures. Moreover, the clean user interface of Photoshop allows you to utilize the advanced functions without any interruptions.
Are you ready to use Photoshop path blur? Read this part of the article to find out two interesting ways to create a path blur effect in the images.
Add Dynamic Effect to Your Static Images
Step1 Open Photoshop and import the desired picture. Once done, go to the “Layers” section and copy the background layer. For this, press “Ctrl + J” in Windows and “Command + J” for MacBook.

Step2 Now proceed to the “Filter” section and locate the option “Blur Gallery”. From there, choose the “Path Blur” option. Now you would be able to see an arrow on your screen. Using this arrow, you can specify the path blur motion. Drag and close the arrow where you want to show the speed. Also, set a higher value for the speed given on the right side. Once done, hit the “OK” button.

Create a Long Exposure Picture
Step1 Navigate to the Adobe Photoshop tool and begin by uploading a picture. Afterward, go to the “Filter” tab and select “Convert for Small Filters.”

Step2 Now go to the “Filter” tab again and choose the “Blur Gallery” option. From there, select the “Path Blur” option. Now adjust the displayed arrow in a particular direction to decide the starting and endpoint of the path blur. Moreover, modify the “Speed” slider according to your choice.

Step3 After dragging the arrow in a particular direction, a blue dot will appear at the center. Press the “Delete” button to eliminate that point. Now select the endpoint of the arrow and change its blur shape.

Step4 Utilize the noise section to add a grainy effect in the blurred area. Once done, click on the “OK” button. Now select the masking tool to select the area in your picture. Afterward, choose the “Smart Mask” filter and then navigate to the “Fill” option given in the “Edit” section.

Step5 In the fill menu, choose the color “Black.” Now go to the “Select” section and click “Deselect.” To soften the whole look, you can go to the “Properties” panel and adjust the “Feather” properties.

Step6 Now add the first layer and choose the option “Convert for Smart Filters.” Again, go to the “Filter” section, select “Blur Gallery,” and uncheck the option called “Edit Blur Screen.”

Step7 Now increase the length of the arrow and press “Ctrl + Click” for Windows or “Command + Click” for Mac to reposition the path. You can also add a curve to the arrow. Enhance the speed from the right panel and uncheck the option of “Center Blur.” You can increase the taper value to make the blur gradually trail off. Add a grainy filter for more enhancements.

Bonus Tips – The Alternative to Photoshop to Create Motion Blur Effect
Many users find the interface of Adobe Photoshop intimidating or challenging to operate. If you want an alternative to Photoshop, the best choice you can make is to use Wondershare Filmora . For beginners, this tool adds built-in presets that are professionally made.
Free Download For Win 7 or later(64-bit)
Free Download For macOS 10.14 or later
It offers more than 900 effects that you can use to add new dimensions to your photos and videos. Moreover, it provides fast processing speed for photo and video editing to help you achieve your goals conveniently.
Steps to Produce Motion Blur Effect in Filmora
If you are a beginner and want to create a motion blur effect, then use the steps mentioned below:
Step1 Add the Image to Timeline
After launching Filmora, select “Create New Project” and import the desired picture. After dragging it to the timeline, you have to split it to proceed.

Step2 Choose the Background Blur
To split, choose the starting and ending point in the clip where you want to add the motion blur effect. Once done, go to the “Effects” tab and search for the “Background Blur” effect section. Pick and apply the desired blur filter to the split section of the video.

Step3 Apply the Transition
Once you have added the motion blur effect, you can check the results from the preview window. You can also apply the “Dissolve” transition from the “Transitions” tab to generate a smooth result.

Conclusion
If you want to display a sense of speed and movement in the picture, you can add a path blur effect. It’s one of the types of motion blur effects that many people use in their pictures to add a dynamic element. By reading this article, you have learned how to add path blur in Photoshop through simple means. Moreover, you can also explore the tool Filmora to create a motion blur effect in the photos effortlessly.
Free Download For macOS 10.14 or later
It offers more than 900 effects that you can use to add new dimensions to your photos and videos. Moreover, it provides fast processing speed for photo and video editing to help you achieve your goals conveniently.
Steps to Produce Motion Blur Effect in Filmora
If you are a beginner and want to create a motion blur effect, then use the steps mentioned below:
Step1 Add the Image to Timeline
After launching Filmora, select “Create New Project” and import the desired picture. After dragging it to the timeline, you have to split it to proceed.

Step2 Choose the Background Blur
To split, choose the starting and ending point in the clip where you want to add the motion blur effect. Once done, go to the “Effects” tab and search for the “Background Blur” effect section. Pick and apply the desired blur filter to the split section of the video.

Step3 Apply the Transition
Once you have added the motion blur effect, you can check the results from the preview window. You can also apply the “Dissolve” transition from the “Transitions” tab to generate a smooth result.

Conclusion
If you want to display a sense of speed and movement in the picture, you can add a path blur effect. It’s one of the types of motion blur effects that many people use in their pictures to add a dynamic element. By reading this article, you have learned how to add path blur in Photoshop through simple means. Moreover, you can also explore the tool Filmora to create a motion blur effect in the photos effortlessly.
Difference Between Time Lapse and Hyperlapse
You’ve probably heard the terms “hyperlapse” and “timelapse” before. Whether it was in a blog post, a how-to guide, or on your preferred social media platform. Each of us has seen at least one image of one of them. However, what makes a difference? You’re about to learn in this article!
With that said, let’s begin!
Part 1. What is a timelapse, and how is it used?
Timelapses are familiar to you, whether they were used in a series to demonstrate a swift change from night today or at the beginning of your favorite influencer’s vlog. But exactly what is it? The term “timelapse” refers to a photography method in which static images are stitched together to produce a time-warping video. When the video is played, the time seems to pass more quickly, creating the illusion that time is slipping away.
Put your camera in a fixed position, stop it from moving, panning, or tilting, then record for a long time to make your own timelapse. This period of time could last for five minutes, an hour, days, or even years. Once the film is gathered, all that’s left to do is speed everything up.
The fact that time-lapses make for a pleasant visual effect is what makes them so popular in Vlogs and other media. This method enables you to describe the passage of time, the movement of individuals through space, etc. utilizes time-lapse.

Part 2. What is a hyperlapse?
On the other side, there are these things that we refer to as hyperlapses. In the subgenre of time-lapse photography known as cinematography, a hyperlapse is a filmmaking method used to generate motion shots by capturing movies rather than taking images. In order to create a hyperlapse, the camera does not remain stationary; rather, it follows the subject around and is typically held by the photographer.
The amount of time that elapses between pictures in a stop-motion video typically ranges from tenths of a second up to a few fractions of a second, although this can change significantly depending on what you want to show. However, after you have picked it, it must remain consistent in the same way that the timelapse does.
The attractive 3D look that hyperlapse produces is the primary draw for its utilization. The hyperlapse that is formed can produce a dreamy image, regardless of whether the camera is attached to a moving vehicle or is mounted on a tripod that is moving towards its target.
Additionally, you may use this approach to make stunning photographs with motion blur by employing long exposures. In most cases, the final image will be stabilized in post-production in order to eliminate some of the flaws that may have been captured in the original photo.

Part 3. What differentiates them from each other?
The movement of the camera is what differentiates these two approaches the most from one another. When capturing a time lapse, the camera is kept relatively still and in the same position throughout. In addition, when you use a hyperlapse, the camera is continuously moving, which creates a 3D appearance in the image.
You could be scratching your head right about now, wondering when you should employ one of the two methods. If your subject is moving, you should take a time-lapse photograph; if the camera is moving, you should take a hyperlapse photograph. This question has a relatively straightforward answer.
The act of recording video for a hyperlapse can cause your storage to be filled up really rapidly. Therefore, you may wish to swap between the two methods depending on the length of time that you want to shoot for. If you are going to be filming for a significant amount of time, you should consider using a timelapse.
It is simple to determine the timelapse interval if you already know these answers. Choose the video’s final frame rate. It may be 24, 25, or 30 fps. You shouldn’t select more quickly. Choose the option that best fits your audience and location. Additionally, a time-lapse calculator is available.
The shoot time should then be converted to seconds. For instance, two hours are equal to 2 x 60 x 60 seconds, or 7200 seconds. Determine how many frames are required for your chosen timelapse now. For instance, the final product should be 30 seconds of 25fps video. You’ll need to capture 750 frames in total because 30 x 25 is 750.
Divide the time (7200s in this case) by the number of frames to obtain the interval (750). You can round up the result, which is 9.6, which is pretty near to 10 seconds. Therefore, in our case, your interval should be set to 10s.
Part 4. Motion control timelapse
Now that we understand how the timelapse images that are static are created, we are able to incorporate some movement into the shots that are static. Moving the camera around during a timelapse is much more difficult than it appears to be in the video. Every movement of the camera is slowed down when using slow motion, which means that you can make even a shaky handheld movie look good when using slow motion. The situation is completely reversed while viewing a timelapse.
Because every movement of the camera is sped up, shooting with the handheld mode is nearly impossible. If you want the camera to appear to be moving slowly in the final timelapse, you will need to move it very slowly while shooting in order to achieve this effect.
For this reason, we will need to make use of motion control devices in order to accomplish our goal. Therefore, we refer to these kinds of photos as motion control timelapses. The camera can be moved very slowly and accurately along one, two, or all three axes using motors that are controlled electronically. The three-axis systems, which include a slider as well as a pan-tilt head, are by far the most popular.
Extra Info: Best Time Lapse Video Maker – Filmora
To create a time lapse video with cool effects, you can use the best video editor with rich effects – Filmora . This software offers many video speed change settings and creative effects to help make a time lapse video easily. Just download the software on your PC or Mac and then start creating a video on your own.
Conclusion
The finest results can be achieved by utilizing a variety of filmmaking approaches concurrently. Therefore, you shouldn’t be afraid to try out new things by combining time-lapse photography with slow motion and video. In addition, make sure you visit the Hyperlapse Academy so you can become familiar with all of the different approaches. Use your imagination, and don’t stop firing.
Free Download For Win 7 or later(64-bit)
Free Download For macOS 10.14 or later
Free Download For macOS 10.14 or later
Google Meet Green Screen Is the Latest Addition to the Virtual Meeting App. It Is a Crucial Feature as It Allows Users to Maintain a Semblance of Privacy Through Virtual Backgrounds
Google meet green screen is the latest addition to the virtual meeting app. It is a crucial feature as it allows users to maintain a semblance of privacy through virtual backgrounds. This video communication app has been a popular choice for classrooms and workplaces since the COVID 19 pandemic of 2019. Since then, Google meet has seen an increase of 3 million users per day since 2020.
The green screen for Google meet has come in handy for its millions of active users across the globe. It is an important feature that safeguards the privacy of its user in the cyber world. Google meet green screen allows you to alter the meeting’s background in real-time, similar to how movies employ the famous green curtain behind the performers during filming. You can use this feature to immediately insert a backdrop image of your choice by activating the green screen provided in the browser extension Visual Effects for Google Meet.
Uses of Google Meet Green Screen
The Google Meet Green Screen feature keeps things interesting in corporate meetings. It also allows users to hide their backgrounds which can often be a source of discomfort or vulnerability. The green screen for Google Meet is a handy feature as you can now attend meetings without worrying about the background.
Virtual Green Screens, Blur, Pixelate, Inverse, Contrast and More! This extension allows you to apply effects like Blur, Pixelate and Inverse to your camera live during Google Meets. And you can use the Virtual Green Screen feature to mask whatever you would not fancy appearing in your videos’ background.
Green screen from Google helps you limit distractions or make video calls more fun, you can now blur or replace your background or replace it with an image, an immersive background, or a video. You can also apply styles to customize your video with various light, color filters and stylized backgrounds.
How to Use Green Screen on Google Meet
With Google Meet Green Screen, you can create a virtual background by either uploading photographs from their PC or using the extension’s stock photos. You can utilize an office background as a backdrop for business meetings. Teachers can add a classroom background to their online classes. Parties and vacation backgrounds from other nations might be used for informal encounters with friends.
For a get-together with friends, users might choose a Hawaii theme or an office wall for business chats. You can create and save as many background photos as you want with Google Meet Green Screen. In addition to all of this, it offers a picture-in-picture (floating window) function that users can enable if desired.
How to use green screen for Google Meet: A guide
You can select a virtual background before beginning a meeting or during an ongoing video conversation. However, this feature is only available on the desktop currently. You can follow the steps given below to use the Green Screen for Google Meet.
Prior to a video call
- Go to Google Meet and select a meeting.
- Change the background of your self-view by clicking Change Background in the bottom right corner.
- Click Blur your background to totally blur your background.
- Click Somewhat blur your background to blur your background slightly.
- Click background to select a previously downloaded backdrop.
- Click Add to add your own image as a background.
- Click on Join Now.
During a video conference
- Click More at the bottom of the page.
- Select Change Background from the drop-down menu.
- Click Blur your background to totally blur your background.
- Click Somewhat blur your background to blur your background slightly.
- Click a background to select a previously downloaded backdrop.
- Click Add to add your own image as a background.
Extra Tips
How to Add Green Screen to Meeting Video
Prior to a video call
- Go to Google Meet and select a meeting.
- Change the background of your self-view by clicking Change Background in the bottom right corner. Click Blur your background to totally blur your background. …
- Click Add to add your own image as a background.
- Click on Join Now.
Filmora
If you’re just starting out with video editing, or just want a simple program that works, Wondershare Filmora might be what you’re looking for. It has the essential tools, and anyone can learn to use it easily.
Wondershare Filmora is the one of best video editing software with cool features that compares to other competing video editing Softwares. Many video editing programs claim to offer professional results; Filmora is one of a few consumer-level tools that actually delivers.
For Win 7 or later (64-bit)
For macOS 10.12 or later
Installation Steps
- Click the icon in the center of the Media Library to add files directly.
- Go File > Import Media > Import Media Files.
- Drag and drop to the Media Library directly.
While importing a media file, Wondershar Filmora may ask you if you wish to create a proxy file to accelerate the editing process. Select “Yes” to have a fast video editing experience.
You can also import video clips using your Touch Bar controls if your computer has Touch Bar.
Record a media file
Apart from the videos shot by your digital devices, you can also directly import media files by recording video from your webcam, capturing the computer screen, or recording a voice-over.
Record computer screen:
Click the “Record” option, and choose “Record PC Screen” to get the built-in Wondershare Screen Recorder. Hit the red button to get started. If you want to stop the recording, you can hit F9.
Record videos from webcam:
Also, click the “Record” option, and choose “Record from Webcam”. In the pop-up Video Recording window, click the red button to start recording and click it again to stop recording. Then click OK to save the recorded video file.
Record voice-over:
Choose “Record a voiceover” under the Record menu. It would be better to connect a microphone to your Mac for a better result. Hit the Record button, and it leaves you 3 seconds to get ready.
All the recorded media files will be saved into Media Library automatically and you can drag them to the Timeline for editing.
Conclusion
The zoom meeting green screen for Google background feature essentially allows users to display an image or a video in place of the actual background during video calls. The feature is especially helpful when you are video conferencing in a messy room. The feature is starting to gain popularity among users and is also available on WebEx for iOS. While Google Meet does not come with a built-in feature to blur or obscure the existing background while on camera, there are still ways you can do it. Luckily, there are a bunch of third-party tools that can build a virtual background for you without a green screen. One of the popular tools you can use is ChromaCam and can be configured in just a few minutes.
Best Ways to Convert Video Frame Rate to 60FPS [Software and Online Choices]
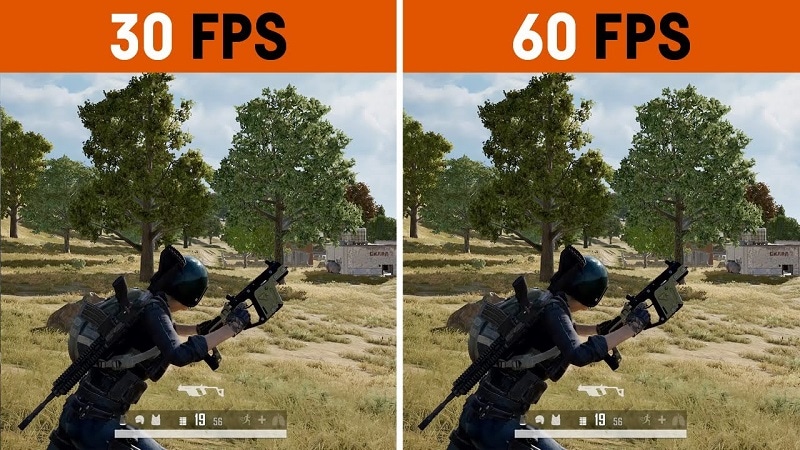
One of the primary things that differentiate a good video from a low-quality one is its frame rate or burst rate. This refers to the frequency of a series of images or frames consecutively appearing during display. A low frame rate per second or FPS causes issues in most display screens, so you will need a 60 FPS video converter to update it.
You need to convert or make video 60FPS online through tools and software to improve the sharpness of frame speed and make it suitable for streaming sites like YouTube that play 60FPS only or create UHD/4K videos. Plus, most high-definition screens for gaming, computers, tablets, and smartphones require high FPS.
This article will teach you the best solutions to make the conversion possible. Choose your option after a full evaluation.
Part I. What does 60 FPS mean?
Before discussing the best tools available for frame rate conversion, you should know what frame rate is. Also known as update rate, this signifies the frequency of the display of consecutive series of frames or images. The speed of how they appear determines the fluid play of the video with no interruption or lag.
In the context of video and film cameras, motion capture systems, and computer graphics, you should try to convert video to 60FPS. There are multiple types available, like the low 24FPS or 30FPS or the higher 60FPS or 120FPS. 60FPS is the most accepted option for diverse operating systems, screens, and graphics.
Differences between 24FPS, 30FPS, and 60FPS
Here are the differences you will note between the three common frame rates per second in videos. For a simple overview, these differences are expressed in tabular form.
| 24FPS | 30FPS | 60FPS | |
|---|---|---|---|
| Description | This universally acceptable frame rate choice is used for transferring video signals to film. | 30FPS is a slightly higher frame rate choice for animations and show videos that are suitable for television viewing and online platforms. | Videos at 60FPS have better fluency and smoother definition, with sharp videos that work during gaming, high-definition streaming, and UHD/4K video editing. |
| Types of videos | Older videos and films. | Online videos, TV shows, and news. | HD-quality movies, online videos, and games. |
| Users | Movie suppliers | Entertainment and Media professionals. | Movie producers, video editors, gaming software developers, etc. |
Why Should You Convert Videos into 60FPS?
In the context of video FPS, the three variations- 30FPS, 60FPS, and 24FPS are the most common. However, there are specific reasons why 60FPS is the best option you should use, and take the time to convert your files with this frame rate.
- Playing 24FPS or 30FPS videos on LCD screens have more prominent motion blur, the sharpness of transition is low and rough, etc.
- Well-known streaming sites like YouTube set their standard for videos at 60FPS. If you use a file with a higher FPS, it will compress to 60FPS automatically. Anything lower than that is unacceptable since it creates a laggy video transition.
- Creating high-quality movies in UHD or 4K resolution requires a high FPS like 60FPS. Movies shot with 24FPS do not assure the best display in the native frame rate and need pulldown conversion. This causes judder, which affects video quality. Converting the video to 60fps ai online is a better choice.
- Modern devices like computers, smartphones, and tablets have a high refresh rate. So, these, including some gaming monitors and television varieties, accept videos with 60FPS best.
- In animation, most creators run 3-4 images per drawing, which means 6 or 8 drawings per second. For the best transition between shorts and images, converting the animation videos to 60FPS is useful.
If you want to know more about these FPS options and which one to select for long-term usage, read through the comprehensive review .
Part II. How to convert A Video to 60fps?
If you plan to use a 60fps video converter, luckily, multiple capable choices are available in the market. Here, we present the top options you can use with an accurate conversion that occurs quickly and with limited errors.
1. Best Software Converters
The following are the best software-based platforms that you can try out.
One notable ai 60fps converter that users find extremely useful all around for optimized video editing is Wondershare UniConverter. The tool comes with varying AI-powered tools you can try to change.
With this software, you can easily make changes to the file during the conversion, like upgrading the FPS and bitrate of various video codecs, adjusting the contrast, contrast, etc., for output. Plus, it is possible to change the speed of the videos you are editing through the Editing timeline, between 0.25X - 3X speed options.

- User Base: Professional video editors, social media vloggers, businesses, students, beginner-level users, etc.
Watch this video to get a visual representation of how the tool works for FPS conversion and other editing functions.
How to use Wondershare UniConverter for converting FPS?
Step1 Download and launch the Wondershare UniConverter software on your device after completing all installation steps.
Step2 Click or drag and drop the video file of which you will change the frame rate.
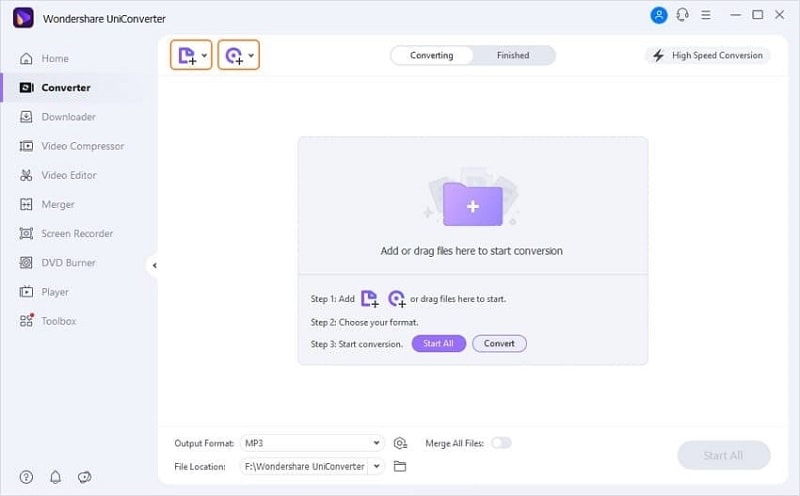
Step3 To make changes to the video, click the Edit button and do them- like speed change, cutting sections, etc.
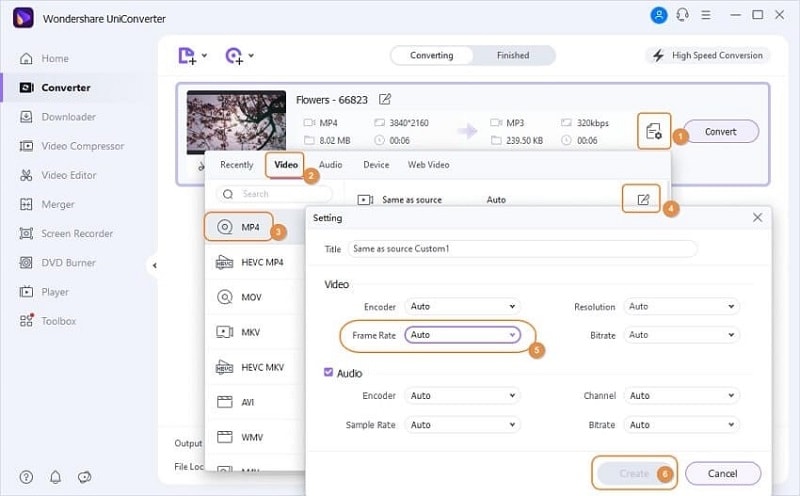
Step4 Then press the Settings button. Choose the Video option and then select the format like MP4.
Step5 Tap the setting icon beside the format choice and set the frame rate option as 60FPS. Then, press the Create button.
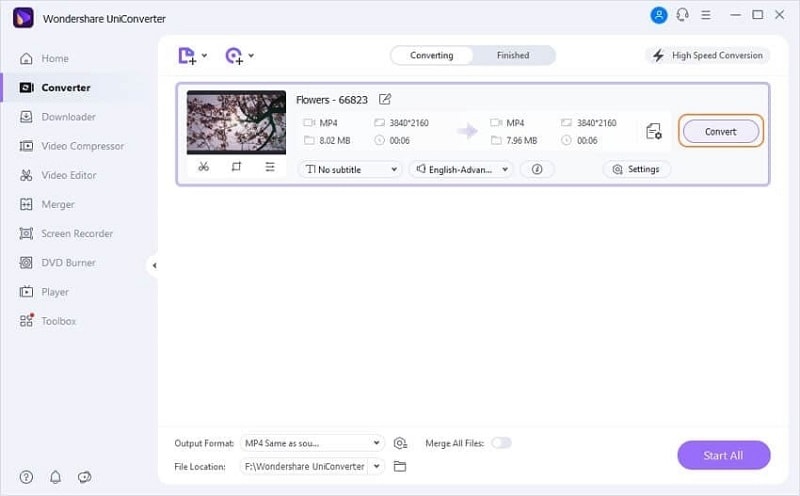
Step6 To convert the file further, click the Convert button and choose the destination file format. Press Convert.
Features:
- Convert between different file formats.
- Edit or split the files.
- Change the speed of the video between various speed modes.
- Download files at high resolution as per customization.
Pros
- Easy to use for non-technical users.
- The free software includes most of the conversion functions.
- Zero quality loss or lagging FPS playthrough in the converted file.
Cons
- GPU acceleration and High-Speed Conversion are available for Pro users only.
- You can resize the file for social media platforms like YouTube once using the Free Trial version.
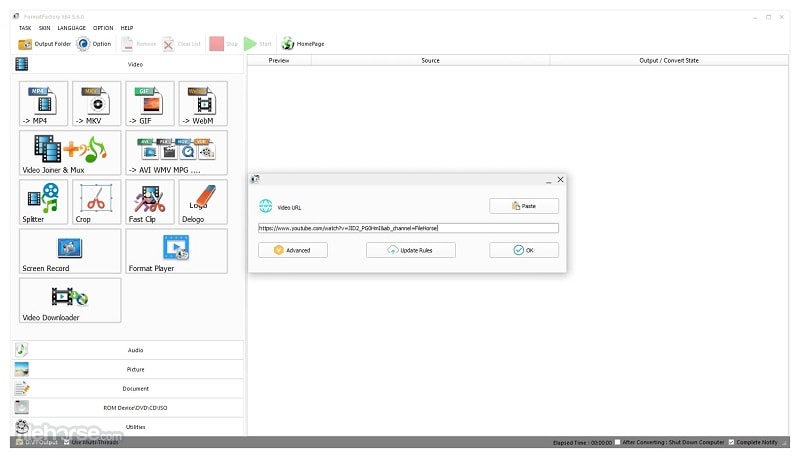
Another FPS video maker and converter tool that you must try is Format Factory. This professional-quality video and audio converter tool are useful for various levels of video editing, including specifications like the frame rate per second.
You can clip and join your video section and do audio mixing steps. Easily adjust your video frame speed to ensure top-grade video playback with limited to no resolution loss. You can easily set the frame rate to 60FPS after downloading YouTube videos and making adjustments.
Pros
- Compress file size with settings changes for frame rate.
- Supports different video formats.
- Compatible with HEIC and WEBP formats for conversion.
Cons
- Only suitable for Windows users.
- Slightly complex to try for beginner-level users.
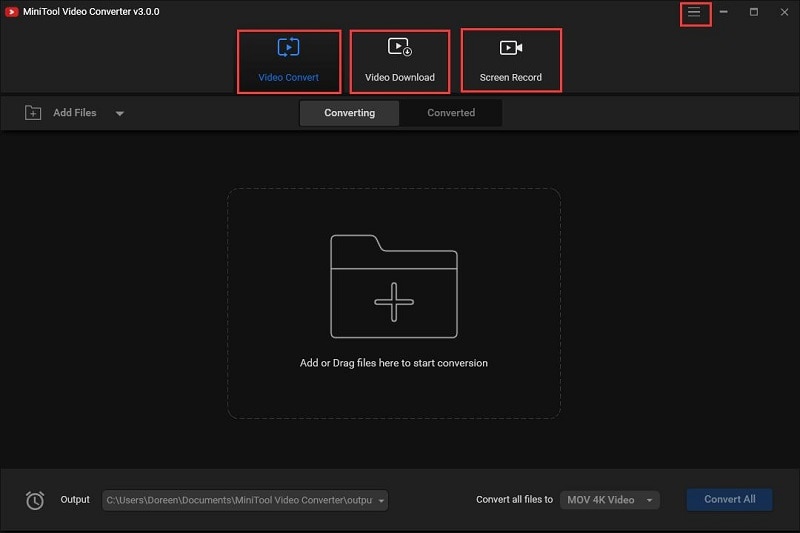
One of the best 60fps video editor options available in the market is MiniTool Video Converter. This Windows-based native software can make multiple advanced changes to your video file during conversion. Not to mention, it supports quick batch processing, with zero drop in quality after the process.
You can easily change the frame rate speed to 60FPS or other speed options during the exporting process. Adding effects will maintain a strong frame rate frequency that you can also preview.
Pros
- Supports a variety of video formats for conversion.
- Batch conversion is supported here.
- No loss of quality when you change the frame rate or bitrate.
Cons
- The process will lag if there is not at least 1 GB of free storage space in your device.
- Only works on Windows devices.
2. Best Online Converters
If you want to use a 60fps video converter online, there are tools available for that as well. These converters come with limited advanced mechanisms or features. However, in terms of changing the FPS of videos, web-based tools are easier to operate and do straightforward tasks.
Plus, you will not need to register or download third-party software here- the tools are accessible through any browser or device.
1) AI Video Frame Rate Converter
One of the best tools for online video frame rate conversion is the AI Video Frame Rate Converter. With this online tool, you can easily insert your file into the tool you access on any browser of your choice.
Then, choose the conversion FPS like 60FPS for your video and get high-resolution video quality in the final file. The software does not keep the file on the server, which assures good privacy protection for users with their files and data.

Pros
- No need to install the software.
- Easily choose the FPS option to convert the file.
- The quick conversion process.
Cons
- The free version only allows 5 credits for users to try.
- No tools to enhance video quality with the free tool.
2) Video2Edit
Another top 60fps converter online that users should give a chance is Video2Edit. This tool is accessible through any web browser and allows one to change various aspects of the video they are converting, including the frame rate.
You can choose 60FPS as the target frame rate choice for the video that you add to your device’s tool. It also supports 120FPS and other options lower than 60FPS- the final converter file is still a high definition.

Pros
- Choose the frame rate per second for your video.
- Make settings changes for your video audio additionally.
- The tool is easily accessible and free to use.
Cons
- You have to take more steps for customization instead of directly getting the FPS changing option.
- Cannot convert multiple files simultaneously.
3) Aconvert
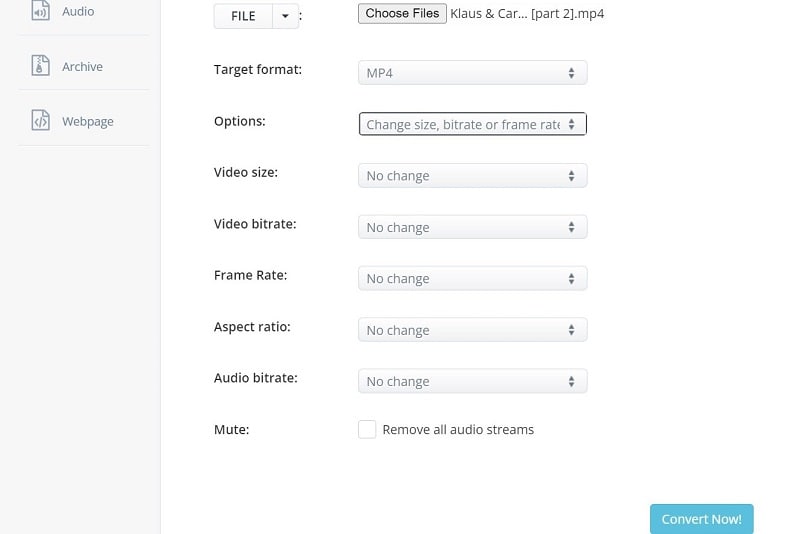
Users can try out this online video to 60fps converter to change elements of videos quickly during conversion. You can insert your file from a cloud account, device, or URL and choose the video format to convert.
Plus, it is much easier to directly set the frame rate you want to change in the video. This tool supports up to 60FPS for the change, and you can choose a custom FPS if necessary.
Pros
- Can convert video codec settings like bitrate, etc., for different file formats.
- Easily add a file from the device, URL, or cloud.
- Quick processing speed for the conversion.
Cons
- No batch conversion for multiple files.
- Big files can get slow to convert.
Bonus Tip. Use Wondershare Filmora to Create High-Quality Videos with 60FPS Support
If you plan to make further edits to your video clips and directly create a project with 60FPS support, using a capable 60fps maker software is necessary. Wondershare Filmora is suitable software for video editing professionals and regular users to try to make videos easily.
Free Download For Win 7 or later(64-bit)
Free Download For macOS 10.14 or later
You can use the different features available for quick and customized video projects. Here, you can try the Instant Mode feature for instantaneous video edits or directly try out the editor timeline with diverse features like Edit icon or Speed Ramping to make changes. As for adjusting the frame rate, you can make those changes during export.
Watch this video to know how to use Filmora for further video editing.
How to Change Frame Rate to 60FPS in Filmora?
Step1 After you have completed all of the edits, click on the Export button in the editor timeline of Filmora.
Step2 Choose the output format you will download the video file, e.g., MP4, from the Local tab.
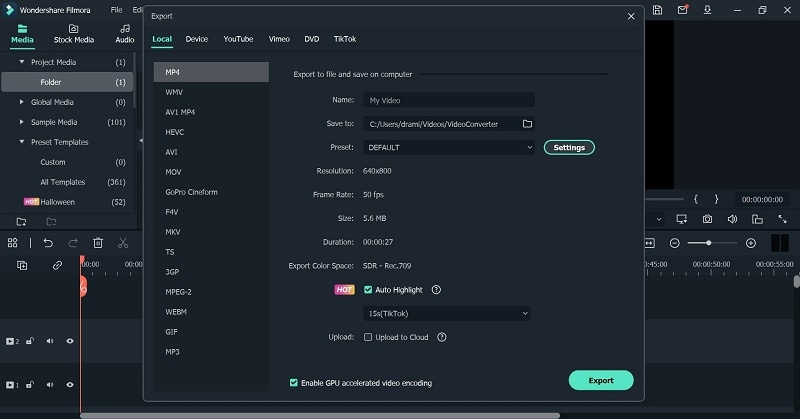
Step3 Click on the Settings button. Adjust the specification of the video, like frame rate, and change to 60FPS. Make other changes if needed, and press OK.
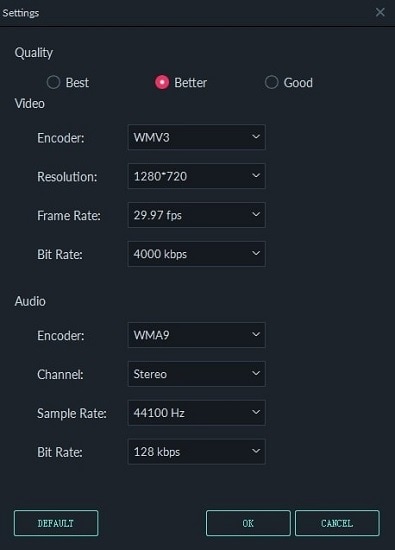
Step4 Click on Export to download the file or directly upload it via Vimeo or YouTube through those tabs.
Conclusion
Indeed, adjusting the frame rate of your video will help you create high-quality videos with a fluid and lag-less transition. You should convert your file to 60FPS if it is a lower version at the time to improve sharpness and make it compatible with most screen types, 4K movie playing, and streaming.
Use the available online and native software options to make these changes quickly and efficiently. Additionally, if you want to create a file directly at 60FPS, you can do so using Filmora.
Give these tools a try first to get a better experience with the features and process.
Why Should You Convert Videos into 60FPS?
In the context of video FPS, the three variations- 30FPS, 60FPS, and 24FPS are the most common. However, there are specific reasons why 60FPS is the best option you should use, and take the time to convert your files with this frame rate.
- Playing 24FPS or 30FPS videos on LCD screens have more prominent motion blur, the sharpness of transition is low and rough, etc.
- Well-known streaming sites like YouTube set their standard for videos at 60FPS. If you use a file with a higher FPS, it will compress to 60FPS automatically. Anything lower than that is unacceptable since it creates a laggy video transition.
- Creating high-quality movies in UHD or 4K resolution requires a high FPS like 60FPS. Movies shot with 24FPS do not assure the best display in the native frame rate and need pulldown conversion. This causes judder, which affects video quality. Converting the video to 60fps ai online is a better choice.
- Modern devices like computers, smartphones, and tablets have a high refresh rate. So, these, including some gaming monitors and television varieties, accept videos with 60FPS best.
- In animation, most creators run 3-4 images per drawing, which means 6 or 8 drawings per second. For the best transition between shorts and images, converting the animation videos to 60FPS is useful.
If you want to know more about these FPS options and which one to select for long-term usage, read through the comprehensive review .
Part II. How to convert A Video to 60fps?
If you plan to use a 60fps video converter, luckily, multiple capable choices are available in the market. Here, we present the top options you can use with an accurate conversion that occurs quickly and with limited errors.
1. Best Software Converters
The following are the best software-based platforms that you can try out.
One notable ai 60fps converter that users find extremely useful all around for optimized video editing is Wondershare UniConverter. The tool comes with varying AI-powered tools you can try to change.
With this software, you can easily make changes to the file during the conversion, like upgrading the FPS and bitrate of various video codecs, adjusting the contrast, contrast, etc., for output. Plus, it is possible to change the speed of the videos you are editing through the Editing timeline, between 0.25X - 3X speed options.

- User Base: Professional video editors, social media vloggers, businesses, students, beginner-level users, etc.
Watch this video to get a visual representation of how the tool works for FPS conversion and other editing functions.
How to use Wondershare UniConverter for converting FPS?
Step1 Download and launch the Wondershare UniConverter software on your device after completing all installation steps.
Step2 Click or drag and drop the video file of which you will change the frame rate.

Step3 To make changes to the video, click the Edit button and do them- like speed change, cutting sections, etc.
Step4 Then press the Settings button. Choose the Video option and then select the format like MP4.
Step5 Tap the setting icon beside the format choice and set the frame rate option as 60FPS. Then, press the Create button.

Step6 To convert the file further, click the Convert button and choose the destination file format. Press Convert.

Features:
- Convert between different file formats.
- Edit or split the files.
- Change the speed of the video between various speed modes.
- Download files at high resolution as per customization.
Pros
- Easy to use for non-technical users.
- The free software includes most of the conversion functions.
- Zero quality loss or lagging FPS playthrough in the converted file.
Cons
- GPU acceleration and High-Speed Conversion are available for Pro users only.
- You can resize the file for social media platforms like YouTube once using the Free Trial version.
Another FPS video maker and converter tool that you must try is Format Factory. This professional-quality video and audio converter tool are useful for various levels of video editing, including specifications like the frame rate per second.
You can clip and join your video section and do audio mixing steps. Easily adjust your video frame speed to ensure top-grade video playback with limited to no resolution loss. You can easily set the frame rate to 60FPS after downloading YouTube videos and making adjustments.

Pros
- Compress file size with settings changes for frame rate.
- Supports different video formats.
- Compatible with HEIC and WEBP formats for conversion.
Cons
- Only suitable for Windows users.
- Slightly complex to try for beginner-level users.
One of the best 60fps video editor options available in the market is MiniTool Video Converter. This Windows-based native software can make multiple advanced changes to your video file during conversion. Not to mention, it supports quick batch processing, with zero drop in quality after the process.
You can easily change the frame rate speed to 60FPS or other speed options during the exporting process. Adding effects will maintain a strong frame rate frequency that you can also preview.

Pros
- Supports a variety of video formats for conversion.
- Batch conversion is supported here.
- No loss of quality when you change the frame rate or bitrate.
Cons
- The process will lag if there is not at least 1 GB of free storage space in your device.
- Only works on Windows devices.
2. Best Online Converters
If you want to use a 60fps video converter online, there are tools available for that as well. These converters come with limited advanced mechanisms or features. However, in terms of changing the FPS of videos, web-based tools are easier to operate and do straightforward tasks.
Plus, you will not need to register or download third-party software here- the tools are accessible through any browser or device.
1) AI Video Frame Rate Converter
One of the best tools for online video frame rate conversion is the AI Video Frame Rate Converter. With this online tool, you can easily insert your file into the tool you access on any browser of your choice.
Then, choose the conversion FPS like 60FPS for your video and get high-resolution video quality in the final file. The software does not keep the file on the server, which assures good privacy protection for users with their files and data.

Pros
- No need to install the software.
- Easily choose the FPS option to convert the file.
- The quick conversion process.
Cons
- The free version only allows 5 credits for users to try.
- No tools to enhance video quality with the free tool.
2) Video2Edit
Another top 60fps converter online that users should give a chance is Video2Edit. This tool is accessible through any web browser and allows one to change various aspects of the video they are converting, including the frame rate.
You can choose 60FPS as the target frame rate choice for the video that you add to your device’s tool. It also supports 120FPS and other options lower than 60FPS- the final converter file is still a high definition.

Pros
- Choose the frame rate per second for your video.
- Make settings changes for your video audio additionally.
- The tool is easily accessible and free to use.
Cons
- You have to take more steps for customization instead of directly getting the FPS changing option.
- Cannot convert multiple files simultaneously.
3) Aconvert
Users can try out this online video to 60fps converter to change elements of videos quickly during conversion. You can insert your file from a cloud account, device, or URL and choose the video format to convert.
Plus, it is much easier to directly set the frame rate you want to change in the video. This tool supports up to 60FPS for the change, and you can choose a custom FPS if necessary.

Pros
- Can convert video codec settings like bitrate, etc., for different file formats.
- Easily add a file from the device, URL, or cloud.
- Quick processing speed for the conversion.
Cons
- No batch conversion for multiple files.
- Big files can get slow to convert.
Bonus Tip. Use Wondershare Filmora to Create High-Quality Videos with 60FPS Support
If you plan to make further edits to your video clips and directly create a project with 60FPS support, using a capable 60fps maker software is necessary. Wondershare Filmora is suitable software for video editing professionals and regular users to try to make videos easily.
Free Download For Win 7 or later(64-bit)
Free Download For macOS 10.14 or later
You can use the different features available for quick and customized video projects. Here, you can try the Instant Mode feature for instantaneous video edits or directly try out the editor timeline with diverse features like Edit icon or Speed Ramping to make changes. As for adjusting the frame rate, you can make those changes during export.
Watch this video to know how to use Filmora for further video editing.
How to Change Frame Rate to 60FPS in Filmora?
Step1 After you have completed all of the edits, click on the Export button in the editor timeline of Filmora.
Step2 Choose the output format you will download the video file, e.g., MP4, from the Local tab.

Step3 Click on the Settings button. Adjust the specification of the video, like frame rate, and change to 60FPS. Make other changes if needed, and press OK.

Step4 Click on Export to download the file or directly upload it via Vimeo or YouTube through those tabs.
Conclusion
Indeed, adjusting the frame rate of your video will help you create high-quality videos with a fluid and lag-less transition. You should convert your file to 60FPS if it is a lower version at the time to improve sharpness and make it compatible with most screen types, 4K movie playing, and streaming.
Use the available online and native software options to make these changes quickly and efficiently. Additionally, if you want to create a file directly at 60FPS, you can do so using Filmora.
Give these tools a try first to get a better experience with the features and process.
Also read:
- Troubleshoot Snapchat Camera Zoomed in Issue 4 Tips for 2024
- Want to Come up with Exciting Sony Vegas Slideshow Templates for Your Next Project on YouTube and Other Mediums Then There Is Something for You
- In This Article, We Will Discuss How to Rotate Videos in the Lightworks Application. Below Is a Way to Rotate Videos in Lightworks Manually, Here, We Will Use the Z-Axis Rotation for 2024
- How to Create Sony Vegas Freeze Frame for 2024
- New In 2024, Are You Tired of Long Video Edits? Do You Speed up the Video in Canva without a Hassle? Well, Stick with Us as We Guide You Through the Process Step by Step
- In 2024, How to Be a Good Podcast Host
- Updated In 2024, Best Free LUTs To Use in Shotcut
- Updated Best 10 Fun Discord Bots You Need
- 2024 Approved HOW to Add Fade to Black on Premiere Pro
- 2024 Approved This Article Will Help You Understand How to Create Flying Objects Using Editing Tools Such as Wondershare Filmora
- Updated Hyperlapse VS Timelapse Videos
- New Did You Know Cameras Have a Built-In Feature to Shoot Slow-Motion Clips? This Article Is About Using Sony S&Q to Capture Slow-Motion Scenes
- 2024 Approved Add Green Screen Video on TikTok
- Do You Want to Apply BRAW LUTs to Your Pictures and Video Footage? Here We Will Discuss some of the Best Options Available to Help You Choose the Right One
- Updated Beginners Guide to Green Screen Keying
- New How to Speed Up Pictures on TikTok Slideshow for 2024
- Updated Do You Wish to Make Changes Across Your Video? Are You Looking to Record Your Desktop Screen on Mac? Worry Not, as This Article Provides Details About QuickTime Player that Caters to All User Requirements for 2024
- New Do You Want to Know About the Photo Video Maker with Song? Are You Ready to Discover It in Detail? This Article Will Give You Valuable Insights on This Topic
- Adobe After Effects Review
- New In 2024, Splitting the Clips in Adobe After Effects Step by Step
- Zoom In and Out on Snapchat for 2024
- New In 2024, Are You Excited to Learn About a Video Maker with a Song? Do You Want to Create a Video Embedded with Audio Tracks to Entertain the Viewers? Then, This Guide Assists You to Build Interesting Videos Along with Songs Precisely
- If Youre Not Using Video yet, Now Is the Time to Start. In This Post, Well Discuss the Benefits of Using Video for Social Media Marketing and Provide Tips for Getting Started. Keep Reading to Learn More for 2024
- New 2024 Approved MP3 Cutter Download for Computer and Mobile
- In 2024, How PGSharp Save You from Ban While Spoofing Pokemon Go On Realme C33 2023? | Dr.fone
- How to Quickly Fix Bluetooth Not Working on Infinix Note 30 VIP | Dr.fone
- In 2024, The Most Effective Ways to Bypass Apple iPhone 6 Plus Activation Lock
- How to Soft Reset Infinix Smart 7 phone? | Dr.fone
- In 2024, 5 Ways to Transfer Music from Asus ROG Phone 7 Ultimate to Other Android Devices Easily | Dr.fone
- How to Downgrade Apple iPhone XR without Losing Any Data? | Dr.fone
- Fixing Persistent Pandora Crashes on Huawei Nova Y71 | Dr.fone
- How to Change Spotify Location After Moving to Another Country On Honor Play 7T | Dr.fone
- Why Does My Honor 90 Pro Keep Turning Off By Itself? 6 Fixes Are Here | Dr.fone
- Proven Ways to Fix There Was A Problem Parsing the Package on Xiaomi 13 Ultra | Dr.fone
- App Wont Open on Your Infinix Zero 30 5G? Here Are All Fixes | Dr.fone
- In 2024, Getting the Pokemon Go GPS Signal Not Found 11 Error in Poco C55 | Dr.fone
- Full Guide to Hard Reset Your Poco M6 Pro 5G | Dr.fone
- How to Mirror Your Itel A70 Screen to PC with Chromecast | Dr.fone
- New Guide How To Check iCloud Activation Lock Status From Your Apple iPhone SE
- In 2024, Downloading SamFw FRP Tool 3.0 for Infinix Smart 7 HD
- Best 10 Anime Websites to Watch Dubbed Anime Free
- In 2024, Recommended Best Applications for Mirroring Your ZTE Nubia Flip 5G Screen | Dr.fone
- How to Unlock SIM Card on Vivo T2x 5G online without jailbreak
- In 2024, Is GSM Flasher ADB Legit? Full Review To Bypass Your Vivo Y100 5G Phone FRP Lock
- Title: New Use Path Blur In Photoshop To Create Motion Effect
- Author: Morgan
- Created at : 2024-06-15 18:56:29
- Updated at : 2024-06-16 18:56:29
- Link: https://ai-video-editing.techidaily.com/new-use-path-blur-in-photoshop-to-create-motion-effect/
- License: This work is licensed under CC BY-NC-SA 4.0.

