:max_bytes(150000):strip_icc():format(webp)/GettyImages-151812569-ff7311e1de18461da9f8698205953384.jpg)
New VSCO Slow Motion

VSCO Slow Motion
While the VSCO app is most commonly used for its filters and editing capabilities. With its built-in slow-motion feature, you can create beautiful, ethereal slow-mo videos that are perfect for Instagram and other social media platforms.
Slow-motion videos have been gaining popularity on social media in recent years. They also have an aesthetic appeal that can be quite captivating. With the VSCO app, it’s easy to create stunning slow-mo videos in no time.
In this article, we’ll explore the VSCO app, its key features, and how to create VSCO smooth slow-mo videos. We’ll also discuss the best desktop alternative to help you have a clear understanding.
Part 1. What Is VSCO App?
VSCO is a photography app with a focus on beautifully edited photos as well as videos. The app offers various editing tools, filters, and presets to help you create stunning images. It is also a social platform, allowing you to share your photos and videos with the VSCO community and connect with other creative users.

Joel Flory and Greg Lutze founded the app in 2011 and first launched it in 2012 as an iOS-only app but soon expanded to Android in 2013. Today, VSCO is one of the most popular photography and videography apps, with over 20 million weekly and 40 million monthly active users.
VSCO app offers some basic image editing features for free, while advanced features are available for monthly and yearly subscriptions with seven days free trial period.
VSCO smooth slow-motion app is popular among amateur photographers because of its range of filters and slow-mo features. However, the app also offers basic image adjustments such as exposure, contrast, color saturation, highlight, and shadow adjustments. It is also designed to share photos to its corresponding social network - VSCO Space. You can add captions and hashtags and choose whether to include your location.
![]()
Note: You can download the VSCO slow motion Android app from the Google Play Storewhile the iOS version of the app is available on the App Store.
Part 2. How To Make Smooth Slow Motion Video In VSCO?
To make a smooth slow-motion video in the VSCO app, do the following steps in sequence:
Step1Download VSCO slow motion app on your device and launch it. You’ll find two options on the Home screen of the app: Take a photo and import. Click “Import” and select your video clip to edit.

Step2On the editing timeline, click “Tools” > “Volume” and drag the slider to turn off the background music.

Step3Now, click “Trim” if you want to get a specific part of a video and edit it. Afterward, click the “Speed” option.

Step4Drag the slider to the left to adjust the slow-mo speed. Make sure to click the “Smooth” option above the slider, so your video does not have any jerks or glitches.
Step5Now, to export your video, click “Next” and turn on the Save option. You can also toggle the Post to VSCO option to post your video to VSCO space and click Save to start the rendering process.

Part 3. Other Key Features Of VSCO
Here are some key features of the VSCO app:
Sharing Platform - VSCO Spaces
VSCO users and creators can collaborate by sharing their creations through Spaces. Users can post comments with joy, constructive criticism, or feedback for improvement, just like other social apps. By utilizing the same tools as others and looking at their work, you will be more inspired.

Instagram Alternative
VSCO free slow-motion app is the best alternative to Instagram. What sets it apart is that it doesn’t show like counts or allow comments. This can be appealing to users who get anxious about negative feedback. Another strength of VSCO is its simple design, which makes the app easy and enjoyable to use.
Shot And Adjust Pictures
VSCO Photo Editor is a powerful app that gives you the ability to shoot pictures and later adjust them to your liking. With VSCO, you can fine-tune your photos to get the perfect shot every time. You can also save your settings as presets so that you can apply them to future pictures.
A Wide Range Of Filters
VSCO offers a wide range of basic and advanced filters, making it easy for you to find the perfect one for your photo. Moreover, you can customize your filters to create the perfect look for your photo.
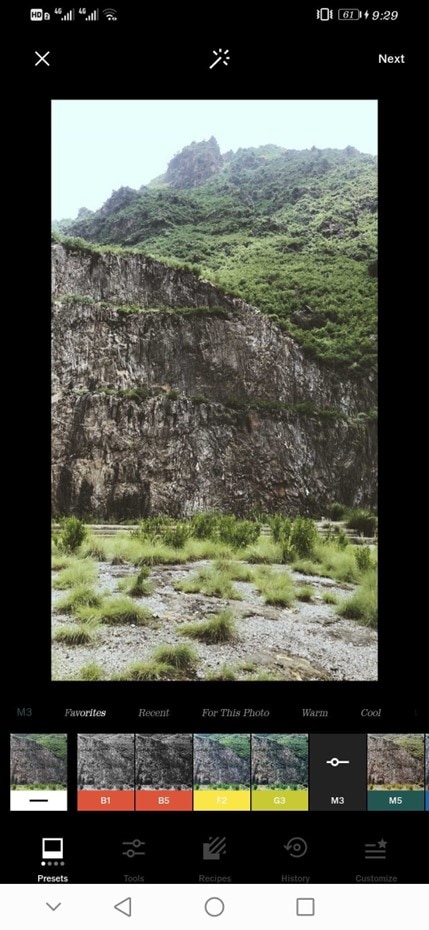
A Variety Of Tools
VSCO has a variety of tools, such as exposure, contrast, and saturation, which you can use to edit your photos.

Part 4. How To Make A Slow-Motion Video On Desktop Alternative?
Desktop video editing apps are better than mobile apps when editing slow-mo or ramping features. For one, the processing power of desktop computers is generally much higher than mobile devices. This means that desktop apps can handle more complex tasks without running into performance issues.
Another advantage of desktop video editing apps is that they usually come with a more robust set of features than their mobile counterparts. This is because app developers typically have more room to add features on desktop than they do on mobile.
Below are some simple and easy steps on how to use the speed ramping tool in Filmora :
Step1To begin, open Filmora on your PC and import the video you want to edit.
Step2Drag it into the timeline once the video is imported.
Step3Next, select the “Speed” option from the Tools option in the toolbar and click “Speed Ramping.”

Step4Select the point in the video where you want the speed ramp to begin. Now, use the slider to adjust the speed of your video. You can make your video faster or slower.

Step5Finally, click “Export” to save your video on your PC.
Conclusion
In this article, we’ve explored how to create VSCO smooth slow-mo videos with simple and easy-to-follow instructions. We’ve also discussed what the app is about and its key features. In the end, we provided a brief guide on creating slow-motion videos on a desktop using Filmora software.
Hopefully, this guide helped resolve your queries, and you can now create stunning slow-motion videos without much effort.
Free Download For Win 7 or later(64-bit)
Free Download For macOS 10.14 or later
To make a smooth slow-motion video in the VSCO app, do the following steps in sequence:Step1Download VSCO slow motion app on your device and launch it. You’ll find two options on the Home screen of the app: Take a photo and import. Click “Import” and select your video clip to edit.

Step2On the editing timeline, click “Tools” > “Volume” and drag the slider to turn off the background music.

Step3Now, click “Trim” if you want to get a specific part of a video and edit it. Afterward, click the “Speed” option.

Step4Drag the slider to the left to adjust the slow-mo speed. Make sure to click the “Smooth” option above the slider, so your video does not have any jerks or glitches.
Step5Now, to export your video, click “Next” and turn on the Save option. You can also toggle the Post to VSCO option to post your video to VSCO space and click Save to start the rendering process.

Part 3. Other Key Features Of VSCO
Here are some key features of the VSCO app:
Sharing Platform - VSCO Spaces
VSCO users and creators can collaborate by sharing their creations through Spaces. Users can post comments with joy, constructive criticism, or feedback for improvement, just like other social apps. By utilizing the same tools as others and looking at their work, you will be more inspired.

Instagram Alternative
VSCO free slow-motion app is the best alternative to Instagram. What sets it apart is that it doesn’t show like counts or allow comments. This can be appealing to users who get anxious about negative feedback. Another strength of VSCO is its simple design, which makes the app easy and enjoyable to use.
Shot And Adjust Pictures
VSCO Photo Editor is a powerful app that gives you the ability to shoot pictures and later adjust them to your liking. With VSCO, you can fine-tune your photos to get the perfect shot every time. You can also save your settings as presets so that you can apply them to future pictures.
A Wide Range Of Filters
VSCO offers a wide range of basic and advanced filters, making it easy for you to find the perfect one for your photo. Moreover, you can customize your filters to create the perfect look for your photo.

A Variety Of Tools
VSCO has a variety of tools, such as exposure, contrast, and saturation, which you can use to edit your photos.

Part 4. How To Make A Slow-Motion Video On Desktop Alternative?
Desktop video editing apps are better than mobile apps when editing slow-mo or ramping features. For one, the processing power of desktop computers is generally much higher than mobile devices. This means that desktop apps can handle more complex tasks without running into performance issues.
Another advantage of desktop video editing apps is that they usually come with a more robust set of features than their mobile counterparts. This is because app developers typically have more room to add features on desktop than they do on mobile.
Below are some simple and easy steps on how to use the speed ramping tool in Filmora :
Step1To begin, open Filmora on your PC and import the video you want to edit.
Step2Drag it into the timeline once the video is imported.
Step3Next, select the “Speed” option from the Tools option in the toolbar and click “Speed Ramping.”

Step4Select the point in the video where you want the speed ramp to begin. Now, use the slider to adjust the speed of your video. You can make your video faster or slower.

Step5Finally, click “Export” to save your video on your PC.
Conclusion
In this article, we’ve explored how to create VSCO smooth slow-mo videos with simple and easy-to-follow instructions. We’ve also discussed what the app is about and its key features. In the end, we provided a brief guide on creating slow-motion videos on a desktop using Filmora software.
Hopefully, this guide helped resolve your queries, and you can now create stunning slow-motion videos without much effort.
Free Download For Win 7 or later(64-bit)
Free Download For macOS 10.14 or later
Make Time-Lapse Video on MacBook [Complete Guide]
The process of time-lapse speeds up the passage of time so that events seem to be happening faster. A time-lapse video is to create photos at regular intervals and assemble them into the video to record changes that would be slow for the human eye to see. Time-Lapse video shows the technique of slow-motion videos using the same principle.
Time-lapse is usually for several purposes but mostly it is utilized to show the passage of time in a fast-forward format. time-lapse means that the camera takes the picture and then combined them into one video that seems to something happen in quickly. The lapse is set into video form in post-production, so movie mode is not necessary. Once the lapse is finished, it’s time to take it into post-production to bring it to life.
Part 1. Use QuickTime Player to Create Timelapse Video
QuickTime player creates a high-resolution video file from the series of photos without having to render the photos twice. The result of QuickTime is a much higher quality result. With this toolkit, after the recording is done, the illusion of fast-moving footage i-e time-lapse is to be created. QuickTime will always ask you what frame rate would you like to video in.
Steps to Create Timelapse Video with QuickTime Player:
To produce a timelapse movie using QuickTime Player, follow these steps:
Step 1: Launch the Recording
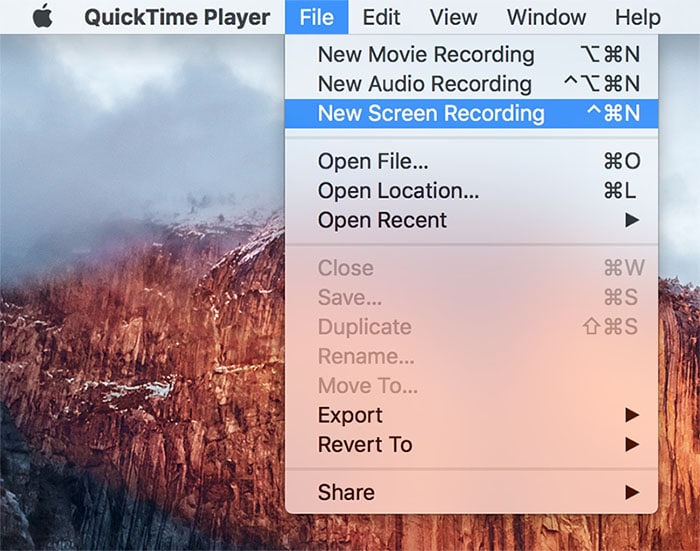
By selecting the File * New Screen Recording option in QuickTime, you may record your screen. After choosing the region to record, your screen will start to be recorded. Real-time video will be captured, and it will be archived.
Step 2: Import the Files
Go to the file > Open Image Sequence menu after starting QuickTime. One of the video files you want to turn into a time-lapse should be opened in QuickTime Player. “Open File.” may be found by clicking the File menu link in the menu bar.
Step 3: Create the Timelapse
Within QuickTime, the series of images will be turned into time-lapse films. Choose one picture from the series, and then change the settings as necessary. Use the Higher Quality Apple Pro Resolution video codec, Actual size resolution, and 25 frames per second.

Step 4: Export Your Video
Finally, you may access the Speed option by selecting Tools>Edit from the top menu’s Imported section. At the conclusion, this will produce your time-lapse, and then choose Save under File. This will open a window where you can choose the codec you want to export it in.

Part 2. Create Timelapse Video with iMovie
To make an iMovie time-lapse on Mac, you have to capture the video and create a time-lapse out of it. For a multiple-hour recording in a few seconds to be fit, you will need software of time-lapse. Timelapse is utilized for accelerated or slow-motion videos with changes in the frame rate and playback videos in speed. The time-lapse software is available to handle the tasks without sacrificing the quality, size, and format of the video.
Steps To Create Timelapse Video with iMovie
Step 1: Launch iMovie
On your Mac, launch the iMovie application, and then import the video clip from the library that you wish to use to create a time-lapse. Drag the video to the timeline. Then you may see additional frames in the timeline by clicking the setting bar below.

Step 2: Import videos and adjust
By clicking the icon that resembles a camera below the Viewer panel, drag images into the project library. Drag the desired images to the Project Library. By choosing File and then selecting Project Properties, you may modify the default settings. Set the first picture location to Fit Frame and the transition length to 1 second.

Step 3: Modify the Clips’ Speed
Select it if you wish to alter the clip’s pace. On the preview window’s top toolbar, tap the clock symbol. You may pick “8x” for the default frame rate or “20x” for “Speed” > “Fast.” In iMovie, the minimum time is 0.1 seconds or around 10 frames. As a result, you must first export the time-lapse sequence before speeding up the clip.

Step 4: Share the Video
Using the Share option at the bottom, you can then save, export, or share your slowed-down time-lapse film. Refer to the “Share” option to decide whether to store or immediately share the iMovie time-lapse.

Part 3. Turn Video into Timelapse with Filmora
Time-Lapse videos can be easily created using Wondershare Filmora which is a very powerful video editing tool . The speed change feature of Filmora works well for time-lapse video editing. Filmora software can be used on both Windows and Mac platforms, it contains the features of a wide range of video effects with filters. it allows you to produce and create amazing video creations from images or video clips.
Filmora is packed with a plethora of editing features that will make your time lapses more appalling. The color tuning feature can be used to adjust the white balance and dynamic range of the video clips. The advanced text editor allows you to edit the size, font, color, and even the animation of text. The feature of video stabilization eliminates the effects of the camera shake. All in all, you can have an all-in-one editor to create your timelapse handily.
Wondershare Filmora Best Way to Make Timelapse Video on Computer.
Free Download Free Download Learn More

Steps to Create a Timelapse Video with Filmora:
Step 1: Launch Filmora Editor
Download the program and launch Filmora in full feature mode. Drag and drop the video clip into the application after selecting the Import option from the software’s menu. Drag the imported video clip to the timeline below, as seen in the figure above.

Free Download For Win 7 or later(64-bit)
Free Download For macOS 10.14 or later
Step 2: Setup the Footage Speed
To adjust the speed, drag the video clip into the timeline by clicking twice, and then slide the speed tool to the desired speed for your time-lapse. The speed is changed to be 100 times faster.

Step 3: Render the Timelapse
The Render Timeline button is recognized by the window’s preview when you click it to guarantee the speed changes your clip has to be adjusted to. You would take off the audio that was in the original video. Utilizing the image’s visible volume tool button, change the volume and then render it again by hitting the render icon as shown here:
Step 4: Edit the Video
To change the perspective of the video to wherever you want it, click right on the video clip on the timeline and choose Crop & Zoom, followed by Pan & Zoom. Additionally, you may add text using the text and title tool that is already built-in, add music using royalty-free music files or apply filters and other features.

Step 5: Share your Timelapse
As you can see, you can drag and drop the pre-built templates from the library onto the timeline. Next, click the Export button at the top to start exporting. The Filmora’s features include support for 4K editing, GIF compatibility, noise reduction, color tuning, a sophisticated text editor, an audio mixer, video stabilization, scene identification, and audio equalization.
Conclusion
Time-lapse is the video editing technique in that the speed is lower and the frequency of video and picture. A time-lapse software, Filmora is a video editor that lets you create a smooth time-lapse where time appears to be passing quickly. This app is very helpful to create the video on time-lapse, making the appearance in the series of quick succession about a long term or period to denote something that happens over a long period.
Free Download Free Download Learn More

Steps to Create a Timelapse Video with Filmora:
Step 1: Launch Filmora Editor
Download the program and launch Filmora in full feature mode. Drag and drop the video clip into the application after selecting the Import option from the software’s menu. Drag the imported video clip to the timeline below, as seen in the figure above.

Free Download For Win 7 or later(64-bit)
Free Download For macOS 10.14 or later
Step 2: Setup the Footage Speed
To adjust the speed, drag the video clip into the timeline by clicking twice, and then slide the speed tool to the desired speed for your time-lapse. The speed is changed to be 100 times faster.

Step 3: Render the Timelapse
The Render Timeline button is recognized by the window’s preview when you click it to guarantee the speed changes your clip has to be adjusted to. You would take off the audio that was in the original video. Utilizing the image’s visible volume tool button, change the volume and then render it again by hitting the render icon as shown here:
Step 4: Edit the Video
To change the perspective of the video to wherever you want it, click right on the video clip on the timeline and choose Crop & Zoom, followed by Pan & Zoom. Additionally, you may add text using the text and title tool that is already built-in, add music using royalty-free music files or apply filters and other features.

Step 5: Share your Timelapse
As you can see, you can drag and drop the pre-built templates from the library onto the timeline. Next, click the Export button at the top to start exporting. The Filmora’s features include support for 4K editing, GIF compatibility, noise reduction, color tuning, a sophisticated text editor, an audio mixer, video stabilization, scene identification, and audio equalization.
Conclusion
Time-lapse is the video editing technique in that the speed is lower and the frequency of video and picture. A time-lapse software, Filmora is a video editor that lets you create a smooth time-lapse where time appears to be passing quickly. This app is very helpful to create the video on time-lapse, making the appearance in the series of quick succession about a long term or period to denote something that happens over a long period.
How To Combine Videos On TikTok
Meta Description: If you have several videos you would like to combine into one video, follow the steps in this article to combine videos on TikTok.
Many people continue to ask how to combine videos on TikTok. If you saw a video that grabbed your attention but consisted of several recordings, you might be wondering how you can combine the videos for TikTok. In this article, we’ll provide all the solutions you need. We’ll explore the best ways to combine videos on TikTok without surpassing the time limit the platform specified. On that note, let’s begin.
2 Practical Ways to Combine Videos on TikTok
This section will explore two practical ways to help you combine videos on TikTok. First, follow the steps outlined to complete the process.
Using the TikTok Camera
You can first combine videos on TikTok by using its official camera. To achieve this, follow the steps outlined below to combine your videos seamlessly.
- First, visit TikTok and click the ‘+’ icon at the bottom of the screen.
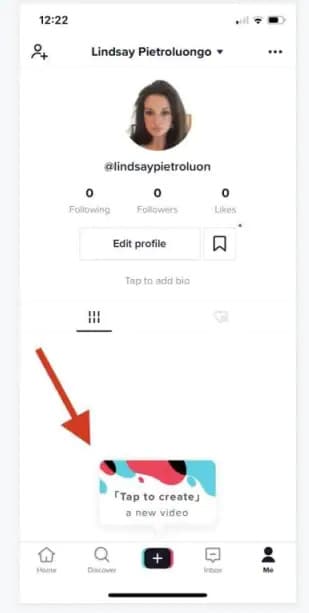
- Once you do this, you can advance to recording the clips you want.
- Click the timer button at the top of the screen to choose how long you would like to shoot your video; you can select 5 seconds, 10 seconds, etc.
- Before starting the countdown, drag the red bar by the audio track to where you want the clip to end.
- You can repeat the recording many times to have many clips recorded.
- Once you’re done recording, click the ‘adjust clip’ icon to adjust your video clips.
- After adjusting, hit the ‘done’ button and have your combined video.
You can go ahead and share with your followers and the general public.
Use the Combining Function
The second practical way you can combine TikTok videos into a single video is by using the app’s built-in combining function. To find out how you can use this technique for your videos, follow the steps outlined below.
- Once you have the TikTok app on your device, open it and go to the menu bar. Select the ‘+’ button; it should be at the end of the screen.
- Instead of recording through the TikTok camera, choose the ‘upload’ button, and it will take you to your device storage, where you can select the videos you would like to upload on TikTok.
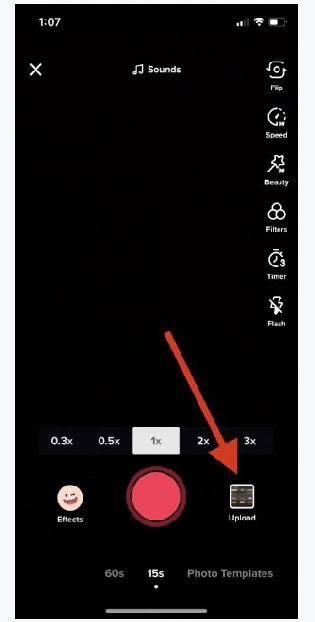
- Now, choose the ‘select multiple’ option at the left corner of your screen. Once you select this option, you can select different videos you would like to join together. Once you are satisfied with your choice, hit the ‘next’ button.
- TikTok will allow you to combine the videos for up to 60 seconds. You can customize the video arrangement according to your preference.
- If you’re satisfied with the final video result, click the next option, and you can share it on your TikTok account.

How to Combine Draft Videos on TikTok
Now that you know how to combine videos on TikTok, you’re probably wondering about the best way to combine the drafts you saved on your TikTok account. Maybe when you made the videos, you were unmotivated to upload them. However, now you want to combine the videos into a single video and don’t know how to proceed. So, follow the steps outlined in this article to get it done.
Step 1: Go to Your Drafts
To begin, you have to launch the TikTok app and click on the ‘me’ option at the end of the screen. Then, it will redirect you to your profile, choose the ‘drafts’ category, and take you to the videos you saved on the app and never published.
Step 2: Update Privacy Settings
Now you want to change the privacy setting in the ‘who can watch this video’ category to ‘just me.’ After updating, tap on ‘post.’ After posting your video, you can change the setting by clicking on ‘change cut.’ You can reduce the video length and add new videos to combine TikTok drafts.
Step 3: Add Filters and More Effects
You can also add music to your newly combined video and texts, stickers, filters, and many more effects to enhance your video.
Step 4: Save Draft
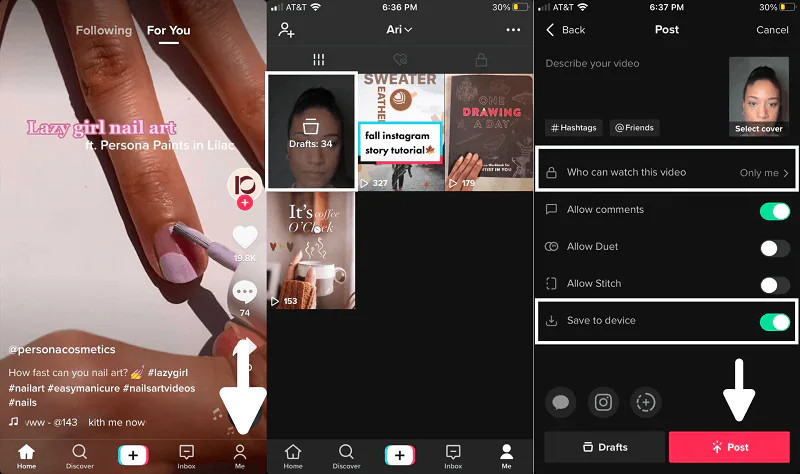
Once again, save the video as a draft, but you’ll have to choose a thumbnail for your video. You can choose any part of the video to become the thumbnail. Then, post your video by navigating to the home screen again and clicking the plus icon to post; select your video and post.
Use Third-Party Tools to Combine Videos for TikTok Before Uploading
There are several tools you can use to combine TikTok videos. While there is software, some are available online. Since TikTok gives limited editing functions, most TikTokers want a rich editing tool that they can use to edit and combine videos for TikTok. Below are three user-friendly software you can use to successfully edit and combine your videos.
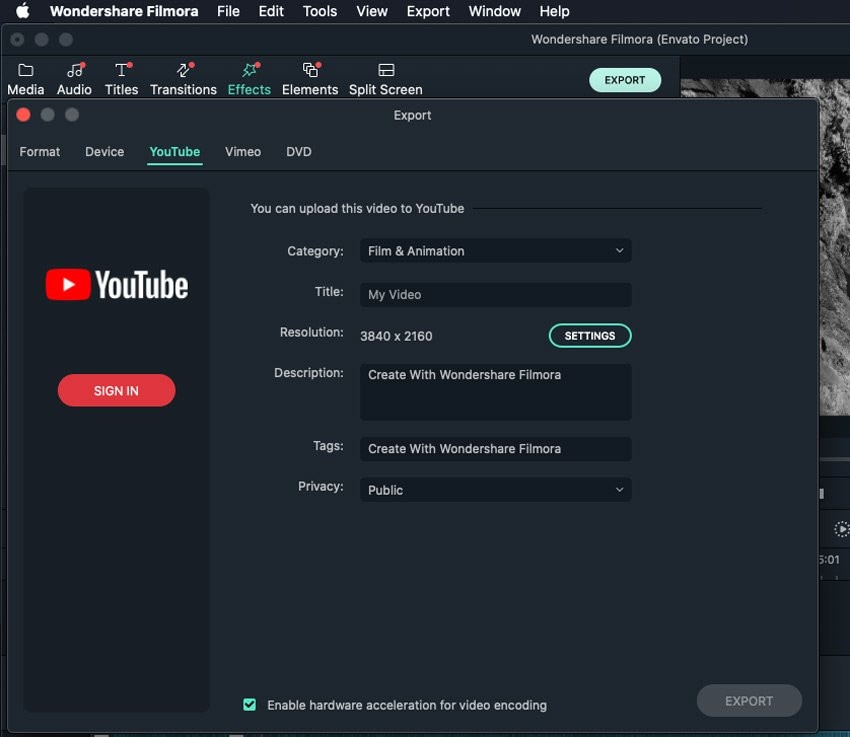
Wondershare filmora
This is the best editing software you can find; it makes it relatively easy to combine your TikTok videos into a single video. Not only does Filmora allow you to combine videos before you upload them, but you can also use its host of editing tools to enhance your video. You can use this software for any type of video like slideshows, documentaries, photomontages, and many more. It is quite easy to use, irrespective of your editing skills, because of its user-friendly interface.
It is a strong contender in the editing world because it offers different effects, overlays, titles, transitions, etc. You can also upload your video directly to TikTok and other social media platforms. With many themes available on the platform, you can create a slideshow right on the platform. Follow the steps outlined below to combine multiple videos on Wondershare Filmora.
- First, you have to download the app on your device; you can do this from the official website. Install the app afterward, and the launch to begin.
- Next, select ‘create new project,’ It will take you to the media screen. Click the ‘add’ button and choose ‘import media file.’
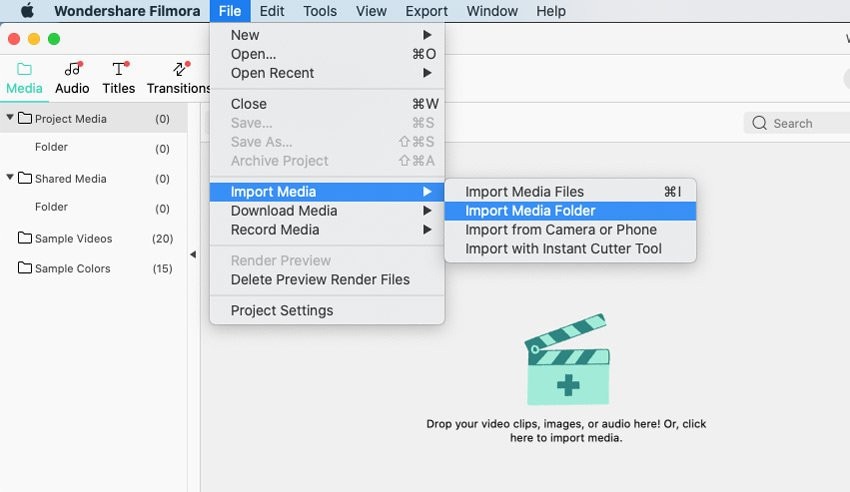
- You can then navigate to the folder with the videos you want to combine and choose.
- Afterward, drag the videos to the timeline. Filmora will ask you if you want to match the project to the resolution of your media; choose to ‘match to media’
- This will make the videos into one. You can rearrange the video clips to your preference; simply click and drag the videos to reposition them.
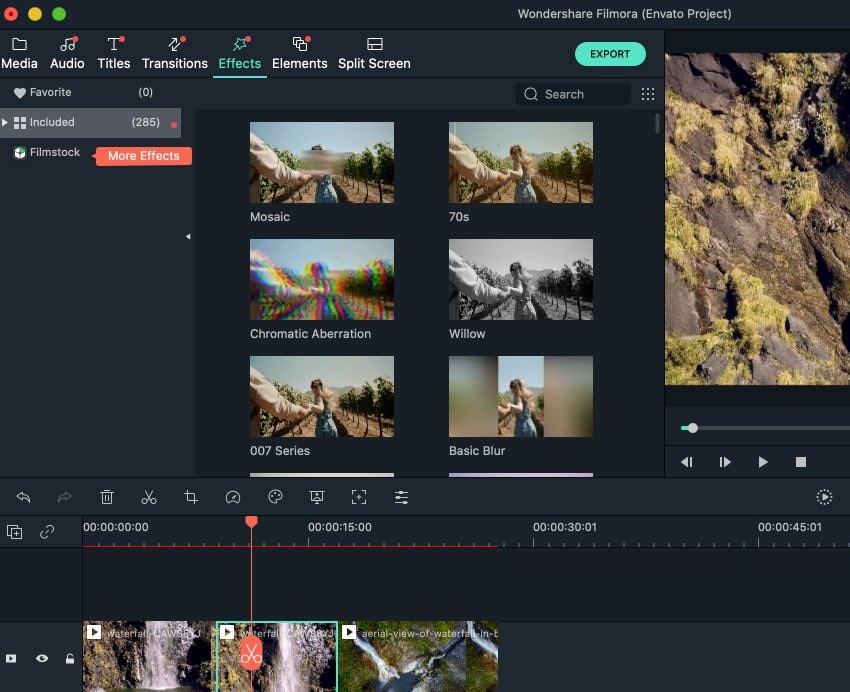
- You can also use the effects, filters, transitions, and overlays on Filmora to enhance your TikTok video.
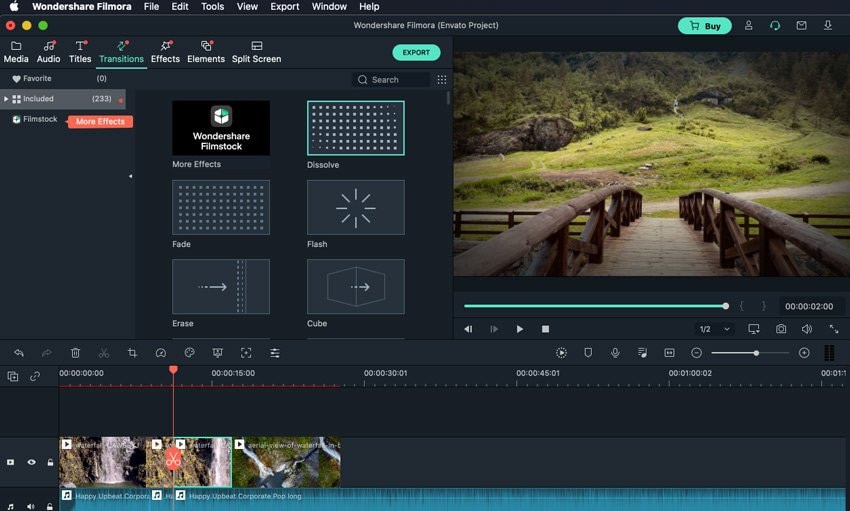
- Once everything looks good, click on the ‘export’ button at the top of the screen.
- You can then rename your video and choose where you would like to save the video. Filmora also allows you to adjust your video’s resolution and bitrate before clicking the ‘export’ option.
VideoProc Converter

Another third-party app you can use to edit your video and combine videos for TikTok is VideooProc Converter. It allows you to merge several videos in a lossless manner, and you can also cut, trim, rotate and resize your videos to your preference. You could also change the format and any other requirements you would like to tweak. Some beginners might find this video editor hard to navigate. However, the steps below should make the process easier for you.
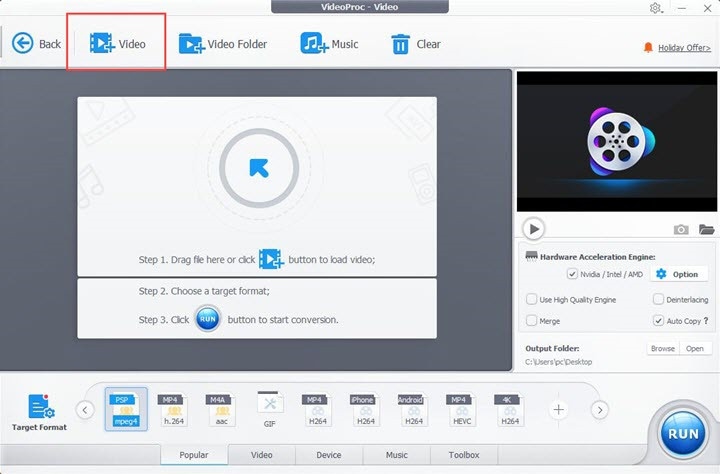
- Firstly, download VideoProc Converter and launch the software.
- Import your TikTok videos and select and output format for your video; there are many options to choose from.
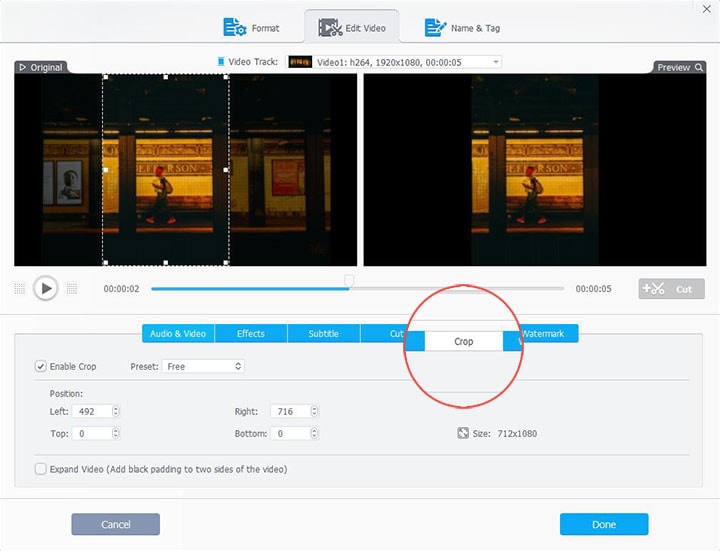
- You can then start editing each video clip separately. You can resize, trim and crop your videos. You can also apply effects, rotate the videos, and add subtitles.
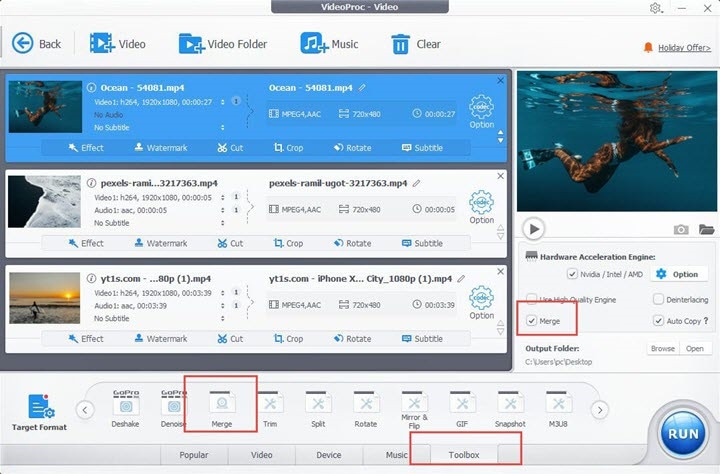
- Next, go to the end of the screen and click the ‘toolbox’ option, select ‘merge,’ and you can choose the videos you would like to combine.
- After combining the videos, you can save the video and export it to your preferred storage device.
Adobe Spark
This is another top video-combining tool you can use for your TikTok videos. It allows you to make quick edits on your TikTok videos. Of course, you have to own a TikTok account to use this video editor. However, using it is quite simple, and the steps outlined below show just that.
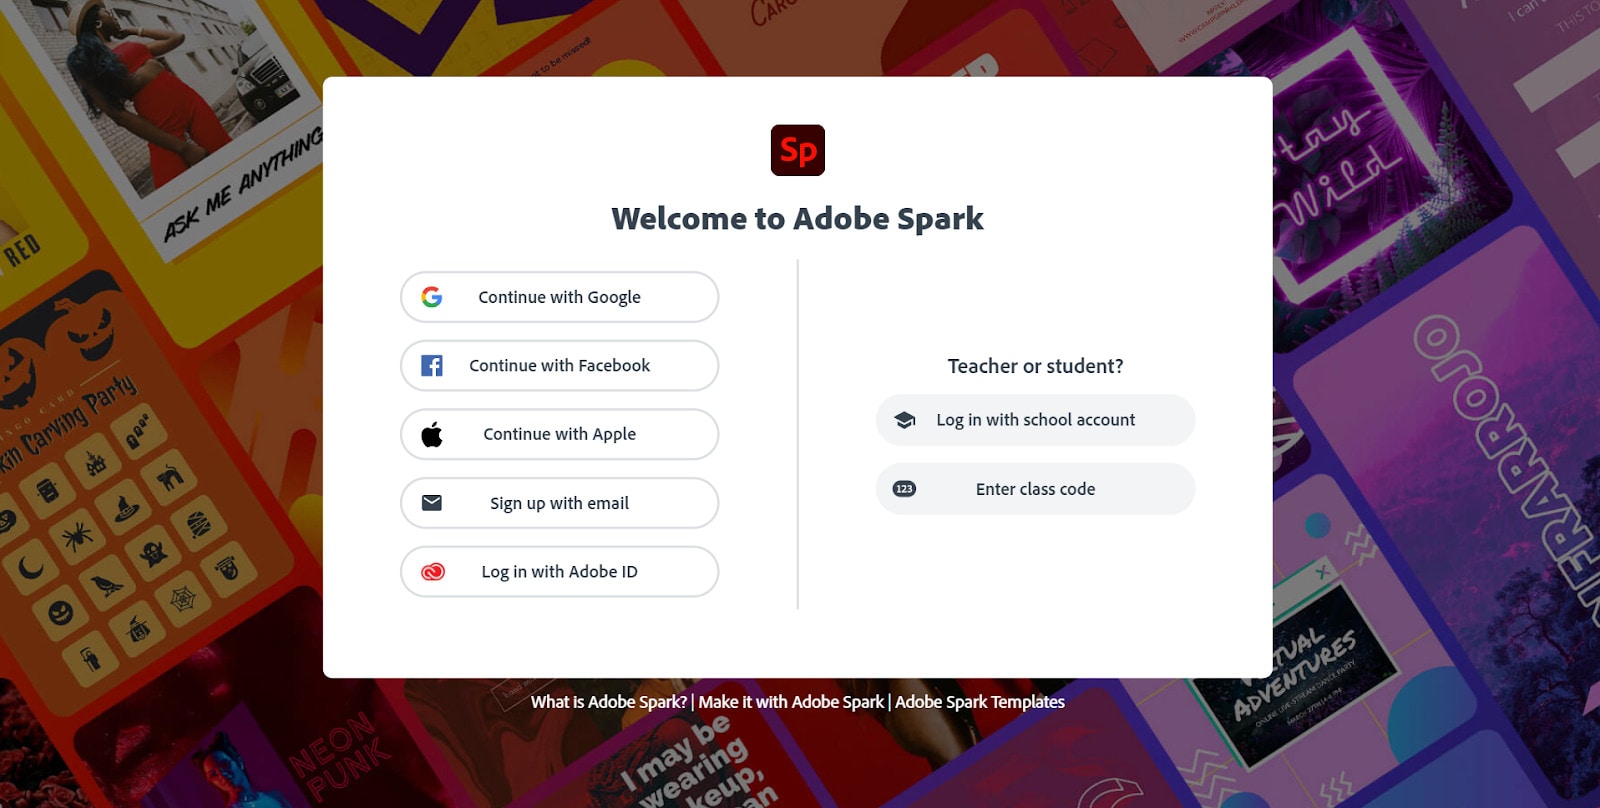
- Go to the Adobe Spark website and sign-in; you can create an account if you don’t have one.
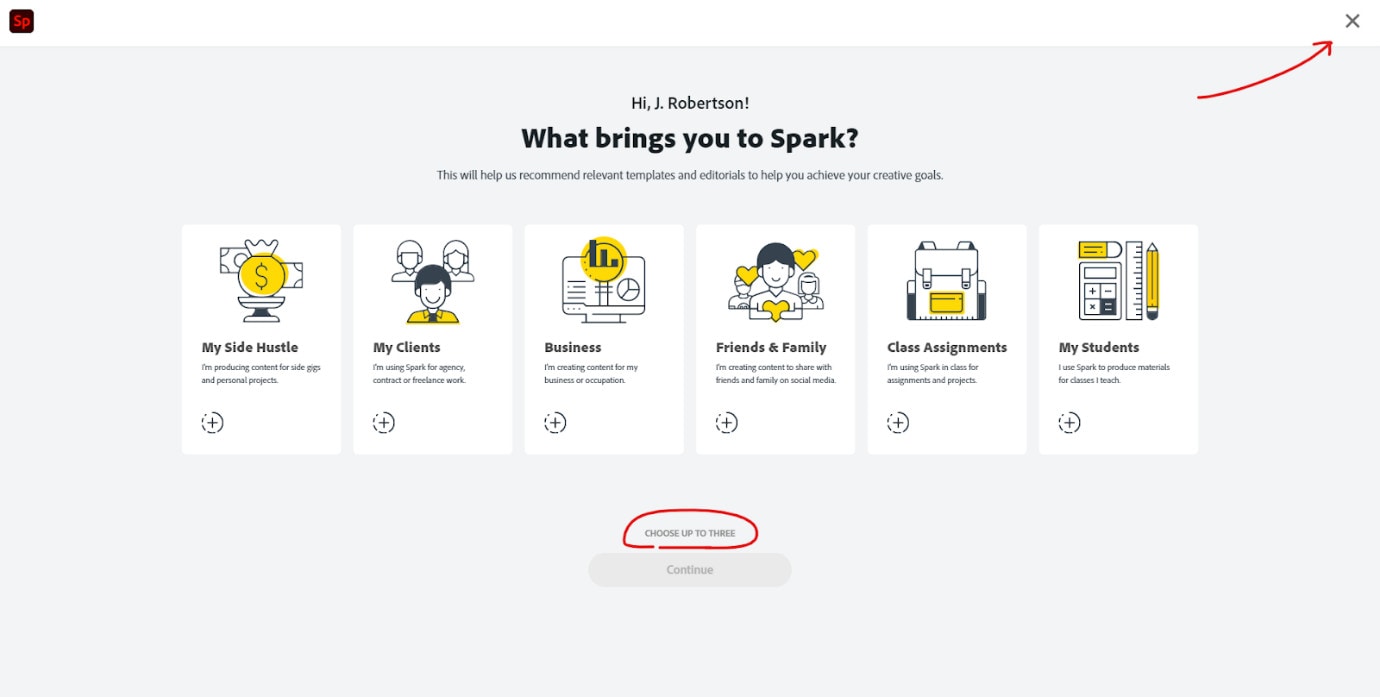
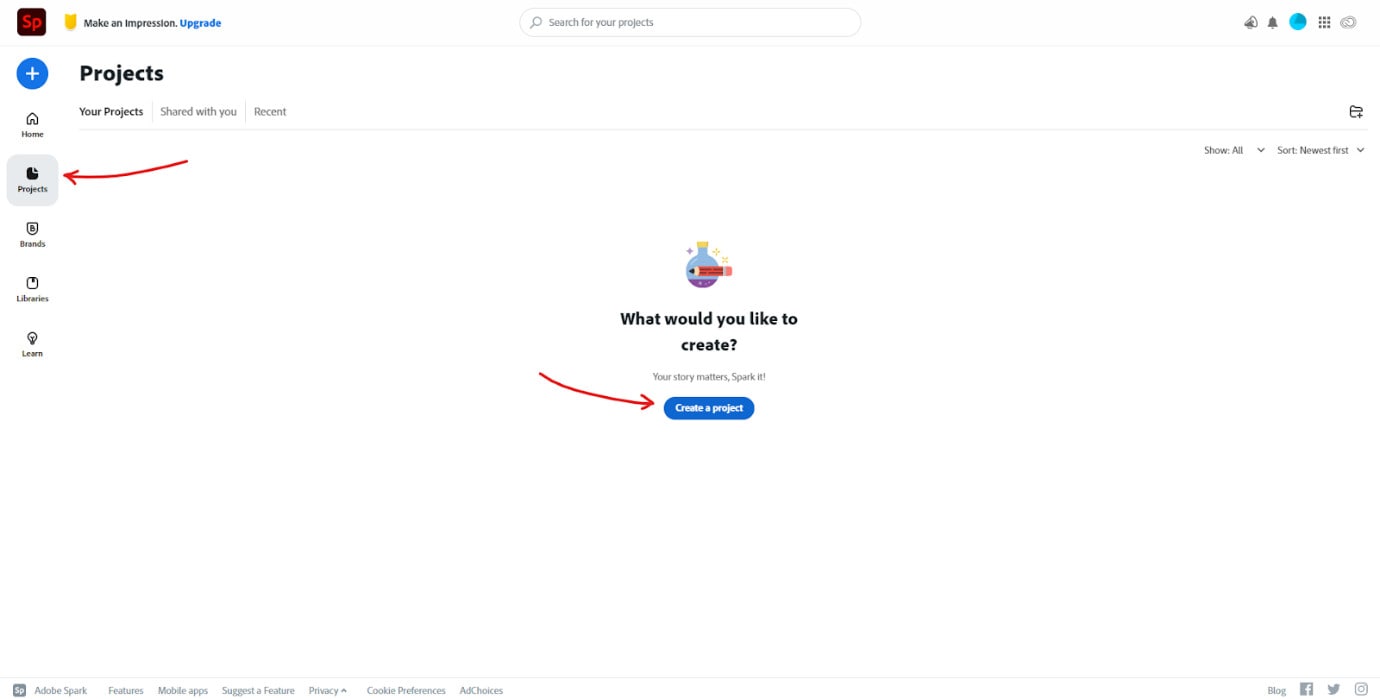
- Navigate to the ‘project’ tab on the homepage and select ‘create a project.’
- Click the ‘videos’ tab and choose a template you prefer. You would also have to give your video a title. Once you’re done, choose ‘start from scratch’ to begin.
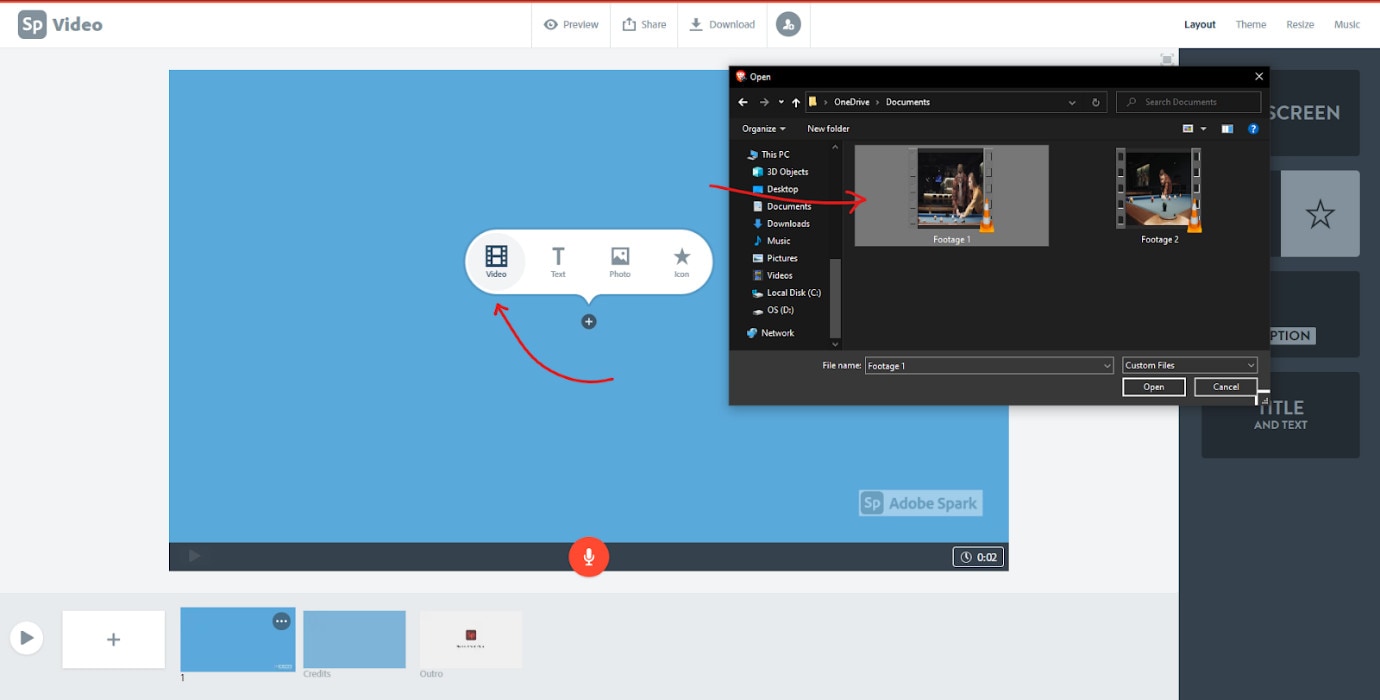
- It would take you to the video editor; hover over an empty slide and click ‘video’ to choose the video you would like to upload.

- Adobe Spark allows you to trim the length of the video if you think it’s too long. Repeat the previous step to add another video again.
- Once you’ve added all the videos you want, you can rearrange them in the proper sequence.
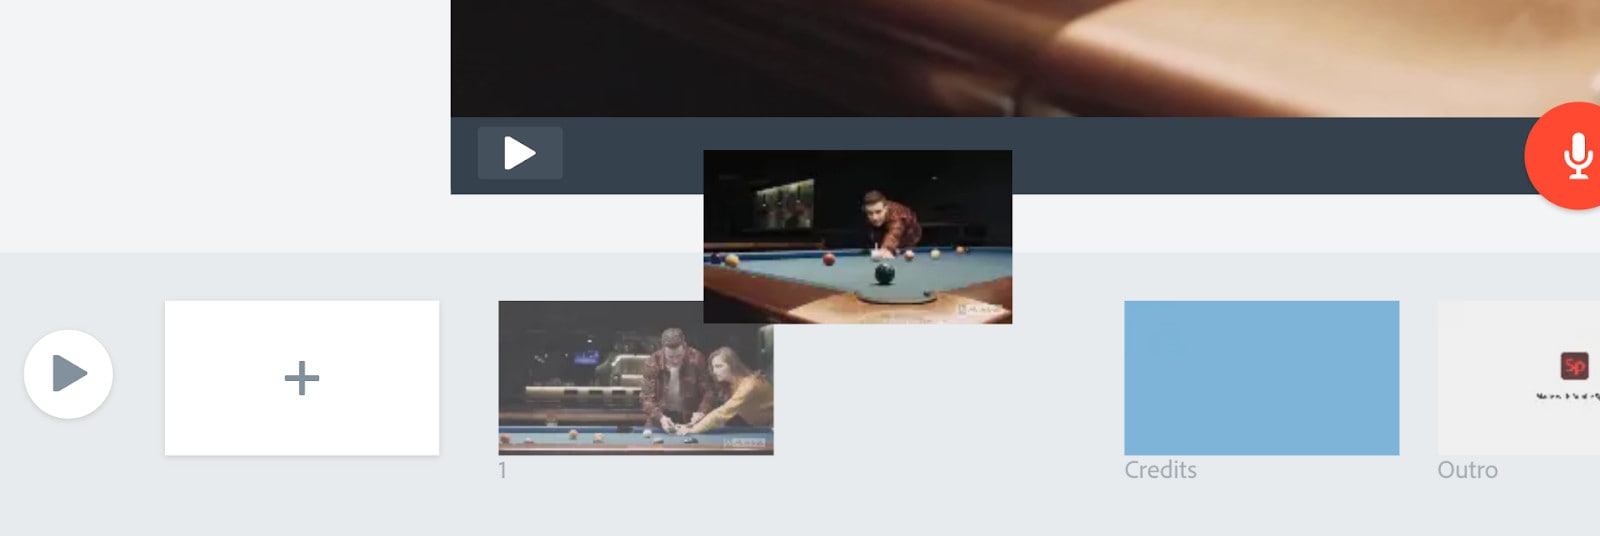
- Now you can save your video; click the ‘download’ button, and Adobe Spark will automatically download the newly combined video to your device.
7 Tips and Tricks You Should Know for TikTok Videos Creation
Although most tips focus on how you can redo your video to focus on the video-sharing platform, we have some tips and tricks you should know for TikTok video creation that focuses on combining videos. If you’re always having drafts or would like to enhance your videos, these cool tips will serve as a quick method for you.
- Combine Photos and Videos
TikTok allows you to combine videos and images. This comes in handy when trying to make a point on your video. For example, you’re probably wondering how you can add a foundation picture to your video. It is quite simple if you follow the steps below.
- Launch the TikTok app and click the ‘+’ button at the end of the screen.
- Record your video and select the ‘impacts’ screen at the end of the screen after a few moments.’
- Choose ‘transfer your picture to change foundation from the options that pop up.’
- Continue recording your video, and the chosen picture will become your video foundation.
- Add Overlay to TikTok Videos
Another tip we have is how to add overlay videos on TikTok without third-party editing apps; follow the steps below.
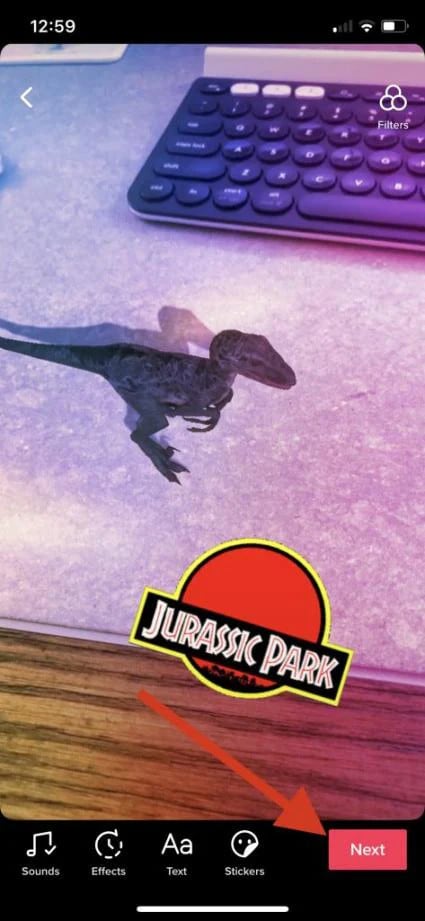
- After chronicling your videos, you can choose to add a melodic overlay, channels, and many more enhancements like stickers and text overlays.
- Once you add this to your video, choose next, and it will take you to the next page, where you can add subtitles, hashtags, and many more before you post.
- How to Add Videos to TikTok After Posting
Apart from making videos, you can also make two-part duets on TikTok. Additionally, TikTok allows you to record with different formats; follow the steps below.
- Firstly, go to the video you would like to edit and click the three-dot icon to edit your video.
- Once you edit the video by changing the format or adding another part, save your video, and TikTok allows you to post your video again.
- Place Videos Side by Side
Another tip we have in store for you is how you can place videos side by side on TikTok; the steps below help you achieve this.
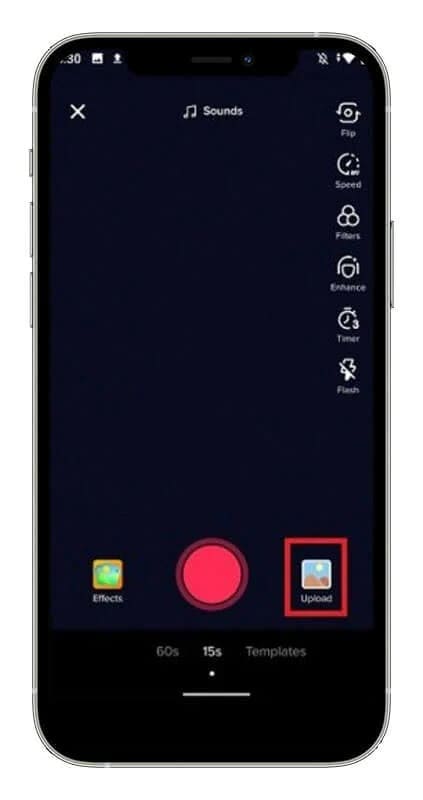
- First, click the ‘star’ button at the side of your screen and select ‘add to favorite.’
- Now, record a second video on your TikTok or simply import it if you have already recorded the video.
- Download the first video, and you can use the combining feature on TikTok to make the video run next to each other
- Once you’re satisfied, you can now proceed to post your video.
- Learn to Perform Duets on TikTok
Another thing you can do on TikTok is to duet with other TikTok users
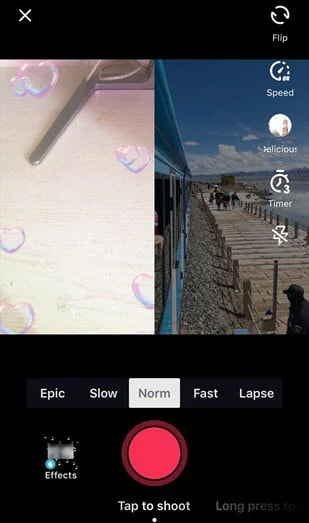
- To do this, go to TikTok and find the video you would like to duet
- At the end of the screen, click on the ‘share’ option and choose ‘duet’ from the option available
- Tap the red icon at the middle of the screen to start recording your video; your video usually appears on the left while the other video shows up in the right corner.
- Once you’re done recording, click the checkmark icon at the top of the screen to save your recording.
- Replay the duet to ensure you like the result; you can add effects, stickers, and other editing features you want to the video before you post.
- Set a Timer for Recording Videos
One of the ways you can record multiple scenes for a video is by using the recording tool; the steps below show you how to do that.
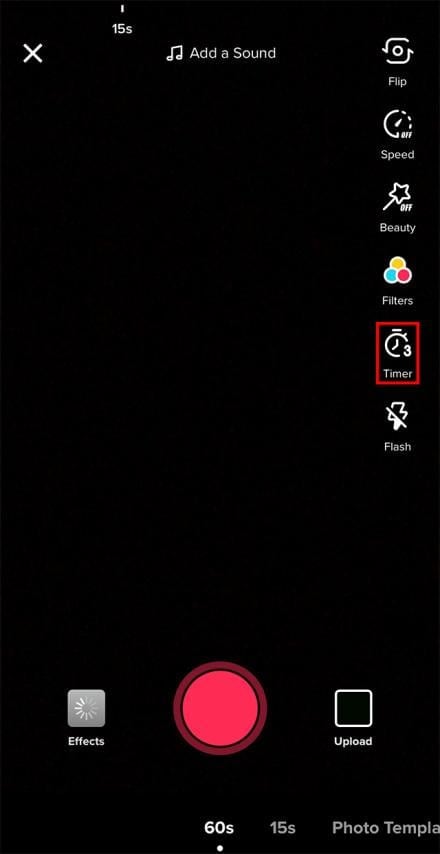
- Once you launch TikTok and click on the camera icon
- Tap the ‘clock’ icon at the side of the screen; you can choose between 3-10 seconds
- Click the red circle to start recording
- A countdown on the screen gives you time to get ready to record. Once the countdown gets to zero, TikTok starts recording your video.
- Use the Stitch Feature
Stitched videos allow you to add the first maker’s details in the new video; these details connect TikTok users to the first video. It is quite easy to stitch one video to another. Simply navigate to the ‘privacy and settings’ tab, and you can enable or disable stitching for your TikTok videos; you can also turn this on and off for your videos. Follow the steps below to stitch your TikTok videos.
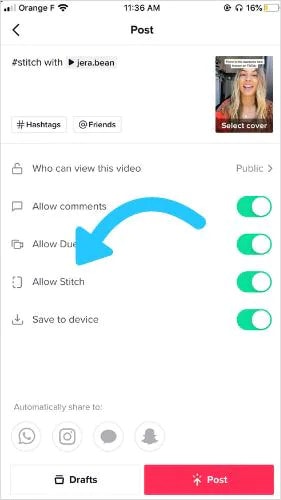
- Open the TikTok app and choose the video you would like to stitch
- Now choose the three-dot icon and select the ‘advanced’ option
- You can stitch up to five seconds from the video you would like to stick to add to the current video.
- You can add recordings to the stitched option and then stitch them together to post.
Final Thoughts
Whether you’re a stranger to the TikTok scene or a professional, TikTok is quite popular as a video-sharing platform. However, you don’t always get it right the first time, and you might want to combine various videos into one perfect option to upload. Apart from the two practical ways you can do this on TikTok, we also share three third-party apps you can use to achieve this. You can also explore the seven tips shared in this article to maximize your potential on the TikTok app.

- Once you do this, you can advance to recording the clips you want.
- Click the timer button at the top of the screen to choose how long you would like to shoot your video; you can select 5 seconds, 10 seconds, etc.
- Before starting the countdown, drag the red bar by the audio track to where you want the clip to end.
- You can repeat the recording many times to have many clips recorded.
- Once you’re done recording, click the ‘adjust clip’ icon to adjust your video clips.
- After adjusting, hit the ‘done’ button and have your combined video.
You can go ahead and share with your followers and the general public.
Use the Combining Function
The second practical way you can combine TikTok videos into a single video is by using the app’s built-in combining function. To find out how you can use this technique for your videos, follow the steps outlined below.
- Once you have the TikTok app on your device, open it and go to the menu bar. Select the ‘+’ button; it should be at the end of the screen.
- Instead of recording through the TikTok camera, choose the ‘upload’ button, and it will take you to your device storage, where you can select the videos you would like to upload on TikTok.

- Now, choose the ‘select multiple’ option at the left corner of your screen. Once you select this option, you can select different videos you would like to join together. Once you are satisfied with your choice, hit the ‘next’ button.
- TikTok will allow you to combine the videos for up to 60 seconds. You can customize the video arrangement according to your preference.
- If you’re satisfied with the final video result, click the next option, and you can share it on your TikTok account.

How to Combine Draft Videos on TikTok
Now that you know how to combine videos on TikTok, you’re probably wondering about the best way to combine the drafts you saved on your TikTok account. Maybe when you made the videos, you were unmotivated to upload them. However, now you want to combine the videos into a single video and don’t know how to proceed. So, follow the steps outlined in this article to get it done.
Step 1: Go to Your Drafts
To begin, you have to launch the TikTok app and click on the ‘me’ option at the end of the screen. Then, it will redirect you to your profile, choose the ‘drafts’ category, and take you to the videos you saved on the app and never published.
Step 2: Update Privacy Settings
Now you want to change the privacy setting in the ‘who can watch this video’ category to ‘just me.’ After updating, tap on ‘post.’ After posting your video, you can change the setting by clicking on ‘change cut.’ You can reduce the video length and add new videos to combine TikTok drafts.
Step 3: Add Filters and More Effects
You can also add music to your newly combined video and texts, stickers, filters, and many more effects to enhance your video.
Step 4: Save Draft

Once again, save the video as a draft, but you’ll have to choose a thumbnail for your video. You can choose any part of the video to become the thumbnail. Then, post your video by navigating to the home screen again and clicking the plus icon to post; select your video and post.
Use Third-Party Tools to Combine Videos for TikTok Before Uploading
There are several tools you can use to combine TikTok videos. While there is software, some are available online. Since TikTok gives limited editing functions, most TikTokers want a rich editing tool that they can use to edit and combine videos for TikTok. Below are three user-friendly software you can use to successfully edit and combine your videos.
Wondershare filmora
This is the best editing software you can find; it makes it relatively easy to combine your TikTok videos into a single video. Not only does Filmora allow you to combine videos before you upload them, but you can also use its host of editing tools to enhance your video. You can use this software for any type of video like slideshows, documentaries, photomontages, and many more. It is quite easy to use, irrespective of your editing skills, because of its user-friendly interface.
It is a strong contender in the editing world because it offers different effects, overlays, titles, transitions, etc. You can also upload your video directly to TikTok and other social media platforms. With many themes available on the platform, you can create a slideshow right on the platform. Follow the steps outlined below to combine multiple videos on Wondershare Filmora.
- First, you have to download the app on your device; you can do this from the official website. Install the app afterward, and the launch to begin.
- Next, select ‘create new project,’ It will take you to the media screen. Click the ‘add’ button and choose ‘import media file.’

- You can then navigate to the folder with the videos you want to combine and choose.
- Afterward, drag the videos to the timeline. Filmora will ask you if you want to match the project to the resolution of your media; choose to ‘match to media’
- This will make the videos into one. You can rearrange the video clips to your preference; simply click and drag the videos to reposition them.

- You can also use the effects, filters, transitions, and overlays on Filmora to enhance your TikTok video.

- Once everything looks good, click on the ‘export’ button at the top of the screen.
- You can then rename your video and choose where you would like to save the video. Filmora also allows you to adjust your video’s resolution and bitrate before clicking the ‘export’ option.

VideoProc Converter

Another third-party app you can use to edit your video and combine videos for TikTok is VideooProc Converter. It allows you to merge several videos in a lossless manner, and you can also cut, trim, rotate and resize your videos to your preference. You could also change the format and any other requirements you would like to tweak. Some beginners might find this video editor hard to navigate. However, the steps below should make the process easier for you.
- Firstly, download VideoProc Converter and launch the software.
- Import your TikTok videos and select and output format for your video; there are many options to choose from.

- You can then start editing each video clip separately. You can resize, trim and crop your videos. You can also apply effects, rotate the videos, and add subtitles.

- Next, go to the end of the screen and click the ‘toolbox’ option, select ‘merge,’ and you can choose the videos you would like to combine.

- After combining the videos, you can save the video and export it to your preferred storage device.
Adobe Spark
This is another top video-combining tool you can use for your TikTok videos. It allows you to make quick edits on your TikTok videos. Of course, you have to own a TikTok account to use this video editor. However, using it is quite simple, and the steps outlined below show just that.
- Go to the Adobe Spark website and sign-in; you can create an account if you don’t have one.

- Navigate to the ‘project’ tab on the homepage and select ‘create a project.’

- Click the ‘videos’ tab and choose a template you prefer. You would also have to give your video a title. Once you’re done, choose ‘start from scratch’ to begin.

- It would take you to the video editor; hover over an empty slide and click ‘video’ to choose the video you would like to upload.

- Adobe Spark allows you to trim the length of the video if you think it’s too long. Repeat the previous step to add another video again.

- Once you’ve added all the videos you want, you can rearrange them in the proper sequence.

- Now you can save your video; click the ‘download’ button, and Adobe Spark will automatically download the newly combined video to your device.
7 Tips and Tricks You Should Know for TikTok Videos Creation
Although most tips focus on how you can redo your video to focus on the video-sharing platform, we have some tips and tricks you should know for TikTok video creation that focuses on combining videos. If you’re always having drafts or would like to enhance your videos, these cool tips will serve as a quick method for you.
- Combine Photos and Videos
TikTok allows you to combine videos and images. This comes in handy when trying to make a point on your video. For example, you’re probably wondering how you can add a foundation picture to your video. It is quite simple if you follow the steps below.
- Launch the TikTok app and click the ‘+’ button at the end of the screen.
- Record your video and select the ‘impacts’ screen at the end of the screen after a few moments.’
- Choose ‘transfer your picture to change foundation from the options that pop up.’
- Continue recording your video, and the chosen picture will become your video foundation.
- Add Overlay to TikTok Videos
Another tip we have is how to add overlay videos on TikTok without third-party editing apps; follow the steps below.

- After chronicling your videos, you can choose to add a melodic overlay, channels, and many more enhancements like stickers and text overlays.
- Once you add this to your video, choose next, and it will take you to the next page, where you can add subtitles, hashtags, and many more before you post.
- How to Add Videos to TikTok After Posting
Apart from making videos, you can also make two-part duets on TikTok. Additionally, TikTok allows you to record with different formats; follow the steps below.
- Firstly, go to the video you would like to edit and click the three-dot icon to edit your video.
- Once you edit the video by changing the format or adding another part, save your video, and TikTok allows you to post your video again.
- Place Videos Side by Side
Another tip we have in store for you is how you can place videos side by side on TikTok; the steps below help you achieve this.

- First, click the ‘star’ button at the side of your screen and select ‘add to favorite.’
- Now, record a second video on your TikTok or simply import it if you have already recorded the video.
- Download the first video, and you can use the combining feature on TikTok to make the video run next to each other
- Once you’re satisfied, you can now proceed to post your video.
- Learn to Perform Duets on TikTok
Another thing you can do on TikTok is to duet with other TikTok users

- To do this, go to TikTok and find the video you would like to duet
- At the end of the screen, click on the ‘share’ option and choose ‘duet’ from the option available
- Tap the red icon at the middle of the screen to start recording your video; your video usually appears on the left while the other video shows up in the right corner.
- Once you’re done recording, click the checkmark icon at the top of the screen to save your recording.
- Replay the duet to ensure you like the result; you can add effects, stickers, and other editing features you want to the video before you post.
- Set a Timer for Recording Videos
One of the ways you can record multiple scenes for a video is by using the recording tool; the steps below show you how to do that.

- Once you launch TikTok and click on the camera icon
- Tap the ‘clock’ icon at the side of the screen; you can choose between 3-10 seconds
- Click the red circle to start recording
- A countdown on the screen gives you time to get ready to record. Once the countdown gets to zero, TikTok starts recording your video.
- Use the Stitch Feature
Stitched videos allow you to add the first maker’s details in the new video; these details connect TikTok users to the first video. It is quite easy to stitch one video to another. Simply navigate to the ‘privacy and settings’ tab, and you can enable or disable stitching for your TikTok videos; you can also turn this on and off for your videos. Follow the steps below to stitch your TikTok videos.

- Open the TikTok app and choose the video you would like to stitch
- Now choose the three-dot icon and select the ‘advanced’ option
- You can stitch up to five seconds from the video you would like to stick to add to the current video.
- You can add recordings to the stitched option and then stitch them together to post.
Final Thoughts
Whether you’re a stranger to the TikTok scene or a professional, TikTok is quite popular as a video-sharing platform. However, you don’t always get it right the first time, and you might want to combine various videos into one perfect option to upload. Apart from the two practical ways you can do this on TikTok, we also share three third-party apps you can use to achieve this. You can also explore the seven tips shared in this article to maximize your potential on the TikTok app.

- Once you do this, you can advance to recording the clips you want.
- Click the timer button at the top of the screen to choose how long you would like to shoot your video; you can select 5 seconds, 10 seconds, etc.
- Before starting the countdown, drag the red bar by the audio track to where you want the clip to end.
- You can repeat the recording many times to have many clips recorded.
- Once you’re done recording, click the ‘adjust clip’ icon to adjust your video clips.
- After adjusting, hit the ‘done’ button and have your combined video.
You can go ahead and share with your followers and the general public.
Use the Combining Function
The second practical way you can combine TikTok videos into a single video is by using the app’s built-in combining function. To find out how you can use this technique for your videos, follow the steps outlined below.
- Once you have the TikTok app on your device, open it and go to the menu bar. Select the ‘+’ button; it should be at the end of the screen.
- Instead of recording through the TikTok camera, choose the ‘upload’ button, and it will take you to your device storage, where you can select the videos you would like to upload on TikTok.

- Now, choose the ‘select multiple’ option at the left corner of your screen. Once you select this option, you can select different videos you would like to join together. Once you are satisfied with your choice, hit the ‘next’ button.
- TikTok will allow you to combine the videos for up to 60 seconds. You can customize the video arrangement according to your preference.
- If you’re satisfied with the final video result, click the next option, and you can share it on your TikTok account.

How to Combine Draft Videos on TikTok
Now that you know how to combine videos on TikTok, you’re probably wondering about the best way to combine the drafts you saved on your TikTok account. Maybe when you made the videos, you were unmotivated to upload them. However, now you want to combine the videos into a single video and don’t know how to proceed. So, follow the steps outlined in this article to get it done.
Step 1: Go to Your Drafts
To begin, you have to launch the TikTok app and click on the ‘me’ option at the end of the screen. Then, it will redirect you to your profile, choose the ‘drafts’ category, and take you to the videos you saved on the app and never published.
Step 2: Update Privacy Settings
Now you want to change the privacy setting in the ‘who can watch this video’ category to ‘just me.’ After updating, tap on ‘post.’ After posting your video, you can change the setting by clicking on ‘change cut.’ You can reduce the video length and add new videos to combine TikTok drafts.
Step 3: Add Filters and More Effects
You can also add music to your newly combined video and texts, stickers, filters, and many more effects to enhance your video.
Step 4: Save Draft

Once again, save the video as a draft, but you’ll have to choose a thumbnail for your video. You can choose any part of the video to become the thumbnail. Then, post your video by navigating to the home screen again and clicking the plus icon to post; select your video and post.
Use Third-Party Tools to Combine Videos for TikTok Before Uploading
There are several tools you can use to combine TikTok videos. While there is software, some are available online. Since TikTok gives limited editing functions, most TikTokers want a rich editing tool that they can use to edit and combine videos for TikTok. Below are three user-friendly software you can use to successfully edit and combine your videos.
Wondershare filmora
This is the best editing software you can find; it makes it relatively easy to combine your TikTok videos into a single video. Not only does Filmora allow you to combine videos before you upload them, but you can also use its host of editing tools to enhance your video. You can use this software for any type of video like slideshows, documentaries, photomontages, and many more. It is quite easy to use, irrespective of your editing skills, because of its user-friendly interface.
It is a strong contender in the editing world because it offers different effects, overlays, titles, transitions, etc. You can also upload your video directly to TikTok and other social media platforms. With many themes available on the platform, you can create a slideshow right on the platform. Follow the steps outlined below to combine multiple videos on Wondershare Filmora.
- First, you have to download the app on your device; you can do this from the official website. Install the app afterward, and the launch to begin.
- Next, select ‘create new project,’ It will take you to the media screen. Click the ‘add’ button and choose ‘import media file.’

- You can then navigate to the folder with the videos you want to combine and choose.
- Afterward, drag the videos to the timeline. Filmora will ask you if you want to match the project to the resolution of your media; choose to ‘match to media’
- This will make the videos into one. You can rearrange the video clips to your preference; simply click and drag the videos to reposition them.

- You can also use the effects, filters, transitions, and overlays on Filmora to enhance your TikTok video.

- Once everything looks good, click on the ‘export’ button at the top of the screen.
- You can then rename your video and choose where you would like to save the video. Filmora also allows you to adjust your video’s resolution and bitrate before clicking the ‘export’ option.

VideoProc Converter

Another third-party app you can use to edit your video and combine videos for TikTok is VideooProc Converter. It allows you to merge several videos in a lossless manner, and you can also cut, trim, rotate and resize your videos to your preference. You could also change the format and any other requirements you would like to tweak. Some beginners might find this video editor hard to navigate. However, the steps below should make the process easier for you.
- Firstly, download VideoProc Converter and launch the software.
- Import your TikTok videos and select and output format for your video; there are many options to choose from.

- You can then start editing each video clip separately. You can resize, trim and crop your videos. You can also apply effects, rotate the videos, and add subtitles.

- Next, go to the end of the screen and click the ‘toolbox’ option, select ‘merge,’ and you can choose the videos you would like to combine.

- After combining the videos, you can save the video and export it to your preferred storage device.
Adobe Spark
This is another top video-combining tool you can use for your TikTok videos. It allows you to make quick edits on your TikTok videos. Of course, you have to own a TikTok account to use this video editor. However, using it is quite simple, and the steps outlined below show just that.
- Go to the Adobe Spark website and sign-in; you can create an account if you don’t have one.

- Navigate to the ‘project’ tab on the homepage and select ‘create a project.’

- Click the ‘videos’ tab and choose a template you prefer. You would also have to give your video a title. Once you’re done, choose ‘start from scratch’ to begin.

- It would take you to the video editor; hover over an empty slide and click ‘video’ to choose the video you would like to upload.

- Adobe Spark allows you to trim the length of the video if you think it’s too long. Repeat the previous step to add another video again.

- Once you’ve added all the videos you want, you can rearrange them in the proper sequence.

- Now you can save your video; click the ‘download’ button, and Adobe Spark will automatically download the newly combined video to your device.
7 Tips and Tricks You Should Know for TikTok Videos Creation
Although most tips focus on how you can redo your video to focus on the video-sharing platform, we have some tips and tricks you should know for TikTok video creation that focuses on combining videos. If you’re always having drafts or would like to enhance your videos, these cool tips will serve as a quick method for you.
- Combine Photos and Videos
TikTok allows you to combine videos and images. This comes in handy when trying to make a point on your video. For example, you’re probably wondering how you can add a foundation picture to your video. It is quite simple if you follow the steps below.
- Launch the TikTok app and click the ‘+’ button at the end of the screen.
- Record your video and select the ‘impacts’ screen at the end of the screen after a few moments.’
- Choose ‘transfer your picture to change foundation from the options that pop up.’
- Continue recording your video, and the chosen picture will become your video foundation.
- Add Overlay to TikTok Videos
Another tip we have is how to add overlay videos on TikTok without third-party editing apps; follow the steps below.

- After chronicling your videos, you can choose to add a melodic overlay, channels, and many more enhancements like stickers and text overlays.
- Once you add this to your video, choose next, and it will take you to the next page, where you can add subtitles, hashtags, and many more before you post.
- How to Add Videos to TikTok After Posting
Apart from making videos, you can also make two-part duets on TikTok. Additionally, TikTok allows you to record with different formats; follow the steps below.
- Firstly, go to the video you would like to edit and click the three-dot icon to edit your video.
- Once you edit the video by changing the format or adding another part, save your video, and TikTok allows you to post your video again.
- Place Videos Side by Side
Another tip we have in store for you is how you can place videos side by side on TikTok; the steps below help you achieve this.

- First, click the ‘star’ button at the side of your screen and select ‘add to favorite.’
- Now, record a second video on your TikTok or simply import it if you have already recorded the video.
- Download the first video, and you can use the combining feature on TikTok to make the video run next to each other
- Once you’re satisfied, you can now proceed to post your video.
- Learn to Perform Duets on TikTok
Another thing you can do on TikTok is to duet with other TikTok users

- To do this, go to TikTok and find the video you would like to duet
- At the end of the screen, click on the ‘share’ option and choose ‘duet’ from the option available
- Tap the red icon at the middle of the screen to start recording your video; your video usually appears on the left while the other video shows up in the right corner.
- Once you’re done recording, click the checkmark icon at the top of the screen to save your recording.
- Replay the duet to ensure you like the result; you can add effects, stickers, and other editing features you want to the video before you post.
- Set a Timer for Recording Videos
One of the ways you can record multiple scenes for a video is by using the recording tool; the steps below show you how to do that.

- Once you launch TikTok and click on the camera icon
- Tap the ‘clock’ icon at the side of the screen; you can choose between 3-10 seconds
- Click the red circle to start recording
- A countdown on the screen gives you time to get ready to record. Once the countdown gets to zero, TikTok starts recording your video.
- Use the Stitch Feature
Stitched videos allow you to add the first maker’s details in the new video; these details connect TikTok users to the first video. It is quite easy to stitch one video to another. Simply navigate to the ‘privacy and settings’ tab, and you can enable or disable stitching for your TikTok videos; you can also turn this on and off for your videos. Follow the steps below to stitch your TikTok videos.

- Open the TikTok app and choose the video you would like to stitch
- Now choose the three-dot icon and select the ‘advanced’ option
- You can stitch up to five seconds from the video you would like to stick to add to the current video.
- You can add recordings to the stitched option and then stitch them together to post.
Final Thoughts
Whether you’re a stranger to the TikTok scene or a professional, TikTok is quite popular as a video-sharing platform. However, you don’t always get it right the first time, and you might want to combine various videos into one perfect option to upload. Apart from the two practical ways you can do this on TikTok, we also share three third-party apps you can use to achieve this. You can also explore the seven tips shared in this article to maximize your potential on the TikTok app.

- Once you do this, you can advance to recording the clips you want.
- Click the timer button at the top of the screen to choose how long you would like to shoot your video; you can select 5 seconds, 10 seconds, etc.
- Before starting the countdown, drag the red bar by the audio track to where you want the clip to end.
- You can repeat the recording many times to have many clips recorded.
- Once you’re done recording, click the ‘adjust clip’ icon to adjust your video clips.
- After adjusting, hit the ‘done’ button and have your combined video.
You can go ahead and share with your followers and the general public.
Use the Combining Function
The second practical way you can combine TikTok videos into a single video is by using the app’s built-in combining function. To find out how you can use this technique for your videos, follow the steps outlined below.
- Once you have the TikTok app on your device, open it and go to the menu bar. Select the ‘+’ button; it should be at the end of the screen.
- Instead of recording through the TikTok camera, choose the ‘upload’ button, and it will take you to your device storage, where you can select the videos you would like to upload on TikTok.

- Now, choose the ‘select multiple’ option at the left corner of your screen. Once you select this option, you can select different videos you would like to join together. Once you are satisfied with your choice, hit the ‘next’ button.
- TikTok will allow you to combine the videos for up to 60 seconds. You can customize the video arrangement according to your preference.
- If you’re satisfied with the final video result, click the next option, and you can share it on your TikTok account.

How to Combine Draft Videos on TikTok
Now that you know how to combine videos on TikTok, you’re probably wondering about the best way to combine the drafts you saved on your TikTok account. Maybe when you made the videos, you were unmotivated to upload them. However, now you want to combine the videos into a single video and don’t know how to proceed. So, follow the steps outlined in this article to get it done.
Step 1: Go to Your Drafts
To begin, you have to launch the TikTok app and click on the ‘me’ option at the end of the screen. Then, it will redirect you to your profile, choose the ‘drafts’ category, and take you to the videos you saved on the app and never published.
Step 2: Update Privacy Settings
Now you want to change the privacy setting in the ‘who can watch this video’ category to ‘just me.’ After updating, tap on ‘post.’ After posting your video, you can change the setting by clicking on ‘change cut.’ You can reduce the video length and add new videos to combine TikTok drafts.
Step 3: Add Filters and More Effects
You can also add music to your newly combined video and texts, stickers, filters, and many more effects to enhance your video.
Step 4: Save Draft

Once again, save the video as a draft, but you’ll have to choose a thumbnail for your video. You can choose any part of the video to become the thumbnail. Then, post your video by navigating to the home screen again and clicking the plus icon to post; select your video and post.
Use Third-Party Tools to Combine Videos for TikTok Before Uploading
There are several tools you can use to combine TikTok videos. While there is software, some are available online. Since TikTok gives limited editing functions, most TikTokers want a rich editing tool that they can use to edit and combine videos for TikTok. Below are three user-friendly software you can use to successfully edit and combine your videos.
Wondershare filmora
This is the best editing software you can find; it makes it relatively easy to combine your TikTok videos into a single video. Not only does Filmora allow you to combine videos before you upload them, but you can also use its host of editing tools to enhance your video. You can use this software for any type of video like slideshows, documentaries, photomontages, and many more. It is quite easy to use, irrespective of your editing skills, because of its user-friendly interface.
It is a strong contender in the editing world because it offers different effects, overlays, titles, transitions, etc. You can also upload your video directly to TikTok and other social media platforms. With many themes available on the platform, you can create a slideshow right on the platform. Follow the steps outlined below to combine multiple videos on Wondershare Filmora.
- First, you have to download the app on your device; you can do this from the official website. Install the app afterward, and the launch to begin.
- Next, select ‘create new project,’ It will take you to the media screen. Click the ‘add’ button and choose ‘import media file.’

- You can then navigate to the folder with the videos you want to combine and choose.
- Afterward, drag the videos to the timeline. Filmora will ask you if you want to match the project to the resolution of your media; choose to ‘match to media’
- This will make the videos into one. You can rearrange the video clips to your preference; simply click and drag the videos to reposition them.

- You can also use the effects, filters, transitions, and overlays on Filmora to enhance your TikTok video.

- Once everything looks good, click on the ‘export’ button at the top of the screen.
- You can then rename your video and choose where you would like to save the video. Filmora also allows you to adjust your video’s resolution and bitrate before clicking the ‘export’ option.

VideoProc Converter

Another third-party app you can use to edit your video and combine videos for TikTok is VideooProc Converter. It allows you to merge several videos in a lossless manner, and you can also cut, trim, rotate and resize your videos to your preference. You could also change the format and any other requirements you would like to tweak. Some beginners might find this video editor hard to navigate. However, the steps below should make the process easier for you.
- Firstly, download VideoProc Converter and launch the software.
- Import your TikTok videos and select and output format for your video; there are many options to choose from.

- You can then start editing each video clip separately. You can resize, trim and crop your videos. You can also apply effects, rotate the videos, and add subtitles.

- Next, go to the end of the screen and click the ‘toolbox’ option, select ‘merge,’ and you can choose the videos you would like to combine.

- After combining the videos, you can save the video and export it to your preferred storage device.
Adobe Spark
This is another top video-combining tool you can use for your TikTok videos. It allows you to make quick edits on your TikTok videos. Of course, you have to own a TikTok account to use this video editor. However, using it is quite simple, and the steps outlined below show just that.
- Go to the Adobe Spark website and sign-in; you can create an account if you don’t have one.

- Navigate to the ‘project’ tab on the homepage and select ‘create a project.’

- Click the ‘videos’ tab and choose a template you prefer. You would also have to give your video a title. Once you’re done, choose ‘start from scratch’ to begin.

- It would take you to the video editor; hover over an empty slide and click ‘video’ to choose the video you would like to upload.

- Adobe Spark allows you to trim the length of the video if you think it’s too long. Repeat the previous step to add another video again.

- Once you’ve added all the videos you want, you can rearrange them in the proper sequence.

- Now you can save your video; click the ‘download’ button, and Adobe Spark will automatically download the newly combined video to your device.
7 Tips and Tricks You Should Know for TikTok Videos Creation
Although most tips focus on how you can redo your video to focus on the video-sharing platform, we have some tips and tricks you should know for TikTok video creation that focuses on combining videos. If you’re always having drafts or would like to enhance your videos, these cool tips will serve as a quick method for you.
- Combine Photos and Videos
TikTok allows you to combine videos and images. This comes in handy when trying to make a point on your video. For example, you’re probably wondering how you can add a foundation picture to your video. It is quite simple if you follow the steps below.
- Launch the TikTok app and click the ‘+’ button at the end of the screen.
- Record your video and select the ‘impacts’ screen at the end of the screen after a few moments.’
- Choose ‘transfer your picture to change foundation from the options that pop up.’
- Continue recording your video, and the chosen picture will become your video foundation.
- Add Overlay to TikTok Videos
Another tip we have is how to add overlay videos on TikTok without third-party editing apps; follow the steps below.

- After chronicling your videos, you can choose to add a melodic overlay, channels, and many more enhancements like stickers and text overlays.
- Once you add this to your video, choose next, and it will take you to the next page, where you can add subtitles, hashtags, and many more before you post.
- How to Add Videos to TikTok After Posting
Apart from making videos, you can also make two-part duets on TikTok. Additionally, TikTok allows you to record with different formats; follow the steps below.
- Firstly, go to the video you would like to edit and click the three-dot icon to edit your video.
- Once you edit the video by changing the format or adding another part, save your video, and TikTok allows you to post your video again.
- Place Videos Side by Side
Another tip we have in store for you is how you can place videos side by side on TikTok; the steps below help you achieve this.

- First, click the ‘star’ button at the side of your screen and select ‘add to favorite.’
- Now, record a second video on your TikTok or simply import it if you have already recorded the video.
- Download the first video, and you can use the combining feature on TikTok to make the video run next to each other
- Once you’re satisfied, you can now proceed to post your video.
- Learn to Perform Duets on TikTok
Another thing you can do on TikTok is to duet with other TikTok users

- To do this, go to TikTok and find the video you would like to duet
- At the end of the screen, click on the ‘share’ option and choose ‘duet’ from the option available
- Tap the red icon at the middle of the screen to start recording your video; your video usually appears on the left while the other video shows up in the right corner.
- Once you’re done recording, click the checkmark icon at the top of the screen to save your recording.
- Replay the duet to ensure you like the result; you can add effects, stickers, and other editing features you want to the video before you post.
- Set a Timer for Recording Videos
One of the ways you can record multiple scenes for a video is by using the recording tool; the steps below show you how to do that.

- Once you launch TikTok and click on the camera icon
- Tap the ‘clock’ icon at the side of the screen; you can choose between 3-10 seconds
- Click the red circle to start recording
- A countdown on the screen gives you time to get ready to record. Once the countdown gets to zero, TikTok starts recording your video.
- Use the Stitch Feature
Stitched videos allow you to add the first maker’s details in the new video; these details connect TikTok users to the first video. It is quite easy to stitch one video to another. Simply navigate to the ‘privacy and settings’ tab, and you can enable or disable stitching for your TikTok videos; you can also turn this on and off for your videos. Follow the steps below to stitch your TikTok videos.

- Open the TikTok app and choose the video you would like to stitch
- Now choose the three-dot icon and select the ‘advanced’ option
- You can stitch up to five seconds from the video you would like to stick to add to the current video.
- You can add recordings to the stitched option and then stitch them together to post.
Final Thoughts
Whether you’re a stranger to the TikTok scene or a professional, TikTok is quite popular as a video-sharing platform. However, you don’t always get it right the first time, and you might want to combine various videos into one perfect option to upload. Apart from the two practical ways you can do this on TikTok, we also share three third-party apps you can use to achieve this. You can also explore the seven tips shared in this article to maximize your potential on the TikTok app.
7 Tips to Create Teaching Videos
For many teachers, online classes begin with a live recording of their lectures or lessons. Sending the recorded lectures to the students allows them to pause the video and rewatch it multiple times.
Recording lectures before class can assist lecturers in filling gaps that may arise due to your absence. You don’t have to worry about missing lessons if you’re going on vacation or to be sick for an extended time.

You can keep the class continuing even if you are absent by using pre-recorded lectures and sending the file to the class, so they know the lesson. With the help of an online lecture software or tool available on the internet, you can download it free.
These are the steps in creating an instructional video in your classes:
Know Your Target Audience
Before you record the video to present in your classes, you need to know your target audience. We all know that some teachers handle grade school, and some handle high school level. We need to discover what kind of knowledge or skills your students hope to gain in your class learning the topic you presented. Try to use your book, or maybe add some research and then use that information to help you discuss with your students.

Things you need to remember before you proceed to the next step:
- Who is your audience? We, educators, already know our audience. It depends on the school and what level we are going to handle. It’s either grade school level or high school level.
- What is your topic/s? There are a lot of topics and subjects in the field of teaching but try to pick only one topic or subject to present to your class. For example, Computer Subject because I’m a computer teacher. I will be using this subject or topic about computers to create my instructional video for the class.
- What is the learning objective or learning outcome of your video? The learning objective of your video is the outcome that captures precisely what knowledge, skills, and attitudes the students should be able to exhibit following the instructions.
- How will your video benefit your audience? The students will learn and understand the lesson you are discussing, helping them gain knowledge of that subject to answer all the assignments, quizzes, or maybe an activity you will give them.
Write a Script
Once you know your audience and have the topic you need, it’s time to write a script. Think about your plan for presenting your video in your classes.

- Here are a few more writing script tips to help you in your classes:
Go to the mirror and practice. This tip may help some teachers instead of calling their loved ones and getting feedback about the script they write.
- Explain what you’re doing and why you’re doing it. You are not only presenting the topic and explaining it but also showing the class what the topic is all about, which will be suitable for your students. Present some examples, pictures, or videos for them to know better what your discussion is all about.
- Knowing your script 100% is important. Make sure that you already know your script before you record. If you forget something or make a mistake, go back to the beginning and repeat it correctly. Remember as a teacher that we are not allowed to make mistakes in the eyes of the students. So, double-check everything before you record it and show it to the class.
Record the Narration
After writing your script, let’s try to record the narration. You don’t need any application software where you can record the narration. Simply using your mobile phone and having a good background is enough.

Using a microphone to record the narration is necessary. Getting those headphones with one connected microphone is good. Some of that has noise cancellation, providing a much better sound quality while recording and ensuring that your videos don’t contain background noise. Then, find a quiet place to record. Explain to your family members that no one will ever talk loud or shout while you are recording the narration.
Once you are ready to hit that record button, speak clearly. Nobody is perfect, so it’s ok if you make a mistake. You don’t need to start over, just pause and start again. You can remove the error or mistake by editing your finished product. Make sure your narration will be the same on the screen while recording your video.
Record and Edit your Video
The first thing you need to do in recording your video is to clean up your computer screen and close all the unnecessary applications. You need to turn off also the notifications that will pop up on your computer before you start recording. You can also add your recorded narration to your video.
Here are a few simple tips for editing your video:
- Add some interactive elements like motions to highlight key points of your video.
- Adding music to your video is optional but may elevate a decent video to the next level. Pick something cheery. You want your audience to feel good while learning.
The Video Duration
I’d say it’s one of the first things students look at before they click the ‘play’ button of the video. It will benefit both teacher and the students if the video is brief and direct to the point. Some students are more likely to want a short video, or maybe let’s focus on the time between 20 - 30 minutes video, where they can watch and learn on any platform, anytime. After that, you can add time by adding other pieces of information and giving activities and assignments.
Be Yourself
Be yourself, and don’t be afraid to make mistakes sometimes. Make sure that your personality shines throughout the video. Try to research how some teachers or maybe some speakers speak naturally and have a conversational manner with an enthusiastic tone.
When you are recording yourself talking, look right at the camera so students can feel eye contact with you, even if it is online. Sometimes we forget the words we need to say to the class, so try to prepare a note next to your webcam. The messages you prepare will help you don’t look away from the camera all the time. Don’t pretend to the class that you’re reading something, just talk naturally as you would in real classrooms.
Sharing your Video
Instead of sharing your recorded video with your students, you can also share it directly to online video platforms like YouTube, Facebook, and Vimeo or save the video as a local file to upload on a social media platform. They can go there and watch the video. You can also upload your file to the school learning management system like Google Classroom. Please take note of this; before sending the recorded video to your students, share it with first to a few people to get some video feedback about what you created. This might help you ensure that your message is clear and that your video accomplishes your goals for your students.
There’s a chance that your recorded video doesn’t meet your requirements or you are not satisfied with that for the first time. Don’t worry; try it again, even if you recorded it once or several times. You need to trust yourself by doing it because we are teachers; we are doing our best for the students to learn something from us.
Free Download For Win 7 or later(64-bit)
Free Download For macOS 10.14 or later
Free Download For macOS 10.14 or later
Also read:
- Updated In 2024, Step By Step Guide on Using Media Player Classic To Rotate A Video
- New Which 10 Best Video Editing Online Makers Is Worth Your Attention, In 2024
- Updated 2024 Approved How To Remove Audio From Video
- Updated 2024 Approved A Vlog Has Many Elements to Answer. While Setting up Ideas for It, There Are Several Things Into Which You Should Look. This Article Presents a Picture of How a Vlog Video Is Made Perfectly
- Updated In 2024, Applying and Creating Gif Background on Your Devices and Presentations Is Not Hard. Read Below to Learn How to Apply a GIF Background on All Devices
- Updated 2024 Approved Right Tools for Converting 60FPS Frame Rate in Videos
- New Best Way to Freeze-Frame in Final Cut Pro
- Updated 2024 Approved Top 5 Free Online Video Filter Editors
- Updated How to Apply Video Filters Mobile and Desktop for 2024
- New 2024 Approved 4 Methods for Rotating Your GoPro Videos Professionally
- Updated Do You Want to Print Designs Onto Your Garments or Other Fashion Accessories? Find Out How to Create a Screen Print Effect in Photoshop to Give Your Text or Graphics a Vintage or Retro Look for 2024
- Updated In 2024, This Easy Hack Using Wondershare Filmora New Masking Feature Will Be a Great Addition to Your Next Horror Video Content
- Updated In 2024, Fascinated About Exploring Your Graphic Creativity by Experimenting with Designing Slideshow Presentations on a Variety of Software Programs? Stay Here to Get the Know-How of Using Clideo
- 2024 Approved Here Is a Guide on How You Can Resize Videos via Handbrake and Wondershare Filmora. The Former Is a Lightweight Tool Perfect for Batch Resizing Videos, While the Latter Is a Powerful Free Video Editing Software
- New This Article Will Focus on Understanding the Secret Tips in Wondershare Filmora that You Can Use to Edit Videos Faster and More Efficiently
- Have You Ever Tried to Remove the Transparent Background of Gif and Failed? This Blog Will Help You with This Issue. Also, We Will Discuss How to Create Animated Gifs and the Best Tools for Them
- Do You Need to Create a Video for Your Business Online but Feel You Do Not Have the Skill and Time to Do That? Try Out These AI Video Generators that Will Work for You to Carry Out Tasks Effectively for 2024
- How to Make an Intro Video Easy Solution for 2024
- New Exploring the Best Slow-Motion App for 2024
- New The Best Tools for Converting Slides to Digital - 2024 Review
- You Can Make Attractive Videos by Adding Text Behind Objects. This Article Will Explain How to Use Wondershare Filmora to Create These Videos for 2024
- 2024 Approved 20 Best Text To Speech Software Windows, Mac, Android, iPhone & O
- Best Video Format Converter for PC and Online
- 2 Ways to Fade in Text in Premiere Pro
- New How to Add Filter to Video Online
- In 2024, Read on to Learn About Multi Object Tracking, Its Types, and Requirements. Youll Also Learn About the Different Approaches Toward Object Tracking
- In 2024, 15 Camera Shake Preset for Adobe Premiere Pro
- Updated Whats an AV1 Format and How Does It Impact Your Life, In 2024
- Updated Are You Aware that AV1 Has the Potential to Change the Way We Watch Videos Online? Read on to Learn More About AV1 and How It Could Impact Your Life for 2024
- Art of Time Manipulation A Guide to After Effects Slow Motion Mastery
- Updated | Top GIF to MP4 Converters
- New In 2024, Learning Unique Ways to Slow Down Time Lapse on iPhone
- New How to Use Motion Tracking in Video Editing for 2024
- Dose Life360 Notify Me When Someone Checks My Location On Samsung Galaxy S21 FE 5G (2023)? | Dr.fone
- How to remove Oppo Find N3 Flip PIN
- In 2024, Top 4 SIM Location Trackers To Easily Find Your Lost Nokia C12 Pro Device
- In 2024, How To Pause Life360 Location Sharing For Poco F5 Pro 5G | Dr.fone
- New What Is an AI Video Editor, In 2024
- Here are Different Ways to Find Pokemon Go Trainer Codes to Add to Your Account On Apple iPhone SE | Dr.fone
- In 2024, Fake Android Location without Rooting For Your Tecno Pova 5 | Dr.fone
- In 2024, Tips And Tricks To Tell if Your iPhone XR Is Unlocked
- New In 2024, Ultimate Guide to Animated Characters Drawings
- Troubleshooting Error Connecting to the Apple ID Server From Apple iPhone 12 mini
- Does Apple iPhone 15 Pro Max Have Find My Friends? | Dr.fone
- In 2024, Why Apple Account Disabled On your Apple iPhone 15 Plus? How to Fix
- How do i add my signature to .dotm file
- The Easiest Methods to Hard Reset Vivo X Fold 2 | Dr.fone
- In 2024, 5 Ways to Transfer Music from Vivo T2 5G to Other Android Devices Easily | Dr.fone
- In 2024, Tips And Tricks To Tell if Your iPhone 12 mini Is Unlocked
- 11 Best Location Changers for Vivo Y100 5G | Dr.fone
- Quick Fixes for Why Is My Vivo S17e Black and White | Dr.fone
- Which is the Best Fake GPS Joystick App On Nokia C110? | Dr.fone
- In 2024, Best Ways to Bypass iCloud Activation Lock on iPhone SE/iPad/iPod
- In 2024, Pattern Locks Are Unsafe Secure Your Realme V30 Phone Now with These Tips
- In 2024, Fake the Location to Get Around the MLB Blackouts on Vivo X Flip | Dr.fone
- Easy Guide to Vivo V29 FRP Bypass With Best Methods
- How to Change/Fake Your Realme C67 5G Location on Viber | Dr.fone
- Easy Ways to Manage Your Realme V30T Location Settings | Dr.fone
- How to Unlock iPhone SE (2020) Passcode Screen? | Dr.fone
- How To Transfer Data From Apple iPhone 11 To Other iPhone 15 Pro Max devices? | Dr.fone
- Here are Some Pro Tips for Pokemon Go PvP Battles On Gionee F3 Pro | Dr.fone
- In 2024, How to Unlock iPhone 15 Passcode without Computer? | Dr.fone
- Fix App Not Available in Your Country Play Store Problem on Realme GT Neo 5 | Dr.fone
- How to Reset Motorola Moto G23 without Losing Data | Dr.fone
- Simple ways to get lost music back from F23 5G
- How to Factory Reset Vivo Y28 5G If I Forgot Security Code or Password? | Dr.fone
- Title: New VSCO Slow Motion
- Author: Morgan
- Created at : 2024-05-19 05:12:10
- Updated at : 2024-05-20 05:12:10
- Link: https://ai-video-editing.techidaily.com/new-vsco-slow-motion/
- License: This work is licensed under CC BY-NC-SA 4.0.


