
:max_bytes(150000):strip_icc():format(webp)/0010_21-best-teen-movies-on-netflix-5104880-b0e9832746854cabb4f33cafef96214b.jpg)
New Want Make a Slide Show Video? Heres How
Want Make a Slide Show Video? Here’s How
Want Make a Slide Show Video Here’s How
An easy yet powerful editor
Numerous effects to choose from
Detailed tutorials provided by the official channel
Dear readers you don’t have to worry a bit, in this article we bring you the best slideshow video maker and easy ways using which you can custom the templates for your presentation in your way.
In this article
01 8 Best Slideshow Video Templates
02 [10 Best Video Slideshow Maker](#Part 2)
03 [5 Easy Steps to Make a Slide Show Video](#Part 3)
04 [How to Custom Templates for Google Slides Presentation](#Part 4)
Part 1 Best Slideshow Video Templates
A slideshow video could be an effective way of presenting your point to your audience. This becomes super easy when you use a good template to create your slide show video. Here are 8 best slideshow video templets which you can give a try
01Instagram Slideshow
This slide show video template is best for creating videos for Instagram and other social media platforms.

02Clean Slideshow Template
This one is suited to create video slide show for family purposes. This template could also be engaged in a clean slideshow presentation for your office.

03Parallax Scrolling Slideshow Template
This is one of the most video templates which you can use for your slide show video. This template has various after-effects which can take your presentations to a different level.

04Modern Tie Slideshow Template
If you are in a business or corporate job then give this slideshow video template a try. With a unique, tiled look and a 3D tile drop-down effect, your videos will impress everyone.

05Minimal Slideshow template
Minimal slide template is best for business presentations or product promotion. Here you can use creative text images and graphics to promote your product.

06Sweet Memories Cinematic Slideshow
If you want the best template for presenting your memories, marriages, anniversaries, emotions etc then Sweet Memories Cinematic Slideshow is the one you need.

07Motiongray Slideshow Templates
If you want to turn your adventure images and videos into an impressive slide show video then this is a must try template for you.

08Stylish Spinning Columns Slideshow Template
This template is best suited for high-end business projects. Here you will have image placeholders paired with a modern spinning column transition effect to make the slideshow video outstanding.

09Fast Slide Slideshow Video Template
If you want to create a high paced slide video show with various concepts explained in it then go for the Fast Slide Slideshow Video Template.

10Creative Slideshow Template
For the ones who want dynamic, fast-paced animation style and bold typography in their slideshow video this is the best-suited one for them.

Part 2 10 Best Video Slideshow Maker
After knowing the best templates for your slideshow video you, may be curious to know about the slideshow video maker. Here, after a lot of research, we have come up with the list of 10 best slideshow video maker which can make your professional life easy. Check the list
01PhotoStage
PhotoStage by NHC Softwares is one the best online software to create video slide shows online. This tool is specially very helpful in creating personal and commercial presentations.
Key Features - Key features of PhotoStage includes user oriented interface, animations, and music tracks (300 +). It has inbuilt Audio editing tools and a built-in music collection. If you use this software in a paid version then you can unlock its thousands of animation effects and transitions. You can also export your slide show between PC, mobile, Web etc.
Price - PhotoStage PRO $70.
Rating - 4 stars

02SmartShow 3D
The next slideshow video maker to feature on our list is SmartShow 3D.
This software is known for its very easy to use interface with power-packed and loaded features.
Key Features - It has more than 200 templates for use of every kind. This software enables you to use 300+ transitions, special effects, 3D collages, and nature effects with animations and graphics. You can add music to your slideshow video from more than 200 music tracks with precise volume adjustment.
Price - Standard version cost $ 39.90 and the Deluxe version costs $ 59.50 (10 days free trial)
Rating - 5 stars

03Magix PhotoStory
If you have a bit of experience in making slideshows then you can take your slideshow making experience to another level using this software. A custom animation module and an integrated photo editing tool of Magix PhotoStory make it stand out in our list.
Key Features - 300+ library of effects coupled with a huge collection of music tracks. 100 + video templates and graphics. This software has Built-in filters for photo enhancement with the picture-in-picture option.
Price - $ 49.99 ( 30 days free trial )
Rating - 4.5 stars

04PTE AV Studio
The best suited online tool to make a slide show video is PTE AV Studio. If you want to create smooth and fluid visual slideshows then try this software once. Here you can combine pictures, videos, and audio files into sleek slideshows and impress your boss and colleagues.
Key Features - PTE AV studio supports 100+ effects and templates. It has the best video, photo, and multitrack sound editing tools among competitors. You can create custom animations and graphics if you want. With a huge collection of masks, filters, and text styles you can create high resolution slideshow videos.
Price - Standard Version costs $ 69 while and Pro version costs $ 139 (30 days free trial)
Rating - 4 stars

05Adobe Premiere Pro
If you are a regular slideshow user then no doubt you would know about Adobe Premiere Pro. Those who want easy to navigate the software with hundreds of features then try this one. The only draw [back of this software is that it has no inbuilt templates but don’t worry you can download thousands of templates from the internet for free.
Key Features - Animations could be added to slides using keyframes. Efficient video and audio editing and creating tool. Animations and graphics add a cherry to the cake. Advanced photo enhancement and filters to make your photos and slideshows stand out.
Price - $ 239.88 a year (30 days free trial)

06CyberLink MediaShow
Cyberlink MediaShow is one of the earliest software that came in the field of slideshow video creation. This software enables you to create awesome slideshows, movies, and screensavers. Cyberlink MediaShow has enough features to make eye-catching videos and still it is one of the easiest ones to use. If you aim to create easily simplistic videos then go for this software.
Key Features - Descent collection of transitions with a built-in photo editing module. It is equipped with face recognition and tagging feature. You can integrate social media platforms like Facebook and share to them directly from the software.
Price - $ 49.99 ( 30 days free trial )
Rating - 3.5 stars

07AquaSoft Slideshow
For users who want to create colourful and dynamic family-themed slide show videos then AquaSoft Slideshow is the software to try. After a review from thousands of users, this software has made a place in our featured list. The user-friendly interface with dozens of eye-catching effects and animated text make it fun to use. It allows you to create colourful, text-filled videos and so on.
Key Features - It is powered packed with more than 200 effects and transitions and hundreds of text options. It supports almost all the formats even the older ones like CDs and DVDs. Smooth and advanced editing tools for a better experience.
Price - Premium costs $ 57.00 while Ultimate costs $ 97.00 ( 30 days free trial version)
Rating - 4 stars

08Kizoa
This software helps you to create slide show videos which can be played on any screen. This is basically an online video creating and editing tool but it provides formats for creating slideshows too. You can use this tool on whatever platform you have like a tablet, TV, smartphone, computer screen etc.
Key Features - Intelligent cropping tool of Kizoa helps you to create and edit world-class finest images for your slideshow video. The created slideshow could be downloaded in various formats like MP4, AVI, MOV, etc. You can directly share the video to online platforms.
Price - Starter $ 29.99, Creator $ 49.99 , Professional $ 99.99, and Business $ 299.99
Rating - 4 stars

Part 3 5 Easy Steps to Make a Slide Show Video
Guys, now you know the best templates and best slideshow video makers but now the question comes “how to make a slideshow video?”. If you are confused and don’t have any clue about making a slideshow video then just get your google slides and follow the steps explained below.
Step 1: Get Free Screen Recorder
Firstly you have to start with launching Free Screen Recorder. You can use any screen recorder of your choice. Create your account on the screen recorder and get started.
Step 2. Record Your Google Slides
Noe on the screen recorder “Drag and drop” the sides of this box that appears on your screen to fit your slides into it. Select a suitable size for your video ( preferably 720 p).
Now on the left corner of the screen, you will see various controls using them you can perform various functions like start and stop recording, recording to webcam, selecting the size of the video, add audio and narration.
After performing all the functions click on “Record” to record your slides into video.
Step 3. Finishing of Recording
If you are satisfied with the video then click on the blue button to stop recording, and select “done” to save your video. However, if you don’t like it you can restart the process anytime.
Step 4. Editing of the Video
Once you have completed the recording of the video you can edit it according to your requirements. You can add or delete overlays, video sounds, narrations, graphics, green screen etc.
Step 5. Publish and Share your Slideshow video
After completing the editing and creating work click on “Publish”. You can save and publish your video directly on a YouTube channel, or Google Drive folder, or save your video as a file. And you can share it on any social media platform.
Part 4 How to Custom Templates for Google Slides Presentation
Just imagine, how easy would it have been if you could create the templates for your slide show videos. This would have made your professional life so easy. If you too are looking for such an online tool which provides you with the feature for creating custom templates for your slideshow video then you should try Wondershare’s Wondershare Filmora Video Editor Video Editor. Don’t get confused with the name it’s a video editor but has awesome features for creating custom slideshow videos. Following are some of the highlighting features of Filmora Video Editor.
Easy to use for beginners.
User-friendly interface and bunches of editing tools.
Library (royalty-free) containing hundreds of audio options.
Hundreds of templates, transitions, and filters to make your video eye-catching.
Here is a brief tutorial to use Wondershare Filmora Video Editor to create custom templates for your slideshow video.
For Win 7 or later (64-bit)
For macOS 10.12 or later
Step 1. Adding Photos and Videos
Open Filmora and click on the “Import menu”. Here select the photos and videos you want to use and click on “OK” to begin the importing.

Step 2. Positioning the Media Files on Timeline
Click on “File menu” > “Preferences option” > “Editing tab” > “Photo Placement drop-down menu”. Here you can perform various functions like zooming of images, setting the duration of images, transitions and effects, crop and fitting.

Now if you want to add more images and videos repeat steps 1 and 2.
Step 3. Use the transitions
Use transitions for smooth transitioning from one slide to another. Click on “Transition Setting Window” and set the duration for the transition.

Step 4. Apply Filters and Overlays
Go to “ Effect Tab” and select suitable filters and overlays for your video.

Step 5. Add Motion Graphics Element (Optional Step)
If you wish you can create motion graphics elements for your video. Click on the “ Elements tab” and select the best suited for you.

Step 6. Record Voiceover and create a Soundtrack
Go to “Media tab” > “ Record drop-down “ > “ Record Voiceover feature” to record and create soundtracks and voiceovers.

Step 7. Exporting the Slideshow Video
After making all the adjustments in the video click on the “Export” and wait for the Export window to appear on the screen. Now here you can select the output format of the file and the location for exporting your slideshow video.

● Ending Thoughts →
● Dear readers, now it’s time, to sum up this article. We hope our efforts have made things simple for you. We have tried to bring you the best online templates available online.
● You can now read our article and learn about the best slideshow video makers available online. You can use any one of them as per your need.
● If you want to create custom templates for your slideshow video, then we recommend to try Wondershare Filmora Video Editor for easy and effective custom template creation.
Dear readers you don’t have to worry a bit, in this article we bring you the best slideshow video maker and easy ways using which you can custom the templates for your presentation in your way.
In this article
01 8 Best Slideshow Video Templates
02 [10 Best Video Slideshow Maker](#Part 2)
03 [5 Easy Steps to Make a Slide Show Video](#Part 3)
04 [How to Custom Templates for Google Slides Presentation](#Part 4)
Part 1 Best Slideshow Video Templates
A slideshow video could be an effective way of presenting your point to your audience. This becomes super easy when you use a good template to create your slide show video. Here are 8 best slideshow video templets which you can give a try
01Instagram Slideshow
This slide show video template is best for creating videos for Instagram and other social media platforms.
02Clean Slideshow Template
This one is suited to create video slide show for family purposes. This template could also be engaged in a clean slideshow presentation for your office.
03Parallax Scrolling Slideshow Template
This is one of the most video templates which you can use for your slide show video. This template has various after-effects which can take your presentations to a different level.
04Modern Tie Slideshow Template
If you are in a business or corporate job then give this slideshow video template a try. With a unique, tiled look and a 3D tile drop-down effect, your videos will impress everyone.
05Minimal Slideshow template
Minimal slide template is best for business presentations or product promotion. Here you can use creative text images and graphics to promote your product.
06Sweet Memories Cinematic Slideshow
If you want the best template for presenting your memories, marriages, anniversaries, emotions etc then Sweet Memories Cinematic Slideshow is the one you need.
07Motiongray Slideshow Templates
If you want to turn your adventure images and videos into an impressive slide show video then this is a must try template for you.
08Stylish Spinning Columns Slideshow Template
This template is best suited for high-end business projects. Here you will have image placeholders paired with a modern spinning column transition effect to make the slideshow video outstanding.
09Fast Slide Slideshow Video Template
If you want to create a high paced slide video show with various concepts explained in it then go for the Fast Slide Slideshow Video Template.
10Creative Slideshow Template
For the ones who want dynamic, fast-paced animation style and bold typography in their slideshow video this is the best-suited one for them.
Part 2 10 Best Video Slideshow Maker
After knowing the best templates for your slideshow video you, may be curious to know about the slideshow video maker. Here, after a lot of research, we have come up with the list of 10 best slideshow video maker which can make your professional life easy. Check the list
01PhotoStage
PhotoStage by NHC Softwares is one the best online software to create video slide shows online. This tool is specially very helpful in creating personal and commercial presentations.
Key Features - Key features of PhotoStage includes user oriented interface, animations, and music tracks (300 +). It has inbuilt Audio editing tools and a built-in music collection. If you use this software in a paid version then you can unlock its thousands of animation effects and transitions. You can also export your slide show between PC, mobile, Web etc.
Price - PhotoStage PRO $70.
Rating - 4 stars
02SmartShow 3D
The next slideshow video maker to feature on our list is SmartShow 3D.
This software is known for its very easy to use interface with power-packed and loaded features.
Key Features - It has more than 200 templates for use of every kind. This software enables you to use 300+ transitions, special effects, 3D collages, and nature effects with animations and graphics. You can add music to your slideshow video from more than 200 music tracks with precise volume adjustment.
Price - Standard version cost $ 39.90 and the Deluxe version costs $ 59.50 (10 days free trial)
Rating - 5 stars
03Magix PhotoStory
If you have a bit of experience in making slideshows then you can take your slideshow making experience to another level using this software. A custom animation module and an integrated photo editing tool of Magix PhotoStory make it stand out in our list.
Key Features - 300+ library of effects coupled with a huge collection of music tracks. 100 + video templates and graphics. This software has Built-in filters for photo enhancement with the picture-in-picture option.
Price - $ 49.99 ( 30 days free trial )
Rating - 4.5 stars
04PTE AV Studio
The best suited online tool to make a slide show video is PTE AV Studio. If you want to create smooth and fluid visual slideshows then try this software once. Here you can combine pictures, videos, and audio files into sleek slideshows and impress your boss and colleagues.
Key Features - PTE AV studio supports 100+ effects and templates. It has the best video, photo, and multitrack sound editing tools among competitors. You can create custom animations and graphics if you want. With a huge collection of masks, filters, and text styles you can create high resolution slideshow videos.
Price - Standard Version costs $ 69 while and Pro version costs $ 139 (30 days free trial)
Rating - 4 stars
05Adobe Premiere Pro
If you are a regular slideshow user then no doubt you would know about Adobe Premiere Pro. Those who want easy to navigate the software with hundreds of features then try this one. The only draw [back of this software is that it has no inbuilt templates but don’t worry you can download thousands of templates from the internet for free.
Key Features - Animations could be added to slides using keyframes. Efficient video and audio editing and creating tool. Animations and graphics add a cherry to the cake. Advanced photo enhancement and filters to make your photos and slideshows stand out.
Price - $ 239.88 a year (30 days free trial)
06CyberLink MediaShow
Cyberlink MediaShow is one of the earliest software that came in the field of slideshow video creation. This software enables you to create awesome slideshows, movies, and screensavers. Cyberlink MediaShow has enough features to make eye-catching videos and still it is one of the easiest ones to use. If you aim to create easily simplistic videos then go for this software.
Key Features - Descent collection of transitions with a built-in photo editing module. It is equipped with face recognition and tagging feature. You can integrate social media platforms like Facebook and share to them directly from the software.
Price - $ 49.99 ( 30 days free trial )
Rating - 3.5 stars
07AquaSoft Slideshow
For users who want to create colourful and dynamic family-themed slide show videos then AquaSoft Slideshow is the software to try. After a review from thousands of users, this software has made a place in our featured list. The user-friendly interface with dozens of eye-catching effects and animated text make it fun to use. It allows you to create colourful, text-filled videos and so on.
Key Features - It is powered packed with more than 200 effects and transitions and hundreds of text options. It supports almost all the formats even the older ones like CDs and DVDs. Smooth and advanced editing tools for a better experience.
Price - Premium costs $ 57.00 while Ultimate costs $ 97.00 ( 30 days free trial version)
Rating - 4 stars
08Kizoa
This software helps you to create slide show videos which can be played on any screen. This is basically an online video creating and editing tool but it provides formats for creating slideshows too. You can use this tool on whatever platform you have like a tablet, TV, smartphone, computer screen etc.
Key Features - Intelligent cropping tool of Kizoa helps you to create and edit world-class finest images for your slideshow video. The created slideshow could be downloaded in various formats like MP4, AVI, MOV, etc. You can directly share the video to online platforms.
Price - Starter $ 29.99, Creator $ 49.99 , Professional $ 99.99, and Business $ 299.99
Rating - 4 stars
Part 3 5 Easy Steps to Make a Slide Show Video
Guys, now you know the best templates and best slideshow video makers but now the question comes “how to make a slideshow video?”. If you are confused and don’t have any clue about making a slideshow video then just get your google slides and follow the steps explained below.
Step 1: Get Free Screen Recorder
Firstly you have to start with launching Free Screen Recorder. You can use any screen recorder of your choice. Create your account on the screen recorder and get started.
Step 2. Record Your Google Slides
Noe on the screen recorder “Drag and drop” the sides of this box that appears on your screen to fit your slides into it. Select a suitable size for your video ( preferably 720 p).
Now on the left corner of the screen, you will see various controls using them you can perform various functions like start and stop recording, recording to webcam, selecting the size of the video, add audio and narration.
After performing all the functions click on “Record” to record your slides into video.
Step 3. Finishing of Recording
If you are satisfied with the video then click on the blue button to stop recording, and select “done” to save your video. However, if you don’t like it you can restart the process anytime.
Step 4. Editing of the Video
Once you have completed the recording of the video you can edit it according to your requirements. You can add or delete overlays, video sounds, narrations, graphics, green screen etc.
Step 5. Publish and Share your Slideshow video
After completing the editing and creating work click on “Publish”. You can save and publish your video directly on a YouTube channel, or Google Drive folder, or save your video as a file. And you can share it on any social media platform.
Part 4 How to Custom Templates for Google Slides Presentation
Just imagine, how easy would it have been if you could create the templates for your slide show videos. This would have made your professional life so easy. If you too are looking for such an online tool which provides you with the feature for creating custom templates for your slideshow video then you should try Wondershare’s Wondershare Filmora Video Editor Video Editor. Don’t get confused with the name it’s a video editor but has awesome features for creating custom slideshow videos. Following are some of the highlighting features of Filmora Video Editor.
Easy to use for beginners.
User-friendly interface and bunches of editing tools.
Library (royalty-free) containing hundreds of audio options.
Hundreds of templates, transitions, and filters to make your video eye-catching.
Here is a brief tutorial to use Wondershare Filmora Video Editor to create custom templates for your slideshow video.
For Win 7 or later (64-bit)
For macOS 10.12 or later
Step 1. Adding Photos and Videos
Open Filmora and click on the “Import menu”. Here select the photos and videos you want to use and click on “OK” to begin the importing.
Step 2. Positioning the Media Files on Timeline
Click on “File menu” > “Preferences option” > “Editing tab” > “Photo Placement drop-down menu”. Here you can perform various functions like zooming of images, setting the duration of images, transitions and effects, crop and fitting.
Now if you want to add more images and videos repeat steps 1 and 2.
Step 3. Use the transitions
Use transitions for smooth transitioning from one slide to another. Click on “Transition Setting Window” and set the duration for the transition.
Step 4. Apply Filters and Overlays
Go to “ Effect Tab” and select suitable filters and overlays for your video.
Step 5. Add Motion Graphics Element (Optional Step)
If you wish you can create motion graphics elements for your video. Click on the “ Elements tab” and select the best suited for you.
Step 6. Record Voiceover and create a Soundtrack
Go to “Media tab” > “ Record drop-down “ > “ Record Voiceover feature” to record and create soundtracks and voiceovers.
Step 7. Exporting the Slideshow Video
After making all the adjustments in the video click on the “Export” and wait for the Export window to appear on the screen. Now here you can select the output format of the file and the location for exporting your slideshow video.
● Ending Thoughts →
● Dear readers, now it’s time, to sum up this article. We hope our efforts have made things simple for you. We have tried to bring you the best online templates available online.
● You can now read our article and learn about the best slideshow video makers available online. You can use any one of them as per your need.
● If you want to create custom templates for your slideshow video, then we recommend to try Wondershare Filmora Video Editor for easy and effective custom template creation.
Best Ideas on Using Green Screen with Filmora
Green screener chroma key is commonly used in film, tv shows, and social media videos nowadays. This article will show you how to light film and edit a green screen. Additionally, you can have some fun ideas with a chroma key. Therefore, keep reading this article to know all the information.
Part 1: Cool Ideas to Use Green Screen
1. The Magic Box

2. Liquid Transformation

3. Key Out a Body Part

4. T-shirt TV Screen

Part 2: Setting Up The Green Screen
Filming with the green screen is getting easier and easier. Anyone can do it, but before you get started, we will share some do’s and don’ts to help you get the best results.
In fact, there are many ways to set up a green screen, but the most cost-efficient way is with a green screen fabric. If you are using a green fabric as a DIY green screen, make sure you steam or iron it out, whether taping it to a wall or hanging it off the rack. Keep in mind the green screen should not leave any wrinkles.
It is because wrinkles will make lighting the green screen a nightmare, and uneven lighting will leave you with shadows and disappointing results. It would help if you also pulled the green screen tight to get a seamless background. The better you do with the setup, the easier it will be the key it out later
Part 3: Lighting a Green Screen
It doesn’t matter how nice your green screen is. You won’t get good results if you don’t light it properly. When you light a green screen, be aware of these things.
- Make sure there are at least six feet of space between you and your green screen; therefore, you’re not casting a shadow that cannot be keyed out later.
- Remember, any shadow on the green screen is bad. The lighting on the screen should be flat, even, and one-dimensional meaning. Please don’t place the screen leaning at an angle since they’ll make it harder to light evenly.
- Do light yourself and your background separately. It will ensure your subject wouldn’t bleed into the green, which will create a halo around them.
- After you key out the green screen and lighting, your subjects should emulate the lighting from your final footage. For example, if you know sunlight is coming from the left light, your subject is from the left direction as well.
Part 4. Keying out your green screen
Once your footage is good, go into Filmora and import it into your timeline, then double-click it to find the chroma key menu. However, don’t stop there. Clicking the chroma key button is not enough to guarantee perfectly keyed footage, so play around with the offset tolerance edge thickness and edge feather. Lastly, adjust it to make sure your edit looks as good as possible.
Free Download For Win 7 or later(64-bit)
Free Download For macOS 10.14 or later

Summary
Aside from a video background, there are many things you can use chrome key effects on. For example, you can make liquid transformation, you can make a magic box, etc. In the meantime, it doesn’t matter how good your green screen, it won’t have a good results if are not light it properly. You can use Filmora to keying out your green screen. It just take a few clicks to be able keying out your green screen by following the tutorial above.
Free Download For macOS 10.14 or later
Summary
Aside from a video background, there are many things you can use chrome key effects on. For example, you can make liquid transformation, you can make a magic box, etc. In the meantime, it doesn’t matter how good your green screen, it won’t have a good results if are not light it properly. You can use Filmora to keying out your green screen. It just take a few clicks to be able keying out your green screen by following the tutorial above.
How to Zoom Picture in Picture [Easy Solution]
Zoom is one of the greatest options on the market for video conferencing. It doesn’t matter whether you use it at home or in an office environment; it will quickly link the team members. One of the most popular video conferencing programs is Zoom. When in-person meetings aren’t feasible, it enables you to communicate electronically with employees, and it’s been a major popularity for social occasions as well. In case you’re not acquainted, picture-in-picture mode enables you to watch videos from one app while using your PC normally. The movie will keep playing in a tiny thumbnail window so that two applications may work simultaneously on your smartphone.
You may create virtual audio and video conferences, webinars, live chats, screen sharing, and other collaboration tools with Zoom, a cloud-based video communications solution. Zoom’s most recent iPhone apps let you dismiss a Zoom Meeting while keeping the Zoom video call open in a picture-in-picture mode. To join a Zoom conference, you don’t need an account, and because the software works with Mac, Windows, Linux, iOS, and Android devices, nearly anybody can use it. Since using Zoom’s picture-in-picture mode is the same as using it with other applications, you shouldn’t have any trouble if you often use PiP mode. Here are the top 4 methods you can refer to picture in picture in Zoom.
Method 1: Swap Shared Screen with Video
You may move the Zoom Meeting PiP window across the screen, change the thumbnail’s size, and utilize other applications while it remains open, just like any other picture-in-picture window. Before leaving the meeting if you’re not giving a presentation or speaking, you should definitely mute Zoom on your iPhone to prevent noises from your typing or other activities from entering the conversation. Additionally, keep in mind to switch off the camera if you’re engaged in something distracting, at least for the duration of your activity. To reopen the Zoom Meeting and go back to the Zoom app, touch the Picture-in-Picture mode pane. Here are some actions to keep in mind:
Steps to Swap Shared Screen for Zoom Picture in Picture
Step1Launch or enter a Zoom meeting. Keep the video on your main screen at all times, closing the chat and participant list as necessary.
Step2Tap the Home button or swipe up from the bottom of the screen.
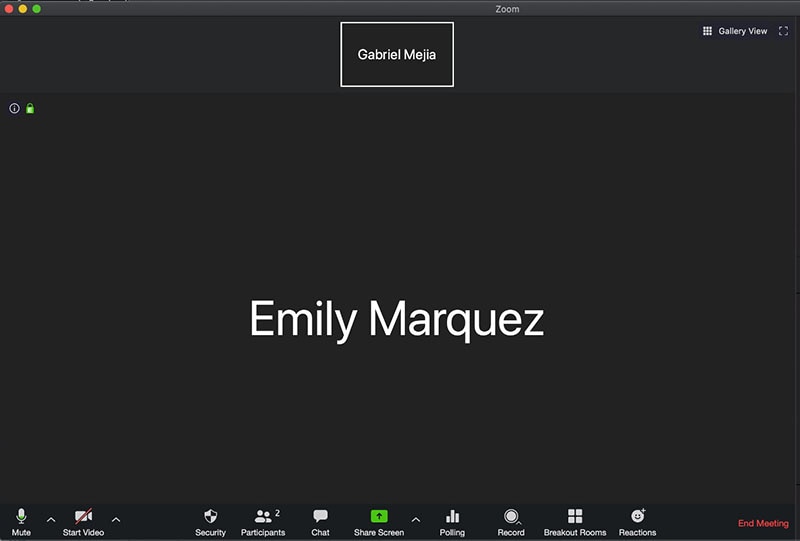
Step3Picture-in-picture mode should be activated automatically throughout the meeting.
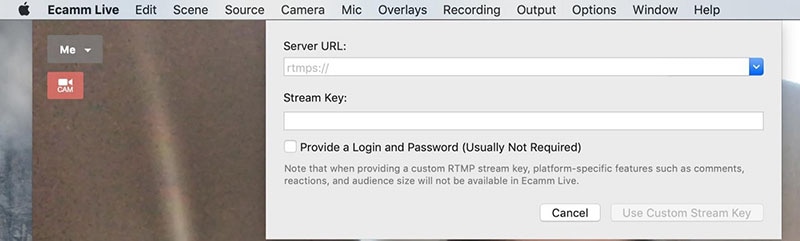
Method 2: Use Ecamm Live
Live streaming is a fantastic way to provide original content and stand out from the crowd. To prevent any operational difficulties, a more sophisticated virtual camera is absolutely necessary. You now have magical abilities thanks to Ecamm virtual cam, including the ability to add text, animations, observe a live stream, post viewer comments, play music, share your screen, use sound effects, and many more. It offers the Ecamm live virtual camera zoom function for video conferences so you may improve your Zoom discussions by sending output to other PC programs. You could see a quality difference between what you view in Ecamm Live and what your Zoom visitors see while utilizing virtual camera with Zoom. The quality of a Zoom video stream cannot be improved using Ecamm Live. Simply broadcast the Zoom app using Ecamm Live’s Screen Share mode to utilize Ecamm Live for picture-in-picture virtual presentations on Zoom.
Steps to Use Ecamm Live for Zoom Picture in Picture
Step1Download the Ecamm Application
Install Ecamm Live on your computer, then choose the center button in the source switcher at the top of the main window to enter Screen Share mode.
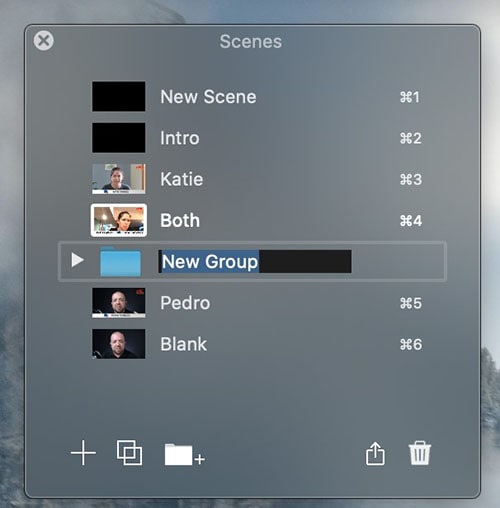
Step2Create Scenes
With the use of Ecamm Live’s Virtual Camera and Virtual Mic capabilities, you may transfer Ecamm Live’s output to almost any other Mac software, including Zoom. After setting, create the scenes in the program to quickly switch between various cameras.
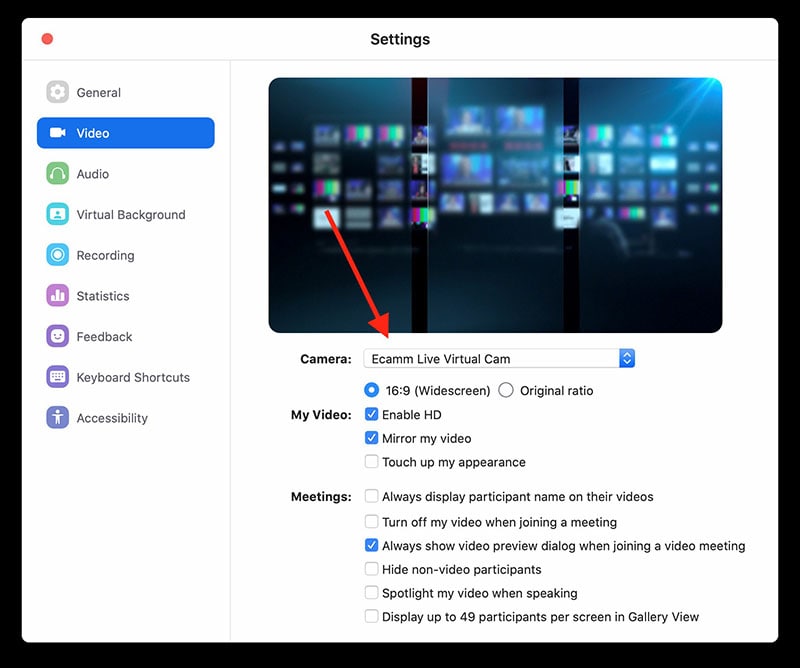
Step3Select Ecamm on Zoom
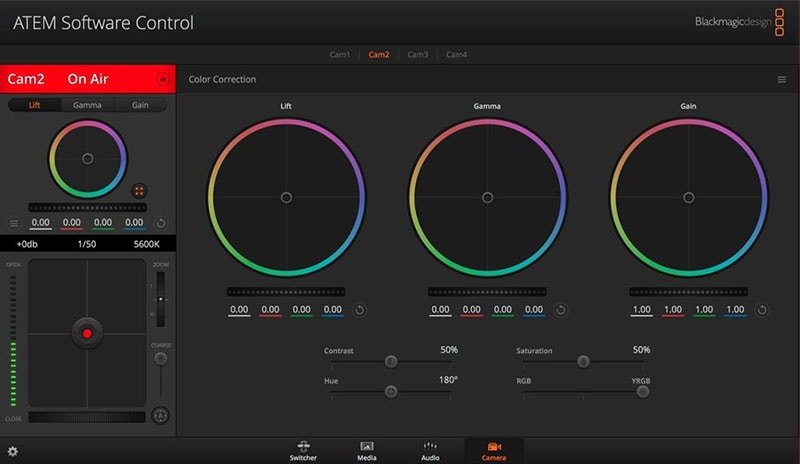
You may also utilize Ecamm Live’s Sharing Window capability to feed Ecamm Live output into Zoom. Simply activate the virtual camera, and then, as seen below, choose Ecamm Live Virtual Camera in Zoom’s video settings:
Step4Begin Your Presentation
Finally, click the PC share option to show your Zoom app to your audience. To conceal a picture-in-picture window that displays your camera image while live streaming, click the PIP button.
Method 3: Use Filmora as A Switcher
Zoom has solutions that will make your meetings simple and secure. It gives your remote staff a secure setting to interact and share crucial information. Ideal control over your film and configuration options to make them aesthetically pleasing is something Zoom lacks. To overcome the drawbacks and improve the quality of your online meetings, you may take use of the capabilities of Zoom in conjunction with Filmora. Filmora was developed with the intention of easing user burden and supporting applications. Though complicated, the program is simple to use. The perhaps most popular web information that may be saved on your computer can be easily captured by just angling your screen. For more information on how to record and save your Zoom for picture in picture, see the guide here.
To broadcast a variety of situations in a grid style, you may also combine inputs from your camera, microphone, computer screen, and web conferencing software. Wondershare -the finest desktop application for recording a Zoom Picture in Picture meeting- is Filmora. With the majority of cameras, this app’s screen recording capability is both user-friendly and feature-rich. Here, users may either choose a particular region to record or record their zoom meetings in Fullscreen mode. Additionally, you may choose the camera and input microphone that will be used while recording a video overlay. The addition of relevant comments like phrases, lines, drawings, symbols, etc. is also possible by users. The detailed procedure for recording a Zoom Picture-in-Picture meeting using a Filmora recorder is given below:
Free Download For Win 7 or later(64-bit)
Free Download For macOS 10.14 or later
Step1Download and Install Filmora Zoom Recorder
You may find both types, i.e., the most recent Windows and Mac versions, by first visiting the usual website and then using this Zoom. Install the program on your computer once you download it to get started.

Step2Initiate Filmora Recorder
After finishing the installation process for this Reside Zoom recorder, launch it from the main menus and choose “New Task” when prompted. It will take you to Filmora’s streamlined user interface where you can immediately start filming. Then, as seen in the picture below, you may adjust the screen recording using your preferred camera, microphone, and system settings:

Step3Begin/End the Recording
When you are through configuring this Zoom picture in picture recorder, click the Record button, and it will immediately begin recording your customized screen. Similar to that, after you’re done recording, click Stop, which will take you inside the video editor where you may edit your recorded information.

Step4Share Recordings
When you have everything ready, export your recording right away. After you’re done with the editing part, you do have a lot of options to choose from when displaying your screen capture and webcam stories. To do so, click the Export button in the item user interface’s top-right corner as shown below:
You may easily choose your preferred way to share from there if you choose to upload your work of zoom picture in picture recordings straight to the YouTube or other reputable websites right now. Simply refer to the Sharing plug-ins in the Export window to find out more.
Method 4: Use Hardware Switcher ATEM Mini Pro
Particularly on Zoom, the ATEM Mini is excellent for video conferences. The Blackmagic ATEM Mini is a USB video interface and HDMI switcher. Four HDMI inputs, or four cameras that can produce an HDMI video stream, may be switched between live. This device integrates Zoom meetings fast and makes it incredibly simple to set up your audio, a sometimes-forgotten aspect of video broadcasting. This sophisticated video switcher promises to offer broadcast-quality multi-camera footage with ease and is targeted at gamers, streamers, and online reviewers. It connects to a computer via a USB-C to USB-A connection. The video feed may then be sent to distant colleagues via a number of well-liked videos streaming services, including Zoom.
Step1The ATEM Mini Pro is a basic control switcher with pro-broadcast performance. Your ATEM Mini Pro is really simple to set up. You can connect a full setup with several cameras and microphones in around 30 minutes.
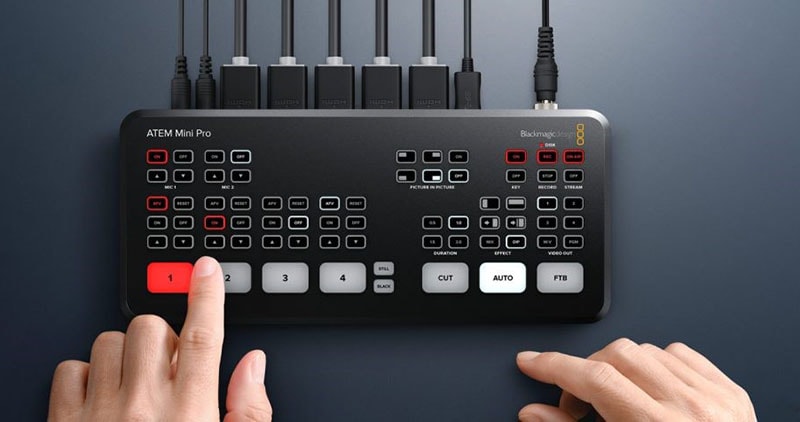
Step2You may connect several camera sources to the inputs of the ATEM Mini Pro. The 4 HDMI inputs each have a separate standards converter built in. As a result, the ATEM Mini can automatically convert inputs that are 1080p, 1080i, or 720p to the switcher’s video standard. You may make quick changes between inputs with no latency or disruption to your video output by using the ergonomic buttons.
Step3As a third option, Zoom offers ATEM Mini, which enables you to switch between several inputs, add custom visuals, and adjust audio levels all from a single interface. To improve the quality of your production, you may even use smooth transitions like wipes or fades. You can even test any input stream before making it live.
Conclusion
When you are doing a Zoom Meeting and share your screen, only to discover that what the other attendees see is a split screen with your material and the other Attendee cams, it is highly annoying. You may move the Zoom Meeting PiP window across the screen, change the thumbnail’s size, and utilize other applications while it remains open, just like any other picture-in-picture window. Someone must be sharing information in the Zoom conference for the Picture in Picture, or “Split Screen” option, to be active. We’ve listed the top techniques for doing it effectively above. To do this work without difficulty, use them as your guide.
Free Download For macOS 10.14 or later
Step1Download and Install Filmora Zoom Recorder
You may find both types, i.e., the most recent Windows and Mac versions, by first visiting the usual website and then using this Zoom. Install the program on your computer once you download it to get started.
Step2Initiate Filmora Recorder
After finishing the installation process for this Reside Zoom recorder, launch it from the main menus and choose “New Task” when prompted. It will take you to Filmora’s streamlined user interface where you can immediately start filming. Then, as seen in the picture below, you may adjust the screen recording using your preferred camera, microphone, and system settings:
Step3Begin/End the Recording
When you are through configuring this Zoom picture in picture recorder, click the Record button, and it will immediately begin recording your customized screen. Similar to that, after you’re done recording, click Stop, which will take you inside the video editor where you may edit your recorded information.
Step4Share Recordings
When you have everything ready, export your recording right away. After you’re done with the editing part, you do have a lot of options to choose from when displaying your screen capture and webcam stories. To do so, click the Export button in the item user interface’s top-right corner as shown below:
You may easily choose your preferred way to share from there if you choose to upload your work of zoom picture in picture recordings straight to the YouTube or other reputable websites right now. Simply refer to the Sharing plug-ins in the Export window to find out more.
Method 4: Use Hardware Switcher ATEM Mini Pro
Particularly on Zoom, the ATEM Mini is excellent for video conferences. The Blackmagic ATEM Mini is a USB video interface and HDMI switcher. Four HDMI inputs, or four cameras that can produce an HDMI video stream, may be switched between live. This device integrates Zoom meetings fast and makes it incredibly simple to set up your audio, a sometimes-forgotten aspect of video broadcasting. This sophisticated video switcher promises to offer broadcast-quality multi-camera footage with ease and is targeted at gamers, streamers, and online reviewers. It connects to a computer via a USB-C to USB-A connection. The video feed may then be sent to distant colleagues via a number of well-liked videos streaming services, including Zoom.
Step1The ATEM Mini Pro is a basic control switcher with pro-broadcast performance. Your ATEM Mini Pro is really simple to set up. You can connect a full setup with several cameras and microphones in around 30 minutes.
Step2You may connect several camera sources to the inputs of the ATEM Mini Pro. The 4 HDMI inputs each have a separate standards converter built in. As a result, the ATEM Mini can automatically convert inputs that are 1080p, 1080i, or 720p to the switcher’s video standard. You may make quick changes between inputs with no latency or disruption to your video output by using the ergonomic buttons.
Step3As a third option, Zoom offers ATEM Mini, which enables you to switch between several inputs, add custom visuals, and adjust audio levels all from a single interface. To improve the quality of your production, you may even use smooth transitions like wipes or fades. You can even test any input stream before making it live.
Conclusion
When you are doing a Zoom Meeting and share your screen, only to discover that what the other attendees see is a split screen with your material and the other Attendee cams, it is highly annoying. You may move the Zoom Meeting PiP window across the screen, change the thumbnail’s size, and utilize other applications while it remains open, just like any other picture-in-picture window. Someone must be sharing information in the Zoom conference for the Picture in Picture, or “Split Screen” option, to be active. We’ve listed the top techniques for doing it effectively above. To do this work without difficulty, use them as your guide.
Top 5 Websites and Software to Convert Powerpoint to Mp4
You will learn how to convert PowerPoint into MP4 or ppt to video converter online using free software in this post. To do so, I’m putting together two freeware programs that convert PPT to MP4. The program allows you to import a PowerPoint presentation, tweak it if necessary, and then exporting powerpoint to video or create video from powerpoint from ppt to video converter online.
Apart from converting, these programs provide a lot of tools for creating effective presentation slides. Clipart, shapes, lists, resizing, text, moving, titles, rotating, and editing slide components are all available. After you’ve finished your presentation, you can export powerpoint to video via ppt to video converter online in various formats.
PPT can be exported to MP4, ASF, AVI, DV, SWF, WEBM, WMV, and other software formats. Because you don’t have to move slides while showing presentations, exporting powerpoint to video or create video from powerpoint is simple.
Let’s get started with convert PowerPoint to MP4 using these software and websites.
Top 5 websites and software to convert PowerPoint to mp4
1.ActivePresenter 7

In terms of convert powerpoint to mp4(create video from powerpoint), ActivePresenter 7 is among the finest. It is possible to convert a PowerPoint presentation to an MP4 file with this program.
Inserting the PPT presentation is a prerequisite for exporting powerpoint to video or create video from powerpoint from PowerPoint to MP4. For this, select ActivePresenter from the drop-down menu in the toolbar at the top left. A PowerPoint import dialogue box will appear as a result of this action. This option can also be found in the Slides menu.
You’ll be able to pick and choose which slides you want to see. When you import a PPT file, each slide appears for about three seconds.
Using this software’s built-in editing options, you may make any necessary adjustments. Among the choices available are Slides, Annotations, Interactions, Animated Design, and Transitions, as can be seen in the menu above. These choices allow you to see more elements and make the presentation more effective.
Right-hand attributes provide options for adding a background picture and filling in background colors. Change the length of each slide here as well.
A PowerPoint presentation can be exported as an MP4 file once it has been completed. You may accomplish this by going to File > Export. For example, you can create a video HTML slide show, a PDF document, or a PowerPoint presentation using Microsoft Office applications such as Excel or Word. Choose the format in which you want to save your presentation.
As an added convenience, you can also export your PPT presentations to AVI, MWV, WEBM, and MKV via the software’s export functionality. To save the file, you’ll need to decide on a format and location.
Features:
- Webcam recording is now available. The ability to record both the camera and the screen at the same time enables the creation of how-to films or interactive eLearning material without the need for visual guidance.
- Green Screen Effect [Extraordinary]…
- Advanced Audio Effects [Updated]…
- Video Compression [with Improvements]
2.Express Points Presentation Software

Another option for convert PowerPoint to MP4 for free is Express Points Presentation Software. You can quickly import PowerPoint into this program and output it as an MP4 file.
Slide shows may be used to produce convert powerpoint to mp4. After that, you may utilize the tool to boost the impact of your speeches. Clipart, shapes, lists, text resizing, text movement, and header placement are just a few of the many options at your disposal.
For multimedia presentations, you may also include audio files, such as music or narration, in this section. More color and opacity choices may be found to the right.
Save the file as an MP4 when you’ve finished adding everything. You can do this by going to the File menu and selecting exporting powerpoint to video. Formats like MP4 and ASF will be available as well as other popular video and audio formats like WEBM and WMV. To save the PPT as a video via ppt to video converter online, choose MP4 as the output format and then click Create.
Features:
- Create visually appealing slide presentations.
- It is simple to get started thanks to the intuitive user interface.
- A variety of presentation templates are included.
- Create bullet points, lists, text, and titles in a matter of seconds.
- Master slide templates may be easily customized and edited.
- Slide elements can be moved, resized, rotated, and edited.
3.Online Convert

You may download the finished movie from Online Convert to your computer for free. It converts the PowerPoint presentation into a variety of video formats and lets you download the completed video to your computer. The website also provides a variety of additional helpful file converters, all of which are completely free and do not include a watermark in the finished output file.
Features:
- This feature enables you to publish presentations directly from your computer or from a Dropbox / Google Drive link.
- It is compatible with a variety of video formats (AVI, FLV, MKV, MOV, MP4, MPG, WMV, & WEBM)
- There will be no watermark on the produced video.
4.ImTOO

In addition, the ImTOO converter touts the capability of converting your PowerPoint files into video without the requirement for you to have PowerPoint installed on the computer beforehand. This software also allows users to add commentaries, watermarks, as well as music to their PowerPoint presentation before converting it to an image format.
Features:
- Transform files into the most common video formats (AVI, MP4, MOV, MPEG2, MOV, WMV, and FLV)
- Allows for the conversion of files to be completed quickly (requires that PowerPoint is installed)
5.Xilisoft

The free version of Xilisoft convert powerpoint to mp4 is a carbon copy of the paid version of ImTOO PowerPoint to MP4 Converter, with slightly more limited functionality. This program includes various features that will assist you in customizing and fine-tuning your presentation before it is converted. A number of famous video formats, such as full high-definition (HD) quality, can be converted from PowerPoint presentations using this program.
Features:
- It provides a variety of different outputs (AVI, FLV, MP4, MOV, MPEG2, and WMV)
- Converts presentations into high-definition videos.
- It is not necessary to have PowerPoint in order to convert.
- It is compatible with the Mac.
Conclusions
To convert files, a variety of programs are available. These programs make it simple to convert PowerPoint files to MP4s use ppt to video converter online. A presentation slide may be imported from a file or created from scratch. After that, you may save it as an MP4 video. To my surprise, the program I was looking for was completely free.
Wondershare Filmora is a popular video-recording software program because of its excellent outcomes. Filmora can capture your best PPT presentation moments without stuttering. Even for complete newbies, PowerPoint to video conversion is as simple as 1-2-3.
For Win 7 or later (64-bit)
For macOS 10.12 or later
In terms of convert powerpoint to mp4(create video from powerpoint), ActivePresenter 7 is among the finest. It is possible to convert a PowerPoint presentation to an MP4 file with this program.
Inserting the PPT presentation is a prerequisite for exporting powerpoint to video or create video from powerpoint from PowerPoint to MP4. For this, select ActivePresenter from the drop-down menu in the toolbar at the top left. A PowerPoint import dialogue box will appear as a result of this action. This option can also be found in the Slides menu.
You’ll be able to pick and choose which slides you want to see. When you import a PPT file, each slide appears for about three seconds.
Using this software’s built-in editing options, you may make any necessary adjustments. Among the choices available are Slides, Annotations, Interactions, Animated Design, and Transitions, as can be seen in the menu above. These choices allow you to see more elements and make the presentation more effective.
Right-hand attributes provide options for adding a background picture and filling in background colors. Change the length of each slide here as well.
A PowerPoint presentation can be exported as an MP4 file once it has been completed. You may accomplish this by going to File > Export. For example, you can create a video HTML slide show, a PDF document, or a PowerPoint presentation using Microsoft Office applications such as Excel or Word. Choose the format in which you want to save your presentation.
As an added convenience, you can also export your PPT presentations to AVI, MWV, WEBM, and MKV via the software’s export functionality. To save the file, you’ll need to decide on a format and location.
Features:
- Webcam recording is now available. The ability to record both the camera and the screen at the same time enables the creation of how-to films or interactive eLearning material without the need for visual guidance.
- Green Screen Effect [Extraordinary]…
- Advanced Audio Effects [Updated]…
- Video Compression [with Improvements]
2.Express Points Presentation Software
Another option for convert PowerPoint to MP4 for free is Express Points Presentation Software. You can quickly import PowerPoint into this program and output it as an MP4 file.
Slide shows may be used to produce convert powerpoint to mp4. After that, you may utilize the tool to boost the impact of your speeches. Clipart, shapes, lists, text resizing, text movement, and header placement are just a few of the many options at your disposal.
For multimedia presentations, you may also include audio files, such as music or narration, in this section. More color and opacity choices may be found to the right.
Save the file as an MP4 when you’ve finished adding everything. You can do this by going to the File menu and selecting exporting powerpoint to video. Formats like MP4 and ASF will be available as well as other popular video and audio formats like WEBM and WMV. To save the PPT as a video via ppt to video converter online, choose MP4 as the output format and then click Create.
Features:
- Create visually appealing slide presentations.
- It is simple to get started thanks to the intuitive user interface.
- A variety of presentation templates are included.
- Create bullet points, lists, text, and titles in a matter of seconds.
- Master slide templates may be easily customized and edited.
- Slide elements can be moved, resized, rotated, and edited.
3.Online Convert
You may download the finished movie from Online Convert to your computer for free. It converts the PowerPoint presentation into a variety of video formats and lets you download the completed video to your computer. The website also provides a variety of additional helpful file converters, all of which are completely free and do not include a watermark in the finished output file.
Features:
- This feature enables you to publish presentations directly from your computer or from a Dropbox / Google Drive link.
- It is compatible with a variety of video formats (AVI, FLV, MKV, MOV, MP4, MPG, WMV, & WEBM)
- There will be no watermark on the produced video.
4.ImTOO
In addition, the ImTOO converter touts the capability of converting your PowerPoint files into video without the requirement for you to have PowerPoint installed on the computer beforehand. This software also allows users to add commentaries, watermarks, as well as music to their PowerPoint presentation before converting it to an image format.
Features:
- Transform files into the most common video formats (AVI, MP4, MOV, MPEG2, MOV, WMV, and FLV)
- Allows for the conversion of files to be completed quickly (requires that PowerPoint is installed)
5.Xilisoft
The free version of Xilisoft convert powerpoint to mp4 is a carbon copy of the paid version of ImTOO PowerPoint to MP4 Converter, with slightly more limited functionality. This program includes various features that will assist you in customizing and fine-tuning your presentation before it is converted. A number of famous video formats, such as full high-definition (HD) quality, can be converted from PowerPoint presentations using this program.
Features:
- It provides a variety of different outputs (AVI, FLV, MP4, MOV, MPEG2, and WMV)
- Converts presentations into high-definition videos.
- It is not necessary to have PowerPoint in order to convert.
- It is compatible with the Mac.
Conclusions
To convert files, a variety of programs are available. These programs make it simple to convert PowerPoint files to MP4s use ppt to video converter online. A presentation slide may be imported from a file or created from scratch. After that, you may save it as an MP4 video. To my surprise, the program I was looking for was completely free.
Wondershare Filmora is a popular video-recording software program because of its excellent outcomes. Filmora can capture your best PPT presentation moments without stuttering. Even for complete newbies, PowerPoint to video conversion is as simple as 1-2-3.
For Win 7 or later (64-bit)
For macOS 10.12 or later
Also read:
- New How to Create a Slideshow with Movavi Slideshow Maker for 2024
- New In 2024, How to Create Cooking Video Intro and End Screen for YouTube Channel?
- Updated In 2024, How to Make A Jaw-Dropping Time Lapse Video? Full Guide
- The Power of Music in Videos
- Updated In 2024, Windows Movie Maker Review
- New How to Rotate AVI in Vertical/Portrait Orientation Windows, Mac,Andro
- In This Article, We Will Show You How to Rotate Videos Using Obs for 2024
- Updated In 2024, Looking for a Way to Learn How to Merge Videos in HandBrake? Theres a Better Solution Waiting for You Inside
- New Best 8 Educational Video Websites for Teachers for 2024
- New What Is TS Format and How To Play TS Files? Basic Tips
- Updated 2024 Approved This Article Covers a Lot of Information About the Freeze-Frame Effect. It Includes Its Power, Its Usage in Films, and How to Create It in Your Videos Using Filmora. It Will Get You a Super Exciting Cinematic Effect
- Updated How to Make Canva Collages for 2024
- New 12 Impressive AI Video Ideas for Creating Engaging Video Content
- New How to Brighten a Video in Windows 10 | Step-By-Step Guide for 2024
- New How to Make Loop Video in PowerPoint for 2024
- 2024 Approved 8 Best Video Editor with Useful Masking
- New 7 Solutions Cut Video For Instagram On Mac
- New Legend Intro Maker – Create Intro Video with Ease for 2024
- New How To Fade Audio In Kinemaster
- Updated 2024 Approved A Wedding Is One of the Exciting Parts that Will Happen in Your Life. Its Not that Easy to Plan a Wedding, Theres a Lot to Be Consider Like Wedding Dress, Food, Venue, Videographer Etc
- 2024 Approved Finding Best GIF Websites Is Easy as Pie — Heres What You Should Know
- In 2024, Are You Eager to Discover the Method of Video Scaling in Filmora? You Are in the Right Place because This Discussion Will Cover the Content on This Matter
- Updated Discord Is the Future of Networking. After All, It Is Here to Stay. Have You Heard of the Discord Animated Avatar? If Yes, You Understand Its Power and if Not, Ensure You Study This Article for More Information for 2024
- Updated The Necessity of the Creation of Video Content for Social Media Has Urged Many Editing Software to Come Out on the Market. We Have Reviewed some, Free of Them in This Article for You
- New There Are a Few Ways to Remove or Mute Audio in a Video, but How? Read This Article and Learn How to Do It Using Recommended Android Apps
- New Using Adobe After Effects as a Pro-Level Editing Platforms Demands You to Add Expressions in After Effects. If Youre Looking for the Solutions on After Effects How to Add Expressions Then Weve Got You Covered. Learn More Here for 2024
- In 2024, Lock Your Vivo Y200 Phone in Style The Top 5 Gesture Lock Screen Apps
- Everything You Need To Know About Unlocked iPhone 14 Plus | Dr.fone
- Top 10 Password Cracking Tools For Nubia Red Magic 8S Pro+
- How To Fix Unresponsive Phone Touchscreen Of Vivo Y200 | Dr.fone
- How to Unlock Apple iPhone 8 Plus Without Passcode? | Dr.fone
- How to Reset a Infinix Hot 40 Pro Phone that is Locked?
- In 2024, A Comprehensive Guide to iCloud Unlock From Apple iPhone 15 Plus Online
- How to Flash Dead Oppo A59 5G Safely | Dr.fone
- Fix App Not Available in Your Country Play Store Problem on Vivo Y55s 5G (2023) | Dr.fone
- How to Make My Photo 3D Cartoon Online
- In 2024, 7 Ways to Unlock a Locked Vivo V27 Pro Phone
- Tutorial to Change Vivo Y28 5G IMEI without Root A Comprehensive Guide
- In 2024, Android to Apple How To Transfer Photos From Realme V30T to iPad Easily | Dr.fone
- In 2024, How to get the dragon scale and evolution-enabled pokemon On Apple iPhone XS Max? | Dr.fone
- New Top 10 3D Text Animation Templates for 2024
- Quick Fixes to Repair Microsoft Excel 2000 Content related error | Stellar
- Will iSpoofer update On Samsung Galaxy A15 5G | Dr.fone
- How to Remove Find My iPhone without Apple ID From your Apple iPhone 7?
- For People Wanting to Mock GPS on Honor 90 Lite Devices | Dr.fone
- Title: New Want Make a Slide Show Video? Heres How
- Author: Morgan
- Created at : 2024-05-19 05:12:10
- Updated at : 2024-05-20 05:12:10
- Link: https://ai-video-editing.techidaily.com/new-want-make-a-slide-show-video-heres-how/
- License: This work is licensed under CC BY-NC-SA 4.0.
