
:max_bytes(150000):strip_icc():format(webp)/GettyImages-944229620-9cff560054804b72a431e9492c7445b4.jpg)
New What Are the Best 10 GIF Creator?
What Are the Best 10 GIF Creator?
What are the 10 Best GIF Creator?
An easy yet powerful editor
Numerous effects to choose from
Detailed tutorials provided by the official channel
Stay tuned to find the most affordable GIF creator solutions.
In this article
01 [Why Gifs Are Essential for Every Marketer?](#Part 1)
02 [How to Make Your Own GIF?](#Part 2)
03 [What Are 10 Best GIF Creator to Find Brilliant Pre-made Gifs?](#Part 3)
Part 1 Why Gifs Are Essential for Every Marketer?
Everyone around you today is accustomed with the fact that GIFs are an interesting and impactful means of content sharing. These 3-5 second snippets are highly preferred and convenient ways to deliver information that is precise, clear and to the point. When it comes to time frames, short and quick GIFs are obvious choices over lengthy videos. Additionally, GIFs are eye-catchy and keep you captivated to see though the entire content within seconds, contradictory to those monotonous and often dull videos that sound more like a long, boring lecture.
These are an effective media tool that is not limited to sharing information that is chiefly entertainment based or fun centered. You can use them to deliver important content that addresses a specific purpose or audience. Owing to this, GIFs have become an essential marketing utility, here’s why:
● Improve Product Branding:
GIFs can serve as impressive branding tools for your products in the market. Markets today are considerably impacted by the ‘What You See is What You Buy’ concept, which puts forward the need to lay added stress on effective branding.
GIFs are ready to sort this out with their exciting range of features. From video editing choices to sound and color customization, GIFs are loaded with everything you need to improvise your product branding. All you have to do is explore your creativity to make the most of the GIF branding choices.
● Explain it Better
On a preference poll, most of us would shift to ‘watch’ over ‘read’ for a comprehensive understanding. An attractive motion visual is an even better treat. GIFs are pivotal in making viewers relate to the concept and message behind your product in a more enhanced manner.
Additionally, these are a continent means to introduce emotional mobility among your target audience with depictive emojis. You can use GIFs to develop effective content approaches to make the audience connect with your product viability, both practically band emotionally.
● Increase Visitor Attraction
Today’s changing times have brought about a rapid outlook towards everything. All of us are bounded by time constraints and when browsing the web, the prime need is to look for quick and accurate solutions to everything concerned.
Short and exact information delivery of GIFs is something that would keep visitors glued to your site because they will be assured of getting exactly what they search for and that too in an interesting and entertaining way.
Part 2 How to Make Your Own GIF?
Now that you are familiar with the creative marketing credibility of GIFs, you might naturally feel motivated towards creating a GIF of your own. In case you are, see through the following section of this article to find out interesting ways of creating interesting and catchy GIFs, either for impressive product marketing or just to make your social media posts leave your community peers in awe!
Looking for the best GIF creator solutions on the web, you can rely on GIPHY, one of the most preferred and convenient databases to create GIFs quickly. This is a smartphone compatible tool and works well with almost any device. Follow the steps given below to make GIFs with this tool:
Step 1:
Download and install the GIPHY app in your device.
Step 2:
Click on ‘Create’ in the app’s welcome screen. This will change (+) icon at the top-right corner to the ‘Camera’ symbol. You can also navigate to the ‘Profile’ at the bottom-right and tap the (+) or ‘Camera’ icon in the app’s account page.
Step 3:
Click on ‘Allow Camera Access’. You will receive two successive prompt messages from the app. Click on ‘Allow’ to grant access permissions to your device media. When you are done, click on ‘I Agree’.
Step 4:
GIFHY uses your device’s front camera for GIF creation. However, if you need to go for a camera switch, click on the ‘Camera’ sign at the bottom-right.
Step 5:
Choose a desired filter and effect for your GIF with a left or right swipe on the live feed toolbar. The app has 11 amazing and realistic effects, including VHS Static, 3D Glasses, etc.
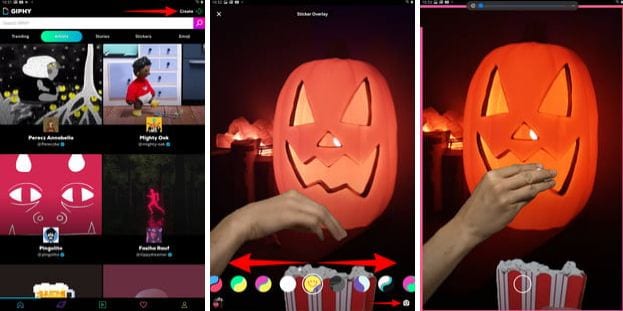
Step 6:
You can take up either of the following:
Press either of the ‘Filter’ or ‘Effect’ buttons to take static shots to create GIF from images, or press and hold the same to create animated GIF. For simply using effects, tap the white button.
In case you choose to create a motion GIF, the app forms a ‘visual timer’ around the editor screen. The motion recording stops once the line is in sync with the screen edges.
Step 7:
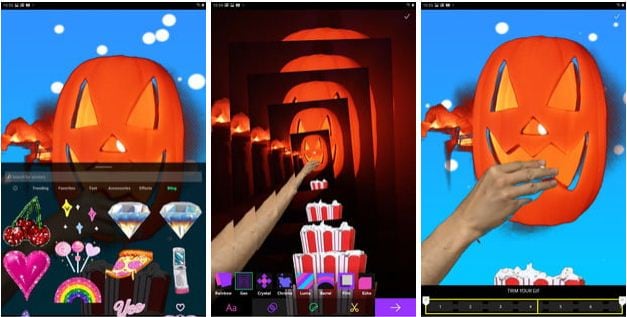
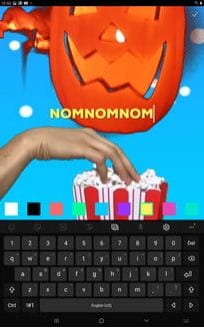
Having captured your perfect shot, you have the liberty to merge it with an image or video. However, do consider the following options to add some more elements to your capture: You can add relatable text in 9 color choices.
● Enhance your graphic presentation with 8 amazing effects like, ‘rainbow overlays’, BW film grains, etc.
● Choose from a never ending list of suitable stickers to add the feel through connect to your GIFs.
● Trim your animated GIFs to the ‘just perfect’ portion by adjusting the editing markers.
Relax; that’s no rocket science. Just tap on the respective buttons and there you go!
Step 8:
Set your GIF in a desired size frame by choosing the ‘Crop’ tool from the top-right corner of the editing screen. You are given a size flexibility of 1:1, 3:2, 16:9, 4:5 and 9:16.

Step 9:
Once you are satisfied with your creation, tap the ‘Right Arrow’ icon. In the interface that follows, add suitable share tags to the GIF.
Step 10:
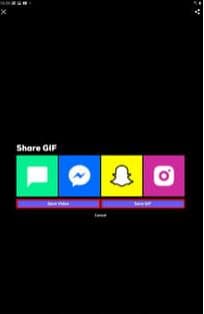
Tap ‘Share GIF’ to post your creation on social media platforms or share it through popular IM apps. To save your initially captured clip, click on ‘Save Video’ or tap ‘Save GIF’ to save your creation in your smartphone’s memory.
Part 1 What Are 10 Best GIF Creator to Find Brilliant Pre-made Gifs?
Having talked about GIF creation on the go, let’s take a dive into the best GIF creator solutions that are a storehouse of exciting pre-made GIFs. When browsing the web for an affordable GIF maker tool, you land across a pool of choices. Read through the further sections of this article to find out what’s best for you.
Described below are 10 best alternatives to get amazing pre-made GIFs:
● Wondershare Filmora Video Editor
This one is a popular, preferred and top rated application where you get to choose from an exciting range of pre-made GIFs under a variety of specific categories. All you need to do is, visit the app’s official site, browse to your favorite GIF category and select a desired GIF. Follow a few app instructions to save your selection and that’s it! Your selected GIF reaches your device memory within seconds.

Wondershare Filmora - Best Video Editor for Mac/Windows
5,481,435 people have downloaded it.
Build unique custom animations without breaking a sweat.
Focus on creating epic stories and leave the details to Filmora’s auto features.
Start a creative adventure with drag & drop effects and endless possibilities.
Filmora simplifies advanced features to save you time and effort.
Filmora cuts out repetition so you can move on to your next creative breakthrough.
Key Features
● This app is available to you absolutely free of cost.
● Has an intelligent and user cohesive interface.
● Loaded with tons of brilliant GIFs to choose from.
● The app supports GIF customization.
● GIFHY
Launched in 2013, this one is probably the best GIF maker and downloader tool available on the web today. It is a free tool, packed with enormous varieties of GIFs to choose from. What’s more interesting about the app is that you are free to play with your editing creativity to enhance your downloaded GIFs in the GIPHY editor.
Key Features
● It comes with an easy to use, convenient interface.
● You can edit downloaded GIFs with hundreds of effects and filters.
● The app provides you a direct sharing platform, allowing you to post GIFs to various social media platforms and also go for sharing via Instant Messaging applications.
● This is a fast processing tool that allows you to escape the notch of annoying and delayed download processes.
● Tenor
You can conveniently regard this one as the closest competitor to the GIPHY GIF creator and downloader tool. Needless to say, both are quite similar to each other in interface and usage respects. However, focusing on search results for a common keyword, you find diverse variations to your obvious surprise.
Key Features
● This is a free to use, interactive interface tool.
● It introduces a GIF Keyboard that allows you to search the most specific and relatable GIFs.
● It ensures a speedy and high quality GIF download.
● You can explore your editing skills to your heart’s content to improvise the downloaded GIFs with this tool.
● This tool gives you the liberty to directly share GIFs across different platforms.
If you like to spend ample time on choosing what’s perfect for you, refer this online tool for your GIF download solutions. It caters to your love of diversity with the most deep rooted and broad GIF range. However, this one comes with a little messy interface, demanding some patience from you to get to the right thing.
Key Features
● This tool provides you with almost all possible choices for a GIF category.
● It is available to you free of cost
● The tool site is loaded with rich and quality GIF content.
● This one is a direct save and export tool for your downloaded GIFs.
● Gfycat
You can prefer this one as a GIF hosting tool. Developed with a view to launch a common medium for GIF and HTML contents, this app ensures in-time and hassle free downloads and delivery. Though lacking a refined search bar, this tool promises you of excellence in content quality.
Key Features
● This comes to you as one of the most reliable GIF hosting tools.
● It is a free and quick content delivery tool.
● You are allowed to select the most suitable one from a variety of playback choices.
● This tool also gives you the flexibility of direct media sharing.
● GIFbin
If you are hung-over decade old nostalgia and the fever doesn’t seem to go away, you can check this site for some really satisfying retro and other similar content. This would definitely make you take a toll back to the times when MSN and Limewire were unparalleled market leaders in content sharing.
Key Features
● GIFbin is a storehouse of the best animated GIFs, that is on a continuous update to facilitate fresh and quality based content, every time you visit the site.
● It has an advanced, API enabled search mechanism.
● It boasts of having the handiest and convenient user interface.
● If you prefer GIFs of the comic genre, this tool is heaven for you.
● Imgflip
This is another GIF download site, commonly preferred for comedy and fun oriented content. Using this site, you can download and create a variety of GIF based memes that have the potential to flood your social media posts with likes and comments. This one is a complete GIF basket, suited to vast content varieties and user preferences. You will find the site’s official watermark on all its contents.
Key Features
● The site stands among the most preferred GIF-meme creation and sharing platforms.
● The tool is packed with loads of quality content under specific categories
● You can improvise the dimensions of your editing skills to modify downloaded GIFs.
● This site has a default media export feature that you can use to share your GIFs on social media.
● Imgur
Launched in 2009, this is among the most visited GIF sites, originally created for sharing meme based contents on social media. Its extensive search filters are dedicated to fetch the exact GIFs and memes you are looking for. If you are tired of browsing sites for particular content requirements, your search spree will definitely end here.
Key Features
● The site is known for its extensive and diversified content quality.
● It is a free, convenient and dependable GIF download tool.
● Imgur is highly preferred for content export across various media platforms.
● It is equipped with an advanced and updated search filter that assures you of getting fresh and top quality GIFs on almost every possible keyword.
● Tumblr
Claiming a launch date of 13 years back, this is quite a good GIF download option. You can find excellent quality GIF content on the site, particularly in the comic genre. Though not as popular as its online counterparts today, the site definitely enjoyed commendable visitor preferences at the time of its launch. You can certainly visit this site for a filling entertainment dose.
Key Features
● Tumblr is a free download site with a user friendly interface.
● The site is loaded with notable content varieties.
● You can go for direct media sharing through this site.
● Its comic GIFs are quite hilarious.
● Know Your Meme
This site uses the Wiki software to stock an inventory of classic GIFs and memes. Using this database for GIF downloads means that you don’t need to compromise on content and image quality. The site contents are periodically updated to ensure that visitors are not exposed to stale and outdated content.
Key Features
● The site offers fresh content having catchy and latest GIFs.
● This is a complete storehouse of GIFs and memes that can definitely keep you rolling.
● The site comes as a free tool and gas a user cohesive interface
● It hast the most efficient search filters that are regularly improvised to ensure quality content delivery.
● Key Takeaways from This Episode →
● GIFs are an effective and captivating means of quality content sharing and message delivery. Take them as a hilarious entertainment source or use them to enhance your marketing policies, GIFs can do it all.
● Influenced by the user credibility of GIFs, there are loads of GIF creator and download tools available online; among which Filmora by Wondershare is the current market leader. You can use this app to explore your GIF editing skills or download and share latest GIFs across media sharing platforms.
Stay tuned to find the most affordable GIF creator solutions.
In this article
01 [Why Gifs Are Essential for Every Marketer?](#Part 1)
02 [How to Make Your Own GIF?](#Part 2)
03 [What Are 10 Best GIF Creator to Find Brilliant Pre-made Gifs?](#Part 3)
Part 1 Why Gifs Are Essential for Every Marketer?
Everyone around you today is accustomed with the fact that GIFs are an interesting and impactful means of content sharing. These 3-5 second snippets are highly preferred and convenient ways to deliver information that is precise, clear and to the point. When it comes to time frames, short and quick GIFs are obvious choices over lengthy videos. Additionally, GIFs are eye-catchy and keep you captivated to see though the entire content within seconds, contradictory to those monotonous and often dull videos that sound more like a long, boring lecture.
These are an effective media tool that is not limited to sharing information that is chiefly entertainment based or fun centered. You can use them to deliver important content that addresses a specific purpose or audience. Owing to this, GIFs have become an essential marketing utility, here’s why:
● Improve Product Branding:
GIFs can serve as impressive branding tools for your products in the market. Markets today are considerably impacted by the ‘What You See is What You Buy’ concept, which puts forward the need to lay added stress on effective branding.
GIFs are ready to sort this out with their exciting range of features. From video editing choices to sound and color customization, GIFs are loaded with everything you need to improvise your product branding. All you have to do is explore your creativity to make the most of the GIF branding choices.
● Explain it Better
On a preference poll, most of us would shift to ‘watch’ over ‘read’ for a comprehensive understanding. An attractive motion visual is an even better treat. GIFs are pivotal in making viewers relate to the concept and message behind your product in a more enhanced manner.
Additionally, these are a continent means to introduce emotional mobility among your target audience with depictive emojis. You can use GIFs to develop effective content approaches to make the audience connect with your product viability, both practically band emotionally.
● Increase Visitor Attraction
Today’s changing times have brought about a rapid outlook towards everything. All of us are bounded by time constraints and when browsing the web, the prime need is to look for quick and accurate solutions to everything concerned.
Short and exact information delivery of GIFs is something that would keep visitors glued to your site because they will be assured of getting exactly what they search for and that too in an interesting and entertaining way.
Part 2 How to Make Your Own GIF?
Now that you are familiar with the creative marketing credibility of GIFs, you might naturally feel motivated towards creating a GIF of your own. In case you are, see through the following section of this article to find out interesting ways of creating interesting and catchy GIFs, either for impressive product marketing or just to make your social media posts leave your community peers in awe!
Looking for the best GIF creator solutions on the web, you can rely on GIPHY, one of the most preferred and convenient databases to create GIFs quickly. This is a smartphone compatible tool and works well with almost any device. Follow the steps given below to make GIFs with this tool:
Step 1:
Download and install the GIPHY app in your device.
Step 2:
Click on ‘Create’ in the app’s welcome screen. This will change (+) icon at the top-right corner to the ‘Camera’ symbol. You can also navigate to the ‘Profile’ at the bottom-right and tap the (+) or ‘Camera’ icon in the app’s account page.
Step 3:
Click on ‘Allow Camera Access’. You will receive two successive prompt messages from the app. Click on ‘Allow’ to grant access permissions to your device media. When you are done, click on ‘I Agree’.
Step 4:
GIFHY uses your device’s front camera for GIF creation. However, if you need to go for a camera switch, click on the ‘Camera’ sign at the bottom-right.
Step 5:
Choose a desired filter and effect for your GIF with a left or right swipe on the live feed toolbar. The app has 11 amazing and realistic effects, including VHS Static, 3D Glasses, etc.
Step 6:
You can take up either of the following:
Press either of the ‘Filter’ or ‘Effect’ buttons to take static shots to create GIF from images, or press and hold the same to create animated GIF. For simply using effects, tap the white button.
In case you choose to create a motion GIF, the app forms a ‘visual timer’ around the editor screen. The motion recording stops once the line is in sync with the screen edges.
Step 7:
Having captured your perfect shot, you have the liberty to merge it with an image or video. However, do consider the following options to add some more elements to your capture: You can add relatable text in 9 color choices.
● Enhance your graphic presentation with 8 amazing effects like, ‘rainbow overlays’, BW film grains, etc.
● Choose from a never ending list of suitable stickers to add the feel through connect to your GIFs.
● Trim your animated GIFs to the ‘just perfect’ portion by adjusting the editing markers.
Relax; that’s no rocket science. Just tap on the respective buttons and there you go!
Step 8:
Set your GIF in a desired size frame by choosing the ‘Crop’ tool from the top-right corner of the editing screen. You are given a size flexibility of 1:1, 3:2, 16:9, 4:5 and 9:16.
Step 9:
Once you are satisfied with your creation, tap the ‘Right Arrow’ icon. In the interface that follows, add suitable share tags to the GIF.
Step 10:
Tap ‘Share GIF’ to post your creation on social media platforms or share it through popular IM apps. To save your initially captured clip, click on ‘Save Video’ or tap ‘Save GIF’ to save your creation in your smartphone’s memory.
Part 1 What Are 10 Best GIF Creator to Find Brilliant Pre-made Gifs?
Having talked about GIF creation on the go, let’s take a dive into the best GIF creator solutions that are a storehouse of exciting pre-made GIFs. When browsing the web for an affordable GIF maker tool, you land across a pool of choices. Read through the further sections of this article to find out what’s best for you.
Described below are 10 best alternatives to get amazing pre-made GIFs:
● Wondershare Filmora Video Editor
This one is a popular, preferred and top rated application where you get to choose from an exciting range of pre-made GIFs under a variety of specific categories. All you need to do is, visit the app’s official site, browse to your favorite GIF category and select a desired GIF. Follow a few app instructions to save your selection and that’s it! Your selected GIF reaches your device memory within seconds.
Wondershare Filmora - Best Video Editor for Mac/Windows
5,481,435 people have downloaded it.
Build unique custom animations without breaking a sweat.
Focus on creating epic stories and leave the details to Filmora’s auto features.
Start a creative adventure with drag & drop effects and endless possibilities.
Filmora simplifies advanced features to save you time and effort.
Filmora cuts out repetition so you can move on to your next creative breakthrough.
Key Features
● This app is available to you absolutely free of cost.
● Has an intelligent and user cohesive interface.
● Loaded with tons of brilliant GIFs to choose from.
● The app supports GIF customization.
● GIFHY
Launched in 2013, this one is probably the best GIF maker and downloader tool available on the web today. It is a free tool, packed with enormous varieties of GIFs to choose from. What’s more interesting about the app is that you are free to play with your editing creativity to enhance your downloaded GIFs in the GIPHY editor.
Key Features
● It comes with an easy to use, convenient interface.
● You can edit downloaded GIFs with hundreds of effects and filters.
● The app provides you a direct sharing platform, allowing you to post GIFs to various social media platforms and also go for sharing via Instant Messaging applications.
● This is a fast processing tool that allows you to escape the notch of annoying and delayed download processes.
● Tenor
You can conveniently regard this one as the closest competitor to the GIPHY GIF creator and downloader tool. Needless to say, both are quite similar to each other in interface and usage respects. However, focusing on search results for a common keyword, you find diverse variations to your obvious surprise.
Key Features
● This is a free to use, interactive interface tool.
● It introduces a GIF Keyboard that allows you to search the most specific and relatable GIFs.
● It ensures a speedy and high quality GIF download.
● You can explore your editing skills to your heart’s content to improvise the downloaded GIFs with this tool.
● This tool gives you the liberty to directly share GIFs across different platforms.
If you like to spend ample time on choosing what’s perfect for you, refer this online tool for your GIF download solutions. It caters to your love of diversity with the most deep rooted and broad GIF range. However, this one comes with a little messy interface, demanding some patience from you to get to the right thing.
Key Features
● This tool provides you with almost all possible choices for a GIF category.
● It is available to you free of cost
● The tool site is loaded with rich and quality GIF content.
● This one is a direct save and export tool for your downloaded GIFs.
● Gfycat
You can prefer this one as a GIF hosting tool. Developed with a view to launch a common medium for GIF and HTML contents, this app ensures in-time and hassle free downloads and delivery. Though lacking a refined search bar, this tool promises you of excellence in content quality.
Key Features
● This comes to you as one of the most reliable GIF hosting tools.
● It is a free and quick content delivery tool.
● You are allowed to select the most suitable one from a variety of playback choices.
● This tool also gives you the flexibility of direct media sharing.
● GIFbin
If you are hung-over decade old nostalgia and the fever doesn’t seem to go away, you can check this site for some really satisfying retro and other similar content. This would definitely make you take a toll back to the times when MSN and Limewire were unparalleled market leaders in content sharing.
Key Features
● GIFbin is a storehouse of the best animated GIFs, that is on a continuous update to facilitate fresh and quality based content, every time you visit the site.
● It has an advanced, API enabled search mechanism.
● It boasts of having the handiest and convenient user interface.
● If you prefer GIFs of the comic genre, this tool is heaven for you.
● Imgflip
This is another GIF download site, commonly preferred for comedy and fun oriented content. Using this site, you can download and create a variety of GIF based memes that have the potential to flood your social media posts with likes and comments. This one is a complete GIF basket, suited to vast content varieties and user preferences. You will find the site’s official watermark on all its contents.
Key Features
● The site stands among the most preferred GIF-meme creation and sharing platforms.
● The tool is packed with loads of quality content under specific categories
● You can improvise the dimensions of your editing skills to modify downloaded GIFs.
● This site has a default media export feature that you can use to share your GIFs on social media.
● Imgur
Launched in 2009, this is among the most visited GIF sites, originally created for sharing meme based contents on social media. Its extensive search filters are dedicated to fetch the exact GIFs and memes you are looking for. If you are tired of browsing sites for particular content requirements, your search spree will definitely end here.
Key Features
● The site is known for its extensive and diversified content quality.
● It is a free, convenient and dependable GIF download tool.
● Imgur is highly preferred for content export across various media platforms.
● It is equipped with an advanced and updated search filter that assures you of getting fresh and top quality GIFs on almost every possible keyword.
● Tumblr
Claiming a launch date of 13 years back, this is quite a good GIF download option. You can find excellent quality GIF content on the site, particularly in the comic genre. Though not as popular as its online counterparts today, the site definitely enjoyed commendable visitor preferences at the time of its launch. You can certainly visit this site for a filling entertainment dose.
Key Features
● Tumblr is a free download site with a user friendly interface.
● The site is loaded with notable content varieties.
● You can go for direct media sharing through this site.
● Its comic GIFs are quite hilarious.
● Know Your Meme
This site uses the Wiki software to stock an inventory of classic GIFs and memes. Using this database for GIF downloads means that you don’t need to compromise on content and image quality. The site contents are periodically updated to ensure that visitors are not exposed to stale and outdated content.
Key Features
● The site offers fresh content having catchy and latest GIFs.
● This is a complete storehouse of GIFs and memes that can definitely keep you rolling.
● The site comes as a free tool and gas a user cohesive interface
● It hast the most efficient search filters that are regularly improvised to ensure quality content delivery.
● Key Takeaways from This Episode →
● GIFs are an effective and captivating means of quality content sharing and message delivery. Take them as a hilarious entertainment source or use them to enhance your marketing policies, GIFs can do it all.
● Influenced by the user credibility of GIFs, there are loads of GIF creator and download tools available online; among which Filmora by Wondershare is the current market leader. You can use this app to explore your GIF editing skills or download and share latest GIFs across media sharing platforms.
Top VHS Sound Effect That You Can Use in Video Making
Do you know why some videos grab your attention more than others? It’s about the visuals and the effects used in those videos. Effects are important in improving the overall experience and making a video more engaging. But it’s not just limited to video effects; audio effects can make a significant difference too. You can create specific themed content by adding effects to your videos.
When it comes to quality content, audio effects can add an extra layer of depth to it. They can transport you to a different time, place, or mood. However, you can create an old vintage-style video and make your audience go “WOW.” You can add an old retro-themed filter to your video, but adding a VHS sound effect is more important. This audio effect will make your video look more authentic and professional.
Part 1: How Are VHS Sound Effects Helpful in Video Creation?
Do you know how much VHS noise sound effects can be helpful? No problem if you don’t know how because this portion is going to answer you anyway.
1. Creates a Nostalgic Ambiance
VHS sound effects can bring back the feeling of nostalgia, just like the visual effects. The distinct sounds associated with VHS, like the gentle hum and hiss, create a vintage ambiance. It can make your video feel more authentic and take viewers back to the time of VHS tapes.
2. Adds Authenticity
Adding VHS audio effects can make your video feel more authentic. Similarly, if you want to recreate the experience of watching content on VHS tapes, this effect can help. Simulating audio imperfections like dropouts and tracking errors can make the video seem more genuine.
3. Sets Time Period
These audio effects help set the period and setting of your video. You can match the sound with the visuals using VHS tape sound effects. Moreover, it creates a consistent audio-visual experience that accurately represents a particular era.
4. Improves Genre and Atmosphere
Such sound effects are particularly effective in genres like horror or suspense. The gritty or distorted audio aesthetic associated with VHS can add depth and intensity to a video. It further improves the experience of your content and engages your audiences.
5. Experimenting Unconventional Techniques
Audio filters like VHS allow filmmakers and video creators to express their artistic style and vision. Using VHS-inspired audio elements, you can experiment with unconventional techniques. It also creates unique and original compositions that stand out from traditional sound designs.
Add VHS Sound Effect to Video
Simply add sound effects on video with Filmora Video Effect Editor ! Experience the magic of cool yet outstanding video effects, where your videos come to life in beautiful visuals.
Apply VHS Sound Effect Apply VHS Sound Effect Learn More >


Part 2: Best VHS Sound Effects To Use in 2024
A video is incomplete without good-quality audio and sound effects. So, if you want to create a VHS-style video, make sure to use VHS audio filters as well. Here are some classic VHS sounds you can use for your content.
1. Video Cass. Recorder 06
This audio effect gives your video the nostalgic feel of an old video reel playing. Its VHS-inspired audio effects last for 30 seconds. You can use this effect to create a vintage atmosphere in your videos. This effect can also transport your viewers back to the era of classic video recordings.
2. Creepy Distortion
You can create a haunting and unsettling atmosphere with this sound effect. It adds a creepy VHS sound distortion effect to your content. This effect is perfect for horror or suspenseful scenes. Moreover, this audio filter has a duration of 30 seconds.
3. VCR Deck Insert VHS Ta PE416803
With this audio effect, you can simulate the experience of inserting a tape into a VCR. You can add this effect to your video to enhance the authenticity and realism of a scene. It will help you in a situation where a tape is being loaded into a VCR. The duration of this audio is 20 seconds.
4. VCR Deck Insert VHS Ta PE416801
In this effect, you can hear the sound of someone inserting a tape into a VCR and pressing the play button. You can use this effect when showing scenes of tapes being loaded and played on a VCR. This 10-second audio effect will add an extra layer of realism and nostalgia.
5. VHS Player
Experience the entire process of using a VHS tape with this audio effect. You’ll hear the opening of the VHS box, inserting it into the VCR, followed by the playback sound. Then, there’s the fast-forward effect; additionally, you can enjoy the sound of the fast reverse. Finally, you’ll hear the stop, ejection of the VHS, and the storage of it back into its original box. This effect lasts for 3 minutes and 5 seconds.
6. VCR: Forward
Get the feeling of fast-forwarding through a VHS tape with this sound effect. It lasts 1 minute and 4 seconds and adds the authentic sound of a fast-forwarding VHS tape. You can use this audio effect when you want to add a similar effect to your content.
7. VCR VHS Tape Rewind M PE1046902
You can use this effect in your VHS-styled videos. It produces the sound of a VHS tape rewinding, followed by the VHS pause sound effect. This effect adds a distinct audio cue for rewinding and pausing scenes involving a VHS. The duration of this VHS effect is 4 seconds.
8. VCR: Rewind
Take a trip back in time with the sound of a VHS tape being rewound. This audio file adds a VHS rewind sound effect to your video. The duration of this file is 1 minute and 9 seconds. It will provide the nostalgic sound of a quick rewinding of a VHS tape.
9. Video Cass. Recorder 07
Using this audio effect, you can create the sensation of a video reel playing in a video cassette recorder. This VHS audio filter lasts for 30 seconds. You can use this effect to emphasize the vintage vibe of your video further. It also adds an old-fashioned charm to your video content.
10. VHS Player Rewind
This sound effect, provided by Pixabay, lasts 1 minute and 13 seconds. It starts with a glitchy and nostalgic VHS rewind sound to your video. The audio file brings back memories of vintage technology by adding the VHS rewind effect. You can recreate the experience of the 90s using this audio filter.
Bonus Part: Creating The Best VHS-Themed Videos With Wondershare Filmora
Filmora Video Editor is the ultimate tool and an incredible software for video editing. From audio effects to professional video edits, this tool can do a lot of stuff. This tool is now powered with AI technology which means more features are added in its latest version. You can edit your video and add sound effects that sync with your content feel.
Add VHS Sound Effect For Win 7 or later(64-bit)
Add VHS Sound Effect For macOS 10.14 or later
To make such videos having VHS effects, first, you need to learn how to use Wondershare Filmora. If you follow the following steps, you can easily edit your videos.
Step 1Starting Your Project
Open Wondershare Filmora and click on “New Project” to begin. This will bring up a new window where you can get started on your video. Import your video file by selecting the “Import Media” option and choosing the file from your system. Then, drag and drop the video into the timeline area to organize and prepare it for editing.

Step 2Apply VHS Effect to the Video
It’s time to add the VHS effects to your video. Look for the “Effects” option in the top bar and click on it. Next, search for “VHS” to find a variety of VHS overlays. Choose the one that suits your style and drag it onto the timeline, placing it over your video.

Step 3Apply VHS Sound Effects
For the VHS audio filter, go to the “Audio” tab, select “Sound Effect,” and search for “VHS.” Proceed further by selecting a suitable sound effect and dragging it onto the timeline beneath your video.

Step 4Export Your File
Once satisfied with the result, click the “Export” tab at the top left of the screen to save your video with the applied VHS effects.

Conclusion
In conclusion, a good video depends not only on your camera. There is so much post-production work behind good-quality content. You have to create a feel and ambiance in a video using effects and other overlays. You can create an old-themed video using the right filter and adding a VHS audio effect. Wondershare Filmora provides you with a platform where you can create such content with ease.
Apply VHS Sound Effect Apply VHS Sound Effect Learn More >
Part 2: Best VHS Sound Effects To Use in 2024
A video is incomplete without good-quality audio and sound effects. So, if you want to create a VHS-style video, make sure to use VHS audio filters as well. Here are some classic VHS sounds you can use for your content.
1. Video Cass. Recorder 06
This audio effect gives your video the nostalgic feel of an old video reel playing. Its VHS-inspired audio effects last for 30 seconds. You can use this effect to create a vintage atmosphere in your videos. This effect can also transport your viewers back to the era of classic video recordings.
2. Creepy Distortion
You can create a haunting and unsettling atmosphere with this sound effect. It adds a creepy VHS sound distortion effect to your content. This effect is perfect for horror or suspenseful scenes. Moreover, this audio filter has a duration of 30 seconds.
3. VCR Deck Insert VHS Ta PE416803
With this audio effect, you can simulate the experience of inserting a tape into a VCR. You can add this effect to your video to enhance the authenticity and realism of a scene. It will help you in a situation where a tape is being loaded into a VCR. The duration of this audio is 20 seconds.
4. VCR Deck Insert VHS Ta PE416801
In this effect, you can hear the sound of someone inserting a tape into a VCR and pressing the play button. You can use this effect when showing scenes of tapes being loaded and played on a VCR. This 10-second audio effect will add an extra layer of realism and nostalgia.
5. VHS Player
Experience the entire process of using a VHS tape with this audio effect. You’ll hear the opening of the VHS box, inserting it into the VCR, followed by the playback sound. Then, there’s the fast-forward effect; additionally, you can enjoy the sound of the fast reverse. Finally, you’ll hear the stop, ejection of the VHS, and the storage of it back into its original box. This effect lasts for 3 minutes and 5 seconds.
6. VCR: Forward
Get the feeling of fast-forwarding through a VHS tape with this sound effect. It lasts 1 minute and 4 seconds and adds the authentic sound of a fast-forwarding VHS tape. You can use this audio effect when you want to add a similar effect to your content.
7. VCR VHS Tape Rewind M PE1046902
You can use this effect in your VHS-styled videos. It produces the sound of a VHS tape rewinding, followed by the VHS pause sound effect. This effect adds a distinct audio cue for rewinding and pausing scenes involving a VHS. The duration of this VHS effect is 4 seconds.
8. VCR: Rewind
Take a trip back in time with the sound of a VHS tape being rewound. This audio file adds a VHS rewind sound effect to your video. The duration of this file is 1 minute and 9 seconds. It will provide the nostalgic sound of a quick rewinding of a VHS tape.
9. Video Cass. Recorder 07
Using this audio effect, you can create the sensation of a video reel playing in a video cassette recorder. This VHS audio filter lasts for 30 seconds. You can use this effect to emphasize the vintage vibe of your video further. It also adds an old-fashioned charm to your video content.
10. VHS Player Rewind
This sound effect, provided by Pixabay, lasts 1 minute and 13 seconds. It starts with a glitchy and nostalgic VHS rewind sound to your video. The audio file brings back memories of vintage technology by adding the VHS rewind effect. You can recreate the experience of the 90s using this audio filter.
Bonus Part: Creating The Best VHS-Themed Videos With Wondershare Filmora
Filmora Video Editor is the ultimate tool and an incredible software for video editing. From audio effects to professional video edits, this tool can do a lot of stuff. This tool is now powered with AI technology which means more features are added in its latest version. You can edit your video and add sound effects that sync with your content feel.
Add VHS Sound Effect For Win 7 or later(64-bit)
Add VHS Sound Effect For macOS 10.14 or later
To make such videos having VHS effects, first, you need to learn how to use Wondershare Filmora. If you follow the following steps, you can easily edit your videos.
Step 1Starting Your Project
Open Wondershare Filmora and click on “New Project” to begin. This will bring up a new window where you can get started on your video. Import your video file by selecting the “Import Media” option and choosing the file from your system. Then, drag and drop the video into the timeline area to organize and prepare it for editing.
Step 2Apply VHS Effect to the Video
It’s time to add the VHS effects to your video. Look for the “Effects” option in the top bar and click on it. Next, search for “VHS” to find a variety of VHS overlays. Choose the one that suits your style and drag it onto the timeline, placing it over your video.
Step 3Apply VHS Sound Effects
For the VHS audio filter, go to the “Audio” tab, select “Sound Effect,” and search for “VHS.” Proceed further by selecting a suitable sound effect and dragging it onto the timeline beneath your video.
Step 4Export Your File
Once satisfied with the result, click the “Export” tab at the top left of the screen to save your video with the applied VHS effects.
Conclusion
In conclusion, a good video depends not only on your camera. There is so much post-production work behind good-quality content. You have to create a feel and ambiance in a video using effects and other overlays. You can create an old-themed video using the right filter and adding a VHS audio effect. Wondershare Filmora provides you with a platform where you can create such content with ease.
How to Create a Video Slideshow in iMovie
How to Make a Video Slideshow in iMovie
An easy yet powerful editor
Numerous effects to choose from
Detailed tutorials provided by the official channel
Landing into the world of creativity, it can be a smart choice to experiment with creating a slideshow in iMovie. Stay tuned to understand the exquisite design know-hows!
In this article
01 [What’s the Advantage of Slideshow in iMovie?](#Part 1)
02 [How to Make a Video Slideshow in iMovie?](#Part 2)
03 [In What Way Could You Edit Your Video Shortly?](#Part 3)
Part 1 What’s the Advantage of Slideshow in iMovie?
Slideshow presentations land among the most elusive means of sharing valuable information across a diverse range of personal and professional content creation domains. Be it a fun-filled family event or a high end business centered client presentation; slideshows are there to address it all! Talking about affordable software solutions to adhere the purpose, you can conveniently pick the iMovie slideshow creator program.
Entering deeper into the software specifications, the iMovie application package is essentially a video and graphic editor tool, exclusively for MacOS and iOS supported devices. Working with the program, you can create stunning slideshow presentations and storytelling movies to commemorate your most cherished personal and commercial events, moments and scenarios.
Now that you have got an elementary overview of the iMovie video editor software, let us move ahead with our discussion to talk about the latter’s credibility towards creating top rated slideshow presentations in the following section prior to proceeding with addressing the concern of how to make a slideshow on iMovie:
Benefits of Creating iMovie Slideshows
● User Cohesive Working Interface
The most pronounced credibility of iOS compatible software tools and program utilities is undoubtedly, their user friendly operation characteristic, and iMovie is no exception to the lineage. The editor workspace of the slideshow creator is intelligently designed to suit the technical aptitude of the expanded diversity of tech savvy and amateur graphic editors. The interface is equally appealing to the newbies in the design realm.
To proceed with creating a slideshow in iMovie, you can either begin with scratch, working on an entirely new idea; or move ahead with picking any preset slideshow template or background theme, followed by customizing the same in line with the specific creation requirements. The software’s effect library is a vast storehouse of high end editing features and tools with the most convenient access.
● Customization Elements
The iMovie program allows you to create cinematic movie edits in Hollywood style. From curiosity generating trailers to nail biting thrills, you can add it all to engage your audience within your presentation. Talking about the customization flexibility, you can try hands at including studio logos, cast names and credit rolls to add extra value to the edits, while simultaneously appreciating the participants of your project.
If that’s not enough, you can work to create your presentations in a variety of genres and themes by choosing from tons of premade templates under a variety of genre centered categories and sub-categories. Moving further, you can also add related effects from the program’s effect library to match the mood and setting of the slideshow.
● Effects And Improvisations
The software offers a decent range of slideshow enhancement features and special effects. You can pick from over 10 different filters, 8 vivid themes and several numbers of sound and audio effects, along with including recorded voiceovers of your own. You can also go ahead to import audio tracks and music files that are saved locally on your iOS device.
● Convenient Presentation Sharing
To make your presentations accessible to a wider audience, you can proceed to share the created slideshows directly from IMovie to any of your preferred media sharing platforms, or export the same to an online storage account, like, AirDrop, iCloud Drive, etc.
Part 2 How to Make a Video Slideshow in iMovie?
Having observed the credibility of designing slideshow presentations in the iMovie video editor program, you might easily have a motivation to explore your graphic creativity by working with the software to make an iMovie slideshow of your own. Adhering to the concern, let us see through the process of making a slideshow in iMovie through a detailed, step by step guide in the following section:
User’s Guide to Create Video Slideshow in iMovie
Step 1: Download and Install the Program
To create slideshow with iMovie, start with visiting the home website of the iMovie video editor program and proceed to download the software in your desired iOS system for free. Next in the line is the installation process, which you need to complete in order to successfully launch the application in your system.
Step 2: Open a New Project
In the app’s welcome screen, navigate to and click on the ‘File’ tab in the ‘Functions Toolbar’ at the top. From the dropdown menu that follows, select the ‘New Project’ option to start working on a new slideshow. You can alternatively, press the ‘+ N’ command keys from your device keyboard to launch a new project. Once your project file is created, assign it a suitable name and select a desired aspect ratio.

Step 3: Create the First Slide
The inaugural slide of your presentation is generally consists of the slideshow the title, which you can add by clicking on the ‘Title’ icon under the ‘Preview’ box, to see a variety of text customization choices appear within the editor workspace.
To work with adding titles to a slide, choose a preferred text style; followed by navigating to the ‘Events Pane’ and dropping the same within the first dotted frame box. You can edit the text in the blue box above the first frame. The amount of text you can add depends on the size of the box. To change the length of the box, click on the same to drag it to a desired place and finally include the text in the ‘Preview’ box.
Navigate to and hit the ‘Show Fonts’ button to customize the added text in terms of color, fonts, style and size. Tap the ‘Preview Slide’ button to see the applied changes and click on ‘Done’ to confirm the same. You can repeat the above process to add titles and informative banners to all the slides within the slideshow presentation that you are about to create.

Step 3: Include Still Images
Browse through the locally saved images within your device gallery and add the desired ones at a specific point in the editor timeline using the ‘Drag and Drop’ method. A green colored indicative light will mark the spot where the images are being dropped. You are free to drop all the images at the same time and sort them at a later stage. Do not close the image folder in your device until you have imported all the stills.
The images can be alternatively added to the timeline by selecting the required ones from the iOS device’s Photo Booth or iPhoto account. All you need to do is navigate to and hit the ‘Photo’ button to drop the selected images in the ‘Photos’ box at the bottom right corner of the software workspace.

Step 4: Adjust Image Pans and Transitions
Having included the desired images within the slideshow project, it is now time to improvise them with classic and enhanced looks. You can adhere to the task by making suitable changes under the ‘Video Adjustments’, ‘Crop Tool’ and ‘Clock’ options. Drag the cursor to a desired slide to see all the 3 options pop up at the top your slide screen.

● Video Adjustment Tool
Using the ‘Video Adjustment’ option, you are granted the liberty to adjust the brightness, contrast, white point, exposure, saturation and levels of the added images. If your images have an appreciable quality by default, you can skip this step.
● Crop Tool
Consider working with the ‘Crop Tool’ to zoom or pan the system camera across a selected slide. Click on the ‘Fit’ option to set the image within a chosen frame size; however you need to be cautious lest using the tool may render an incorrectly cropped image. Select the ‘Crop’ option to adjust the image aspect ratio according to your specific size constraints.
The ‘Ken Burns’ tool, you can rely on this one to spark the slideshow images with the coolest zoom and pan effects. The tool is represented by ‘Red and Green’ boxes above the ‘Video Preview’ box in the editor timeline. You can easily move and resize the boxes using the ‘Hand’ and the ‘Cross Hair’ tools respectively. When you are satisfied with your work, hit ‘Done’ to return and confirm the changes, or click on the next presentation slide to crop and pan the same.
● Clock Tool
The ‘Clock’ icon lets you adjust the screen time of each slide, assigning a preset minimum duration of 0.25 seconds to each slide. Setting a play duration somewhere between 2-2.5 seconds would be an optimal choice. Avoid choosing shorter slide duration unless it becomes an obvious requirement, lest the audience may find it hard to process the contents.
Prefer adjusting the screen time separately for each slide, in case you have a large project with more than 50 slides. It is instead, advisable to time the entire project under one time frame, while setting a longer screen time for the title slide.
Step 5: Add an Upbeat Background Audio
Adding background music to your presentation slides is pretty simple, with you having to just position the audio files within the desired slides using the ‘Drag and Drop’ method. The slides containing music pieces will have a ‘Light Green’ highlighting box under them. To correct a wrong placement, drag the audio file across the individual slides and drop at the correct space. You can further, modify the length of the audio clips by extending and trimming them.
To import audio files from your online iTunes account, navigate to and click within the ‘Music and Sound Effects’ box at the bottom right corner of the editor timeline. You can also clip the music file to start playing the background audio from a certain point within the track. To do this, take the cursor to the end of the track and drag the red indicator line to the point where you wish the audio to end at or begin playing from.

Step 6: Share Your Presentation
Run a mock slideshow in the ‘Preview’ box to ensure that every element of the presentation is at its specified place. When all looks good, navigate to the ‘Functions Toolbar’ at the top and hit the ‘Share’ tab to select a media sharing platform of your choice. You can even choose to export your slideshow directly from the editor timeline via QuickTime.
Part 3 In What Way Could You Edit Your Video Shortly?
Creating slideshow iMovie presentations is a creative task and everything comes on the line with the finesse of editing skills to evoke an intelligent play with features, tools and effects. While you can master the art with consistent effort and practice, there are some really cool tips and tricks to quickly edit and uplift iMovie presentations.
Let us have a look at a few of the most prominent ones in the following section before you move ahead to create slideshow in iMovie:
01Cool Ways to Quickly Edit Your iMovie Videos
● Crop to Zoon in the Video
When editing your videos in the iMovie software, you can zoom in a desired portion of the video frame. All you need to do is, select a clip, tap on the ‘Crop’ button at the top right corner over the ‘Preview’ box, choose the ‘Crop to Fill’ option and drag the effect to the specific clip area you wish to crop. Apply your changes by clicking inside the checkbox at the top right corner.

● Split a Clip
You can reduce the size of a sufficiently long video clip by choosing to break the same into several parts or trim it to ward off unwanted portions. To split your footage, take your cursor to the specific splitting point of the clip within the editor timeline, make a right click, and select the ‘Split Clip’ option from the dropdown menu that follows next.
● Detach an Audio File
Detaching audio from a clip allows you to experiment with different video play options. You can let the run the in the background as you proceed to split a clip for inserting a still image. To work with the effect, navigate to and right click on a desired clip within the editor timeline and tap on ‘Detach Audio’ in the upcoming list of options. The added music clip in ’Blue’ will detach to appear as an independent clip in ‘Green’ within the software timeline.
● Fade Audio In and Out
To ensure a smooth audio transition between successive clips, try hands at fading the audio in and out by pointing the cursor at a detached green or an attached blue audio clip, followed by dragging the small round circles at the beginning or end of the footage. To introduce a gradual fade in or out effect, drag the round button to the center of the video clip.
● Include Transitions
Transitions allow a seamless presentation flow by ensuring a smooth movement between different slides appearing in continuity. Add a suitable transition element to the video footage of your slideshow by navigating to and hitting the ‘Transition’ tab in the ‘Functions Toolbar’. The default transition screen time is 1 second, but you can customize the same by double clicking on the effect post the latter’s addition within the editor timeline.
02Editing Video Slideshows in Filmora
The iMovie slideshow maker program is an excellent choice to work on, as far as the creation of classic and stunning examples of professional, personal and commercial presentations is concerned. However, if you ever land across the need to pick alternative software for making high end slideshows, you can safely choose to go with the Wondershare Filmora Video Editor slideshow creator and editor application package without having to think twice.
For Win 7 or later (64-bit)
For macOS 10.12 or later
Talking about the specific concern of editing flexibility, tools and features; working with the program you are entitled to access a trunk of graphic customization utilities to spark up your presentations that are bound to receive jaw dropping viewer appreciation. The vast, inbuilt effect library of the program houses more than 800 different and top rated, latest editing effects to uplift and improvise your presentations. Here’s a mention of some of the most distinguished ones:
● The ‘Picture-in-Picture’ effect allows you to layer several video clips in a single track.
● You can change the background and add special effects to the presentation slides with the ‘Green Screen’ feature.
● The ‘Split Screen’ feature of the editor program allows you to introduce a new and unique style of storytelling though a multi-screen access.
● Filmora offers over 70 different ‘AI Potrait’ effects that visibly have the highest accuracy of background removal.
● Using the ‘Auto Reframe’ tool to automatically resize your videos without any pro level editing skills.
● You can work towards creating high resolution screen recordings of business meetings, live events, gameplay sessions, product demo presentations, etc., with the software’s ‘Screen Recorder’ tool.
● Use the ‘Silence Detection’ feature to instantly fade out the slideshow music and make your narration more pronounced.
● You can use the ‘Color Match’ tool to introduce suitable color corrections simultaneously within several slides, thus saving much of your valuable time.
● The program allows you to eliminate the camera shake distortions from your clips with its ‘Video Stabilization’ feature.
● Ending Thoughts →
● iMovie slideshows are exemplary in class and style as far as graphic presentation design is concerned.
● You can quickly create and conveniently edit slideshow presentations with the iMovie graphic editor package in your favorite iOS devices.
● When looking for relevant iMovie alternatives to design and edit slideshow presentations, you can conveniently depend on the Wondershare Filmora video editor program.
Landing into the world of creativity, it can be a smart choice to experiment with creating a slideshow in iMovie. Stay tuned to understand the exquisite design know-hows!
In this article
01 [What’s the Advantage of Slideshow in iMovie?](#Part 1)
02 [How to Make a Video Slideshow in iMovie?](#Part 2)
03 [In What Way Could You Edit Your Video Shortly?](#Part 3)
Part 1 What’s the Advantage of Slideshow in iMovie?
Slideshow presentations land among the most elusive means of sharing valuable information across a diverse range of personal and professional content creation domains. Be it a fun-filled family event or a high end business centered client presentation; slideshows are there to address it all! Talking about affordable software solutions to adhere the purpose, you can conveniently pick the iMovie slideshow creator program.
Entering deeper into the software specifications, the iMovie application package is essentially a video and graphic editor tool, exclusively for MacOS and iOS supported devices. Working with the program, you can create stunning slideshow presentations and storytelling movies to commemorate your most cherished personal and commercial events, moments and scenarios.
Now that you have got an elementary overview of the iMovie video editor software, let us move ahead with our discussion to talk about the latter’s credibility towards creating top rated slideshow presentations in the following section prior to proceeding with addressing the concern of how to make a slideshow on iMovie:
Benefits of Creating iMovie Slideshows
● User Cohesive Working Interface
The most pronounced credibility of iOS compatible software tools and program utilities is undoubtedly, their user friendly operation characteristic, and iMovie is no exception to the lineage. The editor workspace of the slideshow creator is intelligently designed to suit the technical aptitude of the expanded diversity of tech savvy and amateur graphic editors. The interface is equally appealing to the newbies in the design realm.
To proceed with creating a slideshow in iMovie, you can either begin with scratch, working on an entirely new idea; or move ahead with picking any preset slideshow template or background theme, followed by customizing the same in line with the specific creation requirements. The software’s effect library is a vast storehouse of high end editing features and tools with the most convenient access.
● Customization Elements
The iMovie program allows you to create cinematic movie edits in Hollywood style. From curiosity generating trailers to nail biting thrills, you can add it all to engage your audience within your presentation. Talking about the customization flexibility, you can try hands at including studio logos, cast names and credit rolls to add extra value to the edits, while simultaneously appreciating the participants of your project.
If that’s not enough, you can work to create your presentations in a variety of genres and themes by choosing from tons of premade templates under a variety of genre centered categories and sub-categories. Moving further, you can also add related effects from the program’s effect library to match the mood and setting of the slideshow.
● Effects And Improvisations
The software offers a decent range of slideshow enhancement features and special effects. You can pick from over 10 different filters, 8 vivid themes and several numbers of sound and audio effects, along with including recorded voiceovers of your own. You can also go ahead to import audio tracks and music files that are saved locally on your iOS device.
● Convenient Presentation Sharing
To make your presentations accessible to a wider audience, you can proceed to share the created slideshows directly from IMovie to any of your preferred media sharing platforms, or export the same to an online storage account, like, AirDrop, iCloud Drive, etc.
Part 2 How to Make a Video Slideshow in iMovie?
Having observed the credibility of designing slideshow presentations in the iMovie video editor program, you might easily have a motivation to explore your graphic creativity by working with the software to make an iMovie slideshow of your own. Adhering to the concern, let us see through the process of making a slideshow in iMovie through a detailed, step by step guide in the following section:
User’s Guide to Create Video Slideshow in iMovie
Step 1: Download and Install the Program
To create slideshow with iMovie, start with visiting the home website of the iMovie video editor program and proceed to download the software in your desired iOS system for free. Next in the line is the installation process, which you need to complete in order to successfully launch the application in your system.
Step 2: Open a New Project
In the app’s welcome screen, navigate to and click on the ‘File’ tab in the ‘Functions Toolbar’ at the top. From the dropdown menu that follows, select the ‘New Project’ option to start working on a new slideshow. You can alternatively, press the ‘+ N’ command keys from your device keyboard to launch a new project. Once your project file is created, assign it a suitable name and select a desired aspect ratio.
Step 3: Create the First Slide
The inaugural slide of your presentation is generally consists of the slideshow the title, which you can add by clicking on the ‘Title’ icon under the ‘Preview’ box, to see a variety of text customization choices appear within the editor workspace.
To work with adding titles to a slide, choose a preferred text style; followed by navigating to the ‘Events Pane’ and dropping the same within the first dotted frame box. You can edit the text in the blue box above the first frame. The amount of text you can add depends on the size of the box. To change the length of the box, click on the same to drag it to a desired place and finally include the text in the ‘Preview’ box.
Navigate to and hit the ‘Show Fonts’ button to customize the added text in terms of color, fonts, style and size. Tap the ‘Preview Slide’ button to see the applied changes and click on ‘Done’ to confirm the same. You can repeat the above process to add titles and informative banners to all the slides within the slideshow presentation that you are about to create.
Step 3: Include Still Images
Browse through the locally saved images within your device gallery and add the desired ones at a specific point in the editor timeline using the ‘Drag and Drop’ method. A green colored indicative light will mark the spot where the images are being dropped. You are free to drop all the images at the same time and sort them at a later stage. Do not close the image folder in your device until you have imported all the stills.
The images can be alternatively added to the timeline by selecting the required ones from the iOS device’s Photo Booth or iPhoto account. All you need to do is navigate to and hit the ‘Photo’ button to drop the selected images in the ‘Photos’ box at the bottom right corner of the software workspace.
Step 4: Adjust Image Pans and Transitions
Having included the desired images within the slideshow project, it is now time to improvise them with classic and enhanced looks. You can adhere to the task by making suitable changes under the ‘Video Adjustments’, ‘Crop Tool’ and ‘Clock’ options. Drag the cursor to a desired slide to see all the 3 options pop up at the top your slide screen.
● Video Adjustment Tool
Using the ‘Video Adjustment’ option, you are granted the liberty to adjust the brightness, contrast, white point, exposure, saturation and levels of the added images. If your images have an appreciable quality by default, you can skip this step.
● Crop Tool
Consider working with the ‘Crop Tool’ to zoom or pan the system camera across a selected slide. Click on the ‘Fit’ option to set the image within a chosen frame size; however you need to be cautious lest using the tool may render an incorrectly cropped image. Select the ‘Crop’ option to adjust the image aspect ratio according to your specific size constraints.
The ‘Ken Burns’ tool, you can rely on this one to spark the slideshow images with the coolest zoom and pan effects. The tool is represented by ‘Red and Green’ boxes above the ‘Video Preview’ box in the editor timeline. You can easily move and resize the boxes using the ‘Hand’ and the ‘Cross Hair’ tools respectively. When you are satisfied with your work, hit ‘Done’ to return and confirm the changes, or click on the next presentation slide to crop and pan the same.
● Clock Tool
The ‘Clock’ icon lets you adjust the screen time of each slide, assigning a preset minimum duration of 0.25 seconds to each slide. Setting a play duration somewhere between 2-2.5 seconds would be an optimal choice. Avoid choosing shorter slide duration unless it becomes an obvious requirement, lest the audience may find it hard to process the contents.
Prefer adjusting the screen time separately for each slide, in case you have a large project with more than 50 slides. It is instead, advisable to time the entire project under one time frame, while setting a longer screen time for the title slide.
Step 5: Add an Upbeat Background Audio
Adding background music to your presentation slides is pretty simple, with you having to just position the audio files within the desired slides using the ‘Drag and Drop’ method. The slides containing music pieces will have a ‘Light Green’ highlighting box under them. To correct a wrong placement, drag the audio file across the individual slides and drop at the correct space. You can further, modify the length of the audio clips by extending and trimming them.
To import audio files from your online iTunes account, navigate to and click within the ‘Music and Sound Effects’ box at the bottom right corner of the editor timeline. You can also clip the music file to start playing the background audio from a certain point within the track. To do this, take the cursor to the end of the track and drag the red indicator line to the point where you wish the audio to end at or begin playing from.
Step 6: Share Your Presentation
Run a mock slideshow in the ‘Preview’ box to ensure that every element of the presentation is at its specified place. When all looks good, navigate to the ‘Functions Toolbar’ at the top and hit the ‘Share’ tab to select a media sharing platform of your choice. You can even choose to export your slideshow directly from the editor timeline via QuickTime.
Part 3 In What Way Could You Edit Your Video Shortly?
Creating slideshow iMovie presentations is a creative task and everything comes on the line with the finesse of editing skills to evoke an intelligent play with features, tools and effects. While you can master the art with consistent effort and practice, there are some really cool tips and tricks to quickly edit and uplift iMovie presentations.
Let us have a look at a few of the most prominent ones in the following section before you move ahead to create slideshow in iMovie:
01Cool Ways to Quickly Edit Your iMovie Videos
● Crop to Zoon in the Video
When editing your videos in the iMovie software, you can zoom in a desired portion of the video frame. All you need to do is, select a clip, tap on the ‘Crop’ button at the top right corner over the ‘Preview’ box, choose the ‘Crop to Fill’ option and drag the effect to the specific clip area you wish to crop. Apply your changes by clicking inside the checkbox at the top right corner.
● Split a Clip
You can reduce the size of a sufficiently long video clip by choosing to break the same into several parts or trim it to ward off unwanted portions. To split your footage, take your cursor to the specific splitting point of the clip within the editor timeline, make a right click, and select the ‘Split Clip’ option from the dropdown menu that follows next.
● Detach an Audio File
Detaching audio from a clip allows you to experiment with different video play options. You can let the run the in the background as you proceed to split a clip for inserting a still image. To work with the effect, navigate to and right click on a desired clip within the editor timeline and tap on ‘Detach Audio’ in the upcoming list of options. The added music clip in ’Blue’ will detach to appear as an independent clip in ‘Green’ within the software timeline.
● Fade Audio In and Out
To ensure a smooth audio transition between successive clips, try hands at fading the audio in and out by pointing the cursor at a detached green or an attached blue audio clip, followed by dragging the small round circles at the beginning or end of the footage. To introduce a gradual fade in or out effect, drag the round button to the center of the video clip.
● Include Transitions
Transitions allow a seamless presentation flow by ensuring a smooth movement between different slides appearing in continuity. Add a suitable transition element to the video footage of your slideshow by navigating to and hitting the ‘Transition’ tab in the ‘Functions Toolbar’. The default transition screen time is 1 second, but you can customize the same by double clicking on the effect post the latter’s addition within the editor timeline.
02Editing Video Slideshows in Filmora
The iMovie slideshow maker program is an excellent choice to work on, as far as the creation of classic and stunning examples of professional, personal and commercial presentations is concerned. However, if you ever land across the need to pick alternative software for making high end slideshows, you can safely choose to go with the Wondershare Filmora Video Editor slideshow creator and editor application package without having to think twice.
For Win 7 or later (64-bit)
For macOS 10.12 or later
Talking about the specific concern of editing flexibility, tools and features; working with the program you are entitled to access a trunk of graphic customization utilities to spark up your presentations that are bound to receive jaw dropping viewer appreciation. The vast, inbuilt effect library of the program houses more than 800 different and top rated, latest editing effects to uplift and improvise your presentations. Here’s a mention of some of the most distinguished ones:
● The ‘Picture-in-Picture’ effect allows you to layer several video clips in a single track.
● You can change the background and add special effects to the presentation slides with the ‘Green Screen’ feature.
● The ‘Split Screen’ feature of the editor program allows you to introduce a new and unique style of storytelling though a multi-screen access.
● Filmora offers over 70 different ‘AI Potrait’ effects that visibly have the highest accuracy of background removal.
● Using the ‘Auto Reframe’ tool to automatically resize your videos without any pro level editing skills.
● You can work towards creating high resolution screen recordings of business meetings, live events, gameplay sessions, product demo presentations, etc., with the software’s ‘Screen Recorder’ tool.
● Use the ‘Silence Detection’ feature to instantly fade out the slideshow music and make your narration more pronounced.
● You can use the ‘Color Match’ tool to introduce suitable color corrections simultaneously within several slides, thus saving much of your valuable time.
● The program allows you to eliminate the camera shake distortions from your clips with its ‘Video Stabilization’ feature.
● Ending Thoughts →
● iMovie slideshows are exemplary in class and style as far as graphic presentation design is concerned.
● You can quickly create and conveniently edit slideshow presentations with the iMovie graphic editor package in your favorite iOS devices.
● When looking for relevant iMovie alternatives to design and edit slideshow presentations, you can conveniently depend on the Wondershare Filmora video editor program.
How To Make Transparent Background On Picsart
How To Make Transparent Background On Picsart
An easy yet powerful editor
Numerous effects to choose from
Detailed tutorials provided by the official channel
Here you can find various ways of making a transparent logo using different video editors. Choosing a video creator and using simple steps for transparent image making is really a fun.
In this article
01 [Easy Steps to create Transparent PNG Image in Picsart](#Part 1)
02 [3 Cool Ways To Make A Transparent Logo](#Part 2)
03 [How To Make Transparent Background On Phone; Three Simple Ways](#Part 3)
Part 1 Easy Steps to create Transparent PNG Image in Picsart

There are times when you feel the need of creating a transparent image. With the rapidly changing scenario regarding picture collage, graphic designing and logo designing for branding, the requirement of making transparent background Picsartis increasing day by day. Although, there are many good video editing apps online for designing transparent images but you will love using Picsart for its simple and easy processing.
Picsart is one of the easiest and advance picture editors to meet your demands.
Here is the whole process of creating transparent PNG image in Picsart –
Step 1
Choose a photo and select it to make particular areas transparent
Step 2
Click picture Tools>recolor>set transparent color.
Step 3
You can click particular colors in the picture to make them transparent
In case a picture has transparent areas, the areas can be changed to opaque or opaque to transparent again for setting back the background color. But the limitation is that opacity can’t be used for creating a semi-opaque background.
Now, changing the transparent picture into opaque one is so easy that you just need to press CTRL+T after selecting the picture.
You will find your transparent picture converted into opaque. Lets create your picsart bike background with this cool trick.
Part 2 Cool Ways To Make A Transparent Logo

You can feel the requirement of generating a transparent logo while creation of graphics for promotional purpose. Although, making a transparent logo is not a tough task and can be done easily with any random video editor but using an efficient and reputed app with lots of features is a better option. So, know here how u can make a transparent logo without wasting much time. Whether you want to make a happy birthday sticker or graphics for branding, this simple process will help you.
● Online tool –Pixcut, create fully transparent logo
Do you want to achieve the result with an intelligent tool? If yes, use wondershare Pixcut as t is capable of removing all kind of background from the picture. You can use this app for editing of portrait, picture, logos and even regular landscapes. So, here you go –
Step 1
Visit wondershare.com and upload an image by clicking on ‘upload’. You can select the image from your local storage as well as prefer drag and drop method too according to your choice.
Step 2
Once your image gets upload, you will see the Pixcut app that it’s removing the background automatically. The final result can be seen on the right side of the screen.
Step 3
Click on ‘download’ in the top of the right corner and save the transparent logo generated this way. Find the image in ‘download’ folder of your device.
So you can see how quick and effective is the process of background removing with Pixcut.
● Use Canva, have control on the level of transparency
Another well known name in the world of video editors is Canva. This extremely effective video editing and graphic designing tool helps you to bring the along with a transparent slider. If you don’t want to spend money for making transparent logo and want to make it balanced and beautiful, go with Canva without second thought.
Step 1
Go to Canva site. Start a new project. You can select your project regardless to shape and size here. The app redirects you to the project window and you just need to click on upload in the menu given in left. Pick the logo you want to make transparent.
Step 2
After uploading the logo in editing window (which you can also drag and drop), click on your logo. Go to the top right corner of the screen and check transparency feature below the download option. You will see the transparency option has a slider here and you can select the percentage of transparency here. Go to the highest level of the slider if you need to create fully transparent logo.
You can create an impressive picsaart background banner also this way.
Step 3
So, making a transparent logo using Canva is this much easy. Now download the logo and use it however you need. Interesting, isn’t it?
● Use Wondershare Filmora, add transparent logo to video directly
Want to work on an really interesting platform with a variety of tools and features? Well, use Wondershare Filmora. It gives you easy, free and quick way of generating transparent logo. Let’s know how to create a transparent logo in Wondershare Filmora Video Editor
For Win 7 or later (64-bit)
For macOS 10.12 or later
Step 1
Download Filmora app in your device and install it. The app can easily be downloaded and installed in windows or Mac computer. Then, open the app and visit file import media. Import the logo and video file you want from here or drag and drop your file to media library.
Step 2
Next you need to drag and drop the video file and logo both on the timeline simultaneously. Put your cursor on logo and right click, you will find the green screen option. Select it.
Step 3
You will find Chroma key settings and your logo overlaying the video in the preview window.
Just enable the Chroma key and your logo becomes transparent. The background found this way will be green and you can change the color of the background by picking an color from the color icon.
Step 4
Finally, you can change the size of the logo and add it to your video. It’s too easy, right?
Part 3 How To Make Transparent Background On Phone; Three Simple Ways

So, you are planning to create your own logo and havepicsart background hd downloadfor promoting your brand. Well there are many attractive ideas to make transparent images and logo but making background transparent is important when you want to layer the logos.
Here find out the idea of generating transparent background with 3 different video editors –
● Apowersoft Background Eraser
The best app to make a transparent background on phone is Apowersoft background eraser. It works on iOS and android platform both. Removing a background is so easy with this app. Here is stepwise guideline for creating transparent background on Apowersoft –
Step 1
Install the app apowersoft background eraser and let the app allow you to upload a photo by tapping on recognition.
Step 2
Upload the photo and the app will delete the background automatically.
Step 3
Save the file by tapping on ‘save’ button
Step 4
Download the file for use.
The entire process is automated and keeps your photo with original quality despite editing.
The app is compatible for android and iOS both platforms but sometimes you can face delay in the process of background removal.
Black picsart background will look cool too.
● Lunapic
Another good tool for easy background removal is Lunapic. It is known for making transparent background for free. You need nothing but to visit official website of lunapic and upload the file that you want to make transparent. Then click on the background that you want to remove and great, you will find your file with transparent background. D
Download the file and save it to apply for the purpose you want.
● Adobe photoshop mix
Adobe photoshop is a fool proof editof for making transparent background on your phone. The app is known for its quick processing and lots of designs. The procedure of background removal or making transparent background is so easy. Go through the steps mentioned here –
Step 1
Open your logo file.
Step 2
Go to menu and Select ‘layer’ and add a transparent layer by clicking on new layer. A dialog box will appear and ask to rename the layer. If you don’t want to rename, just leave the layer default as layer 0 and click OK.
Step 3
This is how you unlock the background layer and make anything transparent by deleting it.
Step 4
Now you can create your selection by using magic wand too. Check the left hand side of your app screen and go to ‘select subject’. Then visit ‘options’ bar at the top of the screen. Using this tool, you can remove the background of selection. The clearness of the background and beauty of the picture depends upon the efficiency of using this tool.
Step 5
After selecting the product, type SHIFT + CTRL+ I and use this short key to select the inverse from dropdown menu at top application.
Step 6
You can deselect the selection by typing CTRL + D
Step 7
This is the entire process for creating transparent background. Save the product image in proper format so that you can display it online easily. PNG – 24 is known to be the best suitable format for this purpose.
● Ending Thoughts →
● Check the list of video creators and pick the one that suits you the most from operation point of view.
● Go with the trend and select design of picsart background.
● Use the easiest application if features are not important.
Here you can find various ways of making a transparent logo using different video editors. Choosing a video creator and using simple steps for transparent image making is really a fun.
In this article
01 [Easy Steps to create Transparent PNG Image in Picsart](#Part 1)
02 [3 Cool Ways To Make A Transparent Logo](#Part 2)
03 [How To Make Transparent Background On Phone; Three Simple Ways](#Part 3)
Part 1 Easy Steps to create Transparent PNG Image in Picsart
There are times when you feel the need of creating a transparent image. With the rapidly changing scenario regarding picture collage, graphic designing and logo designing for branding, the requirement of making transparent background Picsartis increasing day by day. Although, there are many good video editing apps online for designing transparent images but you will love using Picsart for its simple and easy processing.
Picsart is one of the easiest and advance picture editors to meet your demands.
Here is the whole process of creating transparent PNG image in Picsart –
Step 1
Choose a photo and select it to make particular areas transparent
Step 2
Click picture Tools>recolor>set transparent color.
Step 3
You can click particular colors in the picture to make them transparent
In case a picture has transparent areas, the areas can be changed to opaque or opaque to transparent again for setting back the background color. But the limitation is that opacity can’t be used for creating a semi-opaque background.
Now, changing the transparent picture into opaque one is so easy that you just need to press CTRL+T after selecting the picture.
You will find your transparent picture converted into opaque. Lets create your picsart bike background with this cool trick.
Part 2 Cool Ways To Make A Transparent Logo
You can feel the requirement of generating a transparent logo while creation of graphics for promotional purpose. Although, making a transparent logo is not a tough task and can be done easily with any random video editor but using an efficient and reputed app with lots of features is a better option. So, know here how u can make a transparent logo without wasting much time. Whether you want to make a happy birthday sticker or graphics for branding, this simple process will help you.
● Online tool –Pixcut, create fully transparent logo
Do you want to achieve the result with an intelligent tool? If yes, use wondershare Pixcut as t is capable of removing all kind of background from the picture. You can use this app for editing of portrait, picture, logos and even regular landscapes. So, here you go –
Step 1
Visit wondershare.com and upload an image by clicking on ‘upload’. You can select the image from your local storage as well as prefer drag and drop method too according to your choice.
Step 2
Once your image gets upload, you will see the Pixcut app that it’s removing the background automatically. The final result can be seen on the right side of the screen.
Step 3
Click on ‘download’ in the top of the right corner and save the transparent logo generated this way. Find the image in ‘download’ folder of your device.
So you can see how quick and effective is the process of background removing with Pixcut.
● Use Canva, have control on the level of transparency
Another well known name in the world of video editors is Canva. This extremely effective video editing and graphic designing tool helps you to bring the along with a transparent slider. If you don’t want to spend money for making transparent logo and want to make it balanced and beautiful, go with Canva without second thought.
Step 1
Go to Canva site. Start a new project. You can select your project regardless to shape and size here. The app redirects you to the project window and you just need to click on upload in the menu given in left. Pick the logo you want to make transparent.
Step 2
After uploading the logo in editing window (which you can also drag and drop), click on your logo. Go to the top right corner of the screen and check transparency feature below the download option. You will see the transparency option has a slider here and you can select the percentage of transparency here. Go to the highest level of the slider if you need to create fully transparent logo.
You can create an impressive picsaart background banner also this way.
Step 3
So, making a transparent logo using Canva is this much easy. Now download the logo and use it however you need. Interesting, isn’t it?
● Use Wondershare Filmora, add transparent logo to video directly
Want to work on an really interesting platform with a variety of tools and features? Well, use Wondershare Filmora. It gives you easy, free and quick way of generating transparent logo. Let’s know how to create a transparent logo in Wondershare Filmora Video Editor
For Win 7 or later (64-bit)
For macOS 10.12 or later
Step 1
Download Filmora app in your device and install it. The app can easily be downloaded and installed in windows or Mac computer. Then, open the app and visit file import media. Import the logo and video file you want from here or drag and drop your file to media library.
Step 2
Next you need to drag and drop the video file and logo both on the timeline simultaneously. Put your cursor on logo and right click, you will find the green screen option. Select it.
Step 3
You will find Chroma key settings and your logo overlaying the video in the preview window.
Just enable the Chroma key and your logo becomes transparent. The background found this way will be green and you can change the color of the background by picking an color from the color icon.
Step 4
Finally, you can change the size of the logo and add it to your video. It’s too easy, right?
Part 3 How To Make Transparent Background On Phone; Three Simple Ways
So, you are planning to create your own logo and havepicsart background hd downloadfor promoting your brand. Well there are many attractive ideas to make transparent images and logo but making background transparent is important when you want to layer the logos.
Here find out the idea of generating transparent background with 3 different video editors –
● Apowersoft Background Eraser
The best app to make a transparent background on phone is Apowersoft background eraser. It works on iOS and android platform both. Removing a background is so easy with this app. Here is stepwise guideline for creating transparent background on Apowersoft –
Step 1
Install the app apowersoft background eraser and let the app allow you to upload a photo by tapping on recognition.
Step 2
Upload the photo and the app will delete the background automatically.
Step 3
Save the file by tapping on ‘save’ button
Step 4
Download the file for use.
The entire process is automated and keeps your photo with original quality despite editing.
The app is compatible for android and iOS both platforms but sometimes you can face delay in the process of background removal.
Black picsart background will look cool too.
● Lunapic
Another good tool for easy background removal is Lunapic. It is known for making transparent background for free. You need nothing but to visit official website of lunapic and upload the file that you want to make transparent. Then click on the background that you want to remove and great, you will find your file with transparent background. D
Download the file and save it to apply for the purpose you want.
● Adobe photoshop mix
Adobe photoshop is a fool proof editof for making transparent background on your phone. The app is known for its quick processing and lots of designs. The procedure of background removal or making transparent background is so easy. Go through the steps mentioned here –
Step 1
Open your logo file.
Step 2
Go to menu and Select ‘layer’ and add a transparent layer by clicking on new layer. A dialog box will appear and ask to rename the layer. If you don’t want to rename, just leave the layer default as layer 0 and click OK.
Step 3
This is how you unlock the background layer and make anything transparent by deleting it.
Step 4
Now you can create your selection by using magic wand too. Check the left hand side of your app screen and go to ‘select subject’. Then visit ‘options’ bar at the top of the screen. Using this tool, you can remove the background of selection. The clearness of the background and beauty of the picture depends upon the efficiency of using this tool.
Step 5
After selecting the product, type SHIFT + CTRL+ I and use this short key to select the inverse from dropdown menu at top application.
Step 6
You can deselect the selection by typing CTRL + D
Step 7
This is the entire process for creating transparent background. Save the product image in proper format so that you can display it online easily. PNG – 24 is known to be the best suitable format for this purpose.
● Ending Thoughts →
● Check the list of video creators and pick the one that suits you the most from operation point of view.
● Go with the trend and select design of picsart background.
● Use the easiest application if features are not important.
Also read:
- In 2024, Do You Know You Can Add LUTs for Cinematic Color Grading on Your Smartphones? With VN Editor You Can, You Can Add LUTs. Choose the Option VN LUTs Free Download
- How to Create Chroma Key Written Text Effects in Filmora for 2024
- Updated 2024 Approved 8 Ways To Live Stream Pre-Recorded Video
- Updated 2024 Approved Top 10 Sound Extractors to Extract Sound From Video
- Updated In 2024, How to Make GIF With Transparent Background?
- Updated 2 Easy Methods | How To Zoom In On TikTok Videos for 2024
- How to Create a Clideo Slideshow Simply for 2024
- New 2024 Approved Do You Need to Make Your Video More Immersive? You Can Make It 60 FPS to Achieve That. And Here Are the 5 Best Tools that You Can Use
- New 2024 Approved This Article Aim to Teach You How to Make a Night to Day Effect Video with Filmora. Follow the Steps to Figure It Out
- A Comprehensive Guide to Slow Motion YouTube Videos and How to Manage Them for 2024
- Updated Turn Your Blog Content Into Audio Podcasts to Reach a Wider Audience and Increase Reader Participation
- Updated Simple Step by Step Tutorial on Creating a Lightroom Collage
- New 5 Methods to Make a Fake Facetime Call Video
- 2024 Approved The Way to Quick and Efficient Editing | Keyboard Shortcuts in Filmora
- Updated In 2024, There Are a Few Ways to Remove or Mute Audio in a Video, but How? Read This Article and Learn How to Do It Using Recommended Android Apps
- New 2024 Approved How to Make Subtitle Videos
- Updated Want to Speed up Your Video to Shorten Its Duration and Make It More Entertaining? Here Is How to Speed up Videos in Final Cut Pro. Get a Better Alternative to FCP to Speed up Videos
- New Best Online MPEG to GIF Converters
- Guide To Creating The Perfect VHS Effect Look in Premiere Pro
- In 2024, How Important It Is to Perform Color Correction to Your Video? Here Is a Solution with After Effects Color Correction with Illustrative Videos
- Basic Knowledge About WMV Format and Best WMV Video Editor
- New 2024 Approved Add Selective Color Effect to Your Videos Using Filmora
- Updated In 2024, Step by Step to Crop a Video with CyberLink PowerDirector
- New You Can Make Stylish Chroma Key Text Effects After Reading This Article. Wondershare Filmora Will Fill the Crazy Colors in Your Handwritten Note or Words for 2024
- The Best Way To Color Grading & Color Correction in Filmora
- New 2024 Approved How to Create a Custom Slide Show in PowerPoint
- Updated Detailed Tutorial to Crop Videos Using Openshot for 2024
- New Step by Step to Add Border to Video Using Premiere Pro for 2024
- 2024 Approved What Is the Best Voice Changer for WhatsApp? Discover the Seven (7) Best Voice Changers for WhatsApp Here in This Post
- Top 10 Transparent Image Online Tools That Help You A Lot for 2024
- Updated Best Tools To Create Blend Image Collage for 2024
- Updated 2024 Approved This Well-Written Article Will Share a Descriptive Method on How to Stream Zoom to YouTube Quickly. By Doing so, You Can Share Your Zoom Session Live with Your YouTube Audience Effortlessly
- New In 2024, Easy Steps to Loop YouTube Videos on iPhone
- Updated 2024 Approved How to Create a Clideo Slideshow Simply
- Updated 15 Camera Shake Preset for Premiere Pro
- Updated How to Zoom Video in VLC Media Player for 2024
- In 2024, Want to Speed up Your Video to Shorten Its Duration and Make It More Entertaining? Here Is How to Speed up Videos in Final Cut Pro. Get a Better Alternative to FCP to Speed up Videos
- New In 2024, Best Photo Video Maker Apps with Song PC, Mobile, Online
- Updated 2024 Approved Create Your Slow Zoom TikTok in Minutes
- Updated With This Article, We Will Be Looking at Steps to Rotate a Video in Cyberlink PowerDirector to Help You when Required. We Have Also Mentioned the Steps You Will Need to Follow in Wondershare Filmora for 2024
- Updated In 2024, How to Perfect Quick and Efficient Video Editing | Keyboard Shortcuts in Filmora
- How To Recover Data from iPhone 15? | Dr.fone
- A Quick Guide to OnePlus FRP Bypass Instantly
- Top 15 Apps To Hack WiFi Password On Samsung Galaxy S24 Ultra
- How to Fix Pokemon Go Route Not Working On Realme C53? | Dr.fone
- In 2024, Ultimate Guide from Asus ROG Phone 8 Pro FRP Bypass
- Updated 2024 Approved Transform YouTube Live with These Must-Know Secrets
- How To Fake GPS On Xiaomi Redmi Note 13 5G For Mobile Legends? | Dr.fone
- In 2024, How to Transfer Data from Realme GT 5 to Other Android Devices? | Dr.fone
- Possible solutions to restore deleted contacts from Nokia C210.
- In 2024, The Updated Method to Bypass Tecno Spark 20C FRP
- In 2024, How to Transfer Everything from Apple iPhone XS to iPhone | Dr.fone
- In 2024, How to Remove Forgotten PIN Of Your Vivo T2 Pro 5G
- What to Do if Google Play Services Keeps Stopping on Motorola Razr 40 | Dr.fone
- In 2024, How to Transfer Contacts from Samsung Galaxy F34 5G to iPhone XS/11 | Dr.fone
- Ways to stop parent tracking your Xiaomi Mix Fold 3 | Dr.fone
- How To Unlock a Realme GT 5 Pro Easily?
- New 2024 Approved Best Text-to-Audio Converters of All Times
- Top 4 Android System Repair Software for Itel S23+ Bricked Devices | Dr.fone
- How to Reset Infinix Note 30 VIP Racing Edition Without the Home Button | Dr.fone
- In 2024, 3 Ways to Track Motorola Razr 40 without Them Knowing | Dr.fone
- In 2024, 4 Most-Known Ways to Find Someone on Tinder For Meizu 21 Pro by Name | Dr.fone
- 9 Best Phone Monitoring Apps for Motorola Moto G13 | Dr.fone
- Unova Stone Pokémon Go Evolution List and How Catch Them For Samsung Galaxy A14 4G | Dr.fone
- In 2024, Overview of the Best Honor 90 Screen Mirroring App | Dr.fone
- How To Update or Downgrade Apple iPhone SE (2022) Without iTunes? | Dr.fone
- Set Your Preferred Job Location on LinkedIn App of your Apple iPhone SE (2022) | Dr.fone
- How To Open Your iPhone 7 Without a Home Button
- Top 6 Apps/Services to Trace Any Samsung Galaxy M34 5G Location By Mobile Number | Dr.fone
- Android Screen Stuck General Honor X50 Partly Screen Unresponsive | Dr.fone
- In 2024, How to Change Netflix Location to Get More Country Version On Honor Magic 5 Lite | Dr.fone
- How to Change Spotify Location After Moving to Another Country On Honor Play 7T | Dr.fone
- In 2024, Resolve Your iPhone 6s Keeps Asking for Outlook Password
- How to Fix & Retrieve Pictures/Videos From a Water Damaged iPhone 15 That Wont Turn on | Stellar
- In 2024, How To Erase an Apple iPhone SE (2022) Without Apple ID Password?
- Bypass iPhone 15 Pro Max activation lock with a professional tool
- 10 Fake GPS Location Apps on Android Of your Tecno Pova 6 Pro 5G | Dr.fone
- How To Simulate GPS Movement With Location Spoofer On Sony Xperia 5 V? | Dr.fone
- In 2024, iPhone Transfer Transfer Contact from Apple iPhone 11 to iPhone without iCloud | Dr.fone
- Best 3 Xiaomi Civi 3 Emulator for Mac to Run Your Wanted Android Apps | Dr.fone
- Prevent Cross-Site Tracking on Samsung Galaxy F04 and Browser | Dr.fone
- All Things You Need to Know about Wipe Data/Factory Reset For Sony Xperia 10 V | Dr.fone
- Title: New What Are the Best 10 GIF Creator?
- Author: Morgan
- Created at : 2024-05-19 05:12:27
- Updated at : 2024-05-20 05:12:27
- Link: https://ai-video-editing.techidaily.com/new-what-are-the-best-10-gif-creator/
- License: This work is licensed under CC BY-NC-SA 4.0.
