:max_bytes(150000):strip_icc():format(webp)/set-top-dvr-1130767-f2aa7f11e3d2442b966d53b8aa2d25fd.png)
New What Is an Eye Zoom Transition Effect? Its a Close-Up Video Effect Allowing Viewers to Transit to the Next Clip From the Eye

What Is an Eye Zoom Transition Effect? It’s a Close-Up Video Effect Allowing Viewers to Transit to the Next Clip From the Eye
What is an eye zoom transition effect? It’s a close-up video effect allowing viewers to transit to the next clip from the eye. This effect is commonly used by musicians and travel bloggers to give their videos a more cinematic feel. So, without wasting time, let’s learn how to create an eye zoom transition with Wondershare Filmora .
Free Download For Win 7 or later(64-bit)
Free Download For macOS 10.14 or later
Preparation:
First, you need to create a close-up eye video. Although you can do that with your digital camera, a standard smartphone should do it just fine. Just ask a friend or family member to use your phone’s rear camera to record your eye centered on the screen. Ensure that the eye is as close as possible and you don’t lose focus. The camera should be around 10cm away from your face. And lest I forget, the flash should be ON.

How to Create an Eye-zoom Transition
Step 1 Align the video clips on Filmora
After recording a close-up eye video, add it on Wondershare Filmora and duplicate it. Alternatively, you can add the video to the first and second tracks.

Step 2 Add a freeze frame to the video
Next, we want to add a freeze frame to the section where the eye opens fully. To do that, select the second video track and place the playhead where the eye is fully open. After that, right-click the video track, then choose the Add Freeze Frame option.

Now trim the first video track from where the freeze frame starts on the second video. Also, cut the second video track to leave only the freeze frame
Step 3 Add a masking effect to the eye
With the two video tracks ready, it’s time to apply a masking effect. Tap the Effect tab on the top menu bar and then find the Shape Mask under the utility section. Now drag and drop the effect to the freeze frame.

Double-click on the freeze frame clip to adjust the Shape Mask on the preview screen. Ensure the mask reveals the eye pupil only and check the Invert Mask box. Also, set the Feather number to 10.

Step 4 Add the transition video
Next, add the video you want to edit with an eye-zoom effect next to the first video track. Preview the video, and you’ll notice your new video playing inside the eye mask.
With that done, move the playhead to the start of the freeze frame video and double-click the video clip to launch the settings window. Click the Animation tab before clicking Customize to see the keyframe settings. Tap the Add button to add a keyframe. Then, add a few frames using the playhead before clicking Add. But because we’re zooming in, increase the scale to 160%. You can also add the rotation and position.

After setting the second keyframe, move the playhead to the right and add the third keyframe. This time, increase the scale number to 400%, as well as the rotation and position. Now preview the video, and you’ll notice the rotating eye-zoom effect.
Summary
There you go! That’s how to create an eye-zoom transition using Wondershare Filmora. Don’t forget to play around with this feature-rich video editor to unlock its full capabilities. Enjoy!
Free Download For macOS 10.14 or later
Preparation:
First, you need to create a close-up eye video. Although you can do that with your digital camera, a standard smartphone should do it just fine. Just ask a friend or family member to use your phone’s rear camera to record your eye centered on the screen. Ensure that the eye is as close as possible and you don’t lose focus. The camera should be around 10cm away from your face. And lest I forget, the flash should be ON.

How to Create an Eye-zoom Transition
Step 1 Align the video clips on Filmora
After recording a close-up eye video, add it on Wondershare Filmora and duplicate it. Alternatively, you can add the video to the first and second tracks.

Step 2 Add a freeze frame to the video
Next, we want to add a freeze frame to the section where the eye opens fully. To do that, select the second video track and place the playhead where the eye is fully open. After that, right-click the video track, then choose the Add Freeze Frame option.

Now trim the first video track from where the freeze frame starts on the second video. Also, cut the second video track to leave only the freeze frame
Step 3 Add a masking effect to the eye
With the two video tracks ready, it’s time to apply a masking effect. Tap the Effect tab on the top menu bar and then find the Shape Mask under the utility section. Now drag and drop the effect to the freeze frame.

Double-click on the freeze frame clip to adjust the Shape Mask on the preview screen. Ensure the mask reveals the eye pupil only and check the Invert Mask box. Also, set the Feather number to 10.

Step 4 Add the transition video
Next, add the video you want to edit with an eye-zoom effect next to the first video track. Preview the video, and you’ll notice your new video playing inside the eye mask.
With that done, move the playhead to the start of the freeze frame video and double-click the video clip to launch the settings window. Click the Animation tab before clicking Customize to see the keyframe settings. Tap the Add button to add a keyframe. Then, add a few frames using the playhead before clicking Add. But because we’re zooming in, increase the scale to 160%. You can also add the rotation and position.

After setting the second keyframe, move the playhead to the right and add the third keyframe. This time, increase the scale number to 400%, as well as the rotation and position. Now preview the video, and you’ll notice the rotating eye-zoom effect.
Summary
There you go! That’s how to create an eye-zoom transition using Wondershare Filmora. Don’t forget to play around with this feature-rich video editor to unlock its full capabilities. Enjoy!
Free Download For macOS 10.14 or later
Preparation:
First, you need to create a close-up eye video. Although you can do that with your digital camera, a standard smartphone should do it just fine. Just ask a friend or family member to use your phone’s rear camera to record your eye centered on the screen. Ensure that the eye is as close as possible and you don’t lose focus. The camera should be around 10cm away from your face. And lest I forget, the flash should be ON.

How to Create an Eye-zoom Transition
Step 1 Align the video clips on Filmora
After recording a close-up eye video, add it on Wondershare Filmora and duplicate it. Alternatively, you can add the video to the first and second tracks.

Step 2 Add a freeze frame to the video
Next, we want to add a freeze frame to the section where the eye opens fully. To do that, select the second video track and place the playhead where the eye is fully open. After that, right-click the video track, then choose the Add Freeze Frame option.

Now trim the first video track from where the freeze frame starts on the second video. Also, cut the second video track to leave only the freeze frame
Step 3 Add a masking effect to the eye
With the two video tracks ready, it’s time to apply a masking effect. Tap the Effect tab on the top menu bar and then find the Shape Mask under the utility section. Now drag and drop the effect to the freeze frame.

Double-click on the freeze frame clip to adjust the Shape Mask on the preview screen. Ensure the mask reveals the eye pupil only and check the Invert Mask box. Also, set the Feather number to 10.

Step 4 Add the transition video
Next, add the video you want to edit with an eye-zoom effect next to the first video track. Preview the video, and you’ll notice your new video playing inside the eye mask.
With that done, move the playhead to the start of the freeze frame video and double-click the video clip to launch the settings window. Click the Animation tab before clicking Customize to see the keyframe settings. Tap the Add button to add a keyframe. Then, add a few frames using the playhead before clicking Add. But because we’re zooming in, increase the scale to 160%. You can also add the rotation and position.

After setting the second keyframe, move the playhead to the right and add the third keyframe. This time, increase the scale number to 400%, as well as the rotation and position. Now preview the video, and you’ll notice the rotating eye-zoom effect.
Summary
There you go! That’s how to create an eye-zoom transition using Wondershare Filmora. Don’t forget to play around with this feature-rich video editor to unlock its full capabilities. Enjoy!
Free Download For macOS 10.14 or later
Preparation:
First, you need to create a close-up eye video. Although you can do that with your digital camera, a standard smartphone should do it just fine. Just ask a friend or family member to use your phone’s rear camera to record your eye centered on the screen. Ensure that the eye is as close as possible and you don’t lose focus. The camera should be around 10cm away from your face. And lest I forget, the flash should be ON.

How to Create an Eye-zoom Transition
Step 1 Align the video clips on Filmora
After recording a close-up eye video, add it on Wondershare Filmora and duplicate it. Alternatively, you can add the video to the first and second tracks.

Step 2 Add a freeze frame to the video
Next, we want to add a freeze frame to the section where the eye opens fully. To do that, select the second video track and place the playhead where the eye is fully open. After that, right-click the video track, then choose the Add Freeze Frame option.

Now trim the first video track from where the freeze frame starts on the second video. Also, cut the second video track to leave only the freeze frame
Step 3 Add a masking effect to the eye
With the two video tracks ready, it’s time to apply a masking effect. Tap the Effect tab on the top menu bar and then find the Shape Mask under the utility section. Now drag and drop the effect to the freeze frame.

Double-click on the freeze frame clip to adjust the Shape Mask on the preview screen. Ensure the mask reveals the eye pupil only and check the Invert Mask box. Also, set the Feather number to 10.

Step 4 Add the transition video
Next, add the video you want to edit with an eye-zoom effect next to the first video track. Preview the video, and you’ll notice your new video playing inside the eye mask.
With that done, move the playhead to the start of the freeze frame video and double-click the video clip to launch the settings window. Click the Animation tab before clicking Customize to see the keyframe settings. Tap the Add button to add a keyframe. Then, add a few frames using the playhead before clicking Add. But because we’re zooming in, increase the scale to 160%. You can also add the rotation and position.

After setting the second keyframe, move the playhead to the right and add the third keyframe. This time, increase the scale number to 400%, as well as the rotation and position. Now preview the video, and you’ll notice the rotating eye-zoom effect.
Summary
There you go! That’s how to create an eye-zoom transition using Wondershare Filmora. Don’t forget to play around with this feature-rich video editor to unlock its full capabilities. Enjoy!
Wondering How to Replace Sky in After Effects? Learn How
Replacing Sky After Effects can change the essence of your videos with an authentic feel. In sci-fi movies, the colors of the sky add a dramatic, intense, or soft touch to videos. In scenes of war, peace, crime, and love, skies represent the theme. Shooting outdoors cannot always capture the essence of the sky. Replacing skies can help with covering over-exposed or under-exposed skies.
In this article, the focus of the discussion is how to replace Sky After Effects. Users can also learn about the advantages of using background replacers. If you want to learn sky replacement in After Effects, there is an instruction manual. It will give you some tips and tricks for replacing and adjusting the sky. At the end, we will discuss another software for replacing video backgrounds .
Sky Replacement A cross-platform works like magic for background removal or sky replacement photos!
Free Download Free Download Learn More

Part 1: What Are the Benefits of Having Video Background Replacers?
Along with enhancing the creative element in videos, background replacers help with more. Users can integrate them for both personal and professional uses. The following section will give a sneak peek at the advantages of background removers:
1. Privacy and Concealment
Video background removers extract the real surroundings, which addresses privacy concerns. In addition, they conceal any mess or imperfections in your background.
2. Maintains Professional Appearance
They help you set up professional backgrounds for Zoom meetings or Google Classrooms. In this way, they maintain the professional element of your videos.
3. Marketing Consistency
When it comes to marketing, they help choose a reliable background for the brand. The background becomes the identity of the brand and maintains its consistency.
4. Creative Expression in Movies
In the media industry, backgrounds like the sky help express the emotion of an actor or a mass. If there is anger, the sky will turn red; if there is peace, it will have a calm outlook.
5. Audience Engagement and Focus
A well-aligned background increases the audience’s focus on the theme of the video. This is because irrelevant backgrounds can catch the audience’s interest and distract them.
Part 2: Top Guide Explaining How to Replace Sky in Adobe After Effects?
Do you want to elevate the graphics of your videos professionally? Adobe After Effects is an ideal software for it as it helps professionals to edit films. It offers multiple animations for titles and videos like revolve, rotate, and more. In addition, you can overlap videos with precision using its Rotoscope feature.
There are built-in effects and features to ease the editing process for you. In addition, you can do custom settings in it and save them as presets. One of its many specifications is that it is an elite background remover and replacement. It enables a seamless addition of the sky in the background. We have mentioned the step-by-step procedure of After Effects replace Sky below:
Procedure 1: Removing Video Background
Step 1: After bringing your video to the timeline, navigate towards the top search bar at the left. In the Effects Control option, search for the “Extractor” effect and add it. Then, change the “Channel” of this effect to your “Blue” or “Luminance.” Change the position of both sliders there to remove and feather the background.
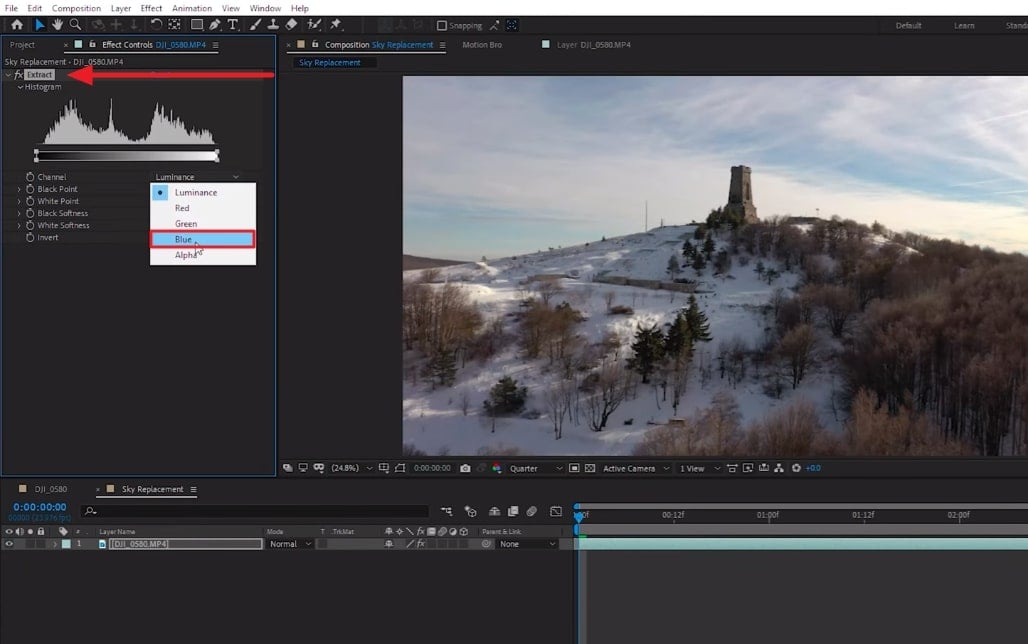
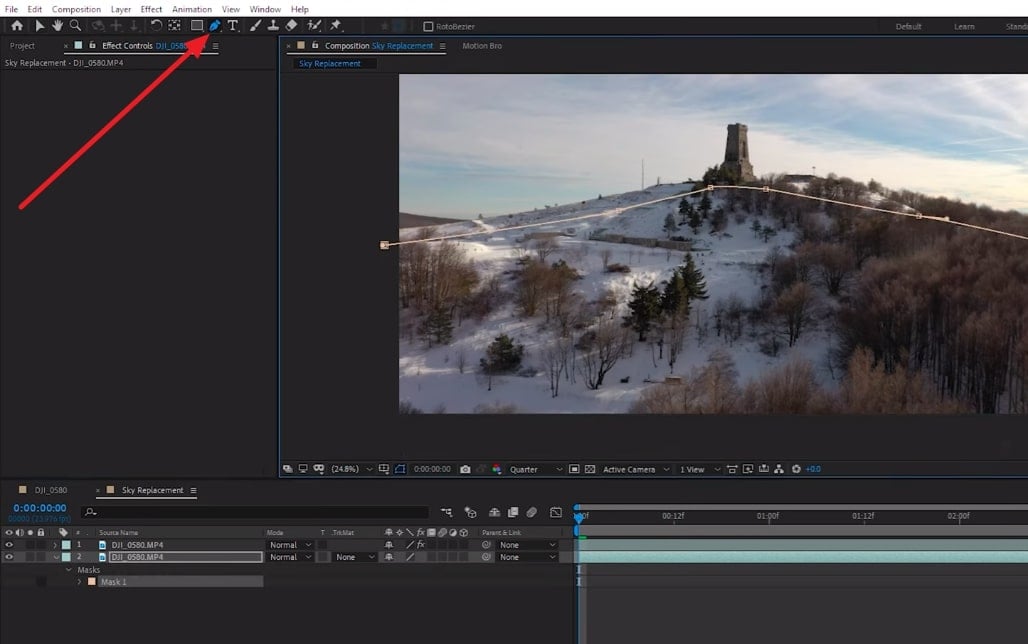
Step 2: To avoid removing parts other than the sky, duplicate this video to the timeline. From the bottom video, eliminate the extractor effect. Navigate towards the top toolbar and select the “Mask” option. Create a mask around the ground at the bottom of the video. In the timeline, click the “Mask Path” option to create the mask throughout the video.
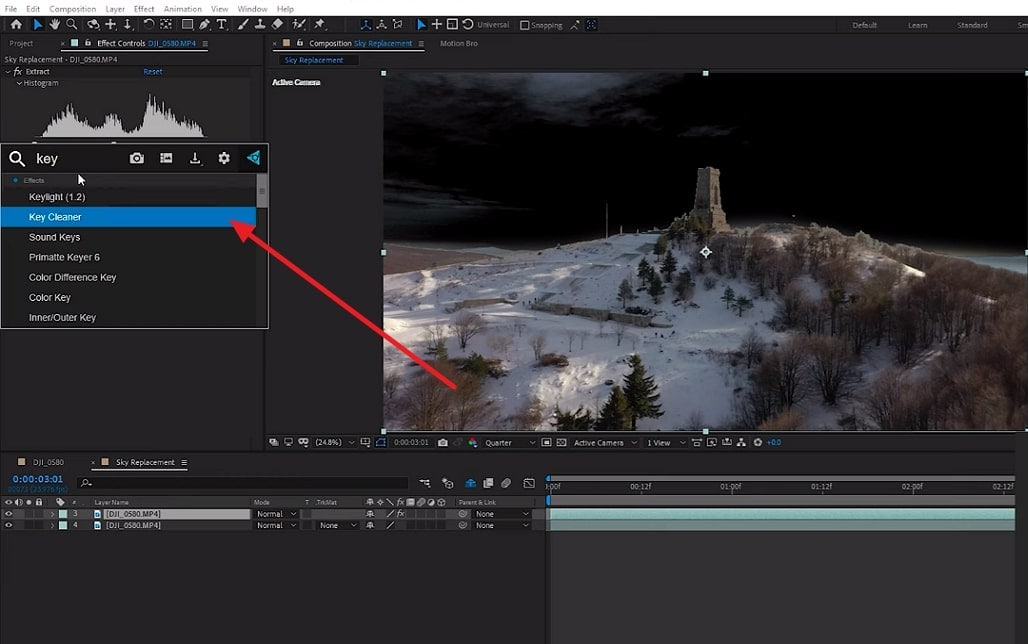
Step 3: Now, select the top video in the timeline and search for “Key Cleaner.” Adjust the values of options under the key cleaner for precision.
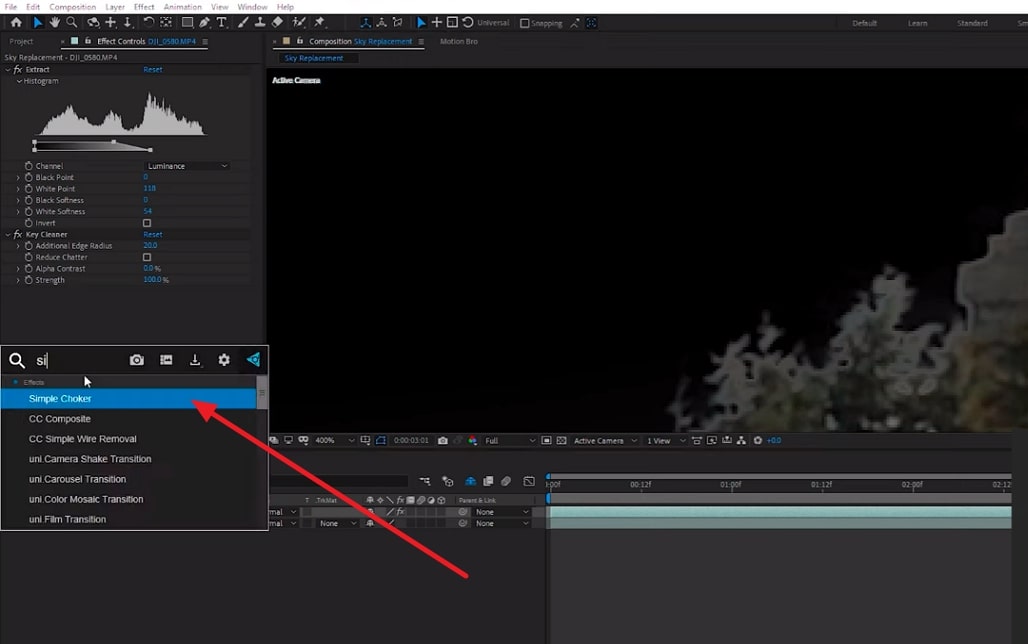
Step 4: If there are still some spaces left, use the “Simple Choker” effect to correct them. You can find it using the search bar and adjust the given values.
Procedure 2: 3D Camera Tracking
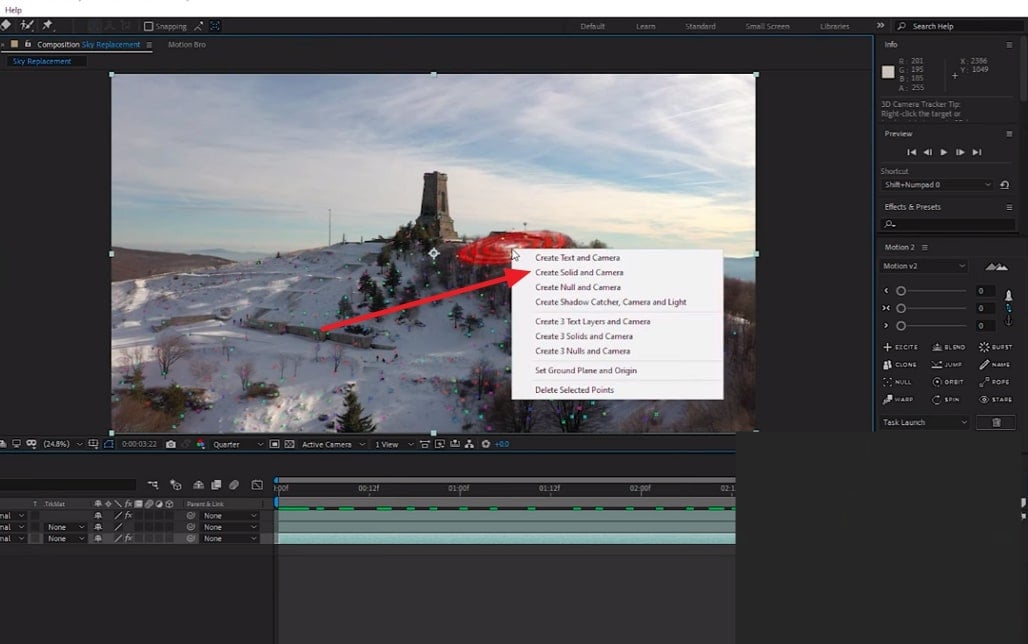
Step 1: Now, duplicate the video again on the timeline and remove all its effects. Afterward, add a “3D Camera Tracker” in it. Then click “Analyze” and let the tracker analyze your video.

Step 2: Next, select any three points from the footage and right-click on them. From the drop-down menu, select “Create Null and Camera” or “Create Solid and Camera.”
Procedure 3: Replacing the Sky
Step 1: Import the video of your sky and bring it to the timeline. Bring the sky in the back of your footage and change it to a 3D layer. Afterward, change the “Position” of your sky from the timeline. We recommend you set the values as far away as possible for realistic effect.

Step 2: Once you have set the sky’s position, navigate towards the timeline panel again. From there, change the “Scale” of the background to set according to your footage. Afterward, see if the sky needs any flipping. This is because you must align the bright parts of the sky with the bright parts of the ground.

Procedure 4: Color Matching
Step 1: Play with the color setting elements like “Saturation” or “Lightness.” Change the position of their sliders to observe the changes in your footage.
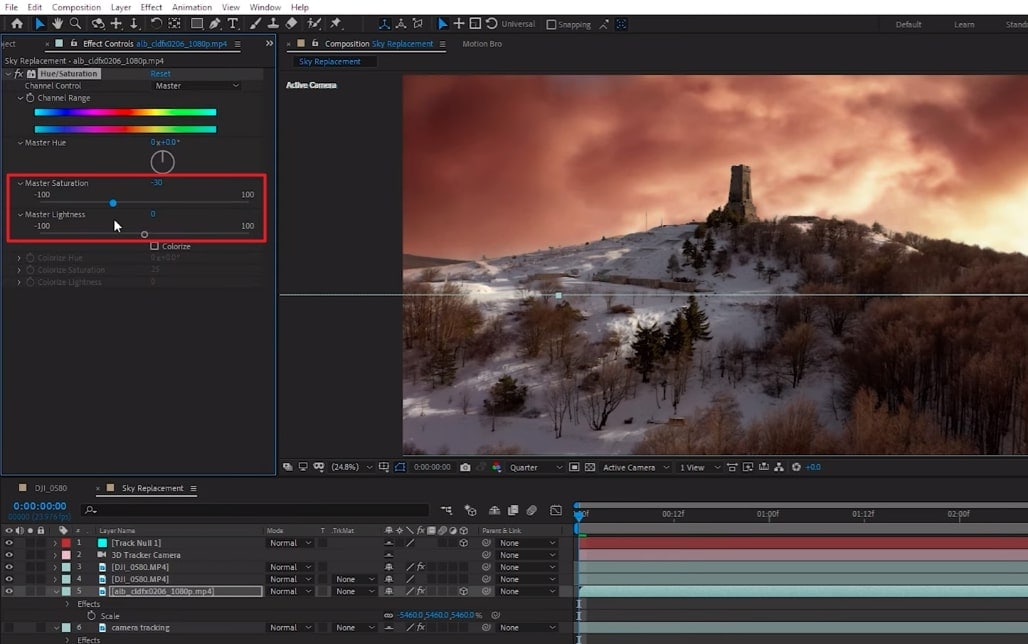
Step 2: Right-click on the timeline and add “New > Adjustment Layer” for settling colors. Afterward, see the preview of your video and export it.

Part 3: Wondershare Filmora: A Breath-taking Alternative to Replacing Backgrounds in Videos
For those who find sky replacement in After Effects difficult, there are alternatives. One of the simplest alternatives to replace sky is Wondershare Filmora . It is a video editor driven by AI technology with multiple effects and presets. Filmora keeps updating its functionalities, and it has recently launched the V13 upgrade. There was the addition of multiple AI tools and enhanced effects for creativity purposes.
Free Download For Win 7 or later(64-bit)
Free Download For macOS 10.14 or later
Filmora’s video background remover uses AI to extract the background with precision. Afterward, users can replace it with Filmora’s pre-assembled background collection. There are multiple colors, gradients, and other replacements for the background. The integration of AI has eliminated the human effort of cutting out background.
Step-by-Step Guide on Replacing Backgrounds in Filmora
Unlike replacing Sky After Effects, it keeps the background changing process simpler. In this guide, we will remove the background first and then replace it. Here is the step-by-step procedure to replace the background using this alternative:
Step 1Create a New Project to Import Media
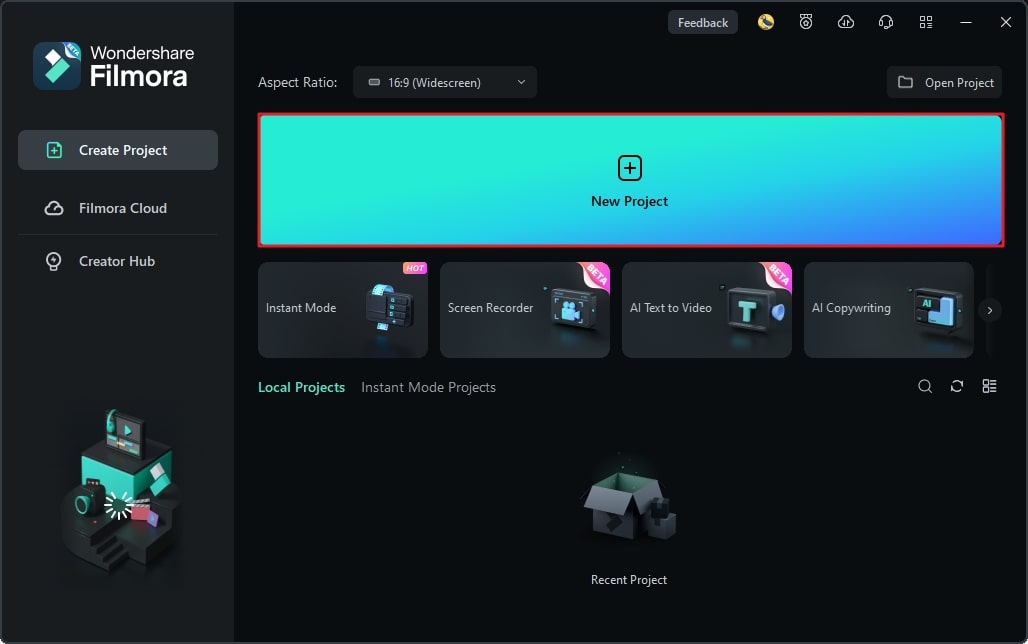
First, install Wondershare Filmora on your device and launch it. Afterward, use the “New Project” button to start a project and enter its editing interface. Use the “Ctrl +I” keys to import your video and drop it on the timeline.
Step 2Enable the Smart Cutout Option
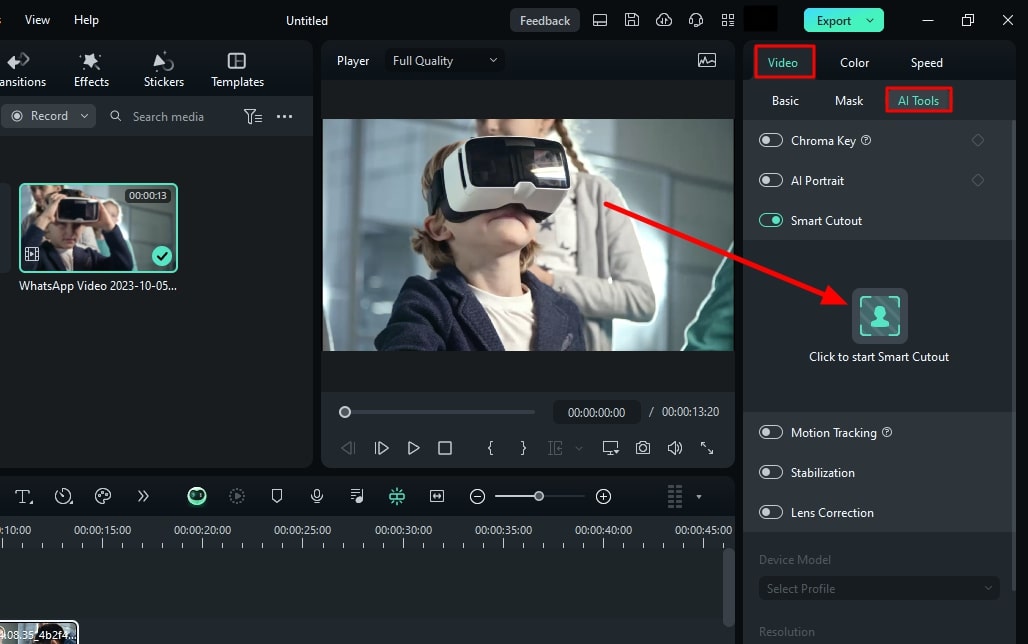
In the timeline panel, select the video and navigate towards the right-side settings panel. Afterwards, go to the “AI Tools” section under the “Video” tab. From there, enable the “Smart Cutout” option and click the Start button below.
Step 3Start Removing Background
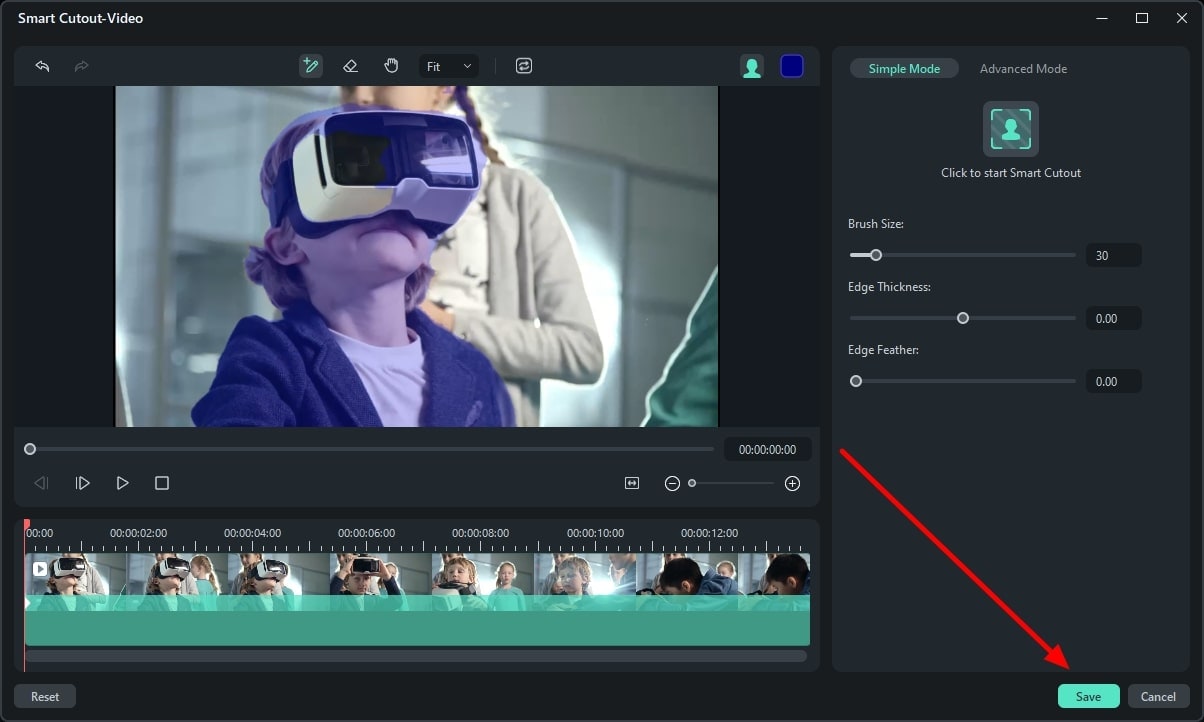
In the Smart Cutout Video window, use the brush to mark the object you want in the video. The AI will auto-select the rest of the object. After that, hit the “Click to start Smart Cutout” option, and it will initiate. Then, click the “Save” button to save the background, removing settings.
Step 4Replace a Background and Export Video
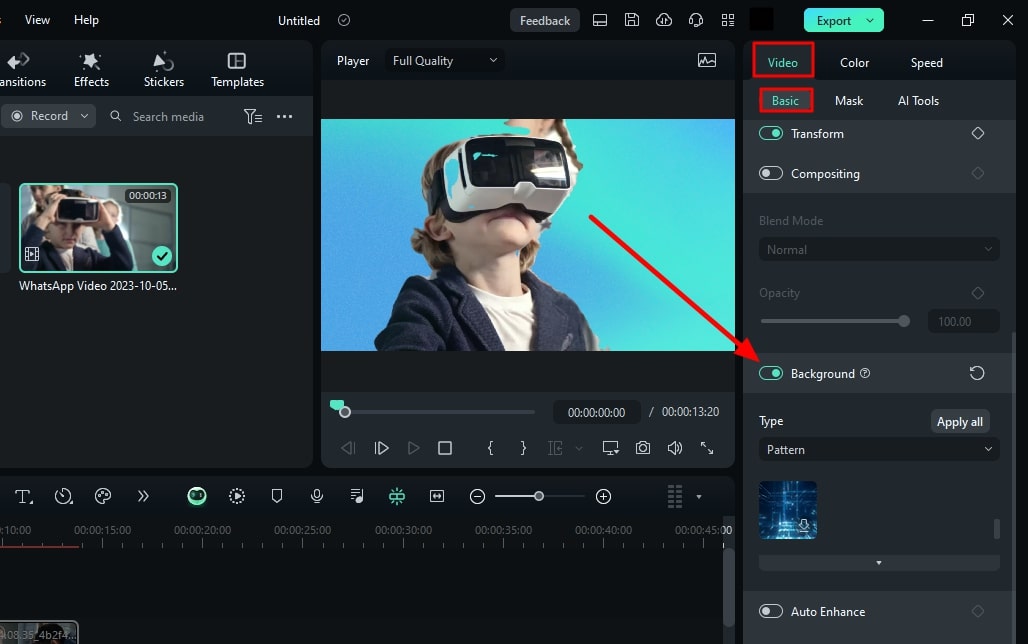
Once the background has been removed, click this video in the timeline. Hover the cursor towards the right settings panel and access the “Video > Basic” tab. Scroll down to find the “Backgrounds” section and enable it. In the “Type” section, select the background type and choose from the options to add. Once you have added the background, click the “Export” button to save this video.
Conclusion
The article emphasized the importance of video background removers and their benefits. In addition, we discussed replacing sky After Effects in detail. In the end, we provided a simple alternative for those looking for it. This is because Adobe After Effects might have a technical editing interface.
Wondershare Filmora, on the other hand, can carry on the process with efficiency and simplicity. If you haven’t yet used this software, visit its website to download it. There are other features that help with uplifting the content. You will also find the detailed user guides to use those functions.
Free Download Free Download Learn More

Part 1: What Are the Benefits of Having Video Background Replacers?
Along with enhancing the creative element in videos, background replacers help with more. Users can integrate them for both personal and professional uses. The following section will give a sneak peek at the advantages of background removers:
1. Privacy and Concealment
Video background removers extract the real surroundings, which addresses privacy concerns. In addition, they conceal any mess or imperfections in your background.
2. Maintains Professional Appearance
They help you set up professional backgrounds for Zoom meetings or Google Classrooms. In this way, they maintain the professional element of your videos.
3. Marketing Consistency
When it comes to marketing, they help choose a reliable background for the brand. The background becomes the identity of the brand and maintains its consistency.
4. Creative Expression in Movies
In the media industry, backgrounds like the sky help express the emotion of an actor or a mass. If there is anger, the sky will turn red; if there is peace, it will have a calm outlook.
5. Audience Engagement and Focus
A well-aligned background increases the audience’s focus on the theme of the video. This is because irrelevant backgrounds can catch the audience’s interest and distract them.
Part 2: Top Guide Explaining How to Replace Sky in Adobe After Effects?
Do you want to elevate the graphics of your videos professionally? Adobe After Effects is an ideal software for it as it helps professionals to edit films. It offers multiple animations for titles and videos like revolve, rotate, and more. In addition, you can overlap videos with precision using its Rotoscope feature.
There are built-in effects and features to ease the editing process for you. In addition, you can do custom settings in it and save them as presets. One of its many specifications is that it is an elite background remover and replacement. It enables a seamless addition of the sky in the background. We have mentioned the step-by-step procedure of After Effects replace Sky below:
Procedure 1: Removing Video Background
Step 1: After bringing your video to the timeline, navigate towards the top search bar at the left. In the Effects Control option, search for the “Extractor” effect and add it. Then, change the “Channel” of this effect to your “Blue” or “Luminance.” Change the position of both sliders there to remove and feather the background.

Step 2: To avoid removing parts other than the sky, duplicate this video to the timeline. From the bottom video, eliminate the extractor effect. Navigate towards the top toolbar and select the “Mask” option. Create a mask around the ground at the bottom of the video. In the timeline, click the “Mask Path” option to create the mask throughout the video.

Step 3: Now, select the top video in the timeline and search for “Key Cleaner.” Adjust the values of options under the key cleaner for precision.

Step 4: If there are still some spaces left, use the “Simple Choker” effect to correct them. You can find it using the search bar and adjust the given values.

Procedure 2: 3D Camera Tracking
Step 1: Now, duplicate the video again on the timeline and remove all its effects. Afterward, add a “3D Camera Tracker” in it. Then click “Analyze” and let the tracker analyze your video.

Step 2: Next, select any three points from the footage and right-click on them. From the drop-down menu, select “Create Null and Camera” or “Create Solid and Camera.”

Procedure 3: Replacing the Sky
Step 1: Import the video of your sky and bring it to the timeline. Bring the sky in the back of your footage and change it to a 3D layer. Afterward, change the “Position” of your sky from the timeline. We recommend you set the values as far away as possible for realistic effect.

Step 2: Once you have set the sky’s position, navigate towards the timeline panel again. From there, change the “Scale” of the background to set according to your footage. Afterward, see if the sky needs any flipping. This is because you must align the bright parts of the sky with the bright parts of the ground.

Procedure 4: Color Matching
Step 1: Play with the color setting elements like “Saturation” or “Lightness.” Change the position of their sliders to observe the changes in your footage.

Step 2: Right-click on the timeline and add “New > Adjustment Layer” for settling colors. Afterward, see the preview of your video and export it.

Part 3: Wondershare Filmora: A Breath-taking Alternative to Replacing Backgrounds in Videos
For those who find sky replacement in After Effects difficult, there are alternatives. One of the simplest alternatives to replace sky is Wondershare Filmora . It is a video editor driven by AI technology with multiple effects and presets. Filmora keeps updating its functionalities, and it has recently launched the V13 upgrade. There was the addition of multiple AI tools and enhanced effects for creativity purposes.
Free Download For Win 7 or later(64-bit)
Free Download For macOS 10.14 or later
Filmora’s video background remover uses AI to extract the background with precision. Afterward, users can replace it with Filmora’s pre-assembled background collection. There are multiple colors, gradients, and other replacements for the background. The integration of AI has eliminated the human effort of cutting out background.
Step-by-Step Guide on Replacing Backgrounds in Filmora
Unlike replacing Sky After Effects, it keeps the background changing process simpler. In this guide, we will remove the background first and then replace it. Here is the step-by-step procedure to replace the background using this alternative:
Step 1Create a New Project to Import Media
First, install Wondershare Filmora on your device and launch it. Afterward, use the “New Project” button to start a project and enter its editing interface. Use the “Ctrl +I” keys to import your video and drop it on the timeline.

Step 2Enable the Smart Cutout Option
In the timeline panel, select the video and navigate towards the right-side settings panel. Afterwards, go to the “AI Tools” section under the “Video” tab. From there, enable the “Smart Cutout” option and click the Start button below.

Step 3Start Removing Background
In the Smart Cutout Video window, use the brush to mark the object you want in the video. The AI will auto-select the rest of the object. After that, hit the “Click to start Smart Cutout” option, and it will initiate. Then, click the “Save” button to save the background, removing settings.

Step 4Replace a Background and Export Video
Once the background has been removed, click this video in the timeline. Hover the cursor towards the right settings panel and access the “Video > Basic” tab. Scroll down to find the “Backgrounds” section and enable it. In the “Type” section, select the background type and choose from the options to add. Once you have added the background, click the “Export” button to save this video.

Conclusion
The article emphasized the importance of video background removers and their benefits. In addition, we discussed replacing sky After Effects in detail. In the end, we provided a simple alternative for those looking for it. This is because Adobe After Effects might have a technical editing interface.
Wondershare Filmora, on the other hand, can carry on the process with efficiency and simplicity. If you haven’t yet used this software, visit its website to download it. There are other features that help with uplifting the content. You will also find the detailed user guides to use those functions.
Complete Guide to Change Video Resolution in Filmora
With the vast number of devices available in the market today, storing data and video files has become difficult. Frequently in cases where the devices share different forms of resolution, it makes sharing videos a hassle.
In those situations, changing the resolution of your video can be a great idea. It will also allow you to save storage. In this article, you’ll adjust the resolution in just a few clicks by Wondershare Filmora. But before we learn how to change a video’s resolution, let’s look into what a video resolution is!
Part 1. What Is a Video Resolution?
A video resolution, in short, is the quality of the video visible. A video is rendered at a specific rate whenever you watch a movie or go to a cinema. A screen is made up of tiny pixels and arranged in an order that determines the resolution of a screen.
Video resolution is rendered in a vertical and horizontal orientation. Therefore, whenever you play a video on YouTube, the resolution scale is available for you to choose from, i.e., 480p, 720p, 1080p, etc.
In most cases, a resolution is dictated by the full abbreviation. So, for example, a 720p video is 1280 x 720, and a 1080p video is a 1920 x 1080 resolution.

![]()
Note: The number written before is the number of horizontal pixels in a video. And the number written after is the vertical pixels in a video.
Before we adjust the resolution of a video, let’s look at a comparison between different types of video resolution.
Part 2. 7 Different Types of Video Resolution
It has been established that a video resolution is not a constant number and changes according to the screen. Scroll below to look at the different forms of video resolutions available!
360p
The full resolution is 480 x 360. This resolution is a minimal video resolution. On a big screen, 360p will look blurry. That is why a 360p resolution is the best for smaller devices such as Mobile phones.
480p
The full resolution is 853 x 480. Although an upgrade from the latter, this resolution is available on many devices. It’s mainly used in devices such as smaller TVs, laptops, and Desktop computers. It is also available for Burn-in DVDs.
720p
The full version of the resolution is 1280 x 720. This resolution is called HD, short for High Definition. 720p quality looks good almost on every device and is also reasonably available.
Most modern devices, such as Mobile phones, Touch Tablets, Laptops, and PCs, are calibrated in 720p Resolution.

1080p
The resolution in its complete form is 1920 x 1080. This resolution is also known as FHD, short for Full High Definition. 1080p resolution is the quality in which many high-quality devices are constructed. As a result, the screens of these devices have a clear and clean display.

![]()
Note: It is usually recommended to share videos on social media in 1080p resolution.
1440p
This resolution is also called QHD (Quad HD). The length and width of this resolution are 2560 x 1440. As the name suggests, its quality is quad (four times) than that of a standard 720p resolution.
The screens of devices constructed in this resolution usually have a high-end purpose. For example, this resolution is commonly used in Gaming monitors and High-end smartphones.

2160p
The screens constructed in this resolution are considered among the best available in the market. 2160p (3840 x 2160) is also known as UHD, which is short for Ultra High Definition. It is also known as 4K because it offers four times the power of 1080p or FHD (Full High Definition.)
These screens are usually available for high-end competitive gaming monitors or big screen LCD and LED Television. In addition, some of the flagship smartphones are also built with 4K resolution.

4320p
This resolution is also known as 8K. The length and width of the pixel arrangement are 7680 x 4320. The pixels are arranged in these screens to offer sixteen times the average power of a 1080p (FHD) monitor.
This resolution is only available on several devices, such as commercial TVs and monitors. However, this is the most significant resolution available in the modern market. Therefore, even if your monitor cannot support a larger resolution, you can test whether your PC can render an 8K resolution.

Part 3. Why Do You Need to Change a Video Resolution?
There are numerous cases where you will want to change the resolution of a video. Some of them are described below.
Decreasing a Video Resolution
Sometimes, you are trying to upload a video from a smartphone. Or, in general, you want to transfer videos to a smartphone. The resolution of your video can play a significant role in the transfer process.
If your video file has a higher resolution, it will take up more space on your phone. As well as, if your PC has a higher resolution, say a 4K resolution, and your phone is of 1080p resolution. You might not be able to play it.
To counter situations like these, you need to change the resolution of your video.
Increasing a Video Resolution
Similarly, there are instances where you would need to change the resolution of your video to increase it.
A good example would be to burn a low-quality DVD. To maintain good quality on a DVD, you need to increase its resolution before transfer.
Changing the exact resolution of a video is only possible in some cases because you cannot change the precise pixel of the video it is recorded in. But software like Wondershare Filmora allows you to change the resolution of your video easily.
Now let’s move to understanding the steps involved in changing the resolution of a video!
Part 4. Steps to Change Video Resolution in Filmora
To change the resolution of a video, you would need a basic video editor. This video editor needs to support the features that enable you to adjust a video resolution. In this case, Filmora is the best option.
Wondershare Filmora
Free Download For Win 7 or later(64-bit)
Free Download For macOS 10.14 or later
It has an attractive system UI that allows inexperienced users to learn how to use it quickly. It also has a diverse stock media collection. Not only that, but It gives you access to dependable features for changing the speed of a video.

Scroll below to learn how to download the latest version!
Step1 Download Filmora
Begin by installing the latest version of Wondershare Filmora if you don’t do already. Then, run the installer of this app on your PC or Mac.
Now that you have downloaded the app let’s change the resolution!
Step2 Import Video Clips
Your next step after launching Filmora is to import video clips you want to resize. To accomplish this, follow the steps outlined below:
- Locate and select the Import icon on the top left side of the Filmora Home Interface.
- It will take you to your computer’s library.
- Select the videos to be edited and then click OK.

If you need clarification about the resolution of the video that you imported, you can also check them before adding it to the timeline.
- Right-Click on the video in the import window.
- In the pop-up column, go to Properties.
It opens a window that will tell you the basic info about your video clips. Here you can also preview the resolution.

Now that we have our clips imported, it is time to add them to the timeline below!
Step3 Add The Video Clips to Timeline
To add Video clips to the timeline, go through the steps as guided:
- Hold Right click to drag and select the video clips in the import window.
- Release Right-click when in the timeline.

Doing so would have added the video clips to the timeline. Instead, it has created a workplace to edit our videos.
You can trim, add effects, and join multiple clips in this process. After finishing the editing process, it’s time to select an export format.
Step4 Export Your Video
You can export into video formats in two ways with Filmora. It can be either selecting a format for your video. Or you can also choose to export your video to a particular device.
Video Format Resolution
Wondershare Filmora is a fantastic software that allows you to access a variety of formats for your videos. These export formats include MP4, WMV, F4V, MOV, TS, 3GP, and more. To select a format for your video, follow the steps as guided:
- Click on Export.
- In the left column, click on the video format you need.
- Click Export on the bottom right corner of the window.

Exporting a video in a specific format not only allows you to change the format of a video but also allows you to change the resolution simultaneously.
Default Resolution Settings
Some formats have a built-in resolution. Whenever you choose a specific format for a video, the resolution of the video will be shifted to the resolution of that format, i.e., TS has a default 1080p resolution.
![]()
Note: Another thing to remember is that most video formats have defaulted to 1080p. But there are some formats whose resolutions vary according to their style. A good example is a 3GP format, which is set to 352 x 488 by default.
Customize the Resolution
But if you don’t find the resolution stable for your device, you can also change this default resolution in simple steps. In the export window, follow the steps mentioned ahead:
- In the preset tab, go to > settings.
- In the video tab, click on the resolution.
- In the drop-down menu, select the resolution that you desire.
You can also select a custom resolution by these steps:
- In the drop-down menu, click on Custom.
- Here, you can change the height and width according to your wish.

Exporting a Video to a Specific Device
Selecting a format for your video can help if you want to change the resolution. But in cases where you want to export a video to a particular mobile device. Such as an iPhone or an iPad, you can select the device export option.
In the device export option, you can select a custom device. Filmora allows you to choose from a wide variety of machines available when you choose a custom device; the resolution will be set to optimal for that particular device.
Select a Folder to Export Your Video
After you are done calibrating the resolution settings, you can move on to select the export location for your video. You can do so by the steps mentioned:
- In the main Export window, navigate to the Save
- Click on the Folder
- It will direct you to your PC library.
- Select the directory you want to export your video to.
- Click Select Folder.

Final Step
The last step to export your video is clicking on the Export icon in the bottom right corner of the window. It opens up a render window. Wait for a few minutes until the video finishes exporting.
When the export is finished, a window will pop up as a reminder. You can also find the target folder by clicking on Find Target.

Congratulations! You have successfully learned how to change the resolution of a video using Wondershare Filmora.
Conclusion
Rapid video technology advancement is leading to the development of higher-resolution devices. The greatest resolution in the modern day is the 8K; soon, everyone will be using 8K devices. So, it is beneficial to learn how to change a video’s resolution.
By following the steps mentioned in this article, you can now change the resolution of your video using Filmora.
Before we adjust the resolution of a video, let’s look at a comparison between different types of video resolution.
Part 2. 7 Different Types of Video Resolution
It has been established that a video resolution is not a constant number and changes according to the screen. Scroll below to look at the different forms of video resolutions available!
360p
The full resolution is 480 x 360. This resolution is a minimal video resolution. On a big screen, 360p will look blurry. That is why a 360p resolution is the best for smaller devices such as Mobile phones.
480p
The full resolution is 853 x 480. Although an upgrade from the latter, this resolution is available on many devices. It’s mainly used in devices such as smaller TVs, laptops, and Desktop computers. It is also available for Burn-in DVDs.
720p
The full version of the resolution is 1280 x 720. This resolution is called HD, short for High Definition. 720p quality looks good almost on every device and is also reasonably available.
Most modern devices, such as Mobile phones, Touch Tablets, Laptops, and PCs, are calibrated in 720p Resolution.

1080p
The resolution in its complete form is 1920 x 1080. This resolution is also known as FHD, short for Full High Definition. 1080p resolution is the quality in which many high-quality devices are constructed. As a result, the screens of these devices have a clear and clean display.

![]()
Note: It is usually recommended to share videos on social media in 1080p resolution.
1440p
This resolution is also called QHD (Quad HD). The length and width of this resolution are 2560 x 1440. As the name suggests, its quality is quad (four times) than that of a standard 720p resolution.
The screens of devices constructed in this resolution usually have a high-end purpose. For example, this resolution is commonly used in Gaming monitors and High-end smartphones.

2160p
The screens constructed in this resolution are considered among the best available in the market. 2160p (3840 x 2160) is also known as UHD, which is short for Ultra High Definition. It is also known as 4K because it offers four times the power of 1080p or FHD (Full High Definition.)
These screens are usually available for high-end competitive gaming monitors or big screen LCD and LED Television. In addition, some of the flagship smartphones are also built with 4K resolution.

4320p
This resolution is also known as 8K. The length and width of the pixel arrangement are 7680 x 4320. The pixels are arranged in these screens to offer sixteen times the average power of a 1080p (FHD) monitor.
This resolution is only available on several devices, such as commercial TVs and monitors. However, this is the most significant resolution available in the modern market. Therefore, even if your monitor cannot support a larger resolution, you can test whether your PC can render an 8K resolution.

Part 3. Why Do You Need to Change a Video Resolution?
There are numerous cases where you will want to change the resolution of a video. Some of them are described below.
Decreasing a Video Resolution
Sometimes, you are trying to upload a video from a smartphone. Or, in general, you want to transfer videos to a smartphone. The resolution of your video can play a significant role in the transfer process.
If your video file has a higher resolution, it will take up more space on your phone. As well as, if your PC has a higher resolution, say a 4K resolution, and your phone is of 1080p resolution. You might not be able to play it.
To counter situations like these, you need to change the resolution of your video.
Increasing a Video Resolution
Similarly, there are instances where you would need to change the resolution of your video to increase it.
A good example would be to burn a low-quality DVD. To maintain good quality on a DVD, you need to increase its resolution before transfer.
Changing the exact resolution of a video is only possible in some cases because you cannot change the precise pixel of the video it is recorded in. But software like Wondershare Filmora allows you to change the resolution of your video easily.
Now let’s move to understanding the steps involved in changing the resolution of a video!
Part 4. Steps to Change Video Resolution in Filmora
To change the resolution of a video, you would need a basic video editor. This video editor needs to support the features that enable you to adjust a video resolution. In this case, Filmora is the best option.
Wondershare Filmora
Free Download For Win 7 or later(64-bit)
Free Download For macOS 10.14 or later
It has an attractive system UI that allows inexperienced users to learn how to use it quickly. It also has a diverse stock media collection. Not only that, but It gives you access to dependable features for changing the speed of a video.

Scroll below to learn how to download the latest version!
Step1 Download Filmora
Begin by installing the latest version of Wondershare Filmora if you don’t do already. Then, run the installer of this app on your PC or Mac.
Now that you have downloaded the app let’s change the resolution!
Step2 Import Video Clips
Your next step after launching Filmora is to import video clips you want to resize. To accomplish this, follow the steps outlined below:
- Locate and select the Import icon on the top left side of the Filmora Home Interface.
- It will take you to your computer’s library.
- Select the videos to be edited and then click OK.

If you need clarification about the resolution of the video that you imported, you can also check them before adding it to the timeline.
- Right-Click on the video in the import window.
- In the pop-up column, go to Properties.
It opens a window that will tell you the basic info about your video clips. Here you can also preview the resolution.

Now that we have our clips imported, it is time to add them to the timeline below!
Step3 Add The Video Clips to Timeline
To add Video clips to the timeline, go through the steps as guided:
- Hold Right click to drag and select the video clips in the import window.
- Release Right-click when in the timeline.

Doing so would have added the video clips to the timeline. Instead, it has created a workplace to edit our videos.
You can trim, add effects, and join multiple clips in this process. After finishing the editing process, it’s time to select an export format.
Step4 Export Your Video
You can export into video formats in two ways with Filmora. It can be either selecting a format for your video. Or you can also choose to export your video to a particular device.
Video Format Resolution
Wondershare Filmora is a fantastic software that allows you to access a variety of formats for your videos. These export formats include MP4, WMV, F4V, MOV, TS, 3GP, and more. To select a format for your video, follow the steps as guided:
- Click on Export.
- In the left column, click on the video format you need.
- Click Export on the bottom right corner of the window.

Exporting a video in a specific format not only allows you to change the format of a video but also allows you to change the resolution simultaneously.
Default Resolution Settings
Some formats have a built-in resolution. Whenever you choose a specific format for a video, the resolution of the video will be shifted to the resolution of that format, i.e., TS has a default 1080p resolution.
![]()
Note: Another thing to remember is that most video formats have defaulted to 1080p. But there are some formats whose resolutions vary according to their style. A good example is a 3GP format, which is set to 352 x 488 by default.
Customize the Resolution
But if you don’t find the resolution stable for your device, you can also change this default resolution in simple steps. In the export window, follow the steps mentioned ahead:
- In the preset tab, go to > settings.
- In the video tab, click on the resolution.
- In the drop-down menu, select the resolution that you desire.
You can also select a custom resolution by these steps:
- In the drop-down menu, click on Custom.
- Here, you can change the height and width according to your wish.

Exporting a Video to a Specific Device
Selecting a format for your video can help if you want to change the resolution. But in cases where you want to export a video to a particular mobile device. Such as an iPhone or an iPad, you can select the device export option.
In the device export option, you can select a custom device. Filmora allows you to choose from a wide variety of machines available when you choose a custom device; the resolution will be set to optimal for that particular device.
Select a Folder to Export Your Video
After you are done calibrating the resolution settings, you can move on to select the export location for your video. You can do so by the steps mentioned:
- In the main Export window, navigate to the Save
- Click on the Folder
- It will direct you to your PC library.
- Select the directory you want to export your video to.
- Click Select Folder.

Final Step
The last step to export your video is clicking on the Export icon in the bottom right corner of the window. It opens up a render window. Wait for a few minutes until the video finishes exporting.
When the export is finished, a window will pop up as a reminder. You can also find the target folder by clicking on Find Target.

Congratulations! You have successfully learned how to change the resolution of a video using Wondershare Filmora.
Conclusion
Rapid video technology advancement is leading to the development of higher-resolution devices. The greatest resolution in the modern day is the 8K; soon, everyone will be using 8K devices. So, it is beneficial to learn how to change a video’s resolution.
By following the steps mentioned in this article, you can now change the resolution of your video using Filmora.
How to Add a Spooky Shadow Effect
Wondershare Filmora’s main purpose is the empowerment of content creators. The latest updates to the program are one of the pieces of evidence.
Whether you’re a horror content creator or simply living the Halloween vibe 24/7, continue reading to know how to use its latest masking feature to create a cool shadow effect for your next mind-blowing social media video.
How to Use The Masking Effect
Wondershare Filmora’s latest Masking feature allows its users to select a specific clip that they can overlay on other parts of the video or other clips.
Free Download For Win 7 or later(64-bit)
Free Download For macOS 10.14 or later
The feature allows you to insert the mask in any shape, such as a rectangle, circle, or triangle. You can also import any shapes you like if you can’t find them in the presets library. You can also adjust the mask placement, width, height, and feather effect.
Without further ado, let’s see the detailed step-by-step guide for this effect.
a. Preparation
You will need at least three shots of the same frame to get the shadow effect to work. The first is the main video, the second is the shadow clip, and the last would be a clip portraying just a plain background.
Make sure that your camera stays at the same point and angle. You can use a tripod for assurance.
Take the first main video and don’t forget to mark the positioning of the object for the next take. Then, you can shoot the shadow clip following the marking of the object to match its position in the main clip.
Finally, shoot the final clip without the object on the frame.

b. Steps to add the shadow effect to your videos using Masking
Step 1: Place the main clip on the timeline and find the start of the segment that you want to use. Press M on the keyboard to set a marker.

Step 2: Place the shadow clip on top of the main clip on the timeline. Trim and adjust until the shadow clip ends right at the marker of the main clip.

Step 3: Move the play head to the start of the shadow clip. Trim the main clip right on that mark so both clips have the same start by clicking the scissor icon and deleting the unused part.

Step 4: Double-click the shadow clip. OpenSettings > Mask Section > Rectangle to apply the mask. Adjust the blur strength to smooth out the edge.

Step 5: Play the result to see if there’s any part you need to block out. When you find them, repeat steps 1 to 4 but with the background clip. Try to conceal all things you need to hide using the masks. Make sure that you get the timings right.

Step6 Trim the length of the masking clips to match the main clip by sliding the play head and clicking the Split button.
Adjust the audio and preview the effect before you save the result. You can also add extra features like slow motion for maximum effect.

Summary
It is so easy to use this shadow effect on your video using Wondershare Filmora. The handy masking feature also comes with additional keyframe control and easy composite adjustment.
Wondershare Filmora is also packed with other powerful new features. This includes Auto Beat Sync, Speed Ramping, Quick Split Mode, and the upgraded Denoise feature. Update today to add more quirk to your content.
Free Download For macOS 10.14 or later
The feature allows you to insert the mask in any shape, such as a rectangle, circle, or triangle. You can also import any shapes you like if you can’t find them in the presets library. You can also adjust the mask placement, width, height, and feather effect.
Without further ado, let’s see the detailed step-by-step guide for this effect.
a. Preparation
You will need at least three shots of the same frame to get the shadow effect to work. The first is the main video, the second is the shadow clip, and the last would be a clip portraying just a plain background.
Make sure that your camera stays at the same point and angle. You can use a tripod for assurance.
Take the first main video and don’t forget to mark the positioning of the object for the next take. Then, you can shoot the shadow clip following the marking of the object to match its position in the main clip.
Finally, shoot the final clip without the object on the frame.

b. Steps to add the shadow effect to your videos using Masking
Step 1: Place the main clip on the timeline and find the start of the segment that you want to use. Press M on the keyboard to set a marker.

Step 2: Place the shadow clip on top of the main clip on the timeline. Trim and adjust until the shadow clip ends right at the marker of the main clip.

Step 3: Move the play head to the start of the shadow clip. Trim the main clip right on that mark so both clips have the same start by clicking the scissor icon and deleting the unused part.

Step 4: Double-click the shadow clip. OpenSettings > Mask Section > Rectangle to apply the mask. Adjust the blur strength to smooth out the edge.

Step 5: Play the result to see if there’s any part you need to block out. When you find them, repeat steps 1 to 4 but with the background clip. Try to conceal all things you need to hide using the masks. Make sure that you get the timings right.

Step6 Trim the length of the masking clips to match the main clip by sliding the play head and clicking the Split button.
Adjust the audio and preview the effect before you save the result. You can also add extra features like slow motion for maximum effect.

Summary
It is so easy to use this shadow effect on your video using Wondershare Filmora. The handy masking feature also comes with additional keyframe control and easy composite adjustment.
Wondershare Filmora is also packed with other powerful new features. This includes Auto Beat Sync, Speed Ramping, Quick Split Mode, and the upgraded Denoise feature. Update today to add more quirk to your content.
Free Download For macOS 10.14 or later
The feature allows you to insert the mask in any shape, such as a rectangle, circle, or triangle. You can also import any shapes you like if you can’t find them in the presets library. You can also adjust the mask placement, width, height, and feather effect.
Without further ado, let’s see the detailed step-by-step guide for this effect.
a. Preparation
You will need at least three shots of the same frame to get the shadow effect to work. The first is the main video, the second is the shadow clip, and the last would be a clip portraying just a plain background.
Make sure that your camera stays at the same point and angle. You can use a tripod for assurance.
Take the first main video and don’t forget to mark the positioning of the object for the next take. Then, you can shoot the shadow clip following the marking of the object to match its position in the main clip.
Finally, shoot the final clip without the object on the frame.

b. Steps to add the shadow effect to your videos using Masking
Step 1: Place the main clip on the timeline and find the start of the segment that you want to use. Press M on the keyboard to set a marker.

Step 2: Place the shadow clip on top of the main clip on the timeline. Trim and adjust until the shadow clip ends right at the marker of the main clip.

Step 3: Move the play head to the start of the shadow clip. Trim the main clip right on that mark so both clips have the same start by clicking the scissor icon and deleting the unused part.

Step 4: Double-click the shadow clip. OpenSettings > Mask Section > Rectangle to apply the mask. Adjust the blur strength to smooth out the edge.

Step 5: Play the result to see if there’s any part you need to block out. When you find them, repeat steps 1 to 4 but with the background clip. Try to conceal all things you need to hide using the masks. Make sure that you get the timings right.

Step6 Trim the length of the masking clips to match the main clip by sliding the play head and clicking the Split button.
Adjust the audio and preview the effect before you save the result. You can also add extra features like slow motion for maximum effect.

Summary
It is so easy to use this shadow effect on your video using Wondershare Filmora. The handy masking feature also comes with additional keyframe control and easy composite adjustment.
Wondershare Filmora is also packed with other powerful new features. This includes Auto Beat Sync, Speed Ramping, Quick Split Mode, and the upgraded Denoise feature. Update today to add more quirk to your content.
Free Download For macOS 10.14 or later
The feature allows you to insert the mask in any shape, such as a rectangle, circle, or triangle. You can also import any shapes you like if you can’t find them in the presets library. You can also adjust the mask placement, width, height, and feather effect.
Without further ado, let’s see the detailed step-by-step guide for this effect.
a. Preparation
You will need at least three shots of the same frame to get the shadow effect to work. The first is the main video, the second is the shadow clip, and the last would be a clip portraying just a plain background.
Make sure that your camera stays at the same point and angle. You can use a tripod for assurance.
Take the first main video and don’t forget to mark the positioning of the object for the next take. Then, you can shoot the shadow clip following the marking of the object to match its position in the main clip.
Finally, shoot the final clip without the object on the frame.

b. Steps to add the shadow effect to your videos using Masking
Step 1: Place the main clip on the timeline and find the start of the segment that you want to use. Press M on the keyboard to set a marker.

Step 2: Place the shadow clip on top of the main clip on the timeline. Trim and adjust until the shadow clip ends right at the marker of the main clip.

Step 3: Move the play head to the start of the shadow clip. Trim the main clip right on that mark so both clips have the same start by clicking the scissor icon and deleting the unused part.

Step 4: Double-click the shadow clip. OpenSettings > Mask Section > Rectangle to apply the mask. Adjust the blur strength to smooth out the edge.

Step 5: Play the result to see if there’s any part you need to block out. When you find them, repeat steps 1 to 4 but with the background clip. Try to conceal all things you need to hide using the masks. Make sure that you get the timings right.

Step6 Trim the length of the masking clips to match the main clip by sliding the play head and clicking the Split button.
Adjust the audio and preview the effect before you save the result. You can also add extra features like slow motion for maximum effect.

Summary
It is so easy to use this shadow effect on your video using Wondershare Filmora. The handy masking feature also comes with additional keyframe control and easy composite adjustment.
Wondershare Filmora is also packed with other powerful new features. This includes Auto Beat Sync, Speed Ramping, Quick Split Mode, and the upgraded Denoise feature. Update today to add more quirk to your content.
Also read:
- 2024 Approved MP3 CUTTER DOWNLOADMP3 Cutter Download Is One of the Most Reliable Tools for Editing of Music Files in a Fast and Friendly Way
- New 2024 Approved This Article Will Show You How to Make a Tattoo Disappear on Your Body Magically
- 2024 Approved Easy Way to Create an Alternate Reality Effect
- Vegas Pro - How to Download, Install and Use It for 2024
- New In 2024, Keyframes Interval Everything You Need To Know
- New In 2024, 6 Best Methods to Make a Video Longer
- New 2024 Approved Find The Best LUTs for Lightroom
- Updated In 2024, How to Start a Video Editing Career
- Updated 2024 Approved Best 10 Crazy-Cool Examples of AR Video
- New Create Your Face Zoom TikTok Now for 2024
- New How to Make Your CSGO Montage Impressive for 2024
- Updated A Guide to Understanding Efectum App and Some Top Alternatives
- 8 Best Free Photo Collage with Music Video Maker
- 2024 Approved How to Remove Audio From Video Without Watermark?
- With Everything Centered Around Videos on the Digital Platform, the Use and the Need for AI-Based Editing Tools Have Also Increased Manifold. We Have Curated a List of the Top Programs that Can Help You with AI Video Editing
- Magic Effects Video Making How To for 2024
- 2024 Approved Online Calculate and Change Video Aspect Ratio
- New Vegas Pro - How to Download, Install and Use It, In 2024
- In 2024, How to Use iMovie Text Effects
- New Looking for Efficient Ways to Create a Slow-Motion Video? Read the Article for Reliable Solutions that Provide Excellent Results for 2024
- Updated How to Use Frame Blending in Adobe Premiere Pro for 2024
- 2024 Approved Want to Add an Exciting Countdown Timer to Your Wedding, Product Launch or Any Other Video Using After Effects or an Alternative Tool? This Article Will Help You Learn All About After Effects Countdown and the Procedure
- How to Resize FLV Video Efficiently Windows, Mac,Android, iPhone & O
- Updated 2024 Approved Change Video Speed with FFmpeg
- Tecno Camon 20 Not Receiving Texts? 10 Hassle-Free Solutions Here | Dr.fone
- Easy steps to recover deleted call history from Motorola Moto G24
- In 2024, How to Migrate Android Data From Honor Play 7T to New Android Phone? | Dr.fone
- In 2024, Downloading SamFw FRP Tool 3.0 for Infinix Note 30 VIP
- In 2024, 9 Best Phone Monitoring Apps for Samsung Galaxy F04 | Dr.fone
- Process of Screen Sharing Samsung Galaxy A14 4G to PC- Detailed Steps | Dr.fone
- Top 4 SIM Location Trackers To Easily Find Your Lost Poco Device
- In 2024, 2 Ways to Transfer Text Messages from OnePlus Ace 2V to iPhone 15/14/13/12/11/X/8/ | Dr.fone
- The Ultimate Guide to Bypassing iCloud Activation Lock from Apple iPhone 15 Pro
- How to Recover Apple iPhone X Data From iOS iCloud? | Dr.fone
- Lava support - Turn Off Screen Lock.
- In 2024, Does Realme 12+ 5G Have Find My Friends? | Dr.fone
- Spoofing Life360 How to Do it on Honor 90? | Dr.fone
- Where Is the Best Place to Catch Dratini On Poco F5 5G | Dr.fone
- In 2024, How to Transfer Contacts from Nokia C300 to Other Android Devices Devices? | Dr.fone
- How to Unlock Vivo S17 Phone without Google Account?
- Complete Tutorial for Vivo Y02T Hard Reset | Dr.fone
- 5 Most Effective Methods to Unlock iPhone 8 Plus in Lost Mode
- Updated 2024 Approved Easy Shortcut to Convert Videos to Gifs on iPhone
- Title: New What Is an Eye Zoom Transition Effect? Its a Close-Up Video Effect Allowing Viewers to Transit to the Next Clip From the Eye
- Author: Morgan
- Created at : 2024-05-19 05:12:46
- Updated at : 2024-05-20 05:12:46
- Link: https://ai-video-editing.techidaily.com/new-what-is-an-eye-zoom-transition-effect-its-a-close-up-video-effect-allowing-viewers-to-transit-to-the-next-clip-from-the-eye/
- License: This work is licensed under CC BY-NC-SA 4.0.

