
:max_bytes(150000):strip_icc():format(webp)/001_best-movies-on-hulu-right-now-5025149-3c80b5664f6541b4a0698333fc447251.jpg)
New Why You Should Master Slideshows In Lightroom, Fresh Insight?
Why You Should Master Slideshows In Lightroom, Fresh Insight?
Why You Should Master Slideshows in Lightroom, Fresh Insight
An easy yet powerful editor
Numerous effects to choose from
Detailed tutorials provided by the official channel
Adobe Lightroom is an image manipulation software which is developed by Adobe Inc. It is used for editing, importing, saving and sharing a large no. of digital images. Lightroom editing functions include HSL, colour grading, lens correction, white balance, the transformation of spot removal, red-eye correction and adjustment brushing. Lightroom has a feature of slideshow module which you must have heard about it before.
The process of creating a slideshow video can be time-consuming but once you have created it, you can rewind your memories in just 3-4 minutes. If you want you can share the video on your social media accounts.
In this article
01 [What is Lightroom and What Advantages Does It Have for Making Slideshows](#Part 1)
02 [What Does Slideshows in Lightroom Do to Different Groups of People](#Part 2)
03 [How to Create a Professional-looking Slideshow with Lightroom](#Part 3)
04 [Hot FAQs About Slideshows in Lightroom](#Part 4)
Part 1 What is lightroom and what advantages does it have for making slideshows?
Lightroom helps in editing the images and it allows the users to edit the images by using external features. Photographers usually like working on the lightroom because it is a very popular and easy tool. It is perfect for beginners and graphic designers who are looking for an easy and straightforward editor.
Lightroom is used for image retouching. Lightroom includes improving the color tone, color balance, cropping, filters, removing red-eye effect, and many more things. Lightroom supports some the image formats like JPEG, PSD, PNG and TIFF. You can also edit the raw images.
Advantages
● Easy to use - The lightroom interface is less complex, which makes it easy to use especially for the newcomers.
● Tidy interface - In lightroom, it is easier to search for images as it gathers the metadata on each image on its own. So you can find the image with a very specific date, time, resolution, model, etc.
● Editing capabilities - With editing capabilities like contrast, exposure, clarity, warmth, and saturation, Lightroom can give the desired look to the image which photographers want to create.
Part 2 What do slideshows in Lightroom do to a different group of people?
01Enable or Disable People View
If you are a beginner and people view is disabled, all pre-existing face model data is deleted from lightroom servers. Lightroom will no longer analyze new images and will not group them in clusters automatically. You need to enable it so that the lightroom desktop can analyze images in the cloud to identify people and form clusters in people’s view.
02View people in your photos
● In the My Photos panel at the upper-left side of the screen, select People to view the people view. You can access People clusters in which each cluster contains images of a particular person. Below the cover photo of each cluster, you can see the total number of photos for each person.
● To view photos of that person you can click on any cluster. In the cluster at the upper right corner of the screen, you can view the total number of photos.
03Sort options in People View
To sort People clusters follow the steps:
● In the My Photos panel at the upper left side of the screen, select People to view People View.
● Click on the three dots at the upper right corner of the screen, from the drop-down list select Sort By, and then select the following option:
● First Name: Sort the clusters in the alphabetical order of the first name.
● Last Name: Sort the clusters in the alphabetical order of the last name.
● Count: Sort the clusters with the highest number of photos to the least no. of photos in a cluster.
Part 3 How to create a professional-looking slideshow with Lightroom?
Do you know that you can create a professional-looking slideshow using lightroom? Here are some steps that you can follow to make a professional-looking slideshow.
Step 1 - Photo selection
The first thing you have to do is select the images you want to include in making the slideshow. There are a lot of ways to do this in Lightroom.
● In the grid view select the photos you want to include. Select CTRL (CMD) key and click on each image.
● Add those images to Quick Collection because it is easiest to work with. Click the B key to add them to the quick collection.
● It will be added to the collection panel when you will name the collection for the slideshow.

Step 2 - Arrange the photos
Now, it is time for arranging the photos in a sequence in which you want them to watch in a slideshow. If you want to rearrange them simply drag and drop each image in the grid view where you want to make them appear in a slideshow.
Try to arrange the photos in such a way so that they can tell a story to the viewers who are watching it.
Step 3 – Create a slideshow
Once you have arranged the photos in a sequence, then create a slideshow.
● Click on the ‘slideshow’ menu given at the top of your screen.
● This will lead you to the slideshow module view in lightroom.
● Click on the ‘Create Slideshow’ given at the top right of the central panel.
● Add a name to your slideshow and then click on create.
● Once you have created it and named your slideshow, all the changes will be automatically saved in lightroom.

Step 4 – Select a template for a slideshow
From the template browser given on the left-hand side panel, you can select a template for your slideshow. Before adding anything, do a run-through on your slideshow to see how it looks.
Step 5 – Designing the lightroom slideshow
You can customize your slideshow to make it more professional. You can make following changes or enrichments by using the features given at the right-hand side panel:
● Titles - You can add text, company logo, introduction or any other important information. You can easily add these things in your slideshow in lightroom.
● Watermarks and overlays - You can add watermarks and custom overlay text in every slide you want to by using the overlays windows.
● Layout - You can change the spacing for each slide by unselecting the Link All Box and selecting the ratio which you prefer. Although the program automatically sets the spacing for each slide.
● Options – You can add a frame or you can change the border it allows you to select how your images are going to be displayed in each slide.
● Background – You can add a background to enhance an image, not to divert attention from it. You can add an image as your background or add any colour as your background. You can create background by using various options available.
● Music – You can add music of your choice using an mp3 file.
● Transitions - Setting a transitions between the slides can really make a huge impact on your overall experience. You can use the auto option or you can set the transitions manually.
Step - 6 Completion of slideshow
Once you have made all the desired changes, you can press “Play” option to run the slideshow. If you still want to make any changes you can go back and change whatever you like. Once it’s done and you are happy with the results it’s time to export the slideshow in the form of video or PDF.

Part 4 Hot FAQs about slideshow in lightroom
Q1. How can you make a slideshow in lightroom?
A. You can create a slideshow by using the slideshow module in lightroom, where you can select templates, layouts, add tiles or songs, choose transitions and playback options.
Q2. Where is the slideshow module in lightroom?
A. Start by clicking on ‘slideshow’ option given at the top menu of your screen. This will open the slideshow module view in lightroom. The right and left panels in slideshow module will look different than the ones in the library module.
Q3. How can you change the sequence of the photos in slideshow lightroom?
A. You can control the order of the photos in a Lightroom folder by dragging and dropping each image from one place to the other in the filmstrip view. To rearrange grab the image and drag on it until you see a black bar appear between two images.
Q4. What is the transition effect in slideshow?
A. Transitions are often called – the movement you see when slide changes to another slide in a slideshow. They are different from animation effect. You can set it manually or with an auto option.
Q5. How to make your slideshow more attractive?
A. There are a lot of options to make your look slideshow more attractive. By using the beautiful template, layouts, background and adding transitions with the perfect time ratio. This will enhance the look of your slideshow and will make it more attractive.
If you are not able to follow the interface of lightroom you can consider Filmora for making attractive slideshows. Wondershare Filmora Video Editor allows you to crop, pan and zoom the slideshow automatically or manually by applying pan and zoom photo placement. It has its own music track and sound effect gallery that allows you to customize the slideshows. Filmora allows you to record your own voiceovers as well. It has also fade-in, fade-out effects with amazing transitions. It exports the videos at resolutions of up to 4K.
For Win 7 or later (64-bit)
For macOS 10.12 or later
● Ending Thoughts →
● Adobe Lightroom is one of the best software for making slideshows due to its amazing features like color grading, red eye correction, transformation of spot removal, white balance etc.
● Lightroom has a feature of slideshow module in which you can create quality slideshow presentations for your business.
● If you are not able to use lightroom you can consider using Filmora for creating amazing slideshows.
Adobe Lightroom is an image manipulation software which is developed by Adobe Inc. It is used for editing, importing, saving and sharing a large no. of digital images. Lightroom editing functions include HSL, colour grading, lens correction, white balance, the transformation of spot removal, red-eye correction and adjustment brushing. Lightroom has a feature of slideshow module which you must have heard about it before.
The process of creating a slideshow video can be time-consuming but once you have created it, you can rewind your memories in just 3-4 minutes. If you want you can share the video on your social media accounts.
In this article
01 [What is Lightroom and What Advantages Does It Have for Making Slideshows](#Part 1)
02 [What Does Slideshows in Lightroom Do to Different Groups of People](#Part 2)
03 [How to Create a Professional-looking Slideshow with Lightroom](#Part 3)
04 [Hot FAQs About Slideshows in Lightroom](#Part 4)
Part 1 What is lightroom and what advantages does it have for making slideshows?
Lightroom helps in editing the images and it allows the users to edit the images by using external features. Photographers usually like working on the lightroom because it is a very popular and easy tool. It is perfect for beginners and graphic designers who are looking for an easy and straightforward editor.
Lightroom is used for image retouching. Lightroom includes improving the color tone, color balance, cropping, filters, removing red-eye effect, and many more things. Lightroom supports some the image formats like JPEG, PSD, PNG and TIFF. You can also edit the raw images.
Advantages
● Easy to use - The lightroom interface is less complex, which makes it easy to use especially for the newcomers.
● Tidy interface - In lightroom, it is easier to search for images as it gathers the metadata on each image on its own. So you can find the image with a very specific date, time, resolution, model, etc.
● Editing capabilities - With editing capabilities like contrast, exposure, clarity, warmth, and saturation, Lightroom can give the desired look to the image which photographers want to create.
Part 2 What do slideshows in Lightroom do to a different group of people?
01Enable or Disable People View
If you are a beginner and people view is disabled, all pre-existing face model data is deleted from lightroom servers. Lightroom will no longer analyze new images and will not group them in clusters automatically. You need to enable it so that the lightroom desktop can analyze images in the cloud to identify people and form clusters in people’s view.
02View people in your photos
● In the My Photos panel at the upper-left side of the screen, select People to view the people view. You can access People clusters in which each cluster contains images of a particular person. Below the cover photo of each cluster, you can see the total number of photos for each person.
● To view photos of that person you can click on any cluster. In the cluster at the upper right corner of the screen, you can view the total number of photos.
03Sort options in People View
To sort People clusters follow the steps:
● In the My Photos panel at the upper left side of the screen, select People to view People View.
● Click on the three dots at the upper right corner of the screen, from the drop-down list select Sort By, and then select the following option:
● First Name: Sort the clusters in the alphabetical order of the first name.
● Last Name: Sort the clusters in the alphabetical order of the last name.
● Count: Sort the clusters with the highest number of photos to the least no. of photos in a cluster.
Part 3 How to create a professional-looking slideshow with Lightroom?
Do you know that you can create a professional-looking slideshow using lightroom? Here are some steps that you can follow to make a professional-looking slideshow.
Step 1 - Photo selection
The first thing you have to do is select the images you want to include in making the slideshow. There are a lot of ways to do this in Lightroom.
● In the grid view select the photos you want to include. Select CTRL (CMD) key and click on each image.
● Add those images to Quick Collection because it is easiest to work with. Click the B key to add them to the quick collection.
● It will be added to the collection panel when you will name the collection for the slideshow.
Step 2 - Arrange the photos
Now, it is time for arranging the photos in a sequence in which you want them to watch in a slideshow. If you want to rearrange them simply drag and drop each image in the grid view where you want to make them appear in a slideshow.
Try to arrange the photos in such a way so that they can tell a story to the viewers who are watching it.
Step 3 – Create a slideshow
Once you have arranged the photos in a sequence, then create a slideshow.
● Click on the ‘slideshow’ menu given at the top of your screen.
● This will lead you to the slideshow module view in lightroom.
● Click on the ‘Create Slideshow’ given at the top right of the central panel.
● Add a name to your slideshow and then click on create.
● Once you have created it and named your slideshow, all the changes will be automatically saved in lightroom.
Step 4 – Select a template for a slideshow
From the template browser given on the left-hand side panel, you can select a template for your slideshow. Before adding anything, do a run-through on your slideshow to see how it looks.
Step 5 – Designing the lightroom slideshow
You can customize your slideshow to make it more professional. You can make following changes or enrichments by using the features given at the right-hand side panel:
● Titles - You can add text, company logo, introduction or any other important information. You can easily add these things in your slideshow in lightroom.
● Watermarks and overlays - You can add watermarks and custom overlay text in every slide you want to by using the overlays windows.
● Layout - You can change the spacing for each slide by unselecting the Link All Box and selecting the ratio which you prefer. Although the program automatically sets the spacing for each slide.
● Options – You can add a frame or you can change the border it allows you to select how your images are going to be displayed in each slide.
● Background – You can add a background to enhance an image, not to divert attention from it. You can add an image as your background or add any colour as your background. You can create background by using various options available.
● Music – You can add music of your choice using an mp3 file.
● Transitions - Setting a transitions between the slides can really make a huge impact on your overall experience. You can use the auto option or you can set the transitions manually.
Step - 6 Completion of slideshow
Once you have made all the desired changes, you can press “Play” option to run the slideshow. If you still want to make any changes you can go back and change whatever you like. Once it’s done and you are happy with the results it’s time to export the slideshow in the form of video or PDF.
Part 4 Hot FAQs about slideshow in lightroom
Q1. How can you make a slideshow in lightroom?
A. You can create a slideshow by using the slideshow module in lightroom, where you can select templates, layouts, add tiles or songs, choose transitions and playback options.
Q2. Where is the slideshow module in lightroom?
A. Start by clicking on ‘slideshow’ option given at the top menu of your screen. This will open the slideshow module view in lightroom. The right and left panels in slideshow module will look different than the ones in the library module.
Q3. How can you change the sequence of the photos in slideshow lightroom?
A. You can control the order of the photos in a Lightroom folder by dragging and dropping each image from one place to the other in the filmstrip view. To rearrange grab the image and drag on it until you see a black bar appear between two images.
Q4. What is the transition effect in slideshow?
A. Transitions are often called – the movement you see when slide changes to another slide in a slideshow. They are different from animation effect. You can set it manually or with an auto option.
Q5. How to make your slideshow more attractive?
A. There are a lot of options to make your look slideshow more attractive. By using the beautiful template, layouts, background and adding transitions with the perfect time ratio. This will enhance the look of your slideshow and will make it more attractive.
If you are not able to follow the interface of lightroom you can consider Filmora for making attractive slideshows. Wondershare Filmora Video Editor allows you to crop, pan and zoom the slideshow automatically or manually by applying pan and zoom photo placement. It has its own music track and sound effect gallery that allows you to customize the slideshows. Filmora allows you to record your own voiceovers as well. It has also fade-in, fade-out effects with amazing transitions. It exports the videos at resolutions of up to 4K.
For Win 7 or later (64-bit)
For macOS 10.12 or later
● Ending Thoughts →
● Adobe Lightroom is one of the best software for making slideshows due to its amazing features like color grading, red eye correction, transformation of spot removal, white balance etc.
● Lightroom has a feature of slideshow module in which you can create quality slideshow presentations for your business.
● If you are not able to use lightroom you can consider using Filmora for creating amazing slideshows.
Deleting White Background in Photoshop Is Hard? No
Deleting White Background in Photoshop Is Hard? No
An easy yet powerful editor
Numerous effects to choose from
Detailed tutorials provided by the official channel
Know how Photoshop make white background transparent. Learn to create transparent background in Photoshop in simple steps. How to delete white background in image?
In this article
01 [Why Shooting with a White Background Makes Sense](#Part 1)
02 [When We Need to Delete White Background and when Not?](#Part 2)
03 [How to Delete White Background in Photoshop (5 Fast Ways)](#Part 3)
04 [Which Photoshop Selection Tool is Best for White Backdrop Removal](#Part 4)
Part 1 Why Shooting with a White Background Makes Sense

Products have gone online with E-commerce and people explore the products over internet more than they pick it from the stores. So, every business needs to showcase their products in a attractive way to get more customers. This needs an attractive photography by experts. Photography for e-commerce products requires expert product photography or commercial photography. They are very important for a business to get success in long run. To do branding the product image should be accurate and attractive.
So, if your company is going online, your products photography should be attractive enough to make buyers purchase your products. Background is essential part of any photography or video making. Whether it is product catalogue, shoot, advertising or commercial videos, white backdrop and white background are always good. With white background one can pay attention to the product. Every details of the product are highlighted when a white background is used.
When you need bright and highlighted images for any commercial videos, using a right technique for background color is must. White background creates a clean and bright commercial photo. If the same is not done correctly, the white background may turn to be off white or grey. A white background is good for isolating an object in the picture.
So, let’s know why shooting with white background make sense. Here are some reasons for it:

Removal of background becomes Easy and quick:
The most important benefit of applying white background is that it can be easily removed or replaced. In place of the blank white background, one can easily apply other background color or make it transparent. The white background has a speciality that it reflects the color of the product better which makes the product image visually good. This can be done with the help of any tool or application. Thus, using a white background gives an opportunity to apply any other background on it.
Promoting product in every occasion: An image with colorful background may not be useful to present in every event or occasion. For example a simple image with colorful background will not look good in a promotional event, while a colorful background will look happening in any festival event celebration. This, a blank background has the option to change as per the need of the occasion.
An image with white background can be changed as per the occasion. This helps a business to use a single image throughout the year without any additional cost for making a different picture. You can just change the white background of any image through various application or software.
Time saving: Removing white background is easy and streamlined as compared to any other color. The reason is that it does not require much editing and work on the edges. So, the steps in removing the white background are less and thus it saves time of the artist and the editors.
Saves location and bulk shooting expenses: When shooting with a white background is done; the same picture with some changes can be reused for number of times in several occasions. Thus, it saves the cost of shooting different in pictures in different location.
Good to celebrate every special day: A picture with white background is perfect and ready to edit for any special day. Whether it I a father’s day, mother’s day or any special day, a single picture can be edited as per the requirement. It will be a great gifting idea also after changing white background of the picture as per the special day.
Part 2 When We Need to Delete White Background and when Not?

A single picture of a person or product cannot be used for a single instance or purpose. Especially when it is a promotional campaign or commercial advertisements, a product is required to be showcased in several marketing campaign for different categories of consumers. Thus, a white background image is good for several purposes while in some circumstances, it requires changes. So, let’s see when to delete white background and when not:
When a picture requires special editing: When a picture requires some special effects like reflection, highlights and shadow effects, the picture with white background is required to be changed. When improvement in picture is requires, the white, transparent and color background can be changed accordingly.
Enhancing the visual impact of the picture: A white background picture grab the attention of the customers. So, it is good for advertising and promotion. While this needs to be removed when one desire to add some visual impact on the pictures or deliver some message to the viewers. So, it requires adding colorful and visually good background in a picture.
Adding more items to a picture: A white background need to be removed when more items are required to be included in it. Special edits and enhancing the pictures requires removing or adding a white background as per the purpose of the picture.
Part 3 How to Delete White Background in Photoshop (5 Fast Ways)

Editing a picture with white background can be done in easy steps through various applications. Deleting white background in Photoshop can be done through various tools. Some of the top 5 fast ways to clear background Photoshop are**:**
With the object selection tool:
● Start Photoshop and open the picture. Select the “object selection” from the tool bar. Hover cursor over subject till it turns blue. The subject is selected.
● Press the shift key to remove the background while selecting the objects which you want in the picture.
● To invert the selection go to Select>Inverse.
● Unlock the image based on what you want in the background. It will no longer be a background. It can be also used to create transparent background Photoshop.
● Click on Erase tool and start erasing the background.
Removing background with quick action
This is the quick method for removing a background when a user is going for own purpose. It is in-built quick action in Photoshop for removing the background. Although it is good for performing work, but the same cannot meet the perfection level that any other method does. It can be done by following the mentioned steps:
● Open the image in Photoshop, right click on background layer and click Duplicate layer. Then click on OK.
● Always try to open the properties panel by going to Window>Properties.
● Click on new layer at Layer panel. Go to Quick action and click on Remove Background.
● The background gets removed with quick action.
● At this point refinements and adjustments can be made.
Using pen tool to remove the background
● Open image in Photoshop, right click on background layer and go to Duplicate Layer. Name the layer and click OK.
● Select the Pen tool from the toolbox. Zoom the area. Start at the edge of subject. Start working on the object; add anchors which will outline the subject.
● Click-hold-drag to produce a curved line.
● Use the Direct Selection tool in the toolbox if you want to adjust an anchor point or directional lines for fine tuning
● Complete the path from where you started and save it by going to Windows>paths. Go to three bar menu, click New Path to name it and then save.
● Go to path panel and right click New Path. Choose Make selection and click OK. This will give the outline of the path.
● Go to Select> Inverse if you don’t want to delete what is inside the selection. An outline can be seen around the image.
● Press delete to delete the background. It can be also done to add Adobe Photoshop transparent background.
With Magnetic Lasso Tool
● Right click Background layer and click duplicate layer on the image opened in Photoshop. Name the layer and then click OK. From the toolbox, select Magic Lasso tool. Start drawing at the edges of subject.
● Move around the subject and complete till the start point. Marching ants can be seen around the selection.
● Go to Selection>Save selection to save and give it a name.
● Select>Inverse to delete the background. Photoshop checkered background is visible now.
With quick selection tool
● Click on Duplicate Layer by right clicking on background layer of the picture opened on the Photoshop. Name the layer and click OK.
● Go to the tool box and select quick selection tool.
● Paint the subject by using tool.
● Clean up the selection path with click by holding the Option key (macOS) or Alt key (Windows).
● Go to Selection>Save selection to save and give it a name.
● Select>Inverse to delete the background. The white background can be seen now.
Part 4 Which Photoshop Selection Tool is Best for White Backdrop Removal

There are various tools available at Photoshop to turn a background white. Each one of them has great utility based on the applications. Background Eraser tool is one of the good tools if there is need of more control over removing the background in Photoshop. It is highly effective and saves time of the user. It gives the desired outcome with perfection to an image. The visualization of image becomes better when the background is turned into white with the help of Background Eraser tool.
The other application that is very helpful in making background white to any image is Filmora.
Filmora is an excellent image and video editing software which helps the users in creating some amazing images and videos. It has wide range of image and video editing tools that can make any user a professional in image and video editing. It has features to add or remove background of an image to make it more visually good. Changing background and adding special effects to images and videos can be easily done through filmora.
Wondershare Filmora Video Editor allows transformation of pictures and videos in a better way by adding filters and graphics. Availability of support, drawing tools, editing tools, special effects and sound make it a complete application for both beginners and professionals. It can be used with various other applications also. Those who wish to know how to make a layer transparent in Photoshop can learn it from Filmora.
For Win 7 or later (64-bit)
For macOS 10.12 or later
● Ending Thoughts →
● Making white background or transparent background adobe photoshop has many benefits like it highlight the picture and make it good for various applications and occasions. It saves money and cost for the image editors and video makers.
● One should also know when to use the white background for images, catalogue and video shoot. Adding and deleting white background can only be done when required as per the demand of the occasion and the category of the user like marketing, media, customers etc.
● Various tools on Photoshop make it easy for the users to add or remove white background of images. Filmora is one of the applications that is very popular for its image editing features. It can be used to give special effects to any image or video.
Know how Photoshop make white background transparent. Learn to create transparent background in Photoshop in simple steps. How to delete white background in image?
In this article
01 [Why Shooting with a White Background Makes Sense](#Part 1)
02 [When We Need to Delete White Background and when Not?](#Part 2)
03 [How to Delete White Background in Photoshop (5 Fast Ways)](#Part 3)
04 [Which Photoshop Selection Tool is Best for White Backdrop Removal](#Part 4)
Part 1 Why Shooting with a White Background Makes Sense
Products have gone online with E-commerce and people explore the products over internet more than they pick it from the stores. So, every business needs to showcase their products in a attractive way to get more customers. This needs an attractive photography by experts. Photography for e-commerce products requires expert product photography or commercial photography. They are very important for a business to get success in long run. To do branding the product image should be accurate and attractive.
So, if your company is going online, your products photography should be attractive enough to make buyers purchase your products. Background is essential part of any photography or video making. Whether it is product catalogue, shoot, advertising or commercial videos, white backdrop and white background are always good. With white background one can pay attention to the product. Every details of the product are highlighted when a white background is used.
When you need bright and highlighted images for any commercial videos, using a right technique for background color is must. White background creates a clean and bright commercial photo. If the same is not done correctly, the white background may turn to be off white or grey. A white background is good for isolating an object in the picture.
So, let’s know why shooting with white background make sense. Here are some reasons for it:
Removal of background becomes Easy and quick:
The most important benefit of applying white background is that it can be easily removed or replaced. In place of the blank white background, one can easily apply other background color or make it transparent. The white background has a speciality that it reflects the color of the product better which makes the product image visually good. This can be done with the help of any tool or application. Thus, using a white background gives an opportunity to apply any other background on it.
Promoting product in every occasion: An image with colorful background may not be useful to present in every event or occasion. For example a simple image with colorful background will not look good in a promotional event, while a colorful background will look happening in any festival event celebration. This, a blank background has the option to change as per the need of the occasion.
An image with white background can be changed as per the occasion. This helps a business to use a single image throughout the year without any additional cost for making a different picture. You can just change the white background of any image through various application or software.
Time saving: Removing white background is easy and streamlined as compared to any other color. The reason is that it does not require much editing and work on the edges. So, the steps in removing the white background are less and thus it saves time of the artist and the editors.
Saves location and bulk shooting expenses: When shooting with a white background is done; the same picture with some changes can be reused for number of times in several occasions. Thus, it saves the cost of shooting different in pictures in different location.
Good to celebrate every special day: A picture with white background is perfect and ready to edit for any special day. Whether it I a father’s day, mother’s day or any special day, a single picture can be edited as per the requirement. It will be a great gifting idea also after changing white background of the picture as per the special day.
Part 2 When We Need to Delete White Background and when Not?
A single picture of a person or product cannot be used for a single instance or purpose. Especially when it is a promotional campaign or commercial advertisements, a product is required to be showcased in several marketing campaign for different categories of consumers. Thus, a white background image is good for several purposes while in some circumstances, it requires changes. So, let’s see when to delete white background and when not:
When a picture requires special editing: When a picture requires some special effects like reflection, highlights and shadow effects, the picture with white background is required to be changed. When improvement in picture is requires, the white, transparent and color background can be changed accordingly.
Enhancing the visual impact of the picture: A white background picture grab the attention of the customers. So, it is good for advertising and promotion. While this needs to be removed when one desire to add some visual impact on the pictures or deliver some message to the viewers. So, it requires adding colorful and visually good background in a picture.
Adding more items to a picture: A white background need to be removed when more items are required to be included in it. Special edits and enhancing the pictures requires removing or adding a white background as per the purpose of the picture.
Part 3 How to Delete White Background in Photoshop (5 Fast Ways)
Editing a picture with white background can be done in easy steps through various applications. Deleting white background in Photoshop can be done through various tools. Some of the top 5 fast ways to clear background Photoshop are**:**
With the object selection tool:
● Start Photoshop and open the picture. Select the “object selection” from the tool bar. Hover cursor over subject till it turns blue. The subject is selected.
● Press the shift key to remove the background while selecting the objects which you want in the picture.
● To invert the selection go to Select>Inverse.
● Unlock the image based on what you want in the background. It will no longer be a background. It can be also used to create transparent background Photoshop.
● Click on Erase tool and start erasing the background.
Removing background with quick action
This is the quick method for removing a background when a user is going for own purpose. It is in-built quick action in Photoshop for removing the background. Although it is good for performing work, but the same cannot meet the perfection level that any other method does. It can be done by following the mentioned steps:
● Open the image in Photoshop, right click on background layer and click Duplicate layer. Then click on OK.
● Always try to open the properties panel by going to Window>Properties.
● Click on new layer at Layer panel. Go to Quick action and click on Remove Background.
● The background gets removed with quick action.
● At this point refinements and adjustments can be made.
Using pen tool to remove the background
● Open image in Photoshop, right click on background layer and go to Duplicate Layer. Name the layer and click OK.
● Select the Pen tool from the toolbox. Zoom the area. Start at the edge of subject. Start working on the object; add anchors which will outline the subject.
● Click-hold-drag to produce a curved line.
● Use the Direct Selection tool in the toolbox if you want to adjust an anchor point or directional lines for fine tuning
● Complete the path from where you started and save it by going to Windows>paths. Go to three bar menu, click New Path to name it and then save.
● Go to path panel and right click New Path. Choose Make selection and click OK. This will give the outline of the path.
● Go to Select> Inverse if you don’t want to delete what is inside the selection. An outline can be seen around the image.
● Press delete to delete the background. It can be also done to add Adobe Photoshop transparent background.
With Magnetic Lasso Tool
● Right click Background layer and click duplicate layer on the image opened in Photoshop. Name the layer and then click OK. From the toolbox, select Magic Lasso tool. Start drawing at the edges of subject.
● Move around the subject and complete till the start point. Marching ants can be seen around the selection.
● Go to Selection>Save selection to save and give it a name.
● Select>Inverse to delete the background. Photoshop checkered background is visible now.
With quick selection tool
● Click on Duplicate Layer by right clicking on background layer of the picture opened on the Photoshop. Name the layer and click OK.
● Go to the tool box and select quick selection tool.
● Paint the subject by using tool.
● Clean up the selection path with click by holding the Option key (macOS) or Alt key (Windows).
● Go to Selection>Save selection to save and give it a name.
● Select>Inverse to delete the background. The white background can be seen now.
Part 4 Which Photoshop Selection Tool is Best for White Backdrop Removal
There are various tools available at Photoshop to turn a background white. Each one of them has great utility based on the applications. Background Eraser tool is one of the good tools if there is need of more control over removing the background in Photoshop. It is highly effective and saves time of the user. It gives the desired outcome with perfection to an image. The visualization of image becomes better when the background is turned into white with the help of Background Eraser tool.
The other application that is very helpful in making background white to any image is Filmora.
Filmora is an excellent image and video editing software which helps the users in creating some amazing images and videos. It has wide range of image and video editing tools that can make any user a professional in image and video editing. It has features to add or remove background of an image to make it more visually good. Changing background and adding special effects to images and videos can be easily done through filmora.
Wondershare Filmora Video Editor allows transformation of pictures and videos in a better way by adding filters and graphics. Availability of support, drawing tools, editing tools, special effects and sound make it a complete application for both beginners and professionals. It can be used with various other applications also. Those who wish to know how to make a layer transparent in Photoshop can learn it from Filmora.
For Win 7 or later (64-bit)
For macOS 10.12 or later
● Ending Thoughts →
● Making white background or transparent background adobe photoshop has many benefits like it highlight the picture and make it good for various applications and occasions. It saves money and cost for the image editors and video makers.
● One should also know when to use the white background for images, catalogue and video shoot. Adding and deleting white background can only be done when required as per the demand of the occasion and the category of the user like marketing, media, customers etc.
● Various tools on Photoshop make it easy for the users to add or remove white background of images. Filmora is one of the applications that is very popular for its image editing features. It can be used to give special effects to any image or video.
Discover the Process of Slowing Down Time-Lapse Videos on Your iPhone
There are moments that need highlighting and there are moments that need a flashing speed. You can control both moments if you are just wondering can slow down a time lapse. There are video editing softwares like Filmora if you want to know how to slow down time lapse on iPhone. Let’s discuss some of the best time lapse editing tools and also learn about how to slow down a time lapse
Part1 What Is Time-Lapse?
Time-lapse is a cinematography and photography technique that captures a series of images or frames at specific intervals over a prolonged period of time and then plays them back at a much faster rate. This creates a visually captivating effect where time appears to be moving faster than in real life.
In a time-lapse video, moments typically occur slowly or over an extended period, such as the movement of clouds, the growth of plants, or construction of buildings are compressed into a short video clip. Time-lapse is a powerful storytelling tool and if you are tempted to learn how to slow down a time lapse video because sometimes they can be faster than we intend them to be. Let’s discuss how you can slow down time lapse video.
Part2 Method 1: Using Filmora To Change Time Lapse Speed
Filmora is one of the best video editing software whose user-friendly interface allows both beginners and professionals to create compelling videos effortlessly. With Filmora, you can cut, trim, slow down time lapse video, and edit videos. You can also apply built-in effects and transitions, and adjust the playback speed to create stunning time-lapse or slow-motion effects.
Filmora also offers advanced color grading tools so that you can correct and enhance the color in your videos to make them visually appealing. Additionally, Filmora supports a wide range of video formats and allows easy exporting of edited videos to various platforms, making the sharing process convenient and straightforward. With its rich library of royalty-free music and sound effects. Let’s discuss how to change time lapse speed on iPhone.
AI Time-Lapse For Win 7 or later(64-bit)
AI Time-Lapse For macOS 10.14 or later
- Open Filmora and start a new project.
- Import your time-lapse video by either clicking on “Import” or dragging and dropping the file into the media library.
- Drag the imported video from the media library to the timeline at the bottom of the screen.
- Click on the video in the timeline to select it. You should see editing options appear.
- Look for a speed option, often represented as a speedometer icon. Click on it to open the speed settings.
- In the speed settings, you can slow down time lapse video. You can make it slower according to your preference.
- After adjusting the speed, play the video in the preview window to see if it’s at the desired speed.
- Once done with performing time lapse slower, save and export your edited time-lapse video by choosing the “Export” option.
- Choose the desired output format and save location, then click “Export” to save the edited video.
Part3 Method 2: Using Imovie To Change Time Lapse Speed
- Open iMovie on your iOS device.
- Import the time-lapse video you want to edit.
- Drag and drop the video onto the timeline.
- Select the video clip on the timeline.
- Look for the speed adjustment settings; it is usually represented by a turtle or hare icon.
- Click on the speed adjustment icon, and a slider or option to change the speed will appear.
- Adjust the speed according to your preference by dragging the slider or entering a value.
- Play the video to preview the new speed.
- Once you are done with the slow down time lapse video, you can save or export the edited video.
Summary
Learning how to slow down time lapse videos on iPhone enhances the storytelling power of your cinematography, allowing viewers to engage more deeply with your content. There are video editing tools like Filmora and iMovie which have revolutionized the editing process, making it feasible to slow down time lapse video directly on your iPhone. These tools are user-friendly and equipped with intuitive features that guide you through the process of modifying the speed of your time-lapse creations.
It is easier to master how to slow down a time lapse, so as a filmmaker, content creator and photographer, you can showcase events or phenomena that unfold over a long period of time in a brief span of time. The techniques and tools such as Filmora , available today, make the task simpler and more accessible, even for beginners. Using Filmora, you can effectively slow down time lapse sequences so that your narratives are conveyed compellingly and that every critical detail is highlighted for your audience’s appreciation and understanding.
How to Add Motion Titles
Do you want to make your videos eye-catching instantly? Looking for some cool title animations to make your texts stand out? You should definitely opt for motion title templates that are widely available in popular video editors. Motion title templates come preloaded with animated texts, engaging graphic elements, and even background effects.
You can add them directly to your video and customize them as per you requirements so that your video looks exactly the way you desire. Different video editors have different motion titles, and therefore, you should check them out one by one to find out the templates you are looking for. We will illustrate title motion graphics in all the leading video editors.
Part 1. Add Motion Title with Filmora
The easiest way to add motion title to your video on your computer is through Wondershare Filmora . Filmora is a professional video editor that is available for Windows and Mac users. Filmora has the best collection of motion title templates, and the user interface is super intuitive and anyone can use without any prior experience. Here are the steps to add motion title with Filmora.
Step1Install and launch Wondershare Filmora on your computer. Click on New Project option on the welcome screen or go to File menu and click on New Project option.

Step2Go to File menu and Import Media option to import your video file. Otherwise, you can simply drop the video file into Project Media folder.
Step3Drag the video file from Project Media folder and drop it into the Timeline.

Step4Go to Titles at the top and go to the left panel. You can different categories of motion title templates. Select any desired text effect and drop into the Timeline above the video layer wherever you want.
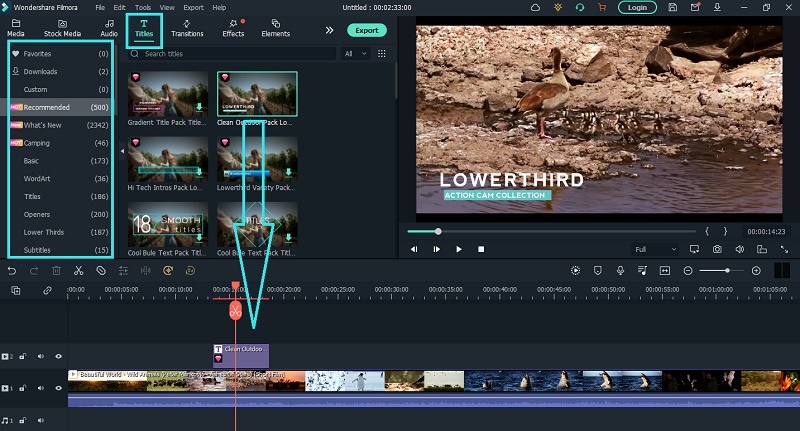
Step5Double clicking on the text layer on Timeline to edit the text and change the styles. Under Preset tab, you can change font, size, and color. Finally, click on OK button to save the edits done.
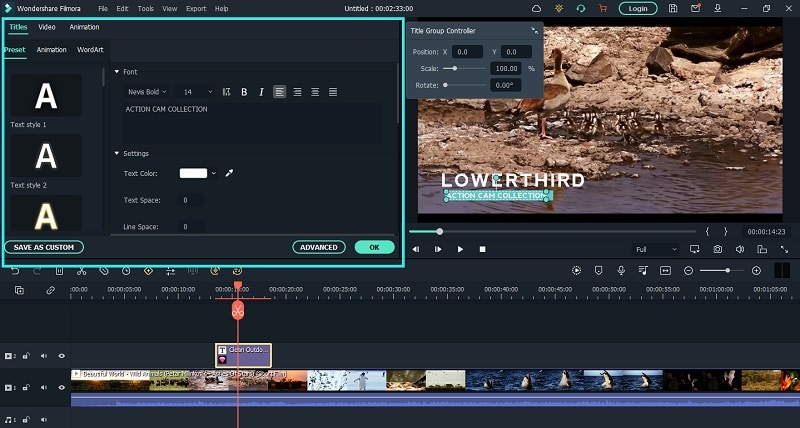
Part 2. Add Motion Title with Premiere Pro
Adobe Premiere Pro is a renowned video editor that is mostly used by professionals to edit videos and add effects and animations. Even though Premiere Pro has a steep learning curve, you can create motion title in simple steps. You can write any text on the video and select from different effects and animations to create motion title graphics. Here are the steps to add title motion graphics Premiere Pro free.
Step1Launch Premiere Pro and go to New> Project option. Import the video file and drop it into Timeline.
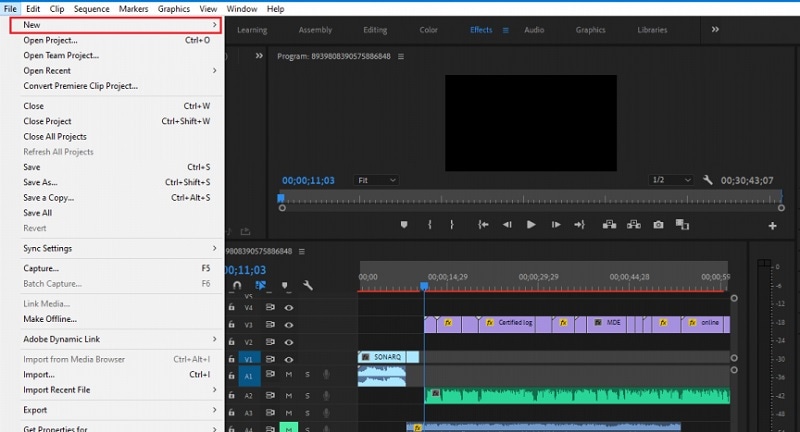
Step2Go to Title> New Title> Default Still option and follow the on-screen instructions.

Step3You will see different types of title styles and designs to choose from as you feel.

Step4Click on Type Tool option and click on the area on the video where you want the text to appear. You can customize them from the right panel from Title Styles, Title Properties, Tools and Title Actions.
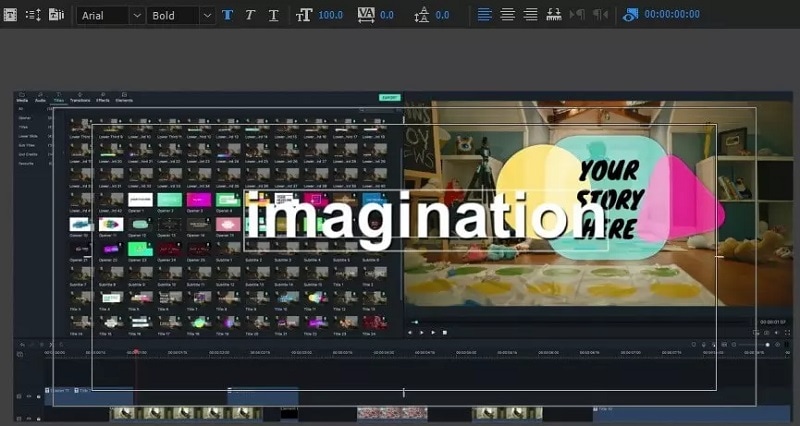
Step5To add motion to the title, click on Effects Control window. Click on any desired animation and turn to Stopwatch icon to apply the effect to the text. There is a dedicated Motion option available.
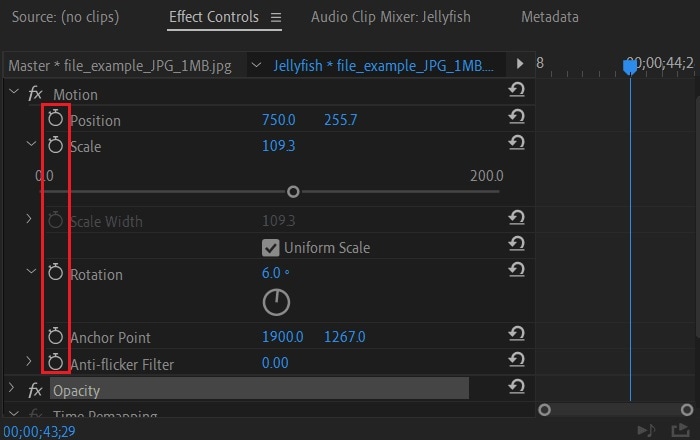
Part 3. Make motion title with Studio
Studio is a popular video editing software where you can not only apply motion title presets but also create motion title presets from scratch. The reason why video editors choose Studio is because it allows users to customize everything and create different templates and animations for personalization. Here are the steps to create title motion graphics in Studio as per your requirements.
Step1Launch Studio. Import your video file, and you can import single frames such as images from a live video for stop motion titles. Once you have imported, go to the header bar above the Timeline. Click on Create Title option to open Title Editor to create title motion.
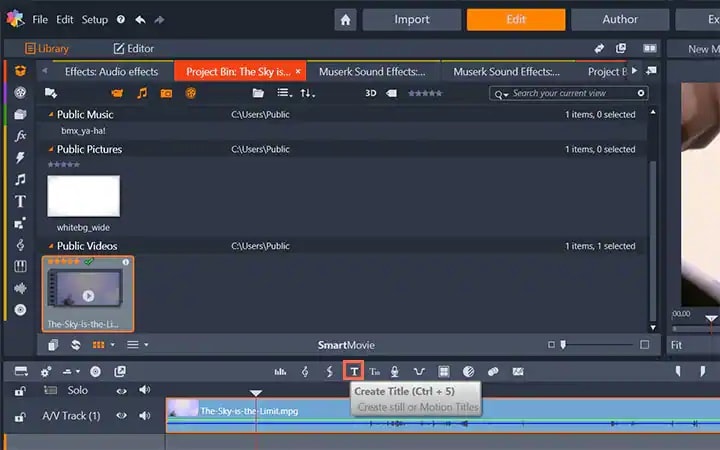
Step2Add your preferred text under Title Editor and adjust font, size, and style as you feel. Go to the right side to make changes to Look, Background, and Stereoscopic Settings to get the perfect text style from the wide range of choices available.
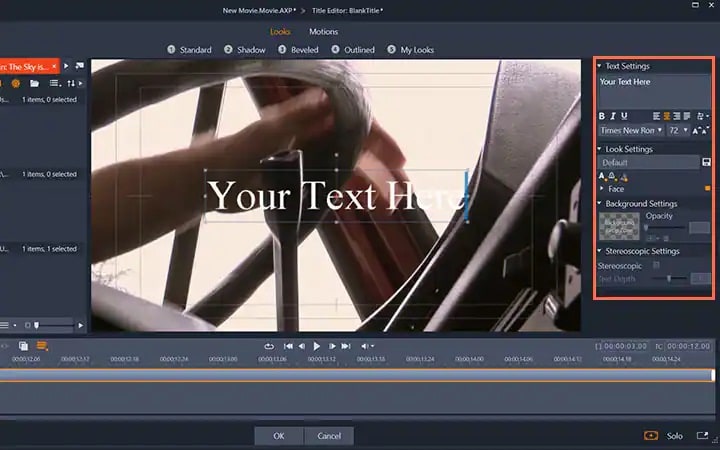
Step3Click on Motion option at the top to add motion to the text. Choose from the different motion title templates as per your preference.
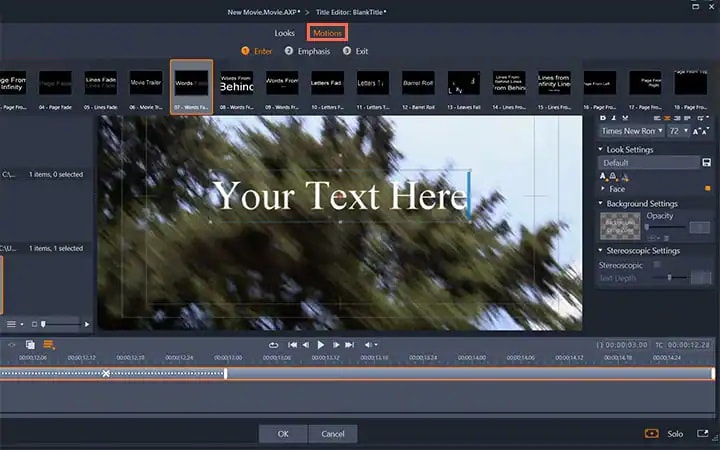
Step4You can adjust the duration of the motion effect from the right panel and click on Ok button.

Part 4. Add Motion Title with WeVideo
WeVideo is a popular online video editor that you can use to add title motion graphics Premiere Pro free. You can find many motion titles on WeVideo for free like you get in Premiere Pro and there are many exclusive motion text templates available. You need to create a free account with WeVideo to get started. You can create your video from scratch by selecting from the available video templates. You can even import your recorded video and add motion texts and animations as per your preference. Here are the steps to add motion title with WeVideo.
Step1Open your web browser and visit “wevideo.com”. Click on Try For Free button. Sign up for free and go to WeVideo video editor.

Step2Click on Create New button and select Video option. Click on Full-featured editor option.
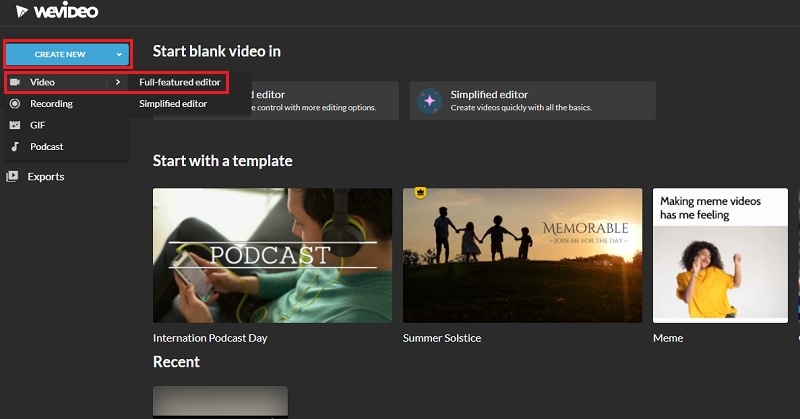
Step3Drag and drop your video file into My Media folder and bring it to Timeline.
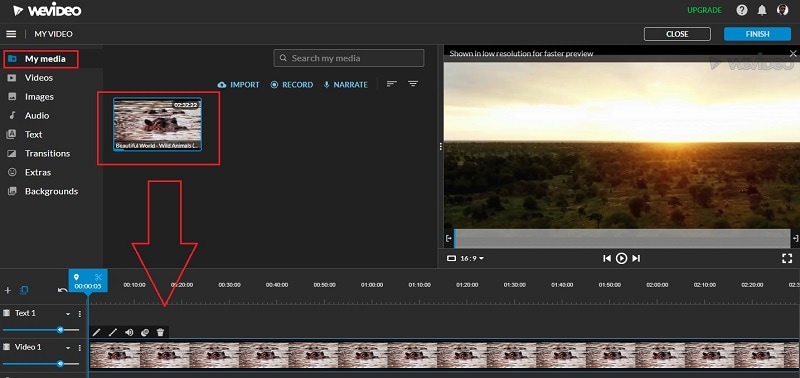
Step4Go to Text tab and you will see all the motion animated titles under Titles section. Click on them to check out their previews in Viewer. If you have selected anyone, drag and drop it into Timeline.
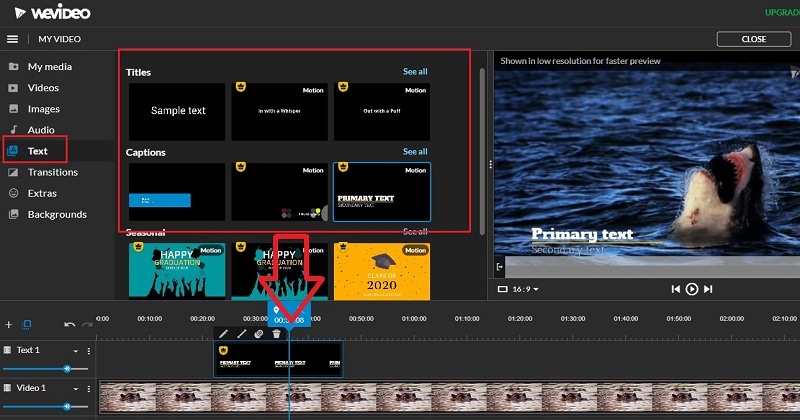
Step5Adjust the position where you want the title to appear on the video and stretch the duration as required. Double-click on the title to edit and customize it as per your preference. Finally, click on Save Changes button.
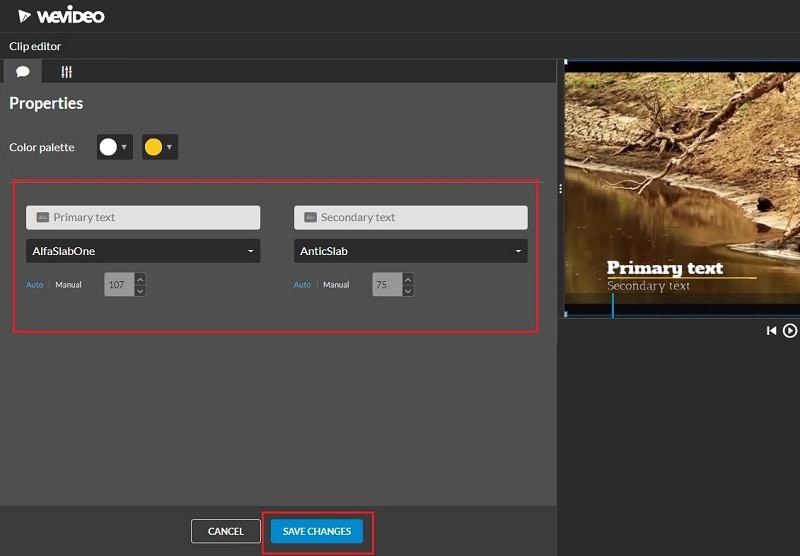
The Bottom Line
Motion titles are extremely important for any video because they bring in a variety to your video. They make the video eye-catching and help in getting the message across by grabbing the attention of the viewers. We have illustrated how to add motion titles Premiere Pro and Studio. You can also use WeVideo online video editor. We recommend Wondershare Filmora for its extensive collection of motion title templates to choose from and apply to your text.
Free Download For Win 7 or later(64-bit)
Free Download For macOS 10.14 or later
Also read:
- Updated 2024 Approved Ways to Make Sure Your Video Editing Course Is Worthing to Watch
- Updated In 2024, Top Shortcut Towards Timeline Template
- New Find Out How to Add Subtitles in the VLC Media Player on Your Windows and Mac System with Quick and Simple Instructions for 2024
- Updated In 2024, Best 5 Solutions on How to Add Emojis to iPhone
- New 2024 Approved Creating a Slideshow Is Necessity of the Modern Time. Whether You Plan a Business Meeting or You Are Going to Do some Family Event with Slideshow Presentation, a Good Slideshow Maker Will Help You in This Direction
- New 2024 Approved Do You Want to Remove Unnecessary Sound From Your Video? We Are Providing You the List of the Best Software to Remove Audio From Video for Mac and Apple
- 2024 Approved A Guide to Color Grade Your Picture in LightRoom
- In This Article, We Will Discuss How to Rotate Videos in the Lightworks Application. Below Is a Way to Rotate Videos in Lightworks Manually, Here, We Will Use the Z-Axis Rotation for 2024
- New In 2024, How Can You Create Outstanding Educational Teaching Videos?
- In 2024, Color Matching Is the Trickiest Part of Graphic Designing. Learn in Detail About Using Canva Color Match Ideally While Working on Your Pins, Social Media Posts, and Other Designs
- Updated 8 Free Photo Collage with Music Video Maker
- Updated 6 Ways to Mimic Professional Filming Gears for 2024
- New 2024 Approved How to Create Glowing Edge Effect in TikTok Dancing Video
- 10 Creative AR Teaching Examples to Tell You What Is AR in Teaching for 2024
- New 2024 Approved In This Article, You Will Learn Easy Ways to Edit Videos Using a Mouse in Wondershare Filmora. You Can Do Video Editing without a Keyboard After Reading This Article
- How to Come up With the Best Pokemon Team On Xiaomi Redmi Note 12 Pro+ 5G? | Dr.fone
- Can’t view MOV movies content on Motorola Razr 40
- Recover your messages after Honor 100 has been deleted
- In 2024, How to Unlock iCloud lock from your iPhone SE (2020) and iPad?
- In 2024, 9 Best Phone Monitoring Apps for Realme 12 5G | Dr.fone
- How to Factory Reset Motorola Edge 2023 in 5 Easy Ways | Dr.fone
- In 2024, Easiest Guide How to Clone OnePlus Ace 2V Phone? | Dr.fone
- Can't open MOV files on P60
- How To Change Your SIM PIN Code on Your Lenovo ThinkPhone Phone
- In 2024, Recommended Best Applications for Mirroring Your Samsung Galaxy M34 Screen | Dr.fone
- In 2024, Tips and Tricks for Setting Up your Itel A70 Phone Pattern Lock
- How to Unlock iPhone 11 Pro When We Dont Have Apple ID or Password?
- Top 10 Fixes for Phone Keep Disconnecting from Wi-Fi On Honor V Purse | Dr.fone
- Process of Screen Sharing Vivo Y78t to PC- Detailed Steps | Dr.fone
- Title: New Why You Should Master Slideshows In Lightroom, Fresh Insight?
- Author: Morgan
- Created at : 2024-05-19 05:12:11
- Updated at : 2024-05-20 05:12:11
- Link: https://ai-video-editing.techidaily.com/new-why-you-should-master-slideshows-in-lightroom-fresh-insight/
- License: This work is licensed under CC BY-NC-SA 4.0.
