:max_bytes(150000):strip_icc():format(webp)/TwitterVideoDownload-5b605aaac9e77c002c3a42f3.jpg)
Practical Ways to Resize Video in Handbrake

Practical Ways to Resize Video in Handbrake
Videos are a great medium to share thoughts, concepts, guides, and memories, but regardless of how far technology has come getting them online can pose an issue sometimes. These obstacles often tend to be because either a video clip is too long or the amount of data in it is so high that the service just cannot upload the file to its servers and make it available for the intended receiver.
To solve this issue, users often need to resize a video so that the data cap, which behaved as a restriction, is no longer applicable. Now, there exist multiple software that can do this, and most video editor programs include the ability to export videos in less data-hungry sizes or formats.
So, if you ever face a similar issue, here is a guide on how you can resize videos via Handbrake and Wondershare Filmora. The former is a lightweight tool perfect for batch resizing videos, while the latter is a powerful free video editing software.
How to resize video with Handbrake
Open Handbrake and follow the steps listed below.
Once open, the software will present you with options to either import a single video file for resize or a whole batch via folder selection.
Note: If you do not have Handbrake, you can download it by visiting the official website. Also, you will need Windows .NET Framework 6.0 to use Handbrake. If your system does not have the correct config Handbrake will let you know and fail to launch.
Once you have imported the video file, the software will present you with two choices.
- Option 1: Use a preset available in the application — the best choice for beginners to choose for beginners.
- Option 2: Set a custom resolution via the Dimensions Tab.
Note: To ensure the resize is perfect, find out which file format plays best with the end location of your video and convert the video clip to that version.

How your screen will look once you have imported a video file.
How to Resize Video via Option 1
Step 1: Import Video File by choosing
- Single Import, or
- Batch Import

Step 2: Choose a Preset in Handbrake.

Step 3: Click on Start Encode after choosing the desired preset.

Step 4: Wait for the Encode to finish. The application shows progress in a bar at the bottom of the screen.

Step 5: Click on Browse in the bottom right corner to enter the Save File dialogue. At this point, you can set a file name and select a new save location.


How to Resize Video via Option 2
Step 1: Import Video File by choosing
- Single Import, or
- Batch Import

Step 2: Click on the Dimensions Tab to open up a dialog box that will let you edit video resolution.


The Dimensions Dialog Box
Step 3: Modify resolution to ensure the clip you get is in the right setup.
Note: If you see 1920 x 1080 on your screen, the first number (1920) stands for the width of the video file, while the second number (1080) stands for the height.

Tip
The one thing to keep in mind while using Option 2 is to ensure that the aspect ratio of the video file is maintained; this will prevent the final video from looking like its skewed and prevent it from becoming too tall or too wide
Via Option 2 you can also add borders to the final video if desired, while resizing it to your liked resolution.
An easier way to resize video with Wondershare Filmora
While the resize feature in Handbrake is capable of working on multiple video files at once, the user interface of the application may seem daunting to some. Hence, if you’re just starting to learn, we recommend accessing more user-friendly software, say Wondershare Filmora Video Editor . You can resize videos in the video editor by following the steps we have detailed below.
For Win 7 or later (64-bit)
For macOS 10.14 or later
Just keep in mind, when using WonderShare Filmora the resize option appears at the end of the video editing process — during the export action.
Step 1: Import a video file into Wondershare Filmora.

Step 2: Drag the video file onto the timeline and then choose Export from the top bar.
Author’s Notes: Here, I recommend using the Export to Device option as having a local copy which you then manually upload to services like YouTube is a process that you can have more control over.

Step 3: Choose the video file format (marked in Red) and then choose the resolution you require (marked in Yellow).

Tip
If you press on the settings tab (marked in Yellow, in the image above) and choose custom you can modify more aspects of your video file. Including the configuration used by the audio components.

Choose Custom under the Settings Option to customise Video Details with more precision
Step 4: Click on Export once you’ve decided on the resolution.

With this you will now have a video file that has been resized to a size or converted to a format that will hopefully function well with your desired platform.
Note: You can also reset the resolution of an entire project before hand in Wondershare Filmora by choosing the right configuration from the Project Settings option, found under the File Tab.

The Bottom Line
Having read this piece, you may have noticed that software capable of resizing videos can prove quite useful. Wondershare Filmora is this, plus a lot more, its convenient and intuitive user interface is also something we believe will feel welcoming to users. Speaking of Handbrake, while effective and great for batch encoding — if you want to resize more than one video we recommend having Handbrake handy — its bare-bones interface can be intimidating. Regardless, both programs are convenient to utilize and perfectly capable of doing the task at hand with relative ease.
How your screen will look once you have imported a video file.
How to Resize Video via Option 1
Step 1: Import Video File by choosing
- Single Import, or
- Batch Import

Step 2: Choose a Preset in Handbrake.

Step 3: Click on Start Encode after choosing the desired preset.

Step 4: Wait for the Encode to finish. The application shows progress in a bar at the bottom of the screen.

Step 5: Click on Browse in the bottom right corner to enter the Save File dialogue. At this point, you can set a file name and select a new save location.


How to Resize Video via Option 2
Step 1: Import Video File by choosing
- Single Import, or
- Batch Import

Step 2: Click on the Dimensions Tab to open up a dialog box that will let you edit video resolution.


The Dimensions Dialog Box
Step 3: Modify resolution to ensure the clip you get is in the right setup.
Note: If you see 1920 x 1080 on your screen, the first number (1920) stands for the width of the video file, while the second number (1080) stands for the height.

Tip
The one thing to keep in mind while using Option 2 is to ensure that the aspect ratio of the video file is maintained; this will prevent the final video from looking like its skewed and prevent it from becoming too tall or too wide
Via Option 2 you can also add borders to the final video if desired, while resizing it to your liked resolution.
An easier way to resize video with Wondershare Filmora
While the resize feature in Handbrake is capable of working on multiple video files at once, the user interface of the application may seem daunting to some. Hence, if you’re just starting to learn, we recommend accessing more user-friendly software, say Wondershare Filmora Video Editor . You can resize videos in the video editor by following the steps we have detailed below.
For Win 7 or later (64-bit)
For macOS 10.14 or later
Just keep in mind, when using WonderShare Filmora the resize option appears at the end of the video editing process — during the export action.
Step 1: Import a video file into Wondershare Filmora.

Step 2: Drag the video file onto the timeline and then choose Export from the top bar.
Author’s Notes: Here, I recommend using the Export to Device option as having a local copy which you then manually upload to services like YouTube is a process that you can have more control over.

Step 3: Choose the video file format (marked in Red) and then choose the resolution you require (marked in Yellow).

Tip
If you press on the settings tab (marked in Yellow, in the image above) and choose custom you can modify more aspects of your video file. Including the configuration used by the audio components.

Choose Custom under the Settings Option to customise Video Details with more precision
Step 4: Click on Export once you’ve decided on the resolution.

With this you will now have a video file that has been resized to a size or converted to a format that will hopefully function well with your desired platform.
Note: You can also reset the resolution of an entire project before hand in Wondershare Filmora by choosing the right configuration from the Project Settings option, found under the File Tab.

The Bottom Line
Having read this piece, you may have noticed that software capable of resizing videos can prove quite useful. Wondershare Filmora is this, plus a lot more, its convenient and intuitive user interface is also something we believe will feel welcoming to users. Speaking of Handbrake, while effective and great for batch encoding — if you want to resize more than one video we recommend having Handbrake handy — its bare-bones interface can be intimidating. Regardless, both programs are convenient to utilize and perfectly capable of doing the task at hand with relative ease.
How your screen will look once you have imported a video file.
How to Resize Video via Option 1
Step 1: Import Video File by choosing
- Single Import, or
- Batch Import

Step 2: Choose a Preset in Handbrake.

Step 3: Click on Start Encode after choosing the desired preset.

Step 4: Wait for the Encode to finish. The application shows progress in a bar at the bottom of the screen.

Step 5: Click on Browse in the bottom right corner to enter the Save File dialogue. At this point, you can set a file name and select a new save location.


How to Resize Video via Option 2
Step 1: Import Video File by choosing
- Single Import, or
- Batch Import

Step 2: Click on the Dimensions Tab to open up a dialog box that will let you edit video resolution.


The Dimensions Dialog Box
Step 3: Modify resolution to ensure the clip you get is in the right setup.
Note: If you see 1920 x 1080 on your screen, the first number (1920) stands for the width of the video file, while the second number (1080) stands for the height.

Tip
The one thing to keep in mind while using Option 2 is to ensure that the aspect ratio of the video file is maintained; this will prevent the final video from looking like its skewed and prevent it from becoming too tall or too wide
Via Option 2 you can also add borders to the final video if desired, while resizing it to your liked resolution.
An easier way to resize video with Wondershare Filmora
While the resize feature in Handbrake is capable of working on multiple video files at once, the user interface of the application may seem daunting to some. Hence, if you’re just starting to learn, we recommend accessing more user-friendly software, say Wondershare Filmora Video Editor . You can resize videos in the video editor by following the steps we have detailed below.
For Win 7 or later (64-bit)
For macOS 10.14 or later
Just keep in mind, when using WonderShare Filmora the resize option appears at the end of the video editing process — during the export action.
Step 1: Import a video file into Wondershare Filmora.

Step 2: Drag the video file onto the timeline and then choose Export from the top bar.
Author’s Notes: Here, I recommend using the Export to Device option as having a local copy which you then manually upload to services like YouTube is a process that you can have more control over.

Step 3: Choose the video file format (marked in Red) and then choose the resolution you require (marked in Yellow).

Tip
If you press on the settings tab (marked in Yellow, in the image above) and choose custom you can modify more aspects of your video file. Including the configuration used by the audio components.

Choose Custom under the Settings Option to customise Video Details with more precision
Step 4: Click on Export once you’ve decided on the resolution.

With this you will now have a video file that has been resized to a size or converted to a format that will hopefully function well with your desired platform.
Note: You can also reset the resolution of an entire project before hand in Wondershare Filmora by choosing the right configuration from the Project Settings option, found under the File Tab.

The Bottom Line
Having read this piece, you may have noticed that software capable of resizing videos can prove quite useful. Wondershare Filmora is this, plus a lot more, its convenient and intuitive user interface is also something we believe will feel welcoming to users. Speaking of Handbrake, while effective and great for batch encoding — if you want to resize more than one video we recommend having Handbrake handy — its bare-bones interface can be intimidating. Regardless, both programs are convenient to utilize and perfectly capable of doing the task at hand with relative ease.
How your screen will look once you have imported a video file.
How to Resize Video via Option 1
Step 1: Import Video File by choosing
- Single Import, or
- Batch Import

Step 2: Choose a Preset in Handbrake.

Step 3: Click on Start Encode after choosing the desired preset.

Step 4: Wait for the Encode to finish. The application shows progress in a bar at the bottom of the screen.

Step 5: Click on Browse in the bottom right corner to enter the Save File dialogue. At this point, you can set a file name and select a new save location.


How to Resize Video via Option 2
Step 1: Import Video File by choosing
- Single Import, or
- Batch Import

Step 2: Click on the Dimensions Tab to open up a dialog box that will let you edit video resolution.


The Dimensions Dialog Box
Step 3: Modify resolution to ensure the clip you get is in the right setup.
Note: If you see 1920 x 1080 on your screen, the first number (1920) stands for the width of the video file, while the second number (1080) stands for the height.

Tip
The one thing to keep in mind while using Option 2 is to ensure that the aspect ratio of the video file is maintained; this will prevent the final video from looking like its skewed and prevent it from becoming too tall or too wide
Via Option 2 you can also add borders to the final video if desired, while resizing it to your liked resolution.
An easier way to resize video with Wondershare Filmora
While the resize feature in Handbrake is capable of working on multiple video files at once, the user interface of the application may seem daunting to some. Hence, if you’re just starting to learn, we recommend accessing more user-friendly software, say Wondershare Filmora Video Editor . You can resize videos in the video editor by following the steps we have detailed below.
For Win 7 or later (64-bit)
For macOS 10.14 or later
Just keep in mind, when using WonderShare Filmora the resize option appears at the end of the video editing process — during the export action.
Step 1: Import a video file into Wondershare Filmora.

Step 2: Drag the video file onto the timeline and then choose Export from the top bar.
Author’s Notes: Here, I recommend using the Export to Device option as having a local copy which you then manually upload to services like YouTube is a process that you can have more control over.

Step 3: Choose the video file format (marked in Red) and then choose the resolution you require (marked in Yellow).

Tip
If you press on the settings tab (marked in Yellow, in the image above) and choose custom you can modify more aspects of your video file. Including the configuration used by the audio components.

Choose Custom under the Settings Option to customise Video Details with more precision
Step 4: Click on Export once you’ve decided on the resolution.

With this you will now have a video file that has been resized to a size or converted to a format that will hopefully function well with your desired platform.
Note: You can also reset the resolution of an entire project before hand in Wondershare Filmora by choosing the right configuration from the Project Settings option, found under the File Tab.

The Bottom Line
Having read this piece, you may have noticed that software capable of resizing videos can prove quite useful. Wondershare Filmora is this, plus a lot more, its convenient and intuitive user interface is also something we believe will feel welcoming to users. Speaking of Handbrake, while effective and great for batch encoding — if you want to resize more than one video we recommend having Handbrake handy — its bare-bones interface can be intimidating. Regardless, both programs are convenient to utilize and perfectly capable of doing the task at hand with relative ease.
How to Create a Light Sweep (Shine) Effect
Preparation
What you need to prepare:
- A computer (Windows or macOS)
- Your video materials.
- Filmora video editor
Step 1
If you haven’t already, go ahead and download the Filmora video editor . Install it and run the application on your computer.
Step 2
Create a New Project by clicking on the big blue button. Immediately after, go to File → Project Settings. Here, make sure the project is in full resolution and 60 fps.

Step 3
Select the Titles tab and drag the Default Title to the Timeline.

Step 4
Double-click on the Default Title inside the Timeline and go to Advanced. Here, you can change the text, pick a new font, change its size, and so on. Make sure you change the Color Type to Gradient Fill. Choose a color of your own liking. When you’re done customizing it, click on OK.

Step 5
Right-click on the Default Title clip and select Copy. Then, right-click anywhere on the Timeline and select Paste. After this, drag the copy of that clip on the Track above it.

Step 6
Double-click on the copied Title, go to Advanced, and change the Color Type to Color Fill. Click OK.

Step 7
Next, take a snapshot of the new title. Then, delete the copied Title clip from your Timeline. After this, drag the snapshot into the Timeline.

Step 8
Double-click on the Snapshot clip and go to the Mask tab. From here, select the Rectangle mask. Then, rotate it as you see in the image below. Don’t click on OK yet.

Step 9
Now, look at the settings panel on the left and scroll down. First, change its Rotation to 40. Then, drag the Blur bar to 15. Finally, move the Rectangle mask to the left side like in the image below. Don’t click OK yet.

Step 10
Now, move the Playhead to the starting position on the Timeline. Then, click on the “**+Add**” button to add a keyframe. Next, move the Playhead a few seconds forward and move the Rectangle mask all the way to the right side of the text. Click OK.

Step 11
You are finally done. You can review, Render, and Export the video now to use it as you wish. Congratulations on creating a light sweep effect in Filmora.
Summary
What you’ve learned:
- How to create a modern light sweep effect in the Filmora video editor
- How to use Masks in Filmora
- Edit titles like a pro
What you need to prepare:
- A computer (Windows or macOS)
- Your video materials.
- Filmora video editor
Step 1
If you haven’t already, go ahead and download the Filmora video editor . Install it and run the application on your computer.
Step 2
Create a New Project by clicking on the big blue button. Immediately after, go to File → Project Settings. Here, make sure the project is in full resolution and 60 fps.

Step 3
Select the Titles tab and drag the Default Title to the Timeline.

Step 4
Double-click on the Default Title inside the Timeline and go to Advanced. Here, you can change the text, pick a new font, change its size, and so on. Make sure you change the Color Type to Gradient Fill. Choose a color of your own liking. When you’re done customizing it, click on OK.

Step 5
Right-click on the Default Title clip and select Copy. Then, right-click anywhere on the Timeline and select Paste. After this, drag the copy of that clip on the Track above it.

Step 6
Double-click on the copied Title, go to Advanced, and change the Color Type to Color Fill. Click OK.

Step 7
Next, take a snapshot of the new title. Then, delete the copied Title clip from your Timeline. After this, drag the snapshot into the Timeline.

Step 8
Double-click on the Snapshot clip and go to the Mask tab. From here, select the Rectangle mask. Then, rotate it as you see in the image below. Don’t click on OK yet.

Step 9
Now, look at the settings panel on the left and scroll down. First, change its Rotation to 40. Then, drag the Blur bar to 15. Finally, move the Rectangle mask to the left side like in the image below. Don’t click OK yet.

Step 10
Now, move the Playhead to the starting position on the Timeline. Then, click on the “**+Add**” button to add a keyframe. Next, move the Playhead a few seconds forward and move the Rectangle mask all the way to the right side of the text. Click OK.

Step 11
You are finally done. You can review, Render, and Export the video now to use it as you wish. Congratulations on creating a light sweep effect in Filmora.
Summary
What you’ve learned:
- How to create a modern light sweep effect in the Filmora video editor
- How to use Masks in Filmora
- Edit titles like a pro
What you need to prepare:
- A computer (Windows or macOS)
- Your video materials.
- Filmora video editor
Step 1
If you haven’t already, go ahead and download the Filmora video editor . Install it and run the application on your computer.
Step 2
Create a New Project by clicking on the big blue button. Immediately after, go to File → Project Settings. Here, make sure the project is in full resolution and 60 fps.

Step 3
Select the Titles tab and drag the Default Title to the Timeline.

Step 4
Double-click on the Default Title inside the Timeline and go to Advanced. Here, you can change the text, pick a new font, change its size, and so on. Make sure you change the Color Type to Gradient Fill. Choose a color of your own liking. When you’re done customizing it, click on OK.

Step 5
Right-click on the Default Title clip and select Copy. Then, right-click anywhere on the Timeline and select Paste. After this, drag the copy of that clip on the Track above it.

Step 6
Double-click on the copied Title, go to Advanced, and change the Color Type to Color Fill. Click OK.

Step 7
Next, take a snapshot of the new title. Then, delete the copied Title clip from your Timeline. After this, drag the snapshot into the Timeline.

Step 8
Double-click on the Snapshot clip and go to the Mask tab. From here, select the Rectangle mask. Then, rotate it as you see in the image below. Don’t click on OK yet.

Step 9
Now, look at the settings panel on the left and scroll down. First, change its Rotation to 40. Then, drag the Blur bar to 15. Finally, move the Rectangle mask to the left side like in the image below. Don’t click OK yet.

Step 10
Now, move the Playhead to the starting position on the Timeline. Then, click on the “**+Add**” button to add a keyframe. Next, move the Playhead a few seconds forward and move the Rectangle mask all the way to the right side of the text. Click OK.

Step 11
You are finally done. You can review, Render, and Export the video now to use it as you wish. Congratulations on creating a light sweep effect in Filmora.
Summary
What you’ve learned:
- How to create a modern light sweep effect in the Filmora video editor
- How to use Masks in Filmora
- Edit titles like a pro
What you need to prepare:
- A computer (Windows or macOS)
- Your video materials.
- Filmora video editor
Step 1
If you haven’t already, go ahead and download the Filmora video editor . Install it and run the application on your computer.
Step 2
Create a New Project by clicking on the big blue button. Immediately after, go to File → Project Settings. Here, make sure the project is in full resolution and 60 fps.

Step 3
Select the Titles tab and drag the Default Title to the Timeline.

Step 4
Double-click on the Default Title inside the Timeline and go to Advanced. Here, you can change the text, pick a new font, change its size, and so on. Make sure you change the Color Type to Gradient Fill. Choose a color of your own liking. When you’re done customizing it, click on OK.

Step 5
Right-click on the Default Title clip and select Copy. Then, right-click anywhere on the Timeline and select Paste. After this, drag the copy of that clip on the Track above it.

Step 6
Double-click on the copied Title, go to Advanced, and change the Color Type to Color Fill. Click OK.

Step 7
Next, take a snapshot of the new title. Then, delete the copied Title clip from your Timeline. After this, drag the snapshot into the Timeline.

Step 8
Double-click on the Snapshot clip and go to the Mask tab. From here, select the Rectangle mask. Then, rotate it as you see in the image below. Don’t click on OK yet.

Step 9
Now, look at the settings panel on the left and scroll down. First, change its Rotation to 40. Then, drag the Blur bar to 15. Finally, move the Rectangle mask to the left side like in the image below. Don’t click OK yet.

Step 10
Now, move the Playhead to the starting position on the Timeline. Then, click on the “**+Add**” button to add a keyframe. Next, move the Playhead a few seconds forward and move the Rectangle mask all the way to the right side of the text. Click OK.

Step 11
You are finally done. You can review, Render, and Export the video now to use it as you wish. Congratulations on creating a light sweep effect in Filmora.
Summary
What you’ve learned:
- How to create a modern light sweep effect in the Filmora video editor
- How to use Masks in Filmora
- Edit titles like a pro
2 Actionable Ways to Extract Subtitles From MKV Videos without Quality Loss
The subtitles are a great way of watching movies in a foreign language, but in several situations, you would need to extract or remove these subtitles from your MKV videos. For instance, if you are fond of watching movies with a clear screen, getting a clean video at times can be a task, and here the need to remove the subtitle SRT files arises. Some of the other possible reasons for removing the subtitles are synchronization issues, changing the subtitle language, using the extracted subtitles in other high-quality videos, incompatible codec issues, and more.
MKV is a popularly used multimedia format that is capable of containing multiple metadata including videos, audio, chapters, subtitles, and more. So, if you too have downloaded an MKV video having subtitles online or ripped it from a DVD. This article will help you to know the 2 actionable ways for extracting the subtitles. So, keep reading to learn about srt extractor tools.

Part 1: Not All Subtitles for MKV files Can Be Extracted (Hardsub Vs. Softsub)
As we have mentioned that there are tools and programs available that can help you remove the subtitle srt files, but here one thing needs to be remembered not all types of subtitle files can be extracted from the MKV videos. The reason for this lies in the type of subtitles used in the videos. So, first, let’s learn about subtitle types and their differences.
There are two major types of forms of subtitles- hardsubs (also known as hardcoded subtitles or open subtitles) or softsubs (also known as closed subtitles or softcoded subtitles).
Hardsubs are the subtitles that are burned in the image of the videos and thus cannot be extracted, removed, hidden, or disabled when the video files are played.
Softsubs are the subtitles that are added as external files to the video container as an independent stream and thus can be turned off, removed, or extracted.
So, what we guide here is for ripping softsubs from videos in MKV videos. Now, let’s dive into the details.
Part 2. 2 Actionable ways for extracting subtitles from MKV videos
There are two different ways by which subtitles can be extracted from MKV files.
Solution 1: Extract Subtitles from MKV Videos Online Extractors
If you are looking for a quick and simple solution for subtitle removal, online tools work as an apt choice. There are several browser-based programs available that works directly from your browser, are simple to use, and need no software download or installation. Below listed are popularly used 3 tools in the category.
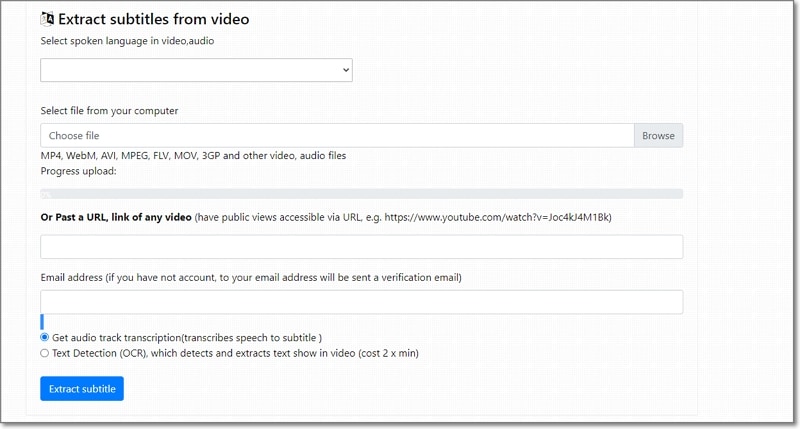
This is a widely used online tool that allows extracting subtitle srt files from an array of video files including MKV, MP4, FLV, MOV, and others.
Key Feature
- Free to use online tool for srt extract.
- Support to a wide range of video formats including MKV, MP$, 3GP, FLV, and others.
- Support to a wide range of video languages.
- Allows extracting subtitles from a local video or using a video link.
Pros
- Simple and free tool.
- Support for multiple video formats
- Allows getting audio transcription.
- Support to Text Detection (OCR).
- Subtitles can be downloaded in SRT and VTT format.
- Option to preview the video.
- Offers 24X7 support.
Cons
- Internet dependency.
- Need to provide a valid email id for processing the files.
- The free version allows uploading videos of only up to 25MB.
- The free version has a slow subtitle extraction speed.
Best for: This online tool is best when you wish to extract subtitles not only from your local files but also from videos on video sites like YouTube and others. Using the tool, you can also add captions to YouTube, Facebook, and other sites.
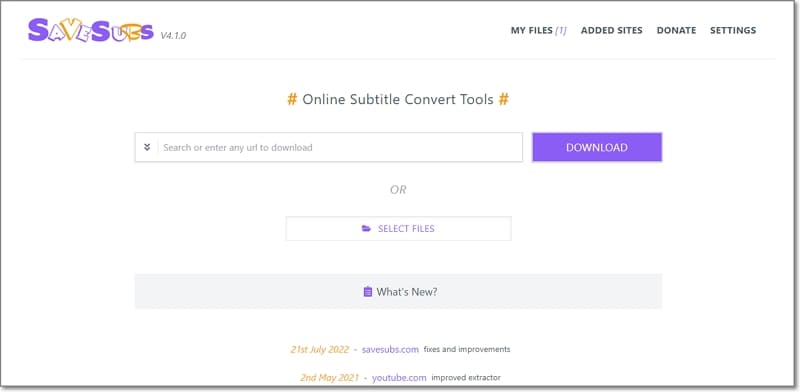
This is a multitasking online tool that allows you to convert, edit, download, as well as extract subtitles.
Key features
- Allows downloading subtitles from local as well as online sites like YouTube, Facebook, DailyMotion, and more.
- Simple and user-friendly interface.
- Free to use browser-based program.
Pros
- No need for any software download or registration.
- Simple and quick file processing.
- Add URL or local files.
- Option to share with friends.
Cons
- Works only when the internet is available.
- Limited format supported for local files.
- Limited additional features.
Best for- When you want to extract and download subtitles from YouTube, Facebook, and other online sites in a simple manner, Savesubs works as the best tool.
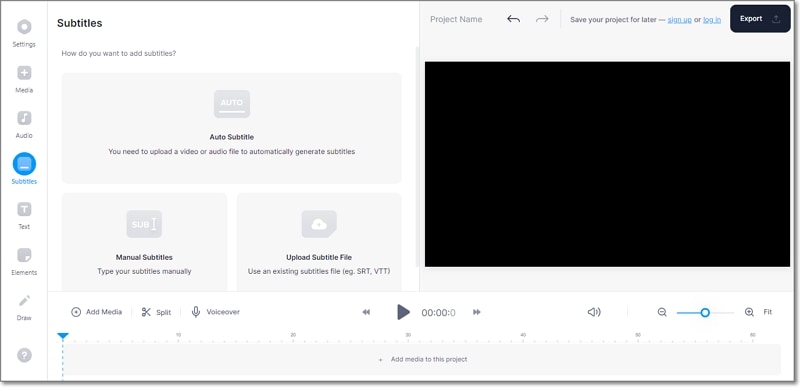
Relied by all, Veed is a feature-packed tool for performing an array of video-related tasks including subtitle extraction.
Key features
- Free to use online tools for a variety of video tasks.
- Allows extracting and downloading subtitles from videos in an array of formats.
- Online videos from popular sites can be added.
- Allows to work manually or through auto-generated subtitles.
- Option to edit the subtitles if needed.
Pros
- Easy to use tool without any training required.
- Support to local, and online files.
- Subtitles support multiple formats including SRT, ASS, VTT, SSA, and TXT.
- Allows editing the subtitles and also choosing their font.
Cons
- Dependency on internet connectivity.
- The free version has a watermark on the processed files.
- With too many features and options, the interface may appear confusing to many.
Best for: Veed is an apt tool for users who want subtitles in an array of formats.
Steps for extracting subtitles
Above we have listed 3 online tools and the steps for extracting subtitles using them are more or less the same. To run you through the general process and steps, below we have listed the steps using Savesubs.
Steps to extract subtitles using Savesubs
Step1On your system browser and vist Savesubs .
Step2Next, add the video URL or enter any keyword related to the video for which you wish to extract the subtitles. Alternatively, you can also add local files by clicking on the
Select Files button. Click on the Download button.
Step3Tap on the Click here to extract button for the tool to start extracting the subtitles.
Solution 2: Rip Subtitles from MKV Video with Extractor Software
Though online tools are simple to use, they are dependent on internet connectivity and have limited additional features. So, if you want to extract SRT subtitles even when there is no network and with added functions, desktop software works as the best choice.
With a wide range of these extractor software available, selecting one can be a daunting task and to help you with this, we have shortlisted a few popular and reliable programs as below.
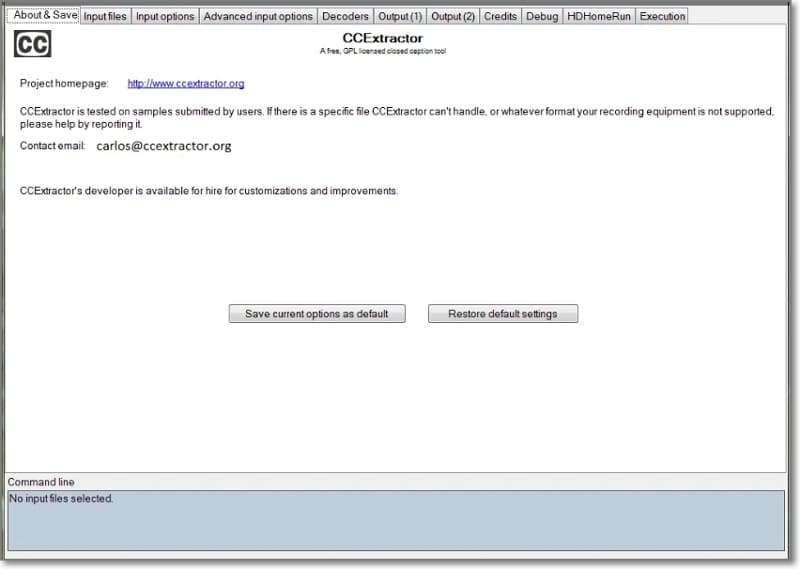
Popular among users across the globe, this free desktop software is known as “de-factor open source for closed captions”.
Key features of the software
- Allows extracting subtitles from a wide range of media files.
- Support to multiple formats including MKV, MP4, MPEG, and more.
- Free to use software with a user-friendly interface.
- Compatible with Windows, Linux, and OSX platforms.
Pros
- Simple to use free tool for subtitle extraction.
- Multi-platform support.
- A small and portable program that is fast in functioning.
Cons
- Software needs to be downloaded and installed on your system.
- Too many settings and features on the interface make it look crammed.
Best for: If you are looking for a free and open-source tool that can work on multiple platforms, CCExtractor is an apt choice.
For Windows and Mac users, VideoProc works as a great tool to extract subtitles from videos in MKV, MP4, VOB, AVI, and other formats.
Key features of the software
- Multi-tasking desktop software supporting subtitle extraction as well.
- Allows extracting subtitles from videos in an array of formats including MKV, AVI, MP4, and more.
- Multiple video editing options are supported like cutting, cropping, rotating, merging, and more.
- Also allows searching and adding subtitles files.
Pros
- Subtitles can be extracted from multiple video file formats. So, you can extract SRT from MP4 as well as other video formats.
- Subtitles can be downloaded and added in srt, ss, and ssa format in one go.
- Support for downloading subtitles for movies and TV shows in multiple languages.
- Multiple video editing options are supported.
Cons
- Lack tutorials which might take time for first-time users to understand the tool.
- A lot of users complain of lagging issues.
- Paid software.
Best for: If you are looking for a tool that not only lets you extract the subtitles but also performs other video editing functions, VideoProc will work great.
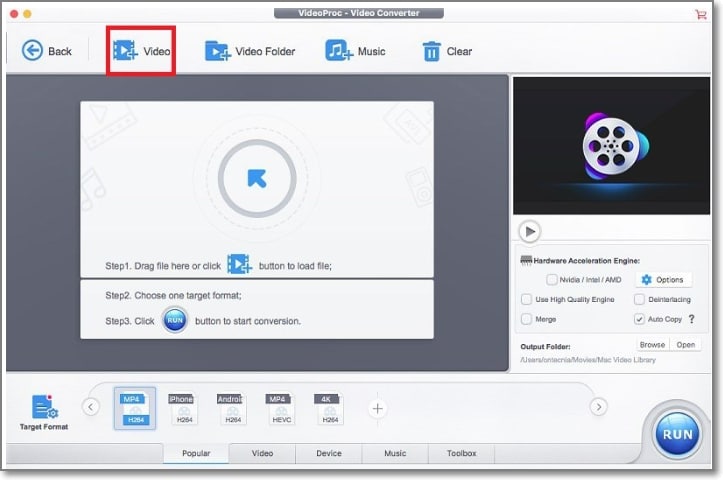
This is a free and open-source tool known for editing text-based subtitles. The most popular subtitle formats can be used. Preview of the subtitles in real-time or in design time, spell checking, translation mode and styles editing are some of the main features.
Key Features of the software
- Free and open-source tool under GNU public license.
- Allows editing text-based subtitles by converting, correcting, transforming, and converting.
- New subtitles can also be added using the software.
- Support to preview the subtitles in the design-time or real-time.
- Support additional features like style editing, spell-check, translation mode, and more.
Pros
- Free and open-source tool.
- Allows adding new subtitles as well as editing the existing ones.
- Allows using the popular subtitle formats.
- Feature to preview the subtitles in design-time or real-time.
Cons
- Software download is needed.
- Limited format support.
Best for: The tool is apt for users who need a free tool that can work on Windows as well as Mac systems.
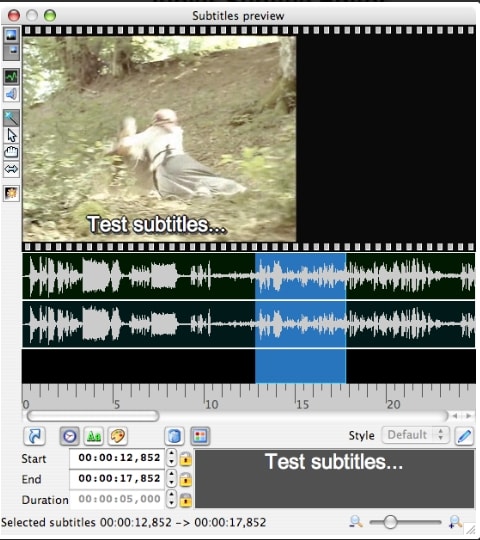
How to extract subtitles using extractor software?
The main key steps for extracting the subtitles using desktop software may differ from tool to tool. Below listed are the steps using CCExtractor for your reference.
Steps to extract subtitles using CCExtractor
Step1Download and install the software on your system.
Step2Next, run CCExtractorGUI.exe and drag the video file to the program under the Input file tab.
Step3Next at the Output (1) tab choose output type as .srt and at the Output (2) tab select UTF-8 Encoding.
Step4Tap on the Execution tab bar and then click on the Start button. The program will start processing and the subtitle SRT file will be generated and will appear with the source video in the same folder.
Pro Tips: How do I Edit embedded SRT subtitles in MKV?
Above we have talked about the ways by which subtitles can be extracted from MKV files. But if you need to edit the embedded SRT subtitles in your MKV videos, professional software would be needed and here we recommend Wondershare Filmora as the best choice.
Wondershare Filmora is a versatile Windows and Mac-based video editing tool that supports a wide range of editing functions like visual effects, transitions, PIP, green screen, split screen, AI portrait, auto reframe, and screen recorder, masking, and many more.
The software supports multiple subtitles-related functions like editing embedded SRT files, speech-to-text, and text to speech.
Free Download For Win 7 or later(64-bit)
Free Download For macOS 10.14 or later
Steps to edit embedded SRT subtitles in MKV files using Wondershare Filmora
Step1Download, install, and launch the software on your system. In the Media Resources area import the SRT subtitles files.
Step2Next, right-click on the timeline and then choose Advanced Edit or double-click on the selected SRT file to clip.
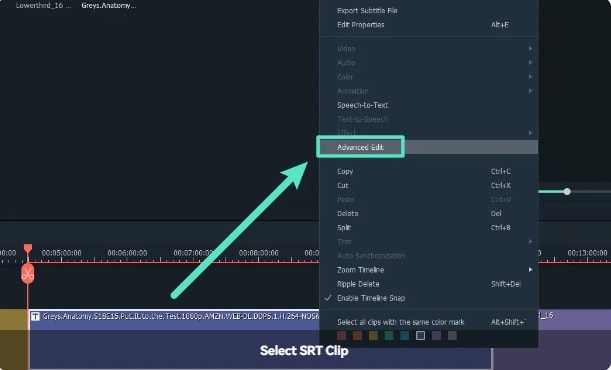
Step3In the next step, multiple subtitle editing tasks can be done like – editing time code, changing the subtitles, add/remove/merge subtitle strips, and changing subtitle styles.
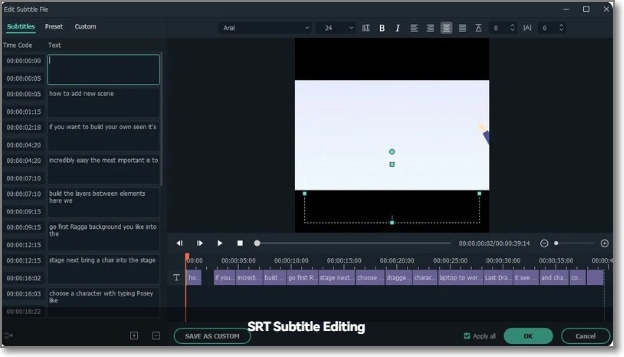
Step4Finally, choose the SRT file at the timeline and then right-click and choose Export Subtitle File.
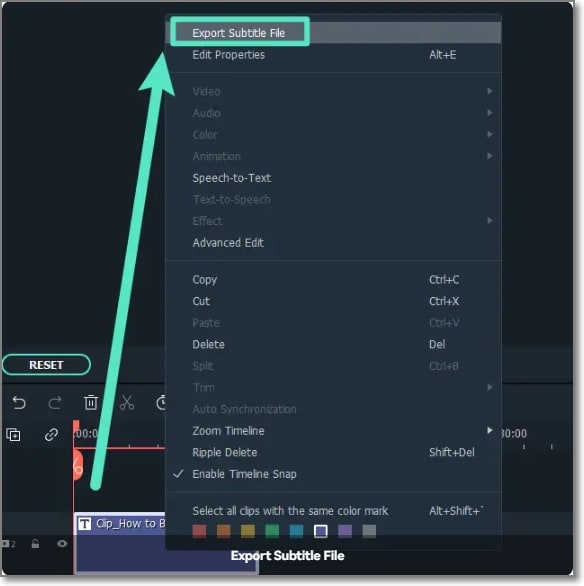
Above are the brief steps for editing the subtitles. You can check the detailed steps at this link here.
Hot FAQs on Extracting SRT from MKV
Below listed are some commonly asked questions and their answers.
1. Except for SRT, what types of subtitle formats does MKV support?
The subtitle formats supported by the MKV file include SRT, PGS/SUP, VobSub, and SSA.
2. Can VLC extract subtitles?
Though VLC is a media player, it supports an array of additional features as well including subtitle extraction. Using the software, you can also add subtitles to the video.
3. How can I extract hardcoded subtitles from a video?
The only solution for extracting hardcoded subtitles from a video is by using the Optical Character Recognition (OTR) technology.
Final Words
We hope, we have answered all your queries and doubts related to subtitle extraction in the article above. The choice of choosing an online tool or a desktop software depends on your requirements and the subtitle file. For editing the subtitles, you can rely on Wondershare Filmora which is an excellent all-in-one video editing tool.
Free Download For Win 7 or later(64-bit)
Free Download For macOS 10.14 or later
Best for: This online tool is best when you wish to extract subtitles not only from your local files but also from videos on video sites like YouTube and others. Using the tool, you can also add captions to YouTube, Facebook, and other sites.

This is a multitasking online tool that allows you to convert, edit, download, as well as extract subtitles.
Key features
- Allows downloading subtitles from local as well as online sites like YouTube, Facebook, DailyMotion, and more.
- Simple and user-friendly interface.
- Free to use browser-based program.
Pros
- No need for any software download or registration.
- Simple and quick file processing.
- Add URL or local files.
- Option to share with friends.
Cons
- Works only when the internet is available.
- Limited format supported for local files.
- Limited additional features.
Best for- When you want to extract and download subtitles from YouTube, Facebook, and other online sites in a simple manner, Savesubs works as the best tool.

Relied by all, Veed is a feature-packed tool for performing an array of video-related tasks including subtitle extraction.
Key features
- Free to use online tools for a variety of video tasks.
- Allows extracting and downloading subtitles from videos in an array of formats.
- Online videos from popular sites can be added.
- Allows to work manually or through auto-generated subtitles.
- Option to edit the subtitles if needed.
Pros
- Easy to use tool without any training required.
- Support to local, and online files.
- Subtitles support multiple formats including SRT, ASS, VTT, SSA, and TXT.
- Allows editing the subtitles and also choosing their font.
Cons
- Dependency on internet connectivity.
- The free version has a watermark on the processed files.
- With too many features and options, the interface may appear confusing to many.
Best for: Veed is an apt tool for users who want subtitles in an array of formats.

Steps for extracting subtitles
Above we have listed 3 online tools and the steps for extracting subtitles using them are more or less the same. To run you through the general process and steps, below we have listed the steps using Savesubs.
Steps to extract subtitles using Savesubs
Step1On your system browser and vist Savesubs .
Step2Next, add the video URL or enter any keyword related to the video for which you wish to extract the subtitles. Alternatively, you can also add local files by clicking on the
Select Files button. Click on the Download button.
Step3Tap on the Click here to extract button for the tool to start extracting the subtitles.
Solution 2: Rip Subtitles from MKV Video with Extractor Software
Though online tools are simple to use, they are dependent on internet connectivity and have limited additional features. So, if you want to extract SRT subtitles even when there is no network and with added functions, desktop software works as the best choice.
With a wide range of these extractor software available, selecting one can be a daunting task and to help you with this, we have shortlisted a few popular and reliable programs as below.
Popular among users across the globe, this free desktop software is known as “de-factor open source for closed captions”.
Key features of the software
- Allows extracting subtitles from a wide range of media files.
- Support to multiple formats including MKV, MP4, MPEG, and more.
- Free to use software with a user-friendly interface.
- Compatible with Windows, Linux, and OSX platforms.
Pros
- Simple to use free tool for subtitle extraction.
- Multi-platform support.
- A small and portable program that is fast in functioning.
Cons
- Software needs to be downloaded and installed on your system.
- Too many settings and features on the interface make it look crammed.
Best for: If you are looking for a free and open-source tool that can work on multiple platforms, CCExtractor is an apt choice.

For Windows and Mac users, VideoProc works as a great tool to extract subtitles from videos in MKV, MP4, VOB, AVI, and other formats.
Key features of the software
- Multi-tasking desktop software supporting subtitle extraction as well.
- Allows extracting subtitles from videos in an array of formats including MKV, AVI, MP4, and more.
- Multiple video editing options are supported like cutting, cropping, rotating, merging, and more.
- Also allows searching and adding subtitles files.
Pros
- Subtitles can be extracted from multiple video file formats. So, you can extract SRT from MP4 as well as other video formats.
- Subtitles can be downloaded and added in srt, ss, and ssa format in one go.
- Support for downloading subtitles for movies and TV shows in multiple languages.
- Multiple video editing options are supported.
Cons
- Lack tutorials which might take time for first-time users to understand the tool.
- A lot of users complain of lagging issues.
- Paid software.
Best for: If you are looking for a tool that not only lets you extract the subtitles but also performs other video editing functions, VideoProc will work great.

This is a free and open-source tool known for editing text-based subtitles. The most popular subtitle formats can be used. Preview of the subtitles in real-time or in design time, spell checking, translation mode and styles editing are some of the main features.
Key Features of the software
- Free and open-source tool under GNU public license.
- Allows editing text-based subtitles by converting, correcting, transforming, and converting.
- New subtitles can also be added using the software.
- Support to preview the subtitles in the design-time or real-time.
- Support additional features like style editing, spell-check, translation mode, and more.
Pros
- Free and open-source tool.
- Allows adding new subtitles as well as editing the existing ones.
- Allows using the popular subtitle formats.
- Feature to preview the subtitles in design-time or real-time.
Cons
- Software download is needed.
- Limited format support.
Best for: The tool is apt for users who need a free tool that can work on Windows as well as Mac systems.

How to extract subtitles using extractor software?
The main key steps for extracting the subtitles using desktop software may differ from tool to tool. Below listed are the steps using CCExtractor for your reference.
Steps to extract subtitles using CCExtractor
Step1Download and install the software on your system.
Step2Next, run CCExtractorGUI.exe and drag the video file to the program under the Input file tab.
Step3Next at the Output (1) tab choose output type as .srt and at the Output (2) tab select UTF-8 Encoding.
Step4Tap on the Execution tab bar and then click on the Start button. The program will start processing and the subtitle SRT file will be generated and will appear with the source video in the same folder.
Pro Tips: How do I Edit embedded SRT subtitles in MKV?
Above we have talked about the ways by which subtitles can be extracted from MKV files. But if you need to edit the embedded SRT subtitles in your MKV videos, professional software would be needed and here we recommend Wondershare Filmora as the best choice.
Wondershare Filmora is a versatile Windows and Mac-based video editing tool that supports a wide range of editing functions like visual effects, transitions, PIP, green screen, split screen, AI portrait, auto reframe, and screen recorder, masking, and many more.
The software supports multiple subtitles-related functions like editing embedded SRT files, speech-to-text, and text to speech.
Free Download For Win 7 or later(64-bit)
Free Download For macOS 10.14 or later
Steps to edit embedded SRT subtitles in MKV files using Wondershare Filmora
Step1Download, install, and launch the software on your system. In the Media Resources area import the SRT subtitles files.
Step2Next, right-click on the timeline and then choose Advanced Edit or double-click on the selected SRT file to clip.

Step3In the next step, multiple subtitle editing tasks can be done like – editing time code, changing the subtitles, add/remove/merge subtitle strips, and changing subtitle styles.

Step4Finally, choose the SRT file at the timeline and then right-click and choose Export Subtitle File.

Above are the brief steps for editing the subtitles. You can check the detailed steps at this link here.
Hot FAQs on Extracting SRT from MKV
Below listed are some commonly asked questions and their answers.
1. Except for SRT, what types of subtitle formats does MKV support?
The subtitle formats supported by the MKV file include SRT, PGS/SUP, VobSub, and SSA.
2. Can VLC extract subtitles?
Though VLC is a media player, it supports an array of additional features as well including subtitle extraction. Using the software, you can also add subtitles to the video.
3. How can I extract hardcoded subtitles from a video?
The only solution for extracting hardcoded subtitles from a video is by using the Optical Character Recognition (OTR) technology.
Final Words
We hope, we have answered all your queries and doubts related to subtitle extraction in the article above. The choice of choosing an online tool or a desktop software depends on your requirements and the subtitle file. For editing the subtitles, you can rely on Wondershare Filmora which is an excellent all-in-one video editing tool.
Free Download For Win 7 or later(64-bit)
Free Download For macOS 10.14 or later
How to Split a Clip in DaVinci Resolve [Step by Step]
The DaVinci resolve is an amazing video editing software that attracts professionals and beginners to work on it. You can also fulfil your wish to edit or split the video clips in it without facing any difficulty.
But, some of them are looking for guidance to work on DaVinci resolve correctly. This article discusses the splitting of the video clips in DaVinci Resolve explicitly. There is also a brief description of its best alternative, Wondershare Filmora. This is also practically relevant and reasonable as well.
How you can split the video clips in DaVinci resolve
DaVinci resolve is a comprehensive program that allows you to deliver different solutions. It can be related to editing the videos, correcting the colours, and producing the videos and audio. Just follow the simple steps below for splitting the videos in the DaVinci resolve:
Part 1 - Splitting of one clip:
Step 1: After installing the DaVinci resolve, launch it in your system.
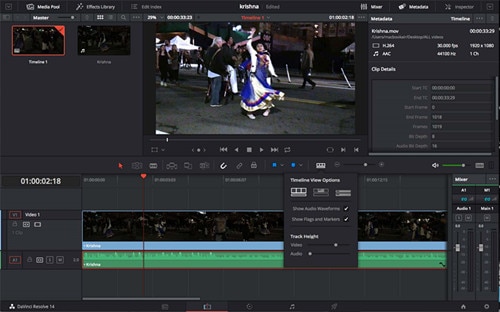
Step 2: Import and place the media file on the timeline from the library. This is the clip you want to split. Select the blade tool from where you want to split the clip. Use the timeline from the menu and go to Split Clip. Shortcut keys are also available that are Ctrl+\ or Cmd+\ or Cmd+B. Now the split clip is easily visible to you. You can use this clip wherever you want to use it.
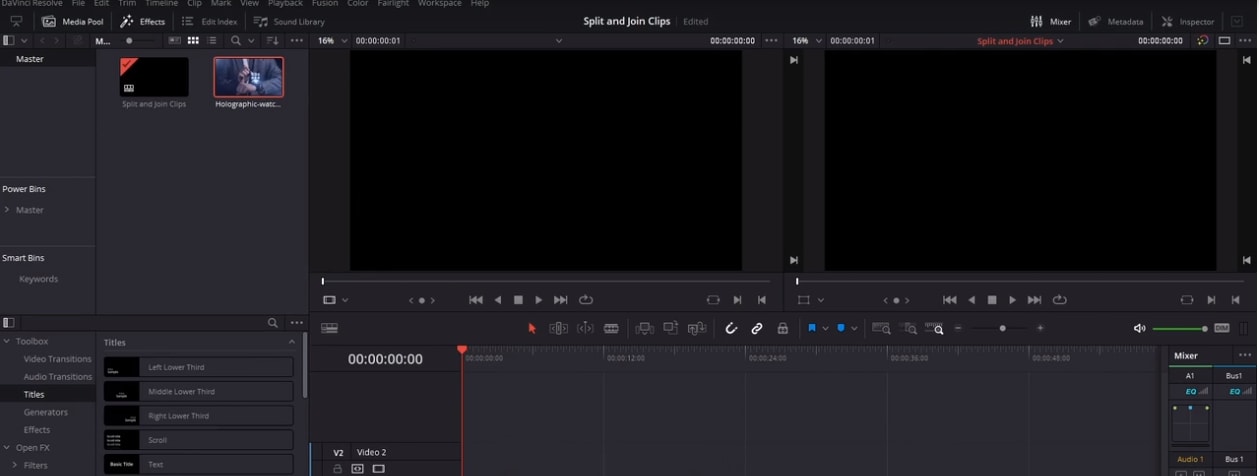
Part 2- Splitting of more than one clip on various tracks:
You can also split the number of video and audio clips at the exact timings in DaVinci resolve.
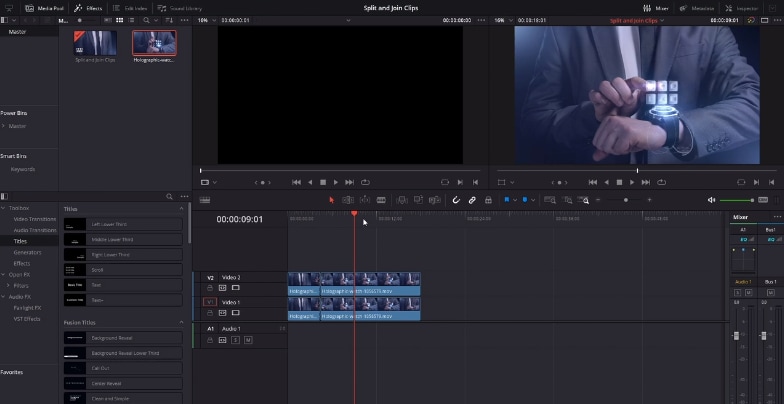
Step 1: When there are piles of clips one after the other, the selection of both of the clips is essential, which have to be split. Keep moving the playhead to the exact area where there is a requirement for the changes.
Step 2: Just keep pressing Command or Control + \ keys, or click on timeline> Split Clip. The selected clips of audio and video get split together now. No more slitting of the clips individually. This option is more appropriate for you when creating and managing different parts of massive projects.
An easier way to split the video clips
Without any doubt, DaVinci resolve is an advanced level software for video editing at the professional level. Moreover, the pricing of DaVinci resolve is $299, and it shows that it is quite expensive for many people. Due to this, you need an economical solution that is Filmora Video Editor .
Most graphic designers and video editors recommend Wondershare Fimora because it is lighter for the systems. All the tools are simplified in using like trimming or splitting the clips. You can convert split video clips into other formats in Wondershare Filmora. Add and apply all the special effects on your videos and export them wherever you want.
For Win 7 or later (64-bit)
For macOS 10.14 or later
Features:
- Splitting or trimming of the video clips
- Removing the noise
- Addition of the transition effects
- Availability of controls for the audio, sound and video
- Separating the audio from the video
Part 1 - Splitting the clips in Wondershare Filmora
If you want to split the clips or trim some parts of the videos, Wondershare Filmora is the right choice. Below are detailed steps for trimming the videos quickly and easily.
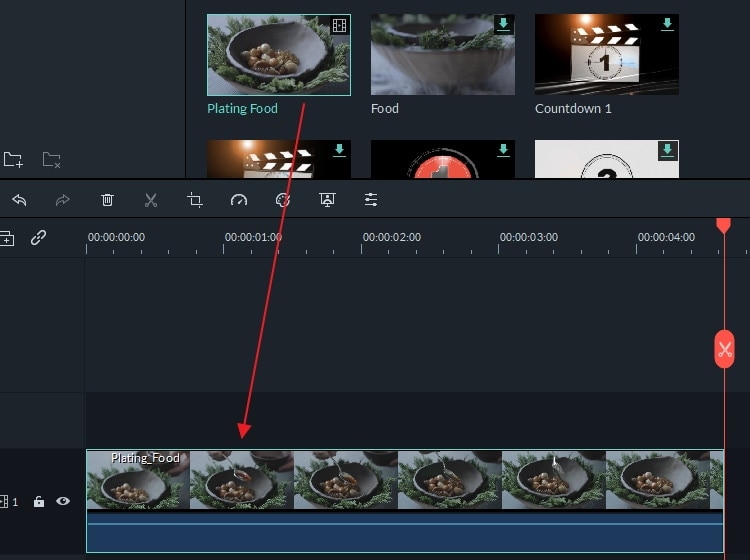
Step :1
Drag or drop the files from Media Library or Click on “Import” after selecting the video clips to make the clip visible on the timeline. No need to worry regarding the formats as Wondershare Filmora is highly supportive towards it/
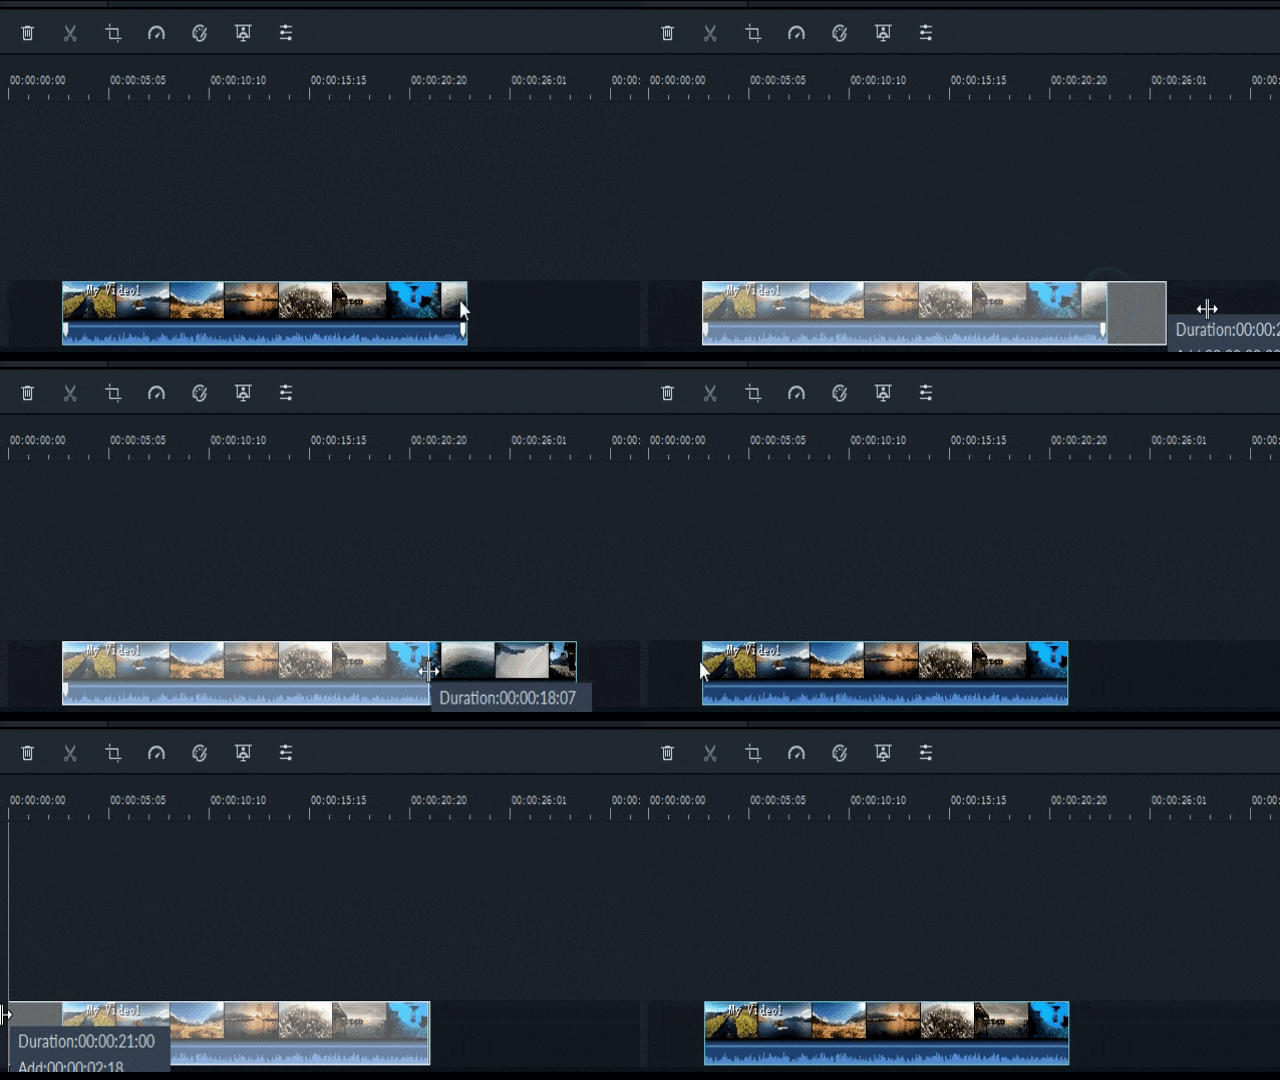
Step:2
Keep hanging the mouse on the corner of the video until and unless the trimming icon appears. So, you can drag ahead or in a backward direction at the endpoints of the video you want to trim.
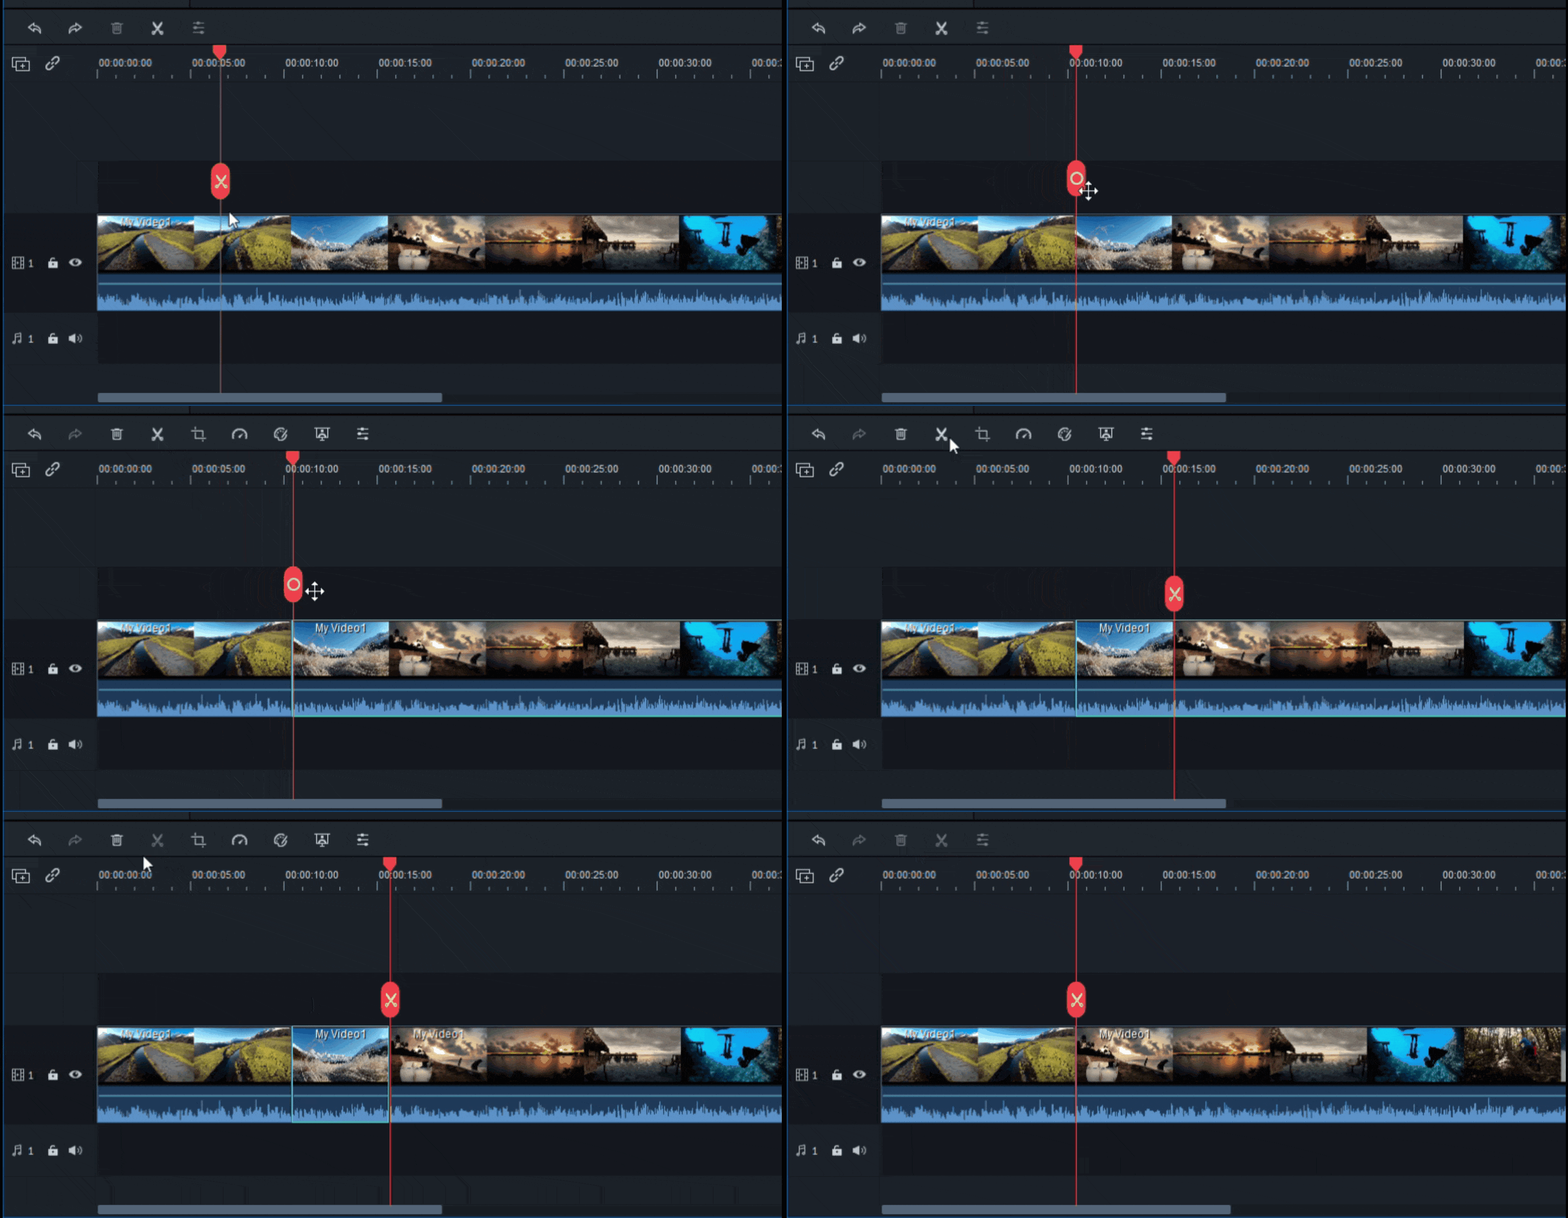
Step: 3
You don’t want the video parts in the centre of the video clips. First, split the video and delete it. For splitting the video, click on the icon of the scissor.
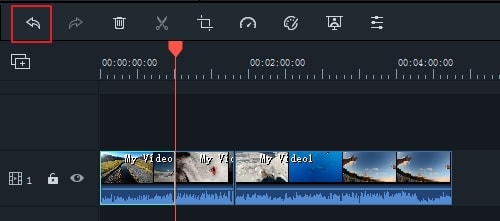
Step: 4
For deleting the part of the undesired part of the video, click on the dustbin icon. If there is any deletion by mistake, there is no need to worry about it. Click on the undo icon to make the video appear on the timeline again.
Part 2 - Splitting and trimming the clips in Wondershare Filmora:
Apart from the above steps for trimming and splitting the videos in Wondershare Filmora, the position of the video has to be in the place head of the frame that you are willing to trim. Right-click on the clip and select the option of “Trim Start to Playhead or Trim End to Playhead “ for deleting the content of the video ahead or back of it.
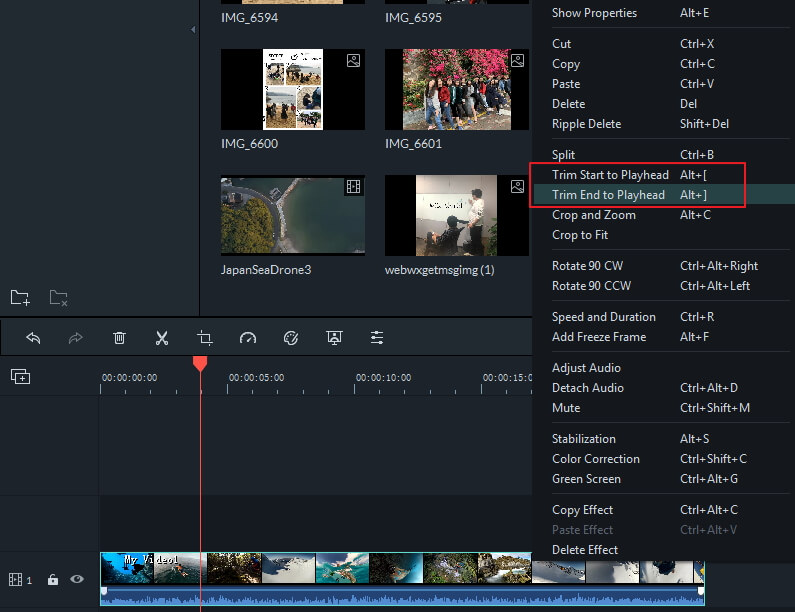
In the latest version of the Wondershare Filmora, you can even trim the video without adding it to the timeline. A similar video can easily split multiple times and load only the required one. Go through the following steps to split the clips in a faster way:
- You can easily preview the video first from the library of your media files.
- Select the clip which you want to split or trim by selecting from the beginning till the end
- After dragging, you can view the trim section
- Keep repeating the steps mentioned above for splitting the videos

Although various editing software is available, Wondershare Filmora has to be on the top. It is the best choice to bring your imagination into reality, whether it is transitioning, applying the effects or importing/exporting the videos. All the options are suitable in front and visible on your timeline. Wondershare Filmora supports different operating systems as well. Even no proper training is required, so start using Wondershare Filmora today to get your editing done.
Step 2: Import and place the media file on the timeline from the library. This is the clip you want to split. Select the blade tool from where you want to split the clip. Use the timeline from the menu and go to Split Clip. Shortcut keys are also available that are Ctrl+\ or Cmd+\ or Cmd+B. Now the split clip is easily visible to you. You can use this clip wherever you want to use it.

Part 2- Splitting of more than one clip on various tracks:
You can also split the number of video and audio clips at the exact timings in DaVinci resolve.
Step 1: When there are piles of clips one after the other, the selection of both of the clips is essential, which have to be split. Keep moving the playhead to the exact area where there is a requirement for the changes.
Step 2: Just keep pressing Command or Control + \ keys, or click on timeline> Split Clip. The selected clips of audio and video get split together now. No more slitting of the clips individually. This option is more appropriate for you when creating and managing different parts of massive projects.

An easier way to split the video clips
Without any doubt, DaVinci resolve is an advanced level software for video editing at the professional level. Moreover, the pricing of DaVinci resolve is $299, and it shows that it is quite expensive for many people. Due to this, you need an economical solution that is Filmora Video Editor .
Most graphic designers and video editors recommend Wondershare Fimora because it is lighter for the systems. All the tools are simplified in using like trimming or splitting the clips. You can convert split video clips into other formats in Wondershare Filmora. Add and apply all the special effects on your videos and export them wherever you want.
For Win 7 or later (64-bit)
For macOS 10.14 or later
Features:
- Splitting or trimming of the video clips
- Removing the noise
- Addition of the transition effects
- Availability of controls for the audio, sound and video
- Separating the audio from the video
Part 1 - Splitting the clips in Wondershare Filmora
If you want to split the clips or trim some parts of the videos, Wondershare Filmora is the right choice. Below are detailed steps for trimming the videos quickly and easily.
Step :1
Drag or drop the files from Media Library or Click on “Import” after selecting the video clips to make the clip visible on the timeline. No need to worry regarding the formats as Wondershare Filmora is highly supportive towards it/

Step:2
Keep hanging the mouse on the corner of the video until and unless the trimming icon appears. So, you can drag ahead or in a backward direction at the endpoints of the video you want to trim.

Step: 3
You don’t want the video parts in the centre of the video clips. First, split the video and delete it. For splitting the video, click on the icon of the scissor.

Step: 4
For deleting the part of the undesired part of the video, click on the dustbin icon. If there is any deletion by mistake, there is no need to worry about it. Click on the undo icon to make the video appear on the timeline again.

Part 2 - Splitting and trimming the clips in Wondershare Filmora:
Apart from the above steps for trimming and splitting the videos in Wondershare Filmora, the position of the video has to be in the place head of the frame that you are willing to trim. Right-click on the clip and select the option of “Trim Start to Playhead or Trim End to Playhead “ for deleting the content of the video ahead or back of it.

In the latest version of the Wondershare Filmora, you can even trim the video without adding it to the timeline. A similar video can easily split multiple times and load only the required one. Go through the following steps to split the clips in a faster way:
- You can easily preview the video first from the library of your media files.
- Select the clip which you want to split or trim by selecting from the beginning till the end
- After dragging, you can view the trim section
- Keep repeating the steps mentioned above for splitting the videos

Although various editing software is available, Wondershare Filmora has to be on the top. It is the best choice to bring your imagination into reality, whether it is transitioning, applying the effects or importing/exporting the videos. All the options are suitable in front and visible on your timeline. Wondershare Filmora supports different operating systems as well. Even no proper training is required, so start using Wondershare Filmora today to get your editing done.
Step 2: Import and place the media file on the timeline from the library. This is the clip you want to split. Select the blade tool from where you want to split the clip. Use the timeline from the menu and go to Split Clip. Shortcut keys are also available that are Ctrl+\ or Cmd+\ or Cmd+B. Now the split clip is easily visible to you. You can use this clip wherever you want to use it.

Part 2- Splitting of more than one clip on various tracks:
You can also split the number of video and audio clips at the exact timings in DaVinci resolve.
Step 1: When there are piles of clips one after the other, the selection of both of the clips is essential, which have to be split. Keep moving the playhead to the exact area where there is a requirement for the changes.
Step 2: Just keep pressing Command or Control + \ keys, or click on timeline> Split Clip. The selected clips of audio and video get split together now. No more slitting of the clips individually. This option is more appropriate for you when creating and managing different parts of massive projects.

An easier way to split the video clips
Without any doubt, DaVinci resolve is an advanced level software for video editing at the professional level. Moreover, the pricing of DaVinci resolve is $299, and it shows that it is quite expensive for many people. Due to this, you need an economical solution that is Filmora Video Editor .
Most graphic designers and video editors recommend Wondershare Fimora because it is lighter for the systems. All the tools are simplified in using like trimming or splitting the clips. You can convert split video clips into other formats in Wondershare Filmora. Add and apply all the special effects on your videos and export them wherever you want.
For Win 7 or later (64-bit)
For macOS 10.14 or later
Features:
- Splitting or trimming of the video clips
- Removing the noise
- Addition of the transition effects
- Availability of controls for the audio, sound and video
- Separating the audio from the video
Part 1 - Splitting the clips in Wondershare Filmora
If you want to split the clips or trim some parts of the videos, Wondershare Filmora is the right choice. Below are detailed steps for trimming the videos quickly and easily.
Step :1
Drag or drop the files from Media Library or Click on “Import” after selecting the video clips to make the clip visible on the timeline. No need to worry regarding the formats as Wondershare Filmora is highly supportive towards it/

Step:2
Keep hanging the mouse on the corner of the video until and unless the trimming icon appears. So, you can drag ahead or in a backward direction at the endpoints of the video you want to trim.

Step: 3
You don’t want the video parts in the centre of the video clips. First, split the video and delete it. For splitting the video, click on the icon of the scissor.

Step: 4
For deleting the part of the undesired part of the video, click on the dustbin icon. If there is any deletion by mistake, there is no need to worry about it. Click on the undo icon to make the video appear on the timeline again.

Part 2 - Splitting and trimming the clips in Wondershare Filmora:
Apart from the above steps for trimming and splitting the videos in Wondershare Filmora, the position of the video has to be in the place head of the frame that you are willing to trim. Right-click on the clip and select the option of “Trim Start to Playhead or Trim End to Playhead “ for deleting the content of the video ahead or back of it.

In the latest version of the Wondershare Filmora, you can even trim the video without adding it to the timeline. A similar video can easily split multiple times and load only the required one. Go through the following steps to split the clips in a faster way:
- You can easily preview the video first from the library of your media files.
- Select the clip which you want to split or trim by selecting from the beginning till the end
- After dragging, you can view the trim section
- Keep repeating the steps mentioned above for splitting the videos

Although various editing software is available, Wondershare Filmora has to be on the top. It is the best choice to bring your imagination into reality, whether it is transitioning, applying the effects or importing/exporting the videos. All the options are suitable in front and visible on your timeline. Wondershare Filmora supports different operating systems as well. Even no proper training is required, so start using Wondershare Filmora today to get your editing done.
Step 2: Import and place the media file on the timeline from the library. This is the clip you want to split. Select the blade tool from where you want to split the clip. Use the timeline from the menu and go to Split Clip. Shortcut keys are also available that are Ctrl+\ or Cmd+\ or Cmd+B. Now the split clip is easily visible to you. You can use this clip wherever you want to use it.

Part 2- Splitting of more than one clip on various tracks:
You can also split the number of video and audio clips at the exact timings in DaVinci resolve.
Step 1: When there are piles of clips one after the other, the selection of both of the clips is essential, which have to be split. Keep moving the playhead to the exact area where there is a requirement for the changes.
Step 2: Just keep pressing Command or Control + \ keys, or click on timeline> Split Clip. The selected clips of audio and video get split together now. No more slitting of the clips individually. This option is more appropriate for you when creating and managing different parts of massive projects.

An easier way to split the video clips
Without any doubt, DaVinci resolve is an advanced level software for video editing at the professional level. Moreover, the pricing of DaVinci resolve is $299, and it shows that it is quite expensive for many people. Due to this, you need an economical solution that is Filmora Video Editor .
Most graphic designers and video editors recommend Wondershare Fimora because it is lighter for the systems. All the tools are simplified in using like trimming or splitting the clips. You can convert split video clips into other formats in Wondershare Filmora. Add and apply all the special effects on your videos and export them wherever you want.
For Win 7 or later (64-bit)
For macOS 10.14 or later
Features:
- Splitting or trimming of the video clips
- Removing the noise
- Addition of the transition effects
- Availability of controls for the audio, sound and video
- Separating the audio from the video
Part 1 - Splitting the clips in Wondershare Filmora
If you want to split the clips or trim some parts of the videos, Wondershare Filmora is the right choice. Below are detailed steps for trimming the videos quickly and easily.
Step :1
Drag or drop the files from Media Library or Click on “Import” after selecting the video clips to make the clip visible on the timeline. No need to worry regarding the formats as Wondershare Filmora is highly supportive towards it/

Step:2
Keep hanging the mouse on the corner of the video until and unless the trimming icon appears. So, you can drag ahead or in a backward direction at the endpoints of the video you want to trim.

Step: 3
You don’t want the video parts in the centre of the video clips. First, split the video and delete it. For splitting the video, click on the icon of the scissor.

Step: 4
For deleting the part of the undesired part of the video, click on the dustbin icon. If there is any deletion by mistake, there is no need to worry about it. Click on the undo icon to make the video appear on the timeline again.

Part 2 - Splitting and trimming the clips in Wondershare Filmora:
Apart from the above steps for trimming and splitting the videos in Wondershare Filmora, the position of the video has to be in the place head of the frame that you are willing to trim. Right-click on the clip and select the option of “Trim Start to Playhead or Trim End to Playhead “ for deleting the content of the video ahead or back of it.

In the latest version of the Wondershare Filmora, you can even trim the video without adding it to the timeline. A similar video can easily split multiple times and load only the required one. Go through the following steps to split the clips in a faster way:
- You can easily preview the video first from the library of your media files.
- Select the clip which you want to split or trim by selecting from the beginning till the end
- After dragging, you can view the trim section
- Keep repeating the steps mentioned above for splitting the videos

Although various editing software is available, Wondershare Filmora has to be on the top. It is the best choice to bring your imagination into reality, whether it is transitioning, applying the effects or importing/exporting the videos. All the options are suitable in front and visible on your timeline. Wondershare Filmora supports different operating systems as well. Even no proper training is required, so start using Wondershare Filmora today to get your editing done.
Also read:
- Updated Detailed Guide to Rotate Videos in Blender for 2024
- Updated The Ultimate Guide to Use LUTS to Color Grade on iPhone
- In 2024, Slow Down the GIF to Emphasize Details Better. To Do so, Read This Guide and Learn to Use the Best Platforms for Slow-Motion GIFs
- 2024 Approved Ultimate Guidelines to Help You Use VLC Media Player Better
- New 2024 Approved Here You Can Lean About the Different Ways for GIMP Transparent Background PNG Format Files
- New 2024 Approved The Craziest 10 AI Editors Youve Ever Seen
- 2024 Approved The Best Jump Cut Editing Tricks Make Your Videos Snappy!
- Updated 2024 Approved Are You Stuck with How to Use Discord GIF Ideally? Check that Out in This Article, as We Will Guide You on All You Need to Know About GIFs for Discord
- New How to Create Liquid Water Reveal Intro for 2024
- In 2024, Want to Buy a Drone for Better Videography Creating? This Article Will Review 6 of the Best Drones on the Market for You to Consider
- In 2024, Step-by-Step Guide to Speed Up and Slow Down a Video
- Color Finale Is a Color Grading Plugin for Final Cur Pro. It Allows Users to Make Cinematic Looking Video Scenes by Adjusting the Color. Here Well Share You some Basic Information About This Plugin
- Multi Object Tracking The Ultimate Guide for 2024
- Updated In 2024, Control Playback Speed in Premiere Pro
- New Are You Looking for the Best Video Marketing Agency to Help Your Business Grow Exponentially with Engaging Video Content? Here Is How to Find a High-Quality Video Marketing Company that Takes Your Videos to the Next Level
- Repeated Text Animation Tutorial
- New How to Make Video Slow Motion? Complete Guide
- How to Perform Mask Tracking Discovering the Best Methods
- In 2024, Based on Preferences, You Can Adjust the Speed of YouTube Videos. Learn How to Produce a YouTube Slow-Motion Video in This Article
- Updated 2024 Approved Detailed Guide to Rotate Videos in Blender
- Updated 20 Best Text To Speech Software Windows, Mac, Android, iPhone & O for 2024
- Updated In 2024, Several Tips Can Facilitate How You Edit Videos Faster and Easier. All You Need to Do Is to Read This Article to Find Out What They Are
- Updated In 2024, How to Rotate AVI in Vertical/Portrait Orientation Windows, Mac,Android, iPhone & Online
- New How to Make GIF With Transparent Background for 2024
- | Top GIF to MP4 Converters for 2024
- Updated Green Screen YouTube Videos
- Updated In 2024, Can You Make an Fcpx Slideshow? Undoubtedly Yes, with the Unlimited Best Fcpx Slideshow Templates Available. To Know How to, Follow the Discussion Below
- The After-Effects Match Colour Feature Bestows Numerous Benefits. Thus, in the Following Discussion, We Will Discuss This Feature and an Equally Proficient Efficient Alternative Tool for Colour Matching
- 2024 Approved MAGIX Vegas Pro Review A Professional Video Editing Software
- New 2024 Approved This Blog Post Shows How to Create an Eye-Catching Paper Rip Effect for Your Videos Using Wondershare Filmora with These Easy-to-Follow Steps
- New In 2024, Want to Apply a Filter on Your Video Using Your iPhone or Mac? Here Are the Simple Steps to Put Add Filters on iMovie. Find Out a Better iMovie Alternative with More Filters
- Updated 2024 Approved Do You Seek a Guide to Add Motion in Blender? This Article Explains the Blender Motion Blur Effect in Detail and Helps You Master It
- Updated Sometimes, when It Comes to Editing a Video, We Dont Even Know Where to Start, because There Are Too Many Options –Online Platforms Which Instantly Help Us Edit Our Clips, without Lengthy Process of Downloading and Installing Computer Programs
- New Applying and Creating Gif Background on Your Devices and Presentations Is Not Hard. Read Below to Learn How to Apply a GIF Background on All Devices for 2024
- Updated Learn How to Add Dynamic Shake Effects to Your Videos Using Alight Motion. Our Step-by-Step Guide Makes It Easy to Create Cinematic Footage
- Updated In 2024, Fixes | What If YouTube Zoom to Fill Not Working?
- Updated In 2024, Best 22 Video Editing Tips to Know
- How to Create the Night-to-Day Effect Video for 2024
- Using Adobe After Effects as a Pro-Level Editing Platforms Demands You to Add Expressions in After Effects. If Youre Looking for the Solutions on After Effects How to Add Expressions Then Weve Got You Covered. Learn More Here for 2024
- Updated Step by Step to Crop a Video Using Lightworks
- New A Complete Guide to the Best Brand Story Videos
- New | How to Change Quicktime Player Speed on Mac, In 2024
- Updated 2024 Approved How to Take Slow Motion Videos
- Possible solutions to restore deleted messages from Infinix Hot 30 5G
- In 2024, How to use Snapchat Location Spoofer to Protect Your Privacy On Xiaomi 13T? | Dr.fone
- In 2024, Forgot Pattern Lock? Heres How You Can Unlock Vivo Y27s Pattern Lock Screen
- Unlock Your Realme GT Neo 5 SEs Potential The Top 20 Lock Screen Apps You Need to Try
- Best Pokemons for PVP Matches in Pokemon Go For Honor V Purse | Dr.fone
- Top 10 Fingerprint Lock Apps to Lock Your Oppo Find X7 Phone
- In 2024, Top 15 Augmented Reality Games Like Pokémon GO To Play On OnePlus Ace 3 | Dr.fone
- Latest way to get Shiny Meltan Box in Pokémon Go Mystery Box On Oppo A1 5G | Dr.fone
- In 2024, The Ultimate Guide to Bypassing iCloud Activation Lock from iPhone 8 Plus
- All Must-Knows to Use Fake GPS GO Location Spoofer On Apple iPhone SE (2020) | Dr.fone
- A Comprehensive Guide to iCloud Unlock On Apple iPhone 14 Pro Max Online
- Why Your Itel P55 Screen Might be Unresponsive and How to Fix It | Dr.fone
- In 2024, How to Transfer Contacts from Honor 70 Lite 5G To Phone | Dr.fone
- In 2024, 5 Ways to Transfer Music from Oppo Reno 11 5G to Other Android Devices Easily | Dr.fone
- A Perfect Guide To Remove or Disable Google Smart Lock On Tecno Spark 10 4G
- All You Need To Know About Mega Greninja For Oppo Find X6 Pro | Dr.fone
- 3uTools Virtual Location Not Working On Tecno Pop 8? Fix Now | Dr.fone
- How To Free Up iPhone 8 Space | Dr.fone
- In 2024, How to Transfer Contacts from Poco M6 5G to iPhone XS/11 | Dr.fone
- How to Remove Find My iPhone without Apple ID On your iPhone SE (2022)?
- Updated Best Tips for Effortless Unity 3D Animation for 2024
- How To Update or Downgrade Apple iPhone 11 Pro Max Without Data Loss? | Dr.fone
- In 2024, The Updated Method to Bypass Infinix Smart 8 Plus FRP
- Where Is the Best Place to Catch Dratini On OnePlus Ace 3 | Dr.fone
- In 2024, How To Change Your SIM PIN Code on Your Asus ROG Phone 7 Ultimate Phone
- How to Fix the Soft Bricked Oppo K11x? | Dr.fone
- In 2024, How To Unlock A Found iPhone 15 Plus? | Dr.fone
- What To Do if Your Vivo V29 Auto Does Not Work | Dr.fone
- In 2024, How to use Pokemon Go Joystick on Lava Blaze Pro 5G? | Dr.fone
- Title: Practical Ways to Resize Video in Handbrake
- Author: Morgan
- Created at : 2024-05-19 05:11:39
- Updated at : 2024-05-20 05:11:39
- Link: https://ai-video-editing.techidaily.com/practical-ways-to-resize-video-in-handbrake/
- License: This work is licensed under CC BY-NC-SA 4.0.

