:max_bytes(150000):strip_icc():format(webp)/GettyImages-165567842-58e5bd253df78c51625e84ab.jpg)
Premiere Pro Best Slow Motion Effects To Use

Premiere Pro Best Slow Motion Effects To Use
Adobe Premiere Pro is a famous video editing program in the media industry. It includes professional-quality features that enable advanced video editing. Due to its impressive performance, many content creators use this tool to add slow-motion effects to the videos. If you are at a beginner stage of video editing, you may not know how to operate Premiere Pro slow-motion effects. Thus, this guide will provide you with basic yet accurate instructions.
To create slow-motion effects in Premiere Pro, the guide will describe the instructions in a simple way. We will also highlight the templates of this tool providing slow-motion effects in Premiere Pro for videos. Hence, keep discovering this guide to learn more details.
Slow Motion Video Maker Slow your video’s speed with better control of your keyframes to create unique cinematic effects!
Make A Slow Motion Video Make A Slow Motion Video More Features

Part 1: How To Perform Slow Motion on Adobe Premiere Pro?
Adobe Premiere Pro offers an advanced user interface to perform complex functions. It contains a wide range of features supporting non-destructive video editing. Its auto-correct feature lets you adjust the color patterns of the video in a smart way. Moreover, it contains a comparison view to analyze the before and after visual effects. You can also add adjustment layers in the timeline to change many clips at once.
On Premiere Pro, you can also connect third-party plugins for more features. It also supports many professional-grade formats to offer flexibility for video editors. Among other features, it can also apply slow-motion effects to the video. To make Premiere Pro slow-motion effects, you can use the following steps:
Step 1: On Premiere Pro, upload the video in which you want to create a slow-motion effect. To proceed, drag it to the timeline with your cursor. At the start of the timeline, right-click on the small icon saying FX on the left side. From there, select “Time Remapping” and then “Speed.”

Step 2: Now, add the keyframe where you want to begin and end the slow-motion effect. To do so, press “CTRL + Click” on the timeline. To add a ramp, click on the added keyframes and drag them a little to the right side.

Step 3: To proceed, move to the central part of the two added keyframes. Afterward, click on the central part and drag it downwards. By doing so, you can see the reduced percentage number on the timeline. To add a more slow-motion effect, pull down the central part of the timeline. For more adjustments in the length within the keyframes, you can go to the effects control. By doing so, you can determine how smoothly you want to create a slow-motion effect.

Part 2:Leading Templates Offering Quick Slow Motion Effect in Premiere Pro
In this section, you can find popular slow-motion effect Premiere Pro templates. After accessing the templates, you can customize them as per your needs. Hence, let’s dig into the details below:
This template is perfect for use in the intros of videos, presentations, slideshows, etc. It contains 9 different scenes of outdoor areas. Moreover, it offers 16 media placeholders and 7 text placeholders to add custom content. You can promote your brand by using its 2 placeholder logos. Hence, it’s a perfect slow-motion video template with HD-quality resolution.

The slow-motion explosion logo opener is an attractive template featuring vibrant colors. It contains a hand-drawn animated logo with suitable backgrounds. Along with the logo reveal, it includes background music that matches the theme of the video. It also offers media and text placeholders to let you introduce your brand.

Do you want to create a modern video on Premiere Pro? Well, this slow-motion template features freeze frames to offer viewers a unique look. The template gives a glimpse of urban life with energetic background music. It’s available in full HD resolution with eye-catching urban locations. Hence, try this template for demos, fashion, and action videos.

Dynamic Sport is one of the famous slow-motion Premiere Pro templates. With a modern outlook, it includes simple text animation. Moreover, it uses many transitioning effects to produce a stunning video. You can insert extra content with its 8 editable text placeholders. Thus, download this template and customize it in Premiere Pro.

This planet-themed template introduces cinematic spinning planets. With 8 text placeholders, you can write content related to your shows, movies, and events. It contains intriguing background music that can grasp the attention of your audience. In full HD resolution, this template can help you produce cinematic slow-motion videos with minimal effort.

Part 3: Tutorial: Perform Slow Motion in Filmora Video Editing
Are you ready to perform slow-motion effects in Premiere Pro in Filmora? Check the directions below to add a slow-motion effect to your video .
Free Download For Win 7 or later(64-bit)
Free Download For macOS 10.14 or later
Step 1Browse and Import the File
After the launch of Filmora, click on the “New Project” button. Click on the “Import Media” section to browse the video file. Once done, drag the video to the timeline to start the editing process.

Step 2Open Speed Ramping Settings
Go to the right panel of the screen to open the settings. From there, go to the “Speed” tab and select “Speed Ramping”. It will display the speed ramping settings below.

Step 3Adjust the Video Speed
The presets are available for speed ramping in the above section. Choose “Customize” and then proceed to the small graph given below. Here, you can move the points to adjust the video’s speed. By pulling down the points, you can reduce the video’s speed. Continue the process until you achieve your desired speed.

Step 4Render the Video
Expand the option of “AI Frame Interpolation” and choose “Optical Flow.” Once done, click on “Render Preview” from the timeline’s toolbar to see the highest-quality results.

Conclusion
Slow-motion effect Premiere Pro can produce high-end results for professionals. Yet, this tool is not ideal for every kind of user. In contrast, Filmora is the most flexible tool due to its friendly user interface. Without extensive manual efforts, you can produce slow-motion videos within a few clicks. Moreover, it features many AI options to let you increase your productivity.
Make A Slow Motion Video Make A Slow Motion Video More Features

Part 1: How To Perform Slow Motion on Adobe Premiere Pro?
Adobe Premiere Pro offers an advanced user interface to perform complex functions. It contains a wide range of features supporting non-destructive video editing. Its auto-correct feature lets you adjust the color patterns of the video in a smart way. Moreover, it contains a comparison view to analyze the before and after visual effects. You can also add adjustment layers in the timeline to change many clips at once.
On Premiere Pro, you can also connect third-party plugins for more features. It also supports many professional-grade formats to offer flexibility for video editors. Among other features, it can also apply slow-motion effects to the video. To make Premiere Pro slow-motion effects, you can use the following steps:
Step 1: On Premiere Pro, upload the video in which you want to create a slow-motion effect. To proceed, drag it to the timeline with your cursor. At the start of the timeline, right-click on the small icon saying FX on the left side. From there, select “Time Remapping” and then “Speed.”

Step 2: Now, add the keyframe where you want to begin and end the slow-motion effect. To do so, press “CTRL + Click” on the timeline. To add a ramp, click on the added keyframes and drag them a little to the right side.

Step 3: To proceed, move to the central part of the two added keyframes. Afterward, click on the central part and drag it downwards. By doing so, you can see the reduced percentage number on the timeline. To add a more slow-motion effect, pull down the central part of the timeline. For more adjustments in the length within the keyframes, you can go to the effects control. By doing so, you can determine how smoothly you want to create a slow-motion effect.

Part 2:Leading Templates Offering Quick Slow Motion Effect in Premiere Pro
In this section, you can find popular slow-motion effect Premiere Pro templates. After accessing the templates, you can customize them as per your needs. Hence, let’s dig into the details below:
This template is perfect for use in the intros of videos, presentations, slideshows, etc. It contains 9 different scenes of outdoor areas. Moreover, it offers 16 media placeholders and 7 text placeholders to add custom content. You can promote your brand by using its 2 placeholder logos. Hence, it’s a perfect slow-motion video template with HD-quality resolution.

The slow-motion explosion logo opener is an attractive template featuring vibrant colors. It contains a hand-drawn animated logo with suitable backgrounds. Along with the logo reveal, it includes background music that matches the theme of the video. It also offers media and text placeholders to let you introduce your brand.

Do you want to create a modern video on Premiere Pro? Well, this slow-motion template features freeze frames to offer viewers a unique look. The template gives a glimpse of urban life with energetic background music. It’s available in full HD resolution with eye-catching urban locations. Hence, try this template for demos, fashion, and action videos.

Dynamic Sport is one of the famous slow-motion Premiere Pro templates. With a modern outlook, it includes simple text animation. Moreover, it uses many transitioning effects to produce a stunning video. You can insert extra content with its 8 editable text placeholders. Thus, download this template and customize it in Premiere Pro.

This planet-themed template introduces cinematic spinning planets. With 8 text placeholders, you can write content related to your shows, movies, and events. It contains intriguing background music that can grasp the attention of your audience. In full HD resolution, this template can help you produce cinematic slow-motion videos with minimal effort.

Part 3: Tutorial: Perform Slow Motion in Filmora Video Editing
Are you ready to perform slow-motion effects in Premiere Pro in Filmora? Check the directions below to add a slow-motion effect to your video .
Free Download For Win 7 or later(64-bit)
Free Download For macOS 10.14 or later
Step 1Browse and Import the File
After the launch of Filmora, click on the “New Project” button. Click on the “Import Media” section to browse the video file. Once done, drag the video to the timeline to start the editing process.

Step 2Open Speed Ramping Settings
Go to the right panel of the screen to open the settings. From there, go to the “Speed” tab and select “Speed Ramping”. It will display the speed ramping settings below.

Step 3Adjust the Video Speed
The presets are available for speed ramping in the above section. Choose “Customize” and then proceed to the small graph given below. Here, you can move the points to adjust the video’s speed. By pulling down the points, you can reduce the video’s speed. Continue the process until you achieve your desired speed.

Step 4Render the Video
Expand the option of “AI Frame Interpolation” and choose “Optical Flow.” Once done, click on “Render Preview” from the timeline’s toolbar to see the highest-quality results.

Conclusion
Slow-motion effect Premiere Pro can produce high-end results for professionals. Yet, this tool is not ideal for every kind of user. In contrast, Filmora is the most flexible tool due to its friendly user interface. Without extensive manual efforts, you can produce slow-motion videos within a few clicks. Moreover, it features many AI options to let you increase your productivity.
Splitting Audio From a Video in Sony Vegas [Step by Step]
The Sony Vegas Pro is software for professionally editing videos. There are many tools and effects available for audio and video that you can add respective to your requirements. The stabilization engine is available in Sony Vegas Pro to reduce the movements that you can observe the shaking in the videos. It helps in improving the quality of your content thoroughly. Sony Vegas pro also helps pin the texts or grading of the colours to apply objects in various dimensions.
You can use this software for editing, organizing or viewing the projects that are going on and present on the timeline. Even sharing the small parts of the video is possible. As a user of Sony Vegas Pro, it is a total choice of handling the colouring exposure to maintain the workflow. Here, the main discussion is regarding the split of the audio from the video in the Sony Vegas Pro. There are also some details about the substitute, which is Wondershare Filmora.
How can you separate audio from the video clips in Sony Vegas Pro?
The best features of Sony Vegas Pro help create, edit, trim or even crop the videos. You can use them in making videos worth viewing for your audience. Sony Vegas Pro can make your work on multiple screens at the same time. The most important characteristic is the extraction of the audio from the video.
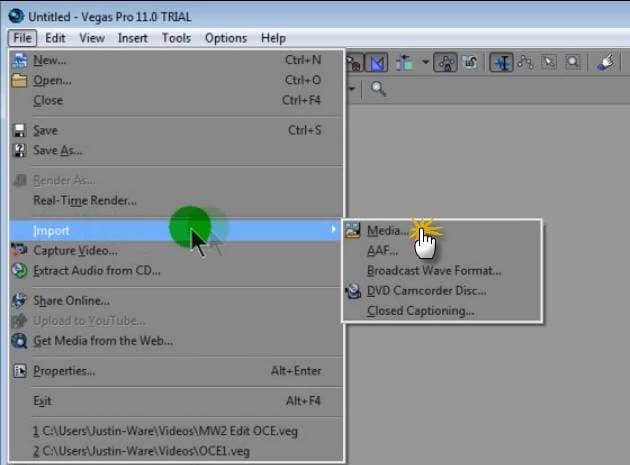
Step 1: When you have finished the installation of the Sony Vegas Pro on your device, now import the video clip from which you want to extract the audio.
Step 2: Drag and drop your video clip in the editing area. Here, you can easily see the video and audio tracks are all together. Whatever effect you apply, both will show the results.
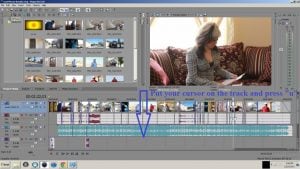
Step 3: You have to separate the audio from the video files in this step. After selecting the track, whether audio or video, simply press the “U” letter on your keyboard. In this step, keep holding the cursor. It permits you to keep moving the video clips quickly. Now, it is easy to download audio files from this area.
Step 4: The tracks are separate now, so you can move, delete or edit them individually. Definitely, it doesn’t affect the other track.
An easier way to split the audio from the video
Most graphic designers and video editors consider the Sony Vegas Pro as the professional level software for editing purposes. Due to the user interface of advanced level, high pricing and availability only for the Mac users make people look for options as the editing tool and accessible on both devices using Windows and Mac.
Filmora Video Editor is the best consideration among all of the editors. You can also use the Wondershare Filmora in dark mode as well. This feature helps the user edit in his comfort zone without causing any harm to the eyes. In the following steps, you can easily separate the audio from the videos in Wondershare Filmora.
For Win 7 or later (64-bit)
For macOS 10.14 or later
Features
- Simple interface and all the tools are easily available
- Just need a few clicks along the drag and drop to perform the functionalities
- Unlimited sharing of the videos on YouTube, Vimeo and many others
- Splitting of the clips and screen
- Easy to split up the audio from the video
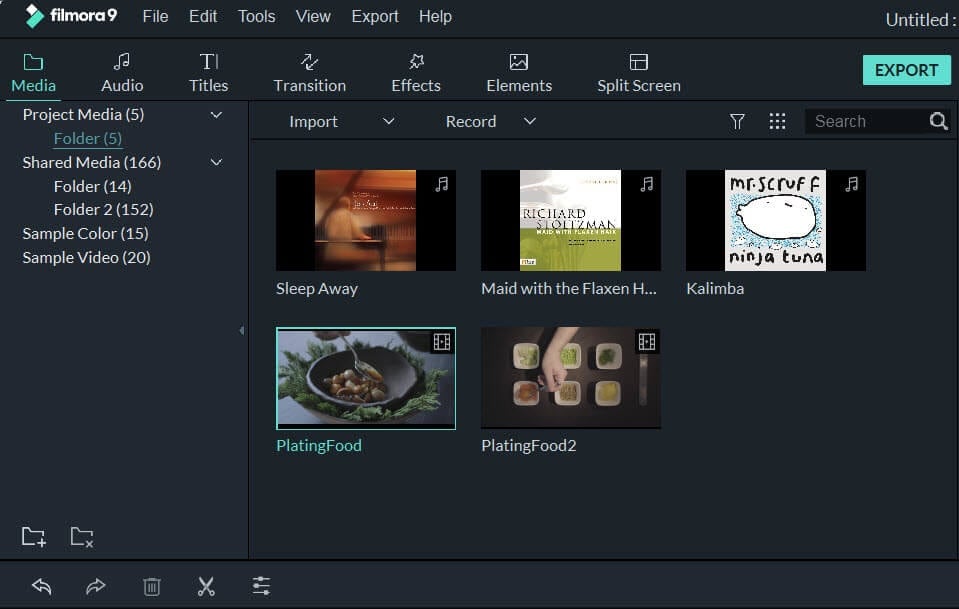
Step 1: After running the Wondershare Filmora, select the ratio of your choice 4:3 or 16:9 for entering in the mode of editing. Click on the “Import” so you can add the photos, video and audio from the folder of your system. After importing the videos, drag and drop in the timeline. As a default, all the files get merged with one another with no gap.
Step 2: Right-click on the video clip from which you want to extract the audio. Select the option of “Detach Audio” from the menu. Instantly, an audio file is visible on the screen, and it is the original one from the source.
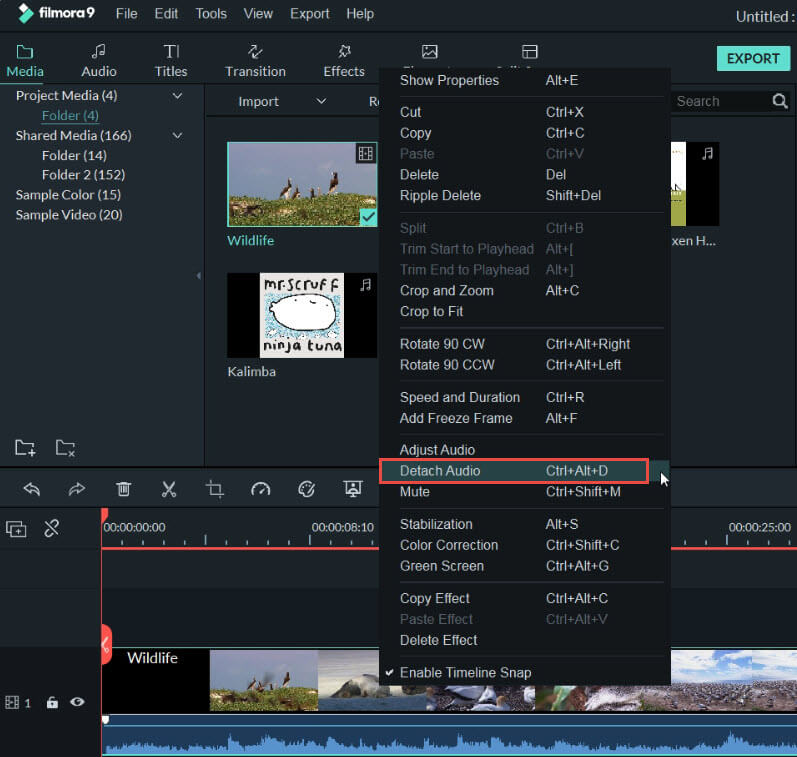
Step 3: Now, the audio track gets separated from the video successfully. Wondershare Filmora also offers to add one more audio file. Yes, it is also possible with this software.
Step 4: After separating the audio from the video, it is simple to delete the track, whether it is audio or video that is not in use or want to use. Click on the “Export” option for saving your required audio tracks, or you can even select the “iPod” for playing the audio. You can also save the audio file separately as the new file on your hard drive. After exporting the audio tracks, load the project file again that has the frames for the video and later export the video file.
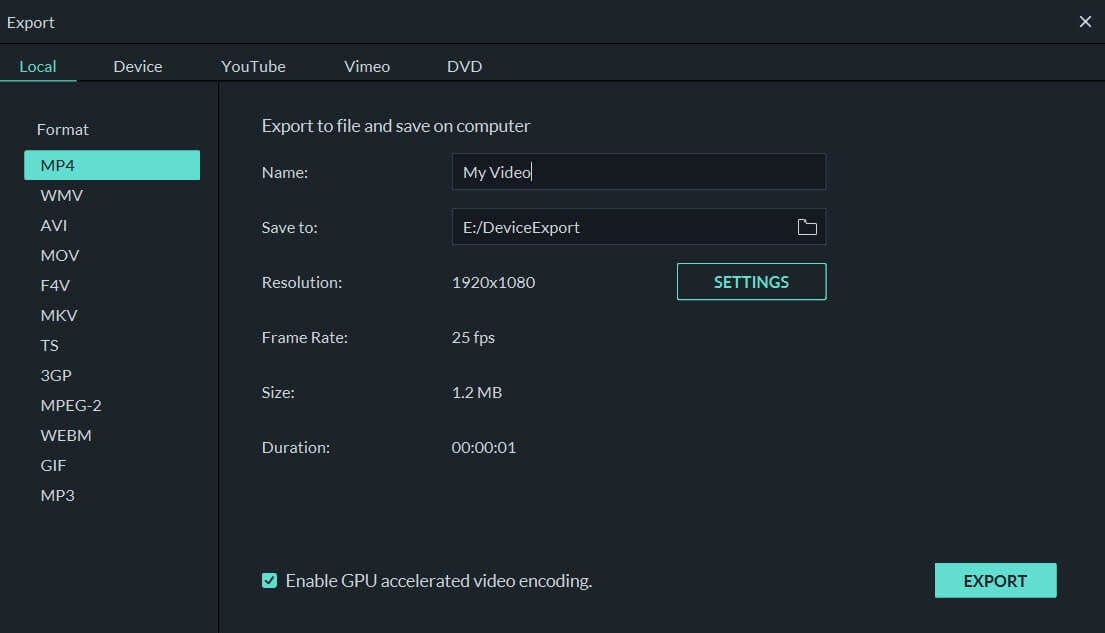
Whenever you think about the compatibility of editing software with different operating systems, Wondershare Filmora comes to mind as the first choice. All the new features of Wondershare Filmora in its latest version have received positive feedback and reviews. Definitely, it is the actual replacement of the previously used editors such as video editor in Windows or iMovie in Mac.
Wondershare Filmora not only adds the animation but as well offers customization. Adding the keyframes is very easy for the user to change the positions, scale or rotate the clips. The feature of colour matching is also available so you can match the clips from one frame to another. Even the shortcut keys are available for all the commands that bring effective and efficient editing tasks.
Just little guidance and assistance can help you use the Wondershare Filmora as the options are suitable in front of your screen. No more waiting and thinking; start using this most straightforward editor and enjoy all the features of Wondershare Filmora.
Step 2: Drag and drop your video clip in the editing area. Here, you can easily see the video and audio tracks are all together. Whatever effect you apply, both will show the results.

Step 3: You have to separate the audio from the video files in this step. After selecting the track, whether audio or video, simply press the “U” letter on your keyboard. In this step, keep holding the cursor. It permits you to keep moving the video clips quickly. Now, it is easy to download audio files from this area.
Step 4: The tracks are separate now, so you can move, delete or edit them individually. Definitely, it doesn’t affect the other track.
An easier way to split the audio from the video
Most graphic designers and video editors consider the Sony Vegas Pro as the professional level software for editing purposes. Due to the user interface of advanced level, high pricing and availability only for the Mac users make people look for options as the editing tool and accessible on both devices using Windows and Mac.
Filmora Video Editor is the best consideration among all of the editors. You can also use the Wondershare Filmora in dark mode as well. This feature helps the user edit in his comfort zone without causing any harm to the eyes. In the following steps, you can easily separate the audio from the videos in Wondershare Filmora.
For Win 7 or later (64-bit)
For macOS 10.14 or later
Features
- Simple interface and all the tools are easily available
- Just need a few clicks along the drag and drop to perform the functionalities
- Unlimited sharing of the videos on YouTube, Vimeo and many others
- Splitting of the clips and screen
- Easy to split up the audio from the video
Step 1: After running the Wondershare Filmora, select the ratio of your choice 4:3 or 16:9 for entering in the mode of editing. Click on the “Import” so you can add the photos, video and audio from the folder of your system. After importing the videos, drag and drop in the timeline. As a default, all the files get merged with one another with no gap.

Step 2: Right-click on the video clip from which you want to extract the audio. Select the option of “Detach Audio” from the menu. Instantly, an audio file is visible on the screen, and it is the original one from the source.

Step 3: Now, the audio track gets separated from the video successfully. Wondershare Filmora also offers to add one more audio file. Yes, it is also possible with this software.
Step 4: After separating the audio from the video, it is simple to delete the track, whether it is audio or video that is not in use or want to use. Click on the “Export” option for saving your required audio tracks, or you can even select the “iPod” for playing the audio. You can also save the audio file separately as the new file on your hard drive. After exporting the audio tracks, load the project file again that has the frames for the video and later export the video file.

Whenever you think about the compatibility of editing software with different operating systems, Wondershare Filmora comes to mind as the first choice. All the new features of Wondershare Filmora in its latest version have received positive feedback and reviews. Definitely, it is the actual replacement of the previously used editors such as video editor in Windows or iMovie in Mac.
Wondershare Filmora not only adds the animation but as well offers customization. Adding the keyframes is very easy for the user to change the positions, scale or rotate the clips. The feature of colour matching is also available so you can match the clips from one frame to another. Even the shortcut keys are available for all the commands that bring effective and efficient editing tasks.
Just little guidance and assistance can help you use the Wondershare Filmora as the options are suitable in front of your screen. No more waiting and thinking; start using this most straightforward editor and enjoy all the features of Wondershare Filmora.
Step 2: Drag and drop your video clip in the editing area. Here, you can easily see the video and audio tracks are all together. Whatever effect you apply, both will show the results.

Step 3: You have to separate the audio from the video files in this step. After selecting the track, whether audio or video, simply press the “U” letter on your keyboard. In this step, keep holding the cursor. It permits you to keep moving the video clips quickly. Now, it is easy to download audio files from this area.
Step 4: The tracks are separate now, so you can move, delete or edit them individually. Definitely, it doesn’t affect the other track.
An easier way to split the audio from the video
Most graphic designers and video editors consider the Sony Vegas Pro as the professional level software for editing purposes. Due to the user interface of advanced level, high pricing and availability only for the Mac users make people look for options as the editing tool and accessible on both devices using Windows and Mac.
Filmora Video Editor is the best consideration among all of the editors. You can also use the Wondershare Filmora in dark mode as well. This feature helps the user edit in his comfort zone without causing any harm to the eyes. In the following steps, you can easily separate the audio from the videos in Wondershare Filmora.
For Win 7 or later (64-bit)
For macOS 10.14 or later
Features
- Simple interface and all the tools are easily available
- Just need a few clicks along the drag and drop to perform the functionalities
- Unlimited sharing of the videos on YouTube, Vimeo and many others
- Splitting of the clips and screen
- Easy to split up the audio from the video
Step 1: After running the Wondershare Filmora, select the ratio of your choice 4:3 or 16:9 for entering in the mode of editing. Click on the “Import” so you can add the photos, video and audio from the folder of your system. After importing the videos, drag and drop in the timeline. As a default, all the files get merged with one another with no gap.

Step 2: Right-click on the video clip from which you want to extract the audio. Select the option of “Detach Audio” from the menu. Instantly, an audio file is visible on the screen, and it is the original one from the source.

Step 3: Now, the audio track gets separated from the video successfully. Wondershare Filmora also offers to add one more audio file. Yes, it is also possible with this software.
Step 4: After separating the audio from the video, it is simple to delete the track, whether it is audio or video that is not in use or want to use. Click on the “Export” option for saving your required audio tracks, or you can even select the “iPod” for playing the audio. You can also save the audio file separately as the new file on your hard drive. After exporting the audio tracks, load the project file again that has the frames for the video and later export the video file.

Whenever you think about the compatibility of editing software with different operating systems, Wondershare Filmora comes to mind as the first choice. All the new features of Wondershare Filmora in its latest version have received positive feedback and reviews. Definitely, it is the actual replacement of the previously used editors such as video editor in Windows or iMovie in Mac.
Wondershare Filmora not only adds the animation but as well offers customization. Adding the keyframes is very easy for the user to change the positions, scale or rotate the clips. The feature of colour matching is also available so you can match the clips from one frame to another. Even the shortcut keys are available for all the commands that bring effective and efficient editing tasks.
Just little guidance and assistance can help you use the Wondershare Filmora as the options are suitable in front of your screen. No more waiting and thinking; start using this most straightforward editor and enjoy all the features of Wondershare Filmora.
Step 2: Drag and drop your video clip in the editing area. Here, you can easily see the video and audio tracks are all together. Whatever effect you apply, both will show the results.

Step 3: You have to separate the audio from the video files in this step. After selecting the track, whether audio or video, simply press the “U” letter on your keyboard. In this step, keep holding the cursor. It permits you to keep moving the video clips quickly. Now, it is easy to download audio files from this area.
Step 4: The tracks are separate now, so you can move, delete or edit them individually. Definitely, it doesn’t affect the other track.
An easier way to split the audio from the video
Most graphic designers and video editors consider the Sony Vegas Pro as the professional level software for editing purposes. Due to the user interface of advanced level, high pricing and availability only for the Mac users make people look for options as the editing tool and accessible on both devices using Windows and Mac.
Filmora Video Editor is the best consideration among all of the editors. You can also use the Wondershare Filmora in dark mode as well. This feature helps the user edit in his comfort zone without causing any harm to the eyes. In the following steps, you can easily separate the audio from the videos in Wondershare Filmora.
For Win 7 or later (64-bit)
For macOS 10.14 or later
Features
- Simple interface and all the tools are easily available
- Just need a few clicks along the drag and drop to perform the functionalities
- Unlimited sharing of the videos on YouTube, Vimeo and many others
- Splitting of the clips and screen
- Easy to split up the audio from the video
Step 1: After running the Wondershare Filmora, select the ratio of your choice 4:3 or 16:9 for entering in the mode of editing. Click on the “Import” so you can add the photos, video and audio from the folder of your system. After importing the videos, drag and drop in the timeline. As a default, all the files get merged with one another with no gap.

Step 2: Right-click on the video clip from which you want to extract the audio. Select the option of “Detach Audio” from the menu. Instantly, an audio file is visible on the screen, and it is the original one from the source.

Step 3: Now, the audio track gets separated from the video successfully. Wondershare Filmora also offers to add one more audio file. Yes, it is also possible with this software.
Step 4: After separating the audio from the video, it is simple to delete the track, whether it is audio or video that is not in use or want to use. Click on the “Export” option for saving your required audio tracks, or you can even select the “iPod” for playing the audio. You can also save the audio file separately as the new file on your hard drive. After exporting the audio tracks, load the project file again that has the frames for the video and later export the video file.

Whenever you think about the compatibility of editing software with different operating systems, Wondershare Filmora comes to mind as the first choice. All the new features of Wondershare Filmora in its latest version have received positive feedback and reviews. Definitely, it is the actual replacement of the previously used editors such as video editor in Windows or iMovie in Mac.
Wondershare Filmora not only adds the animation but as well offers customization. Adding the keyframes is very easy for the user to change the positions, scale or rotate the clips. The feature of colour matching is also available so you can match the clips from one frame to another. Even the shortcut keys are available for all the commands that bring effective and efficient editing tasks.
Just little guidance and assistance can help you use the Wondershare Filmora as the options are suitable in front of your screen. No more waiting and thinking; start using this most straightforward editor and enjoy all the features of Wondershare Filmora.
Read and Learn How to Convert a Slow-Motion Video to Normal in This Guide. Besides, Find the Best Desktop Solution to Adjust Video Speed Quickly and Easily
Maintain consistency in your projects by adding all video clips simultaneously. Sometimes, you have to include a slow-motion video due to its content. In such cases, convert them into a normal video for an even flow in the media. Turning slow-motion videos into the normal is essential in several cases. Unfortunately, many people don’t know how to make a slow-mo video at normal speed.
To address this concern, we have enlisted perfect ways to make slow-mo to usual video. Read this guide and learn how to convert a slow-motion video to normal step-wise. Besides, you will also find some online and desktop solutions to make the best choice.
Slow Motion Video Maker Slow your video’s speed with better control of your keyframes to create unique cinematic effects!
Make A Slow Motion Video Make A Slow Motion Video More Features

Part 1: Android User’s Solution: Converting Slow Motion Video to Normal
Android cameras can record slow-motion videos and turn them into normal as well. For this purpose, you have to upload your clips on Google Photos. Let’s discover how to convert slow-motion video to normal in Google Photos for Android. Remember that these steps might vary across different Android models.
Step 1
Enter your Google Photos app and pick one of your intended Slow-motion videos. While previewing it, look for the “Slow Motion” option at the top and touch it.

Step 2
Read the instructions from the displayed pop-up and hit the “OK.” Drag the two sliders and enclose them from both ends. Your slow-motion video is converted into the normal one.

Part 2: iOS User’s Solution: Converting Slow Motion Video to Normal
iPhone also offers a built-in option to change the speed of videos. Almost all iPhone series follow the same steps to change the video speed. Thus, you can quickly learn how to make slow-motion videos at regular speed, regardless of the version. Without further delay, make a slow-motion video and read the given steps:
Step 1
Unlock your iPhone and open the “Photos” app from the main screen. There, reach the “Albums” icon from the bottom and scroll until you get the “Slo-mo” option. Click on it and get a preview of your slow-motion video.

Step 2
Now, hit “Edit” from the top right side and find an editing screen. From the bottom, enclose the sliders from both sides and tap the “Done” button. This way, you will get a standard video instantly saved on your iPhone.

Part 3: Online Solution: Converting Slow Motion Video to Normal
Use this online tool if you cannot perform slow-motion to normal video conversion. Clideo is an online platform that allows you to change the video speed without causing playback issues. It offers a high level of security where only you can access your files. Some of its additional editing options allow you to pick an output format. Besides, users can keep their media sound or mute while making the conversion.
This tool supports MP4, MPG, VOB, MOV, and WMV media file formats. The following is a step-by-step guide to using this online solution:
Step 1
Access the official site of Clideo Stop Motion Maker and click the “Choose File” button. Browse your slow-motion video and press the “Open” button. Now, wait for a while until it gets uploaded on the site.

Step 2
Afterward, set the “Speed” from three given options. Choose to set the video to “Medium” speed. Moreover, you can also set the “Clip Rate” of the video as per requirements.

Step 3
When you get the desired outcome, click the “Export” button from the bottom-right corner. You will get a preview of the video on the next screen. Tap on the downward “ Download “ symbol and pick the file export destination. You can simply hit “Download” to get the file in your system.

Part 4: Desktop Recommendation: Converting Slow Motion Video to Normal Using Wondershare Filmora
In the above sections, you have learned how to turn slow-mo into normal. Now, it is time to look for an effective offline solution. That’s where you can count on Wondershare Filmora , which is the simplest but powerful video editor. Fortunately, it can speed up and slow down videos within the highest quality. Filmora provides more advanced editing options than the above solutions.
Free Download For Win 7 or later(64-bit)
Free Download For macOS 10.14 or later
Steps to Perform Slow Motion and Speed Up Videos to Normal with Filmora
Unlike other tools, Filmora can quickly convert your video speed to your desired extent. Head below and transform your video easily with this step-by-step guide.
Step 1Install Filmora and Export Your Media to Start a Project
Successfully launch Filmora in your system and access its home screen. Click on the “New Project” option to initiate media editing. Bring your video to the timeline after importing it into the media panel. To import the file, press the “Ctrl + I” keys using your keyboard.

Step 2Slow Down or Speed Up the Video with Optical Flow
Right-click on your slow-motion video in the timeline to get an extended list. From that list, tap the “Uniform Speed” option and find an editing panel on the right. Now, drag the “Speed” slider right to speed up the video. You can move it to the left side to slow down the video. To ensure a smooth quality, extend the “AI Frame Interpolation” menu and pick the “Optical Flow.”

Step 3Save the File Through the Export Button
Press the Space bar from your keyboard and preview the video. Navigate toward the “Export” button at the top right corner. You can adjust the export parameters and tap “Export” to save the file on your device.

Other Exceptional Features of Filmora
Filmora is more than a simple video editing app. AI integration can generate music, images, and scripts to embrace creativity in your content. Read the following points to learn more about Filmora’s incredible features.
- AI Vocal Remover: If you want to dub a video, use this feature to remove existing vocals. It can separate music and vocal soundtracks while keeping their quality high. Once AI removes vocals, you can quickly edit or remove unwanted elements from the tracks.
- AI Text to Video: Content creators can get instant engagement in their content with this feature. Users just have to write their ideas and let AI transform them into a visual story. They can later customize fonts, styles, and other elements to achieve desired results.
- AI Smart Masking: Professionals can improve their multi-dimensional scenes using this option. It enables multi-layer overlay editing that isolates subjects. Users can freeze frames and perform auto-correction for visual enhancements of the projects.
Conclusion
In short, slow-motion to normal video conversion is possible and serves fruitful purposes. In this regard, iPhone and Android offer built-in options that are explained earlier. Besides, you get familiar with how to convert a slow-motion video to normal using an online tool. For an effective desktop solution, try using Filmora, which is a top-notch video editor so far.
Make A Slow Motion Video Make A Slow Motion Video More Features

Part 1: Android User’s Solution: Converting Slow Motion Video to Normal
Android cameras can record slow-motion videos and turn them into normal as well. For this purpose, you have to upload your clips on Google Photos. Let’s discover how to convert slow-motion video to normal in Google Photos for Android. Remember that these steps might vary across different Android models.
Step 1
Enter your Google Photos app and pick one of your intended Slow-motion videos. While previewing it, look for the “Slow Motion” option at the top and touch it.

Step 2
Read the instructions from the displayed pop-up and hit the “OK.” Drag the two sliders and enclose them from both ends. Your slow-motion video is converted into the normal one.

Part 2: iOS User’s Solution: Converting Slow Motion Video to Normal
iPhone also offers a built-in option to change the speed of videos. Almost all iPhone series follow the same steps to change the video speed. Thus, you can quickly learn how to make slow-motion videos at regular speed, regardless of the version. Without further delay, make a slow-motion video and read the given steps:
Step 1
Unlock your iPhone and open the “Photos” app from the main screen. There, reach the “Albums” icon from the bottom and scroll until you get the “Slo-mo” option. Click on it and get a preview of your slow-motion video.

Step 2
Now, hit “Edit” from the top right side and find an editing screen. From the bottom, enclose the sliders from both sides and tap the “Done” button. This way, you will get a standard video instantly saved on your iPhone.

Part 3: Online Solution: Converting Slow Motion Video to Normal
Use this online tool if you cannot perform slow-motion to normal video conversion. Clideo is an online platform that allows you to change the video speed without causing playback issues. It offers a high level of security where only you can access your files. Some of its additional editing options allow you to pick an output format. Besides, users can keep their media sound or mute while making the conversion.
This tool supports MP4, MPG, VOB, MOV, and WMV media file formats. The following is a step-by-step guide to using this online solution:
Step 1
Access the official site of Clideo Stop Motion Maker and click the “Choose File” button. Browse your slow-motion video and press the “Open” button. Now, wait for a while until it gets uploaded on the site.

Step 2
Afterward, set the “Speed” from three given options. Choose to set the video to “Medium” speed. Moreover, you can also set the “Clip Rate” of the video as per requirements.

Step 3
When you get the desired outcome, click the “Export” button from the bottom-right corner. You will get a preview of the video on the next screen. Tap on the downward “ Download “ symbol and pick the file export destination. You can simply hit “Download” to get the file in your system.

Part 4: Desktop Recommendation: Converting Slow Motion Video to Normal Using Wondershare Filmora
In the above sections, you have learned how to turn slow-mo into normal. Now, it is time to look for an effective offline solution. That’s where you can count on Wondershare Filmora , which is the simplest but powerful video editor. Fortunately, it can speed up and slow down videos within the highest quality. Filmora provides more advanced editing options than the above solutions.
Free Download For Win 7 or later(64-bit)
Free Download For macOS 10.14 or later
Steps to Perform Slow Motion and Speed Up Videos to Normal with Filmora
Unlike other tools, Filmora can quickly convert your video speed to your desired extent. Head below and transform your video easily with this step-by-step guide.
Step 1Install Filmora and Export Your Media to Start a Project
Successfully launch Filmora in your system and access its home screen. Click on the “New Project” option to initiate media editing. Bring your video to the timeline after importing it into the media panel. To import the file, press the “Ctrl + I” keys using your keyboard.

Step 2Slow Down or Speed Up the Video with Optical Flow
Right-click on your slow-motion video in the timeline to get an extended list. From that list, tap the “Uniform Speed” option and find an editing panel on the right. Now, drag the “Speed” slider right to speed up the video. You can move it to the left side to slow down the video. To ensure a smooth quality, extend the “AI Frame Interpolation” menu and pick the “Optical Flow.”

Step 3Save the File Through the Export Button
Press the Space bar from your keyboard and preview the video. Navigate toward the “Export” button at the top right corner. You can adjust the export parameters and tap “Export” to save the file on your device.

Other Exceptional Features of Filmora
Filmora is more than a simple video editing app. AI integration can generate music, images, and scripts to embrace creativity in your content. Read the following points to learn more about Filmora’s incredible features.
- AI Vocal Remover: If you want to dub a video, use this feature to remove existing vocals. It can separate music and vocal soundtracks while keeping their quality high. Once AI removes vocals, you can quickly edit or remove unwanted elements from the tracks.
- AI Text to Video: Content creators can get instant engagement in their content with this feature. Users just have to write their ideas and let AI transform them into a visual story. They can later customize fonts, styles, and other elements to achieve desired results.
- AI Smart Masking: Professionals can improve their multi-dimensional scenes using this option. It enables multi-layer overlay editing that isolates subjects. Users can freeze frames and perform auto-correction for visual enhancements of the projects.
Conclusion
In short, slow-motion to normal video conversion is possible and serves fruitful purposes. In this regard, iPhone and Android offer built-in options that are explained earlier. Besides, you get familiar with how to convert a slow-motion video to normal using an online tool. For an effective desktop solution, try using Filmora, which is a top-notch video editor so far.
Unraveling How the Slow Motion Guys Have Revolutionized The Slow Motion Game
All the aspects of our lives are inspired by someone, and we try to follow in their footsteps. Sometimes, it can be a person in your life, an influential personality, or YouTube. When it comes to editing, beginners often try to follow those who have mastered it. In a similar way, you might seek inspiration from social media or websites to create slomos.
One of the greatest inspirations in the realm of slow-motion videos is The Slow Mo Guys . Continue reading this article for a brief review of The Slow Mo Guys. In addition, the article will give you a basic guide on creating slo-mos. You can also learn how to create high-quality slo-mo videos like the Slow Motion Guys.
Slow Motion Video Maker Slow your video’s speed with better control of your keyframes to create unique cinematic effects!
Make A Slow Motion Video Make A Slow Motion Video More Features

Part 1: The Slow Mo Guys: A Real-Life Sensation in Creating Slow Motion Videos
The Slow Mo Guys is a YouTube channel with over 14.8M subscribers and is determined to deliver high-quality content. The channel appeared as a collaboration between Gavin Free and Daniel Gruchy. Both had a history of using high-speed slow-motion cameras and set their channel in 2010. The channel began to gain recognition in 2012 and became a living sensation in the slo-mo world.

In this era, if you are looking for a start to create slomos, Slow Motion Guys come to mind. One of the many things that took the channel to heights is their ability to explain everything. The normal slow-mo speed by most editors is either 120 or 240 fps. However, The Slow Mo Guys shoot videos at 1000 fps, which is ultra-slow motion. The channel usually features natural phenomena, pranks, and relevant content.
Part 2: Want to Make Such Slow-Motion Videos on Your Smartphone? Learn How
The most used and dear gadget to all of us in this era is our smartphones. It has also become a requirement to stay connected, and so we often shoot on them. To retain the video quality, we try to edit it through built-in features. This section highlights creating slow-motion videos using iPhone or Android. Learn to create professional slo-mos like Gave Slow Mo Guys here:
Step-by-Step Guide to Create a Slow Motion in iPhone
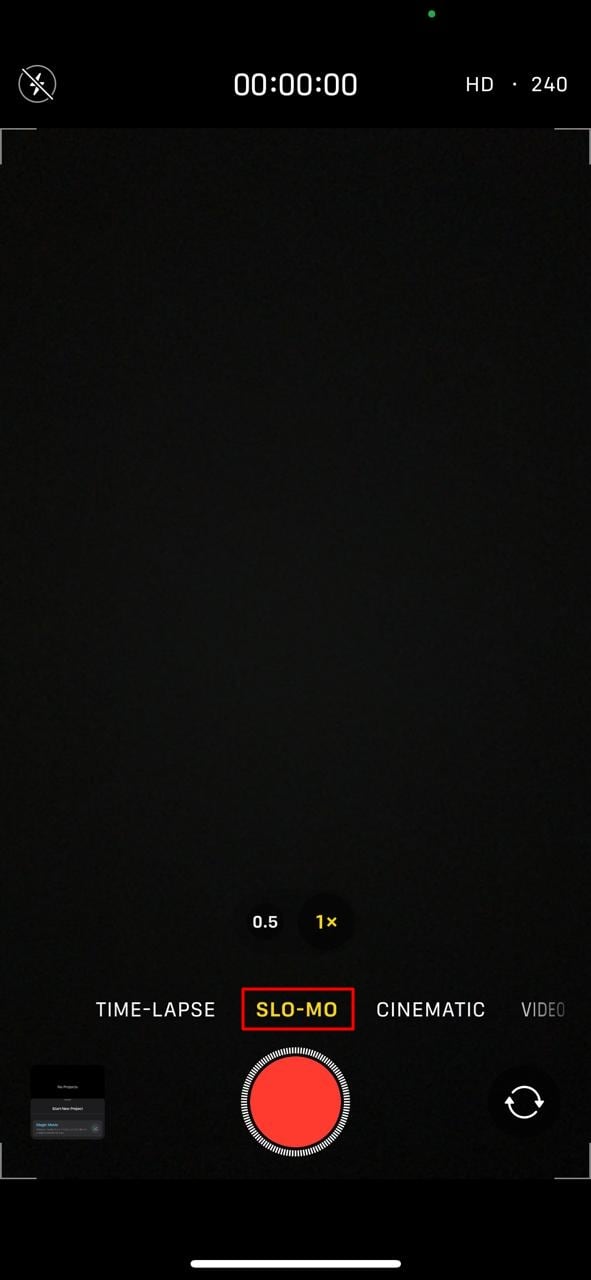
Apple offers a pre-developed feature to create slomos using a simple method. In this section, we will discuss how to shoot a video in slow motion using an iPhone. Follow the lead and create results like The Slow Mo Guys camera:
Instruction: Once you launch the “Camera” application, open the recorder and select “SLO-MO.” Now, redirect to your camera and hit the recorder button to start recording a solo.
Step-by-Step Guide to Creating a Slow Motion in Android
The Android has also introduced a slo-mo feature to record content in slow motion. It helps creators in crafting transitions or aesthetic videos. We have given a detailed procedure for recording a slow-motion video in Android:
Step 1
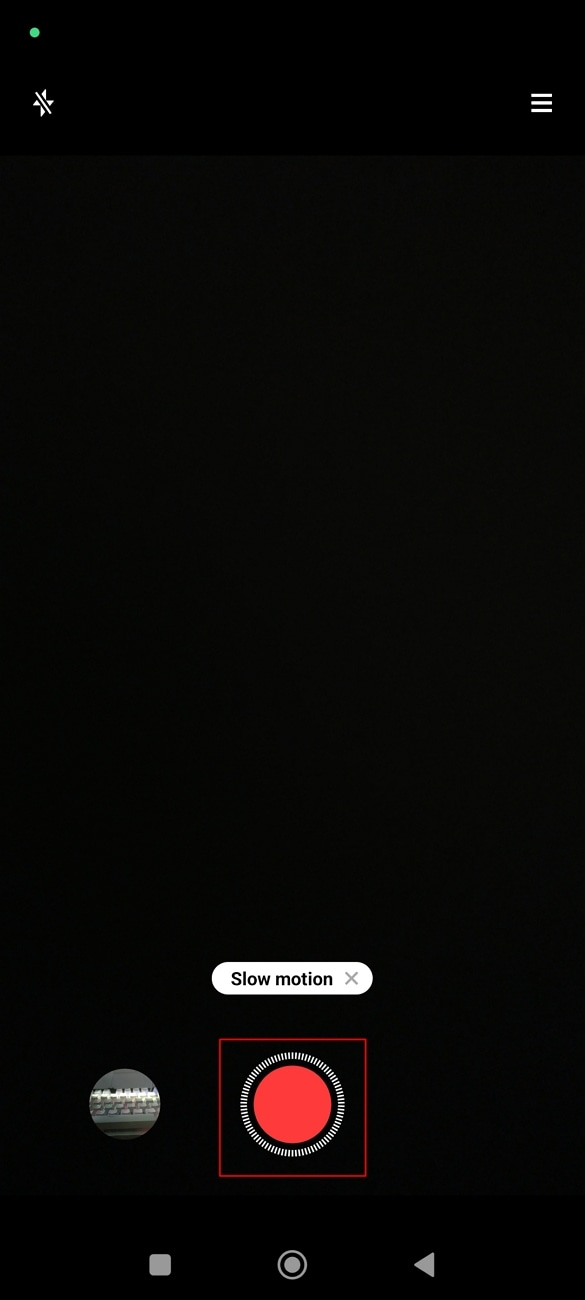
Locate and launch the “Camera” application on your Android. In the bottom bar, you’ll find multiple camera modes and settings. Drag and find the “More” option in this settings bar.

Step 2
In the appearing menu, locate and select the “Slow motion” option. After setting these preferences, hit the recorder button and record the video. The video will record normally, but when you preview it later, you’ll have a slomo.
Part 3: Slow Motion Video Making and Wondershare Filmora: Make Videos Like Slow Mo Guys
All the above methods of creating slow motion are effective, but there is a drawback. You’ll have to record the complete video in slow motion, and there are no custom options. Wondershare Filmora is a professional video editing software that can resolve this. This software will help you create videos similar to Dan Slow Mo Guys.
In addition, you can infuse your slomo with multiple visual effects, transitions, and more. Filmora displays two features to create a slow-motion video, one of which is Uniform Speed. The other feature is Speed Ramping with pre-assembled slow-motion presets. With its AI-backed technology, you can increase the video frame rate as well.
Free Download For Win 7 or later(64-bit)
Free Download For macOS 10.14 or later
Using Uniform Speed to Create a Slow-Motion Video in Filmora
Uniform Speed is the basic method of creating slow motion in Filmora. It simply modifies the playback speed of video with the help of a slider. The procedure of slomo creation, like The Slow Mo Guys in Filmora, is given below:
Step 1Import Media to Start Slomo Creation
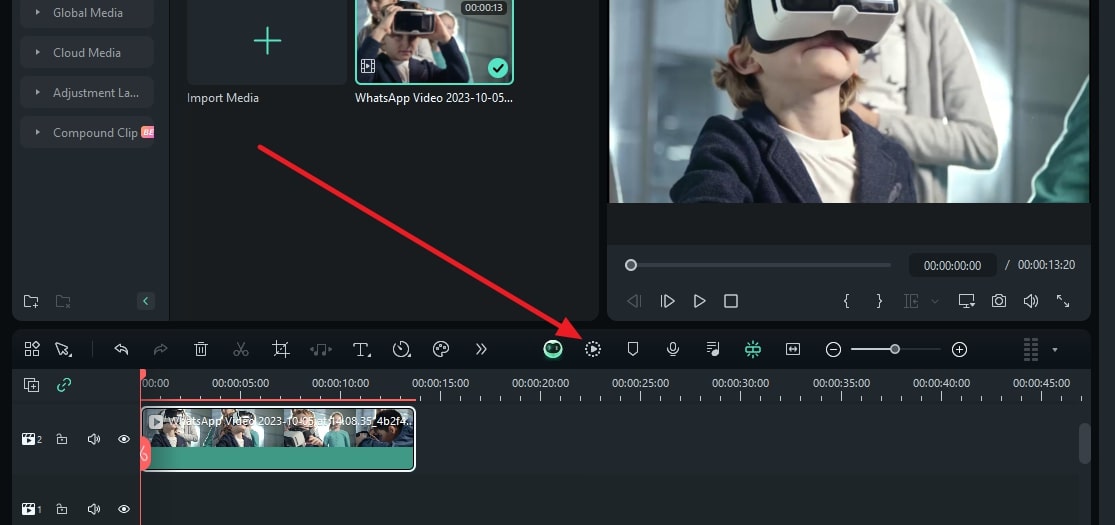
After downloading Filmora on your device, click the “New Project” button to start. From the editing interface, click the “Ctrl + I” keys, choose the video, and bring it to the timeline after import. Select the clip in the timeline and use your cursor to reach the settings panel. Go to the “Uniform Speed” section under the “Speed” tab and change the speed slider settings.
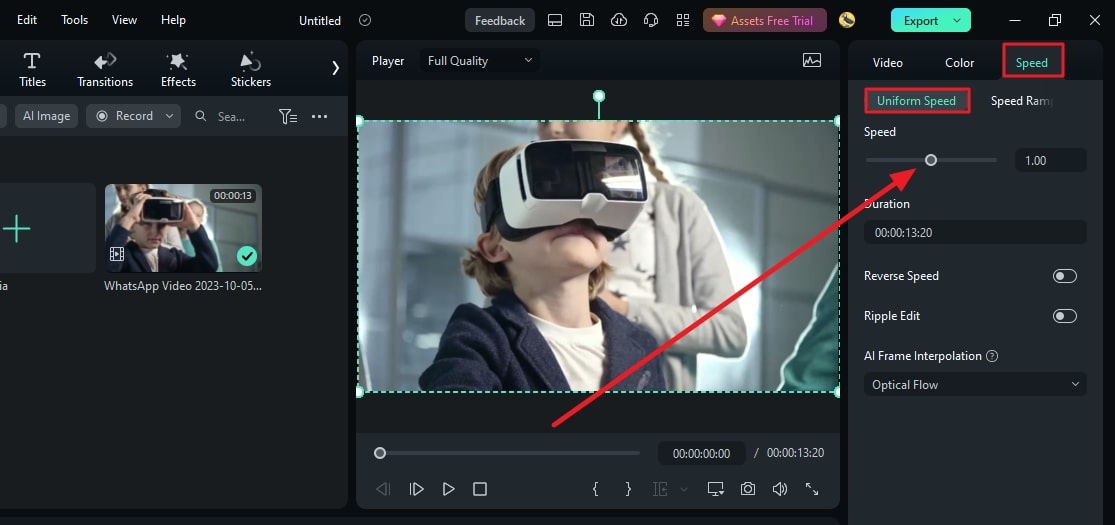
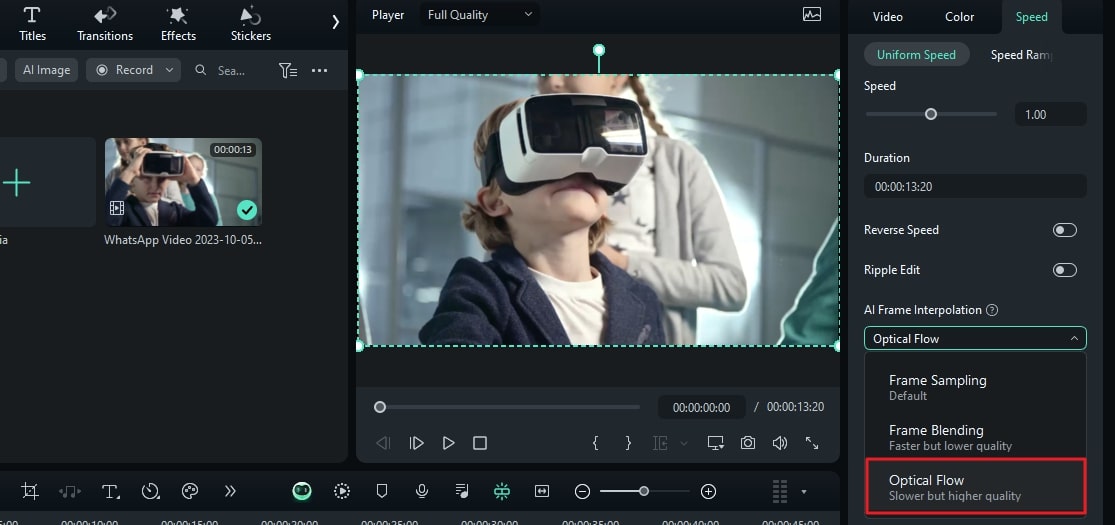
Step 2Start AI Frame Interpolation Settings
This is the AI feature that increases the video frame rate for a smooth, slow-motion effect. You can access this option at the bottom of Uniform Speed settings. Expand it and select the “Optical Flow” option for your purpose.
Step 3Enable Render Preview to See Results
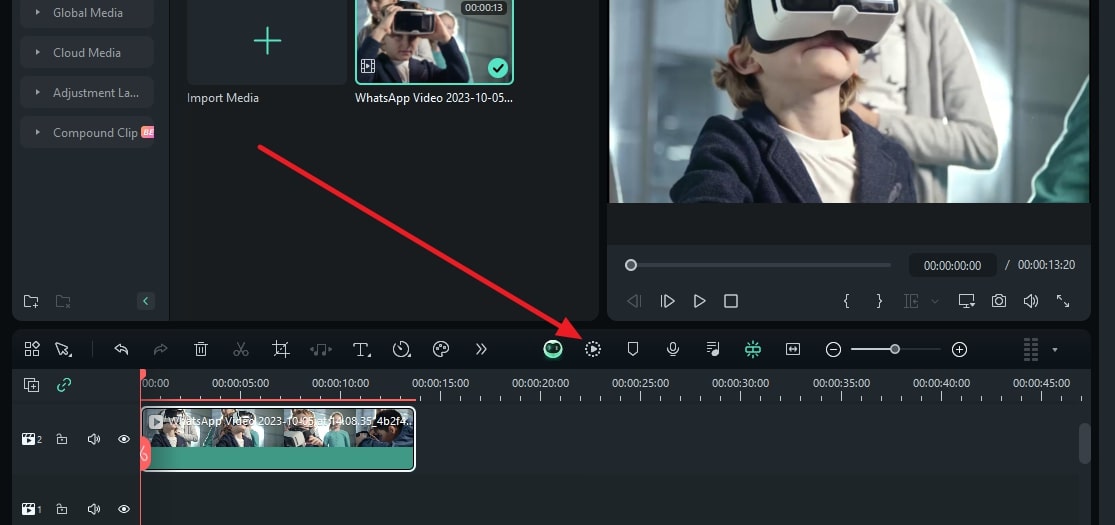
Once all is set and done, navigate towards the timeline panel to select this video again. With the help of your cursor, access the “File” tab at the top toolbar. Select the “Render Preview” option from the expanding menu. After rendering is complete, use the preview screen to observe the slo-mo and export it.
Using Speed Ramping to Create a Slow-Motion Video in Filmora
The second method is also simple, but it has more precise options to create a slow-mo. It uses the velocity graph to rise or decline video speed at certain intervals. Gather the knowledge about how The Slow Mo Guys YouTube creates slow-mo here:
Step 1Access the Speed Ramping Feature
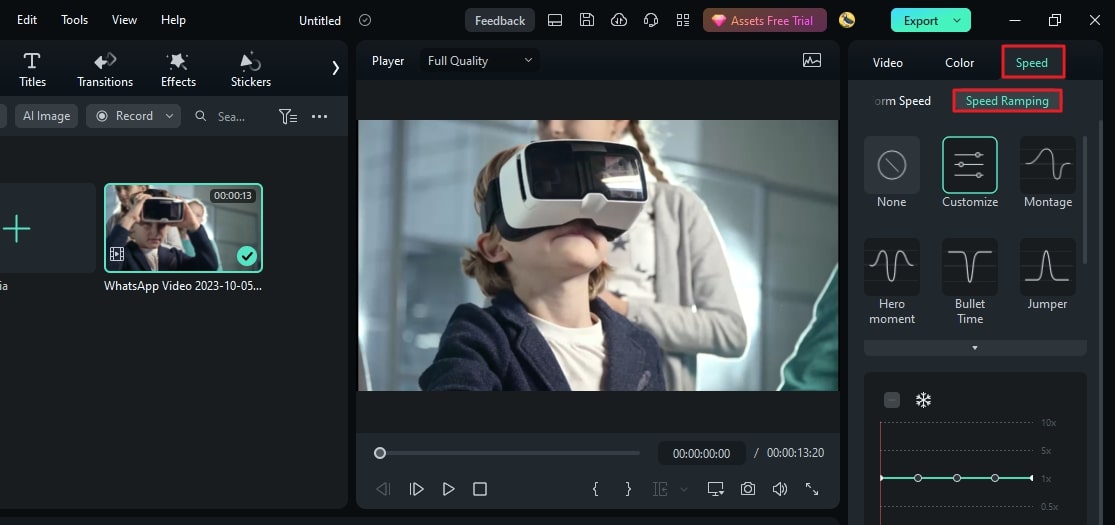
After importing and bringing media to the timeline, select it and reach the settings panel. Access the “Speed” > “Speed Ramping” option to start editing. There, you can find many custom speed presets for automated editing. However, you can also use the “Customize” preset to create from scratch. Then, reach the speed graph and move the slider downward to bring the slo-mo effect.
Step 2Enable the Optical Flow Option
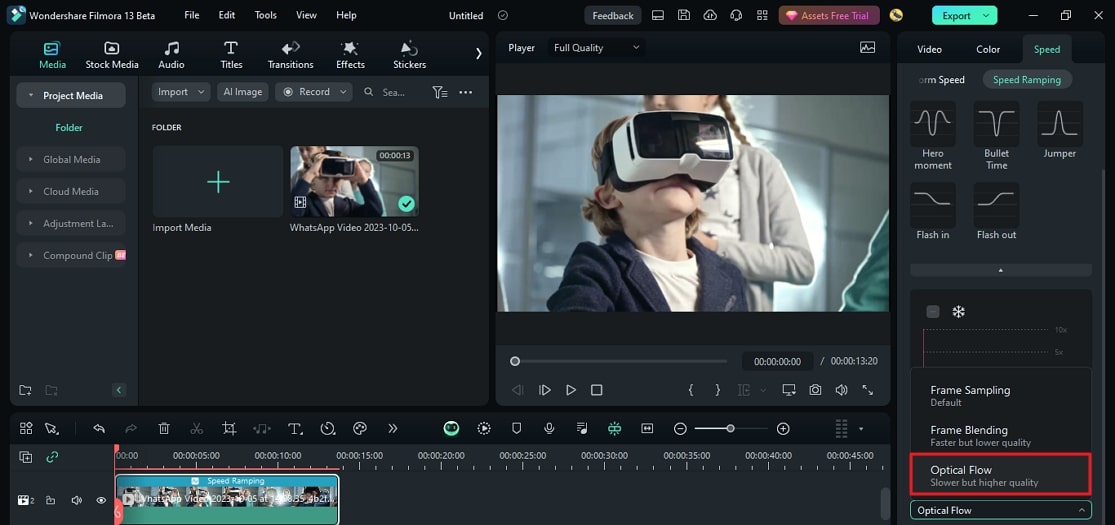
Navigate to the bottom of this panel and expand the AI Frame Interpolation menu. Choose the “Optical Flow” option to achieve your desired outcome.
Step 3Activate Render Preview for Confirmed Results
After configuring your settings, return to the timeline panel and reselect the video. From the timeline toolbar, click the “Render Preview” option. Once the rendering process ends, see the preview before exporting.
Conclusion
This article introduced readers to The Slow Mo Guys and their work. If you haven’t heard about them before, you are now familiar with them. You can head over to YouTube to find their channel and see their work. After guiding users on creating slo-mos on Android and iPhone, we introduced Filmora.
It’s a proficient way of creating slo-mo with AI assistance and custom settings. It has recently launched the V13 upgrade, which is full of AI features and editing possibilities. Head over to their official site and download it to edit like The Slow Mo Guys.
Make A Slow Motion Video Make A Slow Motion Video More Features

Part 1: The Slow Mo Guys: A Real-Life Sensation in Creating Slow Motion Videos
The Slow Mo Guys is a YouTube channel with over 14.8M subscribers and is determined to deliver high-quality content. The channel appeared as a collaboration between Gavin Free and Daniel Gruchy. Both had a history of using high-speed slow-motion cameras and set their channel in 2010. The channel began to gain recognition in 2012 and became a living sensation in the slo-mo world.

In this era, if you are looking for a start to create slomos, Slow Motion Guys come to mind. One of the many things that took the channel to heights is their ability to explain everything. The normal slow-mo speed by most editors is either 120 or 240 fps. However, The Slow Mo Guys shoot videos at 1000 fps, which is ultra-slow motion. The channel usually features natural phenomena, pranks, and relevant content.
Part 2: Want to Make Such Slow-Motion Videos on Your Smartphone? Learn How
The most used and dear gadget to all of us in this era is our smartphones. It has also become a requirement to stay connected, and so we often shoot on them. To retain the video quality, we try to edit it through built-in features. This section highlights creating slow-motion videos using iPhone or Android. Learn to create professional slo-mos like Gave Slow Mo Guys here:
Step-by-Step Guide to Create a Slow Motion in iPhone
Apple offers a pre-developed feature to create slomos using a simple method. In this section, we will discuss how to shoot a video in slow motion using an iPhone. Follow the lead and create results like The Slow Mo Guys camera:
Instruction: Once you launch the “Camera” application, open the recorder and select “SLO-MO.” Now, redirect to your camera and hit the recorder button to start recording a solo.

Step-by-Step Guide to Creating a Slow Motion in Android
The Android has also introduced a slo-mo feature to record content in slow motion. It helps creators in crafting transitions or aesthetic videos. We have given a detailed procedure for recording a slow-motion video in Android:
Step 1
Locate and launch the “Camera” application on your Android. In the bottom bar, you’ll find multiple camera modes and settings. Drag and find the “More” option in this settings bar.

Step 2
In the appearing menu, locate and select the “Slow motion” option. After setting these preferences, hit the recorder button and record the video. The video will record normally, but when you preview it later, you’ll have a slomo.

Part 3: Slow Motion Video Making and Wondershare Filmora: Make Videos Like Slow Mo Guys
All the above methods of creating slow motion are effective, but there is a drawback. You’ll have to record the complete video in slow motion, and there are no custom options. Wondershare Filmora is a professional video editing software that can resolve this. This software will help you create videos similar to Dan Slow Mo Guys.
In addition, you can infuse your slomo with multiple visual effects, transitions, and more. Filmora displays two features to create a slow-motion video, one of which is Uniform Speed. The other feature is Speed Ramping with pre-assembled slow-motion presets. With its AI-backed technology, you can increase the video frame rate as well.
Free Download For Win 7 or later(64-bit)
Free Download For macOS 10.14 or later
Using Uniform Speed to Create a Slow-Motion Video in Filmora
Uniform Speed is the basic method of creating slow motion in Filmora. It simply modifies the playback speed of video with the help of a slider. The procedure of slomo creation, like The Slow Mo Guys in Filmora, is given below:
Step 1Import Media to Start Slomo Creation
After downloading Filmora on your device, click the “New Project” button to start. From the editing interface, click the “Ctrl + I” keys, choose the video, and bring it to the timeline after import. Select the clip in the timeline and use your cursor to reach the settings panel. Go to the “Uniform Speed” section under the “Speed” tab and change the speed slider settings.

Step 2Start AI Frame Interpolation Settings
This is the AI feature that increases the video frame rate for a smooth, slow-motion effect. You can access this option at the bottom of Uniform Speed settings. Expand it and select the “Optical Flow” option for your purpose.

Step 3Enable Render Preview to See Results
Once all is set and done, navigate towards the timeline panel to select this video again. With the help of your cursor, access the “File” tab at the top toolbar. Select the “Render Preview” option from the expanding menu. After rendering is complete, use the preview screen to observe the slo-mo and export it.

Using Speed Ramping to Create a Slow-Motion Video in Filmora
The second method is also simple, but it has more precise options to create a slow-mo. It uses the velocity graph to rise or decline video speed at certain intervals. Gather the knowledge about how The Slow Mo Guys YouTube creates slow-mo here:
Step 1Access the Speed Ramping Feature
After importing and bringing media to the timeline, select it and reach the settings panel. Access the “Speed” > “Speed Ramping” option to start editing. There, you can find many custom speed presets for automated editing. However, you can also use the “Customize” preset to create from scratch. Then, reach the speed graph and move the slider downward to bring the slo-mo effect.

Step 2Enable the Optical Flow Option
Navigate to the bottom of this panel and expand the AI Frame Interpolation menu. Choose the “Optical Flow” option to achieve your desired outcome.

Step 3Activate Render Preview for Confirmed Results
After configuring your settings, return to the timeline panel and reselect the video. From the timeline toolbar, click the “Render Preview” option. Once the rendering process ends, see the preview before exporting.

Conclusion
This article introduced readers to The Slow Mo Guys and their work. If you haven’t heard about them before, you are now familiar with them. You can head over to YouTube to find their channel and see their work. After guiding users on creating slo-mos on Android and iPhone, we introduced Filmora.
It’s a proficient way of creating slo-mo with AI assistance and custom settings. It has recently launched the V13 upgrade, which is full of AI features and editing possibilities. Head over to their official site and download it to edit like The Slow Mo Guys.
Also read:
- How to Make a Countdown Video
- New In 2024, Do You Want Your Video Footage to Resemble Kodak Films? You Can Get the Old Kodak Film Look by Searching for Kodak 2383 LUT Free Download on the Internet
- Updated In 2024, 3GP Video Format What Is 3GP Format And How To Open It?
- New 2024 Approved Top Online Video Background Changers Transform Your Videos with Ease
- New In 2024, Looking For a Cheap Camera to Make Slow Motion Video? Get It Now
- Updated How to Export iMovie for 2024
- Updated What Are AR Emoji Stickers & How to Add Them to Your Video
- New 2024 Approved How to Make a Video Slideshow in iMovie
- Updated In 2024, How to Color Grading in Final Cut Pro
- New Are You Looking for the Best Premiere Pro Slideshow Template Online for Free? If Yes, You Can Find a Few Exciting Slideshow Templates Here. They Are Worth Using for 2024
- 2024 Approved How to Add Subtitles in Canva?
- Updated How Does the YouTube AI Algorithm Work - AI EXPLAINED
- How Important It Is to Perform Color Correction to Your Video? Here Is a Solution with After Effects Color Correction with Illustrative Videos for 2024
- Updated 2024 Approved 2 Methods to Crop a Video in VLC
- New In 2024, Consider a LUT to Be a Color Preset that a Filmmaker Can Use to Start Working on a Project Quickly. Sony Engineers Have Developed LUTs to Help Filmmakers Perform Specific Tasks. All of These Are Available for Free
- 2024 Approved Using Montage In Movies | Learn to Use Montage With Movies
- Updated Top 7 Easy Ways to Convert a Video to a GIF Online
- Updated 2024 Approved Sync Audio With Video With Filmora
- Updated How to Create Freeze Frame Clone Effect for 2024
- Updated Cropping a Video in Final Cut Pro Step by Step
- Updated Best 8 AI Video Denoise Software
- 2024 Approved Are You Looking to Enhance Your Video or Photo Colors Using Premiere LUTs? Get to Know About the Best Free LUT Effects to Get Started
- New How to Easily Add VHS Green Screen to Your Video
- New 2024 Approved You Are Planning to Convert an AVI to GIF Online but You Are Not Sure How? If You Are Looking for an Idea on How to Do It, You Have Come to the Right Place
- Updated In 2024, This Article Will Show You the Steps to Make Coin Magic in Videos with Filmora
- New How to Do Velocity Edits on PC for 2024
- Updated In 2024, Discover How You Can Use Vectorscope to Adjust Luminance, Color Grading, and More in Your Video Editing Projects
- 2 Ways to Add Custom Subtitles to Netflix
- Updated Can You Enhance Your Drone Footage with Cinematic Drone LUTs? This Article Discusses Top Drone LUTs Recommendations to Simplify Video Editing
- With This Article, We Will Be Looking at Steps to Rotate a Video in Cyberlink PowerDirector to Help You when Required. We Have Also Mentioned the Steps You Will Need to Follow in Wondershare Filmora
- New In 2024, Top 10 Free WhatsApp Video Converter
- Updated Best Way To Color Grading & Color Correction in Filmora
- 2024 Approved Using This Article as a Reference, the Users Would Create a Café Meal Intro and YouTube End Screen While Knowing Multiple Ways to Download Cooking Background Music
- How to Add Adjustment Layer in Premiere Pro for 2024
- New Best CapCut Templates for Slow Motion Video Trend for 2024
- Updated 2024 Approved This Article Presents a Guide to Using the Keyframe Feature for Creating Competent Films with Detailed Instructions and Filmoras Grow and Win Program Contest
- New Are You Ready to Learn About Something Free yet Amazing? We Are Talking About All Format Video Players for PC that You Should Know , Lets Begin
- New Best Way To Color Grading & Color Correction in Filmora
- Detailed Steps to Rotate Videos Using OBS
- In 2024, This Article Aims to Provide a Step-by-Step Guide to Changing a Videos Speed by Using the Speed Adjustment Panel and Duration Panel on Wondershare Filmora
- Easy steps to recover deleted messages from Oppo Reno 10 Pro+ 5G
- 5 Easy Ways to Change Location on YouTube TV On Tecno Spark 10C | Dr.fone
- Your Complete Guide To Reset Gionee F3 Pro | Dr.fone
- Updated 5 Best Chrome Extensions You Can Use to Translate Videos for 2024
- Complete Tutorial for Nokia C02 Hard Reset | Dr.fone
- In 2024, How To Enable USB Debugging on a Locked Realme 12 5G Phone
- In 2024, 3 Things You Must Know about Fake Snapchat Location On Motorola Moto G13 | Dr.fone
- In 2024, How To Activate and Use Life360 Ghost Mode On Vivo Y36 | Dr.fone
- The Magnificent Art of Pokemon Go Streaming On Vivo V29 Pro? | Dr.fone
- 10 Easy-to-Use FRP Bypass Tools for Unlocking Google Accounts On Huawei
- In 2024, Three Ways to Sim Unlock OnePlus Ace 2
- In 2024, How to Unlock Apple iPhone X Passcode without iTunes without Knowing Passcode?
- Best Ways on How to Unlock/Bypass/Swipe/Remove Vivo Y200e 5G Fingerprint Lock
- In 2024, How to get the dragon scale and evolution-enabled pokemon On Oppo Reno 11 Pro 5G? | Dr.fone
- Will the iPogo Get You Banned and How to Solve It On Lava Storm 5G | Dr.fone
- Title: Premiere Pro Best Slow Motion Effects To Use
- Author: Morgan
- Created at : 2024-05-19 05:11:39
- Updated at : 2024-05-20 05:11:39
- Link: https://ai-video-editing.techidaily.com/premiere-pro-best-slow-motion-effects-to-use/
- License: This work is licensed under CC BY-NC-SA 4.0.

