
Recording Video in Slow Motion Some Considerable Points for 2024

Recording Video in Slow Motion: Some Considerable Points
Slow motion helps filmmakers to achieve several goals in their projects. Slo-mo can dramatize emotions, set the right mood for watching action films, and so on. Recording slow-motion videos with high-end cameras was a matter of the past. In this tech-based era, capturing moments in slow motion is a built-in feature in your smartphone.
Amplify your message in slow-motion videos by understanding how to record slow-motion video. You will learn how to record a slow-motion video using any model of Android and iPhones. Besides, there are some aspects that you should know before start recording scenes. As a plus point, here you can find a top-notch editing app with a guide on how to record slow-motion video.
Slow Motion Video Maker Slow your video’s speed with better control of your keyframes to create unique cinematic effects

Part 1: Some Important Deliverables to Ensure While Recording Videos in Slow Motion
Capture fleeting moments in the slow-motion mode of the camera to emphasize details. It’s the only way to highlight important aspects of sports and action scenes. Recording in slow motion is not difficult when you will learn how to record slow-motion video. Before learning, let’s understand important aspects you should look at while recording.
- Frame Rate: For slow-motion video, choosing the right frame rate is crucial. A higher framerate, such as 120fps and 240fps, allows smoother playback. So, before recording, ensure that your camera supports a good framerate.
- Resolution: Maintaining high-resolution videos is important to get good quality. Usually, slow-motion footage uses 4K and HD (High Definition) resolution. Having a high video resolution means providing clarity in details in videos.
- Shutter Speed: It refers to the speed at which the camera closes and controls exposure. Adjust the shutter speed to faster mode to capture every crisp in slow motion. It will prevent motion blur and help in freezing fast-moving objects.
- Audio Consideration: You should know that recording slow motion will affect the original audio. Meanwhile, some cameras preserve the original sound. So, be prepared and test your camera’s audio speed to ease the editing process.
- Focus and Stability: Minimize your camera shake and enable a stabilizer or tripod. Stable footage is essential to enhance the video quality. Moreover, try to keep your main subject in camera focus. In this regard, you can use manual focus control if necessary.
- Editing Software Compatibility: Another thing that you must consider is tool compatibility. It’s better to check it before recording so you will not regret it later. Check your editing tools are supporting the file format of the recorded slow-motion video.
- Storage Space: The “No More Storage” sign is a nightmare when you have recorded a perfect shot. Slow-motion videos consume large storage because of high resolution and frame rate. Thus, consider this aspect before recording to avoid inconvenience and arrange storage media.
Part 2: How to Record a Slow-Motion Video on Android/iPhone?
No matter your smartphone, recording slow-mo is just one click away. Luckily, you don’t need any separate app and technical equipment for this task. If you want to record slow motion now, keep reading this section for detailed steps. Here, you will find how to record a slow-motion video using an iPhone and Android.
Record Slow Motion Using an iPhone
Apple has offered a slow-motion feature since 2013 with the release of the iPhone 5s. Subsequent iPhone models also support this feature. Following are the steps that you can follow to record a slow-motion video on an iPhone:
Step 1
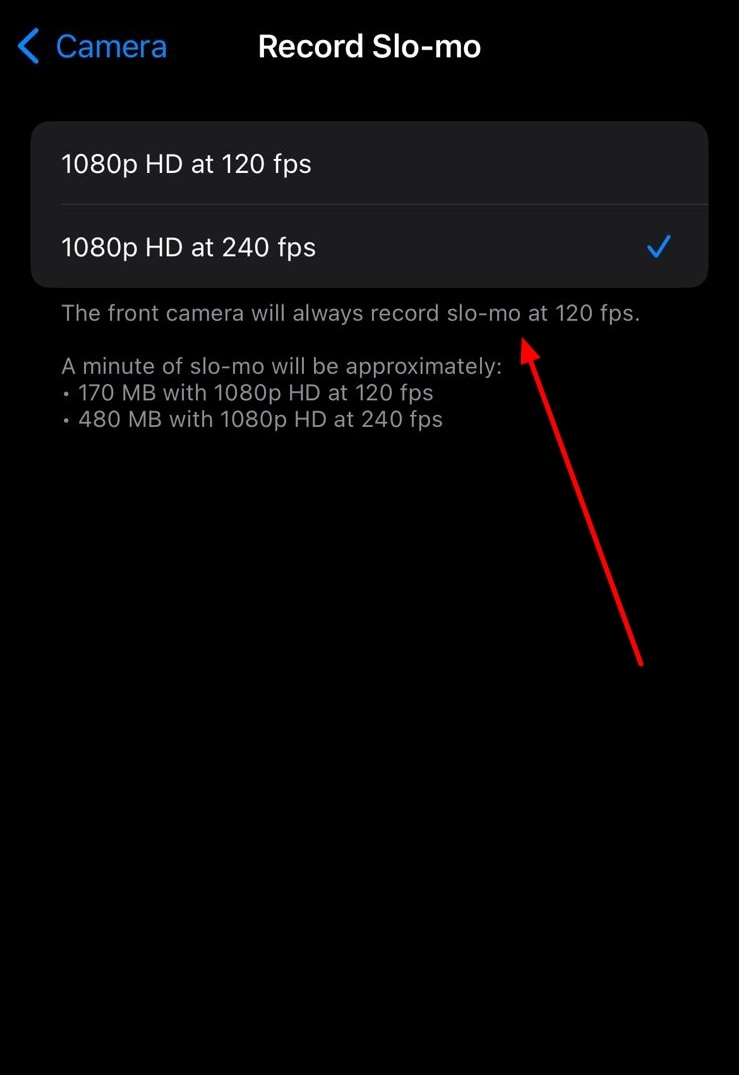
Before recording, set frame rate and resolution. To do so, go to “Settings” and scroll until you find “Camera.” After choosing the camera, touch the “Record Slo-mo.” From the given two choices, select one frame rate and resolution option.
Step 2
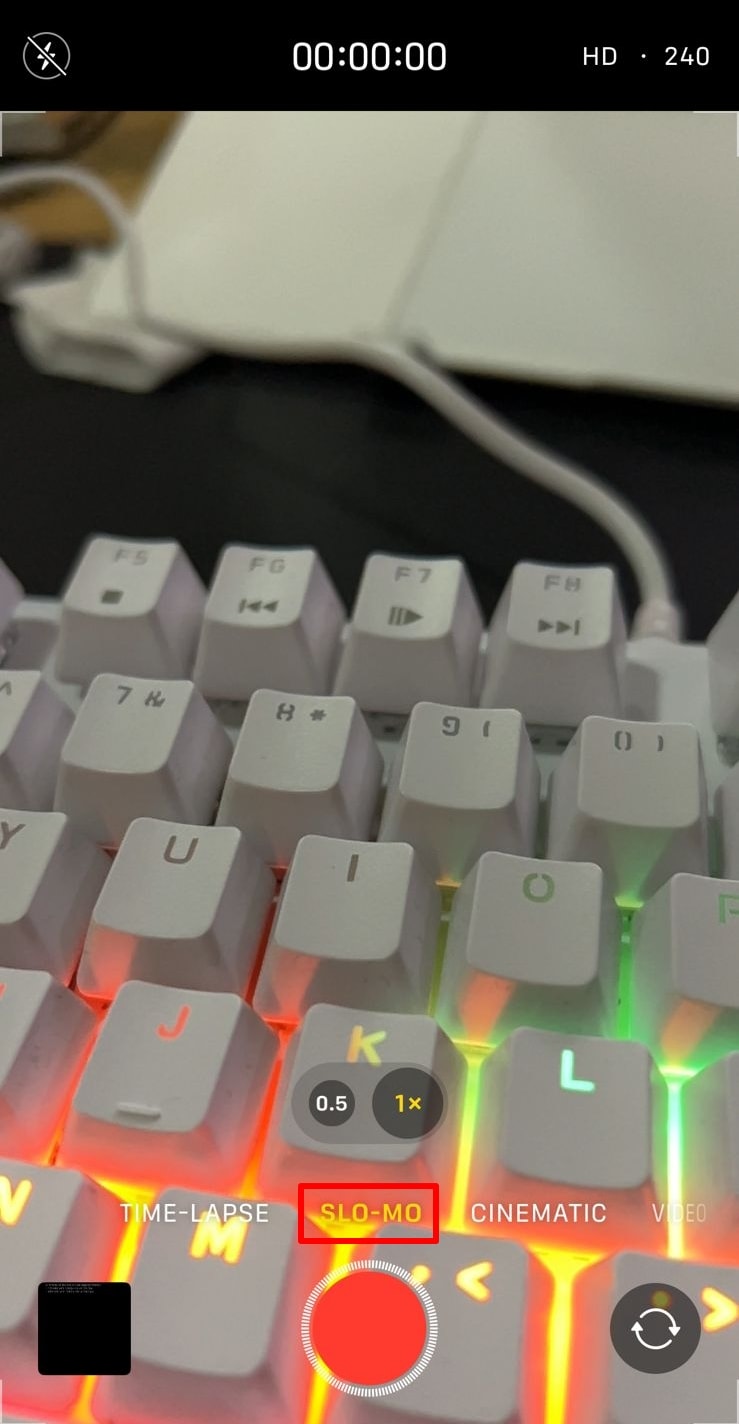
Now, tap on the “Camera” app on the home screen of your iPhone. Click on the “Slo-Mo” option next to the “Video.” Then, touch the red “Record” button and capture moments till you want. Finally, stop recording by hitting the same red button. Your footage will automatically be saved in your gallery.
Record Slow Motion Using Android
Who needs a third-party app when Android also supports a slow-motion recording feature? Currently, almost all Android phones are offering slow-motion. The location and access to slow-motion options might differ per Android phone model. To start recording, look at the given steps:
Step 1
Unlock your phone and click on the “Camera” from the main screen. Click on the “More” option next to the “Portrait.” From the next menu, look for the “Slow Motion” circle icon.

Step 2
After selecting slow motion, adjust the focus manually. Head to the top-right corner and click on the small menu icon. Choose a frame rate and resolution from the displayed options. To start recording, touch the red “Record” button. When you capture the desired shots, press the red button again and get the video on your phone.

Part 3: Making Recorded Video in Slow Motion Using the Right Tools
Now, you are pretty much familiar with how to record slow-motion video using smartphones. A phenomenon that arises here is, can we slow down the normally recorded video? The simple answer is yes. There are many editing apps designed for this purpose. Adobe Premiere Pro is one such editing app to slow down the pre-recorded videos.
Step 1
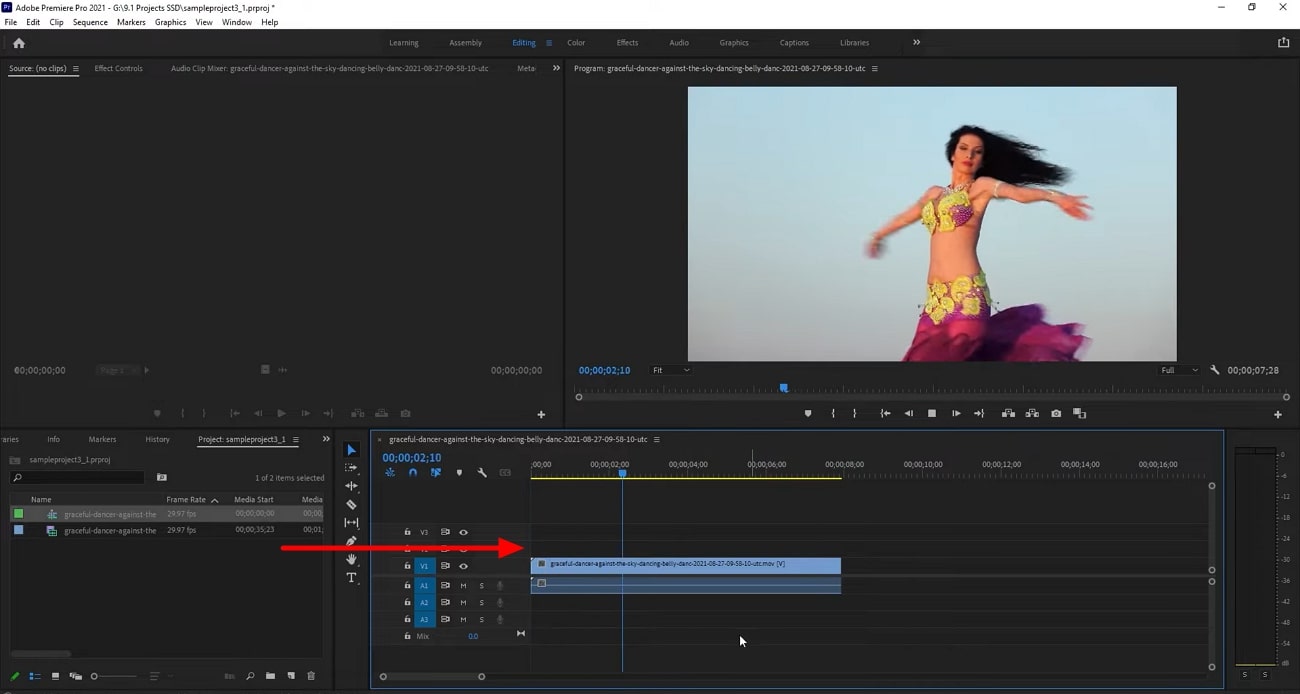
Access your Adobe Premiere Pro application and import a video in the timeline. Identify the frame rate of your video clip for a non-choppy playback.
Step 2
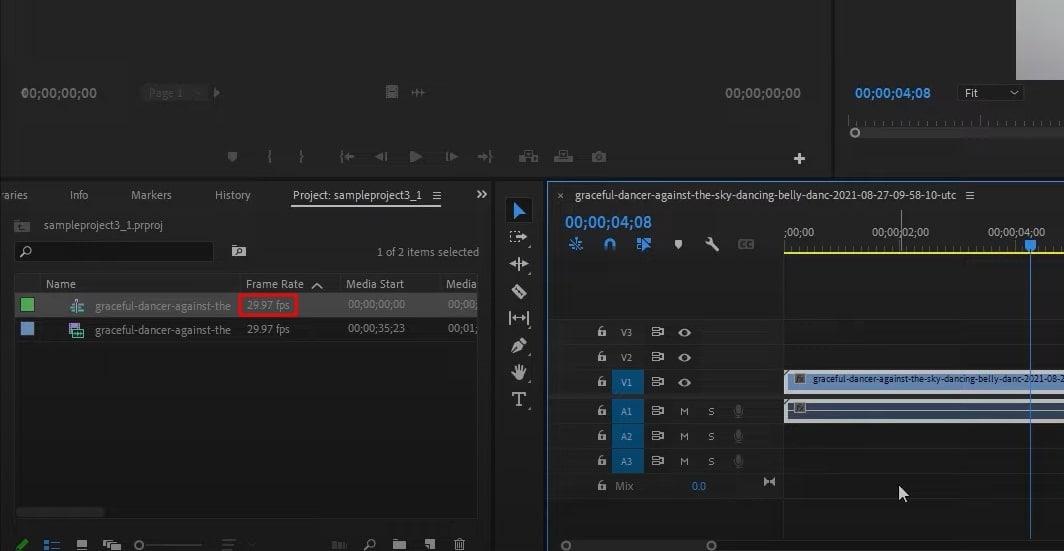
The frame rate will tell you how much you need to slow down the video. To do so, use this “(Timeline Frame Rate ÷ Footage Frame Rate) x 100” formula. Before moving, analyze the slow motion you can add in your clip as per their frame rate.
Step 3
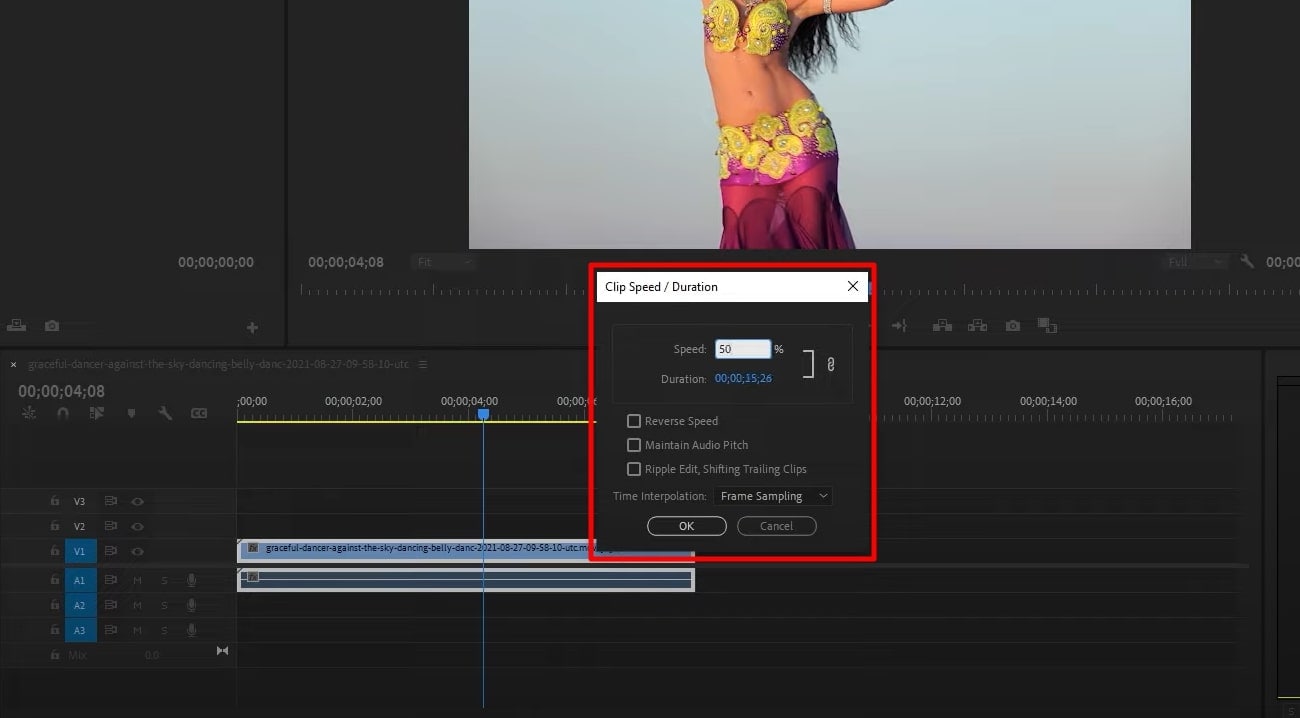
After making calculations, right-click on your footage in the timeline. Select the “Speed/Duration” option from the list and get a small pop-up screen. There, type any number; suppose you type 40% in the box given next to the “Speed.” Finally, click on the “OK” and press the Space bar to get a preview.
Bonus Part: Making Video Editing Simpler! Use Wondershare Filmora to Slow Down Your Video
Apart from Adobe Premiere Pro, there are many other software to do the same task. From multiple options, it’s quite difficult to pick the best option. Let us ease your selection by introducing Wondershare Filmora . It’s a video editing app that is much easier to operate than any other option. With AI integration, many time-consuming editing tasks are now a matter of seconds.
Free Download For Win 7 or later(64-bit)
Free Download For macOS 10.14 or later
How to Turn a Video into Slow-Motion with Optical Flow
As discussed earlier, Filmora can slow down your videos with customization options. Users can set their video to optical flow to automatically get slow speed with high quality.
Step 1Import a Project in Timeline after Launching Filmora
Launch the latest version of Filmora on your device. Access the main interface and choose the “New Project” option to start editing. From the editing screen, look for the “Import” option and bring your media to the timeline. Now, right-click on your video in the timeline to get an extended list. Select the “Uniform Speed” option to get a panel on the right side.

Step 2Explore the Uniform Speed option to Slow Down Videos
Move to that panel, hold, and drag the “Speed” slider towards the left. Drop the slider at your desired speed for slow-motion video. Go downward and click on the downward icon of “AI Interpolation.” From the extended menu, pick the “Optical Flow” option.

Step 3Head to Export Button Once You Finish Editing
Get a preview of the slow-motion video and decide whether to continue editing or quit. If you are done with editing, move to the top right corner and click on the “Export” button. Assign parameters of your choice and again press the “Export” option to get the file on your PC.

In slow-motion video editing, you can slow down videos to the extent you want. In addition, users can try the AI features of Filmora to explore its powerful functionalities. Keep reading to know some of the key features that Filmora offers to ensure your workflow.
1. AI Copilot Editing
Have you ever imagined AI as your assistant in video editing? Filmora offers an AI copilot editor to assist you in complex editing tasks. To optimize your workflow, it provides valuable insights and guidance with navigations. It ensures that your projects maintain high quality, so it detects conflicting parameters. Afterward, it sends error messages to prevent any issues.
2. AI Text-Based Editing
Getting editable text out of videos is no more challenging with this feature of Filmora. It offers transformative leap technology that converts audio into video and text. After getting transcribed text from the video, users can edit it as per their preferences. You can save work hours because AI can add subtitles to your movies. Also, it allows you to export, translate, and rewrite the subtitles.
3. AI Image
If you are searching for an image that matches your content needs, look no forward. You can generate your own image after giving instructions to AI. This creative concept of Filmora aims to bring your imagination into visual content. In this regard, you just have to describe your image in simple words. Later, users can pick one resolution and image style from endless options.
4. AI Thumbnail Creator
As a content creator, you might know that thumbnail creates a first impression on viewers. A stunning and informative thumbnail attracts viewers to watch the video. For this purpose, Filmora automatically detects the best shots out of your video as a thumbnail. Despite that, you can choose any thumbnail from the professional thumbnail templates library.
5. AI Music Generator
Finding a musical video according to the video content is a hectic job. What if AI generates a soundtrack tailored to your needs? Filmora can generate a musical video by assigning musical choices and sound duration. In addition, you can prompt the number of musical tracks you want. The generated music will be royalty-free and further editable.
Conclusion
Overall, slow-motion videos are becoming a necessity for digital media. That’s why smartphones are offering built-in slow-motion recording features. In this guide, you have learned how to record a slow-motion video and edit it using Premiere Pro. Still, there lies a need to get a better and easier option. For this, you can rely on Filmora, which offers powerful AI features to boost productivity.
Make A Slow Motion Video Make A Slow Motion Video More Features

Part 1: Some Important Deliverables to Ensure While Recording Videos in Slow Motion
Capture fleeting moments in the slow-motion mode of the camera to emphasize details. It’s the only way to highlight important aspects of sports and action scenes. Recording in slow motion is not difficult when you will learn how to record slow-motion video. Before learning, let’s understand important aspects you should look at while recording.
- Frame Rate: For slow-motion video, choosing the right frame rate is crucial. A higher framerate, such as 120fps and 240fps, allows smoother playback. So, before recording, ensure that your camera supports a good framerate.
- Resolution: Maintaining high-resolution videos is important to get good quality. Usually, slow-motion footage uses 4K and HD (High Definition) resolution. Having a high video resolution means providing clarity in details in videos.
- Shutter Speed: It refers to the speed at which the camera closes and controls exposure. Adjust the shutter speed to faster mode to capture every crisp in slow motion. It will prevent motion blur and help in freezing fast-moving objects.
- Audio Consideration: You should know that recording slow motion will affect the original audio. Meanwhile, some cameras preserve the original sound. So, be prepared and test your camera’s audio speed to ease the editing process.
- Focus and Stability: Minimize your camera shake and enable a stabilizer or tripod. Stable footage is essential to enhance the video quality. Moreover, try to keep your main subject in camera focus. In this regard, you can use manual focus control if necessary.
- Editing Software Compatibility: Another thing that you must consider is tool compatibility. It’s better to check it before recording so you will not regret it later. Check your editing tools are supporting the file format of the recorded slow-motion video.
- Storage Space: The “No More Storage” sign is a nightmare when you have recorded a perfect shot. Slow-motion videos consume large storage because of high resolution and frame rate. Thus, consider this aspect before recording to avoid inconvenience and arrange storage media.
Part 2: How to Record a Slow-Motion Video on Android/iPhone?
No matter your smartphone, recording slow-mo is just one click away. Luckily, you don’t need any separate app and technical equipment for this task. If you want to record slow motion now, keep reading this section for detailed steps. Here, you will find how to record a slow-motion video using an iPhone and Android.
Record Slow Motion Using an iPhone
Apple has offered a slow-motion feature since 2013 with the release of the iPhone 5s. Subsequent iPhone models also support this feature. Following are the steps that you can follow to record a slow-motion video on an iPhone:
Step 1
Before recording, set frame rate and resolution. To do so, go to “Settings” and scroll until you find “Camera.” After choosing the camera, touch the “Record Slo-mo.” From the given two choices, select one frame rate and resolution option.

Step 2
Now, tap on the “Camera” app on the home screen of your iPhone. Click on the “Slo-Mo” option next to the “Video.” Then, touch the red “Record” button and capture moments till you want. Finally, stop recording by hitting the same red button. Your footage will automatically be saved in your gallery.

Record Slow Motion Using Android
Who needs a third-party app when Android also supports a slow-motion recording feature? Currently, almost all Android phones are offering slow-motion. The location and access to slow-motion options might differ per Android phone model. To start recording, look at the given steps:
Step 1
Unlock your phone and click on the “Camera” from the main screen. Click on the “More” option next to the “Portrait.” From the next menu, look for the “Slow Motion” circle icon.

Step 2
After selecting slow motion, adjust the focus manually. Head to the top-right corner and click on the small menu icon. Choose a frame rate and resolution from the displayed options. To start recording, touch the red “Record” button. When you capture the desired shots, press the red button again and get the video on your phone.

Part 3: Making Recorded Video in Slow Motion Using the Right Tools
Now, you are pretty much familiar with how to record slow-motion video using smartphones. A phenomenon that arises here is, can we slow down the normally recorded video? The simple answer is yes. There are many editing apps designed for this purpose. Adobe Premiere Pro is one such editing app to slow down the pre-recorded videos.
Step 1
Access your Adobe Premiere Pro application and import a video in the timeline. Identify the frame rate of your video clip for a non-choppy playback.

Step 2
The frame rate will tell you how much you need to slow down the video. To do so, use this “(Timeline Frame Rate ÷ Footage Frame Rate) x 100” formula. Before moving, analyze the slow motion you can add in your clip as per their frame rate.

Step 3
After making calculations, right-click on your footage in the timeline. Select the “Speed/Duration” option from the list and get a small pop-up screen. There, type any number; suppose you type 40% in the box given next to the “Speed.” Finally, click on the “OK” and press the Space bar to get a preview.

Bonus Part: Making Video Editing Simpler! Use Wondershare Filmora to Slow Down Your Video
Apart from Adobe Premiere Pro, there are many other software to do the same task. From multiple options, it’s quite difficult to pick the best option. Let us ease your selection by introducing Wondershare Filmora . It’s a video editing app that is much easier to operate than any other option. With AI integration, many time-consuming editing tasks are now a matter of seconds.
Free Download For Win 7 or later(64-bit)
Free Download For macOS 10.14 or later
How to Turn a Video into Slow-Motion with Optical Flow
As discussed earlier, Filmora can slow down your videos with customization options. Users can set their video to optical flow to automatically get slow speed with high quality.
Step 1Import a Project in Timeline after Launching Filmora
Launch the latest version of Filmora on your device. Access the main interface and choose the “New Project” option to start editing. From the editing screen, look for the “Import” option and bring your media to the timeline. Now, right-click on your video in the timeline to get an extended list. Select the “Uniform Speed” option to get a panel on the right side.

Step 2Explore the Uniform Speed option to Slow Down Videos
Move to that panel, hold, and drag the “Speed” slider towards the left. Drop the slider at your desired speed for slow-motion video. Go downward and click on the downward icon of “AI Interpolation.” From the extended menu, pick the “Optical Flow” option.

Step 3Head to Export Button Once You Finish Editing
Get a preview of the slow-motion video and decide whether to continue editing or quit. If you are done with editing, move to the top right corner and click on the “Export” button. Assign parameters of your choice and again press the “Export” option to get the file on your PC.

In slow-motion video editing, you can slow down videos to the extent you want. In addition, users can try the AI features of Filmora to explore its powerful functionalities. Keep reading to know some of the key features that Filmora offers to ensure your workflow.
1. AI Copilot Editing
Have you ever imagined AI as your assistant in video editing? Filmora offers an AI copilot editor to assist you in complex editing tasks. To optimize your workflow, it provides valuable insights and guidance with navigations. It ensures that your projects maintain high quality, so it detects conflicting parameters. Afterward, it sends error messages to prevent any issues.
2. AI Text-Based Editing
Getting editable text out of videos is no more challenging with this feature of Filmora. It offers transformative leap technology that converts audio into video and text. After getting transcribed text from the video, users can edit it as per their preferences. You can save work hours because AI can add subtitles to your movies. Also, it allows you to export, translate, and rewrite the subtitles.
3. AI Image
If you are searching for an image that matches your content needs, look no forward. You can generate your own image after giving instructions to AI. This creative concept of Filmora aims to bring your imagination into visual content. In this regard, you just have to describe your image in simple words. Later, users can pick one resolution and image style from endless options.
4. AI Thumbnail Creator
As a content creator, you might know that thumbnail creates a first impression on viewers. A stunning and informative thumbnail attracts viewers to watch the video. For this purpose, Filmora automatically detects the best shots out of your video as a thumbnail. Despite that, you can choose any thumbnail from the professional thumbnail templates library.
5. AI Music Generator
Finding a musical video according to the video content is a hectic job. What if AI generates a soundtrack tailored to your needs? Filmora can generate a musical video by assigning musical choices and sound duration. In addition, you can prompt the number of musical tracks you want. The generated music will be royalty-free and further editable.
Conclusion
Overall, slow-motion videos are becoming a necessity for digital media. That’s why smartphones are offering built-in slow-motion recording features. In this guide, you have learned how to record a slow-motion video and edit it using Premiere Pro. Still, there lies a need to get a better and easier option. For this, you can rely on Filmora, which offers powerful AI features to boost productivity.
2 Solutions to Cut Video in VLC on Windows
Other than playing videos and music, VLC Media Player can also be used as a video editing tool. While advanced video editing requires unconventional and powerful video editing software, VLC offers a simpler and easy-to-learn process of cutting and/or trimming videos.
You can cut a section of your video and make shorter video clips. This means that you can now get rid of parts of a video that you do not need and preserve those that you like. VLC automatically saves the video clips made, so you do not have to save them again.
In this article, we are going to learn the simplest procedure on how to cut and/or trim videos using VLC Media Player. Each step is carefully explained, with screenshots attached.
To Cut Video Using VLC Media Player
- Download VLC Media Player
You need to have the app before using it. To download it, visit Google Play Store or any other suitable app, search and download. There are a variety of versions that is, 32-bit, 64-bit and Windows ARM. You may as well narrow down your search to the version of your gadget, be it Android, iOS, Linux or Windows.
- Install and Open VLC Media Player
The installation process is simple. You click on the icon indicating ‘install’ then open. On opening, you will come across a page that looks like the one attached below.

This is the dashboard of the VLC Media Player.
- Select the file you would like to cut
On the top of the screen is the menu with ‘Media’ being the first on the far left. On clicking the ‘Media’ button, a drop-down menu will appear. Select the first option, ‘Open File’ to access your files. From the dialogue box that appears, locate your video (the one you would like to cut), select it then click to open. The video will start playing.

- Click on Advanced Controls (View > Advanced Controls)
Some videos will play automatically while others will wait for an action. In case your video plays automatically, it is advisable that you pause it.
On the menu is a tab labelled ‘View’. Choose the tab, click open it and on the drop-down menu, select ‘Advanced Options’.

On selecting ‘Advanced Options’, a red button will appear at the bottom-left corner of the VLC. This is the record button.

Its purpose is to indicate the recording of the section of the video that you would like to cut.
- Click to Cut or Trim
If you had paused your video, you can play it at this stage. If you do not want to cut/trim your video from the start, scroll to the point from which you would like to cut it. Click on the red button for the recording to start. If the video does not play automatically, click to play.
After the video has played till the point where you would like to end, click on the red button again to stop the recording. The cut section will be automatically saved on the videos’ folder on C:\Users\Username\Videos.
An easier way to cut videos with Wondershare Filmora
Wondershare Filmora Video Editor is an alternative video editor. Unlike VLC Media Player, Filmora gives you more options. It allows you to split, trim, edit, combine, and crop a video, among others. It also gives you room to add footnotes, a variety of transitions, lower thirds, among other features. You can as well resize your video and enhance its quality.
For Win 7 or later (64-bit)
For macOS 10.14 or later
To Cut/Trim Videos with Wondershare Filmora:
- Drag and Drop the Video
Assuming that you have already downloaded and installed Wondershare Filmora app, click to open. There are two ways through which you can locate your video.
One, you can opt to drag and drop the video from its location to the app’s timeline. Secondly, you can right click on the space at the top left then select the video to be edited from the dialogue box that will appear.

- Trimming the video
After dropping the video on the timeline, it is likely to take up a lot of space, especially if it is long.
To trim the video from the beginning, place your cursor at the starting point and wait for the pointer to appear. Then move the point forward. To trim from the end, place the cursor at that point, hold and move the pointer forward till the required point.


Trimming the video does not mean that you lose the parts. It is more like shortening it to fit in place.
- Cutting the video
Unlike trimming, cutting involves getting rid of a section of the video completely. To do so, you need to first of all isolate that section.
With the video on the timeline, move and point your cursor at the starting point of the video and click on the scissors icon at the top. Then move it to the end of the video section and click on the scissors icon again. By so doing, you will have selected that section.
Once the section has been selected, right click on the video, select and click to delete. You can then drag the remaining parts to make them one.

After cutting or trimming, you can choose to add several effects to the video. Transitions, watermarks, cropping, resizing, ripple effects among others are some of the changes you could make. All these appear on the menu at the top.
- Save and/or Import your video
The final step is saving or importing your file to prevent its loss. By clicking on the ‘Import’ button, you save the file to the Media Library. By selecting ‘save as’, you select the location where you want to store your file.

Conclusion
There are so many video editors, each with different features. Some are simple to use while others will require advanced software to operate. Whether you use VLC Media Player or Wondershare Filmora, the results will be the same. The difference comes in where you have the knowledge and skills to use one app better than the other one.
The above steps on how to use both VLC Media Player and Wondershare Filmora will guide you through the whole process. It is said that, ‘practice makes perfect’. So yes, keep practicing and putting these skills into use. Sooner or later you will be an expert!
This is the dashboard of the VLC Media Player.
- Select the file you would like to cut
On the top of the screen is the menu with ‘Media’ being the first on the far left. On clicking the ‘Media’ button, a drop-down menu will appear. Select the first option, ‘Open File’ to access your files. From the dialogue box that appears, locate your video (the one you would like to cut), select it then click to open. The video will start playing.

- Click on Advanced Controls (View > Advanced Controls)
Some videos will play automatically while others will wait for an action. In case your video plays automatically, it is advisable that you pause it.
On the menu is a tab labelled ‘View’. Choose the tab, click open it and on the drop-down menu, select ‘Advanced Options’.

On selecting ‘Advanced Options’, a red button will appear at the bottom-left corner of the VLC. This is the record button.

Its purpose is to indicate the recording of the section of the video that you would like to cut.
- Click to Cut or Trim
If you had paused your video, you can play it at this stage. If you do not want to cut/trim your video from the start, scroll to the point from which you would like to cut it. Click on the red button for the recording to start. If the video does not play automatically, click to play.
After the video has played till the point where you would like to end, click on the red button again to stop the recording. The cut section will be automatically saved on the videos’ folder on C:\Users\Username\Videos.
An easier way to cut videos with Wondershare Filmora
Wondershare Filmora Video Editor is an alternative video editor. Unlike VLC Media Player, Filmora gives you more options. It allows you to split, trim, edit, combine, and crop a video, among others. It also gives you room to add footnotes, a variety of transitions, lower thirds, among other features. You can as well resize your video and enhance its quality.
For Win 7 or later (64-bit)
For macOS 10.14 or later
To Cut/Trim Videos with Wondershare Filmora:
- Drag and Drop the Video
Assuming that you have already downloaded and installed Wondershare Filmora app, click to open. There are two ways through which you can locate your video.
One, you can opt to drag and drop the video from its location to the app’s timeline. Secondly, you can right click on the space at the top left then select the video to be edited from the dialogue box that will appear.

- Trimming the video
After dropping the video on the timeline, it is likely to take up a lot of space, especially if it is long.
To trim the video from the beginning, place your cursor at the starting point and wait for the pointer to appear. Then move the point forward. To trim from the end, place the cursor at that point, hold and move the pointer forward till the required point.


Trimming the video does not mean that you lose the parts. It is more like shortening it to fit in place.
- Cutting the video
Unlike trimming, cutting involves getting rid of a section of the video completely. To do so, you need to first of all isolate that section.
With the video on the timeline, move and point your cursor at the starting point of the video and click on the scissors icon at the top. Then move it to the end of the video section and click on the scissors icon again. By so doing, you will have selected that section.
Once the section has been selected, right click on the video, select and click to delete. You can then drag the remaining parts to make them one.

After cutting or trimming, you can choose to add several effects to the video. Transitions, watermarks, cropping, resizing, ripple effects among others are some of the changes you could make. All these appear on the menu at the top.
- Save and/or Import your video
The final step is saving or importing your file to prevent its loss. By clicking on the ‘Import’ button, you save the file to the Media Library. By selecting ‘save as’, you select the location where you want to store your file.

Conclusion
There are so many video editors, each with different features. Some are simple to use while others will require advanced software to operate. Whether you use VLC Media Player or Wondershare Filmora, the results will be the same. The difference comes in where you have the knowledge and skills to use one app better than the other one.
The above steps on how to use both VLC Media Player and Wondershare Filmora will guide you through the whole process. It is said that, ‘practice makes perfect’. So yes, keep practicing and putting these skills into use. Sooner or later you will be an expert!
This is the dashboard of the VLC Media Player.
- Select the file you would like to cut
On the top of the screen is the menu with ‘Media’ being the first on the far left. On clicking the ‘Media’ button, a drop-down menu will appear. Select the first option, ‘Open File’ to access your files. From the dialogue box that appears, locate your video (the one you would like to cut), select it then click to open. The video will start playing.

- Click on Advanced Controls (View > Advanced Controls)
Some videos will play automatically while others will wait for an action. In case your video plays automatically, it is advisable that you pause it.
On the menu is a tab labelled ‘View’. Choose the tab, click open it and on the drop-down menu, select ‘Advanced Options’.

On selecting ‘Advanced Options’, a red button will appear at the bottom-left corner of the VLC. This is the record button.

Its purpose is to indicate the recording of the section of the video that you would like to cut.
- Click to Cut or Trim
If you had paused your video, you can play it at this stage. If you do not want to cut/trim your video from the start, scroll to the point from which you would like to cut it. Click on the red button for the recording to start. If the video does not play automatically, click to play.
After the video has played till the point where you would like to end, click on the red button again to stop the recording. The cut section will be automatically saved on the videos’ folder on C:\Users\Username\Videos.
An easier way to cut videos with Wondershare Filmora
Wondershare Filmora Video Editor is an alternative video editor. Unlike VLC Media Player, Filmora gives you more options. It allows you to split, trim, edit, combine, and crop a video, among others. It also gives you room to add footnotes, a variety of transitions, lower thirds, among other features. You can as well resize your video and enhance its quality.
For Win 7 or later (64-bit)
For macOS 10.14 or later
To Cut/Trim Videos with Wondershare Filmora:
- Drag and Drop the Video
Assuming that you have already downloaded and installed Wondershare Filmora app, click to open. There are two ways through which you can locate your video.
One, you can opt to drag and drop the video from its location to the app’s timeline. Secondly, you can right click on the space at the top left then select the video to be edited from the dialogue box that will appear.

- Trimming the video
After dropping the video on the timeline, it is likely to take up a lot of space, especially if it is long.
To trim the video from the beginning, place your cursor at the starting point and wait for the pointer to appear. Then move the point forward. To trim from the end, place the cursor at that point, hold and move the pointer forward till the required point.


Trimming the video does not mean that you lose the parts. It is more like shortening it to fit in place.
- Cutting the video
Unlike trimming, cutting involves getting rid of a section of the video completely. To do so, you need to first of all isolate that section.
With the video on the timeline, move and point your cursor at the starting point of the video and click on the scissors icon at the top. Then move it to the end of the video section and click on the scissors icon again. By so doing, you will have selected that section.
Once the section has been selected, right click on the video, select and click to delete. You can then drag the remaining parts to make them one.

After cutting or trimming, you can choose to add several effects to the video. Transitions, watermarks, cropping, resizing, ripple effects among others are some of the changes you could make. All these appear on the menu at the top.
- Save and/or Import your video
The final step is saving or importing your file to prevent its loss. By clicking on the ‘Import’ button, you save the file to the Media Library. By selecting ‘save as’, you select the location where you want to store your file.

Conclusion
There are so many video editors, each with different features. Some are simple to use while others will require advanced software to operate. Whether you use VLC Media Player or Wondershare Filmora, the results will be the same. The difference comes in where you have the knowledge and skills to use one app better than the other one.
The above steps on how to use both VLC Media Player and Wondershare Filmora will guide you through the whole process. It is said that, ‘practice makes perfect’. So yes, keep practicing and putting these skills into use. Sooner or later you will be an expert!
This is the dashboard of the VLC Media Player.
- Select the file you would like to cut
On the top of the screen is the menu with ‘Media’ being the first on the far left. On clicking the ‘Media’ button, a drop-down menu will appear. Select the first option, ‘Open File’ to access your files. From the dialogue box that appears, locate your video (the one you would like to cut), select it then click to open. The video will start playing.

- Click on Advanced Controls (View > Advanced Controls)
Some videos will play automatically while others will wait for an action. In case your video plays automatically, it is advisable that you pause it.
On the menu is a tab labelled ‘View’. Choose the tab, click open it and on the drop-down menu, select ‘Advanced Options’.

On selecting ‘Advanced Options’, a red button will appear at the bottom-left corner of the VLC. This is the record button.

Its purpose is to indicate the recording of the section of the video that you would like to cut.
- Click to Cut or Trim
If you had paused your video, you can play it at this stage. If you do not want to cut/trim your video from the start, scroll to the point from which you would like to cut it. Click on the red button for the recording to start. If the video does not play automatically, click to play.
After the video has played till the point where you would like to end, click on the red button again to stop the recording. The cut section will be automatically saved on the videos’ folder on C:\Users\Username\Videos.
An easier way to cut videos with Wondershare Filmora
Wondershare Filmora Video Editor is an alternative video editor. Unlike VLC Media Player, Filmora gives you more options. It allows you to split, trim, edit, combine, and crop a video, among others. It also gives you room to add footnotes, a variety of transitions, lower thirds, among other features. You can as well resize your video and enhance its quality.
For Win 7 or later (64-bit)
For macOS 10.14 or later
To Cut/Trim Videos with Wondershare Filmora:
- Drag and Drop the Video
Assuming that you have already downloaded and installed Wondershare Filmora app, click to open. There are two ways through which you can locate your video.
One, you can opt to drag and drop the video from its location to the app’s timeline. Secondly, you can right click on the space at the top left then select the video to be edited from the dialogue box that will appear.

- Trimming the video
After dropping the video on the timeline, it is likely to take up a lot of space, especially if it is long.
To trim the video from the beginning, place your cursor at the starting point and wait for the pointer to appear. Then move the point forward. To trim from the end, place the cursor at that point, hold and move the pointer forward till the required point.


Trimming the video does not mean that you lose the parts. It is more like shortening it to fit in place.
- Cutting the video
Unlike trimming, cutting involves getting rid of a section of the video completely. To do so, you need to first of all isolate that section.
With the video on the timeline, move and point your cursor at the starting point of the video and click on the scissors icon at the top. Then move it to the end of the video section and click on the scissors icon again. By so doing, you will have selected that section.
Once the section has been selected, right click on the video, select and click to delete. You can then drag the remaining parts to make them one.

After cutting or trimming, you can choose to add several effects to the video. Transitions, watermarks, cropping, resizing, ripple effects among others are some of the changes you could make. All these appear on the menu at the top.
- Save and/or Import your video
The final step is saving or importing your file to prevent its loss. By clicking on the ‘Import’ button, you save the file to the Media Library. By selecting ‘save as’, you select the location where you want to store your file.

Conclusion
There are so many video editors, each with different features. Some are simple to use while others will require advanced software to operate. Whether you use VLC Media Player or Wondershare Filmora, the results will be the same. The difference comes in where you have the knowledge and skills to use one app better than the other one.
The above steps on how to use both VLC Media Player and Wondershare Filmora will guide you through the whole process. It is said that, ‘practice makes perfect’. So yes, keep practicing and putting these skills into use. Sooner or later you will be an expert!
Top Tips for Camtasia Freeze-Frame
Best Tips of Camtasia Freeze Frame
An easy yet powerful editor
Numerous effects to choose from
Detailed tutorials provided by the official channel
A freeze-frame is a technique whereby editors can suddenly halt motion in a film to make it look like a photograph. Then the still shot in the movie is usually used to create suspense or add emphasis to a scene. When freeze-frame gets added at the film’s end, it leaves the viewer guessing what will happen next.

Freezing or extending a frame will allow users to pace their video better. More importantly, freeze-frame applies on a per track basis, which helps buy users more time for a voiceover or an annotation. This article will teach you how to freeze-frame in Camtasia perfectly.
In this article
01 [How to Do Freeze-frame or Extended Frame in Camtasia?](#Part 1)
02 [What’s the Best Freeze-frame Video Editing Effect in Camtasia?](#Part 2)
03 [Best 5 Alternatives to Freeze-frame](#Part 3)
Part 1 How to Do Freeze-frame or Extended Frame in Camtasia?
If you are looking to bring in more creativity to your video clips by doing freeze-frame in Camtasia or extend frame, here is a step-by-step guide:
Step 1: Select the Video Part and Enter Duration
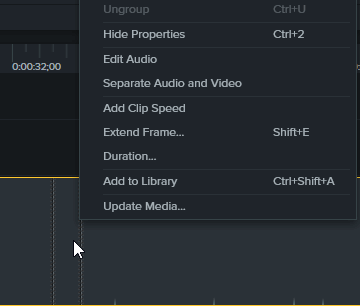
You have to move the Playhead to the frame if you want to extend. Then right-click on the track you wish to extend to choose the Extend Frame option or press shift+E.
For the keyboard shortcut to work, select the track first.
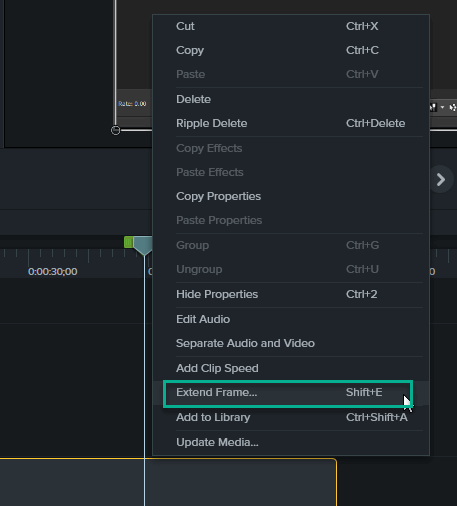
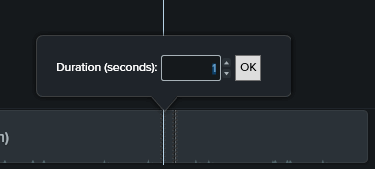
Now, enter the desired duration in seconds.
This will, in turn, create a stitched clip, provided that the auto-stitch in preferences hasn’t been disabled.
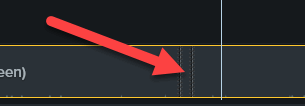
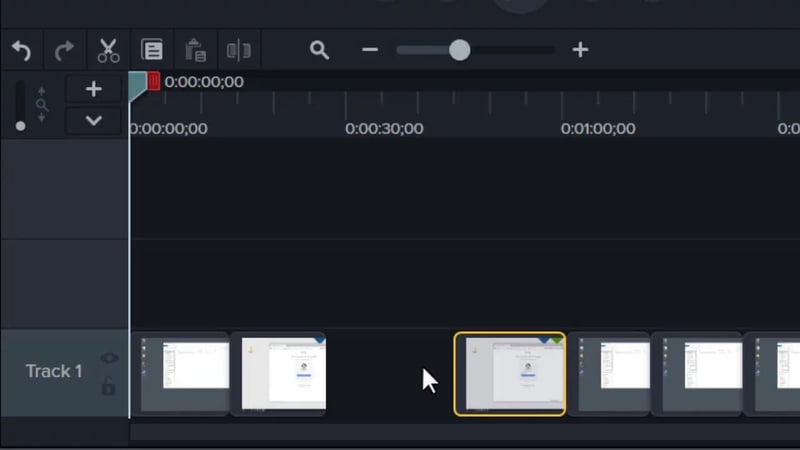
In addition, if the auto-stitch has been disabled, the clip will be split into three, as shown below, with the middle clip containing the extended frame.

Step 2: Change the Duration
To change the freeze duration in Camtasia freeze frame, right-click on the still portion of the clip and choose the Duration option. However, this will work with both split segments and stitched segments.
Part 2 What’s the Best Freeze-frame Video Editing Effect in Camtasia?
The freeze-frame effect in Camtasia is an excellent feature with a unique, elegant glitch and warp design. This well-organized and straightforward template is perfect for any event and features a full HD version and different freeze time effects. It is easy to use and customize, render your new awesome video, and drop media.
Here is the best Camtasia freeze-frame video editing effect of 2021, which is how to extend the frame and customize the amount of time in Camtasia Studio:
Step 1: Upload the Video
Download the Camtasia software, install and open it on your PC. Then drag and drop the video that must be freeze-frame on the timeline.
Step 2: Select Video Portion and Duration
Play the click on the timeline and when it gets to the position, you want to freeze-frame, pause the video and left-click on the Playhead to select extend the frame.
Now, select the desired duration you want to extend the freeze-frame
Step 3: Extend Frame
Next is to go back to the timeline and left-click on the Playhead to select extend frame, then, click on split tool. After that, drag the extended frame to the upper new layer.
Step 4: Add Clip Speed
Right-click on the extended frame and apply “add clip speed” to select the amount of time required.
Step 5: Export and Save
Finally, reposition it back to the main track and play your video. Then, when you feel satisfied with the result, export and save it on your device.
For a more detailed, interactive explanation and understanding, watch the video
https://m.youtube.com/watch?v=j4zHxtflMsM
Part 3 Best 5 Alternatives to Freeze-frame
Here are the top five (5) alternatives to Camtasia freeze frames. We have mentioned their pros and cons for better understanding.
01** Wondershare Filmora Video Editor
For Win 7 or later (64-bit)
For macOS 10.12 or later
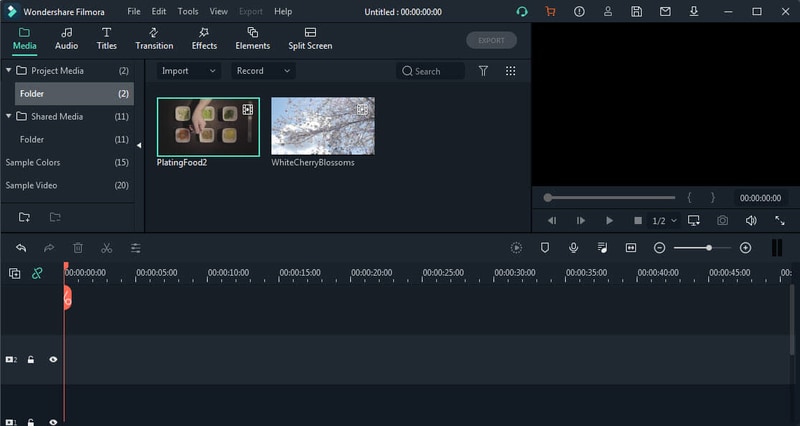
Filmora is our first alternative for freeze frames in Camtasia. It is an easy-to-use video editing software with excellent tools and an outline of creative video effects. Being the best Mac video editor, it is safe to say you can directly make your freeze-frame effect from scratch.
Filmora is free to download, supports Mac and Windows devices, and has a practical freeze-frame effect function.
Pros:
● Ease of use
● No payment until required
● The full-featured video editing tool
● Tons of effects are available
Cons:
● Some effects are not free.
02Kinemaster
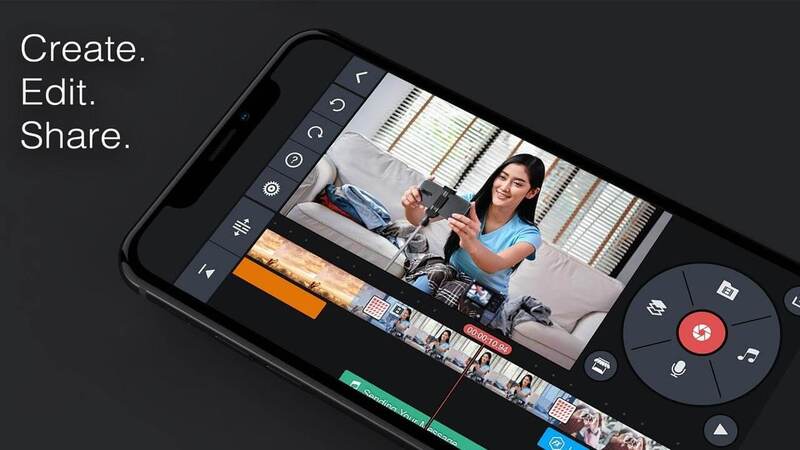
This is a free video editing application that edits your smartphone with much more fun and accessibility. It is equipped with top-notch editing tools and features and supports iOS and Android devices. Kinemaster is also a powerful application you can get creative with and makes it the top 5 alternatives to Camtasia freeze frame.
Pros:
● Easy-to-use editing tools.
● User-friendly interface.
Cons:
● There is a watermark at the end of the video
● Limited video format support.
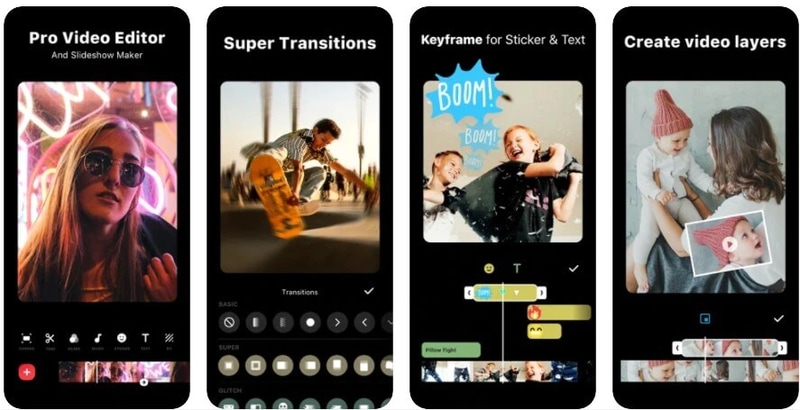
03InShot
This is a free iOS and Android video editing application and a multi-featured application that assits you to get creative and edit videos with limitless features and the freeze-frame effect inclusive of its element.
Pros:
● Easy to use
● A wide range of quick, accessible features and editing tools to use.
Cons:
● Purchase needed to access the top features.
● Hardly intuitive.
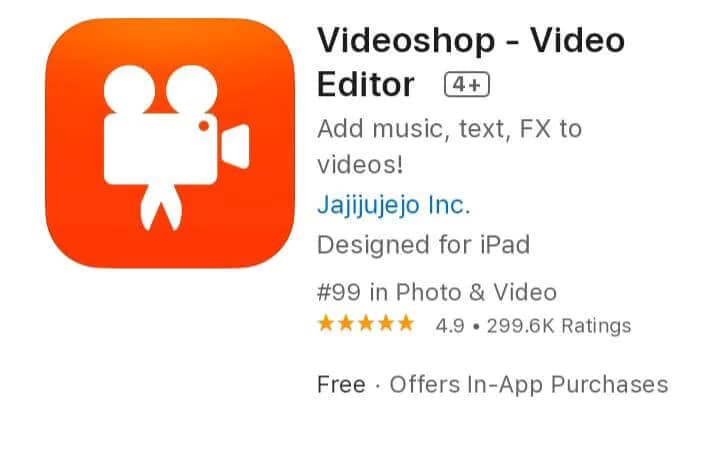
04Videoshop video editor.
This is an effortless video editing application that is specifically for iOS devices. In addition, it comes furnished with remarkable video editing tools and stunning features to transform your video. This freeze-frame Camtasia alternative app is easy to use and gives your videos a creative shine.
Pros
● It is straightforward to use
● It has a detailed UI design
Cons:
● It has some glitches
● It has limited resolution support.
● The CIT can support a large amount of content.
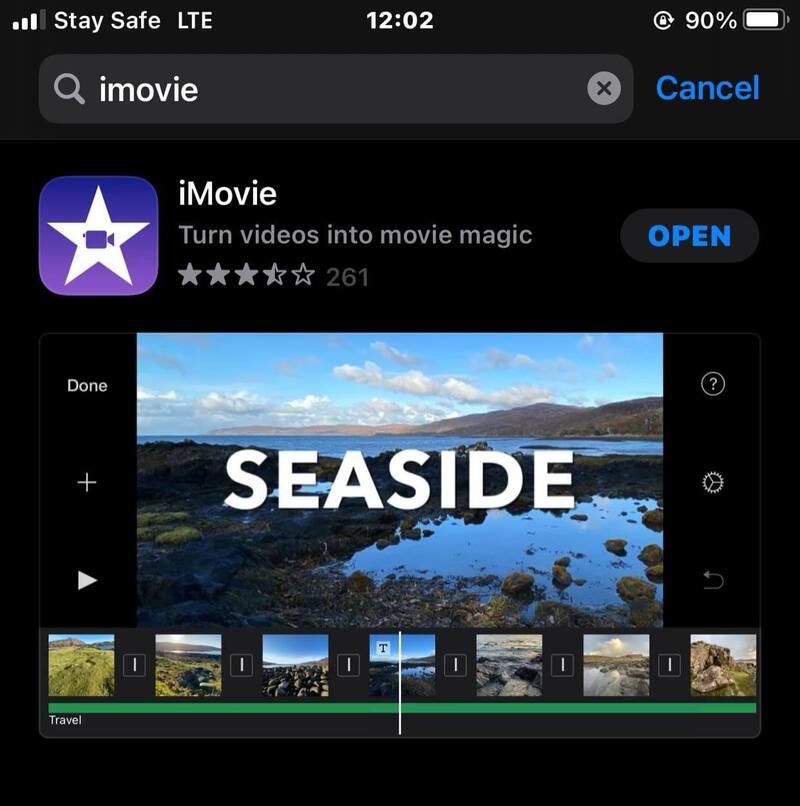
05iMovie
iMovie application is popularly known to create and edit videos into a movie-like shine. However, the application is accessible for iOS video editing software equipped with the freeze-frame effect. iMovie is stocked with a bonus of powerful features to make your pop and stand out amongst others.
Pros:
● it has a user-friendly interface
● Allow users to share videos directly after editing
● It is straightforward and intuitive to use without guidelines
Cons:
● It supports a limited video format
● Video edits take up lots of phone storage.
● It crashes if video content is significant.
● Ending Thoughts →
● This article guided using the Camtasia freeze-frame and explained extending the freeze-frame features.
● The report also included the top 5 alternatives to freeze-frame Camtasia and rated Filmora as the number one due to its many latest effects in the upgraded version.
A freeze-frame is a technique whereby editors can suddenly halt motion in a film to make it look like a photograph. Then the still shot in the movie is usually used to create suspense or add emphasis to a scene. When freeze-frame gets added at the film’s end, it leaves the viewer guessing what will happen next.

Freezing or extending a frame will allow users to pace their video better. More importantly, freeze-frame applies on a per track basis, which helps buy users more time for a voiceover or an annotation. This article will teach you how to freeze-frame in Camtasia perfectly.
In this article
01 [How to Do Freeze-frame or Extended Frame in Camtasia?](#Part 1)
02 [What’s the Best Freeze-frame Video Editing Effect in Camtasia?](#Part 2)
03 [Best 5 Alternatives to Freeze-frame](#Part 3)
Part 1 How to Do Freeze-frame or Extended Frame in Camtasia?
If you are looking to bring in more creativity to your video clips by doing freeze-frame in Camtasia or extend frame, here is a step-by-step guide:
Step 1: Select the Video Part and Enter Duration
You have to move the Playhead to the frame if you want to extend. Then right-click on the track you wish to extend to choose the Extend Frame option or press shift+E.
For the keyboard shortcut to work, select the track first.

Now, enter the desired duration in seconds.

This will, in turn, create a stitched clip, provided that the auto-stitch in preferences hasn’t been disabled.

In addition, if the auto-stitch has been disabled, the clip will be split into three, as shown below, with the middle clip containing the extended frame.

Step 2: Change the Duration
To change the freeze duration in Camtasia freeze frame, right-click on the still portion of the clip and choose the Duration option. However, this will work with both split segments and stitched segments.

Part 2 What’s the Best Freeze-frame Video Editing Effect in Camtasia?
The freeze-frame effect in Camtasia is an excellent feature with a unique, elegant glitch and warp design. This well-organized and straightforward template is perfect for any event and features a full HD version and different freeze time effects. It is easy to use and customize, render your new awesome video, and drop media.
Here is the best Camtasia freeze-frame video editing effect of 2021, which is how to extend the frame and customize the amount of time in Camtasia Studio:

Step 1: Upload the Video
Download the Camtasia software, install and open it on your PC. Then drag and drop the video that must be freeze-frame on the timeline.
Step 2: Select Video Portion and Duration
Play the click on the timeline and when it gets to the position, you want to freeze-frame, pause the video and left-click on the Playhead to select extend the frame.
Now, select the desired duration you want to extend the freeze-frame
Step 3: Extend Frame
Next is to go back to the timeline and left-click on the Playhead to select extend frame, then, click on split tool. After that, drag the extended frame to the upper new layer.
Step 4: Add Clip Speed
Right-click on the extended frame and apply “add clip speed” to select the amount of time required.
Step 5: Export and Save
Finally, reposition it back to the main track and play your video. Then, when you feel satisfied with the result, export and save it on your device.
For a more detailed, interactive explanation and understanding, watch the video
https://m.youtube.com/watch?v=j4zHxtflMsM
Part 3 Best 5 Alternatives to Freeze-frame
Here are the top five (5) alternatives to Camtasia freeze frames. We have mentioned their pros and cons for better understanding.
01** Wondershare Filmora Video Editor
For Win 7 or later (64-bit)
For macOS 10.12 or later
Filmora is our first alternative for freeze frames in Camtasia. It is an easy-to-use video editing software with excellent tools and an outline of creative video effects. Being the best Mac video editor, it is safe to say you can directly make your freeze-frame effect from scratch.
Filmora is free to download, supports Mac and Windows devices, and has a practical freeze-frame effect function.
Pros:
● Ease of use
● No payment until required
● The full-featured video editing tool
● Tons of effects are available
Cons:
● Some effects are not free.

02Kinemaster
This is a free video editing application that edits your smartphone with much more fun and accessibility. It is equipped with top-notch editing tools and features and supports iOS and Android devices. Kinemaster is also a powerful application you can get creative with and makes it the top 5 alternatives to Camtasia freeze frame.
Pros:
● Easy-to-use editing tools.
● User-friendly interface.
Cons:
● There is a watermark at the end of the video
● Limited video format support.

03InShot
This is a free iOS and Android video editing application and a multi-featured application that assits you to get creative and edit videos with limitless features and the freeze-frame effect inclusive of its element.
Pros:
● Easy to use
● A wide range of quick, accessible features and editing tools to use.
Cons:
● Purchase needed to access the top features.
● Hardly intuitive.

04Videoshop video editor.
This is an effortless video editing application that is specifically for iOS devices. In addition, it comes furnished with remarkable video editing tools and stunning features to transform your video. This freeze-frame Camtasia alternative app is easy to use and gives your videos a creative shine.
Pros
● It is straightforward to use
● It has a detailed UI design
Cons:
● It has some glitches
● It has limited resolution support.
● The CIT can support a large amount of content.

05iMovie
iMovie application is popularly known to create and edit videos into a movie-like shine. However, the application is accessible for iOS video editing software equipped with the freeze-frame effect. iMovie is stocked with a bonus of powerful features to make your pop and stand out amongst others.
Pros:
● it has a user-friendly interface
● Allow users to share videos directly after editing
● It is straightforward and intuitive to use without guidelines
Cons:
● It supports a limited video format
● Video edits take up lots of phone storage.
● It crashes if video content is significant.

● Ending Thoughts →
● This article guided using the Camtasia freeze-frame and explained extending the freeze-frame features.
● The report also included the top 5 alternatives to freeze-frame Camtasia and rated Filmora as the number one due to its many latest effects in the upgraded version.
A freeze-frame is a technique whereby editors can suddenly halt motion in a film to make it look like a photograph. Then the still shot in the movie is usually used to create suspense or add emphasis to a scene. When freeze-frame gets added at the film’s end, it leaves the viewer guessing what will happen next.

Freezing or extending a frame will allow users to pace their video better. More importantly, freeze-frame applies on a per track basis, which helps buy users more time for a voiceover or an annotation. This article will teach you how to freeze-frame in Camtasia perfectly.
In this article
01 [How to Do Freeze-frame or Extended Frame in Camtasia?](#Part 1)
02 [What’s the Best Freeze-frame Video Editing Effect in Camtasia?](#Part 2)
03 [Best 5 Alternatives to Freeze-frame](#Part 3)
Part 1 How to Do Freeze-frame or Extended Frame in Camtasia?
If you are looking to bring in more creativity to your video clips by doing freeze-frame in Camtasia or extend frame, here is a step-by-step guide:
Step 1: Select the Video Part and Enter Duration
You have to move the Playhead to the frame if you want to extend. Then right-click on the track you wish to extend to choose the Extend Frame option or press shift+E.
For the keyboard shortcut to work, select the track first.

Now, enter the desired duration in seconds.

This will, in turn, create a stitched clip, provided that the auto-stitch in preferences hasn’t been disabled.

In addition, if the auto-stitch has been disabled, the clip will be split into three, as shown below, with the middle clip containing the extended frame.

Step 2: Change the Duration
To change the freeze duration in Camtasia freeze frame, right-click on the still portion of the clip and choose the Duration option. However, this will work with both split segments and stitched segments.

Part 2 What’s the Best Freeze-frame Video Editing Effect in Camtasia?
The freeze-frame effect in Camtasia is an excellent feature with a unique, elegant glitch and warp design. This well-organized and straightforward template is perfect for any event and features a full HD version and different freeze time effects. It is easy to use and customize, render your new awesome video, and drop media.
Here is the best Camtasia freeze-frame video editing effect of 2021, which is how to extend the frame and customize the amount of time in Camtasia Studio:

Step 1: Upload the Video
Download the Camtasia software, install and open it on your PC. Then drag and drop the video that must be freeze-frame on the timeline.
Step 2: Select Video Portion and Duration
Play the click on the timeline and when it gets to the position, you want to freeze-frame, pause the video and left-click on the Playhead to select extend the frame.
Now, select the desired duration you want to extend the freeze-frame
Step 3: Extend Frame
Next is to go back to the timeline and left-click on the Playhead to select extend frame, then, click on split tool. After that, drag the extended frame to the upper new layer.
Step 4: Add Clip Speed
Right-click on the extended frame and apply “add clip speed” to select the amount of time required.
Step 5: Export and Save
Finally, reposition it back to the main track and play your video. Then, when you feel satisfied with the result, export and save it on your device.
For a more detailed, interactive explanation and understanding, watch the video
https://m.youtube.com/watch?v=j4zHxtflMsM
Part 3 Best 5 Alternatives to Freeze-frame
Here are the top five (5) alternatives to Camtasia freeze frames. We have mentioned their pros and cons for better understanding.
01** Wondershare Filmora Video Editor
For Win 7 or later (64-bit)
For macOS 10.12 or later
Filmora is our first alternative for freeze frames in Camtasia. It is an easy-to-use video editing software with excellent tools and an outline of creative video effects. Being the best Mac video editor, it is safe to say you can directly make your freeze-frame effect from scratch.
Filmora is free to download, supports Mac and Windows devices, and has a practical freeze-frame effect function.
Pros:
● Ease of use
● No payment until required
● The full-featured video editing tool
● Tons of effects are available
Cons:
● Some effects are not free.

02Kinemaster
This is a free video editing application that edits your smartphone with much more fun and accessibility. It is equipped with top-notch editing tools and features and supports iOS and Android devices. Kinemaster is also a powerful application you can get creative with and makes it the top 5 alternatives to Camtasia freeze frame.
Pros:
● Easy-to-use editing tools.
● User-friendly interface.
Cons:
● There is a watermark at the end of the video
● Limited video format support.

03InShot
This is a free iOS and Android video editing application and a multi-featured application that assits you to get creative and edit videos with limitless features and the freeze-frame effect inclusive of its element.
Pros:
● Easy to use
● A wide range of quick, accessible features and editing tools to use.
Cons:
● Purchase needed to access the top features.
● Hardly intuitive.

04Videoshop video editor.
This is an effortless video editing application that is specifically for iOS devices. In addition, it comes furnished with remarkable video editing tools and stunning features to transform your video. This freeze-frame Camtasia alternative app is easy to use and gives your videos a creative shine.
Pros
● It is straightforward to use
● It has a detailed UI design
Cons:
● It has some glitches
● It has limited resolution support.
● The CIT can support a large amount of content.

05iMovie
iMovie application is popularly known to create and edit videos into a movie-like shine. However, the application is accessible for iOS video editing software equipped with the freeze-frame effect. iMovie is stocked with a bonus of powerful features to make your pop and stand out amongst others.
Pros:
● it has a user-friendly interface
● Allow users to share videos directly after editing
● It is straightforward and intuitive to use without guidelines
Cons:
● It supports a limited video format
● Video edits take up lots of phone storage.
● It crashes if video content is significant.

● Ending Thoughts →
● This article guided using the Camtasia freeze-frame and explained extending the freeze-frame features.
● The report also included the top 5 alternatives to freeze-frame Camtasia and rated Filmora as the number one due to its many latest effects in the upgraded version.
A freeze-frame is a technique whereby editors can suddenly halt motion in a film to make it look like a photograph. Then the still shot in the movie is usually used to create suspense or add emphasis to a scene. When freeze-frame gets added at the film’s end, it leaves the viewer guessing what will happen next.

Freezing or extending a frame will allow users to pace their video better. More importantly, freeze-frame applies on a per track basis, which helps buy users more time for a voiceover or an annotation. This article will teach you how to freeze-frame in Camtasia perfectly.
In this article
01 [How to Do Freeze-frame or Extended Frame in Camtasia?](#Part 1)
02 [What’s the Best Freeze-frame Video Editing Effect in Camtasia?](#Part 2)
03 [Best 5 Alternatives to Freeze-frame](#Part 3)
Part 1 How to Do Freeze-frame or Extended Frame in Camtasia?
If you are looking to bring in more creativity to your video clips by doing freeze-frame in Camtasia or extend frame, here is a step-by-step guide:
Step 1: Select the Video Part and Enter Duration
You have to move the Playhead to the frame if you want to extend. Then right-click on the track you wish to extend to choose the Extend Frame option or press shift+E.
For the keyboard shortcut to work, select the track first.

Now, enter the desired duration in seconds.

This will, in turn, create a stitched clip, provided that the auto-stitch in preferences hasn’t been disabled.

In addition, if the auto-stitch has been disabled, the clip will be split into three, as shown below, with the middle clip containing the extended frame.

Step 2: Change the Duration
To change the freeze duration in Camtasia freeze frame, right-click on the still portion of the clip and choose the Duration option. However, this will work with both split segments and stitched segments.

Part 2 What’s the Best Freeze-frame Video Editing Effect in Camtasia?
The freeze-frame effect in Camtasia is an excellent feature with a unique, elegant glitch and warp design. This well-organized and straightforward template is perfect for any event and features a full HD version and different freeze time effects. It is easy to use and customize, render your new awesome video, and drop media.
Here is the best Camtasia freeze-frame video editing effect of 2021, which is how to extend the frame and customize the amount of time in Camtasia Studio:

Step 1: Upload the Video
Download the Camtasia software, install and open it on your PC. Then drag and drop the video that must be freeze-frame on the timeline.
Step 2: Select Video Portion and Duration
Play the click on the timeline and when it gets to the position, you want to freeze-frame, pause the video and left-click on the Playhead to select extend the frame.
Now, select the desired duration you want to extend the freeze-frame
Step 3: Extend Frame
Next is to go back to the timeline and left-click on the Playhead to select extend frame, then, click on split tool. After that, drag the extended frame to the upper new layer.
Step 4: Add Clip Speed
Right-click on the extended frame and apply “add clip speed” to select the amount of time required.
Step 5: Export and Save
Finally, reposition it back to the main track and play your video. Then, when you feel satisfied with the result, export and save it on your device.
For a more detailed, interactive explanation and understanding, watch the video
https://m.youtube.com/watch?v=j4zHxtflMsM
Part 3 Best 5 Alternatives to Freeze-frame
Here are the top five (5) alternatives to Camtasia freeze frames. We have mentioned their pros and cons for better understanding.
01** Wondershare Filmora Video Editor
For Win 7 or later (64-bit)
For macOS 10.12 or later
Filmora is our first alternative for freeze frames in Camtasia. It is an easy-to-use video editing software with excellent tools and an outline of creative video effects. Being the best Mac video editor, it is safe to say you can directly make your freeze-frame effect from scratch.
Filmora is free to download, supports Mac and Windows devices, and has a practical freeze-frame effect function.
Pros:
● Ease of use
● No payment until required
● The full-featured video editing tool
● Tons of effects are available
Cons:
● Some effects are not free.

02Kinemaster
This is a free video editing application that edits your smartphone with much more fun and accessibility. It is equipped with top-notch editing tools and features and supports iOS and Android devices. Kinemaster is also a powerful application you can get creative with and makes it the top 5 alternatives to Camtasia freeze frame.
Pros:
● Easy-to-use editing tools.
● User-friendly interface.
Cons:
● There is a watermark at the end of the video
● Limited video format support.

03InShot
This is a free iOS and Android video editing application and a multi-featured application that assits you to get creative and edit videos with limitless features and the freeze-frame effect inclusive of its element.
Pros:
● Easy to use
● A wide range of quick, accessible features and editing tools to use.
Cons:
● Purchase needed to access the top features.
● Hardly intuitive.

04Videoshop video editor.
This is an effortless video editing application that is specifically for iOS devices. In addition, it comes furnished with remarkable video editing tools and stunning features to transform your video. This freeze-frame Camtasia alternative app is easy to use and gives your videos a creative shine.
Pros
● It is straightforward to use
● It has a detailed UI design
Cons:
● It has some glitches
● It has limited resolution support.
● The CIT can support a large amount of content.

05iMovie
iMovie application is popularly known to create and edit videos into a movie-like shine. However, the application is accessible for iOS video editing software equipped with the freeze-frame effect. iMovie is stocked with a bonus of powerful features to make your pop and stand out amongst others.
Pros:
● it has a user-friendly interface
● Allow users to share videos directly after editing
● It is straightforward and intuitive to use without guidelines
Cons:
● It supports a limited video format
● Video edits take up lots of phone storage.
● It crashes if video content is significant.

● Ending Thoughts →
● This article guided using the Camtasia freeze-frame and explained extending the freeze-frame features.
● The report also included the top 5 alternatives to freeze-frame Camtasia and rated Filmora as the number one due to its many latest effects in the upgraded version.
| Live Stream on YouTube Using Zoom
Abundant Video Effects - Wondershare Filmora
Provide abundant video effects - A creative video editor
Powerful color correction and grading
Detailed tutorials provided by the official channel
Zoom sessions have made daily meetings a lot easier as it offers great flexibility to the people. You can conduct long and important business meetings or educational class lessons in the comfort of your home. As Zoom meetings are widely adopted as a new medium of communication, many people have started to stream live Zoom sessions across various online platforms.
One of the popular online platforms is YouTube, so one must know how to Zoom YouTube live streaming instantly. Through this article, you will come to know about simple and basic steps regarding stream Zoom to YouTube flawlessly.
In this article
Part 1: Software Requirements
Part 2: Live Stream on YouTube Using Zoom
Part 1: Software Requirements
In this part, we will mention software requirements for Zoom meetings and webinars to conduct Zoom live streams on YouTube comfortably on your devices.
Streaming for Zoom Meeting
- Pro, Business, Education, or Enterprise Account
- The Host is Licensed
- Zoom Desktop Client
- **Windows:**Version 4.4.53582 or Higher
- **macOS:**Version 4.4.53582 or Higher
- Zoom Mobile Client
- **Android:**Version 5.4.0 or Higher
- **iOS:**Version 5.4.0 or Higher
- Live streaming is enabled on YouTube
Streaming for Zoom Webinar
- Pro, Business, Education, or Enterprise Account
- The Host is Assigned a Zoom Webinar License
- Zoom Desktop Client
- **Windows:**Version 4.0 or Higher
- **macOS:**Version 4.0 or Higher
- Zoom Mobile Client
- **Android:**Version 5.4.0 or Higher
- **iOS:**Version 5.4.0 or Higher
- Live Streaming Enabled on YouTube
Part 2: Live Stream on YouTube Using Zoom
To Zoom YouTube live, this part contains detailed steps that will assist you throughout the whole process.
Steps to Execute Before Live Streaming
Before going live on YouTube, the first step is to schedule the meeting in Zoom for successful live streaming. To do so, open your Zoom account and schedule a suitable time for the meeting or webinar you want to conduct.

Activating the Live Streaming Option
Step 1: To begin, first sign in to your Zoom account and then navigate to “Zoom meeting settings.” On this menu, scroll down to find the option “In Meeting (Advanced)” on the left side.
Step 2: Now turn on the toggle of “Allow live streaming meetings” to activate the feature of live streaming. Afterward, you would see four checkboxes on your screen through which you can control where to stream Zoom meetings.
Step 3: Start by unchecking the Facebook box if you don’t want to want live stream Zoom on the Facebook platform. Then, tap on the checkbox of YouTube to allow the live streaming of Zoom meetings on your YouTube account.
Step 4: Now, click on the checkbox for “Custom live streaming service” to enable the live streaming before your meeting starts. Also, on the displayed text box, you can enter any instructions for the host who will live stream your Zoom meeting. Once done with all the changes, tap on “Save” and continue with the steps given below.

Settings Up Live Streaming of Scheduled Meeting
If you want to live stream the scheduled Zoom meeting through the option of “Custom live streaming,” you should have your stream key, stream URL, and the URL of the live streaming page of your streaming site. Now read the below instructions to set up live streaming settings on YouTube.
Step 1: Navigate to the site Youtube.com by entering the internet ID and password. Then tap on the button “Create a video or post” displayed in the top right corner.

Step 2: From the displayed options, click on “Go Live” and create your channel for the live streaming videos. Verify your account from the phone call or received text message. Now from the YouTube home page, tap on the “Create a video or post” button to proceed further.

Step 3: After clicking on the option of “Go Live” again, enter the information about your live streaming video in the pop-up window. For this, you should navigate to the “Stream” tab to build an “Event title.” You can also enter a description along with the title. Now you can control the viewability of your live stream video such as public, private and unlisted.

Step 4: From the appeared drop-down menu, tap on the category of your live stream video. You can also turn on the toggle of “Schedule for later” if you want to live stream later and enter the date and time simultaneously.
Step 5: You can also add a thumbnail to your live stream video so that people can easily search. Afterward, choose the option either “Yes” or “No” of the heading saying, “Is this video made for kids?”. Once done, tap on the “Create Stream” button.
Step 6: A new window will appear containing your “Stream URL” and “Stream Key.” Copy and save this information for pre-scheduled live streaming on a text file. Now tap on the “Share” option from the top right and then also copy the “Livestream URL” and save it in a text file.

How to Set Up the Live Stream on Zoom
Step 1: On your Zoom account, go to the lists of upcoming meetings and locate your scheduled meeting. After finding the scheduled meeting, choose the meeting topic to continue.

Step 2: Now scroll down the page to select the option called “Live Streaming.” Click on this tab and then click on the option saying “configure live stream settings.”

Step 3: On the pop-up screen, enter all the information you saved before, such as “Stream key,” “Stream URL,” and “Live streaming page URL” on their respective boxes. Once done, click on the “Save” button.

Guidelines to Perform Quickly Before Your Live Stream
Step 1: Start this process before half an hour of your meeting and click to begin your Zoom meeting. Then tap on the “More” option displayed on the toolbar.

Step 2: From the more options, select “Live on custom live streaming service.” Now proceed with the live streaming on your streaming platform.

Step 3: If you are utilizing YouTube live from the settings of “Live on custom live streaming service,” navigate to your YouTube live window. If you don’t have this window open, tap on the “Create a video or post” button and click on “Go Live.” From the “Manage” tab, select the title of your live stream video and then tap on the “Go Live” option from the top right corner.

How to Go Live from Your Zoom Meeting
Step 1: Through your Zoom meeting, tap on the “More” button and then click on “Live on YouTube.” A new window will display the form where you select your account.

Step 2: On the next page, enter the title of the YouTube live stream video and choose the viewability options such as public, private and unlisted. Once done with privacy options, tap on the “Go Live” button.

How to Stop the Stop the Live Stream and End the Zoom Meeting
Ending the Live Stream through Custom Streaming Service
For live-streaming YouTube videos through “Live on custom live streaming service,” tap on the “End Stream” button displayed in the top right corner that will end your live session.
Ending the Live Stream and Zoom Meeting
From your Zoom meeting, tap on the “More” button and tap on the option called “Stop live stream.” Afterward, select the “End Meeting” option to end the Zoom meeting for all participants. Then tap on the “End Meeting for All” option for confirmation.

Conclusion
Many people across the world use online platforms like YouTube to live stream their videos for more connectivity. As Zoom meetings and webinars are getting recognition, it’s a great idea to stream Zoom to YouTube live to have a larger audience. Using this article, you can find easy and simple steps to Zoom YouTube live according to your convenience.
Zoom sessions have made daily meetings a lot easier as it offers great flexibility to the people. You can conduct long and important business meetings or educational class lessons in the comfort of your home. As Zoom meetings are widely adopted as a new medium of communication, many people have started to stream live Zoom sessions across various online platforms.
One of the popular online platforms is YouTube, so one must know how to Zoom YouTube live streaming instantly. Through this article, you will come to know about simple and basic steps regarding stream Zoom to YouTube flawlessly.
In this article
Part 1: Software Requirements
Part 2: Live Stream on YouTube Using Zoom
Part 1: Software Requirements
In this part, we will mention software requirements for Zoom meetings and webinars to conduct Zoom live streams on YouTube comfortably on your devices.
Streaming for Zoom Meeting
- Pro, Business, Education, or Enterprise Account
- The Host is Licensed
- Zoom Desktop Client
- **Windows:**Version 4.4.53582 or Higher
- **macOS:**Version 4.4.53582 or Higher
- Zoom Mobile Client
- **Android:**Version 5.4.0 or Higher
- **iOS:**Version 5.4.0 or Higher
- Live streaming is enabled on YouTube
Streaming for Zoom Webinar
- Pro, Business, Education, or Enterprise Account
- The Host is Assigned a Zoom Webinar License
- Zoom Desktop Client
- **Windows:**Version 4.0 or Higher
- **macOS:**Version 4.0 or Higher
- Zoom Mobile Client
- **Android:**Version 5.4.0 or Higher
- **iOS:**Version 5.4.0 or Higher
- Live Streaming Enabled on YouTube
Part 2: Live Stream on YouTube Using Zoom
To Zoom YouTube live, this part contains detailed steps that will assist you throughout the whole process.
Steps to Execute Before Live Streaming
Before going live on YouTube, the first step is to schedule the meeting in Zoom for successful live streaming. To do so, open your Zoom account and schedule a suitable time for the meeting or webinar you want to conduct.

Activating the Live Streaming Option
Step 1: To begin, first sign in to your Zoom account and then navigate to “Zoom meeting settings.” On this menu, scroll down to find the option “In Meeting (Advanced)” on the left side.
Step 2: Now turn on the toggle of “Allow live streaming meetings” to activate the feature of live streaming. Afterward, you would see four checkboxes on your screen through which you can control where to stream Zoom meetings.
Step 3: Start by unchecking the Facebook box if you don’t want to want live stream Zoom on the Facebook platform. Then, tap on the checkbox of YouTube to allow the live streaming of Zoom meetings on your YouTube account.
Step 4: Now, click on the checkbox for “Custom live streaming service” to enable the live streaming before your meeting starts. Also, on the displayed text box, you can enter any instructions for the host who will live stream your Zoom meeting. Once done with all the changes, tap on “Save” and continue with the steps given below.

Settings Up Live Streaming of Scheduled Meeting
If you want to live stream the scheduled Zoom meeting through the option of “Custom live streaming,” you should have your stream key, stream URL, and the URL of the live streaming page of your streaming site. Now read the below instructions to set up live streaming settings on YouTube.
Step 1: Navigate to the site Youtube.com by entering the internet ID and password. Then tap on the button “Create a video or post” displayed in the top right corner.

Step 2: From the displayed options, click on “Go Live” and create your channel for the live streaming videos. Verify your account from the phone call or received text message. Now from the YouTube home page, tap on the “Create a video or post” button to proceed further.

Step 3: After clicking on the option of “Go Live” again, enter the information about your live streaming video in the pop-up window. For this, you should navigate to the “Stream” tab to build an “Event title.” You can also enter a description along with the title. Now you can control the viewability of your live stream video such as public, private and unlisted.

Step 4: From the appeared drop-down menu, tap on the category of your live stream video. You can also turn on the toggle of “Schedule for later” if you want to live stream later and enter the date and time simultaneously.
Step 5: You can also add a thumbnail to your live stream video so that people can easily search. Afterward, choose the option either “Yes” or “No” of the heading saying, “Is this video made for kids?”. Once done, tap on the “Create Stream” button.
Step 6: A new window will appear containing your “Stream URL” and “Stream Key.” Copy and save this information for pre-scheduled live streaming on a text file. Now tap on the “Share” option from the top right and then also copy the “Livestream URL” and save it in a text file.

How to Set Up the Live Stream on Zoom
Step 1: On your Zoom account, go to the lists of upcoming meetings and locate your scheduled meeting. After finding the scheduled meeting, choose the meeting topic to continue.

Step 2: Now scroll down the page to select the option called “Live Streaming.” Click on this tab and then click on the option saying “configure live stream settings.”

Step 3: On the pop-up screen, enter all the information you saved before, such as “Stream key,” “Stream URL,” and “Live streaming page URL” on their respective boxes. Once done, click on the “Save” button.

Guidelines to Perform Quickly Before Your Live Stream
Step 1: Start this process before half an hour of your meeting and click to begin your Zoom meeting. Then tap on the “More” option displayed on the toolbar.

Step 2: From the more options, select “Live on custom live streaming service.” Now proceed with the live streaming on your streaming platform.

Step 3: If you are utilizing YouTube live from the settings of “Live on custom live streaming service,” navigate to your YouTube live window. If you don’t have this window open, tap on the “Create a video or post” button and click on “Go Live.” From the “Manage” tab, select the title of your live stream video and then tap on the “Go Live” option from the top right corner.

How to Go Live from Your Zoom Meeting
Step 1: Through your Zoom meeting, tap on the “More” button and then click on “Live on YouTube.” A new window will display the form where you select your account.

Step 2: On the next page, enter the title of the YouTube live stream video and choose the viewability options such as public, private and unlisted. Once done with privacy options, tap on the “Go Live” button.

How to Stop the Stop the Live Stream and End the Zoom Meeting
Ending the Live Stream through Custom Streaming Service
For live-streaming YouTube videos through “Live on custom live streaming service,” tap on the “End Stream” button displayed in the top right corner that will end your live session.
Ending the Live Stream and Zoom Meeting
From your Zoom meeting, tap on the “More” button and tap on the option called “Stop live stream.” Afterward, select the “End Meeting” option to end the Zoom meeting for all participants. Then tap on the “End Meeting for All” option for confirmation.

Conclusion
Many people across the world use online platforms like YouTube to live stream their videos for more connectivity. As Zoom meetings and webinars are getting recognition, it’s a great idea to stream Zoom to YouTube live to have a larger audience. Using this article, you can find easy and simple steps to Zoom YouTube live according to your convenience.
Zoom sessions have made daily meetings a lot easier as it offers great flexibility to the people. You can conduct long and important business meetings or educational class lessons in the comfort of your home. As Zoom meetings are widely adopted as a new medium of communication, many people have started to stream live Zoom sessions across various online platforms.
One of the popular online platforms is YouTube, so one must know how to Zoom YouTube live streaming instantly. Through this article, you will come to know about simple and basic steps regarding stream Zoom to YouTube flawlessly.
In this article
Part 1: Software Requirements
Part 2: Live Stream on YouTube Using Zoom
Part 1: Software Requirements
In this part, we will mention software requirements for Zoom meetings and webinars to conduct Zoom live streams on YouTube comfortably on your devices.
Streaming for Zoom Meeting
- Pro, Business, Education, or Enterprise Account
- The Host is Licensed
- Zoom Desktop Client
- **Windows:**Version 4.4.53582 or Higher
- **macOS:**Version 4.4.53582 or Higher
- Zoom Mobile Client
- **Android:**Version 5.4.0 or Higher
- **iOS:**Version 5.4.0 or Higher
- Live streaming is enabled on YouTube
Streaming for Zoom Webinar
- Pro, Business, Education, or Enterprise Account
- The Host is Assigned a Zoom Webinar License
- Zoom Desktop Client
- **Windows:**Version 4.0 or Higher
- **macOS:**Version 4.0 or Higher
- Zoom Mobile Client
- **Android:**Version 5.4.0 or Higher
- **iOS:**Version 5.4.0 or Higher
- Live Streaming Enabled on YouTube
Part 2: Live Stream on YouTube Using Zoom
To Zoom YouTube live, this part contains detailed steps that will assist you throughout the whole process.
Steps to Execute Before Live Streaming
Before going live on YouTube, the first step is to schedule the meeting in Zoom for successful live streaming. To do so, open your Zoom account and schedule a suitable time for the meeting or webinar you want to conduct.

Activating the Live Streaming Option
Step 1: To begin, first sign in to your Zoom account and then navigate to “Zoom meeting settings.” On this menu, scroll down to find the option “In Meeting (Advanced)” on the left side.
Step 2: Now turn on the toggle of “Allow live streaming meetings” to activate the feature of live streaming. Afterward, you would see four checkboxes on your screen through which you can control where to stream Zoom meetings.
Step 3: Start by unchecking the Facebook box if you don’t want to want live stream Zoom on the Facebook platform. Then, tap on the checkbox of YouTube to allow the live streaming of Zoom meetings on your YouTube account.
Step 4: Now, click on the checkbox for “Custom live streaming service” to enable the live streaming before your meeting starts. Also, on the displayed text box, you can enter any instructions for the host who will live stream your Zoom meeting. Once done with all the changes, tap on “Save” and continue with the steps given below.

Settings Up Live Streaming of Scheduled Meeting
If you want to live stream the scheduled Zoom meeting through the option of “Custom live streaming,” you should have your stream key, stream URL, and the URL of the live streaming page of your streaming site. Now read the below instructions to set up live streaming settings on YouTube.
Step 1: Navigate to the site Youtube.com by entering the internet ID and password. Then tap on the button “Create a video or post” displayed in the top right corner.

Step 2: From the displayed options, click on “Go Live” and create your channel for the live streaming videos. Verify your account from the phone call or received text message. Now from the YouTube home page, tap on the “Create a video or post” button to proceed further.

Step 3: After clicking on the option of “Go Live” again, enter the information about your live streaming video in the pop-up window. For this, you should navigate to the “Stream” tab to build an “Event title.” You can also enter a description along with the title. Now you can control the viewability of your live stream video such as public, private and unlisted.

Step 4: From the appeared drop-down menu, tap on the category of your live stream video. You can also turn on the toggle of “Schedule for later” if you want to live stream later and enter the date and time simultaneously.
Step 5: You can also add a thumbnail to your live stream video so that people can easily search. Afterward, choose the option either “Yes” or “No” of the heading saying, “Is this video made for kids?”. Once done, tap on the “Create Stream” button.
Step 6: A new window will appear containing your “Stream URL” and “Stream Key.” Copy and save this information for pre-scheduled live streaming on a text file. Now tap on the “Share” option from the top right and then also copy the “Livestream URL” and save it in a text file.

How to Set Up the Live Stream on Zoom
Step 1: On your Zoom account, go to the lists of upcoming meetings and locate your scheduled meeting. After finding the scheduled meeting, choose the meeting topic to continue.

Step 2: Now scroll down the page to select the option called “Live Streaming.” Click on this tab and then click on the option saying “configure live stream settings.”

Step 3: On the pop-up screen, enter all the information you saved before, such as “Stream key,” “Stream URL,” and “Live streaming page URL” on their respective boxes. Once done, click on the “Save” button.

Guidelines to Perform Quickly Before Your Live Stream
Step 1: Start this process before half an hour of your meeting and click to begin your Zoom meeting. Then tap on the “More” option displayed on the toolbar.

Step 2: From the more options, select “Live on custom live streaming service.” Now proceed with the live streaming on your streaming platform.

Step 3: If you are utilizing YouTube live from the settings of “Live on custom live streaming service,” navigate to your YouTube live window. If you don’t have this window open, tap on the “Create a video or post” button and click on “Go Live.” From the “Manage” tab, select the title of your live stream video and then tap on the “Go Live” option from the top right corner.

How to Go Live from Your Zoom Meeting
Step 1: Through your Zoom meeting, tap on the “More” button and then click on “Live on YouTube.” A new window will display the form where you select your account.

Step 2: On the next page, enter the title of the YouTube live stream video and choose the viewability options such as public, private and unlisted. Once done with privacy options, tap on the “Go Live” button.

How to Stop the Stop the Live Stream and End the Zoom Meeting
Ending the Live Stream through Custom Streaming Service
For live-streaming YouTube videos through “Live on custom live streaming service,” tap on the “End Stream” button displayed in the top right corner that will end your live session.
Ending the Live Stream and Zoom Meeting
From your Zoom meeting, tap on the “More” button and tap on the option called “Stop live stream.” Afterward, select the “End Meeting” option to end the Zoom meeting for all participants. Then tap on the “End Meeting for All” option for confirmation.

Conclusion
Many people across the world use online platforms like YouTube to live stream their videos for more connectivity. As Zoom meetings and webinars are getting recognition, it’s a great idea to stream Zoom to YouTube live to have a larger audience. Using this article, you can find easy and simple steps to Zoom YouTube live according to your convenience.
Zoom sessions have made daily meetings a lot easier as it offers great flexibility to the people. You can conduct long and important business meetings or educational class lessons in the comfort of your home. As Zoom meetings are widely adopted as a new medium of communication, many people have started to stream live Zoom sessions across various online platforms.
One of the popular online platforms is YouTube, so one must know how to Zoom YouTube live streaming instantly. Through this article, you will come to know about simple and basic steps regarding stream Zoom to YouTube flawlessly.
In this article
Part 1: Software Requirements
Part 2: Live Stream on YouTube Using Zoom
Part 1: Software Requirements
In this part, we will mention software requirements for Zoom meetings and webinars to conduct Zoom live streams on YouTube comfortably on your devices.
Streaming for Zoom Meeting
- Pro, Business, Education, or Enterprise Account
- The Host is Licensed
- Zoom Desktop Client
- **Windows:**Version 4.4.53582 or Higher
- **macOS:**Version 4.4.53582 or Higher
- Zoom Mobile Client
- **Android:**Version 5.4.0 or Higher
- **iOS:**Version 5.4.0 or Higher
- Live streaming is enabled on YouTube
Streaming for Zoom Webinar
- Pro, Business, Education, or Enterprise Account
- The Host is Assigned a Zoom Webinar License
- Zoom Desktop Client
- **Windows:**Version 4.0 or Higher
- **macOS:**Version 4.0 or Higher
- Zoom Mobile Client
- **Android:**Version 5.4.0 or Higher
- **iOS:**Version 5.4.0 or Higher
- Live Streaming Enabled on YouTube
Part 2: Live Stream on YouTube Using Zoom
To Zoom YouTube live, this part contains detailed steps that will assist you throughout the whole process.
Steps to Execute Before Live Streaming
Before going live on YouTube, the first step is to schedule the meeting in Zoom for successful live streaming. To do so, open your Zoom account and schedule a suitable time for the meeting or webinar you want to conduct.

Activating the Live Streaming Option
Step 1: To begin, first sign in to your Zoom account and then navigate to “Zoom meeting settings.” On this menu, scroll down to find the option “In Meeting (Advanced)” on the left side.
Step 2: Now turn on the toggle of “Allow live streaming meetings” to activate the feature of live streaming. Afterward, you would see four checkboxes on your screen through which you can control where to stream Zoom meetings.
Step 3: Start by unchecking the Facebook box if you don’t want to want live stream Zoom on the Facebook platform. Then, tap on the checkbox of YouTube to allow the live streaming of Zoom meetings on your YouTube account.
Step 4: Now, click on the checkbox for “Custom live streaming service” to enable the live streaming before your meeting starts. Also, on the displayed text box, you can enter any instructions for the host who will live stream your Zoom meeting. Once done with all the changes, tap on “Save” and continue with the steps given below.

Settings Up Live Streaming of Scheduled Meeting
If you want to live stream the scheduled Zoom meeting through the option of “Custom live streaming,” you should have your stream key, stream URL, and the URL of the live streaming page of your streaming site. Now read the below instructions to set up live streaming settings on YouTube.
Step 1: Navigate to the site Youtube.com by entering the internet ID and password. Then tap on the button “Create a video or post” displayed in the top right corner.

Step 2: From the displayed options, click on “Go Live” and create your channel for the live streaming videos. Verify your account from the phone call or received text message. Now from the YouTube home page, tap on the “Create a video or post” button to proceed further.

Step 3: After clicking on the option of “Go Live” again, enter the information about your live streaming video in the pop-up window. For this, you should navigate to the “Stream” tab to build an “Event title.” You can also enter a description along with the title. Now you can control the viewability of your live stream video such as public, private and unlisted.

Step 4: From the appeared drop-down menu, tap on the category of your live stream video. You can also turn on the toggle of “Schedule for later” if you want to live stream later and enter the date and time simultaneously.
Step 5: You can also add a thumbnail to your live stream video so that people can easily search. Afterward, choose the option either “Yes” or “No” of the heading saying, “Is this video made for kids?”. Once done, tap on the “Create Stream” button.
Step 6: A new window will appear containing your “Stream URL” and “Stream Key.” Copy and save this information for pre-scheduled live streaming on a text file. Now tap on the “Share” option from the top right and then also copy the “Livestream URL” and save it in a text file.

How to Set Up the Live Stream on Zoom
Step 1: On your Zoom account, go to the lists of upcoming meetings and locate your scheduled meeting. After finding the scheduled meeting, choose the meeting topic to continue.

Step 2: Now scroll down the page to select the option called “Live Streaming.” Click on this tab and then click on the option saying “configure live stream settings.”

Step 3: On the pop-up screen, enter all the information you saved before, such as “Stream key,” “Stream URL,” and “Live streaming page URL” on their respective boxes. Once done, click on the “Save” button.

Guidelines to Perform Quickly Before Your Live Stream
Step 1: Start this process before half an hour of your meeting and click to begin your Zoom meeting. Then tap on the “More” option displayed on the toolbar.

Step 2: From the more options, select “Live on custom live streaming service.” Now proceed with the live streaming on your streaming platform.

Step 3: If you are utilizing YouTube live from the settings of “Live on custom live streaming service,” navigate to your YouTube live window. If you don’t have this window open, tap on the “Create a video or post” button and click on “Go Live.” From the “Manage” tab, select the title of your live stream video and then tap on the “Go Live” option from the top right corner.

How to Go Live from Your Zoom Meeting
Step 1: Through your Zoom meeting, tap on the “More” button and then click on “Live on YouTube.” A new window will display the form where you select your account.

Step 2: On the next page, enter the title of the YouTube live stream video and choose the viewability options such as public, private and unlisted. Once done with privacy options, tap on the “Go Live” button.

How to Stop the Stop the Live Stream and End the Zoom Meeting
Ending the Live Stream through Custom Streaming Service
For live-streaming YouTube videos through “Live on custom live streaming service,” tap on the “End Stream” button displayed in the top right corner that will end your live session.
Ending the Live Stream and Zoom Meeting
From your Zoom meeting, tap on the “More” button and tap on the option called “Stop live stream.” Afterward, select the “End Meeting” option to end the Zoom meeting for all participants. Then tap on the “End Meeting for All” option for confirmation.

Conclusion
Many people across the world use online platforms like YouTube to live stream their videos for more connectivity. As Zoom meetings and webinars are getting recognition, it’s a great idea to stream Zoom to YouTube live to have a larger audience. Using this article, you can find easy and simple steps to Zoom YouTube live according to your convenience.
Also read:
- In 2024, What Does It Mean to Color Grade Your Images, and Why Is It so Important? Does It Mean the Same Thing as a Color Correction? Read on to Gather All the Information You Need on Color Grading Photography
- Discover the Ultimate LUTs for Wondershare Filmora Uncover the Answer
- Guide To Slowing Down Videos in Snapchat Discussing the Details
- Updated In 2024, Enhance Your Film Production with These 5 Silence Detection Tools
- In 2024, Fixes | What If YouTube Zoom to Fill Not Working?
- Updated 2024 Approved Understanding The Best Tools for Changing Sky Background
- Updated In 2024, Looking for a Legitimate Tutorial to Create and Add Text Effects in Adobe Premiere Pro? Here Are the Simple Steps for Premiere Pro Text Effects and Find an Alternative Way
- In 2024, A Guide to Find a High-Quality Video Marketing Agency
- Updated In 2024, 12 Top Picks of Video Enhancer Software
- Updated 2024 Approved Tiktok Aspect Ratio Is a Crucial Element to Succeeding in the Tiktok Algorithm. Here Are some Suggestions to Improve Video Quality and Land on the for You Page
- How to Make a GIF With Transparent Background for 2024
- Updated Do You Know What Is Motion Blur in Fortnite? Read This Article to Find Out How to Apply Motion Blur in Fortnite Efficiently and with Ease for 2024
- New In 2024, To Know How to Add Effects in Premiere Pro, You Need to Follow This Guide as It Has All You Need to Know to Add Effects in Premiere Pro. Learn More Here
- New | Change Speed of a Video on iPhone for 2024
- Whats an AV1 Format and How Does It Impact Your Life?
- New Frame Rates, Speed, and Wondershare Filmora An Overview for 2024
- Updated In 2024, How to Use Canva Color Match
- How to Unlock Disabled Apple iPhone 13/iPad Without Computer | Dr.fone
- Full Guide How To Fix Connection Is Not Private on Honor 90 Pro | Dr.fone
- In 2024, Full Guide to Unlock iPhone 11 Pro with iTunes | Dr.fone
- 15 Best Strongest Pokémon To Use in Pokémon GO PvP Leagues For Apple iPhone 14 | Dr.fone
- How to Track a Lost Motorola Moto G84 5G for Free? | Dr.fone
- In 2024, The Ultimate Guide to Get the Rare Candy on Pokemon Go Fire Red On Oppo A58 4G | Dr.fone
- Can Life360 Track You When Your Xiaomi Redmi 12 is off? | Dr.fone
- In 2024, Full Guide to Fix iToolab AnyGO Not Working On Realme C67 5G | Dr.fone
- In 2024, Top 10 Password Cracking Tools For Infinix Hot 40
- Google Play Services Wont Update? 12 Fixes are Here on Tecno Camon 20 Pro 5G | Dr.fone
- Top 5 OnePlus 11R Bypass FRP Tools for PC That Actually Work
- In 2024, How To Change Vivo T2 Pro 5G Lock Screen Password?
- How to Unlock Xiaomi 13T Phone without PIN
- updated Top 5 Udemy Subtitle Translation Tools for Seamless Auto Translations
- Best Methods for Realme Narzo 60x 5G Wont Turn On | Dr.fone
- Top 5 Car Locator Apps for Lava Blaze Pro 5G | Dr.fone
- Title: Recording Video in Slow Motion Some Considerable Points for 2024
- Author: Morgan
- Created at : 2024-06-24 01:30:36
- Updated at : 2024-06-25 01:30:36
- Link: https://ai-video-editing.techidaily.com/recording-video-in-slow-motion-some-considerable-points-for-2024/
- License: This work is licensed under CC BY-NC-SA 4.0.

