:max_bytes(150000):strip_icc():format(webp)/F8conferencelogo-7ec4475dc6624114aea076c2611df199.jpg)
SBV to SRT How to Convert YouTube SBV Subtitle to SRT Format

SBV to SRT: How to Convert YouTube SBV Subtitle to SRT Format
SBV to SRT: How to Convert YouTube SBV Subtitle to SRT Format
YouTube subtitles are becoming increasingly common, and business people mainly use subtitles for those who are hard to listen to. So everyone can understand the content.
Luckily, we’ve happened upon a relatively simple process by which SBV files can be converted to the commonly-used (and compatible with YouTube) SubRip (SRT) format, which we’ll discuss here.
In this article, we will discuss the converters that can convert SBV format to SRT files within just a few clicks. Sounds interesting? Keep reading the article to understand the context better. Let’s get started.
What is an SBV file?
It is an extension of a plain text file used for video subtitles. It is used to add subtitles and closed captions to the YouTube video.
It includes three sets of data:
- Start and end times for subtitle timings
- The actual content of the subtitle
- Its ID, which is just plain text that
- consists of additional information such as font size, etc.
Furthermore, SBV subtitles are saved in plain text format to be opened and edited efficiently. They also work on systems where notepad might be the only word processor available.
SBV files are similar to SRT files. YouTube recommends that caption creators create caption files using the SBV or SRT formats because those formats are pretty basic.
You’ll be thinking, can you convert the SBV files to SRT? Yes, you can. Now we know what an SBV file is, let’s find out why we need to convert SBV files to SRT.
Why do we need to convert SBV files to SRT?
Subtitles are necessary for accessibility and SEO. There are multiple file formats for subtitles. One of the most common is the SubRip (.srt) file format. But there are various cases when you have subtitles in SBV format, which your standard media player fails to identify.
That’s why the convenient thing to do is to convert SBV to SRT.
Let’s find out how to perform a such activity using online SBV to SRT converters.
Convert SBV to SRT with an Online Converter
Many users want to convert their SBV caption or subtitle into other formats for all devices.
Following, we have mentioned the top 4 SB- to-SRT converters capable of completing the file conversion in no time.
1. SBV to SRT converter for subtitles
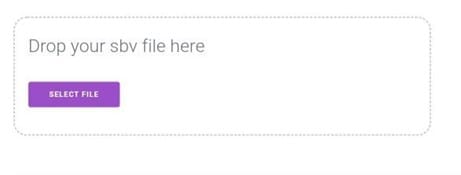
This online converter takes the subtitles created by YouTube or other resources and then converts them into the SRT file format. This SRT file can be imported into any video editing software. It has a simple user interface. Its entire conversion process is instant.
Supported Platform: Browser-based
To convert the SBV format into SRT,
- It would help if you opened the online tool on your browser.
- Then click Select File to upload the SBV file.
- In the end, the service will automatically download the SRT file to your device.
2. Subtitles Converter
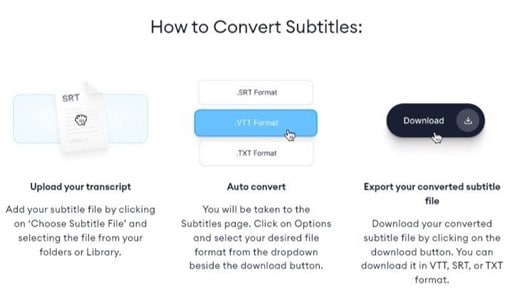
It is a tool that can be converted between subtitles. If the subtitle file is not reversed or truncated, change the subtitle extension in Explorer to any desired format.
Supported platforms: Browser-based.
Following the guides below, you can convert your SBV file into an SRT file.
- Go to Subtitles converters website .
- Upload your SBV file.
- Select the targeted format; SRT.
- Select sync control.
- Select a subtitle language.
- Then click on “Download after conversion.”
3. GoTranscript Subtitle Converter

GoTranscript is an online converter specializing in converting your subtitle files in SBV to your preferred format. Moreover, it is compatible with almost every subtitle file type, including SRT, SCC, VTT, RT, and more. Furthermore, the product has a high success rate for video transcription services.
GoTranscript is easy to use, offering a streamlined ordering process, affordable pricing, and customization options.
GoTranscript has a global team of 20,000 language experts ready to convert your content into text, including
- Medical files (reports, records)
- Legal documents (hearings, proceedings, interrogations)
- Academic materials (lectures, interviews)
- Enterprise recordings (focus groups, corporate meetings)
- Entertainment industry content (film, TV, news) and more!
Supported Platform: Browser-based
Services offers:
- Transcription, translation, subtitling, and caption
To convert the SBV format to SRT format by GoTrancscript, you need to follow the steps below.
Step1 Go to the Website
Click on Upload and add the SBV subtitle file after opening the online converter.

Step2 Select format
Then, head to the Select Format section and click on the SubRip(.srt) option.

Step3 Click on convert
Finally, click on convert to start the process and download the subtitles.

Convert SBV to SRT with desktop Software
As we’ve mentioned about the online converters, you can use them without wasting money and time. All you need is an internet connection, though it causes problems sometimes when you run out of the internet.
Many desktop converters have been introduced to help you with this problem. For this reason, We’ll tell you about top desktop software through which you can convert SBV format to SRT format.
We’ll also explain how to use one of the best file converters, FFmpeg, as an example to show you how to convert SBV to SRT. Let’s move on.
1. Jubler
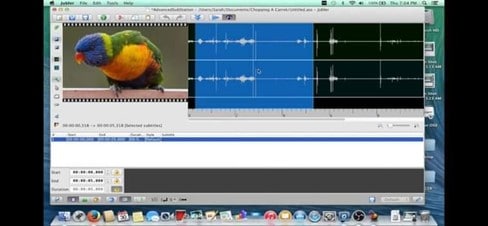
It is another free open source SBV to SRT converter software. It allows you to edit subtitle files of SBV, SUB, TXT, SRT, etc. As soon as you upload a subtle file in it, you can view all the subtitle text and their times’ side by side. You can select and edit both subtitle text and time.
Platforms supported: Windows, Linux, and macOS.
After editing subtitles, start the conversion process. Now, follow the below steps to convert SBV to SRT using a jubler.
- Run this converter and upload an SBV file.
- Then, you can select and edit the subtitle text and its timings.
- After making the changes to the subtitle text and time, go to the file> Save As option.
- Ultimately, choose SubRip as the output format and press the Save button.
2. Subtitle Edit

If you are looking for desktop-based software that can carefully convert or edit subtitles files in SBV, we suggest using Subtitle Edit. This software allows you to edit timings/speed and change subtitle font type. Moreover, it supports a simple interface and runs smoothly on low-end PCs.
Supported Platform: Windows
Follow the steps to convert the SBV file to SRT
- Open Subtitle Edit on your Windows system.
- Then, open the subtitle file under the General tab.
- After adding the SBV file, select the SRT format as the new file type.
- Then, click on the “Save button” to export the converted subtitles.
3. FFmpeg

You might think that FFmpeg is only used for video file conversion. Although, it is not the case, as you can utilize this Platform to convert SBV subtitles to SRT using a single command line.
It is a free, open-source software project comprising a suite of libraries and programs which handles video, audio, streams, and other multimedia files.
There is an excellent library in your video processing and compression toolbox. It has endless capabilities, and being open-source, you are more than welcome to modify the source and extend its capabilities
Features of FFmpeg:
- It supports multiple formats conversion, not only subtitle conversion, like txt to srt, srt to sbv, word to srt, etc., but also aduio, video conversion.
- Basic video editing is also enabled by FFmpeg, post-production effects and scaling for video can be used at ease.
Supported Platform: macOS and Windows
YouTube supports the basic features of SBV (SuBView), and SRT (SubRipText) closed captions. You can download existing closed captions (including auto-generated subtitles) as SBV, convert them to SRT and edit the subtitles in a text editor such as vim or notepad. You can also upload the fixed version to YouTube and overwrite the old subtitles for the given language.
To convert SBV format to SRT through FFmpeg, you need to follow the steps given below.
The steps to convert SBV to SRT:
Step1 Visit the official website of FFmpeg. Download the software. After downloading, install it.
Step2 Run FFmpeg using Terminal or Command Prompt on your Mac or Windows computer.
Step3 Enter the following command to convert SBV to SRT instantly.
Pros
- FFmpeg is safe and easy to use
- You can convert any file in your desired format through command lines
Cons
- Interface is a little bit out of date. Except for this, everything seems good for now
How to Edit SRT Subtitles for Videos After Converting from SBV
Now that you know how to convert the SBV file to SRT format, the next step you may want to take is to learn how to hardcode them into your videos. We recommend the Wondershare Filmora Subtitle Editor feature to perform the task proficiently.
The software is available on Windows and macOS. It offers an intuitive user interface that will make beginners feel right at home.
Wondershare Filmora:
It is an easy free video editing software for a beginner that allows you to edit the created content. It also Supports 50 above formats, 4k editing, Filmstock effects store, and all basic and advanced editing tools in the most easily accessible and used manner.
However, the majority of video editors are limited to Windows 10. It works perfectly with Win 10, Win 8, Win 7, and Mac. After downloading this software, you will have plenty of features for free and produce videos with no watermarks.
Let’s have a look at its unique features.
Features:
SRT files Editing
You don’t need to waste your time creating a data backup. Auto synchronization ensures that data is backed up to another device.
Speech to Text (STT)
You can convert your speech into text.
Text to Speech (TTS)
It also allows you to convert your text into speech.
Also, it has various video editing functions, like green screen, split screen, motion tracking, etc., to help you make a video like a pro.
How to edit the SRT file with Filmora :
To edit the converted file, you’ll need to follow the steps
Free Download For Win 7 or later(64-bit)
Free Download For macOS 10.14 or later
Step1 Open Filmora. If you don’t have this software, go to its website and download it. Click on “New Project.”
Step2 Import the video and SRT file to the media library.
Step3 Drag the video and SRT file to the timeline. Then double-click on the SRT file, or you can right-click and choose “Advanced Edit” for the further subtitles editing.
Step4 From there, you can edit the subtitles the way you want.
Click on “PRESET” to select the font style. From custom, you can adjust the following settings
- Fade in/out
- Opacity
- Color gradient
- Effect
- Blur
Step5 You can delete the unwanted part and split and merge more clips. Once the editing is over, click on the “Export” option and save it.
Hot FAQs on converting SBV to SRT
1. How do I download SRT files from YouTube?
You can download the DRT files from YouTube by using the transcription option included below the video player: For this, press the small dot icon below the video, Then choose “open the transcription,” where you can copy and paste a complete transcript, in SRT format, of any video!
2. Can you download auto-generated subtitles from YouTube?
Yes, you can download auto-generated subtitles from YouTube. DownSub is a web-based application that can download automatically generated subtitles directly from YouTube, VIU, Viki, Vlive, and more. It supports downloading all subtitles/captions formats such as SRT, TXT, and VTT.
It doesn’t force our users to download or install any extensions or third-party software. It provides an online method to download subtitles by just entering the URL of the video and clicking Download.
3. What program opens an SBV file?
You can open the SBV file using any text editor, such as Notepad (Windows), TextEdit (Mac), or Atom. You can also see an SBV file’s contents by dragging the file into any web browser. Plus, it also allows you to edit.
Final words
By default, YouTube allows those files created in various formats such as SRT, SBV, MPSUB, etc. But the drawback is that the site automatically converts the SBV format once uploaded.
We’ve explained above the variety of online video converters and desktop software. You can convert the SBV files to SRT in no time.
After converting, editing, or merging the .srt file is necessary. For this, a variety of software is available, but Wondershare Filmora is one of the best video editing software.
Download Filmora and edit the content the way you want.
What is an SBV file?
It is an extension of a plain text file used for video subtitles. It is used to add subtitles and closed captions to the YouTube video.
It includes three sets of data:
- Start and end times for subtitle timings
- The actual content of the subtitle
- Its ID, which is just plain text that
- consists of additional information such as font size, etc.
Furthermore, SBV subtitles are saved in plain text format to be opened and edited efficiently. They also work on systems where notepad might be the only word processor available.
SBV files are similar to SRT files. YouTube recommends that caption creators create caption files using the SBV or SRT formats because those formats are pretty basic.
You’ll be thinking, can you convert the SBV files to SRT? Yes, you can. Now we know what an SBV file is, let’s find out why we need to convert SBV files to SRT.
Why do we need to convert SBV files to SRT?
Subtitles are necessary for accessibility and SEO. There are multiple file formats for subtitles. One of the most common is the SubRip (.srt) file format. But there are various cases when you have subtitles in SBV format, which your standard media player fails to identify.
That’s why the convenient thing to do is to convert SBV to SRT.
Let’s find out how to perform a such activity using online SBV to SRT converters.
Convert SBV to SRT with an Online Converter
Many users want to convert their SBV caption or subtitle into other formats for all devices.
Following, we have mentioned the top 4 SB- to-SRT converters capable of completing the file conversion in no time.
1. SBV to SRT converter for subtitles

This online converter takes the subtitles created by YouTube or other resources and then converts them into the SRT file format. This SRT file can be imported into any video editing software. It has a simple user interface. Its entire conversion process is instant.
Supported Platform: Browser-based
To convert the SBV format into SRT,
- It would help if you opened the online tool on your browser.
- Then click Select File to upload the SBV file.
- In the end, the service will automatically download the SRT file to your device.
2. Subtitles Converter

It is a tool that can be converted between subtitles. If the subtitle file is not reversed or truncated, change the subtitle extension in Explorer to any desired format.
Supported platforms: Browser-based.
Following the guides below, you can convert your SBV file into an SRT file.
- Go to Subtitles converters website .
- Upload your SBV file.
- Select the targeted format; SRT.
- Select sync control.
- Select a subtitle language.
- Then click on “Download after conversion.”
3. GoTranscript Subtitle Converter

GoTranscript is an online converter specializing in converting your subtitle files in SBV to your preferred format. Moreover, it is compatible with almost every subtitle file type, including SRT, SCC, VTT, RT, and more. Furthermore, the product has a high success rate for video transcription services.
GoTranscript is easy to use, offering a streamlined ordering process, affordable pricing, and customization options.
GoTranscript has a global team of 20,000 language experts ready to convert your content into text, including
- Medical files (reports, records)
- Legal documents (hearings, proceedings, interrogations)
- Academic materials (lectures, interviews)
- Enterprise recordings (focus groups, corporate meetings)
- Entertainment industry content (film, TV, news) and more!
Supported Platform: Browser-based
Services offers:
- Transcription, translation, subtitling, and caption
To convert the SBV format to SRT format by GoTrancscript, you need to follow the steps below.
Step1 Go to the Website
Click on Upload and add the SBV subtitle file after opening the online converter.

Step2 Select format
Then, head to the Select Format section and click on the SubRip(.srt) option.

Step3 Click on convert
Finally, click on convert to start the process and download the subtitles.

Convert SBV to SRT with desktop Software
As we’ve mentioned about the online converters, you can use them without wasting money and time. All you need is an internet connection, though it causes problems sometimes when you run out of the internet.
Many desktop converters have been introduced to help you with this problem. For this reason, We’ll tell you about top desktop software through which you can convert SBV format to SRT format.
We’ll also explain how to use one of the best file converters, FFmpeg, as an example to show you how to convert SBV to SRT. Let’s move on.
1. Jubler

It is another free open source SBV to SRT converter software. It allows you to edit subtitle files of SBV, SUB, TXT, SRT, etc. As soon as you upload a subtle file in it, you can view all the subtitle text and their times’ side by side. You can select and edit both subtitle text and time.
Platforms supported: Windows, Linux, and macOS.
After editing subtitles, start the conversion process. Now, follow the below steps to convert SBV to SRT using a jubler.
- Run this converter and upload an SBV file.
- Then, you can select and edit the subtitle text and its timings.
- After making the changes to the subtitle text and time, go to the file> Save As option.
- Ultimately, choose SubRip as the output format and press the Save button.
2. Subtitle Edit

If you are looking for desktop-based software that can carefully convert or edit subtitles files in SBV, we suggest using Subtitle Edit. This software allows you to edit timings/speed and change subtitle font type. Moreover, it supports a simple interface and runs smoothly on low-end PCs.
Supported Platform: Windows
Follow the steps to convert the SBV file to SRT
- Open Subtitle Edit on your Windows system.
- Then, open the subtitle file under the General tab.
- After adding the SBV file, select the SRT format as the new file type.
- Then, click on the “Save button” to export the converted subtitles.
3. FFmpeg

You might think that FFmpeg is only used for video file conversion. Although, it is not the case, as you can utilize this Platform to convert SBV subtitles to SRT using a single command line.
It is a free, open-source software project comprising a suite of libraries and programs which handles video, audio, streams, and other multimedia files.
There is an excellent library in your video processing and compression toolbox. It has endless capabilities, and being open-source, you are more than welcome to modify the source and extend its capabilities
Features of FFmpeg:
- It supports multiple formats conversion, not only subtitle conversion, like txt to srt, srt to sbv, word to srt, etc., but also aduio, video conversion.
- Basic video editing is also enabled by FFmpeg, post-production effects and scaling for video can be used at ease.
Supported Platform: macOS and Windows
YouTube supports the basic features of SBV (SuBView), and SRT (SubRipText) closed captions. You can download existing closed captions (including auto-generated subtitles) as SBV, convert them to SRT and edit the subtitles in a text editor such as vim or notepad. You can also upload the fixed version to YouTube and overwrite the old subtitles for the given language.
To convert SBV format to SRT through FFmpeg, you need to follow the steps given below.
The steps to convert SBV to SRT:
Step1 Visit the official website of FFmpeg. Download the software. After downloading, install it.
Step2 Run FFmpeg using Terminal or Command Prompt on your Mac or Windows computer.
Step3 Enter the following command to convert SBV to SRT instantly.
Pros
- FFmpeg is safe and easy to use
- You can convert any file in your desired format through command lines
Cons
- Interface is a little bit out of date. Except for this, everything seems good for now
How to Edit SRT Subtitles for Videos After Converting from SBV
Now that you know how to convert the SBV file to SRT format, the next step you may want to take is to learn how to hardcode them into your videos. We recommend the Wondershare Filmora Subtitle Editor feature to perform the task proficiently.
The software is available on Windows and macOS. It offers an intuitive user interface that will make beginners feel right at home.
Wondershare Filmora:
It is an easy free video editing software for a beginner that allows you to edit the created content. It also Supports 50 above formats, 4k editing, Filmstock effects store, and all basic and advanced editing tools in the most easily accessible and used manner.
However, the majority of video editors are limited to Windows 10. It works perfectly with Win 10, Win 8, Win 7, and Mac. After downloading this software, you will have plenty of features for free and produce videos with no watermarks.
Let’s have a look at its unique features.
Features:
SRT files Editing
You don’t need to waste your time creating a data backup. Auto synchronization ensures that data is backed up to another device.
Speech to Text (STT)
You can convert your speech into text.
Text to Speech (TTS)
It also allows you to convert your text into speech.
Also, it has various video editing functions, like green screen, split screen, motion tracking, etc., to help you make a video like a pro.
How to edit the SRT file with Filmora :
To edit the converted file, you’ll need to follow the steps
Free Download For Win 7 or later(64-bit)
Free Download For macOS 10.14 or later
Step1 Open Filmora. If you don’t have this software, go to its website and download it. Click on “New Project.”
Step2 Import the video and SRT file to the media library.
Step3 Drag the video and SRT file to the timeline. Then double-click on the SRT file, or you can right-click and choose “Advanced Edit” for the further subtitles editing.
Step4 From there, you can edit the subtitles the way you want.
Click on “PRESET” to select the font style. From custom, you can adjust the following settings
- Fade in/out
- Opacity
- Color gradient
- Effect
- Blur
Step5 You can delete the unwanted part and split and merge more clips. Once the editing is over, click on the “Export” option and save it.
Hot FAQs on converting SBV to SRT
1. How do I download SRT files from YouTube?
You can download the DRT files from YouTube by using the transcription option included below the video player: For this, press the small dot icon below the video, Then choose “open the transcription,” where you can copy and paste a complete transcript, in SRT format, of any video!
2. Can you download auto-generated subtitles from YouTube?
Yes, you can download auto-generated subtitles from YouTube. DownSub is a web-based application that can download automatically generated subtitles directly from YouTube, VIU, Viki, Vlive, and more. It supports downloading all subtitles/captions formats such as SRT, TXT, and VTT.
It doesn’t force our users to download or install any extensions or third-party software. It provides an online method to download subtitles by just entering the URL of the video and clicking Download.
3. What program opens an SBV file?
You can open the SBV file using any text editor, such as Notepad (Windows), TextEdit (Mac), or Atom. You can also see an SBV file’s contents by dragging the file into any web browser. Plus, it also allows you to edit.
Final words
By default, YouTube allows those files created in various formats such as SRT, SBV, MPSUB, etc. But the drawback is that the site automatically converts the SBV format once uploaded.
We’ve explained above the variety of online video converters and desktop software. You can convert the SBV files to SRT in no time.
After converting, editing, or merging the .srt file is necessary. For this, a variety of software is available, but Wondershare Filmora is one of the best video editing software.
Download Filmora and edit the content the way you want.
The Ultimate Guide to Use LUTS to Color Grade on iPhone
Are you a photographer? Do you like to capture the best moments as media files? Then, the LUTs app offers you surprising editing options to retain realistic clicks. The iPhone LUT refine the images and videos by color grading and adding filters. It is an exclusive tool applicable to iPhone and iOS gadgets.
Many iPhone devices have a good picture quality, and some users try filming using this gadget. Upgrade the recordings and redefine the images and videos with perfect color matches using the grading techniques. The essence of the picture depends on the combinations of brightness, hue, color, and saturation level. The LUT apps include the correct combinations of these attributes to enhance the overall captures. Connect with this article to discover the best ways to use the LUTs app for optimal image and video clicks.

Useful LUTs app for iPhone
Here, you will explore the best LUTs apps available for download at the app store. Here, you will find only reliable applications that serve your purpose without compromising the quality factors.
• 3D LUT app
In this LUT apo, you can perform high-end color grading techniques and bring out the best in the picture by assigning the correct combination of colors. This app also works on complex images and fixes the issues quickly. It allows you to build your color filter and apply it to the photos and videos on your iPhone. You can either upload the media file into the 3D LUT interface or use the recent clicks to customize the color attributes using this software.
Pros
- Excellent and quality color grading is feasible using this tool.
- Easy to upload the media files into this editing interface. It does not consume much of your time.
Cons
- Some newbie users find it slightly hard to handle the controls on its interface.

3DLUTS-app
• Video LUT
It is a high-end video editing LUTs app that works on every detail of the videos. This app helps you upload the images even from the virtual storage effortlessly. It supports some of the LUT formats like a 3D cube, Autodesk 3D LUT, and .png files. Use this app to adjust the brightness level, contrast, shadows, and saturation to obtain better looks in the images and videos.
Use this application to set the CMYK curves and insert the desired effects like glow and denoise to improve the visual and audio quality of the videos. The color grading option increases the standards of the videos and photos. The White balance attributes can be set to automatic mode to adapt to the existing levels in the original videos.
Pros
- Allows the users to perform batch processing and enables you to work with multiple files hassle-free.
- Merging of LUTs to create newer ones is feasible using this tool.
Cons
- Sometimes due to the file size, importing the videos from different sources affects the overall editing time. While accessing the virtual storage space, any unexpected network issues slow down the procedure.

Video LUts
• LUTs App
This application assists you to edit the LUTs images professionally. It is in-built with features like brightness, saturation, contrast, shadow, light, and tone. Set the precise values for these attributes to enhance the overall appearance of the images and videos. This application allows you to create a filter by customizing it with desired visual settings and implementing it on any uploaded videos and images for future use. This app aids you to share it without friends too.
Pros
- Easy navigation while editing the imported images and videos.
- Efficiently edit the color and export the photo directly to any destination quickly.
Cons
- Only limited features are available with this LUTs app.

LUTs app
• Filmic Pro
It is a cinematic LUT app and provides you with the essential effects of the uploaded content. You can purchase the professional LUTs pack to add value to your captures. It is a sophisticated tool and it works beyond boundaries. Use this limitless feature of this Cini Kit to bring out the best in the imported video content. There are options to integrate the in-built LUTs into your editing interface and apply the desired ones based on your requirements. It has a comfortable interface and promises you quality results.
Pros
- This app satisfies both beginners and professionals. It is a valuable LUT pack and makes a worthy purchase by purchasing the advanced features at cost-effective price tags.
- There are options to create a 3D illusion of the imported images using this Filmic Pro LUTs tool.
Cons
- The learning curve is steep and you have to spend extra hours to master all the in-built options available with this software.

Filmic Pro
How do you use the LUTs app to edit the videos precisely?
This section is an elaborate discussion on the best ways to use the LUTs app to edit the images or videos on iPhone efficiently. Every image takes a new look after editing with this giant program. The unique feature of this program is that you can create a filter on your own and apply it to obtain awesome outcomes. In the LUTs app, you will find the Export option on every edit page. It helps you to share it with your friends anytime even during the editing period. Any changes can be further included by scrolling the option at its interface.
You can follow up on the below instructions to successfully edit the images and videos using the LUTs app. Carefully watch out for the steps to edit the images or videos on your iPhone precisely.
Step 1Install the LUTs app
Go to the App Store and download this app. You can install the program and launch it to make further edits to the images.

Install Luts
Step 2 Create your filter
On the home screen of this app, create a customized filter and upload the images to apply to it. You can also use the in-built filters, LUTs files, and color grading attributes. The onscreen instruction is available to guide you with the respective pages for further edits on the imported files.

Create LUTs
Select the LUTs and apply, then adjust the color gradings and work with the parameters like brightness, hue, luminescence, and saturation. Make changes with the uploaded file and save the changes by tapping the tick icon at the top corner of the screen on your iPhone device.
Step 3 Export the edited content
Finally, press the export button to share the edited images with your friends at their respective destinations.

Export
Some of the options integrate for free into this platform. Apply them wisely to make the right changes to the image and videos.
All the above discussed three LUTs application gives you results with high standards. Every image looks great after undergoing the LUT filters. They are precise applications and reveal the flavors of the images and videos efficiently. The LUTs applications are simple and give you more features to personalize the photos and videos for your need. It is high time to select the reliable one from the list.
Wondershare Filmora11 Express Better
Archive More
Grow Together
Free Download Free Download Learn More

Summarize:
Thus, you had an enlightening journey with the iPhone LUT. You can process the images and videos using these LUTs apps and choose the above-discussed programs to make the perfect edits on the media files. They are simple to work with and give you the best outcomes without prior editing skills.
All the editing control are visible, and it is enough if you make the right clicks to include the desired effects on the imported media file. Connect with this article to discover efficient editing with the LUTs app. Stay tuned for further exciting facts about it in detail.

3DLUTS-app
• Video LUT
It is a high-end video editing LUTs app that works on every detail of the videos. This app helps you upload the images even from the virtual storage effortlessly. It supports some of the LUT formats like a 3D cube, Autodesk 3D LUT, and .png files. Use this app to adjust the brightness level, contrast, shadows, and saturation to obtain better looks in the images and videos.
Use this application to set the CMYK curves and insert the desired effects like glow and denoise to improve the visual and audio quality of the videos. The color grading option increases the standards of the videos and photos. The White balance attributes can be set to automatic mode to adapt to the existing levels in the original videos.
Pros
- Allows the users to perform batch processing and enables you to work with multiple files hassle-free.
- Merging of LUTs to create newer ones is feasible using this tool.
Cons
- Sometimes due to the file size, importing the videos from different sources affects the overall editing time. While accessing the virtual storage space, any unexpected network issues slow down the procedure.

Video LUts
• LUTs App
This application assists you to edit the LUTs images professionally. It is in-built with features like brightness, saturation, contrast, shadow, light, and tone. Set the precise values for these attributes to enhance the overall appearance of the images and videos. This application allows you to create a filter by customizing it with desired visual settings and implementing it on any uploaded videos and images for future use. This app aids you to share it without friends too.
Pros
- Easy navigation while editing the imported images and videos.
- Efficiently edit the color and export the photo directly to any destination quickly.
Cons
- Only limited features are available with this LUTs app.

LUTs app
• Filmic Pro
It is a cinematic LUT app and provides you with the essential effects of the uploaded content. You can purchase the professional LUTs pack to add value to your captures. It is a sophisticated tool and it works beyond boundaries. Use this limitless feature of this Cini Kit to bring out the best in the imported video content. There are options to integrate the in-built LUTs into your editing interface and apply the desired ones based on your requirements. It has a comfortable interface and promises you quality results.
Pros
- This app satisfies both beginners and professionals. It is a valuable LUT pack and makes a worthy purchase by purchasing the advanced features at cost-effective price tags.
- There are options to create a 3D illusion of the imported images using this Filmic Pro LUTs tool.
Cons
- The learning curve is steep and you have to spend extra hours to master all the in-built options available with this software.

Filmic Pro
How do you use the LUTs app to edit the videos precisely?
This section is an elaborate discussion on the best ways to use the LUTs app to edit the images or videos on iPhone efficiently. Every image takes a new look after editing with this giant program. The unique feature of this program is that you can create a filter on your own and apply it to obtain awesome outcomes. In the LUTs app, you will find the Export option on every edit page. It helps you to share it with your friends anytime even during the editing period. Any changes can be further included by scrolling the option at its interface.
You can follow up on the below instructions to successfully edit the images and videos using the LUTs app. Carefully watch out for the steps to edit the images or videos on your iPhone precisely.
Step 1Install the LUTs app
Go to the App Store and download this app. You can install the program and launch it to make further edits to the images.

Install Luts
Step 2 Create your filter
On the home screen of this app, create a customized filter and upload the images to apply to it. You can also use the in-built filters, LUTs files, and color grading attributes. The onscreen instruction is available to guide you with the respective pages for further edits on the imported files.

Create LUTs
Select the LUTs and apply, then adjust the color gradings and work with the parameters like brightness, hue, luminescence, and saturation. Make changes with the uploaded file and save the changes by tapping the tick icon at the top corner of the screen on your iPhone device.
Step 3 Export the edited content
Finally, press the export button to share the edited images with your friends at their respective destinations.

Export
Some of the options integrate for free into this platform. Apply them wisely to make the right changes to the image and videos.
All the above discussed three LUTs application gives you results with high standards. Every image looks great after undergoing the LUT filters. They are precise applications and reveal the flavors of the images and videos efficiently. The LUTs applications are simple and give you more features to personalize the photos and videos for your need. It is high time to select the reliable one from the list.
Wondershare Filmora11 Express Better
Archive More
Grow Together
Free Download Free Download Learn More

Summarize:
Thus, you had an enlightening journey with the iPhone LUT. You can process the images and videos using these LUTs apps and choose the above-discussed programs to make the perfect edits on the media files. They are simple to work with and give you the best outcomes without prior editing skills.
All the editing control are visible, and it is enough if you make the right clicks to include the desired effects on the imported media file. Connect with this article to discover efficient editing with the LUTs app. Stay tuned for further exciting facts about it in detail.
Make Super Easy Coin Magic With Filmora
Do you want to become a magician in your videos? Now, everyone can look like a magician with the magic of editing. This article will show you how to do a cool coin trick in Filmora 11 .
Part 1: What is the filmmaking technique “Cutting on action”
Cutting on action is a technique the editors use to cut in the middle of an action to another shot that matches the first shot’s action. Typically, the subject starts an action in one shot and continues the action in another, creating a smooth transition. For example, when you make the coin trick video, you need to cut on the tapping so it can trick the eyes, and the cut won’t be noticeable.
Part 2: Things You Need to Prepare for The Coin Magic Trick
- Glass and two coins

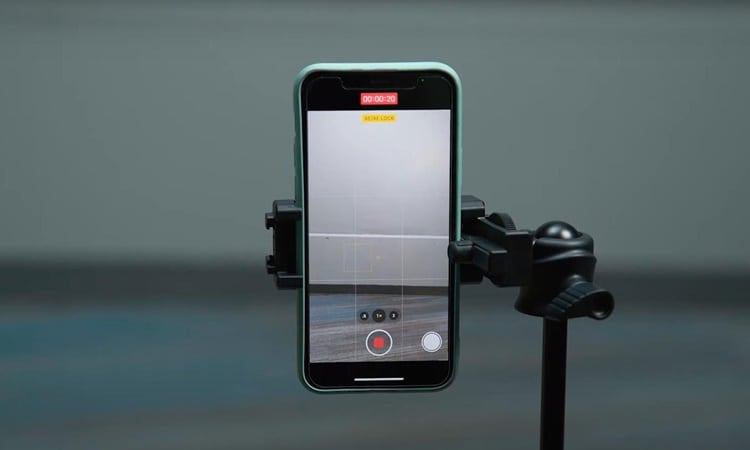
- Set the phone on a tripod. Because utilizing a tripod can significantly improve the recording’s stability.
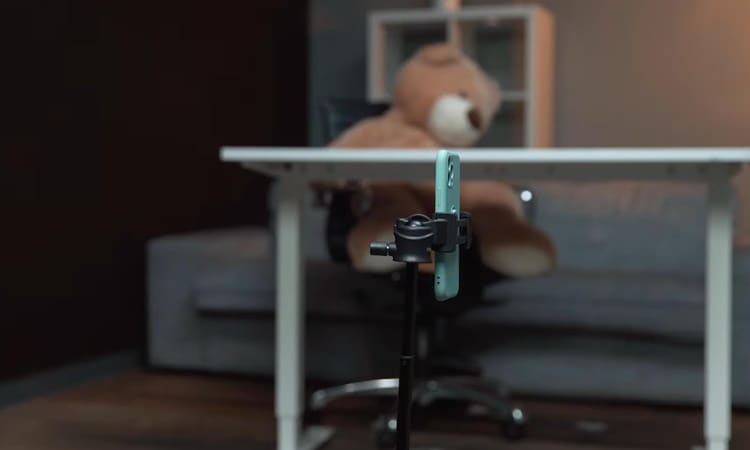
Part 3: Start Filming
Step1 Firstly, you must show the coin and the bottom of the glass.
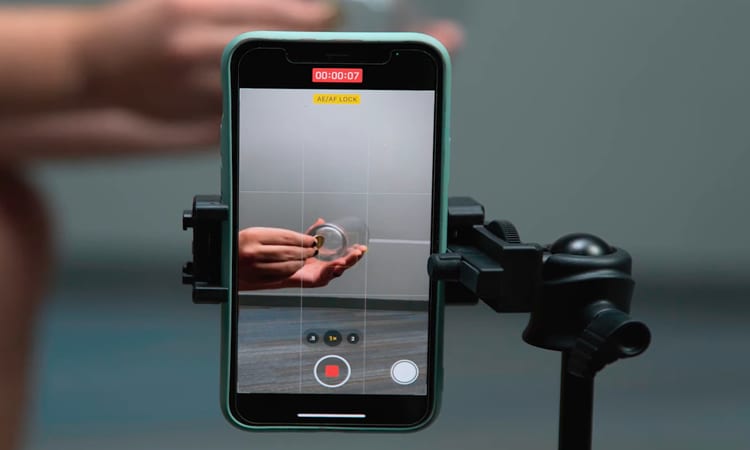
Step2 After that, you need to hold the coin with the fingers part of one hand and tap down on the coin. Make sure it looks like the coin is going through straight to the glass.
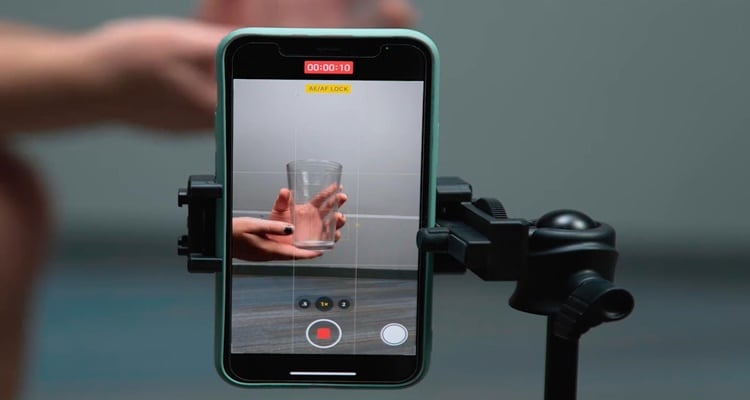
Step3 You need someone else to drop the other coin from the top. Meanwhile, you are pretending to tap a coin on the glass. You don’t need to worry about someone else hand in the frame. Since you can remove it easily with the masking feature in Filmora.
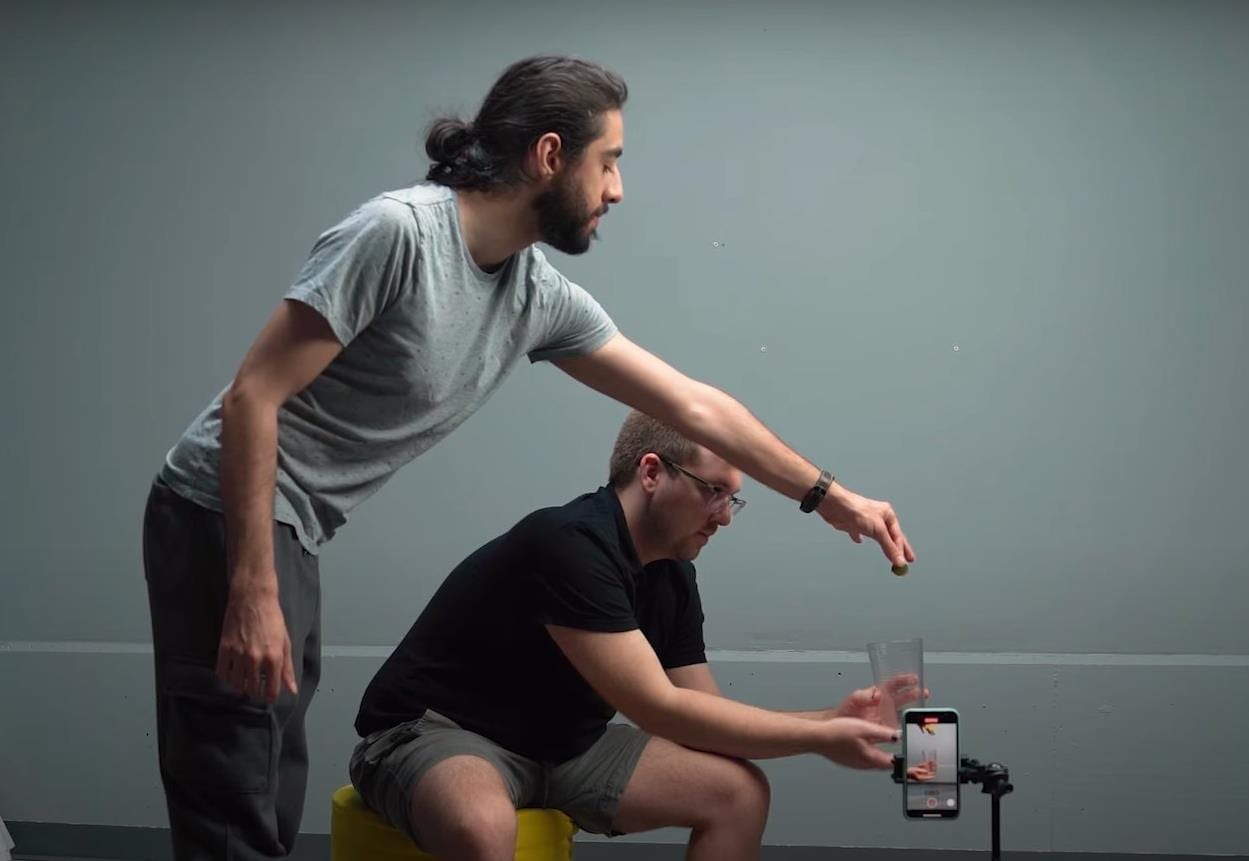
Step4 It would help if you had a second shot for a clean plate of the background. You can record background for 20 seconds.
Part 4: Bring the clips into Filmora 11
Step1 If you have not downloaded Filmora, you can visit filmora.wondershare.com to download Filmora’s new version.
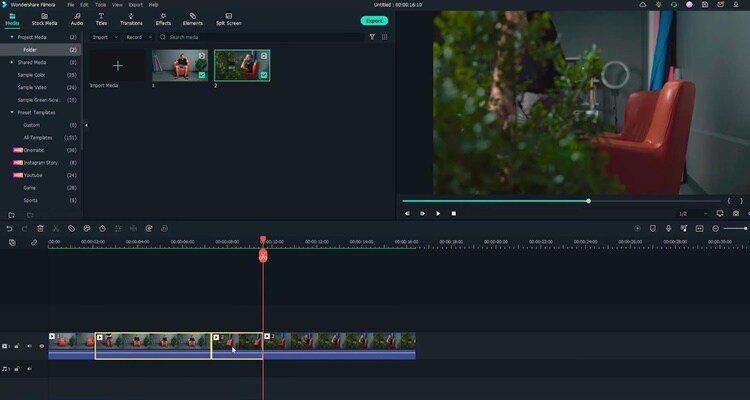
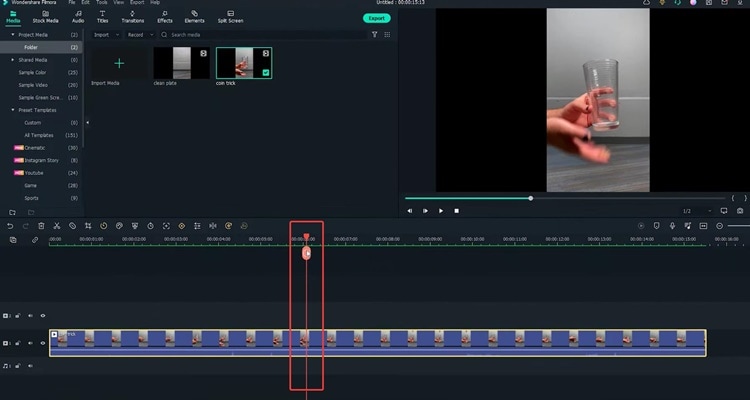
Step2 Drag and drop the clip onto the first track of the timeline.Afterward, move the playhead to the right and find the spot where you tapped the coin last time before your friend drops the other coin. Additionally, make sure it is in the middle of the tapping action and cut.
Step3 Then move the playhead to the right and find the spot where your friend drops the coin while you tap without the coin in your hand. Make sure it is in the middle of the tapping action, and the position of your hand roughly matches that in the last cut and make a cut.
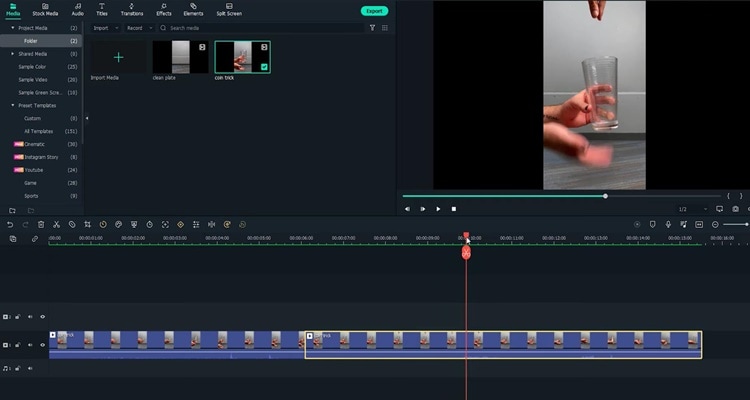
Step4 Now you need to delete the middle part and play it back. Indeed, cutting on action is the key to creating the illusion that the action is continued without editing.
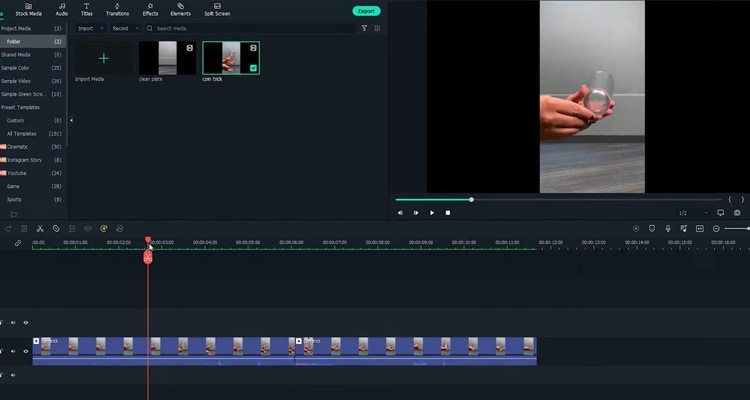
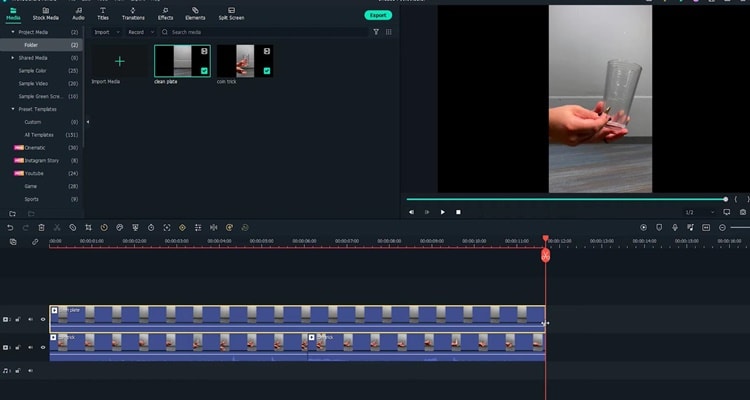
Step5 Next, you must remove your friend’s hand in the frame with the Filmora masking feature. Afterwards. drag and drop the clean plate video onto the second track of the timeline.
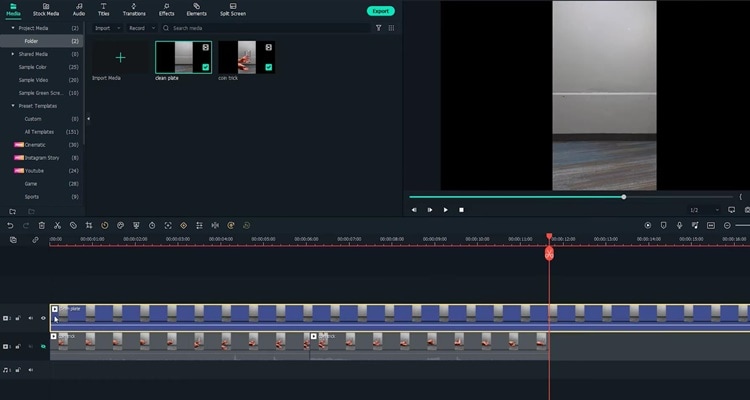
Step6 Next, double-click the clip to open the setting video. Find the Mask Section and select the single line.
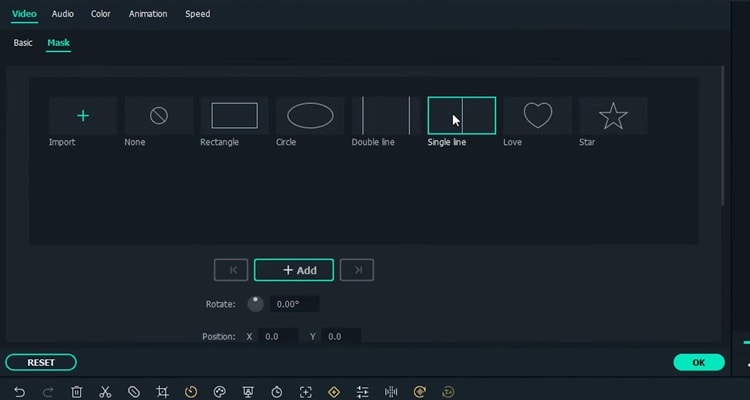
Step7 Here you can see the mask is applied.First, adjust the angle and position of the mask to only show the top part of the frame. Then you have to change the Blur Strength to add more blur to the edge of the mask.
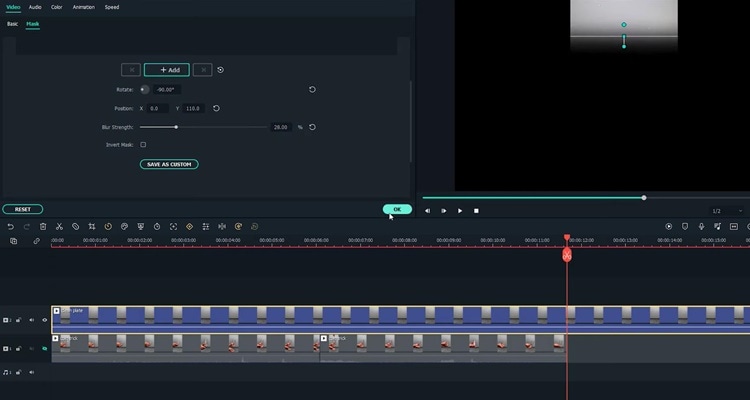
Step8 With the mask finalized, unhide the first video track and adjust the length of the clip on the timeline. Finally, playback the video and see how it looks.
Summary
That’s how to make a coin move through a glass-like MAGIC with the cutting on action editing technique. You can pay close attention to the steps above and follow each step for perfect results.
Free Download For Win 7 or later(64-bit)
Free Download For macOS 10.14 or later
Free Download For macOS 10.14 or later
Stunning Glitch Effect and Its Creation Guideline for Premiere Pro
Glitch means errors and malfunction in the footage in software, games, videos, images, and audio. Presently, creative professionals are intentionally adding the glitch effect to their work to give a unique vibe to it. The effect appears as the pixels glitch organically, appearing to melt or duplicate onto the next scene.
The article takes Adobe Premiere Pro under consideration. First, glitch effect Premiere templates and then the step-by-step guide to add glitch transition Premiere Pro would be discussed. Time to begin!
In this article
01 Part 1: 8 Amazing Glitch Effect for Premiere Pro
02 Part 2: How Do You Do the Glitch Effect in Premiere Pro?
Part 1: 8 Amazing Glitch Effect for Premiere Pro
There are extensive websites in business that offer amazing templates to add glitch effects to your video. The subsection of this article shall come up with eight workable VHS effect Premiere, which would be perfectly compatible with Premiere Pro. These VHS effect Premiere Pro are HD quality, which means you do not have to worry about the output. So, let us start! Shall we?
The first VHS overlay Premiere is Digital Glitch Transitions. Envato Elements offers 20 glitch transitions that can be used in different video themes. The HD resolution of this distortion effect Premiere Pro is 1920x1080. There are noise effects as well.

Glitch Slideshow is another amazing glitch effect Premiere Pro free introduced by Envato Elements. If you are a photographer or a film director, this glitch transition Premiere gives you what you need. The HD resolution is offered, and no plugins are required.

3. Venus
Venus is the perfect choice to add an Adobe Premiere VHS effect by offering an adjustable duration of the video with effortless customization. The template is highly famous among YouTubers and content creators to leave a long-lasting impact on the audience via glitchy titles and effects.

Presenting another Premiere Pro template, Fast Glitch Transitions is a ready-to-use template. It offers ten fast-tracked transitions that add value to the project. Moreover, it brings versatile colors to the video with the glitches. This Premiere VHS effect is perfect for intros and travel videos.

Allow me to introduce you to another new and stylish static effect Premiere Pro known as Glitch Multiframe Opener. It is a dynamic template that needs no plugins. Be free to use the template for commercials, Facebook video openers, and teasers. Moreover, photos and videos can be added to make the glitch workable.

Glitch Urban Opener is an impeccable glitch effect for Premiere Pro, presenting trendy and creative designs. It brings smooth transitions to the video with 17 editable layers, 11 media holders, and one logo placeholder. All of these options make this VHS filter Premiereeasily customizable and operatable.

Another retro effect Premiere Pro from Motion Elements is 30 Glitch Transitions. The media industry uses this template to insert different glitch effects into the video and make it eye-catching for everyone. The effects are styled with interference, bad TV, distortions, VHS noise, and other fatal errors.

Last but not the least, Glitch Transitions can be counted upon to act as the best Adobe Premiere glitch effect. There are three transitions for different themes. The color controls help manage the video editing more effectively. Moreover, the templates offer horizontal and vertical directions to work better.

Part 2: How Do You Do the Glitch Effect in Premiere Pro?
Are you a Premiere Pro user? Do you need to add the Premiere glitch transition to the video? Worry no more! Follow this subsection vividly. Would you?
Adobe Premiere Pro is a video editing software that has got you covered. You can enhance the speed of the video to tell your story better and share the vision. With Premiere Pro in the frame, you can shift the colors, insert graphics and titles, and give a unique music effect to the video. All in one platform, a dream come true, don’t you agree?
If you want to perform a Premiere Pro VHS effect, allow us to walk you through the process. It is highly recommended that you follow the guide carefully to have desirable results. So, what are we waiting for? Time to start, right?
Step 1: Importing the Targeted Video
To begin the process, open Adobe Premiere Pro on your system. Import the targeted footage and drag it to the timeline. After the video is added, head to the “Effects” panel on the left side of the interface.

Step 2: Launching the VR Digital Glitch
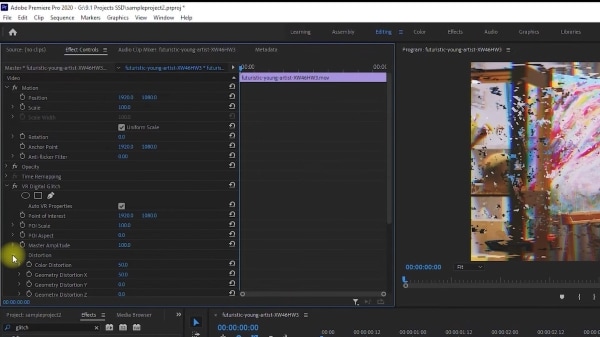
Type away glitch in the search bar. The user will find VR Digital Glitch in the results. Drag the effect to the clip on the timeline. Now, it is time to navigate to the “Effect Controls.”
Step 3: Changing the Distortion Control
Scroll down to find “Distortion” in the controls and expand it. The user is suggested to increase the color distortion to give an RGB effect to the footage. After that, you should reduce the distortion rate to 0 so that different artifacts can be eliminated effortlessly.

Step 4: Changing the Noise Strength
Moving on, expand the “Noise” control section and increase the noise strength. It will give the footage a significant level of graininess.

Step 5: Animating the Glitch Effect
To animate the glitch, use the playhead on the top and drag it to the first position where the effect should start from. Hit the stopwatch located on the left of “Master Amplitude.” It will create a keyframe. Alter the “Master Amplitude” to 0 as we do not want the clip to begin with a glitch.

Step 6: Playing with the Playhead
Now, use your keyboard’s right arrow to move the playhead three frames forward. After that, set the “Master Amplitude” to 100. Again, move the playhead three frames forward and set the “Master Amplitude” to 0. The animation is produced on the RGB color distortion.

Step 7: Positioning the Video
Move back to the first keyframe and head to the top that shows “Scale” settings. Enhance the scale value so that the video position can be leveled. Click on the stopwatch next to “Position” to create a keyframe. Move the playhead one frame forward and adjust the position of the frame.

Step 8: Final Process
Again, move the playhead to the next frame and click on the “Reset” shaped icon to reset the position of the video. Move another frame forward and reposition the video. You can do this multiple times to give a glitchy effect to the clip. There you go! It is all done.

Conclusion
A raw video doesn’t send the message as the user wants. For this, creative professionals need to give some effects to the video, such as glitch effect Premiere. The article highlighted some famous glitch effects which were perfectly compatible with Adobe Premiere Pro. The whole procedure to add the Adobe Premiere glitch effect was also the crux of this write-up.
02 Part 2: How Do You Do the Glitch Effect in Premiere Pro?
Part 1: 8 Amazing Glitch Effect for Premiere Pro
There are extensive websites in business that offer amazing templates to add glitch effects to your video. The subsection of this article shall come up with eight workable VHS effect Premiere, which would be perfectly compatible with Premiere Pro. These VHS effect Premiere Pro are HD quality, which means you do not have to worry about the output. So, let us start! Shall we?
The first VHS overlay Premiere is Digital Glitch Transitions. Envato Elements offers 20 glitch transitions that can be used in different video themes. The HD resolution of this distortion effect Premiere Pro is 1920x1080. There are noise effects as well.

Glitch Slideshow is another amazing glitch effect Premiere Pro free introduced by Envato Elements. If you are a photographer or a film director, this glitch transition Premiere gives you what you need. The HD resolution is offered, and no plugins are required.

3. Venus
Venus is the perfect choice to add an Adobe Premiere VHS effect by offering an adjustable duration of the video with effortless customization. The template is highly famous among YouTubers and content creators to leave a long-lasting impact on the audience via glitchy titles and effects.

Presenting another Premiere Pro template, Fast Glitch Transitions is a ready-to-use template. It offers ten fast-tracked transitions that add value to the project. Moreover, it brings versatile colors to the video with the glitches. This Premiere VHS effect is perfect for intros and travel videos.

Allow me to introduce you to another new and stylish static effect Premiere Pro known as Glitch Multiframe Opener. It is a dynamic template that needs no plugins. Be free to use the template for commercials, Facebook video openers, and teasers. Moreover, photos and videos can be added to make the glitch workable.

Glitch Urban Opener is an impeccable glitch effect for Premiere Pro, presenting trendy and creative designs. It brings smooth transitions to the video with 17 editable layers, 11 media holders, and one logo placeholder. All of these options make this VHS filter Premiereeasily customizable and operatable.

Another retro effect Premiere Pro from Motion Elements is 30 Glitch Transitions. The media industry uses this template to insert different glitch effects into the video and make it eye-catching for everyone. The effects are styled with interference, bad TV, distortions, VHS noise, and other fatal errors.

Last but not the least, Glitch Transitions can be counted upon to act as the best Adobe Premiere glitch effect. There are three transitions for different themes. The color controls help manage the video editing more effectively. Moreover, the templates offer horizontal and vertical directions to work better.

Part 2: How Do You Do the Glitch Effect in Premiere Pro?
Are you a Premiere Pro user? Do you need to add the Premiere glitch transition to the video? Worry no more! Follow this subsection vividly. Would you?
Adobe Premiere Pro is a video editing software that has got you covered. You can enhance the speed of the video to tell your story better and share the vision. With Premiere Pro in the frame, you can shift the colors, insert graphics and titles, and give a unique music effect to the video. All in one platform, a dream come true, don’t you agree?
If you want to perform a Premiere Pro VHS effect, allow us to walk you through the process. It is highly recommended that you follow the guide carefully to have desirable results. So, what are we waiting for? Time to start, right?
Step 1: Importing the Targeted Video
To begin the process, open Adobe Premiere Pro on your system. Import the targeted footage and drag it to the timeline. After the video is added, head to the “Effects” panel on the left side of the interface.

Step 2: Launching the VR Digital Glitch
Type away glitch in the search bar. The user will find VR Digital Glitch in the results. Drag the effect to the clip on the timeline. Now, it is time to navigate to the “Effect Controls.”

Step 3: Changing the Distortion Control
Scroll down to find “Distortion” in the controls and expand it. The user is suggested to increase the color distortion to give an RGB effect to the footage. After that, you should reduce the distortion rate to 0 so that different artifacts can be eliminated effortlessly.

Step 4: Changing the Noise Strength
Moving on, expand the “Noise” control section and increase the noise strength. It will give the footage a significant level of graininess.

Step 5: Animating the Glitch Effect
To animate the glitch, use the playhead on the top and drag it to the first position where the effect should start from. Hit the stopwatch located on the left of “Master Amplitude.” It will create a keyframe. Alter the “Master Amplitude” to 0 as we do not want the clip to begin with a glitch.

Step 6: Playing with the Playhead
Now, use your keyboard’s right arrow to move the playhead three frames forward. After that, set the “Master Amplitude” to 100. Again, move the playhead three frames forward and set the “Master Amplitude” to 0. The animation is produced on the RGB color distortion.

Step 7: Positioning the Video
Move back to the first keyframe and head to the top that shows “Scale” settings. Enhance the scale value so that the video position can be leveled. Click on the stopwatch next to “Position” to create a keyframe. Move the playhead one frame forward and adjust the position of the frame.

Step 8: Final Process
Again, move the playhead to the next frame and click on the “Reset” shaped icon to reset the position of the video. Move another frame forward and reposition the video. You can do this multiple times to give a glitchy effect to the clip. There you go! It is all done.

Conclusion
A raw video doesn’t send the message as the user wants. For this, creative professionals need to give some effects to the video, such as glitch effect Premiere. The article highlighted some famous glitch effects which were perfectly compatible with Adobe Premiere Pro. The whole procedure to add the Adobe Premiere glitch effect was also the crux of this write-up.
02 Part 2: How Do You Do the Glitch Effect in Premiere Pro?
Part 1: 8 Amazing Glitch Effect for Premiere Pro
There are extensive websites in business that offer amazing templates to add glitch effects to your video. The subsection of this article shall come up with eight workable VHS effect Premiere, which would be perfectly compatible with Premiere Pro. These VHS effect Premiere Pro are HD quality, which means you do not have to worry about the output. So, let us start! Shall we?
The first VHS overlay Premiere is Digital Glitch Transitions. Envato Elements offers 20 glitch transitions that can be used in different video themes. The HD resolution of this distortion effect Premiere Pro is 1920x1080. There are noise effects as well.

Glitch Slideshow is another amazing glitch effect Premiere Pro free introduced by Envato Elements. If you are a photographer or a film director, this glitch transition Premiere gives you what you need. The HD resolution is offered, and no plugins are required.

3. Venus
Venus is the perfect choice to add an Adobe Premiere VHS effect by offering an adjustable duration of the video with effortless customization. The template is highly famous among YouTubers and content creators to leave a long-lasting impact on the audience via glitchy titles and effects.

Presenting another Premiere Pro template, Fast Glitch Transitions is a ready-to-use template. It offers ten fast-tracked transitions that add value to the project. Moreover, it brings versatile colors to the video with the glitches. This Premiere VHS effect is perfect for intros and travel videos.

Allow me to introduce you to another new and stylish static effect Premiere Pro known as Glitch Multiframe Opener. It is a dynamic template that needs no plugins. Be free to use the template for commercials, Facebook video openers, and teasers. Moreover, photos and videos can be added to make the glitch workable.

Glitch Urban Opener is an impeccable glitch effect for Premiere Pro, presenting trendy and creative designs. It brings smooth transitions to the video with 17 editable layers, 11 media holders, and one logo placeholder. All of these options make this VHS filter Premiereeasily customizable and operatable.

Another retro effect Premiere Pro from Motion Elements is 30 Glitch Transitions. The media industry uses this template to insert different glitch effects into the video and make it eye-catching for everyone. The effects are styled with interference, bad TV, distortions, VHS noise, and other fatal errors.

Last but not the least, Glitch Transitions can be counted upon to act as the best Adobe Premiere glitch effect. There are three transitions for different themes. The color controls help manage the video editing more effectively. Moreover, the templates offer horizontal and vertical directions to work better.

Part 2: How Do You Do the Glitch Effect in Premiere Pro?
Are you a Premiere Pro user? Do you need to add the Premiere glitch transition to the video? Worry no more! Follow this subsection vividly. Would you?
Adobe Premiere Pro is a video editing software that has got you covered. You can enhance the speed of the video to tell your story better and share the vision. With Premiere Pro in the frame, you can shift the colors, insert graphics and titles, and give a unique music effect to the video. All in one platform, a dream come true, don’t you agree?
If you want to perform a Premiere Pro VHS effect, allow us to walk you through the process. It is highly recommended that you follow the guide carefully to have desirable results. So, what are we waiting for? Time to start, right?
Step 1: Importing the Targeted Video
To begin the process, open Adobe Premiere Pro on your system. Import the targeted footage and drag it to the timeline. After the video is added, head to the “Effects” panel on the left side of the interface.

Step 2: Launching the VR Digital Glitch
Type away glitch in the search bar. The user will find VR Digital Glitch in the results. Drag the effect to the clip on the timeline. Now, it is time to navigate to the “Effect Controls.”

Step 3: Changing the Distortion Control
Scroll down to find “Distortion” in the controls and expand it. The user is suggested to increase the color distortion to give an RGB effect to the footage. After that, you should reduce the distortion rate to 0 so that different artifacts can be eliminated effortlessly.

Step 4: Changing the Noise Strength
Moving on, expand the “Noise” control section and increase the noise strength. It will give the footage a significant level of graininess.

Step 5: Animating the Glitch Effect
To animate the glitch, use the playhead on the top and drag it to the first position where the effect should start from. Hit the stopwatch located on the left of “Master Amplitude.” It will create a keyframe. Alter the “Master Amplitude” to 0 as we do not want the clip to begin with a glitch.

Step 6: Playing with the Playhead
Now, use your keyboard’s right arrow to move the playhead three frames forward. After that, set the “Master Amplitude” to 100. Again, move the playhead three frames forward and set the “Master Amplitude” to 0. The animation is produced on the RGB color distortion.

Step 7: Positioning the Video
Move back to the first keyframe and head to the top that shows “Scale” settings. Enhance the scale value so that the video position can be leveled. Click on the stopwatch next to “Position” to create a keyframe. Move the playhead one frame forward and adjust the position of the frame.

Step 8: Final Process
Again, move the playhead to the next frame and click on the “Reset” shaped icon to reset the position of the video. Move another frame forward and reposition the video. You can do this multiple times to give a glitchy effect to the clip. There you go! It is all done.

Conclusion
A raw video doesn’t send the message as the user wants. For this, creative professionals need to give some effects to the video, such as glitch effect Premiere. The article highlighted some famous glitch effects which were perfectly compatible with Adobe Premiere Pro. The whole procedure to add the Adobe Premiere glitch effect was also the crux of this write-up.
02 Part 2: How Do You Do the Glitch Effect in Premiere Pro?
Part 1: 8 Amazing Glitch Effect for Premiere Pro
There are extensive websites in business that offer amazing templates to add glitch effects to your video. The subsection of this article shall come up with eight workable VHS effect Premiere, which would be perfectly compatible with Premiere Pro. These VHS effect Premiere Pro are HD quality, which means you do not have to worry about the output. So, let us start! Shall we?
The first VHS overlay Premiere is Digital Glitch Transitions. Envato Elements offers 20 glitch transitions that can be used in different video themes. The HD resolution of this distortion effect Premiere Pro is 1920x1080. There are noise effects as well.

Glitch Slideshow is another amazing glitch effect Premiere Pro free introduced by Envato Elements. If you are a photographer or a film director, this glitch transition Premiere gives you what you need. The HD resolution is offered, and no plugins are required.

3. Venus
Venus is the perfect choice to add an Adobe Premiere VHS effect by offering an adjustable duration of the video with effortless customization. The template is highly famous among YouTubers and content creators to leave a long-lasting impact on the audience via glitchy titles and effects.

Presenting another Premiere Pro template, Fast Glitch Transitions is a ready-to-use template. It offers ten fast-tracked transitions that add value to the project. Moreover, it brings versatile colors to the video with the glitches. This Premiere VHS effect is perfect for intros and travel videos.

Allow me to introduce you to another new and stylish static effect Premiere Pro known as Glitch Multiframe Opener. It is a dynamic template that needs no plugins. Be free to use the template for commercials, Facebook video openers, and teasers. Moreover, photos and videos can be added to make the glitch workable.

Glitch Urban Opener is an impeccable glitch effect for Premiere Pro, presenting trendy and creative designs. It brings smooth transitions to the video with 17 editable layers, 11 media holders, and one logo placeholder. All of these options make this VHS filter Premiereeasily customizable and operatable.

Another retro effect Premiere Pro from Motion Elements is 30 Glitch Transitions. The media industry uses this template to insert different glitch effects into the video and make it eye-catching for everyone. The effects are styled with interference, bad TV, distortions, VHS noise, and other fatal errors.

Last but not the least, Glitch Transitions can be counted upon to act as the best Adobe Premiere glitch effect. There are three transitions for different themes. The color controls help manage the video editing more effectively. Moreover, the templates offer horizontal and vertical directions to work better.

Part 2: How Do You Do the Glitch Effect in Premiere Pro?
Are you a Premiere Pro user? Do you need to add the Premiere glitch transition to the video? Worry no more! Follow this subsection vividly. Would you?
Adobe Premiere Pro is a video editing software that has got you covered. You can enhance the speed of the video to tell your story better and share the vision. With Premiere Pro in the frame, you can shift the colors, insert graphics and titles, and give a unique music effect to the video. All in one platform, a dream come true, don’t you agree?
If you want to perform a Premiere Pro VHS effect, allow us to walk you through the process. It is highly recommended that you follow the guide carefully to have desirable results. So, what are we waiting for? Time to start, right?
Step 1: Importing the Targeted Video
To begin the process, open Adobe Premiere Pro on your system. Import the targeted footage and drag it to the timeline. After the video is added, head to the “Effects” panel on the left side of the interface.

Step 2: Launching the VR Digital Glitch
Type away glitch in the search bar. The user will find VR Digital Glitch in the results. Drag the effect to the clip on the timeline. Now, it is time to navigate to the “Effect Controls.”

Step 3: Changing the Distortion Control
Scroll down to find “Distortion” in the controls and expand it. The user is suggested to increase the color distortion to give an RGB effect to the footage. After that, you should reduce the distortion rate to 0 so that different artifacts can be eliminated effortlessly.

Step 4: Changing the Noise Strength
Moving on, expand the “Noise” control section and increase the noise strength. It will give the footage a significant level of graininess.

Step 5: Animating the Glitch Effect
To animate the glitch, use the playhead on the top and drag it to the first position where the effect should start from. Hit the stopwatch located on the left of “Master Amplitude.” It will create a keyframe. Alter the “Master Amplitude” to 0 as we do not want the clip to begin with a glitch.

Step 6: Playing with the Playhead
Now, use your keyboard’s right arrow to move the playhead three frames forward. After that, set the “Master Amplitude” to 100. Again, move the playhead three frames forward and set the “Master Amplitude” to 0. The animation is produced on the RGB color distortion.

Step 7: Positioning the Video
Move back to the first keyframe and head to the top that shows “Scale” settings. Enhance the scale value so that the video position can be leveled. Click on the stopwatch next to “Position” to create a keyframe. Move the playhead one frame forward and adjust the position of the frame.

Step 8: Final Process
Again, move the playhead to the next frame and click on the “Reset” shaped icon to reset the position of the video. Move another frame forward and reposition the video. You can do this multiple times to give a glitchy effect to the clip. There you go! It is all done.

Conclusion
A raw video doesn’t send the message as the user wants. For this, creative professionals need to give some effects to the video, such as glitch effect Premiere. The article highlighted some famous glitch effects which were perfectly compatible with Adobe Premiere Pro. The whole procedure to add the Adobe Premiere glitch effect was also the crux of this write-up.
Also read:
- New Top 8 Memoji Makers to Make a Memoji on PC, Android, and iPhone for 2024
- New Tutorial | How to Make a Smooth Speed Ramping in Premiere Pro?
- 2024 Approved Follow a Few Simple Steps and Learn How to Create a Professional Glowing Edge Effect to Your Videos in Filmora
- 2024 Approved Do You Have a Loved Ones Birthday Fast Approaching, and Youre Wondering What to Do? A Birthday Photo Slideshow Is One Good Way to Celebrate the Person and Make Them Feel that They Are Loved
- Updated 2024 Approved Editing Videos Was Never so Easy as It Is Now. With Video Enhancer Ai, This Task Is Very Simple to Do and No Trouble Will Be There in Getting the Things Done as Needed. Choose the Right AI Video Enhancer for Task Completion
- New The Premiere Pro Video Templates Help Make Original Content of Broadcast Quality. The Article Introduces 10 Free Premiere Pro Templates that Are Sure to Make Your Life Easy for 2024
- Create a Kickass COD Warzone Thumbnail for Free for 2024
- Updated Step-by-Step Guide to Speed Up and Slow Down a Video
- New In 2024, How I Got Free After Effects Templates Slideshow with Simple Trick
- Updated TOP 6 Online Video Speed Controller for Chrome, Safari, Firefox for 2024
- Do You Intend to Include Motion Blur on Your Video Using Video Star? This Article Explains How to Use Motion Blur on Video Star with Exquisite Control
- Updated In 2024, 5 Tried-And-True Methods to GIF Making
- Updated 2024 Approved How to Change Quicktime Player Speed on Mac?
- New 2024 Approved Know How to Create OBS Slideshow. Creating OBS Slideshow in Simple Steps; Application for Creating OBS Slideshow. Make OBS Slideshow Online
- Having GoPro Accessories Is Easy, but Editing on GoPro Quik Is Challenging. Read This Guide and, Stepwise, Learn to Use GoPro Slow-Motion for Perfect Shots for 2024
- 2024 Approved Create Photoshop GIFs with Zero Hustle
- How to Make a Video Slideshow in iMovie for 2024
- Is GSM Flasher ADB Legit? Full Review To Bypass Your Xiaomi Redmi 13CFRP Lock
- In 2024, How Can We Bypass ZTE Blade A73 5G FRP?
- Easily Unlock Your OnePlus Open Device SIM
- In 2024, How to Unlock Xiaomi Redmi Note 12 Pro 4G PIN Code/Pattern Lock/Password
- How to fix videos not playing with my Nokia 105 (2023)?
- Forgot Pattern Lock? Heres How You Can Unlock Infinix Note 30 Pro Pattern Lock Screen
- Infinix Hot 40 Camera Not Working Unexpected Error? Fix It Now | Dr.fone
- Complete Tutorial to Use GPS Joystick to Fake GPS Location On Vivo X100 Pro | Dr.fone
- How To Stream Anything From Samsung Galaxy A34 5G to Apple TV | Dr.fone
- In 2024, How to Unlock Apple iPhone 14 Pro Max Passcode without iTunes without Knowing Passcode? | Dr.fone
- How To Repair iPhone SE System? | Dr.fone
- How to Reset Apple iPhone 12 Pro to Factory Settings? | Dr.fone
- How To Repair iPhone 15 Plus System Issues? | Dr.fone
- How To Deal With the Poco X6 Screen Black But Still Works? | Dr.fone
- In 2024, 10 Free Location Spoofers to Fake GPS Location on your Samsung Galaxy S23 Tactical Edition | Dr.fone
- The Magnificent Art of Pokemon Go Streaming On Sony Xperia 10 V? | Dr.fone
- Title: SBV to SRT How to Convert YouTube SBV Subtitle to SRT Format
- Author: Morgan
- Created at : 2024-05-19 05:11:39
- Updated at : 2024-05-20 05:11:39
- Link: https://ai-video-editing.techidaily.com/sbv-to-srt-how-to-convert-youtube-sbv-subtitle-to-srt-format/
- License: This work is licensed under CC BY-NC-SA 4.0.


