
:max_bytes(150000):strip_icc():format(webp)/wimbledonlivestream-c22d5eefbf8f40e9b25ba4cab1734ece.jpg)
Searching for the Best Video Editor to Make Your Video More Attractive? This Article Introduce You Everything About Choosing a Video Editing Software for 2024
Searching for the Best Video Editor to Make Your Video More Attractive? This Article Introduce You Everything About Choosing a Video Editing Software
More and more people love to share their knowledge, experience and daily life via videos. Platforms such as TikTok, YouTube, Vimeo are continuing to attract more and more people. But most people don’t know much about video editing. Which video editor they can use? How to apply the effects to improve the video visually? This post will give you all the tips and answers on editing a video.
Contents
01 [Video Editing Basics ](#Part 1)
02 [Editor’s Top 3 Picks ](#Part 2)
03 [Open-Source Video Editors](#Part 3)
04 [Freemium and Freeware Video Editors](#Part 4)
05 [Proprietary Video Editing Software](#Part 5)
06 [How to Choose the Suitable Video Editor](#Part 6)
07 [Video Editing Tips for Newbies](#Part 7)
08 [Frequently Asked Questions of Video Editor](#Part 8)
Part 1: Video Editing Basics
Before going to the best video editors, you should be aware of the basics of video editing. Here are the basic concepts of video editing that you must know as they are common across all video editors.
1. The Timeline: The timeline is an area of a video editor where you place your video clips sequentially. When you play the video after editing, the video will play from the start of the timeline and finish at the end of the timeline where your video content ends. The timeline is where you can place your audio clips, video effects, and graphical elements as per your requirements.
2. The Canvas: The canvas is an area of a video editor where you view your video clips frame by frame. The canvas allows you to edit the video starting from cropping to adding graphical elements. You can view all the changes you make to the video before applying them permanently.
3. Basic editing: The basic editing of a video includes splitting and trimming out important parts of a large video file and, thereafter, joining the different video clips to make an engaging video. The basic editing also includes adding audio clips, adjusting video parameters such as color, brightness, contrast as well as adding texts to the video.
4. Aspect Ratio: The aspect ratio of a video represents the ratio of width to height of the video in terms of pixels. For example, a video with aspect ratio of 16:9 means the video is 1920p x 1080p. You can edit the aspect ratio depending on where you want to publish the video. For example, social media videos use 1:1 and 9: 16 aspect ratio, tablets use 4:3 aspect ratio, and 16:9 is the standard aspect ratio.
5. B-roll: B-roll is a secondary video footage that you can add to your primary video(A-roll) to enhance the video creativity and aesthetic value. B-roll could be a cinematic shot, a slow-motion footage, a close-up shot from different angles, as well as a shot mixed with wide-angle, pans, and tilts.
6. Frame Rate: Frame rate refers to the number of images or frames displayed per second in a video. In short, frame rate refers to frames per second in a video. For example, a video of 30fps means the video is showing 30 different images per second. The 24fps is used for movies and the 30fps is used for online and TV videos. Even 60fps videos are becoming common as they produce a smoother video experience.
Part 2: Editor’s Top 3 Picks - Choose The Best Video Editor
Best Video Editor for All Creators - Filmora
Wondershare Filmora is the ideal video editor with an intuitive user interface. You get all the standard and advanced video editing features packed into its platform. You can record videos of external webcam and computer screen as well. There are unlimited video effects and graphical elements to turn your raw videos into eye-catching videos instantly.
Best for Professional Editing - Premiere Pro
Adobe Premium Pro is the best professional video editor where all the advanced features of video editing are available. The software supports editing multiple projects simultaneously. You can edit VR, Multicam, and 3D videos as well. It is a perfect platform for a professional video editing team to work in sync.
Best for Online Video Editing - WeVideo
WeVideo is by far the best online video editor with 30 million users. Starting from standard video editing options and uploading directly to social media platforms, WeVideo is a full-fledged video editor. You can also record videos and create your own video templates. Moreover, you can collaborate with other video creators and make the best use of the unlimited stock media library.
Part 3: Open-Source Video Editors
Open-source video editors have compatibility with all the desktop operating systems. Moreover, due to their codes readily available online, these video editing software applications are available completely free of cost. Here are the best open-source video editors for beginners and experienced users.
# For Beginner Users
1. Blender
Compatibility: Windows, Mac, Linux
Best for: best open-source video editor with balanced features
G2 rating: 4.5 out of 5

Blender is an open-source video editing suite that is popular for its 3D models. Since it is a suite, you can use the platform not only for video editing but also for creating animated videos and games.
Starting from basic video editing such as trim and split to advance video editing such as masking and color adjustment, all options are readily available. Besides, there are options for audio mixing and live preview of editing works.
Reason to Choose:-
- Video cropping, trimming, splitting, joining, and adjusting speed.
- Different slots to add videos, images, scenes, audio clips, effects and masks.
- Different transitions, filters, effects, waveforms, and keyframes available.
- Create 3D models and animated videos with proper audio mixing.
Reason to Avoid:-
- Takes time to get used to the platform.
- Reports of bugs have become a regular occurrence.
2. Avidemux
Compatibility: Windows, Mac, Linux
Best for: best open-source video editor for basic editing
G2 rating: 4.4 out of 5

Avidemux from Soundforge is a lightweight and basic video editor. Starting from trimming and cutting videos to applying filters and encoding videos, all the options are readily available. The software supports a wide range of video file formats for editing.
The platform also supports scripting through which you can automate tasks to perform on videos. Besides, there are options for color adjustments, video conversion, and advanced interlacing. The simple user interface is perfect for beginners to edit videos intuitively.
Reason to Choose:-
- Quick video editing for trimming, cutting, rotating, and cropping.
- Change speed and use different filters for color adjustments and subtitles.
- Supports different video file formats in import and export.
- The user interface is simple and suitable for beginners.
Reason to Avoid:-
- Does not have a traditional timeline for video editing.
- Limited effects, filters, and advanced features.
3. Kdenlive
Compatibility: Windows, Mac, Linux
Best for: best open-source video editor for all
G2 rating: 4.3 out of 5
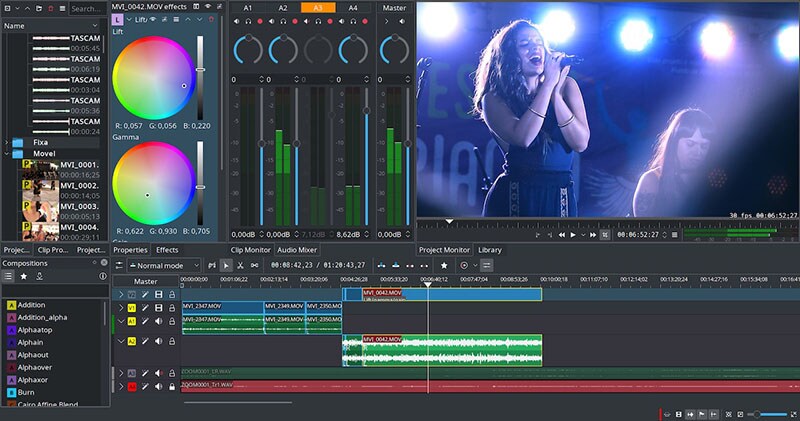
Kdenlive video editor is a versatile video editor with standard and advanced video editing features balanced properly. The open-source software allows multi-track timeline and supports dual monitor setup for video editing. The user interface is simple, and you can configure it as per your preference.
Kdenlive supports a wide range of video and audio files, and you can use configurable keyboard shortcuts for easy operation. The automatic backup feature is highly useful in the professional video editing world. Similarly, the presence of keyframe-based effects and advanced effects can make a video stand out.
Reason to Choose:-
- Multi-track timeline for working with multiple video and audio clips.
- Keyframeable effects, transitions, color correction and unlimited online resources.
- Vast set of options for creating stunning texts and titles.
- Smooth preview, configurable interface, and automatic backup.
Reason to Avoid:-
- Lacks GPU acceleration and hence, slow response at times.
- Speed adjustment effect is not efficient.
# For Advanced Users
4. OpenShot
Compatibility: Windows, Mac, Linux, Chrome OS
Best for: Best open source editor for all desktop users
G2 rating: 4.4 out of 5

OpenShot is a cross-platform, open-source video editor where you can work on one project on different operating systems. It works on keyframe animation framework, and you can choose from different interpolations. The platform offers you to work with unlimited video and audio clips as well as layers.
You can perform all the basic video editing operations as well as go for advanced editing. The features and tools are well-balanced for regular as well as professional video editing. Starting from video effects and audio mixing to chroma key and time-mapping, everything is available under one roof.
Reason to Choose:-
- Basic video editing with panning, zooming, and scrolling features.
- Wide range of transitions, effects, time and speed control.
- Time-mapping, audio mixing, overlays, and composting.
- Supports 3D animations and objects, templates for titles and sub-titles.
Reason to Avoid:-
- Hardware acceleration is not very powerful.
- Not suitable for 4K video editing as it gets extremely slow.
5. Shotcut
Compatibility: Windows, Mac, Linux
Best for: Best for video editors who love filters and effects
G2 rating: 4.2 out of 5

Shotcut is another open-source and cross-platform video editor with a professional user interface. The software supports importing different file formats of video and audio files. It is suitable for editing 4K videos, and it is a full-fledged audio editor as well.
Its vast video filters and effects are comparable to premium video editors. You can work with multi-track timeline and keyframes with markers and rangers. Besides, you can keep notes on your project easily. Overall, it is a balanced video editor in terms of features and functionalities.
Reason to Choose:-
- Wide categories of video effects, transitions, and filters.
- Multi-track and multi-format timeline and detailed audio editor.
- Standard and advanced editing options with hardware acceleration.
- Export video in high-resolution and in different formats.
Reason to Avoid:-
- The user interface can take some time to get used to.
- The stock media library is rather limited.
6. NATRON
Compatibility: Windows, Mac, Linux
Best for: Best open-source video editor with visual effects
G2 rating: 3.5 out of 5
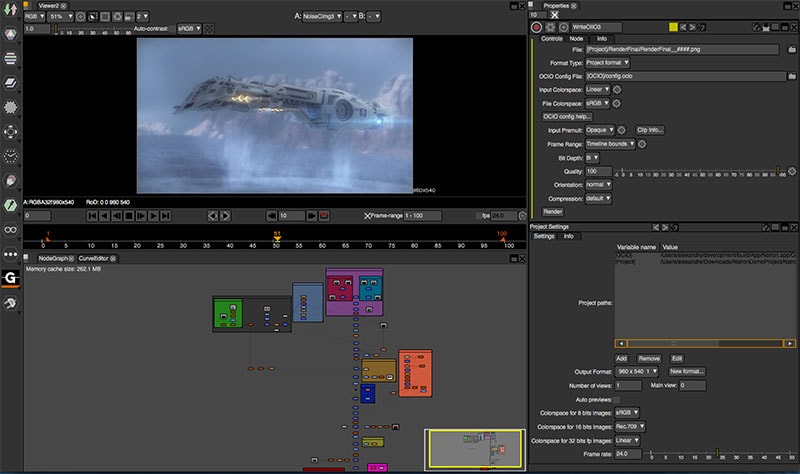
NATRON is a robust video editor with powerful tracking tool for 2D and planar tracking. You can work with multiple layers and clips and avail various keying options on your video editing project. In fact, it is a full-fledged video compositing software for better video production with multi-layer structure.
The hardware acceleration of the software produces faster rendering. You get to work with presets, tracker nodes, rotoscoping, multi-plane and motion editing. The option of multi-view workflow along with real-time playback is extremely useful while editing multicam videos.
Reason to Choose:-
- Superior visual effects and motion editing.
- Multi-tasking with multi-view workflow.
- Option of rotoscoping and python scripting.
- Supports different open-source plugins.
Reason to Avoid:-
- The user interface is quite advanced and needs some learning time.
- It gets unstable and slow while previewing high-resolution videos.
Part 4: Freemium and Freeware Video Editors
Freeware video editors are available completely free of cost and they are mostly exclusive to a certain operating system. On the other hand, freemium video editors have certain features completely free while it charges users a small fee for certain advanced features. Here is the list of the best freemium and freeware video editors.
# For Beginner Users
7. ActivePresenter
Compatibility: Windows and Mac
Best for: best video editing software for learning videos.
G2 rating: 4.5 out of 5

ActivePresenter from AtomiSystems is a video editor with screen recording options. The software is particularly useful in making and editing learning videos. There are different templates available for editing videos quickly. Besides, you can use the platform for standard editing options for any video.
Starting from working with multiple timelines to making videos interactive and responsive, there are various out-of-box features. Moreover, you can edit your audio and export your edited video in different file formats.
Reason to Choose:-
- Multiple timelines for editing various video and audio clips.
- Basic video and audio editing options and greenscreen effects.
- Webcam and screen recording with audio from different sources.
- Export videos with different file formats, HTML, xAPI, SCORM and much more.
Reason to Avoid:-
- The learning curve is slightly steep.
- Not suitable for editing all types of videos.
8. Microsoft Photos
Compatibility: Windows
Best for: best built-in video editor for Windows users
G2 rating: 4.6 out of 5

Microsoft Photos is the inbuilt video editor for Windows users. The app comes pre-installed in Windows and it is mostly used for viewing photos. But there is an inbuilt video editor where you can do the basic video editing works.
You can trim a video, add texts, and apply 3D effects as well as different filters available. There are also options for rotating videos, applying background music and customizing audio. The user interface is very simple for all users.
Reason to Choose:-
- Instant basic video editing options available.
- Apply effects, filters, as well as music.
- Simple and intuitive user interface for everyone.
- Comes pre-installed and completely free of cost.
Reason to Avoid:-
- Very limited video editing options.
- Very limited video file formats supported.
9. iMovie
Compatibility: Mac
Best for: Best built-in video editor for Mac users
G2 rating: 4.3 out of 5

iMovie is the inbuilt video editor for Mac users as it comes pre-installed on macOS. The application is free to use and it is compatible with iPhone and iPad as well. You can perform all the basic video editing works starting from trimming to rotating videos.
Besides, there is a wide range of effects and filters available to apply on your videos. The best part is that it supports editing 4K videos. There are also various graphical elements available and you can share your video easily on different platforms.
Reason to Choose:-
- Trim, rotate, split and crop videos easily.
- Work across Mac, iPhone and iPad seamlessly.
- Wide range of effects, filters, and objects available.
- Supports editing 4K videos without any lag.
Reason to Avoid:-
- Lacks advanced editing options though it is a dedicated video editor.
- Supports very limited video file formats.
# For Advanced Users
10. Lightworks
Compatibility: Windows, Mac, Linux
Best for: best for social media video creators
G2 rating: 3.5 out of 5

Lightworks is a freemium video editor where most features are reserved for premium users. If you are a social media creator or learning video creator, Lightworks Create is best for you. If you are a professional video creator, you should opt for Lightworks Pro.
The software supports almost all file formats, and you can export videos on social media instantly. The timeline is advanced with proxy editing, autosave and background processing features. You can share projects with your teammates and work collaboratively.
Reason to Choose:-
- Powerful and advanced timeline for quick editing.
- Motion graphics and tilting along with advanced metadata.
- Flexible user interface with proxy workflow and storyboard bin.
- Suitable for collaborating works and cloud storage.
Reason to Avoid:-
- Can crash while working with 4K videos.
- Limited options for advanced video editing.
11. VideoPad
Compatibility: Windows
Best for: best video editor for short video creators.
G2 rating: 4.1 out of 5

VideoPad by NCH Software is an intuitive video editor that supports over 60 different video file formats. There are tools available for basic editing such as trimming and cropping. Besides, there are various effects and transitions available to apply on your video.
The video editor also lets you edit audio files and you can edit 360-degree videos as well. There are video stabilization and chroma key effect available. The video editor is available free for non-commercial use with certain limitations that you can overcome with its premium plan.
Reason to Choose:-
- Edit in Storybook or Timeline mode and perfect all basic editing works.
- Audio editing options with different audio effects.
- Add 3D video effects, special filters, and change video speed.
- Supports a wide range of video file formats.
Reason to Avoid:-
- Can crash while editing 4K videos.
- Lacks advanced editing options.
12. VSDC Free Video Editor
Compatibility: Windows only.
Best for: Free feature-rich video editing suite
G2 rating: 4.0 out of 5

VSDC Free Video Editor is a free suite that includes both video and audio editor. You can use the software for recording screen as well as voiceovers. The software is suitable for low-end computers as it is a lightweight application.
Apart from basic editing, you can edit 360 videos. Starting from color correction and zooming to split-screen effect and chroma key, it is full-fledged feature-rich software. For more advanced features, you can opt for VSDC Video Editor Pro version.
Reason to Choose:-
- Zooming, panning, and color correction options.
- Wide range of effects and filters present.
- Chrome key option as well as 360 degree video editing.
- Work with multiple layers and sync objects perfectly.
Reason to Avoid:-
- Lacks advanced video editing options.
- No masking or video stabilization option available.
Part 5: Proprietary Video Editing Software
If you are a regular video creator and you want to invest in video editing to improve the quality of your video content, you have to opt for a proprietary video editing software. All professional video creators prefer proprietary video editing software over freeware and freemium video editors. Here are the best premium video videos with the most advanced video editing options.
# For Beginner Users
13. Filmora
Compatibility: Windows and Mac.
Best for: Best video editors for YouTubers and vloggers
G2 rating: 4.4 out of 5

Wondershare Filmora is a feature-rich video editor but an intuitive user interface. Therefore, it is perfectly suitable for beginners who want all the features and tools for advanced video editing without a steep learning curve. Filmora is also useful if you want to record screen or webcam video.
Starting from tons of video effects and transitions to a large stock library and graphical elements, Filmora is tailor-made for editing all types of videos. It also supports a wide range of file formats and you can edit 4K videos as well as audio files comfortably.
For Win 7 or later (64-bit)
For macOS 10.12 or later
Reason to Choose:-
- Trim, split, join, crop and work with multiple video and audio clips.
- Large collection of video and audio effects, transitions, and graphical elements.
- Large stock library of free media files and animations.
- Work with multiple layers and clips effortlessly on its smooth timeline.
Reason to Avoid:-
- The processing time for videos could be on the higher side.
14. Camtasia
Compatibility: Windows and Mac.
Best for: Teachers and students to edit tutorial videos
G2 rating: 4.6 out of 5

Camtasia by Techsmith is a premium video editor and it is equally popular as a video recorder. It is particularly useful for recording and editing tutorial videos as there are different templates available. Coming to video editing part, you can perform all the basic video editing works instantly.
There are various trendy effects, transitions, and presets available. You can remove green screen and apply different frames for video compatibility on different devices. Besides, you can upload the editing video different on different platforms instantly.
Reason to Choose:-
- Quick trimming, splitting, cropping options.
- Large collection of templates and presets.
- Wide range of effects, annotations, and transitions.
- Import, export, and share different file formats.
Reason to Avoid:-
- No motion tracking option.
- Reports of frequent crashes.
15. Final Cut Pro
Compatibility: Mac only.
Best for: best professional video editors for Mac users
G2 rating: 4.4 out of 5

Final Cut Pro from Apple is an extremely popular premium video editor among professional video creators who are Mac users. It is a powerful and advanced video editor that can handle high resolution videos smoothly. It is a perfect mix of standard and advanced video editing features.
Starting from editing multicam and VR videos to 3D and 360 degree videos, Final Cut Pro is suitable for all. There are unlimited presets and effects present and you can edit 4K videos as well as large video files smoothly.
Reason to Choose:-
- Basic and advanced video and audio editing features.
- Supports editing all the different video types such as 3D, 4K, VR videos.
- Supports plug-ins, external tools and cinematic effects.
- Renders high resolution, large video files in short time.
Reason to Avoid:-
- Learning curve is quite steep.
- Pricing is on the higher side.
# For Beginner Users
16. Adobe Premiere Pro
Compatibility: Windows only.
Best for: best professional video editing software for most people
G2 rating: 4.5 out of 5

Adobe Premiere Pro is the ultimate video editor in the professional video editing world. You get all the different advanced features of video editing packed in the application. Even though the learning curve is steep, Adobe Premiere Pro is one of the most used video editors in professional video creation.
Adobe Premiere Pro supports all the different video file formats and you can edit various videos simultaneously. It is a perfect tool for editing a large video project collaboratively. It supports editing VR videos, 3D videos, as well as multicam videos.
Reason to Choose:-
- Standard and advanced editing options with quick rendering.
- Suitable for multi-tasking and collaborative work in video editing.
- Supports almost all types of videos and audio file formats.
- Flexible and configurable user interface and advanced timeline.
Reason to Avoid:-
- Learning curve is very steep.
- Not suitable for low-end computers.
17. Vegas Pro
Compatibility: Windows only.
Best for: Video & audio editing for professionals
G2 rating: 4.2 out of 5

Vegas Pro from Sony is a professional video and audio editor. You can work with multiple video and audio files and you can choose from timeline or storyboard layout. In fact, there are options for nested timeline and multicam editing. The customized workflow and layouts make the application suitable for everyone.
You can enhance your video with its large collection of filters, effects, and titles. There are options for keyframing, scene detection, color correction, and light adjustments. The artificial intelligence makes editing faster with automation control.
Reason to Choose:-
- Powerful timeline and storyboard mode with keyframing.
- Advanced HDR color correction and grading.
- Artificial intelligence for quick and repeated editing.
- Multicam editing, motion tracking, and support for 3D videos.
Reason to Avoid:-
- Stability of the application is questionable.
- Pricing is steep and lacks tutorial guide.
18. Hitfilm Express
Compatibility: Windows and Mac
Best for: Best for video effects lovers
G2 rating: 4.4 out of 5

Hitfilm Express is particularly popular for its unlimited video effects that make the video stand out easily. The user interface is quite simple to use, and you can apply effects to turn your raw video into professional video instantly. In fact, it has the largest VFX toolkit with industry-grade effects.
You can edit 4K videos, and there are options for motion tracking and video animations. You can also opt for color correction and grading. You can also edit vertical videos and upload them on social media platforms. You can also edit audio clips and use composting and layering features to enhance your video.
Reason to Choose:-
- Advanced timeline for better workflow.
- Standard and advanced video editing options.
- Largest collection of video effects of different categories.
- Color grading, correction, and free training and support.
Reason to Avoid:-
- Lacks green screen editing option.
- Rendering is not always swift.
Part 6: How to Choose the Suitable Video Editor?
The most important part of video editing is to choose the most suitable video editor for your videos. Here are some important factors to consider while choosing a video editor.
1. Budget and Price: If you are getting started, you can opt for a free video editor. But eventually, you have to go for a premium video editor if you are serious about video editing. You should opt for that video editor that fits your budget and offers more features for the price charged in comparison to its competitors.
2. Learning Curve: You should always opt for a video editor that has a low learning curve. If the video editor is complicated to operate, you will get frustrated, and you won’t be able to unlock the full potential of the video editor. Besides, you will have to lose a lot of time in learning and perfecting the usage of the application.
3. Stock Library: The video editor you are choosing must have a sizeable stock media library. A stock library is where you can find video clips and audio clips that are free to use for everyone. You can incorporate them into your video to enhance the content quality and bring variety to your audiences.
4. Audio control: Video editing is incomplete without proper audio editing. Your video editor should have a separate timeline for audio clips so that you can place them perfect to go in sync with the video clips. Some video editors have dedicated options for audio mixing and editing as per requirements.
5. upport video formats: Your video editor must support a wide range of video file formats that you have to include from time to time. If it supports only the popular file formats, you will not be able to include the interesting videos you may get from different sources which the video editor does not support.
6. Software stability: If you need to edit high-resolution videos, you have to ensure that the video editor you are choosing can stay stable throughout. There are many popular video editors available that become unstable while editing and rendering high-resolution videos. You have to read reviews to come to a conclusion about software stability.
7. Customer Support: Last but most importantly, your video editor must have a good customer support team. In your video editing journey, you will need the help of technical customer support to clarify issues related to the software so that you can excel in your video editing sessions.
Part 7: Video Editing Tips for Beginners
Here are some basic video editing tips that you should keep in mind while editing any video.
1. Try Tight Cuts: Your video should not be too long so that it gets boring for the viewers. Therefore, you have to make tight cuts which means you have to cut out pauses, gaps between dialogs, and anything that is unnecessary for viewers. If you think that tight cuts will take more time than usual, you can consider reshooting the part to save time.
2. Put The Story Before The Footage: When you are shooting a planned video, you must be shooting the video with multiple cameras from different angles. While editing and choosing the perfect angle for a certain video segment, you have to select the one that enhances the story you are telling through your video. For example, in an interview video, you should know when to emphasize and show close angles to capture the emotion of the speaker.
3. Chop Out Mistakes: The most basic work in video editing is to cut out the mistakes. This is because you are sure to make mistakes while shooting, and you will reshoot a lot of mistakes to correct them. Therefore, take your time to chop out mistakes but make sure that the video feels continuous, and if required, you can reshoot. To avoid mistakes in action, you can use different camera angles, blur portions, and bleep out certain words.
4. Learn to use color: Color correction and adjustment is a majorly neglected part of video editing that can make your video different from others. When you are shooting in outdoor conditions, the color of the video could get disturbed depending on the color of your dress as well as your surrounding. While editing, you need to correct them so that the video looks visually pleasing to the eyes.
5. Cut to music: Audio plays a very important role in any video, and hence, you should not neglect it. Always opt for a video editor that has a good collection of stock music so that you can apply them to your video in appropriate places. Music helps to break the monotony and grab the attention of the audience instantly.
6. Back up your work: It takes hours to shoot a video but only a second to lose it. Instead of blindingly relying on your storage device, you should take back up of your work on multiple devices. Taking backup in the cloud storage area is the best option as you can access your work from anywhere.
Part 8: Frequently Asked Questions of Video Editor
What is the best video editor?
Wondershare Filmora is the best video editor as it has the perfect mix of standard and advanced video editing options. The user interface is intuitive and easy to operate for every video creator.
What editor do YouTubers use on PC?
The most commonly used video editors by YouTubers are Final Cut Pro, Adobe Premiere Pro and Filmora. Unless you are a pro in video editing, we recommend Filmora and Shotcut for your YouTube videos.
How can I edit videos for free?
If you are a Windows user, you can use Microsoft Photos and Openshot for editing your videos for free. For Mac users, iMovie is the best free video editor with balanced features.
Does Windows 10 have a free video editor?
Yes, Windows 10 does come with a free video editor and it is called Microsoft Photos. You can edit your photos and videos with the application.
Is Filmora Free?
No, Filmora is a premium video editor. However, you can download its free trial version to understand its features and functionalities. Thereafter, you can purchase its premium plan as per your suitability.
02 [Editor’s Top 3 Picks ](#Part 2)
03 [Open-Source Video Editors](#Part 3)
04 [Freemium and Freeware Video Editors](#Part 4)
05 [Proprietary Video Editing Software](#Part 5)
06 [How to Choose the Suitable Video Editor](#Part 6)
07 [Video Editing Tips for Newbies](#Part 7)
08 [Frequently Asked Questions of Video Editor](#Part 8)
Part 1: Video Editing Basics
Before going to the best video editors, you should be aware of the basics of video editing. Here are the basic concepts of video editing that you must know as they are common across all video editors.
1. The Timeline: The timeline is an area of a video editor where you place your video clips sequentially. When you play the video after editing, the video will play from the start of the timeline and finish at the end of the timeline where your video content ends. The timeline is where you can place your audio clips, video effects, and graphical elements as per your requirements.
2. The Canvas: The canvas is an area of a video editor where you view your video clips frame by frame. The canvas allows you to edit the video starting from cropping to adding graphical elements. You can view all the changes you make to the video before applying them permanently.
3. Basic editing: The basic editing of a video includes splitting and trimming out important parts of a large video file and, thereafter, joining the different video clips to make an engaging video. The basic editing also includes adding audio clips, adjusting video parameters such as color, brightness, contrast as well as adding texts to the video.
4. Aspect Ratio: The aspect ratio of a video represents the ratio of width to height of the video in terms of pixels. For example, a video with aspect ratio of 16:9 means the video is 1920p x 1080p. You can edit the aspect ratio depending on where you want to publish the video. For example, social media videos use 1:1 and 9: 16 aspect ratio, tablets use 4:3 aspect ratio, and 16:9 is the standard aspect ratio.
5. B-roll: B-roll is a secondary video footage that you can add to your primary video(A-roll) to enhance the video creativity and aesthetic value. B-roll could be a cinematic shot, a slow-motion footage, a close-up shot from different angles, as well as a shot mixed with wide-angle, pans, and tilts.
6. Frame Rate: Frame rate refers to the number of images or frames displayed per second in a video. In short, frame rate refers to frames per second in a video. For example, a video of 30fps means the video is showing 30 different images per second. The 24fps is used for movies and the 30fps is used for online and TV videos. Even 60fps videos are becoming common as they produce a smoother video experience.
Part 2: Editor’s Top 3 Picks - Choose The Best Video Editor
Best Video Editor for All Creators - Filmora
Wondershare Filmora is the ideal video editor with an intuitive user interface. You get all the standard and advanced video editing features packed into its platform. You can record videos of external webcam and computer screen as well. There are unlimited video effects and graphical elements to turn your raw videos into eye-catching videos instantly.
Best for Professional Editing - Premiere Pro
Adobe Premium Pro is the best professional video editor where all the advanced features of video editing are available. The software supports editing multiple projects simultaneously. You can edit VR, Multicam, and 3D videos as well. It is a perfect platform for a professional video editing team to work in sync.
Best for Online Video Editing - WeVideo
WeVideo is by far the best online video editor with 30 million users. Starting from standard video editing options and uploading directly to social media platforms, WeVideo is a full-fledged video editor. You can also record videos and create your own video templates. Moreover, you can collaborate with other video creators and make the best use of the unlimited stock media library.
Part 3: Open-Source Video Editors
Open-source video editors have compatibility with all the desktop operating systems. Moreover, due to their codes readily available online, these video editing software applications are available completely free of cost. Here are the best open-source video editors for beginners and experienced users.
# For Beginner Users
1. Blender
Compatibility: Windows, Mac, Linux
Best for: best open-source video editor with balanced features
G2 rating: 4.5 out of 5
Blender is an open-source video editing suite that is popular for its 3D models. Since it is a suite, you can use the platform not only for video editing but also for creating animated videos and games.
Starting from basic video editing such as trim and split to advance video editing such as masking and color adjustment, all options are readily available. Besides, there are options for audio mixing and live preview of editing works.
Reason to Choose:-
- Video cropping, trimming, splitting, joining, and adjusting speed.
- Different slots to add videos, images, scenes, audio clips, effects and masks.
- Different transitions, filters, effects, waveforms, and keyframes available.
- Create 3D models and animated videos with proper audio mixing.
Reason to Avoid:-
- Takes time to get used to the platform.
- Reports of bugs have become a regular occurrence.
2. Avidemux
Compatibility: Windows, Mac, Linux
Best for: best open-source video editor for basic editing
G2 rating: 4.4 out of 5
Avidemux from Soundforge is a lightweight and basic video editor. Starting from trimming and cutting videos to applying filters and encoding videos, all the options are readily available. The software supports a wide range of video file formats for editing.
The platform also supports scripting through which you can automate tasks to perform on videos. Besides, there are options for color adjustments, video conversion, and advanced interlacing. The simple user interface is perfect for beginners to edit videos intuitively.
Reason to Choose:-
- Quick video editing for trimming, cutting, rotating, and cropping.
- Change speed and use different filters for color adjustments and subtitles.
- Supports different video file formats in import and export.
- The user interface is simple and suitable for beginners.
Reason to Avoid:-
- Does not have a traditional timeline for video editing.
- Limited effects, filters, and advanced features.
3. Kdenlive
Compatibility: Windows, Mac, Linux
Best for: best open-source video editor for all
G2 rating: 4.3 out of 5
Kdenlive video editor is a versatile video editor with standard and advanced video editing features balanced properly. The open-source software allows multi-track timeline and supports dual monitor setup for video editing. The user interface is simple, and you can configure it as per your preference.
Kdenlive supports a wide range of video and audio files, and you can use configurable keyboard shortcuts for easy operation. The automatic backup feature is highly useful in the professional video editing world. Similarly, the presence of keyframe-based effects and advanced effects can make a video stand out.
Reason to Choose:-
- Multi-track timeline for working with multiple video and audio clips.
- Keyframeable effects, transitions, color correction and unlimited online resources.
- Vast set of options for creating stunning texts and titles.
- Smooth preview, configurable interface, and automatic backup.
Reason to Avoid:-
- Lacks GPU acceleration and hence, slow response at times.
- Speed adjustment effect is not efficient.
# For Advanced Users
4. OpenShot
Compatibility: Windows, Mac, Linux, Chrome OS
Best for: Best open source editor for all desktop users
G2 rating: 4.4 out of 5
OpenShot is a cross-platform, open-source video editor where you can work on one project on different operating systems. It works on keyframe animation framework, and you can choose from different interpolations. The platform offers you to work with unlimited video and audio clips as well as layers.
You can perform all the basic video editing operations as well as go for advanced editing. The features and tools are well-balanced for regular as well as professional video editing. Starting from video effects and audio mixing to chroma key and time-mapping, everything is available under one roof.
Reason to Choose:-
- Basic video editing with panning, zooming, and scrolling features.
- Wide range of transitions, effects, time and speed control.
- Time-mapping, audio mixing, overlays, and composting.
- Supports 3D animations and objects, templates for titles and sub-titles.
Reason to Avoid:-
- Hardware acceleration is not very powerful.
- Not suitable for 4K video editing as it gets extremely slow.
5. Shotcut
Compatibility: Windows, Mac, Linux
Best for: Best for video editors who love filters and effects
G2 rating: 4.2 out of 5
Shotcut is another open-source and cross-platform video editor with a professional user interface. The software supports importing different file formats of video and audio files. It is suitable for editing 4K videos, and it is a full-fledged audio editor as well.
Its vast video filters and effects are comparable to premium video editors. You can work with multi-track timeline and keyframes with markers and rangers. Besides, you can keep notes on your project easily. Overall, it is a balanced video editor in terms of features and functionalities.
Reason to Choose:-
- Wide categories of video effects, transitions, and filters.
- Multi-track and multi-format timeline and detailed audio editor.
- Standard and advanced editing options with hardware acceleration.
- Export video in high-resolution and in different formats.
Reason to Avoid:-
- The user interface can take some time to get used to.
- The stock media library is rather limited.
6. NATRON
Compatibility: Windows, Mac, Linux
Best for: Best open-source video editor with visual effects
G2 rating: 3.5 out of 5
NATRON is a robust video editor with powerful tracking tool for 2D and planar tracking. You can work with multiple layers and clips and avail various keying options on your video editing project. In fact, it is a full-fledged video compositing software for better video production with multi-layer structure.
The hardware acceleration of the software produces faster rendering. You get to work with presets, tracker nodes, rotoscoping, multi-plane and motion editing. The option of multi-view workflow along with real-time playback is extremely useful while editing multicam videos.
Reason to Choose:-
- Superior visual effects and motion editing.
- Multi-tasking with multi-view workflow.
- Option of rotoscoping and python scripting.
- Supports different open-source plugins.
Reason to Avoid:-
- The user interface is quite advanced and needs some learning time.
- It gets unstable and slow while previewing high-resolution videos.
Part 4: Freemium and Freeware Video Editors
Freeware video editors are available completely free of cost and they are mostly exclusive to a certain operating system. On the other hand, freemium video editors have certain features completely free while it charges users a small fee for certain advanced features. Here is the list of the best freemium and freeware video editors.
# For Beginner Users
7. ActivePresenter
Compatibility: Windows and Mac
Best for: best video editing software for learning videos.
G2 rating: 4.5 out of 5
ActivePresenter from AtomiSystems is a video editor with screen recording options. The software is particularly useful in making and editing learning videos. There are different templates available for editing videos quickly. Besides, you can use the platform for standard editing options for any video.
Starting from working with multiple timelines to making videos interactive and responsive, there are various out-of-box features. Moreover, you can edit your audio and export your edited video in different file formats.
Reason to Choose:-
- Multiple timelines for editing various video and audio clips.
- Basic video and audio editing options and greenscreen effects.
- Webcam and screen recording with audio from different sources.
- Export videos with different file formats, HTML, xAPI, SCORM and much more.
Reason to Avoid:-
- The learning curve is slightly steep.
- Not suitable for editing all types of videos.
8. Microsoft Photos
Compatibility: Windows
Best for: best built-in video editor for Windows users
G2 rating: 4.6 out of 5
Microsoft Photos is the inbuilt video editor for Windows users. The app comes pre-installed in Windows and it is mostly used for viewing photos. But there is an inbuilt video editor where you can do the basic video editing works.
You can trim a video, add texts, and apply 3D effects as well as different filters available. There are also options for rotating videos, applying background music and customizing audio. The user interface is very simple for all users.
Reason to Choose:-
- Instant basic video editing options available.
- Apply effects, filters, as well as music.
- Simple and intuitive user interface for everyone.
- Comes pre-installed and completely free of cost.
Reason to Avoid:-
- Very limited video editing options.
- Very limited video file formats supported.
9. iMovie
Compatibility: Mac
Best for: Best built-in video editor for Mac users
G2 rating: 4.3 out of 5
iMovie is the inbuilt video editor for Mac users as it comes pre-installed on macOS. The application is free to use and it is compatible with iPhone and iPad as well. You can perform all the basic video editing works starting from trimming to rotating videos.
Besides, there is a wide range of effects and filters available to apply on your videos. The best part is that it supports editing 4K videos. There are also various graphical elements available and you can share your video easily on different platforms.
Reason to Choose:-
- Trim, rotate, split and crop videos easily.
- Work across Mac, iPhone and iPad seamlessly.
- Wide range of effects, filters, and objects available.
- Supports editing 4K videos without any lag.
Reason to Avoid:-
- Lacks advanced editing options though it is a dedicated video editor.
- Supports very limited video file formats.
# For Advanced Users
10. Lightworks
Compatibility: Windows, Mac, Linux
Best for: best for social media video creators
G2 rating: 3.5 out of 5
Lightworks is a freemium video editor where most features are reserved for premium users. If you are a social media creator or learning video creator, Lightworks Create is best for you. If you are a professional video creator, you should opt for Lightworks Pro.
The software supports almost all file formats, and you can export videos on social media instantly. The timeline is advanced with proxy editing, autosave and background processing features. You can share projects with your teammates and work collaboratively.
Reason to Choose:-
- Powerful and advanced timeline for quick editing.
- Motion graphics and tilting along with advanced metadata.
- Flexible user interface with proxy workflow and storyboard bin.
- Suitable for collaborating works and cloud storage.
Reason to Avoid:-
- Can crash while working with 4K videos.
- Limited options for advanced video editing.
11. VideoPad
Compatibility: Windows
Best for: best video editor for short video creators.
G2 rating: 4.1 out of 5
VideoPad by NCH Software is an intuitive video editor that supports over 60 different video file formats. There are tools available for basic editing such as trimming and cropping. Besides, there are various effects and transitions available to apply on your video.
The video editor also lets you edit audio files and you can edit 360-degree videos as well. There are video stabilization and chroma key effect available. The video editor is available free for non-commercial use with certain limitations that you can overcome with its premium plan.
Reason to Choose:-
- Edit in Storybook or Timeline mode and perfect all basic editing works.
- Audio editing options with different audio effects.
- Add 3D video effects, special filters, and change video speed.
- Supports a wide range of video file formats.
Reason to Avoid:-
- Can crash while editing 4K videos.
- Lacks advanced editing options.
12. VSDC Free Video Editor
Compatibility: Windows only.
Best for: Free feature-rich video editing suite
G2 rating: 4.0 out of 5
VSDC Free Video Editor is a free suite that includes both video and audio editor. You can use the software for recording screen as well as voiceovers. The software is suitable for low-end computers as it is a lightweight application.
Apart from basic editing, you can edit 360 videos. Starting from color correction and zooming to split-screen effect and chroma key, it is full-fledged feature-rich software. For more advanced features, you can opt for VSDC Video Editor Pro version.
Reason to Choose:-
- Zooming, panning, and color correction options.
- Wide range of effects and filters present.
- Chrome key option as well as 360 degree video editing.
- Work with multiple layers and sync objects perfectly.
Reason to Avoid:-
- Lacks advanced video editing options.
- No masking or video stabilization option available.
Part 5: Proprietary Video Editing Software
If you are a regular video creator and you want to invest in video editing to improve the quality of your video content, you have to opt for a proprietary video editing software. All professional video creators prefer proprietary video editing software over freeware and freemium video editors. Here are the best premium video videos with the most advanced video editing options.
# For Beginner Users
13. Filmora
Compatibility: Windows and Mac.
Best for: Best video editors for YouTubers and vloggers
G2 rating: 4.4 out of 5
Wondershare Filmora is a feature-rich video editor but an intuitive user interface. Therefore, it is perfectly suitable for beginners who want all the features and tools for advanced video editing without a steep learning curve. Filmora is also useful if you want to record screen or webcam video.
Starting from tons of video effects and transitions to a large stock library and graphical elements, Filmora is tailor-made for editing all types of videos. It also supports a wide range of file formats and you can edit 4K videos as well as audio files comfortably.
For Win 7 or later (64-bit)
For macOS 10.12 or later
Reason to Choose:-
- Trim, split, join, crop and work with multiple video and audio clips.
- Large collection of video and audio effects, transitions, and graphical elements.
- Large stock library of free media files and animations.
- Work with multiple layers and clips effortlessly on its smooth timeline.
Reason to Avoid:-
- The processing time for videos could be on the higher side.
14. Camtasia
Compatibility: Windows and Mac.
Best for: Teachers and students to edit tutorial videos
G2 rating: 4.6 out of 5
Camtasia by Techsmith is a premium video editor and it is equally popular as a video recorder. It is particularly useful for recording and editing tutorial videos as there are different templates available. Coming to video editing part, you can perform all the basic video editing works instantly.
There are various trendy effects, transitions, and presets available. You can remove green screen and apply different frames for video compatibility on different devices. Besides, you can upload the editing video different on different platforms instantly.
Reason to Choose:-
- Quick trimming, splitting, cropping options.
- Large collection of templates and presets.
- Wide range of effects, annotations, and transitions.
- Import, export, and share different file formats.
Reason to Avoid:-
- No motion tracking option.
- Reports of frequent crashes.
15. Final Cut Pro
Compatibility: Mac only.
Best for: best professional video editors for Mac users
G2 rating: 4.4 out of 5
Final Cut Pro from Apple is an extremely popular premium video editor among professional video creators who are Mac users. It is a powerful and advanced video editor that can handle high resolution videos smoothly. It is a perfect mix of standard and advanced video editing features.
Starting from editing multicam and VR videos to 3D and 360 degree videos, Final Cut Pro is suitable for all. There are unlimited presets and effects present and you can edit 4K videos as well as large video files smoothly.
Reason to Choose:-
- Basic and advanced video and audio editing features.
- Supports editing all the different video types such as 3D, 4K, VR videos.
- Supports plug-ins, external tools and cinematic effects.
- Renders high resolution, large video files in short time.
Reason to Avoid:-
- Learning curve is quite steep.
- Pricing is on the higher side.
# For Beginner Users
16. Adobe Premiere Pro
Compatibility: Windows only.
Best for: best professional video editing software for most people
G2 rating: 4.5 out of 5
Adobe Premiere Pro is the ultimate video editor in the professional video editing world. You get all the different advanced features of video editing packed in the application. Even though the learning curve is steep, Adobe Premiere Pro is one of the most used video editors in professional video creation.
Adobe Premiere Pro supports all the different video file formats and you can edit various videos simultaneously. It is a perfect tool for editing a large video project collaboratively. It supports editing VR videos, 3D videos, as well as multicam videos.
Reason to Choose:-
- Standard and advanced editing options with quick rendering.
- Suitable for multi-tasking and collaborative work in video editing.
- Supports almost all types of videos and audio file formats.
- Flexible and configurable user interface and advanced timeline.
Reason to Avoid:-
- Learning curve is very steep.
- Not suitable for low-end computers.
17. Vegas Pro
Compatibility: Windows only.
Best for: Video & audio editing for professionals
G2 rating: 4.2 out of 5
Vegas Pro from Sony is a professional video and audio editor. You can work with multiple video and audio files and you can choose from timeline or storyboard layout. In fact, there are options for nested timeline and multicam editing. The customized workflow and layouts make the application suitable for everyone.
You can enhance your video with its large collection of filters, effects, and titles. There are options for keyframing, scene detection, color correction, and light adjustments. The artificial intelligence makes editing faster with automation control.
Reason to Choose:-
- Powerful timeline and storyboard mode with keyframing.
- Advanced HDR color correction and grading.
- Artificial intelligence for quick and repeated editing.
- Multicam editing, motion tracking, and support for 3D videos.
Reason to Avoid:-
- Stability of the application is questionable.
- Pricing is steep and lacks tutorial guide.
18. Hitfilm Express
Compatibility: Windows and Mac
Best for: Best for video effects lovers
G2 rating: 4.4 out of 5
Hitfilm Express is particularly popular for its unlimited video effects that make the video stand out easily. The user interface is quite simple to use, and you can apply effects to turn your raw video into professional video instantly. In fact, it has the largest VFX toolkit with industry-grade effects.
You can edit 4K videos, and there are options for motion tracking and video animations. You can also opt for color correction and grading. You can also edit vertical videos and upload them on social media platforms. You can also edit audio clips and use composting and layering features to enhance your video.
Reason to Choose:-
- Advanced timeline for better workflow.
- Standard and advanced video editing options.
- Largest collection of video effects of different categories.
- Color grading, correction, and free training and support.
Reason to Avoid:-
- Lacks green screen editing option.
- Rendering is not always swift.
Part 6: How to Choose the Suitable Video Editor?
The most important part of video editing is to choose the most suitable video editor for your videos. Here are some important factors to consider while choosing a video editor.
1. Budget and Price: If you are getting started, you can opt for a free video editor. But eventually, you have to go for a premium video editor if you are serious about video editing. You should opt for that video editor that fits your budget and offers more features for the price charged in comparison to its competitors.
2. Learning Curve: You should always opt for a video editor that has a low learning curve. If the video editor is complicated to operate, you will get frustrated, and you won’t be able to unlock the full potential of the video editor. Besides, you will have to lose a lot of time in learning and perfecting the usage of the application.
3. Stock Library: The video editor you are choosing must have a sizeable stock media library. A stock library is where you can find video clips and audio clips that are free to use for everyone. You can incorporate them into your video to enhance the content quality and bring variety to your audiences.
4. Audio control: Video editing is incomplete without proper audio editing. Your video editor should have a separate timeline for audio clips so that you can place them perfect to go in sync with the video clips. Some video editors have dedicated options for audio mixing and editing as per requirements.
5. upport video formats: Your video editor must support a wide range of video file formats that you have to include from time to time. If it supports only the popular file formats, you will not be able to include the interesting videos you may get from different sources which the video editor does not support.
6. Software stability: If you need to edit high-resolution videos, you have to ensure that the video editor you are choosing can stay stable throughout. There are many popular video editors available that become unstable while editing and rendering high-resolution videos. You have to read reviews to come to a conclusion about software stability.
7. Customer Support: Last but most importantly, your video editor must have a good customer support team. In your video editing journey, you will need the help of technical customer support to clarify issues related to the software so that you can excel in your video editing sessions.
Part 7: Video Editing Tips for Beginners
Here are some basic video editing tips that you should keep in mind while editing any video.
1. Try Tight Cuts: Your video should not be too long so that it gets boring for the viewers. Therefore, you have to make tight cuts which means you have to cut out pauses, gaps between dialogs, and anything that is unnecessary for viewers. If you think that tight cuts will take more time than usual, you can consider reshooting the part to save time.
2. Put The Story Before The Footage: When you are shooting a planned video, you must be shooting the video with multiple cameras from different angles. While editing and choosing the perfect angle for a certain video segment, you have to select the one that enhances the story you are telling through your video. For example, in an interview video, you should know when to emphasize and show close angles to capture the emotion of the speaker.
3. Chop Out Mistakes: The most basic work in video editing is to cut out the mistakes. This is because you are sure to make mistakes while shooting, and you will reshoot a lot of mistakes to correct them. Therefore, take your time to chop out mistakes but make sure that the video feels continuous, and if required, you can reshoot. To avoid mistakes in action, you can use different camera angles, blur portions, and bleep out certain words.
4. Learn to use color: Color correction and adjustment is a majorly neglected part of video editing that can make your video different from others. When you are shooting in outdoor conditions, the color of the video could get disturbed depending on the color of your dress as well as your surrounding. While editing, you need to correct them so that the video looks visually pleasing to the eyes.
5. Cut to music: Audio plays a very important role in any video, and hence, you should not neglect it. Always opt for a video editor that has a good collection of stock music so that you can apply them to your video in appropriate places. Music helps to break the monotony and grab the attention of the audience instantly.
6. Back up your work: It takes hours to shoot a video but only a second to lose it. Instead of blindingly relying on your storage device, you should take back up of your work on multiple devices. Taking backup in the cloud storage area is the best option as you can access your work from anywhere.
Part 8: Frequently Asked Questions of Video Editor
What is the best video editor?
Wondershare Filmora is the best video editor as it has the perfect mix of standard and advanced video editing options. The user interface is intuitive and easy to operate for every video creator.
What editor do YouTubers use on PC?
The most commonly used video editors by YouTubers are Final Cut Pro, Adobe Premiere Pro and Filmora. Unless you are a pro in video editing, we recommend Filmora and Shotcut for your YouTube videos.
How can I edit videos for free?
If you are a Windows user, you can use Microsoft Photos and Openshot for editing your videos for free. For Mac users, iMovie is the best free video editor with balanced features.
Does Windows 10 have a free video editor?
Yes, Windows 10 does come with a free video editor and it is called Microsoft Photos. You can edit your photos and videos with the application.
Is Filmora Free?
No, Filmora is a premium video editor. However, you can download its free trial version to understand its features and functionalities. Thereafter, you can purchase its premium plan as per your suitability.
Detailed Steps to Cut a Video in QuickTime
Filming a video is fun and editing is more interesting and entertaining. Today, everyone is making videos and there are tons of videos on the internet. Editing videos is required to make the video stand out and retain the audience. Video trimming helps you cut out the unwanted part of the video and leave the desired portion of the viewers.
Cutting a video means your video starts quickly and you don’t lose your audience’s attention.
The first ten seconds of the video are very important when deciding whether to stay or move on to the next video.
How to cut a video in QuickTime
Quicktime is an authentic application developed by Apple in 1991. It allows the users to edit, record, play, and share videos and pictures. If some editing software confuses you, QuickTime is just for you.
You need to download the application and here are all the features you can enjoy. It is compatible with all versions of windows whereas, if you are a Mac user it is already installed in your system.
Cutting a video is one of the basic but useful functions of QuickTime. It requires a few simple steps and some features related to cutting, splitting, and trimming a video.
Let’s start…
1. Cutting/splitting a video
Cutting a video means splitting some parts of the video to edit and rearrange the clips to make a new video. Mostly, it is used where you want to edit all clips of the video differently. It is also needed as it allows you to focus on your message and delete the portion not required and make the video large. You can remove the extra fat from the video to give clarity, direction, and hope. You can convey your message in a clear and concise way.
These steps should be followed to cut/split the video in minutes.
- In the QuickTime player, open the desired video.
- Select show clips from the view on the menu bar.
- Move the red marker from right to left to select the desired portion.
- Hit split clip from the edit

- A yellow rectangular bar appears over the edges of your video.
- You can cut the desired portion and make editing as you like.
- Repeat the sequence until you are done.
- Press the done

Cutting the video by splitting is used when you have a long video and you can easily edit them by splitting them into two parts.
2. Trimming a video
If you are cutting some parts at the beginning and the end of the video, it is called trimming a video. You can say it as removing unnecessary preparation scenes. Normally, professionals start their cameras before the film scene to ensure not to miss any part of the video. Here’s, how to trim video in the QuickTime player.
Let’s dive in…
- Launch QuickTime
- Select your video from the system.
- Select edit from the top menu.
- Select the trim or command T, or you can select the hold option from the drop-down list.

- A yellow trimming bar will appear over the edges of your video.
- Remove the unwanted area by moving from the right or left trim edges also called handles.

Everything inside the yellow bars will remain. You can preview your video anytime during the editing process.
- Hit the trim from the bottom right corner.
- Select save from the file on the top menu bar.
Trimming is critical because it is the time to convince the viewers to stick around and stay with your video.
For more advanced editing without losing the quality of the video, I recommend you to use Wonder Share Filmora 11. It’s an amazing app and very easy to use even for a layman.
An easier way to cut a video with Filmora
Wonder Share Filmora is one of the best video editing tools for beginners. It simplifies the editing process using smart and congenital features that can automate repetitive tasks. It has a lot of exciting features and has collaborated with others to make the work easier.
So here, I recommend Filmora Video Editor , an easy and very powerful, all-in-one video editor software. It enables you to cut, crop, and trim the videos in a few clicks without losing the quality of the video.
For Win 7 or later (64-bit)
For macOS 10.14 or later
Point to be noted:
The cut is removing some unwanted parts of the video.
The Split is dividing the clips into two parts.
The trim is deleting the starting or endpoints of the video.
1. Cut video using Filmora video cutter
Cutting a video is necessary even if you shot a very good video because it contains some irrelevant and unwanted clips. Removing the unnecessary part of the video will make the video short, concise, and to the point. Moreover, it helps in grabbing the attention of your valuable viewers.
If your video has multiple scenes to cut, the scene detection function would be helpful.
- Install Filmora video cutter
- Select the New project.
- Select the video in the media library.
- Right-click and select scene detection to enter the scene detection window.

- Select Detect
This will automatically detach your unwanted videos based on the change in scene.

- Click add to timeline to add the separated video into the timeline.
You can also remove the unwanted videos by clicking the delete icon.
2. Manually cut/split videos
To cut the beginning and the end portion of the video, we can use the trim feature.
Let’s start…
- Import the video and drag it into the timeline.
- Add Marker in the timeline to spot a particular clip.

Pointing the Marker will help to find the unwanted potion without wasting the important portion of the clip.
Here is all about trimming the video from beginning to end but if you want to cut the video into parts to remove the rest of the fat from the clips. You can follow these steps:
- Click the split icon above the timeline.
- Drag the play head to make a rectangle to cover the unwanted portion of the video.
- Press delete from the timeline besides the split tab.

Repeat the process and cut the video into many segments to get the desired video.
Conclusion
Video editing is a critical part of creating eye-catching movies. Along with this, cutting and trimming a video is the core of the whole process as it makes sure that your audience is hooked with your content or not. Once you have downloaded the Wonder Share Filmora app, the art of cutting the video and transforming into a new film is really amazing.
- A yellow rectangular bar appears over the edges of your video.
- You can cut the desired portion and make editing as you like.
- Repeat the sequence until you are done.
- Press the done
Cutting the video by splitting is used when you have a long video and you can easily edit them by splitting them into two parts.
2. Trimming a video
If you are cutting some parts at the beginning and the end of the video, it is called trimming a video. You can say it as removing unnecessary preparation scenes. Normally, professionals start their cameras before the film scene to ensure not to miss any part of the video. Here’s, how to trim video in the QuickTime player.
Let’s dive in…
- Launch QuickTime
- Select your video from the system.
- Select edit from the top menu.
- Select the trim or command T, or you can select the hold option from the drop-down list.
- A yellow trimming bar will appear over the edges of your video.
- Remove the unwanted area by moving from the right or left trim edges also called handles.
Everything inside the yellow bars will remain. You can preview your video anytime during the editing process.
- Hit the trim from the bottom right corner.
- Select save from the file on the top menu bar.
Trimming is critical because it is the time to convince the viewers to stick around and stay with your video.
For more advanced editing without losing the quality of the video, I recommend you to use Wonder Share Filmora 11. It’s an amazing app and very easy to use even for a layman.
An easier way to cut a video with Filmora
Wonder Share Filmora is one of the best video editing tools for beginners. It simplifies the editing process using smart and congenital features that can automate repetitive tasks. It has a lot of exciting features and has collaborated with others to make the work easier.
So here, I recommend Filmora Video Editor , an easy and very powerful, all-in-one video editor software. It enables you to cut, crop, and trim the videos in a few clicks without losing the quality of the video.
For Win 7 or later (64-bit)
For macOS 10.14 or later
Point to be noted:
The cut is removing some unwanted parts of the video.
The Split is dividing the clips into two parts.
The trim is deleting the starting or endpoints of the video.
1. Cut video using Filmora video cutter
Cutting a video is necessary even if you shot a very good video because it contains some irrelevant and unwanted clips. Removing the unnecessary part of the video will make the video short, concise, and to the point. Moreover, it helps in grabbing the attention of your valuable viewers.
If your video has multiple scenes to cut, the scene detection function would be helpful.
- Install Filmora video cutter
- Select the New project.
- Select the video in the media library.
- Right-click and select scene detection to enter the scene detection window.
- Select Detect
This will automatically detach your unwanted videos based on the change in scene.
- Click add to timeline to add the separated video into the timeline.
You can also remove the unwanted videos by clicking the delete icon.
2. Manually cut/split videos
To cut the beginning and the end portion of the video, we can use the trim feature.
Let’s start…
- Import the video and drag it into the timeline.
- Add Marker in the timeline to spot a particular clip.
Pointing the Marker will help to find the unwanted potion without wasting the important portion of the clip.
Here is all about trimming the video from beginning to end but if you want to cut the video into parts to remove the rest of the fat from the clips. You can follow these steps:
- Click the split icon above the timeline.
- Drag the play head to make a rectangle to cover the unwanted portion of the video.
- Press delete from the timeline besides the split tab.
Repeat the process and cut the video into many segments to get the desired video.
Conclusion
Video editing is a critical part of creating eye-catching movies. Along with this, cutting and trimming a video is the core of the whole process as it makes sure that your audience is hooked with your content or not. Once you have downloaded the Wonder Share Filmora app, the art of cutting the video and transforming into a new film is really amazing.
How to Create a Slideshow with Icecream Slideshow Maker
How to Make a Slideshow with Icecream Slideshow Maker
An easy yet powerful editor
Numerous effects to choose from
Detailed tutorials provided by the official channel
The Icecream slideshow creator software is a known name in the domain of graphic design applications. Keep reading ahead to learn the knowhow of creating Icecream presentations!
In this article
01 [What is Icecream Slideshow Maker?](#Part 1)
02 [How to Use an Ice Cream Slideshow Maker?](#Part 2)
03 [How Do You Add Music to an Icecream Slideshow?](#Part 3)
Part 1 What is Icecream Slideshow Maker?
Slideshows are interesting content presentation tools that have the potential to deliver even the most customary information in a manner that is engaging enough to hold your audience captive. Browsing across the web or the IT market, you can easily encounter a cluster of slideshow builder software and tools that are ready to cater to your requirement of making top quality slideshow presentations that suit a diversity of personal and professional needs.
Moving ahead with the discussion, let us have a talk about the Icecream slide show maker program, which can definitely be a great choice to design graphic artworks of professional excellence, thanks to the latter’s upgraded features and graphic editing utilities. You can pick the tool to create fun-filled slideshows of cherished personal events, or craft elusive and explanatory business presentations to deliver the most precise company and product information to your clients.
Let us now dive deeper into the program specifications and proceed to take a look at the distinguishing features of the Icecream slideshow maker program in the following section:
● The software grants you the liberty to adjust the screen time and the transition play duration of each of the slide contents.
● You can uplift the feel of your presentations with an upbeat background audio, while choosing the same from the editor’s preset media library in a preferred file format.
● You are allowed to customize the presentation slides with matching text annotations and adjust its font, size, orientation, color and animation.
● Working with the program lets you ensure a seamless presentation flow with a diverse range of inbuilt transition effects.
● Before you set into the final creation process, the software facilitates you with a preview of your work, with all the applied effects, element inclusions and parameter variations introduced. You can thus, observe and modify the presentation if required.
● You can save the slideshows midway of the creation process and resume whenever you like, and prefer to sort the presentation slides in a definite or random sequence.
● The software allows you to create and export high resolution 4K slideshows by burning them to CDs and DVDs.
● The created slideshows can be uploaded to online storage accounts and shared across a variety of social media platforms, in almost any common output file format.
● The software is a Windows exclusive program and works effectively well with the Windows XP, Vista, 7, 8, 8.1 and 10 operating system versions.
Part 2 How to Use an Ice Cream Slideshow Maker?
By now, you must have become quite familiar with the credibility of designing slideshow presentations with the Icecream slideshow creator software. However, the real essence lies in taking a practical experience of working with the program to comprehensively understand the slideshow design process in detail.
Adhering to the aforesaid concern, let us try hands at having an in depth understanding of different aspects of working on a slideshow presentation within the program interface through the following stepwise tutorial guide:
User’s Guide to Work With the Icecream Slideshow Maker Program
Step 1: Download and Install Icecream Slideshow Creator
To begin with, visit the official website of the program to download the same in your Windows device. Once the download is successful, you will need to save and run the program’s installation files sin your system. Having done that, you will be directed to the software’s ‘Installation Wizard’ to initiate a quick an easy installation process.

Step 2: Import Media Files
Post a successful installation, proceed to launch the program and wait for the latter’s welcome screen to appear. In the launch screen, navigate to and tap any one of the ‘Add Photo’ or ‘Add Folder’ buttons at the top left corner to import either a single media file, or an entire media folder to the program’s editing workspace.
Instead of using the ‘Add Folder’ option at the top left, you can also select multiple files by pressing and holding the ‘Ctrl’ key son your system’s keyboard and import them to the editor timeline, all at once. You can alternatively, click on the ‘Add Files to Start Your Photostory’ tab in the center of the software’s welcome screen to import the required media files.

Clicking on any of the aforesaid buttons or tabs will direct you to a ‘File Explorer’ window, where you can make the desired media selections. Your choices are however; filtered according to their respective file formats and only those in line with the formats supported by the Icecream Slideshow creator program are imported to the timeline.
Step 3: Configure the Presentation Settings
As soon as you finish the media import process, the editing workspace bifurcates to present the ‘Queue’ window at the left and ‘Preview and Settings’ window at the right side of the screen. This is the space where you can proceed to configure your presentation settings.
● File Sorting
To sort the arrangement of a media file, navigate to the ‘File Queue Panel’ at the left and click on the desired file, while using the ‘Arrow Keys’ at the right to change the latter’s position in the queue, or choose to delete it from the queue by tapping the ‘Recycle Bin’ icon beside the file.
● Duration and Transition Adjustments
Proceeding further, you can try hands at customizing the duration and transition effects for each of the added media files within the queue. All you need to do is, navigate to and click on the respective tabs within the window. Hit the ‘Time’ button to adjust the screen time of the slides or click on the ‘Transitions’ tab to include suitable animation effects between successive slides for a smooth presentation flow.
You can even stick with a random transition effect to add to the slides, or choose to add no transition effect at all. The inbuilt slideshow player the right side of the editor workspace automatically plays the preview of the applied transition effects. The ‘Transition’ and ‘Time’ settings are the sole customizations that you can apply individually to the slides, the rest of the effects being universally applicable to all the presentation slides together.
If you are interested to apply a particular transition and play duration to all the slides, navigate to and click within the gray bar at the bottom of the file queue to apply the same transition and time characteristics to all the slides of the presentation. You can even opt to delete all the added media files at the same time by tapping the ‘Clear List’ button.

● Media Resolution
Working with the Icecream slideshow creator program, you are allowed to adjust the output resolution of your slideshow in the preview window at the right side of the editor timeline. The resolution range lies between 640 x 480 to 1600 x 1200 pixels. Moving further, you can set common play duration for all the transition effects within different slides of the presentation that you have included within the queue.
● Aspect Ratio
You can choose to either keep the actual aspect ratio of the media files or customize the same to fit into the screen size. To go with the former choice, click within the ‘Scale to Fit’ checkbox. In case you wish to stick to the latter option, click inside the ‘Original Ratio’ checkbox. To learn more about working with any of the aforesaid settings, navigate to and click on the ‘Question Mark’ icon alongside each setting.
● Audio Settings
To add upbeat background music to your presentation, navigate to and tap the ‘Add Audio’ button at the bottom left corner of the ‘Preview’ window. You can choose a desired audio track from your system and use the same as the background sound of the slideshow.
You are additionally, permitted to configure the added music track in line with your specific preferences using the ‘Fade’ and ‘Offset’ settings at the right side of the selected music file. To play the audio track immediately with a time shift, choose to set a negative offset value. Likewise, enter a positive offset value to start playing the track after the lapse of a specified time period.

When you are done with adjusting all the settings and adding the desired effects, proceed to watch a preview of the same in the right side ‘Preview Pane’ of the editor workspace and move ahead with creating the slideshow presentation.
Step 4: Create Your Slideshow
If the slideshow preview ensures that everything is at the right place, navigate to the bottom right corner of the editing timeline and click on the ‘Create’ button start building your presentation. You can tap on the ‘Pause/Resume’ and ‘Cancel’ buttons at the bottom of the screen at any time throughout the project creation process. A pop up window will notify you the completion of the design process, while asking you to click on the ‘Open Folder’ button to view your creation in the latter’s destination folder.

Part 3 How Do You Add Music to an Icecream Slideshow?
Supplementing your slideshow presentations with appealing background music adds that extra spark to your creation, while making them stand out of the crowd. A cohesive audio works to create a perfect sync between the contents and mood of your presentation. Having said that, let us look through the process to add suitable background music to your Icecream slideshow in the following section:
User’s Guide for Adding Music to an Icecream Slideshow
Step 1: Download and Install the Program
Navigate to the home website of the Icecream Slideshow maker program to initiate a free download of the software into your system and proceed to install the same to start the slideshow creation process.
Icecream Slideshow Maker Official Download Link:
https://icecreamapps.com/Download-Slideshow-Maker/

Step 2: Import Media Files
Begin with importing the selected media files to the editor workspace of the program in either of the following ways:
● Add the images directly from your system to the editor timeline through the conventional ‘Drag and Drop’ method.
● Navigate to and hit the ‘Add Photo’ button at the top left corner of the program’s main workspace to browse for the media files in the ‘Windows Explorer’.
● Click on the ‘Add Folder’ button to import all the media files within a selected folder.

Step 3: Sort the Imported Files
Once you are done with importing all the media files, you can see them appear within the ‘File Queue’ at the left window of the slideshow creator program. Use the ‘Up/Down’ arrow keys to sort the media files in your preferred order, for example, arranging them according to their specific file names. The file sorting options are available at the right side of the ‘File Queue’.
Step 4: Include Text Customizations
Navigate to the ‘Text Column’ of the ‘File Queue’ and tap the ‘Add Text’ button to include text annotations within each slide of your presentation. A ‘Text Panel’ will pop up, where you can choose to add color, position and font customizations to the included text, followed by previewing the effect on every slide within the ‘Text Panel’ itself.
Step 5: Add a Desired Background Music
The Icecream Slideshow maker pro allows you to include a background music track within your presentation. For working towards the inclusion process, you will have to import the desired audio files to the program’s editor timeline. The software works well with the WAV, WMA, FLAC, M4A, MP3 and OGG audio file formats. Navigate to and hit the ‘Add Audio’ button in the editor workspace to ‘Drag and Drop’ the desired music files within the software’s timeline.
There is an option to create a playlist of the selected audio tracks, along with dragging the files to set them in a preferred sequence within the playlist. You are also granted the liberty to try hands at looping the audio playback and uplift the tracks with fade and offset effects within the playlist pane.

Step 6: Tweak Some Extra Settings
If you are keen towards making your presentation more impressive, try experimenting with including transition effects within the slides. Though the Icecream slideshow maker full version supports the application of default random transitions, you are allowed to add and customize the same as per your will, both, separately for each slide, as well as to the entre presentation as a whole.
You can even choose to add no transition effect at all, or set the same transition value for all the media files within the queue, by navigating to and clicking on the ‘Common Image Settings in the ’File Queue’ window.

Step 7: Output Resolution
Set a preferable output resolution to generate a premium quality slideshow presentation. To do this, navigate to the bottom left corner of the ‘Preview’ window at the right side of the editor workspace and choose a desired resolution for the slideshow from a range of values, such as, 1280 x 1024, 2560 x 1440, 1920 x 1080, etc., in the ‘Resolution’ tab.

Step 8: Format Selection
The next thing you need to do is, select a convenient output file format for your presentation. You can pick anyone from the available AVI, WebM, MP4, MOV file formats. To make your choice, navigate to the bottom of the ‘File Queue’ window at the left and click on the ‘File Format’ dropdown arrow at the right. A list of the output formats supported by the program appears next, and you are free to pick the one you like.

Step 9: Create Your Icecream Slideshow
When you have finalized all the arrangements and settings, navigate to and hit the ‘Preview’ button at the bottom right corner of the ‘Preview’ window to initiate a mock run of your slideshow in the software’s inbuilt slideshow player. If everything seems fine, proceed to start the slideshow creation process by clicking on the ‘Create’ button.

The process may require you to wait for a few moments before the final presentation output is generated. Nonetheless, you can always keep a track of the creation process through the elapsed and remaining duration in the ‘Progress Bar’ at the bottom of the program’s editing workspace. A completion prompt will pop up as soon as the slideshow is ready.
Creating Music Slideshows in Filmora
When searching for an Icecream slideshow maker alternative to craft your slideshow presentations, you can move ahead with picking the Wondershare Filmora Video Editor slideshow creator program for high end and professional quality results. While the aforementioned software is an all in one package for almost any of your most diverse editing needs, music slideshows are a specialty of the same on account of the following reasons:
For Win 7 or later (64-bit)
For macOS 10.12 or later
● Within by the Filmora slideshow creator program.
● Working on your music presentation in the software, you are allowed to cut and trim the music files automatically as well as manually to ward off undesired portions from the included audio.
● You can pick the most suitable soundtrack from the hundreds of choices available within Filmora’s preset audio library and uplift them with a variety of audio effects.
● Using the software, you can proceed with recording your voiceover, followed by applying fade in and fade out effects to the same.
● The software allows you to design professional slideshows for personal media sharing across various platforms, along with catering to product marketing needs and company business concerns.
● Ending Thoughts →
● Icecream slideshow maker review claims that the latter is an effective slideshow creator and graphic editor program.
● Working with the program, you can easily create high quality photo, video and music slideshow presentations in a quick time span.
● Mentioning about the alternatives to the aforesaid program, you can comfortably choose the Wondershare Filmora slideshow maker software to address the concern.
The Icecream slideshow creator software is a known name in the domain of graphic design applications. Keep reading ahead to learn the knowhow of creating Icecream presentations!
In this article
01 [What is Icecream Slideshow Maker?](#Part 1)
02 [How to Use an Ice Cream Slideshow Maker?](#Part 2)
03 [How Do You Add Music to an Icecream Slideshow?](#Part 3)
Part 1 What is Icecream Slideshow Maker?
Slideshows are interesting content presentation tools that have the potential to deliver even the most customary information in a manner that is engaging enough to hold your audience captive. Browsing across the web or the IT market, you can easily encounter a cluster of slideshow builder software and tools that are ready to cater to your requirement of making top quality slideshow presentations that suit a diversity of personal and professional needs.
Moving ahead with the discussion, let us have a talk about the Icecream slide show maker program, which can definitely be a great choice to design graphic artworks of professional excellence, thanks to the latter’s upgraded features and graphic editing utilities. You can pick the tool to create fun-filled slideshows of cherished personal events, or craft elusive and explanatory business presentations to deliver the most precise company and product information to your clients.
Let us now dive deeper into the program specifications and proceed to take a look at the distinguishing features of the Icecream slideshow maker program in the following section:
● The software grants you the liberty to adjust the screen time and the transition play duration of each of the slide contents.
● You can uplift the feel of your presentations with an upbeat background audio, while choosing the same from the editor’s preset media library in a preferred file format.
● You are allowed to customize the presentation slides with matching text annotations and adjust its font, size, orientation, color and animation.
● Working with the program lets you ensure a seamless presentation flow with a diverse range of inbuilt transition effects.
● Before you set into the final creation process, the software facilitates you with a preview of your work, with all the applied effects, element inclusions and parameter variations introduced. You can thus, observe and modify the presentation if required.
● You can save the slideshows midway of the creation process and resume whenever you like, and prefer to sort the presentation slides in a definite or random sequence.
● The software allows you to create and export high resolution 4K slideshows by burning them to CDs and DVDs.
● The created slideshows can be uploaded to online storage accounts and shared across a variety of social media platforms, in almost any common output file format.
● The software is a Windows exclusive program and works effectively well with the Windows XP, Vista, 7, 8, 8.1 and 10 operating system versions.
Part 2 How to Use an Ice Cream Slideshow Maker?
By now, you must have become quite familiar with the credibility of designing slideshow presentations with the Icecream slideshow creator software. However, the real essence lies in taking a practical experience of working with the program to comprehensively understand the slideshow design process in detail.
Adhering to the aforesaid concern, let us try hands at having an in depth understanding of different aspects of working on a slideshow presentation within the program interface through the following stepwise tutorial guide:
User’s Guide to Work With the Icecream Slideshow Maker Program
Step 1: Download and Install Icecream Slideshow Creator
To begin with, visit the official website of the program to download the same in your Windows device. Once the download is successful, you will need to save and run the program’s installation files sin your system. Having done that, you will be directed to the software’s ‘Installation Wizard’ to initiate a quick an easy installation process.
Step 2: Import Media Files
Post a successful installation, proceed to launch the program and wait for the latter’s welcome screen to appear. In the launch screen, navigate to and tap any one of the ‘Add Photo’ or ‘Add Folder’ buttons at the top left corner to import either a single media file, or an entire media folder to the program’s editing workspace.
Instead of using the ‘Add Folder’ option at the top left, you can also select multiple files by pressing and holding the ‘Ctrl’ key son your system’s keyboard and import them to the editor timeline, all at once. You can alternatively, click on the ‘Add Files to Start Your Photostory’ tab in the center of the software’s welcome screen to import the required media files.
Clicking on any of the aforesaid buttons or tabs will direct you to a ‘File Explorer’ window, where you can make the desired media selections. Your choices are however; filtered according to their respective file formats and only those in line with the formats supported by the Icecream Slideshow creator program are imported to the timeline.
Step 3: Configure the Presentation Settings
As soon as you finish the media import process, the editing workspace bifurcates to present the ‘Queue’ window at the left and ‘Preview and Settings’ window at the right side of the screen. This is the space where you can proceed to configure your presentation settings.
● File Sorting
To sort the arrangement of a media file, navigate to the ‘File Queue Panel’ at the left and click on the desired file, while using the ‘Arrow Keys’ at the right to change the latter’s position in the queue, or choose to delete it from the queue by tapping the ‘Recycle Bin’ icon beside the file.
● Duration and Transition Adjustments
Proceeding further, you can try hands at customizing the duration and transition effects for each of the added media files within the queue. All you need to do is, navigate to and click on the respective tabs within the window. Hit the ‘Time’ button to adjust the screen time of the slides or click on the ‘Transitions’ tab to include suitable animation effects between successive slides for a smooth presentation flow.
You can even stick with a random transition effect to add to the slides, or choose to add no transition effect at all. The inbuilt slideshow player the right side of the editor workspace automatically plays the preview of the applied transition effects. The ‘Transition’ and ‘Time’ settings are the sole customizations that you can apply individually to the slides, the rest of the effects being universally applicable to all the presentation slides together.
If you are interested to apply a particular transition and play duration to all the slides, navigate to and click within the gray bar at the bottom of the file queue to apply the same transition and time characteristics to all the slides of the presentation. You can even opt to delete all the added media files at the same time by tapping the ‘Clear List’ button.
● Media Resolution
Working with the Icecream slideshow creator program, you are allowed to adjust the output resolution of your slideshow in the preview window at the right side of the editor timeline. The resolution range lies between 640 x 480 to 1600 x 1200 pixels. Moving further, you can set common play duration for all the transition effects within different slides of the presentation that you have included within the queue.
● Aspect Ratio
You can choose to either keep the actual aspect ratio of the media files or customize the same to fit into the screen size. To go with the former choice, click within the ‘Scale to Fit’ checkbox. In case you wish to stick to the latter option, click inside the ‘Original Ratio’ checkbox. To learn more about working with any of the aforesaid settings, navigate to and click on the ‘Question Mark’ icon alongside each setting.
● Audio Settings
To add upbeat background music to your presentation, navigate to and tap the ‘Add Audio’ button at the bottom left corner of the ‘Preview’ window. You can choose a desired audio track from your system and use the same as the background sound of the slideshow.
You are additionally, permitted to configure the added music track in line with your specific preferences using the ‘Fade’ and ‘Offset’ settings at the right side of the selected music file. To play the audio track immediately with a time shift, choose to set a negative offset value. Likewise, enter a positive offset value to start playing the track after the lapse of a specified time period.
When you are done with adjusting all the settings and adding the desired effects, proceed to watch a preview of the same in the right side ‘Preview Pane’ of the editor workspace and move ahead with creating the slideshow presentation.
Step 4: Create Your Slideshow
If the slideshow preview ensures that everything is at the right place, navigate to the bottom right corner of the editing timeline and click on the ‘Create’ button start building your presentation. You can tap on the ‘Pause/Resume’ and ‘Cancel’ buttons at the bottom of the screen at any time throughout the project creation process. A pop up window will notify you the completion of the design process, while asking you to click on the ‘Open Folder’ button to view your creation in the latter’s destination folder.
Part 3 How Do You Add Music to an Icecream Slideshow?
Supplementing your slideshow presentations with appealing background music adds that extra spark to your creation, while making them stand out of the crowd. A cohesive audio works to create a perfect sync between the contents and mood of your presentation. Having said that, let us look through the process to add suitable background music to your Icecream slideshow in the following section:
User’s Guide for Adding Music to an Icecream Slideshow
Step 1: Download and Install the Program
Navigate to the home website of the Icecream Slideshow maker program to initiate a free download of the software into your system and proceed to install the same to start the slideshow creation process.
Icecream Slideshow Maker Official Download Link:
https://icecreamapps.com/Download-Slideshow-Maker/
Step 2: Import Media Files
Begin with importing the selected media files to the editor workspace of the program in either of the following ways:
● Add the images directly from your system to the editor timeline through the conventional ‘Drag and Drop’ method.
● Navigate to and hit the ‘Add Photo’ button at the top left corner of the program’s main workspace to browse for the media files in the ‘Windows Explorer’.
● Click on the ‘Add Folder’ button to import all the media files within a selected folder.
Step 3: Sort the Imported Files
Once you are done with importing all the media files, you can see them appear within the ‘File Queue’ at the left window of the slideshow creator program. Use the ‘Up/Down’ arrow keys to sort the media files in your preferred order, for example, arranging them according to their specific file names. The file sorting options are available at the right side of the ‘File Queue’.
Step 4: Include Text Customizations
Navigate to the ‘Text Column’ of the ‘File Queue’ and tap the ‘Add Text’ button to include text annotations within each slide of your presentation. A ‘Text Panel’ will pop up, where you can choose to add color, position and font customizations to the included text, followed by previewing the effect on every slide within the ‘Text Panel’ itself.
Step 5: Add a Desired Background Music
The Icecream Slideshow maker pro allows you to include a background music track within your presentation. For working towards the inclusion process, you will have to import the desired audio files to the program’s editor timeline. The software works well with the WAV, WMA, FLAC, M4A, MP3 and OGG audio file formats. Navigate to and hit the ‘Add Audio’ button in the editor workspace to ‘Drag and Drop’ the desired music files within the software’s timeline.
There is an option to create a playlist of the selected audio tracks, along with dragging the files to set them in a preferred sequence within the playlist. You are also granted the liberty to try hands at looping the audio playback and uplift the tracks with fade and offset effects within the playlist pane.
Step 6: Tweak Some Extra Settings
If you are keen towards making your presentation more impressive, try experimenting with including transition effects within the slides. Though the Icecream slideshow maker full version supports the application of default random transitions, you are allowed to add and customize the same as per your will, both, separately for each slide, as well as to the entre presentation as a whole.
You can even choose to add no transition effect at all, or set the same transition value for all the media files within the queue, by navigating to and clicking on the ‘Common Image Settings in the ’File Queue’ window.
Step 7: Output Resolution
Set a preferable output resolution to generate a premium quality slideshow presentation. To do this, navigate to the bottom left corner of the ‘Preview’ window at the right side of the editor workspace and choose a desired resolution for the slideshow from a range of values, such as, 1280 x 1024, 2560 x 1440, 1920 x 1080, etc., in the ‘Resolution’ tab.
Step 8: Format Selection
The next thing you need to do is, select a convenient output file format for your presentation. You can pick anyone from the available AVI, WebM, MP4, MOV file formats. To make your choice, navigate to the bottom of the ‘File Queue’ window at the left and click on the ‘File Format’ dropdown arrow at the right. A list of the output formats supported by the program appears next, and you are free to pick the one you like.
Step 9: Create Your Icecream Slideshow
When you have finalized all the arrangements and settings, navigate to and hit the ‘Preview’ button at the bottom right corner of the ‘Preview’ window to initiate a mock run of your slideshow in the software’s inbuilt slideshow player. If everything seems fine, proceed to start the slideshow creation process by clicking on the ‘Create’ button.
The process may require you to wait for a few moments before the final presentation output is generated. Nonetheless, you can always keep a track of the creation process through the elapsed and remaining duration in the ‘Progress Bar’ at the bottom of the program’s editing workspace. A completion prompt will pop up as soon as the slideshow is ready.
Creating Music Slideshows in Filmora
When searching for an Icecream slideshow maker alternative to craft your slideshow presentations, you can move ahead with picking the Wondershare Filmora Video Editor slideshow creator program for high end and professional quality results. While the aforementioned software is an all in one package for almost any of your most diverse editing needs, music slideshows are a specialty of the same on account of the following reasons:
For Win 7 or later (64-bit)
For macOS 10.12 or later
● Within by the Filmora slideshow creator program.
● Working on your music presentation in the software, you are allowed to cut and trim the music files automatically as well as manually to ward off undesired portions from the included audio.
● You can pick the most suitable soundtrack from the hundreds of choices available within Filmora’s preset audio library and uplift them with a variety of audio effects.
● Using the software, you can proceed with recording your voiceover, followed by applying fade in and fade out effects to the same.
● The software allows you to design professional slideshows for personal media sharing across various platforms, along with catering to product marketing needs and company business concerns.
● Ending Thoughts →
● Icecream slideshow maker review claims that the latter is an effective slideshow creator and graphic editor program.
● Working with the program, you can easily create high quality photo, video and music slideshow presentations in a quick time span.
● Mentioning about the alternatives to the aforesaid program, you can comfortably choose the Wondershare Filmora slideshow maker software to address the concern.
Best GIF to AVI Converters (Online + Software Solutions)
Great Video Converter - Wondershare Filmora
Provide abundant video effects - A creative video editor
Powerful color correction and grading
Detailed tutorials provided by the official channel
Introduction
It will be much fun if you get to assort most of your GIF files and turn them into full-length streaming videos. However, many conversion websites and software on the internet offer you the facility to convert GIF to AVI file format with ease of use. With these online tools, you also get the opportunity to upload the converted file on various social media channels. Unlike real video, these files have less memory and are easy to save on your device or hard disk.
Although both AVI and GIF are two commonly used file formats, they are different. First of all, GIF stands for Graphical Interchange Format, and it is an image format that can store several consequent or dis-consequent pictures into an animated file. In contrast, AVI is a lossless video file format. This guide focuses on turning GIF animated images into AVI videos and gives a list of the best GIF to AVI converters you can choose from.
In this article
Part 1: Best 4 Online GIFs to AVI Converters
Part 2: Best 4 GIFs to AVI Software
Part 3: How to Convert GIF to AVI?

Part 1: Best 4 Online GIFs to AVI Converters
· Cloudconvert
One prominent feature of this tool is the interface of this GIF to AVI converter is straightforward to follow. However, you don’t have to download any plug-ins or software during the file conversion process with this online tool. This online website is SSL protected; thus, you will not need to deal with worms or viruses when downloading your converted file. In addition, you can also choose from more than 200 different file formats. Moreso, you get a chance to contact webmasters through email channels.
Main Features:
- There is an API function that you can use the site on several of your laptops, mobile devices, etc.
- It offers users various platforms to upload files for conversion through URL, PC, DropBox, Google Drive, etc.

· Video.online-convert
Using this GIF to AVI online converter, you do not have to deal with many advertisements; furthermore, the conversion speed is very high. Thus, with this converter, you can work on lengthy projects efficiently. In addition, the website also offers a lot of options that you can choose from while converting a file. This software also allows you to crop, change the bitrate of the video, change the rate of the frame, etc. The uploaded files will be secure and safe as the website follows strict confidentiality norms.
Main Features:
- This converter website offers a drag-drop feature that allows users to upload a file quickly.
- The facility to solve your queries is available through various frequently asked questions.

· Convertio
Using Convertio will have to follow a few initial steps to change GIF to AVI file extension. However, to convert GIF files to AVI online, you are not required to download any external software, saving your computer memory and time. It is effortless to download converted files on your system, as the website also provides API services. The website also gives an effective option to store and save data over cloud services through DropBox, Google Drive, etc.
Main Features:
- The site provides excellent options for video cutting, rotating, clipping, filtering, etc.
- Choose from different languages; thus, converting a file would be more comfortable and practical.

· File-conversion
The website has excellent UI and UX features. Allows users to convert GIF to AVI file format within a short time. Once you can convert GIF to AVI with this software, you will be able to download the file straight into your PC. The website also grants the opportunity to delete the data once it gets converted, and you can then download the file.
Main Features:
- This converter web portal gives you the chance to make several changes to the file you plan to convert.
- There are no unnecessary advertisements, which speeds up the conversion process.

Part 2: Best 4 GIFs to AVI Software
· Filmora.
Wondershare Filmora is editing and creating software specially designed for Windows and Mac PCs that is also an excellent GIF to AVI converter. In addition, it is highly compatible with a variety of media formats and gives you access to a variety of editing options. It also provides you with high-quality output files and uses various effects, transitions, overlays, graphics, and titles to create videos.
This software also supports numerous formats: MPEG, MP4, AVI, WebM, etc. It extracts the audio or converts them into MP3 format. In addition, it outputs high-quality videos, which include ones in 4K resolution.
Pros
It is compatible with various media formats
It comes with a built-in video editing tool
Receive high-quality output files
Grant users with access to multiple video editing options
Cons
Sometimes it takes extra time to generate the output files
Some of the sample files require a download

· ACDSee
This GIF to AVI converter software can share, manage, and edit photographs. In addition, its interface is, however, similar to those of other similar products, so if you have previous experience in using any editing software, this is no different. This software is also highly improbable. Thus, you will not have any difficulty using ACDSee. Its working area is usually divided into three sections:
- a left panel where you can browse folders
- a right panel with the properties
- the prominent viewing area in the middle.
Pros
It is elementary to use
It has a very lovely user-interface
An extensive collection of tools
Quick browsing through photos is allowed
Uploading photographs to the cloud through photos is supported
Cons
There are not as many features as other video editing tools
Its corrections are not always effective

· Free Video Editor
If you need a GIF to AVI converter that works free of charge, you need to try this software. This software program allows you to slice your video files and convert them into popular video formats. It also enables users to perform some basic edits and supports AVI, GIF, MKV, and MP4 for the output. It also gives users the possibility of extracting the audio stream of your video files and saving it as an MP3 file. In addition, users can load any MPG, MKV, AVI, WEBM, MP$, or WMV files split easily into as many clips as possible.
Pros
Has an accurate cutting point
It has useful features that can help to maximize the cutting process
Capabilities for rotation
Tag editor
Allows the conversion to some of the most well-known video formats
Cons
Some complex editing features are lacking
Unable to customize output profiles

· Easy GIF Animator
The main intention of this software is to create animations for your web pages. In addition, this software has a modern interface, in the style of Microsoft Office’s latest versions. However, some wizards can help to guide users of this software.
Pros
Helpful in creating graphical banners for advertising
Perfect for animation frame by frame
Convert video to GIF animations
Ideal for converting GIF to AVI
Add effects to your animations
Cons
Key-framing animation unsupported
Layers are not supported

Part 3: How to Convert GIF to AVI?
Convert GIF to AVI Using Online Converters
Convertio is an online file format converting tool compatible with a wide range of input and output formats, including GIF to AVI.
Here is a step-by-step guide of this GIF to AVI converter:

Step 1: Visit Convertio in your browser and select and upload a GIF file from your channel, like URL, computer, Dropbox, and Google Drive.
Step 2: Select AVI from the dropdown format option and click the Convert button to begin converting GIF to AVI.
Step 3: When completed, download the AVI files to your computer or send them to the cloud service
Save GIF as AVI through GIF to AVI Software
One of the primary reasons we recommend Wondershare Filmora is that online GIF converters can be unreliable. This implies that there must be a stable internet connection and power supply. In addition, Filmora software is safe and secure, which is a common concern with online tools.
Follow the steps below to turn GIF into AVI:
Step 1: Install Filmora on Mac or Windows
Download and Install Filmora software on your PC. Double click the .dmg file and follow all the instructions to install this software.
Step 2: Begin New Project
Click on the Filmora icon to start a new project and when it is open, click “New Project,” and make sure you select the “Project Settings” from the dropdown options (desired video aspect ratio, resolution and frame rate based on the sharing platform)

Step 3: Import Files to Convert
Start a new project by importing the GIF you want to convert to the timeline. A prompt project setting will pop up if the media aspect ratio and resolution do not match. Make sure you click on “DON’T CHANGE” to maintain your earlier setting

Step 4: Finish the Process and Export
Click on export to convert the video and select the AVI file format to save your file

Finally, save your GIF to AVI video on your preferred location
Conclusion
Thus, we learned:
- The process of converting GIF files to AVI using online tools
- How to use downloaded software to turn GIF to AVI
- It also provided a list of the top best software and online tool you can choose from to convert your GIF to AVIvery quickly.
- Lastly, it recommended Filmora as the top-most GIF to AVI converterdue to its reliability and safety commitment.
Introduction
It will be much fun if you get to assort most of your GIF files and turn them into full-length streaming videos. However, many conversion websites and software on the internet offer you the facility to convert GIF to AVI file format with ease of use. With these online tools, you also get the opportunity to upload the converted file on various social media channels. Unlike real video, these files have less memory and are easy to save on your device or hard disk.
Although both AVI and GIF are two commonly used file formats, they are different. First of all, GIF stands for Graphical Interchange Format, and it is an image format that can store several consequent or dis-consequent pictures into an animated file. In contrast, AVI is a lossless video file format. This guide focuses on turning GIF animated images into AVI videos and gives a list of the best GIF to AVI converters you can choose from.
In this article
Part 1: Best 4 Online GIFs to AVI Converters
Part 2: Best 4 GIFs to AVI Software
Part 3: How to Convert GIF to AVI?
Part 1: Best 4 Online GIFs to AVI Converters
· Cloudconvert
One prominent feature of this tool is the interface of this GIF to AVI converter is straightforward to follow. However, you don’t have to download any plug-ins or software during the file conversion process with this online tool. This online website is SSL protected; thus, you will not need to deal with worms or viruses when downloading your converted file. In addition, you can also choose from more than 200 different file formats. Moreso, you get a chance to contact webmasters through email channels.
Main Features:
- There is an API function that you can use the site on several of your laptops, mobile devices, etc.
- It offers users various platforms to upload files for conversion through URL, PC, DropBox, Google Drive, etc.
· Video.online-convert
Using this GIF to AVI online converter, you do not have to deal with many advertisements; furthermore, the conversion speed is very high. Thus, with this converter, you can work on lengthy projects efficiently. In addition, the website also offers a lot of options that you can choose from while converting a file. This software also allows you to crop, change the bitrate of the video, change the rate of the frame, etc. The uploaded files will be secure and safe as the website follows strict confidentiality norms.
Main Features:
- This converter website offers a drag-drop feature that allows users to upload a file quickly.
- The facility to solve your queries is available through various frequently asked questions.
· Convertio
Using Convertio will have to follow a few initial steps to change GIF to AVI file extension. However, to convert GIF files to AVI online, you are not required to download any external software, saving your computer memory and time. It is effortless to download converted files on your system, as the website also provides API services. The website also gives an effective option to store and save data over cloud services through DropBox, Google Drive, etc.
Main Features:
- The site provides excellent options for video cutting, rotating, clipping, filtering, etc.
- Choose from different languages; thus, converting a file would be more comfortable and practical.
· File-conversion
The website has excellent UI and UX features. Allows users to convert GIF to AVI file format within a short time. Once you can convert GIF to AVI with this software, you will be able to download the file straight into your PC. The website also grants the opportunity to delete the data once it gets converted, and you can then download the file.
Main Features:
- This converter web portal gives you the chance to make several changes to the file you plan to convert.
- There are no unnecessary advertisements, which speeds up the conversion process.
Part 2: Best 4 GIFs to AVI Software
· Filmora.
Wondershare Filmora is editing and creating software specially designed for Windows and Mac PCs that is also an excellent GIF to AVI converter. In addition, it is highly compatible with a variety of media formats and gives you access to a variety of editing options. It also provides you with high-quality output files and uses various effects, transitions, overlays, graphics, and titles to create videos.
This software also supports numerous formats: MPEG, MP4, AVI, WebM, etc. It extracts the audio or converts them into MP3 format. In addition, it outputs high-quality videos, which include ones in 4K resolution.
Pros
It is compatible with various media formats
It comes with a built-in video editing tool
Receive high-quality output files
Grant users with access to multiple video editing options
Cons
Sometimes it takes extra time to generate the output files
Some of the sample files require a download
· ACDSee
This GIF to AVI converter software can share, manage, and edit photographs. In addition, its interface is, however, similar to those of other similar products, so if you have previous experience in using any editing software, this is no different. This software is also highly improbable. Thus, you will not have any difficulty using ACDSee. Its working area is usually divided into three sections:
- a left panel where you can browse folders
- a right panel with the properties
- the prominent viewing area in the middle.
Pros
It is elementary to use
It has a very lovely user-interface
An extensive collection of tools
Quick browsing through photos is allowed
Uploading photographs to the cloud through photos is supported
Cons
There are not as many features as other video editing tools
Its corrections are not always effective
· Free Video Editor
If you need a GIF to AVI converter that works free of charge, you need to try this software. This software program allows you to slice your video files and convert them into popular video formats. It also enables users to perform some basic edits and supports AVI, GIF, MKV, and MP4 for the output. It also gives users the possibility of extracting the audio stream of your video files and saving it as an MP3 file. In addition, users can load any MPG, MKV, AVI, WEBM, MP$, or WMV files split easily into as many clips as possible.
Pros
Has an accurate cutting point
It has useful features that can help to maximize the cutting process
Capabilities for rotation
Tag editor
Allows the conversion to some of the most well-known video formats
Cons
Some complex editing features are lacking
Unable to customize output profiles
· Easy GIF Animator
The main intention of this software is to create animations for your web pages. In addition, this software has a modern interface, in the style of Microsoft Office’s latest versions. However, some wizards can help to guide users of this software.
Pros
Helpful in creating graphical banners for advertising
Perfect for animation frame by frame
Convert video to GIF animations
Ideal for converting GIF to AVI
Add effects to your animations
Cons
Key-framing animation unsupported
Layers are not supported
Part 3: How to Convert GIF to AVI?
Convert GIF to AVI Using Online Converters
Convertio is an online file format converting tool compatible with a wide range of input and output formats, including GIF to AVI.
Here is a step-by-step guide of this GIF to AVI converter:
Step 1: Visit Convertio in your browser and select and upload a GIF file from your channel, like URL, computer, Dropbox, and Google Drive.
Step 2: Select AVI from the dropdown format option and click the Convert button to begin converting GIF to AVI.
Step 3: When completed, download the AVI files to your computer or send them to the cloud service
Save GIF as AVI through GIF to AVI Software
One of the primary reasons we recommend Wondershare Filmora is that online GIF converters can be unreliable. This implies that there must be a stable internet connection and power supply. In addition, Filmora software is safe and secure, which is a common concern with online tools.
Follow the steps below to turn GIF into AVI:
Step 1: Install Filmora on Mac or Windows
Download and Install Filmora software on your PC. Double click the .dmg file and follow all the instructions to install this software.
Step 2: Begin New Project
Click on the Filmora icon to start a new project and when it is open, click “New Project,” and make sure you select the “Project Settings” from the dropdown options (desired video aspect ratio, resolution and frame rate based on the sharing platform)
Step 3: Import Files to Convert
Start a new project by importing the GIF you want to convert to the timeline. A prompt project setting will pop up if the media aspect ratio and resolution do not match. Make sure you click on “DON’T CHANGE” to maintain your earlier setting
Step 4: Finish the Process and Export
Click on export to convert the video and select the AVI file format to save your file
Finally, save your GIF to AVI video on your preferred location
Conclusion
Thus, we learned:
- The process of converting GIF files to AVI using online tools
- How to use downloaded software to turn GIF to AVI
- It also provided a list of the top best software and online tool you can choose from to convert your GIF to AVIvery quickly.
- Lastly, it recommended Filmora as the top-most GIF to AVI converterdue to its reliability and safety commitment.
Also read:
- Updated In 2024, In This Guidepost, Youll Learn What an HDRI Photo Is and How to Use the Best Free HDRI Program to Edit Photos. Youll Also Know the Difference Between HDR and HDRI
- New 2024 Approved How to Got Free After Effects Templates Slideshow with Simple Trick
- 2024 Approved How to Add Motion Titles
- New In 2024, Ultimate Guide to Countdown Animation in Videos
- New In 2024, Knowing All Ways To Slow Down Video With Adobe Premiere Pro
- 2024 Approved Discover the Various Techniques of Video Framing, Which Involve Capturing the Essence of a Subject While Eliminating Distractions in the Background, Andlearn How to Apply Them Skillfully to Achieve Desired Results
- Updated 2024 Approved Do You Want to Apply Professional-Looking Color Grading on Your iPhones Photos and Videos? You Can Use Different iPhone LUTs for Your Pictures and Videos
- Updated 2024 Approved How to Take Slow Motion Videos
- Whats an AV1 Format and How Does It Impact Your Life for 2024
- Updated Do You Wish to Create the Best Video Collages ? No Problem, because Wondershare Filmora Will Help You Make the Best Video Collages
- Updated 2024 Approved How To Make a Polaroid Collage
- 2024 Approved How Much Wedding Videographer Cost
- Updated How to Turn On/Off Motion Blur in Dying Light 2?
- New Do You Want to Add Subtitles to Your Videos Efficiently? This Article Will Introduce an Online Subtitle Editor that Will Help You to Create Subtitles for Your Video for 2024
- New In 2024, Troubleshoot Snapchat Camera Zoomed in Issue 4 Tips
- New In 2024, Perfectly Use the Audio Mixer in Filmora
- A Review On 3D LUT Creator for 2024
- New In 2024, Boost Your Spirit Creating Motivational Status Videos
- Updated In 2024, 11 Tips to Make Product Ad Videos
- How to Zoom Video in VLC Media Player for 2024
- New In 2024, Looking for Ways to Enhance Overall Look for Your Contents Professionally? Then Coming up with These Cool PowerPoint Templates Can Help You a Lot
- Updated In 2024, Guide To Slowing Down Videos in Snapchat Discussing the Details
- 3 Best Motion Blur Plugins for Adobe After Effects
- New In 2024, Color Matching Is the Trickiest Part of Graphic Designing. Learn in Detail About Using Canva Color Match Ideally While Working on Your Pins, Social Media Posts, and Other Designs
- There Are Many Aspects to Consider when It Comes to Publishing a Video. Safety and Privacy Aspects Are some of Them. If Youre Looking to Blur Out a Bystander or Cut Out Profanities From Your Video with Filmora, This Is the Right Article for You for 2024
- Updated In 2024, REVIEW Whats Best 10 Software to Make AI Upscaling Video
- 2024 Approved 8 Best Video Editor with Useful Masking
- New How To Zoom In On TikTok Videos, In 2024
- New In 2024, Here Is a Guide on How You Can Resize Videos via Handbrake and Wondershare Filmora. The Former Is a Lightweight Tool Perfect for Batch Resizing Videos, While the Latter Is a Powerful Free Video Editing Software
- In 2024, Replacing the Sky in Adobe After Effects An Extensive Guide
- New In 2024, Are You Ready to Learn About Something Free yet Amazing? We Are Talking About All Format Video Players for PC that You Should Know , Lets Begin
- Keyframes Interval Everything You Need To Know | Filmora
- In 2024, How to Remove Motion Blur In Photoshop
- New In 2024, Basic Introduction for LumaFusion Color Grading
- An Introduction to LUTs | Their Overview and Benefits
- How To Slow Down GIF Building an Understanding
- Updated In 2024, 3 Actionable Ways to Create Countdown Animation for Videos
- New 2024 Approved How to Make a Transparent Background in Paint. How 3D Paint Transparent Background Can Be Made. How to Save an Image with Transparent Background?
- Updated How To Make a Timelapse in After Effects for 2024
- Full Guide to Unlock Your Xiaomi Civi 3 Disney 100th Anniversary Edition
- New 5 Photoshop Alternatives to Animate Your Logo for 2024
- In 2024, How To Unlock Stolen iPhone XS In Different Conditionsin
- In 2024, How To Change Your Apple ID Password On your iPhone 14 Plus
- A Perfect Guide To Remove or Disable Google Smart Lock On Vivo Y200
- In 2024, CatchEmAll Celebrate National Pokémon Day with Virtual Location On Apple iPhone 14 | Dr.fone
- How to Unlock Apple iPhone 14 Plus With an Apple Watch & What to Do if It Doesnt Work | Dr.fone
- In 2024, How to Fake Snapchat Location without Jailbreak On Samsung Galaxy XCover 7 | Dr.fone
- 5 Ways to Reset Huawei P60 Without Volume Buttons | Dr.fone
- In 2024, 6 Methods to Protect Yourself from Location Tracking on Apple iPhone 6 | Dr.fone
- In 2024, The Best iSpoofer Alternative to Try On Realme V30T | Dr.fone
- The Ultimate Guide to Bypassing iCloud Activation Lock on Apple iPhone 11 Pro
- Title: Searching for the Best Video Editor to Make Your Video More Attractive? This Article Introduce You Everything About Choosing a Video Editing Software for 2024
- Author: Morgan
- Created at : 2024-05-19 05:12:41
- Updated at : 2024-05-20 05:12:41
- Link: https://ai-video-editing.techidaily.com/searching-for-the-best-video-editor-to-make-your-video-more-attractive-this-article-introduce-you-everything-about-choosing-a-video-editing-software-for-202/
- License: This work is licensed under CC BY-NC-SA 4.0.
