:max_bytes(150000):strip_icc():format(webp)/GettyImages-678913139-58a4ece73df78c345bcd781b.jpg)
Splitting Audio From a Video in Sony Vegas Step by Step

Splitting Audio From a Video in Sony Vegas [Step by Step]
The Sony Vegas Pro is software for professionally editing videos. There are many tools and effects available for audio and video that you can add respective to your requirements. The stabilization engine is available in Sony Vegas Pro to reduce the movements that you can observe the shaking in the videos. It helps in improving the quality of your content thoroughly. Sony Vegas pro also helps pin the texts or grading of the colours to apply objects in various dimensions.
You can use this software for editing, organizing or viewing the projects that are going on and present on the timeline. Even sharing the small parts of the video is possible. As a user of Sony Vegas Pro, it is a total choice of handling the colouring exposure to maintain the workflow. Here, the main discussion is regarding the split of the audio from the video in the Sony Vegas Pro. There are also some details about the substitute, which is Wondershare Filmora.
How can you separate audio from the video clips in Sony Vegas Pro?
The best features of Sony Vegas Pro help create, edit, trim or even crop the videos. You can use them in making videos worth viewing for your audience. Sony Vegas Pro can make your work on multiple screens at the same time. The most important characteristic is the extraction of the audio from the video.
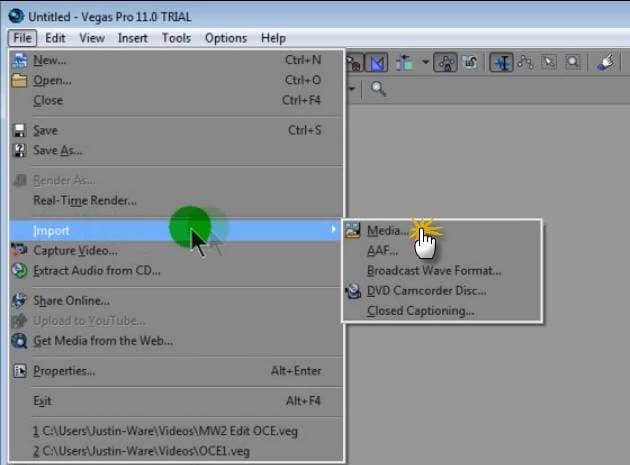
Step 1: When you have finished the installation of the Sony Vegas Pro on your device, now import the video clip from which you want to extract the audio.
Step 2: Drag and drop your video clip in the editing area. Here, you can easily see the video and audio tracks are all together. Whatever effect you apply, both will show the results.
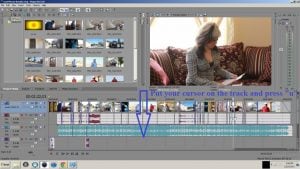
Step 3: You have to separate the audio from the video files in this step. After selecting the track, whether audio or video, simply press the “U” letter on your keyboard. In this step, keep holding the cursor. It permits you to keep moving the video clips quickly. Now, it is easy to download audio files from this area.
Step 4: The tracks are separate now, so you can move, delete or edit them individually. Definitely, it doesn’t affect the other track.
An easier way to split the audio from the video
Most graphic designers and video editors consider the Sony Vegas Pro as the professional level software for editing purposes. Due to the user interface of advanced level, high pricing and availability only for the Mac users make people look for options as the editing tool and accessible on both devices using Windows and Mac.
Filmora Video Editor is the best consideration among all of the editors. You can also use the Wondershare Filmora in dark mode as well. This feature helps the user edit in his comfort zone without causing any harm to the eyes. In the following steps, you can easily separate the audio from the videos in Wondershare Filmora.
For Win 7 or later (64-bit)
For macOS 10.14 or later
Features
- Simple interface and all the tools are easily available
- Just need a few clicks along the drag and drop to perform the functionalities
- Unlimited sharing of the videos on YouTube, Vimeo and many others
- Splitting of the clips and screen
- Easy to split up the audio from the video
Step 1: After running the Wondershare Filmora, select the ratio of your choice 4:3 or 16:9 for entering in the mode of editing. Click on the “Import” so you can add the photos, video and audio from the folder of your system. After importing the videos, drag and drop in the timeline. As a default, all the files get merged with one another with no gap.
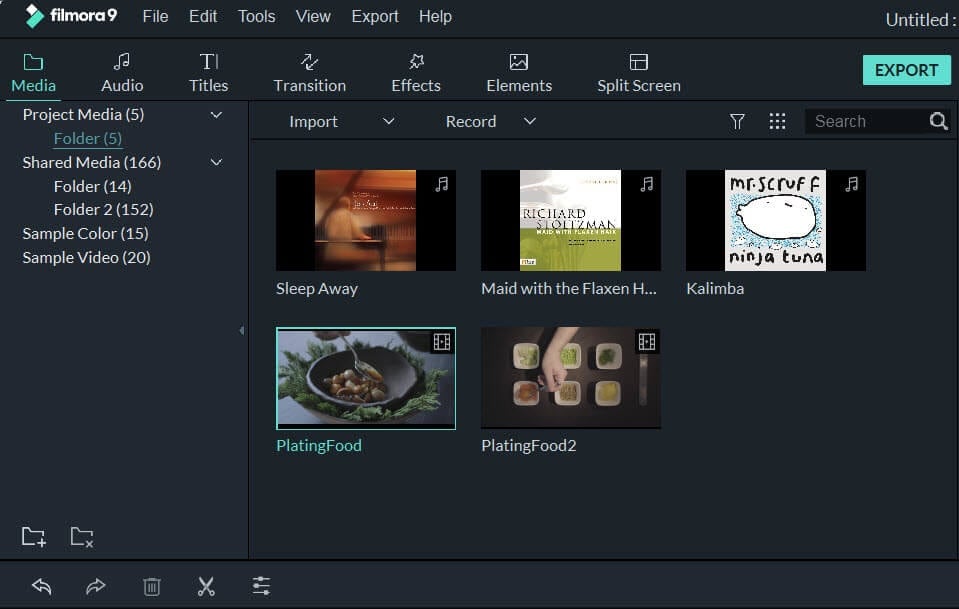
Step 2: Right-click on the video clip from which you want to extract the audio. Select the option of “Detach Audio” from the menu. Instantly, an audio file is visible on the screen, and it is the original one from the source.

Step 3: Now, the audio track gets separated from the video successfully. Wondershare Filmora also offers to add one more audio file. Yes, it is also possible with this software.
Step 4: After separating the audio from the video, it is simple to delete the track, whether it is audio or video that is not in use or want to use. Click on the “Export” option for saving your required audio tracks, or you can even select the “iPod” for playing the audio. You can also save the audio file separately as the new file on your hard drive. After exporting the audio tracks, load the project file again that has the frames for the video and later export the video file.

Whenever you think about the compatibility of editing software with different operating systems, Wondershare Filmora comes to mind as the first choice. All the new features of Wondershare Filmora in its latest version have received positive feedback and reviews. Definitely, it is the actual replacement of the previously used editors such as video editor in Windows or iMovie in Mac.
Wondershare Filmora not only adds the animation but as well offers customization. Adding the keyframes is very easy for the user to change the positions, scale or rotate the clips. The feature of colour matching is also available so you can match the clips from one frame to another. Even the shortcut keys are available for all the commands that bring effective and efficient editing tasks.
Just little guidance and assistance can help you use the Wondershare Filmora as the options are suitable in front of your screen. No more waiting and thinking; start using this most straightforward editor and enjoy all the features of Wondershare Filmora.
Step 2: Drag and drop your video clip in the editing area. Here, you can easily see the video and audio tracks are all together. Whatever effect you apply, both will show the results.

Step 3: You have to separate the audio from the video files in this step. After selecting the track, whether audio or video, simply press the “U” letter on your keyboard. In this step, keep holding the cursor. It permits you to keep moving the video clips quickly. Now, it is easy to download audio files from this area.
Step 4: The tracks are separate now, so you can move, delete or edit them individually. Definitely, it doesn’t affect the other track.
An easier way to split the audio from the video
Most graphic designers and video editors consider the Sony Vegas Pro as the professional level software for editing purposes. Due to the user interface of advanced level, high pricing and availability only for the Mac users make people look for options as the editing tool and accessible on both devices using Windows and Mac.
Filmora Video Editor is the best consideration among all of the editors. You can also use the Wondershare Filmora in dark mode as well. This feature helps the user edit in his comfort zone without causing any harm to the eyes. In the following steps, you can easily separate the audio from the videos in Wondershare Filmora.
For Win 7 or later (64-bit)
For macOS 10.14 or later
Features
- Simple interface and all the tools are easily available
- Just need a few clicks along the drag and drop to perform the functionalities
- Unlimited sharing of the videos on YouTube, Vimeo and many others
- Splitting of the clips and screen
- Easy to split up the audio from the video
Step 1: After running the Wondershare Filmora, select the ratio of your choice 4:3 or 16:9 for entering in the mode of editing. Click on the “Import” so you can add the photos, video and audio from the folder of your system. After importing the videos, drag and drop in the timeline. As a default, all the files get merged with one another with no gap.

Step 2: Right-click on the video clip from which you want to extract the audio. Select the option of “Detach Audio” from the menu. Instantly, an audio file is visible on the screen, and it is the original one from the source.

Step 3: Now, the audio track gets separated from the video successfully. Wondershare Filmora also offers to add one more audio file. Yes, it is also possible with this software.
Step 4: After separating the audio from the video, it is simple to delete the track, whether it is audio or video that is not in use or want to use. Click on the “Export” option for saving your required audio tracks, or you can even select the “iPod” for playing the audio. You can also save the audio file separately as the new file on your hard drive. After exporting the audio tracks, load the project file again that has the frames for the video and later export the video file.

Whenever you think about the compatibility of editing software with different operating systems, Wondershare Filmora comes to mind as the first choice. All the new features of Wondershare Filmora in its latest version have received positive feedback and reviews. Definitely, it is the actual replacement of the previously used editors such as video editor in Windows or iMovie in Mac.
Wondershare Filmora not only adds the animation but as well offers customization. Adding the keyframes is very easy for the user to change the positions, scale or rotate the clips. The feature of colour matching is also available so you can match the clips from one frame to another. Even the shortcut keys are available for all the commands that bring effective and efficient editing tasks.
Just little guidance and assistance can help you use the Wondershare Filmora as the options are suitable in front of your screen. No more waiting and thinking; start using this most straightforward editor and enjoy all the features of Wondershare Filmora.
Step 2: Drag and drop your video clip in the editing area. Here, you can easily see the video and audio tracks are all together. Whatever effect you apply, both will show the results.

Step 3: You have to separate the audio from the video files in this step. After selecting the track, whether audio or video, simply press the “U” letter on your keyboard. In this step, keep holding the cursor. It permits you to keep moving the video clips quickly. Now, it is easy to download audio files from this area.
Step 4: The tracks are separate now, so you can move, delete or edit them individually. Definitely, it doesn’t affect the other track.
An easier way to split the audio from the video
Most graphic designers and video editors consider the Sony Vegas Pro as the professional level software for editing purposes. Due to the user interface of advanced level, high pricing and availability only for the Mac users make people look for options as the editing tool and accessible on both devices using Windows and Mac.
Filmora Video Editor is the best consideration among all of the editors. You can also use the Wondershare Filmora in dark mode as well. This feature helps the user edit in his comfort zone without causing any harm to the eyes. In the following steps, you can easily separate the audio from the videos in Wondershare Filmora.
For Win 7 or later (64-bit)
For macOS 10.14 or later
Features
- Simple interface and all the tools are easily available
- Just need a few clicks along the drag and drop to perform the functionalities
- Unlimited sharing of the videos on YouTube, Vimeo and many others
- Splitting of the clips and screen
- Easy to split up the audio from the video
Step 1: After running the Wondershare Filmora, select the ratio of your choice 4:3 or 16:9 for entering in the mode of editing. Click on the “Import” so you can add the photos, video and audio from the folder of your system. After importing the videos, drag and drop in the timeline. As a default, all the files get merged with one another with no gap.

Step 2: Right-click on the video clip from which you want to extract the audio. Select the option of “Detach Audio” from the menu. Instantly, an audio file is visible on the screen, and it is the original one from the source.

Step 3: Now, the audio track gets separated from the video successfully. Wondershare Filmora also offers to add one more audio file. Yes, it is also possible with this software.
Step 4: After separating the audio from the video, it is simple to delete the track, whether it is audio or video that is not in use or want to use. Click on the “Export” option for saving your required audio tracks, or you can even select the “iPod” for playing the audio. You can also save the audio file separately as the new file on your hard drive. After exporting the audio tracks, load the project file again that has the frames for the video and later export the video file.

Whenever you think about the compatibility of editing software with different operating systems, Wondershare Filmora comes to mind as the first choice. All the new features of Wondershare Filmora in its latest version have received positive feedback and reviews. Definitely, it is the actual replacement of the previously used editors such as video editor in Windows or iMovie in Mac.
Wondershare Filmora not only adds the animation but as well offers customization. Adding the keyframes is very easy for the user to change the positions, scale or rotate the clips. The feature of colour matching is also available so you can match the clips from one frame to another. Even the shortcut keys are available for all the commands that bring effective and efficient editing tasks.
Just little guidance and assistance can help you use the Wondershare Filmora as the options are suitable in front of your screen. No more waiting and thinking; start using this most straightforward editor and enjoy all the features of Wondershare Filmora.
Step 2: Drag and drop your video clip in the editing area. Here, you can easily see the video and audio tracks are all together. Whatever effect you apply, both will show the results.

Step 3: You have to separate the audio from the video files in this step. After selecting the track, whether audio or video, simply press the “U” letter on your keyboard. In this step, keep holding the cursor. It permits you to keep moving the video clips quickly. Now, it is easy to download audio files from this area.
Step 4: The tracks are separate now, so you can move, delete or edit them individually. Definitely, it doesn’t affect the other track.
An easier way to split the audio from the video
Most graphic designers and video editors consider the Sony Vegas Pro as the professional level software for editing purposes. Due to the user interface of advanced level, high pricing and availability only for the Mac users make people look for options as the editing tool and accessible on both devices using Windows and Mac.
Filmora Video Editor is the best consideration among all of the editors. You can also use the Wondershare Filmora in dark mode as well. This feature helps the user edit in his comfort zone without causing any harm to the eyes. In the following steps, you can easily separate the audio from the videos in Wondershare Filmora.
For Win 7 or later (64-bit)
For macOS 10.14 or later
Features
- Simple interface and all the tools are easily available
- Just need a few clicks along the drag and drop to perform the functionalities
- Unlimited sharing of the videos on YouTube, Vimeo and many others
- Splitting of the clips and screen
- Easy to split up the audio from the video
Step 1: After running the Wondershare Filmora, select the ratio of your choice 4:3 or 16:9 for entering in the mode of editing. Click on the “Import” so you can add the photos, video and audio from the folder of your system. After importing the videos, drag and drop in the timeline. As a default, all the files get merged with one another with no gap.

Step 2: Right-click on the video clip from which you want to extract the audio. Select the option of “Detach Audio” from the menu. Instantly, an audio file is visible on the screen, and it is the original one from the source.

Step 3: Now, the audio track gets separated from the video successfully. Wondershare Filmora also offers to add one more audio file. Yes, it is also possible with this software.
Step 4: After separating the audio from the video, it is simple to delete the track, whether it is audio or video that is not in use or want to use. Click on the “Export” option for saving your required audio tracks, or you can even select the “iPod” for playing the audio. You can also save the audio file separately as the new file on your hard drive. After exporting the audio tracks, load the project file again that has the frames for the video and later export the video file.

Whenever you think about the compatibility of editing software with different operating systems, Wondershare Filmora comes to mind as the first choice. All the new features of Wondershare Filmora in its latest version have received positive feedback and reviews. Definitely, it is the actual replacement of the previously used editors such as video editor in Windows or iMovie in Mac.
Wondershare Filmora not only adds the animation but as well offers customization. Adding the keyframes is very easy for the user to change the positions, scale or rotate the clips. The feature of colour matching is also available so you can match the clips from one frame to another. Even the shortcut keys are available for all the commands that bring effective and efficient editing tasks.
Just little guidance and assistance can help you use the Wondershare Filmora as the options are suitable in front of your screen. No more waiting and thinking; start using this most straightforward editor and enjoy all the features of Wondershare Filmora.
6 Ways to Mimic Professional Filming Gears
The professional and expensive gears are primarily out of budget for starters. But there is no need to stop filming because household things will give good output.
In this article, you will learn 6 pro tips to make professional filming gear using cardboard, container, and tape. It will turn out into POV and barrel roll shots. Scroll more to learn the top ways, and then enjoy the rest with your audience.
Part 1. Things to Remember Before Making Gears
Before using tools for professional videos, you should remember some side effects and cautions to make everything reliable and simple. Read the below outlines!
Not Professional Results
You should remember that homemade tools will give you different results than professional gear because they are expensive for a purpose. But you can experiment and get fun during filming with these products.
Safety Measures
If you use any heavy or temperature-sensitive equipment, you should take safety before operating them.
Handle Carefully
Before experimenting, make sure that you are holding everything tightly. Ensure that no accident occurs during filming!
After taking precautions and understanding the output, it’s time to make tools and film!
Part 2. Smooth Camera Movement with A Door
With a simple mobile camera, you can make smooth shots of any action, like walking, running, and playing. There is no need to get any professional gear.
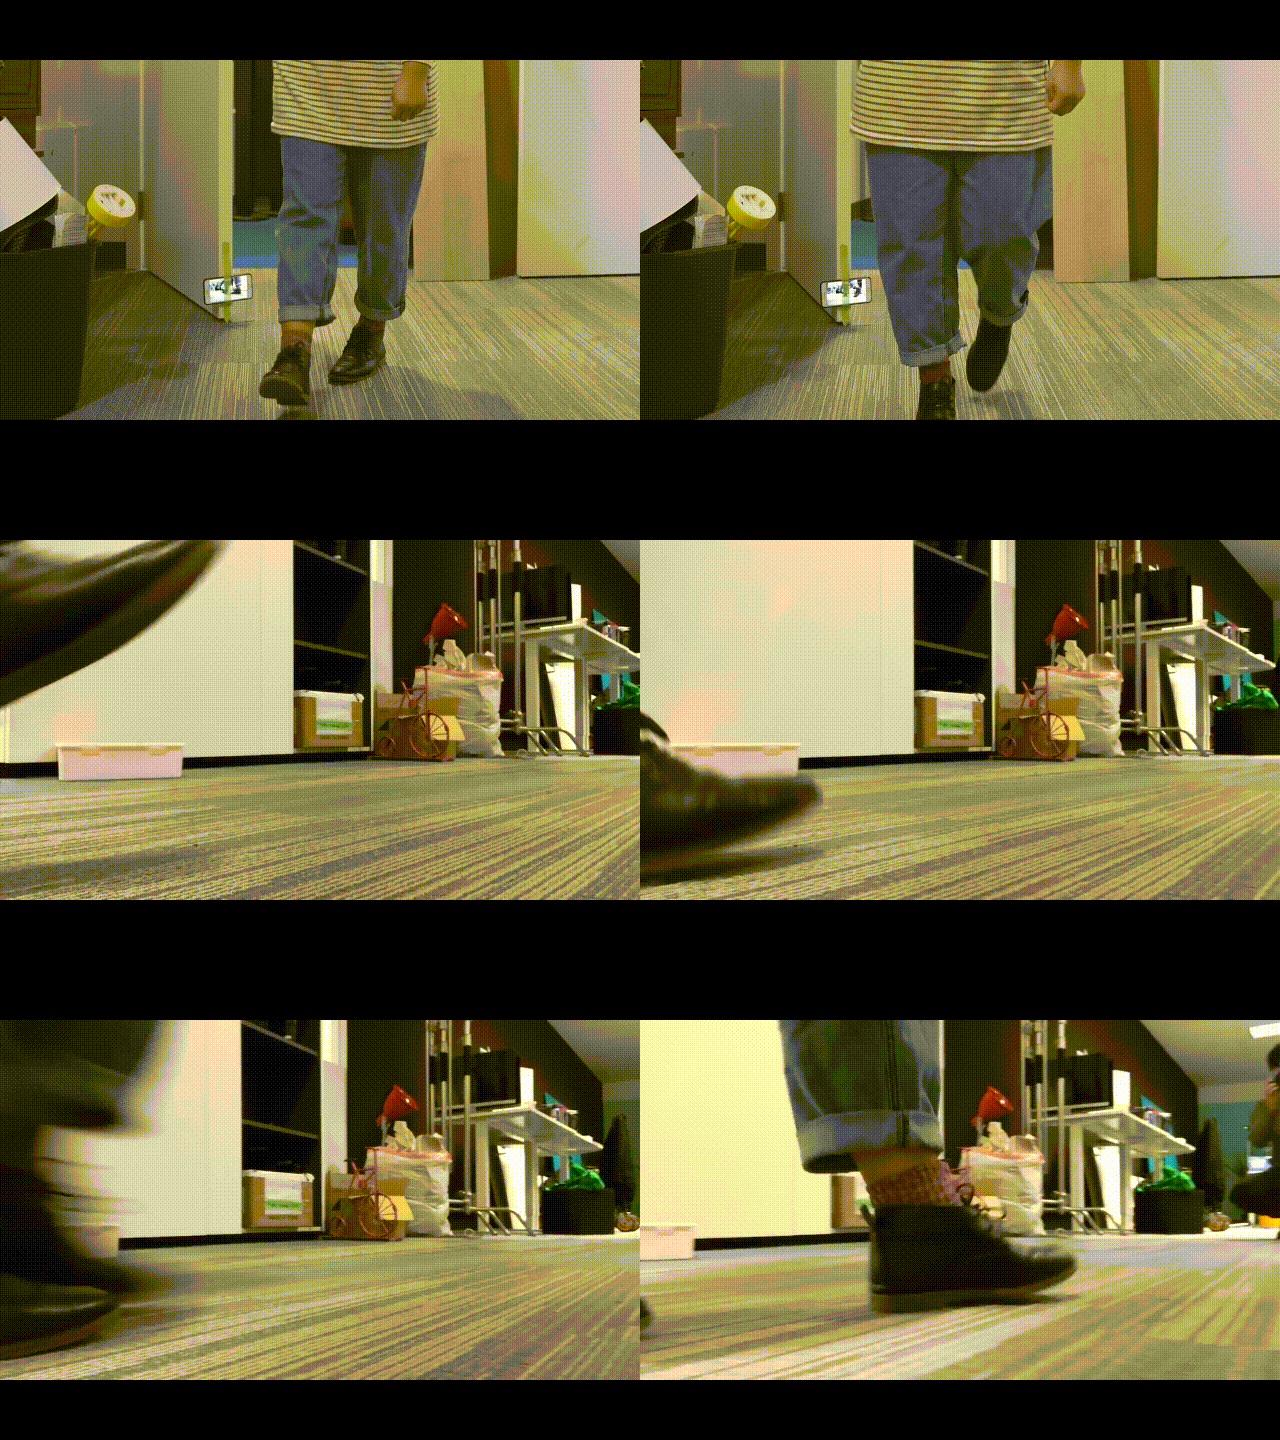
It easy to achieve by attaching a camera to the door. You can use duct or any other tape which is easily available in the home. Fasten the mobile phone to the side of the door with tape, as shown below!

Moving the door while performing any action will result in smooth shots. Check out the final results below.
Part 3. Film Shots of Underwater
Filming underwater is always a dream of any videographer, but we were limited to get shots from the water’s surface. So now it’s time to add more creativity to your video.
First, you need to take a transparent container or any glass container. Pour water according to your need in it.
![]()
Note: Ensure the container is light enough to put on the phone.
Then, place the container on the lens of the phone to make a video. Then, take care of the phone from the water.

Pro Tip: You can also shine light source in water and add glitter or colors to get more astonishing shots.
Part 4. Make Colourful Shots Without Coloured Lights
All filmmakers love party lights and want to add colors like that in the video. Different colored lights in videos usually represent different mood swings and enhance the creativity of storytellers.
Professional videographers use expensive lights to give these effects. But you don’t need to purchase any expensive gear. Because you can make colorful shots easily with colored plastic binder dividers, or you can also use cellophane wraps.
First, wrap the colored divider around the LED light or any light you use to shoot video.
![]()
Note: Check the light temperature after short intervals because it melts or burns the dividers when the light source gets hot.
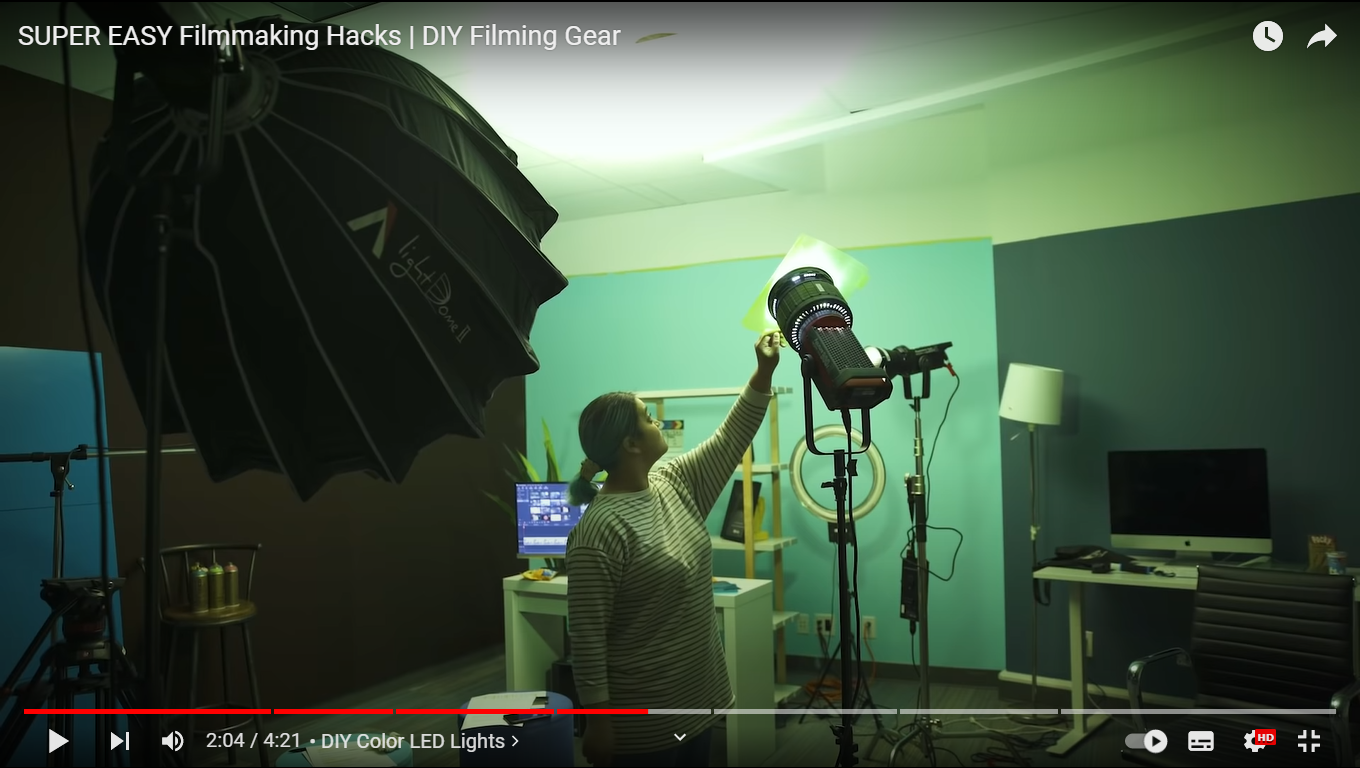
Now make the video and try with different colors to add suspense, horror, and happy effects to the video.
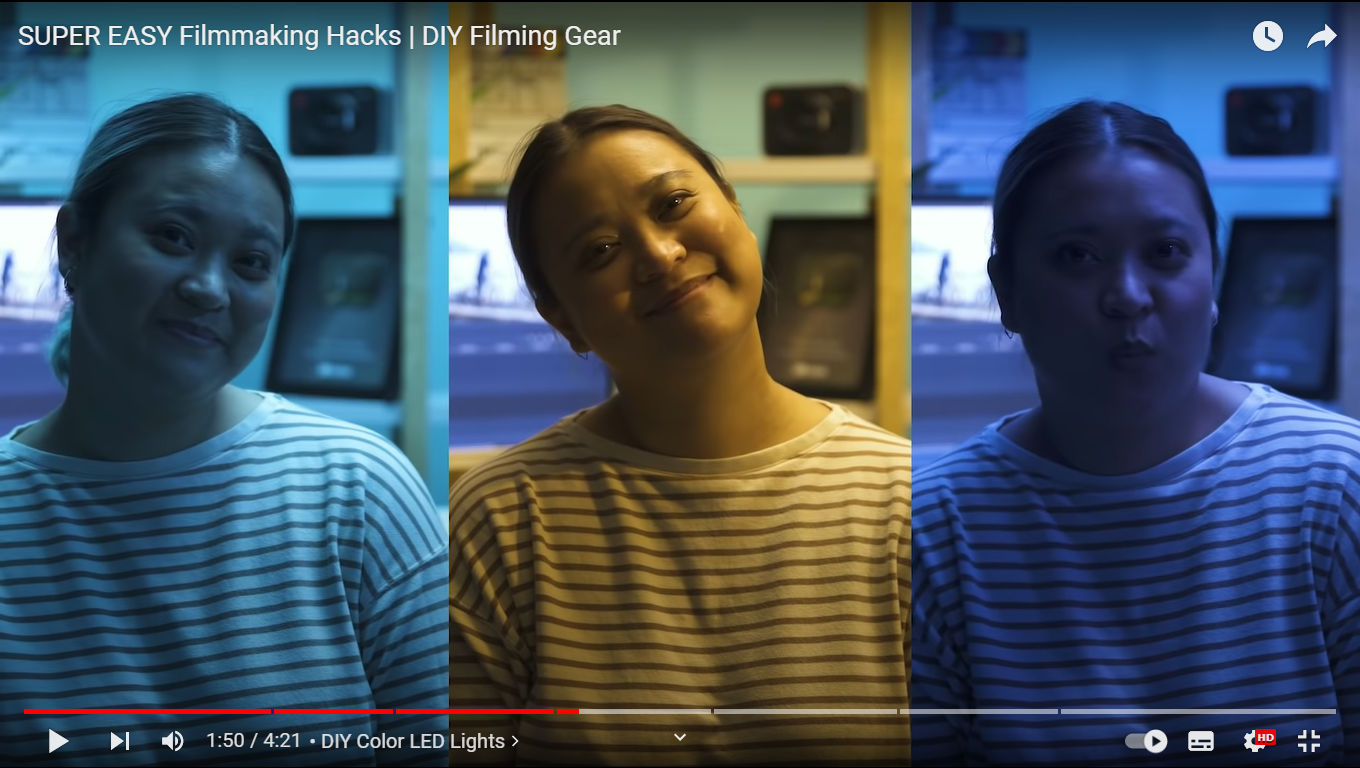
The video still needs more creative effects and designs; scroll more to read exciting tips.
Part 5. Different Shapes of Light with Cardboard
To add a fantasy location in the video and make light effects in the form of shapes, try out easily available cardboard. Most of the time, aesthetic videos are made by these hacks, giving viewers different vibes.
Only a professional photographer and videographer know how to attract the audience to the shots by doing these simple hacks.
The interesting thing is that if light has more shape, it will precisely describe more about the scene’s backstory, location, and context. Give it a try!
Step1 Cutting of cardboards
Cut the cardboard in any shape, whatever you want. We will experiment by cutting cardboard in window blinds shape.
![]()
Note: There is no specific recommendation for the cardboard, you can use any size or shape which suits you the best.

Step2 Make shots in different shapes of light
After giving shape, now move the cardboard around the light source and make a video. It seems like the subject is sitting near the window and has aesthetic vibes.
![]()
Note: The more precise the cutting of cardboard, the more professional it looks.

Become more creative and make more shapes with cardboard because the audience always prefers new content in the market.
Part 6. Create Point of View Shots
After adding colors and shapes, now it’s time to get some Point of View (POV) shots. Most of the time, viewers become bored by watching framing and filming coverages.
POV shots are mostly captured from a specific angle to show an object’s characters. They are mostly seen in food commercials, and videographers of snacks just love to make these shots.
To make POV shots, there is nothing specific required. You just have to make a suitable position for the lens. Follow the below guidelines and capture it!
Step1 Cut ends of packet
To create POV shots of your favorite snack, first of all, cut down both ends of the packets.
Step2 Attach packet on a camera
After cutting, attach the packet of snacks to the camera lens or phone with the help of old-fashioned tape.
Ensure the camera is turned on, and then make a POV shot. Now, it’s time to enjoy the rest part with the audience. Check out the final results, as shown below!

Due to this, the food seems good, and you can notice the number of spices too. This one actually looks amazing!
What if we add the rotatory shots, too, in the video? For this, check out the last tip and try that!
Part 7. Create a Barrel Roll Shot
Barrel roll shots are the full axial shot by spinning the camera lens. Epic shots that formerly required costly gimbals and sophisticated techniques are now as simple as strolling.
It’s pretty easy to make a rotatory shot at 360° by using equipment easily available at home. Rolling may feel anxiety and disorientation. Filmmakers utilize it to confuse or unnerve audiences in movies.
There is no need to purchase expensive gambles to make barrel roll clips. Instead, try this hack by utilizing a power drill present at your home. Then, follow the below steps to give it a professional look!
Step1 Take equipment
First, take a camera lens or smartphone, whatever you are using to make a video, and a power drill as a gimbal.
Step2 Camera with drill
Attach the camera to the power drill with the help of old-fashioned tape.
![]()
Note: You should have a piece of square foam or soft block placed between the camera and drill to assist.
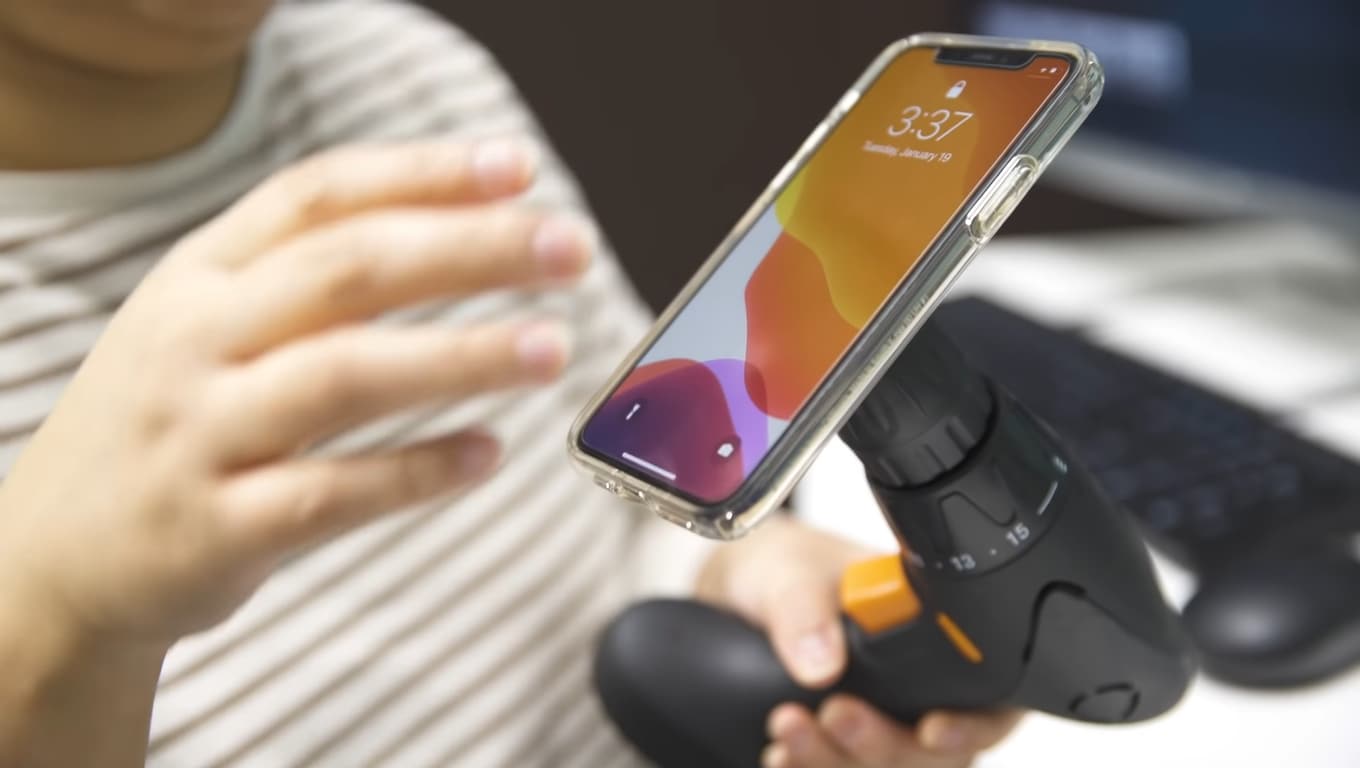
Now, it’s time to turn on the drill and ensure that the video option is “Turn On” in the camera. Then, enjoy the shots of 360° with your audience!

Conclusion
Finally, you get a filmy video after performing above mentioned 6 DIY hacks without expensive gear. More creativity in a video attracts more audience, which makes you more prior in the videography industry.
You can also try more tools at home and share your ideas with others to get reviews on them and make better changes. Make sure that you are taking all safety measures and precautions.
Then, place the container on the lens of the phone to make a video. Then, take care of the phone from the water.

Pro Tip: You can also shine light source in water and add glitter or colors to get more astonishing shots.
Part 4. Make Colourful Shots Without Coloured Lights
All filmmakers love party lights and want to add colors like that in the video. Different colored lights in videos usually represent different mood swings and enhance the creativity of storytellers.
Professional videographers use expensive lights to give these effects. But you don’t need to purchase any expensive gear. Because you can make colorful shots easily with colored plastic binder dividers, or you can also use cellophane wraps.
First, wrap the colored divider around the LED light or any light you use to shoot video.
![]()
Note: Check the light temperature after short intervals because it melts or burns the dividers when the light source gets hot.

Now make the video and try with different colors to add suspense, horror, and happy effects to the video.

The video still needs more creative effects and designs; scroll more to read exciting tips.
Part 5. Different Shapes of Light with Cardboard
To add a fantasy location in the video and make light effects in the form of shapes, try out easily available cardboard. Most of the time, aesthetic videos are made by these hacks, giving viewers different vibes.
Only a professional photographer and videographer know how to attract the audience to the shots by doing these simple hacks.
The interesting thing is that if light has more shape, it will precisely describe more about the scene’s backstory, location, and context. Give it a try!
Step1 Cutting of cardboards
Cut the cardboard in any shape, whatever you want. We will experiment by cutting cardboard in window blinds shape.
![]()
Note: There is no specific recommendation for the cardboard, you can use any size or shape which suits you the best.

Step2 Make shots in different shapes of light
After giving shape, now move the cardboard around the light source and make a video. It seems like the subject is sitting near the window and has aesthetic vibes.
![]()
Note: The more precise the cutting of cardboard, the more professional it looks.

Become more creative and make more shapes with cardboard because the audience always prefers new content in the market.
Part 6. Create Point of View Shots
After adding colors and shapes, now it’s time to get some Point of View (POV) shots. Most of the time, viewers become bored by watching framing and filming coverages.
POV shots are mostly captured from a specific angle to show an object’s characters. They are mostly seen in food commercials, and videographers of snacks just love to make these shots.
To make POV shots, there is nothing specific required. You just have to make a suitable position for the lens. Follow the below guidelines and capture it!
Step1 Cut ends of packet
To create POV shots of your favorite snack, first of all, cut down both ends of the packets.
Step2 Attach packet on a camera
After cutting, attach the packet of snacks to the camera lens or phone with the help of old-fashioned tape.
Ensure the camera is turned on, and then make a POV shot. Now, it’s time to enjoy the rest part with the audience. Check out the final results, as shown below!

Due to this, the food seems good, and you can notice the number of spices too. This one actually looks amazing!
What if we add the rotatory shots, too, in the video? For this, check out the last tip and try that!
Part 7. Create a Barrel Roll Shot
Barrel roll shots are the full axial shot by spinning the camera lens. Epic shots that formerly required costly gimbals and sophisticated techniques are now as simple as strolling.
It’s pretty easy to make a rotatory shot at 360° by using equipment easily available at home. Rolling may feel anxiety and disorientation. Filmmakers utilize it to confuse or unnerve audiences in movies.
There is no need to purchase expensive gambles to make barrel roll clips. Instead, try this hack by utilizing a power drill present at your home. Then, follow the below steps to give it a professional look!
Step1 Take equipment
First, take a camera lens or smartphone, whatever you are using to make a video, and a power drill as a gimbal.
Step2 Camera with drill
Attach the camera to the power drill with the help of old-fashioned tape.
![]()
Note: You should have a piece of square foam or soft block placed between the camera and drill to assist.

Now, it’s time to turn on the drill and ensure that the video option is “Turn On” in the camera. Then, enjoy the shots of 360° with your audience!

Conclusion
Finally, you get a filmy video after performing above mentioned 6 DIY hacks without expensive gear. More creativity in a video attracts more audience, which makes you more prior in the videography industry.
You can also try more tools at home and share your ideas with others to get reviews on them and make better changes. Make sure that you are taking all safety measures and precautions.
The Best Peter McKinnon LUTs for Perfect Video Editing
Peter McKinnon is a highly talented video editor and YouTuber. He gained widespread recognition for his amazing video editing skills. Furthermore, his content always stands out from others for his exceptional color-grading abilities. Additionally, he has a keen eye for choosing the perfect color tones and contrasts to make his videos look impressive.
One of the secrets behind Peter’s impressive color grading is his use of LUTs. Peter McKinnon has developed his collection of LUTs. By using Peter McKinnon LUTs, you can easily apply his signature color grading style to your videos. These LUTs can enhance the colors, add depth and dimension, and give your videos that cinematic feel.
Part 1: Why Should You Use LUTs in Video Editing?
If you need Peter McKinnon LUT packs, you must know how effective LUTs are. Using Look-Up Tables in video editing has several advantages that can make your editing process easier, which are discussed as follows:
Save Time on Color Grading
LUTs offer a quick way to adjust the colors in your videos. Instead of manually tweaking each color parameter, you can apply a LUT with a few clicks. It saves time and lets you easily try different styles. Moreover, it makes the color grading process more convenient for beginners.
Maintain Consistency
Applying the same LUT to multiple clips ensures a consistent look throughout your video. It is constructive when you have different scenes or shots. Furthermore, you don’t need to edit each clip separately. Moreover, you can save time and effort by applying the same LUT to your project.
Professional and Creative Looks
LUTs are created by experts and provide a range of creative styles. They can imitate the look of different films, genres, or specific grading techniques. Additionally, using LUTs helps you achieve a particular mood or style. Furthermore, LUTs enhance your storytelling or align with your creative vision.
Match Footage from Different Sources
When working with footage from different cameras or lighting conditions, LUTs can help. They can help match the color and tone of the clips. Each camera may capture colors; lighting variations can affect the overall look. However, applying a LUT gives you a consistent result throughout.
Preview and Communicate Ideas
Another advantage is that LUTs offer real-time previews of the final look as you edit. Moreover, it helps you visualize the aesthetic and make informed creative decisions. Sharing LUTs with your team or collaborators communicates your creative ideas. Furthermore, it ensures everyone understands the desired look of the project.
Streamline Workflow
LUTs can be integrated into your editing software, allowing you to apply and modify them. They can be combined with other adjustments like exposure, contrast, and saturation. In addition to this, it streamlines your workflow, freeing up time to focus on other editing tasks.
Empower your videos with a new mood using different LUTs. Filmora now offers 100+ top-quality 3D LUTs cover a broad range of scenarios. Transform your videos with Filmora’s powerful 3D LUTs.
Apply LUT on Videos Apply LUT on Videos Learn More

Part 2: Top Peter McKinnon Influenced LUTs for Videos
Peter McKinnon is a great content creator with exceptional video editing skills. Here is a list of Peter McKinnon LUT Pack free and paid ones, which you can download. Make your videos look like Peter McKinnon’s and get the praise you deserve.
1. Cine LUTS V2
Cine LUTS V2 is a pack of 15 cinematic-style LUTs to color grade your videos. With these LUTs, you can achieve various cinematic looks, such as Dawn, Dusk, Elemental, and Ember. Moreover, the Dawn LUT adds a warm and soft color tone to your video. However, the Elemental LUT brings out vibrant colors, making your content appear bold and impactful. Furthermore, each LUT in this pack offers a unique color grading style.

2. Cine LUTS V1
With the Cine LUTs V1 pack, you’ll have access to 7 unique LUTs. This Peter McKinnon LUT pack gives your videos a cinematic look. Furthermore, this pack has different LUTs, including Orange & Teal and Noir. The Orange & Teal LUT adds a warm orange tone to the highlights and a cool teal tone to the shadows. However, you can use the Noir LUT to add a more dramatic look to your video.

3. Arctic Shade
Arctic Shade LUT is a color grading tool inspired by Peter McKinnon’s technique. Applying this LUT adjusts the white balance to give your video a balanced white exposure. Furthermore, it increases saturation and enhances contrast to make your colors pop. It’s a great option to experiment with and matches the color grading style of Peter McKinnon.

4. Bleak Galaxy
Bleak Galaxy is a fantastic LUT pack inspired by Peter McKinnon. This LUT is perfect for enhancing your night sky footage. It amplifies the blue tones, making the night sky even more beautiful. Additionally, it boosts saturation, bringing out the vibrant colors in the scene. With Bleak Galaxy, you can capture the details of the stunning night sky in all its beauty.

Part 3: Wondershare Filmora: Get Free LUTs on an Alternative Platform
Are you a fan of Peter McKinnon and want to make your content look professional and cinematic? It would be best to use professional video editing software like Wondershare Filmora . Filmora is an excellent tool that helps you in editing videos. Moreover, Filmora offers simple enhancement and adjustment tools for more advanced AI features.
Add LUTs on Video For Win 7 or later(64-bit)
Add LUTs on Video For macOS 10.14 or later
Besides video editing capabilities, you can color grade your videos like Peter McKinnon. In the same way, this tool offers paid and free LUTs that you can use. Additionally, Filmora has over 200 LUTs, each with a unique set of styles and color tones. You can download similar-looking Peter McKinnon LUTs free LUTs to apply on your digital media using Filmora.

Conclusion
In conclusion, Peter McKinnon is an impressive content creator and professional. There are many different LUTs inspired by Peter McKinnon LUT packs. Furthermore, these LUTs allow you to experiment and find the perfect color grading for your videos. Moreover, you can use these LUTs pack for a travel vlog, B-roll, or even a short film. With these LUTs, your videos will look better than ever.
Add LUTs on Video For Win 7 or later(64-bit)
Add LUTs on Video For macOS 10.14 or later
Apply LUT on Videos Apply LUT on Videos Learn More

Part 2: Top Peter McKinnon Influenced LUTs for Videos
Peter McKinnon is a great content creator with exceptional video editing skills. Here is a list of Peter McKinnon LUT Pack free and paid ones, which you can download. Make your videos look like Peter McKinnon’s and get the praise you deserve.
1. Cine LUTS V2
Cine LUTS V2 is a pack of 15 cinematic-style LUTs to color grade your videos. With these LUTs, you can achieve various cinematic looks, such as Dawn, Dusk, Elemental, and Ember. Moreover, the Dawn LUT adds a warm and soft color tone to your video. However, the Elemental LUT brings out vibrant colors, making your content appear bold and impactful. Furthermore, each LUT in this pack offers a unique color grading style.

2. Cine LUTS V1
With the Cine LUTs V1 pack, you’ll have access to 7 unique LUTs. This Peter McKinnon LUT pack gives your videos a cinematic look. Furthermore, this pack has different LUTs, including Orange & Teal and Noir. The Orange & Teal LUT adds a warm orange tone to the highlights and a cool teal tone to the shadows. However, you can use the Noir LUT to add a more dramatic look to your video.

3. Arctic Shade
Arctic Shade LUT is a color grading tool inspired by Peter McKinnon’s technique. Applying this LUT adjusts the white balance to give your video a balanced white exposure. Furthermore, it increases saturation and enhances contrast to make your colors pop. It’s a great option to experiment with and matches the color grading style of Peter McKinnon.

4. Bleak Galaxy
Bleak Galaxy is a fantastic LUT pack inspired by Peter McKinnon. This LUT is perfect for enhancing your night sky footage. It amplifies the blue tones, making the night sky even more beautiful. Additionally, it boosts saturation, bringing out the vibrant colors in the scene. With Bleak Galaxy, you can capture the details of the stunning night sky in all its beauty.

Part 3: Wondershare Filmora: Get Free LUTs on an Alternative Platform
Are you a fan of Peter McKinnon and want to make your content look professional and cinematic? It would be best to use professional video editing software like Wondershare Filmora . Filmora is an excellent tool that helps you in editing videos. Moreover, Filmora offers simple enhancement and adjustment tools for more advanced AI features.
Add LUTs on Video For Win 7 or later(64-bit)
Add LUTs on Video For macOS 10.14 or later
Besides video editing capabilities, you can color grade your videos like Peter McKinnon. In the same way, this tool offers paid and free LUTs that you can use. Additionally, Filmora has over 200 LUTs, each with a unique set of styles and color tones. You can download similar-looking Peter McKinnon LUTs free LUTs to apply on your digital media using Filmora.

Conclusion
In conclusion, Peter McKinnon is an impressive content creator and professional. There are many different LUTs inspired by Peter McKinnon LUT packs. Furthermore, these LUTs allow you to experiment and find the perfect color grading for your videos. Moreover, you can use these LUTs pack for a travel vlog, B-roll, or even a short film. With these LUTs, your videos will look better than ever.
Add LUTs on Video For Win 7 or later(64-bit)
Add LUTs on Video For macOS 10.14 or later
A Guide to Effective Video Marketing
Video marketing is the process of promoting a product, service, or brand using videos intended to attract audiences’ attention and prompt them to action. With marketers and communicators working increasingly with AI, automation, chatbots, and all sorts of generative technology in 2023 and beyond, video is one of the most common digital mediums for connecting with people.
What exactly does effective video marketing look like today? This guide will take a closer look.
- Part 2. 3 Typical Types of Marketing Videos
- Part 3. 6 Tips for Making Your Video Effective
- Part 4: Useful Video Editing Tool
- Conclusion
Part 1: How to Create a Video Marketing Campaign

Launching a video marketing campaign requires considerable planning and preparation. Follow these best practices for video campaign success:
1.Set Goals and Identify Your Audience
The aim of video marketing for small businesses or large businesses should be tied to business objectives, such as raising brand awareness, educating consumers, or driving conversions. First and foremost, define these goals.
Who are you trying to reach with video content? You need a clear picture of this. Collect insights about audiences with regard to demographics, interests, values, media habits, and existing brand impressions. With these insights, you can create unique content that appeals to your target viewers.
2.Conduct Market Research
Research what kinds of videos connect with your audiences by accounting for competitors and non-competitors successfully using video. Identify videos with the most hits, shares, subscribers generated, and other metrics through channels like YouTube Analytics, Tubular Labs or SEMrush.
From the data, conclude common themes around video length, preferred formats for content, production methodologies, and so on, which should then serve to guide your own content.
3.Craft a Compelling Story
Every great marketing video is a story. Draw a story plot with rising tension and emotion leading to resolution. The story’s exposition, rising action, climax, and denouement can be outlined by famous storytelling frameworks.
Narratives that keep viewers engaged from beginning to end result in better videos. Early validation for your script ideas can be gathered through focus groups, social listening, surveys, and interviews with members of your target audience.
4.Produce Video/Audio with Quality
Bring your story to life by investing in experienced video producers. Budgets may be wildly divergent, so always aim to achieve the best production quality.
Feature crisp, bright camerawork, professional editing, and transitions. Be sure to use intense music to underscore emotional peaks and simple but eye-catching visual effects where they make sense.
For audio, manage volumes between scenes at the same level; minimize background noise; have clear dialogue and smooth mixing. Good video and audio keep viewers glued to your content.
5. Select Suitable Video Platforms
Research where video marketing is most effective in your niche, and figure out which social platforms and media sites your target audiences use.
Being present on several different platforms is every strategy’s dream. However, the real key is finding out where your audiences are most engaged and directing them there with video content tailored for the individual user experience by the platform.
6.Implement a Strong Call-to-Action
The ending of every video narrative should take the viewer toward an action. Clicks to websites? Subscriptions to YouTube channels? Form fills? App downloads?
Your final message in your video clears CTA. Add supporting calls-to-action in the form of superimposed graphics, cards, or endscreens outside of the video to direct traffic beyond that medium and give more expression to the story.
7.Track and Optimize Performance
After videos are posted, collect data on performance. Such indicators include view counts, average % viewed, changes in viewership over time, referral traffic, subscribers gained (added), conversion rates, and so on.
Feed analytics insights into an optimization road map. To inform new video projects targeting the same KPIs, look at higher versus lower-converting videos. Test repetition of the same content on different media platforms at various time intervals, with varying images of thumbnails and so forth, to improve metrics.
Part 2: 3 Typical Types of Marketing Videos

There are some video formats that particularly suit certain marketing objectives. Let’s explore some of the most versatile, effective genres with real-world examples:
1. Explainer Videos
Knowing how to simplify and explain complex products, services, or concepts is precisely what Seasoned Explainers do. They use motion graphics, cartoons, live action–it’s all good. They express it interestingly and help audiences understand value offerings they may be unfamiliar with.
2. Tutorial Videos
A good video tutorial leads audiences through a process one can use to employ the product, carry out the method, or develop the skill. Hands-on learning material meets user information needs, indirectly promoting brand owners of the know-how.
3. Behind-the-Scenes Content
These videos give audiences an insider’s perspective on making popular products. Getting a peek behind the curtain helps pique viewer curiosity while humanizing brands through interviews, b-roll footage, and more.
Part 3: 6 Tips for making your video effective

Creating personalized video marketing strategies that effectively engage your target audience and achieve your marketing goals requires careful planning and execution. You need to grab viewer attention fast, communicate your key messages clearly, and provide strong calls to action.
The key is to keep it concise, optimize for sound-off viewing, build in interactivity, showcase user-generated content, partner with influencers, and more. Apply these best practices for getting your marketing videos noticed and acted upon:
1.Keep It Concise
With a sea of content competing for viewer attention getting longer daily, shorter is better. Videos under 1 minute perform far better for driving clicks, conversions, completes, and shares. Test even 6-second bumper ads on YouTube and Facebook.
2. Capture Attention Early
You have seconds to hook audiences scrolling feeds non-stop. Dynamically edited intros with eye-catching colors, quick cuts, and dramatic questions/facts immediately grab interest versus slow fades or titles.
3.Make Sound Optional
85% of videos are now watched without sound on mobile devices. While strong audio is still important for reeled-in viewers, ensure critical info is communicated visually as well.
4.Incorporate Interactive Elements
Leverage platform tools like YouTube cards, info cards, links, hashtags, Q&As and more to keep audiences actively engaged with video content instead of passively viewing.
5. Spotlight User-Generated Content
User videos reviewing products or demonstrating branded tutorials often outperform corporate studio content now. Repurpose this UGC via reaction videos, contest highlights, and “best of” community compilations.
6.Build Influencer Partnerships
Collaborations with influencers popular with your target demos lend video credibility. Support creators with gear, access, co-promotion, etc., in exchange for branded integration and affiliate sales.
Part 4: Useful Video Editing Tool

Video Editing Now For Win 7 or later(64-bit)
Video Editing Now For macOS 10.14 or later
In creating marketing videos, the right editing software should help cut together raw material gatherings and integrate graphic elements. It must also permit an easy handling of musical components and the application of effects, among other things. The final step, polishing the product into various forms for export to a multitude of servers, should all be done with minimal effort through intelligent operating interfaces (UI). Among the options used by amateurs and professionals alike, Wondershare’s Filmora is one of the most popular.
Advertisement Video Editing in Filmora
Free Download For Win 7 or later(64-bit)
Free Download For macOS 10.14 or later
More advanced video editing for veteran editors yet an easy-to-use, intuitive software for beginners. Key features of Filmora include:
- Simple Drag-and-Drop Timeline Interface
- Library Of Visual Effects and Transitions
- Built-In Title Templates
- Color Grading and Color Matching Tools
- Support For Keyframe Animation
- Background Audio Mixer
- The Free-Use Audio, Image, Video Library
- Instant Previews of Edits
- Export For All Types of Platforms
From planning and carrying out shooting to editing, rendering and output, Filmora speeds up all the steps of bringing video projects to life. For marketing teams constantly producing clips, an intriguing aspect of the software is that its wide appeal to video skill levels combines well with pro-grade tools.
Conclusion
In the future, video marketing will only grow more critical. With virtual reality moving from gaming to experiential e-commerce, it is up to marketers to drive adoption. With these strategies, your brand can get ahead of the curve and use groundbreaking video programs to win over audiences at this time and in the years that follow.
Part 1: How to Create a Video Marketing Campaign

Launching a video marketing campaign requires considerable planning and preparation. Follow these best practices for video campaign success:
1.Set Goals and Identify Your Audience
The aim of video marketing for small businesses or large businesses should be tied to business objectives, such as raising brand awareness, educating consumers, or driving conversions. First and foremost, define these goals.
Who are you trying to reach with video content? You need a clear picture of this. Collect insights about audiences with regard to demographics, interests, values, media habits, and existing brand impressions. With these insights, you can create unique content that appeals to your target viewers.
2.Conduct Market Research
Research what kinds of videos connect with your audiences by accounting for competitors and non-competitors successfully using video. Identify videos with the most hits, shares, subscribers generated, and other metrics through channels like YouTube Analytics, Tubular Labs or SEMrush.
From the data, conclude common themes around video length, preferred formats for content, production methodologies, and so on, which should then serve to guide your own content.
3.Craft a Compelling Story
Every great marketing video is a story. Draw a story plot with rising tension and emotion leading to resolution. The story’s exposition, rising action, climax, and denouement can be outlined by famous storytelling frameworks.
Narratives that keep viewers engaged from beginning to end result in better videos. Early validation for your script ideas can be gathered through focus groups, social listening, surveys, and interviews with members of your target audience.
4.Produce Video/Audio with Quality
Bring your story to life by investing in experienced video producers. Budgets may be wildly divergent, so always aim to achieve the best production quality.
Feature crisp, bright camerawork, professional editing, and transitions. Be sure to use intense music to underscore emotional peaks and simple but eye-catching visual effects where they make sense.
For audio, manage volumes between scenes at the same level; minimize background noise; have clear dialogue and smooth mixing. Good video and audio keep viewers glued to your content.
5. Select Suitable Video Platforms
Research where video marketing is most effective in your niche, and figure out which social platforms and media sites your target audiences use.
Being present on several different platforms is every strategy’s dream. However, the real key is finding out where your audiences are most engaged and directing them there with video content tailored for the individual user experience by the platform.
6.Implement a Strong Call-to-Action
The ending of every video narrative should take the viewer toward an action. Clicks to websites? Subscriptions to YouTube channels? Form fills? App downloads?
Your final message in your video clears CTA. Add supporting calls-to-action in the form of superimposed graphics, cards, or endscreens outside of the video to direct traffic beyond that medium and give more expression to the story.
7.Track and Optimize Performance
After videos are posted, collect data on performance. Such indicators include view counts, average % viewed, changes in viewership over time, referral traffic, subscribers gained (added), conversion rates, and so on.
Feed analytics insights into an optimization road map. To inform new video projects targeting the same KPIs, look at higher versus lower-converting videos. Test repetition of the same content on different media platforms at various time intervals, with varying images of thumbnails and so forth, to improve metrics.
Part 2: 3 Typical Types of Marketing Videos

There are some video formats that particularly suit certain marketing objectives. Let’s explore some of the most versatile, effective genres with real-world examples:
1. Explainer Videos
Knowing how to simplify and explain complex products, services, or concepts is precisely what Seasoned Explainers do. They use motion graphics, cartoons, live action–it’s all good. They express it interestingly and help audiences understand value offerings they may be unfamiliar with.
2. Tutorial Videos
A good video tutorial leads audiences through a process one can use to employ the product, carry out the method, or develop the skill. Hands-on learning material meets user information needs, indirectly promoting brand owners of the know-how.
3. Behind-the-Scenes Content
These videos give audiences an insider’s perspective on making popular products. Getting a peek behind the curtain helps pique viewer curiosity while humanizing brands through interviews, b-roll footage, and more.
Part 3: 6 Tips for making your video effective

Creating personalized video marketing strategies that effectively engage your target audience and achieve your marketing goals requires careful planning and execution. You need to grab viewer attention fast, communicate your key messages clearly, and provide strong calls to action.
The key is to keep it concise, optimize for sound-off viewing, build in interactivity, showcase user-generated content, partner with influencers, and more. Apply these best practices for getting your marketing videos noticed and acted upon:
1.Keep It Concise
With a sea of content competing for viewer attention getting longer daily, shorter is better. Videos under 1 minute perform far better for driving clicks, conversions, completes, and shares. Test even 6-second bumper ads on YouTube and Facebook.
2. Capture Attention Early
You have seconds to hook audiences scrolling feeds non-stop. Dynamically edited intros with eye-catching colors, quick cuts, and dramatic questions/facts immediately grab interest versus slow fades or titles.
3.Make Sound Optional
85% of videos are now watched without sound on mobile devices. While strong audio is still important for reeled-in viewers, ensure critical info is communicated visually as well.
4.Incorporate Interactive Elements
Leverage platform tools like YouTube cards, info cards, links, hashtags, Q&As and more to keep audiences actively engaged with video content instead of passively viewing.
5. Spotlight User-Generated Content
User videos reviewing products or demonstrating branded tutorials often outperform corporate studio content now. Repurpose this UGC via reaction videos, contest highlights, and “best of” community compilations.
6.Build Influencer Partnerships
Collaborations with influencers popular with your target demos lend video credibility. Support creators with gear, access, co-promotion, etc., in exchange for branded integration and affiliate sales.
Part 4: Useful Video Editing Tool

Video Editing Now For Win 7 or later(64-bit)
Video Editing Now For macOS 10.14 or later
In creating marketing videos, the right editing software should help cut together raw material gatherings and integrate graphic elements. It must also permit an easy handling of musical components and the application of effects, among other things. The final step, polishing the product into various forms for export to a multitude of servers, should all be done with minimal effort through intelligent operating interfaces (UI). Among the options used by amateurs and professionals alike, Wondershare’s Filmora is one of the most popular.
Advertisement Video Editing in Filmora
Free Download For Win 7 or later(64-bit)
Free Download For macOS 10.14 or later
More advanced video editing for veteran editors yet an easy-to-use, intuitive software for beginners. Key features of Filmora include:
- Simple Drag-and-Drop Timeline Interface
- Library Of Visual Effects and Transitions
- Built-In Title Templates
- Color Grading and Color Matching Tools
- Support For Keyframe Animation
- Background Audio Mixer
- The Free-Use Audio, Image, Video Library
- Instant Previews of Edits
- Export For All Types of Platforms
From planning and carrying out shooting to editing, rendering and output, Filmora speeds up all the steps of bringing video projects to life. For marketing teams constantly producing clips, an intriguing aspect of the software is that its wide appeal to video skill levels combines well with pro-grade tools.
Conclusion
In the future, video marketing will only grow more critical. With virtual reality moving from gaming to experiential e-commerce, it is up to marketers to drive adoption. With these strategies, your brand can get ahead of the curve and use groundbreaking video programs to win over audiences at this time and in the years that follow.
Also read:
- 2024 Approved Frame Blending Is a Great Way to Smooth Out Your Video Footage in Adobe Premiere Pro. Using This Technique, You Can Create a More Natural Looking Motion by Averaging Out the Frames in Your Clips
- New Templates Increase the Editing Possibilities for Beginners and Professionals. Read This Article to Learn About some Customizable Slow-Motion CapCut Templates
- Updated 2024 Approved Top 5 Solutions on How to Add Emojis to iPhone
- New With an SRT Editor Online, You Can Synchronize the Subtitles with the Video, Change the Font, and Make Them More Readable. Read on to Know Your Options for 2024
- In 2024, Do You Want to Know How to Add LUTs to Premiere Pro? In This Guide, You Will Find Details and Easy Steps to Proceed with Using LUTs in Premiere Pro
- Create a Kickass COD Warzone Thumbnail for Free for 2024
- Updated Deep Learning of AI Video Recognition - Guide
- New 2024 Approved How to Use Zoom in Google
- New 2024 Approved 30+ Amazing Templates for VN Video Editor
- Updated In 2024, Find Out What the Flexclip Trimmer Is, Its Key Features, and How to Use It to Trim Your Videos to Remove Unwanted Parts with Just a Few Clicks
- New 2024 Approved Create Your Slow Zoom TikTok in Minutes
- In 2024, Everything About Adding Effects In Kinemaster
- Updated In 2024, Discover the Top 5 Online Tools for Merging MP4 Files Easily and Quickly. Streamline Your Video Editing Process and Create Seamless Videos with These User-Friendly Tools
- Updated How to Create Vintage Film Effect 1950S
- Updated 2024 Approved Step by Step to Rotate Videos in Davinci Resolve
- Do You Want Your Music Videos to Look Like Professional Music Videos? You Can Always Choose From Music Videos LUTs to Give Your Videos a Cinematic Touch
- Updated If You Have a Low Budget but Want to Create a Filmy Appearance of the Video, Then Read 6 Ways to Get Professional Filming Equipment by Using Household Objects
- Updated Have You Tried Creating an Engaging Video? Try Out Impressive AI Video Ideas that Give You a Clue on How to Create an Attention Catching Video. Here Is a Breakdown of What an AI Video Idea Generator Is and How to Utilize It Efficiently
- New In 2024, Time Bending Brilliance The Ultimate Slow Motion Video Makers
- In 2024, Introduction to LUTs Their Overview and Benefits
- Updated In 2024, Top 22 Free Video Editing Software
- Updated In 2024, Do You Want to Blur Faces in Your Videos? Read This Article to Find Out the Easiest Way to Blur the Faces in Videos Using Adobe Premiere Pro
- How to Easily Convert SRT to VTT
- Updated How Can I Control Speed of a Video for 2024
- Updated 2024 Approved Wondering How to Stand Out with Your Adobe Slideshow Presentation? Follow the Given Discussion to Learn All About the Easiest Ways of Making a Slideshow at Adobe
- New In This Article, We Will Introduce You Our Top 5 Picks of Websites and Software Converter Online to Convert Powerpoint to Mp4
- Updated In 2024, 10 Best Movie Trailer Voice Generators Windows, Mac, Android, iPhone & Online
- New 2024 Approved This Article Talks in Detail About Why People Look for a Free Title Maker, and 8 Options that Will Benefit Their Work. It Includes Tools Like SEMrush Title Generator, Hubspot Title Generator, and More. Check Out
- Updated Wondering About How to Easily Create a Slideshow on Your iPhone? Well, Take Note of some of the Finest Apps to Turn Your Vision Into Reality for 2024
- New What Is the Best MP4 Cutter for YouTuber on Mac?
- New 10 Best Free Text to Speech Software Windows, Mac,Android, iPhone & Online
- Updated 2024 Approved Discover How to Change Sky Background with The Best Applications? A Review
- New Discover the Best Video Frame Rate Converters for Smooth Playback, Including Online and Offline Options. Learn How to Convert Frame Rates for Free and Elevate Your Video Quality with These Top 8 Tools
- Updated In 2024, Best Cinematic LUTs For Premiere Pro Recommendation
- 15 Best Free MP4 Video Rotators Windows,Mac, Android, iPhone & Online for 2024
- Updated Looking For The Best Slow Motion Effect in Premiere Pro
- New 2024 Approved Best Slow Motion Camera Apps for Best Content Creation
- Updated How to Combine Multiple Videos Into One on Instagram for 2024
- In 2024, The Most Useful Tips for Pokemon Go Ultra League On Apple iPhone XS Max | Dr.fone
- How To Unlock Xiaomi Redmi K70 Pro Phone Without Password?
- How To Enable USB Debugging on a Locked Nokia C22 Phone
- How to Hide/Fake Snapchat Location on Your Lava Yuva 3 | Dr.fone
- In 2024, The 6 Best SIM Unlock Services That Actually Work On Your OnePlus 12R Device
- How to Use Pokémon Emerald Master Ball Cheat On Vivo S18 | Dr.fone
- Top 4 Android System Repair Software for Honor Magic 6 Bricked Devices | Dr.fone
- New Dead Simple Guide to Create New and Exciting Blackboard Animation
- How to Unlock iPhone 13 Pro Max with IMEI Code?
- In 2024, All You Need To Know About Mega Greninja For Samsung Galaxy M34 | Dr.fone
- The Ultimate Guide to Samsung Galaxy F04 Pattern Lock Screen Everything You Need to Know
- In 2024, How to Remove Forgotten PIN Of Your Samsung Galaxy M54 5G
- Preparation to Beat Giovani in Pokemon Go For Tecno Spark Go (2024) | Dr.fone
- In 2024, 5 Most Effective Methods to Unlock Apple iPhone 6 Plus in Lost Mode
- The Ultimate Guide to Xiaomi Redmi Note 12 5G Pattern Lock Screen Everything You Need to Know
- Everything You Need To Know About Unlocked iPhone 15 Plus | Dr.fone
- How to Reset a Tecno Spark 20C Phone That Is Locked | Dr.fone
- Does Life360 Notify When You Log Out On Infinix Hot 40? | Dr.fone
- In 2024, Latest way to get Shiny Meltan Box in Pokémon Go Mystery Box On Xiaomi Redmi Note 12T Pro | Dr.fone
- What You Want To Know About Two-Factor Authentication for iCloud From your iPhone 13 Pro
- In 2024, Apple iPhone XS Max Asking for Passcode after iOS 17/14 Update, What to Do?
- 3 Ways for Android Pokemon Go Spoofing On Vivo V29e | Dr.fone
- A Quick Guide to Nokia 105 Classic FRP Bypass Instantly
- How To Fix OEM Unlock Missing on Motorola Moto G04?
- Online signatures for .xlsm documents
- In 2024, How to Fix Apple iPhone 14 Plus Passcode not Working? | Dr.fone
- 10 Easy-to-Use FRP Bypass Tools for Unlocking Google Accounts On Nokia C110
- 8 Solutions to Fix Find My Friends Location Not Available On Samsung Galaxy A14 5G | Dr.fone
- How To Use Allshare Cast To Turn On Screen Mirroring On Samsung Galaxy S23 Ultra | Dr.fone
- 2024 Approved Revealing Translation Methods Netflix Subtitle Software Comprehensive Guide
- In 2024, How and Where to Find a Shiny Stone Pokémon For Oppo Find X6? | Dr.fone
- Everything You Need to Know about Lock Screen Settings on your Nokia C300
- How to Track WhatsApp Messages on Vivo V27 Pro Without Them Knowing? | Dr.fone
- In 2024, How to Change Lock Screen Wallpaper on Infinix Hot 40
- How Can I Catch the Regional Pokémon without Traveling On Honor 90 GT | Dr.fone
- Play Store Not Working On ZTE Nubia Flip 5G? 8 Solutions Inside | Dr.fone
- Title: Splitting Audio From a Video in Sony Vegas Step by Step
- Author: Morgan
- Created at : 2024-05-19 05:11:40
- Updated at : 2024-05-20 05:11:40
- Link: https://ai-video-editing.techidaily.com/splitting-audio-from-a-video-in-sony-vegas-step-by-step/
- License: This work is licensed under CC BY-NC-SA 4.0.


