:max_bytes(150000):strip_icc():format(webp)/GettyImages-454939687-56cac7b03df78cfb37988474.jpg)
Step By Step Guide on Using Media Player Classic To Rotate A Video

Step By Step Guide on Using Media Player Classic To Rotate A Video
The Internet and social media have become a staple in our daily lives. Internet users post thousands of videos every day that you can watch online or download and rewatch in your free time. Suppose you encounter a video that is upside down or shot at an angle that makes it difficult for you to enjoy it fully.
It would be nice to find a way to rotate the video to portrait mode so you can watch it without any distractions. Fortunately, this article will discuss using Media Player Classic to rotate any video. We also discuss an excellent alternative to the aforementioned media player.
What Is Media Player Classic?
In a nutshell, Media Player Classic is an open-source media player suitable for 32-bit and 64-bit Microsoft Windows. If you have used the original interface, you might notice that it resembles Windows Media Player 6.4. The only key difference is that the former is more feature-rich and provides more options. In addition, Media Player Classic is very compact and lightweight.

A programmer named “Gabest’’ created and designed this platform as a closed-source application. Things changed, and he later relicensed the media player as free under the terms of the GLP-2.0 license. He released the final version, MPC 6.4.9.0, on 20th March 2006.
Unfortunately, development stalled in 2006, much to the disappointment of many users who had grown to love it. Gabest made a public statement in 2007 saying that Media Player Classic was not dead, just that he couldn’t work on it anymore.
How To Rotate Video in Media Player Classic?
Media Player Classic allows you to rotate your video around three axes, X, Y, and Z. Once you are done, you can fix a video that was initially upside down or in landscape mode for a better viewing experience. Another perk of using Media Player Classic to rotate a video is that you can use shortcuts to make your work easier.
Before we teach you how to rotate video in windows Media Player Classic, there are a few things you should know. Unfortunately, this platform doesn’t allow you to rotate a video in its graphical user interface. You can’t also use it to edit a video. Suppose you want to add text or overwrite the original video clip. Media Player Classic can only allow you to playback a video or rotate it.
Here is a simple guide on how to rotate videos in Media Player Classic.
Step1 Launch Media Player Classic and click on the “View” tab. Select “Options” or click “O” to display the “Options” window.

Step2 Navigate to the left pane to the Player Group and click on “Keys.” If the Player Group is not expanded by the time, you launch the platform, double-click it and wait a few seconds. You can then navigate to the “PnS Rotate” command on the Keys list.

Step3 Go to the “PnS Rotate+” command and double-click the “Key” field. You can then click on any key to rotate your video around the x-axis. Once you are satisfied with the results, click “…” to apply the changes you have made.

Step4 You can now assign shortcuts to “PnS Rotate” commands. For instance, you could assign PnS Rotate Y for rotation along the Y axis and PnS Z for rotation along the Z axis. After each axis has a shortcut, select “Apply” then “OK” to save your changes and close the Options window respectively.

Step5 Select “Output” on the Options window and navigate to the DirectShow Video section to confirm whether the Media Classic Player supports rotation for the rendered video. Ascertain the Rotation feature has a green check mark, which indicates that the platform promotes rotation for the video. If the video has a red X, select “Apply” and click “OK.”

Step6 Use the shortcuts you assigned to the keys in Step 4 to rotate your video as you see fit. Since the rotation occurs gradually, you might need to press the keys numerous times or press and hold to see a visible change.
For instance, you can rotate your video from landscape to portrait by clicking “Alt-Num 1” and “Alt-Num 3,” respectively. To revert your video to its original state, press “Alt-Num 5.”
Need an alternative to Media Player Classic? Try Wondershare Filmora To Rotate a Video
Free Download For Win 7 or later(64-bit)
Free Download For macOS 10.14 or later
You might need a better alternative to Media Classic Player to help rotate your videos. As we mentioned, Media Classic Player doesn’t allow you to change the video. The scope of this platform only extends to playing and rotating videos along three axes. In our opinion, Wondershare Filmora is an excellent alternative.

This feature-rich platform is your one-stop solution for any creator who wants to make a mark with their videos. You can download it free on your desktop, laptop, or smartphone and use it anytime. The cloud storage allows you to snap a photo and upload it for editing at a later time.
In addition, the platform has a co-creation space where you can share your work with other users and compare notes. Here is a list of other nifty features we guarantee you will enjoy.
- Motion tracking
- Auto beat sync
- Split screen
- Title Editing
- Preset templates
- AI Portrait
- Mask and blend
- Text to speech
- Silence detection
- Audio visualizer
How To Rotate a Video 90 Degrees With Wondershare Filmora?
Now that you have seen how different this platform is from Media Classic Player, you might be curious about how effectively it rotates your videos. Perhaps our detailed guide will help you decide whether you want to give Wondershare Filmora a shot.
Stick around to learn how to rotate a video 90 degrees with Wondershare Filmora.
Step1 Import the video you want to rotate to Wondershare Filmora and drag and drop it to the timeline as shown below.

Step2 Click on the monitor icon and select “Change Project Aspect Ratio” in the drop-down menu.

Step3 In the “Project Settings” window, you can change your video’s Aspect Ratio, Resolution, Frame Rate, and Color space.

Step4 Once you are happy with your changes, click “OK” and close the window.

Step5 Double-click the video track and navigate to the Rotate option in the window. Hover your mouse over the dot in the Rotate tab until you get to 90 degrees. You could also adjust the rotation of the video by clicking on the pivot in the media player till the video is at 90 degrees.

Step6 Click “Export” to save a copy of the rotated video to your device.

Which Is Better To Rotate a Video? Media Player Classic or Wondershare Filmora?
Having seen both sides of the coin, you might wonder which option is better to help you rotate a video. In this section of the article, we pit Wondershare Filmora against Media Player Classic to help you determine which option will work best for you.
Take a look at the table below.
| Media Player Classic | Wondershare Filmora | |
|---|---|---|
| Operating System | Microsoft Windows | Windows & Mac |
| Ratings from G2 | N/A | 4.4/5 stars |
| Pricing | Free | Annual Plan – US$49.99/yearCross Platform Plan - US$59.99/YearPerpetual Plan - US$79.99 |
| Features | ● Enhanced video rendering● Removal of tearing● Supports SVCD, VCD, and DVD playback● AVI subtitles● Customizable toolbar | ● AI Portrait● Mask and blend● Text to speech● Silence detection● Audio visualizer● Motion tracking● Auto beat sync● Split screen● Title Editing● Preset templates |
As you have seen, Media player Classic doesn’t have the Rotate feature per se. However, you can assign shortcuts to the keys to rotate a video along three axes as you see fit. You can also use a combination of keys like Alt and Num to change how your video sits so you can enjoy it as you like.
On the other hand, Wondershare Filmora has a more comprehensive Rotate feature that allows you to drag your pointer along a bar till the video sits at the correct number of degrees.
This platform also provides additional features, like allowing you to scale the video to fit the screen and adjusting project settings like the resolution and frame rate. If you don’t want to use the sliding bar, you can use your pointer to manually adjust the rotation by clicking on the pivot with your pointer.
In a nutshell, Windows Media Player is the ideal choice if you want to rotate your video and leave it at that. However, if you are looking for more advanced features, you are better off choosing Wondershare Filmora. The latter option also makes your videos look more polished like they were edited by a professional.
Conclusion
Videos might be trickier to edit than photos, especially when you want to rotate them. Fortunately, developers have been working tirelessly to ensure you have many tools at your disposal to edit your videos from any device at any time.
If you don’t fancy editing videos on your laptop, you could download the software to your smartphone and rotate videos on the move. Technology is truly a blessing that has come to make our work easier. Hopefully, after reading this article, you can effortlessly rotate any video you encounter.
Free Download For macOS 10.14 or later
You might need a better alternative to Media Classic Player to help rotate your videos. As we mentioned, Media Classic Player doesn’t allow you to change the video. The scope of this platform only extends to playing and rotating videos along three axes. In our opinion, Wondershare Filmora is an excellent alternative.

This feature-rich platform is your one-stop solution for any creator who wants to make a mark with their videos. You can download it free on your desktop, laptop, or smartphone and use it anytime. The cloud storage allows you to snap a photo and upload it for editing at a later time.
In addition, the platform has a co-creation space where you can share your work with other users and compare notes. Here is a list of other nifty features we guarantee you will enjoy.
- Motion tracking
- Auto beat sync
- Split screen
- Title Editing
- Preset templates
- AI Portrait
- Mask and blend
- Text to speech
- Silence detection
- Audio visualizer
How To Rotate a Video 90 Degrees With Wondershare Filmora?
Now that you have seen how different this platform is from Media Classic Player, you might be curious about how effectively it rotates your videos. Perhaps our detailed guide will help you decide whether you want to give Wondershare Filmora a shot.
Stick around to learn how to rotate a video 90 degrees with Wondershare Filmora.
Step1 Import the video you want to rotate to Wondershare Filmora and drag and drop it to the timeline as shown below.

Step2 Click on the monitor icon and select “Change Project Aspect Ratio” in the drop-down menu.

Step3 In the “Project Settings” window, you can change your video’s Aspect Ratio, Resolution, Frame Rate, and Color space.

Step4 Once you are happy with your changes, click “OK” and close the window.

Step5 Double-click the video track and navigate to the Rotate option in the window. Hover your mouse over the dot in the Rotate tab until you get to 90 degrees. You could also adjust the rotation of the video by clicking on the pivot in the media player till the video is at 90 degrees.

Step6 Click “Export” to save a copy of the rotated video to your device.

Which Is Better To Rotate a Video? Media Player Classic or Wondershare Filmora?
Having seen both sides of the coin, you might wonder which option is better to help you rotate a video. In this section of the article, we pit Wondershare Filmora against Media Player Classic to help you determine which option will work best for you.
Take a look at the table below.
| Media Player Classic | Wondershare Filmora | |
|---|---|---|
| Operating System | Microsoft Windows | Windows & Mac |
| Ratings from G2 | N/A | 4.4/5 stars |
| Pricing | Free | Annual Plan – US$49.99/yearCross Platform Plan - US$59.99/YearPerpetual Plan - US$79.99 |
| Features | ● Enhanced video rendering● Removal of tearing● Supports SVCD, VCD, and DVD playback● AVI subtitles● Customizable toolbar | ● AI Portrait● Mask and blend● Text to speech● Silence detection● Audio visualizer● Motion tracking● Auto beat sync● Split screen● Title Editing● Preset templates |
As you have seen, Media player Classic doesn’t have the Rotate feature per se. However, you can assign shortcuts to the keys to rotate a video along three axes as you see fit. You can also use a combination of keys like Alt and Num to change how your video sits so you can enjoy it as you like.
On the other hand, Wondershare Filmora has a more comprehensive Rotate feature that allows you to drag your pointer along a bar till the video sits at the correct number of degrees.
This platform also provides additional features, like allowing you to scale the video to fit the screen and adjusting project settings like the resolution and frame rate. If you don’t want to use the sliding bar, you can use your pointer to manually adjust the rotation by clicking on the pivot with your pointer.
In a nutshell, Windows Media Player is the ideal choice if you want to rotate your video and leave it at that. However, if you are looking for more advanced features, you are better off choosing Wondershare Filmora. The latter option also makes your videos look more polished like they were edited by a professional.
Conclusion
Videos might be trickier to edit than photos, especially when you want to rotate them. Fortunately, developers have been working tirelessly to ensure you have many tools at your disposal to edit your videos from any device at any time.
If you don’t fancy editing videos on your laptop, you could download the software to your smartphone and rotate videos on the move. Technology is truly a blessing that has come to make our work easier. Hopefully, after reading this article, you can effortlessly rotate any video you encounter.
| Zoom In and Zoom Out on YouTube
Abundant Video Effects - Wondershare Filmora
Provide abundant video effects - A creative video editor
Powerful color correction and grading
Detailed tutorials provided by the official channel
YouTube has undoubtedly become the most popular platform for streaming millions of videos to people worldwide. People, influencers, celebrities, and various brands can freely post their videos on YouTube, and with a single click, they can fetch millions of views. Due to the simplicity and exceptional features of YouTube, people across the globe have shifted to this platform to extract various kinds of information comfortably.
Many times, people find it difficult to catch small yet important details from the videos on YouTube. If you want to observe little details in the YouTube videos closely, this article will address easy methods on how to zoom in on YouTube videos quickly.
In this article
Part 1: Why Should You Look Forward to Zoom Your YouTube Video?
Part 2: Effective Methods on How to Zoom in and Out YouTube Videos Easily
Part 1: Why Should You Look Forward to Zoom Your YouTube Video?
There can be various causes to zoom in on YouTube videos as users can clearly see hidden information and details from the video through it. For instance, if you are reviewing a trailer of a particular movie on your YouTube channel, you would be required to zoom in YouTube video many times. For breaking down the trailer, you would need to focus on the backgrounds, props, and other hidden details that are only possible through zooming in and out of the videos.
Moreover, if you are watching a demonstration of the chemistry practical on YouTube videos, readings on the apparatus may not be apparent in it. So here, you can also read and notice precise complicated readings on the videos by just zooming in. Also, in other scenarios, you can read the product’s description in makeup tutorials by using the option of zooming in and out.
To sum up, every regular user of YouTube must know how to zoom in on YouTube videos so that he can quickly focus on the details with a single click. By knowing the methods of zooming in and out, you can comprehensively extract the information through YouTube videos that can make your daily tasks easier.
Part 2: Effective Methods on How to Zoom in and Out YouTube Videos Easily
In this section, we will provide three effective methods to zoom in YouTube videos effortlessly. By applying any of the following methods, you can easily focus on the small details.
Method 1: Zoom In and Out on the YouTube Video Player
Are you looking for easier ways to zoom in and out of the YouTube video? YouTube gives the option on its player for viewing the videos in two modes: Theatre mode and full mode. Through theater mode, you can watch your video in a comparatively zoomed manner, whereas, in full screen, you can watch the video on a full screen of the monitor.
In this particular method, we will provide simple and easy steps for zooming in on the YouTube video player:
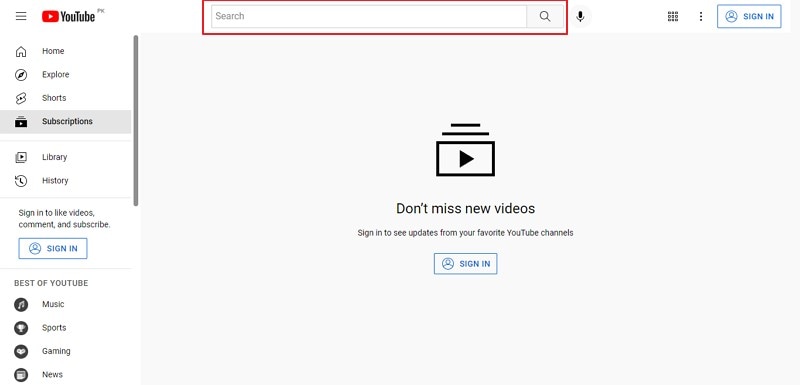
Step 1: Navigate to the YouTube app on your device browser, such as Google Chrome. On its search box, enter the video you want to watch.
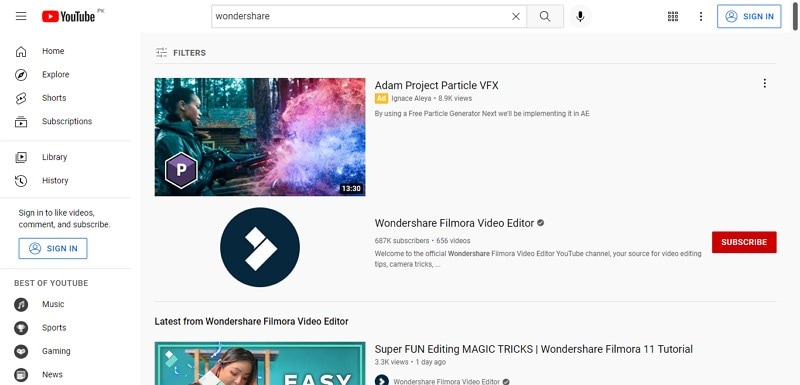
Step 2: Press Enter, and you will see various options related to your desired video. Click on any particular video to watch.
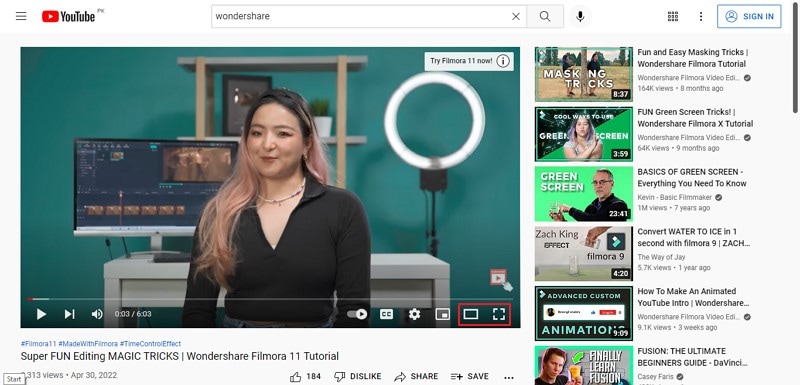
Step 3: On the YouTube video player, you would be able to see two screen mode options on the right side. The first option is “Full Screen” mode, through which you can enjoy watching your videos on a full monitor screen. The second option is “Theatre Mode,” which will display the video in a cinematic look by zooming in to some extent. Explore these options to observe the small details in your YouTube video closely.
Method 2: Zoom In and Out with Browser Zoom Features
To zoom in on YouTube videos, your browser also offers effective ways for the users. By using the browser zoom features, you can quickly zoom in and out of the video without the need for additional help. Moreover, these zoom features are also beneficial for reading eBooks or online documents.
Here are the three ways through which you can instantly zoom in on your favorite YouTube videos easily:
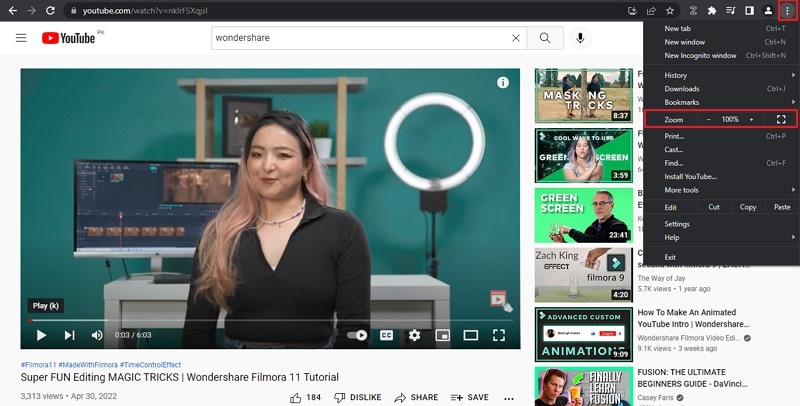
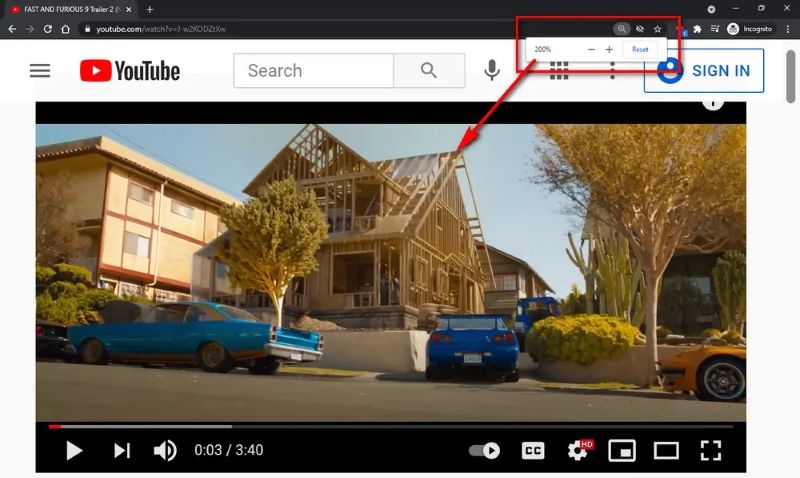
Way 1: The first way to zoom in on video is through browser options. To do so, tap on the “Three-Dot” icon of your browser displayed in the top right corner. From the menu, tap on “Zoom” and control the actions through its small menu.
Way 2: Another way to zoom in and out of the YouTube video is through your mouse pad. Point your cursor to the place where you want to zoom and try to expand the screen from your mouse pad and vice versa for zoom out.

Way 3: On the URL search bar of YouTube, you can see different icons displayed next to it. Simply tap on the “Zoom” icon to control the zoom in and out accordingly.
Method 3: Zoom In on YouTube Video with Browser Extension
In this section, we will use a browser extension that will assist you in zooming in and out on YouTube videos comfortably. We will recommend the Zoom browser extension due to its distinct properties and features. Through its slider, you can zoom in on the YouTube video up to 400 factors with a single swipe.
Moreover, through this special browser extension, you can save the zoomed version of the website and can resume watching the videos from the set zoom value. To save your time, this browser also gives the option to zoom in and out the web pages together with a single click. To use this browser extension to zoom in on Youtube, here are simple steps.
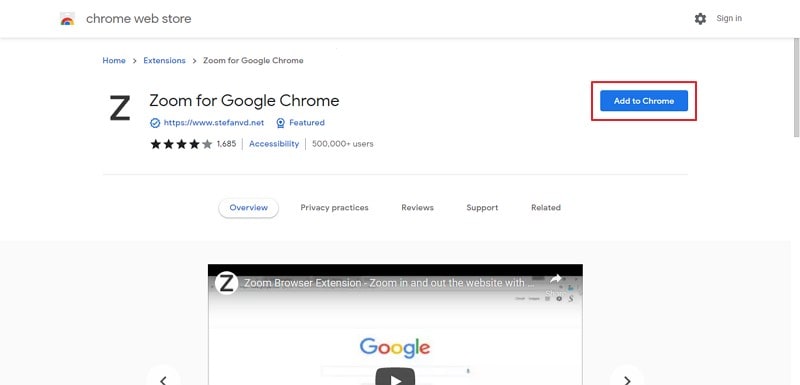
Step 1: Install the Zoom browser extension on your device from the Chrome Store by tapping on the “Add to Chrome” button to download and install the extension.
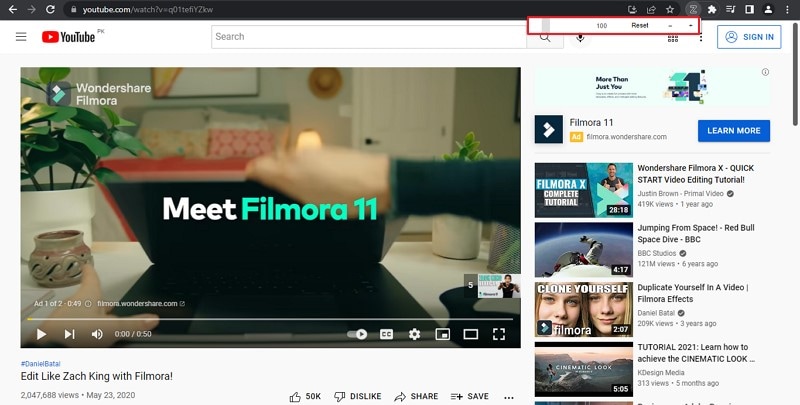
Step 2: Now, open YouTube and play your desired video. Afterward, tap on the icon of extensions from the top and select this particular extension. Through this extension, you can either click on the “+” button or the slider to zoom the video accordingly.
Conclusion
YouTube has become a mainstream channel for watching and creating videos in this era. Many times we miss small yet important details while watching YouTube videos on our devices. To quickly catch up on these essential details, we have offered different and easy methods regarding zoom in on YouTube videos with a single click.
YouTube has undoubtedly become the most popular platform for streaming millions of videos to people worldwide. People, influencers, celebrities, and various brands can freely post their videos on YouTube, and with a single click, they can fetch millions of views. Due to the simplicity and exceptional features of YouTube, people across the globe have shifted to this platform to extract various kinds of information comfortably.
Many times, people find it difficult to catch small yet important details from the videos on YouTube. If you want to observe little details in the YouTube videos closely, this article will address easy methods on how to zoom in on YouTube videos quickly.
In this article
Part 1: Why Should You Look Forward to Zoom Your YouTube Video?
Part 2: Effective Methods on How to Zoom in and Out YouTube Videos Easily
Part 1: Why Should You Look Forward to Zoom Your YouTube Video?
There can be various causes to zoom in on YouTube videos as users can clearly see hidden information and details from the video through it. For instance, if you are reviewing a trailer of a particular movie on your YouTube channel, you would be required to zoom in YouTube video many times. For breaking down the trailer, you would need to focus on the backgrounds, props, and other hidden details that are only possible through zooming in and out of the videos.
Moreover, if you are watching a demonstration of the chemistry practical on YouTube videos, readings on the apparatus may not be apparent in it. So here, you can also read and notice precise complicated readings on the videos by just zooming in. Also, in other scenarios, you can read the product’s description in makeup tutorials by using the option of zooming in and out.
To sum up, every regular user of YouTube must know how to zoom in on YouTube videos so that he can quickly focus on the details with a single click. By knowing the methods of zooming in and out, you can comprehensively extract the information through YouTube videos that can make your daily tasks easier.
Part 2: Effective Methods on How to Zoom in and Out YouTube Videos Easily
In this section, we will provide three effective methods to zoom in YouTube videos effortlessly. By applying any of the following methods, you can easily focus on the small details.
Method 1: Zoom In and Out on the YouTube Video Player
Are you looking for easier ways to zoom in and out of the YouTube video? YouTube gives the option on its player for viewing the videos in two modes: Theatre mode and full mode. Through theater mode, you can watch your video in a comparatively zoomed manner, whereas, in full screen, you can watch the video on a full screen of the monitor.
In this particular method, we will provide simple and easy steps for zooming in on the YouTube video player:
Step 1: Navigate to the YouTube app on your device browser, such as Google Chrome. On its search box, enter the video you want to watch.

Step 2: Press Enter, and you will see various options related to your desired video. Click on any particular video to watch.

Step 3: On the YouTube video player, you would be able to see two screen mode options on the right side. The first option is “Full Screen” mode, through which you can enjoy watching your videos on a full monitor screen. The second option is “Theatre Mode,” which will display the video in a cinematic look by zooming in to some extent. Explore these options to observe the small details in your YouTube video closely.

Method 2: Zoom In and Out with Browser Zoom Features
To zoom in on YouTube videos, your browser also offers effective ways for the users. By using the browser zoom features, you can quickly zoom in and out of the video without the need for additional help. Moreover, these zoom features are also beneficial for reading eBooks or online documents.
Here are the three ways through which you can instantly zoom in on your favorite YouTube videos easily:
Way 1: The first way to zoom in on video is through browser options. To do so, tap on the “Three-Dot” icon of your browser displayed in the top right corner. From the menu, tap on “Zoom” and control the actions through its small menu.

Way 2: Another way to zoom in and out of the YouTube video is through your mouse pad. Point your cursor to the place where you want to zoom and try to expand the screen from your mouse pad and vice versa for zoom out.

Way 3: On the URL search bar of YouTube, you can see different icons displayed next to it. Simply tap on the “Zoom” icon to control the zoom in and out accordingly.

Method 3: Zoom In on YouTube Video with Browser Extension
In this section, we will use a browser extension that will assist you in zooming in and out on YouTube videos comfortably. We will recommend the Zoom browser extension due to its distinct properties and features. Through its slider, you can zoom in on the YouTube video up to 400 factors with a single swipe.
Moreover, through this special browser extension, you can save the zoomed version of the website and can resume watching the videos from the set zoom value. To save your time, this browser also gives the option to zoom in and out the web pages together with a single click. To use this browser extension to zoom in on Youtube, here are simple steps.
Step 1: Install the Zoom browser extension on your device from the Chrome Store by tapping on the “Add to Chrome” button to download and install the extension.

Step 2: Now, open YouTube and play your desired video. Afterward, tap on the icon of extensions from the top and select this particular extension. Through this extension, you can either click on the “+” button or the slider to zoom the video accordingly.

Conclusion
YouTube has become a mainstream channel for watching and creating videos in this era. Many times we miss small yet important details while watching YouTube videos on our devices. To quickly catch up on these essential details, we have offered different and easy methods regarding zoom in on YouTube videos with a single click.
YouTube has undoubtedly become the most popular platform for streaming millions of videos to people worldwide. People, influencers, celebrities, and various brands can freely post their videos on YouTube, and with a single click, they can fetch millions of views. Due to the simplicity and exceptional features of YouTube, people across the globe have shifted to this platform to extract various kinds of information comfortably.
Many times, people find it difficult to catch small yet important details from the videos on YouTube. If you want to observe little details in the YouTube videos closely, this article will address easy methods on how to zoom in on YouTube videos quickly.
In this article
Part 1: Why Should You Look Forward to Zoom Your YouTube Video?
Part 2: Effective Methods on How to Zoom in and Out YouTube Videos Easily
Part 1: Why Should You Look Forward to Zoom Your YouTube Video?
There can be various causes to zoom in on YouTube videos as users can clearly see hidden information and details from the video through it. For instance, if you are reviewing a trailer of a particular movie on your YouTube channel, you would be required to zoom in YouTube video many times. For breaking down the trailer, you would need to focus on the backgrounds, props, and other hidden details that are only possible through zooming in and out of the videos.
Moreover, if you are watching a demonstration of the chemistry practical on YouTube videos, readings on the apparatus may not be apparent in it. So here, you can also read and notice precise complicated readings on the videos by just zooming in. Also, in other scenarios, you can read the product’s description in makeup tutorials by using the option of zooming in and out.
To sum up, every regular user of YouTube must know how to zoom in on YouTube videos so that he can quickly focus on the details with a single click. By knowing the methods of zooming in and out, you can comprehensively extract the information through YouTube videos that can make your daily tasks easier.
Part 2: Effective Methods on How to Zoom in and Out YouTube Videos Easily
In this section, we will provide three effective methods to zoom in YouTube videos effortlessly. By applying any of the following methods, you can easily focus on the small details.
Method 1: Zoom In and Out on the YouTube Video Player
Are you looking for easier ways to zoom in and out of the YouTube video? YouTube gives the option on its player for viewing the videos in two modes: Theatre mode and full mode. Through theater mode, you can watch your video in a comparatively zoomed manner, whereas, in full screen, you can watch the video on a full screen of the monitor.
In this particular method, we will provide simple and easy steps for zooming in on the YouTube video player:
Step 1: Navigate to the YouTube app on your device browser, such as Google Chrome. On its search box, enter the video you want to watch.

Step 2: Press Enter, and you will see various options related to your desired video. Click on any particular video to watch.

Step 3: On the YouTube video player, you would be able to see two screen mode options on the right side. The first option is “Full Screen” mode, through which you can enjoy watching your videos on a full monitor screen. The second option is “Theatre Mode,” which will display the video in a cinematic look by zooming in to some extent. Explore these options to observe the small details in your YouTube video closely.

Method 2: Zoom In and Out with Browser Zoom Features
To zoom in on YouTube videos, your browser also offers effective ways for the users. By using the browser zoom features, you can quickly zoom in and out of the video without the need for additional help. Moreover, these zoom features are also beneficial for reading eBooks or online documents.
Here are the three ways through which you can instantly zoom in on your favorite YouTube videos easily:
Way 1: The first way to zoom in on video is through browser options. To do so, tap on the “Three-Dot” icon of your browser displayed in the top right corner. From the menu, tap on “Zoom” and control the actions through its small menu.

Way 2: Another way to zoom in and out of the YouTube video is through your mouse pad. Point your cursor to the place where you want to zoom and try to expand the screen from your mouse pad and vice versa for zoom out.

Way 3: On the URL search bar of YouTube, you can see different icons displayed next to it. Simply tap on the “Zoom” icon to control the zoom in and out accordingly.

Method 3: Zoom In on YouTube Video with Browser Extension
In this section, we will use a browser extension that will assist you in zooming in and out on YouTube videos comfortably. We will recommend the Zoom browser extension due to its distinct properties and features. Through its slider, you can zoom in on the YouTube video up to 400 factors with a single swipe.
Moreover, through this special browser extension, you can save the zoomed version of the website and can resume watching the videos from the set zoom value. To save your time, this browser also gives the option to zoom in and out the web pages together with a single click. To use this browser extension to zoom in on Youtube, here are simple steps.
Step 1: Install the Zoom browser extension on your device from the Chrome Store by tapping on the “Add to Chrome” button to download and install the extension.

Step 2: Now, open YouTube and play your desired video. Afterward, tap on the icon of extensions from the top and select this particular extension. Through this extension, you can either click on the “+” button or the slider to zoom the video accordingly.

Conclusion
YouTube has become a mainstream channel for watching and creating videos in this era. Many times we miss small yet important details while watching YouTube videos on our devices. To quickly catch up on these essential details, we have offered different and easy methods regarding zoom in on YouTube videos with a single click.
YouTube has undoubtedly become the most popular platform for streaming millions of videos to people worldwide. People, influencers, celebrities, and various brands can freely post their videos on YouTube, and with a single click, they can fetch millions of views. Due to the simplicity and exceptional features of YouTube, people across the globe have shifted to this platform to extract various kinds of information comfortably.
Many times, people find it difficult to catch small yet important details from the videos on YouTube. If you want to observe little details in the YouTube videos closely, this article will address easy methods on how to zoom in on YouTube videos quickly.
In this article
Part 1: Why Should You Look Forward to Zoom Your YouTube Video?
Part 2: Effective Methods on How to Zoom in and Out YouTube Videos Easily
Part 1: Why Should You Look Forward to Zoom Your YouTube Video?
There can be various causes to zoom in on YouTube videos as users can clearly see hidden information and details from the video through it. For instance, if you are reviewing a trailer of a particular movie on your YouTube channel, you would be required to zoom in YouTube video many times. For breaking down the trailer, you would need to focus on the backgrounds, props, and other hidden details that are only possible through zooming in and out of the videos.
Moreover, if you are watching a demonstration of the chemistry practical on YouTube videos, readings on the apparatus may not be apparent in it. So here, you can also read and notice precise complicated readings on the videos by just zooming in. Also, in other scenarios, you can read the product’s description in makeup tutorials by using the option of zooming in and out.
To sum up, every regular user of YouTube must know how to zoom in on YouTube videos so that he can quickly focus on the details with a single click. By knowing the methods of zooming in and out, you can comprehensively extract the information through YouTube videos that can make your daily tasks easier.
Part 2: Effective Methods on How to Zoom in and Out YouTube Videos Easily
In this section, we will provide three effective methods to zoom in YouTube videos effortlessly. By applying any of the following methods, you can easily focus on the small details.
Method 1: Zoom In and Out on the YouTube Video Player
Are you looking for easier ways to zoom in and out of the YouTube video? YouTube gives the option on its player for viewing the videos in two modes: Theatre mode and full mode. Through theater mode, you can watch your video in a comparatively zoomed manner, whereas, in full screen, you can watch the video on a full screen of the monitor.
In this particular method, we will provide simple and easy steps for zooming in on the YouTube video player:
Step 1: Navigate to the YouTube app on your device browser, such as Google Chrome. On its search box, enter the video you want to watch.

Step 2: Press Enter, and you will see various options related to your desired video. Click on any particular video to watch.

Step 3: On the YouTube video player, you would be able to see two screen mode options on the right side. The first option is “Full Screen” mode, through which you can enjoy watching your videos on a full monitor screen. The second option is “Theatre Mode,” which will display the video in a cinematic look by zooming in to some extent. Explore these options to observe the small details in your YouTube video closely.

Method 2: Zoom In and Out with Browser Zoom Features
To zoom in on YouTube videos, your browser also offers effective ways for the users. By using the browser zoom features, you can quickly zoom in and out of the video without the need for additional help. Moreover, these zoom features are also beneficial for reading eBooks or online documents.
Here are the three ways through which you can instantly zoom in on your favorite YouTube videos easily:
Way 1: The first way to zoom in on video is through browser options. To do so, tap on the “Three-Dot” icon of your browser displayed in the top right corner. From the menu, tap on “Zoom” and control the actions through its small menu.

Way 2: Another way to zoom in and out of the YouTube video is through your mouse pad. Point your cursor to the place where you want to zoom and try to expand the screen from your mouse pad and vice versa for zoom out.

Way 3: On the URL search bar of YouTube, you can see different icons displayed next to it. Simply tap on the “Zoom” icon to control the zoom in and out accordingly.

Method 3: Zoom In on YouTube Video with Browser Extension
In this section, we will use a browser extension that will assist you in zooming in and out on YouTube videos comfortably. We will recommend the Zoom browser extension due to its distinct properties and features. Through its slider, you can zoom in on the YouTube video up to 400 factors with a single swipe.
Moreover, through this special browser extension, you can save the zoomed version of the website and can resume watching the videos from the set zoom value. To save your time, this browser also gives the option to zoom in and out the web pages together with a single click. To use this browser extension to zoom in on Youtube, here are simple steps.
Step 1: Install the Zoom browser extension on your device from the Chrome Store by tapping on the “Add to Chrome” button to download and install the extension.

Step 2: Now, open YouTube and play your desired video. Afterward, tap on the icon of extensions from the top and select this particular extension. Through this extension, you can either click on the “+” button or the slider to zoom the video accordingly.

Conclusion
YouTube has become a mainstream channel for watching and creating videos in this era. Many times we miss small yet important details while watching YouTube videos on our devices. To quickly catch up on these essential details, we have offered different and easy methods regarding zoom in on YouTube videos with a single click.
Create Perfect Slow Motion Videos With The Best CapCut Templates
Editing from scratch is a time-consuming process, especially when you’re a beginner. Even skilled editors opt for different ways to maintain productivity. One of the means to save time is the use of templates for creating or editing videos. Slow-motion videos require the manipulation of speed or framerate to produce results. Slow-motion CapCut templates prove to be a valuable source.
In this article, readers will learn about slow-mo CapCut templates for crafting slow-motion videos. For those unfamiliar with CapCut, a brief overview of its functions will be provided. In addition, we’ll introduce some remarkable slow-mo CapCut templates. Moreover, you can learn about an extraordinary alternative for fashioning amazing slow-motion videos.
Slow Motion Video Maker Slow your video’s speed with better control of your keyframes to create unique cinematic effects!
Make A Slow Motion Video Make A Slow Motion Video More Features

Part 1. CapCut Video Editor for Smartphone: Reading Out the Detailed Review
CapCut is a content editing platform that acts as a smartphone application and computing software. The application serves in various video editing tasks while giving professional outcomes. Most of CapCut’s features are free to use; however, there is an affordable subscription plan.
It has AI and manual functioning features to help you edit how you like. In its “Explore” section, you can find various effects, text styles, stickers, and audio tracks. Moreover, you can also introduce subtitles and captions with its “Caption” tool. Plus, it offers camera recording where you can adjust record time, effects, multi-clip options, and more. Here are some of CapCut’s limitless editing features:

- Templates: CapCut enables you to access its pre-built templates for distinct purposes. You can access it all from there, be it fast-motion, cinematic effect, or CapCut slow-mo template. Moreover, when you add the keyword for search, it can show you trending templates and hashtags.
- Remove Background: If you couldn’t decide on a good background while recording, CapCut has got you covered. This feature not only removes the background but also offers a setting for bringing precision. You can adjust the edge setting or intensity of these settings accordingly.
- Smart User-Interface: This application has an intuitive, clean, and smart smartphone interface. The themes and the positioning of features are done minimally, where nothing looks stuffed. In addition, you can expand or collapse the display menu accordingly.
- Image Enhancement: As discussed before, CapCut is a content editing app that offers image enhancements as well. The feature automatically compresses your content quality to 1080p. Moreover, you can resize the image post-enhancement and add an AI background to it.
- Cloud Storage and Collaboration: You can edit without any prior account information in CapCut. However, signing up comes with various benefits, such as accessing pre-edited projects. In addition, you can connect with other editors on CapCut and take your editing up a notch.
Part 2. Some Top-Rated CapCut Templates to Try for Creating Perfect Slow-Motion Videos
With a wide range of features and effects, CapCut also has the power to turn videos into slow-mos. You can craft a slow-motion video via manual speed change or be smart with its templates. CapCut slow-motion templates are easily accessible in its Template section. While there are hundreds of slow-mo templates CapCut, take a look at these that we’ve compiled for you:
1. Slowmo
This template is reachable via the CapCut slow-mo edit template gallery and is open for access. The template possesses an aspect ratio of 9:16 and is a suitable fit for your Instagram reels and YouTube shorts. It only requires a video of 16 seconds to get started with this trending template. The template slows down your video at specific durations, giving it a majestic resonance.

2. Slowmotion Smooth
With a catchy song and visually striking filter, this is perfect for aesthetic dress-up videos. This CapCut video slow motion template applies to a single clip of 14 seconds duration. With its 9:16 aspect ratio, it is well-fitted for a majority of social platforms. The template has over 316.3K uses, and you can replace its background song using CapCut.

3. Trend Slowmo
Use this trending slow-motion song CapCut template with over 1.1 million uses to make viral slo-mos. It doesn’t offer a basic Slomo effect but has a trendy background song. In addition, the template is a collaboration between slow motion and blur effect. Users only require a video to employ this effect, offering a 9:16 aspect ratio.

4. Slowmo Aesthetic
Make your modeling and dress-up video look aesthetic with this slow-mo CapCut template. It is a beautiful blend of slow-motion effects on specific scenes with an aesthetic filter. The video will start with a black-and-white look with a smooth transition toward colors and slo-mo. With its 9:16 aspect ratio and 6-second duration, it is perfect for showcasing dresses and fashion.

5. Healing Slowmo
Craft aesthetic travel videos and capture landscapes using this CapCut slow-mo template. It appears as a combination of slow motion and blur effect at multiple periods. You only require a portrait clip to use this template in an efficient way. You can fashion captivating Instagram, Facebook, and Pinterest reels with its 9:16 ratio.

Part 3. How to Create Proper Slow-Motion Videos on CapCut Video Editor?
CapCut slow-mo edit not only slows down video but also helps in post-editing. The user interface is self-explanatory, and you can find the features with ease. However, this section will provide you with a detailed guide on using the template CapCut slow-mo. Here is a step-by-step guide to creating a slo-mo in CapCut via its templates collection:
Step 1. After downloading CapCut on your smartphone, launch it to access its main menu. From there, navigate towards the downward bar and click the “Templates” option.

Step 2. In the templates collection, go to the search bar and type slow motion. Multiple options will appear on the screen in the Trending section. From there, select a template to employ it. Once you have selected the template, observe if it is right for your video. Afterward, click the “Use template” button to start editing with it.

Step 3. Once you have selected a video, click the “Preview” button. Notice that you can only select the number of videos the template offers.

Step 4. Afterward, click on the “Text” option and add text if you want. After all the editing is done, click on the “Export” button to download the video.

Part 4. Smartphone Alternative: Creating Slow Motion Videos with Wondershare Filmora App
Wondershare Filmora is a versatile platform for creating or editing slow motions with smartphone services. You can access the application from the Play Store or App Store and start editing instantly. The Filmora app displays a clearly laid out interface with easy access to features. Here, you can use advanced and basic speed editing to create a slow motion:

Method 1. Using the Normal Speed Option
The normal method in this CapCut slow-mo edit alternative uses playback speed. It involves a simple slider positioning and some enhancement options. Here is how to create a slow motion in the Filmora app using the standard approach:
Step 1. After downloading the Filmora application, navigate towards the top tools. From there, select the “Speed” option and choose a clip for import.

Step 2. Select the “Normal” section and drag the playback towards the left. This will slow down the video, and you can set the speed up to 0.2x for slo-mo. After speed settings, click the “ü” icon, and if you want, do other settings.

Step 3. Once you are done with post-slow motion settings, click the “Export” button.

Method 2. Using the Speed Curve Option
This method involves slightly advanced speed settings for slow-motion creation. This method features many templates alternative to CapCut slow-mo templates. Further, you can use the custom setting template to edit as per your taste. Here is how to create a slow motion using Filmora’s speed curve:
Step 1. Repeat the same process of importing the video and go to the “Curve” section. Select a pre-designed speed template if it fits your video. If not, go for the “Customize” template, and a panel will display.

Step 2. In this panel, adjust the slider position in the downward direction. This will slow down your video at specific durations. You can also enable the “+ Add beat” option for audio adjustments.

Step 3. Click the “ü” icon a couple of times in the respective panels to finalize settings. Afterward, export the video by opting for the “Export” button.

Bonus Part. Make Your Video Editing Perfect with Wondershare Filmora
For beginners, smartphone editing might be satisfactory. However, for a skilled professional with a passion for editing, it’s not enough. For more precise editing and smooth slow motions, we recommend a desktop solution. This CapCut slow-motion edit alternative is Wondershare Filmora’s computing software.
It is an adaptable editing software offering basic as well as advanced video editing features. The features rest on its intuitive interface and are reachable to all. It has a resource library that is filled with transition templates, effects, presets, and more. It has both visual and audio editing options along with AI abilities for production purposes. All in all, the software is an amazing pick for those who prefer high-quality results.
Free Download For Win 7 or later(64-bit)
Free Download For macOS 10.14 or later
AI-Backed Professional Video Editing Features of Filmora
If you are looking to create high-grade slow motions using speed templates, Filmora is for you. There are multiple settings to enhance visuals, audio tracks, and texts. You can do amazing color corrections or add mesmerizing effects to videos. Here are some of its video editing features to consider during editing:
1. AI Copilot Editing
For instance, you are using Filmora for slow motion and don’t know where to start. Employ its copilot assistant and ask it about slo-mo creation. It will direct you towards the speed options with insights on editing. Moreover, the copilot provides one-click access buttons for you to access the feature.
2. AI Text-to-Video
If you are a big fan of AI applications, then Filmora is the right stop for you. Its text-to-video AI allows you to generate videos via prompts or scripts. The function automatically adds graphics and AI voice to videos.
3. Remove Background
The video background remover of Filmora uses high-end AI technology to do the work. It analyzes and cuts out the background with accuracy while providing replacements. You employ three background options: solid color, gradients, and graphics. Users can also add a custom image or video in the timeline to use a background.
4. Instant Mode
If you are not familiar with video and need to start editing videos, this feature is for you. It is an automated video editor for you that uses AI algorithms to edit videos. It color-corrects or enhances any flaws and adds templates and beats to the video. Moreover, it has 115+ multi-contextual templates for diverse video editing.
Conclusion
Slow-motion CapCut templates serve as a powerful resource for creating slo-mos. The con is that with automated templates, there is no room for customizations. However, Wondershare Filmora is a powerful software application with no such limit. It offers visual, audio, and more custom options after some creation. Hence, if you are looking for an editor to broaden your editing game, use Filmora.
Make A Slow Motion Video Make A Slow Motion Video More Features

Part 1. CapCut Video Editor for Smartphone: Reading Out the Detailed Review
CapCut is a content editing platform that acts as a smartphone application and computing software. The application serves in various video editing tasks while giving professional outcomes. Most of CapCut’s features are free to use; however, there is an affordable subscription plan.
It has AI and manual functioning features to help you edit how you like. In its “Explore” section, you can find various effects, text styles, stickers, and audio tracks. Moreover, you can also introduce subtitles and captions with its “Caption” tool. Plus, it offers camera recording where you can adjust record time, effects, multi-clip options, and more. Here are some of CapCut’s limitless editing features:

- Templates: CapCut enables you to access its pre-built templates for distinct purposes. You can access it all from there, be it fast-motion, cinematic effect, or CapCut slow-mo template. Moreover, when you add the keyword for search, it can show you trending templates and hashtags.
- Remove Background: If you couldn’t decide on a good background while recording, CapCut has got you covered. This feature not only removes the background but also offers a setting for bringing precision. You can adjust the edge setting or intensity of these settings accordingly.
- Smart User-Interface: This application has an intuitive, clean, and smart smartphone interface. The themes and the positioning of features are done minimally, where nothing looks stuffed. In addition, you can expand or collapse the display menu accordingly.
- Image Enhancement: As discussed before, CapCut is a content editing app that offers image enhancements as well. The feature automatically compresses your content quality to 1080p. Moreover, you can resize the image post-enhancement and add an AI background to it.
- Cloud Storage and Collaboration: You can edit without any prior account information in CapCut. However, signing up comes with various benefits, such as accessing pre-edited projects. In addition, you can connect with other editors on CapCut and take your editing up a notch.
Part 2. Some Top-Rated CapCut Templates to Try for Creating Perfect Slow-Motion Videos
With a wide range of features and effects, CapCut also has the power to turn videos into slow-mos. You can craft a slow-motion video via manual speed change or be smart with its templates. CapCut slow-motion templates are easily accessible in its Template section. While there are hundreds of slow-mo templates CapCut, take a look at these that we’ve compiled for you:
1. Slowmo
This template is reachable via the CapCut slow-mo edit template gallery and is open for access. The template possesses an aspect ratio of 9:16 and is a suitable fit for your Instagram reels and YouTube shorts. It only requires a video of 16 seconds to get started with this trending template. The template slows down your video at specific durations, giving it a majestic resonance.

2. Slowmotion Smooth
With a catchy song and visually striking filter, this is perfect for aesthetic dress-up videos. This CapCut video slow motion template applies to a single clip of 14 seconds duration. With its 9:16 aspect ratio, it is well-fitted for a majority of social platforms. The template has over 316.3K uses, and you can replace its background song using CapCut.

3. Trend Slowmo
Use this trending slow-motion song CapCut template with over 1.1 million uses to make viral slo-mos. It doesn’t offer a basic Slomo effect but has a trendy background song. In addition, the template is a collaboration between slow motion and blur effect. Users only require a video to employ this effect, offering a 9:16 aspect ratio.

4. Slowmo Aesthetic
Make your modeling and dress-up video look aesthetic with this slow-mo CapCut template. It is a beautiful blend of slow-motion effects on specific scenes with an aesthetic filter. The video will start with a black-and-white look with a smooth transition toward colors and slo-mo. With its 9:16 aspect ratio and 6-second duration, it is perfect for showcasing dresses and fashion.

5. Healing Slowmo
Craft aesthetic travel videos and capture landscapes using this CapCut slow-mo template. It appears as a combination of slow motion and blur effect at multiple periods. You only require a portrait clip to use this template in an efficient way. You can fashion captivating Instagram, Facebook, and Pinterest reels with its 9:16 ratio.

Part 3. How to Create Proper Slow-Motion Videos on CapCut Video Editor?
CapCut slow-mo edit not only slows down video but also helps in post-editing. The user interface is self-explanatory, and you can find the features with ease. However, this section will provide you with a detailed guide on using the template CapCut slow-mo. Here is a step-by-step guide to creating a slo-mo in CapCut via its templates collection:
Step 1. After downloading CapCut on your smartphone, launch it to access its main menu. From there, navigate towards the downward bar and click the “Templates” option.

Step 2. In the templates collection, go to the search bar and type slow motion. Multiple options will appear on the screen in the Trending section. From there, select a template to employ it. Once you have selected the template, observe if it is right for your video. Afterward, click the “Use template” button to start editing with it.

Step 3. Once you have selected a video, click the “Preview” button. Notice that you can only select the number of videos the template offers.

Step 4. Afterward, click on the “Text” option and add text if you want. After all the editing is done, click on the “Export” button to download the video.

Part 4. Smartphone Alternative: Creating Slow Motion Videos with Wondershare Filmora App
Wondershare Filmora is a versatile platform for creating or editing slow motions with smartphone services. You can access the application from the Play Store or App Store and start editing instantly. The Filmora app displays a clearly laid out interface with easy access to features. Here, you can use advanced and basic speed editing to create a slow motion:

Method 1. Using the Normal Speed Option
The normal method in this CapCut slow-mo edit alternative uses playback speed. It involves a simple slider positioning and some enhancement options. Here is how to create a slow motion in the Filmora app using the standard approach:
Step 1. After downloading the Filmora application, navigate towards the top tools. From there, select the “Speed” option and choose a clip for import.

Step 2. Select the “Normal” section and drag the playback towards the left. This will slow down the video, and you can set the speed up to 0.2x for slo-mo. After speed settings, click the “ü” icon, and if you want, do other settings.

Step 3. Once you are done with post-slow motion settings, click the “Export” button.

Method 2. Using the Speed Curve Option
This method involves slightly advanced speed settings for slow-motion creation. This method features many templates alternative to CapCut slow-mo templates. Further, you can use the custom setting template to edit as per your taste. Here is how to create a slow motion using Filmora’s speed curve:
Step 1. Repeat the same process of importing the video and go to the “Curve” section. Select a pre-designed speed template if it fits your video. If not, go for the “Customize” template, and a panel will display.

Step 2. In this panel, adjust the slider position in the downward direction. This will slow down your video at specific durations. You can also enable the “+ Add beat” option for audio adjustments.

Step 3. Click the “ü” icon a couple of times in the respective panels to finalize settings. Afterward, export the video by opting for the “Export” button.

Bonus Part. Make Your Video Editing Perfect with Wondershare Filmora
For beginners, smartphone editing might be satisfactory. However, for a skilled professional with a passion for editing, it’s not enough. For more precise editing and smooth slow motions, we recommend a desktop solution. This CapCut slow-motion edit alternative is Wondershare Filmora’s computing software.
It is an adaptable editing software offering basic as well as advanced video editing features. The features rest on its intuitive interface and are reachable to all. It has a resource library that is filled with transition templates, effects, presets, and more. It has both visual and audio editing options along with AI abilities for production purposes. All in all, the software is an amazing pick for those who prefer high-quality results.
Free Download For Win 7 or later(64-bit)
Free Download For macOS 10.14 or later
AI-Backed Professional Video Editing Features of Filmora
If you are looking to create high-grade slow motions using speed templates, Filmora is for you. There are multiple settings to enhance visuals, audio tracks, and texts. You can do amazing color corrections or add mesmerizing effects to videos. Here are some of its video editing features to consider during editing:
1. AI Copilot Editing
For instance, you are using Filmora for slow motion and don’t know where to start. Employ its copilot assistant and ask it about slo-mo creation. It will direct you towards the speed options with insights on editing. Moreover, the copilot provides one-click access buttons for you to access the feature.
2. AI Text-to-Video
If you are a big fan of AI applications, then Filmora is the right stop for you. Its text-to-video AI allows you to generate videos via prompts or scripts. The function automatically adds graphics and AI voice to videos.
3. Remove Background
The video background remover of Filmora uses high-end AI technology to do the work. It analyzes and cuts out the background with accuracy while providing replacements. You employ three background options: solid color, gradients, and graphics. Users can also add a custom image or video in the timeline to use a background.
4. Instant Mode
If you are not familiar with video and need to start editing videos, this feature is for you. It is an automated video editor for you that uses AI algorithms to edit videos. It color-corrects or enhances any flaws and adds templates and beats to the video. Moreover, it has 115+ multi-contextual templates for diverse video editing.
Conclusion
Slow-motion CapCut templates serve as a powerful resource for creating slo-mos. The con is that with automated templates, there is no room for customizations. However, Wondershare Filmora is a powerful software application with no such limit. It offers visual, audio, and more custom options after some creation. Hence, if you are looking for an editor to broaden your editing game, use Filmora.
Turn Your Text Into a Podcast Made Possible
Being a content creator, either writing or generating videos, requires podcast text-to-speech knowledge. The impact of content depends on how many people see it. It means finding new ways to get it into real and virtual places where customers and users might be.
Depending on the context, podcasting can be a perfect alternative for sharing content.
This article will address your questions about the easiest way to turn a blog into a podcast. Let’s begin with the reasons why you should do a podcast.
Part 1. Why You Should Podcast
Podcasts are one of the simplest and most cost-effective ways. It helps to advertise yourself and your products to a highly targeted audience. Podcasts are also excellent for engaging with potential clients interested in your content. In your field, you can achieve fame and expertise.

Repurposing of Content
Podcasters can maximize their potential for successful episodes and repurposing their podcast into multiple content pieces.
This podcasting strategy can help you reach more people by putting your podcasts on more channels and engaging more people who might be interested.
More Fulfilling than Articles
Unlike music, news, TV, and social media, podcast listeners don’t have to watch the screen like they do with YouTube videos or TV shows. This means they can listen while walking or driving home from work.
Podcasts are the best way to get people to pay attention and make fundamental societal changes. They can keep people interested for a long time, so you can go into detail and get personal without turning off your audience.
Minimal Start-Up Costs
To start a podcast, you can spend a little money. Even some of the most famous podcasts use a microphone, a computer, and software for recording. But it’s common to spend more money on advertising and better hosting.
Starting a podcast doesn’t cost much, as you can get everything you need for about $145.
Expansion of Search Potential
In the past few years, many big brands and small to medium-sized businesses have started using podcasts as a marketing strategy. This is because podcasts are becoming more and more popular and can help raise your company’s profile.
Podcasting is another way to disseminate your study to a broader audience, whether that audience consists of policymakers or interested citizens.
Potential to Monetize
Using an affiliate program podcast, you can earn money. Businesses can increase their income by offering paid advertising sponsorships to monetize podcasts. Suppose you accept an affiliate offer to sell ads. In that case, you become the company’s voice and put recorded ads in your podcast episodes.
The most common way to make money from a podcast is through sponsorship. It’s also the easiest way to make money because you don’t have to make or sell anything. You just have to make a deal with a sponsor.
Part 2. Why Are Writers Hesitant to Start a Podcast?
Even after knowing all these benefits, writers are still hesitant to start a podcast. One of the main reasons a writer may be reluctant to launch a podcast is the cost of the necessary equipment. You will need at least $80 to $500 for this unpromissing business.
However, let me tell you a secret that many podcastors didn’t buy any audio equipment for the launch of their podcast channel on Spotify.
Moreover, many writers don’t want to show their voice through recordings. This is because they couldn’t just make a recording and hand it off to a sound specialist. Besides, finding their voice through the stories they write is the routine.
But we all need to get the truth that many podcastors don’t record a single word of the podcast with their own voice. Due to a solution: text-to-speech, technology like this has been around for a while and continues to improve.
The two important issues have been solved, so what are you waiting for? Platform building has always relied heavily on content marketing. With blog posts and social media, additional support was provided, and now podcasts are becoming more commonplace.
Part 3. How to Turn a Text Into a Podcast?
Text To Speech
To turn your text into audible content, Text-to-speech (TTS) is an assistive technology. With a single click, TTS reads your written text aloud. Many people also use it for writing and editing to maintain audience concentration.
Text-to-speech technology is compatible with all digital devices, including computers, tablets, and smartphones. Increasing numbers of websites and products now have developed this function. For example, you can find it within the trusted video editing software like Filmora. With Filmora’s Text to Speech (TTS) feature , you may add extra aspects to your video by turning your text files into voiceovers.
Free Download For Win 7 or later(64-bit)
Free Download For macOS 10.14 or later
Why we regard text to speech as a good
For writers, imagination is the only tool to construct their stories. To bring our stories to life, all we need is a laptop. The same holds for text-to-speech technologies, which can significantly assist writing and editing by allowing the author to hear their words without using their voice.
- Text-to-speech applications can assist you in repurposing your material.
Your written work can be converted into spoken language or a podcast. A podcast can be converted into a YouTube video with a few alterations. All of these factors can help you reach new audiences.
Repurposing material permits your audience to consume it in a variety of ways. The audience can read, listen to, or view your content.
- Text-to-speech systems enable authors to create information that is accessible.
As per World Health Organization, there are almost 285 million visually impaired persons and 39 million blind people. We writers can create a more inclusive world by constantly keeping accessibility in mind.
The limitations of text to speech
Text-to-speech software is becoming increasingly lifelike thanks to technological advancements. However, it cannot still express genuine human emotions. However, this should allow you to utilize these tools. The positives significantly exceed the disadvantages, and technology is continually improving.
Easiest Fix: Turn Texts Into Podcasts With TTS in Filmora
So how can you use text-to-speech? Andhow you can turn your texts into audio podcasts in a daily routine? Filmora, a all-in-one video editor, gets you the solution.
Step1 Download and install Filmora on your PC or Mac.
Step2 Open Filmora and select the video on which you wish to add audio.
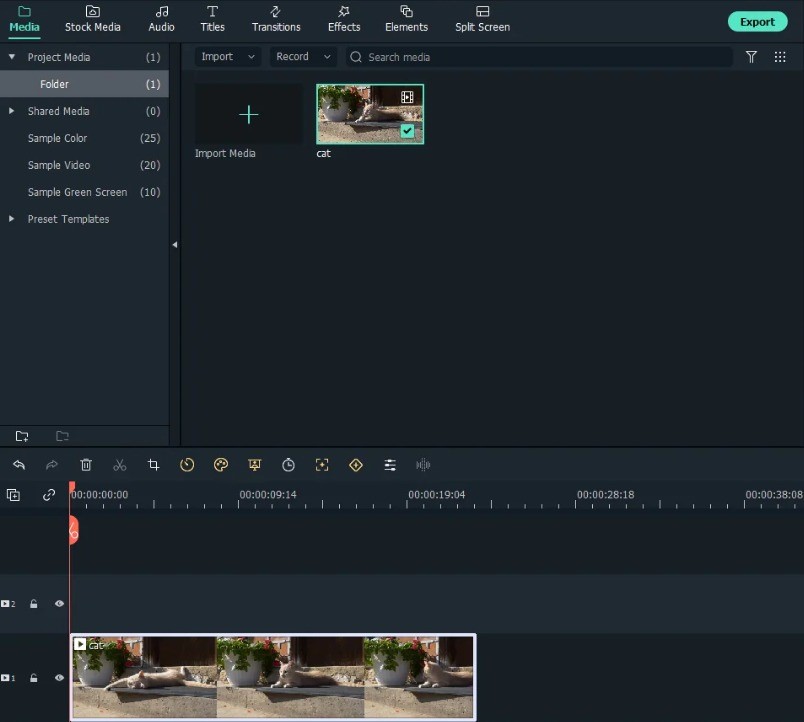
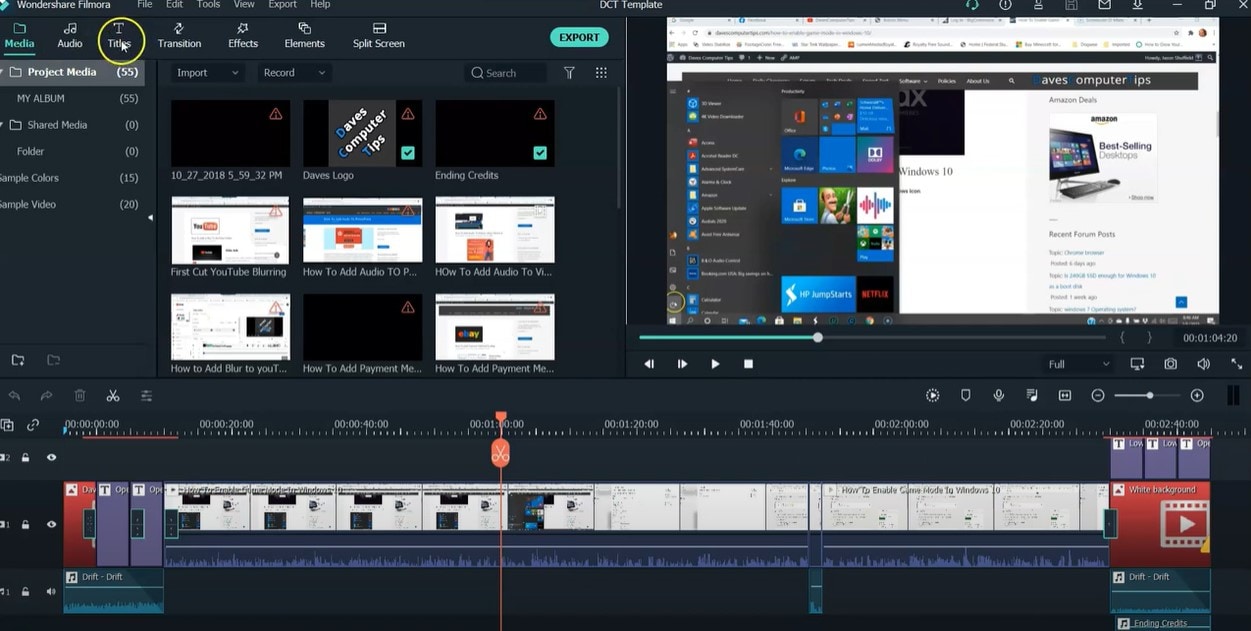
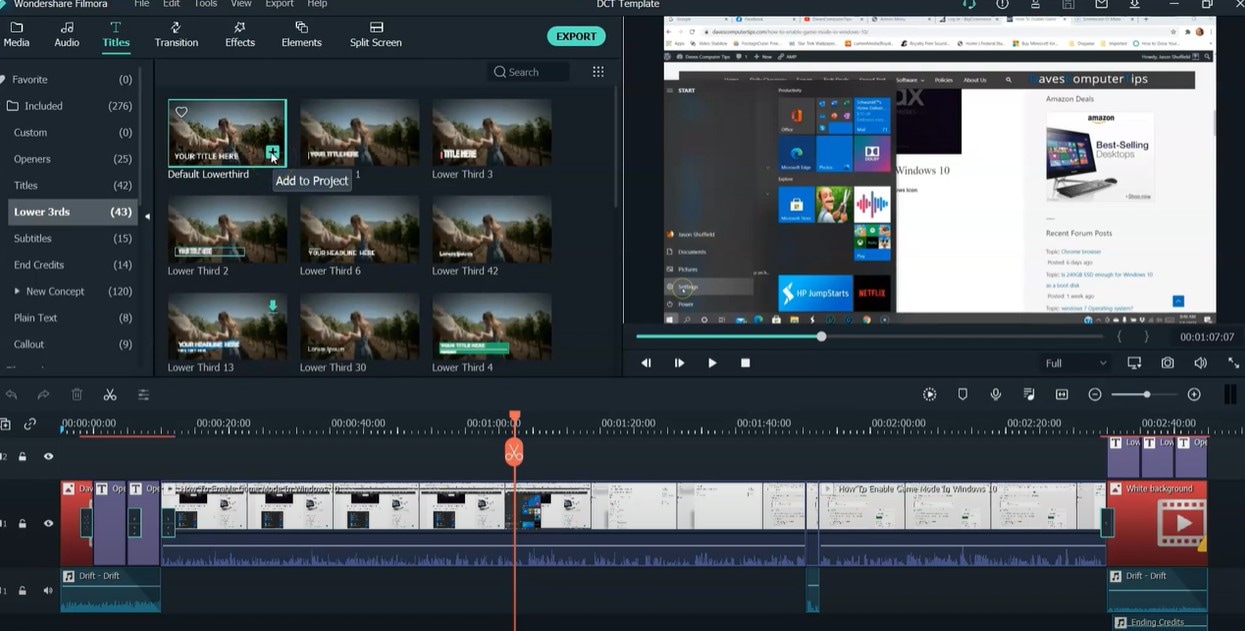
Step3 After adding your selected video, select the option “Titles” to add text to your video.
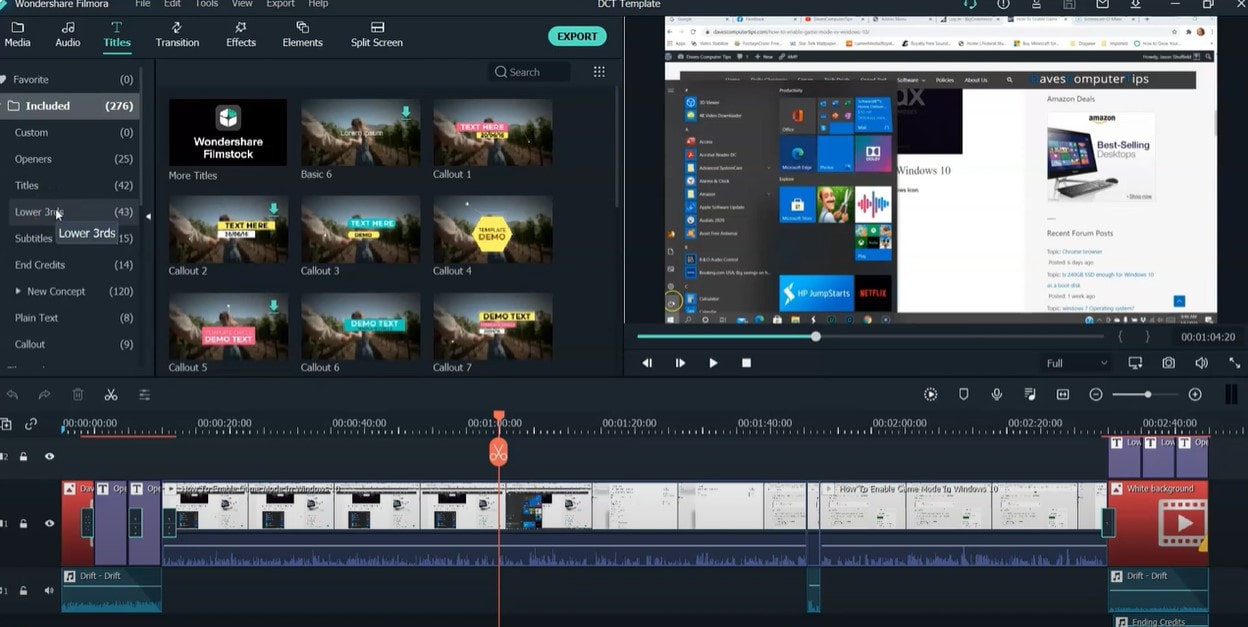
Step4 Select your favorite position for text in the video, like “lower third,” which is used the most in video titles.
Step5 Add text to the timeline and click “Ok.” You can move the red timeline marker if you want your text in a certain spot.
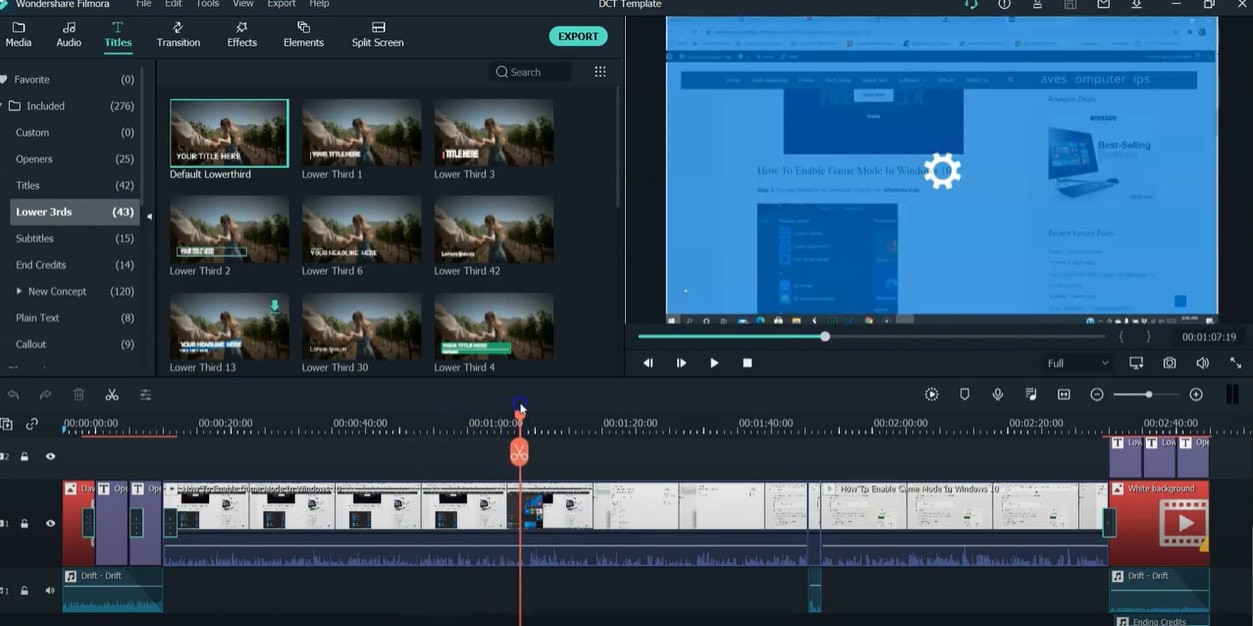
Click the “+” button marked in the picture below to add text.
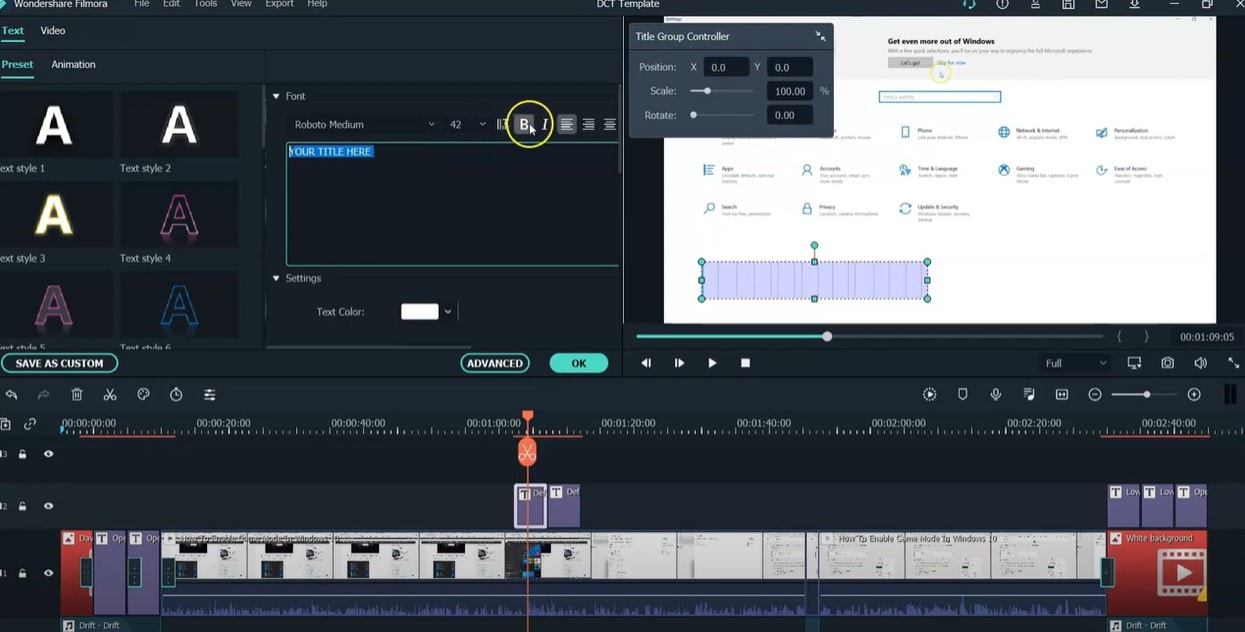
You can also edit the text by changing its style, color, and font or by animating it.
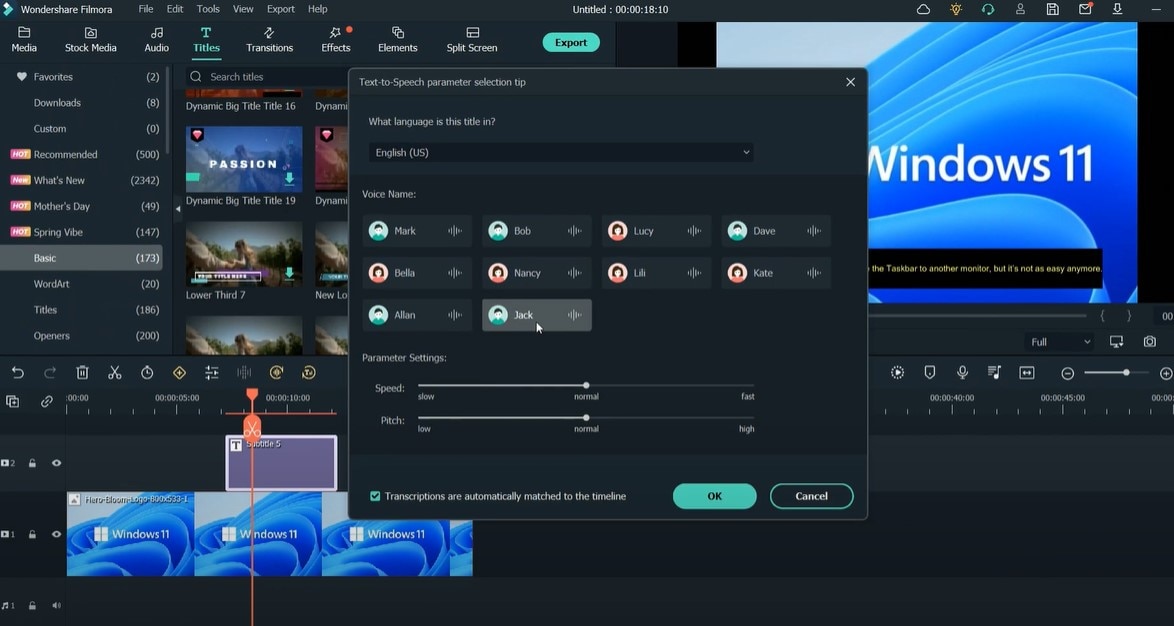
Step6 Press the “Text-to-Speech” button in the lower right side and choose your preferred voice. For example, Lilly’s voice resembles Siri.
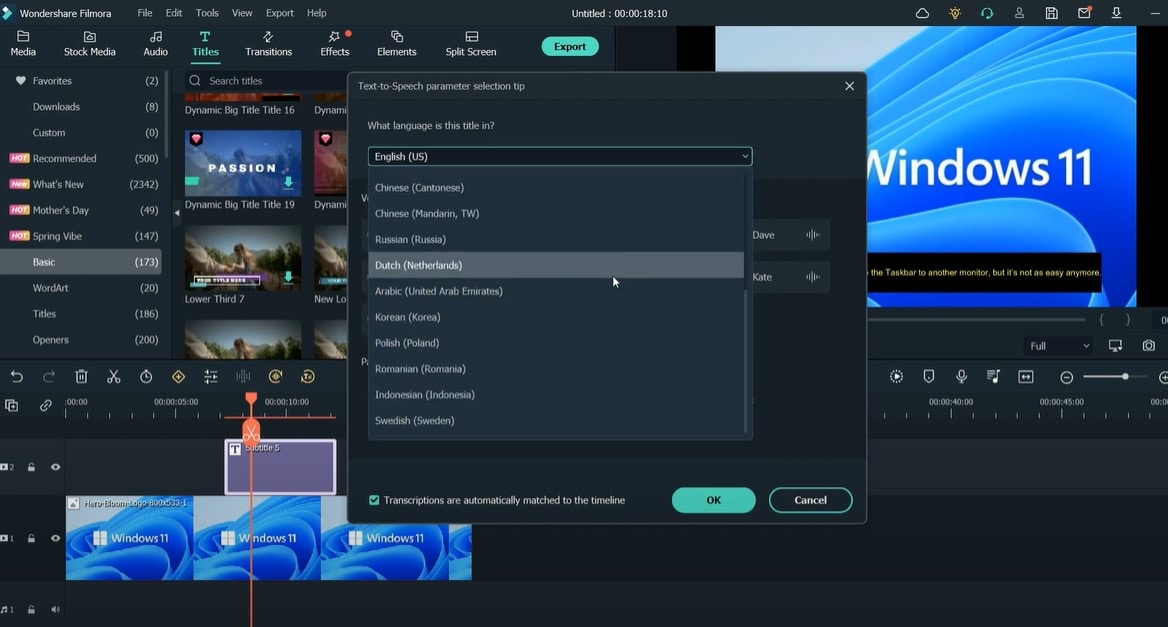
You can also choose another language other than English.
Click “Ok” once you’ve selected everything according to your requirements.
Step7 Once the transcription is completed, go ahead and test the video and audio to see if it’s synching.
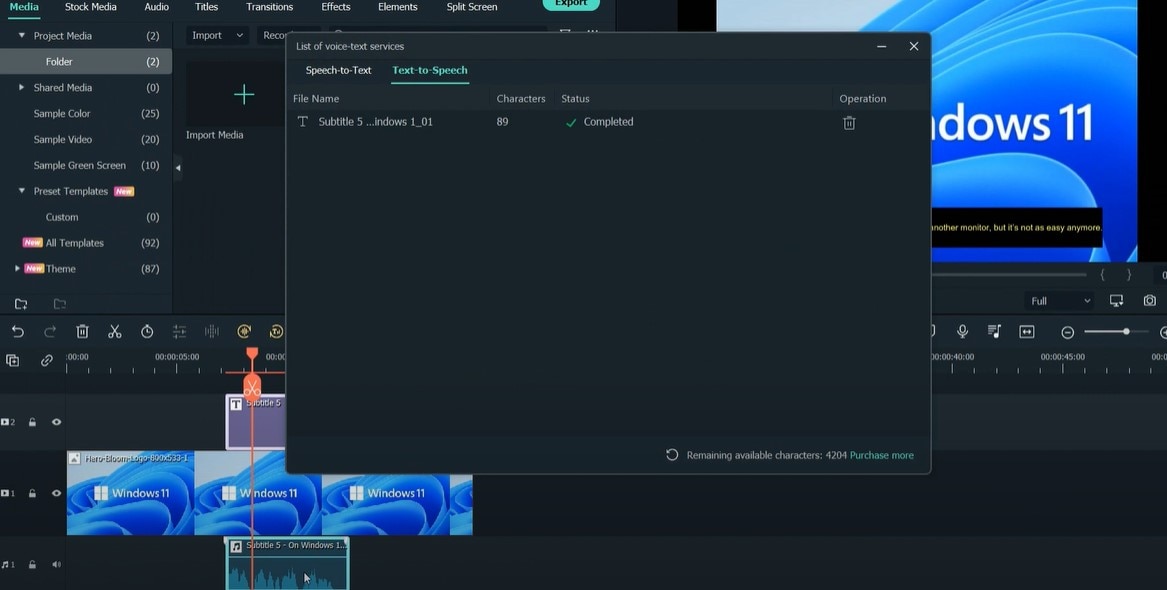
And that’s done. This is how easy it is to turn your texts into speech using Filmora.
Part 4. Hot FAQs on Podcast Text to Speech
How do I convert podcasts to text?
With the help of the smartphone app Google Recorder you can easily convert podcasts to texts for free.
- Open the app on your phone, start recording to it, and start recording your podcast simultaneously.
- The words will be automatically recorded and entered into the application as you talk into your phone’s microphone.
- After you click stop on the app, you can store and share the files once you finish your recording.
You have an option of sharing the text, the audio, or both. Alternatively, you can save them to your Google Drive if you don’t want to share them.
How to turn my podcast into a sound?
To convert your video podcasts into audio through Filmora. Follow these steps:
- Drag the imported video from the media library into the video timeline.
- To extract the audio from the video, right-click the video clip and select “Audio Detach.”
- After a while, audio and video will be seen on separate tracks.
Can I save the sound after converting text to speech?
Once the text has been converted to speech, you can save the sound. Select your preferred format after clicking the “export” option in Filmora.
Conclusion
Many of us wish to launch a podcast and blog. A productive podcast’s essence is turning writing into audio using various podcasting techniques. AI-powered text-to-speech softwares can quickly convert articles into podcasts. Or, you can invite significant people to your podcast to personalize it. Podcasting can give outdated content a new life.
Free Download For macOS 10.14 or later
Why we regard text to speech as a good
For writers, imagination is the only tool to construct their stories. To bring our stories to life, all we need is a laptop. The same holds for text-to-speech technologies, which can significantly assist writing and editing by allowing the author to hear their words without using their voice.
- Text-to-speech applications can assist you in repurposing your material.
Your written work can be converted into spoken language or a podcast. A podcast can be converted into a YouTube video with a few alterations. All of these factors can help you reach new audiences.
Repurposing material permits your audience to consume it in a variety of ways. The audience can read, listen to, or view your content.
- Text-to-speech systems enable authors to create information that is accessible.
As per World Health Organization, there are almost 285 million visually impaired persons and 39 million blind people. We writers can create a more inclusive world by constantly keeping accessibility in mind.
The limitations of text to speech
Text-to-speech software is becoming increasingly lifelike thanks to technological advancements. However, it cannot still express genuine human emotions. However, this should allow you to utilize these tools. The positives significantly exceed the disadvantages, and technology is continually improving.
Easiest Fix: Turn Texts Into Podcasts With TTS in Filmora
So how can you use text-to-speech? Andhow you can turn your texts into audio podcasts in a daily routine? Filmora, a all-in-one video editor, gets you the solution.
Step1 Download and install Filmora on your PC or Mac.

Step2 Open Filmora and select the video on which you wish to add audio.

Step3 After adding your selected video, select the option “Titles” to add text to your video.

Step4 Select your favorite position for text in the video, like “lower third,” which is used the most in video titles.

Step5 Add text to the timeline and click “Ok.” You can move the red timeline marker if you want your text in a certain spot.

Click the “+” button marked in the picture below to add text.

You can also edit the text by changing its style, color, and font or by animating it.

Step6 Press the “Text-to-Speech” button in the lower right side and choose your preferred voice. For example, Lilly’s voice resembles Siri.

You can also choose another language other than English.

Click “Ok” once you’ve selected everything according to your requirements.
Step7 Once the transcription is completed, go ahead and test the video and audio to see if it’s synching.

And that’s done. This is how easy it is to turn your texts into speech using Filmora.
Part 4. Hot FAQs on Podcast Text to Speech
How do I convert podcasts to text?
With the help of the smartphone app Google Recorder you can easily convert podcasts to texts for free.
- Open the app on your phone, start recording to it, and start recording your podcast simultaneously.
- The words will be automatically recorded and entered into the application as you talk into your phone’s microphone.
- After you click stop on the app, you can store and share the files once you finish your recording.
You have an option of sharing the text, the audio, or both. Alternatively, you can save them to your Google Drive if you don’t want to share them.
How to turn my podcast into a sound?
To convert your video podcasts into audio through Filmora. Follow these steps:
- Drag the imported video from the media library into the video timeline.
- To extract the audio from the video, right-click the video clip and select “Audio Detach.”
- After a while, audio and video will be seen on separate tracks.
Can I save the sound after converting text to speech?
Once the text has been converted to speech, you can save the sound. Select your preferred format after clicking the “export” option in Filmora.
Conclusion
Many of us wish to launch a podcast and blog. A productive podcast’s essence is turning writing into audio using various podcasting techniques. AI-powered text-to-speech softwares can quickly convert articles into podcasts. Or, you can invite significant people to your podcast to personalize it. Podcasting can give outdated content a new life.
Also read:
- Updated In 2024, Easy Guide to Use a Stabilization Tool in Filmora
- Updated Are You Finding It Challenging to Upload and Create a Link for Your Video? Well, This Detailed Upload Video to Link Guide Will Help You with This. Check It Out Now
- New 2024 Approved This Article Aim to Teach You How to Make a Night to Day Effect Video with Filmora. Follow the Steps to Figure It Out
- In 2024, How to Make Double Exposure Effect in Filmora
- Updated In 2024, TEXT REVEAL Animation | Easy Masking Filmora
- Updated In 2024, How to Create Cooking Video Intro and End Screen for YouTube Channel?
- Steps to Rotate Videos in Lightworks for 2024
- New In 2024, Want to Apply a Filter on Your Video Using Your iPhone or Mac? Here Are the Simple Steps to Put Add Filters on iMovie. Find Out a Better iMovie Alternative with More Filters
- Finding the Best Voice Changers for WhatsApp Free and Paid
- Updated How to Use LUTS to Color Grade on Your iPhone
- Updated 2024 Approved Here Are the Steps to Crop a Video in Sony Vegas Pro Step 1 Click on Import and Import the Video to Be Edited. Click on It and Drag-Drop to Timeline
- Updated Color Lut in Video - Color Grade Your Video for 2024
- Updated How Does the YouTube AI Algorithm Work - AI EXPLAINED
- Updated The Complete Guide to Slideshow Maker with Music
- Updated Ways to Find Free Online Slideshow Maker with No Watermark
- New 2024 Approved What Is HDRI? Everything You Need to Know About HDRI
- In 2024, Do You Want to Apply LUTs Using Open Broadcaster Software? You Can Download Free LUTs for OBS and Apply Them to Your Files. There Are Many LUTs Available
- New Videos Look Better when Edited Professionally. If Youre Looking to Edit Recorded Video with a Pro-Level Editing Then Weve Got You Covered. Learn About Editing Recorded Videos with the Best Toolkit Here
- Do You Intend to Include Motion Blur on Your Video Using Video Star? This Article Explains How to Use Motion Blur on Video Star with Exquisite Control
- 2024 Approved Wondering if You Can Make DIY Green Screen Video for Streaming? Learn the Easy Steps to Setup DIY Green Screen, Shoot the Video and Edit It Out to Add Green Screen Effects
- In 2024, Preparation to Beat Giovani in Pokemon Go For Xiaomi Redmi Note 12 Pro+ 5G | Dr.fone
- 10 Free Location Spoofers to Fake GPS Location on your Honor X7b | Dr.fone
- In 2024, How to Unlock iCloud Activation Lock and iCloud Account From iPhone 7?
- In 2024, How to Hide/Fake Snapchat Location on Your Samsung Galaxy A24 | Dr.fone
- How To Unlock iPhone 12 Pro Without Passcode? 4 Easy Methods | Dr.fone
- Can I play MKV movies on Samsung Galaxy Z Flip 5?
- New The Ultimate Guide to Learning All the Details About Voice Cloning
- Failed to play MP4 movies with Xiaomi Mix Fold 3
- How to recover deleted photos from Android Gallery after format on Galaxy XCover 6 Pro Tactical Edition
- How does the stardust trade cost In pokemon go On Poco X5 Pro? | Dr.fone
- Title: Step By Step Guide on Using Media Player Classic To Rotate A Video
- Author: Morgan
- Created at : 2024-05-19 05:11:40
- Updated at : 2024-05-20 05:11:40
- Link: https://ai-video-editing.techidaily.com/step-by-step-guide-on-using-media-player-classic-to-rotate-a-video/
- License: This work is licensed under CC BY-NC-SA 4.0.


