:max_bytes(150000):strip_icc():format(webp)/full-frame-shot-of-speakers-1138109687-33289baddc314b44ae87abc2fc8060cd-e7bccad6d81244509ed97ddf557f89e4.jpg)
Step by Step to Cut Videos in Lightworks

Step by Step to Cut Videos in Lightworks
Have you ever tried to edit a video, but found that it was too difficult? In this article, we will take a look at the software Lightworks and learn how to cut videos using it.
In this blog post, we will cover the cutting of videos in Lightworks. We will talk about what Lightworks is and how to download it. We’ll also cover the general interface so you know which buttons do what. Finally, we’ll talk about exporting a finished video and getting started with your next project in Lightworks!
What is Lightworks?
Lightworks is an editing software created by a company called Lightworks. It’s a free video editor that is incredibly powerful and has been used to edit some of the most popular films of recent years.
The software was originally designed for professional filmmakers, but it’s now available for anyone to use for any type of project. You can download Lightworks from the website here - https://www.lightworks.com/
Downloading the Software
First, download the Lightworks software from the website. You can do this by clicking on the big green button that says “Download the Latest Version”. When you click on it, you’ll be prompted to select your operating system and download the appropriate package.
Click “Next” and you’ll see a license agreement and a prompt for installation details. Fill in your information and click “Next” again to start your installation.
When installation is complete, launch Lightworks by double-clicking on the Lightworks icon in your files section.
The first time you open Lightworks, you’ll need to go through a few steps of initializing before using it for editing videos. This includes setting up your project settings and choosing whether or not to keep a backup of your previous work.
We will cover these initial steps separately in future blog posts, so don’t worry if it’s all unclear right now!
The Interface
New users to the software will notice that there are four different windows. The first window is the Project window. This window shows you all of the footage you have loaded into your project, as well as any clips you’ve added to your project (see below) and edits you’ve made. You may also notice a timeline in this window; this is where you’ll be placing your clips to create your video.
The Toolbar is located at the top of all four windows and gives quick access to commonly used features like adding clips, cropping, cutting clips, and more.
The Edit List Window displays all of the clips that are available for use in your Project Window or Timeline. They’re not ordered chronologically; they’re ordered by how they were imported into Lightworks.
The Timeline Window displays a list of edited scenes from your edited project for viewing purposes only - it does not contain anything about editing or timeline manipulation tasks.
The Monitor Window displays information about what’s being displayed on screen at any given time. It can be used to preview videos before exporting them, previous scenes from the timeline, or rendered video frames after applying render effects.
Step by Step in Cutting Videos in Lightworks
It’s not difficult to cut or divide a clip in Lightworks, and it doesn’t require a lot of time or effort. The following are the simple actions you’ll need to do to get started:
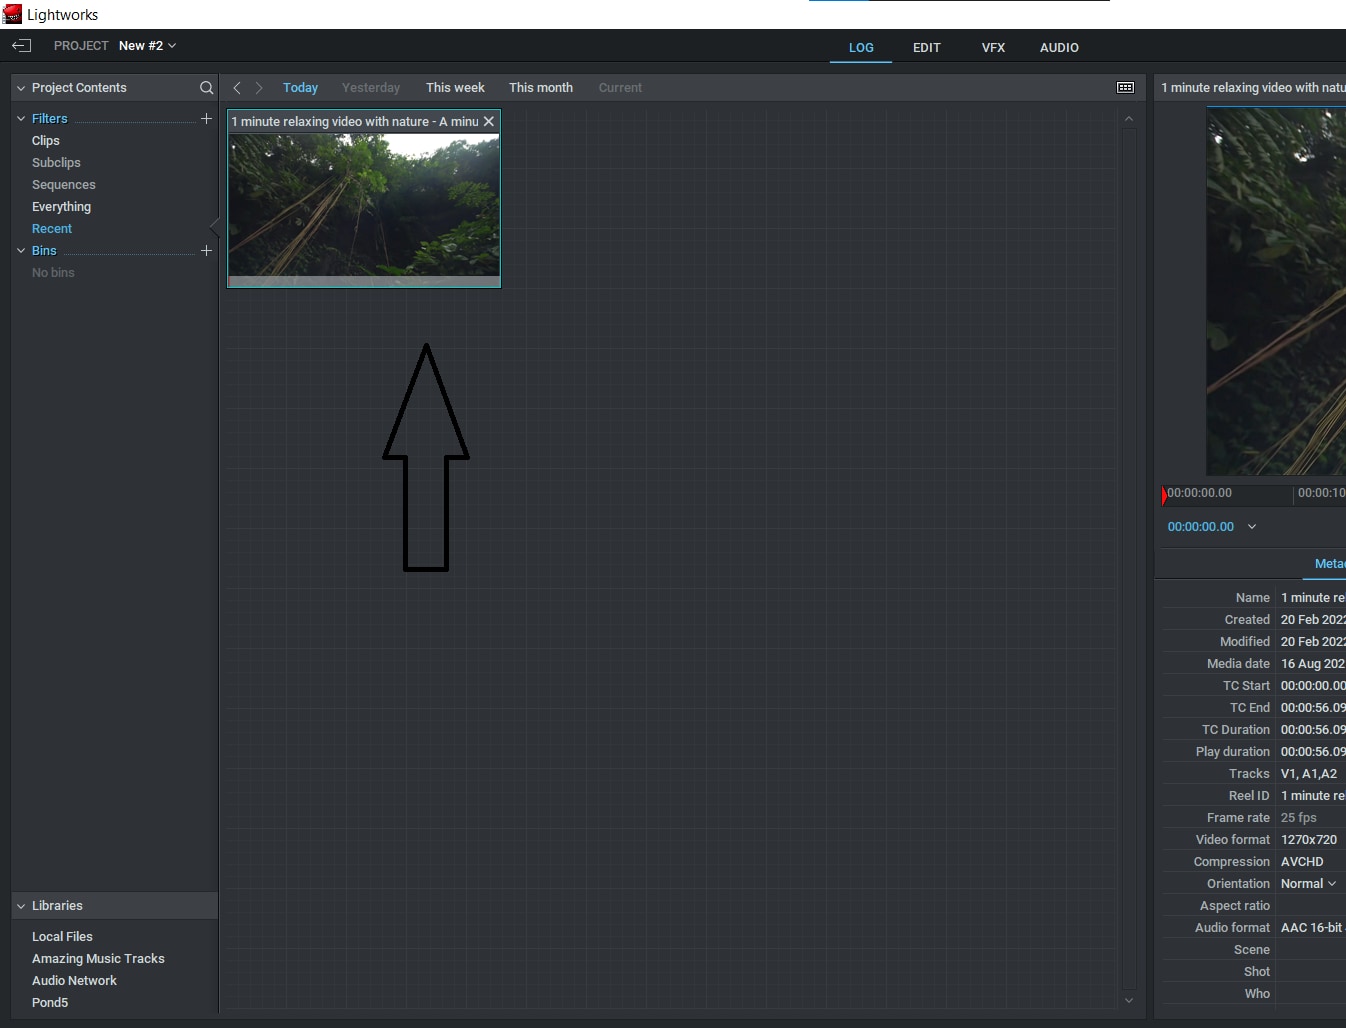
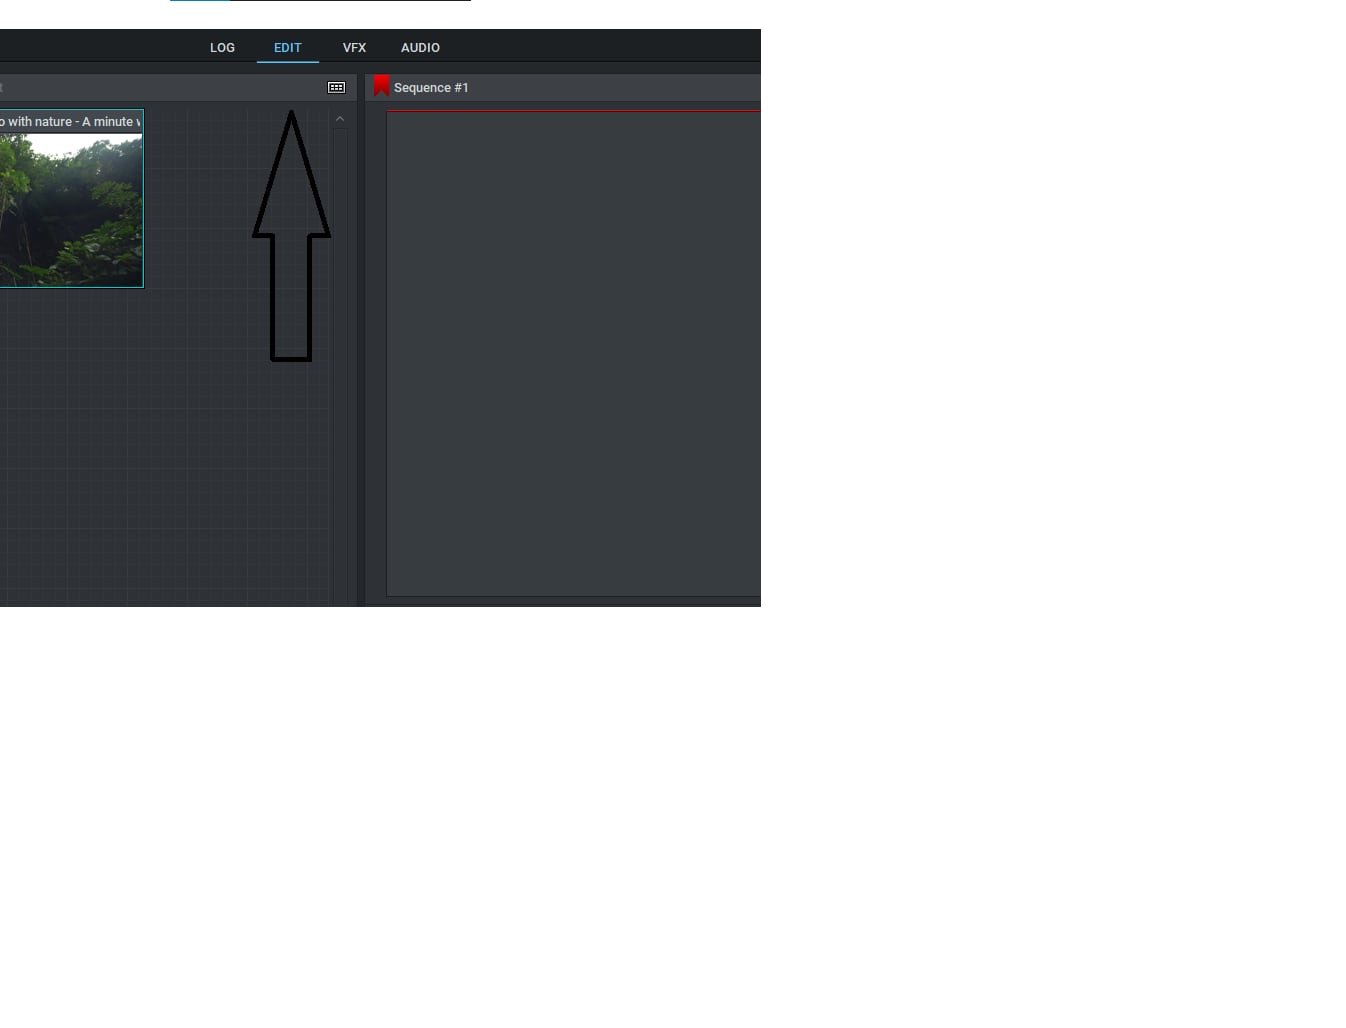
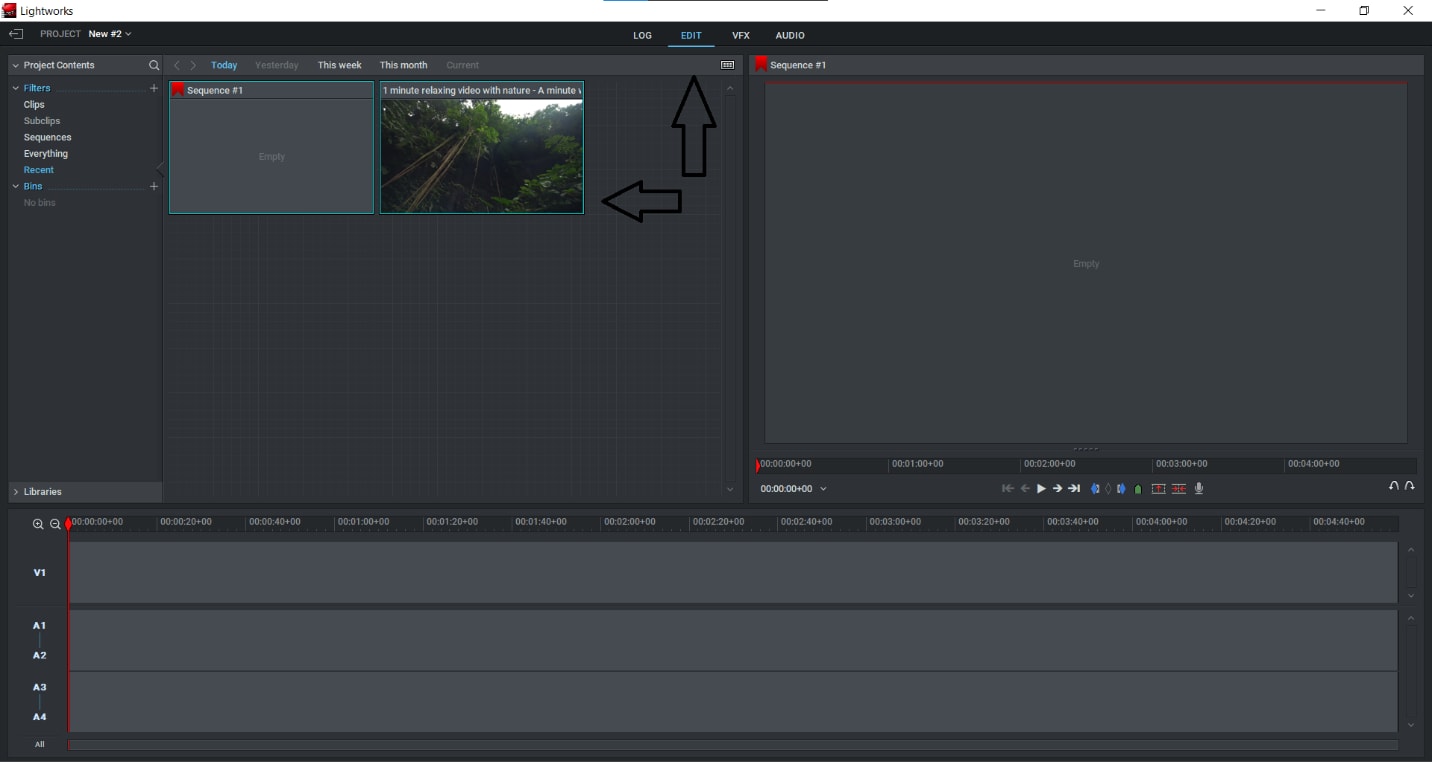
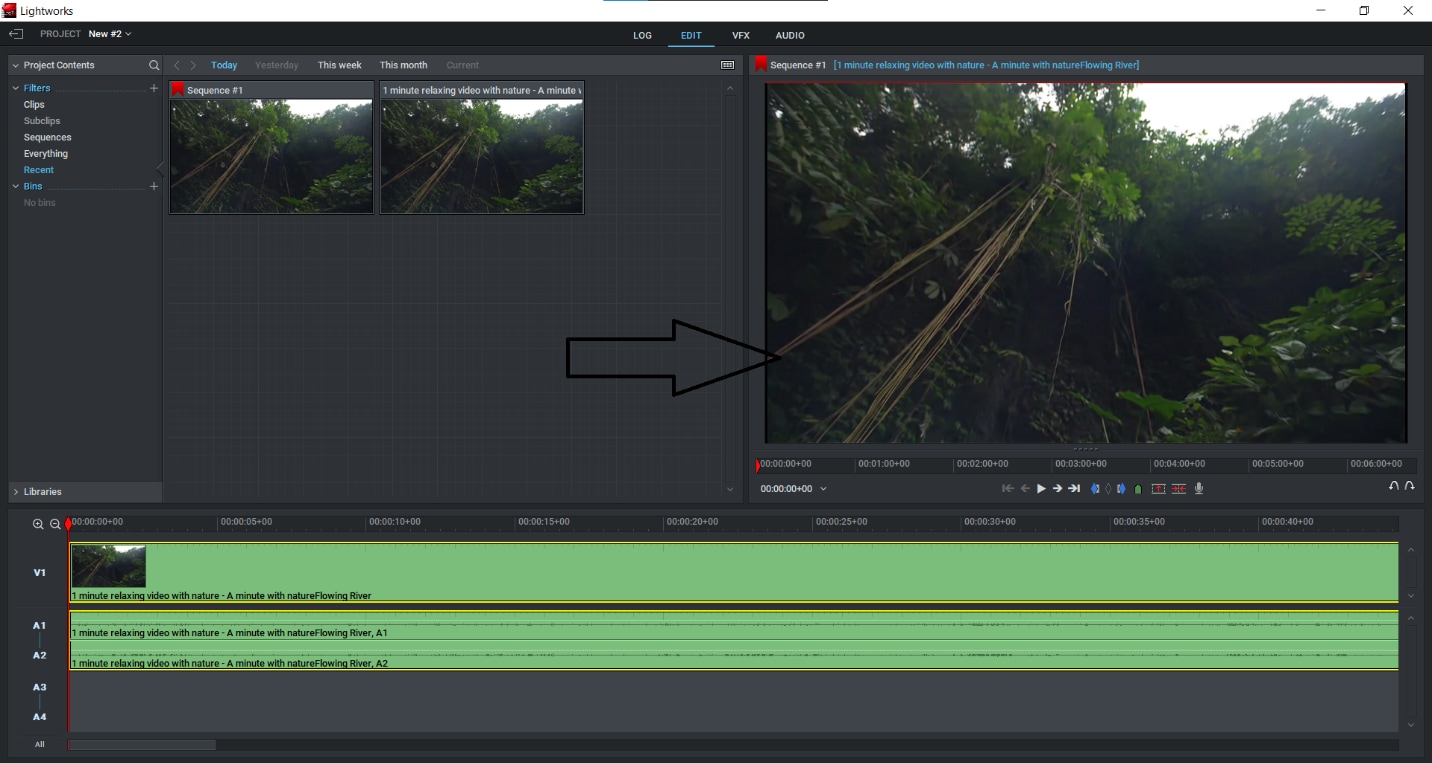
Step 1: First and foremost, you must import your movie into Lightworks. The simplest way to do this is to drag the clip you wish to work with onto the timeline:
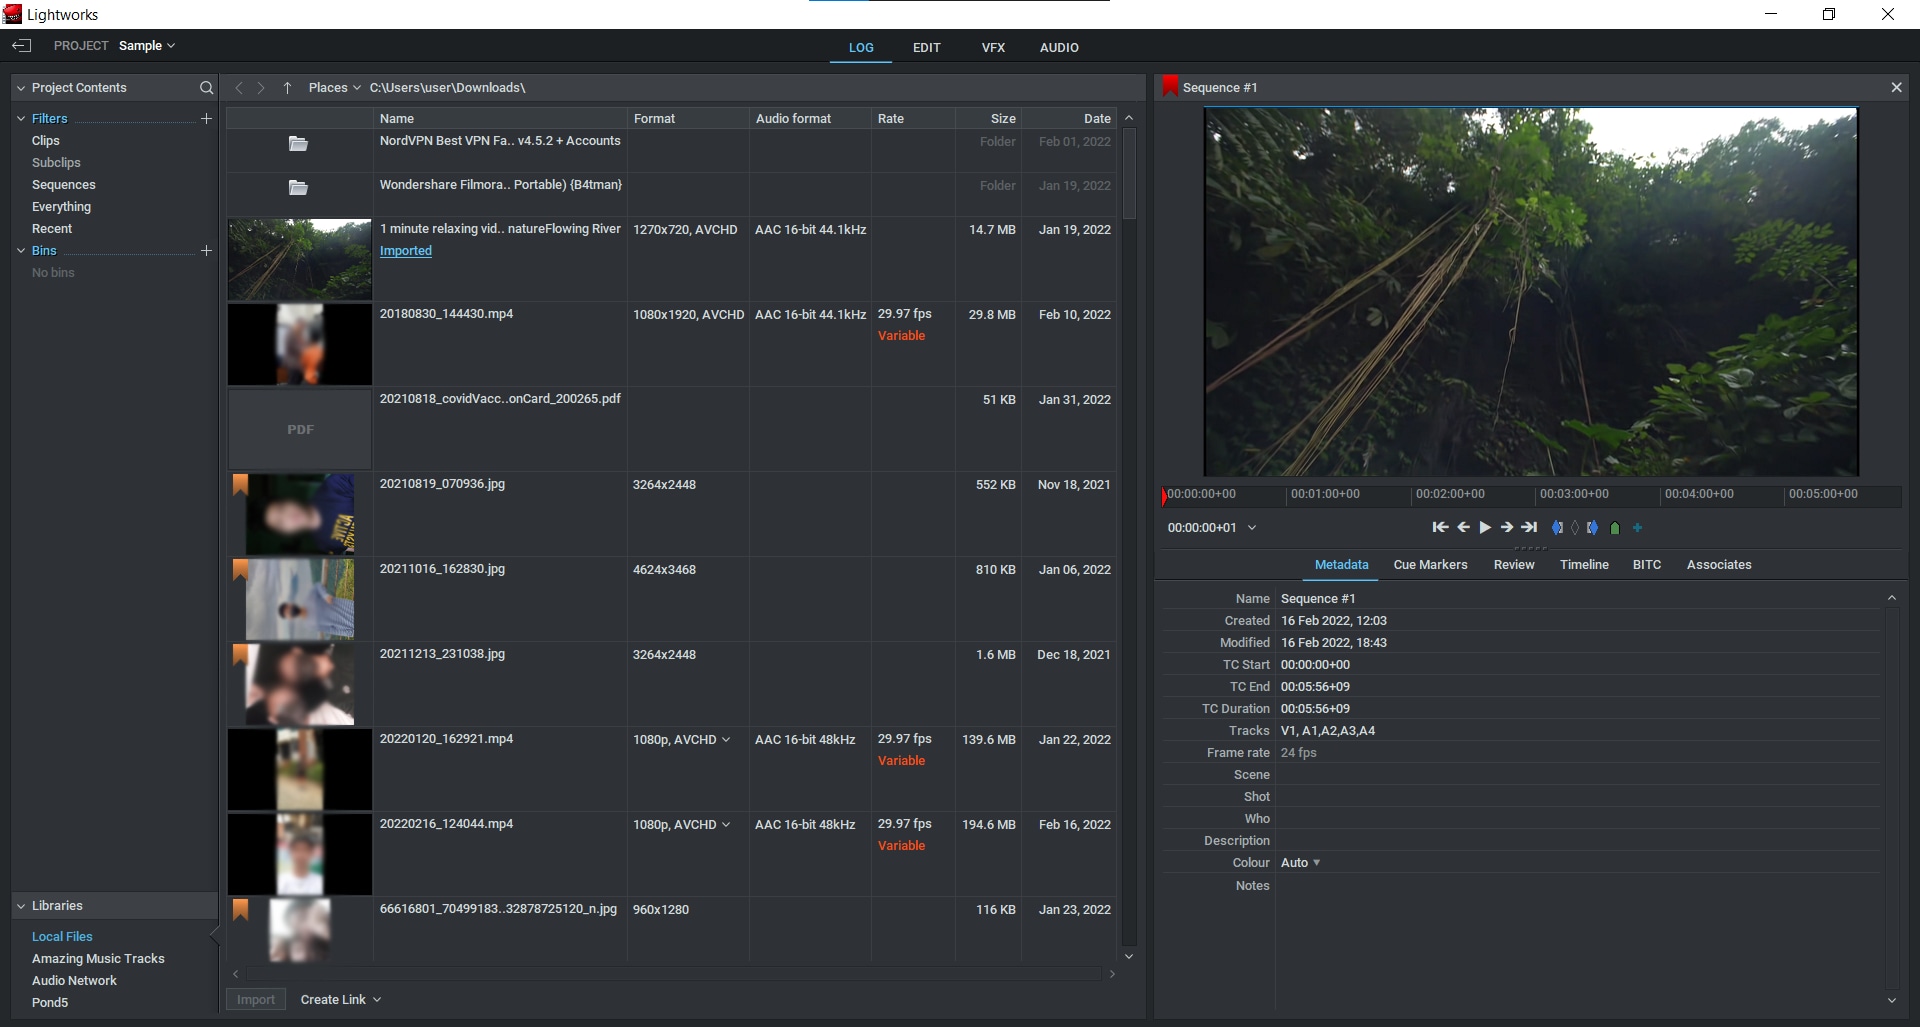
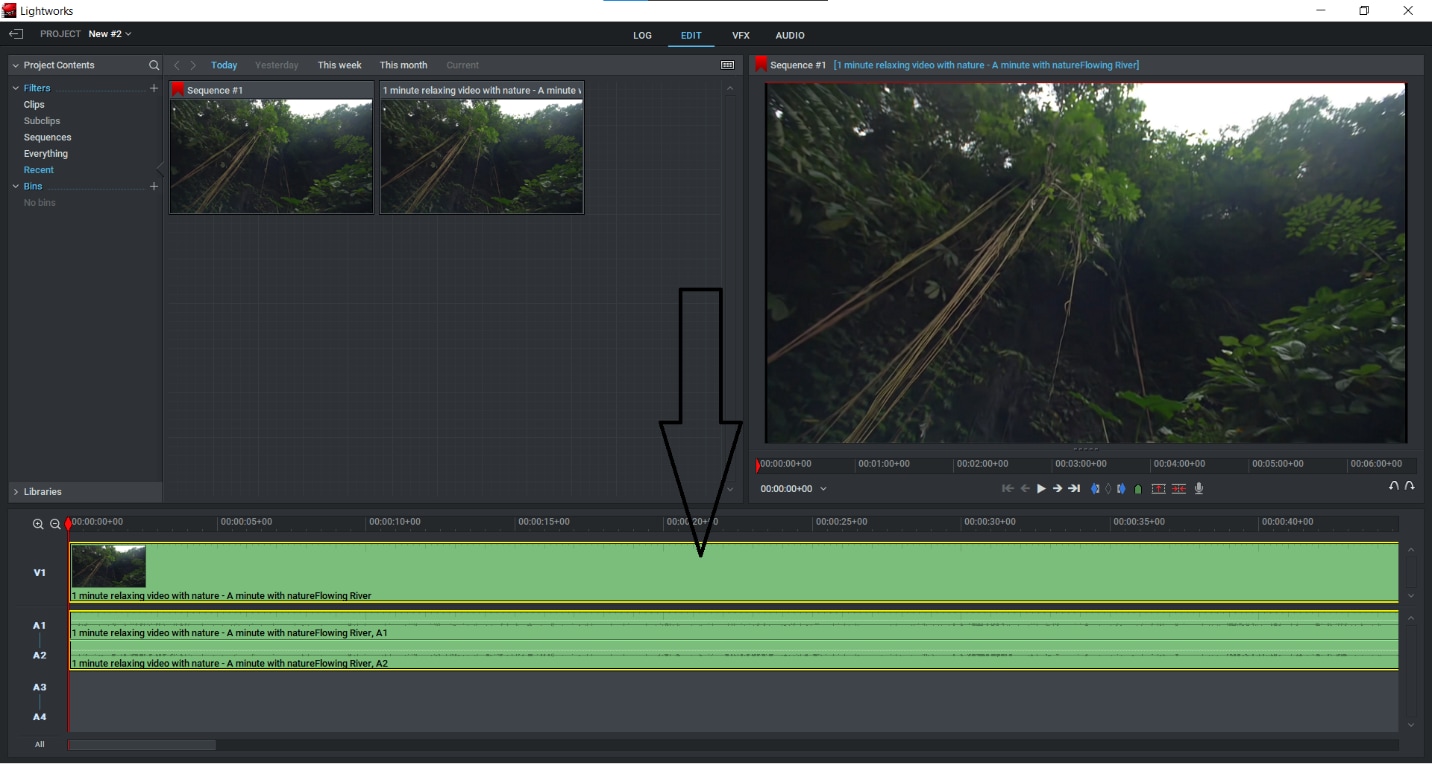
Step 2: After you’ve uploaded your clips to the timeline, you’ll be able to begin trimming them. To do so, simply slide the play head to the point where you wish to cut the clip and press the “C” key on your keyboard:
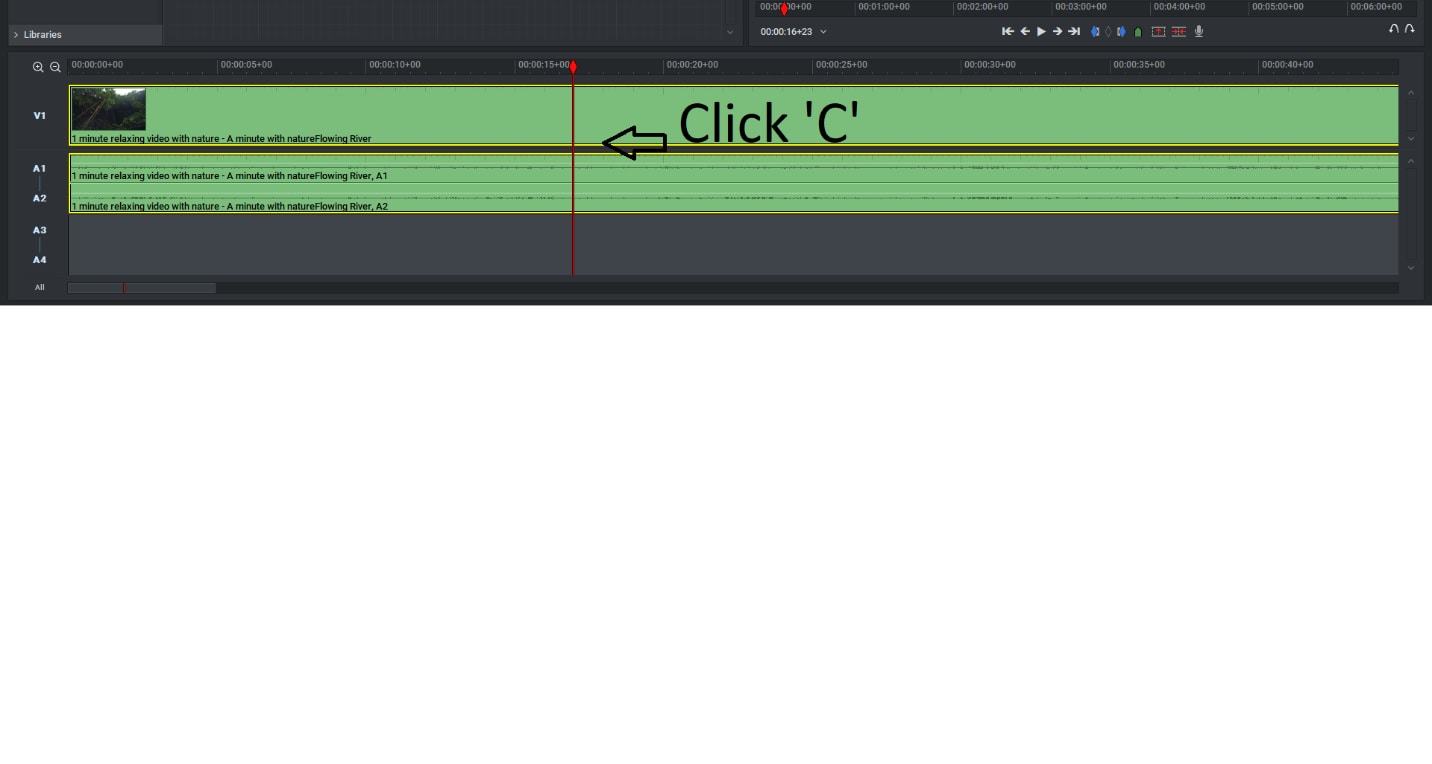
Step 3: After you’ve cut the part you need, you’ll need to erase the rest. To do so, use your mouse to select the part you don’t want to erase, then use your mouse to pick the “Delete” option, or just click the “delete” button on your keyboard:
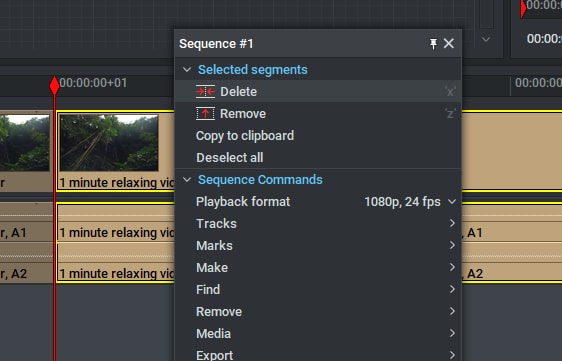
Step 4: When you’re finished, right-click the “ALL” option in the lower-left corner of the Timeline and select “Export” from the menu that appears:
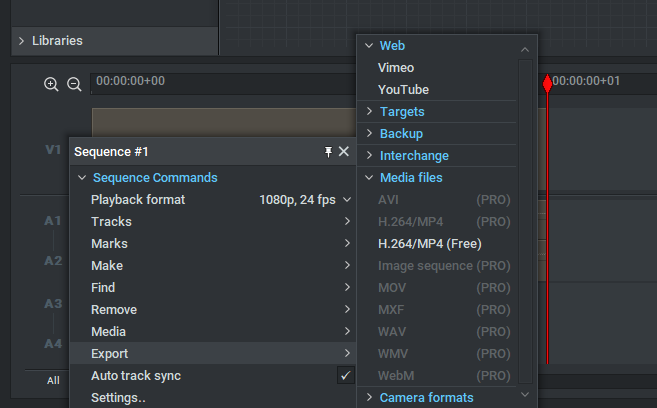
And that is how to use Lightworks video editing software to cut and trim a clip, which is a very fundamental component of video editing and one of the simplest tasks to undertake. So, I hope you’ve learned how to chop and trim a video after reading this article.
Exporting a Finished Video
Lightworks is a video editing software that has been used in Hollywood since the 1990s. It’s an open-source program, which means it’s free to download and use for anyone who wants a powerful video editing tool.
To export your video, you’ll need to save it in one of the formats that Lightworks supports. Your options include AVI, MPEG-1/2/4, MOV, DIVX1/2/3, WMV9, MKV or another supported format.
Once you’ve saved your video file in one of these formats, you can upload it to YouTube or Facebook from within Lightworks to share with friends and family immediately!
Learning how to cut videos in Lightworks is an invaluable skill for any filmmaker. The software can be used to edit footage captured by professionals or amateurs alike, so it’s very versatile for what you need. Today, we are going to show you how to get started cutting videos in Lightworks. But there’s other way to do it, and it is using Filmora.
An easier way to cut videos using Filmora
Filmora Video Editor is an intuitive video editor that allows you to cut and resize videos with just a few clicks of your mouse. Whether you’re looking to edit the length of your footage or change the aspect ratio, Filmora has you covered!
For Win 7 or later (64-bit)
For macOS 10.14 or later
Step by Step on How to Cut Videos using Filmora
Step 1: There are a few ways to start this process. The first way is to go to File and click Import Media.
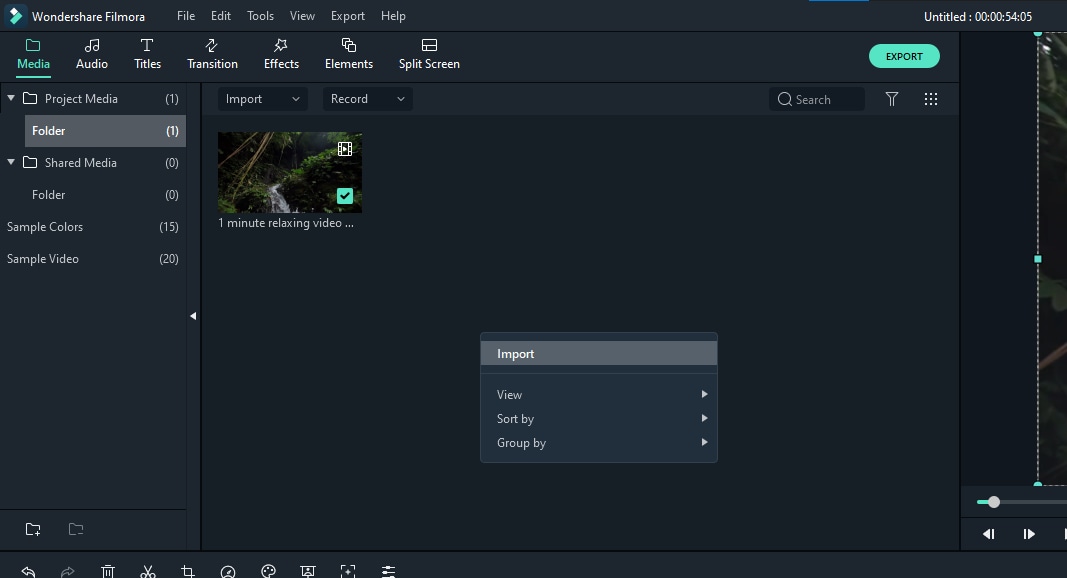
Step 2: This will open up a window where you can choose files from your computer or browse for them on the internet.
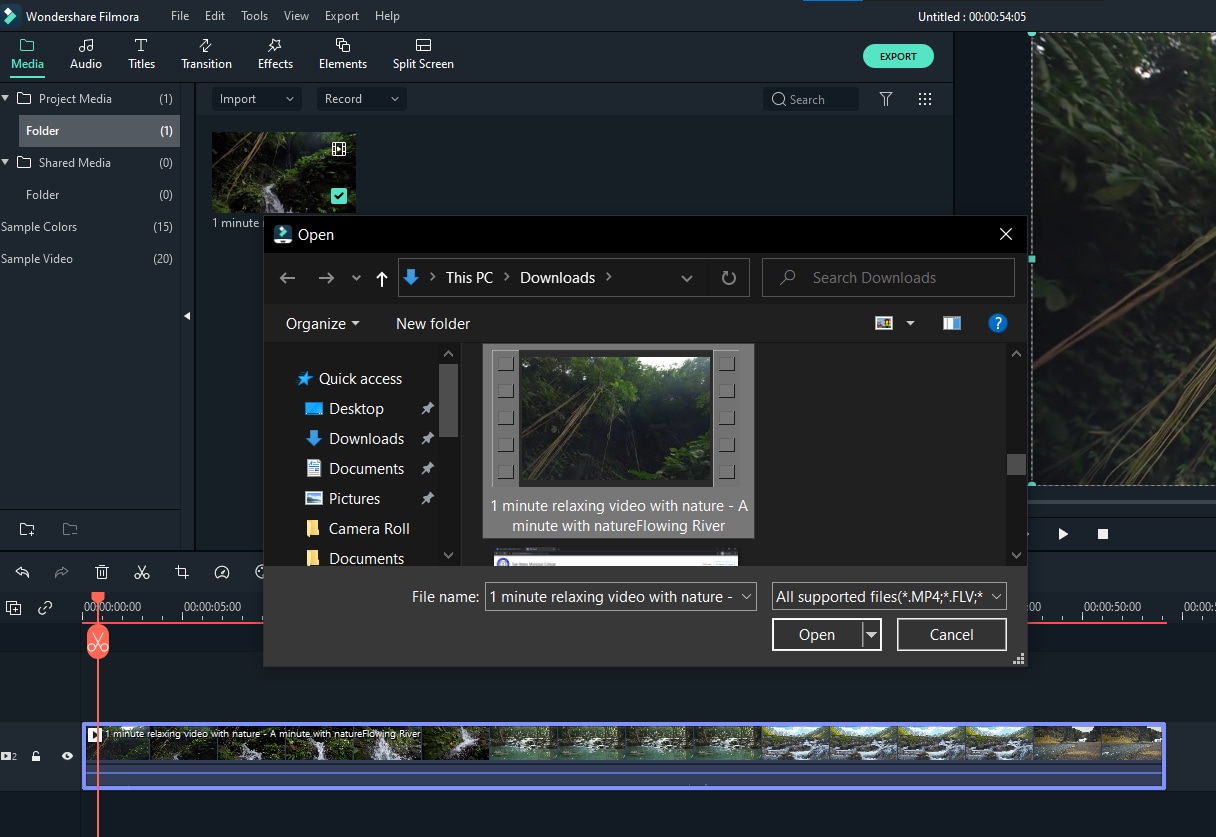
Step 3: The second way is to click the video icon in the left toolbar, then import the video from your camera roll or select from your file directory.
Step 4: Once you have selected a video, click OK and Filmora will start importing it.
Step 5: In order to cut a video, select a section of the timeline by clicking on it with your mouse. You can then move it around by dragging it back and forth along the timeline until you’ve created an appropriate cut point. Selecting a cut point is as easy as clicking and dragging on the time bar on the right side of the screen, which will let you set precise points of cuts anywhere in your video timeline!

Step 6: Once you’ve selected a cut point, click the scissor-like icon in the middle of the bar. After that, choose right-click on the left or right section, depending on what part you wanted to cut, of the time bar. Then, delete.
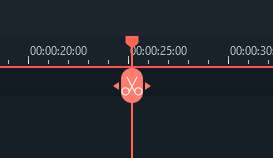
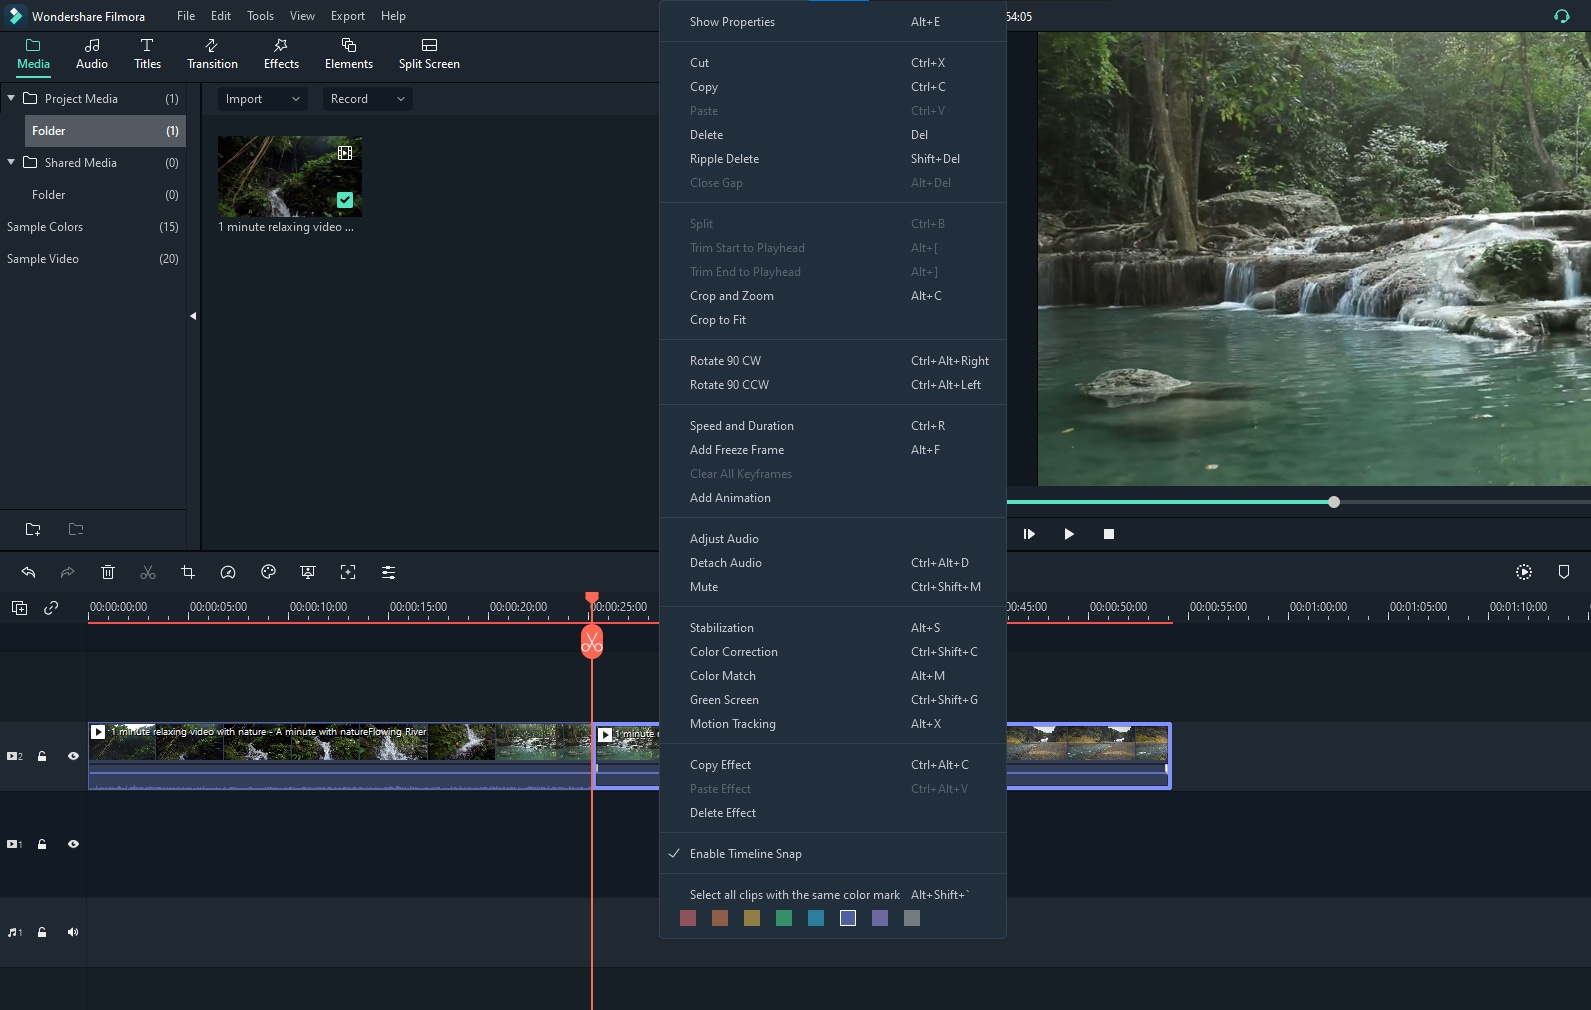
Step 7: You can repeat these steps in order to cut any videos. Then, save the project by clicking ctrl + s or exporting the video.
Conclusion
Cutting Videos is easier with the right knowledge. Filmora and Lightworks allow you to edit your videos and both are beginner-friendly.
The Toolbar is located at the top of all four windows and gives quick access to commonly used features like adding clips, cropping, cutting clips, and more.

The Edit List Window displays all of the clips that are available for use in your Project Window or Timeline. They’re not ordered chronologically; they’re ordered by how they were imported into Lightworks.

The Timeline Window displays a list of edited scenes from your edited project for viewing purposes only - it does not contain anything about editing or timeline manipulation tasks.

The Monitor Window displays information about what’s being displayed on screen at any given time. It can be used to preview videos before exporting them, previous scenes from the timeline, or rendered video frames after applying render effects.

Step by Step in Cutting Videos in Lightworks
It’s not difficult to cut or divide a clip in Lightworks, and it doesn’t require a lot of time or effort. The following are the simple actions you’ll need to do to get started:
Step 1: First and foremost, you must import your movie into Lightworks. The simplest way to do this is to drag the clip you wish to work with onto the timeline:

Step 2: After you’ve uploaded your clips to the timeline, you’ll be able to begin trimming them. To do so, simply slide the play head to the point where you wish to cut the clip and press the “C” key on your keyboard:

Step 3: After you’ve cut the part you need, you’ll need to erase the rest. To do so, use your mouse to select the part you don’t want to erase, then use your mouse to pick the “Delete” option, or just click the “delete” button on your keyboard:

Step 4: When you’re finished, right-click the “ALL” option in the lower-left corner of the Timeline and select “Export” from the menu that appears:

And that is how to use Lightworks video editing software to cut and trim a clip, which is a very fundamental component of video editing and one of the simplest tasks to undertake. So, I hope you’ve learned how to chop and trim a video after reading this article.
Exporting a Finished Video
Lightworks is a video editing software that has been used in Hollywood since the 1990s. It’s an open-source program, which means it’s free to download and use for anyone who wants a powerful video editing tool.
To export your video, you’ll need to save it in one of the formats that Lightworks supports. Your options include AVI, MPEG-1/2/4, MOV, DIVX1/2/3, WMV9, MKV or another supported format.
Once you’ve saved your video file in one of these formats, you can upload it to YouTube or Facebook from within Lightworks to share with friends and family immediately!
Learning how to cut videos in Lightworks is an invaluable skill for any filmmaker. The software can be used to edit footage captured by professionals or amateurs alike, so it’s very versatile for what you need. Today, we are going to show you how to get started cutting videos in Lightworks. But there’s other way to do it, and it is using Filmora.
An easier way to cut videos using Filmora
Filmora Video Editor is an intuitive video editor that allows you to cut and resize videos with just a few clicks of your mouse. Whether you’re looking to edit the length of your footage or change the aspect ratio, Filmora has you covered!
For Win 7 or later (64-bit)
For macOS 10.14 or later
Step by Step on How to Cut Videos using Filmora
Step 1: There are a few ways to start this process. The first way is to go to File and click Import Media.

Step 2: This will open up a window where you can choose files from your computer or browse for them on the internet.

Step 3: The second way is to click the video icon in the left toolbar, then import the video from your camera roll or select from your file directory.
Step 4: Once you have selected a video, click OK and Filmora will start importing it.
Step 5: In order to cut a video, select a section of the timeline by clicking on it with your mouse. You can then move it around by dragging it back and forth along the timeline until you’ve created an appropriate cut point. Selecting a cut point is as easy as clicking and dragging on the time bar on the right side of the screen, which will let you set precise points of cuts anywhere in your video timeline!

Step 6: Once you’ve selected a cut point, click the scissor-like icon in the middle of the bar. After that, choose right-click on the left or right section, depending on what part you wanted to cut, of the time bar. Then, delete.


Step 7: You can repeat these steps in order to cut any videos. Then, save the project by clicking ctrl + s or exporting the video.

Conclusion
Cutting Videos is easier with the right knowledge. Filmora and Lightworks allow you to edit your videos and both are beginner-friendly.
The Toolbar is located at the top of all four windows and gives quick access to commonly used features like adding clips, cropping, cutting clips, and more.

The Edit List Window displays all of the clips that are available for use in your Project Window or Timeline. They’re not ordered chronologically; they’re ordered by how they were imported into Lightworks.

The Timeline Window displays a list of edited scenes from your edited project for viewing purposes only - it does not contain anything about editing or timeline manipulation tasks.

The Monitor Window displays information about what’s being displayed on screen at any given time. It can be used to preview videos before exporting them, previous scenes from the timeline, or rendered video frames after applying render effects.

Step by Step in Cutting Videos in Lightworks
It’s not difficult to cut or divide a clip in Lightworks, and it doesn’t require a lot of time or effort. The following are the simple actions you’ll need to do to get started:
Step 1: First and foremost, you must import your movie into Lightworks. The simplest way to do this is to drag the clip you wish to work with onto the timeline:

Step 2: After you’ve uploaded your clips to the timeline, you’ll be able to begin trimming them. To do so, simply slide the play head to the point where you wish to cut the clip and press the “C” key on your keyboard:

Step 3: After you’ve cut the part you need, you’ll need to erase the rest. To do so, use your mouse to select the part you don’t want to erase, then use your mouse to pick the “Delete” option, or just click the “delete” button on your keyboard:

Step 4: When you’re finished, right-click the “ALL” option in the lower-left corner of the Timeline and select “Export” from the menu that appears:

And that is how to use Lightworks video editing software to cut and trim a clip, which is a very fundamental component of video editing and one of the simplest tasks to undertake. So, I hope you’ve learned how to chop and trim a video after reading this article.
Exporting a Finished Video
Lightworks is a video editing software that has been used in Hollywood since the 1990s. It’s an open-source program, which means it’s free to download and use for anyone who wants a powerful video editing tool.
To export your video, you’ll need to save it in one of the formats that Lightworks supports. Your options include AVI, MPEG-1/2/4, MOV, DIVX1/2/3, WMV9, MKV or another supported format.
Once you’ve saved your video file in one of these formats, you can upload it to YouTube or Facebook from within Lightworks to share with friends and family immediately!
Learning how to cut videos in Lightworks is an invaluable skill for any filmmaker. The software can be used to edit footage captured by professionals or amateurs alike, so it’s very versatile for what you need. Today, we are going to show you how to get started cutting videos in Lightworks. But there’s other way to do it, and it is using Filmora.
An easier way to cut videos using Filmora
Filmora Video Editor is an intuitive video editor that allows you to cut and resize videos with just a few clicks of your mouse. Whether you’re looking to edit the length of your footage or change the aspect ratio, Filmora has you covered!
For Win 7 or later (64-bit)
For macOS 10.14 or later
Step by Step on How to Cut Videos using Filmora
Step 1: There are a few ways to start this process. The first way is to go to File and click Import Media.

Step 2: This will open up a window where you can choose files from your computer or browse for them on the internet.

Step 3: The second way is to click the video icon in the left toolbar, then import the video from your camera roll or select from your file directory.
Step 4: Once you have selected a video, click OK and Filmora will start importing it.
Step 5: In order to cut a video, select a section of the timeline by clicking on it with your mouse. You can then move it around by dragging it back and forth along the timeline until you’ve created an appropriate cut point. Selecting a cut point is as easy as clicking and dragging on the time bar on the right side of the screen, which will let you set precise points of cuts anywhere in your video timeline!

Step 6: Once you’ve selected a cut point, click the scissor-like icon in the middle of the bar. After that, choose right-click on the left or right section, depending on what part you wanted to cut, of the time bar. Then, delete.


Step 7: You can repeat these steps in order to cut any videos. Then, save the project by clicking ctrl + s or exporting the video.

Conclusion
Cutting Videos is easier with the right knowledge. Filmora and Lightworks allow you to edit your videos and both are beginner-friendly.
The Toolbar is located at the top of all four windows and gives quick access to commonly used features like adding clips, cropping, cutting clips, and more.

The Edit List Window displays all of the clips that are available for use in your Project Window or Timeline. They’re not ordered chronologically; they’re ordered by how they were imported into Lightworks.

The Timeline Window displays a list of edited scenes from your edited project for viewing purposes only - it does not contain anything about editing or timeline manipulation tasks.

The Monitor Window displays information about what’s being displayed on screen at any given time. It can be used to preview videos before exporting them, previous scenes from the timeline, or rendered video frames after applying render effects.

Step by Step in Cutting Videos in Lightworks
It’s not difficult to cut or divide a clip in Lightworks, and it doesn’t require a lot of time or effort. The following are the simple actions you’ll need to do to get started:
Step 1: First and foremost, you must import your movie into Lightworks. The simplest way to do this is to drag the clip you wish to work with onto the timeline:

Step 2: After you’ve uploaded your clips to the timeline, you’ll be able to begin trimming them. To do so, simply slide the play head to the point where you wish to cut the clip and press the “C” key on your keyboard:

Step 3: After you’ve cut the part you need, you’ll need to erase the rest. To do so, use your mouse to select the part you don’t want to erase, then use your mouse to pick the “Delete” option, or just click the “delete” button on your keyboard:

Step 4: When you’re finished, right-click the “ALL” option in the lower-left corner of the Timeline and select “Export” from the menu that appears:

And that is how to use Lightworks video editing software to cut and trim a clip, which is a very fundamental component of video editing and one of the simplest tasks to undertake. So, I hope you’ve learned how to chop and trim a video after reading this article.
Exporting a Finished Video
Lightworks is a video editing software that has been used in Hollywood since the 1990s. It’s an open-source program, which means it’s free to download and use for anyone who wants a powerful video editing tool.
To export your video, you’ll need to save it in one of the formats that Lightworks supports. Your options include AVI, MPEG-1/2/4, MOV, DIVX1/2/3, WMV9, MKV or another supported format.
Once you’ve saved your video file in one of these formats, you can upload it to YouTube or Facebook from within Lightworks to share with friends and family immediately!
Learning how to cut videos in Lightworks is an invaluable skill for any filmmaker. The software can be used to edit footage captured by professionals or amateurs alike, so it’s very versatile for what you need. Today, we are going to show you how to get started cutting videos in Lightworks. But there’s other way to do it, and it is using Filmora.
An easier way to cut videos using Filmora
Filmora Video Editor is an intuitive video editor that allows you to cut and resize videos with just a few clicks of your mouse. Whether you’re looking to edit the length of your footage or change the aspect ratio, Filmora has you covered!
For Win 7 or later (64-bit)
For macOS 10.14 or later
Step by Step on How to Cut Videos using Filmora
Step 1: There are a few ways to start this process. The first way is to go to File and click Import Media.

Step 2: This will open up a window where you can choose files from your computer or browse for them on the internet.

Step 3: The second way is to click the video icon in the left toolbar, then import the video from your camera roll or select from your file directory.
Step 4: Once you have selected a video, click OK and Filmora will start importing it.
Step 5: In order to cut a video, select a section of the timeline by clicking on it with your mouse. You can then move it around by dragging it back and forth along the timeline until you’ve created an appropriate cut point. Selecting a cut point is as easy as clicking and dragging on the time bar on the right side of the screen, which will let you set precise points of cuts anywhere in your video timeline!

Step 6: Once you’ve selected a cut point, click the scissor-like icon in the middle of the bar. After that, choose right-click on the left or right section, depending on what part you wanted to cut, of the time bar. Then, delete.


Step 7: You can repeat these steps in order to cut any videos. Then, save the project by clicking ctrl + s or exporting the video.

Conclusion
Cutting Videos is easier with the right knowledge. Filmora and Lightworks allow you to edit your videos and both are beginner-friendly.
Learn Color Correction in After Effects with These YouTube Videos
Create High-Quality Video - Wondershare Filmora
An easy and powerful YouTube video editor
Numerous video and audio effects to choose from
Detailed tutorials provided by the official channel
When it comes to understanding and mastery of information, videos are always the best. Research carried out by Wyzwol, a marketing research institute, states that 68% of people like to learn about services through videos.
Color correction in After Effects involves a wide range of tools, including Lumetri color, Hue saturation, and RGB curves. It involves extensive reading and interpretation of graphs and histograms – A thing not for the faint-hearted. To better your understanding of color correction in After Effects, you not only need to rely on blogs but also videos. Therefore from this article, you will learn about color correction in After Effects with videos.
Let’s dive in!
In this article
01 What is Color Correction in After Effects
02 Learn Color Correction in After Effects with These Videos
What is Color Correction in After Effects
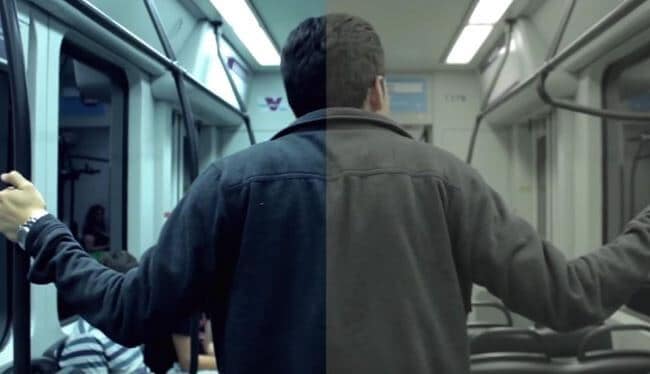
Color correction is a functionality feature in Adobe After effects that fixes all the color complications in an image or a video. This functionality feature alters a clip of footage to match a constant appearance.
Most colorists and editors use After Effects to adjust color, saturation, and contrast in clips that look unreal and make them appear natural and unprocessed.
When you want to color correct your footage, you first need to establish your video clip and then determine the colors needs for your clip. With this, color grading will become an absolute breeze for you.
Learn Color Correction in After Effects with These Videos
1. Pro Tip - Cinematic Color Grade in After Effects - After Effects Tutorial by Dope Motions
One of the top-notch videos we will use to learn color correcting is one produced by Dope Motions. Dope Motions is a YouTube channel that is managed by Nick Pawar. Nick creates high-quality graphics and VFX tutorials where he shares insightful ideas on how to carry out various cinematic edits to videos – This includes color correction.
In this video, Nick gives his voice on color grid videos giving it that cinematic look with much ease. His method is relatively simpler since one need not use plugins to do color correction. Though it is much easier to carry out color correction with plugins, Nick emphasizes more on color correction without plugins since you will be able to extensively customize your video based on your preference.
In this video, Nick spotlights various topics, including how to use lumetri color, color correction, cinematic color grading, how to make presets, color effects, among many more. All in After Effects.
Besides, with these techniques, you cannot not only use color correction in After Effects but also in premiere pro. Beginners, as well as intermediate video editors, will significantly benefit from this exemplary video. Learn from Nick and create splendid videos that will leave your clients and viewers all rooted to the ground.
2. Create a Cinematic Look with After Effects Tricks! by Kriscoart
Another enlightening video that talks about color correction in After Effect are this one from Kriscoart. Kriscoart is a fast-growing YouTube channel developed by managed by Kris Truini. Some of the core values of this channel are to learn, create and share content. From his channel, Truini does not centralize his focus to only video editing; he goes to the extremes of edifying on VFX tutorials, lighting workshops, and short film breakdowns.
In this video, Truini shares some simple tricks with his subscribers as well as new visitors on how to carry out a color correction in After Effects. He elaborates on manipulating lights and adding dramatic atmospheres and cinematic looks to your video shots by using some simple masks, solids, and adjustment layers.
Truini uses the project he is working on to flesh out various color correction tools and how to put them into use authentically. He targets not only beginner video editors but also intermediate ones who are looking forward to increasing their skill set.
Through his YouTube channels, Truini aims at educating the masses so that they can be well conversant with most of the video editing tools. He wants the voice of every filmmaker and prospective to be heard by their prospective audiences.
3. Advanced Color Grading in After Effects - NO PLUGINS by the VFX Show
Color correcting and Color grading without plugins is something that is a back-breaking activity to beginner video editors. Here, Collin Black of @ The VFX Show tends to break that misconception. Collin Black, the manager of The VFX Show, teaches his subscribers and new visitors to his channel how to carry out color correction without necessarily using plugins.
Collin Black states that even though plugins are very easy to use in color correction, you cannot carry out a wide range of customizable activities. It makes color correction without plugins be something to use to create neck-breaking video clips.
In this video, Collin uses a photo that he took while driving. The image appears to be faulty with lousy lighting. He uses a wide range of tools while elaborating every single step. When compared to the start, the final result of his work can be said to be “something out of this world.”
The target audience is beginner video editors with the zeal and zest of learning and wanting to get to know more about color correction without plugins.
4. Easy Colour Correction - After Effects Tutorial by DM Design
Are there scenarios where you come across a simple-looking video clip that is perfectly edited with ideal visual colors and has a sensational cinematic appearance? Debra Mayer, the founder, and owner of DM Designs, a renowned YouTube channel, simplify the processes required to get stunning videos.
Debra Mayer, in her YouTube channel, does all in her powers to teach all the Adobe techniques. She simplifies it and makes every single step to be somewhat relatable. In her channel, she does say much but expounds on tons of tools and activities.
Debra uses footage of a deserted land occupied by trees and grassland in this video. Everything in the picture looks dull and dusty. Debra expounds on how to create some cinematic appearance on clips with straightforward steps. Her after video appears to be something unreal due to extensive editing.
Her target audience for this video is beginner video editors. She can explain color correction in the easiest way possible from her immerse skillset. With that, beginner editors will significantly benefit from it.
5. Make Cinematic Looks with After Effects Color Correction Tricks! by Black Mixture
Paying for the After Effects subscription and again paying for color correction is something most people cannot wish to do. Even though you are not good at color correction, you need to stress yourself since Nate and Chriselle of Black Mixture will make things easy for you. Black Mixture is a YouTube account managed by Nate and Chriselle, a couple. In their channel, they expound on topics surrounding filmmaking, graphic design, motion design, and photography.
In this video, Nate elaborates on various steps on how to carry out a color correction in Adobe After Effects without plugins. He even goes to the extent of showing how to add music video effects as well as cinematic effects.
Nate uniquely uses only three color correction effects to carry out all the color correction needed to his footage – A super-fast driving car on a highway – And comes up with stunning results. He uses various customizable Adobe Effects settings such as hue, contrast, saturation.
Furthermore, Nate explains how to interpret and use histograms and graphs in adjusting various customizable settings. He also emphasizes the glow, a unique functionality feature that alters the lighting of clips to make his background appear super cool. Most editors do not commonly use glow, but it creates outstanding videos when used.
Nate does not only target beginner video editors but also intermediate ones. There is something new that intermediate editors will also learn.
6. Color Correction in After Effects - Tutorial by Kenneth Moore
This is the last YouTube video that we are going to learn about color correcting from. It is a video produced by Kenneth Moore, A prime owner of Kenneth Moore’s YouTube Channel. Even though his channel, Kenneth Moore channel, is still on the grow, he straightforwardly brought out every step to carry out when doing color correction in After Effects.
In this video, Moore uses a shot of a drown to elaborate color correction. The initial footage appears to be dull with indistinct features. With the color corrections tools, Moore is able to liven the footage giving it that outstanding look.
Moore unfolds on how to use various functionality tools in After Effects. In his video, he incorporates contrast, curves, RGB Parade, color balancing, color wheels, Vectorscope, and HSL Secondary functionalities. He used another footage, a car, to elaborate on HSL secondary.
In the video, Moore targets beginner and intermediate video editors to throw light on other color correction functionalities that video editors need to learn.
Conclusion
● Supplement your reading about color correction in After Effects with these videos. The above six videos evidently explain how to carry out a color correction in Adobe After Effects with ease. The videos are created with established producers and video editors; therefore they give professional insights and teachings.
● Color correction in After Effects should no longer stress you out. All you have to do is watch any of the above videos, or you can watch all of them and have a better grip of color correction. You will be able to create exceptional footage.
When it comes to understanding and mastery of information, videos are always the best. Research carried out by Wyzwol, a marketing research institute, states that 68% of people like to learn about services through videos.
Color correction in After Effects involves a wide range of tools, including Lumetri color, Hue saturation, and RGB curves. It involves extensive reading and interpretation of graphs and histograms – A thing not for the faint-hearted. To better your understanding of color correction in After Effects, you not only need to rely on blogs but also videos. Therefore from this article, you will learn about color correction in After Effects with videos.
Let’s dive in!

In this article
01 What is Color Correction in After Effects
02 Learn Color Correction in After Effects with These Videos
What is Color Correction in After Effects
Color correction is a functionality feature in Adobe After effects that fixes all the color complications in an image or a video. This functionality feature alters a clip of footage to match a constant appearance.
Most colorists and editors use After Effects to adjust color, saturation, and contrast in clips that look unreal and make them appear natural and unprocessed.
When you want to color correct your footage, you first need to establish your video clip and then determine the colors needs for your clip. With this, color grading will become an absolute breeze for you.
Learn Color Correction in After Effects with These Videos
1. Pro Tip - Cinematic Color Grade in After Effects - After Effects Tutorial by Dope Motions
One of the top-notch videos we will use to learn color correcting is one produced by Dope Motions. Dope Motions is a YouTube channel that is managed by Nick Pawar. Nick creates high-quality graphics and VFX tutorials where he shares insightful ideas on how to carry out various cinematic edits to videos – This includes color correction.
In this video, Nick gives his voice on color grid videos giving it that cinematic look with much ease. His method is relatively simpler since one need not use plugins to do color correction. Though it is much easier to carry out color correction with plugins, Nick emphasizes more on color correction without plugins since you will be able to extensively customize your video based on your preference.
In this video, Nick spotlights various topics, including how to use lumetri color, color correction, cinematic color grading, how to make presets, color effects, among many more. All in After Effects.
Besides, with these techniques, you cannot not only use color correction in After Effects but also in premiere pro. Beginners, as well as intermediate video editors, will significantly benefit from this exemplary video. Learn from Nick and create splendid videos that will leave your clients and viewers all rooted to the ground.
2. Create a Cinematic Look with After Effects Tricks! by Kriscoart
Another enlightening video that talks about color correction in After Effect are this one from Kriscoart. Kriscoart is a fast-growing YouTube channel developed by managed by Kris Truini. Some of the core values of this channel are to learn, create and share content. From his channel, Truini does not centralize his focus to only video editing; he goes to the extremes of edifying on VFX tutorials, lighting workshops, and short film breakdowns.
In this video, Truini shares some simple tricks with his subscribers as well as new visitors on how to carry out a color correction in After Effects. He elaborates on manipulating lights and adding dramatic atmospheres and cinematic looks to your video shots by using some simple masks, solids, and adjustment layers.
Truini uses the project he is working on to flesh out various color correction tools and how to put them into use authentically. He targets not only beginner video editors but also intermediate ones who are looking forward to increasing their skill set.
Through his YouTube channels, Truini aims at educating the masses so that they can be well conversant with most of the video editing tools. He wants the voice of every filmmaker and prospective to be heard by their prospective audiences.
3. Advanced Color Grading in After Effects - NO PLUGINS by the VFX Show
Color correcting and Color grading without plugins is something that is a back-breaking activity to beginner video editors. Here, Collin Black of @ The VFX Show tends to break that misconception. Collin Black, the manager of The VFX Show, teaches his subscribers and new visitors to his channel how to carry out color correction without necessarily using plugins.
Collin Black states that even though plugins are very easy to use in color correction, you cannot carry out a wide range of customizable activities. It makes color correction without plugins be something to use to create neck-breaking video clips.
In this video, Collin uses a photo that he took while driving. The image appears to be faulty with lousy lighting. He uses a wide range of tools while elaborating every single step. When compared to the start, the final result of his work can be said to be “something out of this world.”
The target audience is beginner video editors with the zeal and zest of learning and wanting to get to know more about color correction without plugins.
4. Easy Colour Correction - After Effects Tutorial by DM Design
Are there scenarios where you come across a simple-looking video clip that is perfectly edited with ideal visual colors and has a sensational cinematic appearance? Debra Mayer, the founder, and owner of DM Designs, a renowned YouTube channel, simplify the processes required to get stunning videos.
Debra Mayer, in her YouTube channel, does all in her powers to teach all the Adobe techniques. She simplifies it and makes every single step to be somewhat relatable. In her channel, she does say much but expounds on tons of tools and activities.
Debra uses footage of a deserted land occupied by trees and grassland in this video. Everything in the picture looks dull and dusty. Debra expounds on how to create some cinematic appearance on clips with straightforward steps. Her after video appears to be something unreal due to extensive editing.
Her target audience for this video is beginner video editors. She can explain color correction in the easiest way possible from her immerse skillset. With that, beginner editors will significantly benefit from it.
5. Make Cinematic Looks with After Effects Color Correction Tricks! by Black Mixture
Paying for the After Effects subscription and again paying for color correction is something most people cannot wish to do. Even though you are not good at color correction, you need to stress yourself since Nate and Chriselle of Black Mixture will make things easy for you. Black Mixture is a YouTube account managed by Nate and Chriselle, a couple. In their channel, they expound on topics surrounding filmmaking, graphic design, motion design, and photography.
In this video, Nate elaborates on various steps on how to carry out a color correction in Adobe After Effects without plugins. He even goes to the extent of showing how to add music video effects as well as cinematic effects.
Nate uniquely uses only three color correction effects to carry out all the color correction needed to his footage – A super-fast driving car on a highway – And comes up with stunning results. He uses various customizable Adobe Effects settings such as hue, contrast, saturation.
Furthermore, Nate explains how to interpret and use histograms and graphs in adjusting various customizable settings. He also emphasizes the glow, a unique functionality feature that alters the lighting of clips to make his background appear super cool. Most editors do not commonly use glow, but it creates outstanding videos when used.
Nate does not only target beginner video editors but also intermediate ones. There is something new that intermediate editors will also learn.
6. Color Correction in After Effects - Tutorial by Kenneth Moore
This is the last YouTube video that we are going to learn about color correcting from. It is a video produced by Kenneth Moore, A prime owner of Kenneth Moore’s YouTube Channel. Even though his channel, Kenneth Moore channel, is still on the grow, he straightforwardly brought out every step to carry out when doing color correction in After Effects.
In this video, Moore uses a shot of a drown to elaborate color correction. The initial footage appears to be dull with indistinct features. With the color corrections tools, Moore is able to liven the footage giving it that outstanding look.
Moore unfolds on how to use various functionality tools in After Effects. In his video, he incorporates contrast, curves, RGB Parade, color balancing, color wheels, Vectorscope, and HSL Secondary functionalities. He used another footage, a car, to elaborate on HSL secondary.
In the video, Moore targets beginner and intermediate video editors to throw light on other color correction functionalities that video editors need to learn.
Conclusion
● Supplement your reading about color correction in After Effects with these videos. The above six videos evidently explain how to carry out a color correction in Adobe After Effects with ease. The videos are created with established producers and video editors; therefore they give professional insights and teachings.
● Color correction in After Effects should no longer stress you out. All you have to do is watch any of the above videos, or you can watch all of them and have a better grip of color correction. You will be able to create exceptional footage.
When it comes to understanding and mastery of information, videos are always the best. Research carried out by Wyzwol, a marketing research institute, states that 68% of people like to learn about services through videos.
Color correction in After Effects involves a wide range of tools, including Lumetri color, Hue saturation, and RGB curves. It involves extensive reading and interpretation of graphs and histograms – A thing not for the faint-hearted. To better your understanding of color correction in After Effects, you not only need to rely on blogs but also videos. Therefore from this article, you will learn about color correction in After Effects with videos.
Let’s dive in!

In this article
01 What is Color Correction in After Effects
02 Learn Color Correction in After Effects with These Videos
What is Color Correction in After Effects
Color correction is a functionality feature in Adobe After effects that fixes all the color complications in an image or a video. This functionality feature alters a clip of footage to match a constant appearance.
Most colorists and editors use After Effects to adjust color, saturation, and contrast in clips that look unreal and make them appear natural and unprocessed.
When you want to color correct your footage, you first need to establish your video clip and then determine the colors needs for your clip. With this, color grading will become an absolute breeze for you.
Learn Color Correction in After Effects with These Videos
1. Pro Tip - Cinematic Color Grade in After Effects - After Effects Tutorial by Dope Motions
One of the top-notch videos we will use to learn color correcting is one produced by Dope Motions. Dope Motions is a YouTube channel that is managed by Nick Pawar. Nick creates high-quality graphics and VFX tutorials where he shares insightful ideas on how to carry out various cinematic edits to videos – This includes color correction.
In this video, Nick gives his voice on color grid videos giving it that cinematic look with much ease. His method is relatively simpler since one need not use plugins to do color correction. Though it is much easier to carry out color correction with plugins, Nick emphasizes more on color correction without plugins since you will be able to extensively customize your video based on your preference.
In this video, Nick spotlights various topics, including how to use lumetri color, color correction, cinematic color grading, how to make presets, color effects, among many more. All in After Effects.
Besides, with these techniques, you cannot not only use color correction in After Effects but also in premiere pro. Beginners, as well as intermediate video editors, will significantly benefit from this exemplary video. Learn from Nick and create splendid videos that will leave your clients and viewers all rooted to the ground.
2. Create a Cinematic Look with After Effects Tricks! by Kriscoart
Another enlightening video that talks about color correction in After Effect are this one from Kriscoart. Kriscoart is a fast-growing YouTube channel developed by managed by Kris Truini. Some of the core values of this channel are to learn, create and share content. From his channel, Truini does not centralize his focus to only video editing; he goes to the extremes of edifying on VFX tutorials, lighting workshops, and short film breakdowns.
In this video, Truini shares some simple tricks with his subscribers as well as new visitors on how to carry out a color correction in After Effects. He elaborates on manipulating lights and adding dramatic atmospheres and cinematic looks to your video shots by using some simple masks, solids, and adjustment layers.
Truini uses the project he is working on to flesh out various color correction tools and how to put them into use authentically. He targets not only beginner video editors but also intermediate ones who are looking forward to increasing their skill set.
Through his YouTube channels, Truini aims at educating the masses so that they can be well conversant with most of the video editing tools. He wants the voice of every filmmaker and prospective to be heard by their prospective audiences.
3. Advanced Color Grading in After Effects - NO PLUGINS by the VFX Show
Color correcting and Color grading without plugins is something that is a back-breaking activity to beginner video editors. Here, Collin Black of @ The VFX Show tends to break that misconception. Collin Black, the manager of The VFX Show, teaches his subscribers and new visitors to his channel how to carry out color correction without necessarily using plugins.
Collin Black states that even though plugins are very easy to use in color correction, you cannot carry out a wide range of customizable activities. It makes color correction without plugins be something to use to create neck-breaking video clips.
In this video, Collin uses a photo that he took while driving. The image appears to be faulty with lousy lighting. He uses a wide range of tools while elaborating every single step. When compared to the start, the final result of his work can be said to be “something out of this world.”
The target audience is beginner video editors with the zeal and zest of learning and wanting to get to know more about color correction without plugins.
4. Easy Colour Correction - After Effects Tutorial by DM Design
Are there scenarios where you come across a simple-looking video clip that is perfectly edited with ideal visual colors and has a sensational cinematic appearance? Debra Mayer, the founder, and owner of DM Designs, a renowned YouTube channel, simplify the processes required to get stunning videos.
Debra Mayer, in her YouTube channel, does all in her powers to teach all the Adobe techniques. She simplifies it and makes every single step to be somewhat relatable. In her channel, she does say much but expounds on tons of tools and activities.
Debra uses footage of a deserted land occupied by trees and grassland in this video. Everything in the picture looks dull and dusty. Debra expounds on how to create some cinematic appearance on clips with straightforward steps. Her after video appears to be something unreal due to extensive editing.
Her target audience for this video is beginner video editors. She can explain color correction in the easiest way possible from her immerse skillset. With that, beginner editors will significantly benefit from it.
5. Make Cinematic Looks with After Effects Color Correction Tricks! by Black Mixture
Paying for the After Effects subscription and again paying for color correction is something most people cannot wish to do. Even though you are not good at color correction, you need to stress yourself since Nate and Chriselle of Black Mixture will make things easy for you. Black Mixture is a YouTube account managed by Nate and Chriselle, a couple. In their channel, they expound on topics surrounding filmmaking, graphic design, motion design, and photography.
In this video, Nate elaborates on various steps on how to carry out a color correction in Adobe After Effects without plugins. He even goes to the extent of showing how to add music video effects as well as cinematic effects.
Nate uniquely uses only three color correction effects to carry out all the color correction needed to his footage – A super-fast driving car on a highway – And comes up with stunning results. He uses various customizable Adobe Effects settings such as hue, contrast, saturation.
Furthermore, Nate explains how to interpret and use histograms and graphs in adjusting various customizable settings. He also emphasizes the glow, a unique functionality feature that alters the lighting of clips to make his background appear super cool. Most editors do not commonly use glow, but it creates outstanding videos when used.
Nate does not only target beginner video editors but also intermediate ones. There is something new that intermediate editors will also learn.
6. Color Correction in After Effects - Tutorial by Kenneth Moore
This is the last YouTube video that we are going to learn about color correcting from. It is a video produced by Kenneth Moore, A prime owner of Kenneth Moore’s YouTube Channel. Even though his channel, Kenneth Moore channel, is still on the grow, he straightforwardly brought out every step to carry out when doing color correction in After Effects.
In this video, Moore uses a shot of a drown to elaborate color correction. The initial footage appears to be dull with indistinct features. With the color corrections tools, Moore is able to liven the footage giving it that outstanding look.
Moore unfolds on how to use various functionality tools in After Effects. In his video, he incorporates contrast, curves, RGB Parade, color balancing, color wheels, Vectorscope, and HSL Secondary functionalities. He used another footage, a car, to elaborate on HSL secondary.
In the video, Moore targets beginner and intermediate video editors to throw light on other color correction functionalities that video editors need to learn.
Conclusion
● Supplement your reading about color correction in After Effects with these videos. The above six videos evidently explain how to carry out a color correction in Adobe After Effects with ease. The videos are created with established producers and video editors; therefore they give professional insights and teachings.
● Color correction in After Effects should no longer stress you out. All you have to do is watch any of the above videos, or you can watch all of them and have a better grip of color correction. You will be able to create exceptional footage.
When it comes to understanding and mastery of information, videos are always the best. Research carried out by Wyzwol, a marketing research institute, states that 68% of people like to learn about services through videos.
Color correction in After Effects involves a wide range of tools, including Lumetri color, Hue saturation, and RGB curves. It involves extensive reading and interpretation of graphs and histograms – A thing not for the faint-hearted. To better your understanding of color correction in After Effects, you not only need to rely on blogs but also videos. Therefore from this article, you will learn about color correction in After Effects with videos.
Let’s dive in!

In this article
01 What is Color Correction in After Effects
02 Learn Color Correction in After Effects with These Videos
What is Color Correction in After Effects
Color correction is a functionality feature in Adobe After effects that fixes all the color complications in an image or a video. This functionality feature alters a clip of footage to match a constant appearance.
Most colorists and editors use After Effects to adjust color, saturation, and contrast in clips that look unreal and make them appear natural and unprocessed.
When you want to color correct your footage, you first need to establish your video clip and then determine the colors needs for your clip. With this, color grading will become an absolute breeze for you.
Learn Color Correction in After Effects with These Videos
1. Pro Tip - Cinematic Color Grade in After Effects - After Effects Tutorial by Dope Motions
One of the top-notch videos we will use to learn color correcting is one produced by Dope Motions. Dope Motions is a YouTube channel that is managed by Nick Pawar. Nick creates high-quality graphics and VFX tutorials where he shares insightful ideas on how to carry out various cinematic edits to videos – This includes color correction.
In this video, Nick gives his voice on color grid videos giving it that cinematic look with much ease. His method is relatively simpler since one need not use plugins to do color correction. Though it is much easier to carry out color correction with plugins, Nick emphasizes more on color correction without plugins since you will be able to extensively customize your video based on your preference.
In this video, Nick spotlights various topics, including how to use lumetri color, color correction, cinematic color grading, how to make presets, color effects, among many more. All in After Effects.
Besides, with these techniques, you cannot not only use color correction in After Effects but also in premiere pro. Beginners, as well as intermediate video editors, will significantly benefit from this exemplary video. Learn from Nick and create splendid videos that will leave your clients and viewers all rooted to the ground.
2. Create a Cinematic Look with After Effects Tricks! by Kriscoart
Another enlightening video that talks about color correction in After Effect are this one from Kriscoart. Kriscoart is a fast-growing YouTube channel developed by managed by Kris Truini. Some of the core values of this channel are to learn, create and share content. From his channel, Truini does not centralize his focus to only video editing; he goes to the extremes of edifying on VFX tutorials, lighting workshops, and short film breakdowns.
In this video, Truini shares some simple tricks with his subscribers as well as new visitors on how to carry out a color correction in After Effects. He elaborates on manipulating lights and adding dramatic atmospheres and cinematic looks to your video shots by using some simple masks, solids, and adjustment layers.
Truini uses the project he is working on to flesh out various color correction tools and how to put them into use authentically. He targets not only beginner video editors but also intermediate ones who are looking forward to increasing their skill set.
Through his YouTube channels, Truini aims at educating the masses so that they can be well conversant with most of the video editing tools. He wants the voice of every filmmaker and prospective to be heard by their prospective audiences.
3. Advanced Color Grading in After Effects - NO PLUGINS by the VFX Show
Color correcting and Color grading without plugins is something that is a back-breaking activity to beginner video editors. Here, Collin Black of @ The VFX Show tends to break that misconception. Collin Black, the manager of The VFX Show, teaches his subscribers and new visitors to his channel how to carry out color correction without necessarily using plugins.
Collin Black states that even though plugins are very easy to use in color correction, you cannot carry out a wide range of customizable activities. It makes color correction without plugins be something to use to create neck-breaking video clips.
In this video, Collin uses a photo that he took while driving. The image appears to be faulty with lousy lighting. He uses a wide range of tools while elaborating every single step. When compared to the start, the final result of his work can be said to be “something out of this world.”
The target audience is beginner video editors with the zeal and zest of learning and wanting to get to know more about color correction without plugins.
4. Easy Colour Correction - After Effects Tutorial by DM Design
Are there scenarios where you come across a simple-looking video clip that is perfectly edited with ideal visual colors and has a sensational cinematic appearance? Debra Mayer, the founder, and owner of DM Designs, a renowned YouTube channel, simplify the processes required to get stunning videos.
Debra Mayer, in her YouTube channel, does all in her powers to teach all the Adobe techniques. She simplifies it and makes every single step to be somewhat relatable. In her channel, she does say much but expounds on tons of tools and activities.
Debra uses footage of a deserted land occupied by trees and grassland in this video. Everything in the picture looks dull and dusty. Debra expounds on how to create some cinematic appearance on clips with straightforward steps. Her after video appears to be something unreal due to extensive editing.
Her target audience for this video is beginner video editors. She can explain color correction in the easiest way possible from her immerse skillset. With that, beginner editors will significantly benefit from it.
5. Make Cinematic Looks with After Effects Color Correction Tricks! by Black Mixture
Paying for the After Effects subscription and again paying for color correction is something most people cannot wish to do. Even though you are not good at color correction, you need to stress yourself since Nate and Chriselle of Black Mixture will make things easy for you. Black Mixture is a YouTube account managed by Nate and Chriselle, a couple. In their channel, they expound on topics surrounding filmmaking, graphic design, motion design, and photography.
In this video, Nate elaborates on various steps on how to carry out a color correction in Adobe After Effects without plugins. He even goes to the extent of showing how to add music video effects as well as cinematic effects.
Nate uniquely uses only three color correction effects to carry out all the color correction needed to his footage – A super-fast driving car on a highway – And comes up with stunning results. He uses various customizable Adobe Effects settings such as hue, contrast, saturation.
Furthermore, Nate explains how to interpret and use histograms and graphs in adjusting various customizable settings. He also emphasizes the glow, a unique functionality feature that alters the lighting of clips to make his background appear super cool. Most editors do not commonly use glow, but it creates outstanding videos when used.
Nate does not only target beginner video editors but also intermediate ones. There is something new that intermediate editors will also learn.
6. Color Correction in After Effects - Tutorial by Kenneth Moore
This is the last YouTube video that we are going to learn about color correcting from. It is a video produced by Kenneth Moore, A prime owner of Kenneth Moore’s YouTube Channel. Even though his channel, Kenneth Moore channel, is still on the grow, he straightforwardly brought out every step to carry out when doing color correction in After Effects.
In this video, Moore uses a shot of a drown to elaborate color correction. The initial footage appears to be dull with indistinct features. With the color corrections tools, Moore is able to liven the footage giving it that outstanding look.
Moore unfolds on how to use various functionality tools in After Effects. In his video, he incorporates contrast, curves, RGB Parade, color balancing, color wheels, Vectorscope, and HSL Secondary functionalities. He used another footage, a car, to elaborate on HSL secondary.
In the video, Moore targets beginner and intermediate video editors to throw light on other color correction functionalities that video editors need to learn.
Conclusion
● Supplement your reading about color correction in After Effects with these videos. The above six videos evidently explain how to carry out a color correction in Adobe After Effects with ease. The videos are created with established producers and video editors; therefore they give professional insights and teachings.
● Color correction in After Effects should no longer stress you out. All you have to do is watch any of the above videos, or you can watch all of them and have a better grip of color correction. You will be able to create exceptional footage.
| Top GIF to MP4 Converters
Great Video Converter - Wondershare Filmora
Provide abundant video effects - A creative video editor
Powerful color correction and grading
Detailed tutorials provided by the official channel
Introduction.
Many people have been searching online for the best GIF to MP4 converter that will help them playback their GIF files on their media player. It is easier for GIF animated files to be converted to MP4 files, as Mp4 is the most popular file format compatible with many devices. Some compatible devices include iOS devices, Mac, Android devices, Windows, etc.
By converting GIF into video, you make a wise move as an encoded MP4 video contains richer colors and higher resolutions, weighs 5 to 10 times lighter in file size, and has engaging audio compared to the GIF. In addition, MP4 is also a wide-known and accepted format for social sharing videos across the web. So, whether you want to convert your Gif to Mp4 for Instagram or you intend to add songs to your animated texts and convert to Mp4, this article will help you out.
We shall explore:
In this article
Part 1: Best Online GIF to MP4 Converters
Part 2: Top GIF to MP4 Software
Part 3: How to Convert GIF to MP4
Part 1: Best Online GIF to MP4 Converters
GIF pictures are a perfect source of entertainment and can also be helpful as memes on the internet. Those wondering what a GIF picture is all about are small videos without sound. They can be used in the comment section of the internet or sent as memes in messages on smartphones.
However, due to third-party keyboard applications, the use and sending of GIFs have become very easy. Thus, many people are trying to migrate from GIF to MP4, and this article is for them. We will give you the best four (4) GIFs to video converter online that you can use.
1. Ezgif
Ezgif is a free GIF to MP4 online converter that allows you to turn your ezGif GIF into MP4 videos with a single click leaving no watermark on your video. The process is relatively easy as you just need to upload a GIF file up to 35MB, then click the “Convert to MP4” button, and your MP4 video will be ready. Besides, it supports the conversions of WEBP and APNG to MP4.
Pros
It is super-fast and free.
It does not have a watermark.
There is no advert on the site.
It does not require any software to download.
Cons
It allows you to convert one file at a time.

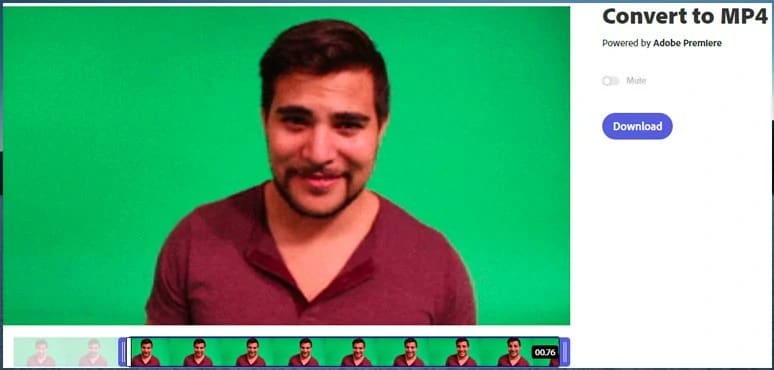
2. Adobe Creative Cloud Express
Adobe Creative Cloud Express is a collection of mobile app-based and web-based video editing tools that all content creators use. It allows you to upload GIFs online and then convert GIFs to MP4. It also allows you to trim the GIF and directly download the MP4 to the local PC.
Pros
It is very free to use
it allows you to trim the GIF
it is available online and on App Store
it does not require any software to download.
Cons
Allows you to upload one GIF at a time
It has limited features

3. FlexClip
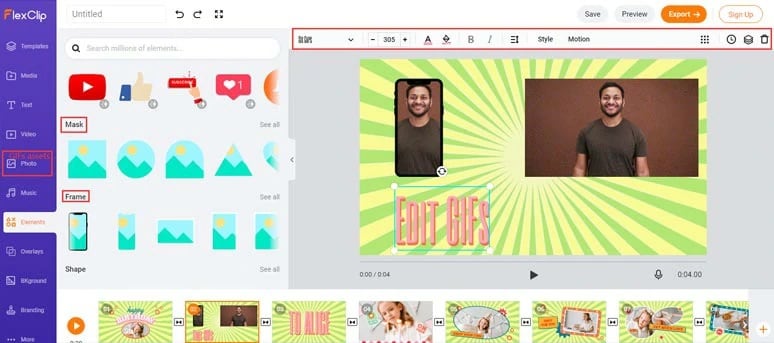
This tool is a feature-packed online video maker and GIF to MP4 converter. It allows users to easily upload GIFs from either their mobile phones or PC to FlexClip’s in-browser editor and also make some edits with both the GIFs and videos before you can convert them.
Pros
No software downloads are required
No experience is needed.
There are tons of features available
Cons
GIFs are irreversible
You cannot change GIFs speed
4. Convertio
This online conversion tool has made GIFs to MP4 conversion much more effortless. This free GIF to video converter has a simple interface and easy-to-use tools that help you turn GIF files to MP4 in a few clicks.
Pros
It is swift and free.
You can convert several files at once.
It does not require any download.
Cons
There are loads of ads on the site.
You can only use 2 concurrent conversions for the free account.

Part 2: Top GIF to MP4 Software
Many people have tried different software to convert GIFs into MP4 that have proven abortive. Most software on the internet only allows you to convert MPEG to GIF, WMV to GIF, or images to GIF files. Only a few software allows the conversion from GIF to videos.
Here are some of the top 4 GIF to MP4 Conversion software:
1. Filmora
Filmora Video Editor is the best software to convert any GIF picture to an MP4 video file. The best part is that you do not need to use the internet, and it works perfectly for all users. In addition, the software is super stable and does not crash even if you load more than ten video files on it. However, the Filmora video editor is a complete package that allows users to edit and convert any video with many accessible features. More so, you are not required to be a professional video editor to be able to convert the GIF image to a professional video.
With the Filmora software, you do not have to download and pay for the music, as the editor also has a great music library from which you can choose to add music within seconds. Moreover, the software has more than 100 different text styles and effects to make your GIF into MP4 videos more beautiful.
Pros
Available for both Windows and Mac Users
Beginners can also use it
It is free and easy to use
You don’t have to use the internet for it to work
Cons
It requires you to download it on your PC

2. Cloudconvert
This free online service tool allows users to convert any GIF image to an MP4 file. In addition, the user interface is quite tricky, but you can edit the videos, trim the videos, and crop them. Users can add subtitles to videos using the SRT files, and finally, you can export files directly to the Dropbox account.
Pros
It is free to use
It helps you export videos directly to your Dropbox
It provides you with a ton of audio and video editing features
Use SRT to add subtitles to your videos
Cons
It has a complicated user-interface
It does not support uploading to video sharing websites

3. Online-Convert
This is a perfect tool to convert GIF image to an MP4 file. In addition, this is a complete online video editor that allows users to perform various kinds of basic video converting options on their files. Users can rotate or crop the videos and extract the unwanted parts from the screen. Once the videos convert successfully, they can be downloaded or directly exported to Google Drive or Dropbox.
Pros
Users can directly export the converted files to the Cloud services
It allows users to convert different files to MP4
It provides users with files settings for basic video editing
Cons
No interactive interface
Many ads on the website

4. File-Conversion
One of the most popular file conversion websites offers this video editing software. In addition, it provides various video editing services rather than just converting GIFs to MP4 video files. It also provides a few settings, including size, resolution, and frame rate.
Pros
· It is user friendly
· It is free to use
· Allows users to change the quality of the output videos
Cons
· Using the service requires sign-up
It does not have an option to crop the Mp4 Videos or edit the frame rate
It does not have an option to export the videos to the third-party cloud services

Part 3: How to Convert GIF to MP4
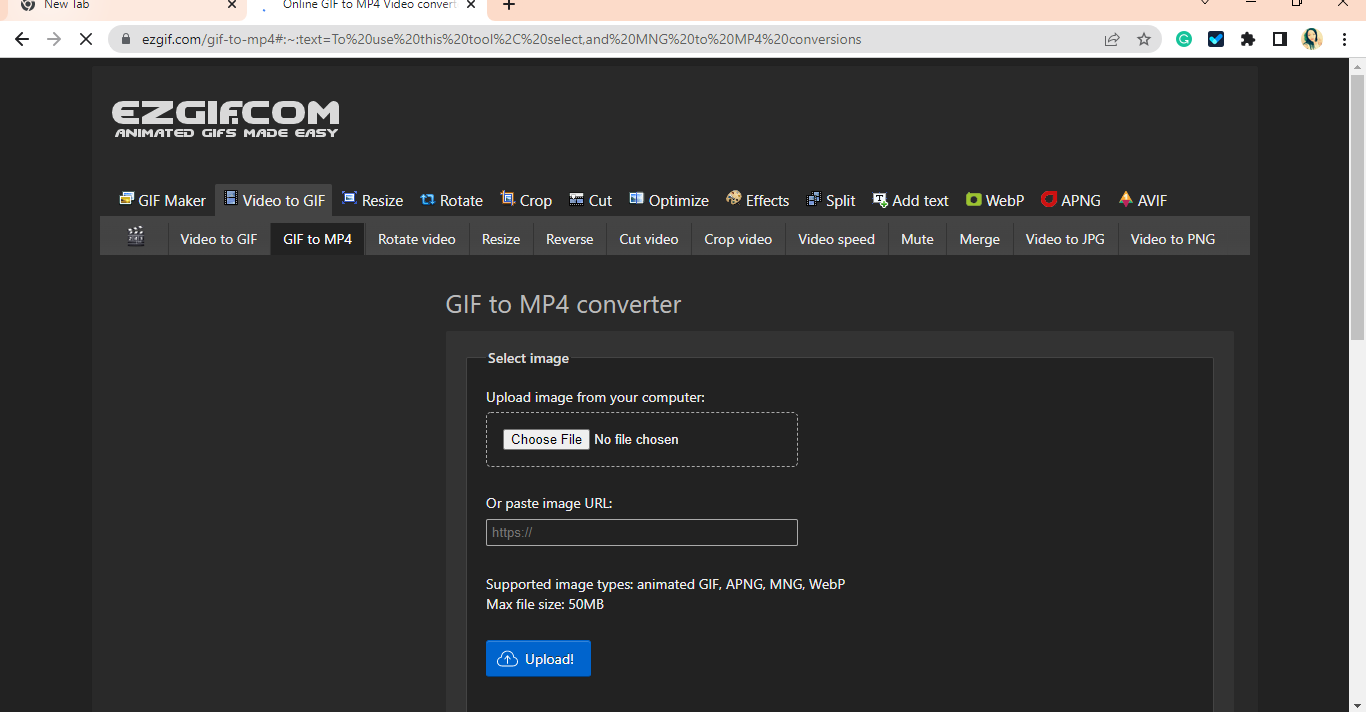
Here are the quick and easy steps to Ezgif GIF to MP4 online conversion:
>
Step1: Choose File to Browse or Copy-Paste URL to Upload
Upload a GIF file to your timeline or paste an image URL that is up to 35MB and Click the “Upload” button
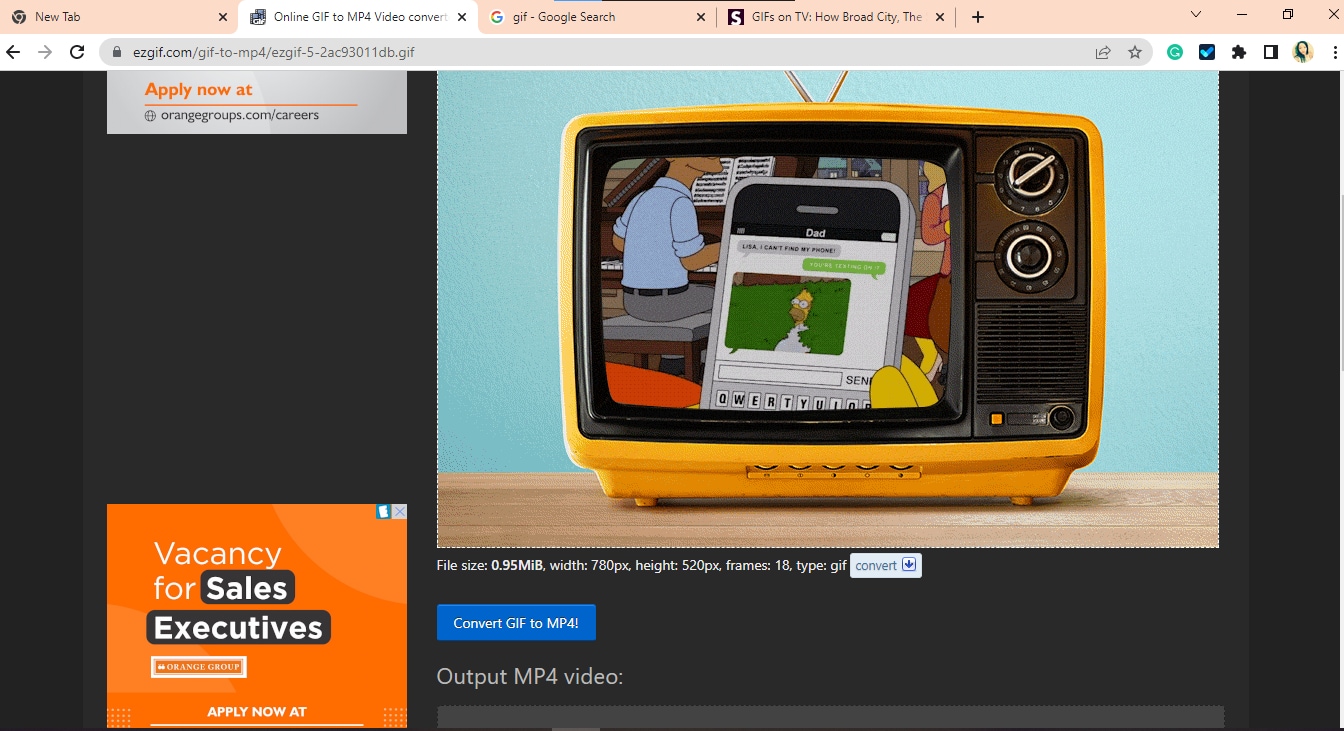
Step 2: Tap on Convert GIF to MP4
After the upload, click Convert GIF to MP4, and it will automatically get converted.
Step 3: Download the MP4
Export your video and download it on your device
Here is how to convert GIF to MP4 using Filmora software
Step 1: Install Filmora and Choose New Project
Open your Filmora software, click on New Project import GIF, or drag and drop them to your timeline.

Step 2: Import Media
If the media aspect ratio and resolution do not match when importing a file, a popup will appear. Make sure you click on DON’T CHANGE.

Step 3: Convert GIF to MP4
Click on export, then you rename and select your desired file format (MP4), and your GIFs will automatically convert.

Step 4: Export and Save
Finally, you can save the file on your device once the conversion process is complete.
Conclusion
From this article, we can pick that Ezgif is the best online tool and Filmora video editor is the easiest and perfect software that is good for GIF converter to MP4. This article also listed other video editors that can help you make GIFs from MP4 quickly and without stress.
Introduction.
Many people have been searching online for the best GIF to MP4 converter that will help them playback their GIF files on their media player. It is easier for GIF animated files to be converted to MP4 files, as Mp4 is the most popular file format compatible with many devices. Some compatible devices include iOS devices, Mac, Android devices, Windows, etc.
By converting GIF into video, you make a wise move as an encoded MP4 video contains richer colors and higher resolutions, weighs 5 to 10 times lighter in file size, and has engaging audio compared to the GIF. In addition, MP4 is also a wide-known and accepted format for social sharing videos across the web. So, whether you want to convert your Gif to Mp4 for Instagram or you intend to add songs to your animated texts and convert to Mp4, this article will help you out.
We shall explore:
In this article
Part 1: Best Online GIF to MP4 Converters
Part 2: Top GIF to MP4 Software
Part 3: How to Convert GIF to MP4

Part 1: Best Online GIF to MP4 Converters
GIF pictures are a perfect source of entertainment and can also be helpful as memes on the internet. Those wondering what a GIF picture is all about are small videos without sound. They can be used in the comment section of the internet or sent as memes in messages on smartphones.
However, due to third-party keyboard applications, the use and sending of GIFs have become very easy. Thus, many people are trying to migrate from GIF to MP4, and this article is for them. We will give you the best four (4) GIFs to video converter online that you can use.
1. Ezgif
Ezgif is a free GIF to MP4 online converter that allows you to turn your ezGif GIF into MP4 videos with a single click leaving no watermark on your video. The process is relatively easy as you just need to upload a GIF file up to 35MB, then click the “Convert to MP4” button, and your MP4 video will be ready. Besides, it supports the conversions of WEBP and APNG to MP4.
Pros
It is super-fast and free.
It does not have a watermark.
There is no advert on the site.
It does not require any software to download.
Cons
It allows you to convert one file at a time.

2. Adobe Creative Cloud Express
Adobe Creative Cloud Express is a collection of mobile app-based and web-based video editing tools that all content creators use. It allows you to upload GIFs online and then convert GIFs to MP4. It also allows you to trim the GIF and directly download the MP4 to the local PC.
Pros
It is very free to use
it allows you to trim the GIF
it is available online and on App Store
it does not require any software to download.
Cons
Allows you to upload one GIF at a time
It has limited features


3. FlexClip
This tool is a feature-packed online video maker and GIF to MP4 converter. It allows users to easily upload GIFs from either their mobile phones or PC to FlexClip’s in-browser editor and also make some edits with both the GIFs and videos before you can convert them.
Pros
No software downloads are required
No experience is needed.
There are tons of features available
Cons
GIFs are irreversible
You cannot change GIFs speed

4. Convertio
This online conversion tool has made GIFs to MP4 conversion much more effortless. This free GIF to video converter has a simple interface and easy-to-use tools that help you turn GIF files to MP4 in a few clicks.
Pros
It is swift and free.
You can convert several files at once.
It does not require any download.
Cons
There are loads of ads on the site.
You can only use 2 concurrent conversions for the free account.

Part 2: Top GIF to MP4 Software
Many people have tried different software to convert GIFs into MP4 that have proven abortive. Most software on the internet only allows you to convert MPEG to GIF, WMV to GIF, or images to GIF files. Only a few software allows the conversion from GIF to videos.
Here are some of the top 4 GIF to MP4 Conversion software:
1. Filmora
Filmora Video Editor is the best software to convert any GIF picture to an MP4 video file. The best part is that you do not need to use the internet, and it works perfectly for all users. In addition, the software is super stable and does not crash even if you load more than ten video files on it. However, the Filmora video editor is a complete package that allows users to edit and convert any video with many accessible features. More so, you are not required to be a professional video editor to be able to convert the GIF image to a professional video.
With the Filmora software, you do not have to download and pay for the music, as the editor also has a great music library from which you can choose to add music within seconds. Moreover, the software has more than 100 different text styles and effects to make your GIF into MP4 videos more beautiful.
Pros
Available for both Windows and Mac Users
Beginners can also use it
It is free and easy to use
You don’t have to use the internet for it to work
Cons
It requires you to download it on your PC

2. Cloudconvert
This free online service tool allows users to convert any GIF image to an MP4 file. In addition, the user interface is quite tricky, but you can edit the videos, trim the videos, and crop them. Users can add subtitles to videos using the SRT files, and finally, you can export files directly to the Dropbox account.
Pros
It is free to use
It helps you export videos directly to your Dropbox
It provides you with a ton of audio and video editing features
Use SRT to add subtitles to your videos
Cons
It has a complicated user-interface
It does not support uploading to video sharing websites

3. Online-Convert
This is a perfect tool to convert GIF image to an MP4 file. In addition, this is a complete online video editor that allows users to perform various kinds of basic video converting options on their files. Users can rotate or crop the videos and extract the unwanted parts from the screen. Once the videos convert successfully, they can be downloaded or directly exported to Google Drive or Dropbox.
Pros
Users can directly export the converted files to the Cloud services
It allows users to convert different files to MP4
It provides users with files settings for basic video editing
Cons
No interactive interface
Many ads on the website

4. File-Conversion
One of the most popular file conversion websites offers this video editing software. In addition, it provides various video editing services rather than just converting GIFs to MP4 video files. It also provides a few settings, including size, resolution, and frame rate.
Pros
· It is user friendly
· It is free to use
· Allows users to change the quality of the output videos
Cons
· Using the service requires sign-up
It does not have an option to crop the Mp4 Videos or edit the frame rate
It does not have an option to export the videos to the third-party cloud services

Part 3: How to Convert GIF to MP4
Here are the quick and easy steps to Ezgif GIF to MP4 online conversion:
>
Step1: Choose File to Browse or Copy-Paste URL to Upload
Upload a GIF file to your timeline or paste an image URL that is up to 35MB and Click the “Upload” button

Step 2: Tap on Convert GIF to MP4
After the upload, click Convert GIF to MP4, and it will automatically get converted.

Step 3: Download the MP4
Export your video and download it on your device
Here is how to convert GIF to MP4 using Filmora software
Step 1: Install Filmora and Choose New Project
Open your Filmora software, click on New Project import GIF, or drag and drop them to your timeline.

Step 2: Import Media
If the media aspect ratio and resolution do not match when importing a file, a popup will appear. Make sure you click on DON’T CHANGE.

Step 3: Convert GIF to MP4
Click on export, then you rename and select your desired file format (MP4), and your GIFs will automatically convert.

Step 4: Export and Save
Finally, you can save the file on your device once the conversion process is complete.
Conclusion
From this article, we can pick that Ezgif is the best online tool and Filmora video editor is the easiest and perfect software that is good for GIF converter to MP4. This article also listed other video editors that can help you make GIFs from MP4 quickly and without stress.
Introduction.
Many people have been searching online for the best GIF to MP4 converter that will help them playback their GIF files on their media player. It is easier for GIF animated files to be converted to MP4 files, as Mp4 is the most popular file format compatible with many devices. Some compatible devices include iOS devices, Mac, Android devices, Windows, etc.
By converting GIF into video, you make a wise move as an encoded MP4 video contains richer colors and higher resolutions, weighs 5 to 10 times lighter in file size, and has engaging audio compared to the GIF. In addition, MP4 is also a wide-known and accepted format for social sharing videos across the web. So, whether you want to convert your Gif to Mp4 for Instagram or you intend to add songs to your animated texts and convert to Mp4, this article will help you out.
We shall explore:
In this article
Part 1: Best Online GIF to MP4 Converters
Part 2: Top GIF to MP4 Software
Part 3: How to Convert GIF to MP4

Part 1: Best Online GIF to MP4 Converters
GIF pictures are a perfect source of entertainment and can also be helpful as memes on the internet. Those wondering what a GIF picture is all about are small videos without sound. They can be used in the comment section of the internet or sent as memes in messages on smartphones.
However, due to third-party keyboard applications, the use and sending of GIFs have become very easy. Thus, many people are trying to migrate from GIF to MP4, and this article is for them. We will give you the best four (4) GIFs to video converter online that you can use.
1. Ezgif
Ezgif is a free GIF to MP4 online converter that allows you to turn your ezGif GIF into MP4 videos with a single click leaving no watermark on your video. The process is relatively easy as you just need to upload a GIF file up to 35MB, then click the “Convert to MP4” button, and your MP4 video will be ready. Besides, it supports the conversions of WEBP and APNG to MP4.
Pros
It is super-fast and free.
It does not have a watermark.
There is no advert on the site.
It does not require any software to download.
Cons
It allows you to convert one file at a time.

2. Adobe Creative Cloud Express
Adobe Creative Cloud Express is a collection of mobile app-based and web-based video editing tools that all content creators use. It allows you to upload GIFs online and then convert GIFs to MP4. It also allows you to trim the GIF and directly download the MP4 to the local PC.
Pros
It is very free to use
it allows you to trim the GIF
it is available online and on App Store
it does not require any software to download.
Cons
Allows you to upload one GIF at a time
It has limited features


3. FlexClip
This tool is a feature-packed online video maker and GIF to MP4 converter. It allows users to easily upload GIFs from either their mobile phones or PC to FlexClip’s in-browser editor and also make some edits with both the GIFs and videos before you can convert them.
Pros
No software downloads are required
No experience is needed.
There are tons of features available
Cons
GIFs are irreversible
You cannot change GIFs speed

4. Convertio
This online conversion tool has made GIFs to MP4 conversion much more effortless. This free GIF to video converter has a simple interface and easy-to-use tools that help you turn GIF files to MP4 in a few clicks.
Pros
It is swift and free.
You can convert several files at once.
It does not require any download.
Cons
There are loads of ads on the site.
You can only use 2 concurrent conversions for the free account.

Part 2: Top GIF to MP4 Software
Many people have tried different software to convert GIFs into MP4 that have proven abortive. Most software on the internet only allows you to convert MPEG to GIF, WMV to GIF, or images to GIF files. Only a few software allows the conversion from GIF to videos.
Here are some of the top 4 GIF to MP4 Conversion software:
1. Filmora
Filmora Video Editor is the best software to convert any GIF picture to an MP4 video file. The best part is that you do not need to use the internet, and it works perfectly for all users. In addition, the software is super stable and does not crash even if you load more than ten video files on it. However, the Filmora video editor is a complete package that allows users to edit and convert any video with many accessible features. More so, you are not required to be a professional video editor to be able to convert the GIF image to a professional video.
With the Filmora software, you do not have to download and pay for the music, as the editor also has a great music library from which you can choose to add music within seconds. Moreover, the software has more than 100 different text styles and effects to make your GIF into MP4 videos more beautiful.
Pros
Available for both Windows and Mac Users
Beginners can also use it
It is free and easy to use
You don’t have to use the internet for it to work
Cons
It requires you to download it on your PC

2. Cloudconvert
This free online service tool allows users to convert any GIF image to an MP4 file. In addition, the user interface is quite tricky, but you can edit the videos, trim the videos, and crop them. Users can add subtitles to videos using the SRT files, and finally, you can export files directly to the Dropbox account.
Pros
It is free to use
It helps you export videos directly to your Dropbox
It provides you with a ton of audio and video editing features
Use SRT to add subtitles to your videos
Cons
It has a complicated user-interface
It does not support uploading to video sharing websites

3. Online-Convert
This is a perfect tool to convert GIF image to an MP4 file. In addition, this is a complete online video editor that allows users to perform various kinds of basic video converting options on their files. Users can rotate or crop the videos and extract the unwanted parts from the screen. Once the videos convert successfully, they can be downloaded or directly exported to Google Drive or Dropbox.
Pros
Users can directly export the converted files to the Cloud services
It allows users to convert different files to MP4
It provides users with files settings for basic video editing
Cons
No interactive interface
Many ads on the website

4. File-Conversion
One of the most popular file conversion websites offers this video editing software. In addition, it provides various video editing services rather than just converting GIFs to MP4 video files. It also provides a few settings, including size, resolution, and frame rate.
Pros
· It is user friendly
· It is free to use
· Allows users to change the quality of the output videos
Cons
· Using the service requires sign-up
It does not have an option to crop the Mp4 Videos or edit the frame rate
It does not have an option to export the videos to the third-party cloud services

Part 3: How to Convert GIF to MP4
Here are the quick and easy steps to Ezgif GIF to MP4 online conversion:
>
Step1: Choose File to Browse or Copy-Paste URL to Upload
Upload a GIF file to your timeline or paste an image URL that is up to 35MB and Click the “Upload” button

Step 2: Tap on Convert GIF to MP4
After the upload, click Convert GIF to MP4, and it will automatically get converted.

Step 3: Download the MP4
Export your video and download it on your device
Here is how to convert GIF to MP4 using Filmora software
Step 1: Install Filmora and Choose New Project
Open your Filmora software, click on New Project import GIF, or drag and drop them to your timeline.

Step 2: Import Media
If the media aspect ratio and resolution do not match when importing a file, a popup will appear. Make sure you click on DON’T CHANGE.

Step 3: Convert GIF to MP4
Click on export, then you rename and select your desired file format (MP4), and your GIFs will automatically convert.

Step 4: Export and Save
Finally, you can save the file on your device once the conversion process is complete.
Conclusion
From this article, we can pick that Ezgif is the best online tool and Filmora video editor is the easiest and perfect software that is good for GIF converter to MP4. This article also listed other video editors that can help you make GIFs from MP4 quickly and without stress.
Introduction.
Many people have been searching online for the best GIF to MP4 converter that will help them playback their GIF files on their media player. It is easier for GIF animated files to be converted to MP4 files, as Mp4 is the most popular file format compatible with many devices. Some compatible devices include iOS devices, Mac, Android devices, Windows, etc.
By converting GIF into video, you make a wise move as an encoded MP4 video contains richer colors and higher resolutions, weighs 5 to 10 times lighter in file size, and has engaging audio compared to the GIF. In addition, MP4 is also a wide-known and accepted format for social sharing videos across the web. So, whether you want to convert your Gif to Mp4 for Instagram or you intend to add songs to your animated texts and convert to Mp4, this article will help you out.
We shall explore:
In this article
Part 1: Best Online GIF to MP4 Converters
Part 2: Top GIF to MP4 Software
Part 3: How to Convert GIF to MP4

Part 1: Best Online GIF to MP4 Converters
GIF pictures are a perfect source of entertainment and can also be helpful as memes on the internet. Those wondering what a GIF picture is all about are small videos without sound. They can be used in the comment section of the internet or sent as memes in messages on smartphones.
However, due to third-party keyboard applications, the use and sending of GIFs have become very easy. Thus, many people are trying to migrate from GIF to MP4, and this article is for them. We will give you the best four (4) GIFs to video converter online that you can use.
1. Ezgif
Ezgif is a free GIF to MP4 online converter that allows you to turn your ezGif GIF into MP4 videos with a single click leaving no watermark on your video. The process is relatively easy as you just need to upload a GIF file up to 35MB, then click the “Convert to MP4” button, and your MP4 video will be ready. Besides, it supports the conversions of WEBP and APNG to MP4.
Pros
It is super-fast and free.
It does not have a watermark.
There is no advert on the site.
It does not require any software to download.
Cons
It allows you to convert one file at a time.

2. Adobe Creative Cloud Express
Adobe Creative Cloud Express is a collection of mobile app-based and web-based video editing tools that all content creators use. It allows you to upload GIFs online and then convert GIFs to MP4. It also allows you to trim the GIF and directly download the MP4 to the local PC.
Pros
It is very free to use
it allows you to trim the GIF
it is available online and on App Store
it does not require any software to download.
Cons
Allows you to upload one GIF at a time
It has limited features


3. FlexClip
This tool is a feature-packed online video maker and GIF to MP4 converter. It allows users to easily upload GIFs from either their mobile phones or PC to FlexClip’s in-browser editor and also make some edits with both the GIFs and videos before you can convert them.
Pros
No software downloads are required
No experience is needed.
There are tons of features available
Cons
GIFs are irreversible
You cannot change GIFs speed

4. Convertio
This online conversion tool has made GIFs to MP4 conversion much more effortless. This free GIF to video converter has a simple interface and easy-to-use tools that help you turn GIF files to MP4 in a few clicks.
Pros
It is swift and free.
You can convert several files at once.
It does not require any download.
Cons
There are loads of ads on the site.
You can only use 2 concurrent conversions for the free account.

Part 2: Top GIF to MP4 Software
Many people have tried different software to convert GIFs into MP4 that have proven abortive. Most software on the internet only allows you to convert MPEG to GIF, WMV to GIF, or images to GIF files. Only a few software allows the conversion from GIF to videos.
Here are some of the top 4 GIF to MP4 Conversion software:
1. Filmora
Filmora Video Editor is the best software to convert any GIF picture to an MP4 video file. The best part is that you do not need to use the internet, and it works perfectly for all users. In addition, the software is super stable and does not crash even if you load more than ten video files on it. However, the Filmora video editor is a complete package that allows users to edit and convert any video with many accessible features. More so, you are not required to be a professional video editor to be able to convert the GIF image to a professional video.
With the Filmora software, you do not have to download and pay for the music, as the editor also has a great music library from which you can choose to add music within seconds. Moreover, the software has more than 100 different text styles and effects to make your GIF into MP4 videos more beautiful.
Pros
Available for both Windows and Mac Users
Beginners can also use it
It is free and easy to use
You don’t have to use the internet for it to work
Cons
It requires you to download it on your PC

2. Cloudconvert
This free online service tool allows users to convert any GIF image to an MP4 file. In addition, the user interface is quite tricky, but you can edit the videos, trim the videos, and crop them. Users can add subtitles to videos using the SRT files, and finally, you can export files directly to the Dropbox account.
Pros
It is free to use
It helps you export videos directly to your Dropbox
It provides you with a ton of audio and video editing features
Use SRT to add subtitles to your videos
Cons
It has a complicated user-interface
It does not support uploading to video sharing websites

3. Online-Convert
This is a perfect tool to convert GIF image to an MP4 file. In addition, this is a complete online video editor that allows users to perform various kinds of basic video converting options on their files. Users can rotate or crop the videos and extract the unwanted parts from the screen. Once the videos convert successfully, they can be downloaded or directly exported to Google Drive or Dropbox.
Pros
Users can directly export the converted files to the Cloud services
It allows users to convert different files to MP4
It provides users with files settings for basic video editing
Cons
No interactive interface
Many ads on the website

4. File-Conversion
One of the most popular file conversion websites offers this video editing software. In addition, it provides various video editing services rather than just converting GIFs to MP4 video files. It also provides a few settings, including size, resolution, and frame rate.
Pros
· It is user friendly
· It is free to use
· Allows users to change the quality of the output videos
Cons
· Using the service requires sign-up
It does not have an option to crop the Mp4 Videos or edit the frame rate
It does not have an option to export the videos to the third-party cloud services

Part 3: How to Convert GIF to MP4
Here are the quick and easy steps to Ezgif GIF to MP4 online conversion:
>
Step1: Choose File to Browse or Copy-Paste URL to Upload
Upload a GIF file to your timeline or paste an image URL that is up to 35MB and Click the “Upload” button

Step 2: Tap on Convert GIF to MP4
After the upload, click Convert GIF to MP4, and it will automatically get converted.

Step 3: Download the MP4
Export your video and download it on your device
Here is how to convert GIF to MP4 using Filmora software
Step 1: Install Filmora and Choose New Project
Open your Filmora software, click on New Project import GIF, or drag and drop them to your timeline.

Step 2: Import Media
If the media aspect ratio and resolution do not match when importing a file, a popup will appear. Make sure you click on DON’T CHANGE.

Step 3: Convert GIF to MP4
Click on export, then you rename and select your desired file format (MP4), and your GIFs will automatically convert.

Step 4: Export and Save
Finally, you can save the file on your device once the conversion process is complete.
Conclusion
From this article, we can pick that Ezgif is the best online tool and Filmora video editor is the easiest and perfect software that is good for GIF converter to MP4. This article also listed other video editors that can help you make GIFs from MP4 quickly and without stress.
Motion Tracking Is the Process of Tracking the Movements of a Project in a Video. This Article Will Show You How to Apply Motion Tracking Effect Into Videos
Motion tracking makes it easier to follow the movement of objects and provide the sensed data to a program for additional processing. Motion tracking involves recording an object’s movements that match a previously stored motion template. This has a wide range of uses, including in robotics, entertainment, sports, the military, and the entertainment industry. Additionally, it is utilized in the creation of video games and films. While motion tracking is frequently referred to as match movement in the film and video game industries, motion tracking is frequently referred to as motion capture in other contexts.
With that said, let’s begin!
Part 1. Learning to Understand Motion Tracking
We need to ask the really crucial question now that we have a fundamental understanding of what it is. What in the world am I going to do with this? In order to do that, let’s quickly review some excellent applications for motion tracking. You could,
Utilize tracking information to stabilize motion
Add text or solids as additional compositional elements
Add 3D elements to 2D footage
Use effects or color gradation methods
Replace the screens on your computer, mobile device, or television
These are just a few examples of how motion tracking might be useful. You need to be able to track motion in compositions of any complexity.
Part 2. What software do you need?
There are numerous options for motion tracking applications. With advantages and downsides, we’ve compiled a list of the finest motion tracking programs. The following are the best video editors for motion tracking in our opinion:
Filmora
Wondershare created Filmora to enable you to fully express your creativity. FilmoraPro is the best option if you want to make some high-level modifications to your video. In addition to the pre-sets offered, it allows you to tweak the effects for a more expertly edited appearance.
![]()
Motion tracking is currently its best feature. You may track a skater as they race across the ice or follow a boat as it travels. Use the motion tracking feature to add drama to your videos. You won’t have to worry about getting lost because FilmoraPro features an amazingly simple UI. Simply click on the person or object you wish to track and choose Motion Track from the Effects menu.
Free Download For Win 7 or later(64-bit)
Free Download For macOS 10.14 or later
Blender
Open-source and cost-free motion tracking software is called Blender. It’s an excellent 3D creating tool. Modeling, rigging, animation, simulation, rendering, compositing, video editing, 2D animation, and of course motion tracking is all supported.

Kdenlive
A motion tracker was recently added to Kdenlive, an open source and free video editing tool, under its Effects section. This program analyzes an object’s tracking information and automatically generates a map of the object’s motion. Following that, you can align a title, an image, an icon, and any other 2D elements to the moving object using this track. Motion Tracker’s regularly updated algorithms are one of its key characteristics, which leads to a higher tracking success rate and faster tracking speed.

HitFilm Express
The free edition of HitFilm Express is a wonderful place to start if you’re learning the fundamentals of 2D motion tracking. To get superior tracking results, it offers two motion tracking types: Single Point for tracking simply position and Double Points for tracking position, scale, or rotation of an object. You can either steady the video with the tracking data or change the point with a CG object.

Its optical flow tracking technique is outstanding. It successfully tracks a moving item that changes into multiple shapes or is veiled for a few frames by figuring out the brightness flow of the moving object. Beginners can therefore save a great deal of time and effort when designing settings to deal with complex frames.
VEGAS Pro
In VEGAS Pro 18 and later, auto motion tracking is a freshly upgraded function. Despite its late birth, it included the Mocha masking and planar tracking technology, winner of an Academy Award. It enables you to accurately attach images and messages and even adjust for shifting perspective. You can hide faces, license information, and any private objects using this capability.

Adobe Premiere Pro
Because of its superior editing capabilities, Premiere Pro seems to be a requirement for anyone learning video editing. Premiere Pro, however, has a limited number of presets and automatic tools in order to provide consumers the most control.

When masking and blurring a face, motion tracking only works with the auto option. If not, you will need to enter and alter multiple keyframes to add text or resize the video, or you will need to install an extension to convert the mask’s tracks to any transformed parts.
PowerDirector
Due to its simplicity of use, PowerDirector is unquestionably among the greatest motion tracking programs currently available. It accomplishes complex effects without having an advanced learning curve, in contrast to other video editing tools. As demonstrated in the introductory video up top, a simple interface may be used to easily track and manage one or more motion-tracked items.
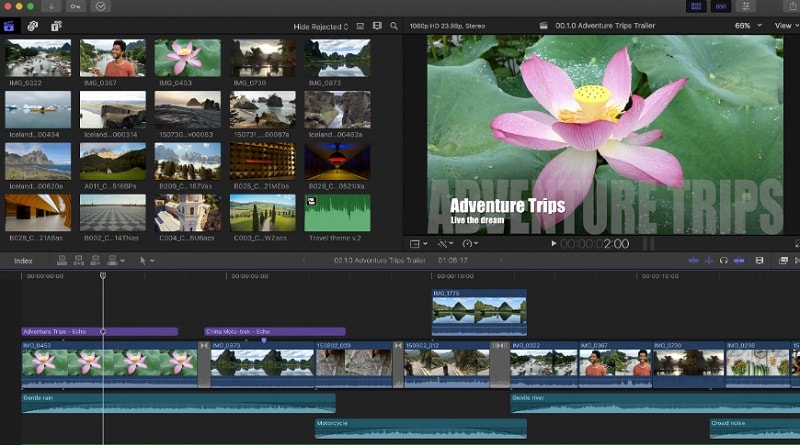
With this program, creating a simple motion track may be done in only three easy steps. This editor is for you if you want to finish the job swiftly and painlessly and are new to intermediate video editing.
Part 3. Differences between camera tracking and motion tracking?
Making the audience forget that there is a camera in the room is one of the primary goals of filmmaking. To engage the audience, tracking shots like camera tracking and motion tracking are helpful. Tracking shots provide filmmakers the chance to immerse their audience more deeply in the storyline of their characters. I discovered that there is some ambiguity around how motion tracking and camera tracking differ from one another. I’ll explain where the confusion might have originated and give you examples of how to use both strategies.
What distinguishes motion tracking from camera tracking? Their differences are due to how they view the course of action. From a camera’s perspective, motion tracking monitors an object’s movement. The scenario is more immersive thanks to camera tracking, which detects the movement of the camera and presents it as though you are in a virtual or augmented reality environment.
We’ll examine tracking’s development in the movie and its significance to the business. What it is and how it affects the cinematography industry. Along with the many software used for both motion tracking and camera tracking, we’ll also look at some of the popular applications for both.
Motion tracking
Motion tracking is similar to a car pursuit on the highway in an action movie. Let’s use a SimCity environment as another illustration: your Sim’s movement is monitored against the steady scene of your home. The frame is set on your Sim, regardless of what your Sim does.
Camera tracking
When the camera must move and the object being “tracked” must remain stationary, camera tracking might be utilized instead of motion tracking. Information from a recorded live shot taken with a live camera is used for camera tracking. Then, using this data, a parallel virtual camera is projected in a three-dimensional composition frame. fresh 3D pieces are added while scenes are recreated.
On the Internet of Vehicles, motion tracking will be crucial. IoV will project the motion of your vehicle along the 2D path. Then, utilizing the information about your surroundings, you are informed of any potential roadblocks.
The same basic idea underlies motion tracking and stabilization. Both follow a moving target. When stabilizing, you choose the location where you wish to remain concentrated and centered despite movement. You track the object you wish to concentrate on while moving when you use motion tracking.
Sports videos frequently use basketball and football and use motion tracking. wherein the player is surrounded by a circle as he circles the court or the field for basketball.
Conclusion
In video editing, techniques like motion tracking and camera tracking are frequently employed. Even though they are frequently compared, both employ various vantage angles to depict motion. By following the moving object’s movement throughout the frame, motion tracking maintains the moving object in focus. A post-production technique called camera tracking uses data from a pre-shot movie to project a parallel virtual camera that displays a 3D perspective. If motion tracking and camera tracking have anything in common, it’s the way they draw the viewer into the tale and make them feel like a part of it. This gives your audience a sense of immersion in the story and enables your movie to linger in their minds emotionally and visually long after the credits have rolled.
Part 1. Learning to Understand Motion Tracking
We need to ask the really crucial question now that we have a fundamental understanding of what it is. What in the world am I going to do with this? In order to do that, let’s quickly review some excellent applications for motion tracking. You could,
Utilize tracking information to stabilize motion
Add text or solids as additional compositional elements
Add 3D elements to 2D footage
Use effects or color gradation methods
Replace the screens on your computer, mobile device, or television
These are just a few examples of how motion tracking might be useful. You need to be able to track motion in compositions of any complexity.
Part 2. What software do you need?
There are numerous options for motion tracking applications. With advantages and downsides, we’ve compiled a list of the finest motion tracking programs. The following are the best video editors for motion tracking in our opinion:
Filmora
Wondershare created Filmora to enable you to fully express your creativity. FilmoraPro is the best option if you want to make some high-level modifications to your video. In addition to the pre-sets offered, it allows you to tweak the effects for a more expertly edited appearance.
![]()
Motion tracking is currently its best feature. You may track a skater as they race across the ice or follow a boat as it travels. Use the motion tracking feature to add drama to your videos. You won’t have to worry about getting lost because FilmoraPro features an amazingly simple UI. Simply click on the person or object you wish to track and choose Motion Track from the Effects menu.
Free Download For Win 7 or later(64-bit)
Free Download For macOS 10.14 or later
Blender
Open-source and cost-free motion tracking software is called Blender. It’s an excellent 3D creating tool. Modeling, rigging, animation, simulation, rendering, compositing, video editing, 2D animation, and of course motion tracking is all supported.

Kdenlive
A motion tracker was recently added to Kdenlive, an open source and free video editing tool, under its Effects section. This program analyzes an object’s tracking information and automatically generates a map of the object’s motion. Following that, you can align a title, an image, an icon, and any other 2D elements to the moving object using this track. Motion Tracker’s regularly updated algorithms are one of its key characteristics, which leads to a higher tracking success rate and faster tracking speed.

HitFilm Express
The free edition of HitFilm Express is a wonderful place to start if you’re learning the fundamentals of 2D motion tracking. To get superior tracking results, it offers two motion tracking types: Single Point for tracking simply position and Double Points for tracking position, scale, or rotation of an object. You can either steady the video with the tracking data or change the point with a CG object.

Its optical flow tracking technique is outstanding. It successfully tracks a moving item that changes into multiple shapes or is veiled for a few frames by figuring out the brightness flow of the moving object. Beginners can therefore save a great deal of time and effort when designing settings to deal with complex frames.
VEGAS Pro
In VEGAS Pro 18 and later, auto motion tracking is a freshly upgraded function. Despite its late birth, it included the Mocha masking and planar tracking technology, winner of an Academy Award. It enables you to accurately attach images and messages and even adjust for shifting perspective. You can hide faces, license information, and any private objects using this capability.

Adobe Premiere Pro
Because of its superior editing capabilities, Premiere Pro seems to be a requirement for anyone learning video editing. Premiere Pro, however, has a limited number of presets and automatic tools in order to provide consumers the most control.

When masking and blurring a face, motion tracking only works with the auto option. If not, you will need to enter and alter multiple keyframes to add text or resize the video, or you will need to install an extension to convert the mask’s tracks to any transformed parts.
PowerDirector
Due to its simplicity of use, PowerDirector is unquestionably among the greatest motion tracking programs currently available. It accomplishes complex effects without having an advanced learning curve, in contrast to other video editing tools. As demonstrated in the introductory video up top, a simple interface may be used to easily track and manage one or more motion-tracked items.

With this program, creating a simple motion track may be done in only three easy steps. This editor is for you if you want to finish the job swiftly and painlessly and are new to intermediate video editing.
Part 3. Differences between camera tracking and motion tracking?
Making the audience forget that there is a camera in the room is one of the primary goals of filmmaking. To engage the audience, tracking shots like camera tracking and motion tracking are helpful. Tracking shots provide filmmakers the chance to immerse their audience more deeply in the storyline of their characters. I discovered that there is some ambiguity around how motion tracking and camera tracking differ from one another. I’ll explain where the confusion might have originated and give you examples of how to use both strategies.
What distinguishes motion tracking from camera tracking? Their differences are due to how they view the course of action. From a camera’s perspective, motion tracking monitors an object’s movement. The scenario is more immersive thanks to camera tracking, which detects the movement of the camera and presents it as though you are in a virtual or augmented reality environment.
We’ll examine tracking’s development in the movie and its significance to the business. What it is and how it affects the cinematography industry. Along with the many software used for both motion tracking and camera tracking, we’ll also look at some of the popular applications for both.
Motion tracking
Motion tracking is similar to a car pursuit on the highway in an action movie. Let’s use a SimCity environment as another illustration: your Sim’s movement is monitored against the steady scene of your home. The frame is set on your Sim, regardless of what your Sim does.
Camera tracking
When the camera must move and the object being “tracked” must remain stationary, camera tracking might be utilized instead of motion tracking. Information from a recorded live shot taken with a live camera is used for camera tracking. Then, using this data, a parallel virtual camera is projected in a three-dimensional composition frame. fresh 3D pieces are added while scenes are recreated.
On the Internet of Vehicles, motion tracking will be crucial. IoV will project the motion of your vehicle along the 2D path. Then, utilizing the information about your surroundings, you are informed of any potential roadblocks.
The same basic idea underlies motion tracking and stabilization. Both follow a moving target. When stabilizing, you choose the location where you wish to remain concentrated and centered despite movement. You track the object you wish to concentrate on while moving when you use motion tracking.
Sports videos frequently use basketball and football and use motion tracking. wherein the player is surrounded by a circle as he circles the court or the field for basketball.
Conclusion
In video editing, techniques like motion tracking and camera tracking are frequently employed. Even though they are frequently compared, both employ various vantage angles to depict motion. By following the moving object’s movement throughout the frame, motion tracking maintains the moving object in focus. A post-production technique called camera tracking uses data from a pre-shot movie to project a parallel virtual camera that displays a 3D perspective. If motion tracking and camera tracking have anything in common, it’s the way they draw the viewer into the tale and make them feel like a part of it. This gives your audience a sense of immersion in the story and enables your movie to linger in their minds emotionally and visually long after the credits have rolled.
Also read:
- Updated Detailed Tutorial to Crop a Video in KineMaster for 2024
- Updated Are You Searching for Professional Subtitle Apps? Read This Article to Explore Various Compatible Subtitle Apps that You Can Run on Multiple Platforms
- Updated Ideas That Help You Out in Making Transparent Image
- How to Add Selective Color Effect to Your Videos for 2024
- In 2024, Want to Create an Impressive Video Collage but Clueless About the Best Tools? No Worries as We Are Here and Will Help You to Learn About the Best Video Collage Maker PC Tools
- Updated Recommended Video Background Changers
- Updated In 2024, How to Add Text in Adobe Rush
- New Adobe Premiere Pro Rec 709 LUTs Finding The Best Options
- New How to Merge Audio and Video Using FFmpeg
- New In 2024, 12 Impressive AI Video Ideas for Making Engaging Video Content
- Updated In 2024, So, without Wasting Time, Let Me Show You How to Mask a Video in Wondershare Filmora. Lets Get Started
- Updated Ways to Make Sure Your Video Editing Course Is Worthing to Watch for 2024
- New How to Uue Adobe Lightroom Color Grading for 2024
- Updated 2024 Approved Best 12 Sony Vegas Slideshow Templates for Free Download
- New How to Create an Adobe Slideshow the Easy Way for 2024
- New This Article Will Show You How to Clone Yourslef in Videos with Filmora for 2024
- New Best 8 Online GIF to APNG Converters
- In 2024, 10 BEST TEXT TO SPEECH VIDEO MAKERS
- New In 2024, How To Fade Audio With Movavi Editor
- New Do You Want to Apply BRAW LUTs to Your Pictures and Video Footage? Here We Will Discuss some of the Best Options Available to Help You Choose the Right One for 2024
- Updated In 2024, How to Make Transparent Background in Canva
- Are You Looking to Find Out How to Loop YouTube Videos on iPhone? Learn How to Loop Your Favorite YouTube Video on Your iPhone, so You Can Play that Part over and Over for 2024
- 2024 Approved How to Add Echo Effect to Video
- Updated Top 11 Best Video Editing Apps for iPhone for 2024
- Updated In 2024, How to Make A Fantastic Café Vlog
- Updated 2024 Approved Best 5 Apps To Add Song To Video
- Updated Do You Know Anything About the Video Format Supported by WhatsApp? If Not, Then This Is the Right Time to Learn About WhatsApp-Supported Video Formats
- Separate Audio From Video in DaVinci Resolve Step by Step
- New 2024 Approved Looking for the Best Way to Create Stunning Video Animations? Here, We Look at some of the Best Animated Video Maker Solutions to Use
- Easy Steps to Slow Down a Video on iPhone and Android for 2024
- Updated Simple Tricks Make 3D GIF Production of Inspiration Pop Up
- New 2024 Approved Best Video Title Generators
- New Want to Buy a Drone for Better Videography Creating? This Article Will Review 6 of the Best Drones on the Market for You to Consider
- Updated Free Drone LUTs For Perfect Drone Footage for 2024
- New How to Resize FLV Videos Efficiently Windows, Mac,Android, iPhone & Online for 2024
- Updated Want to Apply a Filter on Your Video Using Your iPhone or Mac? Here Are the Simple Steps to Put Add Filters on iMovie. Find Out a Better iMovie Alternative with More Filters for 2024
- How to Make A Jaw-Dropping Time Lapse Video?
- How to Make Discord Logo GIF for 2024
- In 2024, 7 Ways to Unlock a Locked Itel A60 Phone
- In 2024, Latest Guide How To Bypass Oppo K11 5G FRP Without Computer
- Fixed Excel 2000 VBA Runtime Error 9 Subscript Out of Range
- Best Poco C65 Pattern Lock Removal Tools Remove Android Pattern Lock Without Losing Data
- Complete Tutorial to Use VPNa to Fake GPS Location On Tecno Spark 10 Pro | Dr.fone
- 6 Fixes to Unfortunately WhatsApp has stopped Error Popups On Xiaomi Redmi A2+ | Dr.fone
- In 2024, How to Mirror Itel P40+ to Mac? | Dr.fone
- 2024 Approved Diverse Template
- In 2024, How to Change your Poco X6 Location on Twitter | Dr.fone
- Three methods to recover lost data on Samsung Galaxy A15 4G
- Will iSpoofer update On Lava Yuva 2 | Dr.fone
- PassFab iPhone 6 Plus Backup Unlocker Top 4 Alternatives
- Updated In 2024, Update 6 Best Voice Changers You Cant Miss
- Samsung Galaxy M34 5G Camera Not Working Unexpected Error? Fix It Now | Dr.fone
- Full Guide How To Fix Connection Is Not Private on Realme 12 Pro 5G | Dr.fone
- Oppo A78 5G Stuck on Screen – Finding Solutions For Stuck on Boot | Dr.fone
- Hard Resetting an Realme GT 3 Device Made Easy | Dr.fone
- In 2024, How to Transfer Data from Nokia C110 to Any iOS Devices | Dr.fone
- How to install device drivers manually on Windows 11/10
- How To Restore Missing Contacts Files from Razr 40 Ultra.
- Recover your contacts after Y55s 5G (2023) has been deleted.
- Best Methods for OnePlus Ace 2 Pro Wont Turn On | Dr.fone
- Title: Step by Step to Cut Videos in Lightworks
- Author: Morgan
- Created at : 2024-05-19 05:11:36
- Updated at : 2024-05-20 05:11:36
- Link: https://ai-video-editing.techidaily.com/step-by-step-to-cut-videos-in-lightworks/
- License: This work is licensed under CC BY-NC-SA 4.0.

