:max_bytes(150000):strip_icc():format(webp)/GettyImages-165567842-58e5bd253df78c51625e84ab.jpg)
Step by Step to Resize Video in Davinci Resolve

Step by Step to Resize Video in Davinci Resolve
While editing videos, you may change the aspect ratio of the video to change the size of the video to upload on different platforms like YouTube, Facebook, Pinterest, and Instagram. Videos come in different sizes and shapes. Some videos are portraits while the others are landscapes. Similarly, videos are captured in different places with different devices. So, we need to set a certain size of the video.
Definitely, a very large video can make delays in the work, similarly, a small size video can result in low resolution and bad quality. Resizing a video saves a lot of time and money whether you have a business, a YouTube channel, a short film, or a feature film. Today, we shall discuss how to resize the videos?
The two free ways to resize the video…
Here are a number of tools used in the market to resize the videos. We are going to teach How to resize the video in Davinci resolve and Fimora wondershare. Once you have mastered How to resize a video, it would be as simple as the ‘click’.
Now the good news is, you can dramatically export the videos in the same resolution in a very short time.
Let’s dive in !
Part 1. How to resize video in Davinci Resolve
Davinci Resolve is a very powerful tool to edit videos. Let’s suppose, you have some videos shots and all the videos have different sizes, some of the videos fit in the timeline and some are out of the timeline. No matter, you are going to make a video on the same scale with the same size.
Resize the video can be done in three ways:
- Zoom in zoom out
- Cropping
- Retime and scaling
1. Zoom in and Zoom out
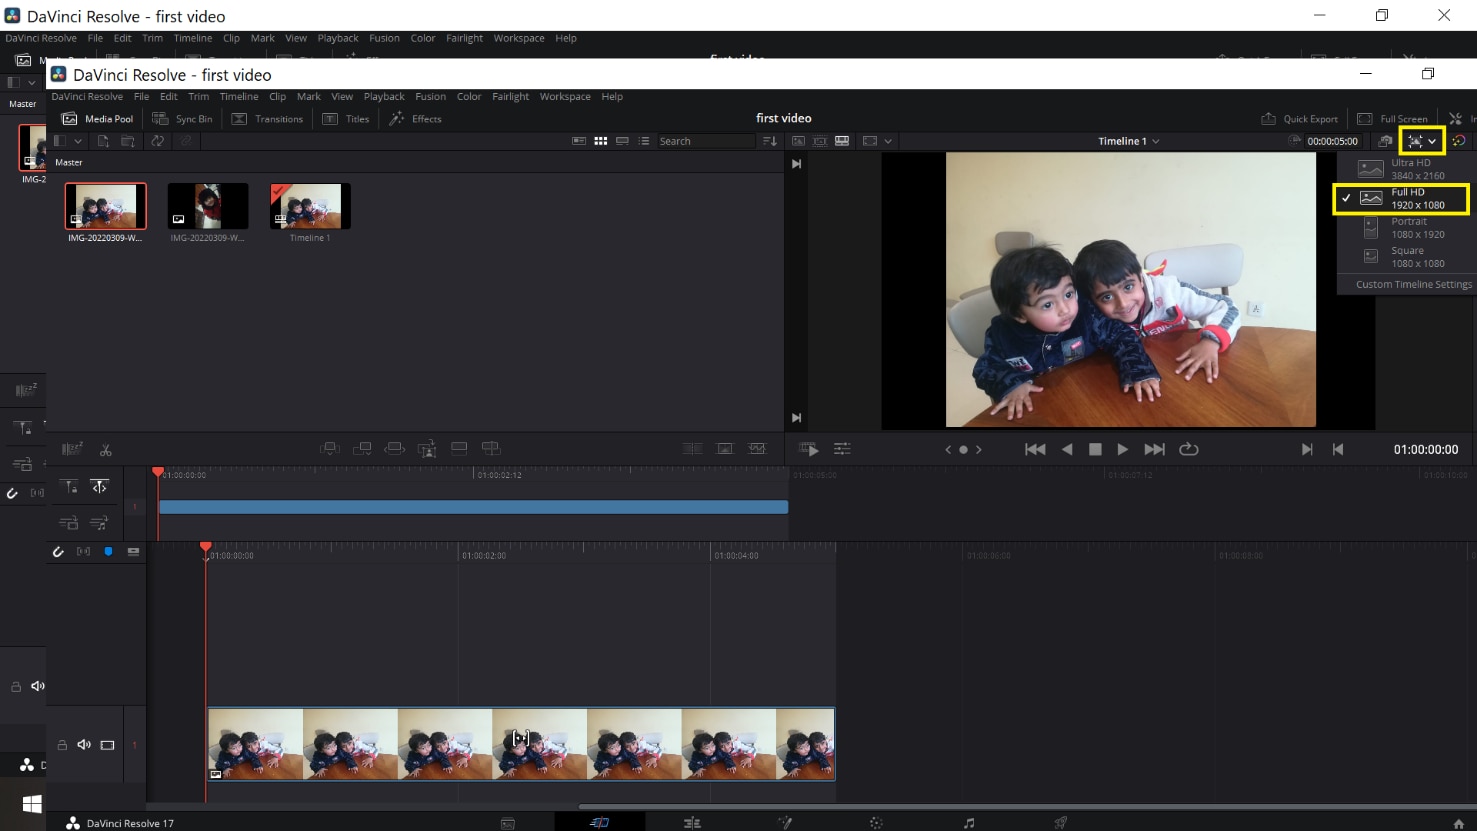
First of all, select the videos in your timeline. You should stay in the middle of the frame to set it because it’s too wide. The timeline moves forward and backward. Let your video be 4k, go to the bottom-right corner and click on timeline format. Select timeline resolution, select ultra HD, or whatever you want from the drop-down list.
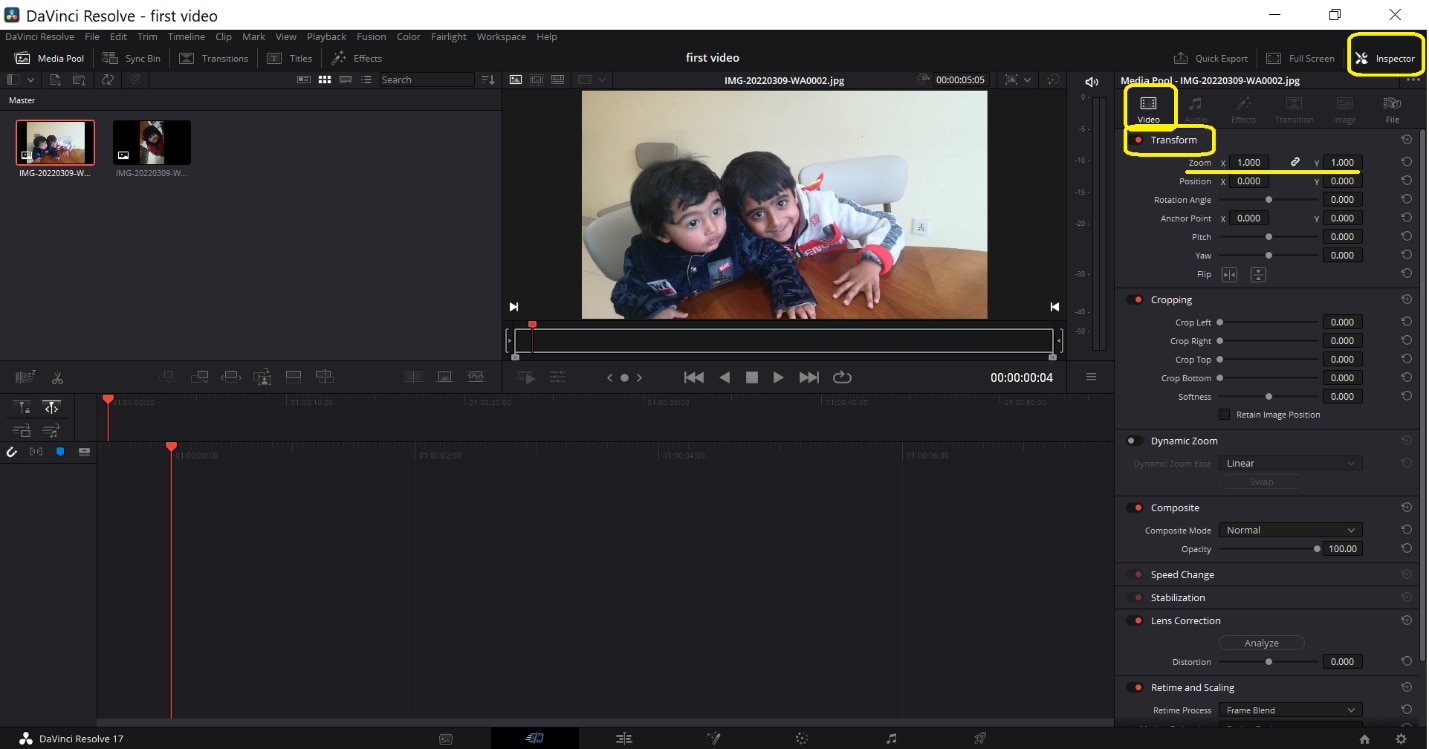
Go to the inspector from the up-right corner and select Transform under the video section. Here you can resize your image. Place the mouse over zoom x (Horizontal) and zoom y (vertical) values to drag left or right for zoom in or zoom out. The video can be resized accordingly.
Here you can also change its rotation.
2. Cropping
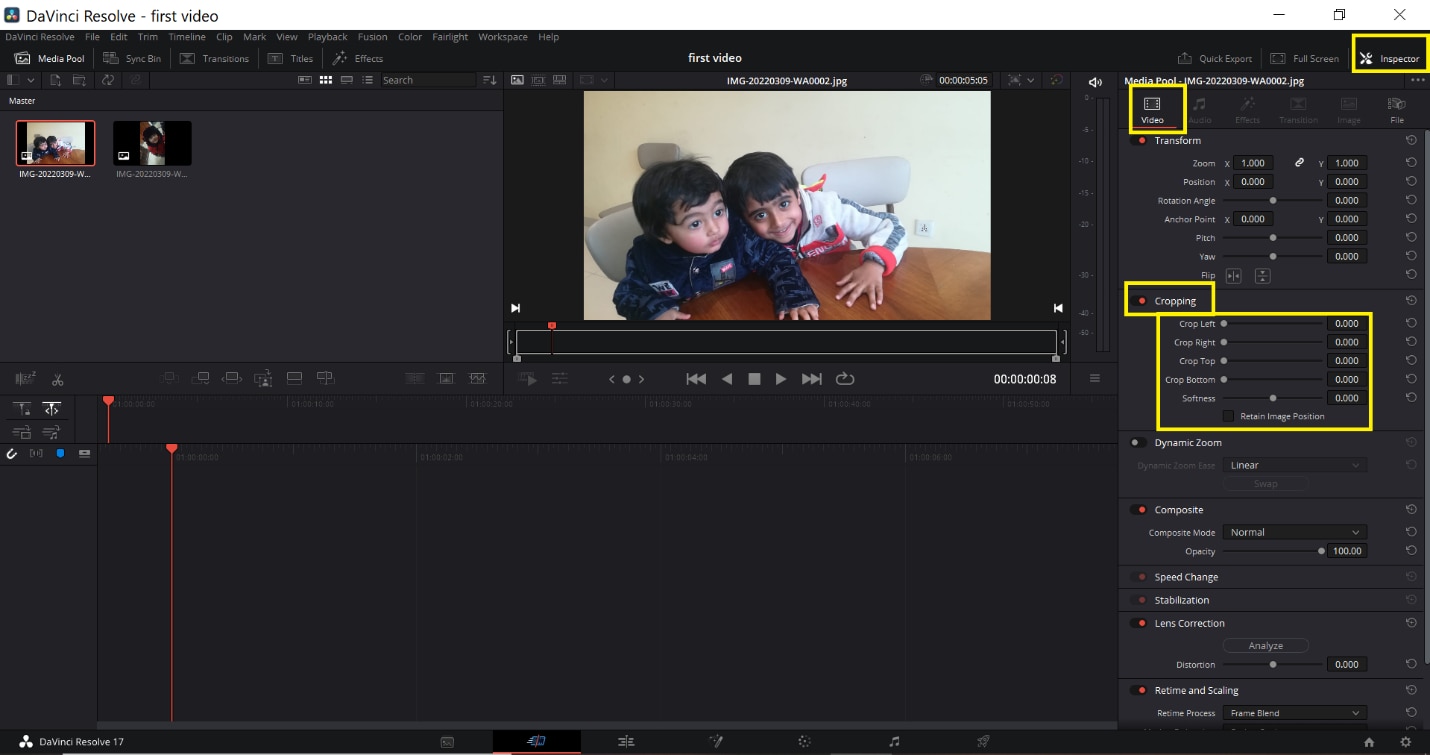
Go to the inspector from the up-right corner and select Transform. Now choose Cropping. Here are four options Crop left, crop right, crop Bottom, and crop Top. You can drag the scale from left to right to adjust the crop settings according to the desired result.
3. Retime and scaling
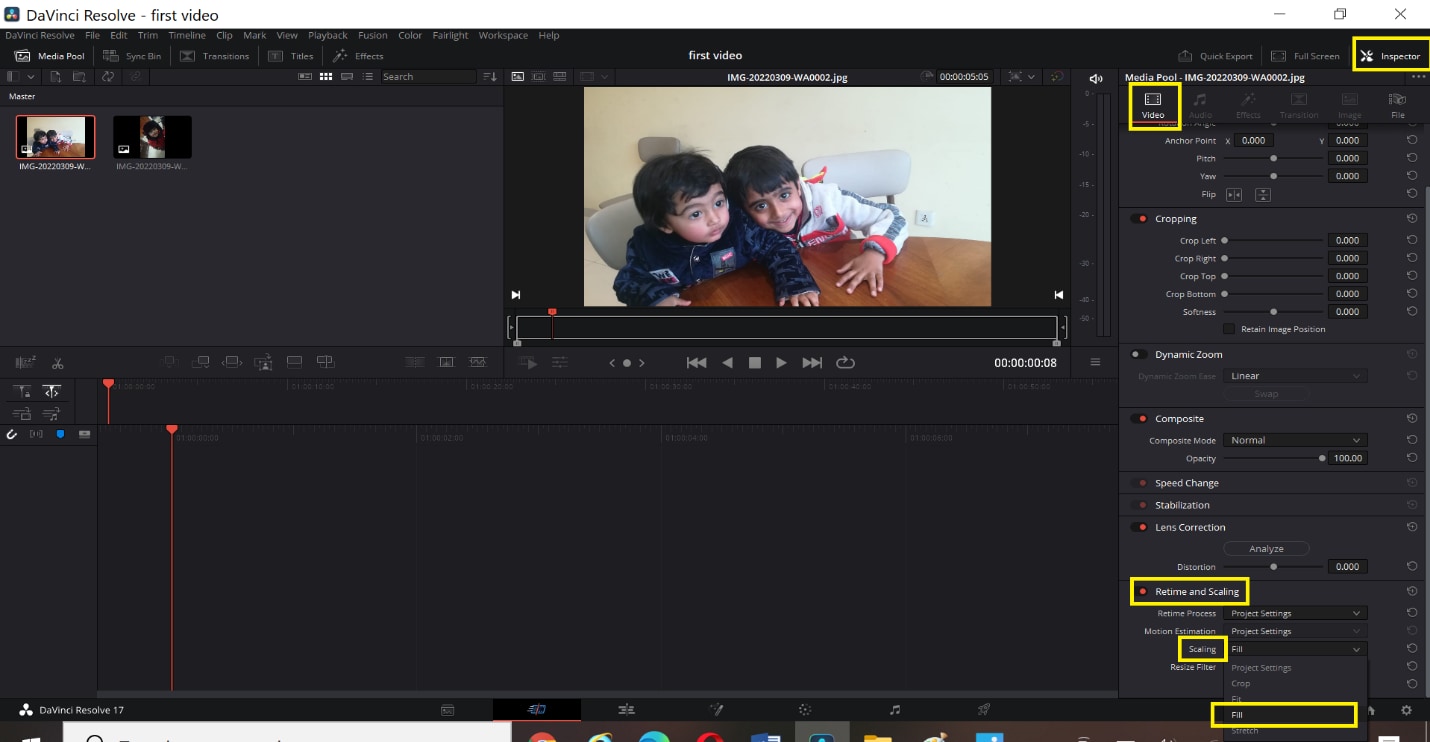
Go to the inspector from the up-right corner and select retime and scaling. You can choose stretch, Fit, Fill, or crop for cropping the video from the drop-down list.
- The Crop function is used to remove the unnecessary or uneven part of the video.
- The Fit function is to have the video auto-center and the selected clips are formatted according to the screen dimensions.
- Stretch Function allows changing the length of the certain clip at a certain duration.
After transforming, cropping, and resizing the videos, you can copy the same settings without repeating the above steps for each video.
Part 2. An alternative way to resize videos with Wondershare
Filmora Video Editor is another great video editing software. It is very easy to use. It offers many different features to resize the videos. Moreover, it allows zooming in the video to highlight the best part of your video. It allows the edited video to export on other devices or YouTube channels.
For Win 7 or later (64-bit)
For macOS 10.14 or later
You can resize your video in three ways:
- Resize video by cropping
- Scale in Scale-out
- Resize by changing Aspect Ratio
1. Resize video by cropping
- Import the videos from your storage by using the import button.
- Drag the videos in the timeline.
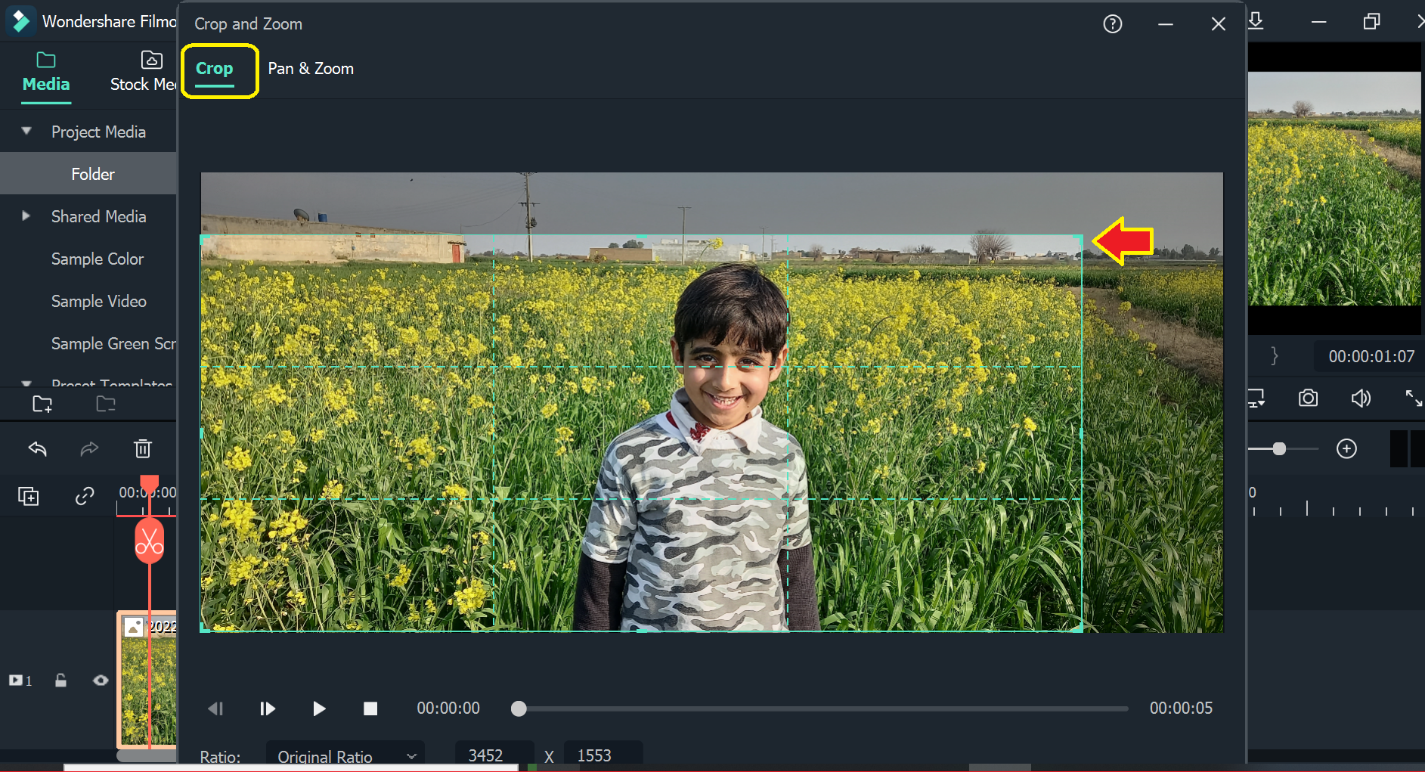
- Right-click on the desired video, crop and zoom option will appear in the menu.
- Select crop tab.
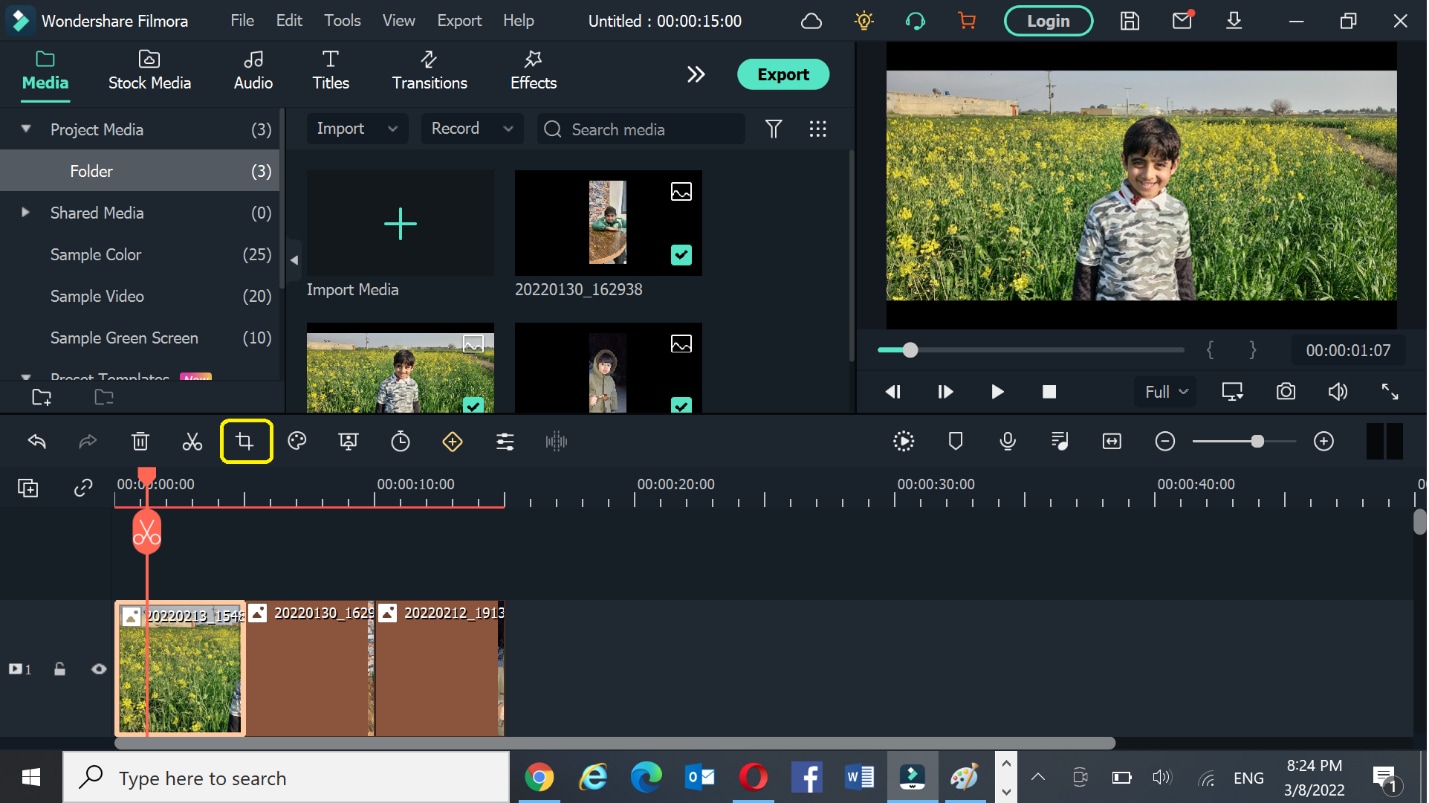
- Grab the corner of the crop inwards, and move to adjust as desired.
- Press the OK tab and your video is cropped.
2. Scale-in and scale-out
- Select the video in the timeline.
- Select the settings
- Click on the Transform tab under image section**.**
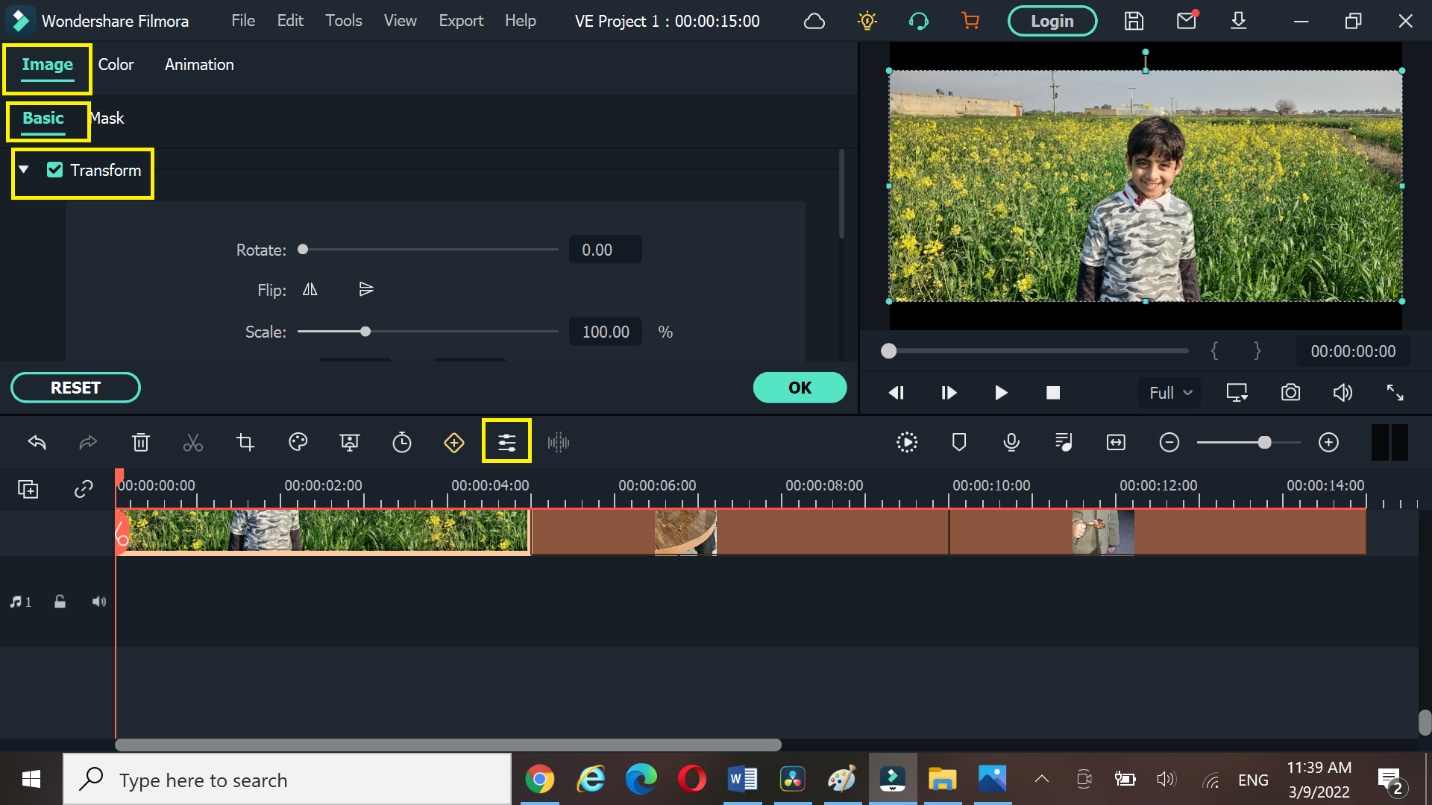
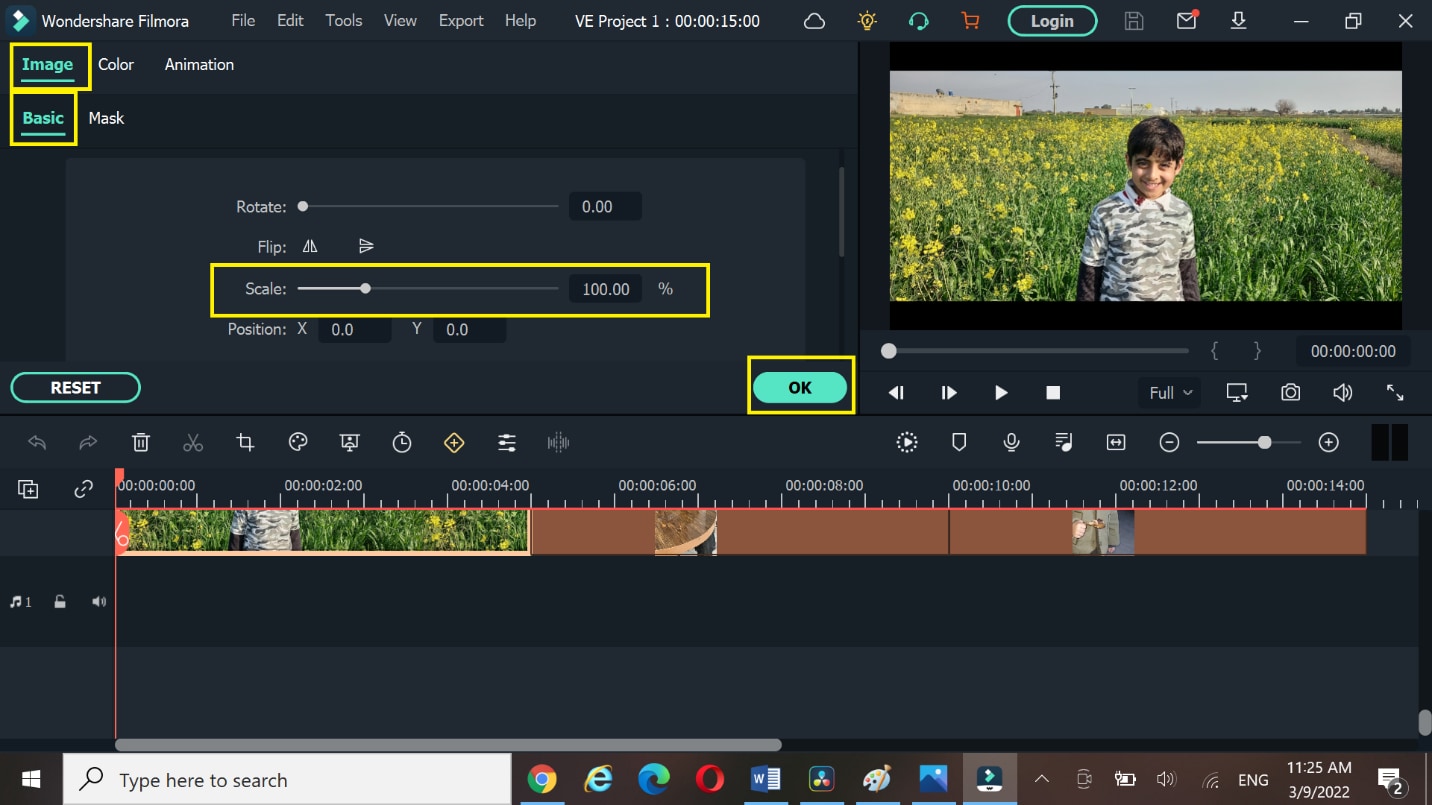
- Move the pointer from left to right on the Scale to zoom in and zoom out the video. You can remove the unwanted portion of the video.
- Press OK tab.
3. Resize video by changing aspect ratio
Some videos are 4k, 6k, and 8k but exporting them in the same resolution and waiting for a long time is really difficult. You need to resize the video to change its width and height. As different social media platforms require a different sizes for videos. We can say, resizing the video in terms of Giga bites and mega bites. You can do it by changing the Project Aspect Ratio. It is a very powerful technique to resize the videos in the timeline.
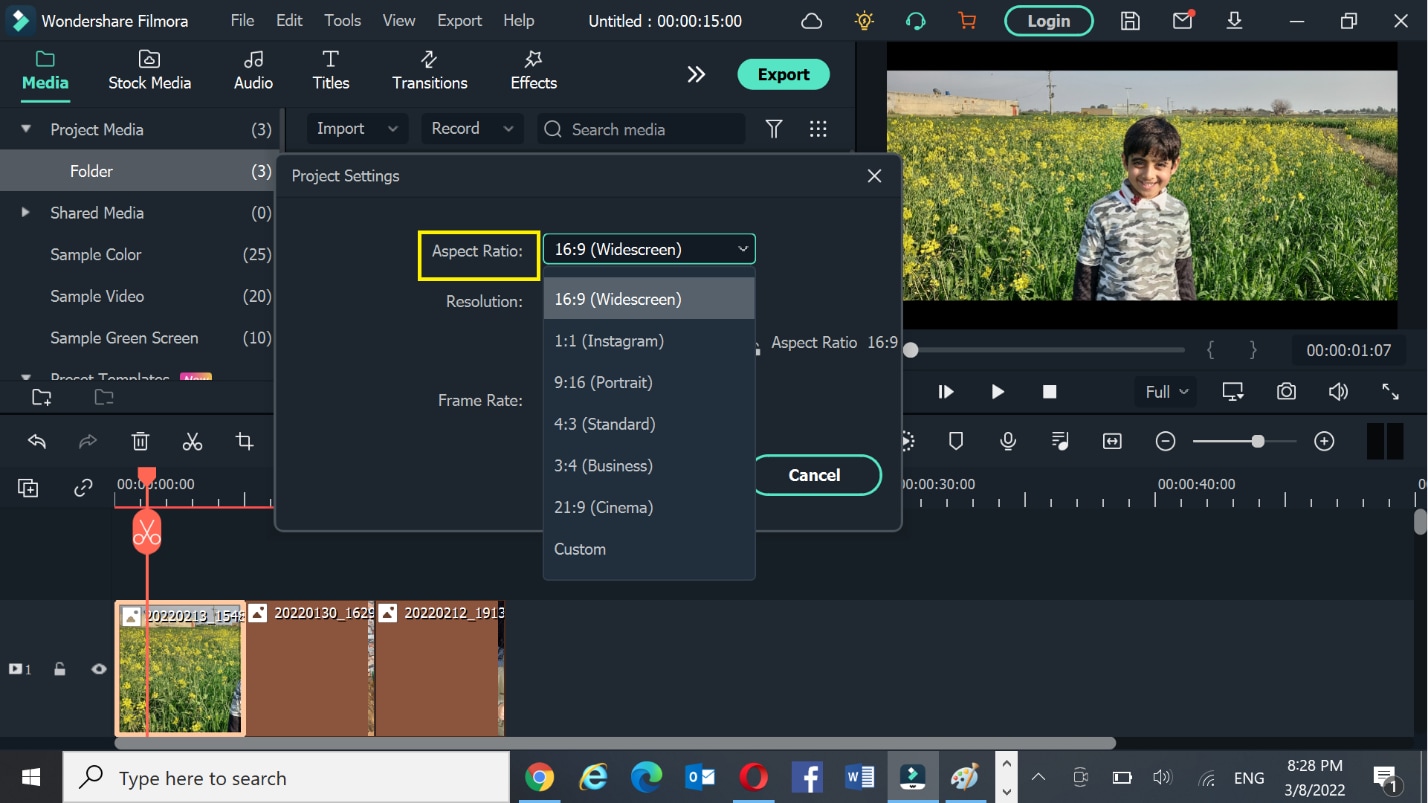
You can change the Project Aspect ratio like 16:9(wide-screen), 1:1(Instagram), 9:16(Portrait), 4:3(standard), 21:9(Cinema), or custom.
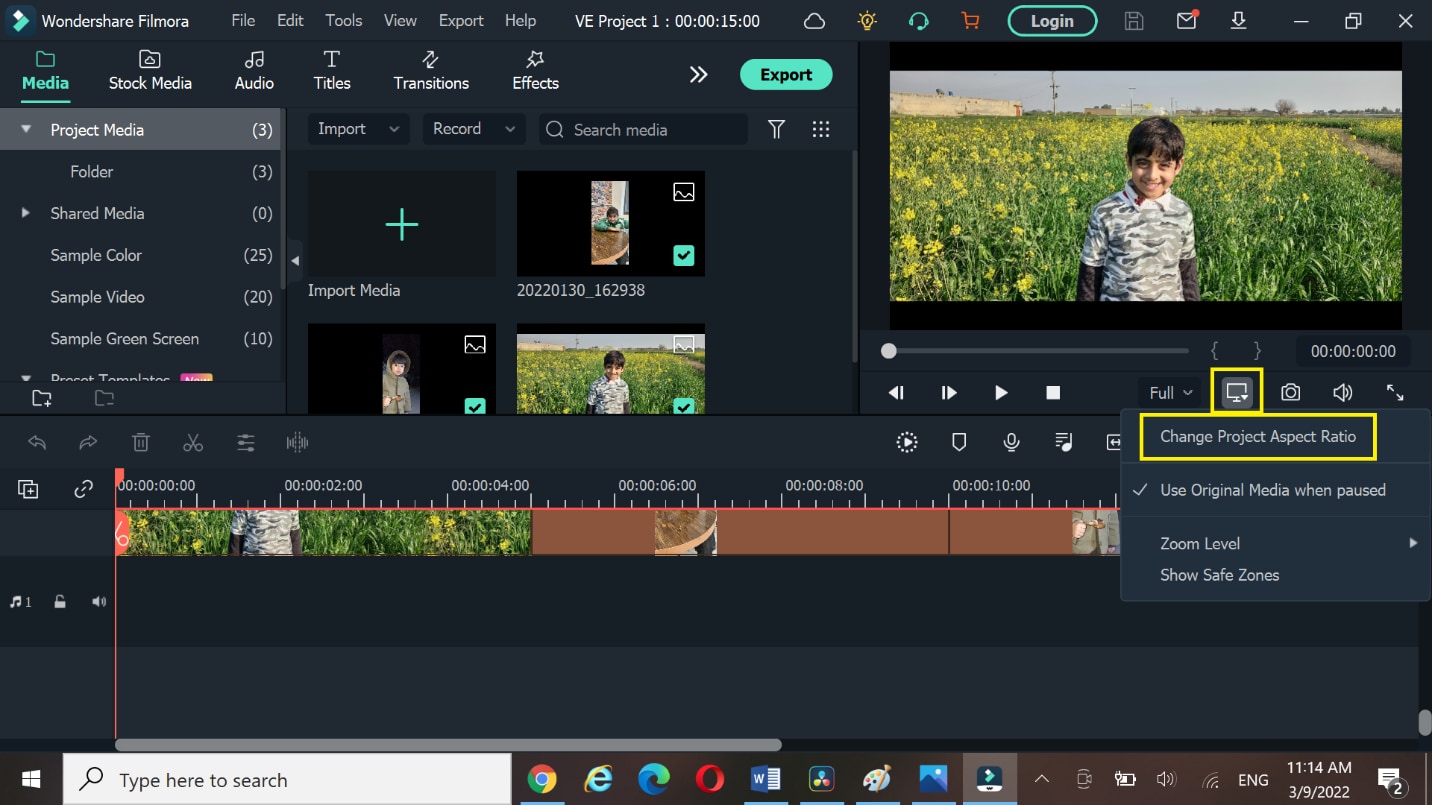
- Select the Aspect Ratio
- Change the ratio 16:9, 1:1, 9:16, 4:3, 21:9, or custom as desired.
- Select OK.
Conclusion
At this time, every business is using marketing to boost the economy, but video marketing is at its climax. Therefore, it is essential to take advantage of video editing tools to increase productivity and efficiency of work.
The Davinci Resolve and Filmora Wonder Share are the best video editing tools to resize the videos. You can easily use these tools on your laptop, tablets, or smartphones in a very short time. Along with this, you can share your compressed videos on different social media platforms like Facebook, Twitter, YouTube, Instagram, and LinkedIn. Moreover, you can enjoy the magical effects of these free tools at the ease of your smartphone. It is beneficial at both small and large businesses for the following
- Time saver
- Economical
- Good video quality
- Presentable
- Increase engagement
Hope the content would be useful for you. If you like the article please leave a comment.
Go to the inspector from the up-right corner and select Transform under the video section. Here you can resize your image. Place the mouse over zoom x (Horizontal) and zoom y (vertical) values to drag left or right for zoom in or zoom out. The video can be resized accordingly.
Here you can also change its rotation.

2. Cropping
Go to the inspector from the up-right corner and select Transform. Now choose Cropping. Here are four options Crop left, crop right, crop Bottom, and crop Top. You can drag the scale from left to right to adjust the crop settings according to the desired result.

3. Retime and scaling
Go to the inspector from the up-right corner and select retime and scaling. You can choose stretch, Fit, Fill, or crop for cropping the video from the drop-down list.
- The Crop function is used to remove the unnecessary or uneven part of the video.
- The Fit function is to have the video auto-center and the selected clips are formatted according to the screen dimensions.
- Stretch Function allows changing the length of the certain clip at a certain duration.

After transforming, cropping, and resizing the videos, you can copy the same settings without repeating the above steps for each video.
Part 2. An alternative way to resize videos with Wondershare
Filmora Video Editor is another great video editing software. It is very easy to use. It offers many different features to resize the videos. Moreover, it allows zooming in the video to highlight the best part of your video. It allows the edited video to export on other devices or YouTube channels.
For Win 7 or later (64-bit)
For macOS 10.14 or later
You can resize your video in three ways:
- Resize video by cropping
- Scale in Scale-out
- Resize by changing Aspect Ratio
1. Resize video by cropping
- Import the videos from your storage by using the import button.
- Drag the videos in the timeline.
- Right-click on the desired video, crop and zoom option will appear in the menu.
- Select crop tab.

- Grab the corner of the crop inwards, and move to adjust as desired.
- Press the OK tab and your video is cropped.

2. Scale-in and scale-out
- Select the video in the timeline.
- Select the settings
- Click on the Transform tab under image section**.**

- Move the pointer from left to right on the Scale to zoom in and zoom out the video. You can remove the unwanted portion of the video.
- Press OK tab.

3. Resize video by changing aspect ratio
Some videos are 4k, 6k, and 8k but exporting them in the same resolution and waiting for a long time is really difficult. You need to resize the video to change its width and height. As different social media platforms require a different sizes for videos. We can say, resizing the video in terms of Giga bites and mega bites. You can do it by changing the Project Aspect Ratio. It is a very powerful technique to resize the videos in the timeline.
You can change the Project Aspect ratio like 16:9(wide-screen), 1:1(Instagram), 9:16(Portrait), 4:3(standard), 21:9(Cinema), or custom.

- Select the Aspect Ratio
- Change the ratio 16:9, 1:1, 9:16, 4:3, 21:9, or custom as desired.
- Select OK.

Conclusion
At this time, every business is using marketing to boost the economy, but video marketing is at its climax. Therefore, it is essential to take advantage of video editing tools to increase productivity and efficiency of work.
The Davinci Resolve and Filmora Wonder Share are the best video editing tools to resize the videos. You can easily use these tools on your laptop, tablets, or smartphones in a very short time. Along with this, you can share your compressed videos on different social media platforms like Facebook, Twitter, YouTube, Instagram, and LinkedIn. Moreover, you can enjoy the magical effects of these free tools at the ease of your smartphone. It is beneficial at both small and large businesses for the following
- Time saver
- Economical
- Good video quality
- Presentable
- Increase engagement
Hope the content would be useful for you. If you like the article please leave a comment.
Go to the inspector from the up-right corner and select Transform under the video section. Here you can resize your image. Place the mouse over zoom x (Horizontal) and zoom y (vertical) values to drag left or right for zoom in or zoom out. The video can be resized accordingly.
Here you can also change its rotation.

2. Cropping
Go to the inspector from the up-right corner and select Transform. Now choose Cropping. Here are four options Crop left, crop right, crop Bottom, and crop Top. You can drag the scale from left to right to adjust the crop settings according to the desired result.

3. Retime and scaling
Go to the inspector from the up-right corner and select retime and scaling. You can choose stretch, Fit, Fill, or crop for cropping the video from the drop-down list.
- The Crop function is used to remove the unnecessary or uneven part of the video.
- The Fit function is to have the video auto-center and the selected clips are formatted according to the screen dimensions.
- Stretch Function allows changing the length of the certain clip at a certain duration.

After transforming, cropping, and resizing the videos, you can copy the same settings without repeating the above steps for each video.
Part 2. An alternative way to resize videos with Wondershare
Filmora Video Editor is another great video editing software. It is very easy to use. It offers many different features to resize the videos. Moreover, it allows zooming in the video to highlight the best part of your video. It allows the edited video to export on other devices or YouTube channels.
For Win 7 or later (64-bit)
For macOS 10.14 or later
You can resize your video in three ways:
- Resize video by cropping
- Scale in Scale-out
- Resize by changing Aspect Ratio
1. Resize video by cropping
- Import the videos from your storage by using the import button.
- Drag the videos in the timeline.
- Right-click on the desired video, crop and zoom option will appear in the menu.
- Select crop tab.

- Grab the corner of the crop inwards, and move to adjust as desired.
- Press the OK tab and your video is cropped.

2. Scale-in and scale-out
- Select the video in the timeline.
- Select the settings
- Click on the Transform tab under image section**.**

- Move the pointer from left to right on the Scale to zoom in and zoom out the video. You can remove the unwanted portion of the video.
- Press OK tab.

3. Resize video by changing aspect ratio
Some videos are 4k, 6k, and 8k but exporting them in the same resolution and waiting for a long time is really difficult. You need to resize the video to change its width and height. As different social media platforms require a different sizes for videos. We can say, resizing the video in terms of Giga bites and mega bites. You can do it by changing the Project Aspect Ratio. It is a very powerful technique to resize the videos in the timeline.
You can change the Project Aspect ratio like 16:9(wide-screen), 1:1(Instagram), 9:16(Portrait), 4:3(standard), 21:9(Cinema), or custom.

- Select the Aspect Ratio
- Change the ratio 16:9, 1:1, 9:16, 4:3, 21:9, or custom as desired.
- Select OK.

Conclusion
At this time, every business is using marketing to boost the economy, but video marketing is at its climax. Therefore, it is essential to take advantage of video editing tools to increase productivity and efficiency of work.
The Davinci Resolve and Filmora Wonder Share are the best video editing tools to resize the videos. You can easily use these tools on your laptop, tablets, or smartphones in a very short time. Along with this, you can share your compressed videos on different social media platforms like Facebook, Twitter, YouTube, Instagram, and LinkedIn. Moreover, you can enjoy the magical effects of these free tools at the ease of your smartphone. It is beneficial at both small and large businesses for the following
- Time saver
- Economical
- Good video quality
- Presentable
- Increase engagement
Hope the content would be useful for you. If you like the article please leave a comment.
Go to the inspector from the up-right corner and select Transform under the video section. Here you can resize your image. Place the mouse over zoom x (Horizontal) and zoom y (vertical) values to drag left or right for zoom in or zoom out. The video can be resized accordingly.
Here you can also change its rotation.

2. Cropping
Go to the inspector from the up-right corner and select Transform. Now choose Cropping. Here are four options Crop left, crop right, crop Bottom, and crop Top. You can drag the scale from left to right to adjust the crop settings according to the desired result.

3. Retime and scaling
Go to the inspector from the up-right corner and select retime and scaling. You can choose stretch, Fit, Fill, or crop for cropping the video from the drop-down list.
- The Crop function is used to remove the unnecessary or uneven part of the video.
- The Fit function is to have the video auto-center and the selected clips are formatted according to the screen dimensions.
- Stretch Function allows changing the length of the certain clip at a certain duration.

After transforming, cropping, and resizing the videos, you can copy the same settings without repeating the above steps for each video.
Part 2. An alternative way to resize videos with Wondershare
Filmora Video Editor is another great video editing software. It is very easy to use. It offers many different features to resize the videos. Moreover, it allows zooming in the video to highlight the best part of your video. It allows the edited video to export on other devices or YouTube channels.
For Win 7 or later (64-bit)
For macOS 10.14 or later
You can resize your video in three ways:
- Resize video by cropping
- Scale in Scale-out
- Resize by changing Aspect Ratio
1. Resize video by cropping
- Import the videos from your storage by using the import button.
- Drag the videos in the timeline.
- Right-click on the desired video, crop and zoom option will appear in the menu.
- Select crop tab.

- Grab the corner of the crop inwards, and move to adjust as desired.
- Press the OK tab and your video is cropped.

2. Scale-in and scale-out
- Select the video in the timeline.
- Select the settings
- Click on the Transform tab under image section**.**

- Move the pointer from left to right on the Scale to zoom in and zoom out the video. You can remove the unwanted portion of the video.
- Press OK tab.

3. Resize video by changing aspect ratio
Some videos are 4k, 6k, and 8k but exporting them in the same resolution and waiting for a long time is really difficult. You need to resize the video to change its width and height. As different social media platforms require a different sizes for videos. We can say, resizing the video in terms of Giga bites and mega bites. You can do it by changing the Project Aspect Ratio. It is a very powerful technique to resize the videos in the timeline.
You can change the Project Aspect ratio like 16:9(wide-screen), 1:1(Instagram), 9:16(Portrait), 4:3(standard), 21:9(Cinema), or custom.

- Select the Aspect Ratio
- Change the ratio 16:9, 1:1, 9:16, 4:3, 21:9, or custom as desired.
- Select OK.

Conclusion
At this time, every business is using marketing to boost the economy, but video marketing is at its climax. Therefore, it is essential to take advantage of video editing tools to increase productivity and efficiency of work.
The Davinci Resolve and Filmora Wonder Share are the best video editing tools to resize the videos. You can easily use these tools on your laptop, tablets, or smartphones in a very short time. Along with this, you can share your compressed videos on different social media platforms like Facebook, Twitter, YouTube, Instagram, and LinkedIn. Moreover, you can enjoy the magical effects of these free tools at the ease of your smartphone. It is beneficial at both small and large businesses for the following
- Time saver
- Economical
- Good video quality
- Presentable
- Increase engagement
Hope the content would be useful for you. If you like the article please leave a comment.
10 Recommended Websites to Discover Awesome Premiere Pro Video Templates
The Premiere Pro templates are a great help to start working on the video right away. You don’t need to create your video from scratch thus, saving time. Moreover, there are fully adaptable features that make your video eye-catching. The article provides knowledge about 10 free Premiere Pro templates. So, let us commence this! Are you with us?
Part 1: 10 Popular Websites to Find Premiere Pro Templates
There is an extensive range of websites to access the free Adobe Premiere templates. It is important to know the workability of such websites and what they bring to the house. Therefore, the sub-section of this write-up would shed light on 10 of such websites where you can download Adobe Premiere templates and find them compatible with the software.
So, what are we waiting for? Let us begin the process!
1. Envato Elements
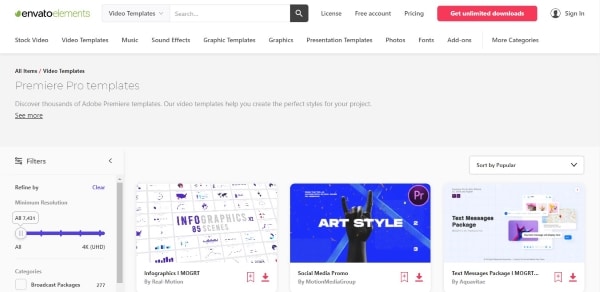
The first website offering Adobe Premiere templates is known as Envato Elements. One can count on this webpage to access millions of creative assets. Envato Elements comes up with Adobe Premiere Pro templates free, stock videos, graphic templates, photos, and website templates.
Moreover, if you are into print and website design, you will find Envato Elements beside you. The search bar makes the search effective as you can choose between categories or applications. The search filter has made life easy for designers and creators.
2. Storyblocks
Storyblocks are the next big thing if you need to download Premiere templates without much effort. This website presents an awful load of green screen footage, music and sound effects, animated backgrounds, royalty stock footage, and templates for Premiere Pro. It also has a Maker, enabling the user to make the professional video in seconds.
The filtering option of Storyblocks is to die for. Style or software can filter the templates and effects to have what we need without wasting much time.

3. MotionElements
The third royalty-free marketplace making a brand name for itself is MotionElements. The website offers more than 3 million assets for its users in different industry sectors. You can access Premiere Pro templates free download with other stock videos and audio files.
From images, music, templates, effects to transitions, logos, and animations, MotionElements has covered its basis. The search filter gives multiple categories, including software, category, and style.

4. Motion Array
Claiming to be an all-in-one video and filmmaker’s platform, Motion Array takes complete responsibility for making your projects successful. The website takes the raw concept of your project and turns it into completion. Adobe Premiere Pro templates can be downloaded via Motion Array with other effects.
You can have Adobe Premiere Pro, Final Cut, DaVinci, and After Effects templates. The stock motion graphics, sound effects, videos, and photos are some of the strengths of Motion Array. The unlimited downloads save you from emptying your wallet.

5. Adobe Stock
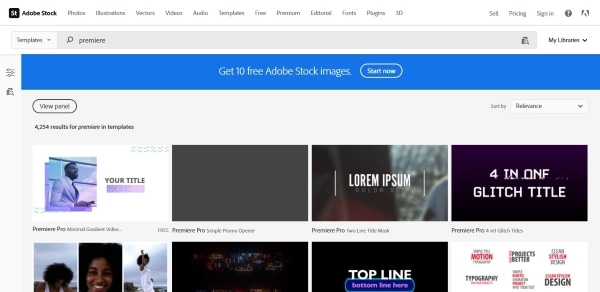
While we are on the subject of template Adobe Premiere free, how can we forget about Adobe Stock? Adobe Stock is a serious archive for templates, especially for Adobe Creative Suite applications. Moreover, getting hands-on an impeccable library of stock photos, audio, and videos, is one of the strongest traits of Adobe Stock.
The search filter has different options to make the search easier, for instance, application, categories, transitions, and whatnot. If you type free in the search bar, you will find Premiere Pro video templates so that downloading them wouldn’t cost a penny.
6. Mixkit
Mixkit is the top choice for getting Premiere Pro split-screen template among other royalty-free assets. Mixkit offers free Premiere Pro templates with After Effects, Final Cut Pro, DaVinci Resolve, and much more.
Moreover, Mixkit can be used for stock videos, music, sound effects, and music tracks. The quality is always high, so you don’t need to worry about that.

7. VideoHive
VideoHive offers the best quality and fast researched Premiere Pro templates. With more than 9,100 free Adobe Premiere templates, VideoHive helps add motion graphics and effects to your videos. Most filmmakers prefer the usage of motion graphics as it improves time and cost-effectiveness and enhances ease in adding animations to the projects.
If you are interested in making a slideshow, animated title, transition, or logo stings, you will find VideoHive there for you.

8. Videezy
Videezy is a fair choice if you need to access Premiere templates free in the most effortless fashion. The search bar of Videezy stock marketplace has interactive filter options. The user is free to navigate by sorting the results based on their presence on the website. Moreover, you can choose between the file type and bring productivity to the media industry.
The resolution can also be decided as Videezy offers SD, HD 720, HD 1080, 4K, and Ultra HD. Doesn’t it feel like a dream come true?

9. Videvo
Videvo is the right shop for you if you prefer the ease-of-use over-complicated workability. Offering an interactive interface and progressive search results, Videvo boosts the production value of your projects multifold. Furthermore, this free Premiere Pro templates provider is an allrounder from the video footage, motion graphics, templates, music, and sound effects.
The user is free to customize titles, intros, typographs, overlays, and transitions. Launch the website, download the template, and get into the process.

10. Monsterone
Offering Trending, Newest, Popular, and Undiscovered filtering options and choosing the right tags, Monsterone has made it to the bucket list of professionals in the field. More than 400 Premiere Pro templates can be downloaded to start working on the deadline right away.
The templates can be effortlessly previewed and launched before accessing them. It helps the user make a conscious choice. The resolution can also be set as the user deems necessary.

The Bottom Line
We are surrounded by videos 24/7. It is true for most creative professionals in the industry who are expected to edit the video to make it more captivating and attractive. One needs to have access to free Premiere Pro templates to obtain a sense of originality as we save money and time on making videos from scratch.
For this very reason, the article discussed 10 compatible and popular websites where Premiere templates free are found. We expect the user to make the right choice based on their niche in the industry. The video editing process can be accelerated by using a phenomenal tool which is Wondershare Filmora.
Filmora has the right toolbox set to make video editing easier and flawless. From cropping to flipping and motion tracking to adding keyframes, Filmora knows it all. One can also count on this tool to add backgrounds in Hollywood effect to gain innovation at all costs.
Wondershare Filmstock is your one-stop shop for royalty-free effects, video footage, clips, video effects, and audio tracks. Do not forget to review Filmora and Filmstock about their workability in the flesh.
Click here to find 10 Free After Effects Logo Templates .
Wondershare Filmora
Get started easily with Filmora’s powerful performance, intuitive interface, and countless effects!
Try It Free Try It Free Try It Free Learn More >


Easy Way to Add Transitions to Videos
Editing a video is equally important as recording a video. A raw video footage is never appealing to the eyes because of sudden cuts, unnecessary parts, and lack of eye-catching effects. That is why video editing is crucial for turning an unappealing raw video into an attention-grabbing video. As a matter of fact, the way you edit your video makes your video stand out when you are posting on social media platforms.
One of the most important aspects of video editing is adding transitions to video clips. When you jump from one scene to another and make sudden cuts, you need to apply some video transitions so that the move from one scene to another becomes soothing to the eyes. Different video editors have different transition effects and Wondershare Filmora has the best collection of transitions. We will illustrate how to add transition in Filmora and how to improve your video with video transitions.
Part 1. What is a Video transition effect?
A video transition effect is the most commonly used graphical effect in video editing. A video transition effect is essential whereby you connect one shot to another, especially when you are making sudden cuts in the video. Therefore, a video transition effect sits in between two shots and connects them together smoothly so that it does not look odd to the eyes. Video editing with transitions is a common practice for short videos on social media, presentation videos, and even movies.
A video transition effect is effective when you are jumping from two moods and emotions in the video. It is equally useful while jumping between storylines, points of view, and timelines. Besides, you can spice up your narrative and make your video eye-catching as well as eye-soothing. There are different types of video transition effects such as fade in and out, zoom in and out, dissolve, wipe and pan.
Part 2. How to add transitions in video?
To add transitions to your video, you will need a video editor. You should choose a video editor that has a wide collection of transition effects so that you can apply them to your video as per your preference. If you are someone who regularly makes videos and edits them, a variety of transitions will make the videos look different. There are Movie Maker transitions for Windows users and iMovie transitions for Mac users. But we recommend Wondershare Filmora as the best video editor for adding transitions.
<pFilmora is a professional video editor with so many different categories of transitions including the trending ones. Their team continuously adds new transitions to their collection, and you can download them and use on your videos. Starting from basic, slideshow, and social media to 3D, light and smoke, there is no dearth of transitions to fulfill your requirements. Here are the steps how to add transition in Filmora. Free Download For Win 7 or later(64-bit)
Free Download For macOS 10.14 or later
Step1 Download and install Filmora on your computer. Filmora is available for Windows and Mac users. Launch Filmora and click on New Project.

Step2 Drag and drop your video clips under Project Media folder. Thereafter, drag and drop them on Timeline.
If you have one raw video file, you can split it up into multiple video clips to add transitions in between them.
Step3 Go to Transitions tab located at the top bar. You will see all the categories of transitions on the left panel.

Step4 Once you select your desired transition effect, drag and drop it in between the video clips. You can add multiple transition effects for different video clips.

Play the video after you are done editing and adding transitions. Thereafter, click on Export button to save the video on your hard drive. You should follow the same steps on how to add transition effects in reels, status videos, and YouTube videos.
Part 3. Video transitions tips and tricks
If you want to make your video stand out by simply using video transition effects, you have to follow the following tips and tricks.
Consistency – Amateur video editors tend to use several extravagant transitions in one video that distract and even annoy the audience. You are using video transition effects not to distract but to smoothen the video content. Therefore, you need to be consistent with the video transition effect you use. You should use one or maximum of two transition effects throughout the video so that the audience does not get distracted.
Experiment – While it is true that you should not be using too many video transitions in one video, but you should definitely apply different video transition effects in different videos initially. This will help you to understand which transition is getting better traction, and thereafter, you can stick to it for the rest of your videos. This is particularly useful when you are making similar type of content for social media and video streaming sites.
Out of the Box – The reason you recommended Wondershare Filmora is that there is a huge collection of different types of transition effects. If you use the regular transitions such as fade, zoom, wipe, and dissolve, you cannot create an impression among your viewers. You have to use out of the box transitions so that your video can look and feel different even when you content is not. There are 3D effects, social media effects, and different genres of effects that can go well with your video content.
Judicious – There is a difference between transition effects and video effects. Transition effects should last only for a fraction of a second so that there is no aftereffect in mind. On the contrary, a video effect can last as long as required in the video. Therefore, do not stretch the duration of a transition effect and keep it as short as possible. Similarly, you should not use transition effects here and there unnecessarily. It should be used only when there is a proper scope such as scene cuts, mood changes, and subject changes.
Meaningful – Even transition effect has a meaning behind it and you should understand it and use wherever appropriate. For example, fade out effect signifies the fading of a scene or changing of mood. Similarly, a dissolve effect is appropriate when the subject is dissolved in certain thoughts or a scene is getting dissolved. That way the effect will look natural and more meaningful as well as impactful.
The Bottom Line
Video transition effects are essential in almost all types of videos. They enhance the video content and make the transition between scenes smoother. You should choose your video editor wisely so that you can avail different types of video transition effects. We recommend Wondershare Filmora for its better collection of video transition effects for all types of videos.
Step1 Download and install Filmora on your computer. Filmora is available for Windows and Mac users. Launch Filmora and click on New Project.
Step2 Drag and drop your video clips under Project Media folder. Thereafter, drag and drop them on Timeline.
If you have one raw video file, you can split it up into multiple video clips to add transitions in between them.
Step3 Go to Transitions tab located at the top bar. You will see all the categories of transitions on the left panel.

Step4 Once you select your desired transition effect, drag and drop it in between the video clips. You can add multiple transition effects for different video clips.

Play the video after you are done editing and adding transitions. Thereafter, click on Export button to save the video on your hard drive. You should follow the same steps on how to add transition effects in reels, status videos, and YouTube videos.
Part 3. Video transitions tips and tricks
If you want to make your video stand out by simply using video transition effects, you have to follow the following tips and tricks.
Consistency – Amateur video editors tend to use several extravagant transitions in one video that distract and even annoy the audience. You are using video transition effects not to distract but to smoothen the video content. Therefore, you need to be consistent with the video transition effect you use. You should use one or maximum of two transition effects throughout the video so that the audience does not get distracted.
Experiment – While it is true that you should not be using too many video transitions in one video, but you should definitely apply different video transition effects in different videos initially. This will help you to understand which transition is getting better traction, and thereafter, you can stick to it for the rest of your videos. This is particularly useful when you are making similar type of content for social media and video streaming sites.
Out of the Box – The reason you recommended Wondershare Filmora is that there is a huge collection of different types of transition effects. If you use the regular transitions such as fade, zoom, wipe, and dissolve, you cannot create an impression among your viewers. You have to use out of the box transitions so that your video can look and feel different even when you content is not. There are 3D effects, social media effects, and different genres of effects that can go well with your video content.
Judicious – There is a difference between transition effects and video effects. Transition effects should last only for a fraction of a second so that there is no aftereffect in mind. On the contrary, a video effect can last as long as required in the video. Therefore, do not stretch the duration of a transition effect and keep it as short as possible. Similarly, you should not use transition effects here and there unnecessarily. It should be used only when there is a proper scope such as scene cuts, mood changes, and subject changes.
Meaningful – Even transition effect has a meaning behind it and you should understand it and use wherever appropriate. For example, fade out effect signifies the fading of a scene or changing of mood. Similarly, a dissolve effect is appropriate when the subject is dissolved in certain thoughts or a scene is getting dissolved. That way the effect will look natural and more meaningful as well as impactful.
The Bottom Line
Video transition effects are essential in almost all types of videos. They enhance the video content and make the transition between scenes smoother. You should choose your video editor wisely so that you can avail different types of video transition effects. We recommend Wondershare Filmora for its better collection of video transition effects for all types of videos.
A Comprehensive Guide on Converting Slo-Mo Videos to Normal Speed Videos On iPhone
Thanks to the eccentric and offbeat elements, slow-motion videos have become the super-fun, state-of-the-art trend. Whether you’re in the bar trying to click the aesthetic, cinematic video or capture cool, unique, and enticing birthday moments, you can always rely on the slow-mo feature.

But do you ever feel like converting the slow-motion video in your iOS device to a normal video? Perhaps you thought the slow-mo video would be more attractive, but it’s not, or maybe you want to determine how to remove slow-motion from a video iPhone.
No matter the reason, there are numerous ways to remove slow motion from iPhone video. In this article, you’ll learn the various methods to convert slow-motion video into a regular video on your iPhone or iPad. Also, learn the steps involved in achieving it.
So, let’s start.
How To Convert Slow Motion Video to Normal on iPhone and iPad
Due to the slow-motion and Time-lapse modes that are built into the iPhone, people may quickly record slo-mo and time-lapse clips using their iOS smartphone cameras.
Access the iPhone camera, select Slo-mo, press the Record icon once to begin filming, and then press it once more to stop. This will create a slo-mo video.
Do you ever wish to get your video’s slow motion removed? How to convert slow-motion video to normal on an iPhone? Well, here’s your answer.
Method 1. Using the Photos App
The Photos app is an in-built app for iPhone and iPad that features editing capabilities like rotation, resizing, and auto-enhancement, in addition to helping you manage videos and images.

You may quickly and effortlessly turn a slow-mo video into a regular-speed one with the Photos app’s tucked-away slow-motion converter feature. Additionally, there won’t be any quality loss in your video.
And here are the steps on how to remove slow-mo from iPhone video using the Photos app on an iPad or iPhone to turn it to normal speed.
Step1: Take your iPad or iPhone, navigate to the Photos app, open it, and then go to the bottom to hit the Albums tab.
Step2: Choose the Slo-mo option, and subsequently select the video you wish to turn into a regular speed video. Go to the top right corner of the screen and hit the Edit button.

Step3: If you look under the timeline, you’ll find vertical lines. Here, the area with apart spaces signifies slow motion.

Step4: To learn how to remove slow mo from iPhone video is to learn how to turn it into regular speed. To do so, select the slow-motion bar and drag it towards the other one to position the lines at a close distance.
Step5: When finished, hit the Done button and save this video. However, if you think this change was unnecessary or incorrect, you can discard it by clicking on Edit → Revert → Revert To Original.

Editing Tip
- The Photos app on iPhone doesn’t allow you to convert any video shot at 24fps or 30fps to slow motion.
- You cannot reduce or decrease the overall size of the video after conversion.
Pros & Cons
Pros
- It is a built-in app on every iOS device.
- Saves the hassle of downloading any third-party app.
- No charges are applicable for using this app.
- Excellent slow-mo video convertor.
Cons
- Limited speed adjustment for the conversion of slow-mo videos into regular videos.
Method 2: Using Other Converter Apps
You may think that converting slow-mo video to a regular speed video on your iPad or iPhone is convenient, but there’s a drawback too. The method mentioned above can only help you with minimalistic speed changes, which may not give you the desired result.
However, other converter apps also help you change slow-mo video to regular iPhone video. These apps work seamlessly on your PC or Mac to turn your slow-mo videos on the iPhone or Mac to normal-speed video using customized and high-resolution settings.
Overview of The Apps
| Particulars | iMovie | Slow-Fast Motion Video Editor |
|---|---|---|
| Type (versatile or specialized) | Versatile | Specialized |
| Supported OS | iOS, Mac | iOS, Mac |
| Average Rating | 3.9/5 | 4.7/5 |
| Price | Free | Free |
| Best for | Video editing with cinematic effects | Slo-mo video conversion |
1) iMovie

iMovie is an excellent option if you’re looking for an application to modify a video with additional tools and convert the slow-mo to a regular pace. Among the top video converters for the iPhone is iMovie.
It offers a wide range of tools and capabilities that allow you to change the video transition, audio, and speed, add music, animated text, video overlay effects, normal video effects, and more. Additionally, it aids users in producing stunning films and commercials in a Cinematic manner.
iMovie could convert slow-mo footage to normal speed, in case you didn’t know. Did you ever attempt to change slow mot to regular speed in iMovie? With the use of iMovie, how can slow-motion video be made normally on an iPhone?
Here are the instructions.
Step1: Open the iMovie app, click on the ‘Create Project’ option, → tap on ‘Movie → Media → Video.

Step2: Tap on the slow-mo option, select the slow-motion video you want to convert and hit the ‘Create Movie’ option.

Step3: Get to know the editing options by clicking on the timeline. Then, click on the clock (speed) icon. At the beginning of the lines, you’ll find a turtle. It demonstrates slow motion. Plus, the number right behind the rabbit at the end signifies the speed.

Step4: To turn this slow-motion video into a regular speed video, drag and slide the speed control slider until the number turns 1x.
Step5: To save the changes, tap on the Done option. Subsequently, edit the video as per your preference.
2) Slow-Fast Motion Video Editor

This slow-mo video converter app helps you slow down or speed up any slow-motion video without any watermark and charges. This free app supports both landscape or portrait operation, unlimited video length, and corrected audio pitch.
The application is convenient to use and seamless to speed up or slow down any parts or clips of your videos. Without charging a penny, this app meets the users’ expectations. If you’re wondering how to use this converter app, here’s a step-by-step guide:
Method 3. Using Third-Party Online Tools
The smartphone sector’s most cutting-edge functionalities can be found on iPhones. Users may capture slow-motion videos, for instance. However, you may consider accelerating the slo-mo movie to regular video speed once it has been recorded.
Using your smartphone, how would you go about doing that? Well, we have seen that using the built-in Photos app and converter apps like iMovie can help, but can they really provide the level of customization and outcomes you need?
When things get professional and the expectations are too high, it’s best to use third-party online tools. So, here are a few practical choices:
Overview of the Online Tools
| Particulars | KAPWING | Clideo | EZGIF |
|---|---|---|---|
| Supported File Format | .AVI, .FLV, 3GP, and other edge file types. | MP4, MOV, WMV, AVI, WEBM, FLV, MKV, MPG, MPEG, MTS. | MNG files |
| Watermark | Not Available | Only in Free version | Not Available |
| Available Speed Option | As fast as 4x for an accelerated video | 0.25 times to 2 times | 0.25 times to 2 times |
| Time Consuming | No | Moderate | No |
1) KAPWING

Kapwing is a tool for group film editing that enables people to collaborate to produce original videos. For individuals to create the ideal video, Kapwing offers a collection of pre-built themes, stock footage, and materials.
Kapwing acts as a digital office solution that enables individuals to organize all of their resources in one location and work together on projects utilizing sharing features. Amid its vast range of features, its slow-mo converter is the most famous and widely used one.
- Rating: 4.1/5
- Price: Plan starts at $20 per month
Step-By-Step Guide To Convert Slow-Mo on Iphone Using Kapwing App
Step1: First, download and install the Kapwing app from the App Store.
Step2: Upload the slow-mo video that you want to speed up.
![]()
Note: Kapwing also lets you speed up any slow-mo video present on TikTok, Twitter, or YouTube.

Step3: Perform the video clip speed adjustment by utilizing the Kapwing sidebar. You can accelerate the video clip speed up to four times the original speed. If not, you can play in every level in between.

Step4: Finally, click on the Export option, and the final video clip with all speed adjustments will be generated within a few seconds.

2) Clideo

Among the finest free tools for rapid photo or video editing is Clideo. You can start upgrading your material by uploading files in a wide range of formats to their site.
Limitless customization is possible with the paid version for just $9 a month. The capabilities, though, aren’t as varied as those offered by rivals, and there aren’t any mobile apps for people who want to generate material while on the go.
- Ratings: 4.3/5
- Price: Starts at $9 per month
Step-By-Step Guide To Convert Slow-Mo on Iphone Using Clideo App:
Step1: From your computer (Mac) or mobile device (iPhone), upload a video. You can also add from a Dropbox or Google Drive account.

Step2: Select to speed up the video after it has been recorded. Then, if required, muffle its sound and alter the file type.


Step3: The video can be seen directly in your browser. Click “Download” after you are finished and delighted with your creation.

3) EZGIF

EZGIF is a free online editing tool that enables individuals to change the playback speed of any video. Not only does it effectively convert your slow-mo video on an iOS device to a normal speed video, but it also comes with many other features (later on that). The website has a simple, outdated interface, but except for that, it’s a fine app for beginners.
Step-By-Step Guide To Convert Slow-Mo on Iphone Using Clideo App:
Step1: Upload the video clip and choose a speed multiplier to start using this program.

Step2: A number less than one will slow down playback; a number greater than one will quicken it.
Step3: Thus, input 0.5 to run the program at 1/2 its normal speed, and so forth.

Step4: You can preserve the audio track’s original tempo, vary the speed along with the video, or silence the audio entirely.
Convert Your Slo-Mo Videos Into Regular Ones In a Few Simple Steps With Filmora
Filmora is a leading online video editing software that has become the preferred choice of all professionals and amateurs. From everyday needs to something formal, it helps you edit videos for every occasion.
You can change pace swiftly or consistently in Filmora and vary the pace of the audio or video recordings. Use the Speed Ramping tool in Filmora. If you want to remove slow-mo or add it, you can use Filmora’s speed ramping feature anytime.
Free Download For Win 7 or later(64-bit)
Free Download For macOS 10.14 or later
We will share some details on how to use this feature here, but for a comprehensive, detailed guide, read to the end.
Step-By-Step Guide to Speed Changing
Step1Launch the Video
Activate Wondershare Filmora on your computer. To increase the speed and runtime of the movie, explore the desired video and enter it into the software. You can drag and drop the movie onto the interface as well.
Step2Speed Adjustment

Press the left mouse button as soon as the video shows on the screen. And click the speed tab in the toolbar. There is then a contextual menu displayed. To double the rate, select 2x from the “Fast” menu. The participant may use any fundamental that has more than one.
Step3Save & Export
When finished, select “Save Project” from the list of available options in the “File” panel. Press “Save” after renaming the project.
Using Filmora’s “Export” feature, selecting “Export,” and then modifying the file name is the alternative way to export the video. A device, a system, or even YouTube can receive the exported video. Next, click “Export.”
Bonus Tips. 2 More Methods to Normalize Your Video Speed
Filmora offers you 2 more advanced methods to increase or decrease the speed of the video, one is uniform speed and the other, is speed ramping . Want to learn more about changing speed in Filmora, watch this video tutorial to get a quick start on using them.
Conclusion
That’s basically it! So that’s how you turn any slow-motion video into a regular one.
This article covers all major techniques to convert videos to slow motion on iOS and Mac. You can pick one of them to convert video to slow motion or to slow down slow motion.
So, are you now prepared to convert slow-motion videos on your iPad or iPhone device to ordinary speed? Try the Filmora video editor if you’re looking for something really professional.
It makes it much easier to convert slow-motion videos from your smartphone or tablet to regular speed. It has powerful video editing features and is more comfortable to use. So, get started today!
Method 2: Using Other Converter Apps
You may think that converting slow-mo video to a regular speed video on your iPad or iPhone is convenient, but there’s a drawback too. The method mentioned above can only help you with minimalistic speed changes, which may not give you the desired result.
However, other converter apps also help you change slow-mo video to regular iPhone video. These apps work seamlessly on your PC or Mac to turn your slow-mo videos on the iPhone or Mac to normal-speed video using customized and high-resolution settings.
Overview of The Apps
| Particulars | iMovie | Slow-Fast Motion Video Editor |
|---|---|---|
| Type (versatile or specialized) | Versatile | Specialized |
| Supported OS | iOS, Mac | iOS, Mac |
| Average Rating | 3.9/5 | 4.7/5 |
| Price | Free | Free |
| Best for | Video editing with cinematic effects | Slo-mo video conversion |
1) iMovie

iMovie is an excellent option if you’re looking for an application to modify a video with additional tools and convert the slow-mo to a regular pace. Among the top video converters for the iPhone is iMovie.
It offers a wide range of tools and capabilities that allow you to change the video transition, audio, and speed, add music, animated text, video overlay effects, normal video effects, and more. Additionally, it aids users in producing stunning films and commercials in a Cinematic manner.
iMovie could convert slow-mo footage to normal speed, in case you didn’t know. Did you ever attempt to change slow mot to regular speed in iMovie? With the use of iMovie, how can slow-motion video be made normally on an iPhone?
Here are the instructions.
Step1: Open the iMovie app, click on the ‘Create Project’ option, → tap on ‘Movie → Media → Video.

Step2: Tap on the slow-mo option, select the slow-motion video you want to convert and hit the ‘Create Movie’ option.

Step3: Get to know the editing options by clicking on the timeline. Then, click on the clock (speed) icon. At the beginning of the lines, you’ll find a turtle. It demonstrates slow motion. Plus, the number right behind the rabbit at the end signifies the speed.

Step4: To turn this slow-motion video into a regular speed video, drag and slide the speed control slider until the number turns 1x.
Step5: To save the changes, tap on the Done option. Subsequently, edit the video as per your preference.
2) Slow-Fast Motion Video Editor

This slow-mo video converter app helps you slow down or speed up any slow-motion video without any watermark and charges. This free app supports both landscape or portrait operation, unlimited video length, and corrected audio pitch.
The application is convenient to use and seamless to speed up or slow down any parts or clips of your videos. Without charging a penny, this app meets the users’ expectations. If you’re wondering how to use this converter app, here’s a step-by-step guide:
Method 3. Using Third-Party Online Tools
The smartphone sector’s most cutting-edge functionalities can be found on iPhones. Users may capture slow-motion videos, for instance. However, you may consider accelerating the slo-mo movie to regular video speed once it has been recorded.
Using your smartphone, how would you go about doing that? Well, we have seen that using the built-in Photos app and converter apps like iMovie can help, but can they really provide the level of customization and outcomes you need?
When things get professional and the expectations are too high, it’s best to use third-party online tools. So, here are a few practical choices:
Overview of the Online Tools
| Particulars | KAPWING | Clideo | EZGIF |
|---|---|---|---|
| Supported File Format | .AVI, .FLV, 3GP, and other edge file types. | MP4, MOV, WMV, AVI, WEBM, FLV, MKV, MPG, MPEG, MTS. | MNG files |
| Watermark | Not Available | Only in Free version | Not Available |
| Available Speed Option | As fast as 4x for an accelerated video | 0.25 times to 2 times | 0.25 times to 2 times |
| Time Consuming | No | Moderate | No |
1) KAPWING

Kapwing is a tool for group film editing that enables people to collaborate to produce original videos. For individuals to create the ideal video, Kapwing offers a collection of pre-built themes, stock footage, and materials.
Kapwing acts as a digital office solution that enables individuals to organize all of their resources in one location and work together on projects utilizing sharing features. Amid its vast range of features, its slow-mo converter is the most famous and widely used one.
- Rating: 4.1/5
- Price: Plan starts at $20 per month
Step-By-Step Guide To Convert Slow-Mo on Iphone Using Kapwing App
Step1: First, download and install the Kapwing app from the App Store.
Step2: Upload the slow-mo video that you want to speed up.
![]()
Note: Kapwing also lets you speed up any slow-mo video present on TikTok, Twitter, or YouTube.

Step3: Perform the video clip speed adjustment by utilizing the Kapwing sidebar. You can accelerate the video clip speed up to four times the original speed. If not, you can play in every level in between.

Step4: Finally, click on the Export option, and the final video clip with all speed adjustments will be generated within a few seconds.

2) Clideo

Among the finest free tools for rapid photo or video editing is Clideo. You can start upgrading your material by uploading files in a wide range of formats to their site.
Limitless customization is possible with the paid version for just $9 a month. The capabilities, though, aren’t as varied as those offered by rivals, and there aren’t any mobile apps for people who want to generate material while on the go.
- Ratings: 4.3/5
- Price: Starts at $9 per month
Step-By-Step Guide To Convert Slow-Mo on Iphone Using Clideo App:
Step1: From your computer (Mac) or mobile device (iPhone), upload a video. You can also add from a Dropbox or Google Drive account.

Step2: Select to speed up the video after it has been recorded. Then, if required, muffle its sound and alter the file type.


Step3: The video can be seen directly in your browser. Click “Download” after you are finished and delighted with your creation.

3) EZGIF

EZGIF is a free online editing tool that enables individuals to change the playback speed of any video. Not only does it effectively convert your slow-mo video on an iOS device to a normal speed video, but it also comes with many other features (later on that). The website has a simple, outdated interface, but except for that, it’s a fine app for beginners.
Step-By-Step Guide To Convert Slow-Mo on Iphone Using Clideo App:
Step1: Upload the video clip and choose a speed multiplier to start using this program.

Step2: A number less than one will slow down playback; a number greater than one will quicken it.
Step3: Thus, input 0.5 to run the program at 1/2 its normal speed, and so forth.

Step4: You can preserve the audio track’s original tempo, vary the speed along with the video, or silence the audio entirely.
Convert Your Slo-Mo Videos Into Regular Ones In a Few Simple Steps With Filmora
Filmora is a leading online video editing software that has become the preferred choice of all professionals and amateurs. From everyday needs to something formal, it helps you edit videos for every occasion.
You can change pace swiftly or consistently in Filmora and vary the pace of the audio or video recordings. Use the Speed Ramping tool in Filmora. If you want to remove slow-mo or add it, you can use Filmora’s speed ramping feature anytime.
Free Download For Win 7 or later(64-bit)
Free Download For macOS 10.14 or later
We will share some details on how to use this feature here, but for a comprehensive, detailed guide, read to the end.
Step-By-Step Guide to Speed Changing
Step1Launch the Video
Activate Wondershare Filmora on your computer. To increase the speed and runtime of the movie, explore the desired video and enter it into the software. You can drag and drop the movie onto the interface as well.
Step2Speed Adjustment

Press the left mouse button as soon as the video shows on the screen. And click the speed tab in the toolbar. There is then a contextual menu displayed. To double the rate, select 2x from the “Fast” menu. The participant may use any fundamental that has more than one.
Step3Save & Export
When finished, select “Save Project” from the list of available options in the “File” panel. Press “Save” after renaming the project.
Using Filmora’s “Export” feature, selecting “Export,” and then modifying the file name is the alternative way to export the video. A device, a system, or even YouTube can receive the exported video. Next, click “Export.”
Bonus Tips. 2 More Methods to Normalize Your Video Speed
Filmora offers you 2 more advanced methods to increase or decrease the speed of the video, one is uniform speed and the other, is speed ramping . Want to learn more about changing speed in Filmora, watch this video tutorial to get a quick start on using them.
Conclusion
That’s basically it! So that’s how you turn any slow-motion video into a regular one.
This article covers all major techniques to convert videos to slow motion on iOS and Mac. You can pick one of them to convert video to slow motion or to slow down slow motion.
So, are you now prepared to convert slow-motion videos on your iPad or iPhone device to ordinary speed? Try the Filmora video editor if you’re looking for something really professional.
It makes it much easier to convert slow-motion videos from your smartphone or tablet to regular speed. It has powerful video editing features and is more comfortable to use. So, get started today!
Also read:
- New In 2024, Learn 4 Proven Methods for Creating Engaging and Memorable Recap Videos. Elevate Your Event Coverage and Engage Your Audience with These Tips and Tricks
- Updated In 2024, How to Create the Stranger Things Upside Down Effect
- New In 2024, Have You Tried a Discord Boost Before? What Does a Discord Server Boost Entail, and Is It Worthwhile? What Are the Advantages? Heres a Quick Guide to Assist You in Making Your Decision
- New How to Be a Good Podcast Host for 2024
- Top 6 End Screen Makers
- Whats an AV1 Format and How Does It Impact Your Life for 2024
- New This Article Will Reveal the Secrets of Choosing a Location to Shoot Your Viral Music Video. As Well as Tips to Make an Energetic Schedule for Shooting Days for 2024
- Updated 2024 Approved Learn About some of the Best Apps for Photo Collage for PC
- 8 Best Free Photo Collage with Music Video Maker
- Top 10 Movie Trailer Voice Generators Windows, Mac, Android, iPhone for 2024
- New Top Free Video Editing Software Enhance Your Content with These Essential Tools for 2024
- How to Make a Neon Dance Effect With Filmora for 2024
- New Complete Guide to Make an Intro Video for 2024
- New Funny Content Ideas for YouTube Videos for 2024
- How Long Does It Take To Edit Videos
- How to Slow-Mo YouTube Videos
- Updated In 2024, How to Use Canva Color Match
- New 2024 Approved Hard to Remove Black Background in After Effects? Heres the Best Way to Deal With It
- New This Article Will Focus on Understanding the Secret Tips in Wondershare Filmora that You Can Use to Edit Videos Faster and More Efficiently
- New How to DIY VHS Overlay in After Effects?
- New Looking for a Full Guide on Removing the Background From PNG Images? Do You Want to Transform JPG to PNG Transparent? If so, Take some Time to Read This Article
- New Looking Forward to Try Hands at Using the Icecream Slideshow Maker Program to Create High End Slideshow Presentations? Stay Here for a Complete Insight Into the Process
- New Find a Video Background Change Online that Works for You. This Article Contains Tools that Can Edit Video Backgrounds Online with Little Effort
- Updated Premiere Pro Tutorial How To Change Video Frame Rate
- The Best iSpoofer Alternative to Try On Samsung Galaxy S23 Ultra | Dr.fone
- How To Activate and Use Life360 Ghost Mode On Oppo K11 5G | Dr.fone
- In 2024, How to Unlock SIM Card on iPhone 7 Plus online without jailbreak
- Complete guide for recovering pictures files on Honor Play 8T.
- In 2024, How to Unlock Apple iPhone SE Passcode Screen? | Dr.fone
- How to install and update device drivers manually on Windows 7
- In 2024, How To Remove Passcode From Apple iPhone 8 Plus? Complete Guide | Dr.fone
- All Must-Knows to Use Fake GPS GO Location Spoofer On Xiaomi 14 | Dr.fone
- How To Remove iCloud From iPhone 14 Smoothly
- 8 Solutions to Fix Find My Friends Location Not Available On Samsung Galaxy A05 | Dr.fone
- How to Change/Add Location Filters on Snapchat For your Samsung Galaxy S24+ | Dr.fone
- In 2024, Easiest Guide How to Clone Honor X8b Phone? | Dr.fone
- iPhone Is Disabled? Here Is The Way To Unlock Disabled Apple iPhone 14 Pro Max
- In 2024, Here Are Some Reliable Ways to Get Pokemon Go Friend Codes For Poco M6 Pro 5G | Dr.fone
- What is the best Pokemon for pokemon pvp ranking On Google Pixel 8 Pro? | Dr.fone
- In 2024, How to Transfer Data from Honor Magic Vs 2 to Any iOS Devices | Dr.fone
- In 2024, 2 Ways to Transfer Text Messages from Oppo Reno 8T 5G to iPhone 15/14/13/12/11/X/8/ | Dr.fone
- 8 Best Apps for Screen Mirroring Vivo V30 Pro PC | Dr.fone
- In 2024, How to Unlock Nubia Red Magic 8S Pro+ Phone Password Without Factory Reset?
- In 2024, How to Unlock Xiaomi Redmi Note 12R Phone without Any Data Loss
- Full Guide How To Fix Connection Is Not Private on Honor X9a | Dr.fone
- Title: Step by Step to Resize Video in Davinci Resolve
- Author: Morgan
- Created at : 2024-05-19 05:11:36
- Updated at : 2024-05-20 05:11:36
- Link: https://ai-video-editing.techidaily.com/step-by-step-to-resize-video-in-davinci-resolve/
- License: This work is licensed under CC BY-NC-SA 4.0.

