
Steps To Fade Audio In Premier Pro for 2024
Steps To Fade Audio In Premier Pro
Audio is a very big part of any video project and it can make or break the video project. This is why it is very important to not just choose a video editor that also offers audio editing, but one that is easy to use and offers a lot of editing options. This way, you can edit the audio in your project to suit your video’s production and end up with a great professional final product.
One of the video editing tools that offer features that can accomplish all that is Adobe Premier Pro. In this article, we will look at how you can use Premier Pro to fade audio in or out.
Steps to Fade Audio in Premier Pro
Premier Pro gives you two different options to fade audio in or out. Let’s look at both options and then you can choose the one that suits you best;
Fade Audio using Crossfade Audio Transition
Step1To begin, open Premier Pro on your computer and then open the audio that you want to edit.
Step2Once it is open, select the audio clip in the timeline and then click on “Sequence” at the top menu and select “Apply Audio Transition.”
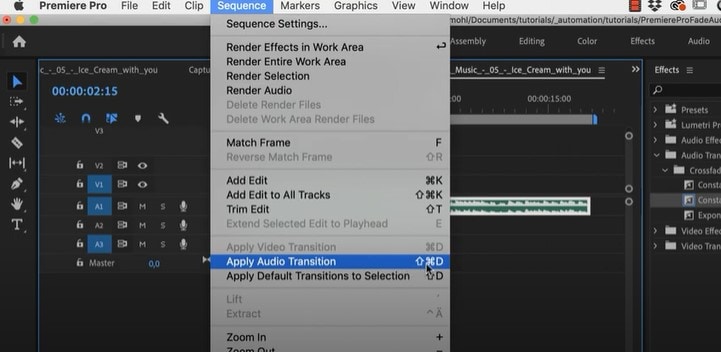
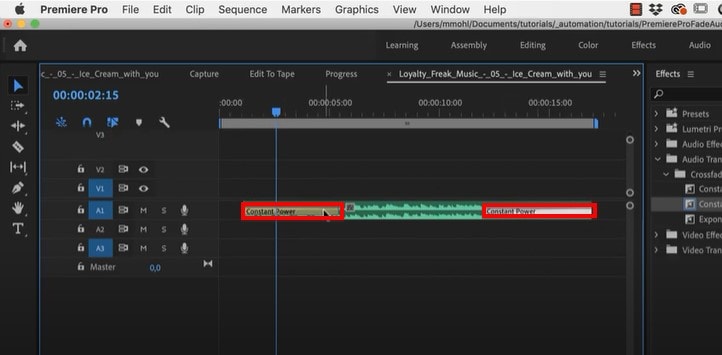
You can also use the keyboard shortcut Shift + Command + D (macOS) or Shift+ Ctrl + D (PC). This will add the “Constant Power Cross Fade” effect at the beginning and the end of the clip.
Step3You can then just change the duration of the effect by simply dragging the end of the transition.
Fade Audio using Clip Keyframes
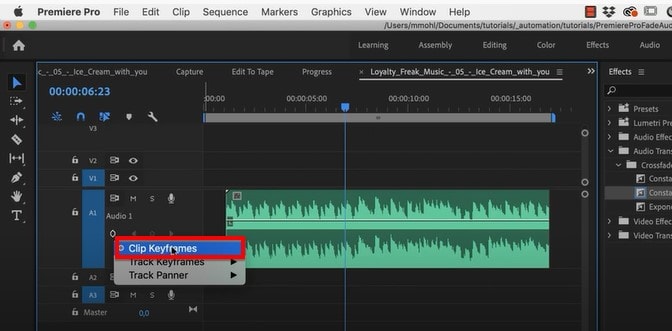
Step1Adobe Premier Pro has two volume keyframes; Track and Clip. Make the audio larger so you can see the volume line and then under the audio name, click on the volume keyframes option to make sure “Clip Keyframes” is enabled.
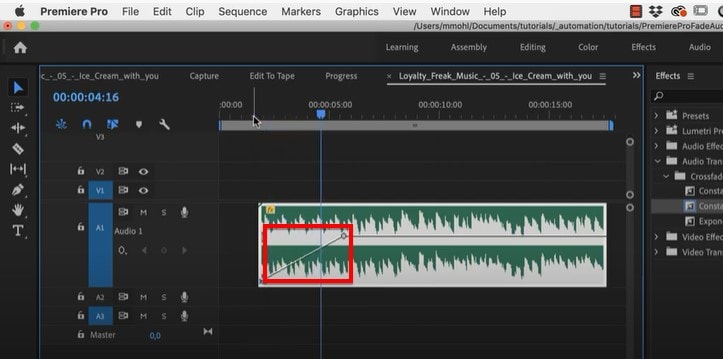
Step2You can then press down on the Command Key (macOS) or the Control Key (PC) and drag the volume line down to add a fade-in or fade-out effect.
Adobe Premiere Alternative Way to Fade Audio
If you are like most people and you find Adobe Premier Pro to be very difficult you use, we have a tool that is just as effective but also simplifies the process. This is the very simple to use Wondershare Filmora .
Just like Premier Pro, Filmora gives you two options to fade audio in and out. Let’s look at both options;
Adding Fade in and Out in Audio Pane
Step1Download and install Wondershare Filmora onto your computer, open the program and then import the audio clip that you want to edit.
Step2Once the video has been added to the timeline, double-click on it to access the “Audio” editing panel.
Step3Here, you can very simply add the fade-in and fade-out effects by simply dragging the sliders to the desired duration or by manually entering the duration in seconds.

Using the Audio Waveform
You can also use the fade icons on the left and right edges of the audio waveform to quickly add a fade in and out.
To add a fade-in effect, drag the fade-in maker to the right. Then go to the end of the clip to drag the fade-out maker to the left to add a fade-out effect.

Related FAQs about Audio Fade
1. How Do I Fade to Black in Adobe Premiere Pro?
You can easily add the Fade to Black transition in Adobe Premiere Pro using the “Effects” tab. Just open the two clips in Premiere Pro and go to “Effects.” Type in “dip to black” in the search box and when you find the effect, drag it between the two clips in the timeline. The effect will appear on the right side of the project.
You also have several customization options that you can apply to the effect to get it just right. To see these options, go to Effect Controls and you should be able to change the alignment of the effect to “Center at Cut” so that the first video fades out to black before the second video appears.
2. Premiere Pro Audio Fade Not Working?
Sometimes you can complete all the editing steps we have described above but you are unable to tell if the fade-in and fade-out effects are working because you can’t play the audio in Premiere. This is a very common problem that can easily be fixed using the following troubleshooting steps;
Check the master volume on your computer to see if this is the problem
Then check the volume in Premiere to see if the audio meter is moving as you play the clip. It is the green bar usually in the lower right corner.
If your volume is fine but you still can’t hear the audio, you may need to adjust several settings. Go to Edit > Preferences (on PC) or Preferences menu under the main Premiere Pro CC menu (macOS) and select “Audio Hardware” in the options that appear. You can then change the “Default Output” device to something else.
3. How Do You do Audio Transitions in Premiere Pro
Adding audio transitions in Premiere Pro is very easy; just open the audio that you want to edit and then Right-click (PC) or Control- Click (macOS) on either the “Constant Gain” or “Constant Power” effect from the Effects panel. Then choose “Set Selected as Default Transition” from the options in the menu.
To add a duration for the audio transitions, go to Edit > Preferences > Timeline (PC) or Premiere Pro Menu > Preferences (macOS) and enter the duration value under “Audio Transition Default Duration.”
Free Download For Win 7 or later(64-bit)
Free Download For macOS 10.14 or later
Craft Powerful Motivational Status Videos for All Occasions, Including Republic Day. Download, Edit, and Inspire with Our Tips and Tricks
The rise in social media’s popularity has brought about a fresh era of creating and enjoying content. Among this plethora of content, one category has managed to stand out prominently - motivational videos. These snippets of inspiration, often not more than a few minutes long, have become a staple of many users’ daily feeds. But what makes them so universally loved?
To begin with, let’s consider the times we live in. The modern world is fast-paced and filled with challenges and hurdles. This is where “motivational video status” or “motivation status video” comes into play. They serve as a brief pause, a moment of reflection, and a powerful jolt of motivation for many. They remind people of their worth, potential, and the strength they possess to overcome adversities. Plus, given their short length, they’re easily digestible, making them perfect for quick breaks.
Moreover, these videos are often shared during specific times of the year, such as the Republic Day. “Republic Day status videos,” for instance, fuse motivation with patriotism, making them a hit among the masses.
For content creators and marketers, the appeal lies in the sheer virality of these videos. A compelling “motivational status video download” can quickly gain traction, garnering thousands, if not millions, of views in a short span. With the right mix of powerful imagery, stirring words, and evocative music, these videos can resonate with a vast audience, driving engagement and shares.
Part 1: 6 Websites to Free Download Motivational Video Footage
Finding the right footage for crafting that perfect motivational video is crucial. The imagery must align with the message, ensuring it’s impactful. For those on the lookout, here are six renowned platforms where one can source high-quality footage for free or at a cost:
Adobe Stock
Adobe Stock is a treasure trove of high-quality videos. While it’s primarily a paid platform, the range and quality of clips available make it a top choice for professionals.
iStock
Another premium platform, iStock by Getty Images, offers a diverse collection of video clips. From breathtaking landscapes to poignant human moments, you’ll find a plethora of options here.
Shutterstock
Shutterstock is a household name in the world of digital media. With an extensive library, this platform provides clips that can cater to virtually any theme or mood you’re aiming for.
Videezy
For those on a budget, Videezy offers a mix of free and premium video clips. It’s a community-driven platform, so you’ll find a unique array of footage not available elsewhere.
Pixabay
Pixabay is an entirely free platform, making it perfect for beginners or those not looking to invest heavily. The site hosts a variety of footage, from nature scenes to urban landscapes.
Pexels
Similar to Pixabay, Pexels offers a rich collection of free video clips. With its user-friendly interface and diverse catalog, it’s a favorite among many content creators.
In essence, whether you’re crafting a “motivation status video download” for a broad audience or a personalized “motivational status video” for a niche group, these platforms have got you covered. Dive in, explore, and let your creativity flow!
Part 2: Using Filmora to Edit Motivational Video Footage
Filmora has steadily risen in popularity, becoming a go-to choice for many when it comes to video editing. Whether you have tons of experience or you’re just starting out in the world of video creation, Filmora provides a user-friendly interface along with a wide range of useful tools. Let’s delve into how you can use Filmora to craft that perfect “motivation status video.”
Step1 Importing Your Footage
Start by importing your selected motivational video footage from platforms like Pixabay, Pexels, or any of the previously mentioned sites. Exactly! Just click on the ‘Import’ button and choose the clips you’d like.
Step2 Trimming and Merging
Once imported, you may want to trim the videos or merge multiple clips to make your motivational status video coherent. Use Filmora’s easy drag-and-drop timeline for this purpose.
Step3 Adding Music
**”motivational video status”**without inspiring music is like a cake without frosting. Filmora boasts an extensive library of music tracks. Alternatively, import your own to perfectly match the tone of your video.
Step4 Text and Titles
If you’re aiming for a “Republic Day status videos”theme or any other, adding text or titles can amplify your message. Filmora offers a range of customizable text options, from sleek and professional to fun and quirky.
Create AI Captions For Win 7 or later(64-bit)
Create AI Captions For macOS 10.14 or later
Step5 Transitions and Effects
Give your**”motivation status video download”**a polished feel with smooth transitions between clips. Add effects like slow motion or color grading to enhance the visual appeal further.
Step6 Export and Share
Once satisfied, export your video in the desired format. With Filmora, you can also directly share your **”motivational status video download”**to various social media platforms, amplifying its reach.
Filmora’s versatility ensures that you not only create a compelling “motivation status video” but also enjoy the process. Its user-friendly tools are perfect for crafting videos that resonate and inspire.
Part 3: Summary
In the age of social media, where content is consumed voraciously, motivational videos have carved a unique niche. They inspire, uplift, and connect with audiences, offering solace in trying times or propelling one towards their goals. Platforms like Adobe Stock, iStock, and Shutterstock, among others, offer a goldmine of footage for crafting these videos. But the magic truly comes alive in the editing room.
Filmora, with its rich array of tools and features, stands out as an excellent choice for editing. Whether you’re crafting a poignant “Republic Day status video” or a general “motivation status video,” Filmora’s capabilities can help bring your vision to fruition.
While sourcing the right footage lays the foundation, it’s the editing that breathes life into a “motivational status video.” So, dive in, explore the world of video creation, and let your stories inspire the world.
Discover the Best Video Filter Software . Elevate Your Video Editing with Top Contenders Like Filmora, DaVinci Resolve, HitFilm Express, and More
In today’s tech-savvy world, whether you’re a budding content creator or a seasoned pro, creating eye-catching videos is a must.
And what’s the secret sauce to make your videos stand out? You guessed it – video filters! These nifty tools can transform your raw footage into a visual masterpiece.
So, if you’re ready to take your video editing game up a notch, you’re in the right place.
In this article, we’ll dig into the top 5 video filter software of 2024 that are worth your attention.
Before we jump into the juicy details, let’s get down to basics.
Part 1: Introduction
What exactly are video filters, you ask?
Well, video filters are like Instagram filters for your videos but with much more finesse.
They allow you to tweak various aspects of your video’s appearance, such as color, contrast, saturation, and more, to achieve the desired visual style.
The beauty of video filter software lies in its ability to enhance your video’s overall look and feel. Let’s explore the top contenders in the video filter software arena.
Part 2: Top 5 Video Filter Software
01 Filmora

Our first contender in the world of video filter software is Filmora. Designed with a user-friendly interface, Filmora is the ideal choice for those who want to enhance their videos effortlessly. Let’s take a closer look at what makes it stand out.
Advantages:
- Filmora’s intuitive interface makes it a breeze for beginners to get started. You don’t need to be a tech whiz to dive into video editing; Filmora guides you through the process seamlessly.
- Filmora boasts an extensive library of video presets and color grading presets. This treasure trove of pre-made styles allows you to give your videos that extra flair without the need for in-depth editing skills.
- Time is precious, and Filmora respects that. It offers quick rendering speeds, so you can see the results of your editing efforts in no time.
- Filmora’s simplicity is its strength, but it doesn’t mean it lacks creative potential. You can still go into more advanced features when you’re ready to level up your video editing game. This software gracefully balances accessibility and functionality.
Disadvantages:
So, you might be wondering, what about the downsides? Well, Filmora is so user-friendly that it can make you addicted to editing!
You might find yourself spending hours perfecting your videos, which, to be honest, is more of an advantage disguised as a disadvantage. Who wouldn’t want to get lost in the world of video editing, creating stunning content effortlessly?
02 DaVinci Resolve

When it comes to professional video editing and color correction, DaVinci Resolve stands as a true powerhouse in the world of video filter software.
Renowned for its robust feature set and precision, it’s the go-to choice for filmmakers, colorists, and anyone who demands the highest level of control over their video projects.
Advantages:
- DaVinci Resolve is unrivaled in its color correction and grading capabilities. Whether you’re aiming for a cinematic look or a specific color scheme, the software provides an extensive suite of tools to fine-tune every detail. Its color wheels, curves, and advanced grading panels allow you to achieve the exact visual style you envision.
- It provides a lot of cool stuff for editing sound and video, like fancy tools for fixing audio, working with multiple cameras, and working together with others on the same project. This makes it an all-in-one solution for every aspect of video post-production.
- In a world where teamwork is essential, DaVinci Resolve shines with its collaboration features. Many people can work on a project together at the same time, making it easier for teams working on big video projects to edit smoothly.
Disadvantages:
DaVinci Resolve can be resource-intensive, demanding a powerful computer setup for smooth operation. This could be a great advantage for people with really good computers, but it might be a bit tough for folks with older or less powerful ones.
03 HitFilm Express

If you’re an aspiring filmmaker or content creator looking to dive into the world of video editing and visual effects, HitFilm Express is your ticket to boundless creativity.
This versatile software combines video editing and visual effects seamlessly, allowing you to create stunning, professional-quality videos without breaking the bank.
Advantages:
- HitFilm Express excels in merging video editing and visual effects into one unified platform. This means you can effortlessly incorporate jaw-dropping visual effects into your videos without the need for additional software. Whether you’re adding explosions, futuristic CGI, or enchanting motion graphics, HitFilm Express has you covered.
- It offers a free version that provides access to its fundamental video filter features and VFX capabilities. This is a fantastic opportunity for budding content creators to dip their toes into the world of video editing without any financial commitment.
- HitFilm Express comes with an extensive library of tutorials, making it incredibly user-friendly for those who are new to video editing or visual effects. These tutorials guide you through the software’s features and help you create eye-catching effects like a pro.
Disadvantages:
As for potential downsides, the free version of HitFilm Express may have some limitations compared to the paid version.
While it provides access to essential features, you may find certain advanced options restricted.
However, this can be seen as an advantage because it allows you to explore the software without any upfront costs.
04 Adobe Premiere Pro

Adobe Premiere Pro is a name that resonates deeply within the video editing community. It’s renowned for its versatility and rich feature set, making it a go-to choice for professional video editors and content creators alike.
Advantages:
- When it comes to customization, Adobe Premiere Pro truly shines. The software offers an extensive library of plugins and extensions, allowing you to tailor your video filter effects to your precise liking. Whether you’re into color grading, visual effects, or audio enhancement, you’ll find the tools you need within Adobe’s vast ecosystem.
- If you’re already a part of the Adobe Creative family, you’ll appreciate Premiere Pro’s seamless integration with other Adobe software. Easily import and export assets from Adobe Photoshop or Adobe After Effects, enhancing your workflow and saving you time.
- Adobe is committed to keeping Premiere Pro at the forefront of video editing technology. With regular updates, you can expect a constant influx of new features, improvements, and bug fixes. This ensures that your editing experience remains cutting-edge.
Disadvantages:
There are a few considerations to keep in mind. Adobe Premiere Pro operates on a subscription-based model, which means you’ll need to pay a monthly or annual fee to access the software. While this provides you with ongoing updates and support, it might not be the best fit for those on a strict budget.
Adobe Premiere Pro’s extensive feature set can be overwhelming for beginners. If you’re new to video editing, you may find the learning curve a bit steep. However, with dedication and a wealth of online tutorials available, mastering the software is within reach.
05 Final Cut Pro

If you’re a proud owner of a Mac, Final Cut Pro should be on your radar as the ultimate video filter software. This Apple-exclusive gem is tailored to take your video editing experience to the next level, offering seamless integration with the macOS ecosystem.
Advantages:
- A standout feature of Final Cut Pro is how well it works together with other Apple devices and software, making everything run smoothly. Whether you’re working on your Macbook, iPad, or iPhone, Final Cut Pro keeps your workflow smooth and consistent. This synergy allows you to transfer projects effortlessly between devices, making it a go-to choice for Apple enthusiasts.
- Final Cut Pro is a powerhouse when it comes to handling high-resolution videos. Whether you’re working with 4K or 8K footage, this software handles it with grace and precision. Expect smooth playback and rapid rendering, even with the most demanding video projects.
- Mac users will feel right at home with Final Cut Pro’s sleek and user-friendly interface. The software’s design prioritizes ease of use without compromising on functionality. You can focus on your creative vision rather than wrestling with a complex interface.
Disadvantages:
It’s important to mention that Final Cut Pro is quite expensive, which might not be affordable for people on a tight budget.
Final Cut Pro is exclusive to macOS, which means Windows users will have to explore alternative software options. If you’re committed to the Apple ecosystem and prioritize top-notch video editing, Final Cut Pro is a wise investment.
Part 3: Summary
In a world where visual content rules supreme, having the right video filter software can make all the difference.
Your choice depends on your skill level, preferences, and budget. Whether you’re a newbie or a seasoned pro, there’s a video filter software out there that’s perfect for you. Feel free to dive in, experiment, and let your creativity sparkle in your videos!
Part 1: Introduction
What exactly are video filters, you ask?
Well, video filters are like Instagram filters for your videos but with much more finesse.
They allow you to tweak various aspects of your video’s appearance, such as color, contrast, saturation, and more, to achieve the desired visual style.
The beauty of video filter software lies in its ability to enhance your video’s overall look and feel. Let’s explore the top contenders in the video filter software arena.
Part 2: Top 5 Video Filter Software
01 Filmora
Our first contender in the world of video filter software is Filmora. Designed with a user-friendly interface, Filmora is the ideal choice for those who want to enhance their videos effortlessly. Let’s take a closer look at what makes it stand out.
Advantages:
- Filmora’s intuitive interface makes it a breeze for beginners to get started. You don’t need to be a tech whiz to dive into video editing; Filmora guides you through the process seamlessly.
- Filmora boasts an extensive library of video presets and color grading presets. This treasure trove of pre-made styles allows you to give your videos that extra flair without the need for in-depth editing skills.
- Time is precious, and Filmora respects that. It offers quick rendering speeds, so you can see the results of your editing efforts in no time.
- Filmora’s simplicity is its strength, but it doesn’t mean it lacks creative potential. You can still go into more advanced features when you’re ready to level up your video editing game. This software gracefully balances accessibility and functionality.
Disadvantages:
So, you might be wondering, what about the downsides? Well, Filmora is so user-friendly that it can make you addicted to editing!
You might find yourself spending hours perfecting your videos, which, to be honest, is more of an advantage disguised as a disadvantage. Who wouldn’t want to get lost in the world of video editing, creating stunning content effortlessly?
02 DaVinci Resolve
When it comes to professional video editing and color correction, DaVinci Resolve stands as a true powerhouse in the world of video filter software.
Renowned for its robust feature set and precision, it’s the go-to choice for filmmakers, colorists, and anyone who demands the highest level of control over their video projects.
Advantages:
- DaVinci Resolve is unrivaled in its color correction and grading capabilities. Whether you’re aiming for a cinematic look or a specific color scheme, the software provides an extensive suite of tools to fine-tune every detail. Its color wheels, curves, and advanced grading panels allow you to achieve the exact visual style you envision.
- It provides a lot of cool stuff for editing sound and video, like fancy tools for fixing audio, working with multiple cameras, and working together with others on the same project. This makes it an all-in-one solution for every aspect of video post-production.
- In a world where teamwork is essential, DaVinci Resolve shines with its collaboration features. Many people can work on a project together at the same time, making it easier for teams working on big video projects to edit smoothly.
Disadvantages:
DaVinci Resolve can be resource-intensive, demanding a powerful computer setup for smooth operation. This could be a great advantage for people with really good computers, but it might be a bit tough for folks with older or less powerful ones.
03 HitFilm Express
If you’re an aspiring filmmaker or content creator looking to dive into the world of video editing and visual effects, HitFilm Express is your ticket to boundless creativity.
This versatile software combines video editing and visual effects seamlessly, allowing you to create stunning, professional-quality videos without breaking the bank.
Advantages:
- HitFilm Express excels in merging video editing and visual effects into one unified platform. This means you can effortlessly incorporate jaw-dropping visual effects into your videos without the need for additional software. Whether you’re adding explosions, futuristic CGI, or enchanting motion graphics, HitFilm Express has you covered.
- It offers a free version that provides access to its fundamental video filter features and VFX capabilities. This is a fantastic opportunity for budding content creators to dip their toes into the world of video editing without any financial commitment.
- HitFilm Express comes with an extensive library of tutorials, making it incredibly user-friendly for those who are new to video editing or visual effects. These tutorials guide you through the software’s features and help you create eye-catching effects like a pro.
Disadvantages:
As for potential downsides, the free version of HitFilm Express may have some limitations compared to the paid version.
While it provides access to essential features, you may find certain advanced options restricted.
However, this can be seen as an advantage because it allows you to explore the software without any upfront costs.
04 Adobe Premiere Pro
Adobe Premiere Pro is a name that resonates deeply within the video editing community. It’s renowned for its versatility and rich feature set, making it a go-to choice for professional video editors and content creators alike.
Advantages:
- When it comes to customization, Adobe Premiere Pro truly shines. The software offers an extensive library of plugins and extensions, allowing you to tailor your video filter effects to your precise liking. Whether you’re into color grading, visual effects, or audio enhancement, you’ll find the tools you need within Adobe’s vast ecosystem.
- If you’re already a part of the Adobe Creative family, you’ll appreciate Premiere Pro’s seamless integration with other Adobe software. Easily import and export assets from Adobe Photoshop or Adobe After Effects, enhancing your workflow and saving you time.
- Adobe is committed to keeping Premiere Pro at the forefront of video editing technology. With regular updates, you can expect a constant influx of new features, improvements, and bug fixes. This ensures that your editing experience remains cutting-edge.
Disadvantages:
There are a few considerations to keep in mind. Adobe Premiere Pro operates on a subscription-based model, which means you’ll need to pay a monthly or annual fee to access the software. While this provides you with ongoing updates and support, it might not be the best fit for those on a strict budget.
Adobe Premiere Pro’s extensive feature set can be overwhelming for beginners. If you’re new to video editing, you may find the learning curve a bit steep. However, with dedication and a wealth of online tutorials available, mastering the software is within reach.
05 Final Cut Pro
If you’re a proud owner of a Mac, Final Cut Pro should be on your radar as the ultimate video filter software. This Apple-exclusive gem is tailored to take your video editing experience to the next level, offering seamless integration with the macOS ecosystem.
Advantages:
- A standout feature of Final Cut Pro is how well it works together with other Apple devices and software, making everything run smoothly. Whether you’re working on your Macbook, iPad, or iPhone, Final Cut Pro keeps your workflow smooth and consistent. This synergy allows you to transfer projects effortlessly between devices, making it a go-to choice for Apple enthusiasts.
- Final Cut Pro is a powerhouse when it comes to handling high-resolution videos. Whether you’re working with 4K or 8K footage, this software handles it with grace and precision. Expect smooth playback and rapid rendering, even with the most demanding video projects.
- Mac users will feel right at home with Final Cut Pro’s sleek and user-friendly interface. The software’s design prioritizes ease of use without compromising on functionality. You can focus on your creative vision rather than wrestling with a complex interface.
Disadvantages:
It’s important to mention that Final Cut Pro is quite expensive, which might not be affordable for people on a tight budget.
Final Cut Pro is exclusive to macOS, which means Windows users will have to explore alternative software options. If you’re committed to the Apple ecosystem and prioritize top-notch video editing, Final Cut Pro is a wise investment.
Part 3: Summary
In a world where visual content rules supreme, having the right video filter software can make all the difference.
Your choice depends on your skill level, preferences, and budget. Whether you’re a newbie or a seasoned pro, there’s a video filter software out there that’s perfect for you. Feel free to dive in, experiment, and let your creativity sparkle in your videos!
How to Create a Clideo Slideshow
How to Create a Clideo Slideshow
An easy yet powerful editor
Numerous effects to choose from
Detailed tutorials provided by the official channel
A clideo slideshow is an interesting trend of precise content delivery. Stay here to understand the working essentials of creating Clideo presentations with utmost ease!
In this article
01 [How Do You Make a Slideshow on Clideo?](#Part 1)
02 [Best 5 Tip to Make a Slideshow with Music](#Part 2)
03 [How to Make a Photo Slideshow on Mac?](#Part 3)
Part 1 How Do You Make a Slideshow on Clideo?
Deciding to create slideshow presentations for a graphic design oriented personal or professional concern lands you across a plethora of choices in the IT market in the shape of high end application software program and tools. No doubt, these are leaders in their task; however, the online slideshow makers available across the web are no less.
Paying attention to the same, let us focus our discussion on how does the Clideo slideshow maker tool work to adhere the aforesaid concern. Talking a bit about the credibility of the online program, the tool grants you the flexibility of creating amazing slideshow movies and presentations from images, video clips and recordings, while allowing you to complement the same with the most upbeat and suitable background music.
Additional appeals of the online include the latter’s free availability and extensive device compatibility to work affordably well with all your Windows and MacOS supported desktops, laptops and PCs, along with Android and iOS compatible smartphones and tablets. All you need is an internet connection to launch the tool in your favorite web browser and that’s how you can step into the creation process right away.
Let us now look through the process of creating slideshows in the Clideo tool using a set of still images in the following section:
Step 1: Launch the Tool
Start with navigating to the official Clideo website in any of your preferred web browsers and launch the online slideshow maker tool in your device.

Step 2: Upload Image Files
The tool’s launch screen displays the ‘Choose Files’ tab in blue, which you can click on to upload the desired image files to the Clideo timeline while selecting them from your device gallery. To select and upload images from your Dropbox or Google Drive accounts, click on the ‘Upside Arrow’ in the ‘Choose Files’ tab.

The tool supports a decent variety of image formats to work with, like, JPG, JPEG, PNG, GIF, TIFF, etc., thus letting you escape the notch of sticking to a specific file format. You can also choose to either upload the image files all at once, or add them at a later stage, as per your requirement.
Step 3: Let’s Get Creating!
Once the selected images get uploaded on the editor timeline of the tool, you can preview them in the editor workspace. You can change the sequence of appearance of the images by dragging and dropping their thumbnails at respective places within the editor timeline or delete them by selecting the image and clicking the ‘X’ symbol.
You can additionally, choose to add extra clips by tapping the ‘Add More Videos’ option in the timeline. As an alternative, navigate to the panel at the right and hit the ‘Add More Files’ button at the top.

Step 4: Crop the Media Files
Below the ‘Add More Files’ option in the right panel, you can see the ‘Crop Options’ tab. You can work with the crop tool to adjust the size of the added videos and images so that they fit in the borders of the media frames. You are further allowed to select a suitable aspect ratio and zoom the media files in and out to obtain the affordable screen size. This would come handy when you proceed to share your slideshow across various media platforms, like, Instagram, Facebook, YouTube, etc., each of which has a different screen resolution and size.

Step 5: Time Your Slides
You can decide play duration for your media files by navigating to the same right panel and hitting the ‘Image Duration’ tab and setting the required parameters in the dropdown list that appears next. Here, you can adjust the time settings of the images in your slideshow presentations, however, the video play durations are preset and you are not allowed to change them. If you wish to have a smooth play of the presentation slides, do not forget to tick the ‘Crossfade’ checkbox.

Step 6: Add a Suitable Background Music
The last one in the right panel is the ‘Add Audio’ option which you can use to supplement your presentation with the coolest and the most suitable background music. All you need to do is, hit the aforesaid tab and browse through your device’s media gallery to select an audio file of your choice. To add a music file that’s belongs to your online storage, click on the ‘Upside Arrow’ in the tab and proceed to make a selection or add a link of the desired audio file.

Once you have added the track, you are permitted to trim, adjust volume settings and loop the track if required under the ‘Audio Options’ tab.

Step 7: Duration, Size and Format Adjustments
Navigate to the left side ‘Options Panel’ at the bottom of the editor workspace, where you can set the different parameters of your slideshow size and run time. You can also choose to generate the output presentation in a specific file format if required, using the ‘Format Picker’ tool. When you are satisfied with everything, reach to and hit the ‘Export’ button at the extreme right.

Step 8: Save Your Creation
Completion of Step 7 will take you to the ‘Slideshow Save’ interface of the video editor tool. Here, you can preview your slideshow and save it to your device if everything seems fine. To save your output file, click on the ‘Download’ tab. If however, you need to make any further changes to the presentation, hit the ‘Edit’ tab to get directed back to the editor workspace.

Part 2 Best 5 Tip to Make a Slideshow with Music
While the visual elements count to be the major attractions of a slideshow presentation, subtle background music can work to bind the audience with the rhythm and flow of the presentation. Having learnt about the fundamentals of creating over the top slideshows with Clideo, let us move ahead with working on some of the best tips to complement your already awesome graphic slideshow artwork with the most appealing audio in the following section:
01Select a Royalty Free Music Plan
Adding suitable background music can uplift the appeal of your slideshow presentation to greater extents. While most of the slideshow creator programs available today are equipped with extensive varieties of inbuilt audio for visibly any presentation setting, you can also opt to choose your own music plan in case you don’t get anything specific.
However, you do need to take care of certain factors when deciding on your music plan, most importantly, the pricing concerns. Go for selecting a royalty free, unlimited audio license via an affordable paid subscription from recognized and leading music hubs and online audio websites.
02Browse the Recommended Audio Choices
When looking through the diversity of music options available on any audio website, do not forget to pay attention to the user and website recommended playlists and music categories. These tend to have a collection of the most preferred audio choices and there are high chances of you getting your exact music piece from within these playlists.
You can further, refine your search within these categories by setting filters of genre and style, in case you have a clear idea of what you exactly need, thus rescuing you from the hustle of browsing through a never ending list of audio files.

03Synchronize the Slideshow Music and the Contents
The credibility of your background audio lies in adding additional spark and integrity to the stills and videos of the presentation. When selecting the music elements for your slideshow, make sure that your choices are well in accordance with the content and mood of your creation. The most important aspect here is that the music you choose to add should complement the story being depicted, while captivating the viewer’s attention.
Avoid choosing a random audio just because you have heard a buzz of the same on popular platforms or a peer recommendation, lest the contents and background score of your presentation may take opposite paths and disrupt the information flow, while resulting in a distracted audience. To escape the hustle, you may seek help from the diversity of stock audio websites for a keyword and category oriented music search.
If you are interested in adding depth to your background audio, consider using the stem files of a selected song to obtain the latter’s instrumental note recordings. This will help to add a unique layer to the song, while uplifting its mood to a different level.

04Curate and Test
When you are done with creating the perfect soundtrack for your presentation with the choicest of music, proceed to narrow down your list to a finer selection via curating the elements of the soundtrack. All you need to do is, add each track to the presentation elements, while taking care that every inclusion matches with the content it is supposed to complement.
Take care to restrict your choices in line with the length of the slideshow; else you may end up stuffing the footage with too many music pieces, leading to a miscoordinated arrangement. Check if you need just a single song or a complete soundtrack.

● Sound Proof the Final Selection
When you are happy with your work, move ahead with running a mock slideshow to have an assurance of everything being at its respective place. Take note of the music flow to be in cohesion with the other elements of the presentation, check the audio quality, resolution, etc., properties and make changes where necessary. When all seems well, you are ready to share your Clideo slideshow with friends and family on social media handles and communities.
Part 3 How to Make a Photo Slideshow on Mac?
Creating a slideshow is among the most recent trends of infotainment and content sharing. Talking of the creation tools, while most of them turn to be platform specific, others tend to have limitless device compatibility. The Clideo Slideshow maker online tool is one such utility that allows you to design slideshow presentations on any device of your exclusive preference.
Having said that, let us try hands at understanding the slideshow creation process of the aforesaid tool on a MacOs supported device in the following section:
Step 1: Launch the Clideo Online Tool
In any of your preferred Mac supported device, navigate to the home site of the Clideo slideshow maker tool using your desired web browser and move ahead with launching the same in your system.

Step 2: Upload Your Media
In the aforesaid slideshow maker’s opening interface, click on the ‘Choose Files’ tab to select and add the required media files from your Mac device’s local gallery. You can also opt for a ‘Drag and Drop’ of the desired files from your system to the tool’s editor workspace. However, if you wish to make an upload from your online storage accounts like that of Google Drive or Dropbox, hover to the ‘Upside Arrow within the ‘Choose Files’ tab.

Step 3: Adding Extra Files
If you want to add some more media files to the slideshow, navigate to the ‘Options Panel’ to the right of the editing workspace and click on ‘Add More Files’ at the top. Repeat Step 1 here to upload the image and video files in a similar way. Once finished, you can proceed to change the file sequence, delete any unwanted selection or click on ‘Add More Videos’ in the timeline to directly add more video files to your presentation.

Step 4: Crop Your Selections
The left side ‘Options Panel’ further consists of ‘Crop Options’ from where you can adjust the size of your images and videos to a particular aspect ratio, or fit them to a custom screen size using the ‘Crop and Zoom’ option. To add borders to the sides of your slideshow images, click on the ‘Fit With Border’ option.

Step 5: Play Duration Adjustments
Below the ‘Crop Options’, lies the ‘Image Duration’ tab, which you can click on to set the time frames of at will be applicable to all the media files. Also, click within the ‘Crossfade’ checkbox to ensure a seamless transition between successive slides.

Step 6: Add a Background Audio
Once again, navigate to the left side ‘Options Panel’ and tap the ‘Add Audio’ tab at the bottom to upload the desired audio files from your system to the editor timeline. You can also add music files from your online storage accounts, such as, Dropbox, Google Drive, etc.

To extract a piece of the audio for slideshow inclusion, click on the ‘Trim Audio’ tab under ‘Audio Options’. You can now select the desired audio fragment either by adjusting the yellow markers at the ends of the music clip, or specify the time stamps of the required fragment in the respective fields. The volume adjustments for both audio as well as video tracks can be made using the ‘Volume Bars’ icon.

Step 7: Output Format Selection and Export
Navigate to the format options beneath the editor timeline to select a desired output format for your slideshow. You can choose from MOV, API, MKV, MP4, WMV, and a number of other file formats. When you are happy with your work, navigate to and tap the ‘Export’ button at the extreme right corner of the editor workspace.

Step 8: Preview and Download Your Presentation
When you are done with everything, move ahead to watch a preview of your work to ascertain that all the aspects of the slideshow are just perfect. If you need to add further changes, hit the ‘Edit’ tab to head back to the editing workspace. In an otherwsise case, proceed to tap the ‘Download’ button for saving the slideshow either to your device gallery or an online storage account.

Designing Stunning Slideshow Presentataions in Filmora
When browsing through reliable software alternatiaves ez start your slideshow creation streak, picking any member of the Wondershare Filmora Video Editor franchise would indeed be a smart choice, owing tso the fact that, the aforesaid program promises to adhere to the most specificuser needs and the large scale disverity in creator preferences.
For Win 7 or later (64-bit)
For macOS 10.12 or later
Diving into the feature rich library of the software, you get to access a plethora of preset and custsomizable audio-visual effects, transitions, filters, background themes and templates; and a huge storehouse of additional elements, that are all set to add the jaw dropping spark to your otherwise customary slideshows.
The later versions of the editor program are upgraged to include a divserity of high end editing effects, like the Green Screen and AI based transitions that wosrk towards delivering a high quality professional slideshow output to enure an auadience appraisal that is simply wow!
● Ending Thoughts →
● The Clideo slideshow maker tool is anexcellent choice to design over the top slideshow presentations on an online platform.
●> Using Clideo, you can choose to create slideshows on any of your preferred devices, like, Mac, Windows, etc.
● If you are interested in looking for additional alternatives of slideshow creator software, the Wondershare Filmora franchise is something to count upon.
A clideo slideshow is an interesting trend of precise content delivery. Stay here to understand the working essentials of creating Clideo presentations with utmost ease!
In this article
01 [How Do You Make a Slideshow on Clideo?](#Part 1)
02 [Best 5 Tip to Make a Slideshow with Music](#Part 2)
03 [How to Make a Photo Slideshow on Mac?](#Part 3)
Part 1 How Do You Make a Slideshow on Clideo?
Deciding to create slideshow presentations for a graphic design oriented personal or professional concern lands you across a plethora of choices in the IT market in the shape of high end application software program and tools. No doubt, these are leaders in their task; however, the online slideshow makers available across the web are no less.
Paying attention to the same, let us focus our discussion on how does the Clideo slideshow maker tool work to adhere the aforesaid concern. Talking a bit about the credibility of the online program, the tool grants you the flexibility of creating amazing slideshow movies and presentations from images, video clips and recordings, while allowing you to complement the same with the most upbeat and suitable background music.
Additional appeals of the online include the latter’s free availability and extensive device compatibility to work affordably well with all your Windows and MacOS supported desktops, laptops and PCs, along with Android and iOS compatible smartphones and tablets. All you need is an internet connection to launch the tool in your favorite web browser and that’s how you can step into the creation process right away.
Let us now look through the process of creating slideshows in the Clideo tool using a set of still images in the following section:
Step 1: Launch the Tool
Start with navigating to the official Clideo website in any of your preferred web browsers and launch the online slideshow maker tool in your device.
Step 2: Upload Image Files
The tool’s launch screen displays the ‘Choose Files’ tab in blue, which you can click on to upload the desired image files to the Clideo timeline while selecting them from your device gallery. To select and upload images from your Dropbox or Google Drive accounts, click on the ‘Upside Arrow’ in the ‘Choose Files’ tab.
The tool supports a decent variety of image formats to work with, like, JPG, JPEG, PNG, GIF, TIFF, etc., thus letting you escape the notch of sticking to a specific file format. You can also choose to either upload the image files all at once, or add them at a later stage, as per your requirement.
Step 3: Let’s Get Creating!
Once the selected images get uploaded on the editor timeline of the tool, you can preview them in the editor workspace. You can change the sequence of appearance of the images by dragging and dropping their thumbnails at respective places within the editor timeline or delete them by selecting the image and clicking the ‘X’ symbol.
You can additionally, choose to add extra clips by tapping the ‘Add More Videos’ option in the timeline. As an alternative, navigate to the panel at the right and hit the ‘Add More Files’ button at the top.
Step 4: Crop the Media Files
Below the ‘Add More Files’ option in the right panel, you can see the ‘Crop Options’ tab. You can work with the crop tool to adjust the size of the added videos and images so that they fit in the borders of the media frames. You are further allowed to select a suitable aspect ratio and zoom the media files in and out to obtain the affordable screen size. This would come handy when you proceed to share your slideshow across various media platforms, like, Instagram, Facebook, YouTube, etc., each of which has a different screen resolution and size.
Step 5: Time Your Slides
You can decide play duration for your media files by navigating to the same right panel and hitting the ‘Image Duration’ tab and setting the required parameters in the dropdown list that appears next. Here, you can adjust the time settings of the images in your slideshow presentations, however, the video play durations are preset and you are not allowed to change them. If you wish to have a smooth play of the presentation slides, do not forget to tick the ‘Crossfade’ checkbox.
Step 6: Add a Suitable Background Music
The last one in the right panel is the ‘Add Audio’ option which you can use to supplement your presentation with the coolest and the most suitable background music. All you need to do is, hit the aforesaid tab and browse through your device’s media gallery to select an audio file of your choice. To add a music file that’s belongs to your online storage, click on the ‘Upside Arrow’ in the tab and proceed to make a selection or add a link of the desired audio file.
Once you have added the track, you are permitted to trim, adjust volume settings and loop the track if required under the ‘Audio Options’ tab.
Step 7: Duration, Size and Format Adjustments
Navigate to the left side ‘Options Panel’ at the bottom of the editor workspace, where you can set the different parameters of your slideshow size and run time. You can also choose to generate the output presentation in a specific file format if required, using the ‘Format Picker’ tool. When you are satisfied with everything, reach to and hit the ‘Export’ button at the extreme right.
Step 8: Save Your Creation
Completion of Step 7 will take you to the ‘Slideshow Save’ interface of the video editor tool. Here, you can preview your slideshow and save it to your device if everything seems fine. To save your output file, click on the ‘Download’ tab. If however, you need to make any further changes to the presentation, hit the ‘Edit’ tab to get directed back to the editor workspace.
Part 2 Best 5 Tip to Make a Slideshow with Music
While the visual elements count to be the major attractions of a slideshow presentation, subtle background music can work to bind the audience with the rhythm and flow of the presentation. Having learnt about the fundamentals of creating over the top slideshows with Clideo, let us move ahead with working on some of the best tips to complement your already awesome graphic slideshow artwork with the most appealing audio in the following section:
01Select a Royalty Free Music Plan
Adding suitable background music can uplift the appeal of your slideshow presentation to greater extents. While most of the slideshow creator programs available today are equipped with extensive varieties of inbuilt audio for visibly any presentation setting, you can also opt to choose your own music plan in case you don’t get anything specific.
However, you do need to take care of certain factors when deciding on your music plan, most importantly, the pricing concerns. Go for selecting a royalty free, unlimited audio license via an affordable paid subscription from recognized and leading music hubs and online audio websites.
02Browse the Recommended Audio Choices
When looking through the diversity of music options available on any audio website, do not forget to pay attention to the user and website recommended playlists and music categories. These tend to have a collection of the most preferred audio choices and there are high chances of you getting your exact music piece from within these playlists.
You can further, refine your search within these categories by setting filters of genre and style, in case you have a clear idea of what you exactly need, thus rescuing you from the hustle of browsing through a never ending list of audio files.
03Synchronize the Slideshow Music and the Contents
The credibility of your background audio lies in adding additional spark and integrity to the stills and videos of the presentation. When selecting the music elements for your slideshow, make sure that your choices are well in accordance with the content and mood of your creation. The most important aspect here is that the music you choose to add should complement the story being depicted, while captivating the viewer’s attention.
Avoid choosing a random audio just because you have heard a buzz of the same on popular platforms or a peer recommendation, lest the contents and background score of your presentation may take opposite paths and disrupt the information flow, while resulting in a distracted audience. To escape the hustle, you may seek help from the diversity of stock audio websites for a keyword and category oriented music search.
If you are interested in adding depth to your background audio, consider using the stem files of a selected song to obtain the latter’s instrumental note recordings. This will help to add a unique layer to the song, while uplifting its mood to a different level.
04Curate and Test
When you are done with creating the perfect soundtrack for your presentation with the choicest of music, proceed to narrow down your list to a finer selection via curating the elements of the soundtrack. All you need to do is, add each track to the presentation elements, while taking care that every inclusion matches with the content it is supposed to complement.
Take care to restrict your choices in line with the length of the slideshow; else you may end up stuffing the footage with too many music pieces, leading to a miscoordinated arrangement. Check if you need just a single song or a complete soundtrack.
● Sound Proof the Final Selection
When you are happy with your work, move ahead with running a mock slideshow to have an assurance of everything being at its respective place. Take note of the music flow to be in cohesion with the other elements of the presentation, check the audio quality, resolution, etc., properties and make changes where necessary. When all seems well, you are ready to share your Clideo slideshow with friends and family on social media handles and communities.
Part 3 How to Make a Photo Slideshow on Mac?
Creating a slideshow is among the most recent trends of infotainment and content sharing. Talking of the creation tools, while most of them turn to be platform specific, others tend to have limitless device compatibility. The Clideo Slideshow maker online tool is one such utility that allows you to design slideshow presentations on any device of your exclusive preference.
Having said that, let us try hands at understanding the slideshow creation process of the aforesaid tool on a MacOs supported device in the following section:
Step 1: Launch the Clideo Online Tool
In any of your preferred Mac supported device, navigate to the home site of the Clideo slideshow maker tool using your desired web browser and move ahead with launching the same in your system.
Step 2: Upload Your Media
In the aforesaid slideshow maker’s opening interface, click on the ‘Choose Files’ tab to select and add the required media files from your Mac device’s local gallery. You can also opt for a ‘Drag and Drop’ of the desired files from your system to the tool’s editor workspace. However, if you wish to make an upload from your online storage accounts like that of Google Drive or Dropbox, hover to the ‘Upside Arrow within the ‘Choose Files’ tab.
Step 3: Adding Extra Files
If you want to add some more media files to the slideshow, navigate to the ‘Options Panel’ to the right of the editing workspace and click on ‘Add More Files’ at the top. Repeat Step 1 here to upload the image and video files in a similar way. Once finished, you can proceed to change the file sequence, delete any unwanted selection or click on ‘Add More Videos’ in the timeline to directly add more video files to your presentation.
Step 4: Crop Your Selections
The left side ‘Options Panel’ further consists of ‘Crop Options’ from where you can adjust the size of your images and videos to a particular aspect ratio, or fit them to a custom screen size using the ‘Crop and Zoom’ option. To add borders to the sides of your slideshow images, click on the ‘Fit With Border’ option.
Step 5: Play Duration Adjustments
Below the ‘Crop Options’, lies the ‘Image Duration’ tab, which you can click on to set the time frames of at will be applicable to all the media files. Also, click within the ‘Crossfade’ checkbox to ensure a seamless transition between successive slides.
Step 6: Add a Background Audio
Once again, navigate to the left side ‘Options Panel’ and tap the ‘Add Audio’ tab at the bottom to upload the desired audio files from your system to the editor timeline. You can also add music files from your online storage accounts, such as, Dropbox, Google Drive, etc.
To extract a piece of the audio for slideshow inclusion, click on the ‘Trim Audio’ tab under ‘Audio Options’. You can now select the desired audio fragment either by adjusting the yellow markers at the ends of the music clip, or specify the time stamps of the required fragment in the respective fields. The volume adjustments for both audio as well as video tracks can be made using the ‘Volume Bars’ icon.
Step 7: Output Format Selection and Export
Navigate to the format options beneath the editor timeline to select a desired output format for your slideshow. You can choose from MOV, API, MKV, MP4, WMV, and a number of other file formats. When you are happy with your work, navigate to and tap the ‘Export’ button at the extreme right corner of the editor workspace.
Step 8: Preview and Download Your Presentation
When you are done with everything, move ahead to watch a preview of your work to ascertain that all the aspects of the slideshow are just perfect. If you need to add further changes, hit the ‘Edit’ tab to head back to the editing workspace. In an otherwsise case, proceed to tap the ‘Download’ button for saving the slideshow either to your device gallery or an online storage account.
Designing Stunning Slideshow Presentataions in Filmora
When browsing through reliable software alternatiaves ez start your slideshow creation streak, picking any member of the Wondershare Filmora Video Editor franchise would indeed be a smart choice, owing tso the fact that, the aforesaid program promises to adhere to the most specificuser needs and the large scale disverity in creator preferences.
For Win 7 or later (64-bit)
For macOS 10.12 or later
Diving into the feature rich library of the software, you get to access a plethora of preset and custsomizable audio-visual effects, transitions, filters, background themes and templates; and a huge storehouse of additional elements, that are all set to add the jaw dropping spark to your otherwise customary slideshows.
The later versions of the editor program are upgraged to include a divserity of high end editing effects, like the Green Screen and AI based transitions that wosrk towards delivering a high quality professional slideshow output to enure an auadience appraisal that is simply wow!
● Ending Thoughts →
● The Clideo slideshow maker tool is anexcellent choice to design over the top slideshow presentations on an online platform.
●> Using Clideo, you can choose to create slideshows on any of your preferred devices, like, Mac, Windows, etc.
● If you are interested in looking for additional alternatives of slideshow creator software, the Wondershare Filmora franchise is something to count upon.
Also read:
- Updated 2024 Approved Merge MP4 Online? Its Easy With These 5 Tools
- How to Share YouTube Video on Zoom, In 2024
- Updated Best Image (JPG/PNG) to GIF Converters
- New 2024 Approved 4 Solutions to Add White Borders on Mobile and Desktop
- How to Add Font Effects to Videos for 2024
- New 2024 Approved Top Free Video Editing Software Enhance Your Content with These Essential Tools
- Updated In 2024, Reversing Time Lapse Videos on iPhone Using Top Applications
- Updated In 2024, Best 5 PDF to GIF Converters You Should Know
- Updated In 2024, 12 Top Picks of Video Enhancer Software
- Updated In 2024, Do You Want to Add Subtitles to Your Videos Efficiently? This Article Will Introduce an Online Subtitle Editor that Will Help You to Create Subtitles for Your Video
- New In 2024, Get The Perfect Drone Footage With Free Drone LUTs
- Updated Looking Forward to Try Hands at Using the Icecream Slideshow Maker Program to Create High End Slideshow Presentations? Stay Here for a Complete Insight Into the Process for 2024
- Updated In 2024, Looking for a Way to Learn How to Merge Videos in HandBrake? Theres a Better Solution Waiting for You Inside
- New 2024 Approved Splitting Video Into Frames with the FFmpeg Step by Step
- Updated In 2024, How to Achieve GoPro Slow Motion With Quality
- Updated If You Are Looking for an Open-Source, Cross-Platform Video Editor, Shotcut Is a Great Choice for 2024 But Is It Truly the Best Video Editor or Is There a Better Alternative Available?
- New How to Make Loop Video in PowerPoint for 2024
- 2024 Approved How to Make an Aesthetic Slideshow
- Updated In 2024, Looking Forward to Complement Your Weekend Evenings with a Fantasy Tour to the Anime World? Stay Here to Pick the Most Appealing Alternative From the Best and Timeless Anime Creations
- New Are You Looking to Freeze-Frame in FCP? If Yes, Read One, as Here Is a Guide About How to Freeze-Frame in Final Cut Pro (FCP) with Ease for 2024
- New Detailed Tutorial to Crop a Video in KineMaster
- New In 2024, Wish to Rock on YouTube, but Lacking Tricks? Here, We Will Tell You Everything About How the YouTube Algorithm AI Works and How You Can Perform Well According to AI
- In 2024, How to Rotate a Video in Windows 10
- In 2024, Simple and Effective Ways to Change Your Country on YouTube App Of your Realme GT 5 Pro | Dr.fone
- In 2024, How to Unlock Apple iPhone 6s, Apples New iPhone
- How To Do Tecno Spark 10 5G Screen Sharing | Dr.fone
- In 2024, Top 12 Prominent Infinix Smart 7 Fingerprint Not Working Solutions
- In 2024, Turning Off Two Factor Authentication From Apple iPhone 6s? 5 Tips You Must Know
- In 2024, 2 Ways to Monitor OnePlus 11 5G Activity | Dr.fone
- In 2024, Top 10 Best Spy Watches For your Lava Blaze 2 | Dr.fone
- In 2024, For People Wanting to Mock GPS on Vivo S17 Devices | Dr.fone
- In 2024, Where Is the Best Place to Catch Dratini On Apple iPhone XS | Dr.fone
- In 2024, FRP Hijacker by Hagard Download and Bypass your Tecno Camon 20 Pro 5G FRP Locks
- How To Activate and Use Life360 Ghost Mode On Realme GT Neo 5 | Dr.fone
- How to Change your Oppo Find N3 Flip Location on Twitter | Dr.fone
- A Detailed VPNa Fake GPS Location Free Review On Oppo Find X7 Ultra | Dr.fone
- In 2024, A Step-by-Step Guide on Using ADB and Fastboot to Remove FRP Lock from your Samsung Galaxy A54 5G
- How To Fix Part of the Touch Screen Not Working on Samsung Galaxy A14 4G | Dr.fone
- 5 Ways to Reset Samsung Galaxy S24+ Without Volume Buttons | Dr.fone
- Change Location on Yik Yak For your Samsung Galaxy A15 5G to Enjoy More Fun | Dr.fone
- Tips And Tricks To Tell if Your iPhone 11 Is Unlocked
- How to retrieve erased messages from Oppo Reno 11 Pro 5G
- Title: Steps To Fade Audio In Premier Pro for 2024
- Author: Morgan
- Created at : 2024-05-19 05:12:24
- Updated at : 2024-05-20 05:12:24
- Link: https://ai-video-editing.techidaily.com/steps-to-fade-audio-in-premier-pro-for-2024/
- License: This work is licensed under CC BY-NC-SA 4.0.
