:max_bytes(150000):strip_icc():format(webp)/TwitterVideoDownload-5b605aaac9e77c002c3a42f3.jpg)
Sync Audio With Video With Filmora

Sync Audio With Video With Filmora
Syncing audio with video is an integral part of video editing for any video creator. But believe me; it’s not such a difficult task if you know what to do. The point is IF YOU KNOW WHAT TO DO.
That’s why in this brief guide, we’ll show you the simplest way to sync audio with video using a fantastic video editor easily. But wait a minute, some of you might be confused about why we even need to sync separate audio & video when a single camera can record both. So let’s first answer this simple question.
Part 1: Why Do We Need to Sync Separate Audio & Video?
Creating great video needs extraordinary video graphics, content, and top-notch audio. And you can’t expect a single camera to achieve all these goals. That’s why all professional video creators use a specialized camera for recording with a separate audio recording device.
You might think it’s an exaggeration, but this small change can have massive effects on the quality of your video. Especially the background noise removal effect of separate external microphones.
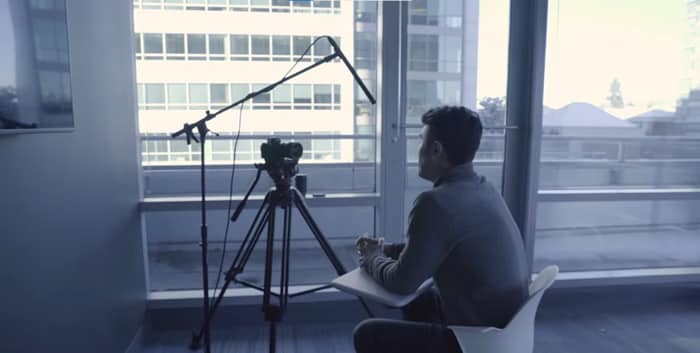
But the downside of using this method is that after the recording is complete, you must sync these audio and video files. And if you don’t do it right, all the effort goes to the drain within a split second. Well, nobody wants to watch a video with an audio lag. Isn’t it?
Correctly synching an audio file with a video is easier than you think. You just need to prepare beforehand and use a suitable video editing tool. So considering these factors, let’s first see what preparations we need. After that, we’ll recommend a top-class video editing tool to achieve this goal in detailed steps. Why are we still waiting? Let’s begin our journey.
Part 2: Preparation for Syncing Audio With Video During Recording
You must make some preparations to sync an audio file with a video properly. It’s to have a sound spike to match the footage properly with the separate audio file. And it might look disturbing, but even a simple Clap might do the job.
And if you want a professional way, just imagine the clapper board. You must have seen it in the film industry. This clapper board is used not only to mark the shot but also to create a sound spike when it claps. We use this audio spike as a reference to sync the audio files with the video.

Every time you cut your shot, remember to clap on camera again the next time you roll. It’s best to clap before you say “Action” or speak so that it’s easy to find and sync when editing. But if you forget, you can also clap at the end of the shot before you cut. That is called a Tail Slate!!!
After you’ve recorded your video like this, the next step is pretty simple. The video editor we recommend is no other than the world’s leading tool in the market, Wondershare Filmora. Let’s move forward and see how to sync audio with video using Filmora .
Part 3: How To Sync Audio With Video Using Filmora
Before we dive into the step-by-step guide, here’s a brief overview of Filmora.
Wondershare Filmora
Filmora is one of the most used video editors that can help all video creators to deliver the best they can. This incredible software from Wondershare contains multiple features that can polish any video.
Free Download For Win 7 or later(64-bit)
Free Download For macOS 10.14 or later
Moreover, the vast arsenal of video effects, images, short clips, AI avatars, and many other things are also available. You just have to pick out the one you like and add it to your video with just a single click.
On top of that, you can also adjust the audio files like audio ducking, silent detection, audio mixing, and synching audio with the video files.
As far as the audio synching is concerned, you can do it either manually or with auto synchronization. And we will explain both of these processes in a stepwise manner to give you complete mastery over your audio synching. Let’s start with the manual process first.
Steps To Manually Sync Audio With Video Using Filmora
Step1Download & install
If you haven’t downloaded the latest version of Filmora yet, click the button below to download it without any cost. And after the download is completed, you can install it on your device right away.
Free Download For Win 7 or later(64-bit)
Free Download For macOS 10.14 or later
Step2Import your files
The next step is to import all the files. Launch the Filmora and click on the “New Project” button from the opening interface.

When a new project is created, you’ll see an “Import Media” section on it. Click on this section to browse your audio and video files from the computer. Or you can also drag and drop these files here to import them.

Step3Prepare your files
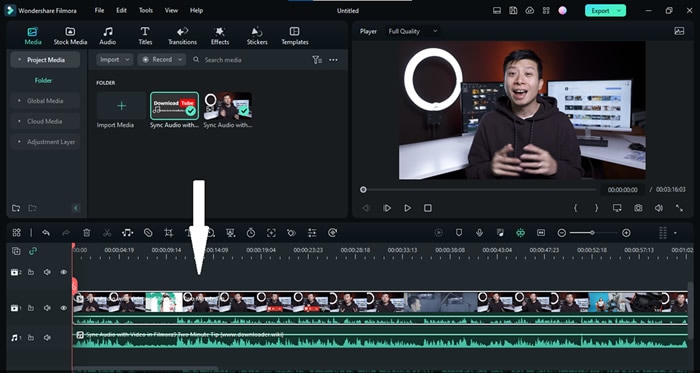
Now, it’s time to prepare our files for synchronization. First, drag the video file down to the timeline from the “Import Media” section. After that, drag the audio file in the same way below the video on the panel.
Step4Sync the audio & video files using the audio spike
Now that the video and audio files are on the timeline, you’ll have to find the moment you clap your hands. Look at the waveform from the in-camera audio and the independent audio track. At the moment you clap, we’ll see a spike.
Bonus Tip: If you can’t find the audio spike, zoom the panel to make it easier.
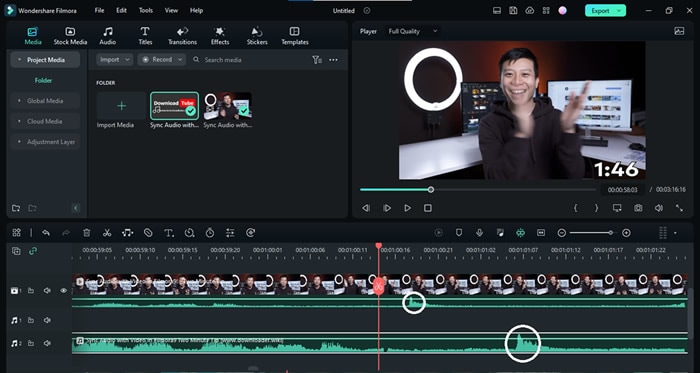
Now take the independent audio clip and align it so that both the spikes match.
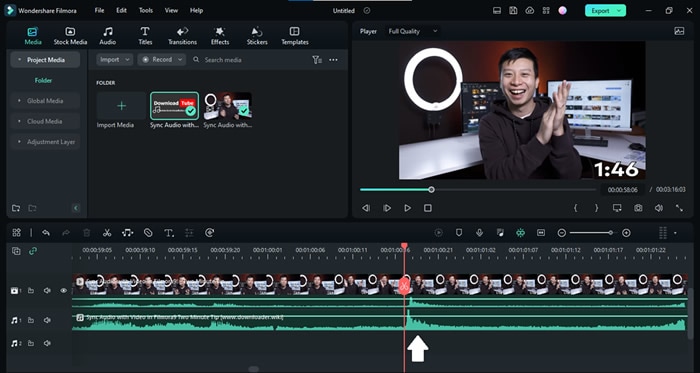
That’s it! We just need to remove the in-camera audio now. Let’s see how to do it now.
Step5Remove the audio from the video footage
To detach the audio in the video footage, right-click on this file and select the “Detach Audio” option. Or you can also use the “Ctrl+Alt+D” as the hotkey.
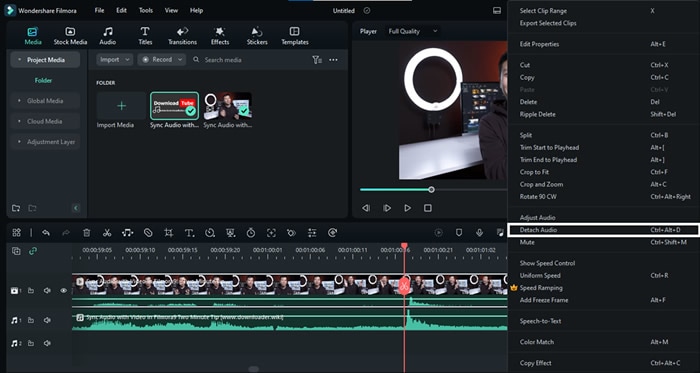
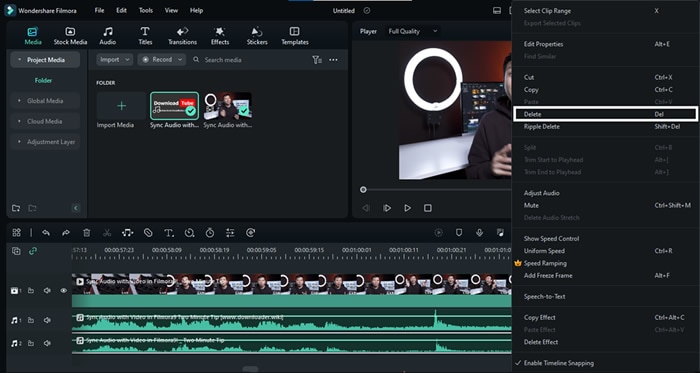
Once the audio file has been separated, you can move forward and delete it. To delete this audio, right-click on it and select “Delete.”
Step6Enjoy your video with the new audio track
So here we go. Our video file has been synced with the high-quality audio file. You can now hit the Export button to get this edited file. But wait a minute. Didn’t we say we’ll show you a method to automatically sync audio with video? Let’s start this method now.
Steps To Automatically Sync Audio With Video Using Filmora
Did you find the above method troubling? Well, be assured because Wondershare Filmora can also automatically sync your audio file with video in a single click. Here are the steps to achieve this feat.
Free Download For Win 7 or later(64-bit)
Free Download For macOS 10.14 or later
Step1Prepare your files
This method’s starting process is the same as the previous one. You’ll need to download the Filmora and prepare your file on the timeline by importing them on a New Project.
Step2Select both audio & video files
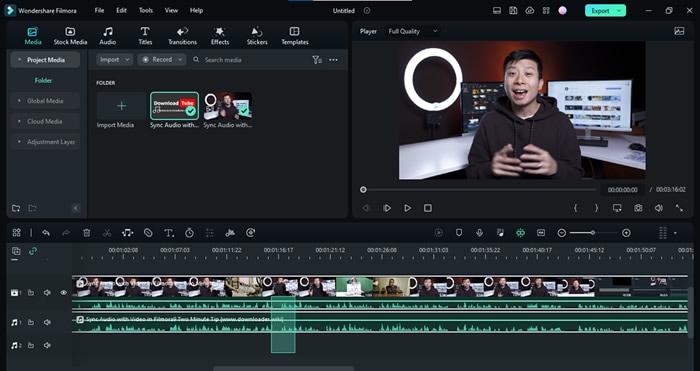
Once you’ve got everything ready, select both your audio and files from the timeline.
Step3Click on the auto synchronization icon
When you select these files, you’ll see that the “Auto Synchronization” icon has appeared on the toolbar below the Import Media section. Click on this icon and wait for the magic.
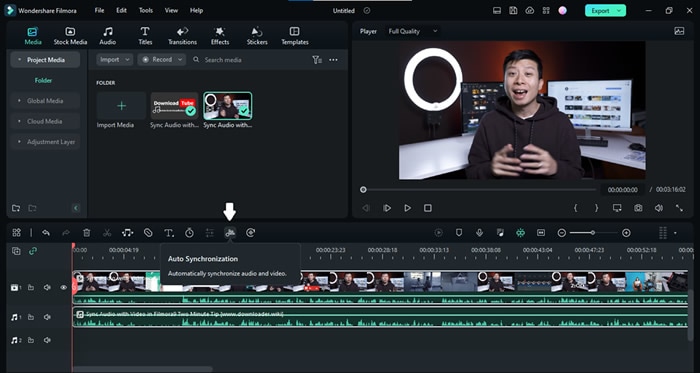
Remember that you need a Premium ID of Wondershare Filmora to use the Auto Synchronization option.
Step4Wait until the syncing is completed
Filmora will start synchronizing your files, and you’ll see the “Synchronization in process” prompt on the screen. Wait until the process is completed.
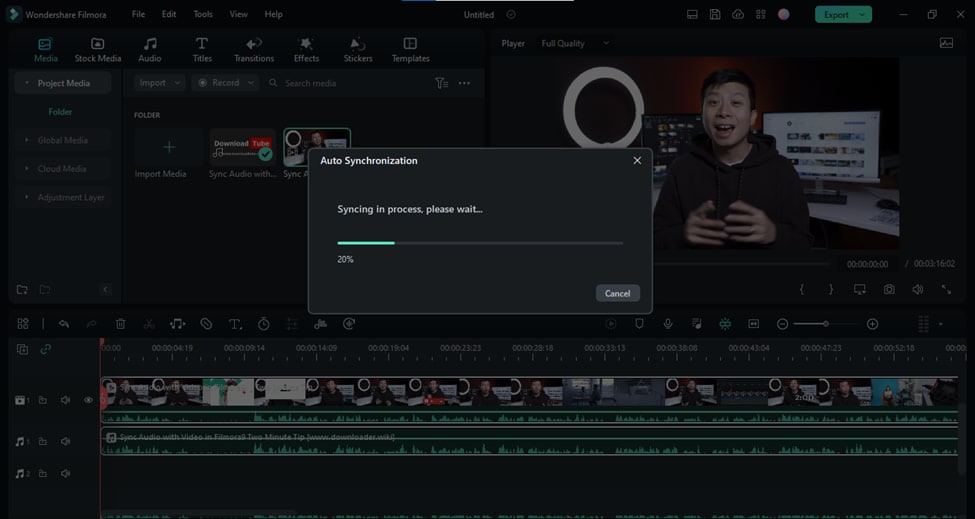
Step5Finish your editing
You can finish your editing when the separate audio file perfectly aligns with the video file. Delete the audio from the in-camera video file and hit the “Export” button.
Congratulations! We have successfully synced separate audio and video files. Now let’s take a look at some hot FAQs before we end our guide.
Part 4: FAQs About Synching Audio With Video
Is auto synchronization better than manual syncing?
Well, auto synchronization is no doubt easier than manual syncing. But that doesn’t mean you don’t need the manual process anymore. Many situations may arise where you may be left with no choice but to use the manual syncing of separate audio and video files. So make sure to properly learn both these methods, and each one of them will definitely come in handy someday.
How can we sync audio & video for free?
Syncing audio and video files for free is not a difficult task. Download the Filmora right now, and after installation, you can freely sync any Audio file with its corresponding video file by using the manual method described above.
Conclusion
For any video creator, knowing how to sync audio with video is a must. That’s because most creators record audio and video separately for higher quality.
This brief guide has covered all the details about how to sync audio and video files using an outstanding video editor, Wondershare Filmora . We hope it comes in handy.
Free Download For Win 7 or later(64-bit)
Free Download For macOS 10.14 or later
Free Download For macOS 10.14 or later
Moreover, the vast arsenal of video effects, images, short clips, AI avatars, and many other things are also available. You just have to pick out the one you like and add it to your video with just a single click.
On top of that, you can also adjust the audio files like audio ducking, silent detection, audio mixing, and synching audio with the video files.

As far as the audio synching is concerned, you can do it either manually or with auto synchronization. And we will explain both of these processes in a stepwise manner to give you complete mastery over your audio synching. Let’s start with the manual process first.
Steps To Manually Sync Audio With Video Using Filmora
Step1Download & install
If you haven’t downloaded the latest version of Filmora yet, click the button below to download it without any cost. And after the download is completed, you can install it on your device right away.
Free Download For Win 7 or later(64-bit)
Free Download For macOS 10.14 or later
Step2Import your files
The next step is to import all the files. Launch the Filmora and click on the “New Project” button from the opening interface.

When a new project is created, you’ll see an “Import Media” section on it. Click on this section to browse your audio and video files from the computer. Or you can also drag and drop these files here to import them.

Step3Prepare your files
Now, it’s time to prepare our files for synchronization. First, drag the video file down to the timeline from the “Import Media” section. After that, drag the audio file in the same way below the video on the panel.

Step4Sync the audio & video files using the audio spike
Now that the video and audio files are on the timeline, you’ll have to find the moment you clap your hands. Look at the waveform from the in-camera audio and the independent audio track. At the moment you clap, we’ll see a spike.
Bonus Tip: If you can’t find the audio spike, zoom the panel to make it easier.

Now take the independent audio clip and align it so that both the spikes match.

That’s it! We just need to remove the in-camera audio now. Let’s see how to do it now.
Step5Remove the audio from the video footage
To detach the audio in the video footage, right-click on this file and select the “Detach Audio” option. Or you can also use the “Ctrl+Alt+D” as the hotkey.

Once the audio file has been separated, you can move forward and delete it. To delete this audio, right-click on it and select “Delete.”

Step6Enjoy your video with the new audio track
So here we go. Our video file has been synced with the high-quality audio file. You can now hit the Export button to get this edited file. But wait a minute. Didn’t we say we’ll show you a method to automatically sync audio with video? Let’s start this method now.
Steps To Automatically Sync Audio With Video Using Filmora
Did you find the above method troubling? Well, be assured because Wondershare Filmora can also automatically sync your audio file with video in a single click. Here are the steps to achieve this feat.
Free Download For Win 7 or later(64-bit)
Free Download For macOS 10.14 or later
Step1Prepare your files
This method’s starting process is the same as the previous one. You’ll need to download the Filmora and prepare your file on the timeline by importing them on a New Project.
Step2Select both audio & video files
Once you’ve got everything ready, select both your audio and files from the timeline.

Step3Click on the auto synchronization icon
When you select these files, you’ll see that the “Auto Synchronization” icon has appeared on the toolbar below the Import Media section. Click on this icon and wait for the magic.

Remember that you need a Premium ID of Wondershare Filmora to use the Auto Synchronization option.
Step4Wait until the syncing is completed
Filmora will start synchronizing your files, and you’ll see the “Synchronization in process” prompt on the screen. Wait until the process is completed.

Step5Finish your editing
You can finish your editing when the separate audio file perfectly aligns with the video file. Delete the audio from the in-camera video file and hit the “Export” button.
Congratulations! We have successfully synced separate audio and video files. Now let’s take a look at some hot FAQs before we end our guide.
Part 4: FAQs About Synching Audio With Video
Is auto synchronization better than manual syncing?
Well, auto synchronization is no doubt easier than manual syncing. But that doesn’t mean you don’t need the manual process anymore. Many situations may arise where you may be left with no choice but to use the manual syncing of separate audio and video files. So make sure to properly learn both these methods, and each one of them will definitely come in handy someday.
How can we sync audio & video for free?
Syncing audio and video files for free is not a difficult task. Download the Filmora right now, and after installation, you can freely sync any Audio file with its corresponding video file by using the manual method described above.
Conclusion
For any video creator, knowing how to sync audio with video is a must. That’s because most creators record audio and video separately for higher quality.
This brief guide has covered all the details about how to sync audio and video files using an outstanding video editor, Wondershare Filmora . We hope it comes in handy.
Free Download For Win 7 or later(64-bit)
Free Download For macOS 10.14 or later
Hitfilm Express Video Editor Review
If you are involved in video editing, you better know the importance of using hitfilm express download. This video editing tool helps the users to perform video editing efficiently. Along with basic features, the program also provides advanced-level functionality that makes edited videos phenomenal. Every casual video editor gets attracted to the hitfilm express download for its extraordinary features. Anyone can download the video editing software from an online platform named FXHome.
The free software is so impressive that it can give tough competition to paid video editing platforms like Studio, Adobe Premiere Pro, and After Effects. For both novice and seasoned youtubers, this platform provides some amusing features like 400+ visual effects, compositing tools presets, and cinematic features to unveil their creativity at its best.
1. How to download and install Hitfilm Express?
People increasingly depend on this software since it is free to download. Available for both Mac and Windows, this software works as exceptional community support. The software comes with documentation and tutorials so that new users don’t face any difficulty getting used to the platform. You can download hitfilm express editing software from any third-party platform, but it is advisable to download the video editor from the official website directly. You only have to ensure that your internet connection is speedy enough for activation.
Here is the step-by-step process for the online installation of HitFilm Express.

- First, go to the official website of HItFilm Express and click the download button.
- You have to fill in the details directly on the registration page. You will get the download URL in your mail address by doing this. Check your inbox to download the installer.
- Now, allow the installation file to run and then follow the steps.
- Once the installation is completed, it’s time to activate the software. A dialog box will appear on opening the program with options like login and activation. Click the “Get Free License” to land on the website.
- After getting into the website, log in to your previously created FXhome account. When you have finally logged in to your account, search the serial code.
- Revert the software and hit the Activate and Unlock button to enter the serial code and opt for software activation. It is how your entire installation process will be completed.
2. Key Features of Hitfilm Express
If you want to take your video editing to the next level like a professional, hitfilm express editing software is your one-stop solution. Here is a wide array of features that provides amateurs to professionals a seamless experience.
**Professional project quality: The UHD support and RAM preview of HitFilm Express provide the users the supreme quality formats. Whatever footage you collect from documentaries captured by high-end cameras or smartphones, HItFilm will manage everything.
**Commentator recorder: Once you click the button, you will easily adjoin voiceover to the uploaded videos without leaving the HitFilm. The HitFilm Express is designed so that your recording will promptly add to a soundtrack so that you can do the finishing touches with the audio effects.
**Integrated timelines: Keep switching from one tab to another, same as you do on the browser, as per your needs. You can edit in one tab, make a composition in the other, and then get back to the editor without the necessity of loading other software.
**Customized playback: You can personalize playback. It will help you get exposed to non-stop playback in the trimmer, thus preventing lagging and making edits easier. It allows you to control the playback quality and make hasty edits.
**Smart search: With the help of HitFilm Express, you can locate your desired keyword quickly. It will also help you find properties for all the effects, media, and timelines. In case you come from a different software system, the algorithm of hitfilm express editor identifies the keyword links and assists you in finding your search.
**Numerous streams: To allow the gamers to have a rejoicing experience, HitFilm allows importing files with multiple audio streams and provides you with complete flexibility over workflow.
**Adjustable trimmer: With HitFilm Express, you can re-trim clips even after adding to the timeline. The moment you double-click the clip, it will automatically get sent to the trimmer panel to allow you to make necessary adjustments. Once you have completed the changes, the clip will be again updated.
**Cinematic outlook: You can prepare your film with the classic cine-effects of HItFilm Express. Choose your most preferred effects like Day For Night, Three-Strip Color, Film Grain, and other styles to give a cinematic edge.
3. How to edit videos with Hitfilm Express?
Editing is cutting and accumulating the selected clips to tell the story better. Editing consists of adding sound effects, transitions, and other visual elements to help it view excellent results.

You have to set up the editor timeline and start importing clips to edit your clips. Use the editor tools like roll, slip, drag, selection, ripple, and others to customize your edit.

- Choose the Set in point button from the point where you want to start the clip. In the timeline, you will notice an orange section representing the part of the clip you want to play.
- Now, skip through, and decide where you want to end the clip. You have to click the Set-out button. You can alternatively use the I and 0 keys as shortcuts.
- Once you get your selected start and endpoint, you can drag down the portion of the video into the timeline. This time, you can get a message that shows the editor settings are different from the adding clip. It is your choice how you want to keep your settings.
- If you find the selected set of a good standard, you can move forward and select “Yes” to ensure that your project gets changed into that setting.
- In the viewer section, you will get to view the final outlook of the video. Here, on the downside of the timeline, you can click on the Zoom bar to see things in detail. Your previews will depend on the selected settings that you have made beforehand.
- If you want to change your default setting, you can come to the hamburger icon for tracking and changing the size of the video to different ones.
- Add a clip to the timeline: Position the play head at the timeline point where you want to start the clip, and then hit the insert clip button.

4. Hitfilm Express Alternative to Edit Videos
Anyone who finds video editing fun filling can try out Filmora . It is an ideal alternative to hitfilm express editing tutorial. Whether you shoot in an entry-level camera or a high-end video camera, Filmora will help you create and edit the most suitable videos. During the video editing procedure, you can experience multiple challenges that help you stay patient and work slowly to come out with the project.

It is the best video editing platform for beginners since it can provide comprehensive support for creating different video formats. The user-friendly interface and powerful editing features make the video editor one of the most used video editing software.
For Win 7 or later (64-bit)
For macOS 10.12 or later
Step-by-step guide for editing videos with Filmora
Step 1: Double click on the Filmora’s icon to start working on your project. Either open the new project or click on the aspect ratio for time-saving editing.
Step 2: Select the “project setting” option to customize the aspect ratio as per your need. Next, you will go to the import media files to choose the import with the instant cutter tool and opt for easy trimming of videos.
You can also use a lens correction tool to improve the quality of videos.
Step 3: Create a new folder and organize the clips alphabetically to increase efficiency.
Step 4: Drag and drop the trimmed videos on the timeline and rearrange them to remove the unnecessary parts. Press the play button to get previews of your added video clips.
Step 5: Now, it’s time to add audio and visual effects to your trimmed footage. You can also add opening titles and subtitles and use text templates to work on the video transition.
Step 6: With the help of a color correction tool, you can make the videos look vivid. It takes enough time and dedication to master color correction for your videos.
Step 7: When you are 100% sure about the final outlook of the project, you have to export the videos on YouTube for fast uploading on social media networks. Otherwise, you can opt for saving the video on the hard drives.
5. FAQs about Hitfilm Express
1.Is Hitfilm Express still free?
Ans: HitFilm Express is still free with alternative paid add-ons. The free video editing software helps make excellent films and video games with the professional-grade VFX. From students, beginners, and gamers to you Tubers – anyone can work on their creativity without spending a penny.
2.Is Hitfilm Express safe to download?
Ans: With more than 5 million active users across 160 countries, HitFilm Express is safe and legit software to download. If you are susceptible to using this platform, it is an excellent option to experience some remarkable features and learn A to Z of video editing.
3.Is Hitfilm Express still worth it?
Ans: IF anyone opts for the paid version, it will be expensive. However, the video editing software has beginner-friendly features like different AI tools for guided editing, 4K support, and others that hardly make any sense compared with other free software.
Looking at its professional features and high-quality editing, it is the most powerful video editing platform.
Conclusion
In a nutshell, HItFilm is an entirely free version of video editing software. Beginners can quickly learn it since the editing features can be easily grasped. To create amateur videos for professional ones, HitFilm Express is your one-stop solution. The customizable effects and compositing layers provide your videos with an excellent cinematic look. Everything you will get without spending any money.
Therefore, if you want to learn the A to Z of video editing for absolutely free, you can blindly rely on the hitfilm express editor.
2. Key Features of Hitfilm Express
If you want to take your video editing to the next level like a professional, hitfilm express editing software is your one-stop solution. Here is a wide array of features that provides amateurs to professionals a seamless experience.
**Professional project quality: The UHD support and RAM preview of HitFilm Express provide the users the supreme quality formats. Whatever footage you collect from documentaries captured by high-end cameras or smartphones, HItFilm will manage everything.
**Commentator recorder: Once you click the button, you will easily adjoin voiceover to the uploaded videos without leaving the HitFilm. The HitFilm Express is designed so that your recording will promptly add to a soundtrack so that you can do the finishing touches with the audio effects.
**Integrated timelines: Keep switching from one tab to another, same as you do on the browser, as per your needs. You can edit in one tab, make a composition in the other, and then get back to the editor without the necessity of loading other software.
**Customized playback: You can personalize playback. It will help you get exposed to non-stop playback in the trimmer, thus preventing lagging and making edits easier. It allows you to control the playback quality and make hasty edits.
**Smart search: With the help of HitFilm Express, you can locate your desired keyword quickly. It will also help you find properties for all the effects, media, and timelines. In case you come from a different software system, the algorithm of hitfilm express editor identifies the keyword links and assists you in finding your search.
**Numerous streams: To allow the gamers to have a rejoicing experience, HitFilm allows importing files with multiple audio streams and provides you with complete flexibility over workflow.
**Adjustable trimmer: With HitFilm Express, you can re-trim clips even after adding to the timeline. The moment you double-click the clip, it will automatically get sent to the trimmer panel to allow you to make necessary adjustments. Once you have completed the changes, the clip will be again updated.
**Cinematic outlook: You can prepare your film with the classic cine-effects of HItFilm Express. Choose your most preferred effects like Day For Night, Three-Strip Color, Film Grain, and other styles to give a cinematic edge.
3. How to edit videos with Hitfilm Express?
Editing is cutting and accumulating the selected clips to tell the story better. Editing consists of adding sound effects, transitions, and other visual elements to help it view excellent results.

You have to set up the editor timeline and start importing clips to edit your clips. Use the editor tools like roll, slip, drag, selection, ripple, and others to customize your edit.

- Choose the Set in point button from the point where you want to start the clip. In the timeline, you will notice an orange section representing the part of the clip you want to play.
- Now, skip through, and decide where you want to end the clip. You have to click the Set-out button. You can alternatively use the I and 0 keys as shortcuts.
- Once you get your selected start and endpoint, you can drag down the portion of the video into the timeline. This time, you can get a message that shows the editor settings are different from the adding clip. It is your choice how you want to keep your settings.
- If you find the selected set of a good standard, you can move forward and select “Yes” to ensure that your project gets changed into that setting.
- In the viewer section, you will get to view the final outlook of the video. Here, on the downside of the timeline, you can click on the Zoom bar to see things in detail. Your previews will depend on the selected settings that you have made beforehand.
- If you want to change your default setting, you can come to the hamburger icon for tracking and changing the size of the video to different ones.
- Add a clip to the timeline: Position the play head at the timeline point where you want to start the clip, and then hit the insert clip button.

4. Hitfilm Express Alternative to Edit Videos
Anyone who finds video editing fun filling can try out Filmora . It is an ideal alternative to hitfilm express editing tutorial. Whether you shoot in an entry-level camera or a high-end video camera, Filmora will help you create and edit the most suitable videos. During the video editing procedure, you can experience multiple challenges that help you stay patient and work slowly to come out with the project.

It is the best video editing platform for beginners since it can provide comprehensive support for creating different video formats. The user-friendly interface and powerful editing features make the video editor one of the most used video editing software.
For Win 7 or later (64-bit)
For macOS 10.12 or later
Step-by-step guide for editing videos with Filmora
Step 1: Double click on the Filmora’s icon to start working on your project. Either open the new project or click on the aspect ratio for time-saving editing.
Step 2: Select the “project setting” option to customize the aspect ratio as per your need. Next, you will go to the import media files to choose the import with the instant cutter tool and opt for easy trimming of videos.
You can also use a lens correction tool to improve the quality of videos.
Step 3: Create a new folder and organize the clips alphabetically to increase efficiency.
Step 4: Drag and drop the trimmed videos on the timeline and rearrange them to remove the unnecessary parts. Press the play button to get previews of your added video clips.
Step 5: Now, it’s time to add audio and visual effects to your trimmed footage. You can also add opening titles and subtitles and use text templates to work on the video transition.
Step 6: With the help of a color correction tool, you can make the videos look vivid. It takes enough time and dedication to master color correction for your videos.
Step 7: When you are 100% sure about the final outlook of the project, you have to export the videos on YouTube for fast uploading on social media networks. Otherwise, you can opt for saving the video on the hard drives.
5. FAQs about Hitfilm Express
1.Is Hitfilm Express still free?
Ans: HitFilm Express is still free with alternative paid add-ons. The free video editing software helps make excellent films and video games with the professional-grade VFX. From students, beginners, and gamers to you Tubers – anyone can work on their creativity without spending a penny.
2.Is Hitfilm Express safe to download?
Ans: With more than 5 million active users across 160 countries, HitFilm Express is safe and legit software to download. If you are susceptible to using this platform, it is an excellent option to experience some remarkable features and learn A to Z of video editing.
3.Is Hitfilm Express still worth it?
Ans: IF anyone opts for the paid version, it will be expensive. However, the video editing software has beginner-friendly features like different AI tools for guided editing, 4K support, and others that hardly make any sense compared with other free software.
Looking at its professional features and high-quality editing, it is the most powerful video editing platform.
Conclusion
In a nutshell, HItFilm is an entirely free version of video editing software. Beginners can quickly learn it since the editing features can be easily grasped. To create amateur videos for professional ones, HitFilm Express is your one-stop solution. The customizable effects and compositing layers provide your videos with an excellent cinematic look. Everything you will get without spending any money.
Therefore, if you want to learn the A to Z of video editing for absolutely free, you can blindly rely on the hitfilm express editor.
2. Key Features of Hitfilm Express
If you want to take your video editing to the next level like a professional, hitfilm express editing software is your one-stop solution. Here is a wide array of features that provides amateurs to professionals a seamless experience.
**Professional project quality: The UHD support and RAM preview of HitFilm Express provide the users the supreme quality formats. Whatever footage you collect from documentaries captured by high-end cameras or smartphones, HItFilm will manage everything.
**Commentator recorder: Once you click the button, you will easily adjoin voiceover to the uploaded videos without leaving the HitFilm. The HitFilm Express is designed so that your recording will promptly add to a soundtrack so that you can do the finishing touches with the audio effects.
**Integrated timelines: Keep switching from one tab to another, same as you do on the browser, as per your needs. You can edit in one tab, make a composition in the other, and then get back to the editor without the necessity of loading other software.
**Customized playback: You can personalize playback. It will help you get exposed to non-stop playback in the trimmer, thus preventing lagging and making edits easier. It allows you to control the playback quality and make hasty edits.
**Smart search: With the help of HitFilm Express, you can locate your desired keyword quickly. It will also help you find properties for all the effects, media, and timelines. In case you come from a different software system, the algorithm of hitfilm express editor identifies the keyword links and assists you in finding your search.
**Numerous streams: To allow the gamers to have a rejoicing experience, HitFilm allows importing files with multiple audio streams and provides you with complete flexibility over workflow.
**Adjustable trimmer: With HitFilm Express, you can re-trim clips even after adding to the timeline. The moment you double-click the clip, it will automatically get sent to the trimmer panel to allow you to make necessary adjustments. Once you have completed the changes, the clip will be again updated.
**Cinematic outlook: You can prepare your film with the classic cine-effects of HItFilm Express. Choose your most preferred effects like Day For Night, Three-Strip Color, Film Grain, and other styles to give a cinematic edge.
3. How to edit videos with Hitfilm Express?
Editing is cutting and accumulating the selected clips to tell the story better. Editing consists of adding sound effects, transitions, and other visual elements to help it view excellent results.

You have to set up the editor timeline and start importing clips to edit your clips. Use the editor tools like roll, slip, drag, selection, ripple, and others to customize your edit.

- Choose the Set in point button from the point where you want to start the clip. In the timeline, you will notice an orange section representing the part of the clip you want to play.
- Now, skip through, and decide where you want to end the clip. You have to click the Set-out button. You can alternatively use the I and 0 keys as shortcuts.
- Once you get your selected start and endpoint, you can drag down the portion of the video into the timeline. This time, you can get a message that shows the editor settings are different from the adding clip. It is your choice how you want to keep your settings.
- If you find the selected set of a good standard, you can move forward and select “Yes” to ensure that your project gets changed into that setting.
- In the viewer section, you will get to view the final outlook of the video. Here, on the downside of the timeline, you can click on the Zoom bar to see things in detail. Your previews will depend on the selected settings that you have made beforehand.
- If you want to change your default setting, you can come to the hamburger icon for tracking and changing the size of the video to different ones.
- Add a clip to the timeline: Position the play head at the timeline point where you want to start the clip, and then hit the insert clip button.

4. Hitfilm Express Alternative to Edit Videos
Anyone who finds video editing fun filling can try out Filmora . It is an ideal alternative to hitfilm express editing tutorial. Whether you shoot in an entry-level camera or a high-end video camera, Filmora will help you create and edit the most suitable videos. During the video editing procedure, you can experience multiple challenges that help you stay patient and work slowly to come out with the project.

It is the best video editing platform for beginners since it can provide comprehensive support for creating different video formats. The user-friendly interface and powerful editing features make the video editor one of the most used video editing software.
For Win 7 or later (64-bit)
For macOS 10.12 or later
Step-by-step guide for editing videos with Filmora
Step 1: Double click on the Filmora’s icon to start working on your project. Either open the new project or click on the aspect ratio for time-saving editing.
Step 2: Select the “project setting” option to customize the aspect ratio as per your need. Next, you will go to the import media files to choose the import with the instant cutter tool and opt for easy trimming of videos.
You can also use a lens correction tool to improve the quality of videos.
Step 3: Create a new folder and organize the clips alphabetically to increase efficiency.
Step 4: Drag and drop the trimmed videos on the timeline and rearrange them to remove the unnecessary parts. Press the play button to get previews of your added video clips.
Step 5: Now, it’s time to add audio and visual effects to your trimmed footage. You can also add opening titles and subtitles and use text templates to work on the video transition.
Step 6: With the help of a color correction tool, you can make the videos look vivid. It takes enough time and dedication to master color correction for your videos.
Step 7: When you are 100% sure about the final outlook of the project, you have to export the videos on YouTube for fast uploading on social media networks. Otherwise, you can opt for saving the video on the hard drives.
5. FAQs about Hitfilm Express
1.Is Hitfilm Express still free?
Ans: HitFilm Express is still free with alternative paid add-ons. The free video editing software helps make excellent films and video games with the professional-grade VFX. From students, beginners, and gamers to you Tubers – anyone can work on their creativity without spending a penny.
2.Is Hitfilm Express safe to download?
Ans: With more than 5 million active users across 160 countries, HitFilm Express is safe and legit software to download. If you are susceptible to using this platform, it is an excellent option to experience some remarkable features and learn A to Z of video editing.
3.Is Hitfilm Express still worth it?
Ans: IF anyone opts for the paid version, it will be expensive. However, the video editing software has beginner-friendly features like different AI tools for guided editing, 4K support, and others that hardly make any sense compared with other free software.
Looking at its professional features and high-quality editing, it is the most powerful video editing platform.
Conclusion
In a nutshell, HItFilm is an entirely free version of video editing software. Beginners can quickly learn it since the editing features can be easily grasped. To create amateur videos for professional ones, HitFilm Express is your one-stop solution. The customizable effects and compositing layers provide your videos with an excellent cinematic look. Everything you will get without spending any money.
Therefore, if you want to learn the A to Z of video editing for absolutely free, you can blindly rely on the hitfilm express editor.
2. Key Features of Hitfilm Express
If you want to take your video editing to the next level like a professional, hitfilm express editing software is your one-stop solution. Here is a wide array of features that provides amateurs to professionals a seamless experience.
**Professional project quality: The UHD support and RAM preview of HitFilm Express provide the users the supreme quality formats. Whatever footage you collect from documentaries captured by high-end cameras or smartphones, HItFilm will manage everything.
**Commentator recorder: Once you click the button, you will easily adjoin voiceover to the uploaded videos without leaving the HitFilm. The HitFilm Express is designed so that your recording will promptly add to a soundtrack so that you can do the finishing touches with the audio effects.
**Integrated timelines: Keep switching from one tab to another, same as you do on the browser, as per your needs. You can edit in one tab, make a composition in the other, and then get back to the editor without the necessity of loading other software.
**Customized playback: You can personalize playback. It will help you get exposed to non-stop playback in the trimmer, thus preventing lagging and making edits easier. It allows you to control the playback quality and make hasty edits.
**Smart search: With the help of HitFilm Express, you can locate your desired keyword quickly. It will also help you find properties for all the effects, media, and timelines. In case you come from a different software system, the algorithm of hitfilm express editor identifies the keyword links and assists you in finding your search.
**Numerous streams: To allow the gamers to have a rejoicing experience, HitFilm allows importing files with multiple audio streams and provides you with complete flexibility over workflow.
**Adjustable trimmer: With HitFilm Express, you can re-trim clips even after adding to the timeline. The moment you double-click the clip, it will automatically get sent to the trimmer panel to allow you to make necessary adjustments. Once you have completed the changes, the clip will be again updated.
**Cinematic outlook: You can prepare your film with the classic cine-effects of HItFilm Express. Choose your most preferred effects like Day For Night, Three-Strip Color, Film Grain, and other styles to give a cinematic edge.
3. How to edit videos with Hitfilm Express?
Editing is cutting and accumulating the selected clips to tell the story better. Editing consists of adding sound effects, transitions, and other visual elements to help it view excellent results.

You have to set up the editor timeline and start importing clips to edit your clips. Use the editor tools like roll, slip, drag, selection, ripple, and others to customize your edit.

- Choose the Set in point button from the point where you want to start the clip. In the timeline, you will notice an orange section representing the part of the clip you want to play.
- Now, skip through, and decide where you want to end the clip. You have to click the Set-out button. You can alternatively use the I and 0 keys as shortcuts.
- Once you get your selected start and endpoint, you can drag down the portion of the video into the timeline. This time, you can get a message that shows the editor settings are different from the adding clip. It is your choice how you want to keep your settings.
- If you find the selected set of a good standard, you can move forward and select “Yes” to ensure that your project gets changed into that setting.
- In the viewer section, you will get to view the final outlook of the video. Here, on the downside of the timeline, you can click on the Zoom bar to see things in detail. Your previews will depend on the selected settings that you have made beforehand.
- If you want to change your default setting, you can come to the hamburger icon for tracking and changing the size of the video to different ones.
- Add a clip to the timeline: Position the play head at the timeline point where you want to start the clip, and then hit the insert clip button.

4. Hitfilm Express Alternative to Edit Videos
Anyone who finds video editing fun filling can try out Filmora . It is an ideal alternative to hitfilm express editing tutorial. Whether you shoot in an entry-level camera or a high-end video camera, Filmora will help you create and edit the most suitable videos. During the video editing procedure, you can experience multiple challenges that help you stay patient and work slowly to come out with the project.

It is the best video editing platform for beginners since it can provide comprehensive support for creating different video formats. The user-friendly interface and powerful editing features make the video editor one of the most used video editing software.
For Win 7 or later (64-bit)
For macOS 10.12 or later
Step-by-step guide for editing videos with Filmora
Step 1: Double click on the Filmora’s icon to start working on your project. Either open the new project or click on the aspect ratio for time-saving editing.
Step 2: Select the “project setting” option to customize the aspect ratio as per your need. Next, you will go to the import media files to choose the import with the instant cutter tool and opt for easy trimming of videos.
You can also use a lens correction tool to improve the quality of videos.
Step 3: Create a new folder and organize the clips alphabetically to increase efficiency.
Step 4: Drag and drop the trimmed videos on the timeline and rearrange them to remove the unnecessary parts. Press the play button to get previews of your added video clips.
Step 5: Now, it’s time to add audio and visual effects to your trimmed footage. You can also add opening titles and subtitles and use text templates to work on the video transition.
Step 6: With the help of a color correction tool, you can make the videos look vivid. It takes enough time and dedication to master color correction for your videos.
Step 7: When you are 100% sure about the final outlook of the project, you have to export the videos on YouTube for fast uploading on social media networks. Otherwise, you can opt for saving the video on the hard drives.
5. FAQs about Hitfilm Express
1.Is Hitfilm Express still free?
Ans: HitFilm Express is still free with alternative paid add-ons. The free video editing software helps make excellent films and video games with the professional-grade VFX. From students, beginners, and gamers to you Tubers – anyone can work on their creativity without spending a penny.
2.Is Hitfilm Express safe to download?
Ans: With more than 5 million active users across 160 countries, HitFilm Express is safe and legit software to download. If you are susceptible to using this platform, it is an excellent option to experience some remarkable features and learn A to Z of video editing.
3.Is Hitfilm Express still worth it?
Ans: IF anyone opts for the paid version, it will be expensive. However, the video editing software has beginner-friendly features like different AI tools for guided editing, 4K support, and others that hardly make any sense compared with other free software.
Looking at its professional features and high-quality editing, it is the most powerful video editing platform.
Conclusion
In a nutshell, HItFilm is an entirely free version of video editing software. Beginners can quickly learn it since the editing features can be easily grasped. To create amateur videos for professional ones, HitFilm Express is your one-stop solution. The customizable effects and compositing layers provide your videos with an excellent cinematic look. Everything you will get without spending any money.
Therefore, if you want to learn the A to Z of video editing for absolutely free, you can blindly rely on the hitfilm express editor.
How to Create a Dynamic Text Animation in Filmora — Step-By-Step
Preparation
What you need to prepare:
- A computer (Windows or macOS)
- Your video materials.
- Filmora video editor
Step 1
Download and install the Filmora video editor . Just click the link, hit “Download”, and it will start automatically. Then, open a New Project.
Step 2
Click on the “Titles” tab and drag a Default Title to Track 2 on your Timeline.

Step 3
Double-click on it and change the font to anything you like. Then, enter the text in the box in front of you. While you’re here, you can also edit the text spacing and other features.

Step 4
Now, take a snapshot of the text. Then, double-click on the default title again and change the text to a single letter I. Once again, take a snapshot of this text and then delete the default title from the timeline.

You should have two snapshots in My Media now. One of them should say “FILMORA” and one with the letter “I”.

Step 5
Drag the “FILMORA” snapshot to track 2 and the “I” snapshot to track 3. Then, click on the “Zoom” button and set this to 50%.

Step 6
Double-click on the “I” snapshot from the timeline. Then, input these settings when the window pops up. After that, drag the Playhead 1 second and 15 frames further down the timeline. Then, double-click on the “I” snapshot again, and change the Y-axis value to 0.

Step 7
Copy the “I” snapshot track from the timeline. Then, paste it on Track 4. Next, double-click on this one and change the X-axis position to whichever letter you want. In this case, it’s the letter “M”. As for the Y-Axis, you can change it any way that suits you.

Step 8
Copy this process as often and with as many letters as you want. Then, when you’re done, export the title animation to your computer.

Step 9
Open a new project in Filmora and import the title animation we just created.
Step 10
Drag the custom title animation to Track 2 and drag any video background you have on Track 1.

Step 11
Double-click on the title track, go to the Video tab, and select “Lighten” from the Blending Mode tab.

Step 12
Shift the title clip from Track 2 to Track 3. Then, go to the Effects tab and drag the Dark Film effect to Track 1 on the timeline.

Step 13
Search for the “Blur” effect in the Effects tab. Then, drag “Square Blur” to Track 2 in the timeline.

Step 14
Select the “Cinema” effect from the Effects tab and drag it to Track 4. Double-click on it and change the border height to 0.10.

Step 15
Now, all left is to render the clip and review the final result.

Summary
What you’ve learned:
- Create a professional-level animated text in Filmora in 15 simple steps
- How to add a video background and cinematic effects to your animated title
- Adjust the settings of clips in the Filmora timeline
What you need to prepare:
- A computer (Windows or macOS)
- Your video materials.
- Filmora video editor
Step 1
Download and install the Filmora video editor . Just click the link, hit “Download”, and it will start automatically. Then, open a New Project.
Step 2
Click on the “Titles” tab and drag a Default Title to Track 2 on your Timeline.

Step 3
Double-click on it and change the font to anything you like. Then, enter the text in the box in front of you. While you’re here, you can also edit the text spacing and other features.

Step 4
Now, take a snapshot of the text. Then, double-click on the default title again and change the text to a single letter I. Once again, take a snapshot of this text and then delete the default title from the timeline.

You should have two snapshots in My Media now. One of them should say “FILMORA” and one with the letter “I”.

Step 5
Drag the “FILMORA” snapshot to track 2 and the “I” snapshot to track 3. Then, click on the “Zoom” button and set this to 50%.

Step 6
Double-click on the “I” snapshot from the timeline. Then, input these settings when the window pops up. After that, drag the Playhead 1 second and 15 frames further down the timeline. Then, double-click on the “I” snapshot again, and change the Y-axis value to 0.

Step 7
Copy the “I” snapshot track from the timeline. Then, paste it on Track 4. Next, double-click on this one and change the X-axis position to whichever letter you want. In this case, it’s the letter “M”. As for the Y-Axis, you can change it any way that suits you.

Step 8
Copy this process as often and with as many letters as you want. Then, when you’re done, export the title animation to your computer.

Step 9
Open a new project in Filmora and import the title animation we just created.
Step 10
Drag the custom title animation to Track 2 and drag any video background you have on Track 1.

Step 11
Double-click on the title track, go to the Video tab, and select “Lighten” from the Blending Mode tab.

Step 12
Shift the title clip from Track 2 to Track 3. Then, go to the Effects tab and drag the Dark Film effect to Track 1 on the timeline.

Step 13
Search for the “Blur” effect in the Effects tab. Then, drag “Square Blur” to Track 2 in the timeline.

Step 14
Select the “Cinema” effect from the Effects tab and drag it to Track 4. Double-click on it and change the border height to 0.10.

Step 15
Now, all left is to render the clip and review the final result.

Summary
What you’ve learned:
- Create a professional-level animated text in Filmora in 15 simple steps
- How to add a video background and cinematic effects to your animated title
- Adjust the settings of clips in the Filmora timeline
What you need to prepare:
- A computer (Windows or macOS)
- Your video materials.
- Filmora video editor
Step 1
Download and install the Filmora video editor . Just click the link, hit “Download”, and it will start automatically. Then, open a New Project.
Step 2
Click on the “Titles” tab and drag a Default Title to Track 2 on your Timeline.

Step 3
Double-click on it and change the font to anything you like. Then, enter the text in the box in front of you. While you’re here, you can also edit the text spacing and other features.

Step 4
Now, take a snapshot of the text. Then, double-click on the default title again and change the text to a single letter I. Once again, take a snapshot of this text and then delete the default title from the timeline.

You should have two snapshots in My Media now. One of them should say “FILMORA” and one with the letter “I”.

Step 5
Drag the “FILMORA” snapshot to track 2 and the “I” snapshot to track 3. Then, click on the “Zoom” button and set this to 50%.

Step 6
Double-click on the “I” snapshot from the timeline. Then, input these settings when the window pops up. After that, drag the Playhead 1 second and 15 frames further down the timeline. Then, double-click on the “I” snapshot again, and change the Y-axis value to 0.

Step 7
Copy the “I” snapshot track from the timeline. Then, paste it on Track 4. Next, double-click on this one and change the X-axis position to whichever letter you want. In this case, it’s the letter “M”. As for the Y-Axis, you can change it any way that suits you.

Step 8
Copy this process as often and with as many letters as you want. Then, when you’re done, export the title animation to your computer.

Step 9
Open a new project in Filmora and import the title animation we just created.
Step 10
Drag the custom title animation to Track 2 and drag any video background you have on Track 1.

Step 11
Double-click on the title track, go to the Video tab, and select “Lighten” from the Blending Mode tab.

Step 12
Shift the title clip from Track 2 to Track 3. Then, go to the Effects tab and drag the Dark Film effect to Track 1 on the timeline.

Step 13
Search for the “Blur” effect in the Effects tab. Then, drag “Square Blur” to Track 2 in the timeline.

Step 14
Select the “Cinema” effect from the Effects tab and drag it to Track 4. Double-click on it and change the border height to 0.10.

Step 15
Now, all left is to render the clip and review the final result.

Summary
What you’ve learned:
- Create a professional-level animated text in Filmora in 15 simple steps
- How to add a video background and cinematic effects to your animated title
- Adjust the settings of clips in the Filmora timeline
What you need to prepare:
- A computer (Windows or macOS)
- Your video materials.
- Filmora video editor
Step 1
Download and install the Filmora video editor . Just click the link, hit “Download”, and it will start automatically. Then, open a New Project.
Step 2
Click on the “Titles” tab and drag a Default Title to Track 2 on your Timeline.

Step 3
Double-click on it and change the font to anything you like. Then, enter the text in the box in front of you. While you’re here, you can also edit the text spacing and other features.

Step 4
Now, take a snapshot of the text. Then, double-click on the default title again and change the text to a single letter I. Once again, take a snapshot of this text and then delete the default title from the timeline.

You should have two snapshots in My Media now. One of them should say “FILMORA” and one with the letter “I”.

Step 5
Drag the “FILMORA” snapshot to track 2 and the “I” snapshot to track 3. Then, click on the “Zoom” button and set this to 50%.

Step 6
Double-click on the “I” snapshot from the timeline. Then, input these settings when the window pops up. After that, drag the Playhead 1 second and 15 frames further down the timeline. Then, double-click on the “I” snapshot again, and change the Y-axis value to 0.

Step 7
Copy the “I” snapshot track from the timeline. Then, paste it on Track 4. Next, double-click on this one and change the X-axis position to whichever letter you want. In this case, it’s the letter “M”. As for the Y-Axis, you can change it any way that suits you.

Step 8
Copy this process as often and with as many letters as you want. Then, when you’re done, export the title animation to your computer.

Step 9
Open a new project in Filmora and import the title animation we just created.
Step 10
Drag the custom title animation to Track 2 and drag any video background you have on Track 1.

Step 11
Double-click on the title track, go to the Video tab, and select “Lighten” from the Blending Mode tab.

Step 12
Shift the title clip from Track 2 to Track 3. Then, go to the Effects tab and drag the Dark Film effect to Track 1 on the timeline.

Step 13
Search for the “Blur” effect in the Effects tab. Then, drag “Square Blur” to Track 2 in the timeline.

Step 14
Select the “Cinema” effect from the Effects tab and drag it to Track 4. Double-click on it and change the border height to 0.10.

Step 15
Now, all left is to render the clip and review the final result.

Summary
What you’ve learned:
- Create a professional-level animated text in Filmora in 15 simple steps
- How to add a video background and cinematic effects to your animated title
- Adjust the settings of clips in the Filmora timeline
Tactics to Make Transparent Image in Minimal Steps
Tactics to Make Transparent Image in Minimal Steps
An easy yet powerful editor
Numerous effects to choose from
Detailed tutorials provided by the official channel
We always want to have the images that give us the power to do customizations as needed. Until and unless an image with appropriate adjustments is not there, we cannot think of editing them as wanted. But how can we forget sometimes the images are already occupied that we cannot make the changes. This sometimes makes us feel annoyed too. But don’t worry about it as now different tools to make pictures transparent are available. After making the image transparent, you can add on the effects as needed.
If you are having confusion how to use these tools or anything else, then keep reading till the last. In this read, we are discussing some transparent image makers that will help you to do it seamlessly. Let’s get started!
In this article
01 [Similarities and Differences Between PNG Vs. JPG Vs. GIF](#Part 1)
02 [Minimal Steps to Make Background Transparent](#Part 2)
03 [How to Insert Transparent Image in Video](#Part 3)
Part 1 Similarities and Differences Between PNG Vs. JPG Vs. GIF
As we all know, there are so many formats in which these images are available. But sometimes it happens we are not aware of the similarities and differences corresponding to them. This confusion sometimes let us chooses the wrong format. But not anymore, and in this section, we are discussing the similarities and differences between PNG Vs. JPG Vs. GIF.
● PNG
PNG is a lossless compression format which means that it can be compressed without losing any data. It also supports transparency. The compression ratio is usually higher than JPG and GIF.
● JPG
JPG is a lossy compression format which means that it can be compressed without losing any data, but the image quality will suffer because of the loss of information. It supports transparency but is not as good as PNG.
● GIF
GIF is a lossless or lossy compression format which means that it can be compressed without losing any data or quality respectively. It does not support transparency and has a limited color range compared to PNG or JPG.
Part 2 Minimal Steps to Make Background Transparent
In this section, we are discussing the steps that you need to follow with transparent image-makers. Here we discuss some of the best tools available so that you can feel a bit confident in utilizing them for editing. This list includes:-
● Canva
Canva is a graphic design tool that helps users creates professional-quality designs. It has easy to use templates and fonts that are free to use. Users can also customize their own templates and fonts, add images and videos, make collages, infographics, and other designs.
Steps to Make in Canva
Step 1: Get “Canva” available on your system and open it.

Step 2: Mode to “Edit Image” and “upload the image” in which you wish to make the background transparent.

Step 3: Choose the “Effect tab” and select the “background remover” option.


Step 4: If you wish to add on any other effect, do it.
Step 5: Click on the “Download icon” and save it for future use.
● Photoshop
Photoshop can be used to edit video footage and create special effects. You can cut video clips together and shape them into a movie sequence by adding transitions and overlays to visualize the actions between shots. You can also use it to add graphics or other visual elements, like animations or even text. But don’t forget this tool also gives you the option to make the backgrounds transparent.
Steps to Make in Photoshop
Step 1: Get Photoshop o your system and import the image you wish to edit.
Step 2: Press Ctrl+J in order to create duplicate layers. (This is important in order to keep an eye on the section you are doing for making the editing.)

Step 3: Move to “Windows” and click on “Properties”

Step 4: From the list of options, hit on “Remove Background”

Step 5: Click on the “Eye icon” to view the transparent image.

Step 6: Save the image for future use.
● Picsart
Picsart is a robust photo editing app which has features such as filters, stickers, and overlays. It also has the ability to create collages and videos. The app also has a feature called “edit & share” which allows the user to edit the photo right in the app, then share it with their friends on social media. Picsart doesn’t require any special knowledge or expertise in photography; so anyone can pick up the basics of using it in no time.
Steps to use Picsart
Step 1: Get the Picsart app in your device or visit the online portal.
Step 2: Upload the image you wish to edit.

Step 3: Click on “Start Editing” button and then choose either of the option from “Behind Person” or “Behind Object” as per your situation.


Step 4: The tool will automatically remove the background and make it transparent. Download the image now.

Part 3 How to Insert Transparent Image in Video
After creating outstanding video content, there is a possibility that you might be looking forward to integrating any transparent image into it. Well, in this case, it is important that you have access to the best tool. Until and unless the best software or tool is not here, you cannot think of getting the task done. Don’t worry because for catering to this need, Filmora is one of the best options to choose.
Wondershare Filmora Video Editor is all-in-one video editing software to help people edit their videos and make them look professional. The best thing about this software is that it doesn’t require any expertise or knowledge of video editing before using it. The user can create a video from scratch just by importing the photos and videos from their camera roll, which are automatically combined into a single video with transitions and music in just a few steps.
For Win 7 or later (64-bit)
For macOS 10.12 or later
Also, this software is both intuitive and easy to use. It also provides many features that you can customize depending on what outcome you want. In addition, this tool also includes tutorials and support services via phone, email or chat line, so all your questions are answered quickly and efficiently.
Furthermore, this allows you to make your videos better by inserting transparent images or graphics in them. You can achieve amazing effects and superimpose without having to spend hours editing your video. With Filmora, it’s simple to create professional-quality videos without using any other software and spending too much time on the editing process.
● Steps to use Filmora
Step 1: After browsing all these features, you might be curious to try out the features integrated into it. The steps you need to follow are:-
Step 2: Get Filmora available on your system. It is compatible with Windows and Mac both.
Step 3: Open Filmora and select “Import-Import Media Files”.

Step 4: Add the imported images. You can do this by doing the right-click and selecting the insert image option. Alternatively you can do it u drag and drop option too.

Step 5: The inserted images will appear in the timeline, and double click on them. The settings menu appear to select the “Chroma key” and enable it.

Step 6: The image will get transparent in no time. If you wish to add on any extra colour or effect to the image, choose it from the editing menu available. The “Color Picker” option is also there that will be helpful in adding the colors.
Step 7: Click on “Ok” to make the changes saved.

Step 7: After getting the expected transparent image, you can simply overlay it into the video.

● Ending Thoughts →
● Transparent images give you the chance to make the editing as required. This simply means there will be no need for you to occupy the image with unnecessary stuff because after making the image transparent only the required content will have a pace on it.
● Filmora is the best tool to insert transparent images in the video. This tool have innovative interface and let users have the best options to make the editing in the video they are creating. Along with making the background transparent, this tool has other editing features too.
● Making transparent images is just a matter of a few steps. One just needs to be sure of the right tools. If they are not having the right tool gett9ing the expected outcome will not be their thing.
We always want to have the images that give us the power to do customizations as needed. Until and unless an image with appropriate adjustments is not there, we cannot think of editing them as wanted. But how can we forget sometimes the images are already occupied that we cannot make the changes. This sometimes makes us feel annoyed too. But don’t worry about it as now different tools to make pictures transparent are available. After making the image transparent, you can add on the effects as needed.
If you are having confusion how to use these tools or anything else, then keep reading till the last. In this read, we are discussing some transparent image makers that will help you to do it seamlessly. Let’s get started!
In this article
01 [Similarities and Differences Between PNG Vs. JPG Vs. GIF](#Part 1)
02 [Minimal Steps to Make Background Transparent](#Part 2)
03 [How to Insert Transparent Image in Video](#Part 3)
Part 1 Similarities and Differences Between PNG Vs. JPG Vs. GIF
As we all know, there are so many formats in which these images are available. But sometimes it happens we are not aware of the similarities and differences corresponding to them. This confusion sometimes let us chooses the wrong format. But not anymore, and in this section, we are discussing the similarities and differences between PNG Vs. JPG Vs. GIF.
● PNG
PNG is a lossless compression format which means that it can be compressed without losing any data. It also supports transparency. The compression ratio is usually higher than JPG and GIF.
● JPG
JPG is a lossy compression format which means that it can be compressed without losing any data, but the image quality will suffer because of the loss of information. It supports transparency but is not as good as PNG.
● GIF
GIF is a lossless or lossy compression format which means that it can be compressed without losing any data or quality respectively. It does not support transparency and has a limited color range compared to PNG or JPG.
Part 2 Minimal Steps to Make Background Transparent
In this section, we are discussing the steps that you need to follow with transparent image-makers. Here we discuss some of the best tools available so that you can feel a bit confident in utilizing them for editing. This list includes:-
● Canva
Canva is a graphic design tool that helps users creates professional-quality designs. It has easy to use templates and fonts that are free to use. Users can also customize their own templates and fonts, add images and videos, make collages, infographics, and other designs.
Steps to Make in Canva
Step 1: Get “Canva” available on your system and open it.

Step 2: Mode to “Edit Image” and “upload the image” in which you wish to make the background transparent.

Step 3: Choose the “Effect tab” and select the “background remover” option.


Step 4: If you wish to add on any other effect, do it.
Step 5: Click on the “Download icon” and save it for future use.
● Photoshop
Photoshop can be used to edit video footage and create special effects. You can cut video clips together and shape them into a movie sequence by adding transitions and overlays to visualize the actions between shots. You can also use it to add graphics or other visual elements, like animations or even text. But don’t forget this tool also gives you the option to make the backgrounds transparent.
Steps to Make in Photoshop
Step 1: Get Photoshop o your system and import the image you wish to edit.
Step 2: Press Ctrl+J in order to create duplicate layers. (This is important in order to keep an eye on the section you are doing for making the editing.)

Step 3: Move to “Windows” and click on “Properties”

Step 4: From the list of options, hit on “Remove Background”

Step 5: Click on the “Eye icon” to view the transparent image.

Step 6: Save the image for future use.
● Picsart
Picsart is a robust photo editing app which has features such as filters, stickers, and overlays. It also has the ability to create collages and videos. The app also has a feature called “edit & share” which allows the user to edit the photo right in the app, then share it with their friends on social media. Picsart doesn’t require any special knowledge or expertise in photography; so anyone can pick up the basics of using it in no time.
Steps to use Picsart
Step 1: Get the Picsart app in your device or visit the online portal.
Step 2: Upload the image you wish to edit.

Step 3: Click on “Start Editing” button and then choose either of the option from “Behind Person” or “Behind Object” as per your situation.


Step 4: The tool will automatically remove the background and make it transparent. Download the image now.

Part 3 How to Insert Transparent Image in Video
After creating outstanding video content, there is a possibility that you might be looking forward to integrating any transparent image into it. Well, in this case, it is important that you have access to the best tool. Until and unless the best software or tool is not here, you cannot think of getting the task done. Don’t worry because for catering to this need, Filmora is one of the best options to choose.
Wondershare Filmora Video Editor is all-in-one video editing software to help people edit their videos and make them look professional. The best thing about this software is that it doesn’t require any expertise or knowledge of video editing before using it. The user can create a video from scratch just by importing the photos and videos from their camera roll, which are automatically combined into a single video with transitions and music in just a few steps.
For Win 7 or later (64-bit)
For macOS 10.12 or later
Also, this software is both intuitive and easy to use. It also provides many features that you can customize depending on what outcome you want. In addition, this tool also includes tutorials and support services via phone, email or chat line, so all your questions are answered quickly and efficiently.
Furthermore, this allows you to make your videos better by inserting transparent images or graphics in them. You can achieve amazing effects and superimpose without having to spend hours editing your video. With Filmora, it’s simple to create professional-quality videos without using any other software and spending too much time on the editing process.
● Steps to use Filmora
Step 1: After browsing all these features, you might be curious to try out the features integrated into it. The steps you need to follow are:-
Step 2: Get Filmora available on your system. It is compatible with Windows and Mac both.
Step 3: Open Filmora and select “Import-Import Media Files”.

Step 4: Add the imported images. You can do this by doing the right-click and selecting the insert image option. Alternatively you can do it u drag and drop option too.

Step 5: The inserted images will appear in the timeline, and double click on them. The settings menu appear to select the “Chroma key” and enable it.

Step 6: The image will get transparent in no time. If you wish to add on any extra colour or effect to the image, choose it from the editing menu available. The “Color Picker” option is also there that will be helpful in adding the colors.
Step 7: Click on “Ok” to make the changes saved.

Step 7: After getting the expected transparent image, you can simply overlay it into the video.

● Ending Thoughts →
● Transparent images give you the chance to make the editing as required. This simply means there will be no need for you to occupy the image with unnecessary stuff because after making the image transparent only the required content will have a pace on it.
● Filmora is the best tool to insert transparent images in the video. This tool have innovative interface and let users have the best options to make the editing in the video they are creating. Along with making the background transparent, this tool has other editing features too.
● Making transparent images is just a matter of a few steps. One just needs to be sure of the right tools. If they are not having the right tool gett9ing the expected outcome will not be their thing.
We always want to have the images that give us the power to do customizations as needed. Until and unless an image with appropriate adjustments is not there, we cannot think of editing them as wanted. But how can we forget sometimes the images are already occupied that we cannot make the changes. This sometimes makes us feel annoyed too. But don’t worry about it as now different tools to make pictures transparent are available. After making the image transparent, you can add on the effects as needed.
If you are having confusion how to use these tools or anything else, then keep reading till the last. In this read, we are discussing some transparent image makers that will help you to do it seamlessly. Let’s get started!
In this article
01 [Similarities and Differences Between PNG Vs. JPG Vs. GIF](#Part 1)
02 [Minimal Steps to Make Background Transparent](#Part 2)
03 [How to Insert Transparent Image in Video](#Part 3)
Part 1 Similarities and Differences Between PNG Vs. JPG Vs. GIF
As we all know, there are so many formats in which these images are available. But sometimes it happens we are not aware of the similarities and differences corresponding to them. This confusion sometimes let us chooses the wrong format. But not anymore, and in this section, we are discussing the similarities and differences between PNG Vs. JPG Vs. GIF.
● PNG
PNG is a lossless compression format which means that it can be compressed without losing any data. It also supports transparency. The compression ratio is usually higher than JPG and GIF.
● JPG
JPG is a lossy compression format which means that it can be compressed without losing any data, but the image quality will suffer because of the loss of information. It supports transparency but is not as good as PNG.
● GIF
GIF is a lossless or lossy compression format which means that it can be compressed without losing any data or quality respectively. It does not support transparency and has a limited color range compared to PNG or JPG.
Part 2 Minimal Steps to Make Background Transparent
In this section, we are discussing the steps that you need to follow with transparent image-makers. Here we discuss some of the best tools available so that you can feel a bit confident in utilizing them for editing. This list includes:-
● Canva
Canva is a graphic design tool that helps users creates professional-quality designs. It has easy to use templates and fonts that are free to use. Users can also customize their own templates and fonts, add images and videos, make collages, infographics, and other designs.
Steps to Make in Canva
Step 1: Get “Canva” available on your system and open it.

Step 2: Mode to “Edit Image” and “upload the image” in which you wish to make the background transparent.

Step 3: Choose the “Effect tab” and select the “background remover” option.


Step 4: If you wish to add on any other effect, do it.
Step 5: Click on the “Download icon” and save it for future use.
● Photoshop
Photoshop can be used to edit video footage and create special effects. You can cut video clips together and shape them into a movie sequence by adding transitions and overlays to visualize the actions between shots. You can also use it to add graphics or other visual elements, like animations or even text. But don’t forget this tool also gives you the option to make the backgrounds transparent.
Steps to Make in Photoshop
Step 1: Get Photoshop o your system and import the image you wish to edit.
Step 2: Press Ctrl+J in order to create duplicate layers. (This is important in order to keep an eye on the section you are doing for making the editing.)

Step 3: Move to “Windows” and click on “Properties”

Step 4: From the list of options, hit on “Remove Background”

Step 5: Click on the “Eye icon” to view the transparent image.

Step 6: Save the image for future use.
● Picsart
Picsart is a robust photo editing app which has features such as filters, stickers, and overlays. It also has the ability to create collages and videos. The app also has a feature called “edit & share” which allows the user to edit the photo right in the app, then share it with their friends on social media. Picsart doesn’t require any special knowledge or expertise in photography; so anyone can pick up the basics of using it in no time.
Steps to use Picsart
Step 1: Get the Picsart app in your device or visit the online portal.
Step 2: Upload the image you wish to edit.

Step 3: Click on “Start Editing” button and then choose either of the option from “Behind Person” or “Behind Object” as per your situation.


Step 4: The tool will automatically remove the background and make it transparent. Download the image now.

Part 3 How to Insert Transparent Image in Video
After creating outstanding video content, there is a possibility that you might be looking forward to integrating any transparent image into it. Well, in this case, it is important that you have access to the best tool. Until and unless the best software or tool is not here, you cannot think of getting the task done. Don’t worry because for catering to this need, Filmora is one of the best options to choose.
Wondershare Filmora Video Editor is all-in-one video editing software to help people edit their videos and make them look professional. The best thing about this software is that it doesn’t require any expertise or knowledge of video editing before using it. The user can create a video from scratch just by importing the photos and videos from their camera roll, which are automatically combined into a single video with transitions and music in just a few steps.
For Win 7 or later (64-bit)
For macOS 10.12 or later
Also, this software is both intuitive and easy to use. It also provides many features that you can customize depending on what outcome you want. In addition, this tool also includes tutorials and support services via phone, email or chat line, so all your questions are answered quickly and efficiently.
Furthermore, this allows you to make your videos better by inserting transparent images or graphics in them. You can achieve amazing effects and superimpose without having to spend hours editing your video. With Filmora, it’s simple to create professional-quality videos without using any other software and spending too much time on the editing process.
● Steps to use Filmora
Step 1: After browsing all these features, you might be curious to try out the features integrated into it. The steps you need to follow are:-
Step 2: Get Filmora available on your system. It is compatible with Windows and Mac both.
Step 3: Open Filmora and select “Import-Import Media Files”.

Step 4: Add the imported images. You can do this by doing the right-click and selecting the insert image option. Alternatively you can do it u drag and drop option too.

Step 5: The inserted images will appear in the timeline, and double click on them. The settings menu appear to select the “Chroma key” and enable it.

Step 6: The image will get transparent in no time. If you wish to add on any extra colour or effect to the image, choose it from the editing menu available. The “Color Picker” option is also there that will be helpful in adding the colors.
Step 7: Click on “Ok” to make the changes saved.

Step 7: After getting the expected transparent image, you can simply overlay it into the video.

● Ending Thoughts →
● Transparent images give you the chance to make the editing as required. This simply means there will be no need for you to occupy the image with unnecessary stuff because after making the image transparent only the required content will have a pace on it.
● Filmora is the best tool to insert transparent images in the video. This tool have innovative interface and let users have the best options to make the editing in the video they are creating. Along with making the background transparent, this tool has other editing features too.
● Making transparent images is just a matter of a few steps. One just needs to be sure of the right tools. If they are not having the right tool gett9ing the expected outcome will not be their thing.
We always want to have the images that give us the power to do customizations as needed. Until and unless an image with appropriate adjustments is not there, we cannot think of editing them as wanted. But how can we forget sometimes the images are already occupied that we cannot make the changes. This sometimes makes us feel annoyed too. But don’t worry about it as now different tools to make pictures transparent are available. After making the image transparent, you can add on the effects as needed.
If you are having confusion how to use these tools or anything else, then keep reading till the last. In this read, we are discussing some transparent image makers that will help you to do it seamlessly. Let’s get started!
In this article
01 [Similarities and Differences Between PNG Vs. JPG Vs. GIF](#Part 1)
02 [Minimal Steps to Make Background Transparent](#Part 2)
03 [How to Insert Transparent Image in Video](#Part 3)
Part 1 Similarities and Differences Between PNG Vs. JPG Vs. GIF
As we all know, there are so many formats in which these images are available. But sometimes it happens we are not aware of the similarities and differences corresponding to them. This confusion sometimes let us chooses the wrong format. But not anymore, and in this section, we are discussing the similarities and differences between PNG Vs. JPG Vs. GIF.
● PNG
PNG is a lossless compression format which means that it can be compressed without losing any data. It also supports transparency. The compression ratio is usually higher than JPG and GIF.
● JPG
JPG is a lossy compression format which means that it can be compressed without losing any data, but the image quality will suffer because of the loss of information. It supports transparency but is not as good as PNG.
● GIF
GIF is a lossless or lossy compression format which means that it can be compressed without losing any data or quality respectively. It does not support transparency and has a limited color range compared to PNG or JPG.
Part 2 Minimal Steps to Make Background Transparent
In this section, we are discussing the steps that you need to follow with transparent image-makers. Here we discuss some of the best tools available so that you can feel a bit confident in utilizing them for editing. This list includes:-
● Canva
Canva is a graphic design tool that helps users creates professional-quality designs. It has easy to use templates and fonts that are free to use. Users can also customize their own templates and fonts, add images and videos, make collages, infographics, and other designs.
Steps to Make in Canva
Step 1: Get “Canva” available on your system and open it.

Step 2: Mode to “Edit Image” and “upload the image” in which you wish to make the background transparent.

Step 3: Choose the “Effect tab” and select the “background remover” option.


Step 4: If you wish to add on any other effect, do it.
Step 5: Click on the “Download icon” and save it for future use.
● Photoshop
Photoshop can be used to edit video footage and create special effects. You can cut video clips together and shape them into a movie sequence by adding transitions and overlays to visualize the actions between shots. You can also use it to add graphics or other visual elements, like animations or even text. But don’t forget this tool also gives you the option to make the backgrounds transparent.
Steps to Make in Photoshop
Step 1: Get Photoshop o your system and import the image you wish to edit.
Step 2: Press Ctrl+J in order to create duplicate layers. (This is important in order to keep an eye on the section you are doing for making the editing.)

Step 3: Move to “Windows” and click on “Properties”

Step 4: From the list of options, hit on “Remove Background”

Step 5: Click on the “Eye icon” to view the transparent image.

Step 6: Save the image for future use.
● Picsart
Picsart is a robust photo editing app which has features such as filters, stickers, and overlays. It also has the ability to create collages and videos. The app also has a feature called “edit & share” which allows the user to edit the photo right in the app, then share it with their friends on social media. Picsart doesn’t require any special knowledge or expertise in photography; so anyone can pick up the basics of using it in no time.
Steps to use Picsart
Step 1: Get the Picsart app in your device or visit the online portal.
Step 2: Upload the image you wish to edit.

Step 3: Click on “Start Editing” button and then choose either of the option from “Behind Person” or “Behind Object” as per your situation.


Step 4: The tool will automatically remove the background and make it transparent. Download the image now.

Part 3 How to Insert Transparent Image in Video
After creating outstanding video content, there is a possibility that you might be looking forward to integrating any transparent image into it. Well, in this case, it is important that you have access to the best tool. Until and unless the best software or tool is not here, you cannot think of getting the task done. Don’t worry because for catering to this need, Filmora is one of the best options to choose.
Wondershare Filmora Video Editor is all-in-one video editing software to help people edit their videos and make them look professional. The best thing about this software is that it doesn’t require any expertise or knowledge of video editing before using it. The user can create a video from scratch just by importing the photos and videos from their camera roll, which are automatically combined into a single video with transitions and music in just a few steps.
For Win 7 or later (64-bit)
For macOS 10.12 or later
Also, this software is both intuitive and easy to use. It also provides many features that you can customize depending on what outcome you want. In addition, this tool also includes tutorials and support services via phone, email or chat line, so all your questions are answered quickly and efficiently.
Furthermore, this allows you to make your videos better by inserting transparent images or graphics in them. You can achieve amazing effects and superimpose without having to spend hours editing your video. With Filmora, it’s simple to create professional-quality videos without using any other software and spending too much time on the editing process.
● Steps to use Filmora
Step 1: After browsing all these features, you might be curious to try out the features integrated into it. The steps you need to follow are:-
Step 2: Get Filmora available on your system. It is compatible with Windows and Mac both.
Step 3: Open Filmora and select “Import-Import Media Files”.

Step 4: Add the imported images. You can do this by doing the right-click and selecting the insert image option. Alternatively you can do it u drag and drop option too.

Step 5: The inserted images will appear in the timeline, and double click on them. The settings menu appear to select the “Chroma key” and enable it.

Step 6: The image will get transparent in no time. If you wish to add on any extra colour or effect to the image, choose it from the editing menu available. The “Color Picker” option is also there that will be helpful in adding the colors.
Step 7: Click on “Ok” to make the changes saved.

Step 7: After getting the expected transparent image, you can simply overlay it into the video.

● Ending Thoughts →
● Transparent images give you the chance to make the editing as required. This simply means there will be no need for you to occupy the image with unnecessary stuff because after making the image transparent only the required content will have a pace on it.
● Filmora is the best tool to insert transparent images in the video. This tool have innovative interface and let users have the best options to make the editing in the video they are creating. Along with making the background transparent, this tool has other editing features too.
● Making transparent images is just a matter of a few steps. One just needs to be sure of the right tools. If they are not having the right tool gett9ing the expected outcome will not be their thing.
Also read:
- Updated In 2024, How Windows Movie Maker Save MP4 File
- Updated In 2024, Before & After Editing Trick | Wondershare Filmora Tutorial
- New In 2024, Can You Enhance Your Drone Footage with Cinematic Drone LUTs? This Article Discusses Top Drone LUTs Recommendations to Simplify Video Editing
- Updated In 2024, The Art of Fashioning Slow Motions Has Remained Popular Ever Since. Read This Article to Learn How to Do Slow-Mo in CapCut and Other Powerful Tools
- Updated Top 10 Video Editing Online Makers Is Worth Your Attention for 2024
- New How to Set Up Twitch Green Screen
- New A Full Guide to Funcall Voice Changer and Its Alternatives
- Updated 2024 Approved If You Want to Color Grading Your Video, Final Cut Pro Can Be One of the Best Choices. However, Its Not Easy for Everyone to Use Color Grading Feature, and in This Guide Well Show You How to Do That
- Updated Do You Want to Replace the Sky in Your Media? Read the Article to Learn How to Change the Sky App on Your Mobile Phone
- 2024 Approved Best Dark Moody LUTs During Editing
- Updated 2024 Approved To Know How to Add Effects in Premiere Pro, You Need to Follow This Guide as It Has All You Need to Know to Add Effects in Premiere Pro. Learn More Here
- New Are You Looking for the Best Premiere Pro Slideshow Template Online for Free? If Yes, You Can Find a Few Exciting Slideshow Templates Here. They Are Worth Using for 2024
- Updated 2024 Approved Twitch Green Screen Guide
- New 2024 Approved In This Article, You Will Learn How to Create an Attractive and Engaging Slideshow Video Using Tools Available in the Wondershare Filmora
- How to Create Discord Logo GIF for 2024
- New Why Did Filmora AI Portrait Attract People, In 2024
- Updated In 2024, Top Animated Title Makers
- Best Method to Split Video Into Parts Online for 2024
- New 4 Solutions to Crop a Video on Android Easily
- Make Videos with Pictures and Music-10 Apps
- 2024 Approved WMV File Format Has Many Benefits over the Video Industry. If You Are Excited to Know More About the Format and Its Pros and Cons, Then Lets Start the Discussion
- New In 2024, Do You Know You Can Use Mobile Apps to Apply Camera Effects to Your Videos? Many Smartphone Applications Allow You to Apply Camcorder Effects
- Updated 6 Instant Mp4 to GIF Online Tools for 2024
- Updated Online Video Makers to Use
- In 2024, How to Create a Slideshow GIF?
- How to Make GIF With Transparent Background, In 2024
- In 2024, How To Blur Background in Adobe Premiere Pro Detailed Guide
- End This Problem! Make Transparent Background Video Today for 2024
- Android Safe Mode - How to Turn off Safe Mode on Nokia C12? | Dr.fone
- Unlocking Made Easy The Best 10 Apps for Unlocking Your Itel P55 Device
- In 2024, The Best iSpoofer Alternative to Try On Tecno Camon 20 | Dr.fone
- Updated What Make Aesthetic Cartoon Drawing More Understandable for 2024
- 6 Fixes to Unfortunately WhatsApp has stopped Error Popups On Itel P40 | Dr.fone
- How to Mirror Apple iPhone 15 Plus to Roku? | Dr.fone
- How to Recover Deleted Photos from Android Gallery App on Oppo A18
- In 2024, How Can I Catch the Regional Pokémon without Traveling On Samsung Galaxy A14 5G | Dr.fone
- Strategies for Apps That Wont Download From Play Store On Xiaomi Redmi Note 12 5G | Dr.fone
- Best Anti Tracker Software For Vivo V27 | Dr.fone
- Full Guide to Bypass Gionee F3 Pro FRP
- In 2024, Easiest Guide How to Clone Tecno Camon 20 Premier 5G Phone? | Dr.fone
- In 2024, Best Apple iPhone SE & iPad Screen Mirroring App | Dr.fone
- In 2024, How to Change/Fake Your Motorola G54 5G Location on Viber | Dr.fone
- Universal Unlock Pattern for Itel P55T
- In 2024, How to Unlock Apple iPhone X With an Apple Watch & What to Do if It Doesnt Work | Dr.fone
- Title: Sync Audio With Video With Filmora
- Author: Morgan
- Created at : 2024-05-19 05:11:40
- Updated at : 2024-05-20 05:11:40
- Link: https://ai-video-editing.techidaily.com/sync-audio-with-video-with-filmora/
- License: This work is licensed under CC BY-NC-SA 4.0.

