:max_bytes(150000):strip_icc():format(webp)/GettyImages-155096051-5b1bf60d43a1030036cfac94.jpg)
TEXT REVEAL Animation | Easy Masking Filmora

TEXT REVEAL Animation | Easy Masking Filmora
Preparation
What you need to prepare:
- A computer (Windows or macOS)
- Your video materials.
- Filmora video editor
Step 1
Download the Filmora video editor and install it. Once it loads, click on “New Project”.
Step 2
Import your footage by clicking on “Import Media”. Then, drag your clip to the Timeline to start editing it.
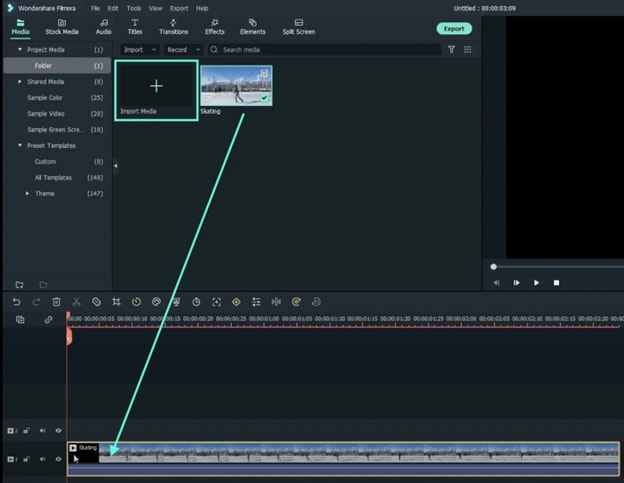
Step 3
Review your video and place the Playhead at the point where you want the text reveal to begin.
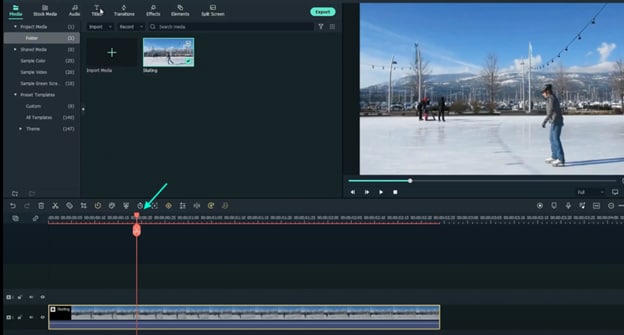
Step 4
Go to the Titles tab and drag the Basic title to Track 2 on the Timeline. Then, right-click on the Title clip and go to Edit Properties. Here, type in your text and change the font to any bold one. You can also go to the WordArt tab to further customize your text. Click OK.
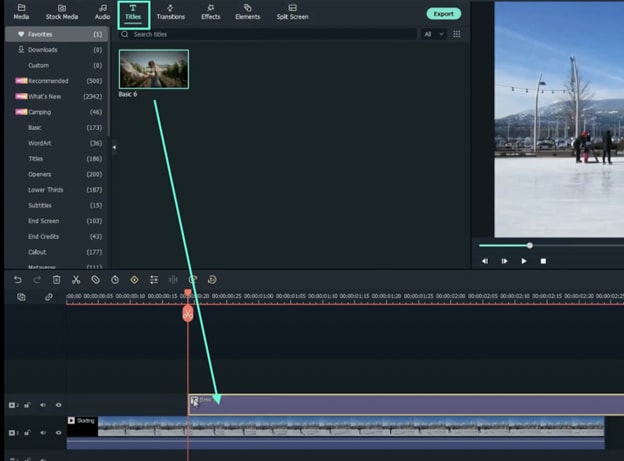
Step 5
Now, move the text to fit the objects or people on your video perfectly. Copy the video clip on Track 1. Then, lock both Track 1 and Track 2 by pressing the key-lock button. Right-click anywhere above Track 2 and select Paste.
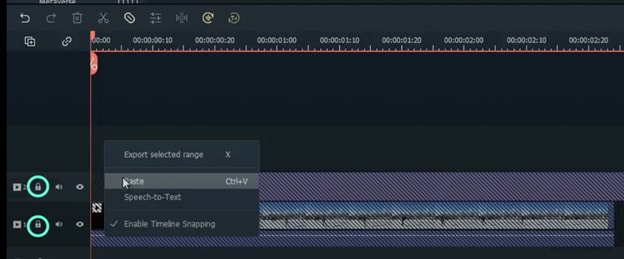
Step 6
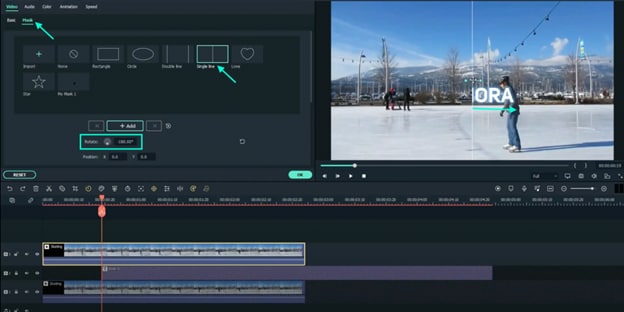
Move the Playhead to where the clip on Track 2 starts. Right-click on the clip in Track 3 → go to Edit Properties → select the Mask tab → click on Single Line. Then, adjust the Rotate value to “-180°”. Drag the slider on the screen to the right side until the text totally disappears next to your moving object. Now, scroll down from the panel on the left and change Blur Strength to 1%.
Step 7
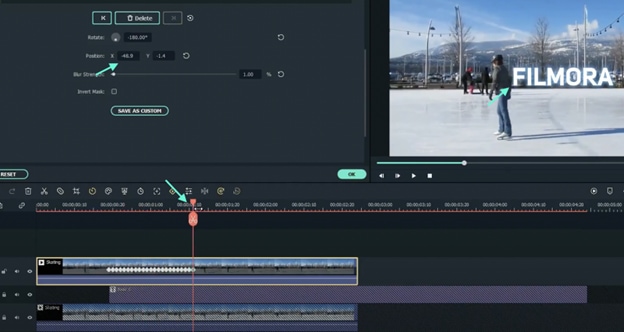
Next, add a keyframe by clicking on the “**+Add**” button. Move the Playhead one frame forward. Drag the X-axis to the left slowly to reveal a tiny portion of the text on the screen. Then, repeat this as many times as it takes until the full text is revealed, going one frame at a time.
Step 8
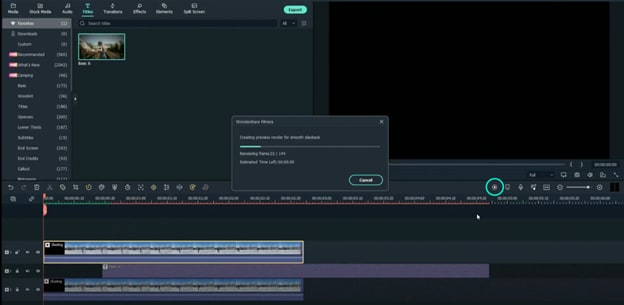
Finally, Render the video and watch the final preview. Congratulations, you’ve just successfully created a text reveal animation in FIlmora.
Summary
What you’ve learned:
- Animate text frame by frame in Filmora
- Edit the properties of clips in the video editor
- Add titles and manipulate clips on the Timeline
What you need to prepare:
- A computer (Windows or macOS)
- Your video materials.
- Filmora video editor
Step 1
Download the Filmora video editor and install it. Once it loads, click on “New Project”.
Step 2
Import your footage by clicking on “Import Media”. Then, drag your clip to the Timeline to start editing it.

Step 3
Review your video and place the Playhead at the point where you want the text reveal to begin.

Step 4
Go to the Titles tab and drag the Basic title to Track 2 on the Timeline. Then, right-click on the Title clip and go to Edit Properties. Here, type in your text and change the font to any bold one. You can also go to the WordArt tab to further customize your text. Click OK.

Step 5
Now, move the text to fit the objects or people on your video perfectly. Copy the video clip on Track 1. Then, lock both Track 1 and Track 2 by pressing the key-lock button. Right-click anywhere above Track 2 and select Paste.

Step 6
Move the Playhead to where the clip on Track 2 starts. Right-click on the clip in Track 3 → go to Edit Properties → select the Mask tab → click on Single Line. Then, adjust the Rotate value to “-180°”. Drag the slider on the screen to the right side until the text totally disappears next to your moving object. Now, scroll down from the panel on the left and change Blur Strength to 1%.

Step 7
Next, add a keyframe by clicking on the “**+Add**” button. Move the Playhead one frame forward. Drag the X-axis to the left slowly to reveal a tiny portion of the text on the screen. Then, repeat this as many times as it takes until the full text is revealed, going one frame at a time.

Step 8
Finally, Render the video and watch the final preview. Congratulations, you’ve just successfully created a text reveal animation in FIlmora.

Summary
What you’ve learned:
- Animate text frame by frame in Filmora
- Edit the properties of clips in the video editor
- Add titles and manipulate clips on the Timeline
What you need to prepare:
- A computer (Windows or macOS)
- Your video materials.
- Filmora video editor
Step 1
Download the Filmora video editor and install it. Once it loads, click on “New Project”.
Step 2
Import your footage by clicking on “Import Media”. Then, drag your clip to the Timeline to start editing it.

Step 3
Review your video and place the Playhead at the point where you want the text reveal to begin.

Step 4
Go to the Titles tab and drag the Basic title to Track 2 on the Timeline. Then, right-click on the Title clip and go to Edit Properties. Here, type in your text and change the font to any bold one. You can also go to the WordArt tab to further customize your text. Click OK.

Step 5
Now, move the text to fit the objects or people on your video perfectly. Copy the video clip on Track 1. Then, lock both Track 1 and Track 2 by pressing the key-lock button. Right-click anywhere above Track 2 and select Paste.

Step 6
Move the Playhead to where the clip on Track 2 starts. Right-click on the clip in Track 3 → go to Edit Properties → select the Mask tab → click on Single Line. Then, adjust the Rotate value to “-180°”. Drag the slider on the screen to the right side until the text totally disappears next to your moving object. Now, scroll down from the panel on the left and change Blur Strength to 1%.

Step 7
Next, add a keyframe by clicking on the “**+Add**” button. Move the Playhead one frame forward. Drag the X-axis to the left slowly to reveal a tiny portion of the text on the screen. Then, repeat this as many times as it takes until the full text is revealed, going one frame at a time.

Step 8
Finally, Render the video and watch the final preview. Congratulations, you’ve just successfully created a text reveal animation in FIlmora.

Summary
What you’ve learned:
- Animate text frame by frame in Filmora
- Edit the properties of clips in the video editor
- Add titles and manipulate clips on the Timeline
What you need to prepare:
- A computer (Windows or macOS)
- Your video materials.
- Filmora video editor
Step 1
Download the Filmora video editor and install it. Once it loads, click on “New Project”.
Step 2
Import your footage by clicking on “Import Media”. Then, drag your clip to the Timeline to start editing it.

Step 3
Review your video and place the Playhead at the point where you want the text reveal to begin.

Step 4
Go to the Titles tab and drag the Basic title to Track 2 on the Timeline. Then, right-click on the Title clip and go to Edit Properties. Here, type in your text and change the font to any bold one. You can also go to the WordArt tab to further customize your text. Click OK.

Step 5
Now, move the text to fit the objects or people on your video perfectly. Copy the video clip on Track 1. Then, lock both Track 1 and Track 2 by pressing the key-lock button. Right-click anywhere above Track 2 and select Paste.

Step 6
Move the Playhead to where the clip on Track 2 starts. Right-click on the clip in Track 3 → go to Edit Properties → select the Mask tab → click on Single Line. Then, adjust the Rotate value to “-180°”. Drag the slider on the screen to the right side until the text totally disappears next to your moving object. Now, scroll down from the panel on the left and change Blur Strength to 1%.

Step 7
Next, add a keyframe by clicking on the “**+Add**” button. Move the Playhead one frame forward. Drag the X-axis to the left slowly to reveal a tiny portion of the text on the screen. Then, repeat this as many times as it takes until the full text is revealed, going one frame at a time.

Step 8
Finally, Render the video and watch the final preview. Congratulations, you’ve just successfully created a text reveal animation in FIlmora.

Summary
What you’ve learned:
- Animate text frame by frame in Filmora
- Edit the properties of clips in the video editor
- Add titles and manipulate clips on the Timeline
How To Create 3D Text In Video
3D text is an essential aspect of graphic design that adds depth and dimension to the text to make it more visually appealing and easier to read. However, finding suitable three-dimensional fonts in PNG format can take time and effort.
We’ll look at this article’s top 8 websites for 3D text PNG to make things easier. We’ll also provide a brief overview of each website so you can decide which is right for you. Keep reading to find the perfect source for your needs!
There are all kinds of great resources out there that offer free 3D fonts. However, the problem is that not all websites are created equal. Some don’t provide an excellent selection, while others only offer high-quality images. That’s why we’ve done the work and compiled a list of the top eight websites containing 3D texts with PNG resources.
1. LovePik
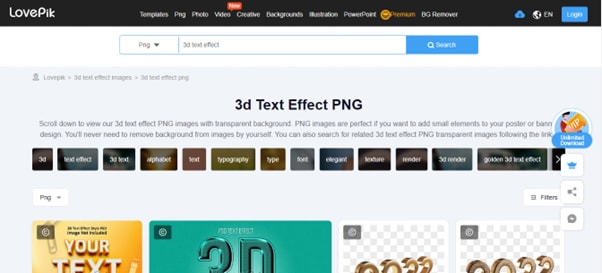
LovePik is an excellent online platform with a massive selection of 3D fonts with transparent backgrounds. In addition, the website offers a separate category for PNG files, and most assets are free to experiment to your heart’s content.
Besides that, LovePik comes with three personal premium plans with pricing starting from $19.9 per month with unlimited downloads.
Pros
- Unlimited collection of assets
- Over 10MB/s download speed
- Clear copyright license
- Easy to navigate and use
- Multiple formats are available
Cons
- Only 1 per day download in the free version.
- The assets are only for personal use, even in the premium plan
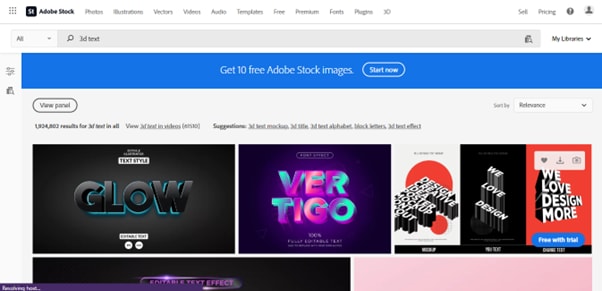
2. Adobe Stock
AdobeStock is a creative resource with an easy-to-use interface with over 9k high-quality 3D fonts in PNG file format. The website is integrated with Creative Cloud and provides a 30-day free trial period.
The premium version will cost you about $49.99 per month with the monthly plan and $29.99/per month with an annual plan.
Pros
- Advanced AI search
- Easy licensing process
- Integrated with creative cloud
- Extensive Library of assets
- 30-day free trial
Cons
- You can only download ten assets in the free-trail
- Licensing is limited to some regions
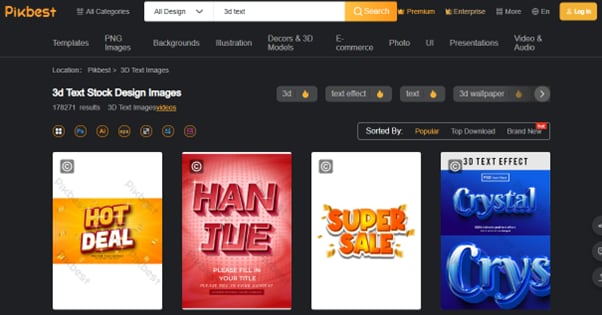
3. PikBest
With its user-friendly UI and multiple search categories, PikBest makes it easy to find suitable 3D fonts in PNG format to add visual interest to your design. The library has over 170,000 3d text assets available for both personal and commercial use.
Besides its advanced search result, PikBest allows you to sort your result based on Popular, Top Download, and Brand New.
Pros
- Inexpensive premium version, starting at $19.9 per month
- Personal and commercial licenses
- Huge selection of high-quality assets
- Multiple file formats
- Intuitive UI
Cons
- Only 1 per day download in the free version.
- You cannot use the assets for commercial use in the free plan.
4. IconScout
IconScout is another online library providing over 5.5 million assets in many file formats. With its easy-to-navigate interface and multiple filters, you’re sure to find a suitable one in PNG format for your project.
It’s important to note that the website only offers paid subscriptions and only 1 selected asset for free per day.
![]()
Pros
- Detailed filters for search results
- Million of high-definition assets
- Multiple platforms integration by using its plugin
- User-friendly
- The Library is updated daily
Cons
- Only 1 selected free asset per day.
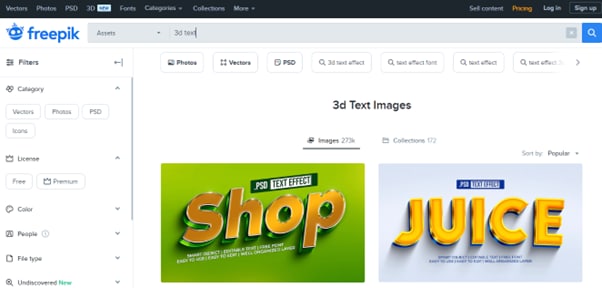
5. FreePik
With the FreePik website, you can access over 1.6k 3D fonts available in PNG format for the free and premium versions. To get the text style, visit the platform, search for the resource, and click Download.
The assets available on FreePik are fully scalable and editable. Moreover, you can even access the built-in icon editor with the premium version.
Pros
- The assets are updated daily
- No attribution is required in the premium version
- The affordable premium plan, starting at only 9 EUR /month
- Fully editable assets
- Massive selection of assets
Cons
- You are only allowed 100 downloads per day in the premium version.
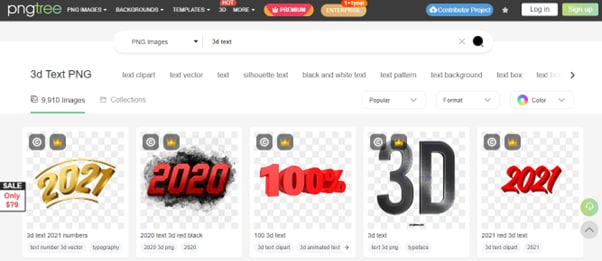
6. Pngtree
Whether you’re a graphic designer, web developer, or just someone who loves playing around with 3D fonts, Pngtree is worth checking out. The website offers a separate category for PNG files and has over 9,910 3D fonts for you to use.
Pngtree comes with four premium plans with unlimited downloads and other features. In comparison, the free version is limited to 1 download per day and has no support for commercial usage.
Pros
- Over 10MB/s download speed
- Free and premium assets
- Has a background remover tool
- Multiple file formats, including PNG, AI, PSD, and EPS
Cons
- Attribution is required in the free plan.
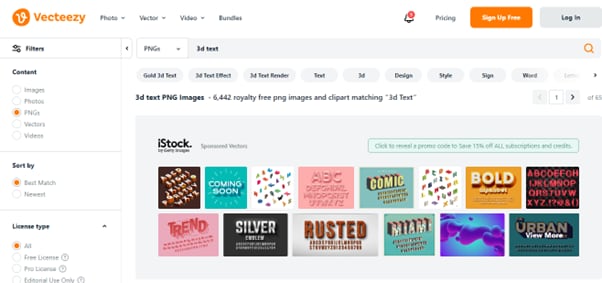
7. Vecteezy
Vecteezy is a leading provider of royalty-free vectors, clipart graphics, icons, stock photos, stock videos, 3D fonts in PNG format, backgrounds, patterns, banners, and designs. Their assets are from professional illustrators and artists from all over the world.
The free version of Vecteezy comes with certain limitations. However, you can get full access with the premium version at just $14/per month.
Pros
- Affordable pricing plans
- Advanced filters
- Easy-to-use
- No need for registration/sign up
- The simple and quick licensing process
Cons
- Attribution is required in the free version
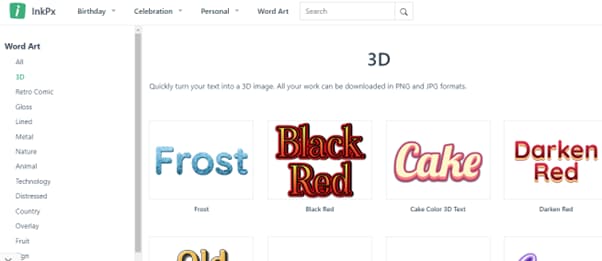
8. InkPx
InkPx Word Art is a simple yet powerful tool for generating different word art styles, including 3D, for your designs in a few seconds. The website supports JPG and PNG file formats when exporting your template.
Moreover, its editor lets you change the presets’ text, font style, line height, line spacing, size, alignment, and background.
Pros
- Available for free
- Personal and commercial usage is allowed
- Fully editable text styles
- Vast collection of font styles is available
- Easy-to-use interface
Cons
- Only JPG and PNG file formats are available.
How to Create 3D Text Effects in Video
If you want to avoid spending time on the internet to find the 3D text effects for your video, you can create them using Wondershare Filmora .
Wondershare Filmora is a unique video editing software with easy-to-use functionality and various features. The software also provides title editing capabilities and numerous text styles, so you can easily add titles, subtitles, and captions to your videos.
You can watch the video below to learn more about the fantastic features of Filmora, including the 3D text animation.
The following step-by-step method will show you how you can create 3D text in a video using Filmora:
Step 1: In the first step, you can download Filmora from the official website, or from the download buttons below.’
Free Download For Win 7 or later(64-bit)
Free Download For macOS 10.14 or later
Step 2: Now, open the Downloads folder and double-click the downloaded installation file. Follow the on-screen instructions to install the software.
Once the software is installed, click its icon to launch it, and click the “New Project” option on the program’s main screen.
Step 3: Next, you must import your video footage to edit and create a 3D text effect. To do this, drag and drop the file directly into the Project Media folder. Alternatively, click “File” and select “Import Media Files” from the drop-down menu.
Step 4: Now, drag and drop the file in the timeline and click the “Titles” tab in the top panel. And you will see “3D Titles” option on the left side of the window.

Once you find the perfect text style for your video, click the “Download” icon at the top right of the template. Next, drag and drop the effect in the timeline and adjust it where you want it to display in the video.
Step 5: Afterward, double-click the template, type your text, and hit Enter to save it. Now, configure the text style and color. Next, right-click or double click the effect in the timeline, and head to advanced setting. Select a suitable animation effect to apply to the text.
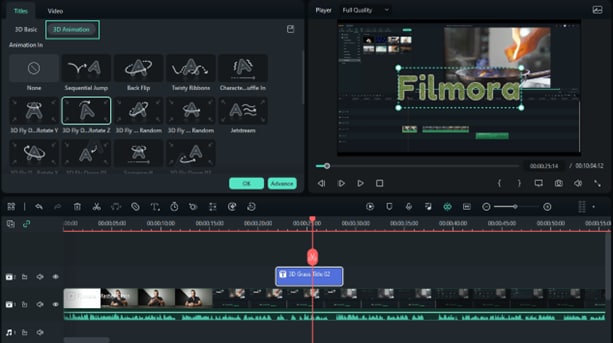
Step 6: Finally, in the video player above the timeline, click the “Play” icon to preview the 3D text effect on your video.
Once done, click “Export” and set the video resolution. Click “Export” again to save the final video on your system.
The Bottom Line
In this article, we’ve recommended and provided an overview of the top 8 websites for 3D text PNG. We’ve also explored their features and limitations to help you select a suitable resource for your upcoming project.
Ultimately, we’ve provided a step-by-step guide on creating 3D text effects in a video using Wondershare Filmora software. Hopefully, you’ve found this article helpful and can now choose a practical resource that meets your requirements.
2. Adobe Stock
AdobeStock is a creative resource with an easy-to-use interface with over 9k high-quality 3D fonts in PNG file format. The website is integrated with Creative Cloud and provides a 30-day free trial period.
The premium version will cost you about $49.99 per month with the monthly plan and $29.99/per month with an annual plan.

Pros
- Advanced AI search
- Easy licensing process
- Integrated with creative cloud
- Extensive Library of assets
- 30-day free trial
Cons
- You can only download ten assets in the free-trail
- Licensing is limited to some regions
3. PikBest
With its user-friendly UI and multiple search categories, PikBest makes it easy to find suitable 3D fonts in PNG format to add visual interest to your design. The library has over 170,000 3d text assets available for both personal and commercial use.
Besides its advanced search result, PikBest allows you to sort your result based on Popular, Top Download, and Brand New.

Pros
- Inexpensive premium version, starting at $19.9 per month
- Personal and commercial licenses
- Huge selection of high-quality assets
- Multiple file formats
- Intuitive UI
Cons
- Only 1 per day download in the free version.
- You cannot use the assets for commercial use in the free plan.
4. IconScout
IconScout is another online library providing over 5.5 million assets in many file formats. With its easy-to-navigate interface and multiple filters, you’re sure to find a suitable one in PNG format for your project.
It’s important to note that the website only offers paid subscriptions and only 1 selected asset for free per day.
![]()
Pros
- Detailed filters for search results
- Million of high-definition assets
- Multiple platforms integration by using its plugin
- User-friendly
- The Library is updated daily
Cons
- Only 1 selected free asset per day.
5. FreePik
With the FreePik website, you can access over 1.6k 3D fonts available in PNG format for the free and premium versions. To get the text style, visit the platform, search for the resource, and click Download.
The assets available on FreePik are fully scalable and editable. Moreover, you can even access the built-in icon editor with the premium version.

Pros
- The assets are updated daily
- No attribution is required in the premium version
- The affordable premium plan, starting at only 9 EUR /month
- Fully editable assets
- Massive selection of assets
Cons
- You are only allowed 100 downloads per day in the premium version.
6. Pngtree
Whether you’re a graphic designer, web developer, or just someone who loves playing around with 3D fonts, Pngtree is worth checking out. The website offers a separate category for PNG files and has over 9,910 3D fonts for you to use.
Pngtree comes with four premium plans with unlimited downloads and other features. In comparison, the free version is limited to 1 download per day and has no support for commercial usage.

Pros
- Over 10MB/s download speed
- Free and premium assets
- Has a background remover tool
- Multiple file formats, including PNG, AI, PSD, and EPS
Cons
- Attribution is required in the free plan.
7. Vecteezy
Vecteezy is a leading provider of royalty-free vectors, clipart graphics, icons, stock photos, stock videos, 3D fonts in PNG format, backgrounds, patterns, banners, and designs. Their assets are from professional illustrators and artists from all over the world.
The free version of Vecteezy comes with certain limitations. However, you can get full access with the premium version at just $14/per month.

Pros
- Affordable pricing plans
- Advanced filters
- Easy-to-use
- No need for registration/sign up
- The simple and quick licensing process
Cons
- Attribution is required in the free version
8. InkPx
InkPx Word Art is a simple yet powerful tool for generating different word art styles, including 3D, for your designs in a few seconds. The website supports JPG and PNG file formats when exporting your template.
Moreover, its editor lets you change the presets’ text, font style, line height, line spacing, size, alignment, and background.

Pros
- Available for free
- Personal and commercial usage is allowed
- Fully editable text styles
- Vast collection of font styles is available
- Easy-to-use interface
Cons
- Only JPG and PNG file formats are available.
How to Create 3D Text Effects in Video
If you want to avoid spending time on the internet to find the 3D text effects for your video, you can create them using Wondershare Filmora .
Wondershare Filmora is a unique video editing software with easy-to-use functionality and various features. The software also provides title editing capabilities and numerous text styles, so you can easily add titles, subtitles, and captions to your videos.
You can watch the video below to learn more about the fantastic features of Filmora, including the 3D text animation.
The following step-by-step method will show you how you can create 3D text in a video using Filmora:
Step 1: In the first step, you can download Filmora from the official website, or from the download buttons below.’
Free Download For Win 7 or later(64-bit)
Free Download For macOS 10.14 or later
Step 2: Now, open the Downloads folder and double-click the downloaded installation file. Follow the on-screen instructions to install the software.
Once the software is installed, click its icon to launch it, and click the “New Project” option on the program’s main screen.
Step 3: Next, you must import your video footage to edit and create a 3D text effect. To do this, drag and drop the file directly into the Project Media folder. Alternatively, click “File” and select “Import Media Files” from the drop-down menu.
Step 4: Now, drag and drop the file in the timeline and click the “Titles” tab in the top panel. And you will see “3D Titles” option on the left side of the window.

Once you find the perfect text style for your video, click the “Download” icon at the top right of the template. Next, drag and drop the effect in the timeline and adjust it where you want it to display in the video.
Step 5: Afterward, double-click the template, type your text, and hit Enter to save it. Now, configure the text style and color. Next, right-click or double click the effect in the timeline, and head to advanced setting. Select a suitable animation effect to apply to the text.

Step 6: Finally, in the video player above the timeline, click the “Play” icon to preview the 3D text effect on your video.
Once done, click “Export” and set the video resolution. Click “Export” again to save the final video on your system.
The Bottom Line
In this article, we’ve recommended and provided an overview of the top 8 websites for 3D text PNG. We’ve also explored their features and limitations to help you select a suitable resource for your upcoming project.
Ultimately, we’ve provided a step-by-step guide on creating 3D text effects in a video using Wondershare Filmora software. Hopefully, you’ve found this article helpful and can now choose a practical resource that meets your requirements.
2. Adobe Stock
AdobeStock is a creative resource with an easy-to-use interface with over 9k high-quality 3D fonts in PNG file format. The website is integrated with Creative Cloud and provides a 30-day free trial period.
The premium version will cost you about $49.99 per month with the monthly plan and $29.99/per month with an annual plan.

Pros
- Advanced AI search
- Easy licensing process
- Integrated with creative cloud
- Extensive Library of assets
- 30-day free trial
Cons
- You can only download ten assets in the free-trail
- Licensing is limited to some regions
3. PikBest
With its user-friendly UI and multiple search categories, PikBest makes it easy to find suitable 3D fonts in PNG format to add visual interest to your design. The library has over 170,000 3d text assets available for both personal and commercial use.
Besides its advanced search result, PikBest allows you to sort your result based on Popular, Top Download, and Brand New.

Pros
- Inexpensive premium version, starting at $19.9 per month
- Personal and commercial licenses
- Huge selection of high-quality assets
- Multiple file formats
- Intuitive UI
Cons
- Only 1 per day download in the free version.
- You cannot use the assets for commercial use in the free plan.
4. IconScout
IconScout is another online library providing over 5.5 million assets in many file formats. With its easy-to-navigate interface and multiple filters, you’re sure to find a suitable one in PNG format for your project.
It’s important to note that the website only offers paid subscriptions and only 1 selected asset for free per day.
![]()
Pros
- Detailed filters for search results
- Million of high-definition assets
- Multiple platforms integration by using its plugin
- User-friendly
- The Library is updated daily
Cons
- Only 1 selected free asset per day.
5. FreePik
With the FreePik website, you can access over 1.6k 3D fonts available in PNG format for the free and premium versions. To get the text style, visit the platform, search for the resource, and click Download.
The assets available on FreePik are fully scalable and editable. Moreover, you can even access the built-in icon editor with the premium version.

Pros
- The assets are updated daily
- No attribution is required in the premium version
- The affordable premium plan, starting at only 9 EUR /month
- Fully editable assets
- Massive selection of assets
Cons
- You are only allowed 100 downloads per day in the premium version.
6. Pngtree
Whether you’re a graphic designer, web developer, or just someone who loves playing around with 3D fonts, Pngtree is worth checking out. The website offers a separate category for PNG files and has over 9,910 3D fonts for you to use.
Pngtree comes with four premium plans with unlimited downloads and other features. In comparison, the free version is limited to 1 download per day and has no support for commercial usage.

Pros
- Over 10MB/s download speed
- Free and premium assets
- Has a background remover tool
- Multiple file formats, including PNG, AI, PSD, and EPS
Cons
- Attribution is required in the free plan.
7. Vecteezy
Vecteezy is a leading provider of royalty-free vectors, clipart graphics, icons, stock photos, stock videos, 3D fonts in PNG format, backgrounds, patterns, banners, and designs. Their assets are from professional illustrators and artists from all over the world.
The free version of Vecteezy comes with certain limitations. However, you can get full access with the premium version at just $14/per month.

Pros
- Affordable pricing plans
- Advanced filters
- Easy-to-use
- No need for registration/sign up
- The simple and quick licensing process
Cons
- Attribution is required in the free version
8. InkPx
InkPx Word Art is a simple yet powerful tool for generating different word art styles, including 3D, for your designs in a few seconds. The website supports JPG and PNG file formats when exporting your template.
Moreover, its editor lets you change the presets’ text, font style, line height, line spacing, size, alignment, and background.

Pros
- Available for free
- Personal and commercial usage is allowed
- Fully editable text styles
- Vast collection of font styles is available
- Easy-to-use interface
Cons
- Only JPG and PNG file formats are available.
How to Create 3D Text Effects in Video
If you want to avoid spending time on the internet to find the 3D text effects for your video, you can create them using Wondershare Filmora .
Wondershare Filmora is a unique video editing software with easy-to-use functionality and various features. The software also provides title editing capabilities and numerous text styles, so you can easily add titles, subtitles, and captions to your videos.
You can watch the video below to learn more about the fantastic features of Filmora, including the 3D text animation.
The following step-by-step method will show you how you can create 3D text in a video using Filmora:
Step 1: In the first step, you can download Filmora from the official website, or from the download buttons below.’
Free Download For Win 7 or later(64-bit)
Free Download For macOS 10.14 or later
Step 2: Now, open the Downloads folder and double-click the downloaded installation file. Follow the on-screen instructions to install the software.
Once the software is installed, click its icon to launch it, and click the “New Project” option on the program’s main screen.
Step 3: Next, you must import your video footage to edit and create a 3D text effect. To do this, drag and drop the file directly into the Project Media folder. Alternatively, click “File” and select “Import Media Files” from the drop-down menu.
Step 4: Now, drag and drop the file in the timeline and click the “Titles” tab in the top panel. And you will see “3D Titles” option on the left side of the window.

Once you find the perfect text style for your video, click the “Download” icon at the top right of the template. Next, drag and drop the effect in the timeline and adjust it where you want it to display in the video.
Step 5: Afterward, double-click the template, type your text, and hit Enter to save it. Now, configure the text style and color. Next, right-click or double click the effect in the timeline, and head to advanced setting. Select a suitable animation effect to apply to the text.

Step 6: Finally, in the video player above the timeline, click the “Play” icon to preview the 3D text effect on your video.
Once done, click “Export” and set the video resolution. Click “Export” again to save the final video on your system.
The Bottom Line
In this article, we’ve recommended and provided an overview of the top 8 websites for 3D text PNG. We’ve also explored their features and limitations to help you select a suitable resource for your upcoming project.
Ultimately, we’ve provided a step-by-step guide on creating 3D text effects in a video using Wondershare Filmora software. Hopefully, you’ve found this article helpful and can now choose a practical resource that meets your requirements.
2. Adobe Stock
AdobeStock is a creative resource with an easy-to-use interface with over 9k high-quality 3D fonts in PNG file format. The website is integrated with Creative Cloud and provides a 30-day free trial period.
The premium version will cost you about $49.99 per month with the monthly plan and $29.99/per month with an annual plan.

Pros
- Advanced AI search
- Easy licensing process
- Integrated with creative cloud
- Extensive Library of assets
- 30-day free trial
Cons
- You can only download ten assets in the free-trail
- Licensing is limited to some regions
3. PikBest
With its user-friendly UI and multiple search categories, PikBest makes it easy to find suitable 3D fonts in PNG format to add visual interest to your design. The library has over 170,000 3d text assets available for both personal and commercial use.
Besides its advanced search result, PikBest allows you to sort your result based on Popular, Top Download, and Brand New.

Pros
- Inexpensive premium version, starting at $19.9 per month
- Personal and commercial licenses
- Huge selection of high-quality assets
- Multiple file formats
- Intuitive UI
Cons
- Only 1 per day download in the free version.
- You cannot use the assets for commercial use in the free plan.
4. IconScout
IconScout is another online library providing over 5.5 million assets in many file formats. With its easy-to-navigate interface and multiple filters, you’re sure to find a suitable one in PNG format for your project.
It’s important to note that the website only offers paid subscriptions and only 1 selected asset for free per day.
![]()
Pros
- Detailed filters for search results
- Million of high-definition assets
- Multiple platforms integration by using its plugin
- User-friendly
- The Library is updated daily
Cons
- Only 1 selected free asset per day.
5. FreePik
With the FreePik website, you can access over 1.6k 3D fonts available in PNG format for the free and premium versions. To get the text style, visit the platform, search for the resource, and click Download.
The assets available on FreePik are fully scalable and editable. Moreover, you can even access the built-in icon editor with the premium version.

Pros
- The assets are updated daily
- No attribution is required in the premium version
- The affordable premium plan, starting at only 9 EUR /month
- Fully editable assets
- Massive selection of assets
Cons
- You are only allowed 100 downloads per day in the premium version.
6. Pngtree
Whether you’re a graphic designer, web developer, or just someone who loves playing around with 3D fonts, Pngtree is worth checking out. The website offers a separate category for PNG files and has over 9,910 3D fonts for you to use.
Pngtree comes with four premium plans with unlimited downloads and other features. In comparison, the free version is limited to 1 download per day and has no support for commercial usage.

Pros
- Over 10MB/s download speed
- Free and premium assets
- Has a background remover tool
- Multiple file formats, including PNG, AI, PSD, and EPS
Cons
- Attribution is required in the free plan.
7. Vecteezy
Vecteezy is a leading provider of royalty-free vectors, clipart graphics, icons, stock photos, stock videos, 3D fonts in PNG format, backgrounds, patterns, banners, and designs. Their assets are from professional illustrators and artists from all over the world.
The free version of Vecteezy comes with certain limitations. However, you can get full access with the premium version at just $14/per month.

Pros
- Affordable pricing plans
- Advanced filters
- Easy-to-use
- No need for registration/sign up
- The simple and quick licensing process
Cons
- Attribution is required in the free version
8. InkPx
InkPx Word Art is a simple yet powerful tool for generating different word art styles, including 3D, for your designs in a few seconds. The website supports JPG and PNG file formats when exporting your template.
Moreover, its editor lets you change the presets’ text, font style, line height, line spacing, size, alignment, and background.

Pros
- Available for free
- Personal and commercial usage is allowed
- Fully editable text styles
- Vast collection of font styles is available
- Easy-to-use interface
Cons
- Only JPG and PNG file formats are available.
How to Create 3D Text Effects in Video
If you want to avoid spending time on the internet to find the 3D text effects for your video, you can create them using Wondershare Filmora .
Wondershare Filmora is a unique video editing software with easy-to-use functionality and various features. The software also provides title editing capabilities and numerous text styles, so you can easily add titles, subtitles, and captions to your videos.
You can watch the video below to learn more about the fantastic features of Filmora, including the 3D text animation.
The following step-by-step method will show you how you can create 3D text in a video using Filmora:
Step 1: In the first step, you can download Filmora from the official website, or from the download buttons below.’
Free Download For Win 7 or later(64-bit)
Free Download For macOS 10.14 or later
Step 2: Now, open the Downloads folder and double-click the downloaded installation file. Follow the on-screen instructions to install the software.
Once the software is installed, click its icon to launch it, and click the “New Project” option on the program’s main screen.
Step 3: Next, you must import your video footage to edit and create a 3D text effect. To do this, drag and drop the file directly into the Project Media folder. Alternatively, click “File” and select “Import Media Files” from the drop-down menu.
Step 4: Now, drag and drop the file in the timeline and click the “Titles” tab in the top panel. And you will see “3D Titles” option on the left side of the window.

Once you find the perfect text style for your video, click the “Download” icon at the top right of the template. Next, drag and drop the effect in the timeline and adjust it where you want it to display in the video.
Step 5: Afterward, double-click the template, type your text, and hit Enter to save it. Now, configure the text style and color. Next, right-click or double click the effect in the timeline, and head to advanced setting. Select a suitable animation effect to apply to the text.

Step 6: Finally, in the video player above the timeline, click the “Play” icon to preview the 3D text effect on your video.
Once done, click “Export” and set the video resolution. Click “Export” again to save the final video on your system.
The Bottom Line
In this article, we’ve recommended and provided an overview of the top 8 websites for 3D text PNG. We’ve also explored their features and limitations to help you select a suitable resource for your upcoming project.
Ultimately, we’ve provided a step-by-step guide on creating 3D text effects in a video using Wondershare Filmora software. Hopefully, you’ve found this article helpful and can now choose a practical resource that meets your requirements.
Progressive Solutions to Add VHS Effects to Video with Ease
Good videos with great edits and effects undoubtedly create a last impression. Videos are like windows to the past, allowing us to relive precious moments and memories. Similarly, good-looking videos have this remarkable ability to last forever. Even when it comes to content creation, videos are a great engagement tool. They engage audiences like no other medium can, conveying emotions and messages.
However, VHS effects have added more spice to the content creation and the creative work behind it. They give a normal video a distinct character and style, further improving it. By applying VHS filters, you can change the mood of your videos entirely. Applying these effects to your videos sometimes becomes difficult. However, there is always a simple solution to apply VHS to your videos.
Part 1: What is VHS Effect? An Overview
People from the 80s would remember the good old days when they used to watch movies on VHS tapes. In simple terms, the VHS effect is a style that tries to recreate the look of VHS recordings. It’s a nostalgic-style effect that has gained popularity in recent years. You can apply different filters and techniques to your videos to achieve this effect.
These techniques aim to replicate the features of VHS tapes. The key features of the VHS filters include distortion, noise, and tracking errors. Distortion and noise create flickering lines and static. Furthermore, the tracking errors give the impression of an unstable video signal. These elements make the video appear just like the old VHS tapes from the 80s.
Additionally, color grading plays an important role in creating this effect. VHS tapes had a unique color palette with saturated and slightly shifted colors. You can replicate this effect by adjusting and applying color grading effects.

Add VHS Effect to Video
Simply add video effects on Video with Filmora Video Effect Editor ! Experience the magic of cool yet outstanding video effects, where your videos come to life in beautiful visuals.
Apply VHS Effect Apply VHS Effect Learn More >

Part 2: How To Add VHS Effect to Video in Premiere Pro
If you want to add a VCR effect to your videos, you are at the right place. This part will discuss the steps to add VHS video effects using Premiere Pro. Although you can also try this on your Mac, you can surely look for other options. If you are a consistent user of FCPX instead of Premiere Pro, you can also apply VFH effects to your videos using FCPX .
Step 1: Open Adobe Premiere Pro and import the video to which you want to apply the effect. Click on the “Color” option in the main toolbar to open the “Lumetri Color” panel. In the panel, choose “Lumetri Scopes” from the top toolbar to open a graph window.

Step 2: Go to the “Basic Correction” option in the “Lumetri Color” box. Lower the “Whites” and increase the “Contrast.” Furthermore, set the “Blacks” to a value of 10 in the graph.

Step 3: Switch to the “Creative” tab in the “Lumetri Color” panel. Increase the “Faded Film” to your preference. Lower the “Sharpness,” “Saturation,” and “Vibrance” as desired. Adjust the color wheels in the “Color Wheels & Match” section of the “Lumetri Color” tab to achieve the desired VHS look. Find the “Vignette” option in the same tab and increase its value.

Step 4: Then, proceed to the editing mode by pressing the “Editing” button in the main toolbar. Choose “Edit” from the bottom half of the screen and search for the “Channel Blur” effect. After that, drag the effect and drop it onto your video clip. Then, select the video in the timeline and go to the “Video Control” section. Drag the “Channel Blur” effect above the previous adjustments and effects.

Step 5: In the “Channel Blur” effect tab, check the “Repeat Edge Pixel” option and increase the value of “Red Blurriness.” Change the “Blur Dimensions” option to “Horizontal.” Add another “Channel Blur” effect and repeat the process. Increase the value of “Blue Blurriness” to “30” and set “Red Blurriness” to “15.” Further, change the “Blur Dimensions” option to “Vertical.”

Step 6: After that, apply the “Unsharp Mask” and “Color Emboss” effects from the “Effect” panel. Adjust the “Amount” and “Radius” of the “Unsharp Mask” to “85” and “20,” respectively. Slightly increase the values of “Relief” for the “Color Emboss” effect.

Step 7: Apply the “Noise” effect from the “Noise & Grain” from the same section. Then, adjust the “Amount of Noise” according to your preference. Apply the “Wave Warp” effect and change the “Wave Height” to “2” and “Wave Width” to “1000.” Set the “Direction” to “0” and “Pinning” to “Horizontal Edges.”

Step 8: To crop your video to a 4:3 aspect ratio, create a “Color Matte” layer by clicking the “New Item” icon. Name the new layer and place it on the video clip. Repeat this step for another “Color Matte” layer. Search for the “Crop” effect in the “Effect” panel. Apply it to both color matte layers. Then, change the “Left” option to “86” for the first layer and the “Right” option to “86” for the second layer. Set the “Edge Feather” to “30” for both layers.

Step 9: Right-click and select “Save Preset” to save your VHS effect for future use. Finally, export your video to your system.

Part 3: How To Add VHS Effect to Video in Davinci Resolve
VHS tape filter is an awesome effect that brings you to the latter half of the 20th century. However, you can add this effect to your videos as well. You can learn how to apply this effect to your video in 3 simple steps:
Step 1: Open Davinci Resolve and import your video clip. Add an adjustment layer by selecting “Effects” from the main toolbar and searching for “Adjustment Layer.” Drag and drop it onto your video clip. Adjust the duration of the adjustment layer to match your video.

Step 2: Go to the bottom toolbar and select “Color.” Activate “Clips,” “Nodes,” and “Effects.” Ensure the adjustment layer is selected in the timeline. Click the “Library” button in the right corner. Search for the “Analog Damage” effect in the library search bar and drag and drop it onto the adjustment layer. Choose your desired VHS video filter from the “Preset” options in the “Analog Damage” tab. Select the “VHS Clean” effect for an almost similar VHS look.

Step 3: Adjust the settings by experimenting with different options like “Broadcast Signal” and “Scan Lines.” Preview your video by pressing the “Play” button and make further adjustments if needed. Finally, save the clip on your system.

Part 4: Some Online Solutions to Adding VHS Effect to Video Quickly
There are so many software and offline tools to apply old VHS effects. However, you don’t need to install software to add a VHS look to your videos. There are many online tools as well that you can use for this purpose.
1. Veed.io
Veed.io is a great online video editor loaded with tons of options. Other than editing and adjustment, this tool can even add subtitles to your videos. You can use this online video editor to add a VHS effect to the video. With simple and easy editing options, you can give your video an old VHS tape look. To apply this effect using this tool, follow the guided steps.
Step 1: Access the official website and click the “Video Editor Effects” option. Look for the “Choose Video” button and click on it. Further, upload your file by selecting “Upload a file.” You can also choose a stock video from the available options.

Step 2: Locate and select the “Filters” option in the sidebar after importing your video. Then, navigate to the “Effects” section and look for the VHS effects in the provided list. Choose the effect you like and apply the effect to your video by clicking it.

Step 3: Further, press the “Play” icon to preview the results. Once satisfied, press “Done,” located at the top right corner of the screen. Finally, press the “Export Video” button to save your file to your system.

2. Kapwing
Kapwing is an online video tool that is capable of doing more than you think. It is powered by AI technology to assist users in video editing, generation, and more. However, this tool is the best bet when it comes to adding a 90s VHS filter to a video. If you’re thinking of applying this effect to your video as well, simply follow the instructions.
Step 1: Access the Kapwing website and go to the “Tools” option. Then, press “Video Editor” in the new window to apply your desired VHS glitch effect.

Step 2: Then, upload your desired video by selecting the “Click to Upload” tab. Further, in the sidebar, select “Images” and search for the “VHS Effect GIF.” Choose from different overlays and drag your preferred one onto the video in the timeline. Adjust the overlay’s opacity as needed.

Step 3: Apply filters to your video for a more authentic VHS effect. To do so, select the video in the timeline and go to the “Effects” tab on the right panel. Choose a filter that gives your video an old and retro look. Once satisfied, click “Export Video” in the top right corner to save your video.

Part 5: Wondershare Filmora: An All-in-One Utility For Adding VHS Effect to Video
Wondershare Filmora is a tool packed with tons of options and features. In its latest update, the tool is now using AI to assist you in your editing work. There are so many effects and filters available that you can apply to your video footage. There is a comprehensive Filmora guide to adding VHS filters to videos on its website. However, these 5 steps will help you learn the process of applying a VHS screen effect.
Add VHS Effect For Win 7 or later(64-bit)
Add VHS Effect For macOS 10.14 or later
Step 1Install and Launch Wondershare Filmora
To begin, install and launch Wondershare Filmora on your computer. Once opened, select the “New Project” tab, which will take you to a new window. Import your video by either dragging and dropping it into the program or using the import media option. As you’ve added the video to the “Media” section, drag and drop it into the timeline.

Step 2Apply the VHS Effects
Access the “Effects” option in the top bar of the program. Search for “VHS” to explore the different VHS effects available. Choose the desired old VHS effect and drag it onto your video in the timeline. To adjust the intensity of the effect, modify the opacity settings in the “Effects” tab located on your screen. Continue adjusting until you are satisfied with the result.

Step 3Export and Save Your Video
Once you are happy with the applied VHS effect, it’s time to save your video. Access the “Export” button in the screen’s top left corner. Follow the instructions to select your desired settings and format for the exported video. Then, click “Export” again to begin the exporting process. Once completed, your video with the VHS effects will be saved and ready to be shared or enjoyed.

Conclusion
In conclusion, videos have a remarkable ability to leave a lasting impression. There are many ways to improve your content, and VHS is one such way. With VHS filters, you can transform your boring video into something appealing. In this scenario, Wondershare has provided tools to help you improve your videos. Filmora is a tool offered by Wondershare that will allow you to apply effects to your videos easily.
Apply VHS Effect Apply VHS Effect Learn More >

Part 2: How To Add VHS Effect to Video in Premiere Pro
If you want to add a VCR effect to your videos, you are at the right place. This part will discuss the steps to add VHS video effects using Premiere Pro. Although you can also try this on your Mac, you can surely look for other options. If you are a consistent user of FCPX instead of Premiere Pro, you can also apply VFH effects to your videos using FCPX .
Step 1: Open Adobe Premiere Pro and import the video to which you want to apply the effect. Click on the “Color” option in the main toolbar to open the “Lumetri Color” panel. In the panel, choose “Lumetri Scopes” from the top toolbar to open a graph window.

Step 2: Go to the “Basic Correction” option in the “Lumetri Color” box. Lower the “Whites” and increase the “Contrast.” Furthermore, set the “Blacks” to a value of 10 in the graph.

Step 3: Switch to the “Creative” tab in the “Lumetri Color” panel. Increase the “Faded Film” to your preference. Lower the “Sharpness,” “Saturation,” and “Vibrance” as desired. Adjust the color wheels in the “Color Wheels & Match” section of the “Lumetri Color” tab to achieve the desired VHS look. Find the “Vignette” option in the same tab and increase its value.

Step 4: Then, proceed to the editing mode by pressing the “Editing” button in the main toolbar. Choose “Edit” from the bottom half of the screen and search for the “Channel Blur” effect. After that, drag the effect and drop it onto your video clip. Then, select the video in the timeline and go to the “Video Control” section. Drag the “Channel Blur” effect above the previous adjustments and effects.

Step 5: In the “Channel Blur” effect tab, check the “Repeat Edge Pixel” option and increase the value of “Red Blurriness.” Change the “Blur Dimensions” option to “Horizontal.” Add another “Channel Blur” effect and repeat the process. Increase the value of “Blue Blurriness” to “30” and set “Red Blurriness” to “15.” Further, change the “Blur Dimensions” option to “Vertical.”

Step 6: After that, apply the “Unsharp Mask” and “Color Emboss” effects from the “Effect” panel. Adjust the “Amount” and “Radius” of the “Unsharp Mask” to “85” and “20,” respectively. Slightly increase the values of “Relief” for the “Color Emboss” effect.

Step 7: Apply the “Noise” effect from the “Noise & Grain” from the same section. Then, adjust the “Amount of Noise” according to your preference. Apply the “Wave Warp” effect and change the “Wave Height” to “2” and “Wave Width” to “1000.” Set the “Direction” to “0” and “Pinning” to “Horizontal Edges.”

Step 8: To crop your video to a 4:3 aspect ratio, create a “Color Matte” layer by clicking the “New Item” icon. Name the new layer and place it on the video clip. Repeat this step for another “Color Matte” layer. Search for the “Crop” effect in the “Effect” panel. Apply it to both color matte layers. Then, change the “Left” option to “86” for the first layer and the “Right” option to “86” for the second layer. Set the “Edge Feather” to “30” for both layers.

Step 9: Right-click and select “Save Preset” to save your VHS effect for future use. Finally, export your video to your system.

Part 3: How To Add VHS Effect to Video in Davinci Resolve
VHS tape filter is an awesome effect that brings you to the latter half of the 20th century. However, you can add this effect to your videos as well. You can learn how to apply this effect to your video in 3 simple steps:
Step 1: Open Davinci Resolve and import your video clip. Add an adjustment layer by selecting “Effects” from the main toolbar and searching for “Adjustment Layer.” Drag and drop it onto your video clip. Adjust the duration of the adjustment layer to match your video.

Step 2: Go to the bottom toolbar and select “Color.” Activate “Clips,” “Nodes,” and “Effects.” Ensure the adjustment layer is selected in the timeline. Click the “Library” button in the right corner. Search for the “Analog Damage” effect in the library search bar and drag and drop it onto the adjustment layer. Choose your desired VHS video filter from the “Preset” options in the “Analog Damage” tab. Select the “VHS Clean” effect for an almost similar VHS look.

Step 3: Adjust the settings by experimenting with different options like “Broadcast Signal” and “Scan Lines.” Preview your video by pressing the “Play” button and make further adjustments if needed. Finally, save the clip on your system.

Part 4: Some Online Solutions to Adding VHS Effect to Video Quickly
There are so many software and offline tools to apply old VHS effects. However, you don’t need to install software to add a VHS look to your videos. There are many online tools as well that you can use for this purpose.
1. Veed.io
Veed.io is a great online video editor loaded with tons of options. Other than editing and adjustment, this tool can even add subtitles to your videos. You can use this online video editor to add a VHS effect to the video. With simple and easy editing options, you can give your video an old VHS tape look. To apply this effect using this tool, follow the guided steps.
Step 1: Access the official website and click the “Video Editor Effects” option. Look for the “Choose Video” button and click on it. Further, upload your file by selecting “Upload a file.” You can also choose a stock video from the available options.

Step 2: Locate and select the “Filters” option in the sidebar after importing your video. Then, navigate to the “Effects” section and look for the VHS effects in the provided list. Choose the effect you like and apply the effect to your video by clicking it.

Step 3: Further, press the “Play” icon to preview the results. Once satisfied, press “Done,” located at the top right corner of the screen. Finally, press the “Export Video” button to save your file to your system.

2. Kapwing
Kapwing is an online video tool that is capable of doing more than you think. It is powered by AI technology to assist users in video editing, generation, and more. However, this tool is the best bet when it comes to adding a 90s VHS filter to a video. If you’re thinking of applying this effect to your video as well, simply follow the instructions.
Step 1: Access the Kapwing website and go to the “Tools” option. Then, press “Video Editor” in the new window to apply your desired VHS glitch effect.

Step 2: Then, upload your desired video by selecting the “Click to Upload” tab. Further, in the sidebar, select “Images” and search for the “VHS Effect GIF.” Choose from different overlays and drag your preferred one onto the video in the timeline. Adjust the overlay’s opacity as needed.

Step 3: Apply filters to your video for a more authentic VHS effect. To do so, select the video in the timeline and go to the “Effects” tab on the right panel. Choose a filter that gives your video an old and retro look. Once satisfied, click “Export Video” in the top right corner to save your video.

Part 5: Wondershare Filmora: An All-in-One Utility For Adding VHS Effect to Video
Wondershare Filmora is a tool packed with tons of options and features. In its latest update, the tool is now using AI to assist you in your editing work. There are so many effects and filters available that you can apply to your video footage. There is a comprehensive Filmora guide to adding VHS filters to videos on its website. However, these 5 steps will help you learn the process of applying a VHS screen effect.
Add VHS Effect For Win 7 or later(64-bit)
Add VHS Effect For macOS 10.14 or later
Step 1Install and Launch Wondershare Filmora
To begin, install and launch Wondershare Filmora on your computer. Once opened, select the “New Project” tab, which will take you to a new window. Import your video by either dragging and dropping it into the program or using the import media option. As you’ve added the video to the “Media” section, drag and drop it into the timeline.

Step 2Apply the VHS Effects
Access the “Effects” option in the top bar of the program. Search for “VHS” to explore the different VHS effects available. Choose the desired old VHS effect and drag it onto your video in the timeline. To adjust the intensity of the effect, modify the opacity settings in the “Effects” tab located on your screen. Continue adjusting until you are satisfied with the result.

Step 3Export and Save Your Video
Once you are happy with the applied VHS effect, it’s time to save your video. Access the “Export” button in the screen’s top left corner. Follow the instructions to select your desired settings and format for the exported video. Then, click “Export” again to begin the exporting process. Once completed, your video with the VHS effects will be saved and ready to be shared or enjoyed.

Conclusion
In conclusion, videos have a remarkable ability to leave a lasting impression. There are many ways to improve your content, and VHS is one such way. With VHS filters, you can transform your boring video into something appealing. In this scenario, Wondershare has provided tools to help you improve your videos. Filmora is a tool offered by Wondershare that will allow you to apply effects to your videos easily.
How to Easily Add VHS Green Screen to Your Video
Create High-Quality Video - Wondershare Filmora
An easy and powerful YouTube video editor
Numerous video and audio effects to choose from
Detailed tutorials provided by the official channel
When making a video, it is always fun to add an effect. You can do this for either atmospheric or aesthetic reasons. VHS green screen effects are among the world’s most popular effects people use today.
We’ll give you the low-down on VHS Green Screen, including how it became popular and where to get these effects for free. Keep reading to learn more.
In this article
01 What Is VHS?
02 How Did VHS Green Screen Become Popular?
03 Free VHS Green Screen Effect Resource to Download
04 How to Edit VHS Green Screen with Filmora
What Is VHS?
Since its introduction in 1976, VHS has been the most frequently used video cassette recording technology. The VHS format is a consumer-level analog video cassette recording standard for videotaping. The acronym VHS referred to Vertical Helical Scan and was eventually modified as the popularity of this technology increased.
Produced by a Japan Victor Company, the technology uses a magnetic tape measuring half an inch. By the 1950s, magnetic tape video recording had become a vital part of the television industry. The technology is exclusively utilized in professional settings like TV studios and medical imaging (fluoroscopy).
As consumer access to videotape increased in the 1970s, a new economy centered on home video emerged, drastically altering the economics of the film and television industries. By 1980, VHS had captured 70% of the market and had established itself as the industry standard for entertainment and instruction.
The original standard has a picture quality equivalent to that of analog television. High-definition television content could be recorded and re-created using digital VHS (D-VHS). Progressively, a new format was launched dubbed S-VHS (Super VHS), which featured improved video quality from 240 to 400 lines; however, people did not use it extensively.
VHS tape, compared to its competition at the time, Betamax tapes had longer tape lifespans. VHS tapes were preferred because they recorded three times as long as Betamax tapes because of their higher storage capacity.
The last VHS recorder manufacturer, Funai Electric of Japan, discontinued manufacturing in 2016 after the introduction of DVDs into the market.
How Did VHS Green Screen Become Popular?
The green screen effect allows you to superimpose subjects onto different virtual background video clips. Essentially, you take a video that’s going to be your background, then overlay another video on top of this background. Using green screen properly will make your video stands out from the crowd. Let’s look at some that made increased the popularity of the VHS green screen:
- Clarity and Interactivity
VHS green screen allows for better understanding and comprehension, especially when explaining complex concepts and processes.
VHS green screen allows users to interact with virtual elements. Essentially, it enhances customer engagement while improving communication between you and the audience.
- Creativity and Versatility
Differentiation is key to the world of business. Therefore, adding VHS green screen to your content allows it to be unique and customized to your business. The best part is: Your imagination is the only limit.
The green screen also helps people avoid building and breaking down sets, allowing them to complete several shoots in a single session, which provides greater efficiency for their business.
- Save Time
With VHS green screen, you can shoot your video anywhere and anytime. That means it helps you remove the extended production time while providing you with one location and infinite possibilities. For this reason, it’s ideal for those who want to get the job done swiftly without hindering the quality.
- Budget and Logistical Solution
It eliminates expenses in the production line, like location, travel, and operational costs. In turn, you’ll free up more budget that you can spend on other things that your business needs.
Additionally, it allows you to control your environment. Shooting a video depends on the weather; however, shooting a video on VHS green screen disregards weather. It also provides an effective solution to problems in different areas, including travel, lighting, sound, and location.
Branding
VHS green screen popularity has grown over the years because it allows you to superimpose your logo onto the background. This makes your videos look professional and clean and provides you with a chance to advertise your business or brand your service or product with your company identity.
Free VHS Green Screen Effect Resource to Download
If you are looking for free VHS green screen effects to make your videos stand out, here are some resources that you might want to consider.
1. ANFX
ANFX is a stock video, after-effects projects, and motion graphics download hub. You can download a range of VHS green screen effects. All items that you will find on this website are licensed under a Creative Commons (CC) Attribution 4.0 International License. That means you can use the effects for any legal purpose, but you have to give them credit.

2. Videezy
As one of the world’s largest video communities, Videezy offers free high-quality footage designed to make filmmaking easy and affordable. You can also download a range of free VHS green screen effects in 4k. The site has more than 4,000 free green screen videos.

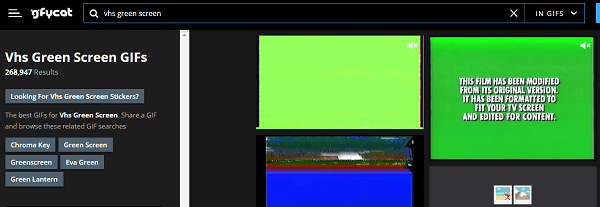
3. Gfycat
VHS green screens for animated gifs is a thing, and Gfycat is a good resource for making animated gifs. It is free to use the green screen gifs on this platform. This user-generated short video hosting company is one of the first web services that offered video encoding of GIFs.
4. Videvo
Videvo offers VHS green-screen effects, music, motion graphics, and sound effects. The site has a variety of effects available in resolutions from 720p-4k. While you’ll need to pay for some premium clips, there are loads of free resources. The site is particularly helpful for those who want green-screen effects that allow them to present content as though it is on a phone, computer, or tablet.

5. Pixabay
This user-submitted content site offers free content for commercial use. You can make attributions or choose not to. The effects on this site are of high quality. All contents are released to users under Creative Commons CC0, making them safe to use without giving credit to the artist or asking for permission. What’s more? You can even use the effects for commercial purposes.

6. YouTube
YouTube is home to millions of users looking for parts to build their videos. You will need to learn how to download YouTube videos to take advantage of these resources. There are tons of YouTube channels devoted to providing users with free VHS green screen effects. Some of the notable channels include BestGreenScreen, HD Green Screen, Free Green HD, and Green Screen Animation.

How to Edit VHS Green Screen with Filmora
Filmora is a relatively new program that has taken the world by storm. This professional video editor is a lifeline for all videographers and creators who work with videos to increase their proficiency and create professional-grade videos without breaking the bank. To learn how to Use VHS green screen in Filmora, follow the steps below.
Step 1\
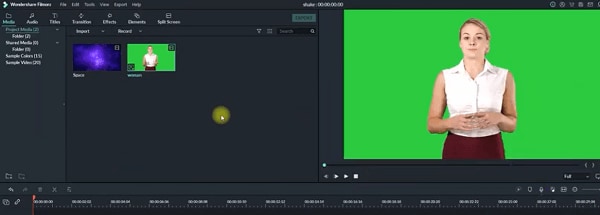
Import the video with the VHS green screen and the background video into the media library.
Step 2\
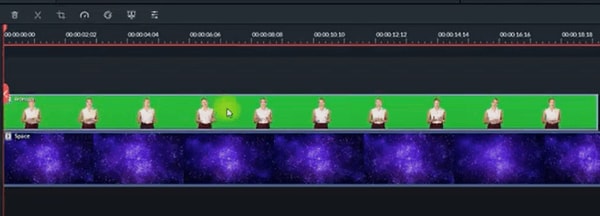
Drag the video with the green screen and the background video that you want to replace the green screen with into the timeline and add it to one of the tracks. The video with the green screen should come second in the timeline.
Step 3\
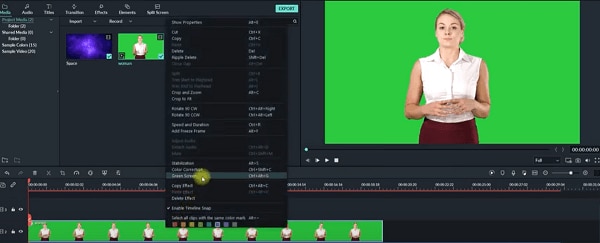
Right-click the green screen on the timeline and select the Green Screen option.
Step 4\
Select a color from the green screen menu.

Various settings under this menu allow you to customize how your video is affected by VHS Green Screen. Experiments with different settings may allow you to make good videos even better or give your videos a whole new feel.
The Tolerance slider adjusts how much of the green screen will be allowed in your subject.
Edge Thickness allows you to adjust the amount of the edge thickness you’ll bring into the shot.
Use the Edge Feather slider to soften the edges of your subject.
Touch your mouse’s right button and move your cursor to select the video you want to insert into the timeline or “Add Video to Timeline” if you are using a project that does not accept videos as sources.
Open Project Settings > Video Editor tab > VHS Green Screen and select Source Video from the drop-down menu to change the video from whatever it is currently set as.
You can also add VHS Green Screen to a Sub-track by pressing Ctrl + Alt combination.
After selecting your video and adding it to the timeline, you will see the Video Properties window.
You can edit the Source Video under Source Video Settings in the Video Properties menu or use the keyframes window to change its settings via a timeline.
You can also watch the below video to get a better underestanding about how to use Green Screen in Filmora.
For Win 7 or later (64-bit)
For macOS 10.12 or later
Conclusion
● VHS video effects have become popular over the years because of the many benefits they offer. They allow you to save time, make unique content, be creative, and more. You can use Filmora’s green screen feature to make your videos stand out.
When making a video, it is always fun to add an effect. You can do this for either atmospheric or aesthetic reasons. VHS green screen effects are among the world’s most popular effects people use today.
We’ll give you the low-down on VHS Green Screen, including how it became popular and where to get these effects for free. Keep reading to learn more.
In this article
01 What Is VHS?
02 How Did VHS Green Screen Become Popular?
03 Free VHS Green Screen Effect Resource to Download
04 How to Edit VHS Green Screen with Filmora
What Is VHS?
Since its introduction in 1976, VHS has been the most frequently used video cassette recording technology. The VHS format is a consumer-level analog video cassette recording standard for videotaping. The acronym VHS referred to Vertical Helical Scan and was eventually modified as the popularity of this technology increased.
Produced by a Japan Victor Company, the technology uses a magnetic tape measuring half an inch. By the 1950s, magnetic tape video recording had become a vital part of the television industry. The technology is exclusively utilized in professional settings like TV studios and medical imaging (fluoroscopy).
As consumer access to videotape increased in the 1970s, a new economy centered on home video emerged, drastically altering the economics of the film and television industries. By 1980, VHS had captured 70% of the market and had established itself as the industry standard for entertainment and instruction.
The original standard has a picture quality equivalent to that of analog television. High-definition television content could be recorded and re-created using digital VHS (D-VHS). Progressively, a new format was launched dubbed S-VHS (Super VHS), which featured improved video quality from 240 to 400 lines; however, people did not use it extensively.
VHS tape, compared to its competition at the time, Betamax tapes had longer tape lifespans. VHS tapes were preferred because they recorded three times as long as Betamax tapes because of their higher storage capacity.
The last VHS recorder manufacturer, Funai Electric of Japan, discontinued manufacturing in 2016 after the introduction of DVDs into the market.
How Did VHS Green Screen Become Popular?
The green screen effect allows you to superimpose subjects onto different virtual background video clips. Essentially, you take a video that’s going to be your background, then overlay another video on top of this background. Using green screen properly will make your video stands out from the crowd. Let’s look at some that made increased the popularity of the VHS green screen:
- Clarity and Interactivity
VHS green screen allows for better understanding and comprehension, especially when explaining complex concepts and processes.
VHS green screen allows users to interact with virtual elements. Essentially, it enhances customer engagement while improving communication between you and the audience.
- Creativity and Versatility
Differentiation is key to the world of business. Therefore, adding VHS green screen to your content allows it to be unique and customized to your business. The best part is: Your imagination is the only limit.
The green screen also helps people avoid building and breaking down sets, allowing them to complete several shoots in a single session, which provides greater efficiency for their business.
- Save Time
With VHS green screen, you can shoot your video anywhere and anytime. That means it helps you remove the extended production time while providing you with one location and infinite possibilities. For this reason, it’s ideal for those who want to get the job done swiftly without hindering the quality.
- Budget and Logistical Solution
It eliminates expenses in the production line, like location, travel, and operational costs. In turn, you’ll free up more budget that you can spend on other things that your business needs.
Additionally, it allows you to control your environment. Shooting a video depends on the weather; however, shooting a video on VHS green screen disregards weather. It also provides an effective solution to problems in different areas, including travel, lighting, sound, and location.
Branding
VHS green screen popularity has grown over the years because it allows you to superimpose your logo onto the background. This makes your videos look professional and clean and provides you with a chance to advertise your business or brand your service or product with your company identity.
Free VHS Green Screen Effect Resource to Download
If you are looking for free VHS green screen effects to make your videos stand out, here are some resources that you might want to consider.
1. ANFX
ANFX is a stock video, after-effects projects, and motion graphics download hub. You can download a range of VHS green screen effects. All items that you will find on this website are licensed under a Creative Commons (CC) Attribution 4.0 International License. That means you can use the effects for any legal purpose, but you have to give them credit.

2. Videezy
As one of the world’s largest video communities, Videezy offers free high-quality footage designed to make filmmaking easy and affordable. You can also download a range of free VHS green screen effects in 4k. The site has more than 4,000 free green screen videos.

3. Gfycat
VHS green screens for animated gifs is a thing, and Gfycat is a good resource for making animated gifs. It is free to use the green screen gifs on this platform. This user-generated short video hosting company is one of the first web services that offered video encoding of GIFs.

4. Videvo
Videvo offers VHS green-screen effects, music, motion graphics, and sound effects. The site has a variety of effects available in resolutions from 720p-4k. While you’ll need to pay for some premium clips, there are loads of free resources. The site is particularly helpful for those who want green-screen effects that allow them to present content as though it is on a phone, computer, or tablet.

5. Pixabay
This user-submitted content site offers free content for commercial use. You can make attributions or choose not to. The effects on this site are of high quality. All contents are released to users under Creative Commons CC0, making them safe to use without giving credit to the artist or asking for permission. What’s more? You can even use the effects for commercial purposes.

6. YouTube
YouTube is home to millions of users looking for parts to build their videos. You will need to learn how to download YouTube videos to take advantage of these resources. There are tons of YouTube channels devoted to providing users with free VHS green screen effects. Some of the notable channels include BestGreenScreen, HD Green Screen, Free Green HD, and Green Screen Animation.

How to Edit VHS Green Screen with Filmora
Filmora is a relatively new program that has taken the world by storm. This professional video editor is a lifeline for all videographers and creators who work with videos to increase their proficiency and create professional-grade videos without breaking the bank. To learn how to Use VHS green screen in Filmora, follow the steps below.
Step 1\
Import the video with the VHS green screen and the background video into the media library.

Step 2\
Drag the video with the green screen and the background video that you want to replace the green screen with into the timeline and add it to one of the tracks. The video with the green screen should come second in the timeline.

Step 3\
Right-click the green screen on the timeline and select the Green Screen option.

Step 4\
Select a color from the green screen menu.

Various settings under this menu allow you to customize how your video is affected by VHS Green Screen. Experiments with different settings may allow you to make good videos even better or give your videos a whole new feel.
The Tolerance slider adjusts how much of the green screen will be allowed in your subject.
Edge Thickness allows you to adjust the amount of the edge thickness you’ll bring into the shot.
Use the Edge Feather slider to soften the edges of your subject.
Touch your mouse’s right button and move your cursor to select the video you want to insert into the timeline or “Add Video to Timeline” if you are using a project that does not accept videos as sources.
Open Project Settings > Video Editor tab > VHS Green Screen and select Source Video from the drop-down menu to change the video from whatever it is currently set as.
You can also add VHS Green Screen to a Sub-track by pressing Ctrl + Alt combination.
After selecting your video and adding it to the timeline, you will see the Video Properties window.
You can edit the Source Video under Source Video Settings in the Video Properties menu or use the keyframes window to change its settings via a timeline.
You can also watch the below video to get a better underestanding about how to use Green Screen in Filmora.
For Win 7 or later (64-bit)
For macOS 10.12 or later
Conclusion
● VHS video effects have become popular over the years because of the many benefits they offer. They allow you to save time, make unique content, be creative, and more. You can use Filmora’s green screen feature to make your videos stand out.
When making a video, it is always fun to add an effect. You can do this for either atmospheric or aesthetic reasons. VHS green screen effects are among the world’s most popular effects people use today.
We’ll give you the low-down on VHS Green Screen, including how it became popular and where to get these effects for free. Keep reading to learn more.
In this article
01 What Is VHS?
02 How Did VHS Green Screen Become Popular?
03 Free VHS Green Screen Effect Resource to Download
04 How to Edit VHS Green Screen with Filmora
What Is VHS?
Since its introduction in 1976, VHS has been the most frequently used video cassette recording technology. The VHS format is a consumer-level analog video cassette recording standard for videotaping. The acronym VHS referred to Vertical Helical Scan and was eventually modified as the popularity of this technology increased.
Produced by a Japan Victor Company, the technology uses a magnetic tape measuring half an inch. By the 1950s, magnetic tape video recording had become a vital part of the television industry. The technology is exclusively utilized in professional settings like TV studios and medical imaging (fluoroscopy).
As consumer access to videotape increased in the 1970s, a new economy centered on home video emerged, drastically altering the economics of the film and television industries. By 1980, VHS had captured 70% of the market and had established itself as the industry standard for entertainment and instruction.
The original standard has a picture quality equivalent to that of analog television. High-definition television content could be recorded and re-created using digital VHS (D-VHS). Progressively, a new format was launched dubbed S-VHS (Super VHS), which featured improved video quality from 240 to 400 lines; however, people did not use it extensively.
VHS tape, compared to its competition at the time, Betamax tapes had longer tape lifespans. VHS tapes were preferred because they recorded three times as long as Betamax tapes because of their higher storage capacity.
The last VHS recorder manufacturer, Funai Electric of Japan, discontinued manufacturing in 2016 after the introduction of DVDs into the market.
How Did VHS Green Screen Become Popular?
The green screen effect allows you to superimpose subjects onto different virtual background video clips. Essentially, you take a video that’s going to be your background, then overlay another video on top of this background. Using green screen properly will make your video stands out from the crowd. Let’s look at some that made increased the popularity of the VHS green screen:
- Clarity and Interactivity
VHS green screen allows for better understanding and comprehension, especially when explaining complex concepts and processes.
VHS green screen allows users to interact with virtual elements. Essentially, it enhances customer engagement while improving communication between you and the audience.
- Creativity and Versatility
Differentiation is key to the world of business. Therefore, adding VHS green screen to your content allows it to be unique and customized to your business. The best part is: Your imagination is the only limit.
The green screen also helps people avoid building and breaking down sets, allowing them to complete several shoots in a single session, which provides greater efficiency for their business.
- Save Time
With VHS green screen, you can shoot your video anywhere and anytime. That means it helps you remove the extended production time while providing you with one location and infinite possibilities. For this reason, it’s ideal for those who want to get the job done swiftly without hindering the quality.
- Budget and Logistical Solution
It eliminates expenses in the production line, like location, travel, and operational costs. In turn, you’ll free up more budget that you can spend on other things that your business needs.
Additionally, it allows you to control your environment. Shooting a video depends on the weather; however, shooting a video on VHS green screen disregards weather. It also provides an effective solution to problems in different areas, including travel, lighting, sound, and location.
Branding
VHS green screen popularity has grown over the years because it allows you to superimpose your logo onto the background. This makes your videos look professional and clean and provides you with a chance to advertise your business or brand your service or product with your company identity.
Free VHS Green Screen Effect Resource to Download
If you are looking for free VHS green screen effects to make your videos stand out, here are some resources that you might want to consider.
1. ANFX
ANFX is a stock video, after-effects projects, and motion graphics download hub. You can download a range of VHS green screen effects. All items that you will find on this website are licensed under a Creative Commons (CC) Attribution 4.0 International License. That means you can use the effects for any legal purpose, but you have to give them credit.

2. Videezy
As one of the world’s largest video communities, Videezy offers free high-quality footage designed to make filmmaking easy and affordable. You can also download a range of free VHS green screen effects in 4k. The site has more than 4,000 free green screen videos.

3. Gfycat
VHS green screens for animated gifs is a thing, and Gfycat is a good resource for making animated gifs. It is free to use the green screen gifs on this platform. This user-generated short video hosting company is one of the first web services that offered video encoding of GIFs.

4. Videvo
Videvo offers VHS green-screen effects, music, motion graphics, and sound effects. The site has a variety of effects available in resolutions from 720p-4k. While you’ll need to pay for some premium clips, there are loads of free resources. The site is particularly helpful for those who want green-screen effects that allow them to present content as though it is on a phone, computer, or tablet.

5. Pixabay
This user-submitted content site offers free content for commercial use. You can make attributions or choose not to. The effects on this site are of high quality. All contents are released to users under Creative Commons CC0, making them safe to use without giving credit to the artist or asking for permission. What’s more? You can even use the effects for commercial purposes.

6. YouTube
YouTube is home to millions of users looking for parts to build their videos. You will need to learn how to download YouTube videos to take advantage of these resources. There are tons of YouTube channels devoted to providing users with free VHS green screen effects. Some of the notable channels include BestGreenScreen, HD Green Screen, Free Green HD, and Green Screen Animation.

How to Edit VHS Green Screen with Filmora
Filmora is a relatively new program that has taken the world by storm. This professional video editor is a lifeline for all videographers and creators who work with videos to increase their proficiency and create professional-grade videos without breaking the bank. To learn how to Use VHS green screen in Filmora, follow the steps below.
Step 1\
Import the video with the VHS green screen and the background video into the media library.

Step 2\
Drag the video with the green screen and the background video that you want to replace the green screen with into the timeline and add it to one of the tracks. The video with the green screen should come second in the timeline.

Step 3\
Right-click the green screen on the timeline and select the Green Screen option.

Step 4\
Select a color from the green screen menu.

Various settings under this menu allow you to customize how your video is affected by VHS Green Screen. Experiments with different settings may allow you to make good videos even better or give your videos a whole new feel.
The Tolerance slider adjusts how much of the green screen will be allowed in your subject.
Edge Thickness allows you to adjust the amount of the edge thickness you’ll bring into the shot.
Use the Edge Feather slider to soften the edges of your subject.
Touch your mouse’s right button and move your cursor to select the video you want to insert into the timeline or “Add Video to Timeline” if you are using a project that does not accept videos as sources.
Open Project Settings > Video Editor tab > VHS Green Screen and select Source Video from the drop-down menu to change the video from whatever it is currently set as.
You can also add VHS Green Screen to a Sub-track by pressing Ctrl + Alt combination.
After selecting your video and adding it to the timeline, you will see the Video Properties window.
You can edit the Source Video under Source Video Settings in the Video Properties menu or use the keyframes window to change its settings via a timeline.
You can also watch the below video to get a better underestanding about how to use Green Screen in Filmora.
For Win 7 or later (64-bit)
For macOS 10.12 or later
Conclusion
● VHS video effects have become popular over the years because of the many benefits they offer. They allow you to save time, make unique content, be creative, and more. You can use Filmora’s green screen feature to make your videos stand out.
When making a video, it is always fun to add an effect. You can do this for either atmospheric or aesthetic reasons. VHS green screen effects are among the world’s most popular effects people use today.
We’ll give you the low-down on VHS Green Screen, including how it became popular and where to get these effects for free. Keep reading to learn more.
In this article
01 What Is VHS?
02 How Did VHS Green Screen Become Popular?
03 Free VHS Green Screen Effect Resource to Download
04 How to Edit VHS Green Screen with Filmora
What Is VHS?
Since its introduction in 1976, VHS has been the most frequently used video cassette recording technology. The VHS format is a consumer-level analog video cassette recording standard for videotaping. The acronym VHS referred to Vertical Helical Scan and was eventually modified as the popularity of this technology increased.
Produced by a Japan Victor Company, the technology uses a magnetic tape measuring half an inch. By the 1950s, magnetic tape video recording had become a vital part of the television industry. The technology is exclusively utilized in professional settings like TV studios and medical imaging (fluoroscopy).
As consumer access to videotape increased in the 1970s, a new economy centered on home video emerged, drastically altering the economics of the film and television industries. By 1980, VHS had captured 70% of the market and had established itself as the industry standard for entertainment and instruction.
The original standard has a picture quality equivalent to that of analog television. High-definition television content could be recorded and re-created using digital VHS (D-VHS). Progressively, a new format was launched dubbed S-VHS (Super VHS), which featured improved video quality from 240 to 400 lines; however, people did not use it extensively.
VHS tape, compared to its competition at the time, Betamax tapes had longer tape lifespans. VHS tapes were preferred because they recorded three times as long as Betamax tapes because of their higher storage capacity.
The last VHS recorder manufacturer, Funai Electric of Japan, discontinued manufacturing in 2016 after the introduction of DVDs into the market.
How Did VHS Green Screen Become Popular?
The green screen effect allows you to superimpose subjects onto different virtual background video clips. Essentially, you take a video that’s going to be your background, then overlay another video on top of this background. Using green screen properly will make your video stands out from the crowd. Let’s look at some that made increased the popularity of the VHS green screen:
- Clarity and Interactivity
VHS green screen allows for better understanding and comprehension, especially when explaining complex concepts and processes.
VHS green screen allows users to interact with virtual elements. Essentially, it enhances customer engagement while improving communication between you and the audience.
- Creativity and Versatility
Differentiation is key to the world of business. Therefore, adding VHS green screen to your content allows it to be unique and customized to your business. The best part is: Your imagination is the only limit.
The green screen also helps people avoid building and breaking down sets, allowing them to complete several shoots in a single session, which provides greater efficiency for their business.
- Save Time
With VHS green screen, you can shoot your video anywhere and anytime. That means it helps you remove the extended production time while providing you with one location and infinite possibilities. For this reason, it’s ideal for those who want to get the job done swiftly without hindering the quality.
- Budget and Logistical Solution
It eliminates expenses in the production line, like location, travel, and operational costs. In turn, you’ll free up more budget that you can spend on other things that your business needs.
Additionally, it allows you to control your environment. Shooting a video depends on the weather; however, shooting a video on VHS green screen disregards weather. It also provides an effective solution to problems in different areas, including travel, lighting, sound, and location.
Branding
VHS green screen popularity has grown over the years because it allows you to superimpose your logo onto the background. This makes your videos look professional and clean and provides you with a chance to advertise your business or brand your service or product with your company identity.
Free VHS Green Screen Effect Resource to Download
If you are looking for free VHS green screen effects to make your videos stand out, here are some resources that you might want to consider.
1. ANFX
ANFX is a stock video, after-effects projects, and motion graphics download hub. You can download a range of VHS green screen effects. All items that you will find on this website are licensed under a Creative Commons (CC) Attribution 4.0 International License. That means you can use the effects for any legal purpose, but you have to give them credit.

2. Videezy
As one of the world’s largest video communities, Videezy offers free high-quality footage designed to make filmmaking easy and affordable. You can also download a range of free VHS green screen effects in 4k. The site has more than 4,000 free green screen videos.

3. Gfycat
VHS green screens for animated gifs is a thing, and Gfycat is a good resource for making animated gifs. It is free to use the green screen gifs on this platform. This user-generated short video hosting company is one of the first web services that offered video encoding of GIFs.

4. Videvo
Videvo offers VHS green-screen effects, music, motion graphics, and sound effects. The site has a variety of effects available in resolutions from 720p-4k. While you’ll need to pay for some premium clips, there are loads of free resources. The site is particularly helpful for those who want green-screen effects that allow them to present content as though it is on a phone, computer, or tablet.

5. Pixabay
This user-submitted content site offers free content for commercial use. You can make attributions or choose not to. The effects on this site are of high quality. All contents are released to users under Creative Commons CC0, making them safe to use without giving credit to the artist or asking for permission. What’s more? You can even use the effects for commercial purposes.

6. YouTube
YouTube is home to millions of users looking for parts to build their videos. You will need to learn how to download YouTube videos to take advantage of these resources. There are tons of YouTube channels devoted to providing users with free VHS green screen effects. Some of the notable channels include BestGreenScreen, HD Green Screen, Free Green HD, and Green Screen Animation.

How to Edit VHS Green Screen with Filmora
Filmora is a relatively new program that has taken the world by storm. This professional video editor is a lifeline for all videographers and creators who work with videos to increase their proficiency and create professional-grade videos without breaking the bank. To learn how to Use VHS green screen in Filmora, follow the steps below.
Step 1\
Import the video with the VHS green screen and the background video into the media library.

Step 2\
Drag the video with the green screen and the background video that you want to replace the green screen with into the timeline and add it to one of the tracks. The video with the green screen should come second in the timeline.

Step 3\
Right-click the green screen on the timeline and select the Green Screen option.

Step 4\
Select a color from the green screen menu.

Various settings under this menu allow you to customize how your video is affected by VHS Green Screen. Experiments with different settings may allow you to make good videos even better or give your videos a whole new feel.
The Tolerance slider adjusts how much of the green screen will be allowed in your subject.
Edge Thickness allows you to adjust the amount of the edge thickness you’ll bring into the shot.
Use the Edge Feather slider to soften the edges of your subject.
Touch your mouse’s right button and move your cursor to select the video you want to insert into the timeline or “Add Video to Timeline” if you are using a project that does not accept videos as sources.
Open Project Settings > Video Editor tab > VHS Green Screen and select Source Video from the drop-down menu to change the video from whatever it is currently set as.
You can also add VHS Green Screen to a Sub-track by pressing Ctrl + Alt combination.
After selecting your video and adding it to the timeline, you will see the Video Properties window.
You can edit the Source Video under Source Video Settings in the Video Properties menu or use the keyframes window to change its settings via a timeline.
You can also watch the below video to get a better underestanding about how to use Green Screen in Filmora.
For Win 7 or later (64-bit)
For macOS 10.12 or later
Conclusion
● VHS video effects have become popular over the years because of the many benefits they offer. They allow you to save time, make unique content, be creative, and more. You can use Filmora’s green screen feature to make your videos stand out.
Also read:
- New How to Put a Background on A Green Screen
- Updated How to Create a DIY Green Screen Video Effect for 2024
- 2 Actionable Ways to Extract Subtitles From MKV Videos without Quality Loss for 2024
- 2024 Approved How to Remove Audio From Videos with FFmpeg?
- In 2024, Want to Create an Impressive Video Collage but Clueless About the Best Tools? No Worries as We Are Here and Will Help You to Learn About the Best Video Collage Maker PC Tools
- Best Jump Cut Editing Tricks
- 15 Best Free Cinematic LUTs for Your Film for 2024
- 2024 Approved How to Create One Click Video Reverse Effect in Filmora
- New 2024 Approved Looking for the Best Quiz-Making Tools? Read Our Full Review to Find Out the 10 Best Video Quiz Makers Available
- New How To Zoom In On TikTok Videos for 2024
- New In 2024, TOP 10 Types of Video Framing From Novice to Master
- Updated Want to Learn How to Create the Random Letter Reveal Intro? Read Through the Stages of Preparing This Effect via Filmora in This Guide for 2024
- New In 2024, Do You Seek to Blur Out Your Video and Photo to Display some Motion Blur? This Article Provides a List of the Best Motion Blur Apps for Videos and Photos
- New 2024 Approved Powerpoint Supported Video Format and User Tips
- KineMaster Templates 101 How to Get the Most Out of Video Templates
- New Create Chroma Key Written Text Effects in Filmora for 2024
- Gif to Svg, Svg to Gif, Convert Gif to Svg, Animated Svg to Gif, Convert Svg to Gif, Svg to Gif Converter, Svg to Gif Animation, Svg Animation to Gif, Gif to Svg Converter
- In 2024, This Review Post Introduces You to EasyHDR to Review and Customize Your HDR Photos. Youll Also Learn the Best Desktop Application to Edit Your HDR Videos Effortlessly
- Updated In 2024, Learn How to Blur Faces in Your Video on iPhone
- How to Export iMovie, In 2024
- In 2024, Top 9 Best Solutions To Go For When Creating an AI Thumbnail
- New In 2024, How to Make a Video with My Phone
- Updated In 2024, Boost the Pace of Your Instagram Reels Videos with These Simple Tricks
- New In 2024, 2 Solutions to Cut Video in VLC on Windows
- New In 2024, Best 5 GIF to Video Converters You Cant-Miss
- New Discover the Essential Steps for Editing a Music Video in This Guide. Learn About Aspect Ratio and the First Cut Process to Create a Visually Captivating Video
- Updated In 2024, Want to Find a Good Camera for YouTube? This Article Brings You some of the Best Options of Different Varieties for Your Channel
- Best Tips on How to Design Travel Slideshow
- In 2024, This Article Aims to Provide a Step-by-Step Guide to Changing a Videos Speed by Using the Speed Adjustment Panel and Duration Panel on Wondershare Filmora
- Updated In 2024, How to Loop a Video on Android
- 2024 Approved Do You Want to Know Which Are the Best Wondershare Filmora LUTs to Use? There Are Many LUTs that You Can Download, Each with a Different Tone and Style
- How and Where to Find a Shiny Stone Pokémon For Oppo Reno 10 5G? | Dr.fone
- 9 Best Phone Monitoring Apps for Honor Magic 6 Pro | Dr.fone
- 3 Best Tools to Hard Reset Xiaomi Redmi Note 12T Pro | Dr.fone
- Lock Your Vivo T2 Pro 5G Phone in Style The Top 5 Gesture Lock Screen Apps
- Additional Tips About Sinnoh Stone For Motorola Moto G13 | Dr.fone
- Troubleshooting Error Connecting to the Apple ID Server On iPhone 6s Plus
- Hard Resetting an Samsung Galaxy M34 5G Device Made Easy | Dr.fone
- In 2024, A Step-by-Step Guide on Using ADB and Fastboot to Remove FRP Lock from your Itel A70
- Best 10 Mock Location Apps Worth Trying On Vivo V30 Pro | Dr.fone
- Why Is My Poco X5 Pro Offline? Troubleshooting Guide | Dr.fone
- In 2024, How to Reset a Locked Samsung Galaxy F04 Phone
- Fake Android Location without Rooting For Your Lava Blaze 2 | Dr.fone
- How to Retrieve deleted photos on Huawei
- In 2024, Is Fake GPS Location Spoofer a Good Choice On Tecno Spark 10C? | Dr.fone
- How to Track Vivo T2 5G Location by Number | Dr.fone
- In 2024, 5 Quick Methods to Bypass OnePlus Open FRP
- In 2024, How To Change Itel P40+ Lock Screen Clock in Seconds
- 2024 Approved Top 12 Evil Cartoon Characters of All Time
- A Detailed VPNa Fake GPS Location Free Review On Samsung Galaxy Z Fold 5 | Dr.fone
- How To Recover Apple iPhone 13 Pro Data From iTunes? | Dr.fone
- AI Script | Wondershare Virbo
- Fix Cant Take Screenshot Due to Security Policy on Vivo Y78 5G | Dr.fone
- In 2024, Easy Cartoon Characters Drawing Tutorials for You Beginners
- Title: TEXT REVEAL Animation | Easy Masking Filmora
- Author: Morgan
- Created at : 2024-05-19 05:11:40
- Updated at : 2024-05-20 05:11:40
- Link: https://ai-video-editing.techidaily.com/text-reveal-animation-easy-masking-filmora/
- License: This work is licensed under CC BY-NC-SA 4.0.


