
:max_bytes(150000):strip_icc():format(webp)/the-best-halloween-live-wallpaper-for-2019-4691483-019a40e91504436ca9fc9f1944d89c15.jpg)
The Best Way To Color Grading & Color Correction in Filmora
The Best Way To Color Grading & Color Correction in Filmora
As a post-production analysis of the filmed video, you might have noticed how the color contrast in a real VS reel. The colors do not appear bright and robust on a screen as in real life.
While there are numerous reasons for the dull, uninviting look- a basic edit could fix it quickly. One of the vital, if not the first, steps in the process is color grading and color correction. However, what exactly are color grading and color correction? And how can they help fix the color ratios and balance in a video?
This article covers everything you need to know about color grading and correction and a complete guide to adjusting cinematic colors with the best video editor, Wondershare Filmora. So, without much ado, let’s dig into it!
Part 1. Color Grading VS Color Correction
These terms have often been used interchangeably; people consider them synonymous. However, they are two different artistic phenomena to adjust the color scheme.
Since we will discuss them in detail later, here is a brief description. Put simply, color correcting is a corrective procedure, while color grading is a cinematic adjustment.
Color correction diverts the colors to a relatively neutral baseline achieving a unified look for all captured shots. On the other hand, color grading is inclined more toward a creative look aimed at balancing colors that reflect the emotion of the sequence.

These two work hand in hand to dramatically uplift the overall look of the sequence. Let’s delve deeper into these techniques and see how to use them.
Part 2. What Is Color Correction?
We will start with color correction- the first step in color editing. Even with a slight glance at the raw shots, you can notice how much the tones are messed up. The crude product is oversaturated with colors.
Color correction is about making the shots look as natural as possible. It brings the sequences to the neutral baseline to achieve a unified look.
For now, we need to ignore our creative and aesthetic preferences and focus entirely on exposure and white balance. The actual end goal is to keep the colors true to life.
However, color-correcting a video is challenging if you are a beginner. There needs to be more than just understanding the fundamentals; it requires cinematic and technical skills.
Here is the basic process for a clean, color-corrected shot, irrespective of the software you use.
Essential Steps for Color Correcting a Shot
1. Set the color profile
Different video formats (HDR, LOG, RAW, HLG, etc.) have different exposure content. Therefore, select a color profile that matches your video format for the best results before starting.
2. Adjust the saturation
It is the primary step of color correction. Often the exposure of raw content is high. Next, equalize the saturation for a natural look.
3. Fix the contrast
Contrast is the difference between the light and dark areas of the image. Pictures with a higher contrast are sharper and more detailed.
However, adjust the contrast during color correcting so that the dark areas are not crushed, and you preserve the details maximally.
4. Set the white balance
It is time to adjust the white balance with the saturation and contrast fixed. The colors will shift to orange and blue hues if it is maladjusted.
Use the color curves to ensure pure whites so all colors fall correctly in place.
5. Double-check individual color tones
The final step is a secondary checking of the individual colors. Double-check the skin tones so they match in each shot.
Make sure the skin tones match their natural hues for an authentic, unfiltered look.
It is a basic walkthrough for color-correcting. More steps can vary according to the professional demands of the video. However, as a beginner, this is the best process to follow.
Once we’ve corrected the color, it is time to move to the next and primary step- color grading.
ChatGPT is Now Available in Filmora! Filmora now offers a ChatGPT plug-in to provide a more inspirational copywriting experience.
Try It Free Try It Free Learn More

Part 3. What Is Color Grading?
After you set all the tones to the baseline, you can start with the creative process of color grading. In this case, you do not change the colors anymore. Instead, you make artistic choices to change the moods and emotions of that particular sequence. Color grading is about manipulating the colors and contrasts that intensify the visual tone and explain your story to the world.
Color correction can be enough if you want to keep the video realistic. However, color grading is essential if you want to imply emotions and feelings in your content. Following is an essential step-by-step guide to color grading.
Basic Steps of Color Grading
If you are a beginner, the color grading process can be tricky without expertise. Hence here are the basic steps of color grading a video.
1. Color correcting
Correcting the colors and balance will always be the first step before you can color-grade footage. Next, the video must be normalized and should seem natural before you intensify the overall look.
2. Match the colors
In the next step, we balance the contours between color-corrected footage and color grading. Then, you can use LUTs (Look Up Tables) to match the individual colors to the scheme.
3. Shot-to-shot matching
The next integral step is to match the colors between all the shots so we can achieve a unified look. The contrasting appearance of shots can make them look unprofessional and poorly cinematic.
4. Adjust the mood and emotions
A well-executed color grading can potentiate the emotions in a shot. Use your artistic choices and tools from editing software to imply the director’s feelings in the video.
5. Make the final adjustments
As the final opportunity, tweak hues and chroma to ensure the colors match your palette in each scene. But, again, do not overdo anything, and play with colors to nudge the moods in the shot.
If your footage is the cake, color grading is the cherry on top that enhances the final look. You can instantly evoke connotations and bring the audience to a different page with some professional color grading.
However, while color correcting and grading, there are a few things that you should take care of. Here is a list of some To-do’s and Not To-do’s in the post-production edit.
Part 4. Things To Consider About the Editing Environment
Before you begin color-grading or color-correcting, here are some essential things to consider that can dramatically improve the results.
1. Neutral editing environment
Funky neon lights or fluorescent lights in the background can dominate your vision. As compensation, you will be over-saturating your footage with colors.
Make sure to use only white, neutral light with a CRI (color rendering Index) of at least 90. It will decrease inconsistencies as much as possible.
2. Using might shifts/orange screen
People often activate night shifts or orange screens to protect their eyes from excessive strain. Resultantly, the screen appears dull and orange-y.
Since this alters the actual colors of the video, the results are undermined. So make sure to turn off all technologies that can sabotage the grading.
3. Control the light
It is necessary to control the amount of light that enters your working space area. Excessive light alters your color perception and hence obstructs achieving a balanced contour.
Ensure that the light does not directly falls on the screen or your eyes. You must maintain an adequate distance from the screen to see nuances as you grade.
After completing all the fundamentals of color correcting and color grading, let’s demonstrate how to do it in real-time.
Choosing good software can be chaos. There are plenty of options in the market with the best features, but we will be using Wondershare Filmora . Read on for a step-by-step guide on color correcting and grading.
Free Download For Win 7 or later(64-bit)
Free Download For macOS 10.14 or later
Part 5. How To Color Correct and Color Grade A Video With Wondershare Filmora?
To color-correct and color-grade a video, we recommend using Wondershare Filmora , one of the finest video editing apps on the market. Equipped with various tools, Filmora allows professional color correction with a few quick steps.
Free Download For Win 7 or later(64-bit)
Free Download For macOS 10.14 or later
With the super simple interface, the software is easy to use for beginners and professionals alike. In addition, Filmora offers extensive tools to manipulate colors and color grade your footage professionally. Here is how to color correct and color grade your video with Filmora post-production.
Step1Open Wondershare Filmora
Before we start, Install Wondersahare Filmora on your device. If you already have it downloaded, launch the software so we can begin.

Step2Color correcting the video
Drag and drop the video to the timeline from the Projects menu. Then, follow these steps to color-correct the video:
- Double-click on the video to open the editing panel. Four options are available: Video, Audio, Color, and Speed. Open the color tab.

- From the Basics menu, adjust the Exposure, Light Color, Contrast, White Balance, and Vibrance. Then, move the slider or add a LUT value to apply.

- Filmora offers a wide variety of 3D LUTs with mapped color spaces that project your preferences on the video with a single click. Select a pre-made LUT to apply to your video in the Preset tab. Or custom builds a Look Up Table and saves it for future use.

- Turn on the Color Match toggle and tap View Comparison to match your current video with a reference shot.

Step3Color grading the video
In the color editing panel, use the other two tabs, HSL and Curves, to create the aesthetics of your video.
- In the HSL panel, select a color from the seven colors of the rainbow. Then, set the hue, luminance, and saturation for each. Next, you can use the slider to nudge the colors or directly input a LUT value.

- The shadow areas are dark and crushed. To fix this, add the Curves effect to the video. Go to the Curves tab, choose a primary color, and move the curves to balance the color scheme.

Step4Save and export the file
Once you finish the final touches, save your footage to a local folder.
- Click the Export button. A pop-up screen will open.
- Select the File type. (MP4, WMV, GIF, etc.)
- Choose a local destination for the file.
- Click Export.

Conclusion
Hopefully, this post has given you a good understanding of the differences between color grading and color correction. But ultimately, it is all about your thought process and intuitions.
Filmora’s extensive collection of color editing tools makes color correction and grading a five-finger thing. You can also follow our guide to create some unique and professional-looking masterpieces. Turn on the artistic side and start creating mystical shots!
Try It Free Try It Free Learn More
Part 3. What Is Color Grading?
After you set all the tones to the baseline, you can start with the creative process of color grading. In this case, you do not change the colors anymore. Instead, you make artistic choices to change the moods and emotions of that particular sequence. Color grading is about manipulating the colors and contrasts that intensify the visual tone and explain your story to the world.
Color correction can be enough if you want to keep the video realistic. However, color grading is essential if you want to imply emotions and feelings in your content. Following is an essential step-by-step guide to color grading.
Basic Steps of Color Grading
If you are a beginner, the color grading process can be tricky without expertise. Hence here are the basic steps of color grading a video.
1. Color correcting
Correcting the colors and balance will always be the first step before you can color-grade footage. Next, the video must be normalized and should seem natural before you intensify the overall look.
2. Match the colors
In the next step, we balance the contours between color-corrected footage and color grading. Then, you can use LUTs (Look Up Tables) to match the individual colors to the scheme.
3. Shot-to-shot matching
The next integral step is to match the colors between all the shots so we can achieve a unified look. The contrasting appearance of shots can make them look unprofessional and poorly cinematic.
4. Adjust the mood and emotions
A well-executed color grading can potentiate the emotions in a shot. Use your artistic choices and tools from editing software to imply the director’s feelings in the video.
5. Make the final adjustments
As the final opportunity, tweak hues and chroma to ensure the colors match your palette in each scene. But, again, do not overdo anything, and play with colors to nudge the moods in the shot.
If your footage is the cake, color grading is the cherry on top that enhances the final look. You can instantly evoke connotations and bring the audience to a different page with some professional color grading.
However, while color correcting and grading, there are a few things that you should take care of. Here is a list of some To-do’s and Not To-do’s in the post-production edit.
Part 4. Things To Consider About the Editing Environment
Before you begin color-grading or color-correcting, here are some essential things to consider that can dramatically improve the results.
1. Neutral editing environment
Funky neon lights or fluorescent lights in the background can dominate your vision. As compensation, you will be over-saturating your footage with colors.
Make sure to use only white, neutral light with a CRI (color rendering Index) of at least 90. It will decrease inconsistencies as much as possible.
2. Using might shifts/orange screen
People often activate night shifts or orange screens to protect their eyes from excessive strain. Resultantly, the screen appears dull and orange-y.
Since this alters the actual colors of the video, the results are undermined. So make sure to turn off all technologies that can sabotage the grading.
3. Control the light
It is necessary to control the amount of light that enters your working space area. Excessive light alters your color perception and hence obstructs achieving a balanced contour.
Ensure that the light does not directly falls on the screen or your eyes. You must maintain an adequate distance from the screen to see nuances as you grade.
After completing all the fundamentals of color correcting and color grading, let’s demonstrate how to do it in real-time.
Choosing good software can be chaos. There are plenty of options in the market with the best features, but we will be using Wondershare Filmora . Read on for a step-by-step guide on color correcting and grading.
Free Download For Win 7 or later(64-bit)
Free Download For macOS 10.14 or later
Part 5. How To Color Correct and Color Grade A Video With Wondershare Filmora?
To color-correct and color-grade a video, we recommend using Wondershare Filmora , one of the finest video editing apps on the market. Equipped with various tools, Filmora allows professional color correction with a few quick steps.
Free Download For Win 7 or later(64-bit)
Free Download For macOS 10.14 or later
With the super simple interface, the software is easy to use for beginners and professionals alike. In addition, Filmora offers extensive tools to manipulate colors and color grade your footage professionally. Here is how to color correct and color grade your video with Filmora post-production.
Step1Open Wondershare Filmora
Before we start, Install Wondersahare Filmora on your device. If you already have it downloaded, launch the software so we can begin.
Step2Color correcting the video
Drag and drop the video to the timeline from the Projects menu. Then, follow these steps to color-correct the video:
- Double-click on the video to open the editing panel. Four options are available: Video, Audio, Color, and Speed. Open the color tab.
- From the Basics menu, adjust the Exposure, Light Color, Contrast, White Balance, and Vibrance. Then, move the slider or add a LUT value to apply.
- Filmora offers a wide variety of 3D LUTs with mapped color spaces that project your preferences on the video with a single click. Select a pre-made LUT to apply to your video in the Preset tab. Or custom builds a Look Up Table and saves it for future use.
- Turn on the Color Match toggle and tap View Comparison to match your current video with a reference shot.
Step3Color grading the video
In the color editing panel, use the other two tabs, HSL and Curves, to create the aesthetics of your video.
- In the HSL panel, select a color from the seven colors of the rainbow. Then, set the hue, luminance, and saturation for each. Next, you can use the slider to nudge the colors or directly input a LUT value.
- The shadow areas are dark and crushed. To fix this, add the Curves effect to the video. Go to the Curves tab, choose a primary color, and move the curves to balance the color scheme.
Step4Save and export the file
Once you finish the final touches, save your footage to a local folder.
- Click the Export button. A pop-up screen will open.
- Select the File type. (MP4, WMV, GIF, etc.)
- Choose a local destination for the file.
- Click Export.
Conclusion
Hopefully, this post has given you a good understanding of the differences between color grading and color correction. But ultimately, it is all about your thought process and intuitions.
Filmora’s extensive collection of color editing tools makes color correction and grading a five-finger thing. You can also follow our guide to create some unique and professional-looking masterpieces. Turn on the artistic side and start creating mystical shots!
Best Online YouTube Video Trimmer
Since the shift in interest from on-site jobs to content creators and exploring opportunities to take advantage of better and improved career growth opportunities, YouTube is one of the most popular social media platforms to get started.
But how do people face difficulties in finding an affordable and quick online YouTube video trimmer? Are you also facing issues with trimming your video before uploading it to get more views?
This is an ultimate guide on online YouTube video trimmer software and how you can trim your YouTube videos in no time.
Part 1. What is a YouTube trimmer?
Before diving into any details, it is important to introduce you to what is a YouTube trimmer and why it is important to trim your video. A YouTube trimmer is an easy and fast video editing tool that allows you to trim, crop, and share your favorite video parts online. You can also create custom links to YouTube Crops to embed on your website.
There are two popular online YouTube trimmers available; one only allows you to edit the YouTube link, which means you can only view the edited video online, while the other allows you to do related operations on the video file and download and save it as an mp4 or other file type for offline viewing.
Part 2. How to online trim YouTube videos?
1. Online YouTube trimmer (no edit and download)
Using these two websites, you can easily find the YouTube video clip you want to keep, but there is no way to download the video or add more editing to the clip. However, it works well for sharing links online or adding them to your website and using them to describe the part that best fits the topic.
The straightforward interface has just one function. Enter the start and end times in the box after entering the right YouTube link, then click “Crop!” to create a string of links.

The video’s beginning and ending times are selected in the same way as on the previous website. However, this website offers some basic code that you may copy and paste into your web pages to suit your demands in order to add YouTube videos.

Once you are done trimming your videos, you can download or export your videos in different formats, depending on your preference. It can be in mp4, mp3, or any other supported format.
2. Online YouTube trimmer (edit and download)
The websites that are listed after that combine an online YouTube downloader with a video editor, allowing you to make a variety of further edits to the selected video clip before downloading it locally.
- Veed.io :
Anyone can make powerful videos and expand their audiences thanks to the online video editing application Veed. It has some useful capabilities, such as the capacity to cut videos and filter them using different aesthetics. Users can crop, add text, make drawings, and even add photos to the movies. In addition, Veed serves as a tool for producing social media films that may be customized for each channel where they will be shared.
Additionally, they are free to play with various tools like rotate, trim, add photos, stickers, emojis, and more. Through the program, users may even create video memes online by uploading a target movie, modifying it using a variety of features, and downloading the altered video after a brief rendering.
Step1Launch veed.io on your web browser. Click on ‘Upload Your Video‘ to upload the video file you want to edit.
Step2You will notice a button to upload your media file once you are taken to the editing page.

Step3You can trim your video section by dragging the mark after you’ve uploaded the media file.

Step4Now, delete the unwanted video segment and click on ‘Export’ to save the trimmed video.
- Kapwing :
An effective, non-linear editing workflow is supported by the online video editor Kapwing. Upload your audio, video, and image files, then edit everything in one location. Since Kapwing is entirely online, content creators may access and edit their work from any computer or mobile device.
Step1Launch Kapwing.com on your web browser. If you are not directed to the trim video section, then go to the ‘Tools‘ menu and select ‘Trim Video‘. Now, click on ‘Choose a Video.’
Step2From the main page, click ‘Click to upload’ to upload the media file.

Step3After uploading the media file, Click on ‘Trim’ from the editing section on the right side of the screen.

Step4A pop-up screen will appear on your screen labeled as Trim Video. Trim the parts of the video as per your requirement and Click ‘Trim’ to finish.

Step5Once you have completed editing, click on ‘Export’ to save the video to your device.
Part 3. How to trim YouTube videos on a desktop?
Using an online video trimmer has been one of the last options that anyone would consider, but due to the expensive software, they have turned out to be a friendly and easy approach to editing videos. But the online video trimmers still rank at the bottom of the list because they’re unstable, and you can’t save the project at any time. If the online program breaks down, all your effort will be wasted. But desktop programs such as Filmora will never make you encounter such problems unless you experience a technical glitch.
With the help of a variety of strong editing tools and Wondershare Filmora , users may quickly and easily make outstanding videos. With Wondershare Filmora, anyone can learn how to be an excellent video editor, thanks to its wonderfully simple design.
You can follow these easy steps to trim your video:
Step1Click “Import” on the main windows and then select the desired video files from your computer to add video files to the Timeline for cutting. Movies can also be dropped directly into the Media Library.

Step2By moving the playhead over the unwanted section and choosing the trash can icon, you can delete it.

Step3When you’re through trimming, click “Export”, then select a location to store the edited video.
Conclusion
Depending on the comparison of how different software work, it is justifiable to conclude that Filmora is the best video editing software by all means. It offers a wide range of editing tools and ensures that progress has not been lost. If you are looking forward to trimming a video, download Filmora on your device to get started.
Free Download For Win 7 or later(64-bit)
Free Download For macOS 10.14 or later
Free Download For macOS 10.14 or later
How To Fade Audio In Kinemaster
If you have been looking for video and audio editing tools then you have probably heard of Kinemaster. It is a great video editing app that allows users to edit all aspects of the video including any audio or music that may accompany the video. It has a lot of very useful features and the user interface is fairly easy to use.
One of the things that you can do with Kinemaster is to fade out audio, a useful feature that can help the ending of any video appear more authentic. In this article, we will be looking at how you can use Kinemaster to fade audio.
Kinemaster Fade Audio Steps
The following steps show you how you can easily fade audio in Kinemaster;
Step1If you don’t have Kinemaster already, start by downloading and installing the video editor on your computer.
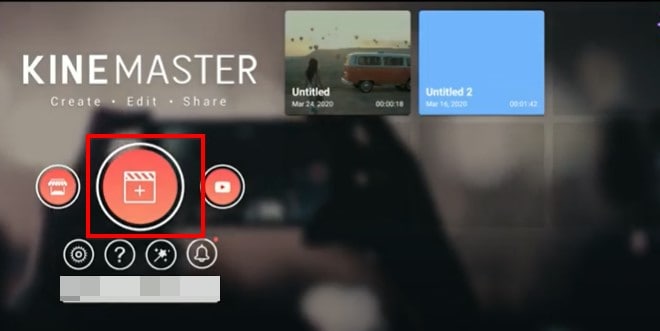
Step2Open Kinemaster on your computer and then click on the “New Project” icon to start. Select the aspect ratio that you would like to use. If you are not sure, we recommend choosing the “16:9” aspect ratio.
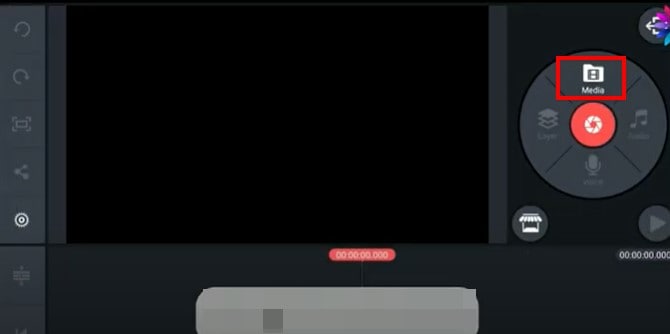
Step3In the next window, click on “Media” to select the clip you would like to add to the Kinemaster project that you have just created.
Step4To fade in and fade out the audio in the project, click on the gear icon from the options to the left of the screen.
![]()
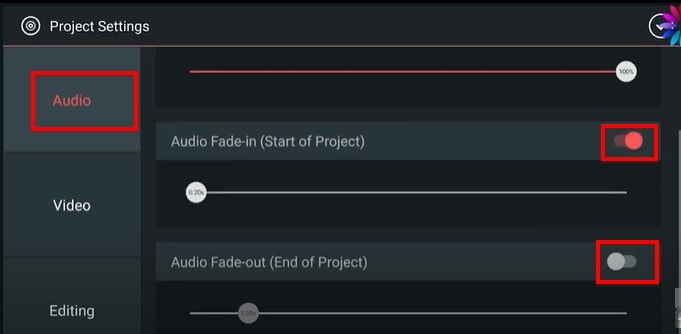
Step5Select the “Audio” tab on the next screen and then turn on the switch next to “Audio Fade-in (Start of Project)” and “Audio Fade-out (End of Project).” This will add a fade-in and fade-out effect at the beginning of the audio and at the end of it.
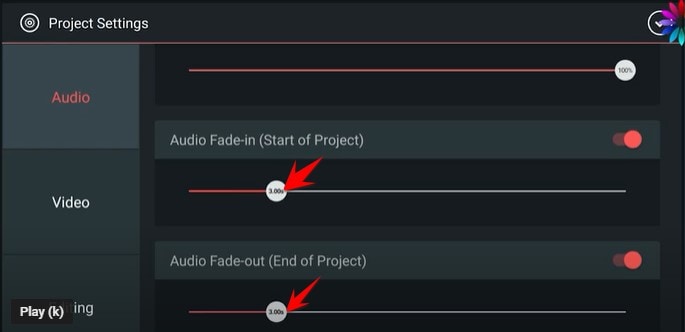
Step6You can then easily set the duration of the “Audio fade-in” and “Audio fade-out” by dragging the slider below each option. We recommend setting the duration to just a few seconds.
Don’t forget to save the project when you’re done.
Kinemaster Alternative to Edit Audio
Kinemaster is a good way to edit both audio and video on your computer, but the following options are just as good;
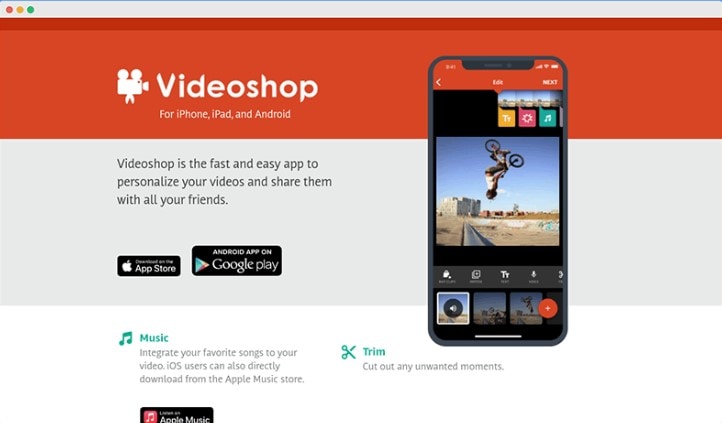
1. VideoShop
VideoShop is a simple to use and highly effective program that you can use to create and edit videos on your computer. The interface makes it easy to import any video project that you have into the program and the wealth of very useful features can help you edit the video in various ways.
For example, you can change the speed of the video, add transitions at various points in the video, add and remove text, add and remove music and so much more. Although there is a free trial version, you will only be able to access some of the more useful features when you purchase the premium version.
The Pro version of VideoShop goes for $3.99 a month, but you can get lifetime access to the program for only $39.99. One thing that VideoShop has over Kinemaster is that it is very easy to use, even beginner users find video editing a breeze with this tool.
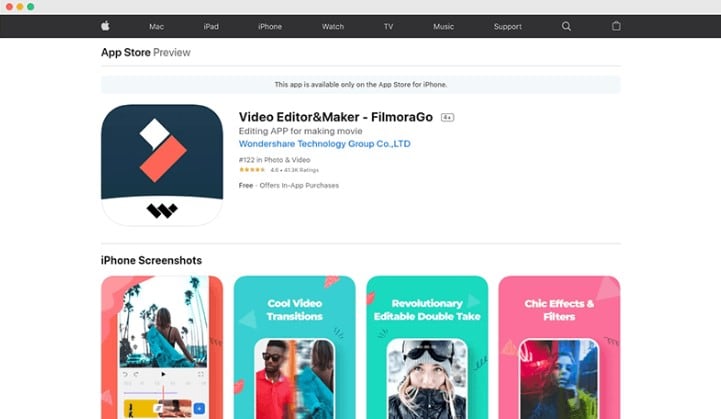
2. Filmora
If you are looking for a simple way to edit videos on Android or iOS devices, Filmora is one of the best options in the market. This mobile version of the very popular Filmora video editor is just as easy to use as its parent program. You can use it to create video projects from scratch or upload a video and make changes to it.
It offers you a lot of choices when it comes to editing features including trimming sections of the video, adding filters, adding music, adding or removing text, and even changing the canvas or the background of the video. Advanced options such as changing the speed of the video are also available.
One of the things that we love about Filmora is that you don’t even have to create an account to use it or remove the watermark added to the completed video project, watching a video ad can be enough. But this option is only available once every 24 hours, meaning that you can only remove a watermark on the free version once a day. Filmora is available for both iOS and Android and the yearly premium plan will cost you just $19.90.
3. Quik
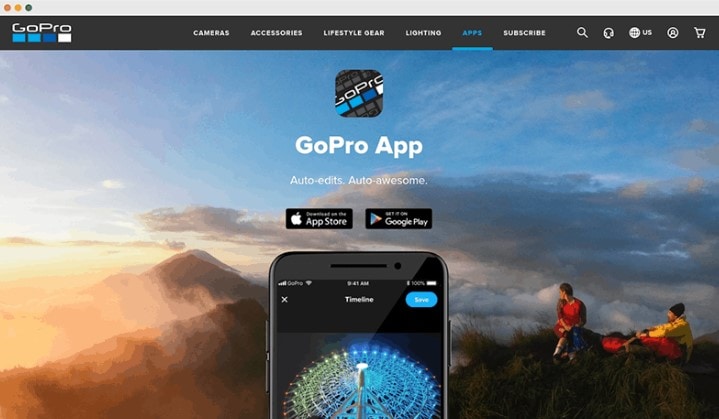
Quik is a video editing program created by GoPro for the purpose of editing GoPro videos, but that doesn’t mean that you will not be able to use it to edit other types of videos. You can use Quik to create a new project or edit an existing video and gives users a lot of different options when it comes to video editing.
One of the main benefits of using Quik is that you can easily add music, audio, and special effects to a video as well as change the length of the video, fade audio in and out and even change when the music starts. It is also one of the best ways to use images to create collages and slideshows very easily. There are a lot of slideshow and collage templates to choose from, and you can edit them easily by adding your music and images. Quik is completely free to use and you can upload your creation to the cloud ad share the link with others.
Conclusion
Kinemaster is one of the most popular video editing tools, especially since it simplifies the video editing process to make it very easy. All the alternative tools we have outlined here in this article are selected because they can make video editing quite simple.
Free Download For Win 7 or later(64-bit)
Free Download For macOS 10.14 or later
How to Make Flying Objects in Wondershare Filmora
Let us be honest here, you want to create fly objects in the air but don’t want to get into the witchcraft school. In that case, we have got your back!
In this article, you can learn how to make objects fly in the air! Technically you will not do that in real-time, but with the latest technology and editing tools at your disposal, you will exactly do that.
Use Wondershare Filmora to create the flying object effect. Scroll below to get the guide to the whole process of creation.
Part 1. What will you need to make a flying object?
This is not witchcraft, so we will abstain from using potions and herbs. Instead, to fly objects in our videos, we will use simple techniques that you may also be familiar with.
Video Cameras
The camera, in this scenario, will be the essential accessory as it will capture your video with the proper aspect ratio. This video camera can now be from a mobile phone or a high-quality DSLR. It will all depend upon your preference for quality and frame rate.

Tri-Pod or camera stands
Selecting the Tri-Pod is also crucial to your quality of video taking as it will ensure stability while capturing the video from the camera.

Stability is the key here, as the captured videos will be masked and combined in the later stages of the steps. To do so, consistently capturing the video in the same ratio is necessary. You can stabilize the video with a simple gorilla pod that you can get of good quality or a simple tripod.
The prop
The prop will be the object that we will be flying in the video. It could be a fluffy toy, a ball, a box, or anything you desire to be flying in your video.
![]()
Note: In this article, we are going to use a ball as a prop.

Wondershare Filmora
Now that we have all the physical requirements for the video, our next goal is to ensure that we have the correct video editing software. And what’s best than Wondershare Filmora? Obviously, there’s nothing!
Filmora allows you to edit your videos with ease and comfort. With its interactive UI, even a beginner feels easy to edit a video. With skills on hand, an expert can edit videos ranging from green screen effects to flying objects.
Free Download For Win 7 or later(64-bit)
Free Download For macOS 10.14 or later
![]()
Good presentation
Now, if you want your video to shine like the good ones, you will need to know how to present it. In this section, the requirement will be yourself. As you are not flying an object, you must act the part.
A good presentation will allow you to make the video more natural. Because no matter how skilled you are with video editing, a video with props will only be of quality until the subject acts their part with quality.
Part 2. How to capture the footage?
Before we get into how we edit our footage, we need to know how to shoot the video to edit. Follow the steps mentioned below:
- Set up your camera on a tripod or a gorilla pod.
- After setting up the camera, record an empty frame.
![]()
Note: An empty frame video will be the one you will use to mask the original clip.
Reference video
Start recording a five-second clip of the sofa where you will be sitting without yourself or the prop. Here you don’t need to add anything except the reference. Follow the guidelines below when making the reference video:
- The video should be plain.
- It should be simple.
- There should be no moving object or subject.

Main video
After shooting the empty frame video, move on to shooting the video with yourself in it. Follow the below to achieve something unique:
- Your focus should be on the prop.
- Use a thread or a rope to attach the prop to it. (In this case, we are using a ball.)
- Attach the ball to the thread and hand it on the roof.
- Record yourself now with the prop with your desired content or script.

After completing the video, simply stop recording. Now you will end up with two video clips.
Adding these two clips in the Wondershare Filmora , you can easily create the flying object effect. To do so, follow the steps explained in the section ahead.
Part 3. Stepwise guide to making flying objects in Wondershare Filmora
Now that we have looked into our requirements, let us dive into how we will apply our skills to achieve an object to fly in Wondershare Filmora .
Of course, without the software, our editing will not be possible, so download Wondershare Filmora from the steps explained below.
Free Download For Win 7 or later(64-bit)
Free Download For macOS 10.14 or later
Step1Open the Wondershare Filmora software
- Open the Wondershare Filmora software and Click on the New Project icon on the window.
- After you have clicked on the New Project icon, our main workplace will be launched.
- Here you can see various options.
- To get started, we need to import our video clips to edit them.

- Here, you can see two ways to import your clips in Wondershare Filmora.
- Shows you how to import by Right-Clicking on File and selecting the import media option.
- Shows you to drag and drop the file from your main directory simply.
You can choose whatever suits you the best!
Step2Add your clips to your timeline
Now that we have imported our videos into the timeline, our next step will be to add our videos to the timeline.
- Simply click on the imported clips on the import window.
- Then drag it to the timeline below.
- Doing so will create a working timeline you can view and edit as you go along the editing process.

Step3Size the reference video to the original video
Now, remember that we recorded a five-second clip that we will use to create the masking effect. You will need to size it to the original video for that to work. Doing so is simple and will require you to take some easy steps.
- First, click on the clip.
- Then, when it is selected, move on to the tab above to choose the speed option from the bar.
- Here, you will also see options such as cropping, Green screen, and color.
- Choose the option of speed.
- Then, a drop-down tile will pop up. Here you can see different options available to speed up your video.

- You can speed up your video and slow it down.
- For now, we will have to slow it down.
![]()
Note: Slowing it down will increase the time of the video clip and allow you to match it with the original video clip.
Don’t worry about the speed, as the video is already empty, and there will be no distractions to disturb our editing.
Step4Add the masking effect
Now that we have our video aligned with the reference video we are using. Let’s move to the next step.
This step will try to remove the thread attached to the ball; otherwise, it will show in the video, and our effect will be ruined. However, before we do that, we will need to know what masking is.
What is the Masking effect in Wondershare Filmora?
Have you ever seen the behind-the-scenes of those big-budget movies? Then you might have seen the actors and the stunt workers hanging from big ropes performing stunts in front of green screens.
Well, the directors capture the video in real-time. But they can do those big stunts on TV with editing and CGI, and one of the effects is “Masking.”
The masking effect allows you to mask the object on the screen with a reference video. So that’s how the ropes attached to the stuntmen get removed in the original videos.
How to add a masking effect?
Although there are numerous ways to do that, the one we will use in this video is to remove the thread. For this, follow the below steps:
- Simply go to the effect icon that you can see in the bar above.
- In the effects bar, move to the utility tab.
- You will see a window showing you the many effects Wondershare Filmora provides you from default.
- Select the shape mask tile.
- Now drag and drop it on the timeline below.

![]()
Note: You must ensure the effect is applied to the main video, not the reference video.
- When you drag the effect into the main video, you will notice a transparent shape added to the video. This is your Mask.
Step5Edit the masking effect
You must hide the thread attached to the ball with the masking effect. To do this, follow the below guidelines:
- Double-click on the effect added to the main video.
- You will notice another window pop up on the import library.
![]()
Note: In the pop-up window, you will see the multiple options and edits you can apply to the masking effect, such as Transform, Compositing, Motion tracking, and stabilization.

- Scroll down on the window and notice a video effect tab.
In the effect tab, you will have multiple options, such as the shape mask, X, Y, and scale and blur strength options, as shown below.
- Now adjust the mask to hide the string. It may be easy to invert the mask.
![]()
Note: That the borders of the mask are blurred. But you can also change them by inverting the mask, which turns the borders and the space between them.
Remember the invisibility cloak from Harry Potter? It works just like that, only with a solid shape.
- Now use the X and Y options to move the mask anywhere in the video.

Step6Hide the sharp borders
You may notice the shape of borders that do not blend with the background. To blend the borders with the background, follow the steps below:
- Simply Double-click on the effect in the timeline.
- Then, in the editing tab, find out the blur strength option.

- Simply drag the bar to increase the blur strength.
![]()
Note: Please keep looking in the window on the right. Check and increase the blur strength until you are satisfied with the result.
- Lastly, click on OK when you are done.
Step7Creating the popup effect
Now, if you want your object to appear out of thin air, you must create that pop-up effect. You can create the pop-up effect in simple and easy steps, as shown below:
- First, drag the timeline dragger to the point where you want the prop or the ball to pop up.
Your presentation should be accurate and precise!
Imagine you were doing a “swoosh“ action, similar to swinging a wand. Now you want your object to appear at that time.
Split the Video:
- Drag the timeline dragger to that point.
- Now press Ctrl+B to split both videos.
Add Popup Effect:
The masking effect will be applied from the start. Our goal is to hide the masking effect before the ball pop-ups. For this, follow the below steps:
- Go into the setting by Double-Clicking the masking effect on the original video.
- Then move the mask over the ball instead of on the thread. Doing so would make the ball disappear.

Final Results:
- Lastly, click on Ok when done.
Play the clip from the start, and you will notice the ball popping up according to your action.

Congratulations! You did it. You are now able to fly objects with the power of your mind.
Following the abovementioned steps, you can control objects and make them fly in the air. The catch is that you will have to use Wondershare Filmora . But, of course, this is not a witchcraft school now.
Free Download For Win 7 or later(64-bit)
Free Download For macOS 10.14 or later
Conclusion
Well, there comes a time when one needs to make flying objects. Wondershare Filmora is an excellent tool that will allow you to add the masking effect to create the illusion of flying objects in the air.
The video quality at the end will only depend upon how clearly you show during the editing process. Try the above steps and enjoy the results!
Wondershare Filmora
Now that we have all the physical requirements for the video, our next goal is to ensure that we have the correct video editing software. And what’s best than Wondershare Filmora? Obviously, there’s nothing!
Filmora allows you to edit your videos with ease and comfort. With its interactive UI, even a beginner feels easy to edit a video. With skills on hand, an expert can edit videos ranging from green screen effects to flying objects.
Free Download For Win 7 or later(64-bit)
Free Download For macOS 10.14 or later
![]()
Good presentation
Now, if you want your video to shine like the good ones, you will need to know how to present it. In this section, the requirement will be yourself. As you are not flying an object, you must act the part.
A good presentation will allow you to make the video more natural. Because no matter how skilled you are with video editing, a video with props will only be of quality until the subject acts their part with quality.
Part 2. How to capture the footage?
Before we get into how we edit our footage, we need to know how to shoot the video to edit. Follow the steps mentioned below:
- Set up your camera on a tripod or a gorilla pod.
- After setting up the camera, record an empty frame.
![]()
Note: An empty frame video will be the one you will use to mask the original clip.
Reference video
Start recording a five-second clip of the sofa where you will be sitting without yourself or the prop. Here you don’t need to add anything except the reference. Follow the guidelines below when making the reference video:
- The video should be plain.
- It should be simple.
- There should be no moving object or subject.
Main video
After shooting the empty frame video, move on to shooting the video with yourself in it. Follow the below to achieve something unique:
- Your focus should be on the prop.
- Use a thread or a rope to attach the prop to it. (In this case, we are using a ball.)
- Attach the ball to the thread and hand it on the roof.
- Record yourself now with the prop with your desired content or script.
After completing the video, simply stop recording. Now you will end up with two video clips.
Adding these two clips in the Wondershare Filmora , you can easily create the flying object effect. To do so, follow the steps explained in the section ahead.
Part 3. Stepwise guide to making flying objects in Wondershare Filmora
Now that we have looked into our requirements, let us dive into how we will apply our skills to achieve an object to fly in Wondershare Filmora .
Of course, without the software, our editing will not be possible, so download Wondershare Filmora from the steps explained below.
Free Download For Win 7 or later(64-bit)
Free Download For macOS 10.14 or later
Step1Open the Wondershare Filmora software
- Open the Wondershare Filmora software and Click on the New Project icon on the window.
- After you have clicked on the New Project icon, our main workplace will be launched.
- Here you can see various options.
- To get started, we need to import our video clips to edit them.
- Here, you can see two ways to import your clips in Wondershare Filmora.
- Shows you how to import by Right-Clicking on File and selecting the import media option.
- Shows you to drag and drop the file from your main directory simply.
You can choose whatever suits you the best!
Step2Add your clips to your timeline
Now that we have imported our videos into the timeline, our next step will be to add our videos to the timeline.
- Simply click on the imported clips on the import window.
- Then drag it to the timeline below.
- Doing so will create a working timeline you can view and edit as you go along the editing process.
Step3Size the reference video to the original video
Now, remember that we recorded a five-second clip that we will use to create the masking effect. You will need to size it to the original video for that to work. Doing so is simple and will require you to take some easy steps.
- First, click on the clip.
- Then, when it is selected, move on to the tab above to choose the speed option from the bar.
- Here, you will also see options such as cropping, Green screen, and color.
- Choose the option of speed.
- Then, a drop-down tile will pop up. Here you can see different options available to speed up your video.
- You can speed up your video and slow it down.
- For now, we will have to slow it down.
![]()
Note: Slowing it down will increase the time of the video clip and allow you to match it with the original video clip.
Don’t worry about the speed, as the video is already empty, and there will be no distractions to disturb our editing.
Step4Add the masking effect
Now that we have our video aligned with the reference video we are using. Let’s move to the next step.
This step will try to remove the thread attached to the ball; otherwise, it will show in the video, and our effect will be ruined. However, before we do that, we will need to know what masking is.
What is the Masking effect in Wondershare Filmora?
Have you ever seen the behind-the-scenes of those big-budget movies? Then you might have seen the actors and the stunt workers hanging from big ropes performing stunts in front of green screens.
Well, the directors capture the video in real-time. But they can do those big stunts on TV with editing and CGI, and one of the effects is “Masking.”
The masking effect allows you to mask the object on the screen with a reference video. So that’s how the ropes attached to the stuntmen get removed in the original videos.
How to add a masking effect?
Although there are numerous ways to do that, the one we will use in this video is to remove the thread. For this, follow the below steps:
- Simply go to the effect icon that you can see in the bar above.
- In the effects bar, move to the utility tab.
- You will see a window showing you the many effects Wondershare Filmora provides you from default.
- Select the shape mask tile.
- Now drag and drop it on the timeline below.
![]()
Note: You must ensure the effect is applied to the main video, not the reference video.
- When you drag the effect into the main video, you will notice a transparent shape added to the video. This is your Mask.
Step5Edit the masking effect
You must hide the thread attached to the ball with the masking effect. To do this, follow the below guidelines:
- Double-click on the effect added to the main video.
- You will notice another window pop up on the import library.
![]()
Note: In the pop-up window, you will see the multiple options and edits you can apply to the masking effect, such as Transform, Compositing, Motion tracking, and stabilization.
- Scroll down on the window and notice a video effect tab.
In the effect tab, you will have multiple options, such as the shape mask, X, Y, and scale and blur strength options, as shown below.
- Now adjust the mask to hide the string. It may be easy to invert the mask.
![]()
Note: That the borders of the mask are blurred. But you can also change them by inverting the mask, which turns the borders and the space between them.
Remember the invisibility cloak from Harry Potter? It works just like that, only with a solid shape.
- Now use the X and Y options to move the mask anywhere in the video.
Step6Hide the sharp borders
You may notice the shape of borders that do not blend with the background. To blend the borders with the background, follow the steps below:
- Simply Double-click on the effect in the timeline.
- Then, in the editing tab, find out the blur strength option.
- Simply drag the bar to increase the blur strength.
![]()
Note: Please keep looking in the window on the right. Check and increase the blur strength until you are satisfied with the result.
- Lastly, click on OK when you are done.
Step7Creating the popup effect
Now, if you want your object to appear out of thin air, you must create that pop-up effect. You can create the pop-up effect in simple and easy steps, as shown below:
- First, drag the timeline dragger to the point where you want the prop or the ball to pop up.
Your presentation should be accurate and precise!
Imagine you were doing a “swoosh“ action, similar to swinging a wand. Now you want your object to appear at that time.
Split the Video:
- Drag the timeline dragger to that point.
- Now press Ctrl+B to split both videos.
Add Popup Effect:
The masking effect will be applied from the start. Our goal is to hide the masking effect before the ball pop-ups. For this, follow the below steps:
- Go into the setting by Double-Clicking the masking effect on the original video.
- Then move the mask over the ball instead of on the thread. Doing so would make the ball disappear.
Final Results:
- Lastly, click on Ok when done.
Play the clip from the start, and you will notice the ball popping up according to your action.
Congratulations! You did it. You are now able to fly objects with the power of your mind.
Following the abovementioned steps, you can control objects and make them fly in the air. The catch is that you will have to use Wondershare Filmora . But, of course, this is not a witchcraft school now.
Free Download For Win 7 or later(64-bit)
Free Download For macOS 10.14 or later
Conclusion
Well, there comes a time when one needs to make flying objects. Wondershare Filmora is an excellent tool that will allow you to add the masking effect to create the illusion of flying objects in the air.
The video quality at the end will only depend upon how clearly you show during the editing process. Try the above steps and enjoy the results!
Also read:
- New In 2024, An Ultimate Guide on the Significance of Music in Videos and How to Choose the Right Music for Your Videos with Wondershare Filmora
- In 2024, This Article Discusses the Splitting of the Video Clips in DaVinci Resolve Explicitly. There Is Also a Brief Description of Its Best Alternative, Wondershare Filmora. This Is Also Practically Relevant and Reasonable as Well
- What Is Motion Blur in the Game for 2024 Do You Really Need It?
- New As an Online Marketer, It Is Important to Know the Algorithm of YouTube Platform. Ill Share You the History of Algorithm of YouTube and the New Changes in This Year for 2024
- New 2024 Approved Fast Method to Match Color in Photoshop
- New Introduction to The Best Cinematic LUTs in The Market
- End This Problem! Make Transparent Background Video Today
- Updated In 2024, Through Speed Ramping, Create a Smooth Transition in Slow-Motion Videos. Follow This Guide and Learn About Premiere Pro Slow Motion and a Better Alternative
- New In 2024, How To Make A Do-It-Yourself Video
- New 2024 Approved How to Change Aspect Ratio of Video?
- New 2024 Approved Easily Cut Large Video Faster on Mac
- New In 2024, Using One of the Best Converter Tools to Turn GIFs Into PNG or JPG. Here, Learn About the Ten Best Ones for Different Operating Systems, with Details on Features, Prices, and More
- New Do You Want to Know About the DaVinci Resolve Adjustment Layer? Read This Article to Learn How to Use an Adjustment Layer (Clip) in DaVinci Resolve to Edit Videos for 2024
- Adobe Premiere Pro Guide to Slow-Down Video for 2024
- Updated How to Start a Video Editing Career
- New 2024 Approved 6 Instant Ways to Create Windows 10 Slideshow
- In 2024, Have You Ever Watched a Movie Where You Felt the Filmmakers Left You Hanging? Yea, Thats What Freeze Frame Does. Here We Will Enlighten You on What It Is, Freeze Frame Examples Where It Has Been Helpful to Drive Our Point Home
- Updated In 2024, Best Video Title Generators
- 2024 Approved Do You Want to Explore some Available Opportunities to Create Slow Motion? Discover the Best Slow-Motion Video Editors for Desktop, Android, and iPhone Here
- Updated 5 Best Video Denoisers for 2024
- Updated In 2024, Steps to Create Makeup Videos
- Updated In 2024, Best 8 Online MPEG to GIF Converters
- Updated Want to Make Use of a Lovely Background for Your Image by Removing the Background or Making It Transparent? Here Is Something You Need to Cover
- In 2024, 5 Methods to Make a Fake Facetime Call Video
- New How Can You DIY VHS Overlay in After Effects?
- New 2024 Approved Best 10 Tools To Make Quiz Videos
- Best Ways to Slow Down Motion in CapCut
- Updated Split a Clip in DaVinci Resolve Step by Step for 2024
- Updated In 2024, Do You Want to Blur Faces in Your Videos? Read This Article to Find Out the Easiest Way to Blur the Faces in Videos Using Adobe Premiere Pro
- New Do You Want to Make Your Video Look Like Its From the 90S? Then, Make Sure to Add Vintage Overlays and VHS Sound Effects to Give It the Old Feel
- How to 11X 5G Get Deleted Pictures Back with Ease and Safety?
- Ultimate Guide from Apple iPhone SE (2020) iCloud Activation Lock Bypass
- New 2024 Approved How To Get More NFL Viewers For Your Sports Live Streaming Channel
- In 2024, 4 Most-Known Ways to Find Someone on Tinder For Samsung Galaxy S24 by Name | Dr.fone
- 5 Ways to Restart Honor X50 GT Without Power Button | Dr.fone
- How to Upgrade Apple iPhone 11 to the Latest iOS Version? | Dr.fone
- Authentication Error Occurred on ZTE Nubia Flip 5G? Here Are 10 Proven Fixes | Dr.fone
- How To Install the Latest iOS/iPadOS Beta Version on Apple iPhone 6s? | Dr.fone
- In 2024, Best 3 Realme C33 2023 Emulator for Mac to Run Your Wanted Android Apps | Dr.fone
- In 2024, How To Leave a Life360 Group On Vivo Y36 Without Anyone Knowing? | Dr.fone
- 4 Ways to Fix Android Blue Screen of Death On Vivo V30 Lite 5G | Dr.fone
- How to Flash Dead Infinix GT 10 Pro Safely | Dr.fone
- How To Do Vivo Y100A Screen Sharing | Dr.fone
- In 2024, Full Guide to Unlock Your Samsung Galaxy S23 Ultra
- In 2024, What Does Jailbreaking iPhone SE i Do? Get Answers here
- In 2024, 10 Free Location Spoofers to Fake GPS Location on your Samsung Galaxy A15 5G | Dr.fone
- In 2024, Top-Notch Solutions for Disabled Apple ID On Apple iPhone 12 Making It Possible
- 2024 Approved Whats Rigging Animation
- In 2024, How to Transfer Data from Samsung Galaxy A05s to BlackBerry | Dr.fone
- Top 20+ Best Free GIF Makers Online to Quickly Edit GIF for 2024
- Best Methods for Poco C55 Wont Turn On | Dr.fone
- In 2024, How to Hide/Fake Snapchat Location on Your Samsung Galaxy S24 Ultra | Dr.fone
- Title: The Best Way To Color Grading & Color Correction in Filmora
- Author: Morgan
- Created at : 2024-05-19 05:11:36
- Updated at : 2024-05-20 05:11:36
- Link: https://ai-video-editing.techidaily.com/the-best-way-to-color-grading-and-color-correction-in-filmora/
- License: This work is licensed under CC BY-NC-SA 4.0.
