
The Power of Music in Videos (+Filmora Editing Tricks) for 2024

The Power of Music in Videos (+Filmora Editing Tricks)
No video is complete without suitable audio. Adding audio to a video is not that difficult, but choosing the right audio can be a hassle. You want something that captures the ears of the audience but, at the same time, compliments your video. The best way to do this is by adding music to your videos with Wondershare Filmora .
Free Download For Win 7 or later(64-bit)
Free Download For macOS 10.14 or later
The following passage will guide you through everything you must consider while choosing music for your videos. But first, we’ll show you how easy it is to alter your video with music using Wondershare Filmora.
How different types of music affect your videos
You can easily change the viewer’s perception using different music, even with the same visuals. The right song will elevate your video to another level and assist in relaying your feelings and emotions to the viewers. The following examples will illustrate how changing the audio changes the impression of the video.
Example #1
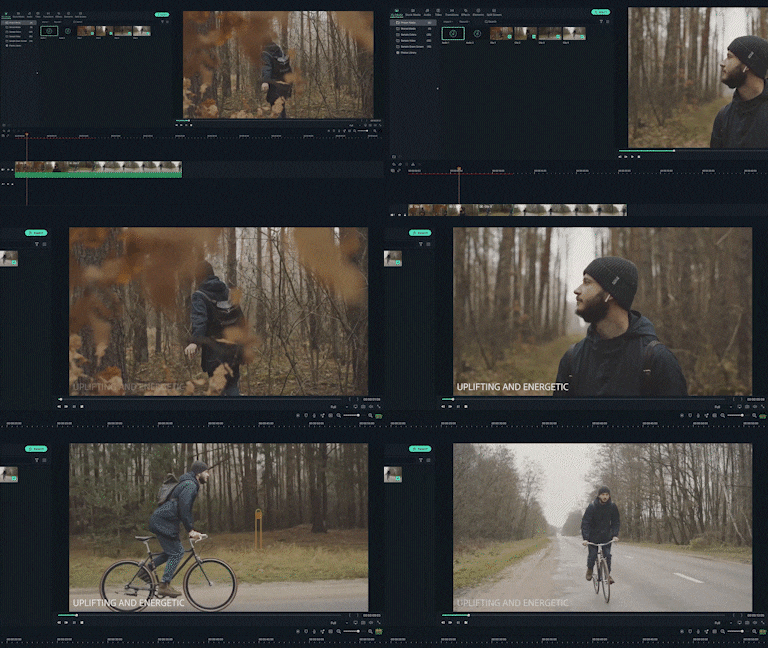
Let’s say you have a video of someone walking through the woods. Now without music audio, your video will be boring. You can quickly fix this by adding an upbeat song to make your video more energetic.
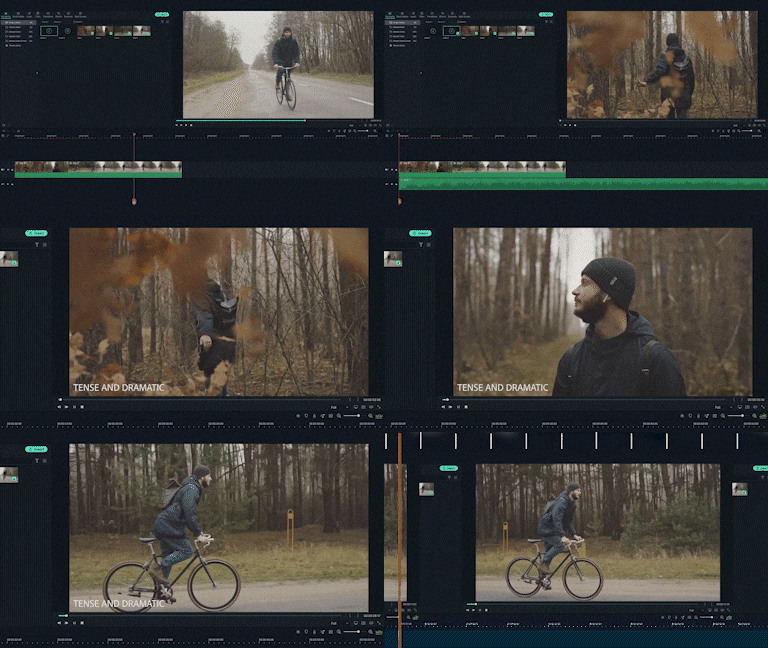
Using the same visuals, you can add a more tense and dramatic song, like from a horror movie. You have successfully changed the entire vibe of the same video from “inspiring” to “sinister.” It proves the importance of the balance between audio and visuals.
Example #2
For a better understanding, let’s look at a movie scene we all know and love. Take the entrance scene from Avengers: Endgame. The music used by the producer aims to excite the audience while building up the hype for the upcoming battle. However, if we change the audio of this scene, we end up with a completely different set of emotions that might not go too well with the shot.

Now that we’ve seen how crucial audio can be in a video, let’s see how to choose the best music audio for your video.
Tip #1: Identify the mood
As we’ve demonstrated before, the audio can change the entire mood of the video. The right music for any video will be the one that compliments the spirit of the visuals and relays the emotions the producer intended.
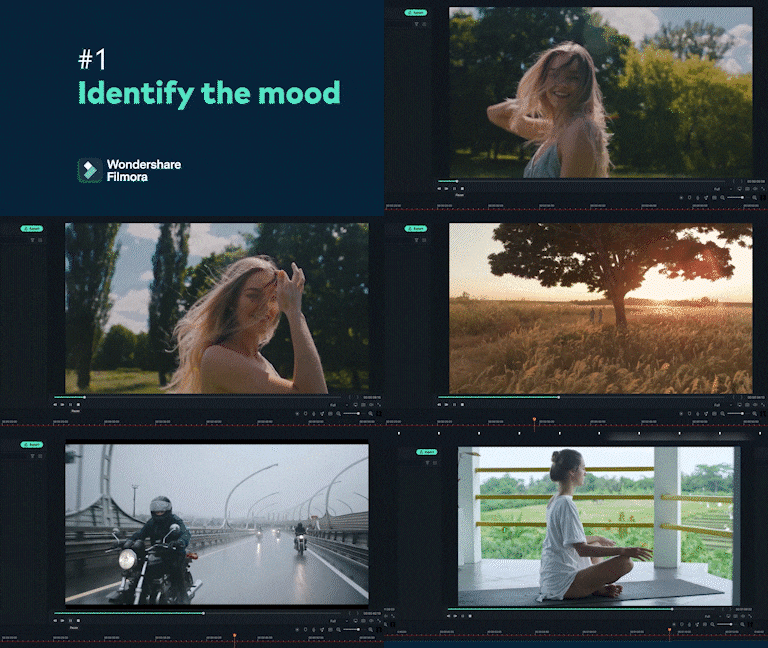
Rewatch your recorded clips until you know the mood portrayed by the visuals. Select music that matches the spirit of your visuals. For example, you would use different music for a sunny day compared to a cloudy day. Once you’ve figured out the mood and understand the emotions you want to elicit, search for audio that achieves this and balances out your visuals.
Tip #2: Video and music style
We’ve already established that different styles of music complement other types of videos. So, keep the type of your video in consideration. For example, is your video fast-paced and full of action, or is it more serious in nature, like an interview or documentary?

Once you have music that matches your video style, check the audio wave. The four most common patterns are steady, ascending, descending, or furious. The audio wave will help you select the visuals that best match that audio.
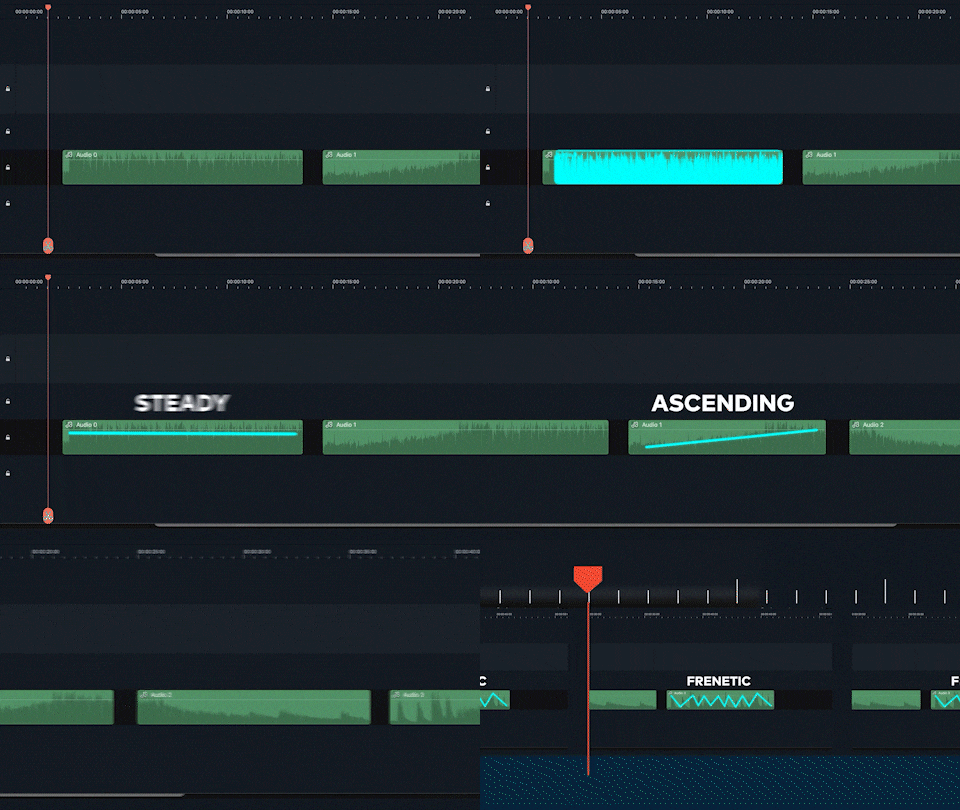
For example, if you’re using audio with an ascending audio wave, you would use visuals that build up with the audio. The beat drop will signal the transition to reveal a powerful shot.
Tip #3: Don’t force the music
As emphasized before, your music should match your video. We all have a favorite music genre, but sometimes that may not go well with our visuals. For example, you love country music but have a video about the nightlife in the city. Using country music in a video about the town does not match well and will confuse your audience.
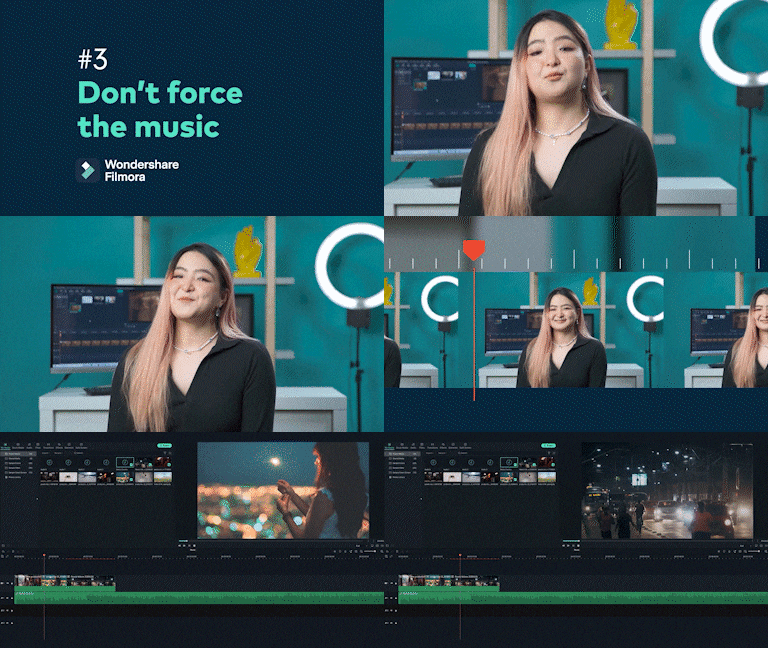
To get music that best suits our video, we must be open and explore all music genres. You’ll see how easy it is to scout a song that fits perfectly with your visuals. The easiest way is to choose a song that gives out the same emotions as intended by the visuals.
Final Words
Now, you clearly understand the importance of music in videos. The right music can uplift your video into a viral sensation, while the wrong music track will turn your video into a catastrophe. Remember to review the legalities of copyright and infringement before using any music in your videos to avoid legal issues. Make sure you have permission to use the music or use royalty-free music.
Share this article with your friends and family interested in making stunning videos with perfect music audio. Comment below on your favorite scene from a movie or show where the music perfectly matched the visuals and left you with goosebumps.
Free Download For macOS 10.14 or later
The following passage will guide you through everything you must consider while choosing music for your videos. But first, we’ll show you how easy it is to alter your video with music using Wondershare Filmora.
How different types of music affect your videos
You can easily change the viewer’s perception using different music, even with the same visuals. The right song will elevate your video to another level and assist in relaying your feelings and emotions to the viewers. The following examples will illustrate how changing the audio changes the impression of the video.
Example #1
Let’s say you have a video of someone walking through the woods. Now without music audio, your video will be boring. You can quickly fix this by adding an upbeat song to make your video more energetic.

Using the same visuals, you can add a more tense and dramatic song, like from a horror movie. You have successfully changed the entire vibe of the same video from “inspiring” to “sinister.” It proves the importance of the balance between audio and visuals.

Example #2
For a better understanding, let’s look at a movie scene we all know and love. Take the entrance scene from Avengers: Endgame. The music used by the producer aims to excite the audience while building up the hype for the upcoming battle. However, if we change the audio of this scene, we end up with a completely different set of emotions that might not go too well with the shot.

Now that we’ve seen how crucial audio can be in a video, let’s see how to choose the best music audio for your video.
Tip #1: Identify the mood
As we’ve demonstrated before, the audio can change the entire mood of the video. The right music for any video will be the one that compliments the spirit of the visuals and relays the emotions the producer intended.

Rewatch your recorded clips until you know the mood portrayed by the visuals. Select music that matches the spirit of your visuals. For example, you would use different music for a sunny day compared to a cloudy day. Once you’ve figured out the mood and understand the emotions you want to elicit, search for audio that achieves this and balances out your visuals.
Tip #2: Video and music style
We’ve already established that different styles of music complement other types of videos. So, keep the type of your video in consideration. For example, is your video fast-paced and full of action, or is it more serious in nature, like an interview or documentary?

Once you have music that matches your video style, check the audio wave. The four most common patterns are steady, ascending, descending, or furious. The audio wave will help you select the visuals that best match that audio.

For example, if you’re using audio with an ascending audio wave, you would use visuals that build up with the audio. The beat drop will signal the transition to reveal a powerful shot.
Tip #3: Don’t force the music
As emphasized before, your music should match your video. We all have a favorite music genre, but sometimes that may not go well with our visuals. For example, you love country music but have a video about the nightlife in the city. Using country music in a video about the town does not match well and will confuse your audience.

To get music that best suits our video, we must be open and explore all music genres. You’ll see how easy it is to scout a song that fits perfectly with your visuals. The easiest way is to choose a song that gives out the same emotions as intended by the visuals.
Final Words
Now, you clearly understand the importance of music in videos. The right music can uplift your video into a viral sensation, while the wrong music track will turn your video into a catastrophe. Remember to review the legalities of copyright and infringement before using any music in your videos to avoid legal issues. Make sure you have permission to use the music or use royalty-free music.
Share this article with your friends and family interested in making stunning videos with perfect music audio. Comment below on your favorite scene from a movie or show where the music perfectly matched the visuals and left you with goosebumps.
How To Change Font In Premiere Pro
To know how to change font Premiere Pro, A video editing program called Adobe Premiere Pro enables you to change font Premiere Pro with high resolution and broadcast quality. Using this tool, you can simply add, modify, or import visuals and text for your films. Utilizing distinctive typefaces in your project gives the video a distinctive feel and helps you create a brand image. Regardless of the operating system you’re using, Premiere Pro makes it simple to edit videos. On this program, free downloadable fonts may also be added or imported.
People that need to create and edit video often utilize Premiere Pro. Knowing how to change font in Premiere Pro is a mandatory skill set. Premiere Pro comes with all you need to create basic text. You may also need After Effects if you want to create something a bit nicer. You may edit elements like text, color, size, and certain animations with Premiere Pro. Text is always added throughout the video editing process, and if you’re using Adobe Premiere Pro, this guide explains how to change font in Premiere Pro in detail.
Part 1. Steps to Change Font on Premiere Pro
Depending on the kind of projects you want to do in the future, learning how to edit text in Premiere Pro is a basic job and a critical talent to acquire. We’ll teach you how to add and modify the pre-installed typefaces in Adobe Premiere Pro so you may utilize them in your movie clip. The tools and functions in Adobe Premiere Pro allow video editors to add, alter, or change the typeface used in their films.
Step1Add Text Template
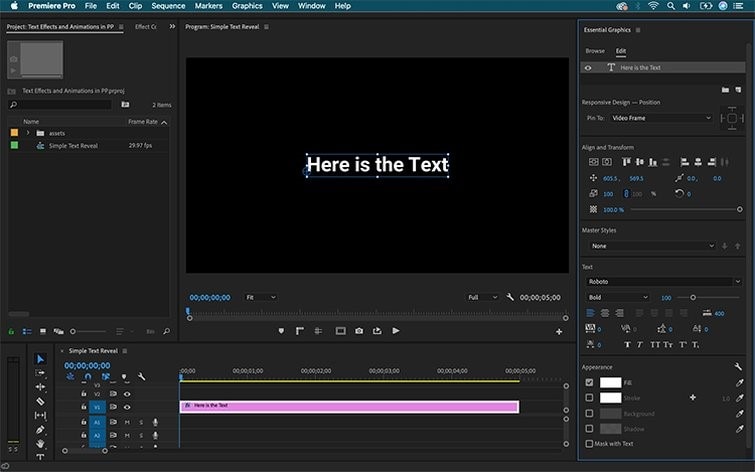
At the top of your project, and above the preview window, the Graphics panel will appear. When you choose it, the Essentials Graphics panel will appear on the Premiere Pro software’s right side. Select Browse. By dragging them into your sequence, you may utilize the graphic templates that are shown.
Step2Change Your Text
You may make simple text modifications, such as changing the font’s size, color, or style, by opening the Essential Graphics panel (Window > Essential Graphics).
Step3Change the Font
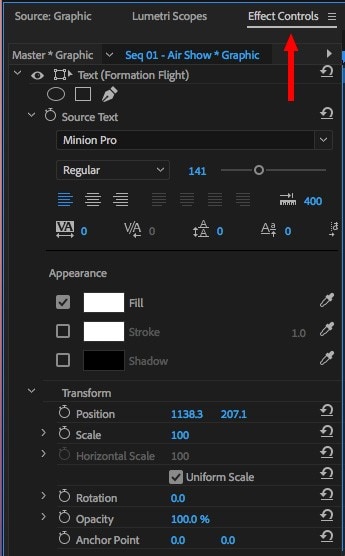
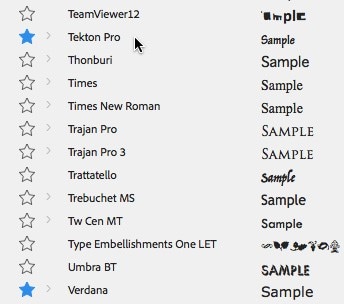
To open the title in the Monitor panel and choose the text, double-click the title under the Export view timeline. Change the font of your text by choosing a style from the Font Style option under the text tab of the Adjust panel.
Step4Export the Content
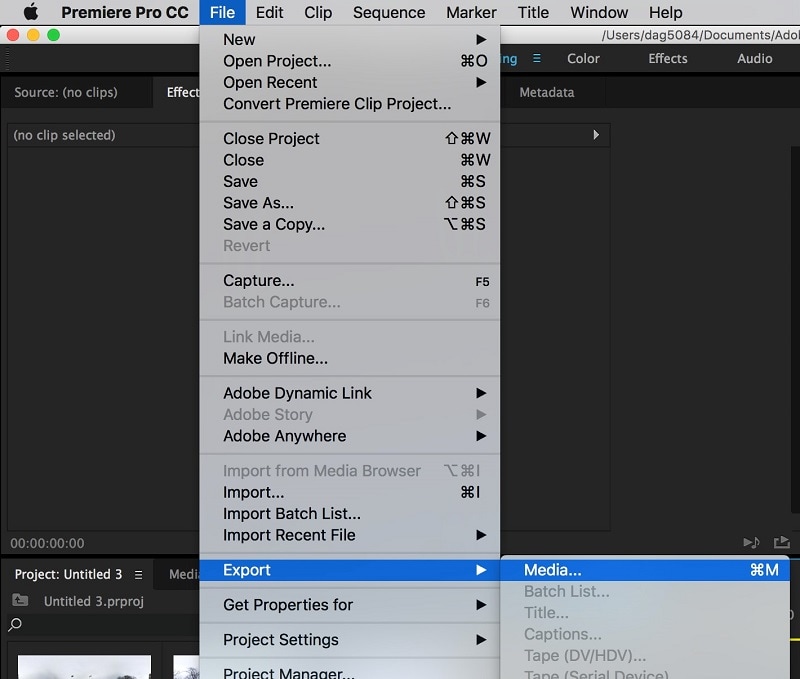
Last but not least, choose File > Export > Media in Premiere Pro to export a video. On a PC or a Mac, you might alternatively hit the shortcut key CMD + M. Your window for export settings will open as a result. Prior to submitting the movie to Media Encoder for export, you may choose your preferred parameters (or presets) for it in this window.
Part 2. Premiere Pro Alternative to Change Font in Video
That’s simple to change typefaces in Adobe Premiere Pro, and it could be all you need to do to keep your audience interested in the footage. It may not be sufficient for your requirements in terms of video editing. Having a backup plan is always beneficial, regardless of the situation. In case anything goes wrong with your initial choice, you will have a backup alternative. You thus need an option like Filmora , which comes with a variety of typefaces pre-installed.
You can simply give your films an aesthetic with Filmora by adding text in a variety of fonts and colors. It’s simple to navigate this program. The installation procedure is also fairly rapid, which is a bonus. Downloads for all of the visuals, audio, and fonts are offered. You don’t have to download everything at once because of this. In conclusion, Filmora is a fantastic substitute to utilize if you are unable to use Adobe Premiere Pro. It contains a number of features that are quite helpful while editing videos. Videos with the highest quality and frame rates are supported.
Step1Install and Import Files
You’ll get the following screen once you launch Filmora on your PC. the Editing Mode option. to open a file, choose it from the menu. Select the picture or video on which you want to add a text by choosing the Import to Add Files option.

Step2Create a Text Layout
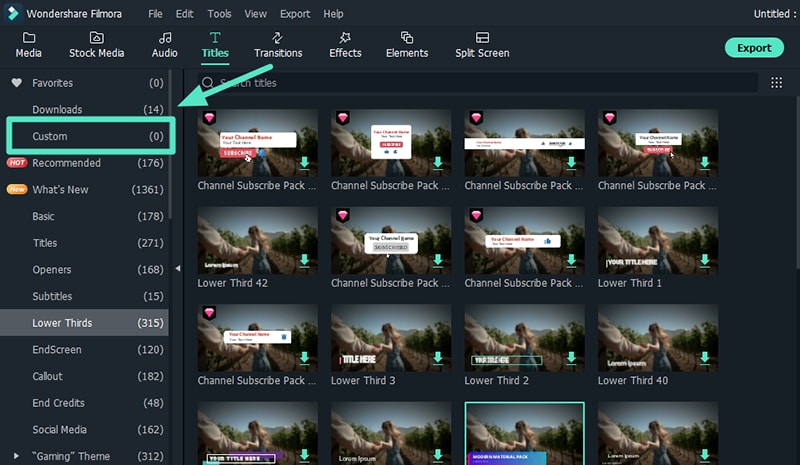
In the next step, refer to the Titles menu and from there, you can add a variety of layouts to add text into your video. For that, add the selected one inside the timeline and refer to the next step:
Step3Add and Change Text Font
On the timeline, drag the picture. Click the picture twice. Select all text by selecting it after selecting the text menu item. Choose text from the menu on the left after that, and then choose the font style you want to use for the picture. You may now alter the text’s font. The text may also be changed, and you can add animation and other styles.

Step4Export or Share Content
In the final step, you can save the photo or video now. You may choose your preferred extension by selecting the export option and saving the movie there. You can also share your content by selecting YouTube or Vimeo or any social platform available to share your edited content on the go. hhghh
Part 3. Related FAQs of Video Font Editing
1. How to change font color in Premiere Pro?
To do so, double-click the title in the timeline of the Expert view to bring up the Monitor panel. Select the text in the Monitor panel, then choose from the options below: Select a font color from the Font menu and paste it into the Text tab of the Adjust panel. Alternately, you may change the font color by pressing Alt + H, typing Font Color and then selecting a color.
2. How to fix the font in Premiere Pro?
You may even classify your excess typefaces if you have too many of them. You’ll be able to locate all of your typefaces in this method. You may use Adobe Premiere Pro’s Align and Transform feature to align the text with the screen. The text’s alignment, centering, nudge, and opacity are all editable. If you don’t want to, you are under no need to arrange your typefaces. It is, nevertheless, quite practical.
3. How to you add font in Premiere Mac?
Fonts from other sources may be downloaded and used with ease in Adobe Premiere Pro Mac. You may download other fonts if you don’t want to utilize Adobe Premiere Pro’s built-in fonts. Downloading your favorite typefaces is the first step. You may obtain fonts from a variety of websites.
Free Download For Win 7 or later(64-bit)
Free Download For macOS 10.14 or later
Steps to Add Subtitles in Canva
Have you ever used Canva before? It is a famous online tool that is also available on Windows, Mac, Android, and iOS platforms. It contains various basic editing features that you can use to crop, trim, resize, and rotate your video clips and images. Apart from these basic tools, you can also navigate to the built-in library of Canva to explore its vibrant templates.
As more than 100 million individuals use Canva every month, it’s a well-trusted tool. If you are a frequent user of Canva, this article can help you how to add subtitles in Canva. Keep reading this article to find out the quickest way to add subtitles to videos using Canva.

Part 1: What is Canva?
To create and edit videos flawlessly, Canva offers great options. It contains pre-sized video formats for YouTube, Facebook, and other social media platforms. If you are a beginner and struggling with ideas, Canva offers various templates of different categories, such as fitness, education, fashion, and real estate. Apart from using the built-in media library, you have complete freedom to upload your media files to add further modifications.

Furthermore, using Canva, you can also add exciting animations and transitions to your videos to generate a smooth look. You can also add multiple overlays to add more dimensions to your video clips. Also, you can use the Canvas captions feature to generate customized subtitles for your video files. To learn more about Canva, let’s shed light on its key features, advantages, and pricing plans:
Key Features of Canva
- Multiple Export Options: Canva offers various export formats such as MP3, PNG, GIF, MP4, PPTX, etc. You can also check the video quality before exporting it to your device.
- Add Audio Tracks: To make your videos more engaging, you can add audio tracks and sound effects using this professional tool.
- Background Remover: To remove a dull background from your video without a green screen or professional software, you can use the background remover of Canva. Through this advanced feature, you can remove the background from your videos with a single click.
- Magic Resize: It offers a Magic Resize option that enables you to resize videos in different formats for multiple platforms.
- Brand Tools: Canva’s branding tools allow users to create and save branded templates, colors, and fonts. This makes it easy to maintain consistency across all design materials and ensures that all designs align with the brand’s visual identity.
- Collaboration Features: Canva’s collaboration features make it easy for teams to work together on a design project. Users can share designs with team members and assign roles and permissions, allowing for seamless collaboration and feedback.
Advantages of Using Canva
- If you want to share your videos on social media platforms instantly, Canva is the best option. Using this software, you can share your videos on Instagram or other social media platforms with a single tap.
- Canva can also add voice-overs and narrations to your videos in high audio quality.
- This tool provides various elements such as lines, shapes, stickers, and frames that you can add to your videos.
Pricing Plans
If you want to learn more about Canva’s detailed plan, you can visit its official website .
| Plan Name | Price |
|---|---|
| Canva Pro | $54.99/Year for 1 Person |
| Canva for Teams | $84.90/Year for 5 Person |
Part 2: How to Add Captions to Videos in Canva?
Do you want to know how to add subtitles in Canva? Adding subtitles in Canva is extremely simple and quick. In this section, we have jotted down accurate and simple instructions to add subtitles using the Canva tool:
Step1 Begin by visiting the video editor tool page of Canva through any web browser. After accessing the tool page, click on “Edit a Video.” This will open a new window on your screen.

Step2 Now, hit the “Upload Files” button from the left panel and import the video file on this tool. Once done, navigate to the “Text” tab and tap “Add a little bit of body text.” Now adjust the position of the text box according to your desire. You can write your Canva captions by choosing your preferred font, color, size, and style.

Step3 You can also add effects and animation to your added subtitles for more enhancements. Once done with customizations, click on the “Share” button. Here select MP4 as the video file format and save the video on your system.

Part 3: Is There a Good Alternative to Add Subtitles to Videos?
Canva provides a very basic user interface to create subtitles. If you want to enhance your added subtitles with more possibilities, Wondershare Filmora is the best alternative. You can add subtitles through this tool in multiple ways. You can either add subtitles manually or use its “Speech-to-Text” feature. Through this feature, you can transcribe your voice to generate subtitles automatically.
Free Download For Win 7 or later(64-bit)
Free Download For macOS 10.14 or later
Filmora also offers great styles and font options to customize the subtitles. You can easily check the results from the preview window of this efficient video editor. Hence, Filmora acts as a complete and well-trusted platform to generate subtitles in different ways.
Instructions to Create Subtitles Using Filmora
Are you tired of writing subtitles manually in Canva? Read the precise instructions guided below to create the subtitles automatically in more than 16 languages:
Step1 Upload the Video File
Download and launch Filmora on your desktop to initiate the process. On its main interface, tap “Create New Project,” which will open a new window. Afterward, upload your desired video on the Project Media to proceed.

Step2 Select Speech-to-Text Feature
Once done with uploading the file, drag the video file to the timeline. Click on the “Speech-to-Text” icon displayed on the timeline and hit the “OK” button after selecting the required language and file. After some seconds, subtitles would be automatically added to the timeline.

Step3 Add Modifications to Subtitles
On your timeline, double-click on the auto-generated subtitles to open the edit settings. By going to the Presets section, you can select the subtitle styles. To add more modifications, you can head to the Custom tab as displayed on your screen. From here, you can change the font, style, color, and size of the subtitles. To confirm the subtitles edits, press the “OK” button.

Step4 Export the Video File
Once you are done with all the subtitle edits, click on the “Export” button. Filmora provides you with various export resolution options and file formats that you can choose. Moreover, you can also share the video file to your desired social media platform, such as YouTube, Vimeo, or TikTok.

Conclusion
Being a non-technical individual, adding subtitles may sound tricky. To provide you with complete assistance, this article has shed light on how to add subtitles in Canva. But, Canva has some limitations in generating subtitles. Hence, we recommend you try and explore Wondershare Filmora to craft subtitles. This tool comprises a Speech-to-Text feature through which you can produce subtitles automatically without hassle.
Part 2: How to Add Captions to Videos in Canva?
Do you want to know how to add subtitles in Canva? Adding subtitles in Canva is extremely simple and quick. In this section, we have jotted down accurate and simple instructions to add subtitles using the Canva tool:
Step1 Begin by visiting the video editor tool page of Canva through any web browser. After accessing the tool page, click on “Edit a Video.” This will open a new window on your screen.

Step2 Now, hit the “Upload Files” button from the left panel and import the video file on this tool. Once done, navigate to the “Text” tab and tap “Add a little bit of body text.” Now adjust the position of the text box according to your desire. You can write your Canva captions by choosing your preferred font, color, size, and style.

Step3 You can also add effects and animation to your added subtitles for more enhancements. Once done with customizations, click on the “Share” button. Here select MP4 as the video file format and save the video on your system.

Part 3: Is There a Good Alternative to Add Subtitles to Videos?
Canva provides a very basic user interface to create subtitles. If you want to enhance your added subtitles with more possibilities, Wondershare Filmora is the best alternative. You can add subtitles through this tool in multiple ways. You can either add subtitles manually or use its “Speech-to-Text” feature. Through this feature, you can transcribe your voice to generate subtitles automatically.
Free Download For Win 7 or later(64-bit)
Free Download For macOS 10.14 or later
Filmora also offers great styles and font options to customize the subtitles. You can easily check the results from the preview window of this efficient video editor. Hence, Filmora acts as a complete and well-trusted platform to generate subtitles in different ways.
Instructions to Create Subtitles Using Filmora
Are you tired of writing subtitles manually in Canva? Read the precise instructions guided below to create the subtitles automatically in more than 16 languages:
Step1 Upload the Video File
Download and launch Filmora on your desktop to initiate the process. On its main interface, tap “Create New Project,” which will open a new window. Afterward, upload your desired video on the Project Media to proceed.

Step2 Select Speech-to-Text Feature
Once done with uploading the file, drag the video file to the timeline. Click on the “Speech-to-Text” icon displayed on the timeline and hit the “OK” button after selecting the required language and file. After some seconds, subtitles would be automatically added to the timeline.

Step3 Add Modifications to Subtitles
On your timeline, double-click on the auto-generated subtitles to open the edit settings. By going to the Presets section, you can select the subtitle styles. To add more modifications, you can head to the Custom tab as displayed on your screen. From here, you can change the font, style, color, and size of the subtitles. To confirm the subtitles edits, press the “OK” button.

Step4 Export the Video File
Once you are done with all the subtitle edits, click on the “Export” button. Filmora provides you with various export resolution options and file formats that you can choose. Moreover, you can also share the video file to your desired social media platform, such as YouTube, Vimeo, or TikTok.

Conclusion
Being a non-technical individual, adding subtitles may sound tricky. To provide you with complete assistance, this article has shed light on how to add subtitles in Canva. But, Canva has some limitations in generating subtitles. Hence, we recommend you try and explore Wondershare Filmora to craft subtitles. This tool comprises a Speech-to-Text feature through which you can produce subtitles automatically without hassle.
Do You Need a Royalty-Free 5 Seconds Countdown Video for Your Video but Don’t Not Where to Find One? We Will Introduce You to the Best HD and 4K Clips that You Can Always Try Anytime
Countdown footage, lately, has become one of the core elements that content creators use in their videos. While some use it to promote special live streams others use it to grab their viewer’s attention. Plus, some also use it as a means of updating their own when a live stream will start.
Perhaps you’re looking for a five-second countdown timer for your video or live stream, chances are you’ll find a lot online. But, sadly, not all of them online is copyrighted free. So, to help you out, we’ve compiled a list of different five seconds countdown footage ranging from HD to 4k that is worth trying.
- Blue Round 5-Second Countdown Timer HD
- Yellow Loading Bar HD
- Red Round 5-second countdown timer HD
- Multi-color Round 5-second Countdown Timer HD
- White Number 5-seconds countdown timer 4K
- Solid Yellow 5-second Countdown Timer HD
- Yellow Round 5-second Countdown Timer HD
- Round Loading 5-second Countdown timer HD
- Minute-Second-Countdown Timer 4K
- 3D 5-second Countdown Timer 4K
- Battery Percentage Countdown Timer HD
- White Loading Bar HD
- How to Find and Apply those 5-second countdown clips to videos?
- Hot FAQs on the 5-second countdown timer
Part 1: 12 Animated 5-second timer Clips for Your Project
After taking our time to search for 5-second timer clips available online, here is a list of the 12 gorgeous animated 5-second countdown timer clips that can be used in any project. All thanks to the Wondershare Filmora video editing software for giving us access to such unique designs of countdown clips. Don’t hesitate to check them out in Filmora because they all look amazing.
1. Blue Round 5-Second Countdown Timer HD
The first 5 seconds countdown video effect on our list is this adorable all-black background HD quality countdown timer that counts in an ascending manner.

2. Yellow Loading Bar HD
This 5-second countdown footage is a loading bar. Yes, a loading bar just like you’re trying install a tool on your PC.

3. Red Round 5-second countdown timer HD
This a simple but gorgeous red round 5-second countdown timer effect with a black background. Honestly, no matter the project you use this for, the viewer will surely fancy this countdown effect.
4. Multi-color Round 5-second Countdown Timer HD
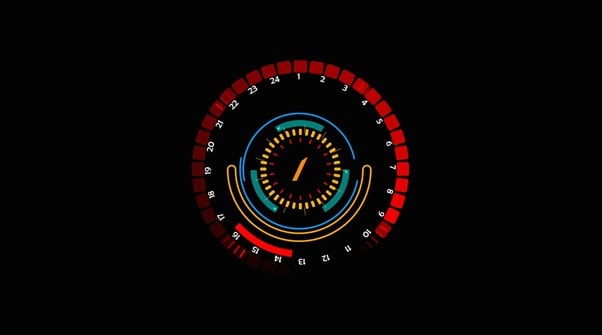
The round circle of this countdown timer displays different colors when it’s played to begin a countdown. Its lemon background color makes it look really attractive for videos.

5. White Number 5-seconds countdown timer 4K
This is another all-black background 5-second countdown timer on this list. It’s great for anyone looking for a very simple 5-second countdown footage for a video.

6. Solid Yellow 5-second Countdown Timer HD
The color of this countdown timer is what makes it very adorable. Honestly, it’s worth mentioning on this list. You should try it for your colorful video,

7. Yellow Round 5-second Countdown Timer HD
A lot of folks fancy black background countdown timers, and we can’t get tired of mentioning any special one we find. This black background timer looks cool.
8. Round Loading 5-second Countdown timer HD
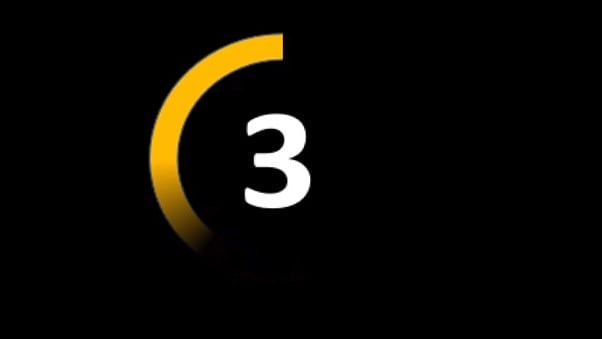
This 5-seconds countdown footage is like a round loading bar. Its background color and all just have the perfect blend.

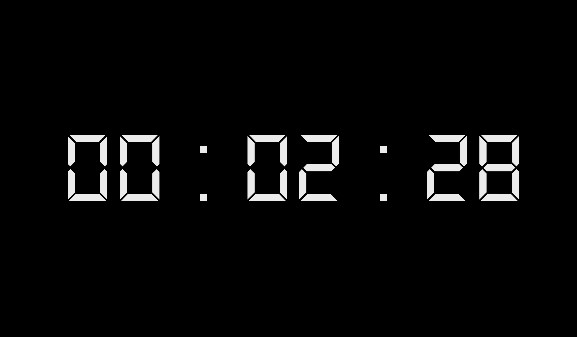
9. Minute-Second-Countdown Timer 4K
Up next is a minute-second-based countdown timer, and it’s also in 4K resolution.
10. 3D 5-second Countdown Timer 4K
This countdown timer with a hi-tech sense. It can be used for a good transition to spice up your explainer videos.

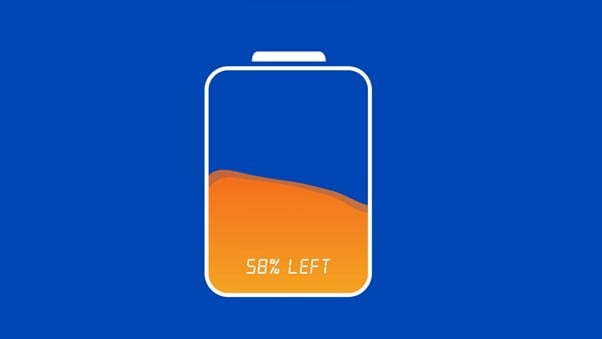
11. Battery Percentage Countdown Timer HD
If you’re looking for a countdown timer like a battery percentage, this one is for you, and it looks really great.
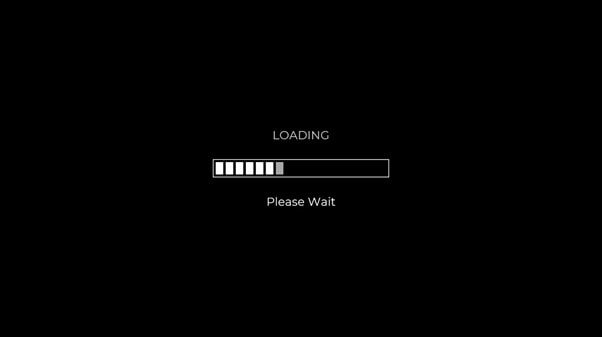
12. White Loading Bar HD
Our final 5-second background timer is a loading bar. But, this time, a white one, and it’s similar to the previously mentioned one.
![]()
Note: Some of the clips introduced above are not typically 5-second countdown footage. Some are up to 10 seconds or even longer. However, the good thing is you can make the clip shorter when embedding it in your video by cutting it according to your requirement.
We would teach you how to make the above 5-seconds shorter if you keep reading.
Part 2: How to Find and Apply those 5-second countdown clips to videos?
I bet you fancy the 5-seconds countdown videos discussed above. But the big question is where can you find them and how do you apply the ones you need to your videos? Well, here is where the help of video editing software like Wondershare Filmora comes into the game.
Wondershare Filmora is a top-leading software that offers users at all levels the best tools needed to execute different types of video editing operations ranging from transitions, resizing, background removal, auto-reframe, and lots more without hassles.
Besides, the boasts lots of modern tools that facilitate not just video editing but also audio editing and screen recording operation. You don’t even need technical knowledge to utilize both the advanced and basic features of the tool.
Let’s proceed to learn the step-by-step process to find all the 5-seconds countdown videos introduced on this page;
Step1 Download the latest version of Filmora software from the official website and install it.
Step2 Launch the tool and use the Import button to upload the video to that you want to add the countdown clip. Alternatively, you can just drag-n-drop the video.
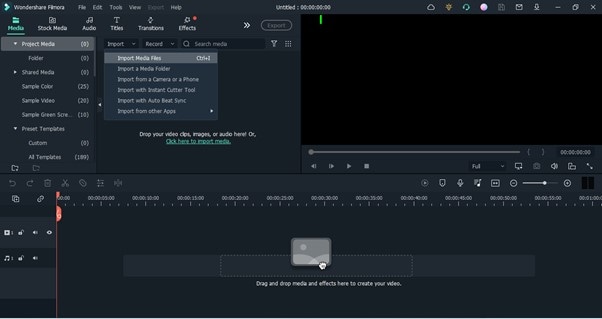
Step3 Drag-n-drop the video to the timeline.
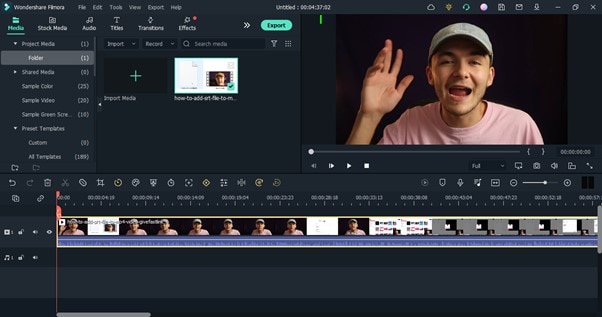
Step4 Navigate to the top-left corner of the screen and click ‘Stock Media’. Then, select ‘Pexels’ or ‘Pixbay’ from the left side of the screen and type ‘Countdown’ in the search bar. After that, find a preferred Countdown effect and move it to the timeline where your video is.
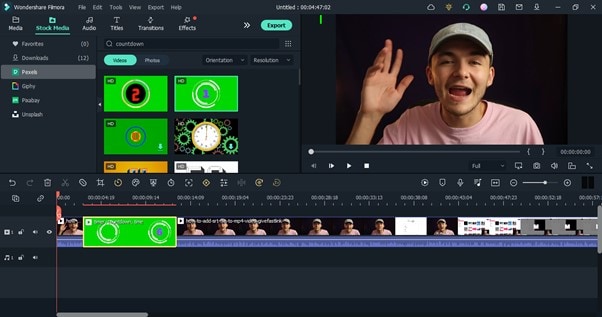
Step5 If the countdown effect you added is more than five seconds, adjust it to five seconds from the timeline. Then, move it to the section of your video where you want it to be displayed.
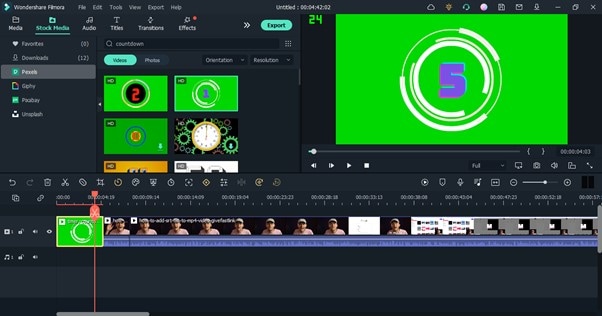
Play your video to preview the countdown effect you added.
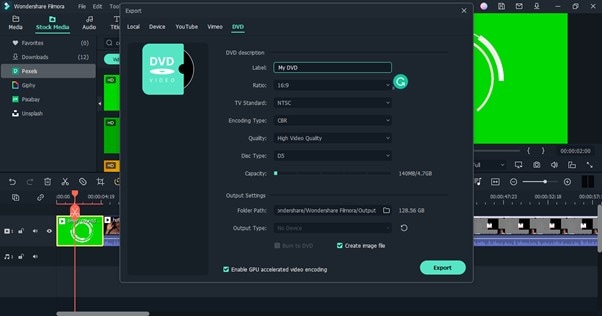
Step6 Once you’re satisfied with the editing, navigate to the top of the screen and click Export, then, select ‘Burn DVD’.
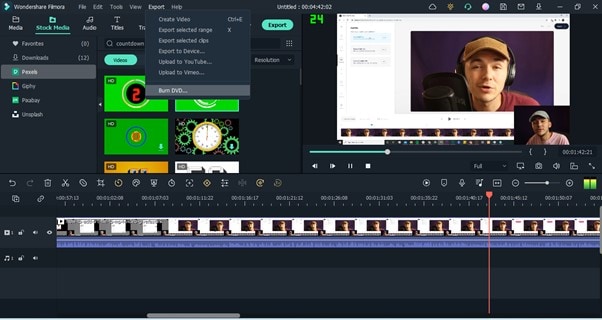
Step7 Enter a preferred name for your video in the pop-up that appears on your screen, then in the Folder Path, choose the location where you want the file to be saved. After that, click the ‘Export’ button to complete the operation.
Hot FAQs on the 5-second countdown timer
There are more FAQs on 5-second countdown timer that you should know about.
1. What is a dynamic countdown?
A dynamic countdown is a countdown used to display the total time left for visitors to claim an offer available on a website.
2. How do you make a countdown video?
To make a countdown video, you need the help of advanced video editing software like Filmora. Filmora offers sophisticated video editing tools that make it easy for folks to make high-quality countdown videos. You can refer to the steps explained on this page to make a countdown video.
3. What are the benefits of adding a 5 seconds countdown for videos?
- It’s a great way to push your audience to make fast decisions that will be in your favor.
- It’s efficient for promoting Livestream.
- It helps to grab viewers’ attention in videos.
Final Words
If you’re looking for beautiful 5-seconds countdown footage for your video, live stream, or whatsoever, the ones introduced on this page are really great. All thanks to the Wondershare tech experts for integrating these special countdown effects into the Filmora video editing tool. The tool is also ideal for applying 5-second countdown footage in your videos or live streams.
Free Download For Win 7 or later(64-bit)
Free Download For macOS 10.14 or later
Part 1: 12 Animated 5-second timer Clips for Your Project
After taking our time to search for 5-second timer clips available online, here is a list of the 12 gorgeous animated 5-second countdown timer clips that can be used in any project. All thanks to the Wondershare Filmora video editing software for giving us access to such unique designs of countdown clips. Don’t hesitate to check them out in Filmora because they all look amazing.
1. Blue Round 5-Second Countdown Timer HD
The first 5 seconds countdown video effect on our list is this adorable all-black background HD quality countdown timer that counts in an ascending manner.

2. Yellow Loading Bar HD
This 5-second countdown footage is a loading bar. Yes, a loading bar just like you’re trying install a tool on your PC.

3. Red Round 5-second countdown timer HD
This a simple but gorgeous red round 5-second countdown timer effect with a black background. Honestly, no matter the project you use this for, the viewer will surely fancy this countdown effect.

4. Multi-color Round 5-second Countdown Timer HD
The round circle of this countdown timer displays different colors when it’s played to begin a countdown. Its lemon background color makes it look really attractive for videos.

5. White Number 5-seconds countdown timer 4K
This is another all-black background 5-second countdown timer on this list. It’s great for anyone looking for a very simple 5-second countdown footage for a video.

6. Solid Yellow 5-second Countdown Timer HD
The color of this countdown timer is what makes it very adorable. Honestly, it’s worth mentioning on this list. You should try it for your colorful video,

7. Yellow Round 5-second Countdown Timer HD
A lot of folks fancy black background countdown timers, and we can’t get tired of mentioning any special one we find. This black background timer looks cool.

8. Round Loading 5-second Countdown timer HD
This 5-seconds countdown footage is like a round loading bar. Its background color and all just have the perfect blend.

9. Minute-Second-Countdown Timer 4K
Up next is a minute-second-based countdown timer, and it’s also in 4K resolution.

10. 3D 5-second Countdown Timer 4K
This countdown timer with a hi-tech sense. It can be used for a good transition to spice up your explainer videos.

11. Battery Percentage Countdown Timer HD
If you’re looking for a countdown timer like a battery percentage, this one is for you, and it looks really great.

12. White Loading Bar HD
Our final 5-second background timer is a loading bar. But, this time, a white one, and it’s similar to the previously mentioned one.

![]()
Note: Some of the clips introduced above are not typically 5-second countdown footage. Some are up to 10 seconds or even longer. However, the good thing is you can make the clip shorter when embedding it in your video by cutting it according to your requirement.
We would teach you how to make the above 5-seconds shorter if you keep reading.
Part 2: How to Find and Apply those 5-second countdown clips to videos?
I bet you fancy the 5-seconds countdown videos discussed above. But the big question is where can you find them and how do you apply the ones you need to your videos? Well, here is where the help of video editing software like Wondershare Filmora comes into the game.
Wondershare Filmora is a top-leading software that offers users at all levels the best tools needed to execute different types of video editing operations ranging from transitions, resizing, background removal, auto-reframe, and lots more without hassles.
Besides, the boasts lots of modern tools that facilitate not just video editing but also audio editing and screen recording operation. You don’t even need technical knowledge to utilize both the advanced and basic features of the tool.
Let’s proceed to learn the step-by-step process to find all the 5-seconds countdown videos introduced on this page;
Step1 Download the latest version of Filmora software from the official website and install it.
Step2 Launch the tool and use the Import button to upload the video to that you want to add the countdown clip. Alternatively, you can just drag-n-drop the video.

Step3 Drag-n-drop the video to the timeline.

Step4 Navigate to the top-left corner of the screen and click ‘Stock Media’. Then, select ‘Pexels’ or ‘Pixbay’ from the left side of the screen and type ‘Countdown’ in the search bar. After that, find a preferred Countdown effect and move it to the timeline where your video is.

Step5 If the countdown effect you added is more than five seconds, adjust it to five seconds from the timeline. Then, move it to the section of your video where you want it to be displayed.

Play your video to preview the countdown effect you added.
Step6 Once you’re satisfied with the editing, navigate to the top of the screen and click Export, then, select ‘Burn DVD’.

Step7 Enter a preferred name for your video in the pop-up that appears on your screen, then in the Folder Path, choose the location where you want the file to be saved. After that, click the ‘Export’ button to complete the operation.

Hot FAQs on the 5-second countdown timer
There are more FAQs on 5-second countdown timer that you should know about.
1. What is a dynamic countdown?
A dynamic countdown is a countdown used to display the total time left for visitors to claim an offer available on a website.
2. How do you make a countdown video?
To make a countdown video, you need the help of advanced video editing software like Filmora. Filmora offers sophisticated video editing tools that make it easy for folks to make high-quality countdown videos. You can refer to the steps explained on this page to make a countdown video.
3. What are the benefits of adding a 5 seconds countdown for videos?
- It’s a great way to push your audience to make fast decisions that will be in your favor.
- It’s efficient for promoting Livestream.
- It helps to grab viewers’ attention in videos.
Final Words
If you’re looking for beautiful 5-seconds countdown footage for your video, live stream, or whatsoever, the ones introduced on this page are really great. All thanks to the Wondershare tech experts for integrating these special countdown effects into the Filmora video editing tool. The tool is also ideal for applying 5-second countdown footage in your videos or live streams.
Free Download For Win 7 or later(64-bit)
Free Download For macOS 10.14 or later
Also read:
- [New] Jumpstart Your Channel with These Top 10 Video Editing Tips
- [Updated] The Visionary Educator's Guide to Multimedia Use
- 2024 Approved From Smartphone Stories to YouTube Success A Step-by-Step Mobile Guide
- Biometric Battleground Face ID Vs. Samsung's Facial Identification
- Fixing Helldivers II: Solutions for the Notorious Black Screen Issue at Startup
- How to Make Money on YouTube Shorts? [Effective Practical Ways] for 2024
- In 2024, Cultivating Productive Collaboration A Pathway to Effective Collab Videos
- In 2024, How to Change Your Honor V Purse Location on life360 Without Anyone Knowing? | Dr.fone
- New 2024 Approved Do You Know CapCut Has some Amazing Slow-Motion Templates You Can Utilize? Read This Article to Access the Slow-Motion CapCut Templates Link
- New 2024 Approved How to Put a Background on A Green Screen
- New In 2024, How to Get Zoom on TV Easy Solutions
- Ultimate Guide to 2023'S Top Value, Zero-Cost Live Broadcasting Tools
- Updated 2024 Approved Discover How You Can Use Vectorscope to Adjust Luminance, Color Grading, and More in Your Video Editing Projects
- Updated 2024 Approved Have a Desire to Uplift Your Editing Creativity with Trying Hands at Working with Storyboards? Keep Reading to Have a Comprehensive Understating of the Workflow Through Stepwise User Guides
- Updated In 2024, Unravel the Creative Potential of Adobe After Effects for Precise Motion Synchronization. Learn How to Use Track Matte and Tracking with a Simple Alternative
- Updated In 2024, What Do You Prefer More, MKV File Format or MOV? Increase Your Knowledge and Learn More About MKV Format by Ready the Detailed Article Below
- Updated Wondering How to Replace Sky in After Effects? Learn How for 2024
- Title: The Power of Music in Videos (+Filmora Editing Tricks) for 2024
- Author: Morgan
- Created at : 2024-10-04 04:39:39
- Updated at : 2024-10-05 21:43:44
- Link: https://ai-video-editing.techidaily.com/the-power-of-music-in-videos-plusfilmora-editing-tricks-for-2024/
- License: This work is licensed under CC BY-NC-SA 4.0.