:max_bytes(150000):strip_icc():format(webp)/TheOscarsStatue-33f6c30d7ffd4694a4dd1d1113de57f5.jpg)
This Article Will Show You How to Make a Tattoo Disappear on Your Body Magically

This Article Will Show You How to Make a Tattoo Disappear on Your Body Magically
Do you have any tattoos that you don’t like anymore? Have you ever wished you had the superpower to make unwanted tattoos vanish? Then, keep reading this article since this article will provide you with how to use masking and colour correction to make a tattoo disappear in Filmora .
Part 1: What You’ll Need to Getting ready
Step1 The first thing you need is a video clip of your arm. Next, place the camera on a tripod, and tilt down to show the table from the top.
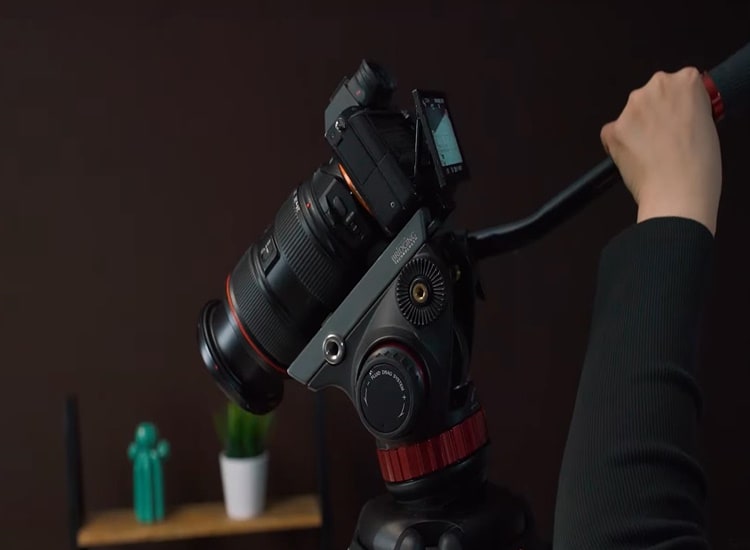
Step2 After that, put the arm on the tableand keep it still while filming. Meanwhile, have another hand perform on the other side of the frame and pretend to use magic to remove the tattoo.

Step3 Next, you need a picture of a tattoo. Indeed, it would be better to have the tattoo in the same position on the arm so it can match the video clip we just filmed.
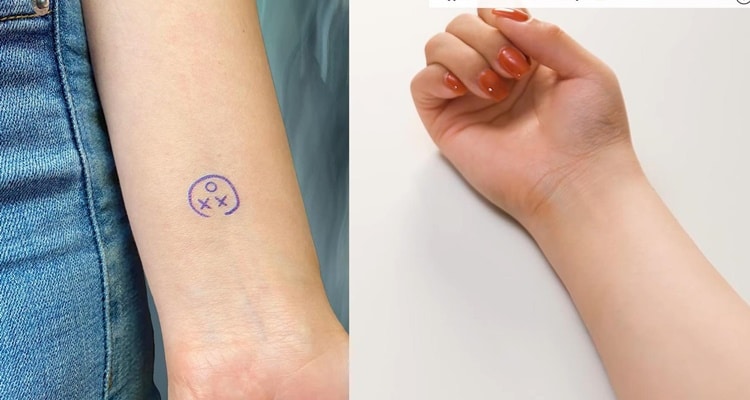
After preparing everything, you need to go to Filmora 11 and start editing. If you haven’t downloaded Filmora already, you can visit filmora.wondershare.com.
Part 2: Editing Tutorial
Step1 First, drag and drop the arm video clip onto the first video track and the tattoo picture on the second video track.
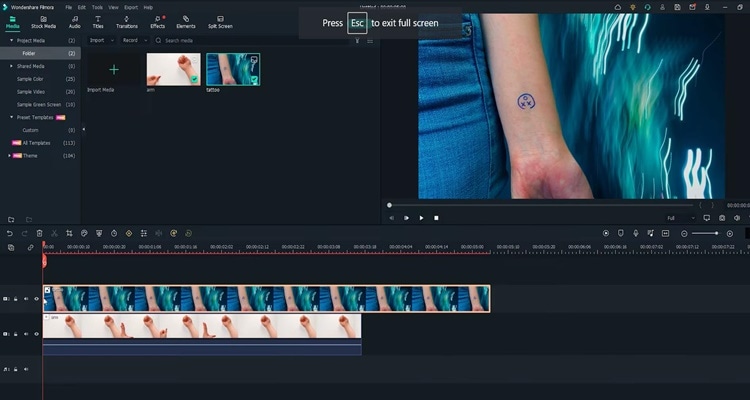
Step2 Add a mask around the tattoo part from the picture. You must hide the first video track to see the mask clearly.Then, double-click on the picture on the timeline and go to the setting window on the top left. Find the Mask Section and select the circle shape. Now you can see the mask is applied.
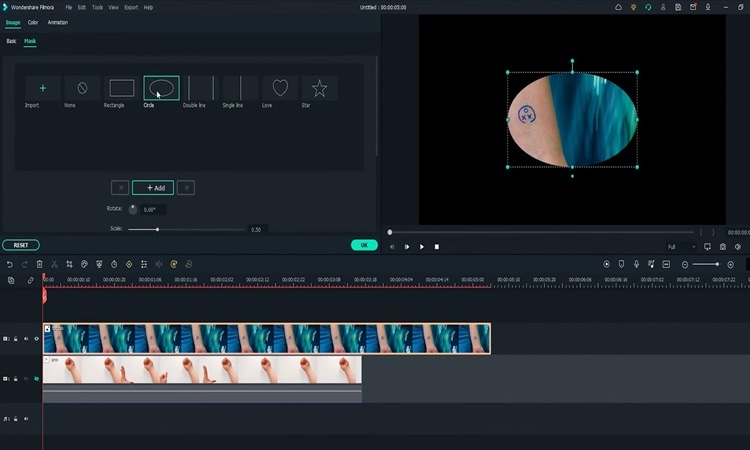
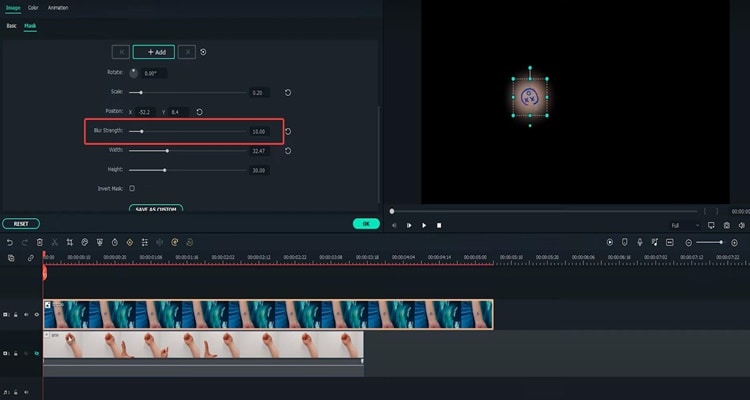
Step3 Adjust the position and size of the mask to reveal only the tattoo part. Then you must change the “Blur Strength” to add more blur to the edge of the mask.
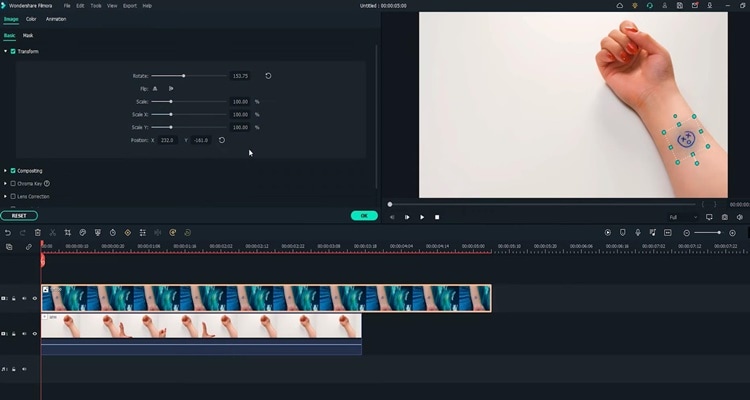
Step4 With the mask finalized,unhide the first video track with the arm video clip. Next, adjust the position and size of the tattoo and make it fit the arm clip.
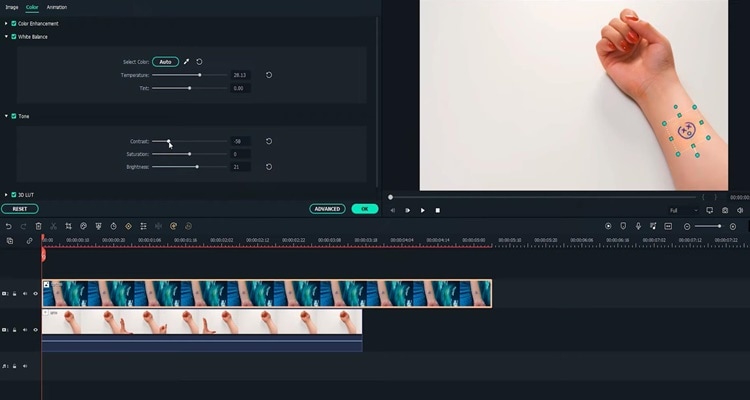
Step5 Go to do colour correction on the tattoo image so that it matches better with the arm skin. Double-click on the tattoo on the timeline and go to the setting window on the top left. Find the “Color” Section and open the “Tone” menu. First, you have to adjust the brightness first.
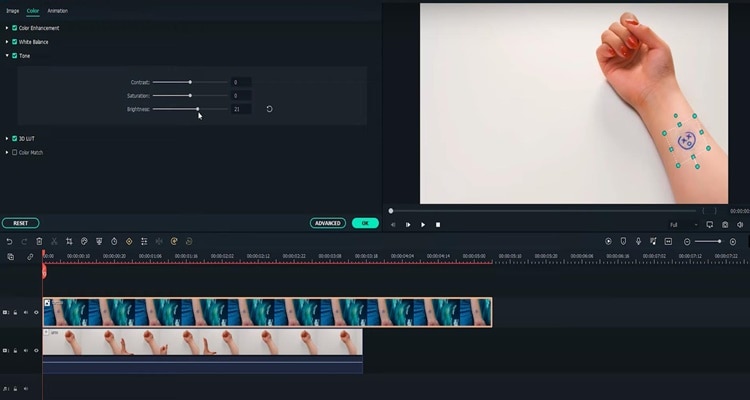
Step6 Afterwards, open the “White Balance”menu and adjust the temperature. Indeed, you can also adjust the contrast and saturation if needed. Once done, click “OK.” The tattoo should look like it blends into the arm video.
Part 3: Make the tattoo disappear
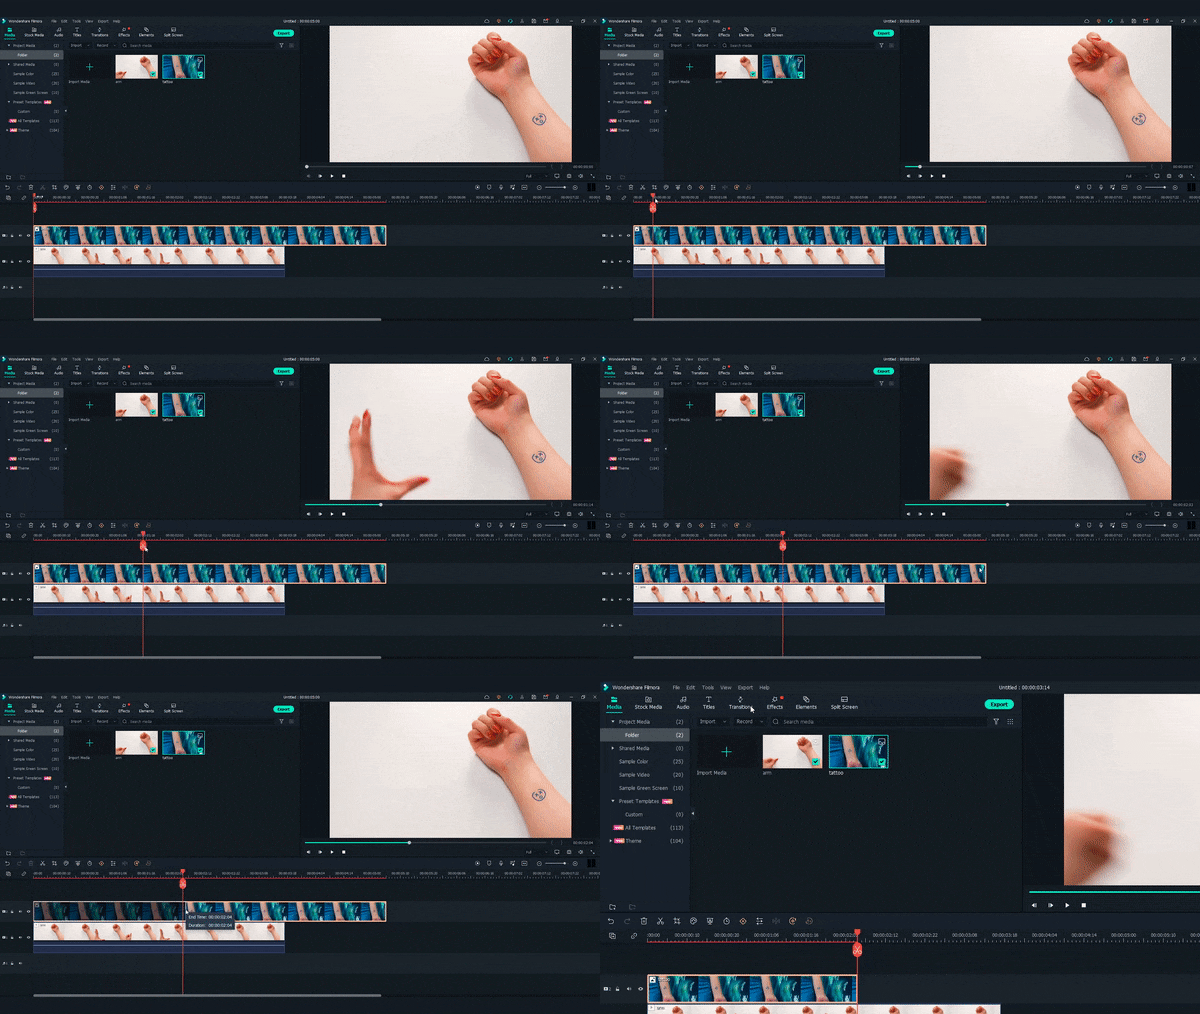
Step1 Move the play head to where you want the tattoo fades, and adjust the length of the tattoo picture there.
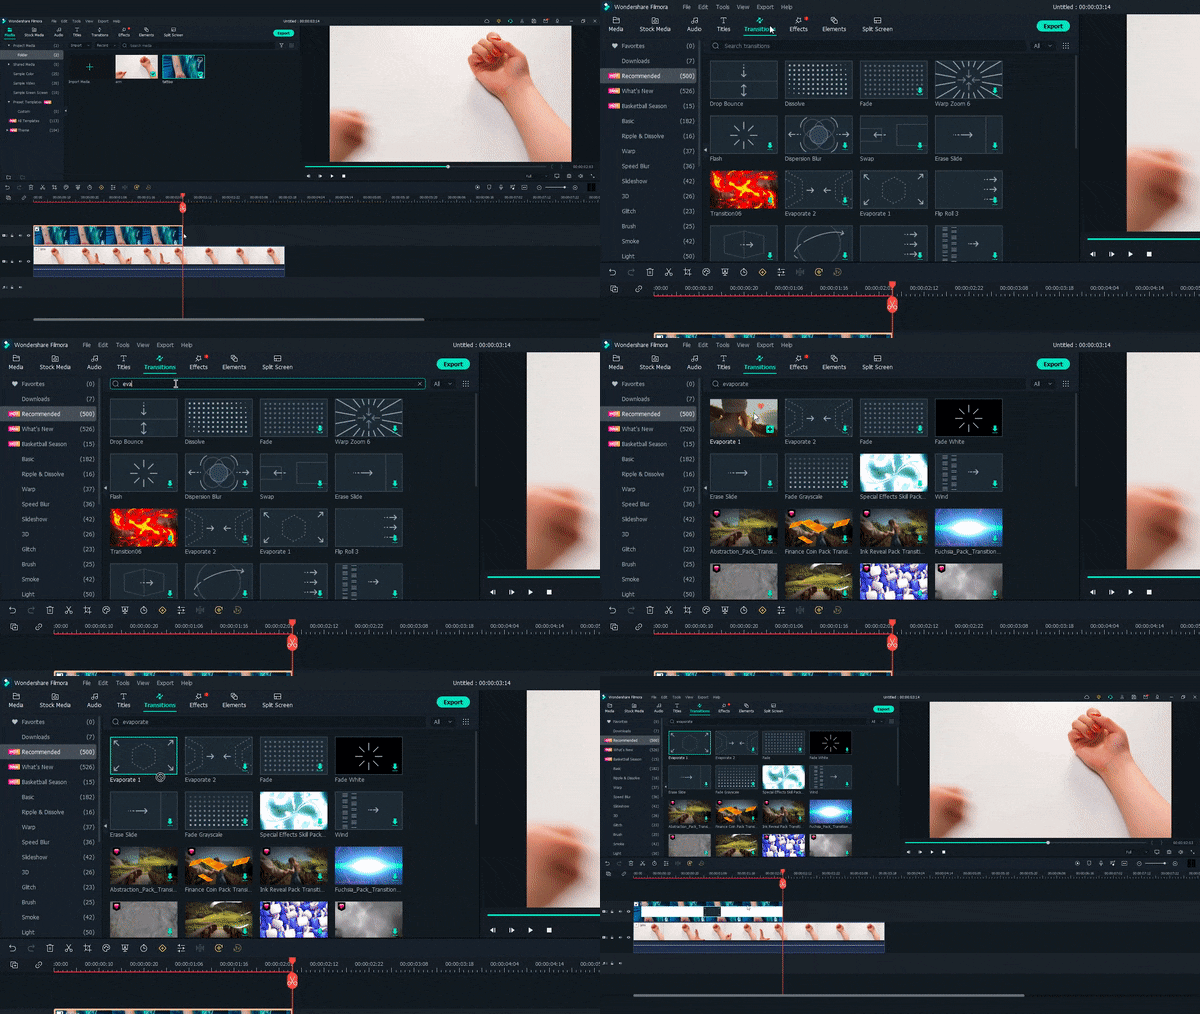
Step2 Next, find the “Evaporate 1” from the “Transitions” window. Drag and drop it to the end of the tattoo clip.
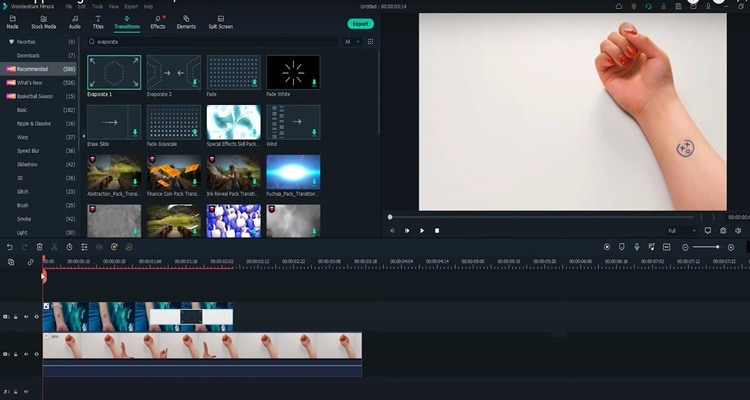
Step3 Adjust the length if needed. Finally, Let’s playback and see how it looks!
Summary
That’s how to make a tattoo disappear in Filmora 11. With Filmora 11, you can get as many new tattoos as possible. Indeed, you can follow all the steps above carefully to get the perfect result.
Free Download For Win 7 or later(64-bit)
Free Download For macOS 10.14 or later
Free Download For macOS 10.14 or later
Basic Introduction for LumaFusion Color Grading
Create High-Quality Video - Wondershare Filmora
An easy and powerful YouTube video editor
Numerous video and audio effects to choose from
Detailed tutorials provided by the official channel
There are many reasons why video editing is essential for content creators. Regardless of your reasons for putting up video content, you’ll achieve little progress without manipulating and structuring your shots. Video editing is what helps to create an emotional connection to your content. That, in turn, is what spurs your viewers to take the action you desire.
Maybe you already know a thing or two about video editing? Good for you! However, there’s always more to learn. For example, only a few people understand the intricacies of luma fusion color grading. Meanwhile, that’s one of the significant differentiating factors between a regular video editor and a pro.
Are you tired of video editing at a basic level? Then this article is for you. It will introduce you to the basics of LumaFusion color grading. Are you ready?
In this article
02 Essential Things You Should Know About Color Grading in LumaFusion
03 Does LumaFusion Have a Desktop Version?
What Is LumaFusion?
Are you a filmmaker, video producer, or editor? Then you’ll need LumaFusion at some point in your editing journey. Whether you are a professional or not, you can use LumaFusion to tell exciting stories through your videos. It has numerous essential features to produce the precise effects you wish to achieve. What’s more, you can use this effective multitrack video editor on iPads and iPhones.
One thing you will love about LumaFusion is its user-friendliness. Even as an aspiring videographer with little experience, you can understand how to use this video editing powerhouse in an instant and with minimal supervision.

LumaFusion is affordable, especially non-linear editors (NLEs) with similar details. When it comes to robust features, LumaFusion retakes the spotlight. This video editor will become your favorite tool in no time.
Here are some exciting things you can do using LumaFusion:
● Enjoy a Simplified SSD and Cloud Storage Importing Process
One of the best things about LumaFusion is your ability to import from SSD and cloud storage seamlessly. If you’re using an external SSD for playback media, this feature will excite you. LumaFusion automatically imports media from your SSD whenever you add video clips to the timeline. There’s no need to waste time importing media by yourself.
● Switch Between Six Workspace Layouts
LumaFusion features six workspace layouts. So you can choose whatever one works best for the project you are working on. With the layout button, you can scramble the source viewer, browser, and timeline to your preference. LumaFusion also gives you the option of viewing the content in portrait or landscape modes. It’s a truly customizable and advanced multitrack video editing app for everyone who loves ease.
● Access Seamless Final Cut Pro Exporting
Do you work with Final Cut Pro X? Then there’s exciting news for you. Lumafusion allows you to export specific project files so that you can work on the NLE. Even though this feature is only available for a fee, it offers excellent value for its $20 price. You can hardly have it cheaper with other NLEs.
● Leverage Its Intuitive UI/UX
This is no hoax—LumaFusion’s intuitive design will blow your mind. If you’ve got prior knowledge or experience using other editing platforms (especially NLEs), you find LumaFusion easy to use. If not, their comprehensive reference guide can help you get acquainted with the app quickly. LumaFusion’s design gives you absolute control.
● Explore Flexibility and Amazing Effects
LumaFusion has numerous fantastic effects to appreciate. These features offer you top-notch flexibility and functionality. The clip editor’s preview window comprises four different editors—the frame and fit editor, audio editors, speed editors, and the color and effects editor. From the timeline navigator to the audio mixer and clip editor, there’s a lot to explore on LumaFusion.
● Enjoy the Automated Audio Ducking Feature
Audio ducking involves temporarily lowering a specified audio signal’s volume when another one comes up. Having to do this manually can be tiring. Fortunately, with LumaFusion’s automatic audio ducking feature, you don’t have to worry about that anymore. All you need to do is assign speakers and music tracks as master and auto track. The audio ducking feature takes it up from there.

● Easy and Direct Exportation to Youtube and Vimeo
LumaFusion comes with an option that allows you to export your edited videos directly to YouTube or Vimeo. When exporting directly to YouTube, the app will enable you to write titles and descriptions or set categories and tags. If you choose to upload your videos to YouTube directly, you can transfer it to your file folder first.
Essential Things You Should Know About Color Grading in LumaFusion
Color grading is an essential post-production process that gives your footage’s color scheme a distinctive appearance and character. This technique gives your videos some cinematic impression by painting over them.
With color grading, you can adjust your video’s color balance, saturation, contrast, luminance, black level, etc. It helps to evoke the particular emotions or moods that you want your videos to exude.
These are the essential things to note about color grading in LumaFusion:
1. Does LumaFusion Have Color Grading?
In answering this question, it’s essential to understand the difference between color correction and color grading. Both editing techniques have vital differentiating characteristics, so it’s wrong to use them interchangeably.
Color correction ensures that videos look as natural to the human eye as possible. If there’s a technical color error, for example, due to bad lighting, color correction helps fix that.
However, the aim of color grading isn’t fixing color mistakes but using colors to convey a mood, atmosphere, or style. Some videographers classify color correction as the first phase in the color grading process.
Generally, you can use LumaFusion to color correct your footage. However, you can’t color grade with the app except you decide to tamper with the color presets tab’s color sliders. Even at that, you wouldn’t get the perfect results you want.
Fortunately, LumaFusion allows you to import and apply LUT (look-up tables). With LumaFusion LUTs, you can color grade your footage to your satisfaction.
2. How To Color Grade in LumaFusion
This is how to color grade your videos:
○ First, Color Correct
When attempting to color grade your footage, it’s essential that you color correct it first. Color correction ensures that your video doesn’t remain flat or unexciting.
○ Create Your LUTs
LUT allows you to save specific color grades to use anytime you need them. This helps to save time by ensuring that you don’t develop color spaces all over again when working on various footage. You can also download as many free LUTs as you like.
○ Bring In a LUT
After creating LUTs, import and apply them to your LumaFusion. Next, blend or adjust your LUt by shifting the slider to get your desired effects. It’s that simple!
3. Can I Use Multiple LUTs in LumaFusion?
The short answer is a big YES. You can apply multiple LUTs in LumaFusion.
Here’s how t go o about it:
- Apply your first LUT
- Export the LUT
- Access rendered movies
- Apply the second LUT
There is numerous manipulation you can do with LUT. For example, you can merge two or more LUTs into one.
Does LumaFusion Have a Desktop Version?
Do you own a PC or desktop[, and you’re wondering how to access LumaFusion’s unique features on it? Unfortunately, LumaFusion is only available for iOS users and not Android or Windows PC.
However, all hope is not lost as Filmora has come to the rescue. Filmora’s video editor provides you with color matching/grading options to create the cinematic effects you want for your footage. You can use the features on your computer.
Let’s talk about Filmora’s Video Editor for Windows features in some detail:
For Win 7 or later (64-bit)
For macOS 10.12 or later
● Color Match
Do you want to achieve a similar color or consistent look for multiple clips? Then Filmora’s video editor is your best bet. The color match feature ensures color consistency throughout your video. It’s easy to use, aids efficiency, and saves your time.
● Color Correction
Color correction is one of the easiest ways to make your footage look extraordinary. With over 40 fantastic drag-and-color presets available to you, your color correction game is about to get lit. Filmora’s color correction feature also allows you to make 3D LUTs conveniently.
Filmora offers free online tools for videographers and unique products for computer software and mobile apps. You can check here to get more information about the Lumafusion alternatives on Mac .
Conclusion
● What’s worth doing is worth doing well? That’s why, as a videographer, you shouldn’t be comfortable with uploading flat, ordinary videos. It’ll help if you take your craft a notch higher by considering color grading for your footage.
● Did you fall in love with LumaFusion’s video editing app? That’s great. With your iPhone or iPad, you can get the best out of the video editor.
● Filmora offers you cool video editing features for color correcting and grading if you’re working on a desktop. There are also amazing Filmora apps for iOS and Android devices. Visit their website for more information on how these video editing features can improve your project’s quality.
There are many reasons why video editing is essential for content creators. Regardless of your reasons for putting up video content, you’ll achieve little progress without manipulating and structuring your shots. Video editing is what helps to create an emotional connection to your content. That, in turn, is what spurs your viewers to take the action you desire.
Maybe you already know a thing or two about video editing? Good for you! However, there’s always more to learn. For example, only a few people understand the intricacies of luma fusion color grading. Meanwhile, that’s one of the significant differentiating factors between a regular video editor and a pro.
Are you tired of video editing at a basic level? Then this article is for you. It will introduce you to the basics of LumaFusion color grading. Are you ready?
In this article
02 Essential Things You Should Know About Color Grading in LumaFusion
03 Does LumaFusion Have a Desktop Version?
What Is LumaFusion?
Are you a filmmaker, video producer, or editor? Then you’ll need LumaFusion at some point in your editing journey. Whether you are a professional or not, you can use LumaFusion to tell exciting stories through your videos. It has numerous essential features to produce the precise effects you wish to achieve. What’s more, you can use this effective multitrack video editor on iPads and iPhones.
One thing you will love about LumaFusion is its user-friendliness. Even as an aspiring videographer with little experience, you can understand how to use this video editing powerhouse in an instant and with minimal supervision.

LumaFusion is affordable, especially non-linear editors (NLEs) with similar details. When it comes to robust features, LumaFusion retakes the spotlight. This video editor will become your favorite tool in no time.
Here are some exciting things you can do using LumaFusion:
● Enjoy a Simplified SSD and Cloud Storage Importing Process
One of the best things about LumaFusion is your ability to import from SSD and cloud storage seamlessly. If you’re using an external SSD for playback media, this feature will excite you. LumaFusion automatically imports media from your SSD whenever you add video clips to the timeline. There’s no need to waste time importing media by yourself.
● Switch Between Six Workspace Layouts
LumaFusion features six workspace layouts. So you can choose whatever one works best for the project you are working on. With the layout button, you can scramble the source viewer, browser, and timeline to your preference. LumaFusion also gives you the option of viewing the content in portrait or landscape modes. It’s a truly customizable and advanced multitrack video editing app for everyone who loves ease.
● Access Seamless Final Cut Pro Exporting
Do you work with Final Cut Pro X? Then there’s exciting news for you. Lumafusion allows you to export specific project files so that you can work on the NLE. Even though this feature is only available for a fee, it offers excellent value for its $20 price. You can hardly have it cheaper with other NLEs.
● Leverage Its Intuitive UI/UX
This is no hoax—LumaFusion’s intuitive design will blow your mind. If you’ve got prior knowledge or experience using other editing platforms (especially NLEs), you find LumaFusion easy to use. If not, their comprehensive reference guide can help you get acquainted with the app quickly. LumaFusion’s design gives you absolute control.
● Explore Flexibility and Amazing Effects
LumaFusion has numerous fantastic effects to appreciate. These features offer you top-notch flexibility and functionality. The clip editor’s preview window comprises four different editors—the frame and fit editor, audio editors, speed editors, and the color and effects editor. From the timeline navigator to the audio mixer and clip editor, there’s a lot to explore on LumaFusion.
● Enjoy the Automated Audio Ducking Feature
Audio ducking involves temporarily lowering a specified audio signal’s volume when another one comes up. Having to do this manually can be tiring. Fortunately, with LumaFusion’s automatic audio ducking feature, you don’t have to worry about that anymore. All you need to do is assign speakers and music tracks as master and auto track. The audio ducking feature takes it up from there.

● Easy and Direct Exportation to Youtube and Vimeo
LumaFusion comes with an option that allows you to export your edited videos directly to YouTube or Vimeo. When exporting directly to YouTube, the app will enable you to write titles and descriptions or set categories and tags. If you choose to upload your videos to YouTube directly, you can transfer it to your file folder first.
Essential Things You Should Know About Color Grading in LumaFusion
Color grading is an essential post-production process that gives your footage’s color scheme a distinctive appearance and character. This technique gives your videos some cinematic impression by painting over them.
With color grading, you can adjust your video’s color balance, saturation, contrast, luminance, black level, etc. It helps to evoke the particular emotions or moods that you want your videos to exude.
These are the essential things to note about color grading in LumaFusion:
1. Does LumaFusion Have Color Grading?
In answering this question, it’s essential to understand the difference between color correction and color grading. Both editing techniques have vital differentiating characteristics, so it’s wrong to use them interchangeably.
Color correction ensures that videos look as natural to the human eye as possible. If there’s a technical color error, for example, due to bad lighting, color correction helps fix that.
However, the aim of color grading isn’t fixing color mistakes but using colors to convey a mood, atmosphere, or style. Some videographers classify color correction as the first phase in the color grading process.
Generally, you can use LumaFusion to color correct your footage. However, you can’t color grade with the app except you decide to tamper with the color presets tab’s color sliders. Even at that, you wouldn’t get the perfect results you want.
Fortunately, LumaFusion allows you to import and apply LUT (look-up tables). With LumaFusion LUTs, you can color grade your footage to your satisfaction.
2. How To Color Grade in LumaFusion
This is how to color grade your videos:
○ First, Color Correct
When attempting to color grade your footage, it’s essential that you color correct it first. Color correction ensures that your video doesn’t remain flat or unexciting.
○ Create Your LUTs
LUT allows you to save specific color grades to use anytime you need them. This helps to save time by ensuring that you don’t develop color spaces all over again when working on various footage. You can also download as many free LUTs as you like.
○ Bring In a LUT
After creating LUTs, import and apply them to your LumaFusion. Next, blend or adjust your LUt by shifting the slider to get your desired effects. It’s that simple!
3. Can I Use Multiple LUTs in LumaFusion?
The short answer is a big YES. You can apply multiple LUTs in LumaFusion.
Here’s how t go o about it:
- Apply your first LUT
- Export the LUT
- Access rendered movies
- Apply the second LUT
There is numerous manipulation you can do with LUT. For example, you can merge two or more LUTs into one.
Does LumaFusion Have a Desktop Version?
Do you own a PC or desktop[, and you’re wondering how to access LumaFusion’s unique features on it? Unfortunately, LumaFusion is only available for iOS users and not Android or Windows PC.
However, all hope is not lost as Filmora has come to the rescue. Filmora’s video editor provides you with color matching/grading options to create the cinematic effects you want for your footage. You can use the features on your computer.
Let’s talk about Filmora’s Video Editor for Windows features in some detail:
For Win 7 or later (64-bit)
For macOS 10.12 or later
● Color Match
Do you want to achieve a similar color or consistent look for multiple clips? Then Filmora’s video editor is your best bet. The color match feature ensures color consistency throughout your video. It’s easy to use, aids efficiency, and saves your time.
● Color Correction
Color correction is one of the easiest ways to make your footage look extraordinary. With over 40 fantastic drag-and-color presets available to you, your color correction game is about to get lit. Filmora’s color correction feature also allows you to make 3D LUTs conveniently.
Filmora offers free online tools for videographers and unique products for computer software and mobile apps. You can check here to get more information about the Lumafusion alternatives on Mac .
Conclusion
● What’s worth doing is worth doing well? That’s why, as a videographer, you shouldn’t be comfortable with uploading flat, ordinary videos. It’ll help if you take your craft a notch higher by considering color grading for your footage.
● Did you fall in love with LumaFusion’s video editing app? That’s great. With your iPhone or iPad, you can get the best out of the video editor.
● Filmora offers you cool video editing features for color correcting and grading if you’re working on a desktop. There are also amazing Filmora apps for iOS and Android devices. Visit their website for more information on how these video editing features can improve your project’s quality.
There are many reasons why video editing is essential for content creators. Regardless of your reasons for putting up video content, you’ll achieve little progress without manipulating and structuring your shots. Video editing is what helps to create an emotional connection to your content. That, in turn, is what spurs your viewers to take the action you desire.
Maybe you already know a thing or two about video editing? Good for you! However, there’s always more to learn. For example, only a few people understand the intricacies of luma fusion color grading. Meanwhile, that’s one of the significant differentiating factors between a regular video editor and a pro.
Are you tired of video editing at a basic level? Then this article is for you. It will introduce you to the basics of LumaFusion color grading. Are you ready?
In this article
02 Essential Things You Should Know About Color Grading in LumaFusion
03 Does LumaFusion Have a Desktop Version?
What Is LumaFusion?
Are you a filmmaker, video producer, or editor? Then you’ll need LumaFusion at some point in your editing journey. Whether you are a professional or not, you can use LumaFusion to tell exciting stories through your videos. It has numerous essential features to produce the precise effects you wish to achieve. What’s more, you can use this effective multitrack video editor on iPads and iPhones.
One thing you will love about LumaFusion is its user-friendliness. Even as an aspiring videographer with little experience, you can understand how to use this video editing powerhouse in an instant and with minimal supervision.

LumaFusion is affordable, especially non-linear editors (NLEs) with similar details. When it comes to robust features, LumaFusion retakes the spotlight. This video editor will become your favorite tool in no time.
Here are some exciting things you can do using LumaFusion:
● Enjoy a Simplified SSD and Cloud Storage Importing Process
One of the best things about LumaFusion is your ability to import from SSD and cloud storage seamlessly. If you’re using an external SSD for playback media, this feature will excite you. LumaFusion automatically imports media from your SSD whenever you add video clips to the timeline. There’s no need to waste time importing media by yourself.
● Switch Between Six Workspace Layouts
LumaFusion features six workspace layouts. So you can choose whatever one works best for the project you are working on. With the layout button, you can scramble the source viewer, browser, and timeline to your preference. LumaFusion also gives you the option of viewing the content in portrait or landscape modes. It’s a truly customizable and advanced multitrack video editing app for everyone who loves ease.
● Access Seamless Final Cut Pro Exporting
Do you work with Final Cut Pro X? Then there’s exciting news for you. Lumafusion allows you to export specific project files so that you can work on the NLE. Even though this feature is only available for a fee, it offers excellent value for its $20 price. You can hardly have it cheaper with other NLEs.
● Leverage Its Intuitive UI/UX
This is no hoax—LumaFusion’s intuitive design will blow your mind. If you’ve got prior knowledge or experience using other editing platforms (especially NLEs), you find LumaFusion easy to use. If not, their comprehensive reference guide can help you get acquainted with the app quickly. LumaFusion’s design gives you absolute control.
● Explore Flexibility and Amazing Effects
LumaFusion has numerous fantastic effects to appreciate. These features offer you top-notch flexibility and functionality. The clip editor’s preview window comprises four different editors—the frame and fit editor, audio editors, speed editors, and the color and effects editor. From the timeline navigator to the audio mixer and clip editor, there’s a lot to explore on LumaFusion.
● Enjoy the Automated Audio Ducking Feature
Audio ducking involves temporarily lowering a specified audio signal’s volume when another one comes up. Having to do this manually can be tiring. Fortunately, with LumaFusion’s automatic audio ducking feature, you don’t have to worry about that anymore. All you need to do is assign speakers and music tracks as master and auto track. The audio ducking feature takes it up from there.

● Easy and Direct Exportation to Youtube and Vimeo
LumaFusion comes with an option that allows you to export your edited videos directly to YouTube or Vimeo. When exporting directly to YouTube, the app will enable you to write titles and descriptions or set categories and tags. If you choose to upload your videos to YouTube directly, you can transfer it to your file folder first.
Essential Things You Should Know About Color Grading in LumaFusion
Color grading is an essential post-production process that gives your footage’s color scheme a distinctive appearance and character. This technique gives your videos some cinematic impression by painting over them.
With color grading, you can adjust your video’s color balance, saturation, contrast, luminance, black level, etc. It helps to evoke the particular emotions or moods that you want your videos to exude.
These are the essential things to note about color grading in LumaFusion:
1. Does LumaFusion Have Color Grading?
In answering this question, it’s essential to understand the difference between color correction and color grading. Both editing techniques have vital differentiating characteristics, so it’s wrong to use them interchangeably.
Color correction ensures that videos look as natural to the human eye as possible. If there’s a technical color error, for example, due to bad lighting, color correction helps fix that.
However, the aim of color grading isn’t fixing color mistakes but using colors to convey a mood, atmosphere, or style. Some videographers classify color correction as the first phase in the color grading process.
Generally, you can use LumaFusion to color correct your footage. However, you can’t color grade with the app except you decide to tamper with the color presets tab’s color sliders. Even at that, you wouldn’t get the perfect results you want.
Fortunately, LumaFusion allows you to import and apply LUT (look-up tables). With LumaFusion LUTs, you can color grade your footage to your satisfaction.
2. How To Color Grade in LumaFusion
This is how to color grade your videos:
○ First, Color Correct
When attempting to color grade your footage, it’s essential that you color correct it first. Color correction ensures that your video doesn’t remain flat or unexciting.
○ Create Your LUTs
LUT allows you to save specific color grades to use anytime you need them. This helps to save time by ensuring that you don’t develop color spaces all over again when working on various footage. You can also download as many free LUTs as you like.
○ Bring In a LUT
After creating LUTs, import and apply them to your LumaFusion. Next, blend or adjust your LUt by shifting the slider to get your desired effects. It’s that simple!
3. Can I Use Multiple LUTs in LumaFusion?
The short answer is a big YES. You can apply multiple LUTs in LumaFusion.
Here’s how t go o about it:
- Apply your first LUT
- Export the LUT
- Access rendered movies
- Apply the second LUT
There is numerous manipulation you can do with LUT. For example, you can merge two or more LUTs into one.
Does LumaFusion Have a Desktop Version?
Do you own a PC or desktop[, and you’re wondering how to access LumaFusion’s unique features on it? Unfortunately, LumaFusion is only available for iOS users and not Android or Windows PC.
However, all hope is not lost as Filmora has come to the rescue. Filmora’s video editor provides you with color matching/grading options to create the cinematic effects you want for your footage. You can use the features on your computer.
Let’s talk about Filmora’s Video Editor for Windows features in some detail:
For Win 7 or later (64-bit)
For macOS 10.12 or later
● Color Match
Do you want to achieve a similar color or consistent look for multiple clips? Then Filmora’s video editor is your best bet. The color match feature ensures color consistency throughout your video. It’s easy to use, aids efficiency, and saves your time.
● Color Correction
Color correction is one of the easiest ways to make your footage look extraordinary. With over 40 fantastic drag-and-color presets available to you, your color correction game is about to get lit. Filmora’s color correction feature also allows you to make 3D LUTs conveniently.
Filmora offers free online tools for videographers and unique products for computer software and mobile apps. You can check here to get more information about the Lumafusion alternatives on Mac .
Conclusion
● What’s worth doing is worth doing well? That’s why, as a videographer, you shouldn’t be comfortable with uploading flat, ordinary videos. It’ll help if you take your craft a notch higher by considering color grading for your footage.
● Did you fall in love with LumaFusion’s video editing app? That’s great. With your iPhone or iPad, you can get the best out of the video editor.
● Filmora offers you cool video editing features for color correcting and grading if you’re working on a desktop. There are also amazing Filmora apps for iOS and Android devices. Visit their website for more information on how these video editing features can improve your project’s quality.
There are many reasons why video editing is essential for content creators. Regardless of your reasons for putting up video content, you’ll achieve little progress without manipulating and structuring your shots. Video editing is what helps to create an emotional connection to your content. That, in turn, is what spurs your viewers to take the action you desire.
Maybe you already know a thing or two about video editing? Good for you! However, there’s always more to learn. For example, only a few people understand the intricacies of luma fusion color grading. Meanwhile, that’s one of the significant differentiating factors between a regular video editor and a pro.
Are you tired of video editing at a basic level? Then this article is for you. It will introduce you to the basics of LumaFusion color grading. Are you ready?
In this article
02 Essential Things You Should Know About Color Grading in LumaFusion
03 Does LumaFusion Have a Desktop Version?
What Is LumaFusion?
Are you a filmmaker, video producer, or editor? Then you’ll need LumaFusion at some point in your editing journey. Whether you are a professional or not, you can use LumaFusion to tell exciting stories through your videos. It has numerous essential features to produce the precise effects you wish to achieve. What’s more, you can use this effective multitrack video editor on iPads and iPhones.
One thing you will love about LumaFusion is its user-friendliness. Even as an aspiring videographer with little experience, you can understand how to use this video editing powerhouse in an instant and with minimal supervision.

LumaFusion is affordable, especially non-linear editors (NLEs) with similar details. When it comes to robust features, LumaFusion retakes the spotlight. This video editor will become your favorite tool in no time.
Here are some exciting things you can do using LumaFusion:
● Enjoy a Simplified SSD and Cloud Storage Importing Process
One of the best things about LumaFusion is your ability to import from SSD and cloud storage seamlessly. If you’re using an external SSD for playback media, this feature will excite you. LumaFusion automatically imports media from your SSD whenever you add video clips to the timeline. There’s no need to waste time importing media by yourself.
● Switch Between Six Workspace Layouts
LumaFusion features six workspace layouts. So you can choose whatever one works best for the project you are working on. With the layout button, you can scramble the source viewer, browser, and timeline to your preference. LumaFusion also gives you the option of viewing the content in portrait or landscape modes. It’s a truly customizable and advanced multitrack video editing app for everyone who loves ease.
● Access Seamless Final Cut Pro Exporting
Do you work with Final Cut Pro X? Then there’s exciting news for you. Lumafusion allows you to export specific project files so that you can work on the NLE. Even though this feature is only available for a fee, it offers excellent value for its $20 price. You can hardly have it cheaper with other NLEs.
● Leverage Its Intuitive UI/UX
This is no hoax—LumaFusion’s intuitive design will blow your mind. If you’ve got prior knowledge or experience using other editing platforms (especially NLEs), you find LumaFusion easy to use. If not, their comprehensive reference guide can help you get acquainted with the app quickly. LumaFusion’s design gives you absolute control.
● Explore Flexibility and Amazing Effects
LumaFusion has numerous fantastic effects to appreciate. These features offer you top-notch flexibility and functionality. The clip editor’s preview window comprises four different editors—the frame and fit editor, audio editors, speed editors, and the color and effects editor. From the timeline navigator to the audio mixer and clip editor, there’s a lot to explore on LumaFusion.
● Enjoy the Automated Audio Ducking Feature
Audio ducking involves temporarily lowering a specified audio signal’s volume when another one comes up. Having to do this manually can be tiring. Fortunately, with LumaFusion’s automatic audio ducking feature, you don’t have to worry about that anymore. All you need to do is assign speakers and music tracks as master and auto track. The audio ducking feature takes it up from there.

● Easy and Direct Exportation to Youtube and Vimeo
LumaFusion comes with an option that allows you to export your edited videos directly to YouTube or Vimeo. When exporting directly to YouTube, the app will enable you to write titles and descriptions or set categories and tags. If you choose to upload your videos to YouTube directly, you can transfer it to your file folder first.
Essential Things You Should Know About Color Grading in LumaFusion
Color grading is an essential post-production process that gives your footage’s color scheme a distinctive appearance and character. This technique gives your videos some cinematic impression by painting over them.
With color grading, you can adjust your video’s color balance, saturation, contrast, luminance, black level, etc. It helps to evoke the particular emotions or moods that you want your videos to exude.
These are the essential things to note about color grading in LumaFusion:
1. Does LumaFusion Have Color Grading?
In answering this question, it’s essential to understand the difference between color correction and color grading. Both editing techniques have vital differentiating characteristics, so it’s wrong to use them interchangeably.
Color correction ensures that videos look as natural to the human eye as possible. If there’s a technical color error, for example, due to bad lighting, color correction helps fix that.
However, the aim of color grading isn’t fixing color mistakes but using colors to convey a mood, atmosphere, or style. Some videographers classify color correction as the first phase in the color grading process.
Generally, you can use LumaFusion to color correct your footage. However, you can’t color grade with the app except you decide to tamper with the color presets tab’s color sliders. Even at that, you wouldn’t get the perfect results you want.
Fortunately, LumaFusion allows you to import and apply LUT (look-up tables). With LumaFusion LUTs, you can color grade your footage to your satisfaction.
2. How To Color Grade in LumaFusion
This is how to color grade your videos:
○ First, Color Correct
When attempting to color grade your footage, it’s essential that you color correct it first. Color correction ensures that your video doesn’t remain flat or unexciting.
○ Create Your LUTs
LUT allows you to save specific color grades to use anytime you need them. This helps to save time by ensuring that you don’t develop color spaces all over again when working on various footage. You can also download as many free LUTs as you like.
○ Bring In a LUT
After creating LUTs, import and apply them to your LumaFusion. Next, blend or adjust your LUt by shifting the slider to get your desired effects. It’s that simple!
3. Can I Use Multiple LUTs in LumaFusion?
The short answer is a big YES. You can apply multiple LUTs in LumaFusion.
Here’s how t go o about it:
- Apply your first LUT
- Export the LUT
- Access rendered movies
- Apply the second LUT
There is numerous manipulation you can do with LUT. For example, you can merge two or more LUTs into one.
Does LumaFusion Have a Desktop Version?
Do you own a PC or desktop[, and you’re wondering how to access LumaFusion’s unique features on it? Unfortunately, LumaFusion is only available for iOS users and not Android or Windows PC.
However, all hope is not lost as Filmora has come to the rescue. Filmora’s video editor provides you with color matching/grading options to create the cinematic effects you want for your footage. You can use the features on your computer.
Let’s talk about Filmora’s Video Editor for Windows features in some detail:
For Win 7 or later (64-bit)
For macOS 10.12 or later
● Color Match
Do you want to achieve a similar color or consistent look for multiple clips? Then Filmora’s video editor is your best bet. The color match feature ensures color consistency throughout your video. It’s easy to use, aids efficiency, and saves your time.
● Color Correction
Color correction is one of the easiest ways to make your footage look extraordinary. With over 40 fantastic drag-and-color presets available to you, your color correction game is about to get lit. Filmora’s color correction feature also allows you to make 3D LUTs conveniently.
Filmora offers free online tools for videographers and unique products for computer software and mobile apps. You can check here to get more information about the Lumafusion alternatives on Mac .
Conclusion
● What’s worth doing is worth doing well? That’s why, as a videographer, you shouldn’t be comfortable with uploading flat, ordinary videos. It’ll help if you take your craft a notch higher by considering color grading for your footage.
● Did you fall in love with LumaFusion’s video editing app? That’s great. With your iPhone or iPad, you can get the best out of the video editor.
● Filmora offers you cool video editing features for color correcting and grading if you’re working on a desktop. There are also amazing Filmora apps for iOS and Android devices. Visit their website for more information on how these video editing features can improve your project’s quality.
Best Method to Split Video Into Parts Online
Apart from offline editing software, online video splitters are also available with the evolution of technology nowadays. VEED is one of them. It helps you in splitting the video into different parts. The splitter tool is available for deleting a specific part of the video. Even you can save these parts separately. The whole video editor is extremely user-friendly.
Along with the split and trimming of the videos, VEED also offers several tools for editing and adding effects to the images. It is suitable for training video makers and social media managers to demonstrate the products, business presentations, and HR videos. There are camera filters present, including sepia, night vision, fish eye, and many others. This article is actually the guide regarding editing the videos through VEED. As a substitute, Wondershare Filmora is also under discussion that is also available for the same purpose.
How can you split the video clips online from VEED?
VEED also supports different formats such as WMV, AVI, MPEG and others. While editing the videos in VEED, it converts into MP4, which is compatible with most media players. This is the most suitable format for sharing videos on social networking sites. This splitter tool also helps create a GIF file with animation. Even there is also a possibility of creating GIFs from various software. No matter the duration is of the video, VEED can split the video. It is freely available, and you can use it easily from your browser. You don’t need purchasing of premium software for splitting the videos.
Step 1: Select the video and upload it on the VEED. Simply drag and drop your video file in the editor when you click on “Choose video”. After the selection, split or trim on the timeline and drag towards the left side corner to make the clips shorter.

Step 2: Click on where you are looking to split the video or keep moving the slider on the timeline. Now, you need to press the “S” key on the keyboard or click on the button “Split”. It is easy to delete the clips you don’t need anymore.
Step 3: Click on the option of “Export”, and this is the time for saving the new file as the MP4 video file. Simply export them as a single video file. It is the simplest option to use, and you can do all the steps in a few clicks.
An easier way to split the video into parts
An online tool is available for instant tasks and increases efficiency. But unfortunately, it becomes time-consuming whenever the size of your file is a large or unstable internet connection. Here emerges the usage of Filmora Video Editor . It is an incredible tool for creating and editing your images and videos. This also helps maintain the quality of the videos without any concern about their size. All the options of splitting, rotating, resizing, and trimming the videos are also available offline.
For Win 7 or later (64-bit)
For macOS 10.14 or later
Features:
- Cloning of the effects
- Magical effects
- Motion graphics and addition of animation as well
- Splitting of the screen and video clips
- Matching of the colour
- Controls available for adjusting the audios and videos
There is a number of options available for a variety of users. There is Wondershare Filmora Pro for the experts and solutions for the business owners. The whole business plan of Wondershare Filmora is for showcasing your brand. Support centres are available for helping you whenever you face any hurdle. All the new features are updated in the latest version of it. User guides are also available on its official site. For splitting the videos and extracting your favourite scenes, below steps are how to split the videos in Wondershare Filmora:
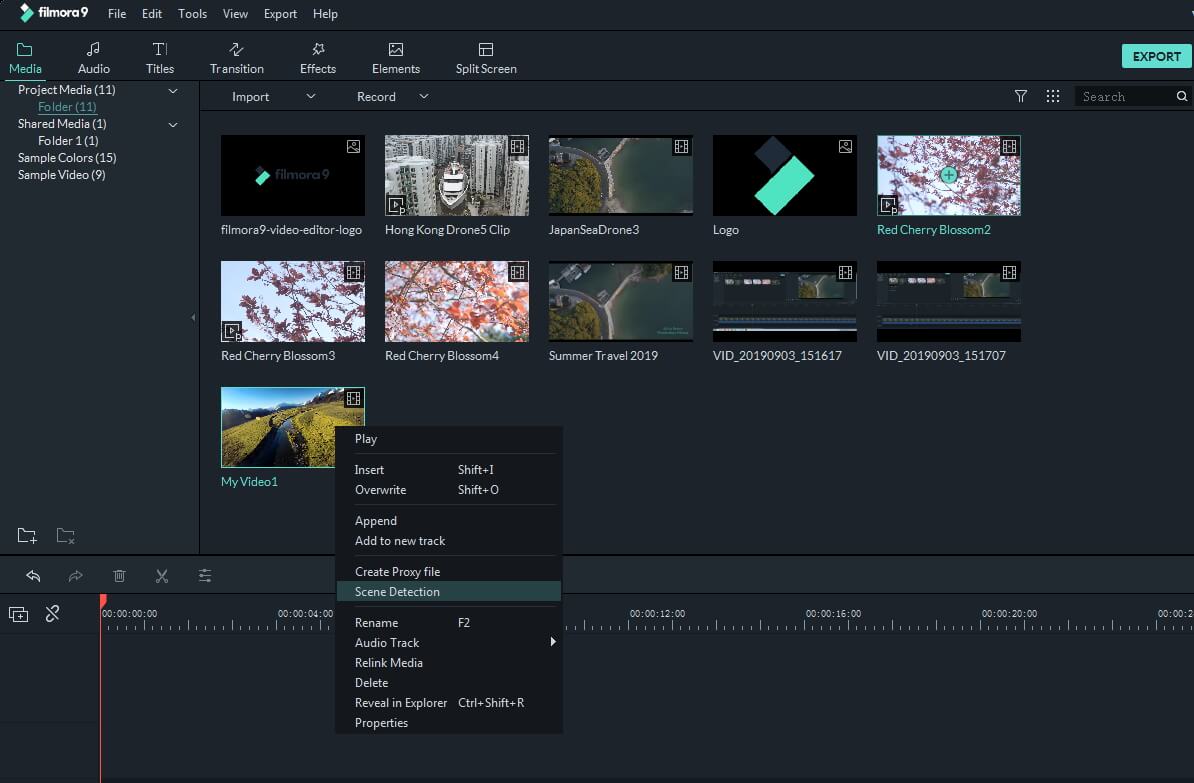
Step 1. To split the videos in Wondershare Filmora, the feature of scene detection is very helpful for this purpose. It automatically makes the parts of the videos depending on the changes of the scene. To enable this feature, right-click on your video clip in your library folder and choose the “scene detection” option for its window.
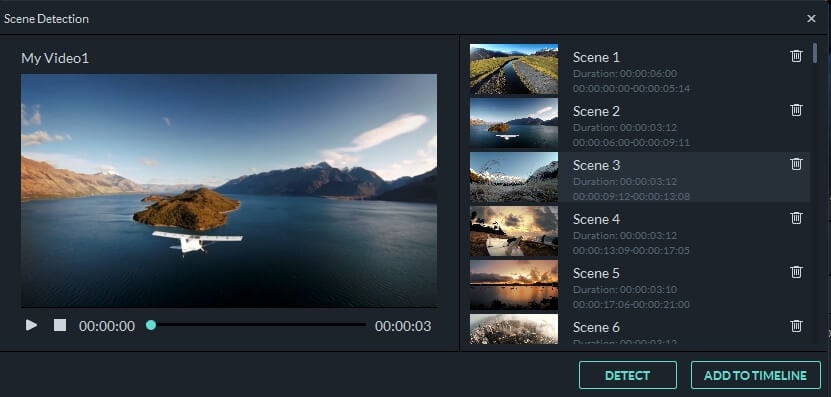
Step 2. Click on “Detect”, and Wondershare Filmora starts dividing the videos into the number of clips depending on changing of the scenes. Click on every small clip for it is easy for you to preview the outcome for its addition on the timeline.
Step 3. For deleting the specific part of the video, its selection is essential and click on the trash icon. Click on “Add on the timeline” for separating the clips and edit them later. The clips you have split can be imported on the timeline, just like in the picture below.
Step 4. After splitting the video files, there are many options to apply to them like rotation, merger, cropping and recording the voice-over. Join the number of segments and add the background music to make the new video.
Wondershare Filmora is on the top ranking in the list of video editing software. Without facing any issues, you can simply create videos as well as edit them as well. You can get quickly a video editor of a professional level in just a smaller number of days of using it. All the tools are just on your timeline, and the simple interface makes it more enjoyable to use.
It is possible for the user to apply every feature in many ways, so Wondershare Filmora is very simple in handling all the functionalities. The whole software is full of fun. It guarantees to deliver highly professional results. Whether online or offline, Wondershare Filmora is also available to bring your imagination into reality. Even you can join the certification program of Wondershare Filmora. Start using it now as you will feel the difference in using it apart from other video editing software.
Step 2: Click on where you are looking to split the video or keep moving the slider on the timeline. Now, you need to press the “S” key on the keyboard or click on the button “Split”. It is easy to delete the clips you don’t need anymore.
Step 3: Click on the option of “Export”, and this is the time for saving the new file as the MP4 video file. Simply export them as a single video file. It is the simplest option to use, and you can do all the steps in a few clicks.

An easier way to split the video into parts
An online tool is available for instant tasks and increases efficiency. But unfortunately, it becomes time-consuming whenever the size of your file is a large or unstable internet connection. Here emerges the usage of Filmora Video Editor . It is an incredible tool for creating and editing your images and videos. This also helps maintain the quality of the videos without any concern about their size. All the options of splitting, rotating, resizing, and trimming the videos are also available offline.
For Win 7 or later (64-bit)
For macOS 10.14 or later
Features:
- Cloning of the effects
- Magical effects
- Motion graphics and addition of animation as well
- Splitting of the screen and video clips
- Matching of the colour
- Controls available for adjusting the audios and videos
There is a number of options available for a variety of users. There is Wondershare Filmora Pro for the experts and solutions for the business owners. The whole business plan of Wondershare Filmora is for showcasing your brand. Support centres are available for helping you whenever you face any hurdle. All the new features are updated in the latest version of it. User guides are also available on its official site. For splitting the videos and extracting your favourite scenes, below steps are how to split the videos in Wondershare Filmora:
Step 1. To split the videos in Wondershare Filmora, the feature of scene detection is very helpful for this purpose. It automatically makes the parts of the videos depending on the changes of the scene. To enable this feature, right-click on your video clip in your library folder and choose the “scene detection” option for its window.

Step 2. Click on “Detect”, and Wondershare Filmora starts dividing the videos into the number of clips depending on changing of the scenes. Click on every small clip for it is easy for you to preview the outcome for its addition on the timeline.

Step 3. For deleting the specific part of the video, its selection is essential and click on the trash icon. Click on “Add on the timeline” for separating the clips and edit them later. The clips you have split can be imported on the timeline, just like in the picture below.

Step 4. After splitting the video files, there are many options to apply to them like rotation, merger, cropping and recording the voice-over. Join the number of segments and add the background music to make the new video.
Wondershare Filmora is on the top ranking in the list of video editing software. Without facing any issues, you can simply create videos as well as edit them as well. You can get quickly a video editor of a professional level in just a smaller number of days of using it. All the tools are just on your timeline, and the simple interface makes it more enjoyable to use.
It is possible for the user to apply every feature in many ways, so Wondershare Filmora is very simple in handling all the functionalities. The whole software is full of fun. It guarantees to deliver highly professional results. Whether online or offline, Wondershare Filmora is also available to bring your imagination into reality. Even you can join the certification program of Wondershare Filmora. Start using it now as you will feel the difference in using it apart from other video editing software.
Step 2: Click on where you are looking to split the video or keep moving the slider on the timeline. Now, you need to press the “S” key on the keyboard or click on the button “Split”. It is easy to delete the clips you don’t need anymore.
Step 3: Click on the option of “Export”, and this is the time for saving the new file as the MP4 video file. Simply export them as a single video file. It is the simplest option to use, and you can do all the steps in a few clicks.

An easier way to split the video into parts
An online tool is available for instant tasks and increases efficiency. But unfortunately, it becomes time-consuming whenever the size of your file is a large or unstable internet connection. Here emerges the usage of Filmora Video Editor . It is an incredible tool for creating and editing your images and videos. This also helps maintain the quality of the videos without any concern about their size. All the options of splitting, rotating, resizing, and trimming the videos are also available offline.
For Win 7 or later (64-bit)
For macOS 10.14 or later
Features:
- Cloning of the effects
- Magical effects
- Motion graphics and addition of animation as well
- Splitting of the screen and video clips
- Matching of the colour
- Controls available for adjusting the audios and videos
There is a number of options available for a variety of users. There is Wondershare Filmora Pro for the experts and solutions for the business owners. The whole business plan of Wondershare Filmora is for showcasing your brand. Support centres are available for helping you whenever you face any hurdle. All the new features are updated in the latest version of it. User guides are also available on its official site. For splitting the videos and extracting your favourite scenes, below steps are how to split the videos in Wondershare Filmora:
Step 1. To split the videos in Wondershare Filmora, the feature of scene detection is very helpful for this purpose. It automatically makes the parts of the videos depending on the changes of the scene. To enable this feature, right-click on your video clip in your library folder and choose the “scene detection” option for its window.

Step 2. Click on “Detect”, and Wondershare Filmora starts dividing the videos into the number of clips depending on changing of the scenes. Click on every small clip for it is easy for you to preview the outcome for its addition on the timeline.

Step 3. For deleting the specific part of the video, its selection is essential and click on the trash icon. Click on “Add on the timeline” for separating the clips and edit them later. The clips you have split can be imported on the timeline, just like in the picture below.

Step 4. After splitting the video files, there are many options to apply to them like rotation, merger, cropping and recording the voice-over. Join the number of segments and add the background music to make the new video.
Wondershare Filmora is on the top ranking in the list of video editing software. Without facing any issues, you can simply create videos as well as edit them as well. You can get quickly a video editor of a professional level in just a smaller number of days of using it. All the tools are just on your timeline, and the simple interface makes it more enjoyable to use.
It is possible for the user to apply every feature in many ways, so Wondershare Filmora is very simple in handling all the functionalities. The whole software is full of fun. It guarantees to deliver highly professional results. Whether online or offline, Wondershare Filmora is also available to bring your imagination into reality. Even you can join the certification program of Wondershare Filmora. Start using it now as you will feel the difference in using it apart from other video editing software.
Step 2: Click on where you are looking to split the video or keep moving the slider on the timeline. Now, you need to press the “S” key on the keyboard or click on the button “Split”. It is easy to delete the clips you don’t need anymore.
Step 3: Click on the option of “Export”, and this is the time for saving the new file as the MP4 video file. Simply export them as a single video file. It is the simplest option to use, and you can do all the steps in a few clicks.

An easier way to split the video into parts
An online tool is available for instant tasks and increases efficiency. But unfortunately, it becomes time-consuming whenever the size of your file is a large or unstable internet connection. Here emerges the usage of Filmora Video Editor . It is an incredible tool for creating and editing your images and videos. This also helps maintain the quality of the videos without any concern about their size. All the options of splitting, rotating, resizing, and trimming the videos are also available offline.
For Win 7 or later (64-bit)
For macOS 10.14 or later
Features:
- Cloning of the effects
- Magical effects
- Motion graphics and addition of animation as well
- Splitting of the screen and video clips
- Matching of the colour
- Controls available for adjusting the audios and videos
There is a number of options available for a variety of users. There is Wondershare Filmora Pro for the experts and solutions for the business owners. The whole business plan of Wondershare Filmora is for showcasing your brand. Support centres are available for helping you whenever you face any hurdle. All the new features are updated in the latest version of it. User guides are also available on its official site. For splitting the videos and extracting your favourite scenes, below steps are how to split the videos in Wondershare Filmora:
Step 1. To split the videos in Wondershare Filmora, the feature of scene detection is very helpful for this purpose. It automatically makes the parts of the videos depending on the changes of the scene. To enable this feature, right-click on your video clip in your library folder and choose the “scene detection” option for its window.

Step 2. Click on “Detect”, and Wondershare Filmora starts dividing the videos into the number of clips depending on changing of the scenes. Click on every small clip for it is easy for you to preview the outcome for its addition on the timeline.

Step 3. For deleting the specific part of the video, its selection is essential and click on the trash icon. Click on “Add on the timeline” for separating the clips and edit them later. The clips you have split can be imported on the timeline, just like in the picture below.

Step 4. After splitting the video files, there are many options to apply to them like rotation, merger, cropping and recording the voice-over. Join the number of segments and add the background music to make the new video.
Wondershare Filmora is on the top ranking in the list of video editing software. Without facing any issues, you can simply create videos as well as edit them as well. You can get quickly a video editor of a professional level in just a smaller number of days of using it. All the tools are just on your timeline, and the simple interface makes it more enjoyable to use.
It is possible for the user to apply every feature in many ways, so Wondershare Filmora is very simple in handling all the functionalities. The whole software is full of fun. It guarantees to deliver highly professional results. Whether online or offline, Wondershare Filmora is also available to bring your imagination into reality. Even you can join the certification program of Wondershare Filmora. Start using it now as you will feel the difference in using it apart from other video editing software.
Hyperlapse VS Timelapse Videos
You’ve probably heard the terms “hyperlapse” and “timelapse” before. Whether it was in a blog post, a how-to guide, or on your preferred social media platform. Each of us has seen at least one image of one of them. However, what makes a difference? You’re about to learn in this article!
With that said, let’s begin!
Part 1. What is a timelapse, and how is it used?
Timelapses are familiar to you, whether they were used in a series to demonstrate a swift change from night today or at the beginning of your favorite influencer’s vlog. But exactly what is it? The term “timelapse” refers to a photography method in which static images are stitched together to produce a time-warping video. When the video is played, the time seems to pass more quickly, creating the illusion that time is slipping away.
Put your camera in a fixed position, stop it from moving, panning, or tilting, then record for a long time to make your own timelapse. This period of time could last for five minutes, an hour, days, or even years. Once the film is gathered, all that’s left to do is speed everything up.
The fact that time-lapses make for a pleasant visual effect is what makes them so popular in Vlogs and other media. This method enables you to describe the passage of time, the movement of individuals through space, etc. utilizes time-lapse.

Part 2. What is a hyperlapse?
On the other side, there are these things that we refer to as hyperlapses. In the subgenre of time-lapse photography known as cinematography, a hyperlapse is a filmmaking method used to generate motion shots by capturing movies rather than taking images. In order to create a hyperlapse, the camera does not remain stationary; rather, it follows the subject around and is typically held by the photographer.
The amount of time that elapses between pictures in a stop-motion video typically ranges from tenths of a second up to a few fractions of a second, although this can change significantly depending on what you want to show. However, after you have picked it, it must remain consistent in the same way that the timelapse does.
The attractive 3D look that hyperlapse produces is the primary draw for its utilization. The hyperlapse that is formed can produce a dreamy image, regardless of whether the camera is attached to a moving vehicle or is mounted on a tripod that is moving towards its target.
Additionally, you may use this approach to make stunning photographs with motion blur by employing long exposures. In most cases, the final image will be stabilized in post-production in order to eliminate some of the flaws that may have been captured in the original photo.

Part 3. What differentiates them from each other?
The movement of the camera is what differentiates these two approaches the most from one another. When capturing a time lapse, the camera is kept relatively still and in the same position throughout. In addition, when you use a hyperlapse, the camera is continuously moving, which creates a 3D appearance in the image.
You could be scratching your head right about now, wondering when you should employ one of the two methods. If your subject is moving, you should take a time-lapse photograph; if the camera is moving, you should take a hyperlapse photograph. This question has a relatively straightforward answer.
The act of recording video for a hyperlapse can cause your storage to be filled up really rapidly. Therefore, you may wish to swap between the two methods depending on the length of time that you want to shoot for. If you are going to be filming for a significant amount of time, you should consider using a timelapse.
It is simple to determine the timelapse interval if you already know these answers. Choose the video’s final frame rate. It may be 24, 25, or 30 fps. You shouldn’t select more quickly. Choose the option that best fits your audience and location. Additionally, a time-lapse calculator is available.
The shoot time should then be converted to seconds. For instance, two hours are equal to 2 x 60 x 60 seconds, or 7200 seconds. Determine how many frames are required for your chosen timelapse now. For instance, the final product should be 30 seconds of 25fps video. You’ll need to capture 750 frames in total because 30 x 25 is 750.
Divide the time (7200s in this case) by the number of frames to obtain the interval (750). You can round up the result, which is 9.6, which is pretty near to 10 seconds. Therefore, in our case, your interval should be set to 10s.
Part 4. Motion control timelapse
Now that we understand how the timelapse images that are static are created, we are able to incorporate some movement into the shots that are static. Moving the camera around during a timelapse is much more difficult than it appears to be in the video. Every movement of the camera is slowed down when using slow motion, which means that you can make even a shaky handheld movie look good when using slow motion. The situation is completely reversed while viewing a timelapse.
Because every movement of the camera is sped up, shooting with the handheld mode is nearly impossible. If you want the camera to appear to be moving slowly in the final timelapse, you will need to move it very slowly while shooting in order to achieve this effect.
For this reason, we will need to make use of motion control devices in order to accomplish our goal. Therefore, we refer to these kinds of photos as motion control timelapses. The camera can be moved very slowly and accurately along one, two, or all three axes using motors that are controlled electronically. The three-axis systems, which include a slider as well as a pan-tilt head, are by far the most popular.
Extra Info: Best Time Lapse Video Maker – Filmora
To create a time lapse video with cool effects, you can use the best video editor with rich effects – Filmora . This software offers many video speed change settings and creative effects to help make a time lapse video easily. Just download the software on your PC or Mac and then start creating a video on your own.
Conclusion
The finest results can be achieved by utilizing a variety of filmmaking approaches concurrently. Therefore, you shouldn’t be afraid to try out new things by combining time-lapse photography with slow motion and video. In addition, make sure you visit the Hyperlapse Academy so you can become familiar with all of the different approaches. Use your imagination, and don’t stop firing.
Free Download For Win 7 or later(64-bit)
Free Download For macOS 10.14 or later
Free Download For macOS 10.14 or later
Also read:
- Want to Come up with Exciting Sony Vegas Slideshow Templates for Your Next Project on YouTube and Other Mediums Then There Is Something for You
- Updated In 2024, Detailed Tutorial to Crop Video in KineMaster
- The Best Way To Color Grading & Color Correction in Filmora
- Updated How to Create Your Own LUTs for Your Video with Filmora for 2024
- New In 2024, Adobe After Effects Review
- New Steps to Create Green Screen Videos in After Effects
- New Find Out the Best Animated Text Video Tools and Learn How to Animate Text in a Video in Simple Steps. Discover the Best Fonts to Animate Text Along with the Text Animation Templates for 2024
- 2024 Approved Want to Make an Epic CSGO Montage? You Are in the Right Place. This In-Depth Guide Will Explain How You Can Make an Attention-Grabbing Gaming Montage
- Updated 2024 Approved Are You Surfing for some Way to Make Your Animated Emoji Discord Using Videos, GIFs, Images, or Text? Read Through This Article as Well Guide You Through the Process
- How to Put Emoji on Mac That Take Less Than 10 Mins for 2024
- 2024 Approved Are You Looking to Freeze-Frame in FCP? If Yes, Read One, as Here Is a Guide About How to Freeze-Frame in Final Cut Pro (FCP) with Ease
- Updated How to Make A Tattoo Disappear Like A Magic
- 2024 Approved In This Article, We Shall Take a Look at the Various Steps of Making a Photo Collage in Microsoft Word, and Also at Other Details of the Process, Which Might Be Relevant
- Updated In 2024, Track Mattes The Ultimate Guide For After Effects
- Updated 4 Simple Methods for Making a High-Quality Recap Video for 2024
- New
- New How To Add Text In After Effects for 2024
- Updated How to DIY VHS Overlay in After Effects, In 2024
- Updated Premiere Pro Slow Playback Issues Finding The Best Solutions
- New In 2024, Adding Shake Effects to Your Video With Alight Motion
- Updated Best 8 Educational Video Websites for Teachers
- A Vacation Slideshow Is a Great Way to Relive the Vacation Memories and Also Share Them with Your Loved Ones. If You Are Looking for Ways to Create a Slideshow in Just a Few Minutes, We Will Help You with the Best Tool
- Are You Finding It Difficult to Freeze-Frame in After Effects? Note that Freeze-Frame Takes only a Few Seconds, and, in This Tutorial, We Will Guide You on How to Create and Add Frame Hold in After Effects for 2024
- In 2024, Steps to Remove Background Noise From Video Sony Vegas
- Updated 2024 Approved How to Loop a Video with iMovie on Mac and iPhone
- Your Search for the Best GIF Creator Tools Ends Here
- Have You Ever Heard Bokeh Effects for Videos? Do You Know that You Can Make Your Own Bokeh Video Easily with some Software. This Article Will Introduce You How to Make a Bokeh Effect Video with Steps
- New In 2024, How to Remove Audio From Videos with FFmpeg?
- New How To Record Video in Slow Motion Comprehending Important Points for 2024
- New How to Add Video Transitions in Videos
- New What Is Lumetri Color and How Do You Use It in Adobe After Effects? Find Out the Numerous Functions of Lumetri Panel and Ways to Apply Them to Your Video for 2024
- Updated How To Add Scrolling Text Effect for 2024
- In 2024, How to Make Audio Visualizer in Filmora Easy
- New Best Free Slow Motion Apps For Android and iPhone for 2024
- Updated How To Remove Audio From Video for 2024
- If You Are a Teacher or People Who Want to Share Their Ideas via Vides, You Can Always Make It on Your Own. This Article Will Share You 7 Tips to Create an Educational Video Easily for 2024
- How to Calculate & Change Video Aspect Ratio Online for 2024
- Updated In 2024, Slow Down the GIF to Emphasize Details Better. To Do so, Read This Guide and Learn to Use the Best Platforms for Slow-Motion GIFs
- New Slow Down the GIF to Emphasize Details Better. To Do so, Read This Guide and Learn to Use the Best Platforms for Slow-Motion GIFs for 2024
- Updated In 2024, 2 Methods to Crop a Video Using After Effects
- 2024 Approved Creating a Slideshow Is Necessity of the Modern Time. Whether You Plan a Business Meeting or You Are Going to Do some Family Event with Slideshow Presentation, a Good Slideshow Maker Will Help You in This Direction
- In 2024, You Can Create a Photo Video Slideshow on YouTube. In Slideshow on YouTube You Can Add Photos and Videos, Effects and Transitions and Make a Quality Slideshow
- Updated GIF to JPG Is as Simple as a Blink of an Eye
- In 2024, This Article Talks in Detail About How to Convert Time-Lapse to Normal Video Using Certain Methods on iPhone, Online Tools, and so On. It Further Discusses Converting Time-Lapse Video to Normal on the Computer. Check Out
- 2024 Approved Easy Steps to Export Video in Filmora
- New In 2024, Liquid Water Text Reveal Intro Offers an Impressive Opening to Any Video Content. Go Through the Detailed Steps to Create Liquid Water Reveal Intro in Wondershare Filmora
- 2024 Approved Boost Your Spirit Creating Motivational Status Videos
- In 2024, How to Track Motorola Moto G Stylus (2023) by Phone Number | Dr.fone
- In 2024, Best Pokemons for PVP Matches in Pokemon Go For Vivo X90S | Dr.fone
- In 2024, Here Are Some Reliable Ways to Get Pokemon Go Friend Codes For Huawei Nova Y91 | Dr.fone
- What Pokémon Evolve with A Dawn Stone For Samsung Galaxy A24? | Dr.fone
- Fake Android Location without Rooting For Your Oppo Reno 10 5G | Dr.fone
- In 2024, A Perfect Guide To Remove or Disable Google Smart Lock On Nubia Red Magic 8S Pro+
- In 2024, Edit and Send Fake Location on Telegram For your Apple iPhone SE (2020) in 3 Ways | Dr.fone
- In 2024, 3 Ways for Android Pokemon Go Spoofing On Nokia C32 | Dr.fone
- Top 10 Password Cracking Tools For Vivo V30
- In 2024, How to Transfer Data from Oppo Find X6 to Samsung Phone | Dr.fone
- Reasons why Pokémon GPS does not Work On Realme GT 5 (240W)? | Dr.fone
- 3 Ways to Change Location on Facebook Marketplace for Vivo V27 | Dr.fone
- Title: This Article Will Show You How to Make a Tattoo Disappear on Your Body Magically
- Author: Morgan
- Created at : 2024-05-19 05:11:43
- Updated at : 2024-05-20 05:11:43
- Link: https://ai-video-editing.techidaily.com/this-article-will-show-you-how-to-make-a-tattoo-disappear-on-your-body-magically/
- License: This work is licensed under CC BY-NC-SA 4.0.

