
Tips to Make Cinematic Color Grading
Tips to Make Cinematic Color Grading
New modern color grading software allows you to do point-and-click color grading right in your browser. Color changes are as easy and intuitive as painting or sketching.
You can choose from many different look presets and movie emulations based on Hollywood movies plus real-time previews of your favorite LUTs with this software.
Part 1. What is Cinematic Color Grading?
The cinematic look is all the rage these days and aims to mimic images captured on real film rather than digitally created. To achieve this effect, film directors use various means from lighting to cinematic color gradation. The latter is a powerful tool for bringing a cool or warm tone to a video and providing smooth color transitions to fall on an image that doesn’t look too real but feels emotional.
This kind of post-production processing, which produces beautiful results when used by color magicians, requires a deep understanding of colors and their effect on our psyche and even physiology. It’s not enough to watch a color grading video and use a LUT to get where you want. You should at the very least have an understanding of:
- Color wheel
- Color quality
- Color harmony and discord
- Warm and cool colors
- Color context
Part 2. Tips to make cinematic color grading
Here are three helpful tips to create cinematic-looking images in DaVinci Resolve.
In my 10-year career as a colorist, I’ve worked on every type of content imaginable: short, long, commercial, educational, episodic—you name it. And while each of these formats requires its approach, the one constant that spans them all is the client’s desire for a cinematic look.
Virtually all of us aspire to more cinematic color, but we often come up short—in part because the term itself has become too broad to effectively target. To focus on the goal, I like to think of “cinematic” as “an image whose key visual properties are consistent with those of printed film.”
The print film was the primary medium through which we consumed cinematic images for the first century of filmmaking and is therefore at the very heart of cinematic aesthetics. In this video, I’ll show you my top three secrets to achieving this aesthetic quickly and consistently in Davinci Resolve.
Tips1: Create Color Density
The first secret to film color is to create color density. Another key aesthetic property of film images is that colors can be either highly saturated or highly luminescent but cannot be both.
We can mimic this visual characteristic by identifying strongly saturated colors in our image and using the Hue vs. Lum to reduce their brightness. This simple technique is especially effective on pure primary colors (red, green, and blue).
Tips2: Separation Beats Saturation
The second secret to film color is prioritizing separation over saturation. When you feel like an image lacks overall color or pop, it’s all too easy to reach for the saturation knob, but that’s not a very cinematic solution.
Instead, try using split toning—pushing cool colors into shadows and warm colors into highlights—to increase tonal separation and add depth to an image. This characteristic is present in virtually every film print and is deeply evocative when applied correctly.
Tips3: Strong Contrast is Your Friend
The third secret of film colors is a strong contrast. This is not always easy, as a higher contrast look inherently requires more precision with exposure placement. Too often we pump up some contrast, end up with an image that looks blown out or too crisp, and then immediately back away from editing.
However, if you stick with high contrast long enough to improve your exposure, you’ll get a very different result and be well on your way to a more cinematic image.
Part 3. How to add color cinematic grading by using Filmora?
New modern color grading software allows you to do point-and-click color grading right in your browser. Color changes are as easy and intuitive as painting or sketching.
You can choose from many different look presets and movie emulations based on Hollywood movies plus real-time previews of your favorite LUTs with this software.
Wondershare Filmora is an option if you want to easily change the colors of your projects. You may just double-click the media after dragging it onto the editing timeline to change the contrast, saturation, brightness, and hue.
Despite its speed, it also allows you to merge, edit audio, divide, rotate, and apply as many cool video effects as you like.
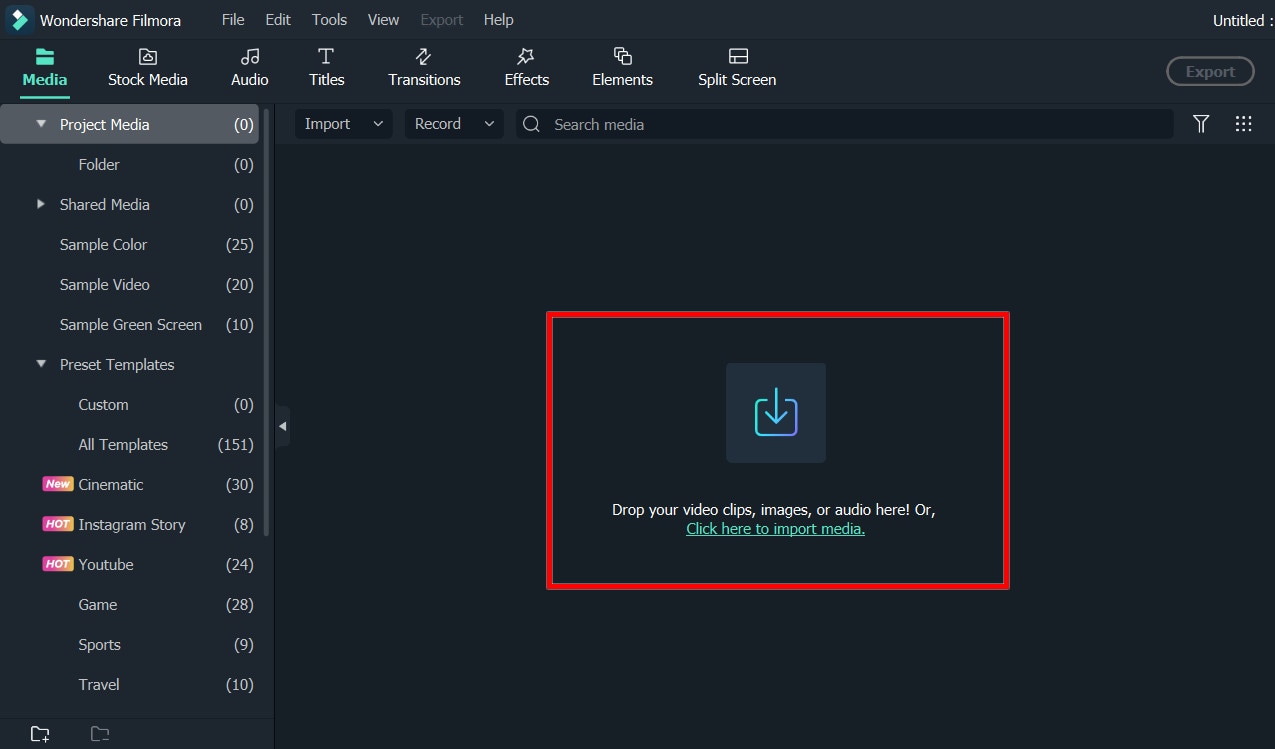
Step1Add the media
After installing Wondershare Filmora, click the New Project and Import button to easily find and load your videos.
Step2Correct the color [Basic and Advanced]
In the timeline, double-click the video editing window. Select the “Color” panel and make adjustments.
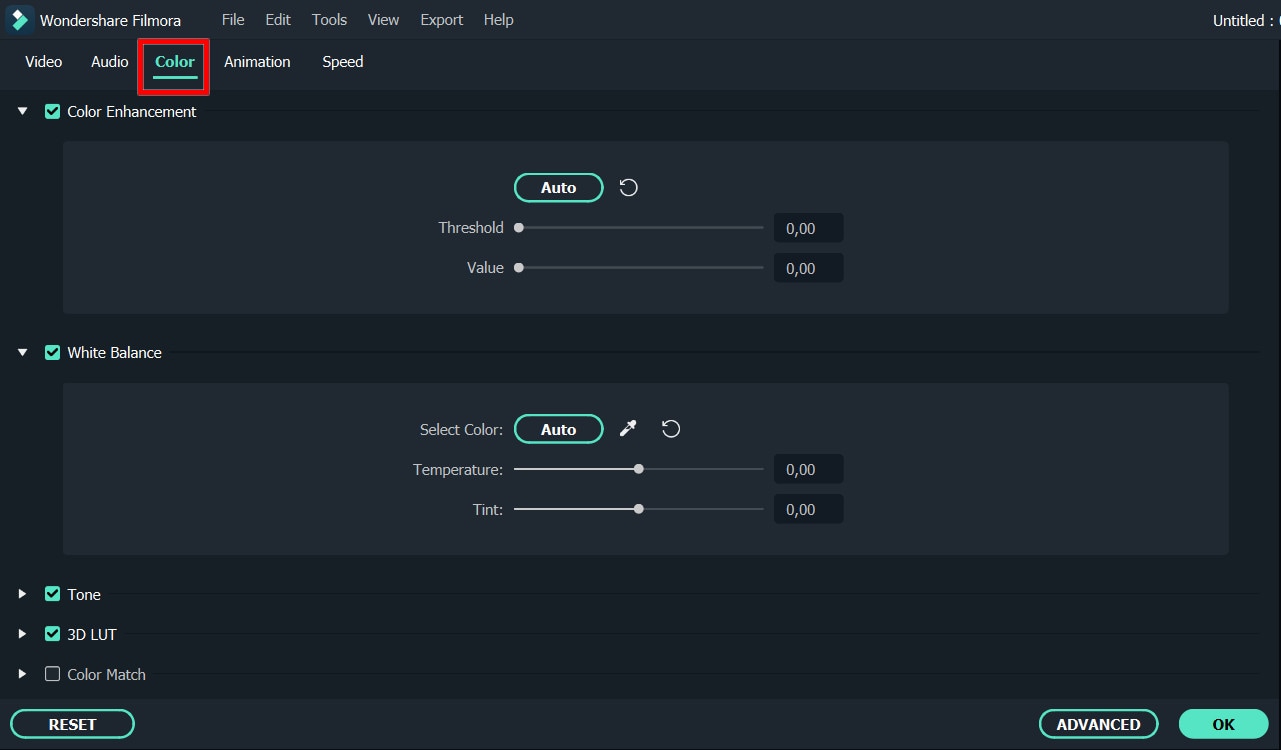
- Contrast: By adjusting this setting, you can control the brightness and color in different parts of the image.
- Saturation: This setting highlights the gray part of the video to a shade. You can adjust it to make the colors of the entire video image appear more saturated or more subdued.
- Brightness: You can change this setting to adjust the overall darkness and lightness of your project.
- Hue: Hue is generally the lightness of a color. Let’s say that when red is saturated with white, it creates a shade of pink.
- 3D LUT: 3D lookup tables provide your media with Hollywood movie color sets like the 007 series, Batman, Harry Porter, etc.
Hover over the indicator to adjust the color correction settings. Then left click on it and move the slider. The corresponding value stabilizes after releasing the mouse button.
With Filmora, you also have access to advanced color correction. Click the Advanced Color Tuning icon to enter the appropriate window where you can fine-tune the color or use preset templates.
The Preferences tab has a variety of templates, including Movie, Normal, 3D LUT, and Vignette. In the Edit tab, you can adjust color temperature, white balance, hue, 3D LUT, color, HSL, light, vignette, etc.
Step3Preview and save the new video
When you are satisfied with your creation, click “Export”. Then click the Settings button and save the new videos in different formats in the Format tab. You can also export the video directly to Vimeo or YouTube or burn it to DVD for better preservation.
Filmora’s color correction tools will make your videos look natural, more attractive, more vibrant, consistent, and professional.
Color Correction Presets
Color correction presets help your video achieve an enhanced cinematic look. Adjust gives you control over fine-tuning the colors in your shots. You can make various adjustments such as color temperature and exposure.
In the “Effects > LUT” tab, you’ll see an extensive selection of preset color settings. These include Vignettes, Movie Looks Like Old Movies, and Cinematic 3D LUT effects such as Harry Potter, Game of Thrones, House of Cards, and Mission Impossible.
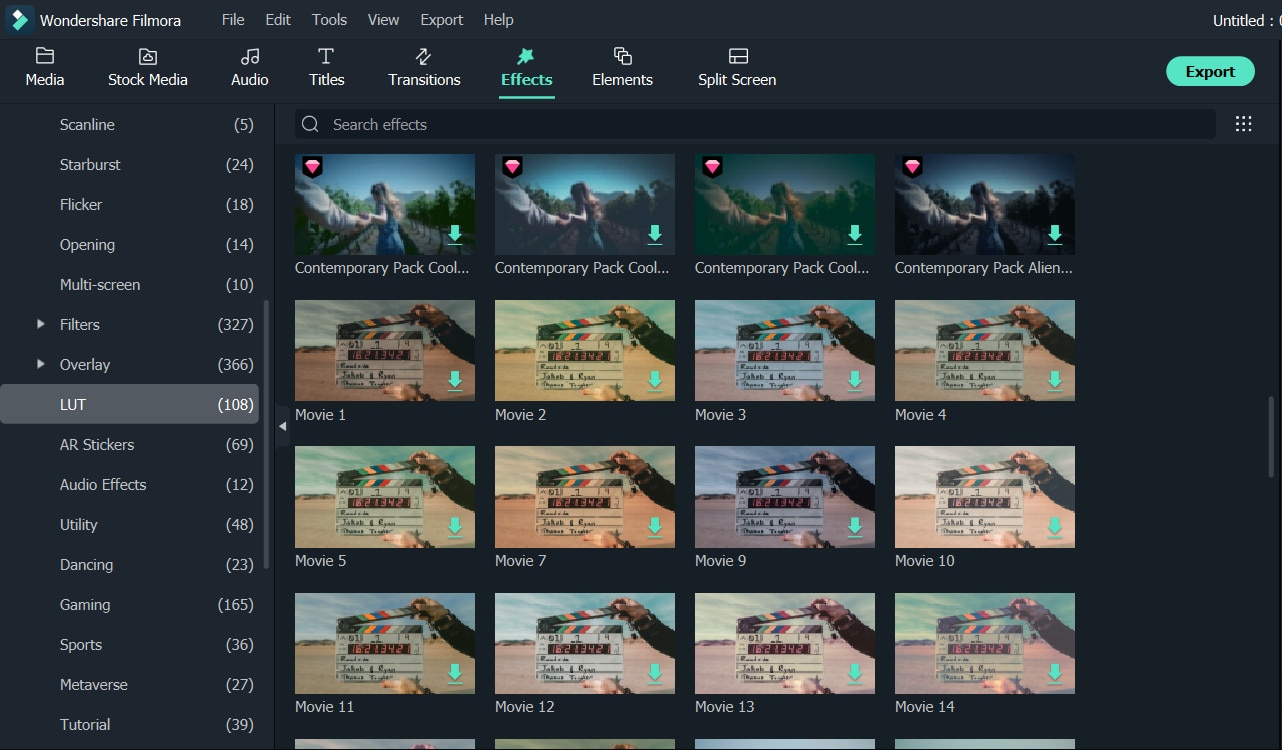
Filmora’s Color Correction Advanced Tool also categorizes your presets. Click on All Presents to see six categories: Favorites, Custom, 3D Lut, Common, Film, and Vignette.
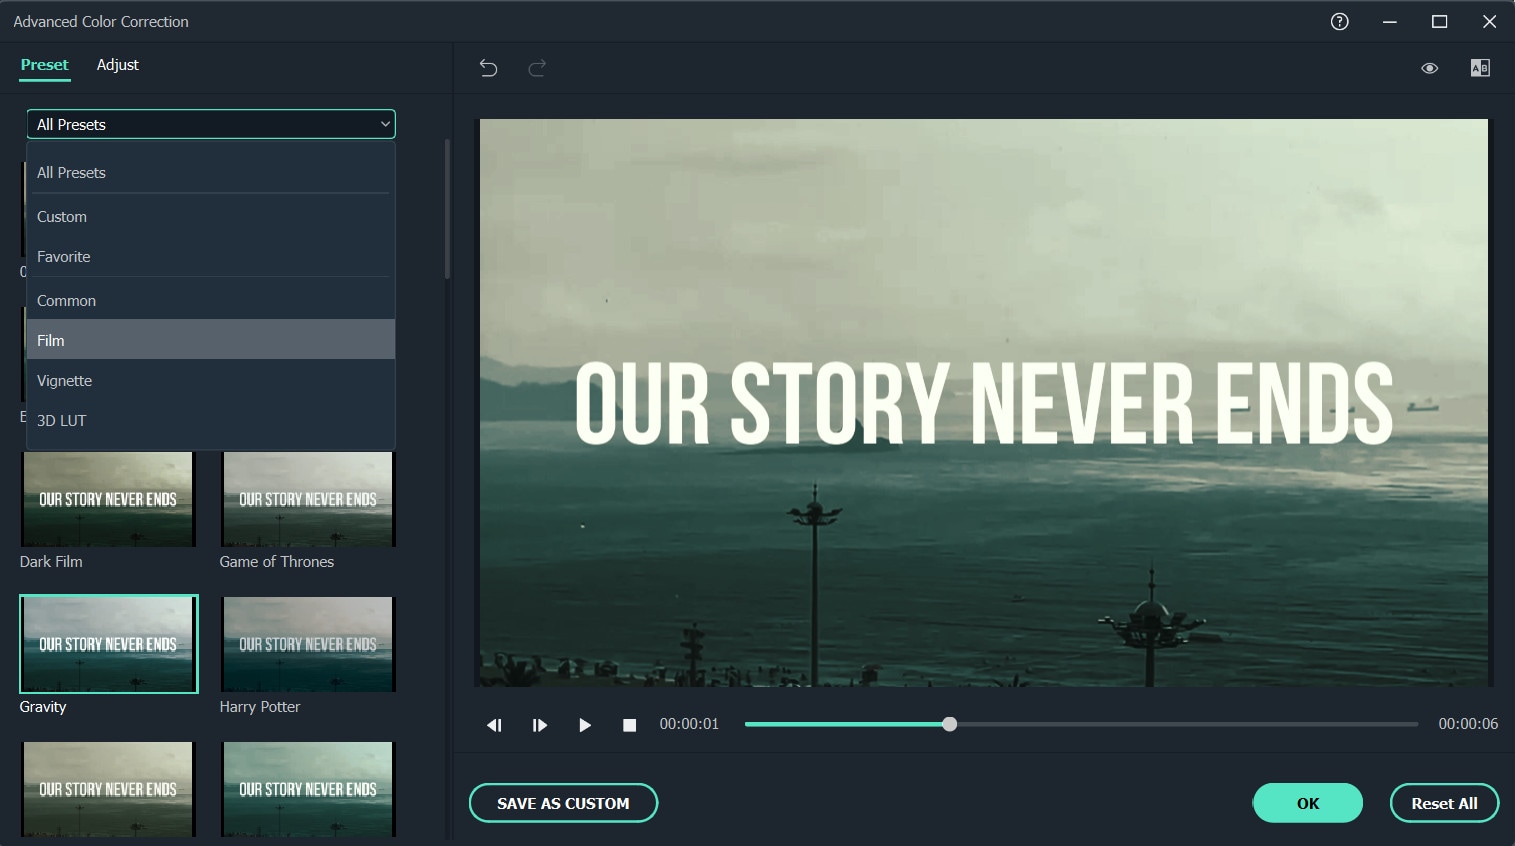
Double-click a preset to apply it to your video. You can see how it looks in the Advanced Color Correction preview window. If you are satisfied with the results, click OK.
Conclusion
Above are the steps to give your video a cinematic look using Wondershare Filmora, hope this helps if you are wondering how to do it. As we can see above, using Filmora video editor will make you more creative in making videos with a suitable emotional tone.
Free Download For Win 7 or later(64-bit)
Free Download For macOS 10.14 or later
10 Recommended Websites to Discover Awesome Premiere Pro Video Templates
The Premiere Pro templates are a great help to start working on the video right away. You don’t need to create your video from scratch thus, saving time. Moreover, there are fully adaptable features that make your video eye-catching. The article provides knowledge about 10 free Premiere Pro templates. So, let us commence this! Are you with us?
Part 1: 10 Popular Websites to Find Premiere Pro Templates
There is an extensive range of websites to access the free Adobe Premiere templates. It is important to know the workability of such websites and what they bring to the house. Therefore, the sub-section of this write-up would shed light on 10 of such websites where you can download Adobe Premiere templates and find them compatible with the software.
So, what are we waiting for? Let us begin the process!
1. Envato Elements
The first website offering Adobe Premiere templates is known as Envato Elements. One can count on this webpage to access millions of creative assets. Envato Elements comes up with Adobe Premiere Pro templates free, stock videos, graphic templates, photos, and website templates.
Moreover, if you are into print and website design, you will find Envato Elements beside you. The search bar makes the search effective as you can choose between categories or applications. The search filter has made life easy for designers and creators.


2. Storyblocks
Storyblocks are the next big thing if you need to download Premiere templates without much effort. This website presents an awful load of green screen footage, music and sound effects, animated backgrounds, royalty stock footage, and templates for Premiere Pro. It also has a Maker, enabling the user to make the professional video in seconds.
The filtering option of Storyblocks is to die for. Style or software can filter the templates and effects to have what we need without wasting much time.

3. MotionElements
The third royalty-free marketplace making a brand name for itself is MotionElements. The website offers more than 3 million assets for its users in different industry sectors. You can access Premiere Pro templates free download with other stock videos and audio files.
From images, music, templates, effects to transitions, logos, and animations, MotionElements has covered its basis. The search filter gives multiple categories, including software, category, and style.

4. Motion Array
Claiming to be an all-in-one video and filmmaker’s platform, Motion Array takes complete responsibility for making your projects successful. The website takes the raw concept of your project and turns it into completion. Adobe Premiere Pro templates can be downloaded via Motion Array with other effects.
You can have Adobe Premiere Pro, Final Cut, DaVinci, and After Effects templates. The stock motion graphics, sound effects, videos, and photos are some of the strengths of Motion Array. The unlimited downloads save you from emptying your wallet.

5. Adobe Stock
While we are on the subject of template Adobe Premiere free, how can we forget about Adobe Stock? Adobe Stock is a serious archive for templates, especially for Adobe Creative Suite applications. Moreover, getting hands-on an impeccable library of stock photos, audio, and videos, is one of the strongest traits of Adobe Stock.
The search filter has different options to make the search easier, for instance, application, categories, transitions, and whatnot. If you type free in the search bar, you will find Premiere Pro video templates so that downloading them wouldn’t cost a penny.

6. Mixkit
Mixkit is the top choice for getting Premiere Pro split-screen template among other royalty-free assets. Mixkit offers free Premiere Pro templates with After Effects, Final Cut Pro, DaVinci Resolve, and much more.
Moreover, Mixkit can be used for stock videos, music, sound effects, and music tracks. The quality is always high, so you don’t need to worry about that.

7. VideoHive
VideoHive offers the best quality and fast researched Premiere Pro templates. With more than 9,100 free Adobe Premiere templates, VideoHive helps add motion graphics and effects to your videos. Most filmmakers prefer the usage of motion graphics as it improves time and cost-effectiveness and enhances ease in adding animations to the projects.
If you are interested in making a slideshow, animated title, transition, or logo stings, you will find VideoHive there for you.

8. Videezy
Videezy is a fair choice if you need to access Premiere templates free in the most effortless fashion. The search bar of Videezy stock marketplace has interactive filter options. The user is free to navigate by sorting the results based on their presence on the website. Moreover, you can choose between the file type and bring productivity to the media industry.
The resolution can also be decided as Videezy offers SD, HD 720, HD 1080, 4K, and Ultra HD. Doesn’t it feel like a dream come true?

9. Videvo
Videvo is the right shop for you if you prefer the ease-of-use over-complicated workability. Offering an interactive interface and progressive search results, Videvo boosts the production value of your projects multifold. Furthermore, this free Premiere Pro templates provider is an allrounder from the video footage, motion graphics, templates, music, and sound effects.
The user is free to customize titles, intros, typographs, overlays, and transitions. Launch the website, download the template, and get into the process.

10. Monsterone
Offering Trending, Newest, Popular, and Undiscovered filtering options and choosing the right tags, Monsterone has made it to the bucket list of professionals in the field. More than 400 Premiere Pro templates can be downloaded to start working on the deadline right away.
The templates can be effortlessly previewed and launched before accessing them. It helps the user make a conscious choice. The resolution can also be set as the user deems necessary.

The Bottom Line
We are surrounded by videos 24/7. It is true for most creative professionals in the industry who are expected to edit the video to make it more captivating and attractive. One needs to have access to free Premiere Pro templates to obtain a sense of originality as we save money and time on making videos from scratch.
For this very reason, the article discussed 10 compatible and popular websites where Premiere templates free are found. We expect the user to make the right choice based on their niche in the industry. The video editing process can be accelerated by using a phenomenal tool which is Wondershare Filmora.
Filmora has the right toolbox set to make video editing easier and flawless. From cropping to flipping and motion tracking to adding keyframes, Filmora knows it all. One can also count on this tool to add backgrounds in Hollywood effect to gain innovation at all costs.
Wondershare Filmstock is your one-stop shop for royalty-free effects, video footage, clips, video effects, and audio tracks. Do not forget to review Filmora and Filmstock about their workability in the flesh.
Click here to find 10 Free After Effects Logo Templates .
Wondershare Filmora
Get started easily with Filmora’s powerful performance, intuitive interface, and countless effects!
Try It Free Try It Free Try It Free Learn More >

Free 3D Intro Makers
A video intro is a great approach to express expertise and credibility in a sea of content. Developing a video intro may be as time-consuming as creating fresh material. No worries! The finest video intro producers help you generate engaging content without spending hours. This article will help you select and use the finest free video intro maker. We offer 5 alternatives for YouTube, gaming, vlog, and 3D intros. This post will break down all the specifics of the Top 5 Video Intro Makers to obtain professional outcomes.
Let’s get started on creating intros that will wow your audience!
1. What is an intro video?
A video intro is a brief introduction, typically lasting between 5 and 15 seconds, that introduces your video, YouTube channel, or brand. Video intros are becoming increasingly popular. It is often the first occasion on which a viewer will have the chance to interact with the content you produce.
Because of this, it has the power to attract attention from the very beginning and to develop trust in the company or product that you are promoting. It goes without saying that this is one of the most critical factors to consider when trying to attract and connect with your desired audience.
2. What are some good intro makers?
Here you will a list of many great intro makers you can use for free and paid.
Adobe After Effects
One of the most well-known pieces of software for creating video effects is called Adobe After Effects. It is capable of producing great motion graphics, and as a result, it should have no trouble animating and producing dynamic video intros or 3D intros for your company, brand, or YouTube channel.

After Effects is utilized by professionals working in the film business to create aesthetically spectacular work for cinema, television, video, and the online. The most significant drawback to After Effects is the fact that it requires an average beginner around eight weeks to learn the program by watching training videos and going through tutorials. In addition, the fee to join Adobe’s Creative Cloud Suite membership service is quite high.
Canva
When you use Canva, you will have instant access to a video introduction creator that is hosted on the web. You get access to a number of different themes, as well as royalty-free photographs and videos, as well as a drag-and-drop editor that you can use to create content that you can then share and post everywhere. In addition to providing, you with intro templates, it also gives you the ability to design your own logo. With a freshly designed logo in hand, now would be the ideal time to produce an introduction film using it.
Canva’s mission is to demystify graphic design and make it available to users who are not designers. They also provide a premium edition of Canva, which is ideally suited for teams to collaborate on the creation of designs with the same objective in mind. In addition, Canva Pro is equipped with additional premium features, such as a brand kit and a backdrop remover.

Canva is an easy-to-use website that provides free access to some of its features, which may be used to create great movies. However, some limitations to using Canva include the fact that it only supports a limited number of output formats and there is a possibility that you will experience connectivity troubles while attempting to save and export your video introductions.
When it came to design, I previously relied on a combination of Adobe Illustrator, Adobe Photoshop, and PicMonkey until I discovered Canva. After some time, we were able to navigate both with ease, but we found that Canva was more difficult to use than PicMonkey. Canva had a steep learning curve and lacked some of the features I was looking for in a design program.
We choose to disregard it. But I decided to give it another shot about two or three years ago, and this time I was impressed enough to switch PicMonkey out for it in my collection of editing tools. Canva had added a large number of features that made the program simpler to use and gave users the ability to accomplish more.
Promo
Promo has a wonderful look that pops. You may build quick video intros for your social media or YouTube channel by using their intro maker, and then post and share them on your social networks afterwards. Promo.com provides filmmakers and video editors with high-quality professional video clips, royalty-free music, adjustable video templates, bespoke text, and logos, and more through their monthly membership programs. You may utilize Promo to create videos in a variety of orientations and forms, including horizontal, vertical, square, and even banner films.
To summarize, Promo is a video maker that has an impressive design and allows for direct uploads to various social media platforms. The only problem is that their website occasionally becomes unresponsive and sluggish. Because of this, the process of creation can become rather laborious and drawn out.

Promo.com is my one-stop-shop for all of my business promotional videos because it offers a variety of video ad templates that I can easily edit on my browser without the need for any program, and they also offer a great selection of stock footage and text overlay options to make the videos look more professional. Promo.com has a lot of awesome templates for a bunch of different categories.
Filmora
If you’re worried about how challenging and time-consuming it will be to create the ideal video introduction, Filmora will put those worries to rest. You can finish your introduction in record time thanks to iStock and Shutterstock’s vast libraries of high-quality stock films, photos, and music, as well as their ability to create fully adjustable titles and more than 5000 intro themes.

Filmora is capable of much more than simply creating video introductions. It is capable of handling anything connected to video and even more. The program is compatible with all of your Ultra HD 4K Video files and provides support for the finest quality hi-fidelity Dolby Surround Sound.
When working on other video projects, you can use masking and blending to add layers to your videos and give them the shape you want, thereby producing the most artistic scenes possible. Make use of keyframing to modify the dynamism and smoothness of your edits with the help of animated effects. The chroma key tool allows you to get rid of green screens and create amazing effects that will blow people away. And AI Motion Tracking is just what you need to make it possible for text or graphics to automatically track specific objects throughout your films.
The Bottom Line
The readers of this post have been provided with a list of many free online 3D intro creator tools, which can be used to create the ideal film for both personal and commercial usage. The availability of multiple tools accompanied by clear descriptions of the capabilities supplied by each helps to simplify the decision process. In addition to this, users have been supplied with an in-depth introduction to Wondershare UniConverter, a program that provides tools that are universally applicable.
Free Download For Win 7 or later(64-bit)
Free Download For macOS 10.14 or later
1. What is an intro video?
A video intro is a brief introduction, typically lasting between 5 and 15 seconds, that introduces your video, YouTube channel, or brand. Video intros are becoming increasingly popular. It is often the first occasion on which a viewer will have the chance to interact with the content you produce.
Because of this, it has the power to attract attention from the very beginning and to develop trust in the company or product that you are promoting. It goes without saying that this is one of the most critical factors to consider when trying to attract and connect with your desired audience.
2. What are some good intro makers?
Here you will a list of many great intro makers you can use for free and paid.
Adobe After Effects
One of the most well-known pieces of software for creating video effects is called Adobe After Effects. It is capable of producing great motion graphics, and as a result, it should have no trouble animating and producing dynamic video intros or 3D intros for your company, brand, or YouTube channel.
After Effects is utilized by professionals working in the film business to create aesthetically spectacular work for cinema, television, video, and the online. The most significant drawback to After Effects is the fact that it requires an average beginner around eight weeks to learn the program by watching training videos and going through tutorials. In addition, the fee to join Adobe’s Creative Cloud Suite membership service is quite high.
Canva
When you use Canva, you will have instant access to a video introduction creator that is hosted on the web. You get access to a number of different themes, as well as royalty-free photographs and videos, as well as a drag-and-drop editor that you can use to create content that you can then share and post everywhere. In addition to providing, you with intro templates, it also gives you the ability to design your own logo. With a freshly designed logo in hand, now would be the ideal time to produce an introduction film using it.
Canva’s mission is to demystify graphic design and make it available to users who are not designers. They also provide a premium edition of Canva, which is ideally suited for teams to collaborate on the creation of designs with the same objective in mind. In addition, Canva Pro is equipped with additional premium features, such as a brand kit and a backdrop remover.
Canva is an easy-to-use website that provides free access to some of its features, which may be used to create great movies. However, some limitations to using Canva include the fact that it only supports a limited number of output formats and there is a possibility that you will experience connectivity troubles while attempting to save and export your video introductions.
When it came to design, I previously relied on a combination of Adobe Illustrator, Adobe Photoshop, and PicMonkey until I discovered Canva. After some time, we were able to navigate both with ease, but we found that Canva was more difficult to use than PicMonkey. Canva had a steep learning curve and lacked some of the features I was looking for in a design program.
We choose to disregard it. But I decided to give it another shot about two or three years ago, and this time I was impressed enough to switch PicMonkey out for it in my collection of editing tools. Canva had added a large number of features that made the program simpler to use and gave users the ability to accomplish more.
Promo
Promo has a wonderful look that pops. You may build quick video intros for your social media or YouTube channel by using their intro maker, and then post and share them on your social networks afterwards. Promo.com provides filmmakers and video editors with high-quality professional video clips, royalty-free music, adjustable video templates, bespoke text, and logos, and more through their monthly membership programs. You may utilize Promo to create videos in a variety of orientations and forms, including horizontal, vertical, square, and even banner films.
To summarize, Promo is a video maker that has an impressive design and allows for direct uploads to various social media platforms. The only problem is that their website occasionally becomes unresponsive and sluggish. Because of this, the process of creation can become rather laborious and drawn out.
Promo.com is my one-stop-shop for all of my business promotional videos because it offers a variety of video ad templates that I can easily edit on my browser without the need for any program, and they also offer a great selection of stock footage and text overlay options to make the videos look more professional. Promo.com has a lot of awesome templates for a bunch of different categories.
Filmora
If you’re worried about how challenging and time-consuming it will be to create the ideal video introduction, Filmora will put those worries to rest. You can finish your introduction in record time thanks to iStock and Shutterstock’s vast libraries of high-quality stock films, photos, and music, as well as their ability to create fully adjustable titles and more than 5000 intro themes.
Filmora is capable of much more than simply creating video introductions. It is capable of handling anything connected to video and even more. The program is compatible with all of your Ultra HD 4K Video files and provides support for the finest quality hi-fidelity Dolby Surround Sound.
When working on other video projects, you can use masking and blending to add layers to your videos and give them the shape you want, thereby producing the most artistic scenes possible. Make use of keyframing to modify the dynamism and smoothness of your edits with the help of animated effects. The chroma key tool allows you to get rid of green screens and create amazing effects that will blow people away. And AI Motion Tracking is just what you need to make it possible for text or graphics to automatically track specific objects throughout your films.
The Bottom Line
The readers of this post have been provided with a list of many free online 3D intro creator tools, which can be used to create the ideal film for both personal and commercial usage. The availability of multiple tools accompanied by clear descriptions of the capabilities supplied by each helps to simplify the decision process. In addition to this, users have been supplied with an in-depth introduction to Wondershare UniConverter, a program that provides tools that are universally applicable.
Free Download For Win 7 or later(64-bit)
Free Download For macOS 10.14 or later
How to Select and Use The Best BRAW LUTs
Good content plays a huge role in this digital age, and making one has many different ingredients. LUTs are one of those secret ingredients that can take your content to new heights. They are essentially pre-defined color grading presets you can apply to your media files. Furthermore, these LUTs act as a guiding map to maintain your video’s color and tone.
In addition, there are many more in the world of LUTs, such as BRAW LUTs. BRAW (Blackmagic RAW) is a popular raw video format with excellent media quality. Such LUTs are specifically used to optimize and improve the colors of any BRAW footage. Moreover, their utility goes beyond just one software. There are many platforms to use these LUTs, such as Premiere Pro and Wondershare Filmora .
Add LUTs on Video For Win 7 or later(64-bit)
Add LUTs on Video For macOS 10.14 or later


Part 1: How to Apply BRAW LUTs on Premiere Pro?
If you want to apply BRAW LUTs Premier Pro to your videos, follow these steps. These simple steps will guide you on how to apply your LUTs using Premier Pro.
Step 1: Import and Set up Your Video
Open Premiere Pro and locate the “File” menu. Choose the “Import” option from the menu and select your files to import. Find your imported video in the “Project” panel and drag it into the timeline. In this way, your files will be imported.

Step 2: Adjust Blackmagic RAW Settings
Lead into the “Source” section and look for the “Effect Controls” tab. Inside the Effects Control tab, locate the Blackmagic RAW tab. Underneath the Blackmagic RAW tab, change the “Decode Using” settings to “Clip.” Furthermore, adjust the “Gamma” settings to “Blackmagic Design Extended Video.”

Step 3: Apply the LUT to Your Video Clips
To apply the LUT to all your video clips, right-click on the “Blackmagic RAW” tab. Click on the “Copy” option from the menu that appears. Now, select all your clips in the “Project” panel by holding the SHIFT key while clicking on each clip. Right-click on the selected clips and choose the “Paste” option to apply the LUT. Your Blackmagic LUT will now be applied to all the selected video files. After completing your edits save your file.

Empower your videos with a new mood using different LUTs. Filmora now offers 100+ top-quality 3D LUTs cover a broad range of scenarios. Transform your videos with Filmora’s powerful 3D LUTs.
Apply LUT on Videos Apply LUT on Videos Learn More

Part 2: Selecting the Best BRAW LUTs: A Look into The Details
Do you have so many BRAW to Rec709 LUTs options to choose from? You don’t need to waste your time in selecting a good one. Here is a list of some of the best BRAW LUTs that you can download.
1. Blackmagic BaseLUTs for BRAW – Gen 5 & Gen 4 Film
The Blackmagic BaseLUTs for BRAW – Gen 5 & Gen 4 Film powerful pack consists of two different Blackmagic LUTs. These LUTs are designed to enhance your video in remarkable ways. Furthermore, you can expect exceptional retention in the highlights. Additionally, these LUTs offer well-balanced saturation levels for your videos.

2. Cinematic BRAW BMPCC LUTs Gen5
Cinematic BRAW BMPCC LUTs Gen5 is a powerful set of seven different cinematic LUTs. With this pack of BRAW LUTs, you can take your video to the next level. It makes your videos feel larger than life with this LUT pack. Additionally, this pack brings cinematic flair and vibrant colors to create an epic visual experience. Besides this, each LUT comes with its unique color grading.

3. Blackmagic Braw Vivid LUTs
Blackmagic BRAW Vivid LUTs is a great pack to make your videos and images look professional. These LUTs work by exposing your images, revealing hidden details and textures. Furthermore, it increases saturation to make your videos pop. Besides this, it also highlights the red and green channels to make your media look more natural and prominent.

4. S20-F87 BRAW FILM
Experience the magic of the S20-F87 BRAW FILM LUT. Using this LUT pack, you can unlock a world of visual possibilities. Moreover, you can improve your videos’ overall look and feel with their soft, warm green tones. This LUT is designed to create a cinematic atmosphere and a professional look. Using this pack, you can impress your viewers with movie-like color grading.

5. Cine Vintage Nature LUT 22
Cine Vintage Nature LUT 22 is a remarkable LUT pack that transports your video back in time. It creates an old vintage look with a cinematic touch. With this pack, you can transform your modern videos into classic Hollywood movies. It beautifully enhances your videos’ colors, tones, and textures to add depth and emotion. Similarly, using this pack, you can recreate old-school cinematic videos.

6. JM- 15+ PREMIUM BMPCC BRAW LUTS
JM-15+ Premium BMPCC BRAW LUTs are the key to unlocking a cinematic feel in your videos. These powerful LUTs highlight colors, creating a cinematic experience. It is a pack of 15 premium cinematic-style LUTs. Additionally, you can darken colors, giving your videos a rich and dramatic look. Furthermore, these LUTs add depth and dimension to your videos by enhancing shadows and textures.

Part 3: An Alternative to Apply 3D LUTs to Videos: Wondershare Filmora
Wondershare Filmora is what you’re looking for if you want a professional video editing tool. It is an all-in-one video editing tool. From basic editing options to high-end professional video editing features, Filmora has it. You can make basic color corrections and adjustments with this tool. However, Filmora also offers more creative editing options for your videos.
Add LUTs on Video For Win 7 or later(64-bit)
Add LUTs on Video For macOS 10.14 or later
Moreover, this tool has recently been updated and has many more options. With this LUT tool, you can apply different LUTs to enhance the mood of your videos. Apart from this, it has a library of 200+ LUTs to download. This extensive library allows you to choose different color grading presets according to your mood. Furthermore, its library also has other free media assets, ranging from over 10 billion.

Conclusion
LUTs are incredible tools to transform your ordinary content into something extraordinary. You can unleash your creativity with professional-looking content. Many LUTs, particularly BRAW LUTs, can be applied to your Blackmagic RAW footage. Take your videos to new heights with these tools by applying them using your favorite editing tools.
Add LUTs on Video For macOS 10.14 or later
Part 1: How to Apply BRAW LUTs on Premiere Pro?
If you want to apply BRAW LUTs Premier Pro to your videos, follow these steps. These simple steps will guide you on how to apply your LUTs using Premier Pro.
Step 1: Import and Set up Your Video
Open Premiere Pro and locate the “File” menu. Choose the “Import” option from the menu and select your files to import. Find your imported video in the “Project” panel and drag it into the timeline. In this way, your files will be imported.
Step 2: Adjust Blackmagic RAW Settings
Lead into the “Source” section and look for the “Effect Controls” tab. Inside the Effects Control tab, locate the Blackmagic RAW tab. Underneath the Blackmagic RAW tab, change the “Decode Using” settings to “Clip.” Furthermore, adjust the “Gamma” settings to “Blackmagic Design Extended Video.”
Step 3: Apply the LUT to Your Video Clips
To apply the LUT to all your video clips, right-click on the “Blackmagic RAW” tab. Click on the “Copy” option from the menu that appears. Now, select all your clips in the “Project” panel by holding the SHIFT key while clicking on each clip. Right-click on the selected clips and choose the “Paste” option to apply the LUT. Your Blackmagic LUT will now be applied to all the selected video files. After completing your edits save your file.
Empower your videos with a new mood using different LUTs. Filmora now offers 100+ top-quality 3D LUTs cover a broad range of scenarios. Transform your videos with Filmora’s powerful 3D LUTs.
Apply LUT on Videos Apply LUT on Videos Learn More
Part 2: Selecting the Best BRAW LUTs: A Look into The Details
Do you have so many BRAW to Rec709 LUTs options to choose from? You don’t need to waste your time in selecting a good one. Here is a list of some of the best BRAW LUTs that you can download.
1. Blackmagic BaseLUTs for BRAW – Gen 5 & Gen 4 Film
The Blackmagic BaseLUTs for BRAW – Gen 5 & Gen 4 Film powerful pack consists of two different Blackmagic LUTs. These LUTs are designed to enhance your video in remarkable ways. Furthermore, you can expect exceptional retention in the highlights. Additionally, these LUTs offer well-balanced saturation levels for your videos.
2. Cinematic BRAW BMPCC LUTs Gen5
Cinematic BRAW BMPCC LUTs Gen5 is a powerful set of seven different cinematic LUTs. With this pack of BRAW LUTs, you can take your video to the next level. It makes your videos feel larger than life with this LUT pack. Additionally, this pack brings cinematic flair and vibrant colors to create an epic visual experience. Besides this, each LUT comes with its unique color grading.
3. Blackmagic Braw Vivid LUTs
Blackmagic BRAW Vivid LUTs is a great pack to make your videos and images look professional. These LUTs work by exposing your images, revealing hidden details and textures. Furthermore, it increases saturation to make your videos pop. Besides this, it also highlights the red and green channels to make your media look more natural and prominent.
4. S20-F87 BRAW FILM
Experience the magic of the S20-F87 BRAW FILM LUT. Using this LUT pack, you can unlock a world of visual possibilities. Moreover, you can improve your videos’ overall look and feel with their soft, warm green tones. This LUT is designed to create a cinematic atmosphere and a professional look. Using this pack, you can impress your viewers with movie-like color grading.
5. Cine Vintage Nature LUT 22
Cine Vintage Nature LUT 22 is a remarkable LUT pack that transports your video back in time. It creates an old vintage look with a cinematic touch. With this pack, you can transform your modern videos into classic Hollywood movies. It beautifully enhances your videos’ colors, tones, and textures to add depth and emotion. Similarly, using this pack, you can recreate old-school cinematic videos.
6. JM- 15+ PREMIUM BMPCC BRAW LUTS
JM-15+ Premium BMPCC BRAW LUTs are the key to unlocking a cinematic feel in your videos. These powerful LUTs highlight colors, creating a cinematic experience. It is a pack of 15 premium cinematic-style LUTs. Additionally, you can darken colors, giving your videos a rich and dramatic look. Furthermore, these LUTs add depth and dimension to your videos by enhancing shadows and textures.
Part 3: An Alternative to Apply 3D LUTs to Videos: Wondershare Filmora
Wondershare Filmora is what you’re looking for if you want a professional video editing tool. It is an all-in-one video editing tool. From basic editing options to high-end professional video editing features, Filmora has it. You can make basic color corrections and adjustments with this tool. However, Filmora also offers more creative editing options for your videos.
Add LUTs on Video For Win 7 or later(64-bit)
Add LUTs on Video For macOS 10.14 or later
Moreover, this tool has recently been updated and has many more options. With this LUT tool, you can apply different LUTs to enhance the mood of your videos. Apart from this, it has a library of 200+ LUTs to download. This extensive library allows you to choose different color grading presets according to your mood. Furthermore, its library also has other free media assets, ranging from over 10 billion.
Conclusion
LUTs are incredible tools to transform your ordinary content into something extraordinary. You can unleash your creativity with professional-looking content. Many LUTs, particularly BRAW LUTs, can be applied to your Blackmagic RAW footage. Take your videos to new heights with these tools by applying them using your favorite editing tools.
Also read:
- [Updated] 2024 Approved Boosting Audience Size A Comprehensive Guide to YouTube Shorts Success
- Console or Computer? The Ultimate Game Test
- Effective Techniques for Retrieving Lost iPhone Data
- In 2024, Best Choice Avi Player with Multiplatform Support
- New 2024 Approved Guide Create The Perfect VHS Effect Look in Premiere Pro
- New How to Make a DIY Vlog or Video
- Updated How to Enable and Use OBS Zoom Camera for 2024
- Updated In 2024, The Art of Storytelling Creating Compelling Slideshows in Final Cut Pro
- Updated So, without Further Dilly-Dallying, Lets Learn How to Create a Retro 1950-Style Video with This Simple Filmora Tutorial
- Title: Tips to Make Cinematic Color Grading
- Author: Morgan
- Created at : 2024-09-29 05:19:12
- Updated at : 2024-10-05 20:31:45
- Link: https://ai-video-editing.techidaily.com/tips-to-make-cinematic-color-grading/
- License: This work is licensed under CC BY-NC-SA 4.0.