:max_bytes(150000):strip_icc():format(webp)/the-11-best-whatsapp-tricks-and-tips-in-2020-4782877-fd12628437f34b85ac38f1a9ac95637e.jpg)
Top 5 Best Video Denoisers

Top 5 Best Video Denoisers
We all know that our recorded videos are not always perfect – when we use a mobile phone or digital cameras to shoot, our clips may contain hiss, compression and particles. These are the impurities that make our videos look uncomfortable, but it’s not a final result impossible to altar – help can come in the form of several video denoise software.
Editing is the guarantor that makes sure we can do different operations and achieve our desired results – computer programs, tools, opportunities that give us a hand in this process are kind of endless.
So, sometimes it’s really difficult to choose among so many options that come into waves. And if we choose our preferred ways, some people might not agree with us. Even so that it is quite subjective, we can still explain which tools and software we like to modify our videos, and fight with the impurities they have.
It looks amateur if the video is grainy, even if it is night shooting. We can get rid of the noise when we add lights or shoot in well-lit places, but there are some situations we can just depend on the ISO. So, for these grainy videos, there is a thing called denoising – when you get rid of the grains and make your shots as clear as possible. There are different ways to do this, and that happens in different software as well. What are the 5 best video denoisers in 2024 for us to work with? That, as we have already mentioned, might be something very subjective, but here is our selection: Wondershare Filmora, Neat Video, Shotcut, Adobe Premiere Pro, and DaVinci Resolve
Wondershare Filmora X
Wondershare Filmora X offers to change our damaged scene into something more acceptable. How to operate it? - You need to go to the Effects panel and type: “Smart Denoise”. right-click on the video and choose Edit Properties.

This ensures you see the Smart Denoise, where you can change opacity of the clip, threshold and radius.

Reduce Opacity until you are satisfied with the result. The box next to Smart Denoise will show you the scene before and after the effect.
Bonus tip: Wondershare Filmora audio denoise
We already explained how video denoising works, and we will go on with our selection and explanatory article about the process, but, as we are on the Filmora topic, we might as well mention that denoising might mean another thing too – which, in this case, regards audio background noise. It means to remove unwanted hum from the audio in order for it to become more hearable. So, doing this in Wondershare Filmora works in a quite easy way. Use the guideline:
Drag and drop your video into the timeline. Right-click on the clip and hit Detach Audio, which will let you separate audio and video from one another and make sure you can work on them one by one.

Double-click on the audio track and have access to the editing panel, where you can see Remove background noise – it is not needed to emphasize what this option does for you!

That’s it – you are done, but keep in mind that there is a second way to achieve the same result as well, but this in case you don’t want to detach the audio: Double-click on the video clip in the timeline, the editing panel opens, so switch to Audio. Checking the box next to Remove background noise will show that there are three levels – weak, mid, and strong, and of course, you can choose to your liking!
If the voice recording doesn’t sound natural anymore, you can do the following: Click on Customize and Customize Equalizer window will open.

On the left, you can see the low tunes, while the highs are on the right. Background noises are often on the left, so you can lower them to get rid of them, but in order to have a more natural sound, raise the middle ones a little – and you are done when you are content with the sound!

So, hmm… back to the original topic – denoising a video, shall we?..
Neat video
Neat Video kind of, speaks for itself… it is a powerful video editing tool suitable for Windows, macOS and Linux. It aims to reduce the digital noise, flicker, dust, scratches and other defects in the captured videos to improve the visual quality of the videos.
It is a plug-in for Premiere Pro, that does more or less what the product noise says: it makes grainy video look neater. It’s very easy to use and
How to do that in Neat Video? Here are the steps:
Find the clip you want to reduce the noise of and search for the neat video effect in the Effects Panel.
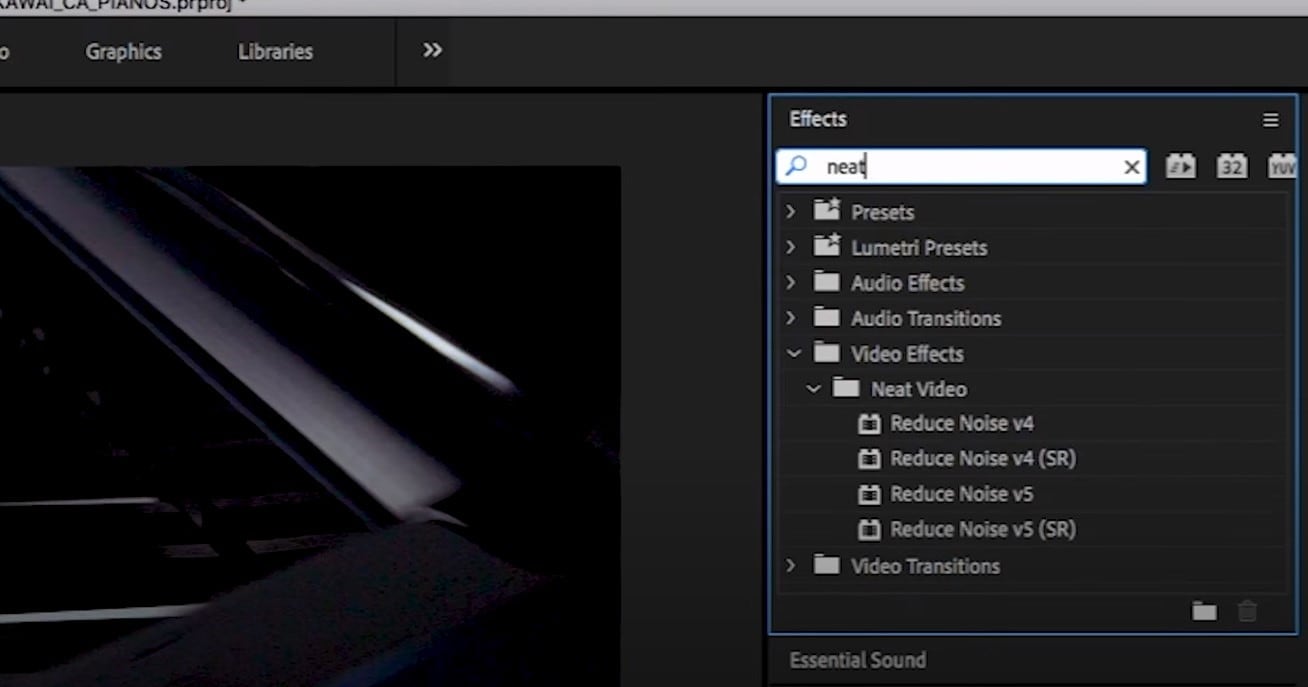
The video editors mostly use the SR version of it, because it seems faster and has kind of a better performance.
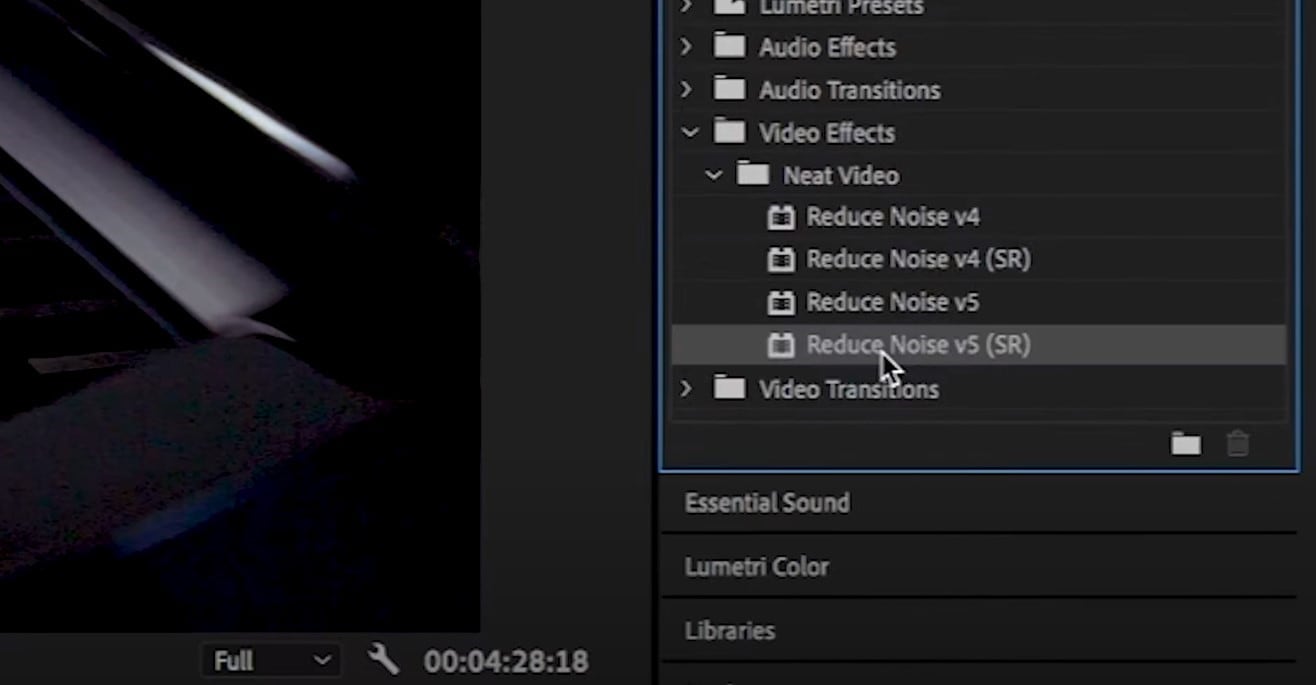
Then, you’ll have to drag the neat video plug-in to the clip to your choosing, take your attention to the Effect Controls panel on the left, and find: fx Reduce Noise v5 (SR) – press the button saying Prepare and this will open up the Build button as well, which wil open the Neat video effect window.
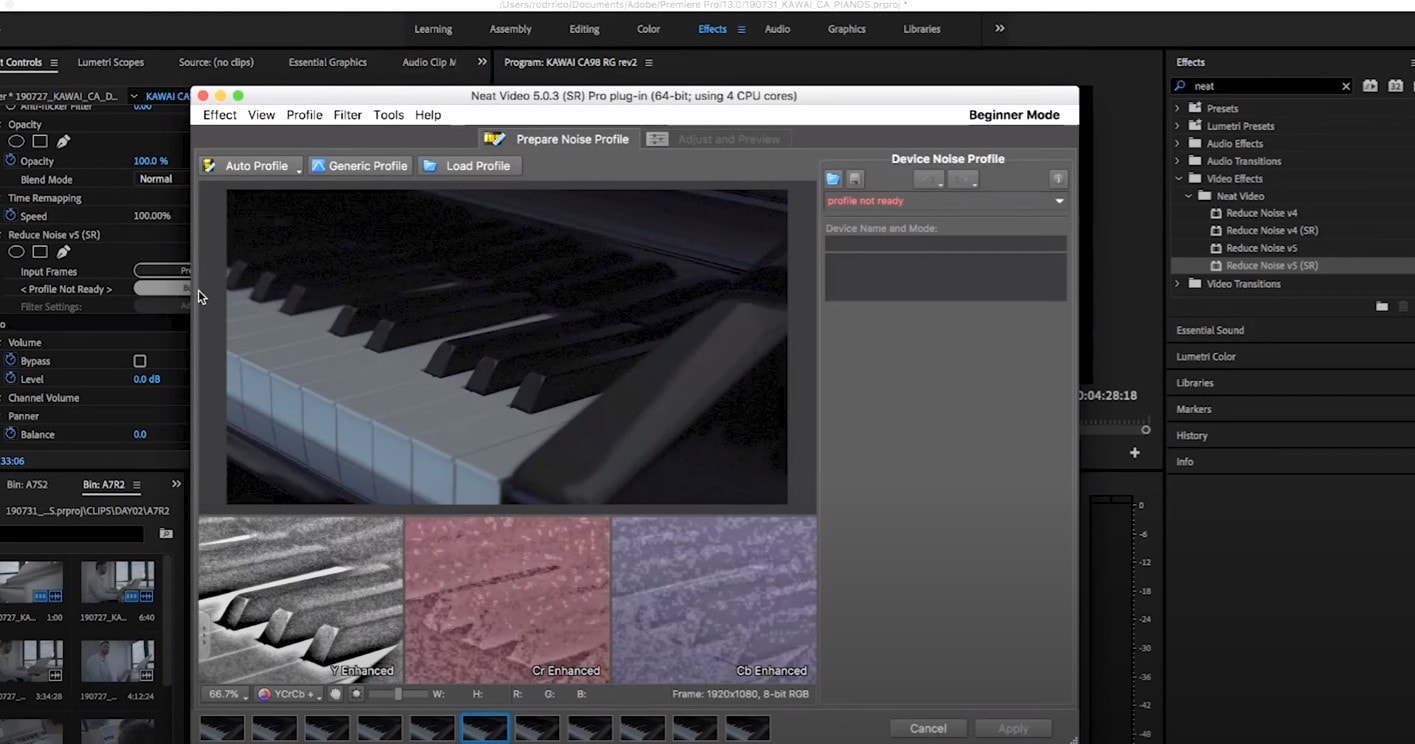
There, you’ll need to click on the Auto Profile. Selection window will appear, which you can move around the scene and resize, in order to select the noisy area of your footage. It is recommended to find the darkest or grainiest area there and select judging by this.
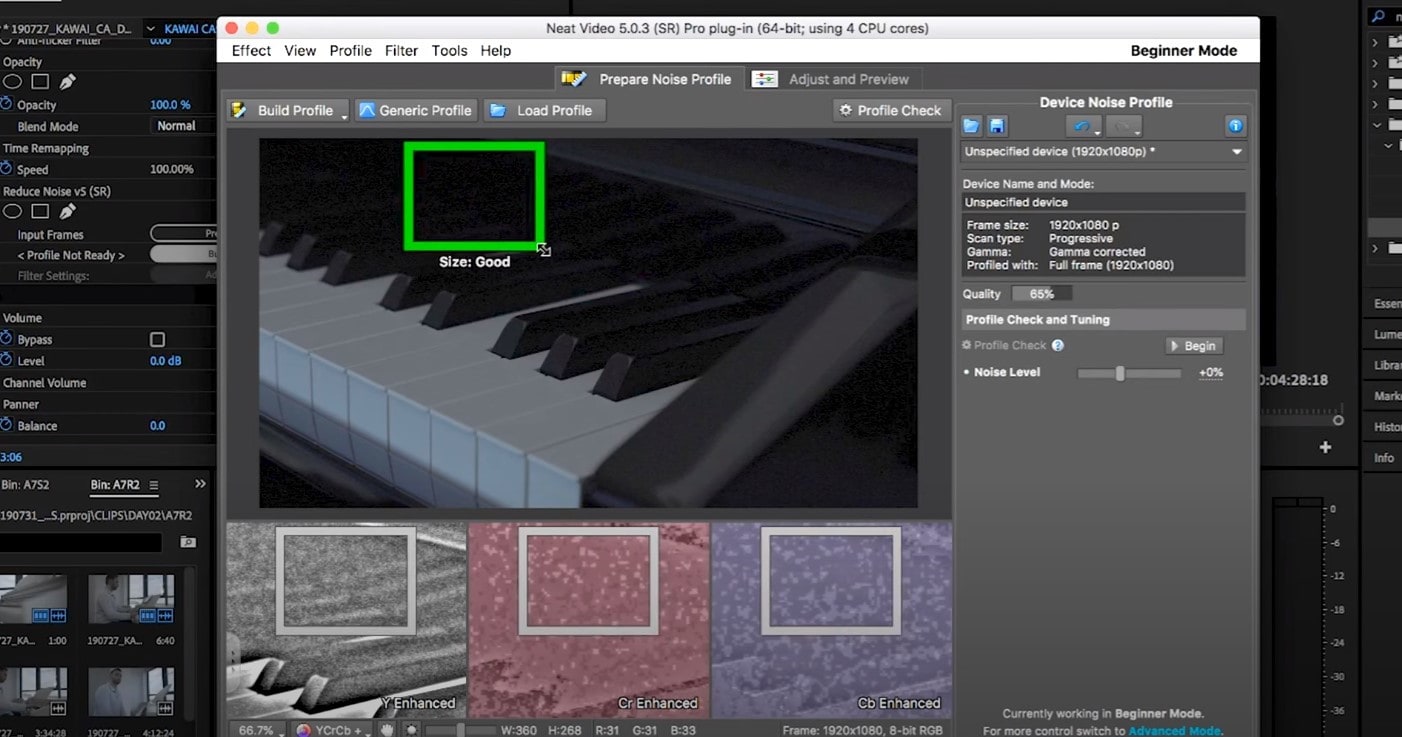
On the left side, you will find Filter Settings: under Spatial, you can play with the Noise Reduction Amount and Noise Level.
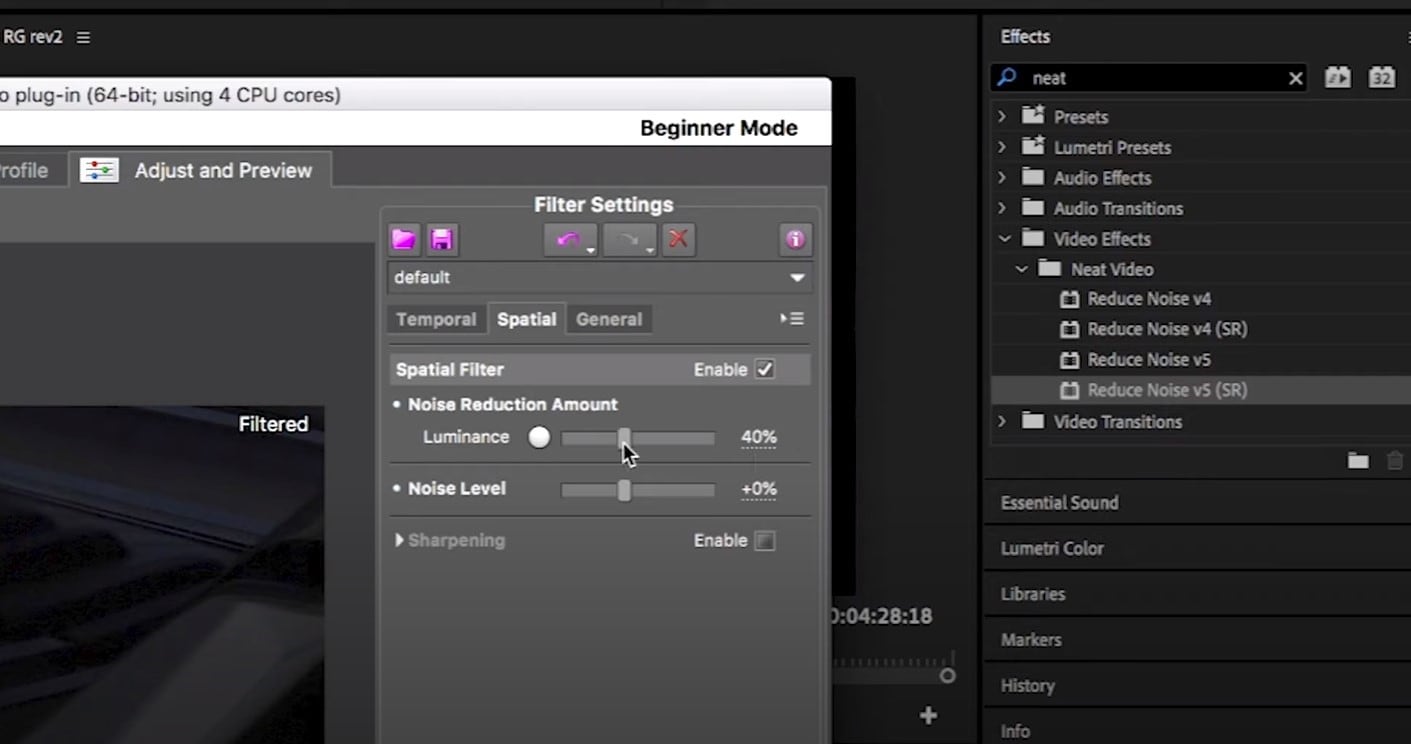
Then, you will hit Apply and – done, you can instantly see the results!
Shotcut
What about Shotcut? It is a free, open-source and cross-platform video denoiser for Windows operating system. It is also an outstanding video editor with trimming, splitting, color correction and other tools.
In order to reduce the noise there, do the following: first off, find filters, open that window and type in: Noise. This will open the options, and several of them are for noise reduction.
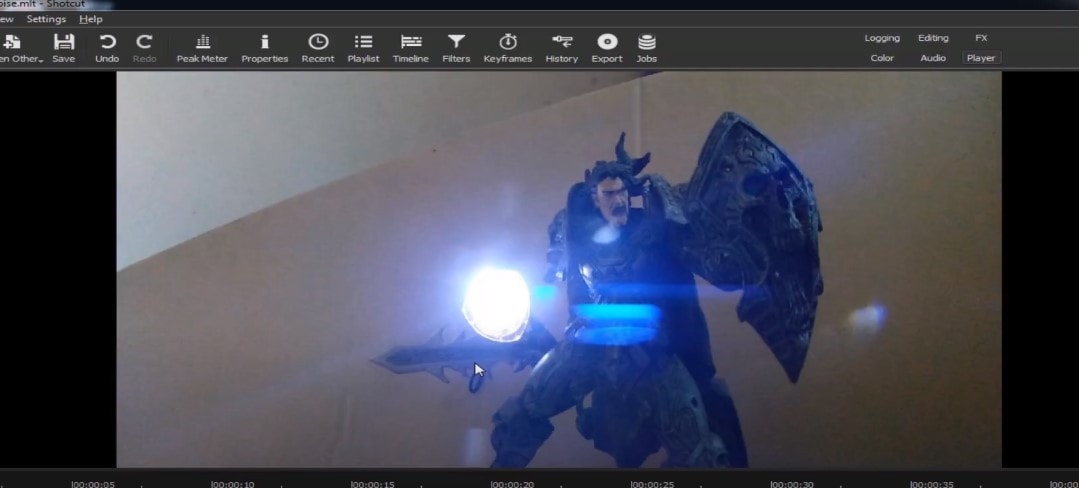
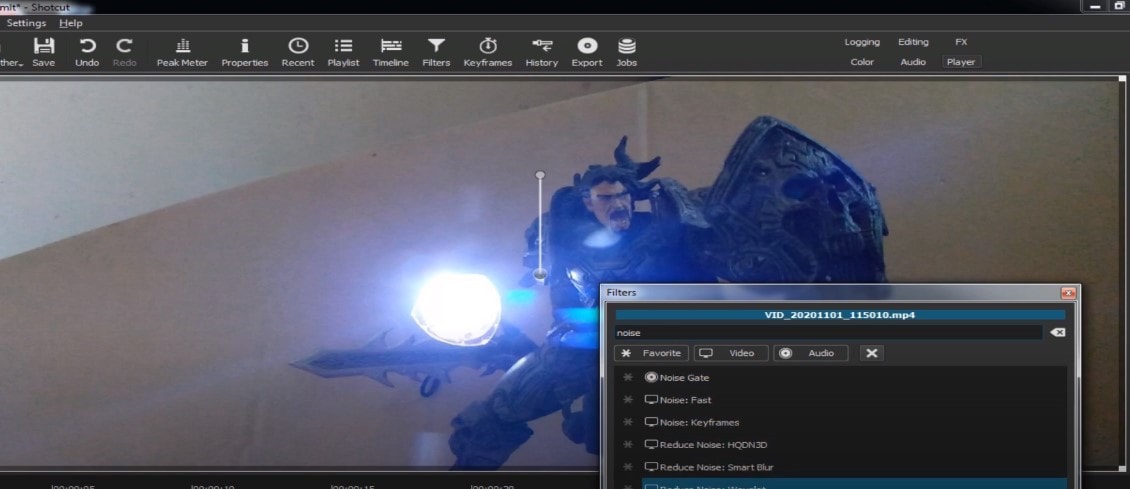
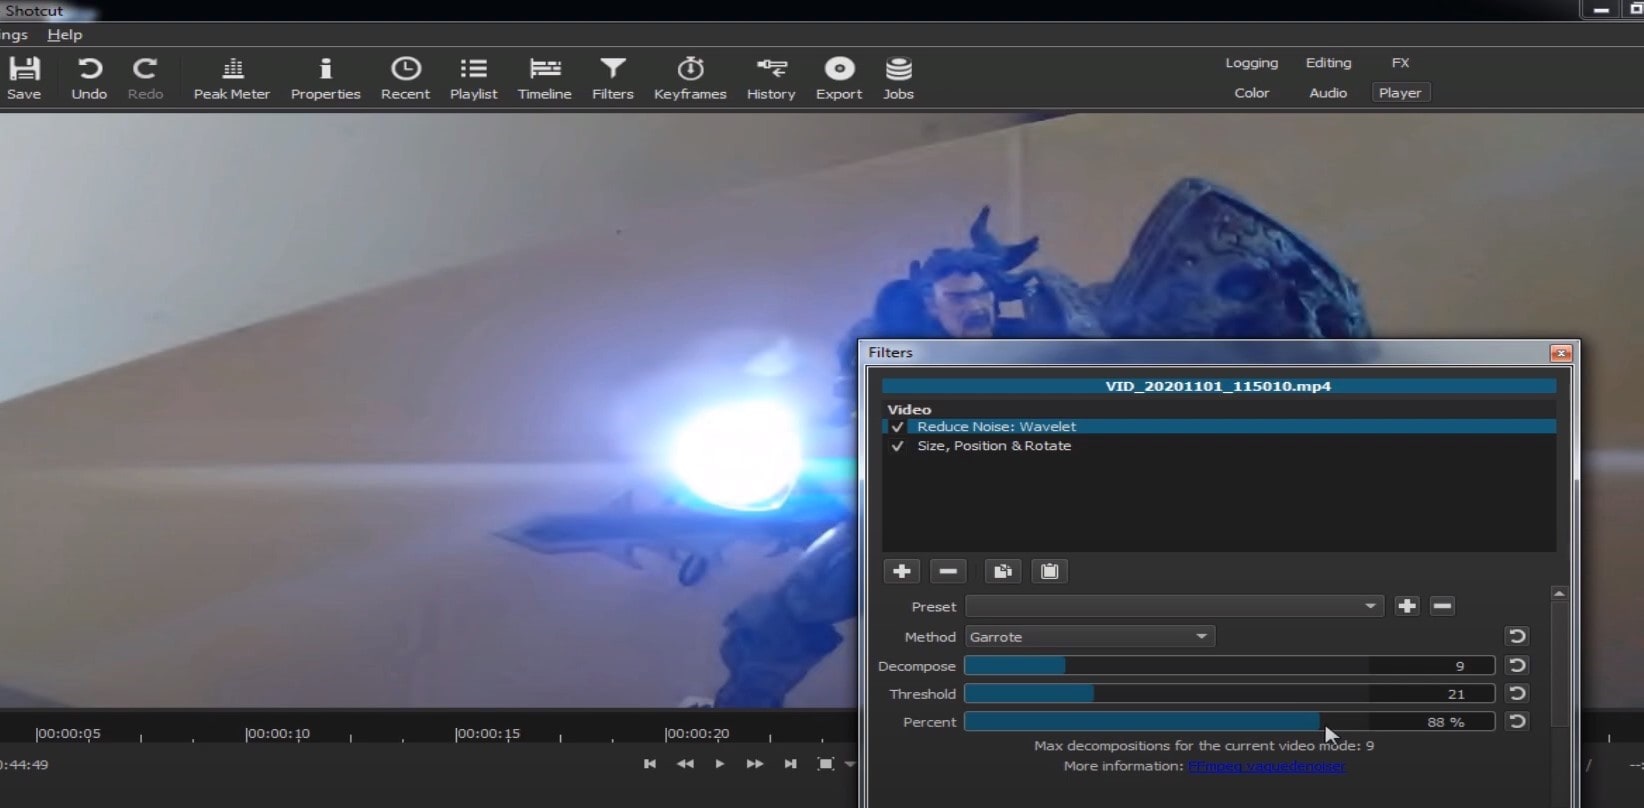
Choose Reduce Noise: Wavelet, add it to the Video and then feel free to modify the settings, such as: Decompose, Threshold, Percent. You can check and uncheck the effect in order to see the before-after difference. Then, click Apply button and it is ready to go!
Anyway, you can also try other similar effects such as Reduce Noise: HQDN3D and Reduce Noise: Smart Blur.
Adobe Premiere Pro
Even though we discussed video denoising in Adobe Premier Pro but with the help of a plug-in called Neat Video, reducing the noise in the video in this software can be achieved without the plug-in as well, through using effect which is called Median. And, Premiere Pro kind of deserves to be mentioned, so, let’s go for it!
Add the desired footage into the Timeline of Premiere Pro. Then, find the Effects Panel, where our wanted Median can be found –drag and drop the effect to the clip.

The Median should modify the grainiest parts of the whole clip, so in order to do this, we need to use masks. In the Effects Control panel, select the mask shape for the clip – the options are: rectangle, circle, or pen tool. With Pen tool, you move the Mask around the screen and resize it – the covered area will be affected.

If you change Feather setting to 100, the effect will lose a sharp edge and instead, there will be a smooth border.

So, you might think it is needed to repeat these steps several time to create masks in different areas, in order to cover all of the grainy space of the scene.
And, at last, to reduce the noise, adjust the effect settings.

Actually, Median just blurs the grainy parts, without directly taking them away. Lastly, you can get to know the Radios settings, which will help you to achieve your most desired look!
Davinci Resolve
DaVinci Resolve is also worth mentioning in this list, in a way because it is also different from other video editors. Let’s see how it works and, meanwhile, differs:
Add the footage into the timeline. Find the fusion tab underneath the timeline panel.
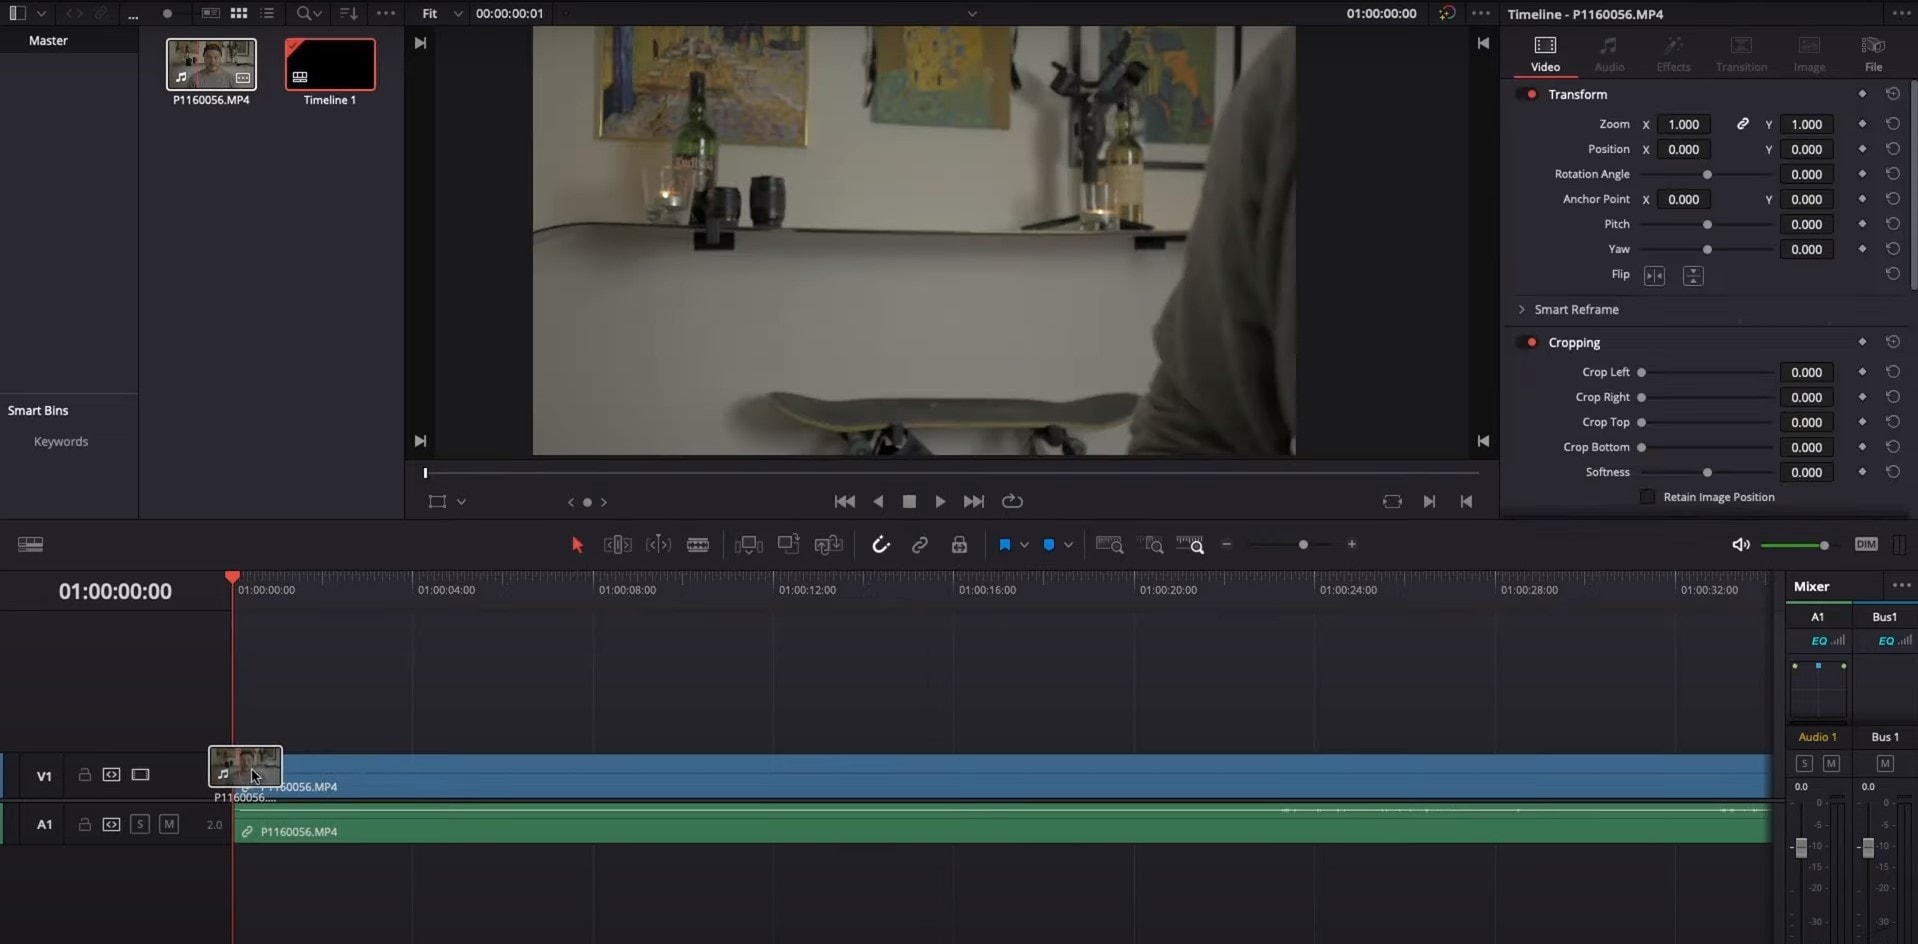
There, MediaIn1 and MediaOut1 will appear, and first, click on MediaIn1, - the scene will be shown in the first viewer – and MediaOut1 by default is appearing in the second. So, stay on MediaIn1, hit shift+spacebar, and find Remove Noise (RN). Click Add, which adds the Remove Noise1 node. On the top right corner there is an Inspector, which opens all the properties you can modify.

After going only into the second viewer, and in the top bar there is channel icons. Open it and click on red, but don’t get alarmed when your footage turns black and white – it’s just for a while. Go back to the Inspector, increase Softness Red and Detail Red.

This step helps remove grain from the red channel. Then repeat the same for green and blue channels. After finishing go to the same channel button and set it to “back to color”. The clip will be colorized again and now be clearer, compared to the first viewer.

So, Evrika – we hot to know 5 best video denoisers in 2024, with the addition of audio background noise removal in Wondershare Filmora – hope you enjoyed it, and hope this will help you create better videos for yourself and your viewers!
This ensures you see the Smart Denoise, where you can change opacity of the clip, threshold and radius.

Reduce Opacity until you are satisfied with the result. The box next to Smart Denoise will show you the scene before and after the effect.
Bonus tip: Wondershare Filmora audio denoise
We already explained how video denoising works, and we will go on with our selection and explanatory article about the process, but, as we are on the Filmora topic, we might as well mention that denoising might mean another thing too – which, in this case, regards audio background noise. It means to remove unwanted hum from the audio in order for it to become more hearable. So, doing this in Wondershare Filmora works in a quite easy way. Use the guideline:
Drag and drop your video into the timeline. Right-click on the clip and hit Detach Audio, which will let you separate audio and video from one another and make sure you can work on them one by one.

Double-click on the audio track and have access to the editing panel, where you can see Remove background noise – it is not needed to emphasize what this option does for you!

That’s it – you are done, but keep in mind that there is a second way to achieve the same result as well, but this in case you don’t want to detach the audio: Double-click on the video clip in the timeline, the editing panel opens, so switch to Audio. Checking the box next to Remove background noise will show that there are three levels – weak, mid, and strong, and of course, you can choose to your liking!
If the voice recording doesn’t sound natural anymore, you can do the following: Click on Customize and Customize Equalizer window will open.

On the left, you can see the low tunes, while the highs are on the right. Background noises are often on the left, so you can lower them to get rid of them, but in order to have a more natural sound, raise the middle ones a little – and you are done when you are content with the sound!

So, hmm… back to the original topic – denoising a video, shall we?..
Neat video
Neat Video kind of, speaks for itself… it is a powerful video editing tool suitable for Windows, macOS and Linux. It aims to reduce the digital noise, flicker, dust, scratches and other defects in the captured videos to improve the visual quality of the videos.
It is a plug-in for Premiere Pro, that does more or less what the product noise says: it makes grainy video look neater. It’s very easy to use and
How to do that in Neat Video? Here are the steps:
Find the clip you want to reduce the noise of and search for the neat video effect in the Effects Panel.

The video editors mostly use the SR version of it, because it seems faster and has kind of a better performance.

Then, you’ll have to drag the neat video plug-in to the clip to your choosing, take your attention to the Effect Controls panel on the left, and find: fx Reduce Noise v5 (SR) – press the button saying Prepare and this will open up the Build button as well, which wil open the Neat video effect window.

There, you’ll need to click on the Auto Profile. Selection window will appear, which you can move around the scene and resize, in order to select the noisy area of your footage. It is recommended to find the darkest or grainiest area there and select judging by this.

On the left side, you will find Filter Settings: under Spatial, you can play with the Noise Reduction Amount and Noise Level.

Then, you will hit Apply and – done, you can instantly see the results!
Shotcut
What about Shotcut? It is a free, open-source and cross-platform video denoiser for Windows operating system. It is also an outstanding video editor with trimming, splitting, color correction and other tools.
In order to reduce the noise there, do the following: first off, find filters, open that window and type in: Noise. This will open the options, and several of them are for noise reduction.


Choose Reduce Noise: Wavelet, add it to the Video and then feel free to modify the settings, such as: Decompose, Threshold, Percent. You can check and uncheck the effect in order to see the before-after difference. Then, click Apply button and it is ready to go!
Anyway, you can also try other similar effects such as Reduce Noise: HQDN3D and Reduce Noise: Smart Blur.
Adobe Premiere Pro
Even though we discussed video denoising in Adobe Premier Pro but with the help of a plug-in called Neat Video, reducing the noise in the video in this software can be achieved without the plug-in as well, through using effect which is called Median. And, Premiere Pro kind of deserves to be mentioned, so, let’s go for it!
Add the desired footage into the Timeline of Premiere Pro. Then, find the Effects Panel, where our wanted Median can be found –drag and drop the effect to the clip.

The Median should modify the grainiest parts of the whole clip, so in order to do this, we need to use masks. In the Effects Control panel, select the mask shape for the clip – the options are: rectangle, circle, or pen tool. With Pen tool, you move the Mask around the screen and resize it – the covered area will be affected.

If you change Feather setting to 100, the effect will lose a sharp edge and instead, there will be a smooth border.

So, you might think it is needed to repeat these steps several time to create masks in different areas, in order to cover all of the grainy space of the scene.
And, at last, to reduce the noise, adjust the effect settings.

Actually, Median just blurs the grainy parts, without directly taking them away. Lastly, you can get to know the Radios settings, which will help you to achieve your most desired look!
Davinci Resolve
DaVinci Resolve is also worth mentioning in this list, in a way because it is also different from other video editors. Let’s see how it works and, meanwhile, differs:
Add the footage into the timeline. Find the fusion tab underneath the timeline panel.

There, MediaIn1 and MediaOut1 will appear, and first, click on MediaIn1, - the scene will be shown in the first viewer – and MediaOut1 by default is appearing in the second. So, stay on MediaIn1, hit shift+spacebar, and find Remove Noise (RN). Click Add, which adds the Remove Noise1 node. On the top right corner there is an Inspector, which opens all the properties you can modify.

After going only into the second viewer, and in the top bar there is channel icons. Open it and click on red, but don’t get alarmed when your footage turns black and white – it’s just for a while. Go back to the Inspector, increase Softness Red and Detail Red.

This step helps remove grain from the red channel. Then repeat the same for green and blue channels. After finishing go to the same channel button and set it to “back to color”. The clip will be colorized again and now be clearer, compared to the first viewer.

So, Evrika – we hot to know 5 best video denoisers in 2024, with the addition of audio background noise removal in Wondershare Filmora – hope you enjoyed it, and hope this will help you create better videos for yourself and your viewers!
This ensures you see the Smart Denoise, where you can change opacity of the clip, threshold and radius.

Reduce Opacity until you are satisfied with the result. The box next to Smart Denoise will show you the scene before and after the effect.
Bonus tip: Wondershare Filmora audio denoise
We already explained how video denoising works, and we will go on with our selection and explanatory article about the process, but, as we are on the Filmora topic, we might as well mention that denoising might mean another thing too – which, in this case, regards audio background noise. It means to remove unwanted hum from the audio in order for it to become more hearable. So, doing this in Wondershare Filmora works in a quite easy way. Use the guideline:
Drag and drop your video into the timeline. Right-click on the clip and hit Detach Audio, which will let you separate audio and video from one another and make sure you can work on them one by one.

Double-click on the audio track and have access to the editing panel, where you can see Remove background noise – it is not needed to emphasize what this option does for you!

That’s it – you are done, but keep in mind that there is a second way to achieve the same result as well, but this in case you don’t want to detach the audio: Double-click on the video clip in the timeline, the editing panel opens, so switch to Audio. Checking the box next to Remove background noise will show that there are three levels – weak, mid, and strong, and of course, you can choose to your liking!
If the voice recording doesn’t sound natural anymore, you can do the following: Click on Customize and Customize Equalizer window will open.

On the left, you can see the low tunes, while the highs are on the right. Background noises are often on the left, so you can lower them to get rid of them, but in order to have a more natural sound, raise the middle ones a little – and you are done when you are content with the sound!

So, hmm… back to the original topic – denoising a video, shall we?..
Neat video
Neat Video kind of, speaks for itself… it is a powerful video editing tool suitable for Windows, macOS and Linux. It aims to reduce the digital noise, flicker, dust, scratches and other defects in the captured videos to improve the visual quality of the videos.
It is a plug-in for Premiere Pro, that does more or less what the product noise says: it makes grainy video look neater. It’s very easy to use and
How to do that in Neat Video? Here are the steps:
Find the clip you want to reduce the noise of and search for the neat video effect in the Effects Panel.

The video editors mostly use the SR version of it, because it seems faster and has kind of a better performance.

Then, you’ll have to drag the neat video plug-in to the clip to your choosing, take your attention to the Effect Controls panel on the left, and find: fx Reduce Noise v5 (SR) – press the button saying Prepare and this will open up the Build button as well, which wil open the Neat video effect window.

There, you’ll need to click on the Auto Profile. Selection window will appear, which you can move around the scene and resize, in order to select the noisy area of your footage. It is recommended to find the darkest or grainiest area there and select judging by this.

On the left side, you will find Filter Settings: under Spatial, you can play with the Noise Reduction Amount and Noise Level.

Then, you will hit Apply and – done, you can instantly see the results!
Shotcut
What about Shotcut? It is a free, open-source and cross-platform video denoiser for Windows operating system. It is also an outstanding video editor with trimming, splitting, color correction and other tools.
In order to reduce the noise there, do the following: first off, find filters, open that window and type in: Noise. This will open the options, and several of them are for noise reduction.


Choose Reduce Noise: Wavelet, add it to the Video and then feel free to modify the settings, such as: Decompose, Threshold, Percent. You can check and uncheck the effect in order to see the before-after difference. Then, click Apply button and it is ready to go!
Anyway, you can also try other similar effects such as Reduce Noise: HQDN3D and Reduce Noise: Smart Blur.
Adobe Premiere Pro
Even though we discussed video denoising in Adobe Premier Pro but with the help of a plug-in called Neat Video, reducing the noise in the video in this software can be achieved without the plug-in as well, through using effect which is called Median. And, Premiere Pro kind of deserves to be mentioned, so, let’s go for it!
Add the desired footage into the Timeline of Premiere Pro. Then, find the Effects Panel, where our wanted Median can be found –drag and drop the effect to the clip.

The Median should modify the grainiest parts of the whole clip, so in order to do this, we need to use masks. In the Effects Control panel, select the mask shape for the clip – the options are: rectangle, circle, or pen tool. With Pen tool, you move the Mask around the screen and resize it – the covered area will be affected.

If you change Feather setting to 100, the effect will lose a sharp edge and instead, there will be a smooth border.

So, you might think it is needed to repeat these steps several time to create masks in different areas, in order to cover all of the grainy space of the scene.
And, at last, to reduce the noise, adjust the effect settings.

Actually, Median just blurs the grainy parts, without directly taking them away. Lastly, you can get to know the Radios settings, which will help you to achieve your most desired look!
Davinci Resolve
DaVinci Resolve is also worth mentioning in this list, in a way because it is also different from other video editors. Let’s see how it works and, meanwhile, differs:
Add the footage into the timeline. Find the fusion tab underneath the timeline panel.

There, MediaIn1 and MediaOut1 will appear, and first, click on MediaIn1, - the scene will be shown in the first viewer – and MediaOut1 by default is appearing in the second. So, stay on MediaIn1, hit shift+spacebar, and find Remove Noise (RN). Click Add, which adds the Remove Noise1 node. On the top right corner there is an Inspector, which opens all the properties you can modify.

After going only into the second viewer, and in the top bar there is channel icons. Open it and click on red, but don’t get alarmed when your footage turns black and white – it’s just for a while. Go back to the Inspector, increase Softness Red and Detail Red.

This step helps remove grain from the red channel. Then repeat the same for green and blue channels. After finishing go to the same channel button and set it to “back to color”. The clip will be colorized again and now be clearer, compared to the first viewer.

So, Evrika – we hot to know 5 best video denoisers in 2024, with the addition of audio background noise removal in Wondershare Filmora – hope you enjoyed it, and hope this will help you create better videos for yourself and your viewers!
This ensures you see the Smart Denoise, where you can change opacity of the clip, threshold and radius.

Reduce Opacity until you are satisfied with the result. The box next to Smart Denoise will show you the scene before and after the effect.
Bonus tip: Wondershare Filmora audio denoise
We already explained how video denoising works, and we will go on with our selection and explanatory article about the process, but, as we are on the Filmora topic, we might as well mention that denoising might mean another thing too – which, in this case, regards audio background noise. It means to remove unwanted hum from the audio in order for it to become more hearable. So, doing this in Wondershare Filmora works in a quite easy way. Use the guideline:
Drag and drop your video into the timeline. Right-click on the clip and hit Detach Audio, which will let you separate audio and video from one another and make sure you can work on them one by one.

Double-click on the audio track and have access to the editing panel, where you can see Remove background noise – it is not needed to emphasize what this option does for you!

That’s it – you are done, but keep in mind that there is a second way to achieve the same result as well, but this in case you don’t want to detach the audio: Double-click on the video clip in the timeline, the editing panel opens, so switch to Audio. Checking the box next to Remove background noise will show that there are three levels – weak, mid, and strong, and of course, you can choose to your liking!
If the voice recording doesn’t sound natural anymore, you can do the following: Click on Customize and Customize Equalizer window will open.

On the left, you can see the low tunes, while the highs are on the right. Background noises are often on the left, so you can lower them to get rid of them, but in order to have a more natural sound, raise the middle ones a little – and you are done when you are content with the sound!

So, hmm… back to the original topic – denoising a video, shall we?..
Neat video
Neat Video kind of, speaks for itself… it is a powerful video editing tool suitable for Windows, macOS and Linux. It aims to reduce the digital noise, flicker, dust, scratches and other defects in the captured videos to improve the visual quality of the videos.
It is a plug-in for Premiere Pro, that does more or less what the product noise says: it makes grainy video look neater. It’s very easy to use and
How to do that in Neat Video? Here are the steps:
Find the clip you want to reduce the noise of and search for the neat video effect in the Effects Panel.

The video editors mostly use the SR version of it, because it seems faster and has kind of a better performance.

Then, you’ll have to drag the neat video plug-in to the clip to your choosing, take your attention to the Effect Controls panel on the left, and find: fx Reduce Noise v5 (SR) – press the button saying Prepare and this will open up the Build button as well, which wil open the Neat video effect window.

There, you’ll need to click on the Auto Profile. Selection window will appear, which you can move around the scene and resize, in order to select the noisy area of your footage. It is recommended to find the darkest or grainiest area there and select judging by this.

On the left side, you will find Filter Settings: under Spatial, you can play with the Noise Reduction Amount and Noise Level.

Then, you will hit Apply and – done, you can instantly see the results!
Shotcut
What about Shotcut? It is a free, open-source and cross-platform video denoiser for Windows operating system. It is also an outstanding video editor with trimming, splitting, color correction and other tools.
In order to reduce the noise there, do the following: first off, find filters, open that window and type in: Noise. This will open the options, and several of them are for noise reduction.


Choose Reduce Noise: Wavelet, add it to the Video and then feel free to modify the settings, such as: Decompose, Threshold, Percent. You can check and uncheck the effect in order to see the before-after difference. Then, click Apply button and it is ready to go!
Anyway, you can also try other similar effects such as Reduce Noise: HQDN3D and Reduce Noise: Smart Blur.
Adobe Premiere Pro
Even though we discussed video denoising in Adobe Premier Pro but with the help of a plug-in called Neat Video, reducing the noise in the video in this software can be achieved without the plug-in as well, through using effect which is called Median. And, Premiere Pro kind of deserves to be mentioned, so, let’s go for it!
Add the desired footage into the Timeline of Premiere Pro. Then, find the Effects Panel, where our wanted Median can be found –drag and drop the effect to the clip.

The Median should modify the grainiest parts of the whole clip, so in order to do this, we need to use masks. In the Effects Control panel, select the mask shape for the clip – the options are: rectangle, circle, or pen tool. With Pen tool, you move the Mask around the screen and resize it – the covered area will be affected.

If you change Feather setting to 100, the effect will lose a sharp edge and instead, there will be a smooth border.

So, you might think it is needed to repeat these steps several time to create masks in different areas, in order to cover all of the grainy space of the scene.
And, at last, to reduce the noise, adjust the effect settings.

Actually, Median just blurs the grainy parts, without directly taking them away. Lastly, you can get to know the Radios settings, which will help you to achieve your most desired look!
Davinci Resolve
DaVinci Resolve is also worth mentioning in this list, in a way because it is also different from other video editors. Let’s see how it works and, meanwhile, differs:
Add the footage into the timeline. Find the fusion tab underneath the timeline panel.

There, MediaIn1 and MediaOut1 will appear, and first, click on MediaIn1, - the scene will be shown in the first viewer – and MediaOut1 by default is appearing in the second. So, stay on MediaIn1, hit shift+spacebar, and find Remove Noise (RN). Click Add, which adds the Remove Noise1 node. On the top right corner there is an Inspector, which opens all the properties you can modify.

After going only into the second viewer, and in the top bar there is channel icons. Open it and click on red, but don’t get alarmed when your footage turns black and white – it’s just for a while. Go back to the Inspector, increase Softness Red and Detail Red.

This step helps remove grain from the red channel. Then repeat the same for green and blue channels. After finishing go to the same channel button and set it to “back to color”. The clip will be colorized again and now be clearer, compared to the first viewer.

So, Evrika – we hot to know 5 best video denoisers in 2024, with the addition of audio background noise removal in Wondershare Filmora – hope you enjoyed it, and hope this will help you create better videos for yourself and your viewers!
4 Ways to Rotate Videos on Windows PC
There are times where you may need to rotate a video into landscape if the video is shot in portrait. This is because watching a video in portrait orientation on a computer is horrible as the video screen size is compressed and the two sides have black screen. Instead, you can rotate video Windows into landscape, you can watch the same video comfortably. Besides, there are times when the entire video is shot at a certain angle as the video device was not properly aligned.
If you are a Windows user, rotating a video in Windows through Windows Media Player is not possible. However, Windows 10 comes with Photos app that contains a video editor to rotate a video and save it permanently. If you use VLC Media Player, you can rotate any video temporarily as well permanently at any desired angle. You can also rotate a video online without installing any software. In this article, we will illustrate how to rotate a video in Windows.
Way 1. Use Photos App
If you are a Windows 10, you can use the pre-installed Photos app to rotate a video and save it permanently. Photos app comes with an inbuilt video editor where rotating a video in Windows 10 is so easy. If you are using an older version of Windows, you can relate Photos app with Windows Movie Maker. Anyway, here are the steps to rotate any video on Photos app.
Step 1: From Start menu, search for “Photos” and open Photos app.

Step 2: Select Video Editor option which is available at the top of the screen. Once, Video Editor opens, click on New Video Project button.

Step 3: Put a name for the project and click on Ok. Thereafter, click on Add button and select the video file from your hard drive that you want to rotate.

Step 4: Drag and drop the video file into Timeline. Thereafter, Click on Rotate icon to turn the video by 90 degrees. You can click again to rotate the video further by 90 degrees again.

Step 5: Once done, click on Finish Video option and save the video file in the destination folder.
Way 2. Use Filmora
The best software on how to rotate a video in Windows 10 to Windows 7 is Wondershare Filmora . It is a professional video editor and there are loads of features to edit the video including rotation. You can make a video more attractive and crisp to publish on professional platforms like YouTube. Here are the steps to rotate a video on Filmora.
Step 1: Download and install Filmora. Open the software and import the video file that you want to rotate. Then drag and drop it on Timeline.
For Win 7 or later (64-bit)
For macOS 10.12 or later
Step 2: From Video Editing panel, expand Transform option and use the slider on Rotate option to rotate the video at any angle. Once done, click on OK button.

Step 3: Go to Export option and click on Export button. The new video files with its new rotation will be saved in the destination folder.

Way 3. Use VLC Media Player
Most Windows users generally install VLC Media Player to watch movies. This is because Windows Media Player supports only limited file formats. Most movie files that you download online are supported by VLC but not on Windows Media Player. Here are the steps on how to rotate a video in Windows temporarily using VLC Media Player.
Step 1: Open VLC Media Player. Go to Media menu and click on Open File option. Select the video file from your hard drive that you want to rotate.
Step 2: Once the video opens, go to Tools menu and click on Effects and Filters option.

Step 3: On Adjustments and Effects window, click on Video Effects tab.
Step 4: Under Video Effects tab, click on Geometry tab.
Step 5: Turn of Transform checkbox and click on drop-down menu to select the required option. You can rotate the video by 90 degrees, 180 degrees and 270 degrees.

Step 6: To rotate the video at any desired angle, turn on Rotate checkbox and select the desired angle.

Step 7: Finally, click on Save and then Close button.

Please note that when you rotate a video temporarily, it is for a one-time watch only. When you open the video again in any other media player, it will have the original orientation.
Way 4. Use EZGIF Online Tool
If you have short video files and you want to upload them on social media platforms, you can convert them into GIF files. You can convert any video file to EZGIF. Therefore, instead of video files, if you want to rotate GIF files, EZGIF is highly useful as an online tool. In fact, you can also convert GIF files into MP4 files. Here are the steps to follow to rotate short video files using EZGIF online tool.
Step 1: Open your web browser and open Ezgif.com.
Step 2: Click on Video to GIF option.
Step 3: Click on Choose File button and select the short video file from your hard drive.

Step 4: Click on Upload Video button and wait for the conversion. Thereafter, download the GIF file.
Step 5: To rotate the GIF file, go to Rotate option. Click on Choose File button.

Step 6: Select the GIF file and click on Upload.
Step 7: You can select from provided rotation options or mention rotation angle explicitly and click on Apply Rotation button.

Wait for the rotation effect and download the file on your hard drive.
FAQs about Rotate Video in Windows 10
1. How do I rotate a video in Windows 10?
To rotate a video in Windows 10, you can use the built-in Photos app. Open the app and select the video you want to rotate. Click on the Edit & Create button at the top of the screen and select Rotate left or Rotate right to adjust the video orientation.
2. Can I rotate a video in Windows Media Player?
No, you can’t rotate a video in Windows Media Player. This feature is only available in the Photos app. However, you can use a third-party video editing software to rotate your videos.
3. How do I save the rotated video?
After rotating the video in the Photos app, click on the Save a copy button at the top of the screen. You can then choose the destination folder and file name for the newly rotated video.
4. What should I do if the video is upside down after rotating it?
If the video is upside down after rotating it, you may have rotated it in the wrong direction. Try rotating it in the opposite direction and see if that fixes the issue. If not, you may need to use a third-party video editing software to rotate the video.
5. Can I rotate a video without losing quality?
Rotating a video can sometimes result in a loss of quality, especially if the video is compressed or low-resolution. However, using a good video editing software can help minimize the loss of quality. Make sure to save the rotated video in the same format and resolution as the original file to avoid further loss of quality.
Conclusion
We have provided you all the possible ways to rotate video Windows. If you want to rotate with pre-installed software, you have Photos app. If you have VLC Media Player installed, you can do the rotation temporarily and permanently. You can also use Ezgif online tool to rotate animated files without installing any
For macOS 10.12 or later
Step 2: From Video Editing panel, expand Transform option and use the slider on Rotate option to rotate the video at any angle. Once done, click on OK button.

Step 3: Go to Export option and click on Export button. The new video files with its new rotation will be saved in the destination folder.

Way 3. Use VLC Media Player
Most Windows users generally install VLC Media Player to watch movies. This is because Windows Media Player supports only limited file formats. Most movie files that you download online are supported by VLC but not on Windows Media Player. Here are the steps on how to rotate a video in Windows temporarily using VLC Media Player.
Step 1: Open VLC Media Player. Go to Media menu and click on Open File option. Select the video file from your hard drive that you want to rotate.
Step 2: Once the video opens, go to Tools menu and click on Effects and Filters option.

Step 3: On Adjustments and Effects window, click on Video Effects tab.
Step 4: Under Video Effects tab, click on Geometry tab.
Step 5: Turn of Transform checkbox and click on drop-down menu to select the required option. You can rotate the video by 90 degrees, 180 degrees and 270 degrees.

Step 6: To rotate the video at any desired angle, turn on Rotate checkbox and select the desired angle.

Step 7: Finally, click on Save and then Close button.

Please note that when you rotate a video temporarily, it is for a one-time watch only. When you open the video again in any other media player, it will have the original orientation.
Way 4. Use EZGIF Online Tool
If you have short video files and you want to upload them on social media platforms, you can convert them into GIF files. You can convert any video file to EZGIF. Therefore, instead of video files, if you want to rotate GIF files, EZGIF is highly useful as an online tool. In fact, you can also convert GIF files into MP4 files. Here are the steps to follow to rotate short video files using EZGIF online tool.
Step 1: Open your web browser and open Ezgif.com.
Step 2: Click on Video to GIF option.
Step 3: Click on Choose File button and select the short video file from your hard drive.

Step 4: Click on Upload Video button and wait for the conversion. Thereafter, download the GIF file.
Step 5: To rotate the GIF file, go to Rotate option. Click on Choose File button.

Step 6: Select the GIF file and click on Upload.
Step 7: You can select from provided rotation options or mention rotation angle explicitly and click on Apply Rotation button.

Wait for the rotation effect and download the file on your hard drive.
FAQs about Rotate Video in Windows 10
1. How do I rotate a video in Windows 10?
To rotate a video in Windows 10, you can use the built-in Photos app. Open the app and select the video you want to rotate. Click on the Edit & Create button at the top of the screen and select Rotate left or Rotate right to adjust the video orientation.
2. Can I rotate a video in Windows Media Player?
No, you can’t rotate a video in Windows Media Player. This feature is only available in the Photos app. However, you can use a third-party video editing software to rotate your videos.
3. How do I save the rotated video?
After rotating the video in the Photos app, click on the Save a copy button at the top of the screen. You can then choose the destination folder and file name for the newly rotated video.
4. What should I do if the video is upside down after rotating it?
If the video is upside down after rotating it, you may have rotated it in the wrong direction. Try rotating it in the opposite direction and see if that fixes the issue. If not, you may need to use a third-party video editing software to rotate the video.
5. Can I rotate a video without losing quality?
Rotating a video can sometimes result in a loss of quality, especially if the video is compressed or low-resolution. However, using a good video editing software can help minimize the loss of quality. Make sure to save the rotated video in the same format and resolution as the original file to avoid further loss of quality.
Conclusion
We have provided you all the possible ways to rotate video Windows. If you want to rotate with pre-installed software, you have Photos app. If you have VLC Media Player installed, you can do the rotation temporarily and permanently. You can also use Ezgif online tool to rotate animated files without installing any
For macOS 10.12 or later
Step 2: From Video Editing panel, expand Transform option and use the slider on Rotate option to rotate the video at any angle. Once done, click on OK button.

Step 3: Go to Export option and click on Export button. The new video files with its new rotation will be saved in the destination folder.

Way 3. Use VLC Media Player
Most Windows users generally install VLC Media Player to watch movies. This is because Windows Media Player supports only limited file formats. Most movie files that you download online are supported by VLC but not on Windows Media Player. Here are the steps on how to rotate a video in Windows temporarily using VLC Media Player.
Step 1: Open VLC Media Player. Go to Media menu and click on Open File option. Select the video file from your hard drive that you want to rotate.
Step 2: Once the video opens, go to Tools menu and click on Effects and Filters option.

Step 3: On Adjustments and Effects window, click on Video Effects tab.
Step 4: Under Video Effects tab, click on Geometry tab.
Step 5: Turn of Transform checkbox and click on drop-down menu to select the required option. You can rotate the video by 90 degrees, 180 degrees and 270 degrees.

Step 6: To rotate the video at any desired angle, turn on Rotate checkbox and select the desired angle.

Step 7: Finally, click on Save and then Close button.

Please note that when you rotate a video temporarily, it is for a one-time watch only. When you open the video again in any other media player, it will have the original orientation.
Way 4. Use EZGIF Online Tool
If you have short video files and you want to upload them on social media platforms, you can convert them into GIF files. You can convert any video file to EZGIF. Therefore, instead of video files, if you want to rotate GIF files, EZGIF is highly useful as an online tool. In fact, you can also convert GIF files into MP4 files. Here are the steps to follow to rotate short video files using EZGIF online tool.
Step 1: Open your web browser and open Ezgif.com.
Step 2: Click on Video to GIF option.
Step 3: Click on Choose File button and select the short video file from your hard drive.

Step 4: Click on Upload Video button and wait for the conversion. Thereafter, download the GIF file.
Step 5: To rotate the GIF file, go to Rotate option. Click on Choose File button.

Step 6: Select the GIF file and click on Upload.
Step 7: You can select from provided rotation options or mention rotation angle explicitly and click on Apply Rotation button.

Wait for the rotation effect and download the file on your hard drive.
FAQs about Rotate Video in Windows 10
1. How do I rotate a video in Windows 10?
To rotate a video in Windows 10, you can use the built-in Photos app. Open the app and select the video you want to rotate. Click on the Edit & Create button at the top of the screen and select Rotate left or Rotate right to adjust the video orientation.
2. Can I rotate a video in Windows Media Player?
No, you can’t rotate a video in Windows Media Player. This feature is only available in the Photos app. However, you can use a third-party video editing software to rotate your videos.
3. How do I save the rotated video?
After rotating the video in the Photos app, click on the Save a copy button at the top of the screen. You can then choose the destination folder and file name for the newly rotated video.
4. What should I do if the video is upside down after rotating it?
If the video is upside down after rotating it, you may have rotated it in the wrong direction. Try rotating it in the opposite direction and see if that fixes the issue. If not, you may need to use a third-party video editing software to rotate the video.
5. Can I rotate a video without losing quality?
Rotating a video can sometimes result in a loss of quality, especially if the video is compressed or low-resolution. However, using a good video editing software can help minimize the loss of quality. Make sure to save the rotated video in the same format and resolution as the original file to avoid further loss of quality.
Conclusion
We have provided you all the possible ways to rotate video Windows. If you want to rotate with pre-installed software, you have Photos app. If you have VLC Media Player installed, you can do the rotation temporarily and permanently. You can also use Ezgif online tool to rotate animated files without installing any
For macOS 10.12 or later
Step 2: From Video Editing panel, expand Transform option and use the slider on Rotate option to rotate the video at any angle. Once done, click on OK button.

Step 3: Go to Export option and click on Export button. The new video files with its new rotation will be saved in the destination folder.

Way 3. Use VLC Media Player
Most Windows users generally install VLC Media Player to watch movies. This is because Windows Media Player supports only limited file formats. Most movie files that you download online are supported by VLC but not on Windows Media Player. Here are the steps on how to rotate a video in Windows temporarily using VLC Media Player.
Step 1: Open VLC Media Player. Go to Media menu and click on Open File option. Select the video file from your hard drive that you want to rotate.
Step 2: Once the video opens, go to Tools menu and click on Effects and Filters option.

Step 3: On Adjustments and Effects window, click on Video Effects tab.
Step 4: Under Video Effects tab, click on Geometry tab.
Step 5: Turn of Transform checkbox and click on drop-down menu to select the required option. You can rotate the video by 90 degrees, 180 degrees and 270 degrees.

Step 6: To rotate the video at any desired angle, turn on Rotate checkbox and select the desired angle.

Step 7: Finally, click on Save and then Close button.

Please note that when you rotate a video temporarily, it is for a one-time watch only. When you open the video again in any other media player, it will have the original orientation.
Way 4. Use EZGIF Online Tool
If you have short video files and you want to upload them on social media platforms, you can convert them into GIF files. You can convert any video file to EZGIF. Therefore, instead of video files, if you want to rotate GIF files, EZGIF is highly useful as an online tool. In fact, you can also convert GIF files into MP4 files. Here are the steps to follow to rotate short video files using EZGIF online tool.
Step 1: Open your web browser and open Ezgif.com.
Step 2: Click on Video to GIF option.
Step 3: Click on Choose File button and select the short video file from your hard drive.

Step 4: Click on Upload Video button and wait for the conversion. Thereafter, download the GIF file.
Step 5: To rotate the GIF file, go to Rotate option. Click on Choose File button.

Step 6: Select the GIF file and click on Upload.
Step 7: You can select from provided rotation options or mention rotation angle explicitly and click on Apply Rotation button.

Wait for the rotation effect and download the file on your hard drive.
FAQs about Rotate Video in Windows 10
1. How do I rotate a video in Windows 10?
To rotate a video in Windows 10, you can use the built-in Photos app. Open the app and select the video you want to rotate. Click on the Edit & Create button at the top of the screen and select Rotate left or Rotate right to adjust the video orientation.
2. Can I rotate a video in Windows Media Player?
No, you can’t rotate a video in Windows Media Player. This feature is only available in the Photos app. However, you can use a third-party video editing software to rotate your videos.
3. How do I save the rotated video?
After rotating the video in the Photos app, click on the Save a copy button at the top of the screen. You can then choose the destination folder and file name for the newly rotated video.
4. What should I do if the video is upside down after rotating it?
If the video is upside down after rotating it, you may have rotated it in the wrong direction. Try rotating it in the opposite direction and see if that fixes the issue. If not, you may need to use a third-party video editing software to rotate the video.
5. Can I rotate a video without losing quality?
Rotating a video can sometimes result in a loss of quality, especially if the video is compressed or low-resolution. However, using a good video editing software can help minimize the loss of quality. Make sure to save the rotated video in the same format and resolution as the original file to avoid further loss of quality.
Conclusion
We have provided you all the possible ways to rotate video Windows. If you want to rotate with pre-installed software, you have Photos app. If you have VLC Media Player installed, you can do the rotation temporarily and permanently. You can also use Ezgif online tool to rotate animated files without installing any
How to Add Filter to Video in Premiere Pro?
When it comes to editing recorded videos like professionals, Adobe Premiere Pro is the most preferred video editor. Editing a video consists of trimming video clips, merging them, adding transitions and video effects, as well as inserting texts and overlays. Another important aspect of video editing is adding filters to your video to enhance the video quality.
Video filters are widely used in the editing phase to correct the color and light imbalances and set the mood for a particular scene so that the audience can reach the desired state of emotion. Premiere Pro has a wide range of preset filters that you can add to your videos to enhance them like never before. We will illustrate how to add filters on Premiere Pro and suggest an alternative way to add video filters for Windows and Mac users.
Part 1. Steps to Add Filter in Premiere Pro?
Premiere Pro comes with a wide range of present filters so that you can adjust the color grading for different scenes in your video. If you are new to using Premiere Pro and you are not a professional video editor, you could find its learning curve on the steeper side. However, you can add video filters in Premiere Pro instantly. Here are the steps on how to add a filter in Premiere Pro.
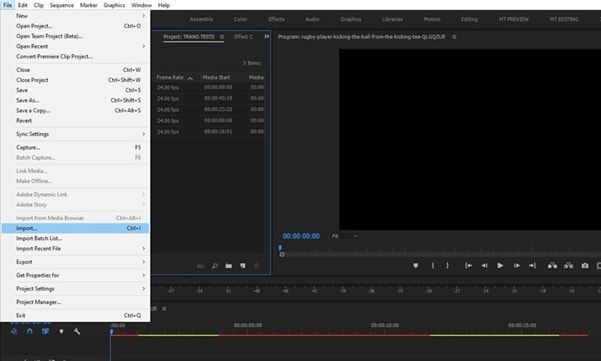
Step1Launch Premiere Pro on your computer. Go to File> Import to bring in the video clip that you want to edit. Move the video clip from Project panel into Timeline.
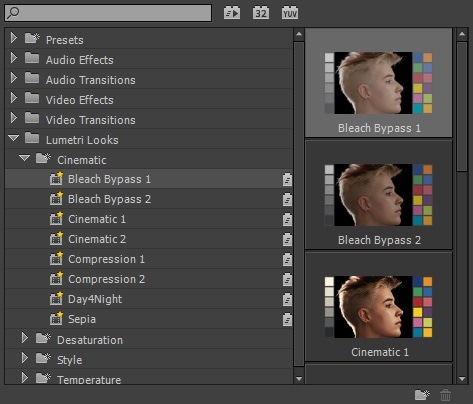
Step2Go to Effects tab from the top and open Lumetri Presets folder. You will find different categories of filters and effects such Cinematic, Desaturation, Style, Temperature and much more. Open up these categories and drag and drop any desired filter into the Timeline. The video filter will get applied to your video automatically.
Step3If you are looking for color grading, go to Color tab from the top. Go to Lumetri Color on the right side, go to Creative> Look > select any Preset filter present.
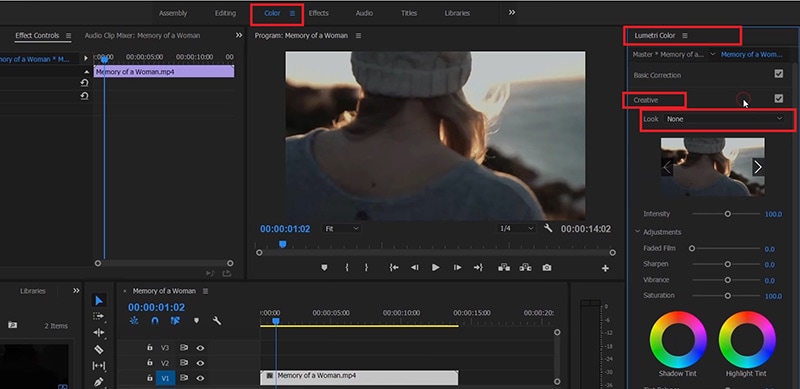
Step4Thereafter, you can adjust certain parameters like intensity, saturation, sharpen as per requirements. You can also go for Basic correction which acts like applying a filter to your videos.
Part 2. Alternative Way to Add Video Filters
If you find the steps on how to add colour filter in Premiere Pro difficult or the filters are not appealing to you, you can opt for an alternative. We recommend Wondershare Filmora as the best alternative to Premiere Pro to add video filters. Filmora comes with a super easy and intuitive and applying filter to your videos cannot get any easier.
The wide range of filters available on Filmora outshines Premiere Pro. Most importantly, trending filters are also available to make your videos follow the current trend on social media and video streaming sites. You can add multiple video filters to one video clip as per your preference. Here are the steps on how to add video filters on Filmora.
Step1Download and install Wondershare Filmora which is available for Windows and Mac users. Launch Filmora and click on New Project option.

Step2Drag and drop your video into Project Media folder and thereafter, into Timeline.

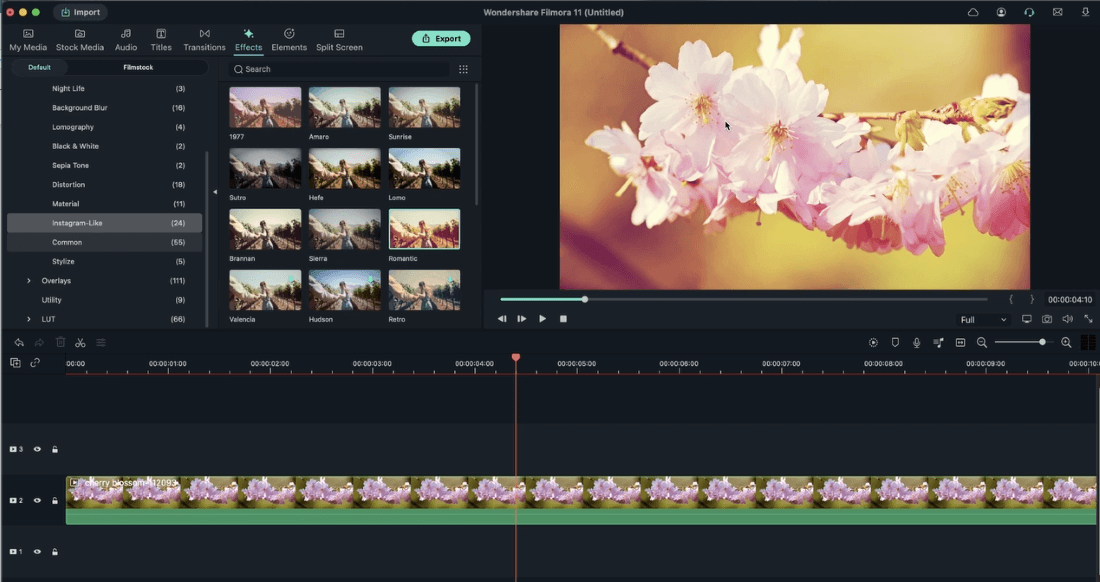
Step3Go Effects located at the top and go to Filters option from the left panel.
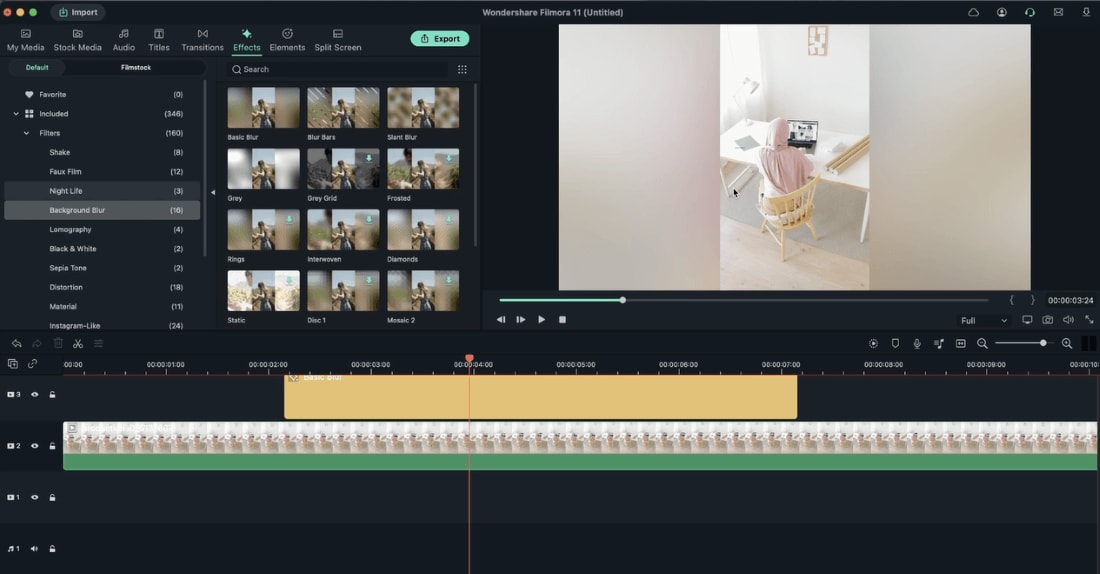
Step4Drag the desired filter into Timeline to apply to your video. You can set the duration of the video filter as per your preference. Play the video and click on Export button to save the edited video.
Part 3. Free Premiere Filter Presets to Use
Adobe Premiere Pro comes with a handful of video filters. However, you can add various free Premiere Pro filter presets and apply them to your video. Here is the list of the free Premiere Pro filter presets to use on your video.
Retro Preset Pack -
There is a craze to have retro filters on the video so that the video looks different and takes the audience back to the golden old days. This is a collection of filter presets where you can get different old-school styles. Starting from VHS filter effect to RGB split, there are ample filter presets to make your video look retro.
Cinematic LUT Pack -
There is no doubt that cinematic videos always look class apart from the rest of the videos and this is the perfect collection of video filters you need. Use these filters to deepen and sharpen colors and cut down brightness so that the video becomes eye-catching and eye-soothing. This is a must-have video filter you should have in Premiere Pro so that you can make regular videos look extraordinary.
Panoramic Transitions Pack -
Transitions are a part of video filters in Premiere Pro and if you want something different in transition effects, you should opt for Panoramic transitions. Starting from fish-eye effect to spinning effect, you can apply them when you move from one scene to another or one clip to another.
Free Animated Text Preset Pack -
Text is an important part of any video and you need video filter presets to apply to the textual part. Instead of the regular text filters, the animated text presets are extremely eye-catching. Starting from shake animations to bounce animations, 13 free animation titles can transform your video especially the part where texts are the main highlights.
Glitch Effects Pack -
If you make videos for social media or you make informational videos, glitch effects must be in your videos. You can get quick attention of your audience with glitch effects, make scene transitions, and add some comedy scenes. Your video will have some extra kick and look more interesting to watch.
Conclusion
If you are using Adobe Premiere Pro to edit your videos, adding filters to your videos could be quite common. We have illustrated how to add filter to video in Premiere Pro to enhance your video quality and outlook. We have also listed the must-have free Premiere Pro filter presents. If you are looking for an alternative to add video filters, we recommend Wondershare Filmora.
Free Download For Win 7 or later(64-bit)
Free Download For macOS 10.14 or later
Free Download For macOS 10.14 or later
Best 9 Amv Makers for Computer
Anime music videos, or AMVs, have become increasingly popular over the years. They allow fans to showcase their creativity and love for their favorite anime series through the use of music and video editing. However, creating a high-quality AMV requires the right software. In this article, we will introduce you to the best AMV maker software available on the market.
Best AMV Maker for Computer
If you would like to create the AMVs on your computer, the following are some of your best options;
Filmora
Best For: Vloggers, teachers and social media users
Supported OS: Windows 11/10/8/7 and macOS
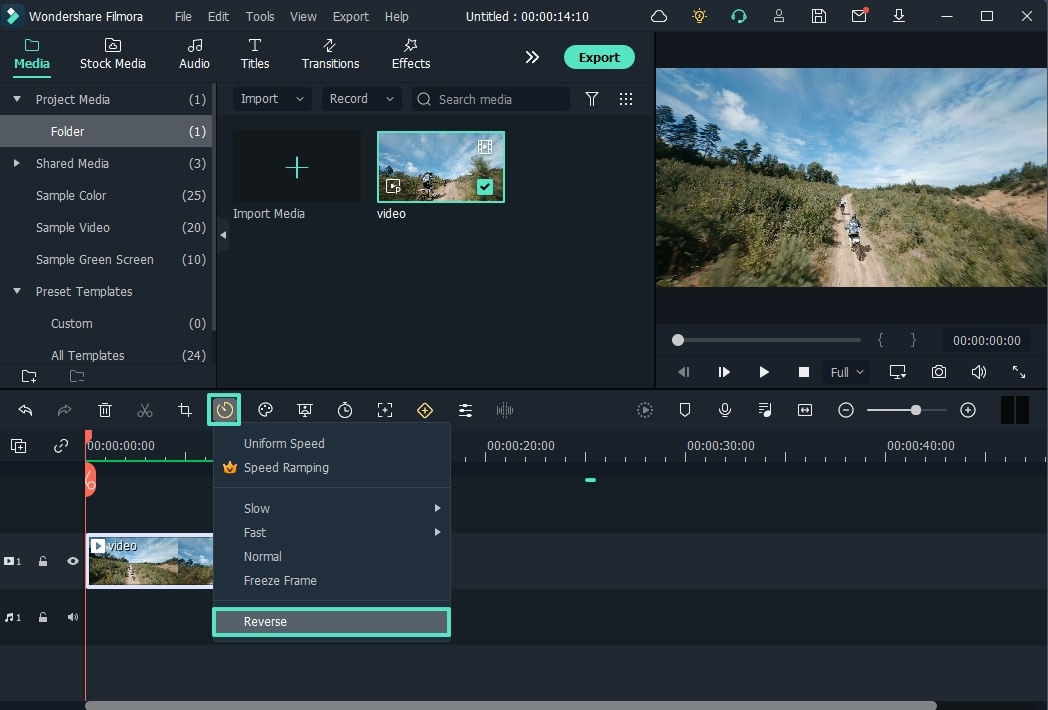
Speaking of the best AMV video maker, I would recommend Filmora as the first choice. It is easy to learn and use for beginner, and come with rich video editing features: split screen, key framing, motion tracking, speed ramping, instant mode, speech to text, audio ducking and more.
Meanwhile, it also helps teachers or business people to record tutorials, files or PowerPoint from their screen wit no limit. For vloggers and other advanced users, Filmora provides green screen, AI Protrait, colorful video effect templates, color match and so forth. You can directly share the video to YouTube, Vimeo and other social media platforms.
For Win 7 or later (64-bit)
For macOS 10.12 or later
Adobe Premiere
Best For: Animators, professional cartoonists, and marketers
Supported OS: Windows and Mac

Adobe Premiere is a video editing program that can be used to create and edit all types of video projects including AMVs. It has numerous features that can make it very easy to come up with the most professional video that you want to create. Because of these very many, but very useful features, using Adobe Premiere can be difficult at first. But once you gate a hang of it, it is one of the best ways to create any video including AMVs.
Adobe Premiere can be used on both Mac and Windows operating systems and it is compatible with most video and audio formats. But like most Adobe software it is not a free solution. You do get a 7-day free trial that you can use without limitation, but you will need to pay a subscription fee to continue using it.
Apple iMovie
Best For: Marketers, freelancers, YouTubers, Bloggers
Supported OS: Mac

Apple iMovie is one of the best video editing programs for Mac and is therefore one of the best tools to choose if you will be creating your AMV on a Mac. It has all the basic video editing features that you need for a project of this magnitude including the ability to merge videos and apply filters.
This makes it the most ideal tool for creating AMVs since you typically need to break a file into various sections for your AMV. You can then add audio to the video and choose one of the effects and filters to add to it. Once the video is complete, you can then export it in 4K resolution or upload it to YouTube directly.
Sony Vegas
Best For: Animators, Marketers, Video Editors and Bloggers
Supported OS: Windows and Mac

If you are looking for a program that is designed with AMVs in mind then Sony Vegas might be a good choice. Its main purpose is to help users create stunning anime videos and it has all the necessary features to make that happen.
Sony Vegas comes with a universal editor that allows you to create your video using the multi-cam editing feature or crossfades. You can also add various effects to the video including various colors and other special effects. But as you can probably guess, Sony Vegas may be a bit complicated for the beginner user, although there are numerous tutorials to help you through this process.
Final Cut Pro
Best For: Marketers, Animators, YouTubers, Freelancers, and Professional video editors
Supported OS: Windows and Mac

Final Cut Pro is another professional and highly effective video editor that you can use to create AMVs. It has very many video editing capabilities, allowing you to edit your video in numerous ways including cropping, rotating, blending, and more. It also has over 100 different transitions and more than 149 different visual effects to create your video any way you want to.
But perhaps the best feature that Final Cut Pro has when it comes to creating and editing AMV videos is the ability to organize and crop videos easily. The “Compounding Clips” feature, in particular, will come in handy when combining footage, soundtracks, and effects into one perfect AMV.
Lightworks
Best For: YouTubers, Freelancers, Bloggers, and Marketers
Supported OS: Windows and Mac

Lightworks is an easy-to-use solution that you can use to create stunning AMV videos. The drag and drop interface makes it the most ideal solution even for beginners and it offers a lot of options for designing and customizing the videos. One other major benefit of choosing Lightworks is that it does come with a free version that is not as limited as you would expect.
The timeline is easy to use, allowing you to create AMVs from scratch or merge clips to create the video. You can also use numerous effects on the video and even add music to the video.
Windows Movie Maker
Best For: Freelancers, bloggers, marketers, and YouTubers
Supported OS: Windows

Windows Movie Maker is one of the most popular video editing tools on the Windows OS and it has all the necessary editing features that you will need when you want to create AMV videos. On this free video editing tool, you can cut, split and crop the video or even add audio files and subtitles as needed,
It can work with numerous video and image formats, offering a wide range of options when it comes to video editing. Some of the functions that you can expect to use include video trimming, which can easily be done by simply dragging the slider to the desired location. But you will find that Windows Movie Maker lacks some of the features that can make your AMVs truly stand out.
Best AMV Maker for Mobile Phones
If you want to make AMVs on your mobile device, the following are some of the best options;
Filmora
Best For: Professional Animators, Marketers, YouTubes, and Bloggers
Supported OS: Android and iOS
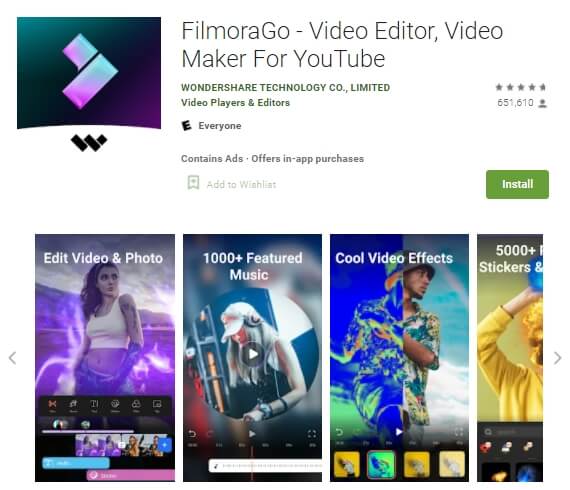
Filmora is one of the best video editing apps that you can download. It somehow manages to offer tools and video editing features that can otherwise be found only on desktop tools. Some of the features that can you can expect when using Filmora include reverse play, transitions, cropping, rotating, adding voiceovers, audio mixing, color tuning, and even picture-in-picture.
Filmora further simplifies the editing process by providing you with premade templates and themes that you can use to customize your AMV in many ways. It will also let you add music to the video from a huge library of licensed audio tracks.
KineMaster
Best For: Professional Animators, Bloggers, Marketers, and YouTubers
Supported OS: iOS and Android
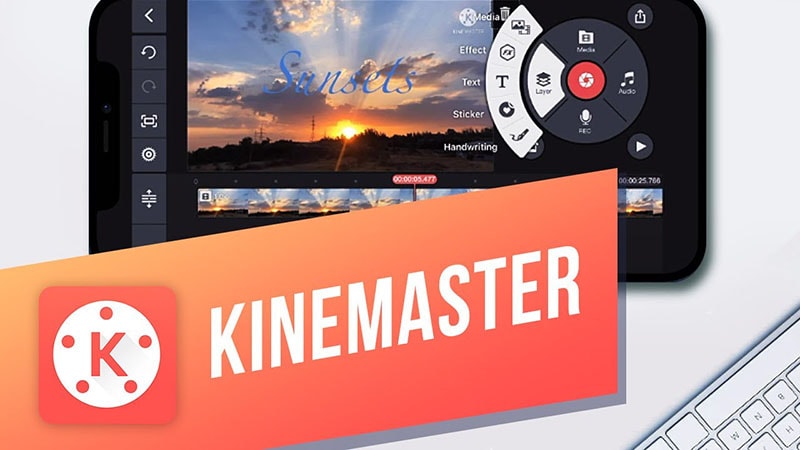
KineMaster is a video editing app that is designed for professionals but is easy enough to use that it can be useful to you even if it is your first time using it. It has a lot of very useful video editing features including frame-by-frame editing, instant previews as well as support for up to four audio tracks that you can add to the video project.
This app also allows you to work with two video layers that you can animate in various ways including chroma key compositing, precise color adjustment, speed control, and keyframe animation.
VivaVideo
Best For: YouTubers, Freelancers, and Marketers
Supported OS: iOS and Android

VivaVideo is another very easy-to-use app that you can install on your device to create AMVs. It has hundreds of features to choose from including stickers, filters, special effects, and animated clips. It also features slow/fast motion control, a huge library of background music that you can add to the video, and premade templates to make everything easier.
It allows you to share your creation with more than 200 million users of the app or even directly share the video on social media platforms.
Related FAQs
1.Is Making AMV illegal?
If you don’t have permission from the copyright owner of the song you are using to create the AMV, then you violate the law. And considering that it can be very difficult to get permission from the copyright owner, usually the record label, most AMVs are not exactly legal.
2.How Do You Make an AMV?
It depends on the kind of AMV that you want to make. But several steps are common to all AMVs. The first thing you want to do is pick the subject of your video, which usually means choosing the character or characters that will make up your video. Then, you will want to pick the song that you will use for the AMV, and finally, choose a video editor that will allow you to put the two together.
3.What Program is Used to Make AMVs?
AMVs are made using video editing software with the necessary features to put together different video components and animate them. We have provided you with various options above.
Conclusion
Creating AMVs can be a fun experience, but only if you have the right tool for the job. The solutions we have discussed in this article can all help you create a great AMV. Choose one that suits your project
For macOS 10.12 or later
Adobe Premiere
Best For: Animators, professional cartoonists, and marketers
Supported OS: Windows and Mac

Adobe Premiere is a video editing program that can be used to create and edit all types of video projects including AMVs. It has numerous features that can make it very easy to come up with the most professional video that you want to create. Because of these very many, but very useful features, using Adobe Premiere can be difficult at first. But once you gate a hang of it, it is one of the best ways to create any video including AMVs.
Adobe Premiere can be used on both Mac and Windows operating systems and it is compatible with most video and audio formats. But like most Adobe software it is not a free solution. You do get a 7-day free trial that you can use without limitation, but you will need to pay a subscription fee to continue using it.
Apple iMovie
Best For: Marketers, freelancers, YouTubers, Bloggers
Supported OS: Mac

Apple iMovie is one of the best video editing programs for Mac and is therefore one of the best tools to choose if you will be creating your AMV on a Mac. It has all the basic video editing features that you need for a project of this magnitude including the ability to merge videos and apply filters.
This makes it the most ideal tool for creating AMVs since you typically need to break a file into various sections for your AMV. You can then add audio to the video and choose one of the effects and filters to add to it. Once the video is complete, you can then export it in 4K resolution or upload it to YouTube directly.
Sony Vegas
Best For: Animators, Marketers, Video Editors and Bloggers
Supported OS: Windows and Mac

If you are looking for a program that is designed with AMVs in mind then Sony Vegas might be a good choice. Its main purpose is to help users create stunning anime videos and it has all the necessary features to make that happen.
Sony Vegas comes with a universal editor that allows you to create your video using the multi-cam editing feature or crossfades. You can also add various effects to the video including various colors and other special effects. But as you can probably guess, Sony Vegas may be a bit complicated for the beginner user, although there are numerous tutorials to help you through this process.
Final Cut Pro
Best For: Marketers, Animators, YouTubers, Freelancers, and Professional video editors
Supported OS: Windows and Mac

Final Cut Pro is another professional and highly effective video editor that you can use to create AMVs. It has very many video editing capabilities, allowing you to edit your video in numerous ways including cropping, rotating, blending, and more. It also has over 100 different transitions and more than 149 different visual effects to create your video any way you want to.
But perhaps the best feature that Final Cut Pro has when it comes to creating and editing AMV videos is the ability to organize and crop videos easily. The “Compounding Clips” feature, in particular, will come in handy when combining footage, soundtracks, and effects into one perfect AMV.
Lightworks
Best For: YouTubers, Freelancers, Bloggers, and Marketers
Supported OS: Windows and Mac

Lightworks is an easy-to-use solution that you can use to create stunning AMV videos. The drag and drop interface makes it the most ideal solution even for beginners and it offers a lot of options for designing and customizing the videos. One other major benefit of choosing Lightworks is that it does come with a free version that is not as limited as you would expect.
The timeline is easy to use, allowing you to create AMVs from scratch or merge clips to create the video. You can also use numerous effects on the video and even add music to the video.
Windows Movie Maker
Best For: Freelancers, bloggers, marketers, and YouTubers
Supported OS: Windows

Windows Movie Maker is one of the most popular video editing tools on the Windows OS and it has all the necessary editing features that you will need when you want to create AMV videos. On this free video editing tool, you can cut, split and crop the video or even add audio files and subtitles as needed,
It can work with numerous video and image formats, offering a wide range of options when it comes to video editing. Some of the functions that you can expect to use include video trimming, which can easily be done by simply dragging the slider to the desired location. But you will find that Windows Movie Maker lacks some of the features that can make your AMVs truly stand out.
Best AMV Maker for Mobile Phones
If you want to make AMVs on your mobile device, the following are some of the best options;
Filmora
Best For: Professional Animators, Marketers, YouTubes, and Bloggers
Supported OS: Android and iOS

Filmora is one of the best video editing apps that you can download. It somehow manages to offer tools and video editing features that can otherwise be found only on desktop tools. Some of the features that can you can expect when using Filmora include reverse play, transitions, cropping, rotating, adding voiceovers, audio mixing, color tuning, and even picture-in-picture.
Filmora further simplifies the editing process by providing you with premade templates and themes that you can use to customize your AMV in many ways. It will also let you add music to the video from a huge library of licensed audio tracks.
KineMaster
Best For: Professional Animators, Bloggers, Marketers, and YouTubers
Supported OS: iOS and Android

KineMaster is a video editing app that is designed for professionals but is easy enough to use that it can be useful to you even if it is your first time using it. It has a lot of very useful video editing features including frame-by-frame editing, instant previews as well as support for up to four audio tracks that you can add to the video project.
This app also allows you to work with two video layers that you can animate in various ways including chroma key compositing, precise color adjustment, speed control, and keyframe animation.
VivaVideo
Best For: YouTubers, Freelancers, and Marketers
Supported OS: iOS and Android

VivaVideo is another very easy-to-use app that you can install on your device to create AMVs. It has hundreds of features to choose from including stickers, filters, special effects, and animated clips. It also features slow/fast motion control, a huge library of background music that you can add to the video, and premade templates to make everything easier.
It allows you to share your creation with more than 200 million users of the app or even directly share the video on social media platforms.
Related FAQs
1.Is Making AMV illegal?
If you don’t have permission from the copyright owner of the song you are using to create the AMV, then you violate the law. And considering that it can be very difficult to get permission from the copyright owner, usually the record label, most AMVs are not exactly legal.
2.How Do You Make an AMV?
It depends on the kind of AMV that you want to make. But several steps are common to all AMVs. The first thing you want to do is pick the subject of your video, which usually means choosing the character or characters that will make up your video. Then, you will want to pick the song that you will use for the AMV, and finally, choose a video editor that will allow you to put the two together.
3.What Program is Used to Make AMVs?
AMVs are made using video editing software with the necessary features to put together different video components and animate them. We have provided you with various options above.
Conclusion
Creating AMVs can be a fun experience, but only if you have the right tool for the job. The solutions we have discussed in this article can all help you create a great AMV. Choose one that suits your project
For macOS 10.12 or later
Adobe Premiere
Best For: Animators, professional cartoonists, and marketers
Supported OS: Windows and Mac

Adobe Premiere is a video editing program that can be used to create and edit all types of video projects including AMVs. It has numerous features that can make it very easy to come up with the most professional video that you want to create. Because of these very many, but very useful features, using Adobe Premiere can be difficult at first. But once you gate a hang of it, it is one of the best ways to create any video including AMVs.
Adobe Premiere can be used on both Mac and Windows operating systems and it is compatible with most video and audio formats. But like most Adobe software it is not a free solution. You do get a 7-day free trial that you can use without limitation, but you will need to pay a subscription fee to continue using it.
Apple iMovie
Best For: Marketers, freelancers, YouTubers, Bloggers
Supported OS: Mac

Apple iMovie is one of the best video editing programs for Mac and is therefore one of the best tools to choose if you will be creating your AMV on a Mac. It has all the basic video editing features that you need for a project of this magnitude including the ability to merge videos and apply filters.
This makes it the most ideal tool for creating AMVs since you typically need to break a file into various sections for your AMV. You can then add audio to the video and choose one of the effects and filters to add to it. Once the video is complete, you can then export it in 4K resolution or upload it to YouTube directly.
Sony Vegas
Best For: Animators, Marketers, Video Editors and Bloggers
Supported OS: Windows and Mac

If you are looking for a program that is designed with AMVs in mind then Sony Vegas might be a good choice. Its main purpose is to help users create stunning anime videos and it has all the necessary features to make that happen.
Sony Vegas comes with a universal editor that allows you to create your video using the multi-cam editing feature or crossfades. You can also add various effects to the video including various colors and other special effects. But as you can probably guess, Sony Vegas may be a bit complicated for the beginner user, although there are numerous tutorials to help you through this process.
Final Cut Pro
Best For: Marketers, Animators, YouTubers, Freelancers, and Professional video editors
Supported OS: Windows and Mac

Final Cut Pro is another professional and highly effective video editor that you can use to create AMVs. It has very many video editing capabilities, allowing you to edit your video in numerous ways including cropping, rotating, blending, and more. It also has over 100 different transitions and more than 149 different visual effects to create your video any way you want to.
But perhaps the best feature that Final Cut Pro has when it comes to creating and editing AMV videos is the ability to organize and crop videos easily. The “Compounding Clips” feature, in particular, will come in handy when combining footage, soundtracks, and effects into one perfect AMV.
Lightworks
Best For: YouTubers, Freelancers, Bloggers, and Marketers
Supported OS: Windows and Mac

Lightworks is an easy-to-use solution that you can use to create stunning AMV videos. The drag and drop interface makes it the most ideal solution even for beginners and it offers a lot of options for designing and customizing the videos. One other major benefit of choosing Lightworks is that it does come with a free version that is not as limited as you would expect.
The timeline is easy to use, allowing you to create AMVs from scratch or merge clips to create the video. You can also use numerous effects on the video and even add music to the video.
Windows Movie Maker
Best For: Freelancers, bloggers, marketers, and YouTubers
Supported OS: Windows

Windows Movie Maker is one of the most popular video editing tools on the Windows OS and it has all the necessary editing features that you will need when you want to create AMV videos. On this free video editing tool, you can cut, split and crop the video or even add audio files and subtitles as needed,
It can work with numerous video and image formats, offering a wide range of options when it comes to video editing. Some of the functions that you can expect to use include video trimming, which can easily be done by simply dragging the slider to the desired location. But you will find that Windows Movie Maker lacks some of the features that can make your AMVs truly stand out.
Best AMV Maker for Mobile Phones
If you want to make AMVs on your mobile device, the following are some of the best options;
Filmora
Best For: Professional Animators, Marketers, YouTubes, and Bloggers
Supported OS: Android and iOS

Filmora is one of the best video editing apps that you can download. It somehow manages to offer tools and video editing features that can otherwise be found only on desktop tools. Some of the features that can you can expect when using Filmora include reverse play, transitions, cropping, rotating, adding voiceovers, audio mixing, color tuning, and even picture-in-picture.
Filmora further simplifies the editing process by providing you with premade templates and themes that you can use to customize your AMV in many ways. It will also let you add music to the video from a huge library of licensed audio tracks.
KineMaster
Best For: Professional Animators, Bloggers, Marketers, and YouTubers
Supported OS: iOS and Android

KineMaster is a video editing app that is designed for professionals but is easy enough to use that it can be useful to you even if it is your first time using it. It has a lot of very useful video editing features including frame-by-frame editing, instant previews as well as support for up to four audio tracks that you can add to the video project.
This app also allows you to work with two video layers that you can animate in various ways including chroma key compositing, precise color adjustment, speed control, and keyframe animation.
VivaVideo
Best For: YouTubers, Freelancers, and Marketers
Supported OS: iOS and Android

VivaVideo is another very easy-to-use app that you can install on your device to create AMVs. It has hundreds of features to choose from including stickers, filters, special effects, and animated clips. It also features slow/fast motion control, a huge library of background music that you can add to the video, and premade templates to make everything easier.
It allows you to share your creation with more than 200 million users of the app or even directly share the video on social media platforms.
Related FAQs
1.Is Making AMV illegal?
If you don’t have permission from the copyright owner of the song you are using to create the AMV, then you violate the law. And considering that it can be very difficult to get permission from the copyright owner, usually the record label, most AMVs are not exactly legal.
2.How Do You Make an AMV?
It depends on the kind of AMV that you want to make. But several steps are common to all AMVs. The first thing you want to do is pick the subject of your video, which usually means choosing the character or characters that will make up your video. Then, you will want to pick the song that you will use for the AMV, and finally, choose a video editor that will allow you to put the two together.
3.What Program is Used to Make AMVs?
AMVs are made using video editing software with the necessary features to put together different video components and animate them. We have provided you with various options above.
Conclusion
Creating AMVs can be a fun experience, but only if you have the right tool for the job. The solutions we have discussed in this article can all help you create a great AMV. Choose one that suits your project
For macOS 10.12 or later
Adobe Premiere
Best For: Animators, professional cartoonists, and marketers
Supported OS: Windows and Mac

Adobe Premiere is a video editing program that can be used to create and edit all types of video projects including AMVs. It has numerous features that can make it very easy to come up with the most professional video that you want to create. Because of these very many, but very useful features, using Adobe Premiere can be difficult at first. But once you gate a hang of it, it is one of the best ways to create any video including AMVs.
Adobe Premiere can be used on both Mac and Windows operating systems and it is compatible with most video and audio formats. But like most Adobe software it is not a free solution. You do get a 7-day free trial that you can use without limitation, but you will need to pay a subscription fee to continue using it.
Apple iMovie
Best For: Marketers, freelancers, YouTubers, Bloggers
Supported OS: Mac

Apple iMovie is one of the best video editing programs for Mac and is therefore one of the best tools to choose if you will be creating your AMV on a Mac. It has all the basic video editing features that you need for a project of this magnitude including the ability to merge videos and apply filters.
This makes it the most ideal tool for creating AMVs since you typically need to break a file into various sections for your AMV. You can then add audio to the video and choose one of the effects and filters to add to it. Once the video is complete, you can then export it in 4K resolution or upload it to YouTube directly.
Sony Vegas
Best For: Animators, Marketers, Video Editors and Bloggers
Supported OS: Windows and Mac

If you are looking for a program that is designed with AMVs in mind then Sony Vegas might be a good choice. Its main purpose is to help users create stunning anime videos and it has all the necessary features to make that happen.
Sony Vegas comes with a universal editor that allows you to create your video using the multi-cam editing feature or crossfades. You can also add various effects to the video including various colors and other special effects. But as you can probably guess, Sony Vegas may be a bit complicated for the beginner user, although there are numerous tutorials to help you through this process.
Final Cut Pro
Best For: Marketers, Animators, YouTubers, Freelancers, and Professional video editors
Supported OS: Windows and Mac

Final Cut Pro is another professional and highly effective video editor that you can use to create AMVs. It has very many video editing capabilities, allowing you to edit your video in numerous ways including cropping, rotating, blending, and more. It also has over 100 different transitions and more than 149 different visual effects to create your video any way you want to.
But perhaps the best feature that Final Cut Pro has when it comes to creating and editing AMV videos is the ability to organize and crop videos easily. The “Compounding Clips” feature, in particular, will come in handy when combining footage, soundtracks, and effects into one perfect AMV.
Lightworks
Best For: YouTubers, Freelancers, Bloggers, and Marketers
Supported OS: Windows and Mac

Lightworks is an easy-to-use solution that you can use to create stunning AMV videos. The drag and drop interface makes it the most ideal solution even for beginners and it offers a lot of options for designing and customizing the videos. One other major benefit of choosing Lightworks is that it does come with a free version that is not as limited as you would expect.
The timeline is easy to use, allowing you to create AMVs from scratch or merge clips to create the video. You can also use numerous effects on the video and even add music to the video.
Windows Movie Maker
Best For: Freelancers, bloggers, marketers, and YouTubers
Supported OS: Windows

Windows Movie Maker is one of the most popular video editing tools on the Windows OS and it has all the necessary editing features that you will need when you want to create AMV videos. On this free video editing tool, you can cut, split and crop the video or even add audio files and subtitles as needed,
It can work with numerous video and image formats, offering a wide range of options when it comes to video editing. Some of the functions that you can expect to use include video trimming, which can easily be done by simply dragging the slider to the desired location. But you will find that Windows Movie Maker lacks some of the features that can make your AMVs truly stand out.
Best AMV Maker for Mobile Phones
If you want to make AMVs on your mobile device, the following are some of the best options;
Filmora
Best For: Professional Animators, Marketers, YouTubes, and Bloggers
Supported OS: Android and iOS

Filmora is one of the best video editing apps that you can download. It somehow manages to offer tools and video editing features that can otherwise be found only on desktop tools. Some of the features that can you can expect when using Filmora include reverse play, transitions, cropping, rotating, adding voiceovers, audio mixing, color tuning, and even picture-in-picture.
Filmora further simplifies the editing process by providing you with premade templates and themes that you can use to customize your AMV in many ways. It will also let you add music to the video from a huge library of licensed audio tracks.
KineMaster
Best For: Professional Animators, Bloggers, Marketers, and YouTubers
Supported OS: iOS and Android

KineMaster is a video editing app that is designed for professionals but is easy enough to use that it can be useful to you even if it is your first time using it. It has a lot of very useful video editing features including frame-by-frame editing, instant previews as well as support for up to four audio tracks that you can add to the video project.
This app also allows you to work with two video layers that you can animate in various ways including chroma key compositing, precise color adjustment, speed control, and keyframe animation.
VivaVideo
Best For: YouTubers, Freelancers, and Marketers
Supported OS: iOS and Android

VivaVideo is another very easy-to-use app that you can install on your device to create AMVs. It has hundreds of features to choose from including stickers, filters, special effects, and animated clips. It also features slow/fast motion control, a huge library of background music that you can add to the video, and premade templates to make everything easier.
It allows you to share your creation with more than 200 million users of the app or even directly share the video on social media platforms.
Related FAQs
1.Is Making AMV illegal?
If you don’t have permission from the copyright owner of the song you are using to create the AMV, then you violate the law. And considering that it can be very difficult to get permission from the copyright owner, usually the record label, most AMVs are not exactly legal.
2.How Do You Make an AMV?
It depends on the kind of AMV that you want to make. But several steps are common to all AMVs. The first thing you want to do is pick the subject of your video, which usually means choosing the character or characters that will make up your video. Then, you will want to pick the song that you will use for the AMV, and finally, choose a video editor that will allow you to put the two together.
3.What Program is Used to Make AMVs?
AMVs are made using video editing software with the necessary features to put together different video components and animate them. We have provided you with various options above.
Conclusion
Creating AMVs can be a fun experience, but only if you have the right tool for the job. The solutions we have discussed in this article can all help you create a great AMV. Choose one that suits your project
Also read:
- New Make Time-Lapse Video on MacBook Complete Guide
- 2024 Approved How to Split a Video Into Parts on All Platforms
- Updated If You Do Not Know How to Blur Faces in a Video on iPhone, You Are in the Right Place. We Have Provided You with All the Details You Need to Learn How to Blur Part of Your Video on Your iOS Device for 2024
- New How to Create Cooking Video Intro and Outro for YouTube Channel, In 2024
- Updated 2024 Approved 12 Best GIF Editors to Use
- Updated 2024 Approved Complete Guide to Make a Super Easy Rotating Video Effect
- In 2024, Top 10 Anime Movies of All Time
- In 2024, How to Use iMovie Text Effects
- In 2024, What Is the Best Voice Changer for WhatsApp? Discover the Seven (7) Best Voice Changers for WhatsApp Here in This Post
- 2024 Approved Exploring the Top Professional Tools to Perform Mask Tracking
- New Customize PowerPoint Slideshow Icon in 8 Simple Ways for 2024
- New How to Convert Time-Lapse to Normal Video
- New This Article Discusses the Splitting of the Video Clips in DaVinci Resolve Explicitly. There Is Also a Brief Description of Its Best Alternative, Wondershare Filmora. This Is Also Practically Relevant and Reasonable as Well for 2024
- New Convert MP4 to 60 FPS GIF A Step-by-Step Guide for 2024
- New 2024 Approved 8 Frame Rate Video Converters You Must Try
- 2024 Approved How to Denoise in Final Cut Pro – Reduce Video and Audio Noise
- What Can Be Better than Converting Apple Video Format Into Other Formats so that You Can Use the Files Easily. We Have a Few Options that You Can Use for This Purpose for 2024
- New Keyframes Interval Everything You Need To Know | Filmora
- New Hey! Are You Looking for Video Reverse Effects in Your Videos? Then, You Are at the Right Place. This Article Will Guide You in Creating a Video Reverse Effect
- Updated 2024 Approved Separating Audio From Video in DaVinci Resolve Step by Step
- New Best Free Slow Motion Apps For Android and iPhone for 2024
- New Steps to Denoise in Final Cut Pro – Reduce Video and Audio Noise
- New Are You Looking for the Best Video Marketing Agency to Help Your Business Grow Exponentially with Engaging Video Content? Here Is How to Find a High-Quality Video Marketing Company that Takes Your Videos to the Next Level
- Updated Practical Way to Resize Video in Handbrake
- A Guide To Adopting Lumetri Color Presets in Effective Color Grading for 2024
- Discover the Best Game Recording Software for Your PC in This Developing Industry. Record Your Gameplay in Real Time and Enjoy the Benefits that Come with It for 2024
- New In 2024, How To Blur Background in Adobe Premiere Pro Detailed Guide
- Updated If Youre Wondering How to Employ Transition Effects in Your Videos to Create Your Signature Look, This Article Can Help
- Updated How to Make a Super Easy Rotating Video Effect for 2024
- New 2024 Approved Do You Want to Use LUTs in Final Cut Pro? There Are Many Free LUTs for FCPX Available that You Can Use. Using LUTs, You Can Create Professional-Looking Content
- Updated The Article Is a Guide About the Split of the Videos in VLC. There Is Also a Particular Description of Its Alternative Wondershare Filmora. It Is Suitable as Well as Reasonable for 2024
- Updated Adding Text to Your Collage Not only Makes It Look Sophisticated but Also Versatile. So, if You Too Are Looking for Ways to Create a Collage Text, Check Out Our Article
- 2024 Approved How To Add Motion Blur In Davinci Resolve?
- New Learn How to Extract Sound From Video Using the Different Online and Software Tools. Details About Their Features, Pros/Cons, and More Are Given
- In 2024, Top Online Video Background Changers Transform Your Videos with Ease
- Updated Detailed Guide to Merge Videos in VLC Media Player for 2024
- New In 2024, How to Create Vintage Film Effect 1920S
- 4 Ways for Rotating Your GoPro Videos Professionally for 2024
- New 2024 Approved Top 10 TEXT TO SPEECH VIDEO MAKERS
- 2024 Approved You Can Use It to Fix Videos that Are Not Aligned Properly or that Have Been Filmed Upside Down. A Handbrake Is a Popular Tool because It Is Easy to Use and It Has a Variety of Features
- Updated In 2024, How To Add Text In After Effects
- Learn How to Trim/Crop Video in Microsoft PowerPoint
- 2024 Approved Splitting Video in VSDC Step by Step
- New How to Vlog? A Ultimate Guide for Beginners for 2024
- New You Can Make Stylish Chroma Key Text Effects After Reading This Article. Wondershare Filmora Will Fill the Crazy Colors in Your Handwritten Note or Words
- Updated If You Do Not Know How to QuickTime Trim Video Clips, You Are in the Right Place. We Have Provided Information that Will Help You Trim Videos with This Application and Make Them Engaging for Viewers
- New Unlocking the Power of DaVinci Resolve Scopes Enhance Your Color Grad
- Updated In 2024, 10 Amazing Anime Character Designs to Inspire You
- New 2024 Approved Follow the Trend of Making Slow-Motion Videos with a Camera Lenta CapCut Template. Learn Everything About CapCut and Find Its Alternatives in This Article
- In 2024, Ultimate Guide to Shopee Livestream Selling Maximize Profits
- Everything You Need to Know about Lock Screen Settings on your Vivo Y27 5G
- How To Transfer Data From iPhone 15 Pro To Other iPhone 15 devices? | Dr.fone
- Updated 2024 Approved Update 6 Best Voice Changers You Cant Miss
- Does Life360 Notify When You Log Out On Samsung Galaxy M34 5G? | Dr.fone
- In 2024, Ways to stop parent tracking your Oppo Reno 8T | Dr.fone
- In 2024, How to Successfully Bypass iCloud Activation Lock on Apple iPhone SE (2020)
- Reliable User Guide to Fix Sony Xperia 1 V Running Slow and Freezing | Dr.fone
- In 2024, How I Transferred Messages from Nokia C22 to iPhone 12/XS (Max) in Seconds | Dr.fone
- 3 Ways to Fake GPS Without Root On Vivo X90S | Dr.fone
- In 2024, The Magnificent Art of Pokemon Go Streaming On Samsung Galaxy A05? | Dr.fone
- In 2024, How Can Oppo Reno 11 5GMirror Share to PC? | Dr.fone
- In 2024, The Best iSpoofer Alternative to Try On Vivo S17 | Dr.fone
- In 2024, Easily Unlock Your Lenovo ThinkPhone Device SIM
- In 2024, How To Unlock iPhone 12 Pro Max Without Swiping Up? 6 Ways | Dr.fone
- In 2024, Ways To Find Unlocking Codes For Samsung Galaxy A23 5G Phones
- Lock Your Motorola Moto G24 Phone in Style The Top 5 Gesture Lock Screen Apps
- How to Unlock Apple iPhone 6s Plus, Apples New iPhone
- Thinking About Changing Your Netflix Region Without a VPN On Infinix Note 30 VIP Racing Edition? | Dr.fone
- In 2024, How to Cast Xiaomi Redmi K70 Pro Screen to PC Using WiFi | Dr.fone
- Title: Top 5 Best Video Denoisers
- Author: Morgan
- Created at : 2024-05-19 05:11:43
- Updated at : 2024-05-20 05:11:43
- Link: https://ai-video-editing.techidaily.com/top-5-best-video-denoisers/
- License: This work is licensed under CC BY-NC-SA 4.0.

