:max_bytes(150000):strip_icc():format(webp)/E-reader-57b936e05f9b58cdfd3e07e1.jpg)
Ultimate Guide on How to Plan and Storyboard a Music Video

Ultimate Guide on How to Plan and Storyboard a Music Video
Do you want to bring your music to life on the big screen? Do you want to create something visually striking? Making a music video seems like a big task. Sometimes, the artist you’re working with might not have a clear idea for their music video. It’s your job to help guide the creative process.
But don’t worry! This guide is going to make it easy for you to plan and storyboard your music video step by step with the help of Filmora . So let’s get started and make an amazing music video together!
Plan and develop initial ideas
The first and essential step in creating a music video is planning. This is where you will lay the foundation of your music video. You need to figure out what your video is about and what you want to convey to the audience. It involves a concept or theme for the video, research, and reference material. You can also explore different ideas to make your video unique and engaging.
Step1Research and gather information
You can begin by researching and gathering information from other music videos. This will help you to know what has been done before and what is currently popular. You can also figure out how you can do it differently.
Step2Brainstorm and concept development
Once you understand the current trends and styles in the music video. It’s time to start brainstorming ideas. You can do it alone or with the help of your team. But remember that you have to think out of the box to make it creative.
Step3Consider the lyrics and message
In the planning stage, it is also important to consider the lyrics and message of the song. It would be best if you plan according to the feel and vibe of the song. It will help you to create a concept tied to the song and will help enhance its meaning.
Step4Experiment and find the right direction
Once you have a general concept, it’s time to develop it further. You can do it by creating rough sketches or storyboards. You can also film test footage to see how the concept will look on screen.
Step5Effort and attention to detail
Remember, this step is the foundation of your music video. So, take your time and don’t rush through it. By putting in effort and attention to detail, you’ll be able to create a visually stunning and closely tied to the song’s music video.
Choose a style for your music video
While creating ideas for the music video, it’s also important to consider the style of the music video. There are two main styles of music videos:
1.Performance-style music video
If you want to showcase energy and charisma in your music video, go for a performance-style music video. This video style focuses on you and your band performing live in front of an audience. You can shoot a video in a single take with minimal cuts or feature different angles and shots. The key is to capture the raw energy and emotion of the performance.
2.Narrative-style music video
A narrative-style music video tells a story or conveys a message along with the music. The story can be a visual representation of the lyrics or a multi-layered narrative. You can choose this style to convey a deeper message or story.
You can shoot this video in different locations and can include different scenes. The main motive is to create a video that emotionally connects with the audience.
Once you have an idea of what you want your music video to be about, you can put together a treatment to show the artist what your initial plan for the music video is.
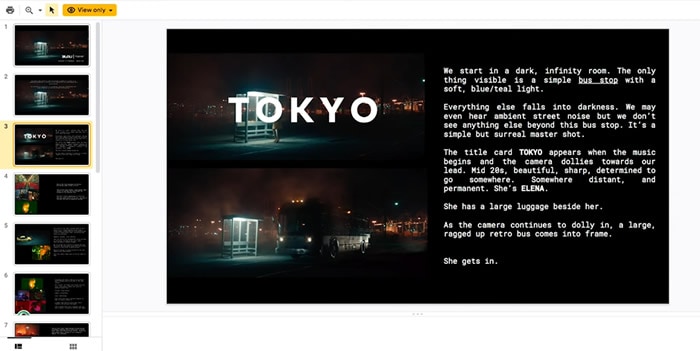
If the artist approves the direction of the video, it’s time to move on to storyboarding!
Storyboard your music video
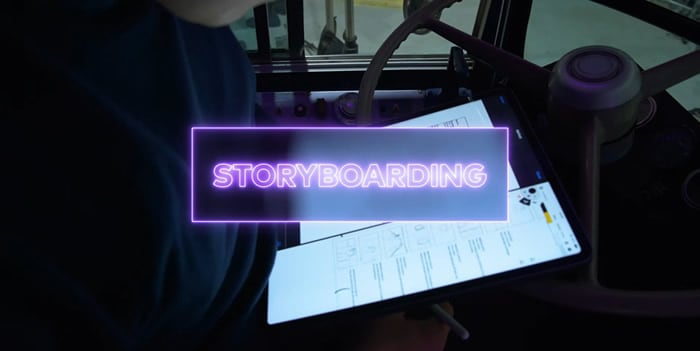
Once you are done with the style and concept of the video, the next step is storyboarding! It allows you to break down your music video visually and highlight key visual moments. It can save time and money and convey a clear idea to the team. You can do this on paper, a computer, or a tablet, whatever works best for you. Let’s see how to do it with the help of Filmora .
Free Download For Win 7 or later(64-bit)
Free Download For macOS 10.14 or later
Step1Draw your ideas
You are supposed to break your video idea into different scenes. For each scene, you should draw a picture of what the shot will look like and draw them within the rectangles.

Step2Take pictures
After doing your storyboarding on paper, take photos of each shot in a sequence and import them to your computer.

Before going to the next step, make sure to download Wondershare Filmora. It is powerful editing software that can help you easily make a storyboard. With its wide range of features, you can also customize your clips with special effects, transitions, and more.

Free Download For Win 7 or later(64-bit)
Free Download For macOS 10.14 or later
Step3Import pictures to Filmora
Now import all the scenes and music to Filmora. You can also create separate folders if you have multiple concepts for a single video.
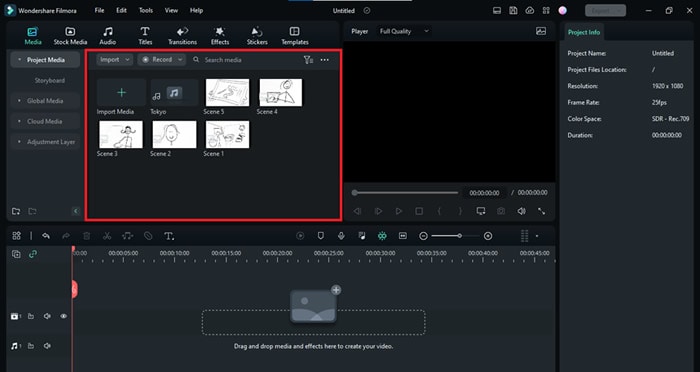
Step4Drop your media onto the timeline
Drag and drop the song to the audio timeline. Then press shift, select all images, and drop them into the picture timeline. If you realize you are missing enough clips to complete the song, you can draw and add more shots.
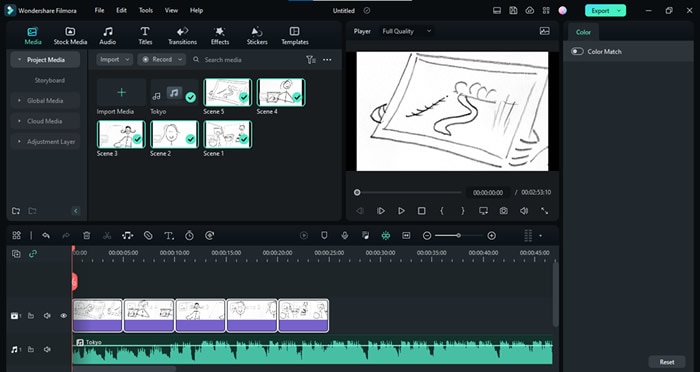
Step5Adjust the frame
You can right-click on the picture’s timeline and select Crop to fit to adjust the image on the screen. You can also adjust the scenes according to the song.
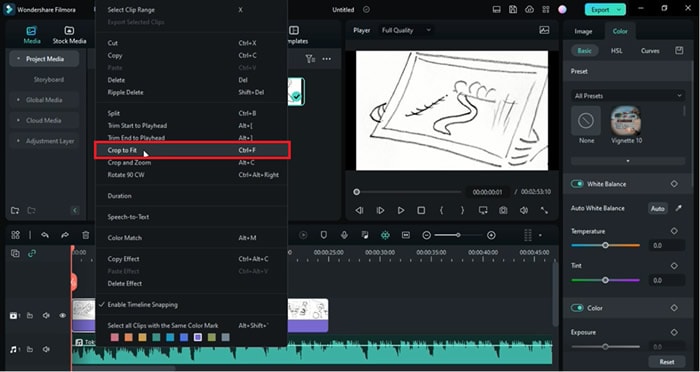
Step6Add effects
You can also simulate transitions and effects in the clips. Let’s suppose you want to show a zoom-in shot. Then you would click on the picture frame and the keyframe option just above the timeline. Now keyframe the position and scale of the clip according to you.
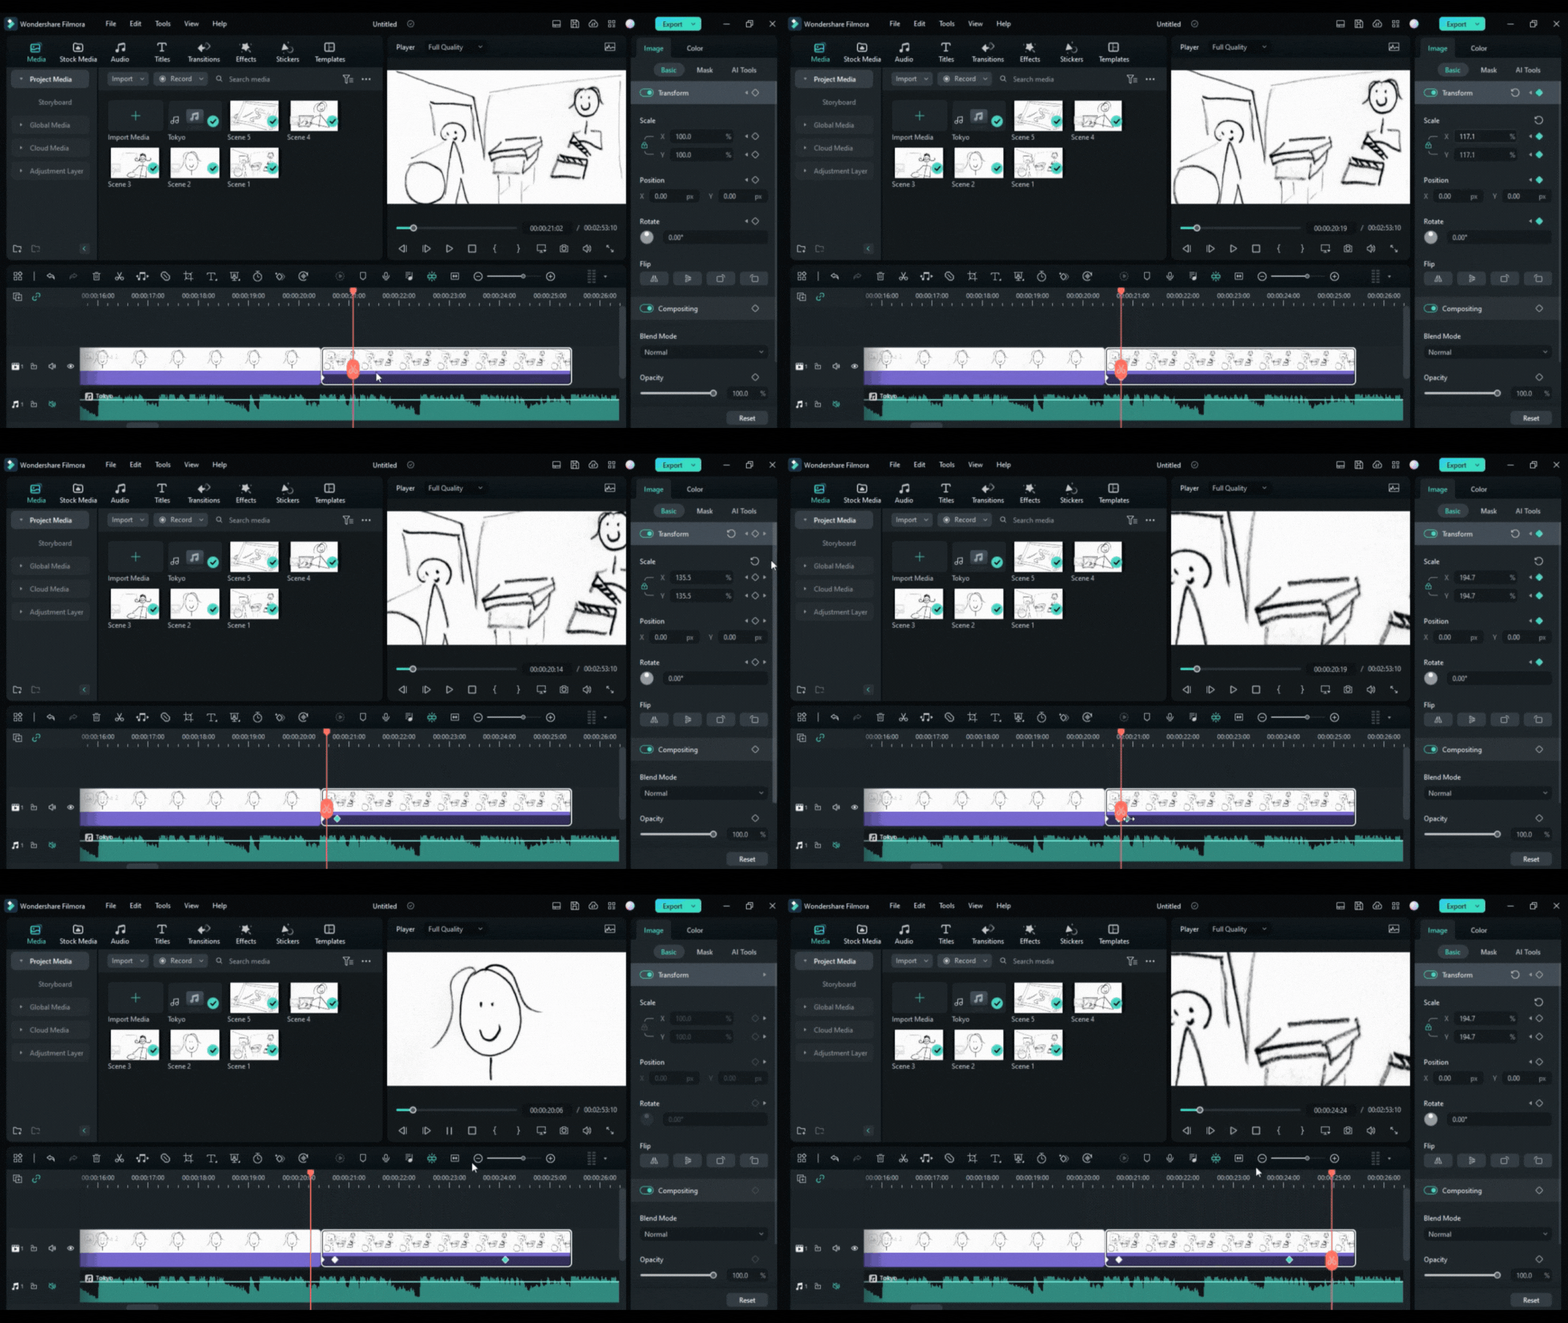
Once you feel like your clips sync with the song, you are ready to start planning for the production of your music video.
Conclusion
We hope this blog has given you a better understanding of how planning and storyboarding can help make your music videos better. You can ensure that your vision is clearly communicated to the audience by planning and storyboarding your music videos properly. Now that you know what to do, it’s time to put that knowledge into action. Take a pencil and paper and start sketching the shots and scenes you want to create.
Free Download For macOS 10.14 or later

Step1Draw your ideas
You are supposed to break your video idea into different scenes. For each scene, you should draw a picture of what the shot will look like and draw them within the rectangles.

Step2Take pictures
After doing your storyboarding on paper, take photos of each shot in a sequence and import them to your computer.

Before going to the next step, make sure to download Wondershare Filmora. It is powerful editing software that can help you easily make a storyboard. With its wide range of features, you can also customize your clips with special effects, transitions, and more.

Free Download For Win 7 or later(64-bit)
Free Download For macOS 10.14 or later
Step3Import pictures to Filmora
Now import all the scenes and music to Filmora. You can also create separate folders if you have multiple concepts for a single video.

Step4Drop your media onto the timeline
Drag and drop the song to the audio timeline. Then press shift, select all images, and drop them into the picture timeline. If you realize you are missing enough clips to complete the song, you can draw and add more shots.

Step5Adjust the frame
You can right-click on the picture’s timeline and select Crop to fit to adjust the image on the screen. You can also adjust the scenes according to the song.

Step6Add effects
You can also simulate transitions and effects in the clips. Let’s suppose you want to show a zoom-in shot. Then you would click on the picture frame and the keyframe option just above the timeline. Now keyframe the position and scale of the clip according to you.

Once you feel like your clips sync with the song, you are ready to start planning for the production of your music video.
Conclusion
We hope this blog has given you a better understanding of how planning and storyboarding can help make your music videos better. You can ensure that your vision is clearly communicated to the audience by planning and storyboarding your music videos properly. Now that you know what to do, it’s time to put that knowledge into action. Take a pencil and paper and start sketching the shots and scenes you want to create.
Do You Want to Slow Down Your TikTok Video and Zoom on a Specific Part? This Is No Longer a Difficult Task as This Video Comes up with the Right Set of Methods that Can Be Used to Implement the Slow Zoom Effect TikTok
Abundant Video Effects - Wondershare Filmora
Provide abundant video effects - A creative video editor
Powerful color correction and grading
Detailed tutorials are provided by the official channel
TikTok videos have become a very common approach to interacting with the social community on a large scale. While making such videos, you may find the need to have tools that can help you make the perfect video with a range of effects. If you want to emphasize a certain part of the video that has been recorded, you can look to zoom it in. However, who knew that you could use the slow zoom effect TikTok across it according to your ease?
This article introduces you to a comprehensive guide on how to do the slow zoom in effect on TikTok with the right set of methods.
In this article
Part 1: What is TikTok Slow Zoom?
Part 2: Create a Slow Zoom TikTok Video in Minutes
Part 3: Bonus | Create Slow Zoom Videos in Wondershare Filmora
Part 1: What is TikTok Slow Zoom?
As the name implies, the slow zoom TikTok effect refers to the gradual zoom that incurs onto a video that has been recorded across the platform. While showing something important across the zoom filter, slowing it down will help the viewers observe the details present across the area that is being zoomed. This particular effect can be used across the short TikTok videos to display important content within a matter of seconds.
Part 2: Create a Slow Zoom TikTok Video in Minutes
For this part, we shall be looking into the direct approaches to slow zoom TikTok that can be adopted to bring out the best for your recorded video within a matter of minutes.
Method 1: Create Face Zoom Video in TikTok
Step 1: For the first step, you need to record a video across TikTok or have it recorded within your smartphone while covering the requirements of the platform.
Step 2: To upload the video, click on the “+” icon and follow through the process to click on “Upload” to add a pre-recorded video.

Step 3: As you’ve added the video, go to “Effects” and proceed into the “Time” section. Click on “Slo-mo” to add a slow-down effect to the video. Move into the “Visuals” section and find the “Zoom” effect in the list. Let the cursor go across the certain part where you want to slow zoom the video. Hold the effect until it is applied across the set portion.

Step 4: Once done, click on “Save” to preview the video and share the video by clicking “Next.” You can share it directly across WhatsApp, Instagram, or Facebook, as desired.

Method 2: Do Slow Zoom Easily by Finding a Slow Zoom Video
Step 1: Launch TikTok on your device and click on “Discover” on the bottom border of the screen. Type “Slow Zoom” across the search bar on the next window and locate the effects section to use the effect.

Step 2: Now, you can click on the effect to see how many people have created their videos using this TikTok effect. After that, click on “Try this effect” to shoot a similar video under the mentioned effect.

Step 3: You need to record the video by clicking on the red recording button. Once recorded, make other significant edits across the video and conclude by posting or sharing it to the appropriate platforms.
Part 3: Bonus | Create Slow Zoom Videos in Wondershare Filmora
Wondershare Filmora provides you with one of the best interfaces to perform the simplest tasks of editing slow zoom TikTok across its platform. Being one of the best third-party video editing tools in the market, Filmora ensures a complete editing platform for beginners and professionals through effective means.
While being known for its impressive editing skillset, the users can easily understand the process of using the slow zoom effect TikTok on a video. For this, you need to follow the simple steps provided below in detail.
Step 1: Launch Wondershare Filmora
Download and install the latest version of Wondershare Filmora on your computer. Launch the software and click on “New Project” to open a blank window.

Step 2: Import TikTok Video
Start by adding the TikTok video that needs to be edited across Wondershare Filmora. Click on the “Arrow” icon across the “Media” tab to import the required video. As you’ve added it, drag it across the timeline to start editing.

Step 3: Cut Down the Clip for Video Editing
At first, you need to clip the part of the video where you want to add the slow zoom effect TikTok. Place the red indicator across the pointer where you want to start the part and hit the split icon. Drag the indicator across the next frames to the point where you want to keep the audio. You will have a separate clip now.

Step 4: Specify Slow Speed of Clip
Select the clip and find the “Speed” icon across the menu above the timeline of the interface. Select the appropriate speed from the drop-down menu that appears on the screen. Go into the “Slow” section and select speeds like 0.5x to slow down the clip speed.

Step 5: Include Animation Keyframes
Proceed to add animation keyframes on the specific clip. Right-click on it and select “Add Animation” from the menu. Proceed into the “Animation” tab and find the “Customize” section across the screen. Move the indicator to the point where you want to add the first keyframe and hit “Add.” Move the indicator further across the clip to add the second keyframe across it. The reason for adding multiple keyframes is to set up the animation keyframe across the TikTok clip.

Step 6: Change the Scale Clip and Export
As you have made respective edits across the video, double click to open a new range of settings for it. Click on the “Transform” menu to open a list of different options. Locate the “Scale” option among them and manage the scaling of the clip through the slider percentages. Once done, click on the “Export” button to download the edited TikTok.

Conclusion
We have provided you with some of the best approaches that can be implemented to slow zoom TikTok video. With these methods, you will be able to make professional-level videos that can be managed within a matter of minutes. Get to know more about these tools by going through the above-mentioned guide.
TikTok videos have become a very common approach to interacting with the social community on a large scale. While making such videos, you may find the need to have tools that can help you make the perfect video with a range of effects. If you want to emphasize a certain part of the video that has been recorded, you can look to zoom it in. However, who knew that you could use the slow zoom effect TikTok across it according to your ease?
This article introduces you to a comprehensive guide on how to do the slow zoom in effect on TikTok with the right set of methods.
In this article
Part 1: What is TikTok Slow Zoom?
Part 2: Create a Slow Zoom TikTok Video in Minutes
Part 3: Bonus | Create Slow Zoom Videos in Wondershare Filmora
Part 1: What is TikTok Slow Zoom?
As the name implies, the slow zoom TikTok effect refers to the gradual zoom that incurs onto a video that has been recorded across the platform. While showing something important across the zoom filter, slowing it down will help the viewers observe the details present across the area that is being zoomed. This particular effect can be used across the short TikTok videos to display important content within a matter of seconds.
Part 2: Create a Slow Zoom TikTok Video in Minutes
For this part, we shall be looking into the direct approaches to slow zoom TikTok that can be adopted to bring out the best for your recorded video within a matter of minutes.
Method 1: Create Face Zoom Video in TikTok
Step 1: For the first step, you need to record a video across TikTok or have it recorded within your smartphone while covering the requirements of the platform.
Step 2: To upload the video, click on the “+” icon and follow through the process to click on “Upload” to add a pre-recorded video.

Step 3: As you’ve added the video, go to “Effects” and proceed into the “Time” section. Click on “Slo-mo” to add a slow-down effect to the video. Move into the “Visuals” section and find the “Zoom” effect in the list. Let the cursor go across the certain part where you want to slow zoom the video. Hold the effect until it is applied across the set portion.

Step 4: Once done, click on “Save” to preview the video and share the video by clicking “Next.” You can share it directly across WhatsApp, Instagram, or Facebook, as desired.

Method 2: Do Slow Zoom Easily by Finding a Slow Zoom Video
Step 1: Launch TikTok on your device and click on “Discover” on the bottom border of the screen. Type “Slow Zoom” across the search bar on the next window and locate the effects section to use the effect.

Step 2: Now, you can click on the effect to see how many people have created their videos using this TikTok effect. After that, click on “Try this effect” to shoot a similar video under the mentioned effect.

Step 3: You need to record the video by clicking on the red recording button. Once recorded, make other significant edits across the video and conclude by posting or sharing it to the appropriate platforms.
Part 3: Bonus | Create Slow Zoom Videos in Wondershare Filmora
Wondershare Filmora provides you with one of the best interfaces to perform the simplest tasks of editing slow zoom TikTok across its platform. Being one of the best third-party video editing tools in the market, Filmora ensures a complete editing platform for beginners and professionals through effective means.
While being known for its impressive editing skillset, the users can easily understand the process of using the slow zoom effect TikTok on a video. For this, you need to follow the simple steps provided below in detail.
Step 1: Launch Wondershare Filmora
Download and install the latest version of Wondershare Filmora on your computer. Launch the software and click on “New Project” to open a blank window.

Step 2: Import TikTok Video
Start by adding the TikTok video that needs to be edited across Wondershare Filmora. Click on the “Arrow” icon across the “Media” tab to import the required video. As you’ve added it, drag it across the timeline to start editing.

Step 3: Cut Down the Clip for Video Editing
At first, you need to clip the part of the video where you want to add the slow zoom effect TikTok. Place the red indicator across the pointer where you want to start the part and hit the split icon. Drag the indicator across the next frames to the point where you want to keep the audio. You will have a separate clip now.

Step 4: Specify Slow Speed of Clip
Select the clip and find the “Speed” icon across the menu above the timeline of the interface. Select the appropriate speed from the drop-down menu that appears on the screen. Go into the “Slow” section and select speeds like 0.5x to slow down the clip speed.

Step 5: Include Animation Keyframes
Proceed to add animation keyframes on the specific clip. Right-click on it and select “Add Animation” from the menu. Proceed into the “Animation” tab and find the “Customize” section across the screen. Move the indicator to the point where you want to add the first keyframe and hit “Add.” Move the indicator further across the clip to add the second keyframe across it. The reason for adding multiple keyframes is to set up the animation keyframe across the TikTok clip.

Step 6: Change the Scale Clip and Export
As you have made respective edits across the video, double click to open a new range of settings for it. Click on the “Transform” menu to open a list of different options. Locate the “Scale” option among them and manage the scaling of the clip through the slider percentages. Once done, click on the “Export” button to download the edited TikTok.

Conclusion
We have provided you with some of the best approaches that can be implemented to slow zoom TikTok video. With these methods, you will be able to make professional-level videos that can be managed within a matter of minutes. Get to know more about these tools by going through the above-mentioned guide.
TikTok videos have become a very common approach to interacting with the social community on a large scale. While making such videos, you may find the need to have tools that can help you make the perfect video with a range of effects. If you want to emphasize a certain part of the video that has been recorded, you can look to zoom it in. However, who knew that you could use the slow zoom effect TikTok across it according to your ease?
This article introduces you to a comprehensive guide on how to do the slow zoom in effect on TikTok with the right set of methods.
In this article
Part 1: What is TikTok Slow Zoom?
Part 2: Create a Slow Zoom TikTok Video in Minutes
Part 3: Bonus | Create Slow Zoom Videos in Wondershare Filmora
Part 1: What is TikTok Slow Zoom?
As the name implies, the slow zoom TikTok effect refers to the gradual zoom that incurs onto a video that has been recorded across the platform. While showing something important across the zoom filter, slowing it down will help the viewers observe the details present across the area that is being zoomed. This particular effect can be used across the short TikTok videos to display important content within a matter of seconds.
Part 2: Create a Slow Zoom TikTok Video in Minutes
For this part, we shall be looking into the direct approaches to slow zoom TikTok that can be adopted to bring out the best for your recorded video within a matter of minutes.
Method 1: Create Face Zoom Video in TikTok
Step 1: For the first step, you need to record a video across TikTok or have it recorded within your smartphone while covering the requirements of the platform.
Step 2: To upload the video, click on the “+” icon and follow through the process to click on “Upload” to add a pre-recorded video.

Step 3: As you’ve added the video, go to “Effects” and proceed into the “Time” section. Click on “Slo-mo” to add a slow-down effect to the video. Move into the “Visuals” section and find the “Zoom” effect in the list. Let the cursor go across the certain part where you want to slow zoom the video. Hold the effect until it is applied across the set portion.

Step 4: Once done, click on “Save” to preview the video and share the video by clicking “Next.” You can share it directly across WhatsApp, Instagram, or Facebook, as desired.

Method 2: Do Slow Zoom Easily by Finding a Slow Zoom Video
Step 1: Launch TikTok on your device and click on “Discover” on the bottom border of the screen. Type “Slow Zoom” across the search bar on the next window and locate the effects section to use the effect.

Step 2: Now, you can click on the effect to see how many people have created their videos using this TikTok effect. After that, click on “Try this effect” to shoot a similar video under the mentioned effect.

Step 3: You need to record the video by clicking on the red recording button. Once recorded, make other significant edits across the video and conclude by posting or sharing it to the appropriate platforms.
Part 3: Bonus | Create Slow Zoom Videos in Wondershare Filmora
Wondershare Filmora provides you with one of the best interfaces to perform the simplest tasks of editing slow zoom TikTok across its platform. Being one of the best third-party video editing tools in the market, Filmora ensures a complete editing platform for beginners and professionals through effective means.
While being known for its impressive editing skillset, the users can easily understand the process of using the slow zoom effect TikTok on a video. For this, you need to follow the simple steps provided below in detail.
Step 1: Launch Wondershare Filmora
Download and install the latest version of Wondershare Filmora on your computer. Launch the software and click on “New Project” to open a blank window.

Step 2: Import TikTok Video
Start by adding the TikTok video that needs to be edited across Wondershare Filmora. Click on the “Arrow” icon across the “Media” tab to import the required video. As you’ve added it, drag it across the timeline to start editing.

Step 3: Cut Down the Clip for Video Editing
At first, you need to clip the part of the video where you want to add the slow zoom effect TikTok. Place the red indicator across the pointer where you want to start the part and hit the split icon. Drag the indicator across the next frames to the point where you want to keep the audio. You will have a separate clip now.

Step 4: Specify Slow Speed of Clip
Select the clip and find the “Speed” icon across the menu above the timeline of the interface. Select the appropriate speed from the drop-down menu that appears on the screen. Go into the “Slow” section and select speeds like 0.5x to slow down the clip speed.

Step 5: Include Animation Keyframes
Proceed to add animation keyframes on the specific clip. Right-click on it and select “Add Animation” from the menu. Proceed into the “Animation” tab and find the “Customize” section across the screen. Move the indicator to the point where you want to add the first keyframe and hit “Add.” Move the indicator further across the clip to add the second keyframe across it. The reason for adding multiple keyframes is to set up the animation keyframe across the TikTok clip.

Step 6: Change the Scale Clip and Export
As you have made respective edits across the video, double click to open a new range of settings for it. Click on the “Transform” menu to open a list of different options. Locate the “Scale” option among them and manage the scaling of the clip through the slider percentages. Once done, click on the “Export” button to download the edited TikTok.

Conclusion
We have provided you with some of the best approaches that can be implemented to slow zoom TikTok video. With these methods, you will be able to make professional-level videos that can be managed within a matter of minutes. Get to know more about these tools by going through the above-mentioned guide.
TikTok videos have become a very common approach to interacting with the social community on a large scale. While making such videos, you may find the need to have tools that can help you make the perfect video with a range of effects. If you want to emphasize a certain part of the video that has been recorded, you can look to zoom it in. However, who knew that you could use the slow zoom effect TikTok across it according to your ease?
This article introduces you to a comprehensive guide on how to do the slow zoom in effect on TikTok with the right set of methods.
In this article
Part 1: What is TikTok Slow Zoom?
Part 2: Create a Slow Zoom TikTok Video in Minutes
Part 3: Bonus | Create Slow Zoom Videos in Wondershare Filmora
Part 1: What is TikTok Slow Zoom?
As the name implies, the slow zoom TikTok effect refers to the gradual zoom that incurs onto a video that has been recorded across the platform. While showing something important across the zoom filter, slowing it down will help the viewers observe the details present across the area that is being zoomed. This particular effect can be used across the short TikTok videos to display important content within a matter of seconds.
Part 2: Create a Slow Zoom TikTok Video in Minutes
For this part, we shall be looking into the direct approaches to slow zoom TikTok that can be adopted to bring out the best for your recorded video within a matter of minutes.
Method 1: Create Face Zoom Video in TikTok
Step 1: For the first step, you need to record a video across TikTok or have it recorded within your smartphone while covering the requirements of the platform.
Step 2: To upload the video, click on the “+” icon and follow through the process to click on “Upload” to add a pre-recorded video.

Step 3: As you’ve added the video, go to “Effects” and proceed into the “Time” section. Click on “Slo-mo” to add a slow-down effect to the video. Move into the “Visuals” section and find the “Zoom” effect in the list. Let the cursor go across the certain part where you want to slow zoom the video. Hold the effect until it is applied across the set portion.

Step 4: Once done, click on “Save” to preview the video and share the video by clicking “Next.” You can share it directly across WhatsApp, Instagram, or Facebook, as desired.

Method 2: Do Slow Zoom Easily by Finding a Slow Zoom Video
Step 1: Launch TikTok on your device and click on “Discover” on the bottom border of the screen. Type “Slow Zoom” across the search bar on the next window and locate the effects section to use the effect.

Step 2: Now, you can click on the effect to see how many people have created their videos using this TikTok effect. After that, click on “Try this effect” to shoot a similar video under the mentioned effect.

Step 3: You need to record the video by clicking on the red recording button. Once recorded, make other significant edits across the video and conclude by posting or sharing it to the appropriate platforms.
Part 3: Bonus | Create Slow Zoom Videos in Wondershare Filmora
Wondershare Filmora provides you with one of the best interfaces to perform the simplest tasks of editing slow zoom TikTok across its platform. Being one of the best third-party video editing tools in the market, Filmora ensures a complete editing platform for beginners and professionals through effective means.
While being known for its impressive editing skillset, the users can easily understand the process of using the slow zoom effect TikTok on a video. For this, you need to follow the simple steps provided below in detail.
Step 1: Launch Wondershare Filmora
Download and install the latest version of Wondershare Filmora on your computer. Launch the software and click on “New Project” to open a blank window.

Step 2: Import TikTok Video
Start by adding the TikTok video that needs to be edited across Wondershare Filmora. Click on the “Arrow” icon across the “Media” tab to import the required video. As you’ve added it, drag it across the timeline to start editing.

Step 3: Cut Down the Clip for Video Editing
At first, you need to clip the part of the video where you want to add the slow zoom effect TikTok. Place the red indicator across the pointer where you want to start the part and hit the split icon. Drag the indicator across the next frames to the point where you want to keep the audio. You will have a separate clip now.

Step 4: Specify Slow Speed of Clip
Select the clip and find the “Speed” icon across the menu above the timeline of the interface. Select the appropriate speed from the drop-down menu that appears on the screen. Go into the “Slow” section and select speeds like 0.5x to slow down the clip speed.

Step 5: Include Animation Keyframes
Proceed to add animation keyframes on the specific clip. Right-click on it and select “Add Animation” from the menu. Proceed into the “Animation” tab and find the “Customize” section across the screen. Move the indicator to the point where you want to add the first keyframe and hit “Add.” Move the indicator further across the clip to add the second keyframe across it. The reason for adding multiple keyframes is to set up the animation keyframe across the TikTok clip.

Step 6: Change the Scale Clip and Export
As you have made respective edits across the video, double click to open a new range of settings for it. Click on the “Transform” menu to open a list of different options. Locate the “Scale” option among them and manage the scaling of the clip through the slider percentages. Once done, click on the “Export” button to download the edited TikTok.

Conclusion
We have provided you with some of the best approaches that can be implemented to slow zoom TikTok video. With these methods, you will be able to make professional-level videos that can be managed within a matter of minutes. Get to know more about these tools by going through the above-mentioned guide.
[Top List] The Best Slow Motion Video Editors Available
In 2024, people believe in effects and filters to elevate content instead of keeping it real. With the increasing demand for video editing, slow motion has gained both creator’s and viewers’ attention. Such videos are responsible for adding a creativity layer to content via slow-motion video editors.
In this article, we are going to discuss some leading slow-motion video editors and their features. Some of these tools are online and hence require internet access to operate. On the other hand, some slo-mo video editors are smartphone applications. All have their advantages and drawbacks; however, we’ll discuss a desktop tool that is more efficient than all and offers nothing but benefits.
Slow Motion Video Maker Slow your video’s speed with better control of your keyframes to create unique cinematic effects!
Make A Slow Motion Video Make A Slow Motion Video More Features

Part 1: Top 5 Online Slow-Motion Video Editors to Use in 2024
This section of the article discusses some slow -motion video makers that are available online. We’ll mention their pros and cons along with their prices. This will make selection easy for those who prefer computer editing over smartphones. Following are the top online tools to use if you want to create a slow-motion effect :
1. CapCut
Do you want a customized editing experience while creating slow-motion videos? CapCut is the right slow motion video editor for you, enabling you to set the slow-mo speed at any point. If there were any jitters in your recording, you can fix them by changing the playback speed. In addition, the tool offers post-production effects, AI visual enhancers, and more.
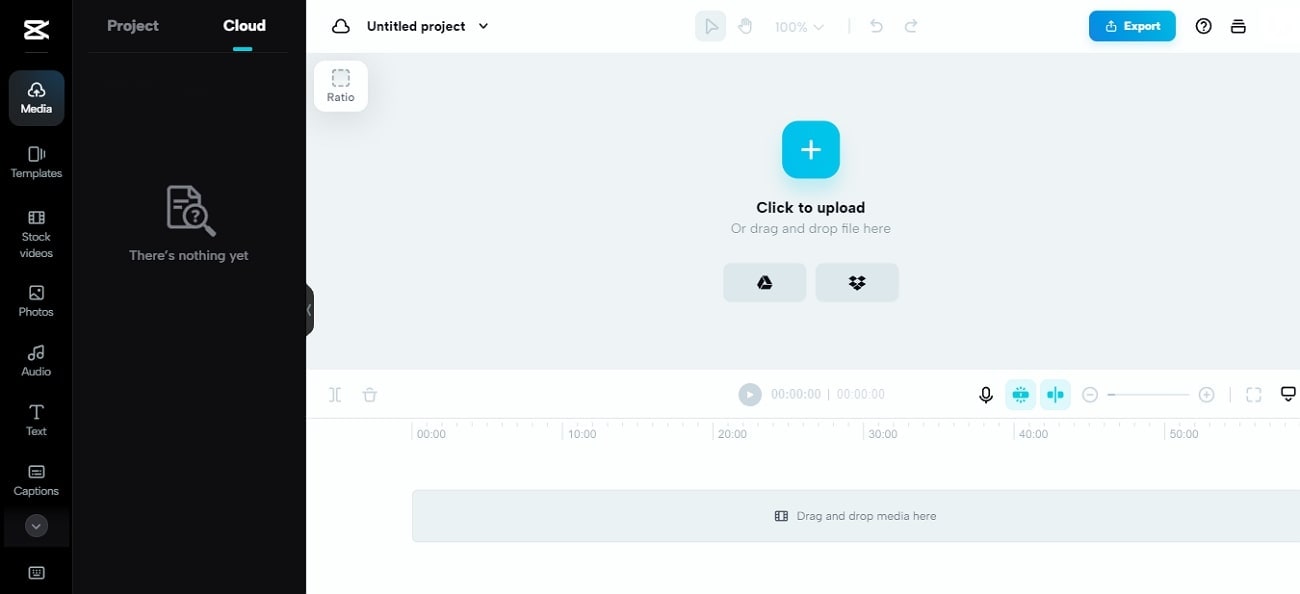
Pros
- It has a timeline panel for editing to ensure smooth and precise editing.
- The tool has a modest yet well-organized user interface to facilitate beginners and professionals.
Cons
- There is a limitation of advanced and upgraded features that are used these days.
Pricing
Free
2. Typito
Say goodbye to the long hours of waiting with your slow-mo editor ’s slow processing. Typito allows users to craft a slow-motion video in 3 steps and a high processing rate. The tool shows compatibility across 20+ video formats. In addition, you can also adjust the video ratio using its built-in ratio presets. In this editor, 1.5x is the normal playback speed, and below this are the slow-motion ones.
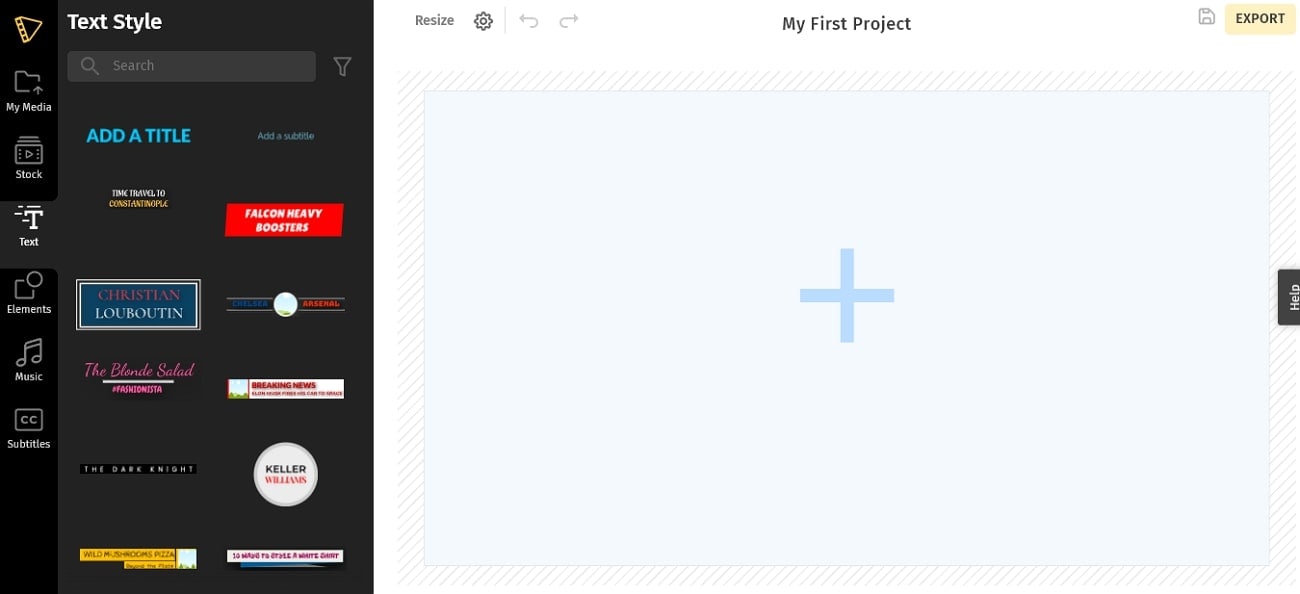
Pros
- The tool offers multiple video formats for editing videos while fitting the right context.
- With its cloud collaboration, you can access your incomplete and edited projects where you left off.
Cons
- The advanced features are not available in the free version, and some users don’t prefer that.
Pricing
| Pricing Plan | Annual Pricing |
|---|---|
| Solo | $15 |
| Pro | $29 |
3. InVideo.ai
Editing with a multifeatured tool is fun as you can do more than just one thing. As the name indicates, this is an AI-driven tool with speed change integration. You can adjust the playback speed and set duration preferences for your video. With its minimal user interface, you can do further cutting and trimming afterward across this slow-mo video editor.
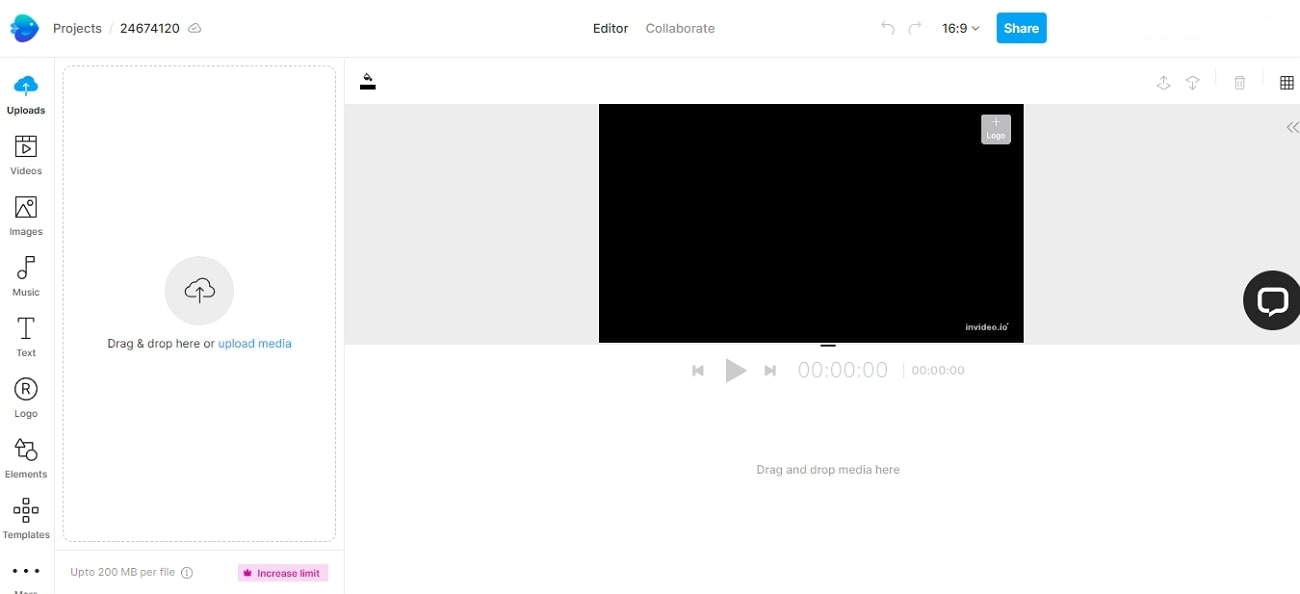
Pros
- Its stock footage library has over 8M+ media to help with video creation.
- It has a removable watermark option that is very important for personal branding.
Cons
- The majority of the AI features are available in the paid version.
Pricing
| Pricing Plan | Annual Pricing |
|---|---|
| Business | $15/month |
| Unlimited | $30/month |
4. Video Candy
If you are looking for a slow-motion editor without having to log in or go through a technical procedure, this tool is for you. Interacting with the tool is easy as the user interface has an intuitive design, and you can start by uploading a file. It has 3 playback speed options: 0.75x, 0.5x, and 0.25x for creating a slomo. In addition, you can also incorporate a high playback speed option to unlock more creativity.
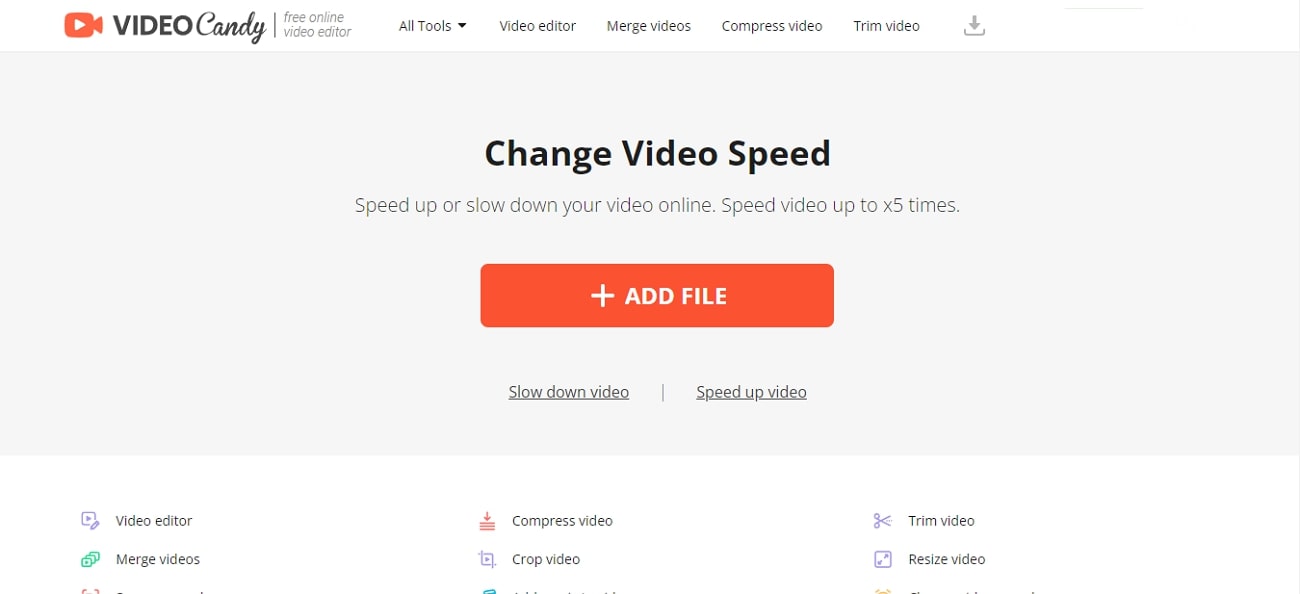
Pros
- It supports 4K resolution, which means high-quality content editing.
- The tool can support large files of 3GB size, which means you don’t have to split up results.
Cons
- The tool doesn’t ask for a Gmail account, which means no record of history and storage.
Pricing
| Pricing Plan | Annual Pricing |
|---|---|
| Yearly | $4/month |
| Month | $8/month |
| Lifetime | $99/pay once |
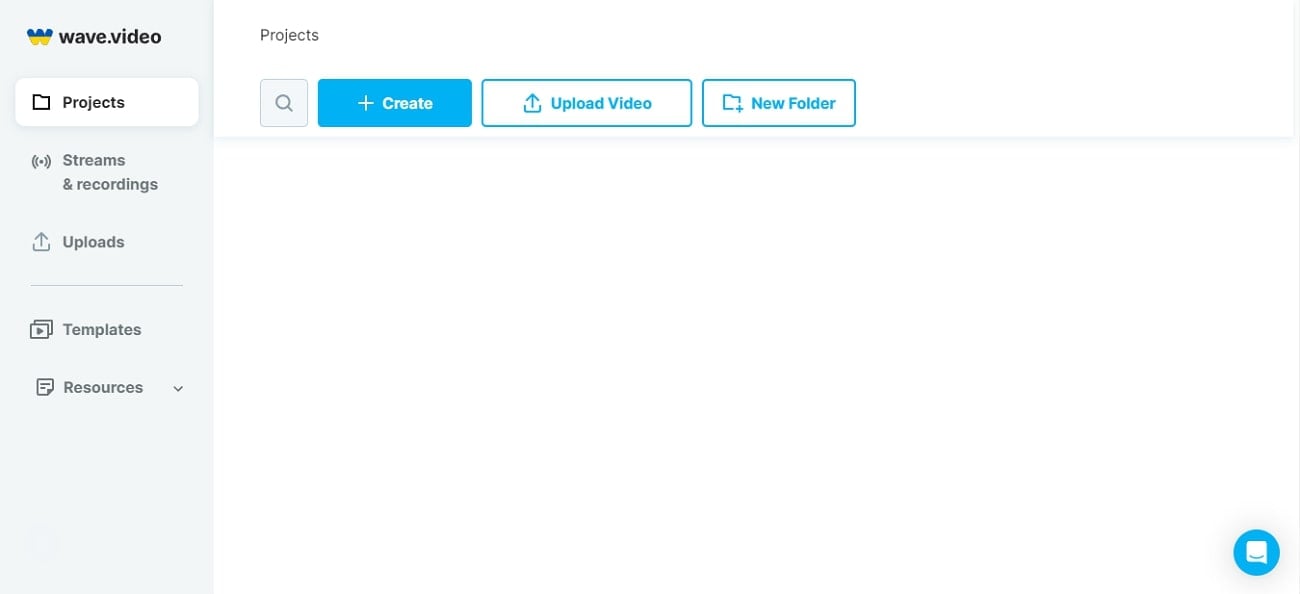
5. Wave.video
This online platform facilitates the alteration of video playback speed effortlessly. It features three distinct playback options, 0.75x, 0.5x, and 0.25x, to ensure precise editing capabilities. Possessing an uncomplicated user interface, the tool extends beyond speed adjustments, offering comprehensive audio modifications. If you want to elevate your videography, use its time-lapse effect to enrich the aesthetics.
Pros
- Continuously offers advanced features with an easy-to-understand interface.
- The drag-and-drop functionality makes it quick to edit videos and increases productivity.
Cons
- The watermark addition in the free version of the slow-mo editor is not good for personal branding and visuals.
Pricing
| Pricing Plan | Annual Pricing |
|---|---|
| Streamer | $16/month |
| Creator | $24/month |
| Business | $48/month |
Part 2: Top 5 Android Apps for Editing Slow-Motion Videos
While professionals prefer editing on a desktop, some people prefer Android editing. It is easier to use smartphones for editing because they come in handy. Moreover, let’s admit that we are on our phones half of the time, and a computer might seem out of our comfort zone. This section has gathered some of the slow-mo maker s to operate on your Android:
- [Slow Motion Video – Fast&Slow Mo](#android app1)
- [Slow Motion Video Maker](#android app2)
- [Video Editor and Maker – InShot](#android app3)
- [Video Editor and Maker – Vidma](#android app4)
- [VivaVideo – Video Editor&Maker](#android app5)
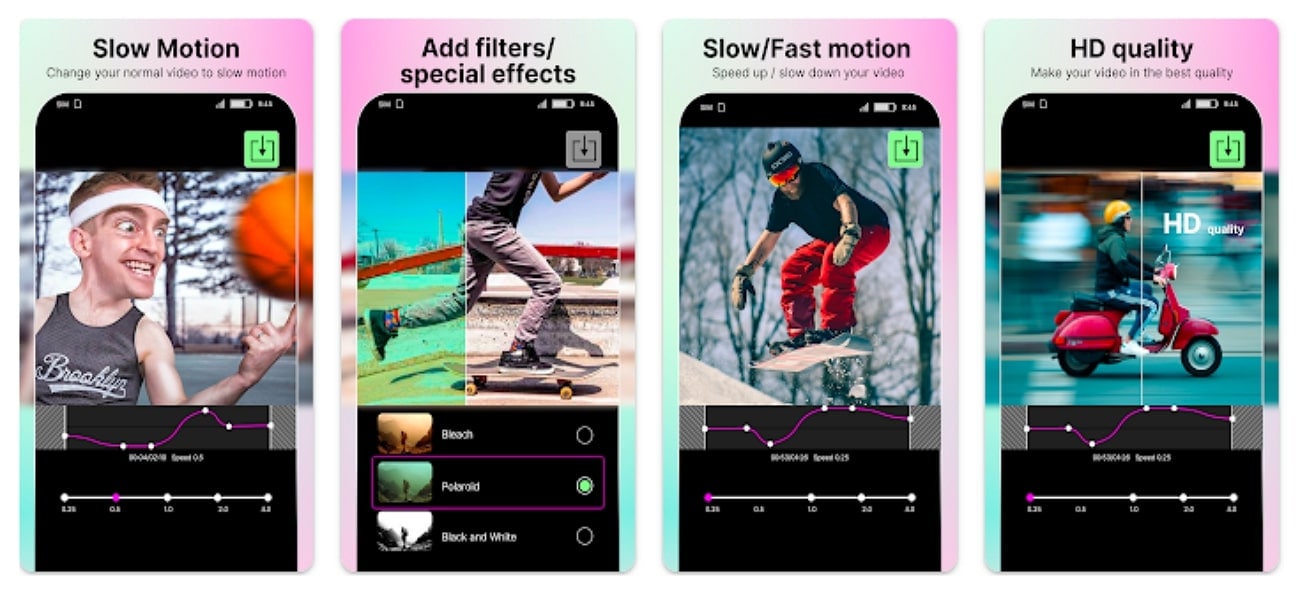
1. Slow Motion Video – Fast&Slow Mo
Becoming the favorite of many, this slow-motion video converter offers an interactive user interface. Editing a slow motion is all about dragging and setting the slider in the downward direction. To slow down a video, you can set its playback speed from 0.25x to 4.0x. In addition, you can also curate a specific portion of your video in slow or fast motion.
Key Features
- This slow-motion video creator offers a pre-built filter and special effects to improve aesthetics.
- This application maintains the video quality and can convert video resolution to HD.
- Never miss a chance to integrate good music in your videos with it, as it has built-in options.
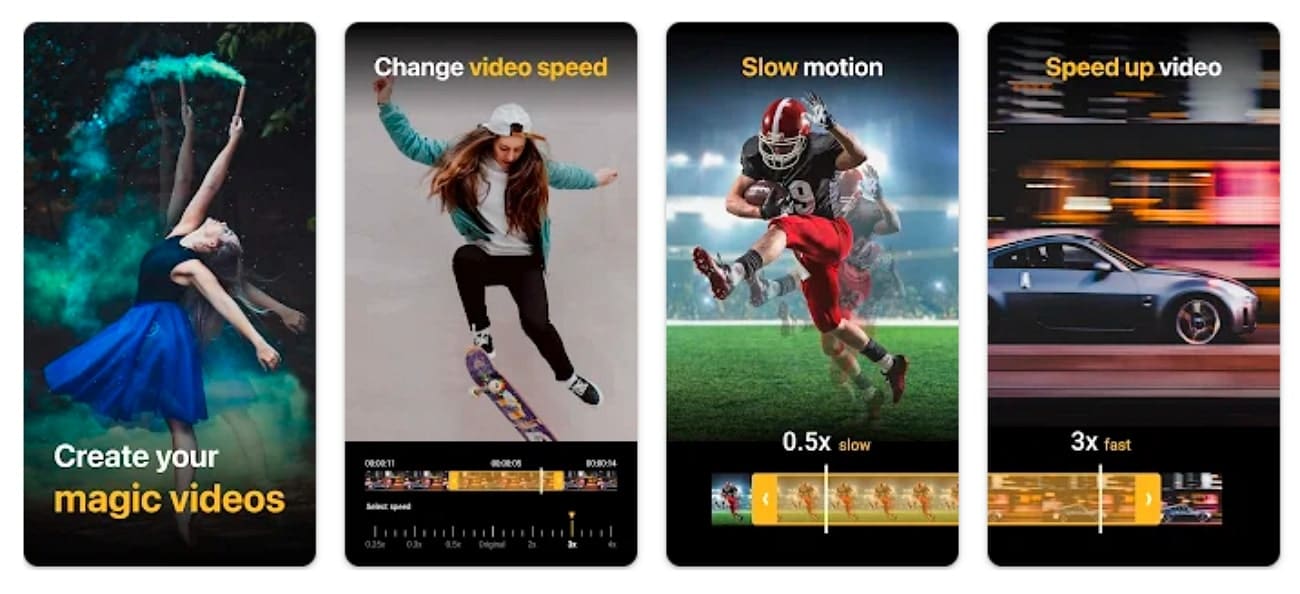
2. Slow Motion Video Maker
This free slo-mo video editor regulates its algorithm to introduce advanced features. It features a timeline editing interface, making it easy to apply slow-motion effects on a definite video section. It displays 3 slow motion speed options: 0.5x, 0.3x, and 0.25x to achieve precision in creating a slomo.
Key Features
- You can fasten your video up to 4x, which is helpful in short-time learning, data compression, and more.
- The premium video trim feature and timeline editing help with the accurate parting of a video.
- This slow-motion video maker has pre-developed music tracks and effects for maximum creativity.
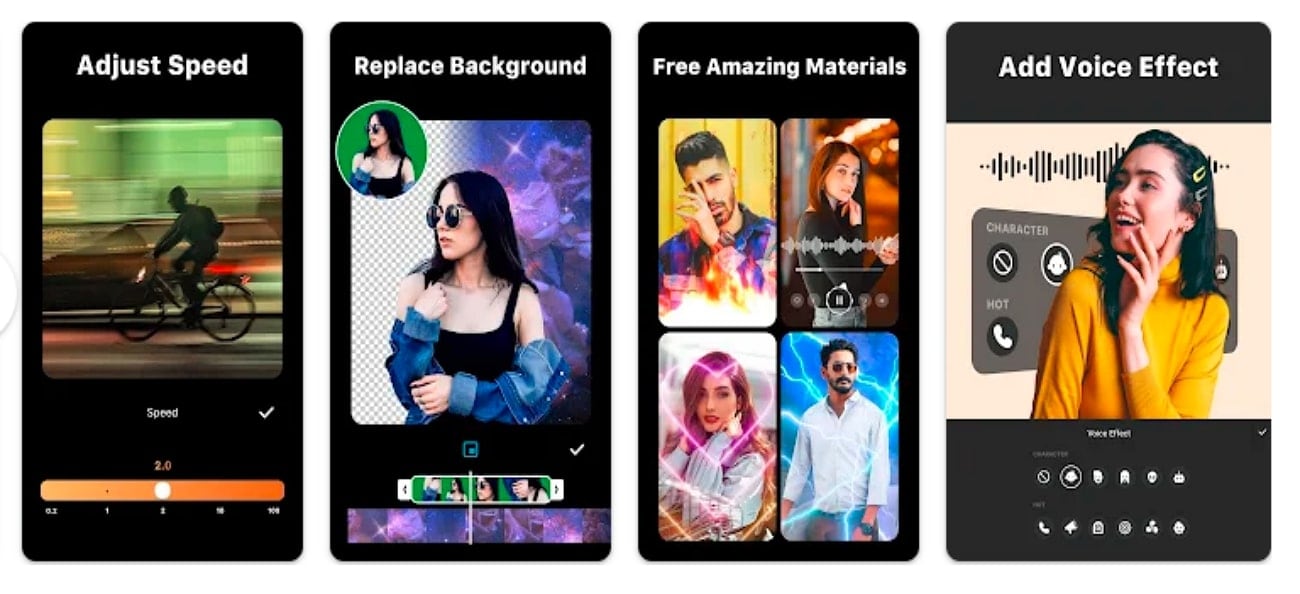
3. Video Editor & Maker – InShot
Step into the realm of this free slo-mo video editor for crafting slo-mos full of creativity. It proposes a simple method to slow down video speed by using a slider. The timeline editing and selective playhead options enable you to create beyond basic. You can alter the speed of specific parts of the video, which means you can do much more than just a plain slo-mo.
Key Features
- Take your vision up a notch by introducing its integral collection of animations and text in your content.
- Make your reels more interesting with its intuitive and numerous transition effects.
- The slow-motion edito r has AI abilities to help you remove image backgrounds with accuracy.
4. Video Editor & Maker – Vidma
This is for you if you are looking for a slow-motion video editor that generates as precise results as those in trending videos. The editing application offers a “Velocity Edit” option with detailed playback speed and positioning options. The application has a velocity graph-like interface for adjusting speed, and you can also see the time you are applying this effect.
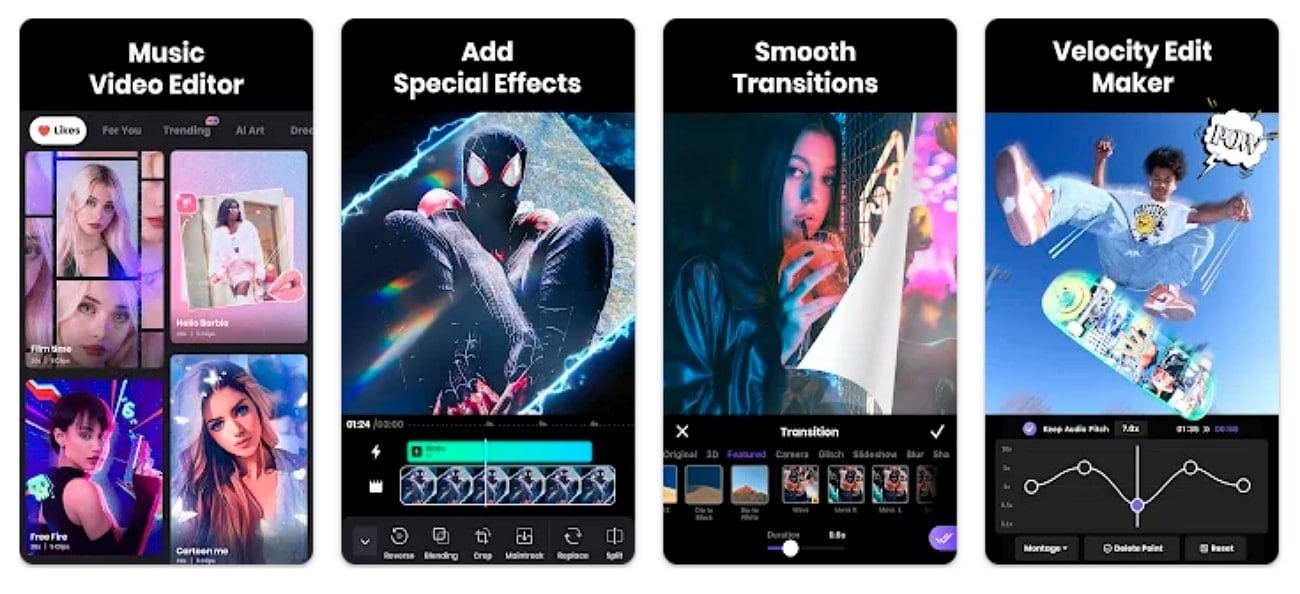
Key Features
- Bids an automated “Keep Audio Pitch” option to maintain the audio quality during speed change.
- Infuse your pictures and videos with its immersive collection of text and stickers.
- Features multiple visual filters categorized according to contexts with custom intensities.
5. VivaVideo – Video Editor&Maker
If you are looking for a slow-motion video editor with additional features to elevate your content, use it. The tool has multiple speed setting presets to help you create a perfect slomo along with fast motion. Among Montage, Hero, Bullet, and other presets, it offers a Custom preset option to edit according to your imagination.
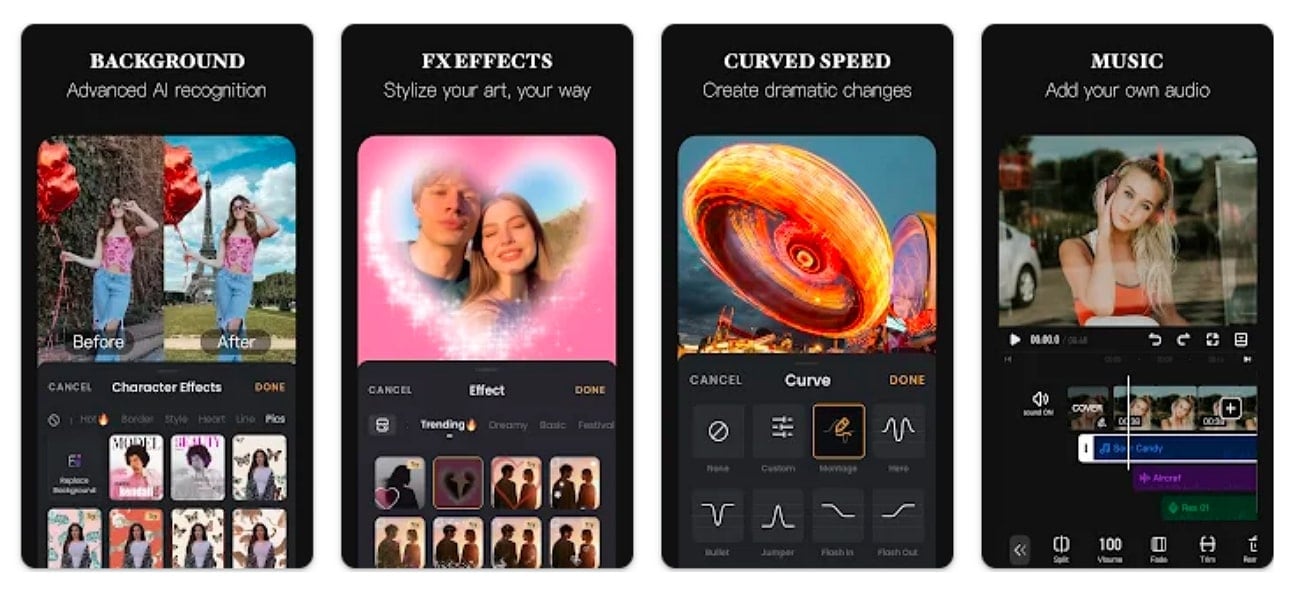
Key Features
- An extensive timeline editing interface with multiple tracks option for smooth transitions.
- The stock media has a wide array of texts, animations, themes, effects, and music.
- This slow-mo video maker also has a “Voice Editor” to maintain the quality of audio tracks afterward.
Part 3: Top 5 iOS Apps for Editing Slow Motion Videos
Multiple people prefer shooting and editing with an iPhone instead of a Mac or desktop. This is because it helps them keep up with the video quality without declining any pixels. In addition, you can share a video directly to social sites from your iPhone instead of transferring them first. This part of the article focuses on some iOS slow-mo video maker s applications here:
- [Velomingo: Velocity Edit Maker](#ios app1)
- [Vizmato: Velocity Edit Maker](#ios app2)
- [Slow Motion Video Editor SLOMO](#ios app3)
- [Slow Motion Video Editor](#ios app4)
- [SloMo Slow Motion Video Editor](#ios app5)
1. Velomingo: Velocity Edit Maker
Creating a slo-mo as a beginner has never been this easy with this slow-mo editor. Users have the opportunity to apply its built-in velocity presets on their videos for a slo-mo effect. Although you cannot customize these presets, the application handles slow-mo quality. Not only does it generate mesmerizing slo-mos, but it also brings them smoothness.
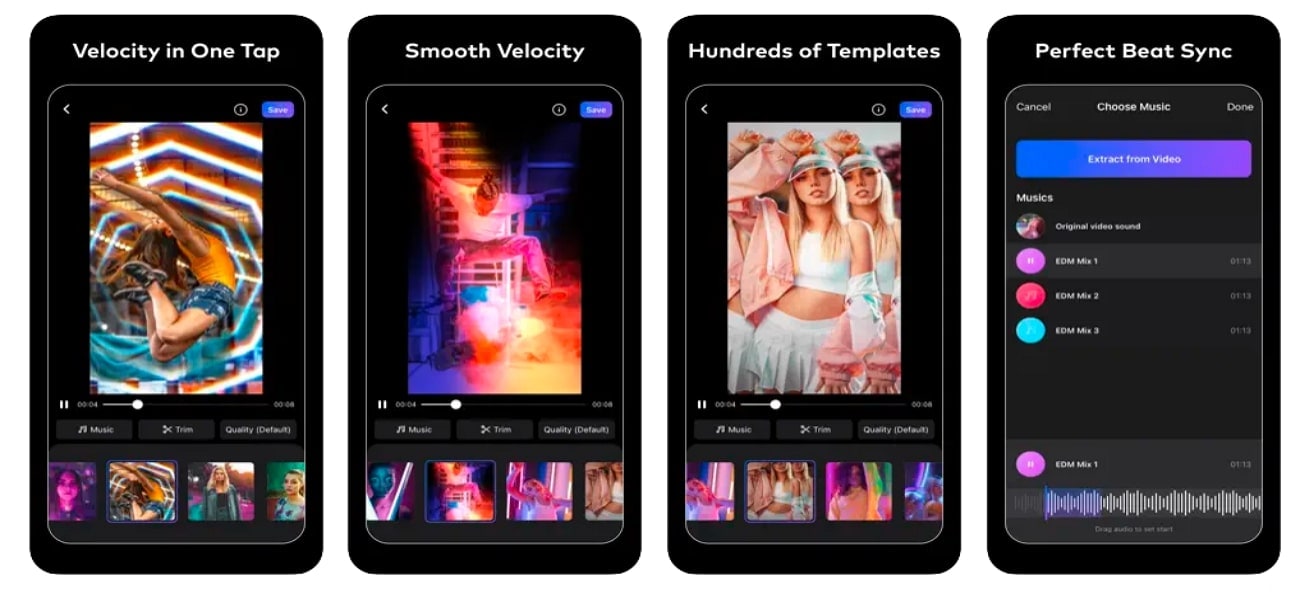
Key Features
- Trim feature for creating transitions or eliminating unnecessary parts of video.
- Make videos creative just by offering hundreds of modern templates.
- This slow-mo maker can feature your video straight to WhatsApp, Instagram, TikTok, and Facebook.
2. Vizmato: Video Editor & Filter
Vizmato is a versatile video editor providing slow-motion services along with other speed editing options. Along with creating a Slow-mo, you can also reverse a video speed to add dramatic effect or enable fast motion. Moreover, it offers a speed manipulation option to customize a video according to your taste.

Key Features
- This slow video editor’s asset collection includes 20+ themes and 40+ visual effects.
- Elevate your slo-mos with its pre-developed music collection featuring 140+ music tracks.
- Along with a slo-mo video converter, it also converts images into a video using the slideshow.
3. Slow Motion Video Editor SLOMO
Customize your slow-motion sequences according to background music and context with this slow-motion editor. The editor offers a timeline editing panel, which provides an organized editing experience. In addition, you can enhance the graphic quality of your slo-mo using its pre-assembled filters. To preserve the video quality, share your slo-mo videos on social applications using its share options.
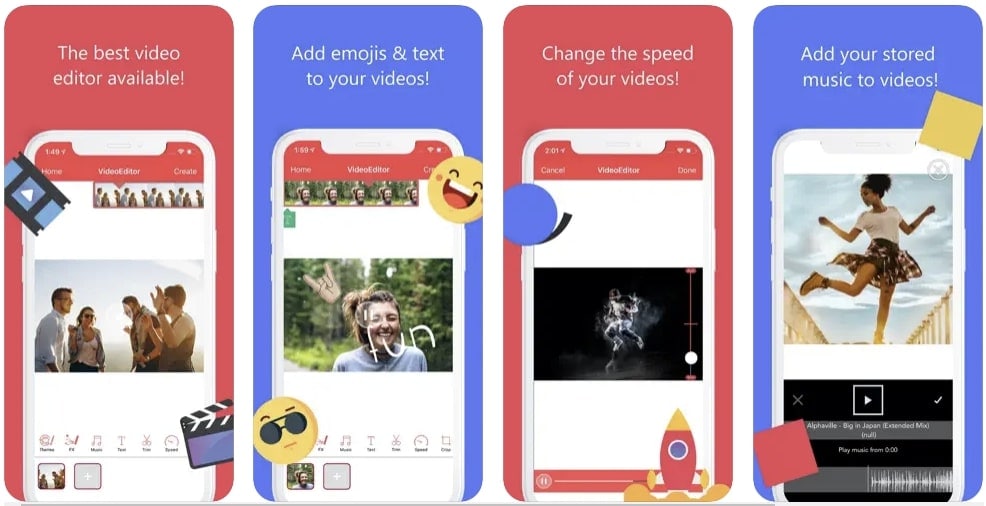
Key Features
- Choose the text option from its toolbar to customize the color, size, and other elements of text.
- Add other graphical elements like stickers and emojis to express your video context or dialogues.
- Resize your video within this application to fit the requirements of social platforms.
4. Slow Motion Video Editor
Wondering about how to achieve a professional-level effect on your iPhone? This slow-motion video converter is full of speed custom setting options to help with that. It uses a timeline bar and velocity graph to adjust the speed settings. The downward slide dragging will slow down your video and vice versa. You can also adjust the video duration via timeline or reset it to set again.
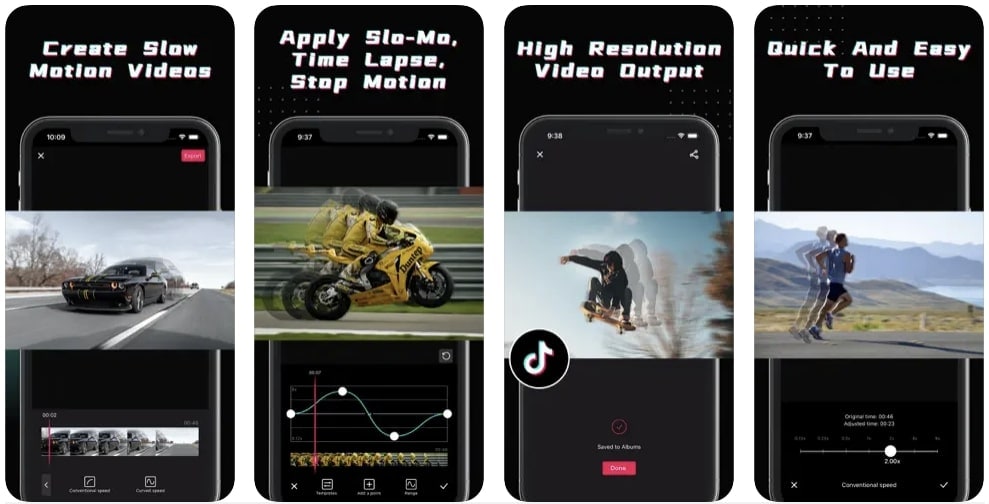
Key Features
- Create a time-lapse or speed up your video by altering its playback speed to 10x, fast or slow.
- Collaborates with iTunes for a seamless integration of music tracks in videos.
- The slow-mo video editor is compatible with social platforms like Instagram, YouTube, and more.
5. SloMo Slow Motion Video Editor
Are you looking for an application just to create slow-mo with a creative user interface? This slow-motion video editor has been developed to help you with speed-alteration tasks. The interface is simple, and you can start creating a slomo just by importing a video. Designed to create professional and cinematic level slo-mos, it offers high video frame rates like 120 fps and 240 fps.
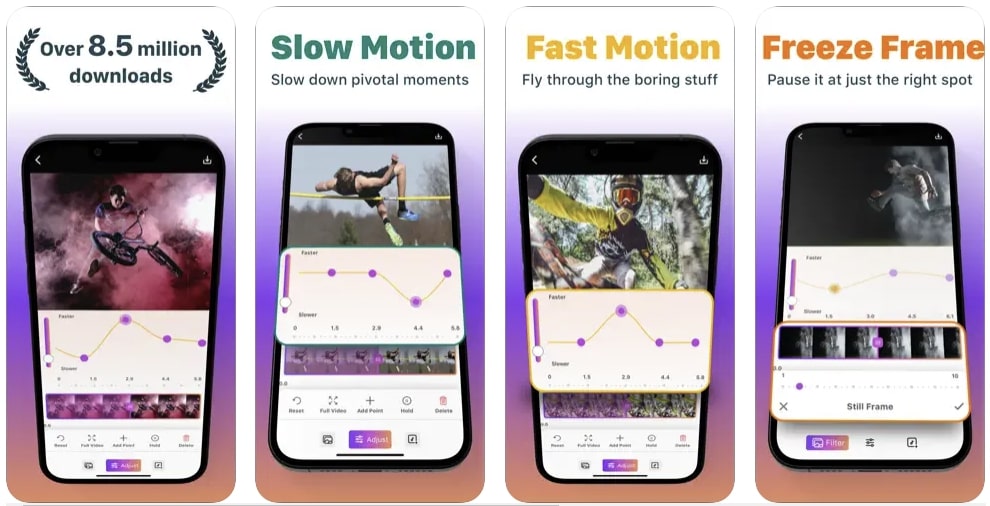
Key Features
- Along with the frame rate, you can manipulate the playback speed range to 12x for both slow and fast.
- With this slow-mo editor’s 40+ illustrative filter, you’ll never run out of creativity.
- Fit your video into different ratios for multiple social media platforms or to your preference.
Bonus Part: Get the Perfect Results of Slow-Motion Video with Wondershare Filmora - Desktop Solution
In this section, you have read about so many slow-mo editors that you might be bored by now. However, one common drawback that all of them had was versatility. They offered high-speed manipulation settings but with limited additional features. Wondershare Filmora is a world-class, all-in-one video editing software. Anyone can use it, from a beginner to a professional or from an Android user to an iOS user.
When you enter this slow-motion video converter, it displays two types of speed modification. One is the Uniform Speed option, while the other one is Speed Ramping. Both of them excel at their tasks and offer custom speed and duration settings. Filmora has recently introduced the “Optical Flow” option in its latest V13 upgrade. This helps to smoothen out a slo-mo video by adding frame rates.
Free Download For Win 7 or later(64-bit)
Free Download For macOS 10.14 or later
Steps to Slow Down Video in Filmora
In this section, we will discuss the Filmora Speed Ramping feature to create a slo-mo. If you are a beginner and have never edited before, this feature suits you the best. It has over 6-speed ramping templates for adding creative speed change effects. You can modify these models to fashion a slo-mo, and here is how to do it:
Step 1Access the Speed Feature
After opening Filmora and opening a project, select the clip in the timeline and go to the settings panel. From there, reach the “Speed” > “Speed Ramping” tabs and select a preset. If you don’t like the featured presets, click on “Customize” for manual editing.
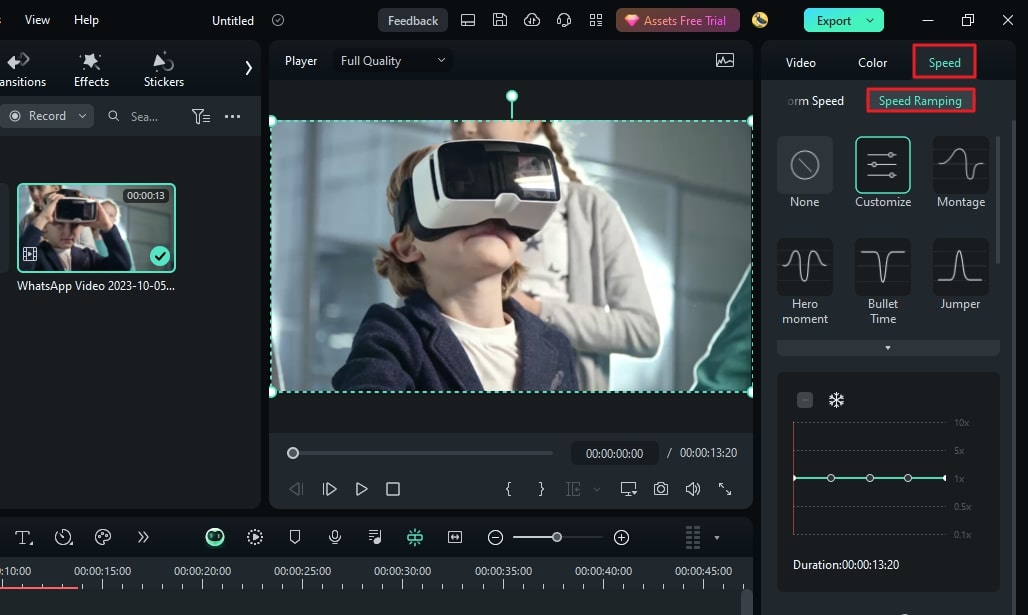
Step 2Add Video Frames
Once you have set the slo-mo speed, reach the “AI Frame Interpolation” section at the bottom. Click on the navigation icon and select “Optical Flow” from there.
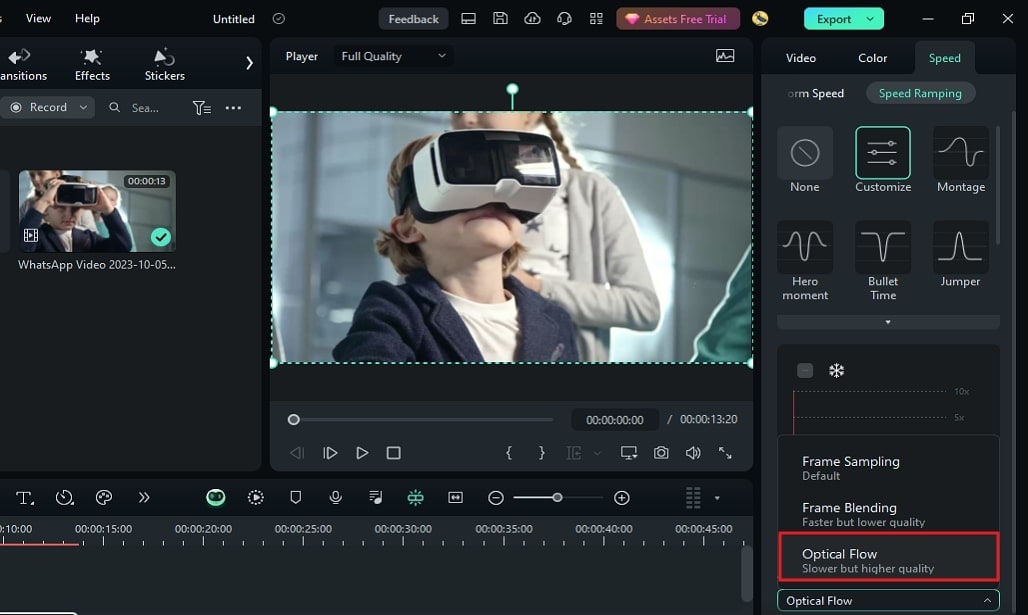
Step 3Render Preview to Observe the Outcome
To ensure that the optical flow has worked, click the “Render Preview” option in the timeline toolbar. Once rendering is complete, play the video and finalize it by clicking “Export.”
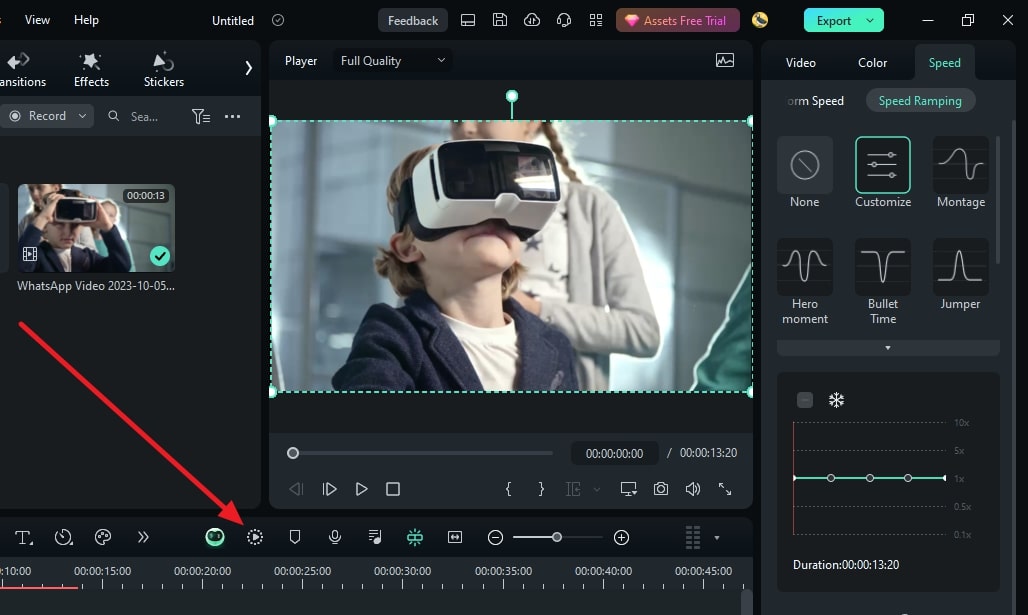
AI Key Features of Filmora
As discussed before, Filmora offers an extensive interface with a wide collection of features. Users can use these features to generate high-quality images, videos, and more. In this section, the focus is on a few of its features discussed below:
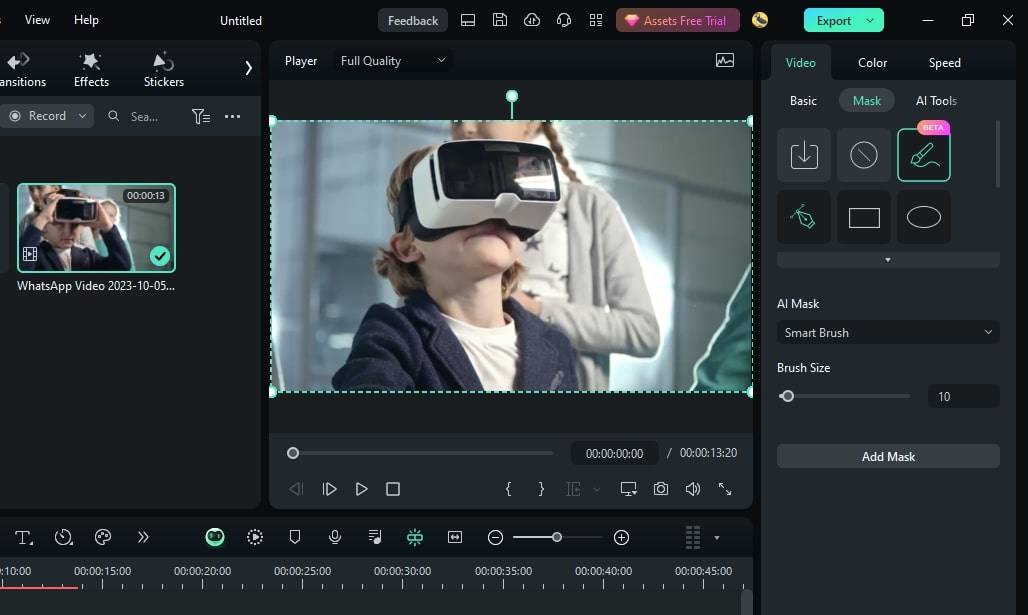
1. AI Smart Masking
Want to create amazing transitions or apply stunning effects on specific video sections? Filmora’s AI mask feature will mask out the unnecessary parts, and you can edit freely. Just enable this feature from its settings panel under AI Tools and select the masking area.
2. AI Text-to-Video
Dive into the realm of Filmora, where there is no limitation on graphics and visuals for videos. This generative AI feature can craft videos from prompts along with suited graphics. You just need to add proper instructions, and AI will do the rest. It enhances the interactive element of your videos via AI voice integration.

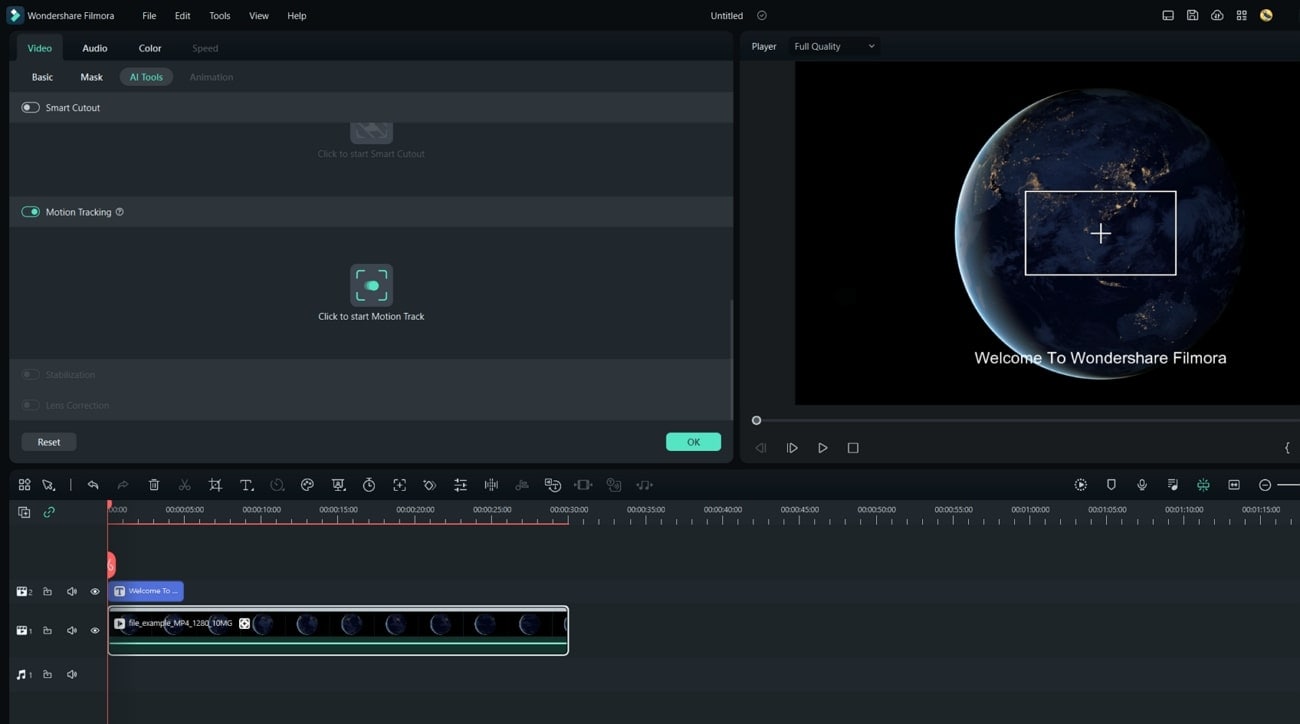
3. Motion Tracking
Create animations from mere graphics to insert in your videos using this AI. Just add any graphical emoji, text, or sticker and link it with a moving object. Once you enable the motion tracking option, you will see them come to life. You can also apply an effect or filter to a specific portion throughout the video using making and motion-tracking options.
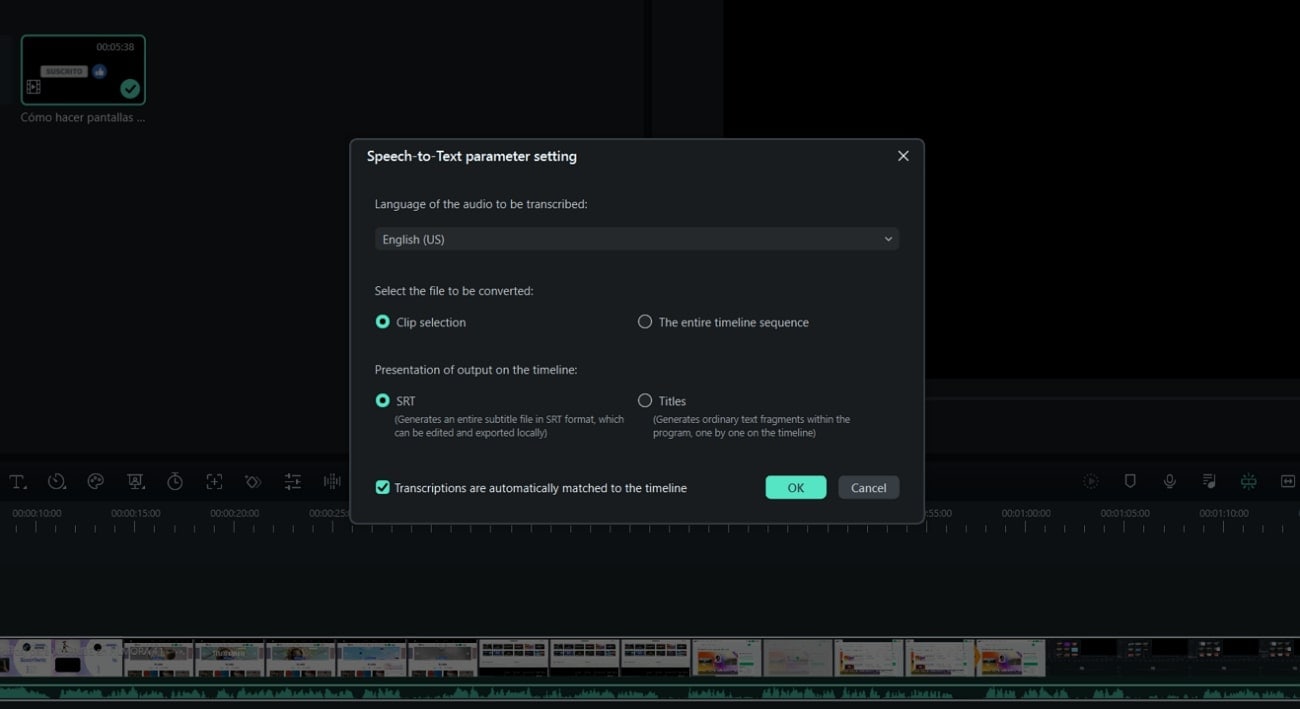
4. Speech-to-Text
Subtitles and captions have become an important part of cinema or videography. To ensure that your content reaches an international audience, use Filmora’s STT feature. With its automated speech recognition and NLP systems, it transforms any speech into text. Moreover, it has multilingual support to make content accessible at international levels.
Conclusion
In this article, you have read about different slow-motion video editor s and their features. Sometimes, they’re amazing editors, while other times, they may show glitches. However, if you want to try an editor that combines all the properties in one place, we suggest Wondershare Filmora. With its amazing content editing features and assets, you can rely on it for Slomo creation or other editing tasks.
Make A Slow Motion Video Make A Slow Motion Video More Features

Part 1: Top 5 Online Slow-Motion Video Editors to Use in 2024
This section of the article discusses some slow -motion video makers that are available online. We’ll mention their pros and cons along with their prices. This will make selection easy for those who prefer computer editing over smartphones. Following are the top online tools to use if you want to create a slow-motion effect :
1. CapCut
Do you want a customized editing experience while creating slow-motion videos? CapCut is the right slow motion video editor for you, enabling you to set the slow-mo speed at any point. If there were any jitters in your recording, you can fix them by changing the playback speed. In addition, the tool offers post-production effects, AI visual enhancers, and more.

Pros
- It has a timeline panel for editing to ensure smooth and precise editing.
- The tool has a modest yet well-organized user interface to facilitate beginners and professionals.
Cons
- There is a limitation of advanced and upgraded features that are used these days.
Pricing
Free
2. Typito
Say goodbye to the long hours of waiting with your slow-mo editor ’s slow processing. Typito allows users to craft a slow-motion video in 3 steps and a high processing rate. The tool shows compatibility across 20+ video formats. In addition, you can also adjust the video ratio using its built-in ratio presets. In this editor, 1.5x is the normal playback speed, and below this are the slow-motion ones.

Pros
- The tool offers multiple video formats for editing videos while fitting the right context.
- With its cloud collaboration, you can access your incomplete and edited projects where you left off.
Cons
- The advanced features are not available in the free version, and some users don’t prefer that.
Pricing
| Pricing Plan | Annual Pricing |
|---|---|
| Solo | $15 |
| Pro | $29 |
3. InVideo.ai
Editing with a multifeatured tool is fun as you can do more than just one thing. As the name indicates, this is an AI-driven tool with speed change integration. You can adjust the playback speed and set duration preferences for your video. With its minimal user interface, you can do further cutting and trimming afterward across this slow-mo video editor.

Pros
- Its stock footage library has over 8M+ media to help with video creation.
- It has a removable watermark option that is very important for personal branding.
Cons
- The majority of the AI features are available in the paid version.
Pricing
| Pricing Plan | Annual Pricing |
|---|---|
| Business | $15/month |
| Unlimited | $30/month |
4. Video Candy
If you are looking for a slow-motion editor without having to log in or go through a technical procedure, this tool is for you. Interacting with the tool is easy as the user interface has an intuitive design, and you can start by uploading a file. It has 3 playback speed options: 0.75x, 0.5x, and 0.25x for creating a slomo. In addition, you can also incorporate a high playback speed option to unlock more creativity.

Pros
- It supports 4K resolution, which means high-quality content editing.
- The tool can support large files of 3GB size, which means you don’t have to split up results.
Cons
- The tool doesn’t ask for a Gmail account, which means no record of history and storage.
Pricing
| Pricing Plan | Annual Pricing |
|---|---|
| Yearly | $4/month |
| Month | $8/month |
| Lifetime | $99/pay once |
5. Wave.video
This online platform facilitates the alteration of video playback speed effortlessly. It features three distinct playback options, 0.75x, 0.5x, and 0.25x, to ensure precise editing capabilities. Possessing an uncomplicated user interface, the tool extends beyond speed adjustments, offering comprehensive audio modifications. If you want to elevate your videography, use its time-lapse effect to enrich the aesthetics.

Pros
- Continuously offers advanced features with an easy-to-understand interface.
- The drag-and-drop functionality makes it quick to edit videos and increases productivity.
Cons
- The watermark addition in the free version of the slow-mo editor is not good for personal branding and visuals.
Pricing
| Pricing Plan | Annual Pricing |
|---|---|
| Streamer | $16/month |
| Creator | $24/month |
| Business | $48/month |
Part 2: Top 5 Android Apps for Editing Slow-Motion Videos
While professionals prefer editing on a desktop, some people prefer Android editing. It is easier to use smartphones for editing because they come in handy. Moreover, let’s admit that we are on our phones half of the time, and a computer might seem out of our comfort zone. This section has gathered some of the slow-mo maker s to operate on your Android:
- [Slow Motion Video – Fast&Slow Mo](#android app1)
- [Slow Motion Video Maker](#android app2)
- [Video Editor and Maker – InShot](#android app3)
- [Video Editor and Maker – Vidma](#android app4)
- [VivaVideo – Video Editor&Maker](#android app5)
1. Slow Motion Video – Fast&Slow Mo
Becoming the favorite of many, this slow-motion video converter offers an interactive user interface. Editing a slow motion is all about dragging and setting the slider in the downward direction. To slow down a video, you can set its playback speed from 0.25x to 4.0x. In addition, you can also curate a specific portion of your video in slow or fast motion.

Key Features
- This slow-motion video creator offers a pre-built filter and special effects to improve aesthetics.
- This application maintains the video quality and can convert video resolution to HD.
- Never miss a chance to integrate good music in your videos with it, as it has built-in options.
2. Slow Motion Video Maker
This free slo-mo video editor regulates its algorithm to introduce advanced features. It features a timeline editing interface, making it easy to apply slow-motion effects on a definite video section. It displays 3 slow motion speed options: 0.5x, 0.3x, and 0.25x to achieve precision in creating a slomo.

Key Features
- You can fasten your video up to 4x, which is helpful in short-time learning, data compression, and more.
- The premium video trim feature and timeline editing help with the accurate parting of a video.
- This slow-motion video maker has pre-developed music tracks and effects for maximum creativity.
3. Video Editor & Maker – InShot
Step into the realm of this free slo-mo video editor for crafting slo-mos full of creativity. It proposes a simple method to slow down video speed by using a slider. The timeline editing and selective playhead options enable you to create beyond basic. You can alter the speed of specific parts of the video, which means you can do much more than just a plain slo-mo.

Key Features
- Take your vision up a notch by introducing its integral collection of animations and text in your content.
- Make your reels more interesting with its intuitive and numerous transition effects.
- The slow-motion edito r has AI abilities to help you remove image backgrounds with accuracy.
4. Video Editor & Maker – Vidma
This is for you if you are looking for a slow-motion video editor that generates as precise results as those in trending videos. The editing application offers a “Velocity Edit” option with detailed playback speed and positioning options. The application has a velocity graph-like interface for adjusting speed, and you can also see the time you are applying this effect.

Key Features
- Bids an automated “Keep Audio Pitch” option to maintain the audio quality during speed change.
- Infuse your pictures and videos with its immersive collection of text and stickers.
- Features multiple visual filters categorized according to contexts with custom intensities.
5. VivaVideo – Video Editor&Maker
If you are looking for a slow-motion video editor with additional features to elevate your content, use it. The tool has multiple speed setting presets to help you create a perfect slomo along with fast motion. Among Montage, Hero, Bullet, and other presets, it offers a Custom preset option to edit according to your imagination.

Key Features
- An extensive timeline editing interface with multiple tracks option for smooth transitions.
- The stock media has a wide array of texts, animations, themes, effects, and music.
- This slow-mo video maker also has a “Voice Editor” to maintain the quality of audio tracks afterward.
Part 3: Top 5 iOS Apps for Editing Slow Motion Videos
Multiple people prefer shooting and editing with an iPhone instead of a Mac or desktop. This is because it helps them keep up with the video quality without declining any pixels. In addition, you can share a video directly to social sites from your iPhone instead of transferring them first. This part of the article focuses on some iOS slow-mo video maker s applications here:
- [Velomingo: Velocity Edit Maker](#ios app1)
- [Vizmato: Velocity Edit Maker](#ios app2)
- [Slow Motion Video Editor SLOMO](#ios app3)
- [Slow Motion Video Editor](#ios app4)
- [SloMo Slow Motion Video Editor](#ios app5)
1. Velomingo: Velocity Edit Maker
Creating a slo-mo as a beginner has never been this easy with this slow-mo editor. Users have the opportunity to apply its built-in velocity presets on their videos for a slo-mo effect. Although you cannot customize these presets, the application handles slow-mo quality. Not only does it generate mesmerizing slo-mos, but it also brings them smoothness.

Key Features
- Trim feature for creating transitions or eliminating unnecessary parts of video.
- Make videos creative just by offering hundreds of modern templates.
- This slow-mo maker can feature your video straight to WhatsApp, Instagram, TikTok, and Facebook.
2. Vizmato: Video Editor & Filter
Vizmato is a versatile video editor providing slow-motion services along with other speed editing options. Along with creating a Slow-mo, you can also reverse a video speed to add dramatic effect or enable fast motion. Moreover, it offers a speed manipulation option to customize a video according to your taste.

Key Features
- This slow video editor’s asset collection includes 20+ themes and 40+ visual effects.
- Elevate your slo-mos with its pre-developed music collection featuring 140+ music tracks.
- Along with a slo-mo video converter, it also converts images into a video using the slideshow.
3. Slow Motion Video Editor SLOMO
Customize your slow-motion sequences according to background music and context with this slow-motion editor. The editor offers a timeline editing panel, which provides an organized editing experience. In addition, you can enhance the graphic quality of your slo-mo using its pre-assembled filters. To preserve the video quality, share your slo-mo videos on social applications using its share options.

Key Features
- Choose the text option from its toolbar to customize the color, size, and other elements of text.
- Add other graphical elements like stickers and emojis to express your video context or dialogues.
- Resize your video within this application to fit the requirements of social platforms.
4. Slow Motion Video Editor
Wondering about how to achieve a professional-level effect on your iPhone? This slow-motion video converter is full of speed custom setting options to help with that. It uses a timeline bar and velocity graph to adjust the speed settings. The downward slide dragging will slow down your video and vice versa. You can also adjust the video duration via timeline or reset it to set again.

Key Features
- Create a time-lapse or speed up your video by altering its playback speed to 10x, fast or slow.
- Collaborates with iTunes for a seamless integration of music tracks in videos.
- The slow-mo video editor is compatible with social platforms like Instagram, YouTube, and more.
5. SloMo Slow Motion Video Editor
Are you looking for an application just to create slow-mo with a creative user interface? This slow-motion video editor has been developed to help you with speed-alteration tasks. The interface is simple, and you can start creating a slomo just by importing a video. Designed to create professional and cinematic level slo-mos, it offers high video frame rates like 120 fps and 240 fps.

Key Features
- Along with the frame rate, you can manipulate the playback speed range to 12x for both slow and fast.
- With this slow-mo editor’s 40+ illustrative filter, you’ll never run out of creativity.
- Fit your video into different ratios for multiple social media platforms or to your preference.
Bonus Part: Get the Perfect Results of Slow-Motion Video with Wondershare Filmora - Desktop Solution
In this section, you have read about so many slow-mo editors that you might be bored by now. However, one common drawback that all of them had was versatility. They offered high-speed manipulation settings but with limited additional features. Wondershare Filmora is a world-class, all-in-one video editing software. Anyone can use it, from a beginner to a professional or from an Android user to an iOS user.
When you enter this slow-motion video converter, it displays two types of speed modification. One is the Uniform Speed option, while the other one is Speed Ramping. Both of them excel at their tasks and offer custom speed and duration settings. Filmora has recently introduced the “Optical Flow” option in its latest V13 upgrade. This helps to smoothen out a slo-mo video by adding frame rates.
Free Download For Win 7 or later(64-bit)
Free Download For macOS 10.14 or later
Steps to Slow Down Video in Filmora
In this section, we will discuss the Filmora Speed Ramping feature to create a slo-mo. If you are a beginner and have never edited before, this feature suits you the best. It has over 6-speed ramping templates for adding creative speed change effects. You can modify these models to fashion a slo-mo, and here is how to do it:
Step 1Access the Speed Feature
After opening Filmora and opening a project, select the clip in the timeline and go to the settings panel. From there, reach the “Speed” > “Speed Ramping” tabs and select a preset. If you don’t like the featured presets, click on “Customize” for manual editing.

Step 2Add Video Frames
Once you have set the slo-mo speed, reach the “AI Frame Interpolation” section at the bottom. Click on the navigation icon and select “Optical Flow” from there.

Step 3Render Preview to Observe the Outcome
To ensure that the optical flow has worked, click the “Render Preview” option in the timeline toolbar. Once rendering is complete, play the video and finalize it by clicking “Export.”

AI Key Features of Filmora
As discussed before, Filmora offers an extensive interface with a wide collection of features. Users can use these features to generate high-quality images, videos, and more. In this section, the focus is on a few of its features discussed below:
1. AI Smart Masking
Want to create amazing transitions or apply stunning effects on specific video sections? Filmora’s AI mask feature will mask out the unnecessary parts, and you can edit freely. Just enable this feature from its settings panel under AI Tools and select the masking area.

2. AI Text-to-Video
Dive into the realm of Filmora, where there is no limitation on graphics and visuals for videos. This generative AI feature can craft videos from prompts along with suited graphics. You just need to add proper instructions, and AI will do the rest. It enhances the interactive element of your videos via AI voice integration.

3. Motion Tracking
Create animations from mere graphics to insert in your videos using this AI. Just add any graphical emoji, text, or sticker and link it with a moving object. Once you enable the motion tracking option, you will see them come to life. You can also apply an effect or filter to a specific portion throughout the video using making and motion-tracking options.

4. Speech-to-Text
Subtitles and captions have become an important part of cinema or videography. To ensure that your content reaches an international audience, use Filmora’s STT feature. With its automated speech recognition and NLP systems, it transforms any speech into text. Moreover, it has multilingual support to make content accessible at international levels.

Conclusion
In this article, you have read about different slow-motion video editor s and their features. Sometimes, they’re amazing editors, while other times, they may show glitches. However, if you want to try an editor that combines all the properties in one place, we suggest Wondershare Filmora. With its amazing content editing features and assets, you can rely on it for Slomo creation or other editing tasks.
Convert MP4 to 60 FPS GIF: A Step-by-Step Guide
GIFs have become a popular way to share short and engaging videos online. They are widely used on social media platforms and messaging apps, making it easy to share moments, reactions, and emotions with friends and family. But not all GIFs are created equal. Some GIFs can look choppy and low-quality, detracting from the viewing experience.
To improve the quality of your GIFs, you can convert your MP4 videos to 60 FPS (frames per second). This will give your GIFs a smooth, fluid motion that looks professional and visually appealing. In this article, we’ll go over the steps you need to follow to convert your MP4 videos to 60 FPS GIFs and create high-quality GIFs that are perfect for sharing online.
Why Convert MP4 to 60-FPS GIF?
GIFs are a great way to share short, eye-catching videos online, but not all are made the same. GIFs with low frame rates tend to look choppy, and the motion could be smoother, making the video look unprofessional and detracting from the overall viewing experience. On the other hand, GIFs with higher frame rates look smoother, and the motion is more fluid, making the video more visually appealing.
Converting your MP4 videos to GIFs has several benefits:
- Smoother Motion: By converting MP4s to GIFs, you increase the frame rate of your GIFs, giving them a smoother and more fluid motion.
- Increased Detail: Higher frame rates allow for more detail and clarity in fast-moving scenes, making the video more engaging and easier to watch.
- Reduced Ghosting: A higher frame rate reduces the “ghosting” effect in low-frame rate GIFs, making the video clearer and reducing distractions.
- High-Quality Videos: Converting MP4s to GIFs eliminates the ghosting effect and creates high-quality GIFs that are perfect for sharing online.
- Increased Engagement: High-quality GIFs will engage and entertain your audience, making them more likely to share and interact with your content.
Converting MP4s to GIFs is a great way to improve the overall quality of your GIFs and create visually appealing videos that are perfect for sharing online. Whether you’re sharing a reaction, a moment, or an emotion, a high-quality GIF will engage and entertain your audience.
Can I Get a 60 FPS GIF?
While it’s true that many people search for 60 FPS GIFs, it’s important to understand that there is no such thing as a true 60 FPS GIF.

GIFs are an image format designed to display simple animations. GIF files store delay time between frames which is defined as multiples of 1/100th of a second. Value 1 would give you 100 FPS; value 2 would already have half of 100 FPS, that is, 50 FPS; value 3 would give you 33.3 FPS GIF, etc. So there are 20 FPS GIFs, 33.3 FPS GIFs, 50 FPS GIFs, and 100 FPS GIFs.
In addition, many websites or programs (including Google Chrome) ignore value 1 (100 FPS GIFs) and default to a much slower animation speed when viewing GIF files. Therefore, 100 FPS GIFs are technically possible but are rarely used. Value 2 (50 FPS) is the most you can get.
If you want to create high-quality animations, consider using MP4s or alternative image formats better suited for high frame rates and detailed animations.
That being said, some websites may have a “60 FPS GIFs” category, but it’s important to understand that most of the content in these categories is not 60 FPS. Instead, it’s likely to be either an MP4 video or a GIF with a lower frame rate, like 50 FPS, labeled as “60 FPS” for marketing purposes.
Is There Any 60 FPS GIF Maker?
Unfortunately, there is no such thing as a 60 FPS GIF maker. As mentioned before, there is no 60 FPS GIF, so it is impossible to create a 60 FPS GIF using traditional methods. However, many excellent video-to-GIF converters in the market allow you to set the GIF frame rate.
These video-to-GIF converters allow you to convert MP4 videos to GIFs with a higher frame rate, which can give your GIFs a smoother and more fluid motion. While these GIFs may not be 60 FPS, they can still provide a significant quality improvement compared to traditional GIFs.
How To Convert Video to GIF and Set Its FPS on Desktop
Converting videos to GIFs is a simple process that can be done using various tools, including desktop software such as Wondershare Filmora . Filmora is a powerful and user-friendly video editor that makes it easy to convert videos to GIFs and set their frame rate.
Free Download For Win 7 or later(64-bit)
Free Download For macOS 10.14 or later

Not only does it allow you to easily convert your videos to GIFs, but it also allows you to customize the frame rate and other settings to get the perfect results. With its user-friendly interface and powerful features, Filmora makes it simple for anyone to create high-quality GIFs that are perfect for sharing on social media or other platforms.
Here’s how to convert MP4 to GIF using Filmora:
Step1 Open the Filmora software and create a new project

Step2 Import your video to the timeline

Step3 Export the video

Step4 In the export window, select “GIF“ and set the frame rate of the GIF.

How To Convert MP4 to GIF Online for Free
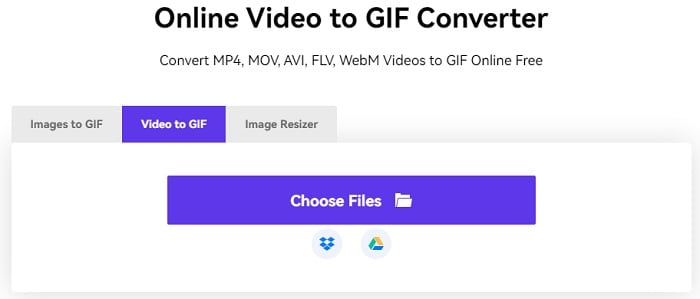
Converting MP4 videos to GIFs online is a quick and convenient way to create animations without needing specialized software. One of the best online tools for this purpose is Media.io . Its simple and user-friendly interface, Media.io, makes it easy to convert MP4 videos to GIFs in just a few clicks.
With Media.io, you can customize the frame rate, duration, and other settings to get the perfect results. Whether you’re looking to create simple animations or more complex and detailed videos, Media.io has everything you need to get started.
Best of all, Media.io is free to use, making it an excellent choice for anyone who wants to convert MP4 and other videos to GIFs without spending a dime. So if you’re looking for a fast, convenient, and reliable way to convert your videos to GIFs, look no further than Media.io.
Follow these steps to convert MP4 to GIF online using Media.io:
Step1 Upload a video from your computer or drag and drop it onto the page.
Step2 Customize the output size, frame rate, and length, and add text before creating your GIF.

Step3 Download the resulting GIF file or save it for later.

People Also Ask
Here are some of the most frequently asked questions about converting MP4 to GIF and other related topics:
Q1. Can a GIF be 30 FPS?
It is impossible to get an exact 30 FPS GIF. Frame rate refers to the number of images (frames) displayed per second in a video or animation. That frame rate is stored as an integer (n) that defines n/100ths of a second. So you can specify a frame of 1/100 second (100 FPS), 2/100 second (50 FPS), 3/100 second (33.33 FPS), 4/100 second (25 FPS), etc. but not something like 3.3333…/100 second (30 FPS).
Q2. How Do I Get the FPS of a GIF?
To determine the speed or frame rate of a GIF, you can use online tools that show the delay time between its frames in milliseconds. The frame rate of a GIF is calculated by counting how many delays fit in 1 second of animation. The delay time determines the playback speed and can be adjusted to increase or decrease the frame rate. These tools also allow you to preview the speed changes and compare the input and output GIFs.
Q3. What FPS Should a GIF Be?
GIF files store delay time between frames in whole hundredths of a second. They typically run between 10 and 100 frames per second (FPS). The common frame rate for a GIF is 10 FPS, 20 FPS, 12.5 FPS, 25 FPS, and 50 FPS. With online tools, it’s possible to determine and change the speed of a GIF.
Q4. What Is the Max FPS for a GIF?
The maximum fps for a GIF is 100 FPS, but browsers or consumer screens do not support it. The browser-engine image decoders will automatically reduce the framerate to 10 fps, playing it ten times slower. If a GIF appears slow, the browser has reset the speed to 10 fps. Some software and devices may support higher frame rates.
Conclusion
GIF is a popular format for short animations and videos. The frame rate of a GIF determines its playback speed, which is usually set at 10, 20, 12.5, 25, and 50 per second. However, the highest possible frame rate that can be represented in the GIF format is 100 FPS, but most browsers and consumer screens cannot display it accurately.
There are various tools available, both online and desktop-based, that can convert videos to GIFs and adjust their frame rate as desired. With these tools, you can create high-quality, personalized GIFs that fit your specific needs and preferences.
Free Download For macOS 10.14 or later

Not only does it allow you to easily convert your videos to GIFs, but it also allows you to customize the frame rate and other settings to get the perfect results. With its user-friendly interface and powerful features, Filmora makes it simple for anyone to create high-quality GIFs that are perfect for sharing on social media or other platforms.
Here’s how to convert MP4 to GIF using Filmora:
Step1 Open the Filmora software and create a new project

Step2 Import your video to the timeline

Step3 Export the video

Step4 In the export window, select “GIF“ and set the frame rate of the GIF.

How To Convert MP4 to GIF Online for Free
Converting MP4 videos to GIFs online is a quick and convenient way to create animations without needing specialized software. One of the best online tools for this purpose is Media.io . Its simple and user-friendly interface, Media.io, makes it easy to convert MP4 videos to GIFs in just a few clicks.
With Media.io, you can customize the frame rate, duration, and other settings to get the perfect results. Whether you’re looking to create simple animations or more complex and detailed videos, Media.io has everything you need to get started.
Best of all, Media.io is free to use, making it an excellent choice for anyone who wants to convert MP4 and other videos to GIFs without spending a dime. So if you’re looking for a fast, convenient, and reliable way to convert your videos to GIFs, look no further than Media.io.
Follow these steps to convert MP4 to GIF online using Media.io:
Step1 Upload a video from your computer or drag and drop it onto the page.

Step2 Customize the output size, frame rate, and length, and add text before creating your GIF.

Step3 Download the resulting GIF file or save it for later.

People Also Ask
Here are some of the most frequently asked questions about converting MP4 to GIF and other related topics:
Q1. Can a GIF be 30 FPS?
It is impossible to get an exact 30 FPS GIF. Frame rate refers to the number of images (frames) displayed per second in a video or animation. That frame rate is stored as an integer (n) that defines n/100ths of a second. So you can specify a frame of 1/100 second (100 FPS), 2/100 second (50 FPS), 3/100 second (33.33 FPS), 4/100 second (25 FPS), etc. but not something like 3.3333…/100 second (30 FPS).
Q2. How Do I Get the FPS of a GIF?
To determine the speed or frame rate of a GIF, you can use online tools that show the delay time between its frames in milliseconds. The frame rate of a GIF is calculated by counting how many delays fit in 1 second of animation. The delay time determines the playback speed and can be adjusted to increase or decrease the frame rate. These tools also allow you to preview the speed changes and compare the input and output GIFs.
Q3. What FPS Should a GIF Be?
GIF files store delay time between frames in whole hundredths of a second. They typically run between 10 and 100 frames per second (FPS). The common frame rate for a GIF is 10 FPS, 20 FPS, 12.5 FPS, 25 FPS, and 50 FPS. With online tools, it’s possible to determine and change the speed of a GIF.
Q4. What Is the Max FPS for a GIF?
The maximum fps for a GIF is 100 FPS, but browsers or consumer screens do not support it. The browser-engine image decoders will automatically reduce the framerate to 10 fps, playing it ten times slower. If a GIF appears slow, the browser has reset the speed to 10 fps. Some software and devices may support higher frame rates.
Conclusion
GIF is a popular format for short animations and videos. The frame rate of a GIF determines its playback speed, which is usually set at 10, 20, 12.5, 25, and 50 per second. However, the highest possible frame rate that can be represented in the GIF format is 100 FPS, but most browsers and consumer screens cannot display it accurately.
There are various tools available, both online and desktop-based, that can convert videos to GIFs and adjust their frame rate as desired. With these tools, you can create high-quality, personalized GIFs that fit your specific needs and preferences.
Also read:
- New Kdenlive Review – Is It The Best Video Editor for 2024
- Updated 11 Tools To Create Radial Blur Photo Mobile And Desktop for 2024
- New How To Unlink Audio and Video in DaVinci Resolve for 2024
- New 10 Best Meme Text to Speech Tools Windows, Mac, Android, iPhone
- New How to Change Quicktime Player Speed on Mac, In 2024
- Updated Here We Will Discuss About Both the Methods Which You Can Choose One to Get Rid of Unwanted Portions From Your Videos or Photos
- 2024 Approved | Top GIF to MP4 Converters
- Updated Top List of Best VHS Video Effect Makers
- How to Make Sony Vegas Freeze Frame
- New In 2024, Record Slow Motion Videos With Phantom Slow-Mo Camera
- New Quick Answer Why Did Filmora AI Portrait Attract People?
- Updated Merging MP4 Videos Made Simple Top 5 Online Tools
- In 2024, How to Shoot Cinematic Footage From a Smartphone
- New 3D Ray Traced Settings In After Effects A Comprehensive Guide
- How to Convert Images Into Video - Kapwing Tutorial
- 2024 Approved Sometimes It May Happen to You that You Are Watching a Video that Has Very Low Graphics or, in Other Words, Low Visual Quality. You Might Wish to Change, Instead Improve the Video Quality. Here, AI Upscaling Video Comes to Use
- In 2024, Top GIF to MP4 Converters
- New Fun & Easy Masking Tricks Wondershare Filmora Tutorial
- Updated Free 3D Intro Makers for 2024
- Updated 2024 Approved Understanding More About CapCut Lenta Template and Slow-Motion Videos
- New 2024 Approved M31 LUT (Teal and Orange LUT) Free Download
- Updated In 2024, Are You Eager to Discover All About Dynamic Videos? You Are in the Right Place because This Article Provides Insight Into Dynamic Video Collages
- How To Quickly Create A Screen Print Effect In Photoshop Detailed Gui
- Updated If You Want to Keep Your Memories in Form of Video or Slideshow Then Keynote Is Great App for You. It Has Amazing and Powerful Tools Which Give Your Slideshow a Great and Beautiful Look
- Updated Camtasia Video Editor Review
- 2024 Approved Here You Can Lean About the Different Ways for GIMP Transparent Background PNG Format Files
- New Fun & Easy Masking Tricks in Filmora
- A Detailed VPNa Fake GPS Location Free Review On Itel P40 | Dr.fone
- How to Find iSpoofer Pro Activation Key On Oppo A58 4G? | Dr.fone
- In 2024, How to Unlock Infinix Note 30 VIP Bootloader Easily
- In 2024, The Best iSpoofer Alternative to Try On Vivo V27 | Dr.fone
- Ultimate Guide from Apple iPhone 13 Pro Max iCloud Activation Lock Bypass
- In 2024, Android to Apple How To Transfer Photos From Infinix Smart 8 Pro to iPad Easily | Dr.fone
- In 2024, How to Change GPS Location on Nokia C300 Easily & Safely | Dr.fone
- In 2024, How to Transfer Apps from Xiaomi Redmi K70E to Another | Dr.fone
- A Detailed VPNa Fake GPS Location Free Review On Samsung Galaxy A05 | Dr.fone
- How to Transfer Everything from Apple iPhone 12 mini to iPhone 8/X/11 | Dr.fone
- Does Airplane Mode Turn off GPS Location On Honor 70 Lite 5G? | Dr.fone
- How To Deal With the Xiaomi Redmi Note 13 Pro 5G Screen Black But Still Works? | Dr.fone
- How to Unlock Apple iPhone 12 mini with/without SIM Card
- The Best iSpoofer Alternative to Try On Realme Narzo N55 | Dr.fone
- How Do You Get Sun Stone Evolutions in Pokémon For Realme V30? | Dr.fone
- New How To Translate Video From Japanese to English Online?
- Restore Missing App Icon on Motorola Moto G14 Step-by-Step Solutions | Dr.fone
- Learn How To Lock Stolen Your Apple iPhone X Properly
- Downloading SamFw FRP Tool 3.0 for Oppo Find N3 Flip
- How to Fix It Samsung Galaxy Z Flip 5 Wont Turn On | Dr.fone
- In 2024, Does Airplane Mode Turn off GPS Location On Tecno Spark 20C? | Dr.fone
- How to Simulate GPS Movement in AR games On Xiaomi 14 Pro? | Dr.fone
- Title: Ultimate Guide on How to Plan and Storyboard a Music Video
- Author: Morgan
- Created at : 2024-05-19 05:11:34
- Updated at : 2024-05-20 05:11:34
- Link: https://ai-video-editing.techidaily.com/ultimate-guide-on-how-to-plan-and-storyboard-a-music-video/
- License: This work is licensed under CC BY-NC-SA 4.0.


