:max_bytes(150000):strip_icc():format(webp)/TwitterVideoDownload-5b605aaac9e77c002c3a42f3.jpg)
Updated 11 Apps To Speed Up A Video On iPhone for 2024

11 Apps To Speed Up A Video On iPhone
As a content creator or a video editor, you may deal with many different aspects of editing. It may go from basic editing to VFX and so on. Speed ramping is also an important feature of editing. Creators who make cinematics or B-rolls often may have used this feature.
Changing the speed of the whole video doesn’t look good in most situations therefore speed ramping feature was created. Speed Ramping means gradually changing the speed of a clip over time. It isn’t a complex thing but doing it correctly in the right amount at the right time can change the feel of the whole video. It catches the attention of viewers through different scenes of a clip.
So, here we have mentioned some iPhone video editing softwares that can at least do basic speed changes. but most of them can also do advanced speed ramping. These are as follows:
Filmora Go:
It is available on IOS and Android both.
Want to do speed ramping? use Filmora Go. But are you a content creator and want to do more than just video editing? I would still recommend “Filmora Go”. Because it is such a versatile and easy-to-use software made by Wondershare. Like its PC software, it is also packed with many cool features such as chroma key, mask, keyframing, blending, e.t.c. It also supports multiple layers. It has built-in effects, transitions, and presets to speed up the editing process.
It is a paid video editor but you can try it for free, free trial includes most of the features but it leaves a watermark on export.
~Features:
- Has speed curves for smooth speed ramping.
- Supports multiple images and video layers.
- Have many presets and filters for fast pace editing.
- Have cool features like chroma key, masking, keyframing, e.t.c.
- Supports “Pixabay’s” stock library.
~Cons:
- Its UI doesn’t support editing in landscape orientation.
- It doesn’t support 4k video resolution.
~Steps:
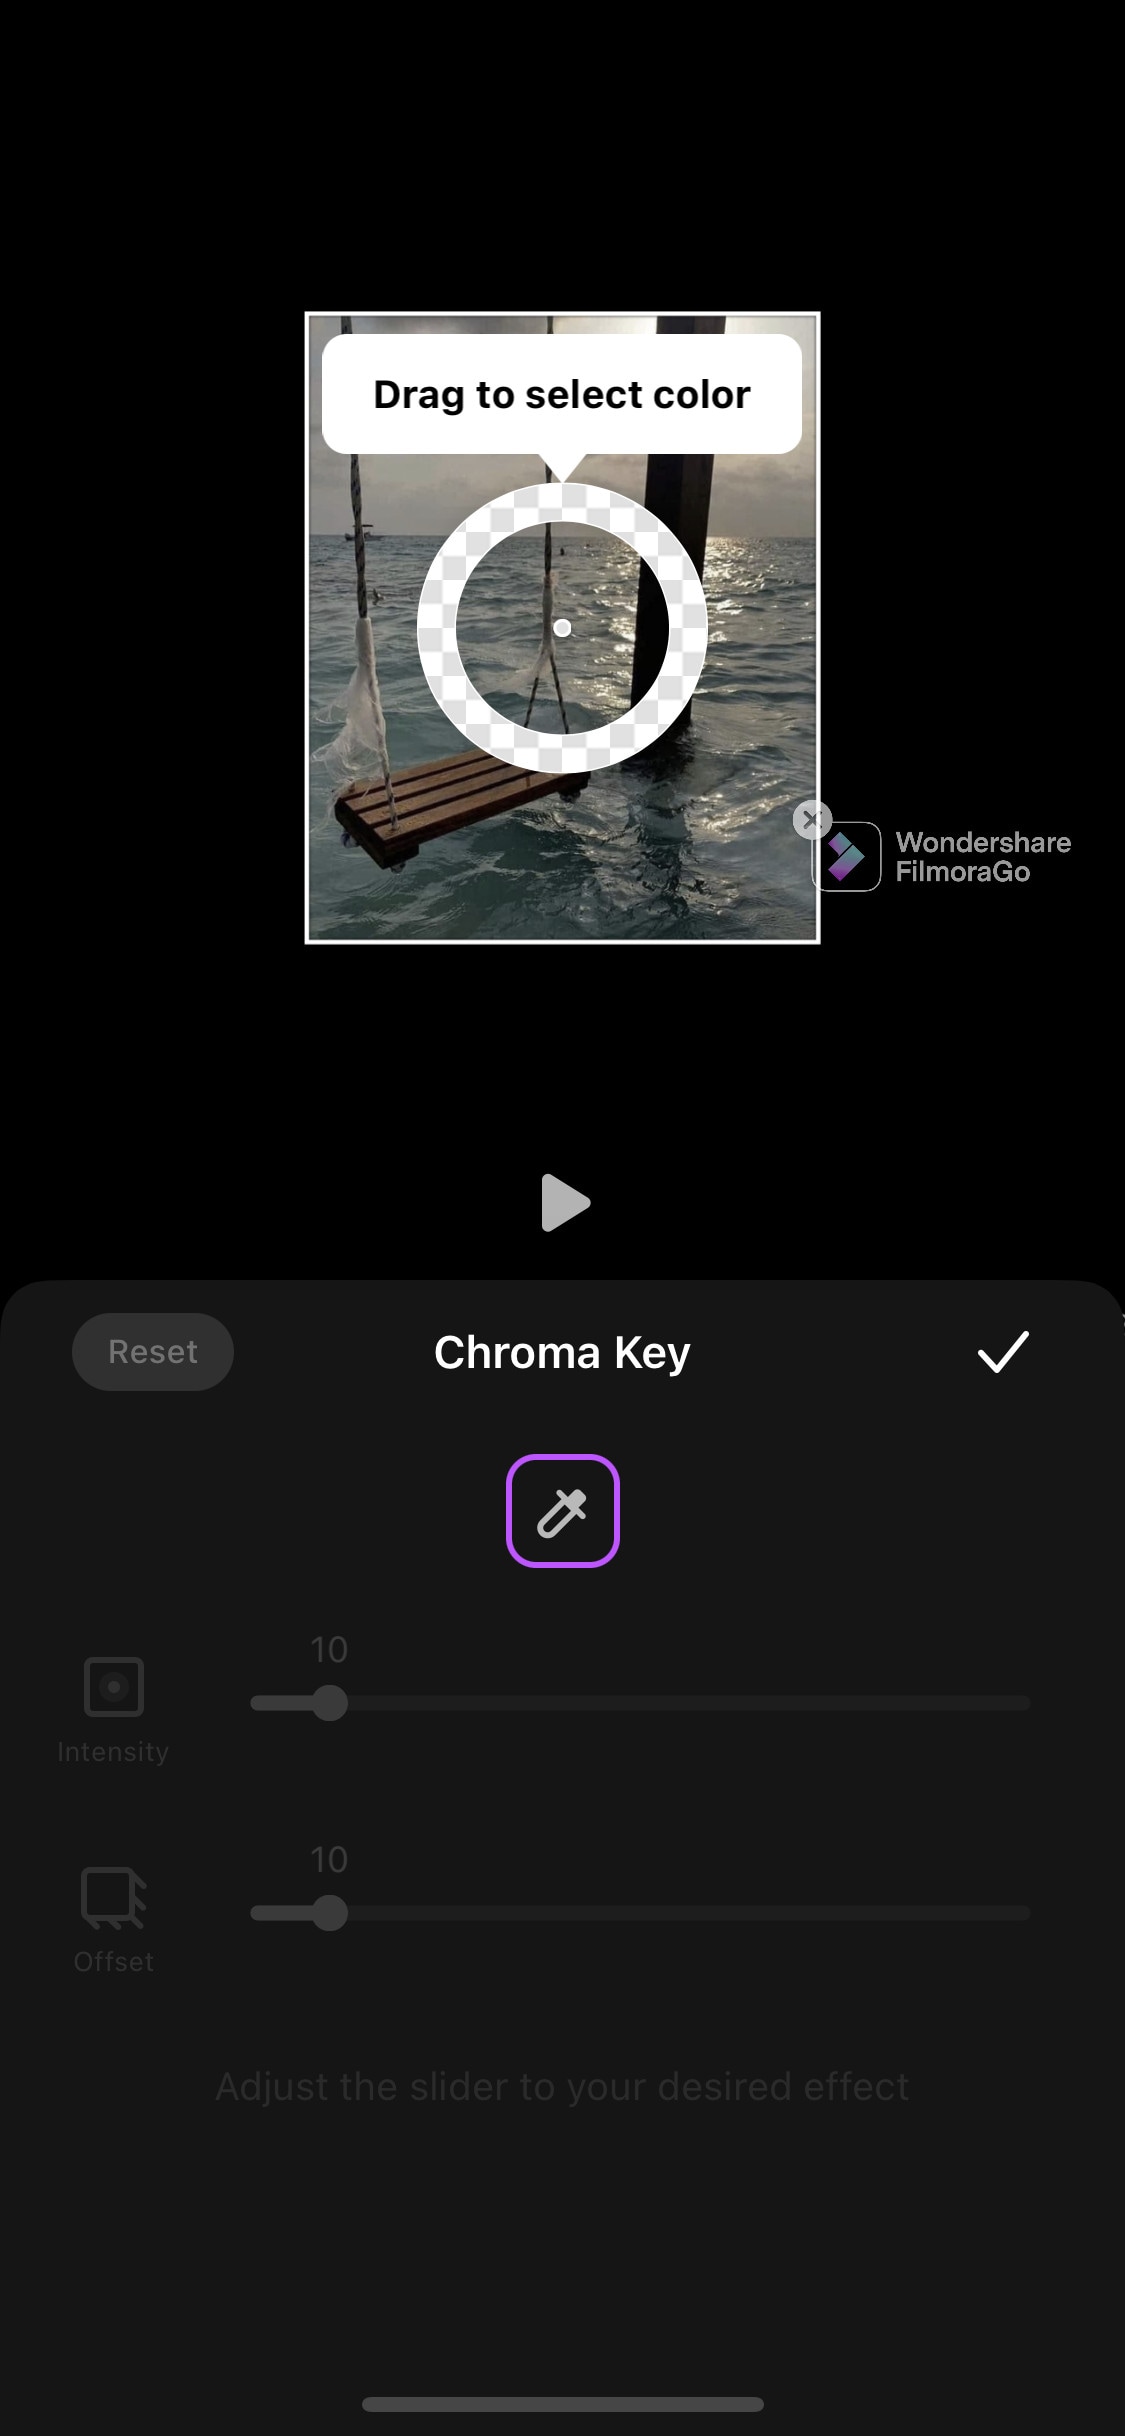
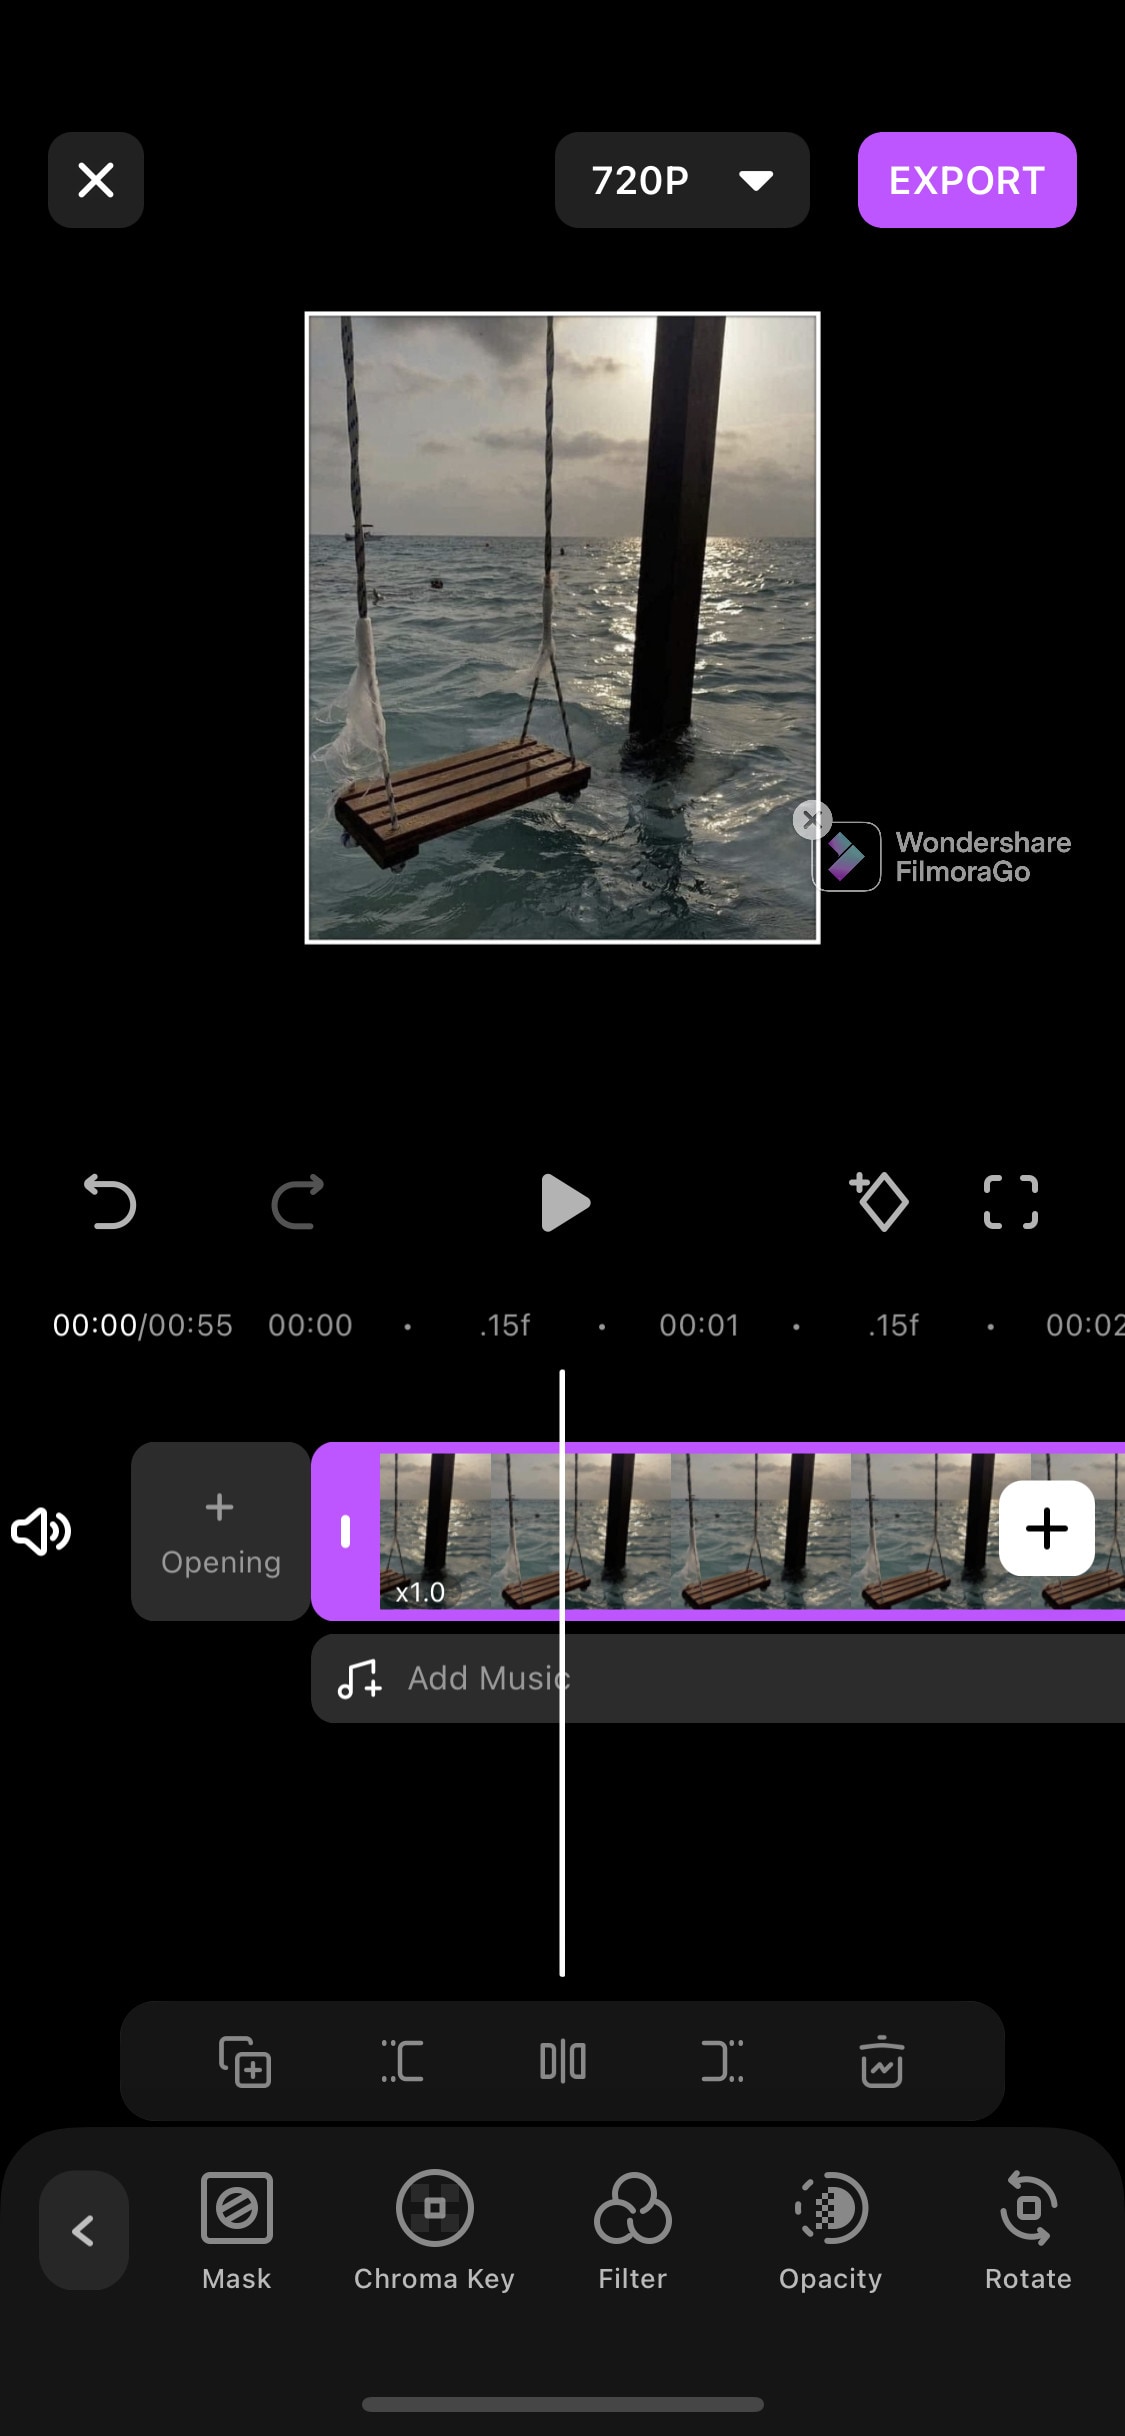
Import: Open Filmora Go, Click “New project” to start a new project, or Choose the previous one from the “Draft” portion. Select videos or images to import to your timeline. Hold and drag the clip to change its arrangement.
Edit: You can add text, effects, stickers, layers, e.t.c. by clicking their icon, present on the bar at the bottom.
Click and Drag a clip from the corner to trim it.
Click the “PiP” icon to add image or video layers, you also can add multiple layers.
Select a clip to edit it. Different editing tools appear on the bottom bar. Here you can change its opacity, its speed, or add animations.
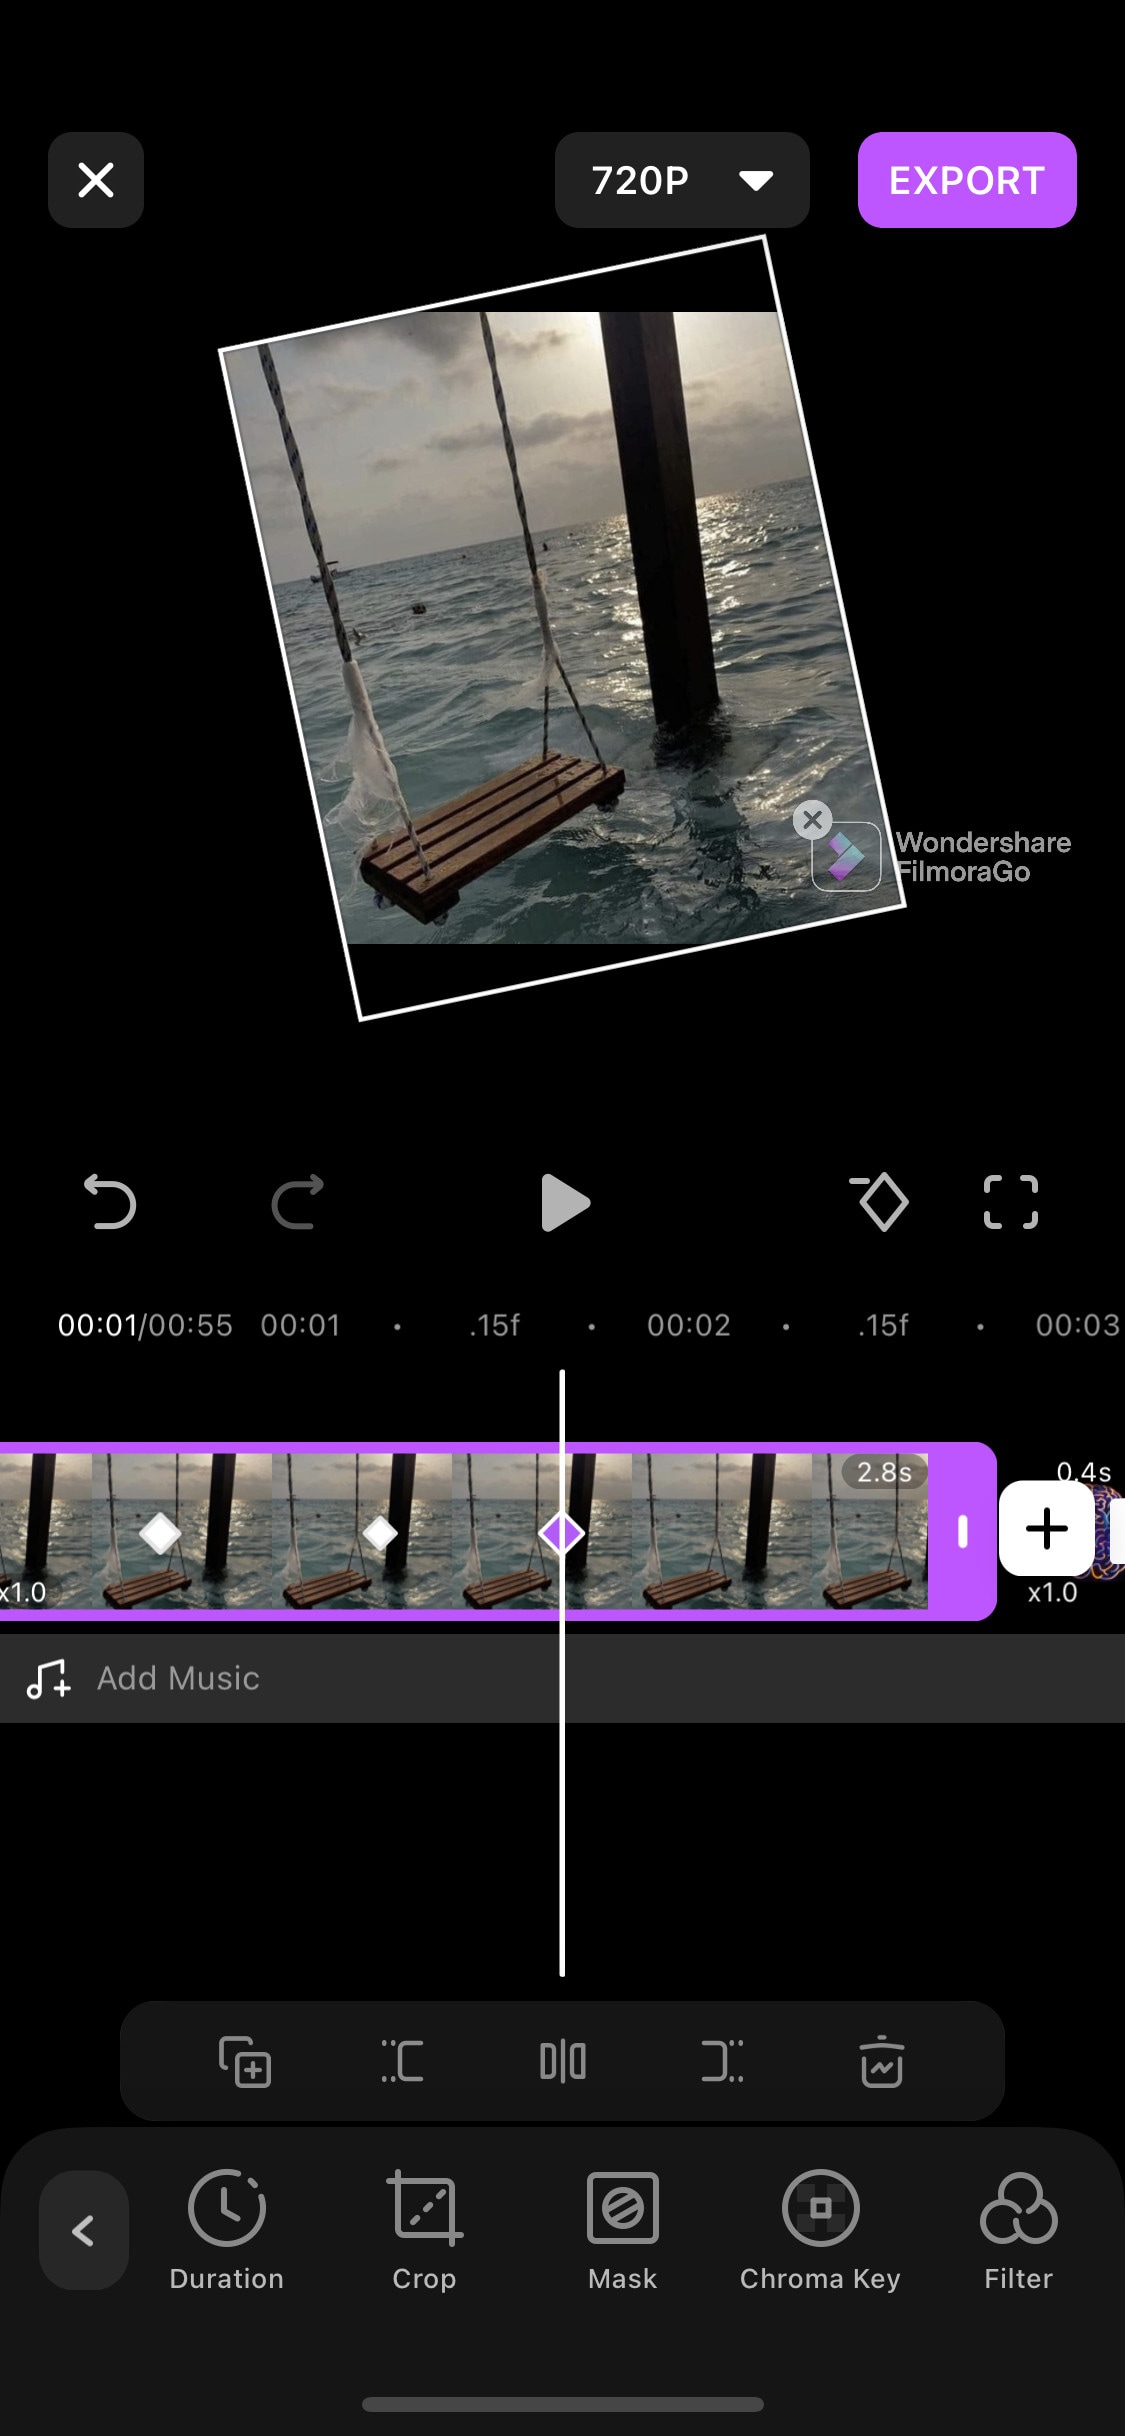
Click the diamond icon above the timeline to add keyframes. Zoom, move, or rotate the clip to add keyframes with the passage of time.
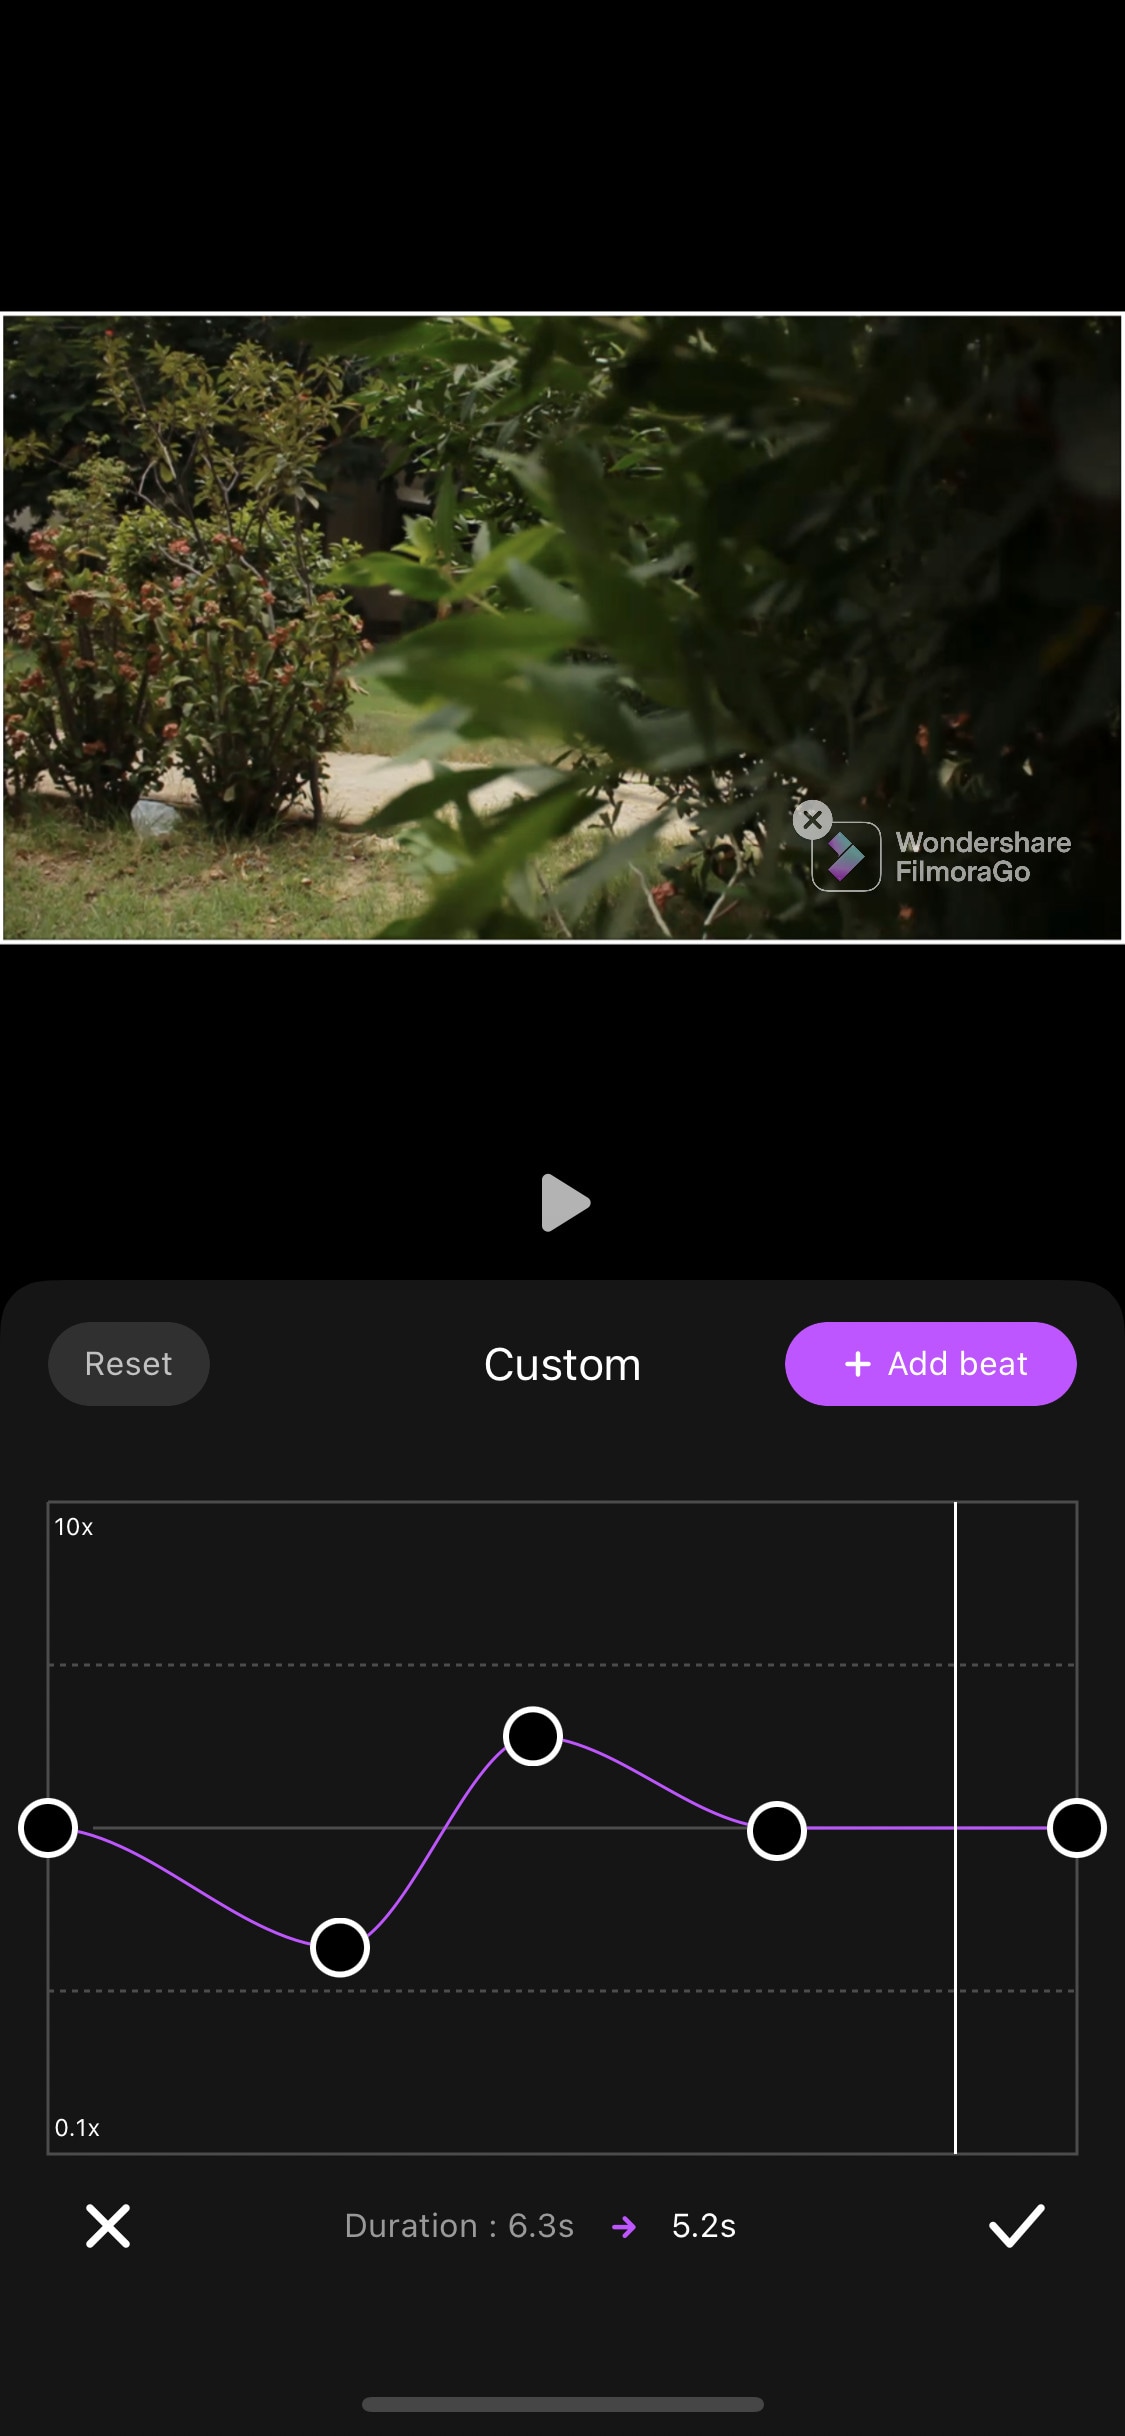
Speed Ramping: To Change the speed of a clip, select it then click the “Speed” icon on the bottom bar of the screen. Move the slider to change the speed of the whole clip. To do speed ramping, click the “curves” option to choose a preset or create your own. Click a preset to apply it, and click again to open its edit menu. drag the beats up and down to change speed or add or delete a beat if you want.
Effects: Click the “Effects” icon to open the effects menu. Select an effect to apply to your clip.
Click the white box between two clips to add transitions.
Export: Click the “Export” button to export your file. Select your desired resolution and frame rate to export your clip.
Some Free Video speeding Softwares for iPhone:
If you are short on budget or don’t want to spend much on video editing softwares then you can try these free softwares. They are free that doesn’t mean that they are useless, they are quite good for beginners or moderate users although some of them are designed for professionals also. If you don’t believe me, go and try it yourself. Apart from just changing the speed, they are good in other editing aspects also.
Adobe Premiere Rush:
It is available on IOS and Android both.
If you are looking for free but good speed ramping software then why go anywhere also when you have an amazing video editor made by a well-known software company “Adobe”. Like premiere pro, they have designed a compact version for phones named “Premiere Rush”.
It is a free video editor that has all the tools needed for video editing, from video effects to color grading and audio editing. Its UI is a bit similar to PC video editors. It is a free video editor with no watermarks. Although it takes some time to understand it. But once mastered, you can do editing quickly.
~Features:
- It is a free video editor with no watermark.
- It supports up to 4K resolution at 60fps.
- You can extract audio and can do voiceover directly from the software.
- It has hundreds of filters, overlays, and title designs.
- It has basic color grading tools.
- It also has a motion tracking feature. (in Paid version)
- It supports multiple audio, video, and text layers.
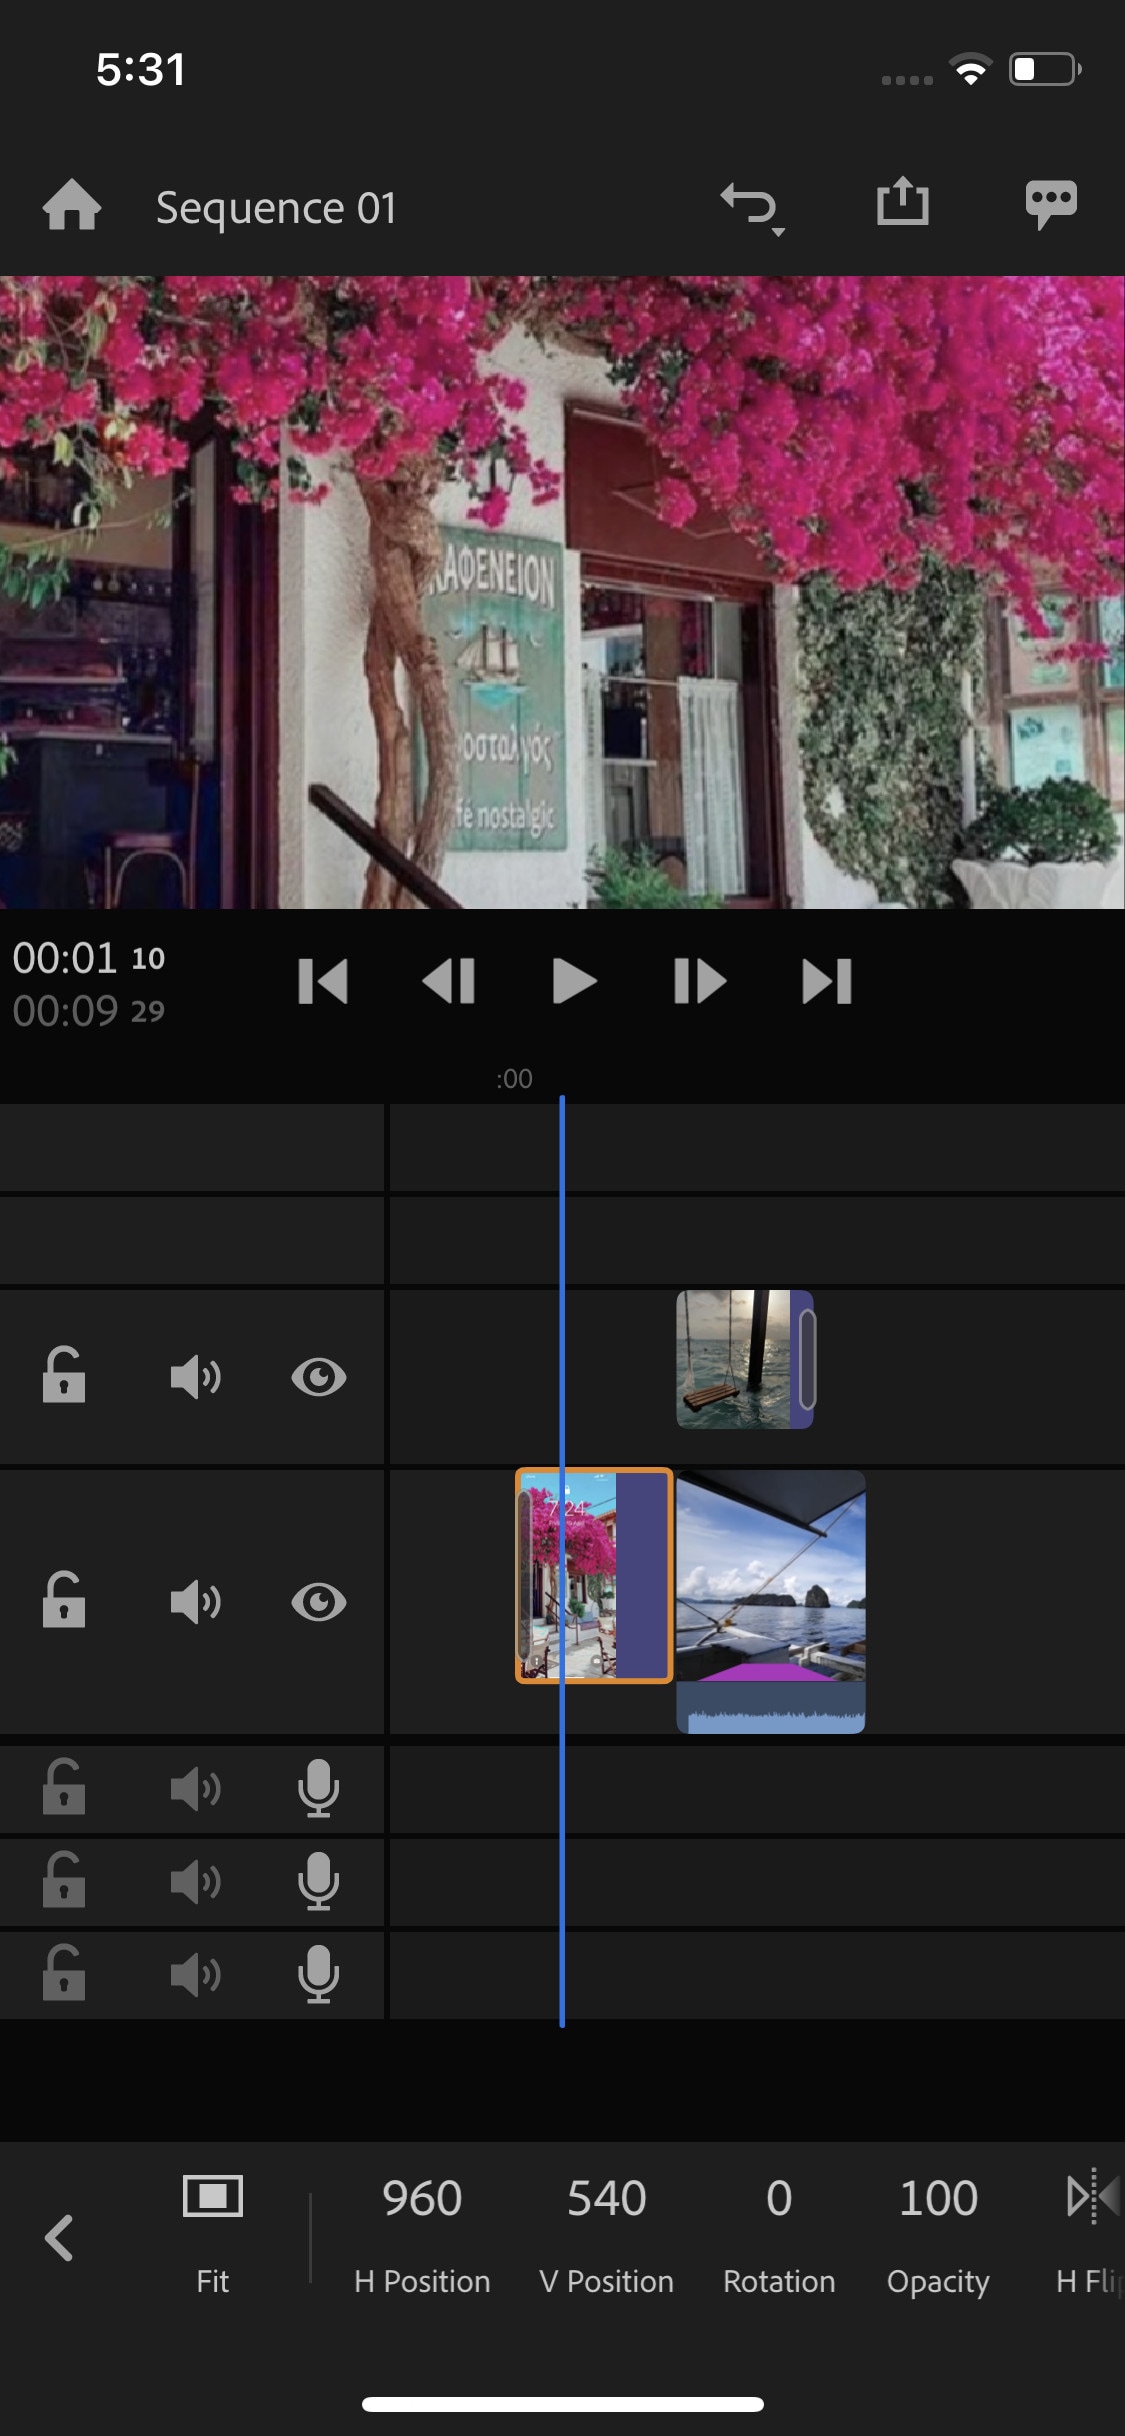
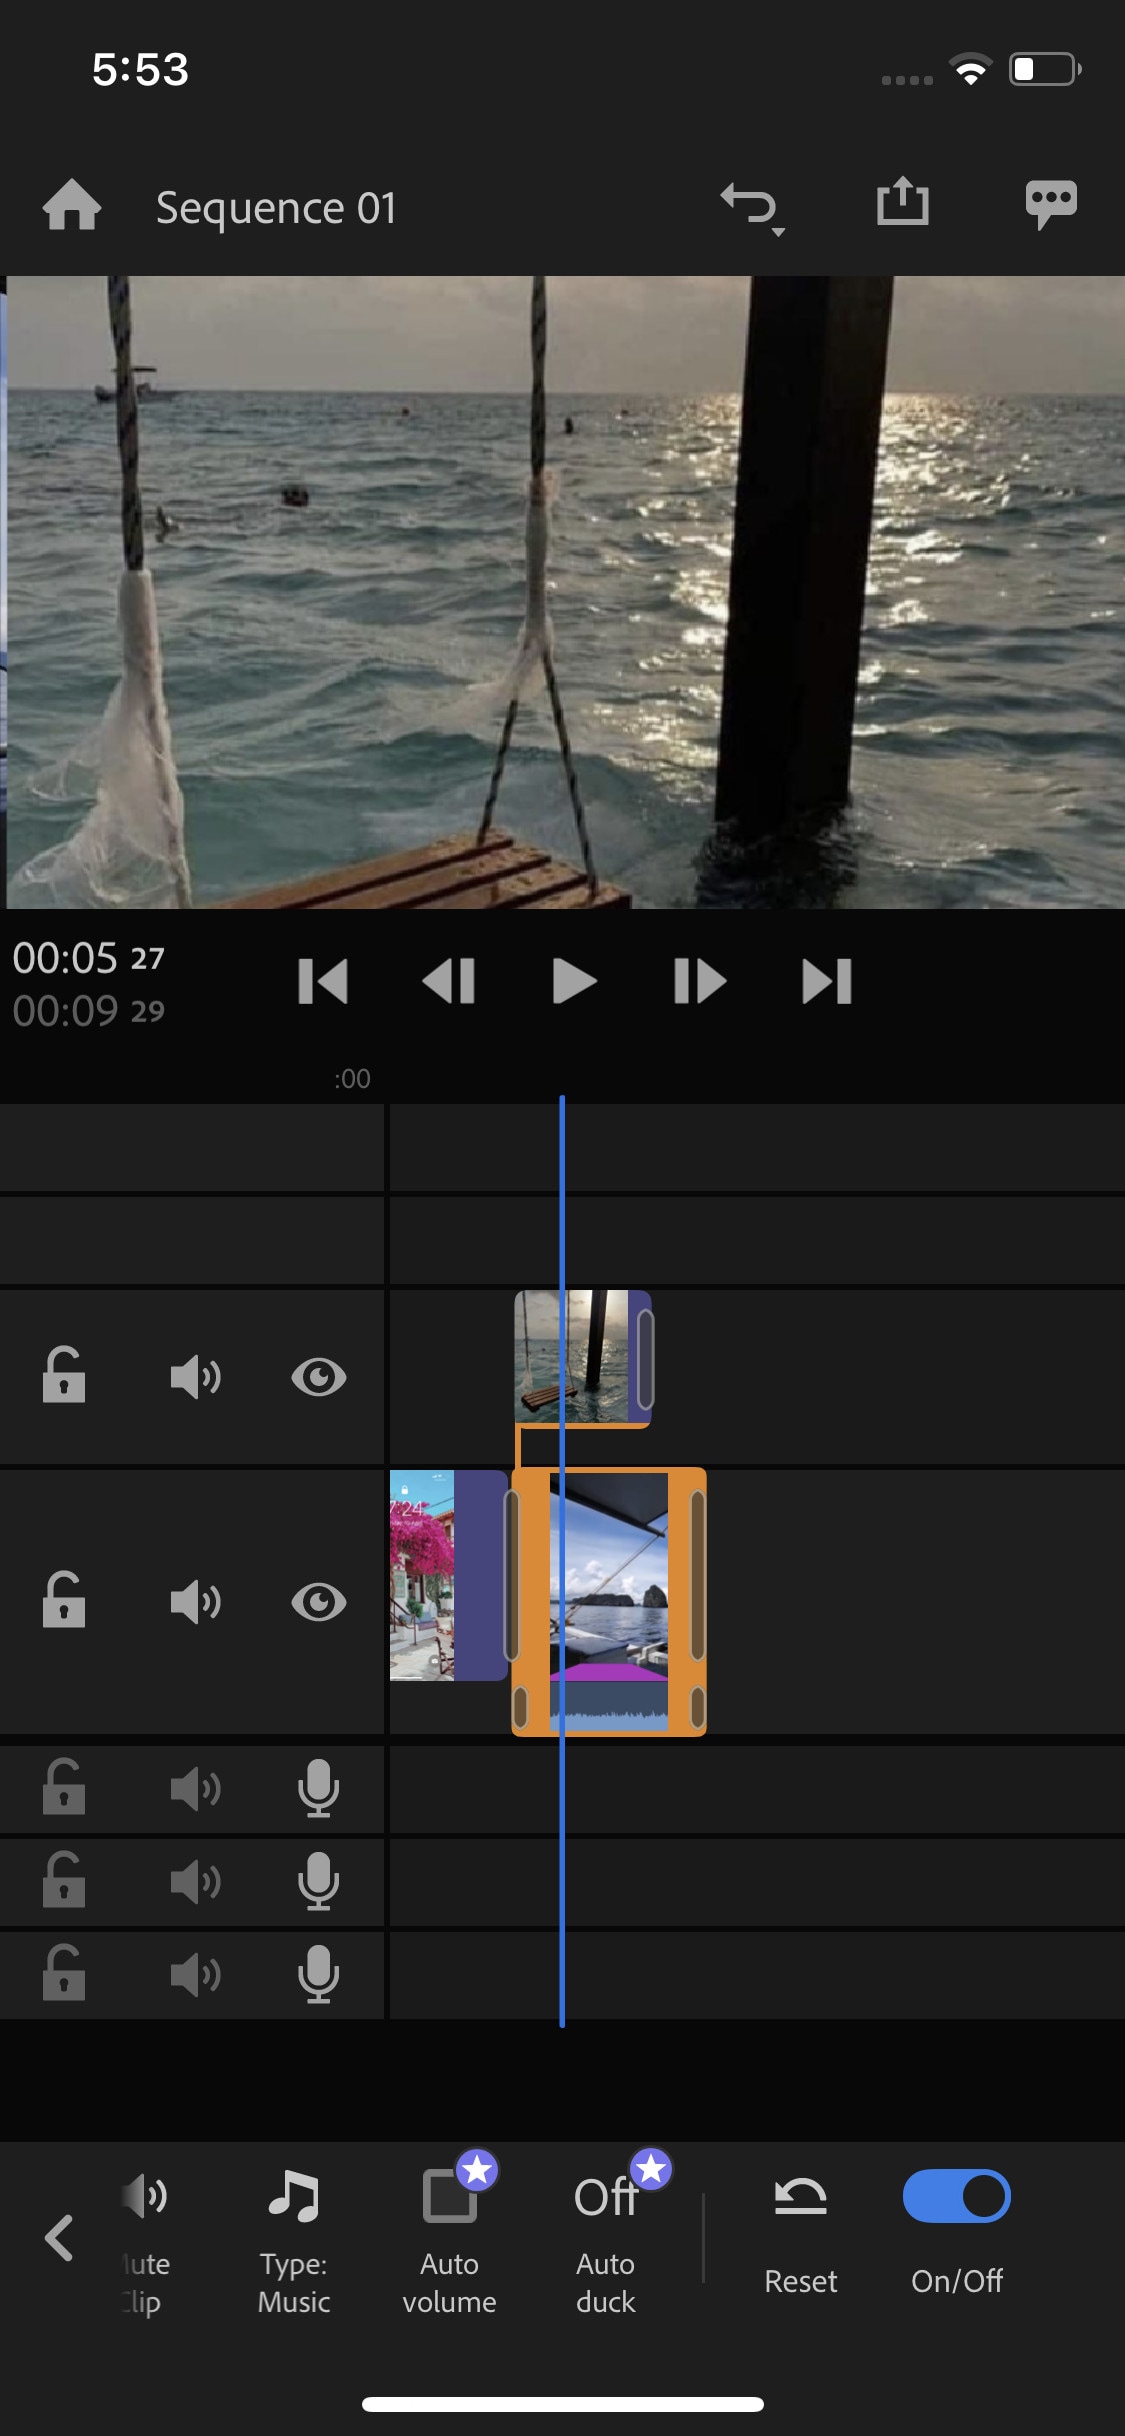
~Cons:
- It only runs on high-end devices. ( It is not supported in most mid-range phones)
- Not suitable for beginners. Its UI is quite hard to understand.
- Doesn’t have common features like the chroma key, masking, e.t.c.
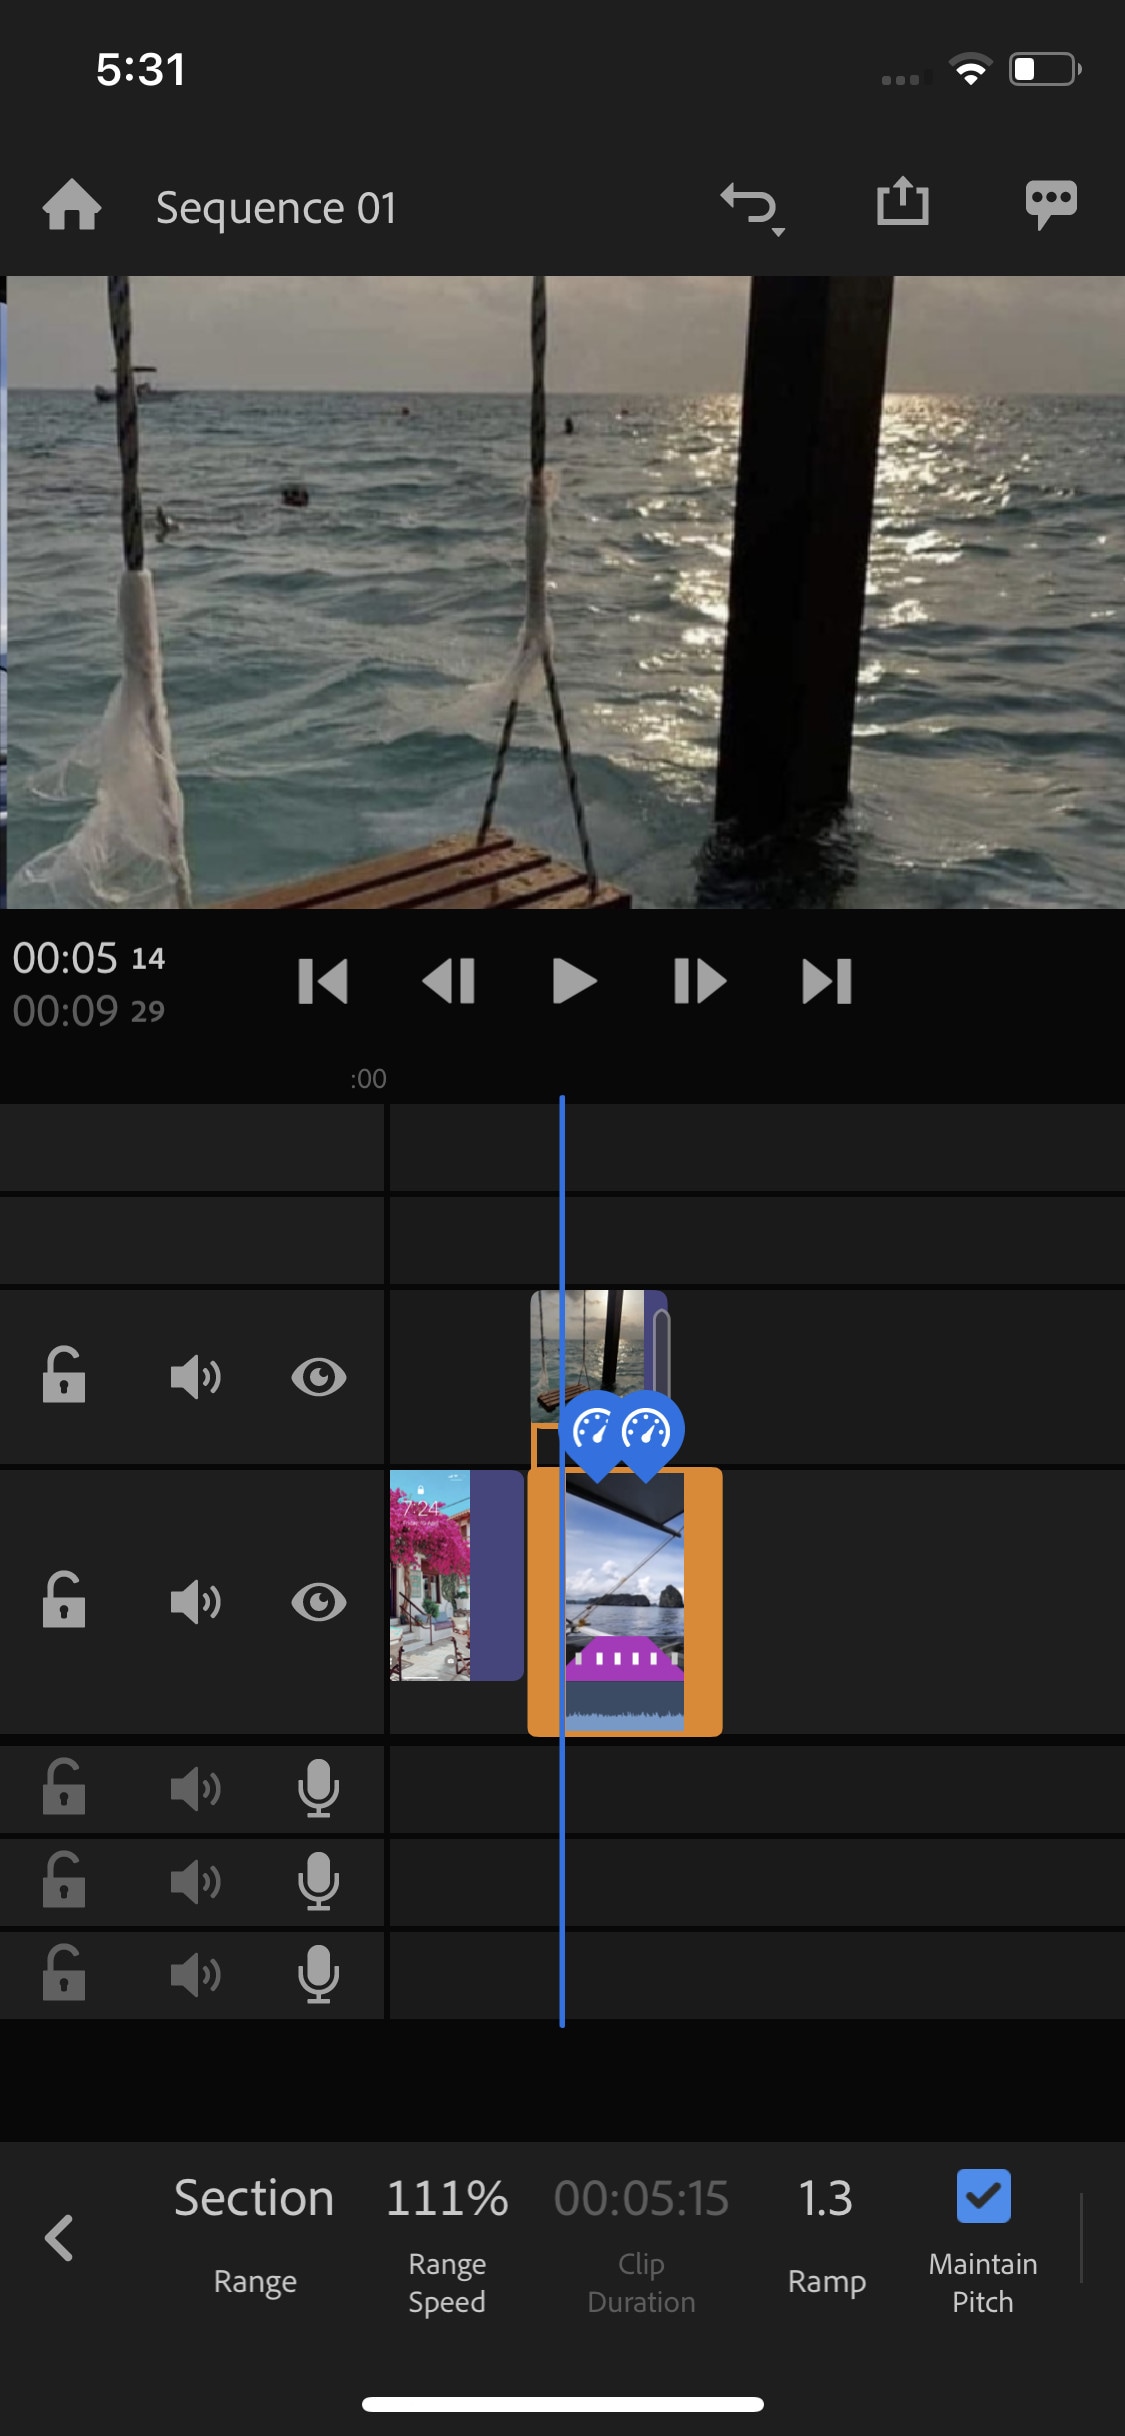
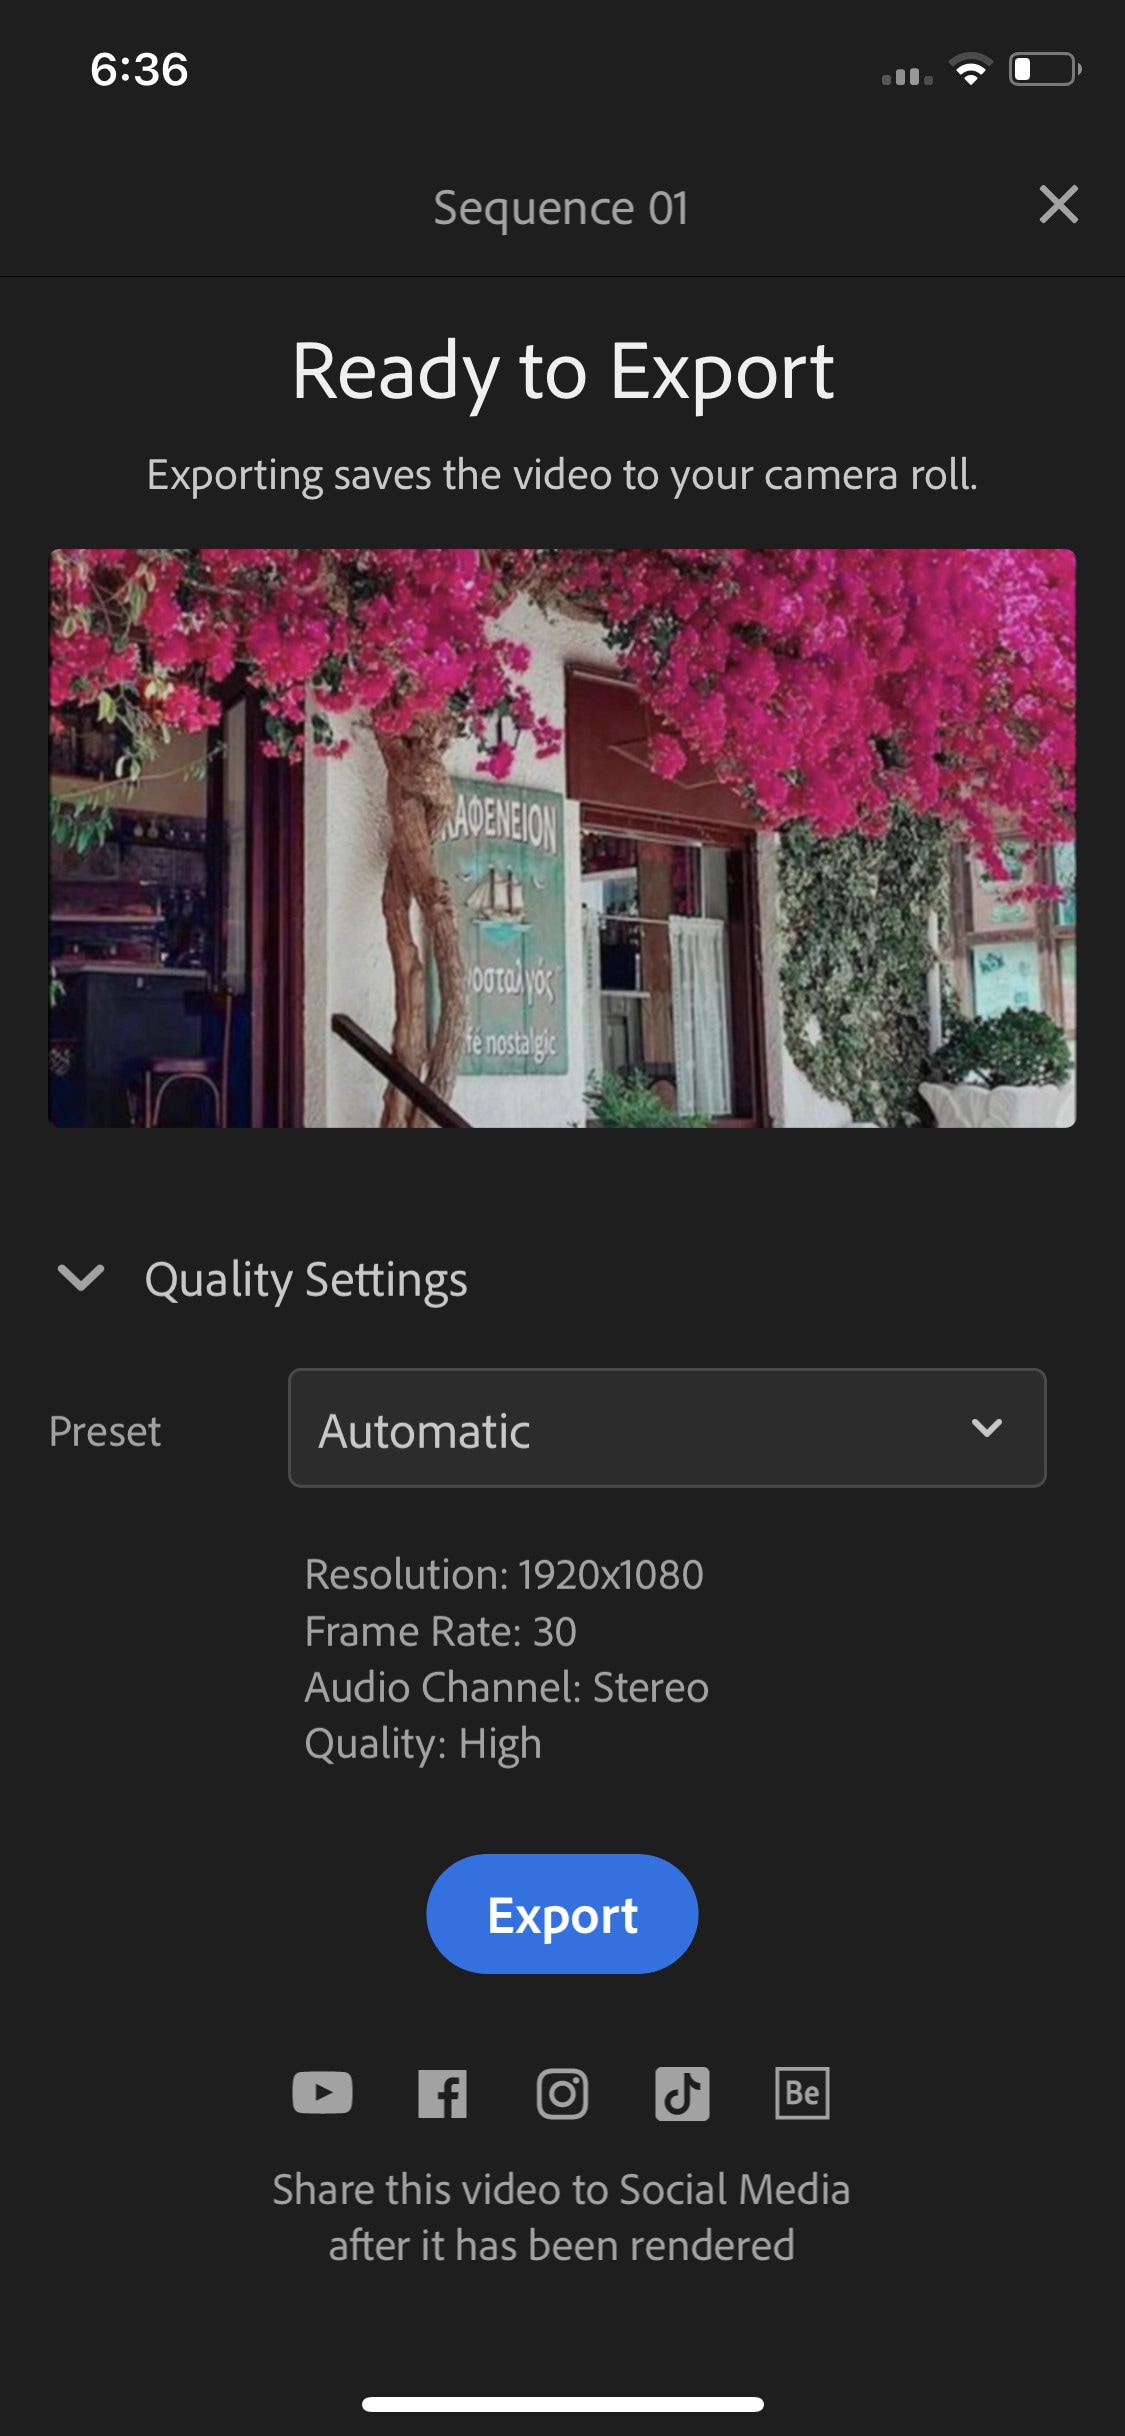
~Price:
Its Premium version is available for 9.99/month. It includes some premium features. Or you can purchase the “All Apps Bundle” at $54.99/month for the annual plan.
~Steps:
Import: Open “Adobe Premiere Rush”, Click the “+” sign at the bottom to create a new project. in the media location, select the clips, then click the blue “create” button to start editing.
Click the blue “+” button at the bottom-left corner to add clips, audio, or graphics.
Hold and drag the clips upward to add them as a layer.
Edit: Scroll over a clip to select it. Clicking again shows a pop-up above the selected clip. Here you get 4 options: split, duplicate, separate audio, and delete.
A number of edit options appear on the bottom line of the screen:
Graphics: Click the “Graphics” button to add animated titles, transition graphics, and overlays as a layer. Select to customize its design.
Effects: Click the “Effects” button to add transitions or motion effect. Select a clip to apply transition at both ends. or select a corner of the clip to apply on it only. And change the duration of transition if you want.
Color: Here you can color grade your clips, Apply a preset or color grade manually by using sliders. You can also create your presets.
Transform: Here you can resize, rotate, crop, or change the position of the clip.
Audio: Here you can edit the audio, select a clip to edit its audio.
Speed Ramping: Click the “Speed” button to edit its speed. Select the range option to speed ramp a specific part of the clip. Select the ramp option to create a smooth speed curve. Or Set the clip duration to change its speed accordingly.
Export: To Export your clip, click the “Export” icon on top of the screen. Click “Quality Settings” to adjust export settings then click “Export” to save your file.
CapCut:
It is available on IOS and Android both.
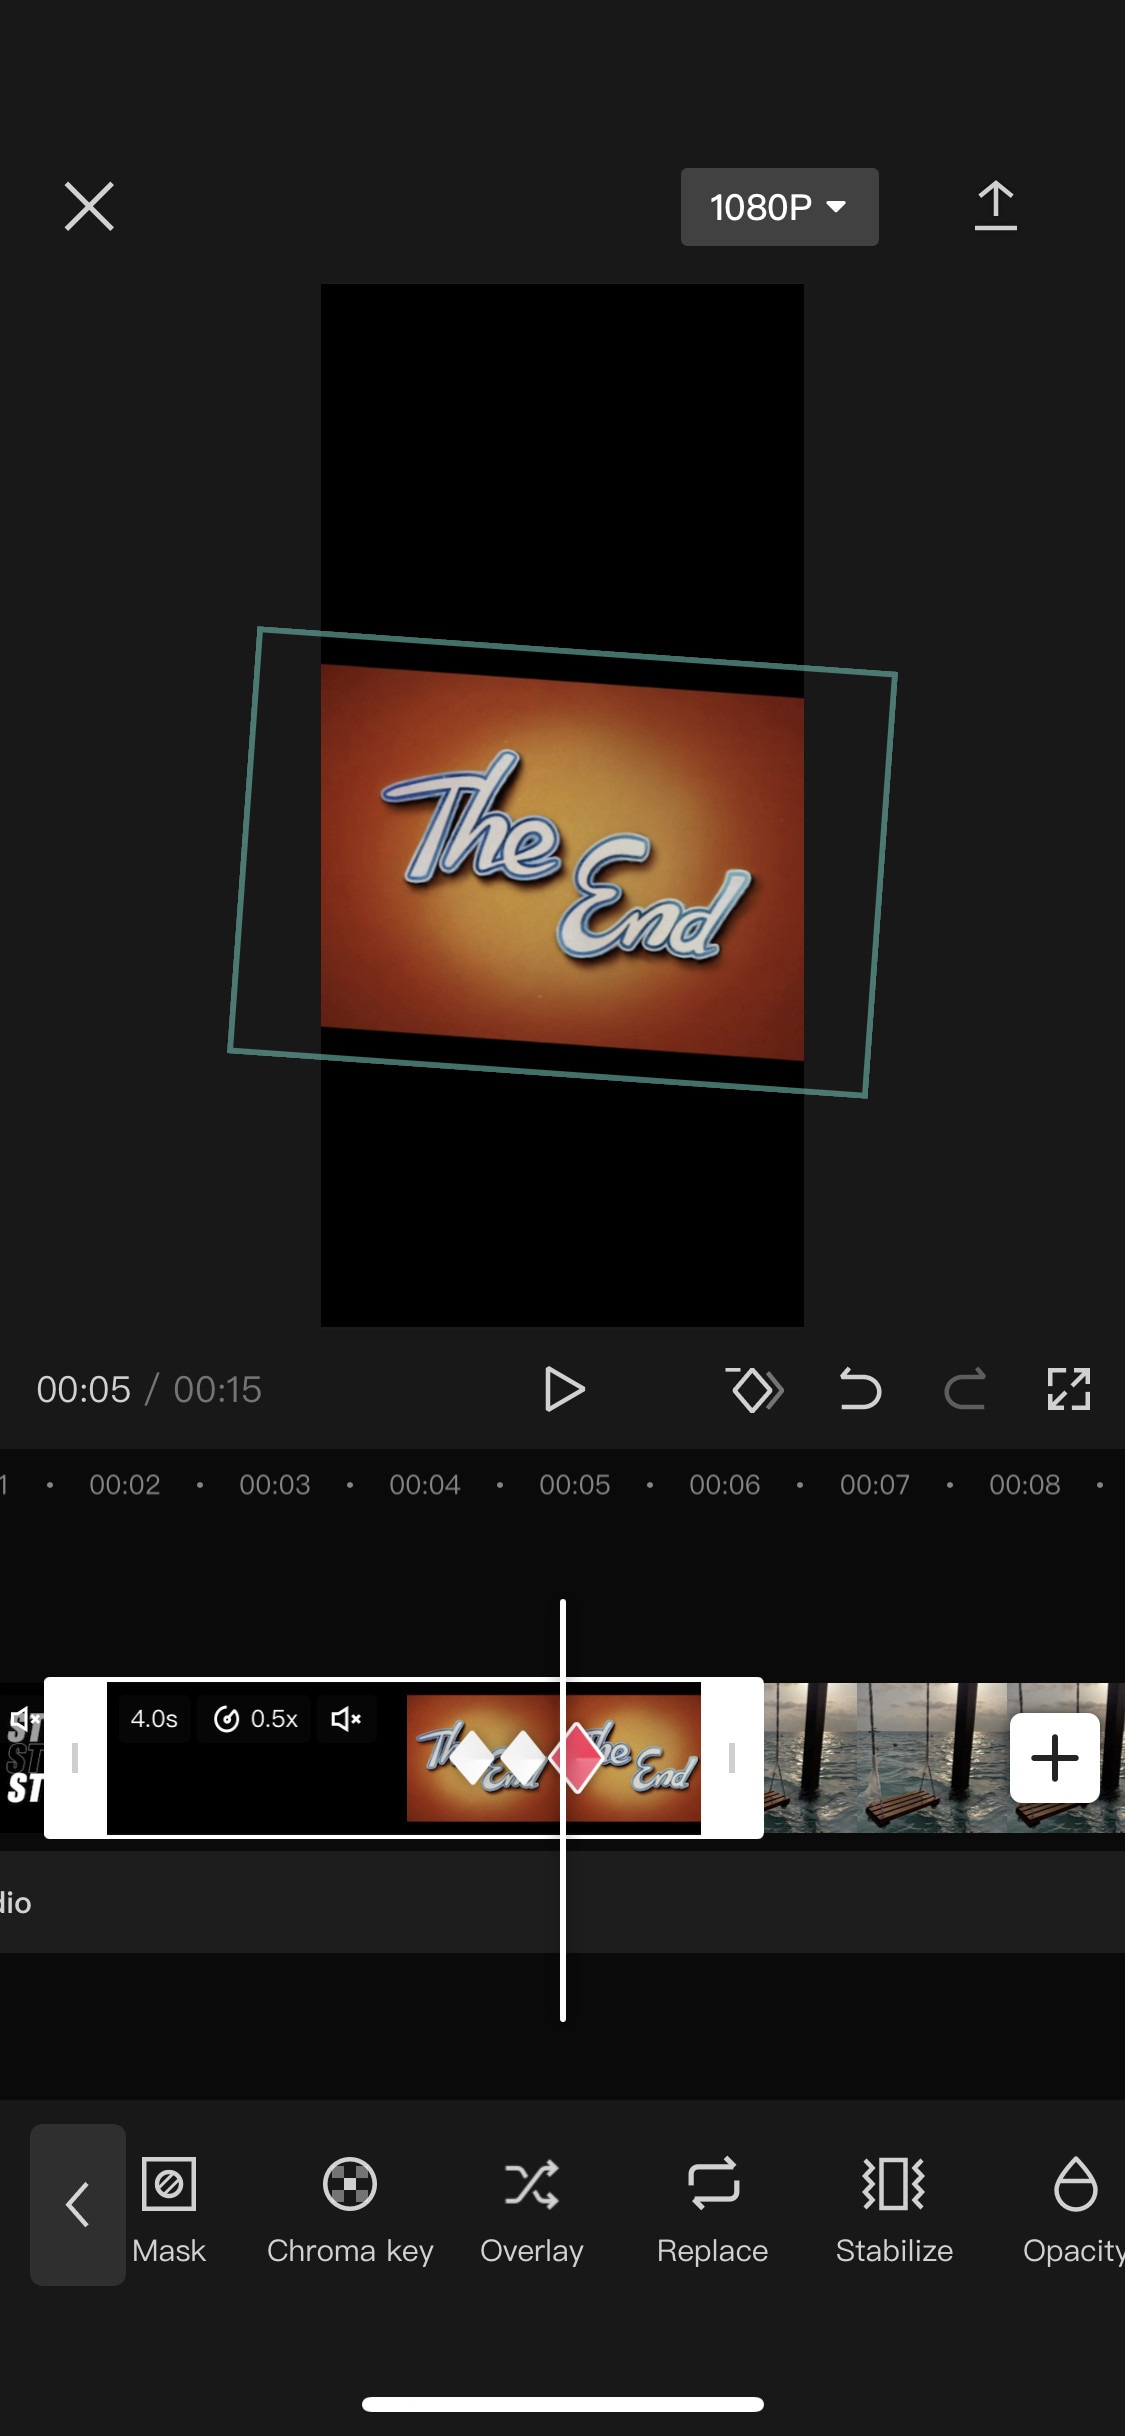
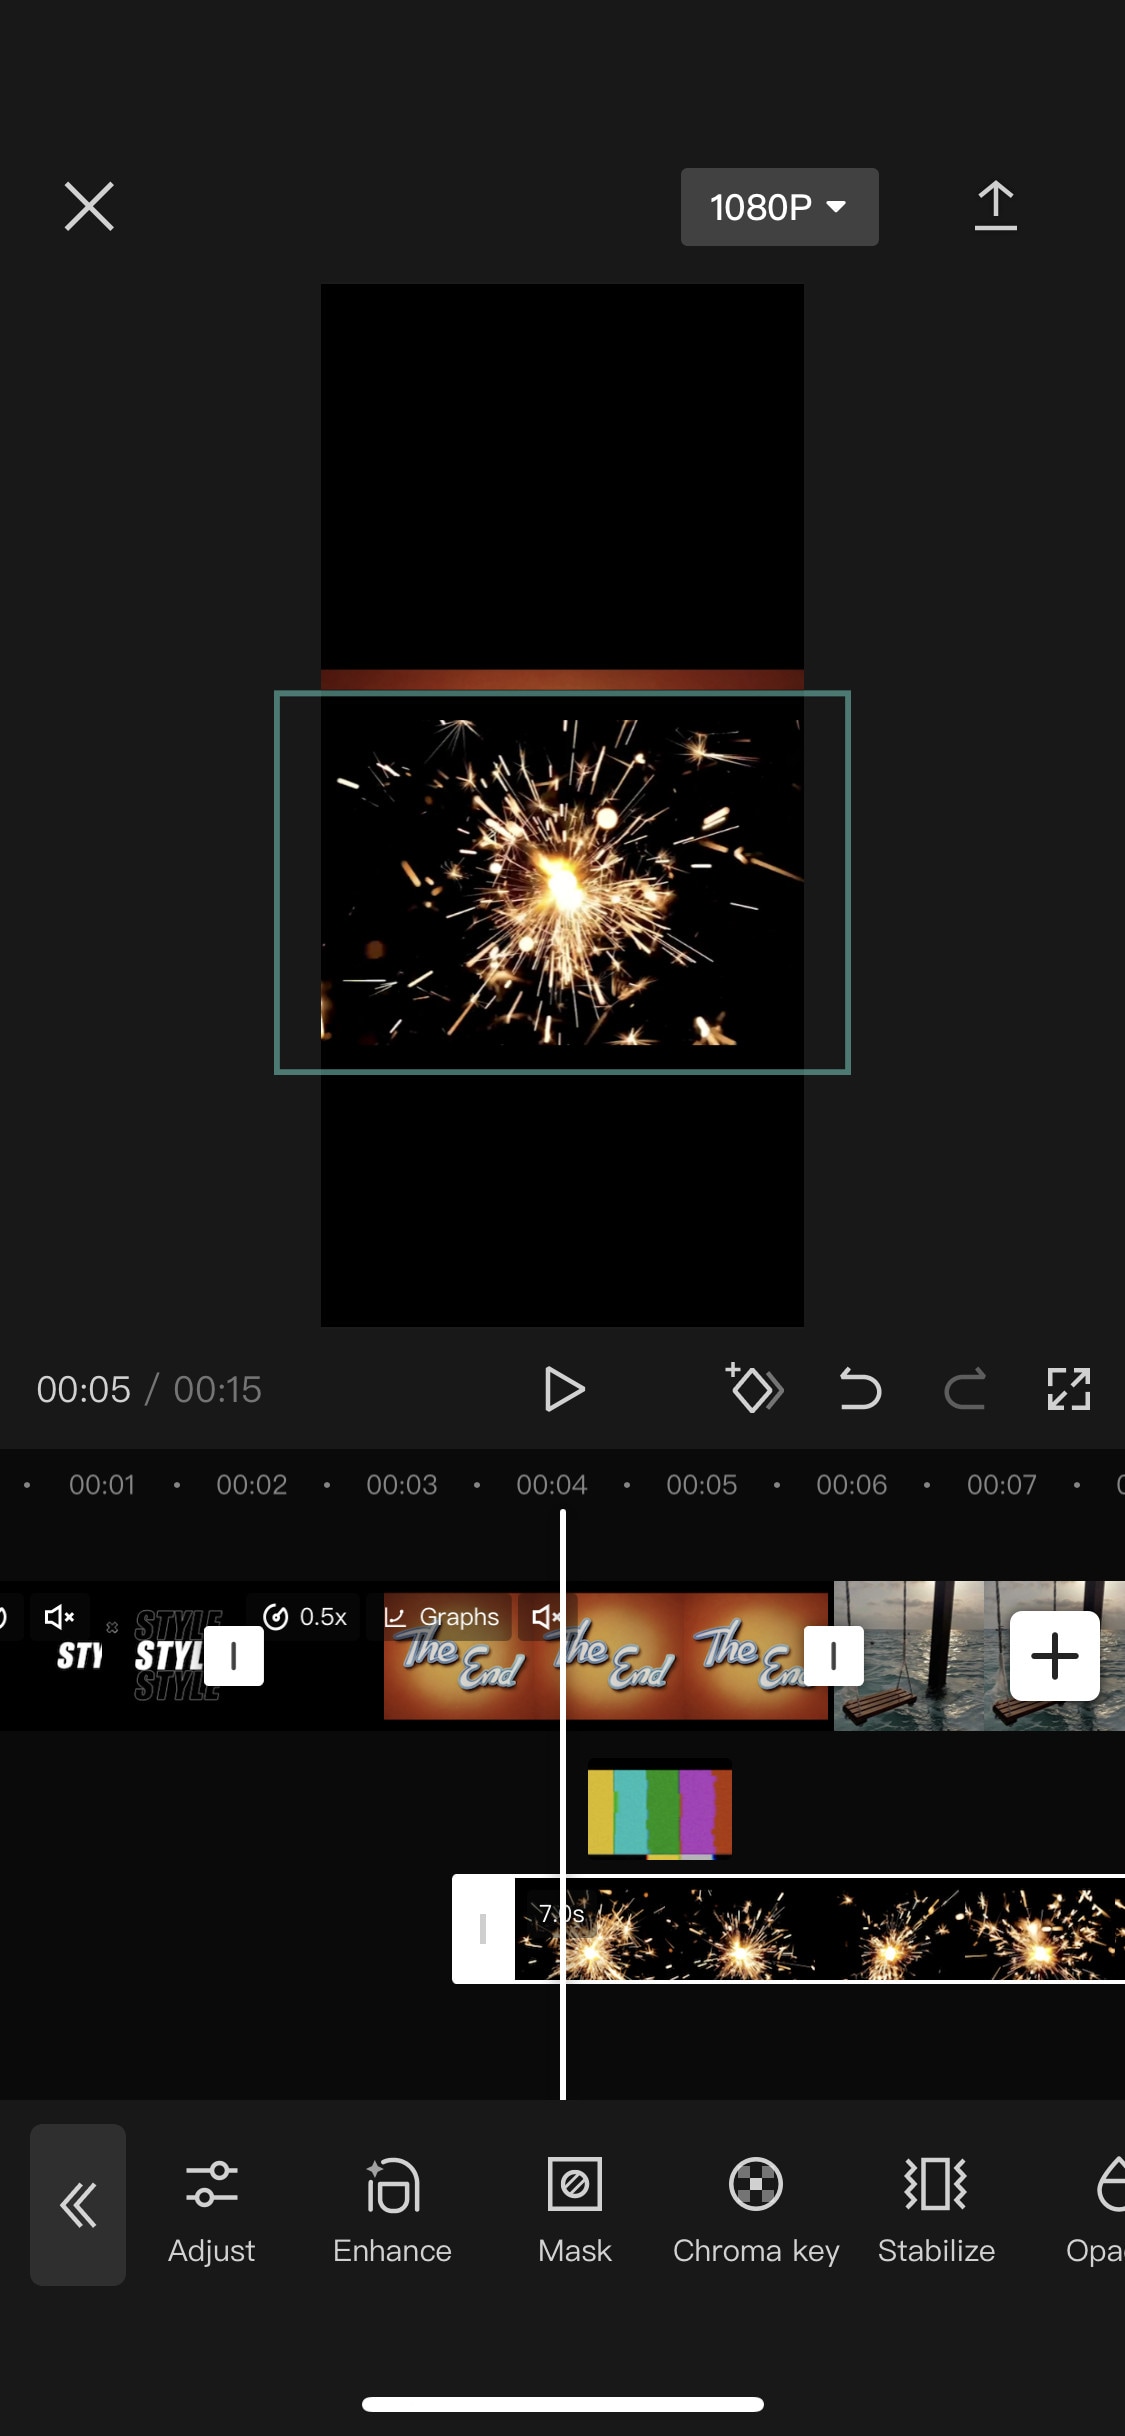
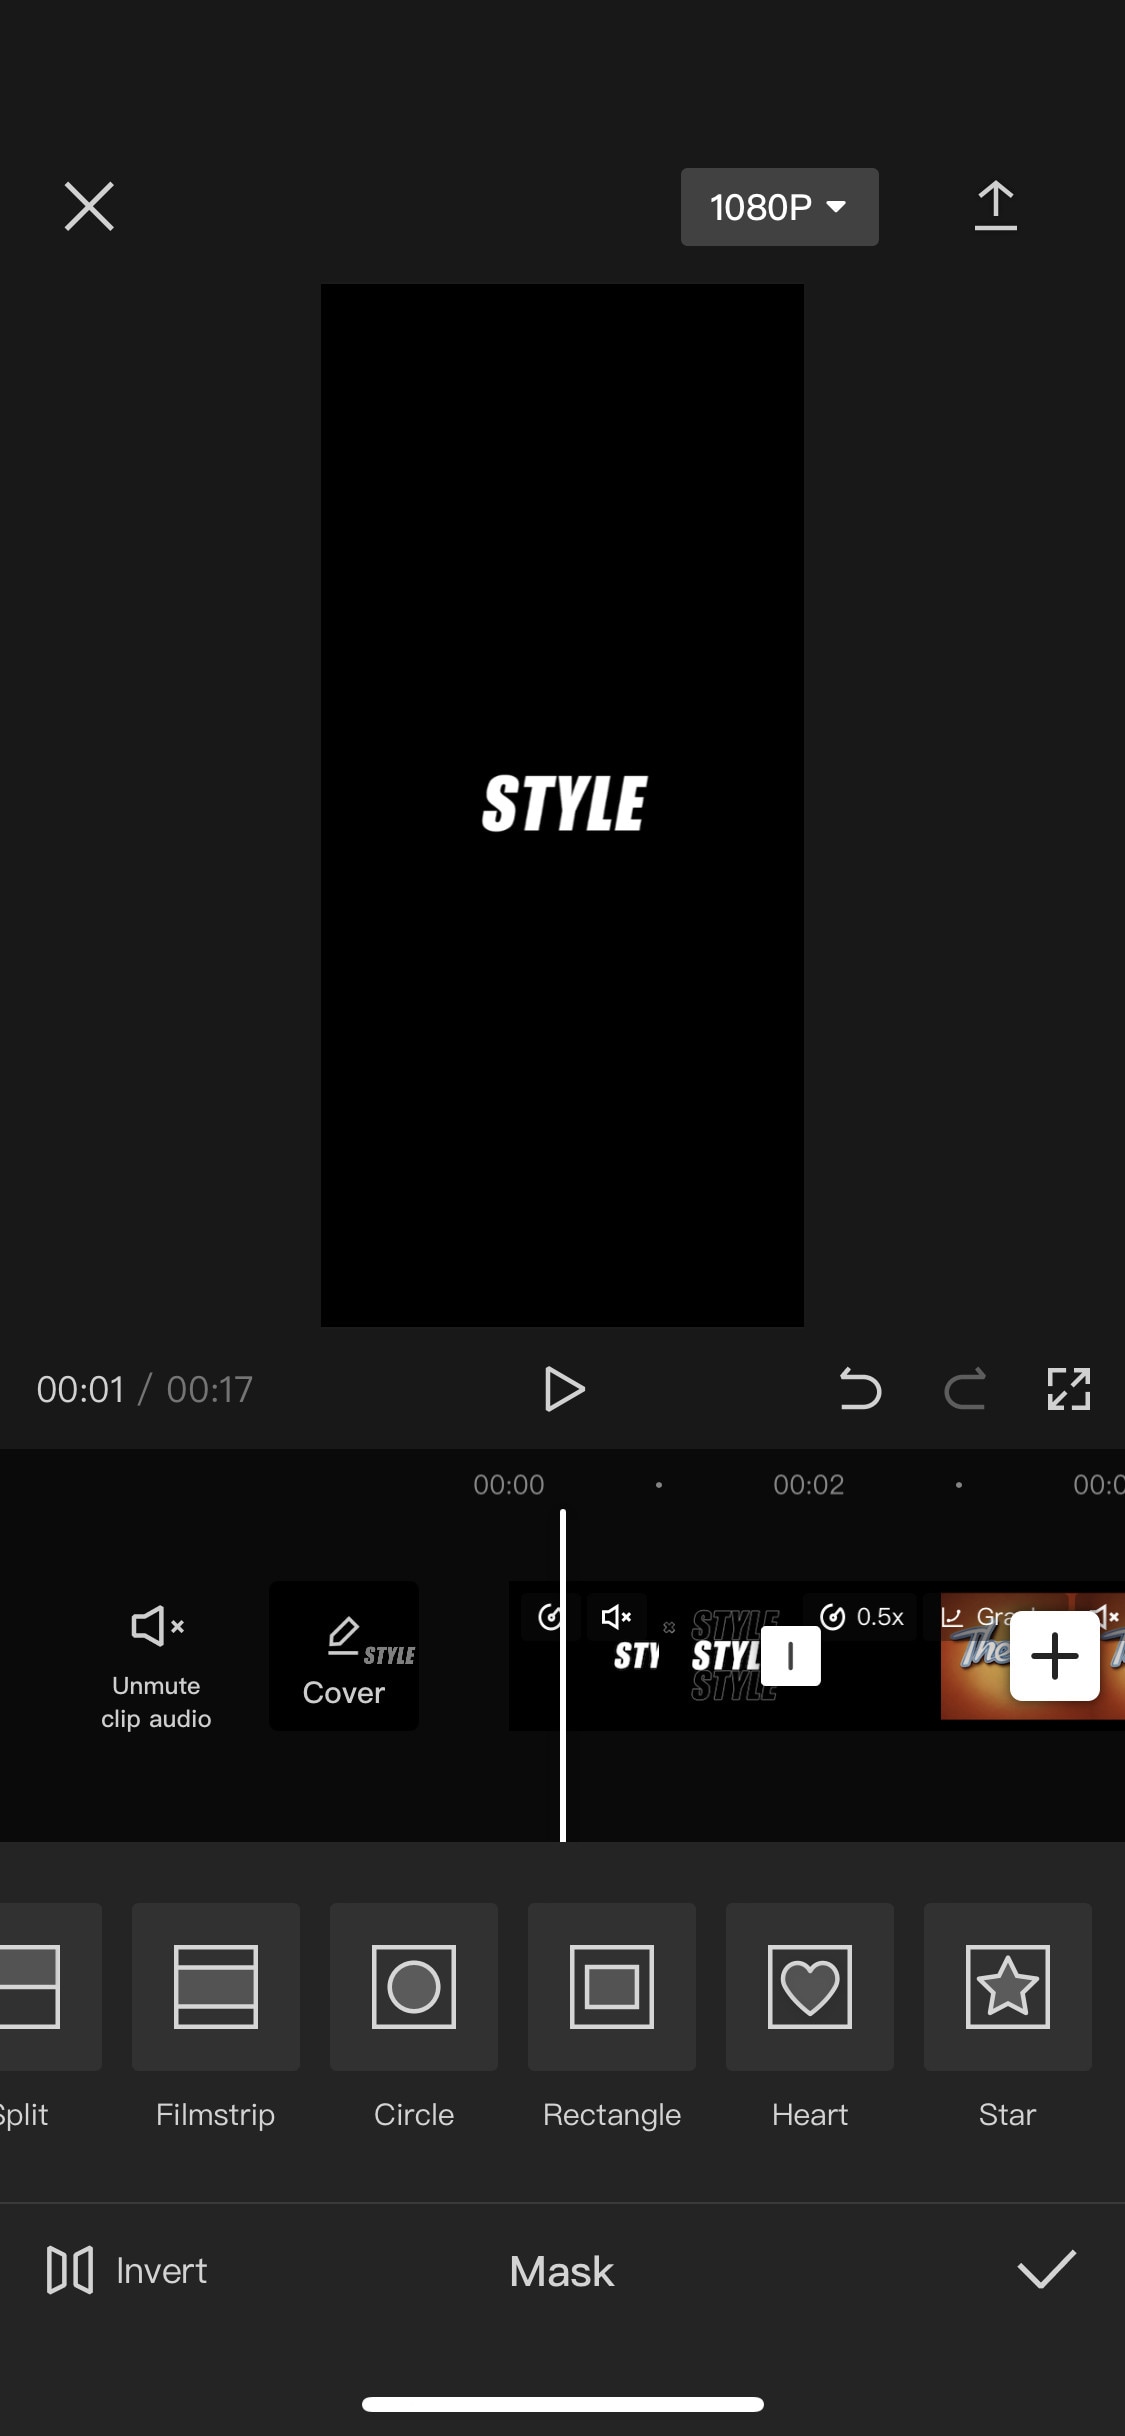
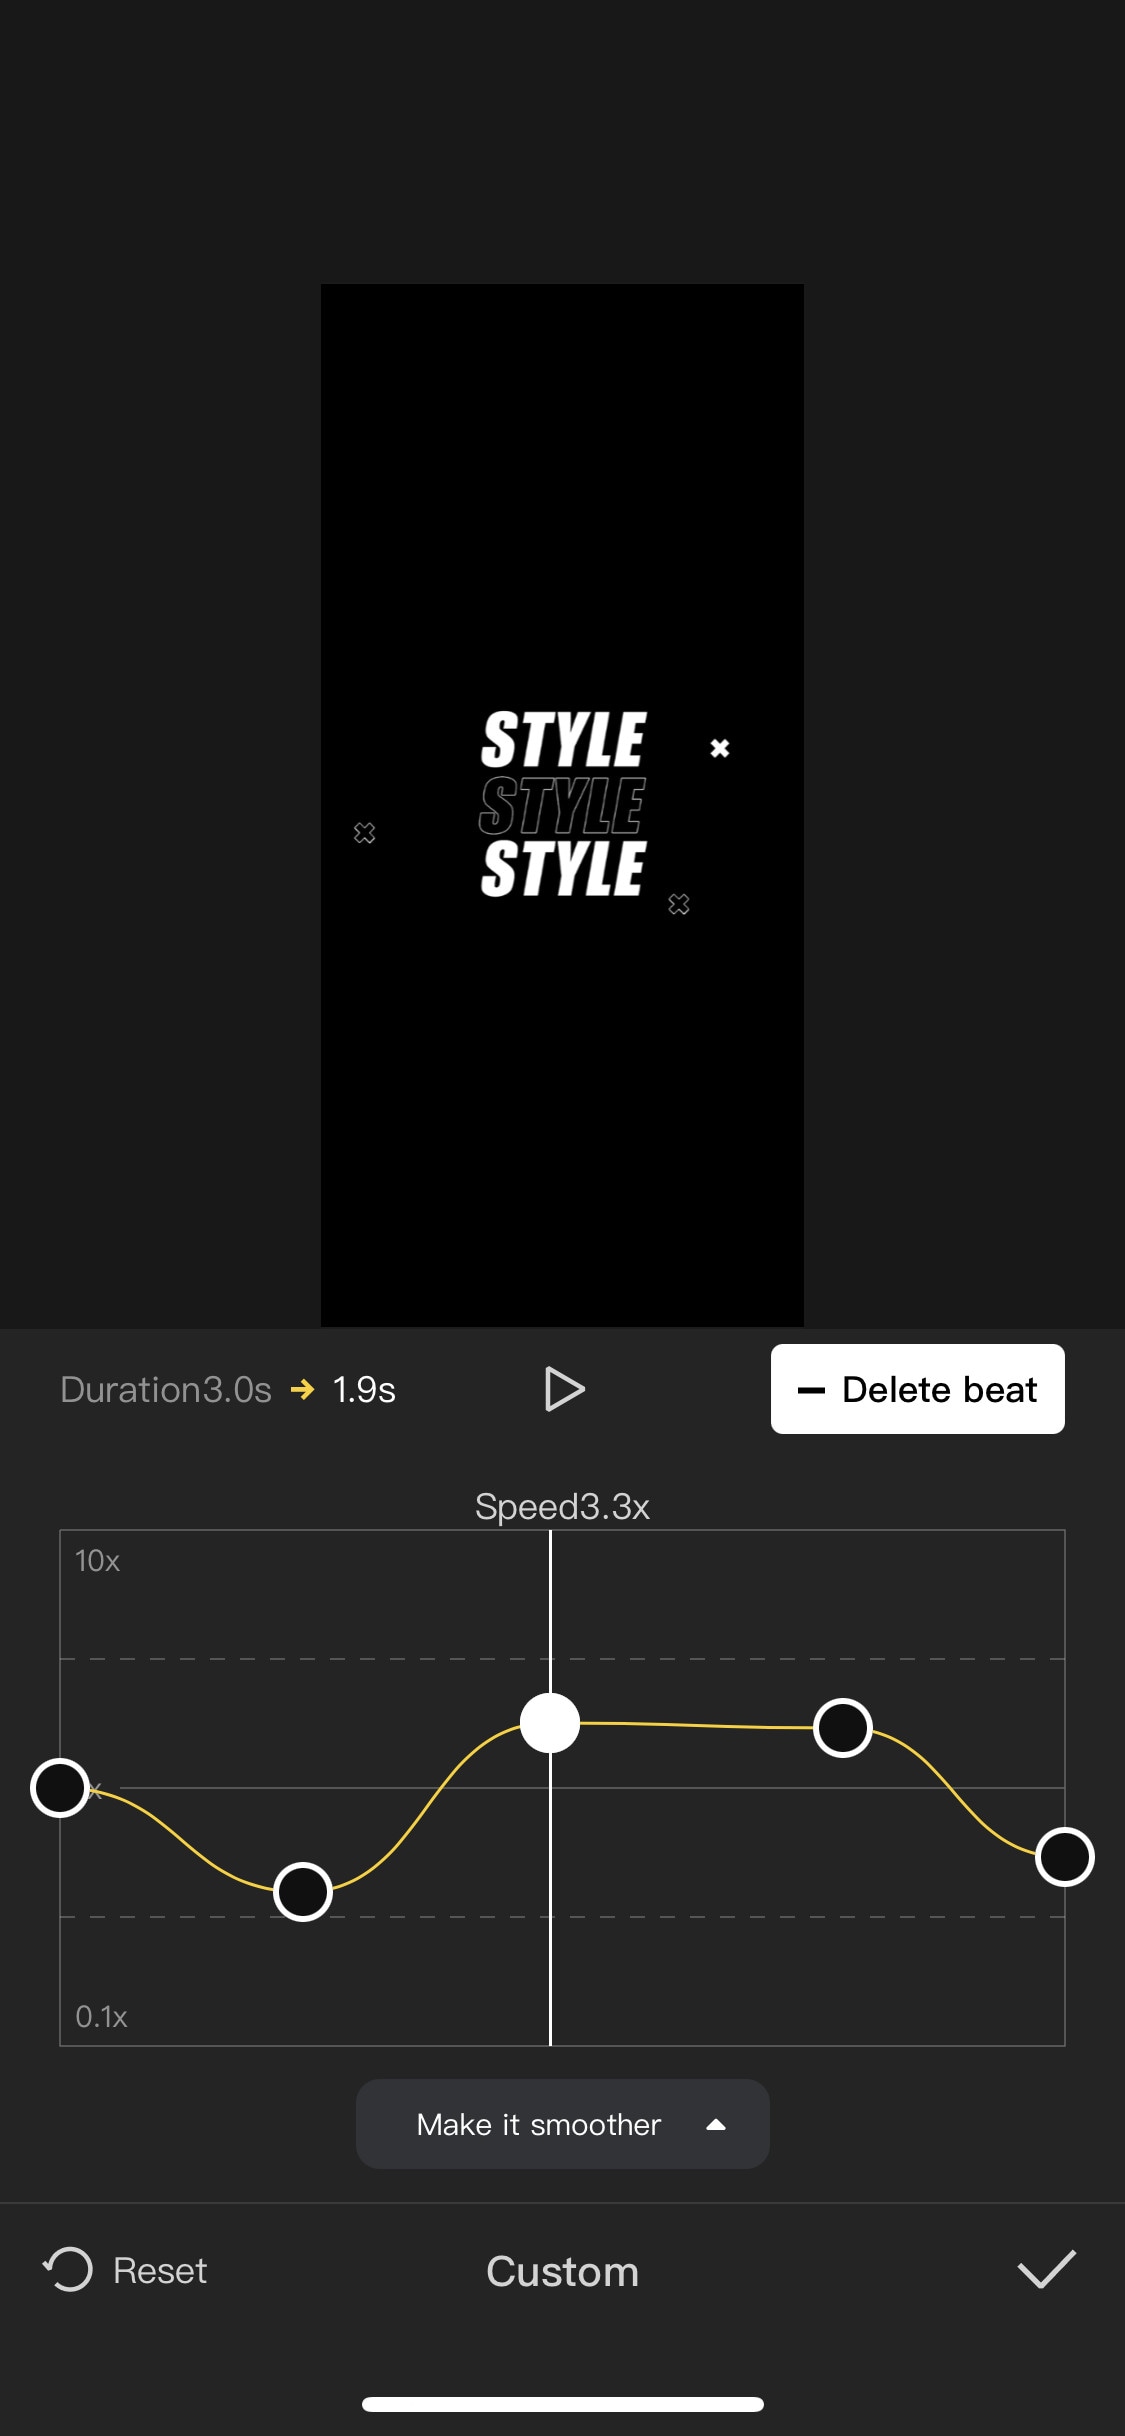
If you are looking for a free but good speed ramping software to help you create slo-mo videos easily anywhere, anytime you want, then “CapCut” can be the right choice for you. It is a free mobile video editing software with many interesting features like keyframing, chroma-key, masking e.t.c. It also supports video and image layers. It has one of the best speed ramping features among other mobile video editors. It provides curves to smoothly speed ramp your clips. It can edit landscape, portrait, and even square video formats. It has many amazing effects and filters, it also has some stock clips.
~Features:
- It is completely free and has no watermarks.
- It supports up to 4K video resolution.
- Has curves for speed ramping.
- Has keyframes for animation.
- It has hundreds of effects, overlays, and titles.
~Cons:
- Its UI doesn’t support editing in landscape orientation.
- Lacks some common editing tools.
~Steps:
Import: Open Capcut, then click “New Project” to start a new project. Select files then click “Add” to import them. Click the white box with the “+” sign to add more clips. Hold and drag to rearrange the clips.
Click the “Add overlay” button to add photos or videos as layers.
Edit: On the bottom of the screen, you can find a bunch of tools for editing. From here you can add overlays, effects, filters, titles e.t.c to the timeline.
Select a clip to open the edit menu situated at the bottom of the screen. Here you can do the following tasks:
Split the clip; Change its speed, remove background, edit audio, do color correction, apply filters, stabilize the clip, e.t.c.
We have more edit features for the layers only which include: Spice (Blending), Animation, Masking, Chroma key, freeze frame, change opacity e.t.c.
Click the “Keyframe” icon (Diamond shaped) below the playback screen to apply keyframes to the layer. Pinch and zoom or rotate to transform the clip. Use the “Graphs” button in the edit menu to customize the keyframe animation.
Speed Ramping: To Change the speed of a clip, select it then click the “Speed” icon on the bottom bar of the screen. Move the slider to change the speed of the whole clip. To do speed ramping, click the “curves” option to choose a preset or create your own. Click a preset to apply it, and click again to open its edit menu. drag the beats up and down to change speed or add or delete a beat if you want.
Effects: Click the “+” sign between the two clips to add a transition between them, and drag the slider to change its duration.
Select the effects, filters, or titles icon to add them as a layer.
Export: Click the “Export” button on the top-right side of the screen to export your clip. Or click the button, left to the “Export” button to change its resolution and frame rate.
iMovie:
It is available on IOS and Mac.
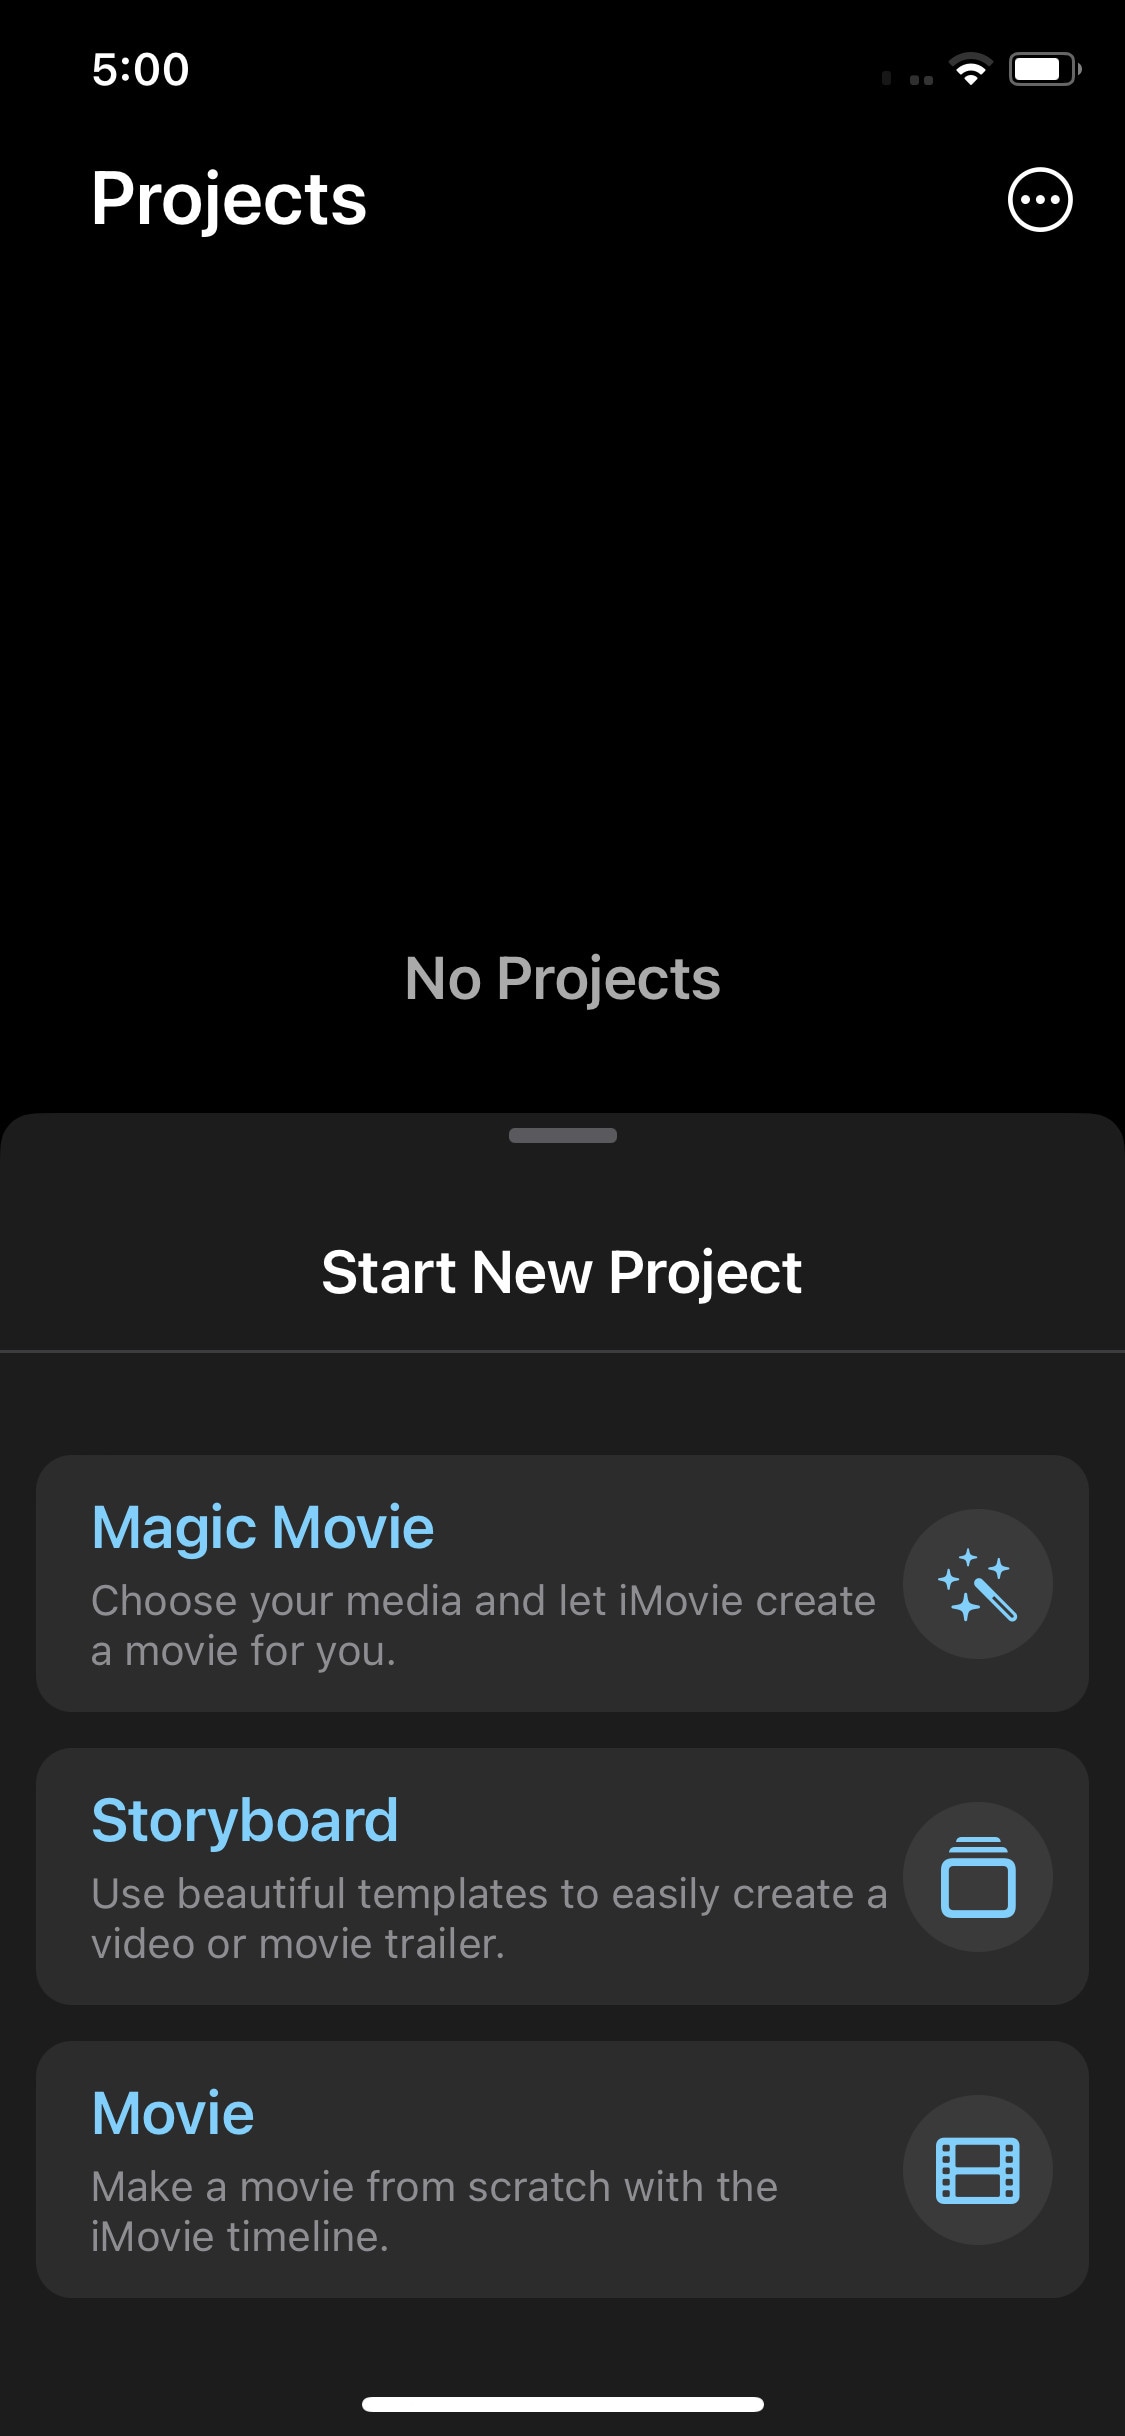
If you are an Apple fan and own everything Apple then what’s better than getting your hands on a video editor designed by Apple. It is simple and easy to use. It has all the basic editing tools to enhance your video like crop, trim, transitions, effects, e.t.c. It also has a speed ramping feature which let you change the speed at different points of a clip. It’s AI mode “Magic Movie” lets you select clips and a style and software will make the final product for you.
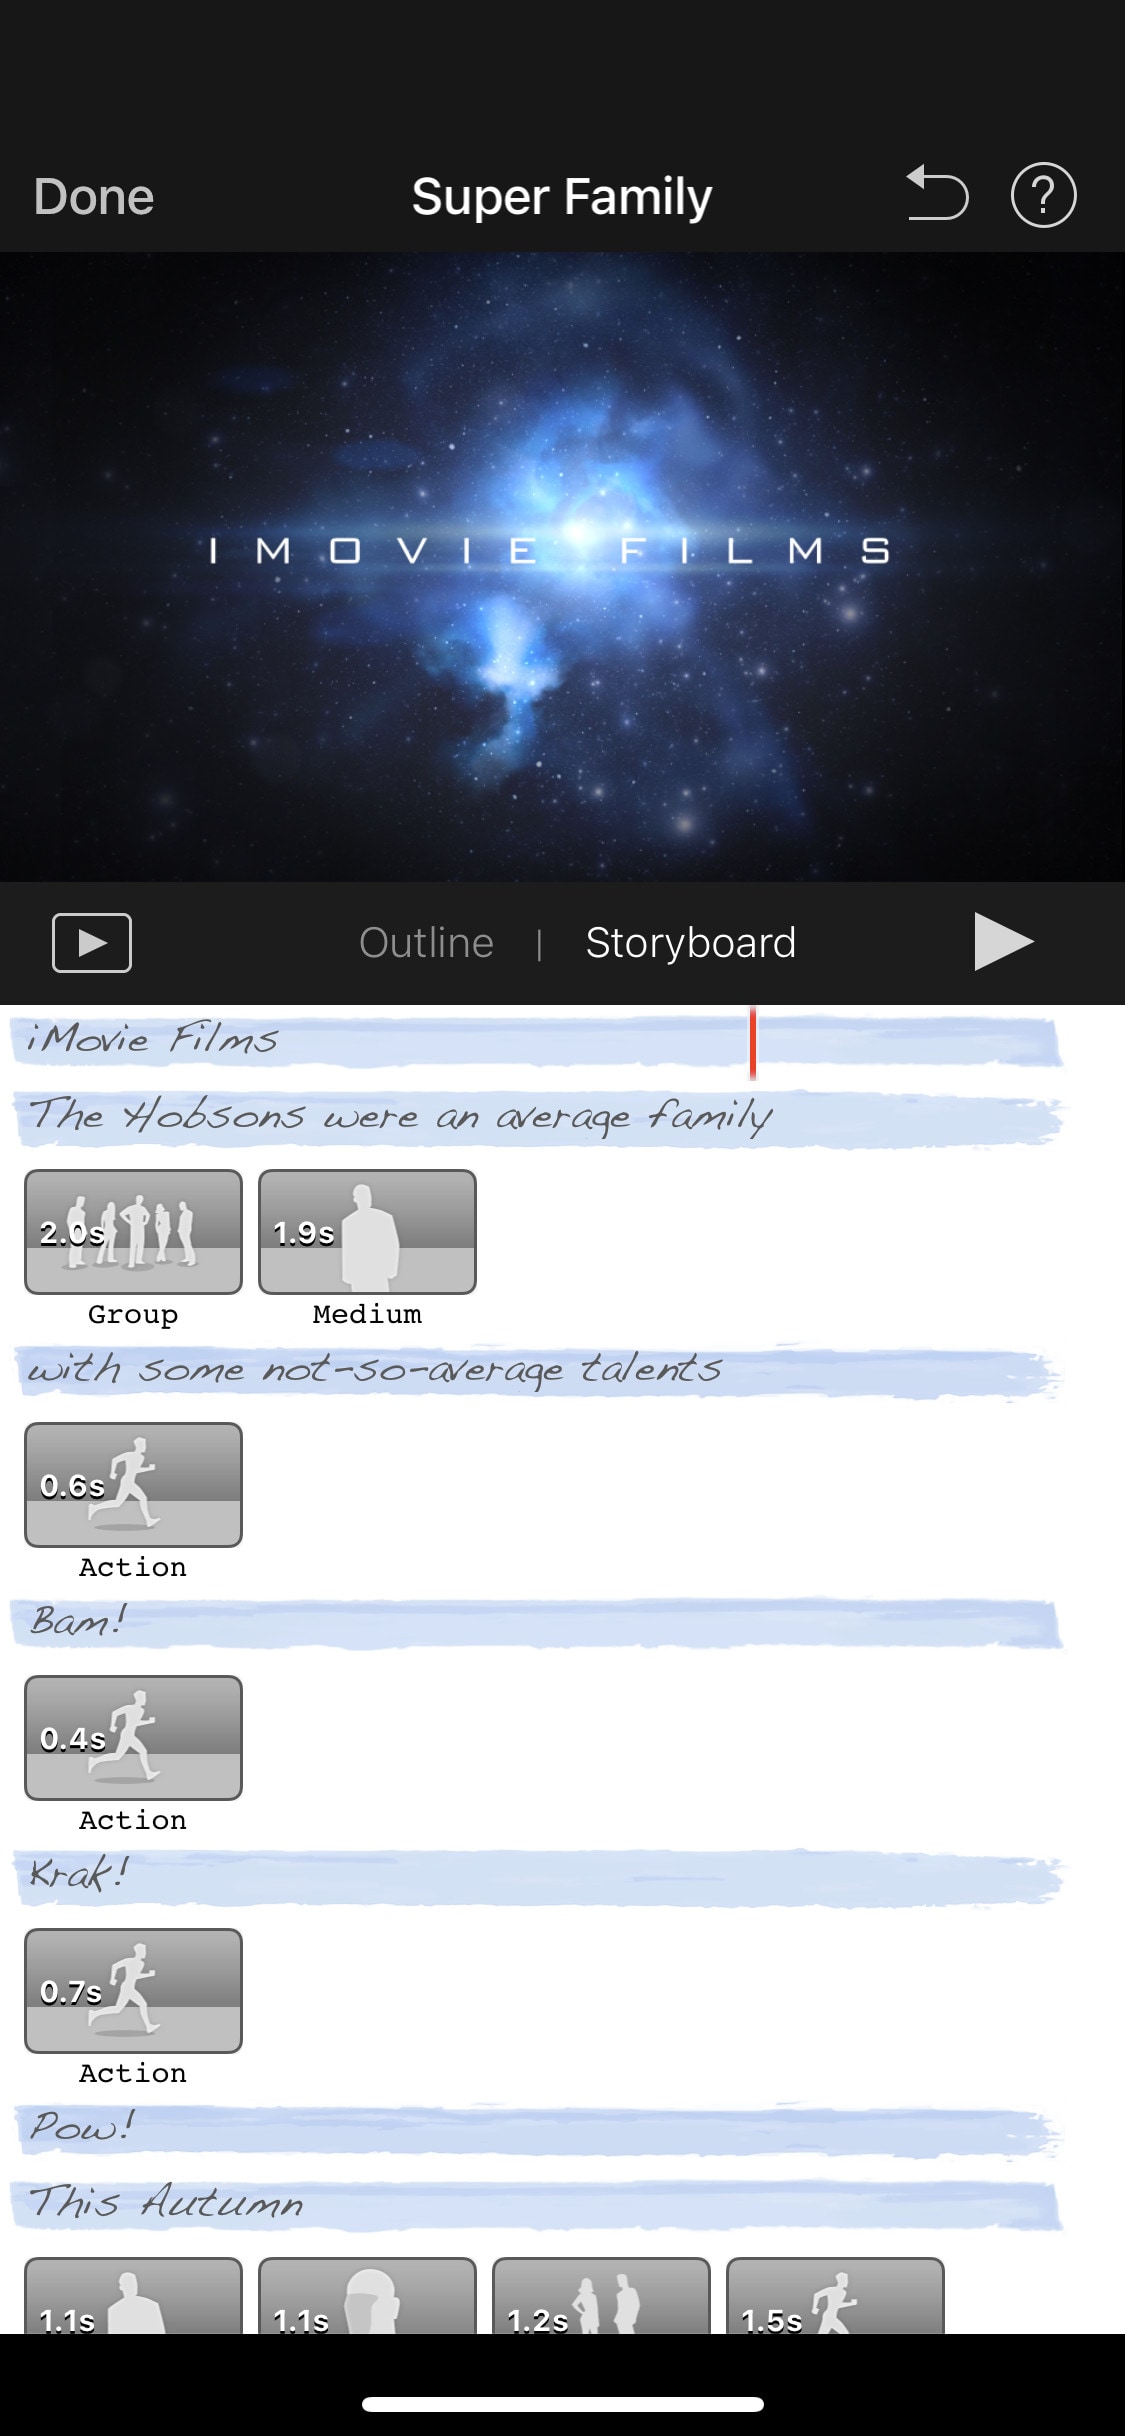
Its “Storyboards” mode is a creative way of learning production and post-production skills. It lets you choose a theme from many famous Genres available, then it will guide you through the production process like capturing footage, arranging your shots, and creating cinematic titles to enhance your story.
~Features:
- It is free and easy to use.
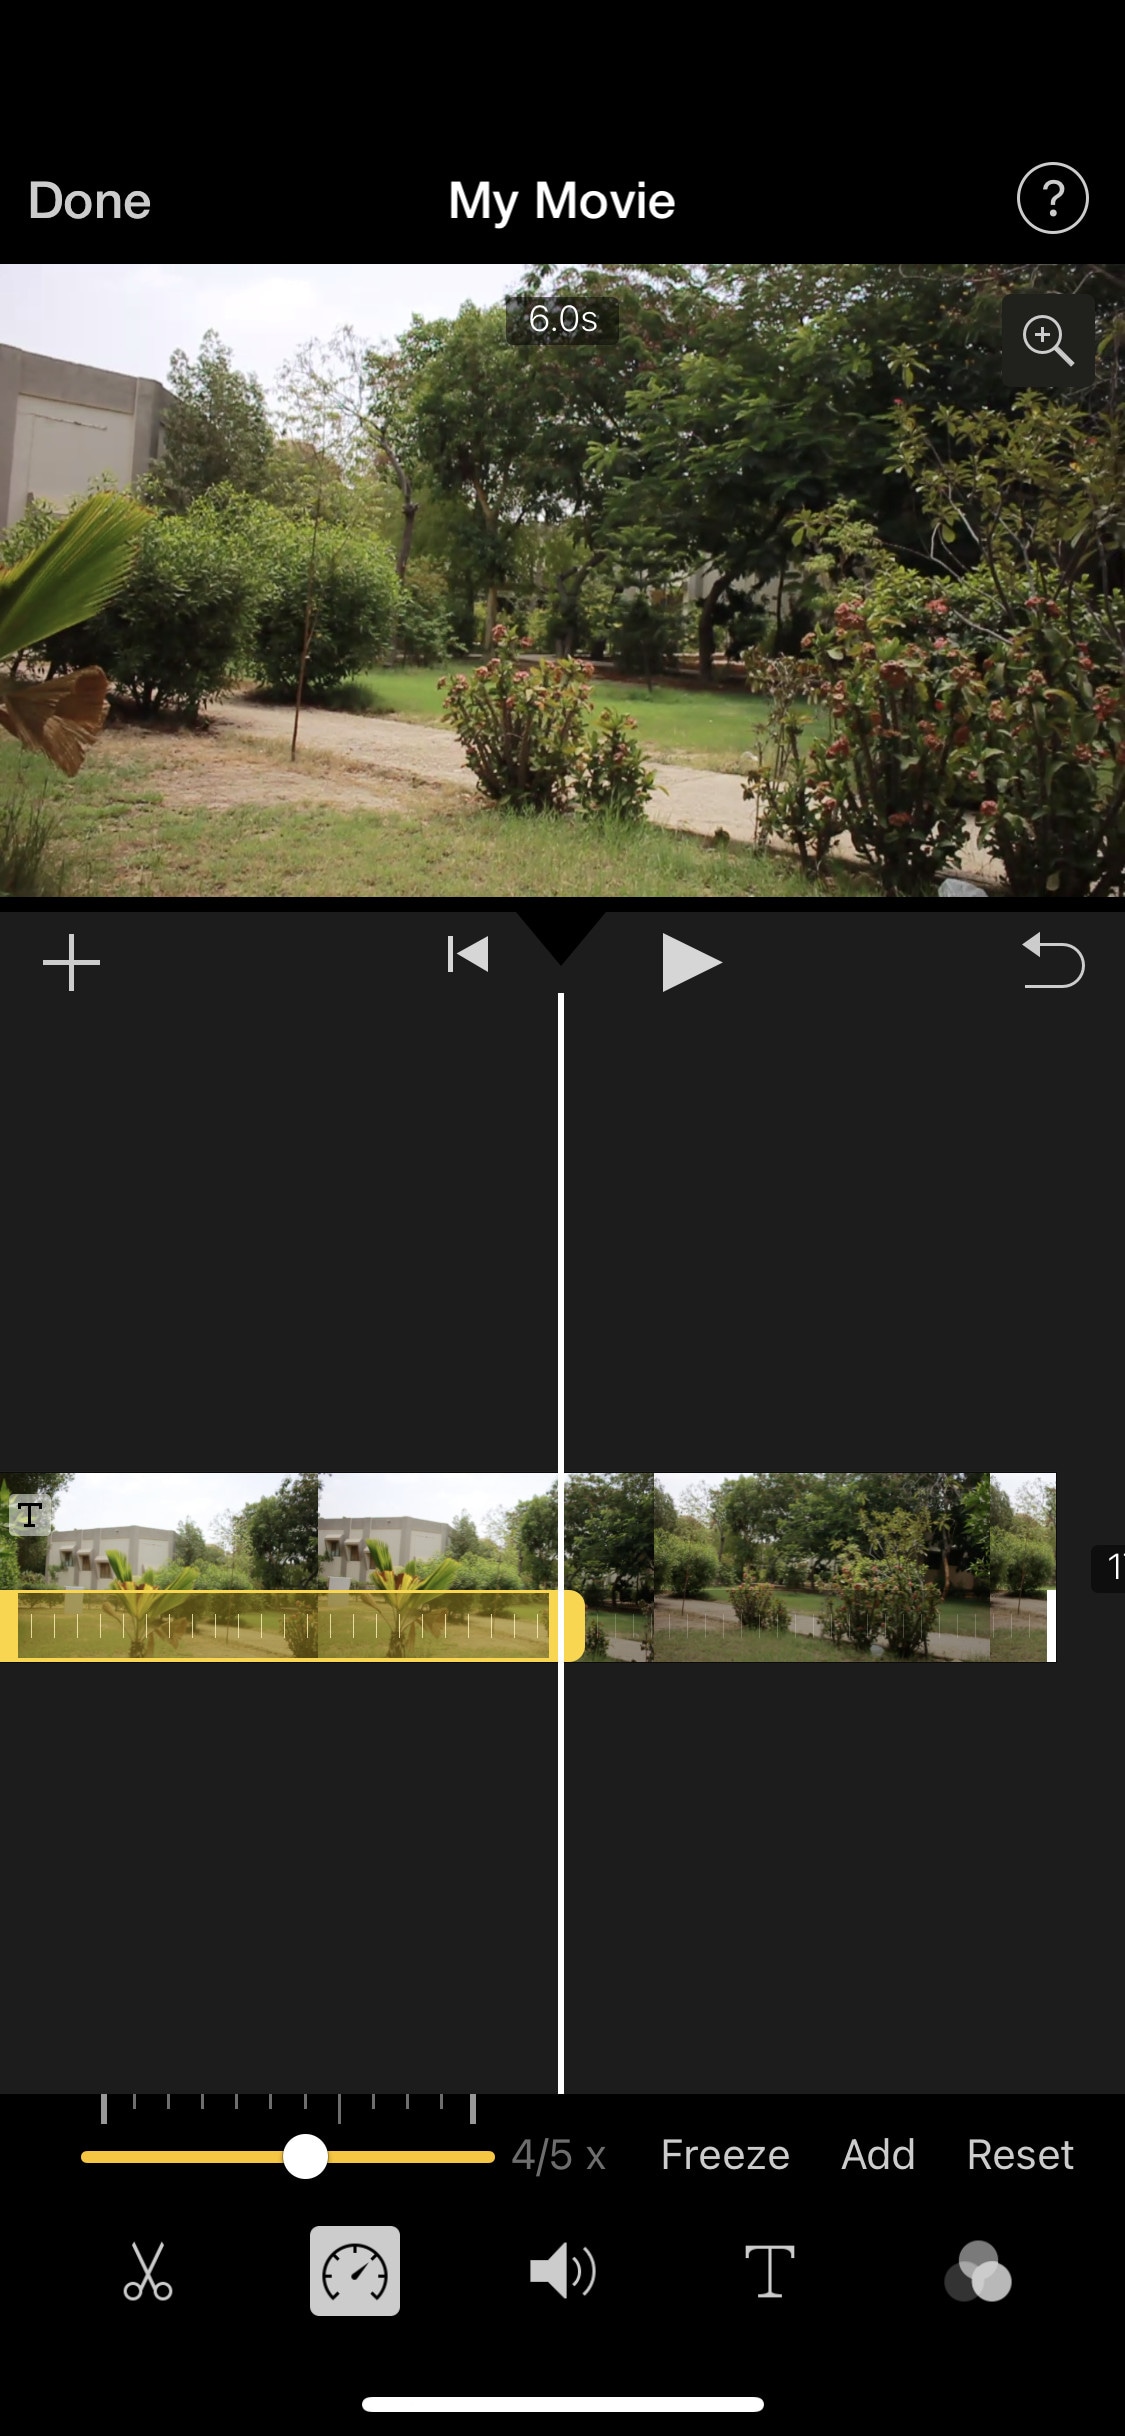
- Let you do speed ramping by changing the speed of different parts of the clip .
- Supports Raw files.
- It’s AI mode creates videos for you on its own.
- The “Storyboarding” feature helps you through the production process.
~Cons:
- It only works on IOS and Mac.
- Not suitable for professional projects.
~Steps:
Import: Open “iMovie” then click “Start New Project” and select one of the 3 following modes to start editing:
- Magic Movie: Select the clips for editing, then click “Create Magic Movie” to let iMovie create a movie for you, which you can customize according to your liking.
- Storyboard: Click “Storyboard” then select Template and a genre or a style then click “Create” to start the project. iMovie will guide you and let you add the clip or title according to the pattern.
- Movie: In “Movie” mode, select the clips from the media browser then click “Create Movie” to start editing.
Edit: Select a clip to edit it. A bunch of tools will appear at the bottom of the screen.
Click the “scissors” icon to split, duplicate, delete the clip, or to detach the audio.
Click the “volume” icon to change the volume of the clip.
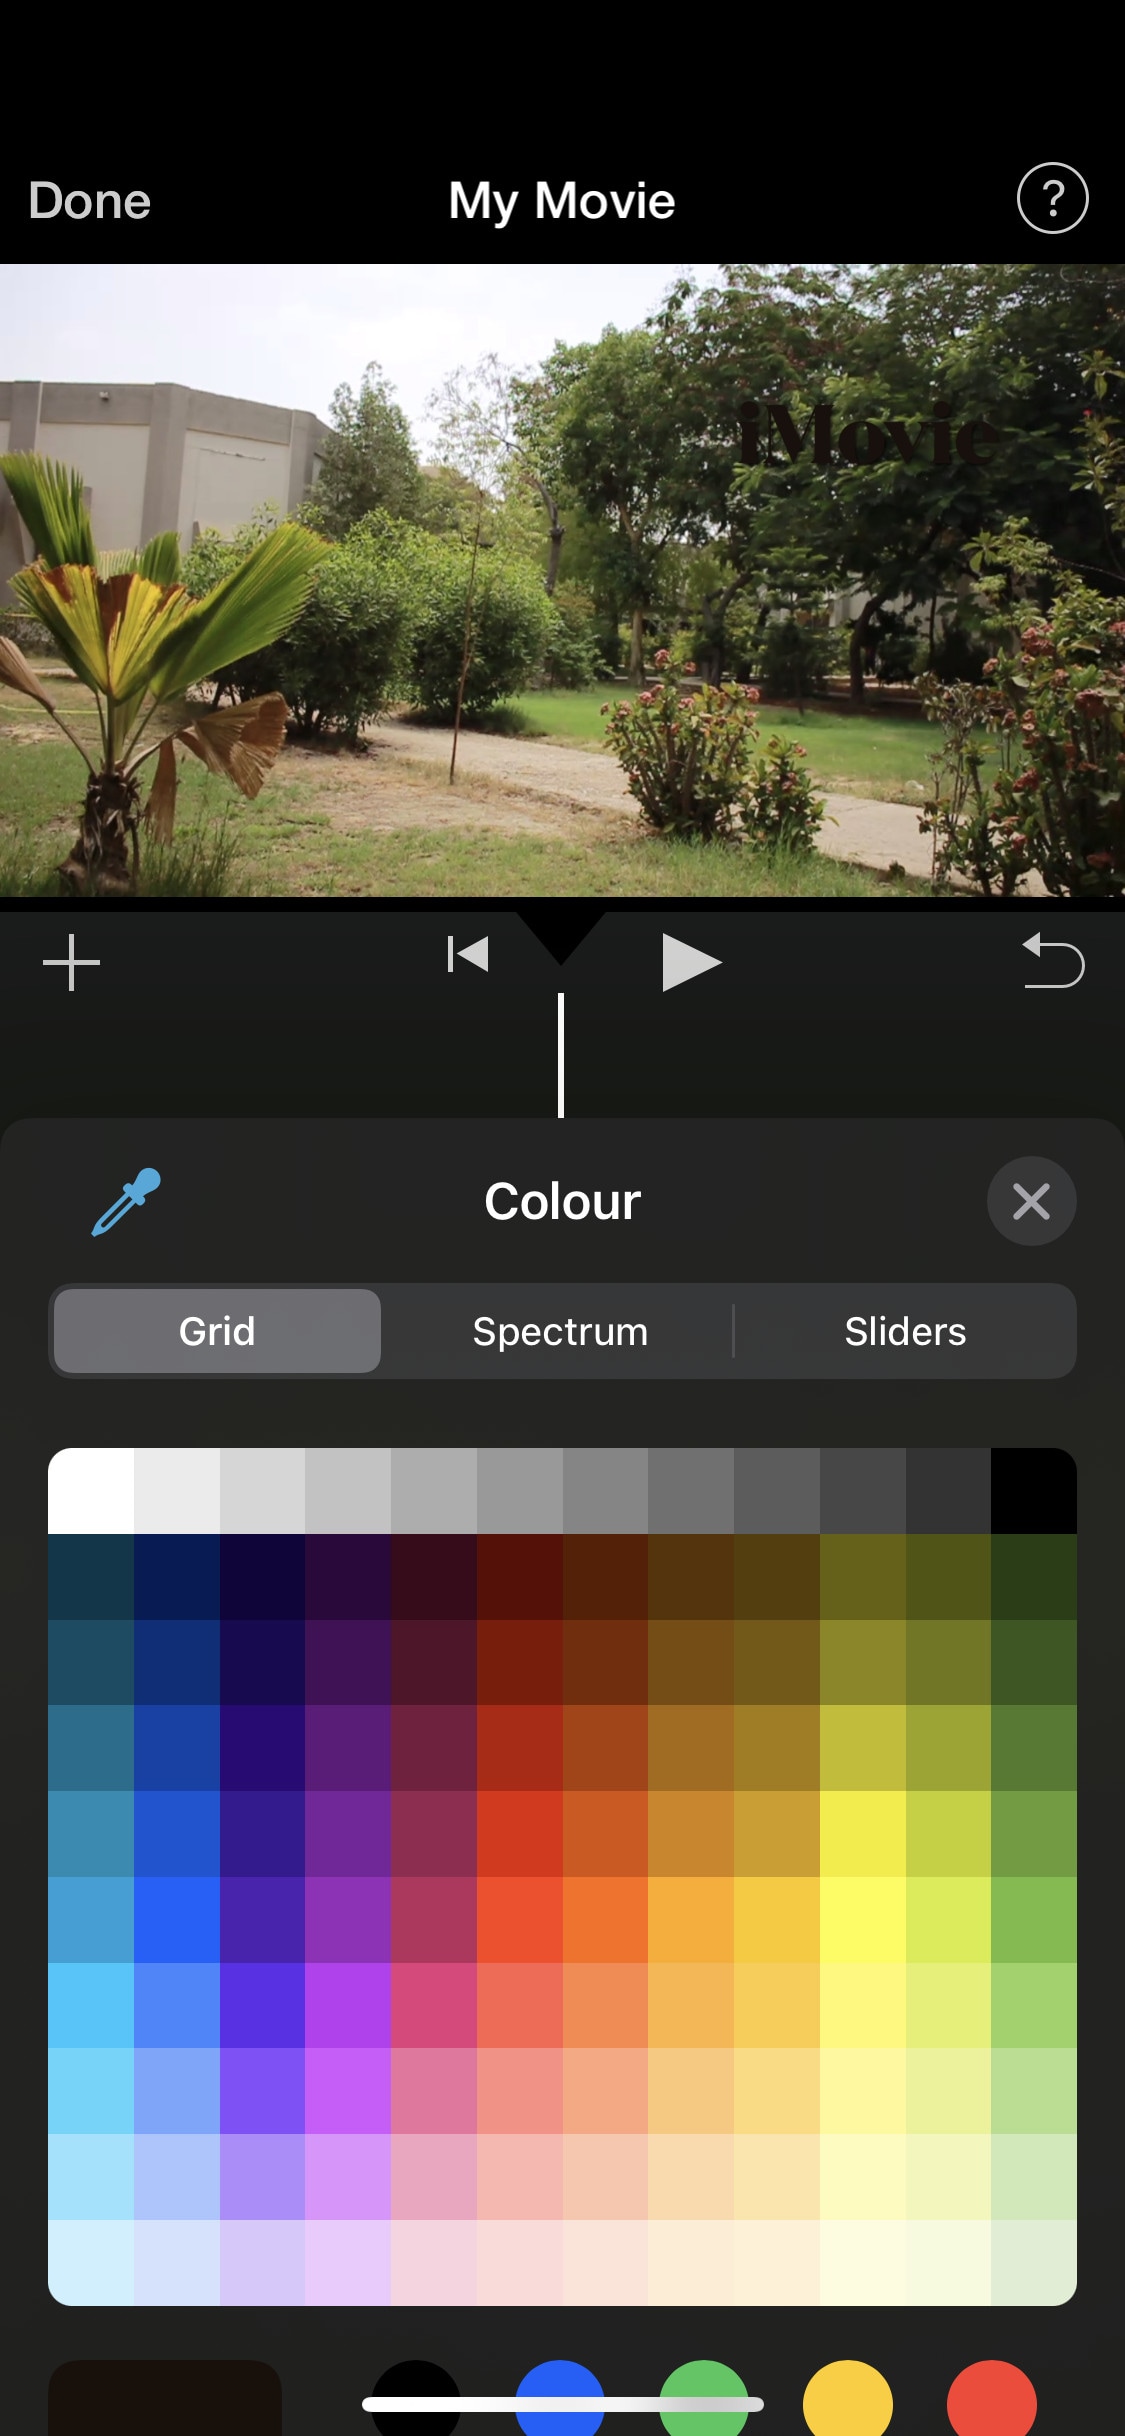
Click the “Title” icon to add a title design. Click the text (on the playback window) to edit it.
Click the “Filters” icon to apply it to the selected clip and move the slider to change its intensity.
Speed Ramping: Click the “Speed” icon to change its speed. Move the yellow slider to change the speed of the whole clip. Or click the “Add” button to add partitions (in yellow color) to the selected clip. Select a partition to change its speed only. And click the “Freeze” button to add a freeze-frame.
Effects: Select the black box between two clips to add a transition. Select a transition to apply it and change its time duration if you want.
Export: Click the “Done” button on the top-left corner of the screen to save the clip, then click the “Export” icon on the bottom of the screen to save your file.
Some Paid Video speeding Softwares for iPhone:
If you do most of your video editing from your phone and want to invest some money in it then you should check the softwares mentioned below. They are quite affordable and are worthy of investment. As they are packed with many cool features. But if you aren’t sure which software to use then don’t worry as most of these softwares have a free version to try on but they have some limited features and they provide a watermark on export. But it is a great option to get your hands on new software and once you are comfortable with it, you can purchase its premium version.
Kinemaster:
It is available on IOS and Android both.
If you want to do more than just trimming and cropping to your videos then you should try Kinemaster. For editors, who want to do some advanced-level video editing on their phone, then you must have Kinemaster on your phone. It is a paid software, which is packed with many useful features. It has many video and audio effects. It also has an amazing audio editor. It also has many title designs and basic color correction tools. It has hundreds of effects and transitions + more can be downloaded from its asset store. Its UI is suitable for beginners and content creators both. It is a paid software, but all its features are completely free to use, but the free version leaves a watermark on export.
~Features:
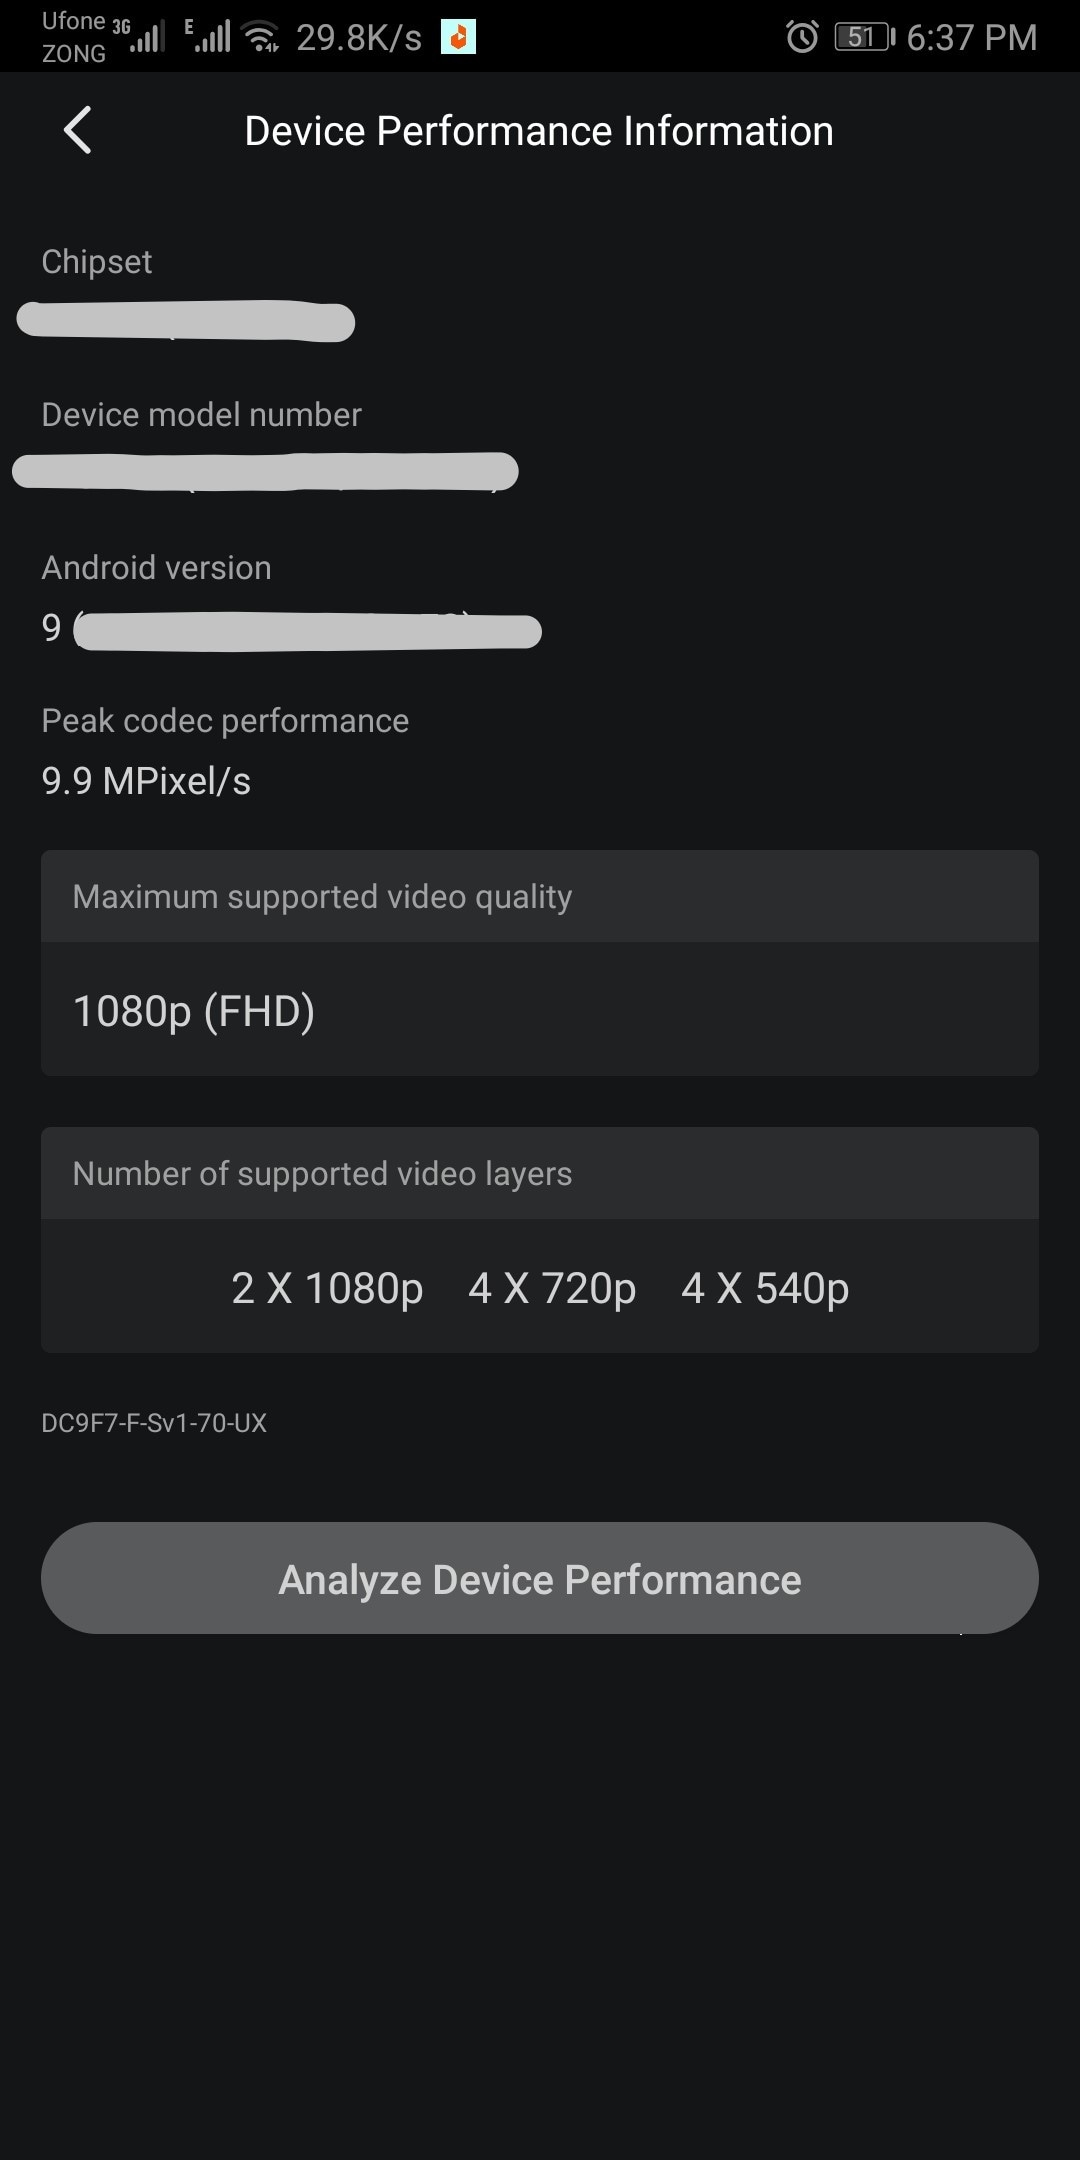
- It supports up to 4K resolution at 60fps. (depending on mobile configuration)
- Have amazing features like chroma key, keyframing, blend e.t.c
- Has built-in audio and video recorder.
- Supports multiple texts and video layers with different resolutions depending on the capability of the mobile phone.
- Has UI like a PC video editor and supports landscape orientation for editing.
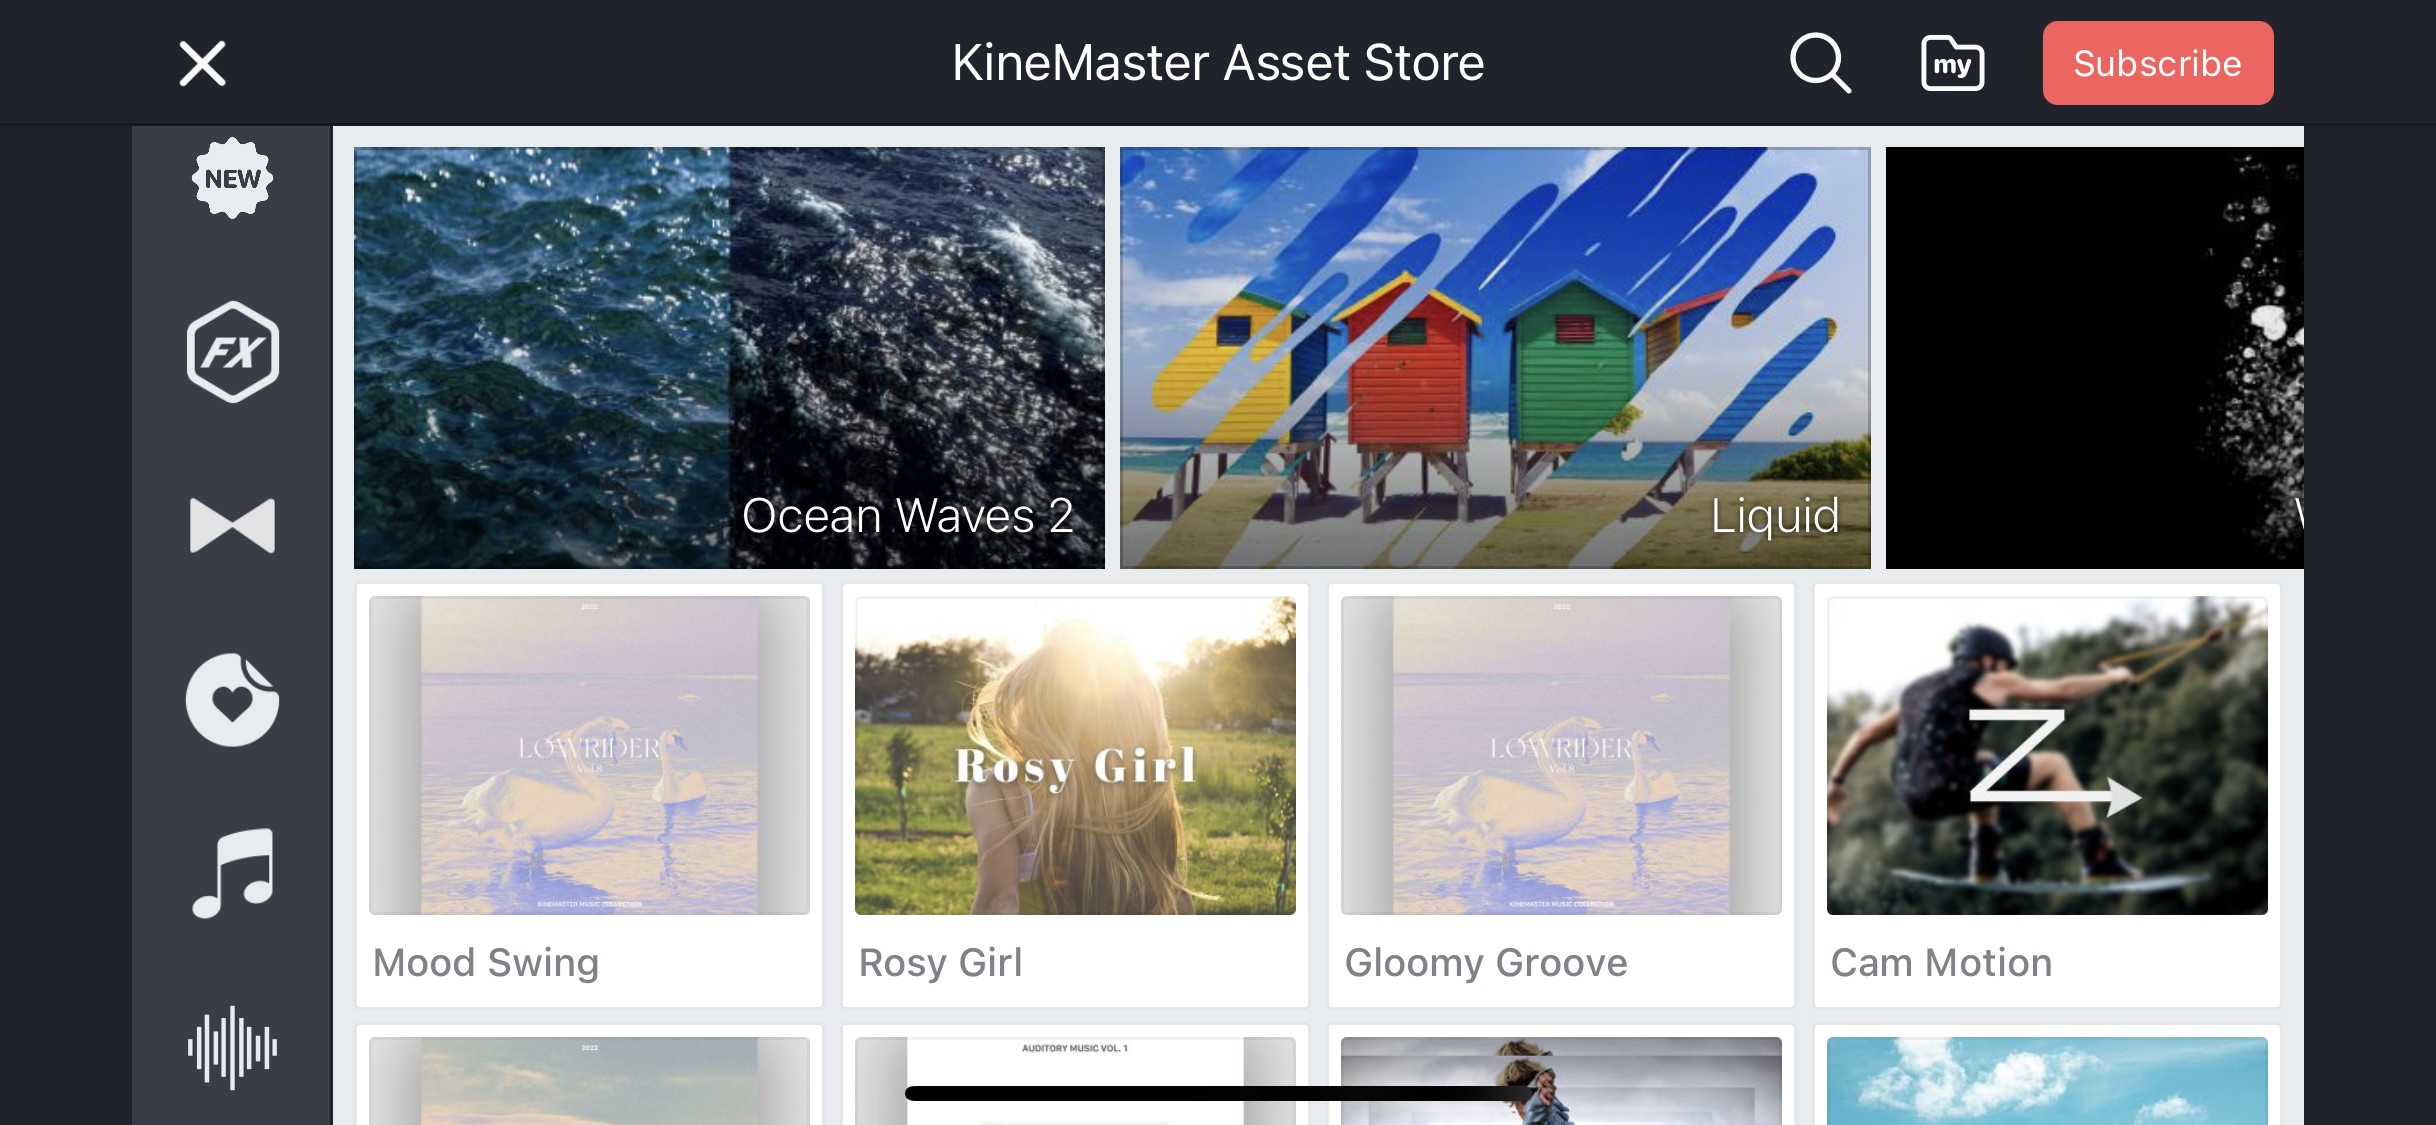
- Have an asset store with 100s of free effects, transitions, and stock material.
~Cons:
- Can’t export 4K videos on most devices.
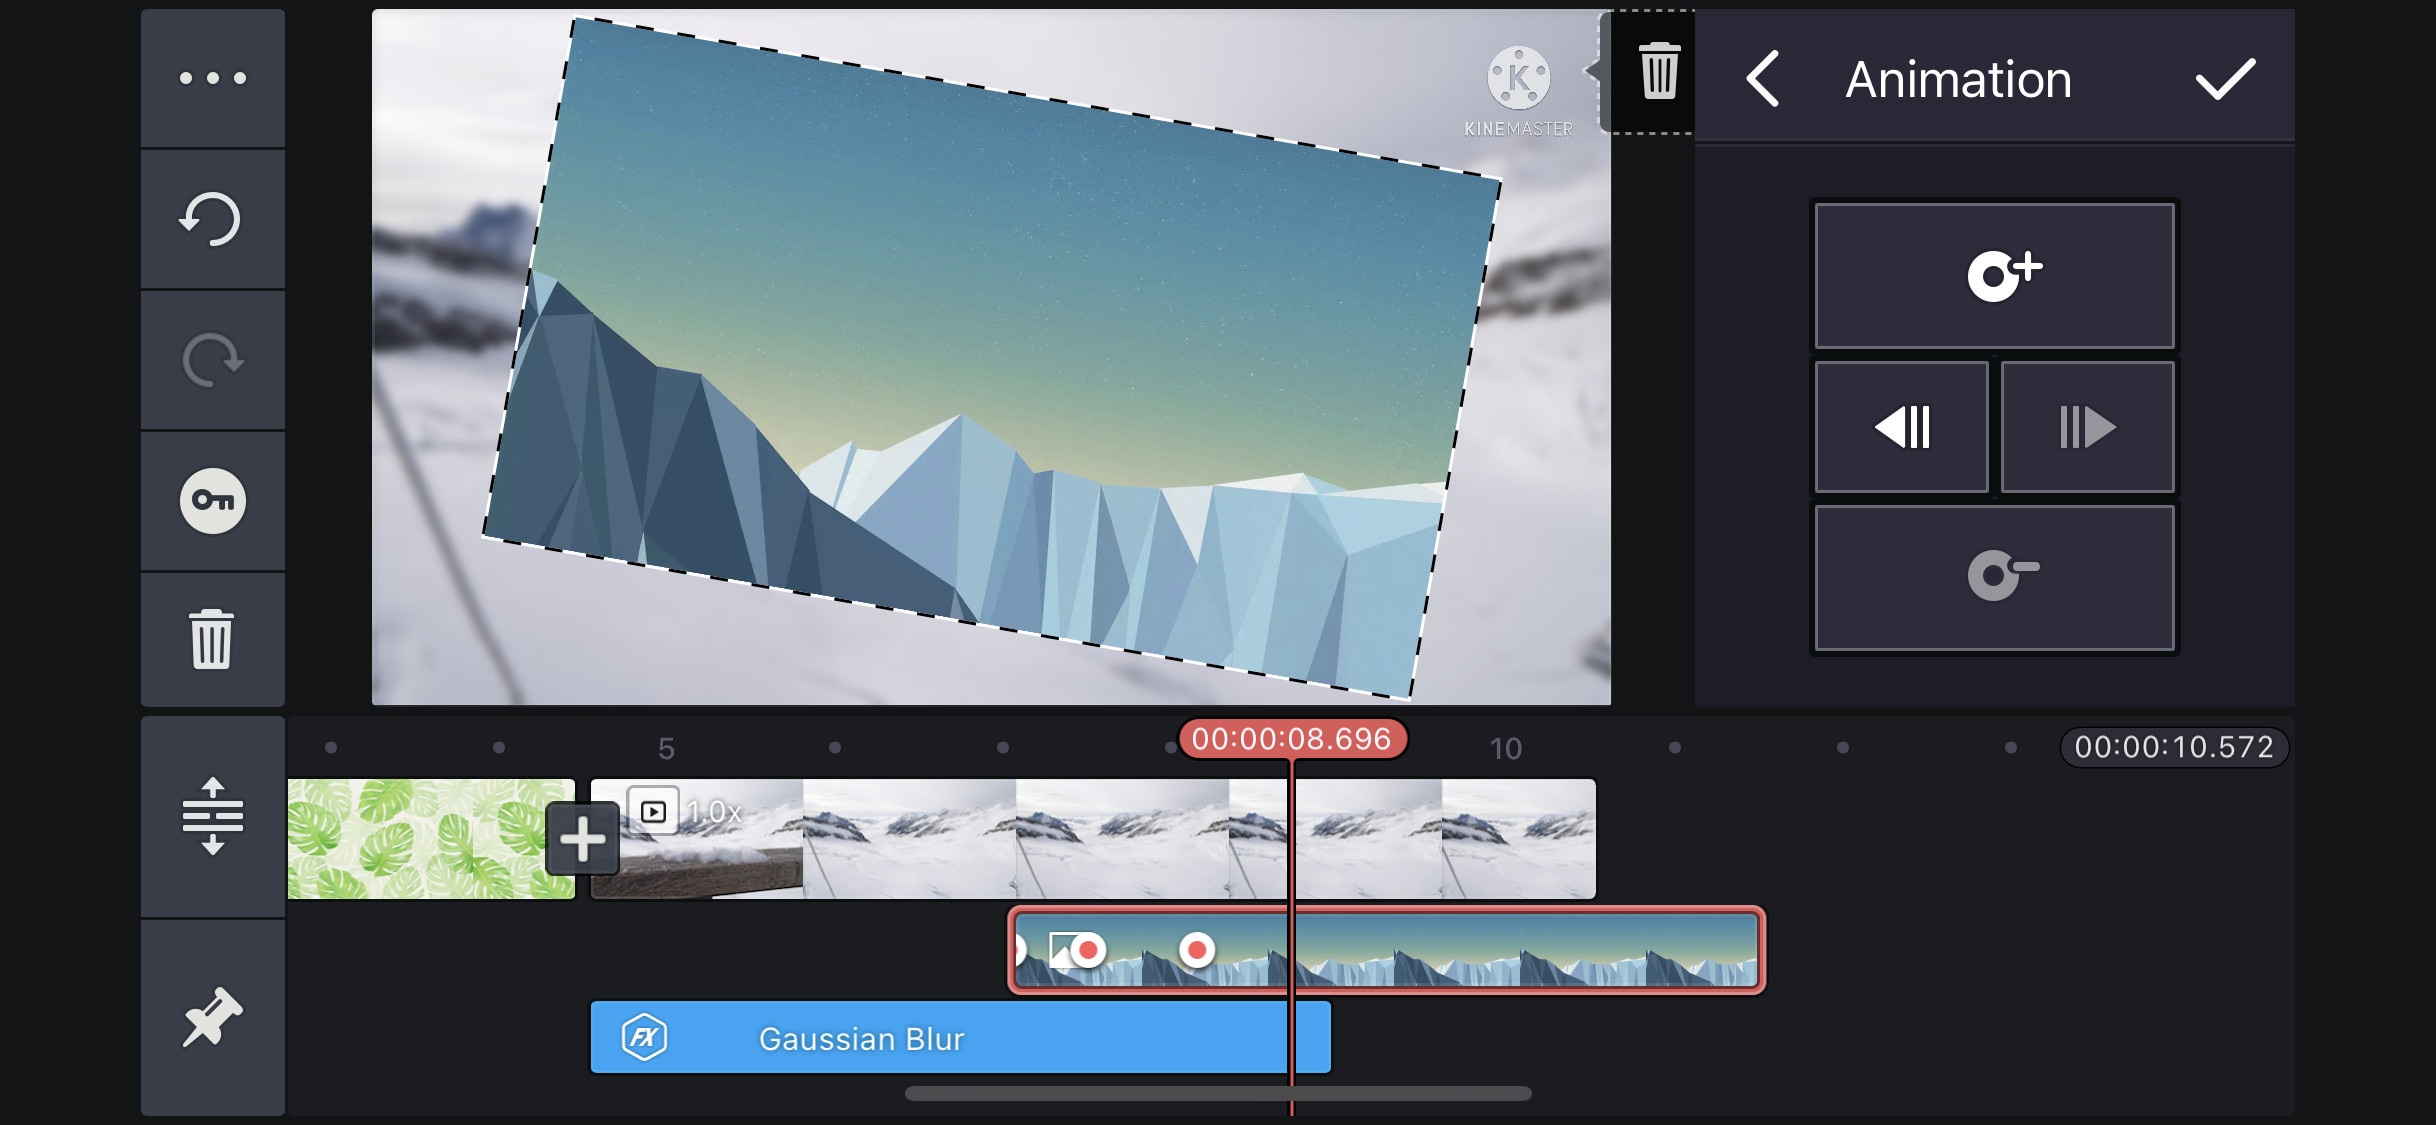
- Can’t apply keyframes and chroma key to the main video. (can be done on layers only)
~Price:
Its Premium version is available for $4.9/month or $39.9/year. It also includes all the premium assets.
~Steps:
Import: Open Kinemaster, then click “New Project” to start a new project. Select the desired aspect ratio then click “Create” to start editing. Or click the “import” button on top to import an existing file to continue editing.
Media Browser will be opened. Select the clips to add them to the timeline. Click the “X” button on the top-right corner to close the media browser.
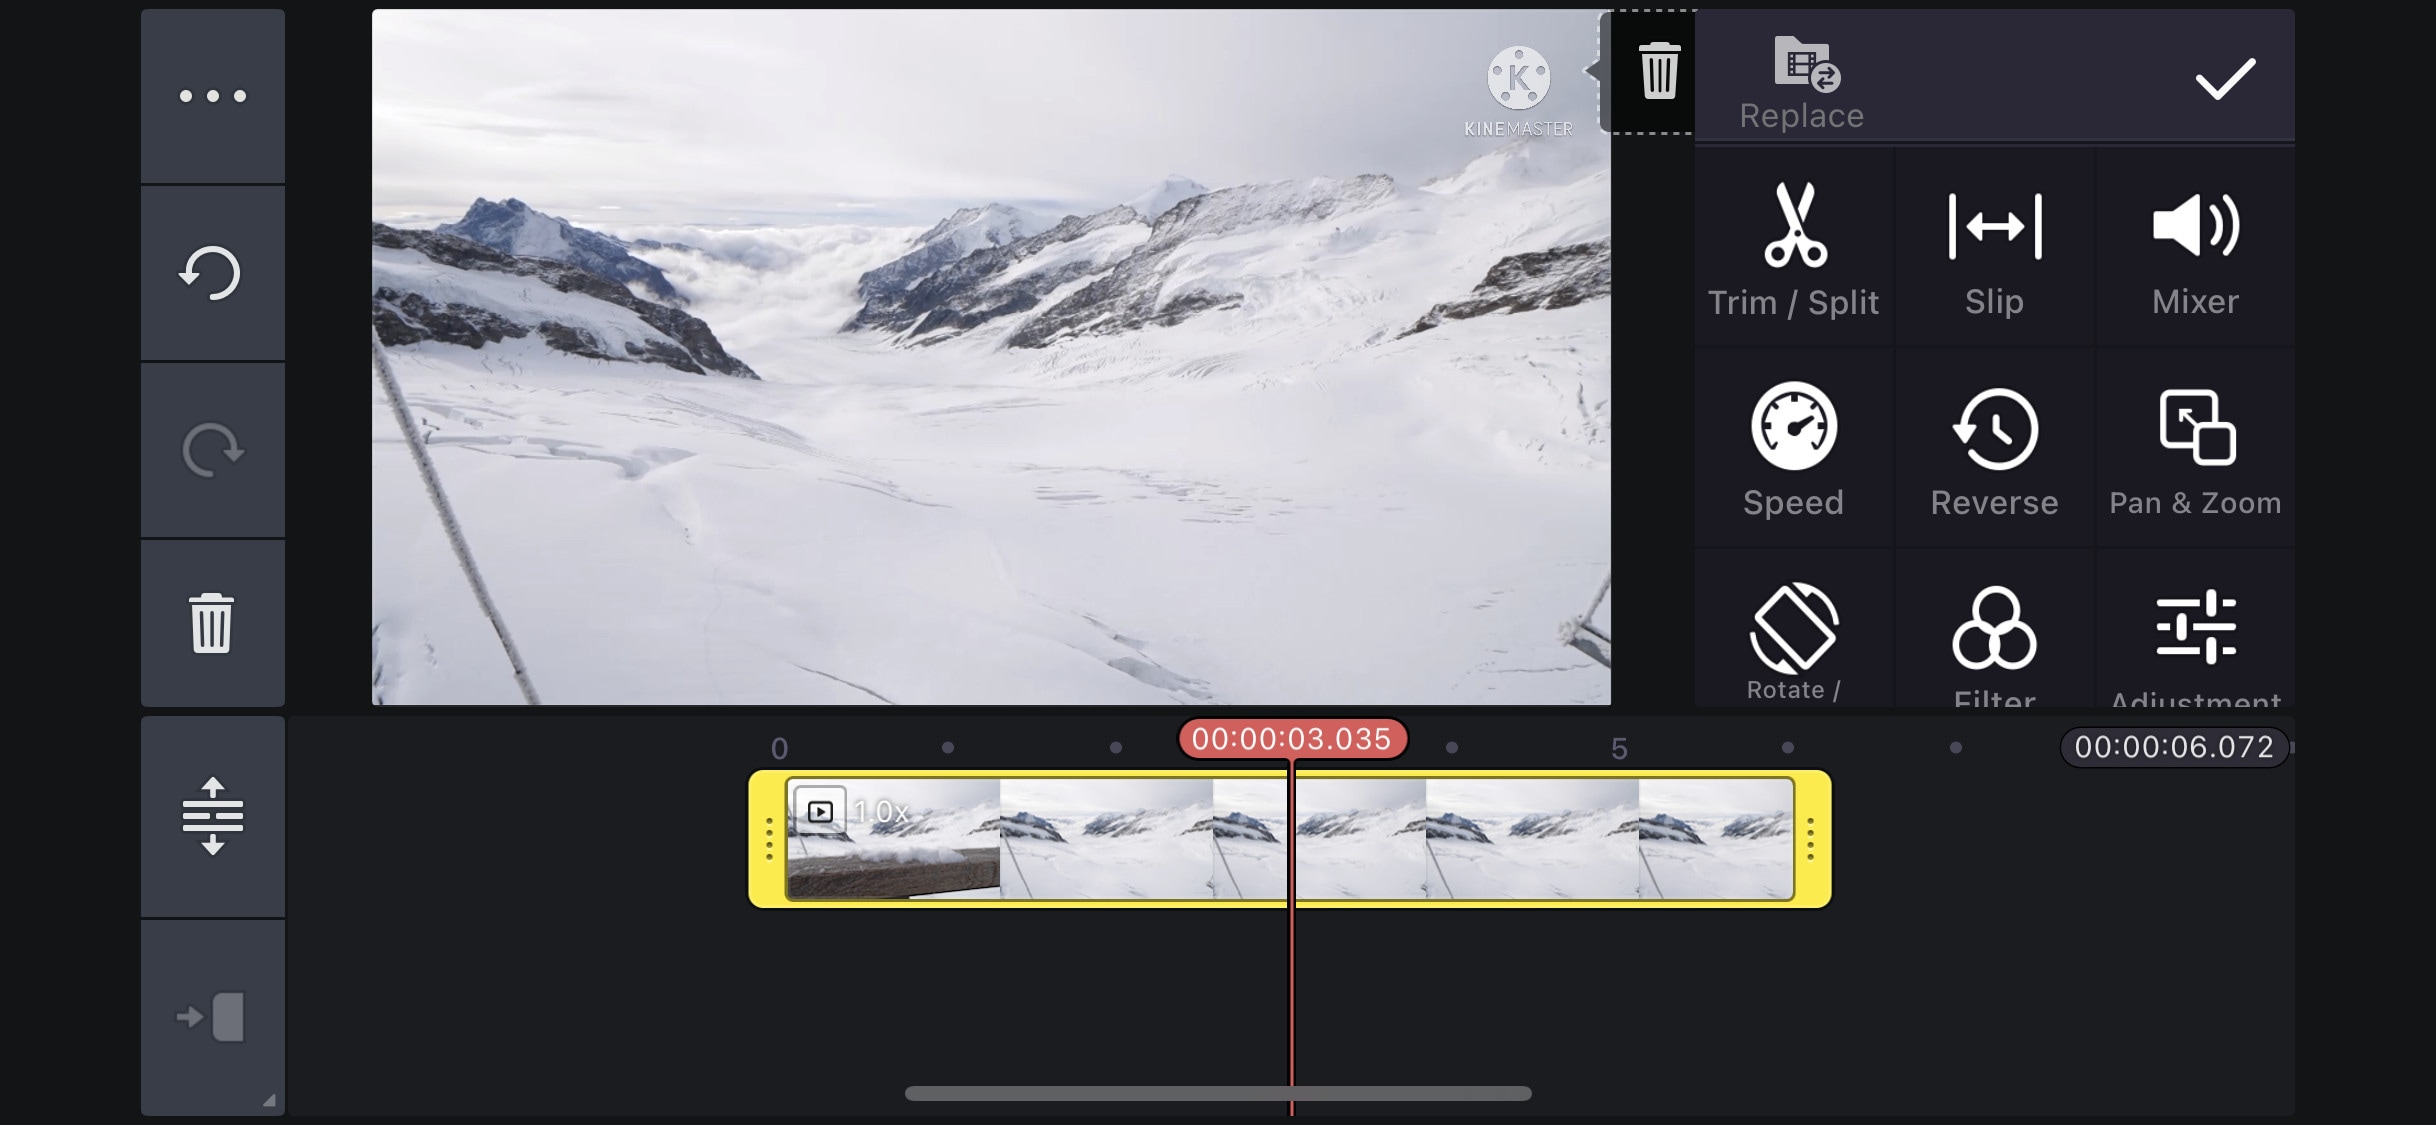
Edit: Drag the clip from the corner to trim it. Select a clip to open its editing menu. Here you can change its speed, add filters, do color correction, edit its audio, e.t.c.
On the right side, you will see a bunch of icons. Click the “Layer” button to add a media file, text, or effect as a layer. Click the “Audio” button to add an audio file. Or click the “Rec” button to do a voice-over.
Click the “+” symbol between two clips to add a transition between them, then adjust its time duration if you want.
Speed Ramping: Select the “Speed” option to change its speed. Here you can only do linear speed change. To create a speed ramp effect, split the clip into different parts and then change their speed according to your liking. Apply a crossfade transition of about 0.1 sec to smooth the jump cut between clips.
Effects: Select a clip then click “Clip Graphics” to apply the effect to your clip. Your clip will be highlighted with a yellow box, adjust it to set the time duration of the effect.
Click the “Shop” icon to visit the Asset store. Here you can find many cool Effects, clip graphics, transitions, and sound effects. Download them to use in your project.
Click the Layer clip to edit it. Here you can do chroma key, keyframing, or apply animation.
Export: Click the “Export” icon on the top-right corner of the app to open the export screen. Select the desired resolution and frame rate then click “Save as video” to export it.
Power Director:
It is available on IOS and Android both.
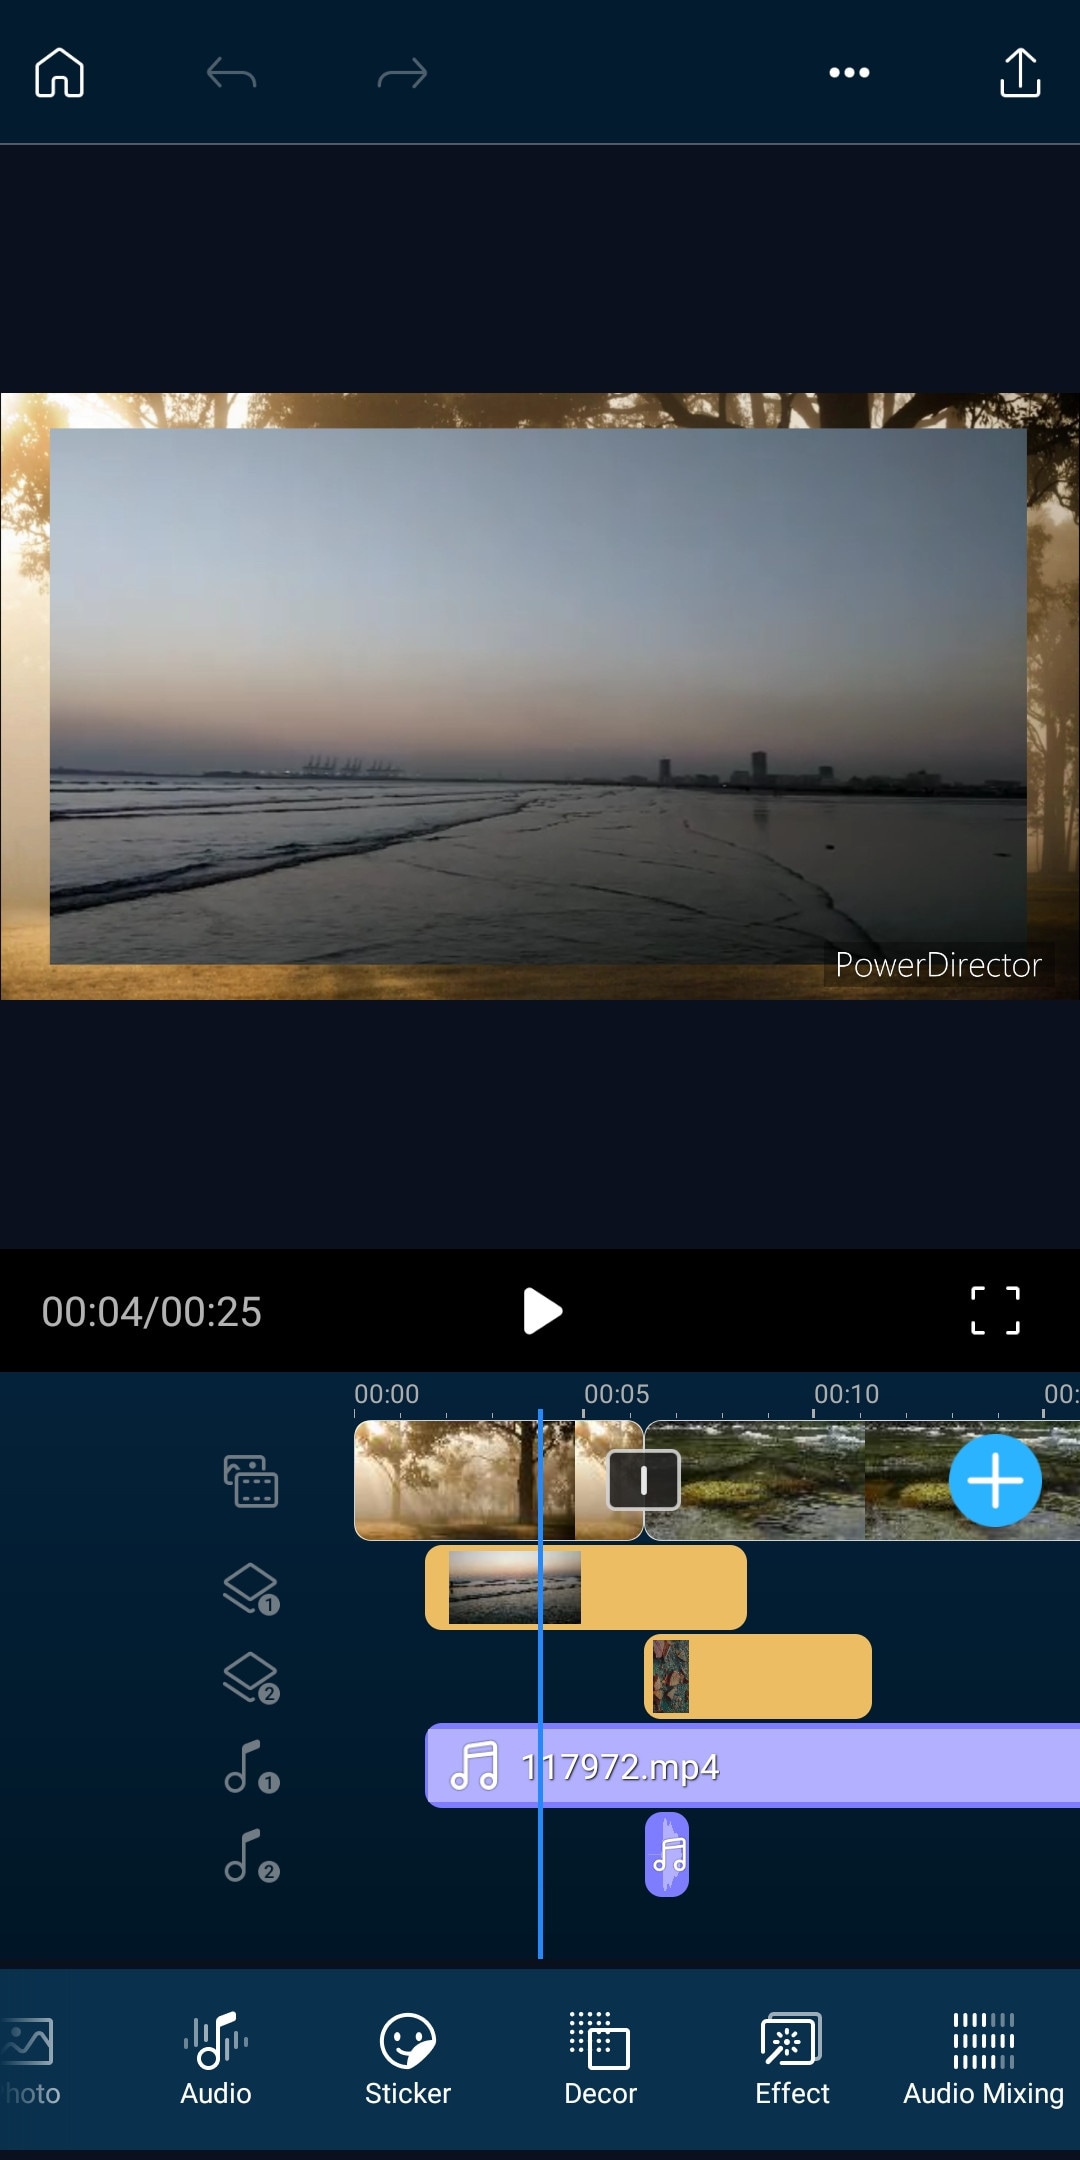
It is a paid but quite advanced video editor available for androids and IOS both. Like its PC version mobile version is also packed with many great features. It is compact and easy to use. It supports multiple video and audio layers. Have many cool filters and transitions. Can also do basic color corrections. To complete post-production work it also has audio editing tools and effects. It also has hundreds of title designs. Its UI is easy to use and supports both portrait and landscape orientation for editing. Most of its features can be used for free with a watermark on export. To remove the watermark you need to purchase the premium version.
~Features:
- It supports up to 4K resolution at 60fps. (compatible on most devices)
- Supports both Portrait and Landscape orientation for editing.
- Supports Key framing and video stabilization also.
- Supports multiple audio and video layers.
- Can edit videos in different aspect ratios.
- Have a vast stock library.
~Cons:
- Can’t export 4K videos on many devices.
- Can apply keyframing and chroma key to layers only.
- Software lags sometimes.
~Price:
Its Premium version is available for $4.9/month or $29.9/year.
~Steps:
Import: Open “Power Director”. Click “New Project” then select Aspect Ratio to start editing. Select clips from the media library Then click the “blue tick” button to add them to the timeline. Click the “+” icon to import more clips. From the bottom bar (in portrait mode), Select the video, image, audio, or effect icon to add them as a layer. In Landscape Mode bar it is situated on the left side of the screen.
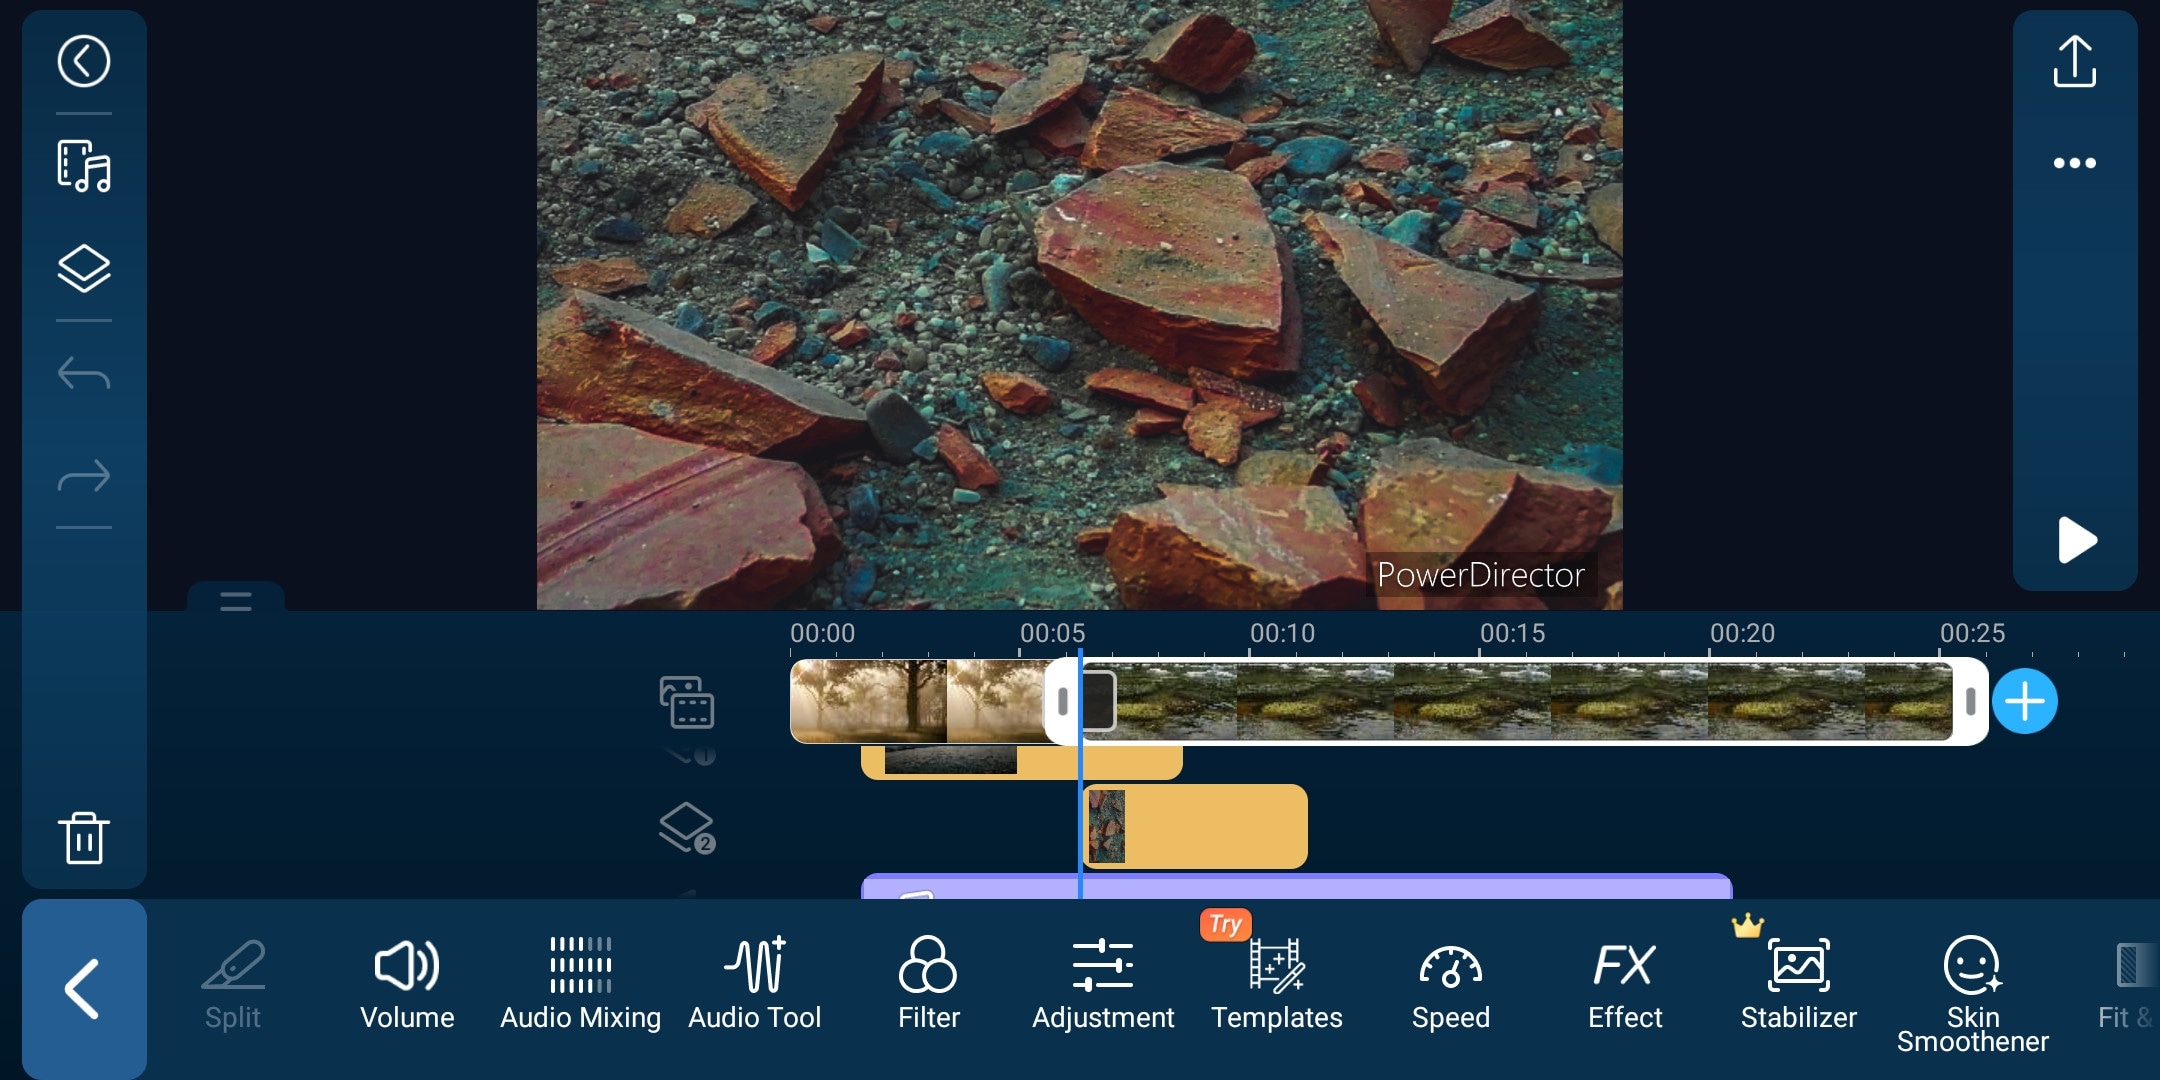
Edit: Select and drag the clip from the corner to trim it. Select a clip to open edit tools. From here you can do audio editing, color correction, cropping, stabilization, and speed change.
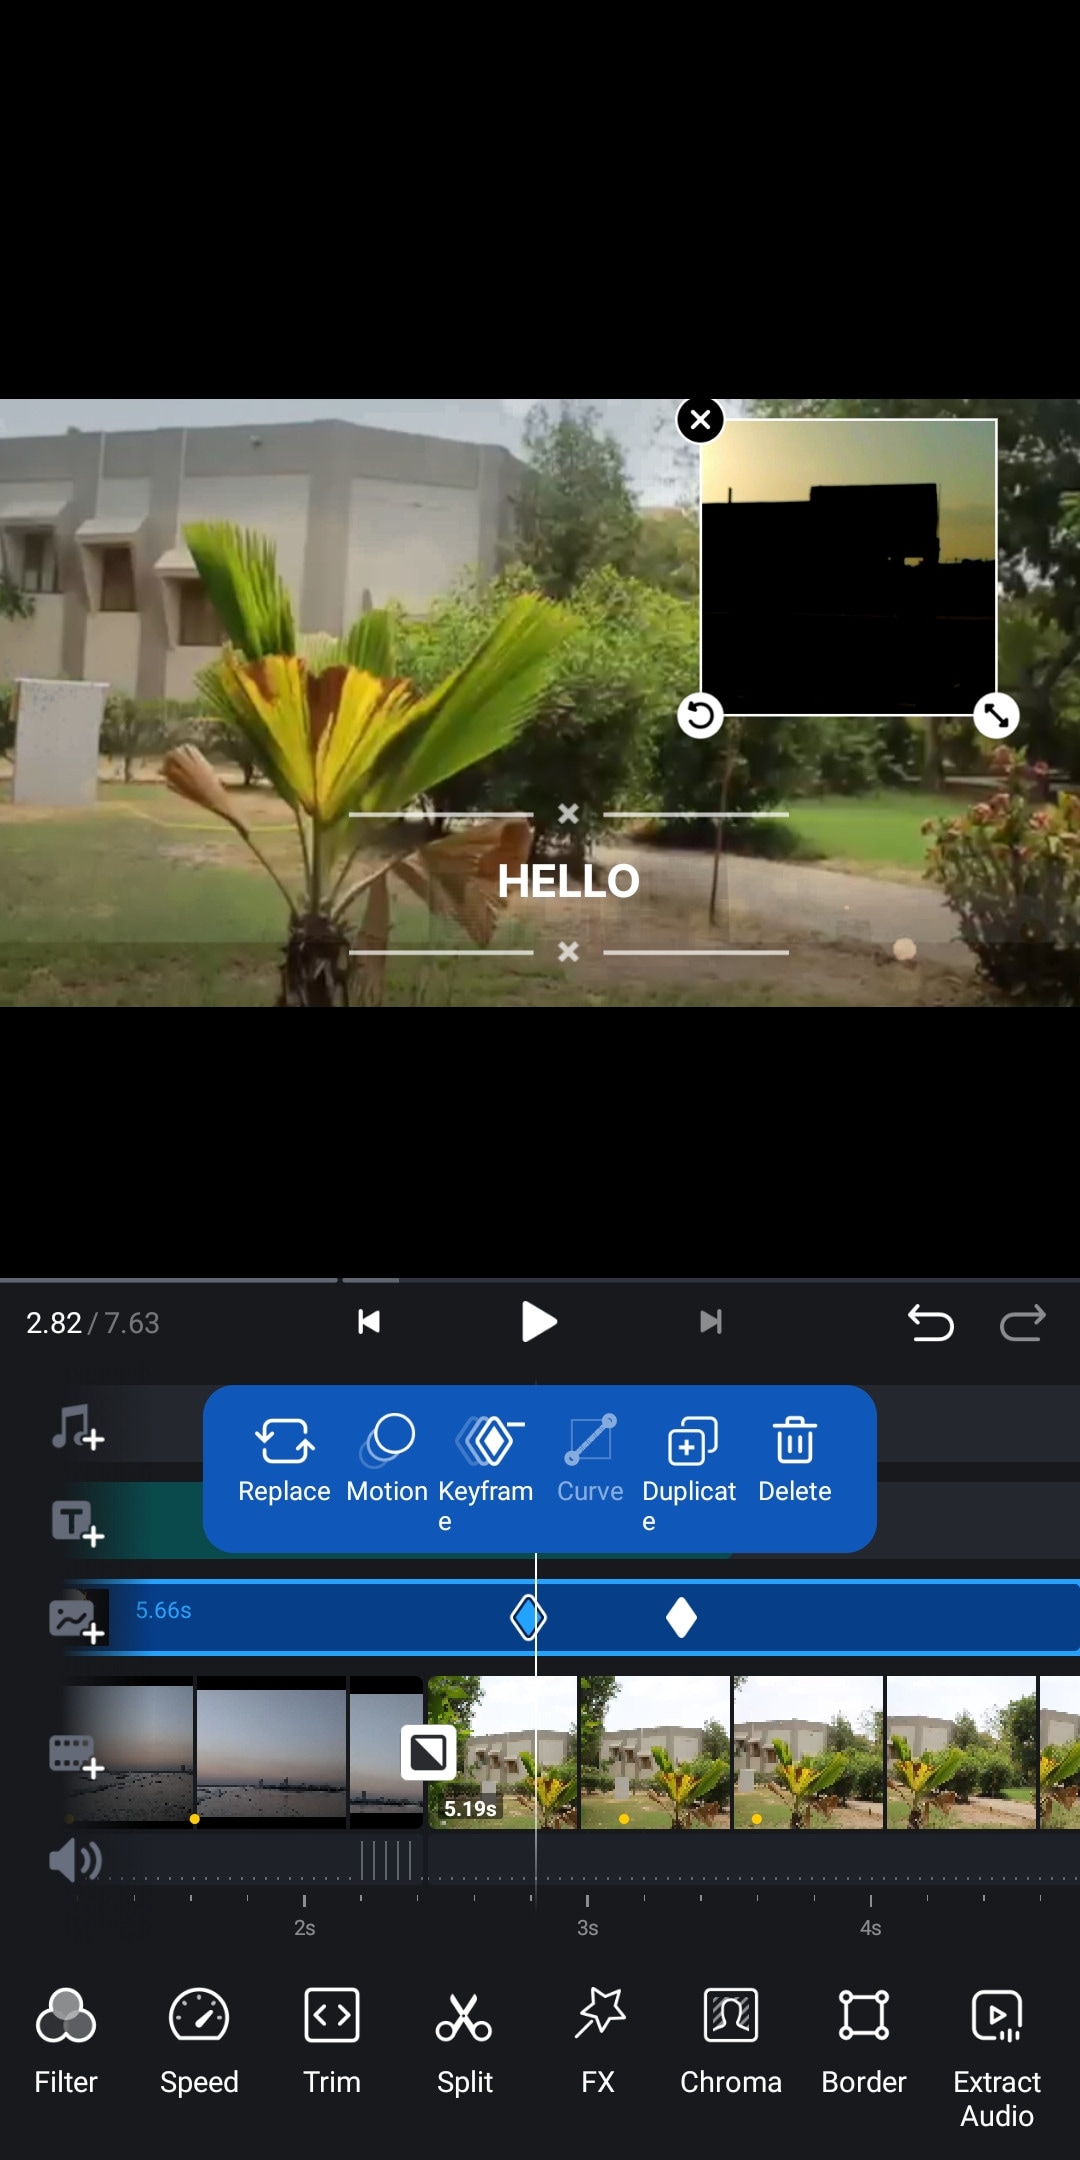
Here you get more features to edit a layer or an overlay such as chroma key, masking, transform keyframe, e.t.c. To do keyframing, select a layer, then click the “diamond” icon located on the right side above the timeline to add keyframes then rotate, zoom or change the position of the clip with time to add more keyframes. You can also do keyframing for other features like adjustment, mask, blend, and opacity.
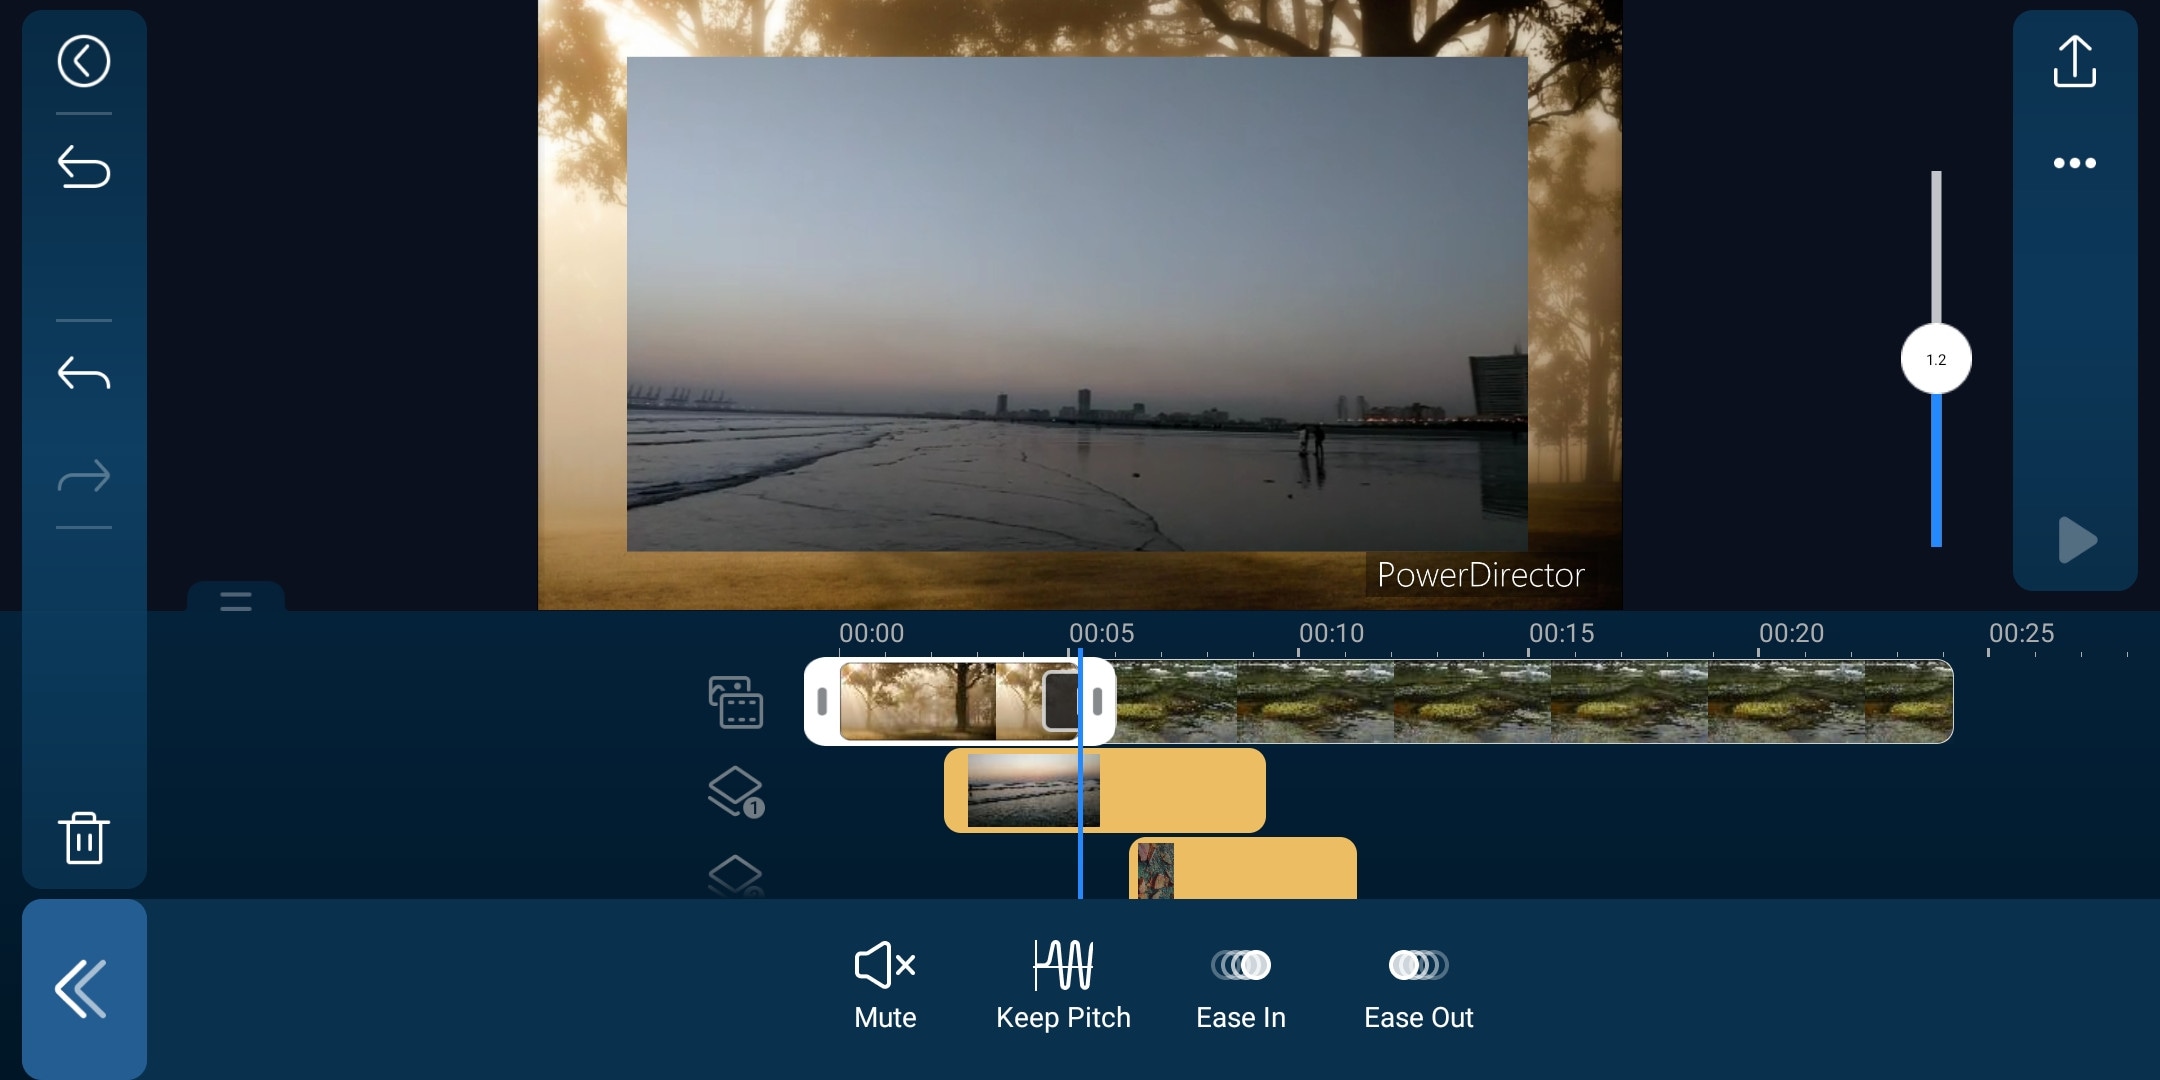
Speed Ramping: To Change speed, select a clip or a layer click the “speed” button then move the slider to change its speed. To do speed ramping split the clip into small parts and change their speed respectively. Click the “ease-in” and “ease-out” buttons to smooth the jump between the clips.
Effects: Click the grey box between the clips to add a transition and move the slider to change its duration if you want.
Select a clip, then choose a filter or an effect to apply to the selected clip.
Export: To Export the finished product, click the “export” icon on the top-right side of the screen then click “Produce and Share” to select the video resolution or click the “Settings” icon to change the storage path and frame rate. Then click “Produce”.
LumaFusion:
It is available on IOS and Mac (with an m1 processor).
As a content creator, have you ever wished for creating your own cinematic masterpiece, but the thing holding you back is that you don’t have a powerful workstation or expensive software then don’t worry. You can do professional-level editing on your iPhone with the software named “LumaFusion. It is one of the most powerful and advanced video editors available for your iPhone or iPad.
It is a multi-track video editor with many useful features like the Chroma key, keyframing, color grading, and color LUTs. Have powerful color grading tools and an audio editor. It also has a lock and load stabilizer. You have to purchase the software before using it. It doesn’t have any free version to try.
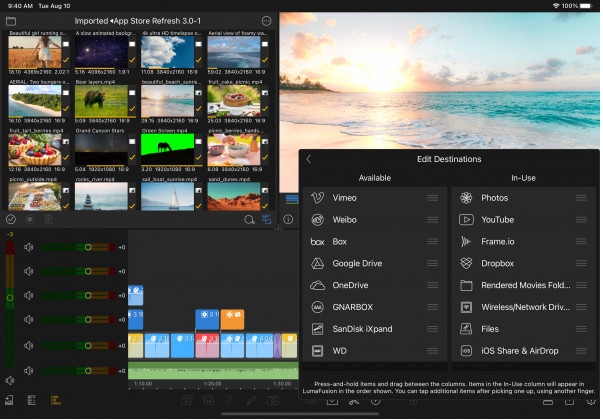
Credits: Pic by Luma touch website.
~Features:
- It supports up to 4K video resolution at a max of 240 fps.
- Can also edit and export 360 videos.
- Have powerful color correction tools. You can also import your own color LUTs.
- Supports Keyframing on almost all the editing tools within the software.
- You can add some third-party audio plugins.
- Supports up to 6 audio and video layers.
- Have “Storyblock” stock library. (Many of its contents are free to use)
- Supports external monitor for display.
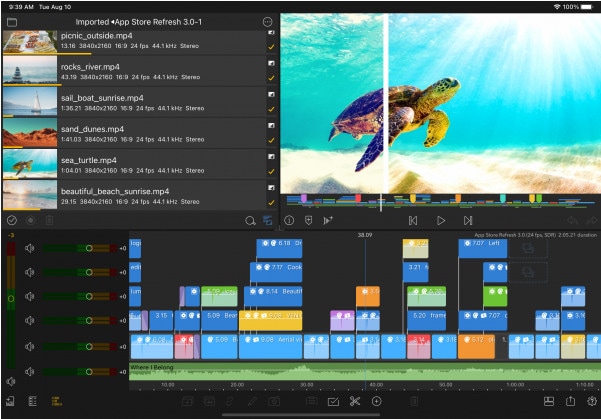
Credits: Pic by Luma touch website.
~Cons:
- Not available for Android devices.
- Being an advanced software, it doesn’t have masking and speed ramping features.
- Doesn’t have a free version to try on.
~Price:
It is available for purchase at $29.99.
~Steps:
Import: Click the “+” button on the bottom of the screen to start a new project. A small tab will appear, change the settings if you want, then click the “+” button on the top-right side of the tab to start your project.
Click the “flower icon” on the top-right side of the screen to open the source menu (Its icon changes depending on the present tab), Click “Photos” to open folders and files. Click and drag files to add them to the timeline. Click and drag the clips on the top of the primary clip to add them as a layer.
Edit: Click and drag the clips from the corner to trim them. On the bar at the bottom of the screen, you will find basic tools. Click the clip, to open editing tools on the same bar.
Click the “+” icon on the bottom bar or select “Titles” on the source menu to open the Titles menu. Drag and drop the titles to use them. Double-click the text to open the edit menu.
Double-click the clip to open the edit menu. Here you can transform the clip, change its speed, Stabilize your clips, do color grading, add an effect and perform audio editing.
Speed Ramping: In the edit mode, click the “speed and reverse” button and move the slider back or forth to change the speed of the whole video. To do speed ramping, split the video into parts and apply different speeds to create a speed ramp effect. This method is not perfect but it gets the job done.
Effects: Select the “Transitions” icon on the source menu to open the transition menu. Drag and drop a transition on a clip to use it.
Double click a clip to open the edit menu. Then in the “Color & Effects” tab select any effects and apply them to your clip.
To do keyframing, on the edit menu, click the “circle” icon on the bottom-right side below the display to start keyframing. then change the settings with time to add further keyframes.
Export: To Export your file, click the “Export” icon on the bottom-right corner of the screen to open the export menu then click the “movie” icon to select the file destination. Select the desired export settings then click the “Export” icon on the top of the menu to export your finished product.
Which One Should I Choose Free or Paid iPhone Video speeding Softwares?
It usually depends on your needs. If you just want a speed editor to make slow-mo or timelapse videos for your social media then you should go for free video editors, as they are easy to use and provide better speed ramping features than some paid video editors mentioned here.
But as a content creator if you want more features alongside speed ramping then you should go for paid softwares mentioned above. As mobile video editors are quite affordable and some of them have features like that of some PC softwares.
FAQs about Speed ramping feature and softwares:
- Q) What is Speed Ramping and where it is used?
Speed Ramping is different from just changing the speed of the whole clip. It means changing the speed of the video gradually, so the clip doesn’t feel jumpy.
It is done to give viewers a smooth experience between different parts of the clip. like the fast-forward clip is used to show the passage of time. and the slow-mo is used to emphasize something or produce tension, while a mix of both is used in ads and action scenes, e.t.c.
- Q) How to do Speed Ramping?
Speed Ramping methods vary from software to software. Either you can do it by adding keyframes and changing speed with time or you can add or adjust curves for speed change. If your software doesn’t support the speed ramping feature, you can split a clip into parts and apply speed change to them differently. For some of the best iPhone softwares, we have mentioned the speed ramping steps above.
- Q) What FPS is best for Slo-mo videos?
Shooting at 60 Fps is ideal as it gives a smooth and crisp video and you can make slow motion easily if required, you can slow it down up to 40% of its speed while maintaining the quality. It is supported in almost most devices nowadays. And if you want to create super slo-mo for your cinematics or product video then 120 or 240 fps is preferable. But higher fps often have disadvantages as it is harder to apply visual effects or masks. So choose the frame rate according to your requirements.
- Q) Does changing the speed of video affect its audio?
Yes, changing the speed of video affects the audio, It affects its pitch (tempo). Increasing its speed increases the pitch of the audio making it sound shrill while decreasing the speed of the video or making slow-mo decreases the pitch making it sound deep.
Although, some softwares provide the feature to maintain the pitch while changing the speed of the clip.
~Cons:
- Its UI doesn’t support editing in landscape orientation.
- It doesn’t support 4k video resolution.


~Steps:
Import: Open Filmora Go, Click “New project” to start a new project, or Choose the previous one from the “Draft” portion. Select videos or images to import to your timeline. Hold and drag the clip to change its arrangement.
Edit: You can add text, effects, stickers, layers, e.t.c. by clicking their icon, present on the bar at the bottom.
Click and Drag a clip from the corner to trim it.
Click the “PiP” icon to add image or video layers, you also can add multiple layers.
Select a clip to edit it. Different editing tools appear on the bottom bar. Here you can change its opacity, its speed, or add animations.
Click the diamond icon above the timeline to add keyframes. Zoom, move, or rotate the clip to add keyframes with the passage of time.
Speed Ramping: To Change the speed of a clip, select it then click the “Speed” icon on the bottom bar of the screen. Move the slider to change the speed of the whole clip. To do speed ramping, click the “curves” option to choose a preset or create your own. Click a preset to apply it, and click again to open its edit menu. drag the beats up and down to change speed or add or delete a beat if you want.
Effects: Click the “Effects” icon to open the effects menu. Select an effect to apply to your clip.
Click the white box between two clips to add transitions.
Export: Click the “Export” button to export your file. Select your desired resolution and frame rate to export your clip.


Some Free Video speeding Softwares for iPhone:
If you are short on budget or don’t want to spend much on video editing softwares then you can try these free softwares. They are free that doesn’t mean that they are useless, they are quite good for beginners or moderate users although some of them are designed for professionals also. If you don’t believe me, go and try it yourself. Apart from just changing the speed, they are good in other editing aspects also.
Adobe Premiere Rush:
It is available on IOS and Android both.
If you are looking for free but good speed ramping software then why go anywhere also when you have an amazing video editor made by a well-known software company “Adobe”. Like premiere pro, they have designed a compact version for phones named “Premiere Rush”.
It is a free video editor that has all the tools needed for video editing, from video effects to color grading and audio editing. Its UI is a bit similar to PC video editors. It is a free video editor with no watermarks. Although it takes some time to understand it. But once mastered, you can do editing quickly.
~Features:
- It is a free video editor with no watermark.
- It supports up to 4K resolution at 60fps.
- You can extract audio and can do voiceover directly from the software.
- It has hundreds of filters, overlays, and title designs.
- It has basic color grading tools.
- It also has a motion tracking feature. (in Paid version)
- It supports multiple audio, video, and text layers.


~Cons:
- It only runs on high-end devices. ( It is not supported in most mid-range phones)
- Not suitable for beginners. Its UI is quite hard to understand.
- Doesn’t have common features like the chroma key, masking, e.t.c.


~Price:
Its Premium version is available for 9.99/month. It includes some premium features. Or you can purchase the “All Apps Bundle” at $54.99/month for the annual plan.
~Steps:
Import: Open “Adobe Premiere Rush”, Click the “+” sign at the bottom to create a new project. in the media location, select the clips, then click the blue “create” button to start editing.
Click the blue “+” button at the bottom-left corner to add clips, audio, or graphics.
Hold and drag the clips upward to add them as a layer.
Edit: Scroll over a clip to select it. Clicking again shows a pop-up above the selected clip. Here you get 4 options: split, duplicate, separate audio, and delete.
A number of edit options appear on the bottom line of the screen:
Graphics: Click the “Graphics” button to add animated titles, transition graphics, and overlays as a layer. Select to customize its design.
Effects: Click the “Effects” button to add transitions or motion effect. Select a clip to apply transition at both ends. or select a corner of the clip to apply on it only. And change the duration of transition if you want.
Color: Here you can color grade your clips, Apply a preset or color grade manually by using sliders. You can also create your presets.
Transform: Here you can resize, rotate, crop, or change the position of the clip.
Audio: Here you can edit the audio, select a clip to edit its audio.
Speed Ramping: Click the “Speed” button to edit its speed. Select the range option to speed ramp a specific part of the clip. Select the ramp option to create a smooth speed curve. Or Set the clip duration to change its speed accordingly.
Export: To Export your clip, click the “Export” icon on top of the screen. Click “Quality Settings” to adjust export settings then click “Export” to save your file.
CapCut:
It is available on IOS and Android both.
If you are looking for a free but good speed ramping software to help you create slo-mo videos easily anywhere, anytime you want, then “CapCut” can be the right choice for you. It is a free mobile video editing software with many interesting features like keyframing, chroma-key, masking e.t.c. It also supports video and image layers. It has one of the best speed ramping features among other mobile video editors. It provides curves to smoothly speed ramp your clips. It can edit landscape, portrait, and even square video formats. It has many amazing effects and filters, it also has some stock clips.


~Features:
- It is completely free and has no watermarks.
- It supports up to 4K video resolution.
- Has curves for speed ramping.
- Has keyframes for animation.
- It has hundreds of effects, overlays, and titles.


~Cons:
- Its UI doesn’t support editing in landscape orientation.
- Lacks some common editing tools.
~Steps:
Import: Open Capcut, then click “New Project” to start a new project. Select files then click “Add” to import them. Click the white box with the “+” sign to add more clips. Hold and drag to rearrange the clips.
Click the “Add overlay” button to add photos or videos as layers.
Edit: On the bottom of the screen, you can find a bunch of tools for editing. From here you can add overlays, effects, filters, titles e.t.c to the timeline.
Select a clip to open the edit menu situated at the bottom of the screen. Here you can do the following tasks:
Split the clip; Change its speed, remove background, edit audio, do color correction, apply filters, stabilize the clip, e.t.c.
We have more edit features for the layers only which include: Spice (Blending), Animation, Masking, Chroma key, freeze frame, change opacity e.t.c.
Click the “Keyframe” icon (Diamond shaped) below the playback screen to apply keyframes to the layer. Pinch and zoom or rotate to transform the clip. Use the “Graphs” button in the edit menu to customize the keyframe animation.
Speed Ramping: To Change the speed of a clip, select it then click the “Speed” icon on the bottom bar of the screen. Move the slider to change the speed of the whole clip. To do speed ramping, click the “curves” option to choose a preset or create your own. Click a preset to apply it, and click again to open its edit menu. drag the beats up and down to change speed or add or delete a beat if you want.
Effects: Click the “+” sign between the two clips to add a transition between them, and drag the slider to change its duration.
Select the effects, filters, or titles icon to add them as a layer.
Export: Click the “Export” button on the top-right side of the screen to export your clip. Or click the button, left to the “Export” button to change its resolution and frame rate.
iMovie:
It is available on IOS and Mac.
If you are an Apple fan and own everything Apple then what’s better than getting your hands on a video editor designed by Apple. It is simple and easy to use. It has all the basic editing tools to enhance your video like crop, trim, transitions, effects, e.t.c. It also has a speed ramping feature which let you change the speed at different points of a clip. It’s AI mode “Magic Movie” lets you select clips and a style and software will make the final product for you.
Its “Storyboards” mode is a creative way of learning production and post-production skills. It lets you choose a theme from many famous Genres available, then it will guide you through the production process like capturing footage, arranging your shots, and creating cinematic titles to enhance your story.


~Features:
- It is free and easy to use.
- Let you do speed ramping by changing the speed of different parts of the clip .
- Supports Raw files.
- It’s AI mode creates videos for you on its own.
- The “Storyboarding” feature helps you through the production process.


~Cons:
- It only works on IOS and Mac.
- Not suitable for professional projects.
~Steps:
Import: Open “iMovie” then click “Start New Project” and select one of the 3 following modes to start editing:
- Magic Movie: Select the clips for editing, then click “Create Magic Movie” to let iMovie create a movie for you, which you can customize according to your liking.
- Storyboard: Click “Storyboard” then select Template and a genre or a style then click “Create” to start the project. iMovie will guide you and let you add the clip or title according to the pattern.
- Movie: In “Movie” mode, select the clips from the media browser then click “Create Movie” to start editing.
Edit: Select a clip to edit it. A bunch of tools will appear at the bottom of the screen.
Click the “scissors” icon to split, duplicate, delete the clip, or to detach the audio.
Click the “volume” icon to change the volume of the clip.
Click the “Title” icon to add a title design. Click the text (on the playback window) to edit it.
Click the “Filters” icon to apply it to the selected clip and move the slider to change its intensity.
Speed Ramping: Click the “Speed” icon to change its speed. Move the yellow slider to change the speed of the whole clip. Or click the “Add” button to add partitions (in yellow color) to the selected clip. Select a partition to change its speed only. And click the “Freeze” button to add a freeze-frame.
Effects: Select the black box between two clips to add a transition. Select a transition to apply it and change its time duration if you want.
Export: Click the “Done” button on the top-left corner of the screen to save the clip, then click the “Export” icon on the bottom of the screen to save your file.
Some Paid Video speeding Softwares for iPhone:
If you do most of your video editing from your phone and want to invest some money in it then you should check the softwares mentioned below. They are quite affordable and are worthy of investment. As they are packed with many cool features. But if you aren’t sure which software to use then don’t worry as most of these softwares have a free version to try on but they have some limited features and they provide a watermark on export. But it is a great option to get your hands on new software and once you are comfortable with it, you can purchase its premium version.
Kinemaster:
It is available on IOS and Android both.
If you want to do more than just trimming and cropping to your videos then you should try Kinemaster. For editors, who want to do some advanced-level video editing on their phone, then you must have Kinemaster on your phone. It is a paid software, which is packed with many useful features. It has many video and audio effects. It also has an amazing audio editor. It also has many title designs and basic color correction tools. It has hundreds of effects and transitions + more can be downloaded from its asset store. Its UI is suitable for beginners and content creators both. It is a paid software, but all its features are completely free to use, but the free version leaves a watermark on export.

~Features:
- It supports up to 4K resolution at 60fps. (depending on mobile configuration)
- Have amazing features like chroma key, keyframing, blend e.t.c
- Has built-in audio and video recorder.
- Supports multiple texts and video layers with different resolutions depending on the capability of the mobile phone.
- Has UI like a PC video editor and supports landscape orientation for editing.
- Have an asset store with 100s of free effects, transitions, and stock material.


~Cons:
- Can’t export 4K videos on most devices.
- Can’t apply keyframes and chroma key to the main video. (can be done on layers only)
~Price:
Its Premium version is available for $4.9/month or $39.9/year. It also includes all the premium assets.

~Steps:
Import: Open Kinemaster, then click “New Project” to start a new project. Select the desired aspect ratio then click “Create” to start editing. Or click the “import” button on top to import an existing file to continue editing.
Media Browser will be opened. Select the clips to add them to the timeline. Click the “X” button on the top-right corner to close the media browser.
Edit: Drag the clip from the corner to trim it. Select a clip to open its editing menu. Here you can change its speed, add filters, do color correction, edit its audio, e.t.c.
On the right side, you will see a bunch of icons. Click the “Layer” button to add a media file, text, or effect as a layer. Click the “Audio” button to add an audio file. Or click the “Rec” button to do a voice-over.
Click the “+” symbol between two clips to add a transition between them, then adjust its time duration if you want.
Speed Ramping: Select the “Speed” option to change its speed. Here you can only do linear speed change. To create a speed ramp effect, split the clip into different parts and then change their speed according to your liking. Apply a crossfade transition of about 0.1 sec to smooth the jump cut between clips.
Effects: Select a clip then click “Clip Graphics” to apply the effect to your clip. Your clip will be highlighted with a yellow box, adjust it to set the time duration of the effect.
Click the “Shop” icon to visit the Asset store. Here you can find many cool Effects, clip graphics, transitions, and sound effects. Download them to use in your project.
Click the Layer clip to edit it. Here you can do chroma key, keyframing, or apply animation.
Export: Click the “Export” icon on the top-right corner of the app to open the export screen. Select the desired resolution and frame rate then click “Save as video” to export it.
Power Director:
It is available on IOS and Android both.
It is a paid but quite advanced video editor available for androids and IOS both. Like its PC version mobile version is also packed with many great features. It is compact and easy to use. It supports multiple video and audio layers. Have many cool filters and transitions. Can also do basic color corrections. To complete post-production work it also has audio editing tools and effects. It also has hundreds of title designs. Its UI is easy to use and supports both portrait and landscape orientation for editing. Most of its features can be used for free with a watermark on export. To remove the watermark you need to purchase the premium version.


~Features:
- It supports up to 4K resolution at 60fps. (compatible on most devices)
- Supports both Portrait and Landscape orientation for editing.
- Supports Key framing and video stabilization also.
- Supports multiple audio and video layers.
- Can edit videos in different aspect ratios.
- Have a vast stock library.


~Cons:
- Can’t export 4K videos on many devices.
- Can apply keyframing and chroma key to layers only.
- Software lags sometimes.
~Price:
Its Premium version is available for $4.9/month or $29.9/year.
~Steps:
Import: Open “Power Director”. Click “New Project” then select Aspect Ratio to start editing. Select clips from the media library Then click the “blue tick” button to add them to the timeline. Click the “+” icon to import more clips. From the bottom bar (in portrait mode), Select the video, image, audio, or effect icon to add them as a layer. In Landscape Mode bar it is situated on the left side of the screen.
Edit: Select and drag the clip from the corner to trim it. Select a clip to open edit tools. From here you can do audio editing, color correction, cropping, stabilization, and speed change.
Here you get more features to edit a layer or an overlay such as chroma key, masking, transform keyframe, e.t.c. To do keyframing, select a layer, then click the “diamond” icon located on the right side above the timeline to add keyframes then rotate, zoom or change the position of the clip with time to add more keyframes. You can also do keyframing for other features like adjustment, mask, blend, and opacity.
Speed Ramping: To Change speed, select a clip or a layer click the “speed” button then move the slider to change its speed. To do speed ramping split the clip into small parts and change their speed respectively. Click the “ease-in” and “ease-out” buttons to smooth the jump between the clips.
Effects: Click the grey box between the clips to add a transition and move the slider to change its duration if you want.
Select a clip, then choose a filter or an effect to apply to the selected clip.
Export: To Export the finished product, click the “export” icon on the top-right side of the screen then click “Produce and Share” to select the video resolution or click the “Settings” icon to change the storage path and frame rate. Then click “Produce”.
LumaFusion:
It is available on IOS and Mac (with an m1 processor).
As a content creator, have you ever wished for creating your own cinematic masterpiece, but the thing holding you back is that you don’t have a powerful workstation or expensive software then don’t worry. You can do professional-level editing on your iPhone with the software named “LumaFusion. It is one of the most powerful and advanced video editors available for your iPhone or iPad.
It is a multi-track video editor with many useful features like the Chroma key, keyframing, color grading, and color LUTs. Have powerful color grading tools and an audio editor. It also has a lock and load stabilizer. You have to purchase the software before using it. It doesn’t have any free version to try.

Credits: Pic by Luma touch website.
~Features:
- It supports up to 4K video resolution at a max of 240 fps.
- Can also edit and export 360 videos.
- Have powerful color correction tools. You can also import your own color LUTs.
- Supports Keyframing on almost all the editing tools within the software.
- You can add some third-party audio plugins.
- Supports up to 6 audio and video layers.
- Have “Storyblock” stock library. (Many of its contents are free to use)
- Supports external monitor for display.

Credits: Pic by Luma touch website.
~Cons:
- Not available for Android devices.
- Being an advanced software, it doesn’t have masking and speed ramping features.
- Doesn’t have a free version to try on.
~Price:
It is available for purchase at $29.99.
~Steps:
Import: Click the “+” button on the bottom of the screen to start a new project. A small tab will appear, change the settings if you want, then click the “+” button on the top-right side of the tab to start your project.
Click the “flower icon” on the top-right side of the screen to open the source menu (Its icon changes depending on the present tab), Click “Photos” to open folders and files. Click and drag files to add them to the timeline. Click and drag the clips on the top of the primary clip to add them as a layer.
Edit: Click and drag the clips from the corner to trim them. On the bar at the bottom of the screen, you will find basic tools. Click the clip, to open editing tools on the same bar.
Click the “+” icon on the bottom bar or select “Titles” on the source menu to open the Titles menu. Drag and drop the titles to use them. Double-click the text to open the edit menu.
Double-click the clip to open the edit menu. Here you can transform the clip, change its speed, Stabilize your clips, do color grading, add an effect and perform audio editing.
Speed Ramping: In the edit mode, click the “speed and reverse” button and move the slider back or forth to change the speed of the whole video. To do speed ramping, split the video into parts and apply different speeds to create a speed ramp effect. This method is not perfect but it gets the job done.
Effects: Select the “Transitions” icon on the source menu to open the transition menu. Drag and drop a transition on a clip to use it.
Double click a clip to open the edit menu. Then in the “Color & Effects” tab select any effects and apply them to your clip.
To do keyframing, on the edit menu, click the “circle” icon on the bottom-right side below the display to start keyframing. then change the settings with time to add further keyframes.
Export: To Export your file, click the “Export” icon on the bottom-right corner of the screen to open the export menu then click the “movie” icon to select the file destination. Select the desired export settings then click the “Export” icon on the top of the menu to export your finished product.
Which One Should I Choose Free or Paid iPhone Video speeding Softwares?
It usually depends on your needs. If you just want a speed editor to make slow-mo or timelapse videos for your social media then you should go for free video editors, as they are easy to use and provide better speed ramping features than some paid video editors mentioned here.
But as a content creator if you want more features alongside speed ramping then you should go for paid softwares mentioned above. As mobile video editors are quite affordable and some of them have features like that of some PC softwares.
FAQs about Speed ramping feature and softwares:
- Q) What is Speed Ramping and where it is used?
Speed Ramping is different from just changing the speed of the whole clip. It means changing the speed of the video gradually, so the clip doesn’t feel jumpy.
It is done to give viewers a smooth experience between different parts of the clip. like the fast-forward clip is used to show the passage of time. and the slow-mo is used to emphasize something or produce tension, while a mix of both is used in ads and action scenes, e.t.c.
- Q) How to do Speed Ramping?
Speed Ramping methods vary from software to software. Either you can do it by adding keyframes and changing speed with time or you can add or adjust curves for speed change. If your software doesn’t support the speed ramping feature, you can split a clip into parts and apply speed change to them differently. For some of the best iPhone softwares, we have mentioned the speed ramping steps above.
- Q) What FPS is best for Slo-mo videos?
Shooting at 60 Fps is ideal as it gives a smooth and crisp video and you can make slow motion easily if required, you can slow it down up to 40% of its speed while maintaining the quality. It is supported in almost most devices nowadays. And if you want to create super slo-mo for your cinematics or product video then 120 or 240 fps is preferable. But higher fps often have disadvantages as it is harder to apply visual effects or masks. So choose the frame rate according to your requirements.
- Q) Does changing the speed of video affect its audio?
Yes, changing the speed of video affects the audio, It affects its pitch (tempo). Increasing its speed increases the pitch of the audio making it sound shrill while decreasing the speed of the video or making slow-mo decreases the pitch making it sound deep.
Although, some softwares provide the feature to maintain the pitch while changing the speed of the clip.
~Cons:
- Its UI doesn’t support editing in landscape orientation.
- It doesn’t support 4k video resolution.


~Steps:
Import: Open Filmora Go, Click “New project” to start a new project, or Choose the previous one from the “Draft” portion. Select videos or images to import to your timeline. Hold and drag the clip to change its arrangement.
Edit: You can add text, effects, stickers, layers, e.t.c. by clicking their icon, present on the bar at the bottom.
Click and Drag a clip from the corner to trim it.
Click the “PiP” icon to add image or video layers, you also can add multiple layers.
Select a clip to edit it. Different editing tools appear on the bottom bar. Here you can change its opacity, its speed, or add animations.
Click the diamond icon above the timeline to add keyframes. Zoom, move, or rotate the clip to add keyframes with the passage of time.
Speed Ramping: To Change the speed of a clip, select it then click the “Speed” icon on the bottom bar of the screen. Move the slider to change the speed of the whole clip. To do speed ramping, click the “curves” option to choose a preset or create your own. Click a preset to apply it, and click again to open its edit menu. drag the beats up and down to change speed or add or delete a beat if you want.
Effects: Click the “Effects” icon to open the effects menu. Select an effect to apply to your clip.
Click the white box between two clips to add transitions.
Export: Click the “Export” button to export your file. Select your desired resolution and frame rate to export your clip.


Some Free Video speeding Softwares for iPhone:
If you are short on budget or don’t want to spend much on video editing softwares then you can try these free softwares. They are free that doesn’t mean that they are useless, they are quite good for beginners or moderate users although some of them are designed for professionals also. If you don’t believe me, go and try it yourself. Apart from just changing the speed, they are good in other editing aspects also.
Adobe Premiere Rush:
It is available on IOS and Android both.
If you are looking for free but good speed ramping software then why go anywhere also when you have an amazing video editor made by a well-known software company “Adobe”. Like premiere pro, they have designed a compact version for phones named “Premiere Rush”.
It is a free video editor that has all the tools needed for video editing, from video effects to color grading and audio editing. Its UI is a bit similar to PC video editors. It is a free video editor with no watermarks. Although it takes some time to understand it. But once mastered, you can do editing quickly.
~Features:
- It is a free video editor with no watermark.
- It supports up to 4K resolution at 60fps.
- You can extract audio and can do voiceover directly from the software.
- It has hundreds of filters, overlays, and title designs.
- It has basic color grading tools.
- It also has a motion tracking feature. (in Paid version)
- It supports multiple audio, video, and text layers.


~Cons:
- It only runs on high-end devices. ( It is not supported in most mid-range phones)
- Not suitable for beginners. Its UI is quite hard to understand.
- Doesn’t have common features like the chroma key, masking, e.t.c.


~Price:
Its Premium version is available for 9.99/month. It includes some premium features. Or you can purchase the “All Apps Bundle” at $54.99/month for the annual plan.
~Steps:
Import: Open “Adobe Premiere Rush”, Click the “+” sign at the bottom to create a new project. in the media location, select the clips, then click the blue “create” button to start editing.
Click the blue “+” button at the bottom-left corner to add clips, audio, or graphics.
Hold and drag the clips upward to add them as a layer.
Edit: Scroll over a clip to select it. Clicking again shows a pop-up above the selected clip. Here you get 4 options: split, duplicate, separate audio, and delete.
A number of edit options appear on the bottom line of the screen:
Graphics: Click the “Graphics” button to add animated titles, transition graphics, and overlays as a layer. Select to customize its design.
Effects: Click the “Effects” button to add transitions or motion effect. Select a clip to apply transition at both ends. or select a corner of the clip to apply on it only. And change the duration of transition if you want.
Color: Here you can color grade your clips, Apply a preset or color grade manually by using sliders. You can also create your presets.
Transform: Here you can resize, rotate, crop, or change the position of the clip.
Audio: Here you can edit the audio, select a clip to edit its audio.
Speed Ramping: Click the “Speed” button to edit its speed. Select the range option to speed ramp a specific part of the clip. Select the ramp option to create a smooth speed curve. Or Set the clip duration to change its speed accordingly.
Export: To Export your clip, click the “Export” icon on top of the screen. Click “Quality Settings” to adjust export settings then click “Export” to save your file.
CapCut:
It is available on IOS and Android both.
If you are looking for a free but good speed ramping software to help you create slo-mo videos easily anywhere, anytime you want, then “CapCut” can be the right choice for you. It is a free mobile video editing software with many interesting features like keyframing, chroma-key, masking e.t.c. It also supports video and image layers. It has one of the best speed ramping features among other mobile video editors. It provides curves to smoothly speed ramp your clips. It can edit landscape, portrait, and even square video formats. It has many amazing effects and filters, it also has some stock clips.


~Features:
- It is completely free and has no watermarks.
- It supports up to 4K video resolution.
- Has curves for speed ramping.
- Has keyframes for animation.
- It has hundreds of effects, overlays, and titles.


~Cons:
- Its UI doesn’t support editing in landscape orientation.
- Lacks some common editing tools.
~Steps:
Import: Open Capcut, then click “New Project” to start a new project. Select files then click “Add” to import them. Click the white box with the “+” sign to add more clips. Hold and drag to rearrange the clips.
Click the “Add overlay” button to add photos or videos as layers.
Edit: On the bottom of the screen, you can find a bunch of tools for editing. From here you can add overlays, effects, filters, titles e.t.c to the timeline.
Select a clip to open the edit menu situated at the bottom of the screen. Here you can do the following tasks:
Split the clip; Change its speed, remove background, edit audio, do color correction, apply filters, stabilize the clip, e.t.c.
We have more edit features for the layers only which include: Spice (Blending), Animation, Masking, Chroma key, freeze frame, change opacity e.t.c.
Click the “Keyframe” icon (Diamond shaped) below the playback screen to apply keyframes to the layer. Pinch and zoom or rotate to transform the clip. Use the “Graphs” button in the edit menu to customize the keyframe animation.
Speed Ramping: To Change the speed of a clip, select it then click the “Speed” icon on the bottom bar of the screen. Move the slider to change the speed of the whole clip. To do speed ramping, click the “curves” option to choose a preset or create your own. Click a preset to apply it, and click again to open its edit menu. drag the beats up and down to change speed or add or delete a beat if you want.
Effects: Click the “+” sign between the two clips to add a transition between them, and drag the slider to change its duration.
Select the effects, filters, or titles icon to add them as a layer.
Export: Click the “Export” button on the top-right side of the screen to export your clip. Or click the button, left to the “Export” button to change its resolution and frame rate.
iMovie:
It is available on IOS and Mac.
If you are an Apple fan and own everything Apple then what’s better than getting your hands on a video editor designed by Apple. It is simple and easy to use. It has all the basic editing tools to enhance your video like crop, trim, transitions, effects, e.t.c. It also has a speed ramping feature which let you change the speed at different points of a clip. It’s AI mode “Magic Movie” lets you select clips and a style and software will make the final product for you.
Its “Storyboards” mode is a creative way of learning production and post-production skills. It lets you choose a theme from many famous Genres available, then it will guide you through the production process like capturing footage, arranging your shots, and creating cinematic titles to enhance your story.


~Features:
- It is free and easy to use.
- Let you do speed ramping by changing the speed of different parts of the clip .
- Supports Raw files.
- It’s AI mode creates videos for you on its own.
- The “Storyboarding” feature helps you through the production process.


~Cons:
- It only works on IOS and Mac.
- Not suitable for professional projects.
~Steps:
Import: Open “iMovie” then click “Start New Project” and select one of the 3 following modes to start editing:
- Magic Movie: Select the clips for editing, then click “Create Magic Movie” to let iMovie create a movie for you, which you can customize according to your liking.
- Storyboard: Click “Storyboard” then select Template and a genre or a style then click “Create” to start the project. iMovie will guide you and let you add the clip or title according to the pattern.
- Movie: In “Movie” mode, select the clips from the media browser then click “Create Movie” to start editing.
Edit: Select a clip to edit it. A bunch of tools will appear at the bottom of the screen.
Click the “scissors” icon to split, duplicate, delete the clip, or to detach the audio.
Click the “volume” icon to change the volume of the clip.
Click the “Title” icon to add a title design. Click the text (on the playback window) to edit it.
Click the “Filters” icon to apply it to the selected clip and move the slider to change its intensity.
Speed Ramping: Click the “Speed” icon to change its speed. Move the yellow slider to change the speed of the whole clip. Or click the “Add” button to add partitions (in yellow color) to the selected clip. Select a partition to change its speed only. And click the “Freeze” button to add a freeze-frame.
Effects: Select the black box between two clips to add a transition. Select a transition to apply it and change its time duration if you want.
Export: Click the “Done” button on the top-left corner of the screen to save the clip, then click the “Export” icon on the bottom of the screen to save your file.
Some Paid Video speeding Softwares for iPhone:
If you do most of your video editing from your phone and want to invest some money in it then you should check the softwares mentioned below. They are quite affordable and are worthy of investment. As they are packed with many cool features. But if you aren’t sure which software to use then don’t worry as most of these softwares have a free version to try on but they have some limited features and they provide a watermark on export. But it is a great option to get your hands on new software and once you are comfortable with it, you can purchase its premium version.
Kinemaster:
It is available on IOS and Android both.
If you want to do more than just trimming and cropping to your videos then you should try Kinemaster. For editors, who want to do some advanced-level video editing on their phone, then you must have Kinemaster on your phone. It is a paid software, which is packed with many useful features. It has many video and audio effects. It also has an amazing audio editor. It also has many title designs and basic color correction tools. It has hundreds of effects and transitions + more can be downloaded from its asset store. Its UI is suitable for beginners and content creators both. It is a paid software, but all its features are completely free to use, but the free version leaves a watermark on export.

~Features:
- It supports up to 4K resolution at 60fps. (depending on mobile configuration)
- Have amazing features like chroma key, keyframing, blend e.t.c
- Has built-in audio and video recorder.
- Supports multiple texts and video layers with different resolutions depending on the capability of the mobile phone.
- Has UI like a PC video editor and supports landscape orientation for editing.
- Have an asset store with 100s of free effects, transitions, and stock material.


~Cons:
- Can’t export 4K videos on most devices.
- Can’t apply keyframes and chroma key to the main video. (can be done on layers only)
~Price:
Its Premium version is available for $4.9/month or $39.9/year. It also includes all the premium assets.

~Steps:
Import: Open Kinemaster, then click “New Project” to start a new project. Select the desired aspect ratio then click “Create” to start editing. Or click the “import” button on top to import an existing file to continue editing.
Media Browser will be opened. Select the clips to add them to the timeline. Click the “X” button on the top-right corner to close the media browser.
Edit: Drag the clip from the corner to trim it. Select a clip to open its editing menu. Here you can change its speed, add filters, do color correction, edit its audio, e.t.c.
On the right side, you will see a bunch of icons. Click the “Layer” button to add a media file, text, or effect as a layer. Click the “Audio” button to add an audio file. Or click the “Rec” button to do a voice-over.
Click the “+” symbol between two clips to add a transition between them, then adjust its time duration if you want.
Speed Ramping: Select the “Speed” option to change its speed. Here you can only do linear speed change. To create a speed ramp effect, split the clip into different parts and then change their speed according to your liking. Apply a crossfade transition of about 0.1 sec to smooth the jump cut between clips.
Effects: Select a clip then click “Clip Graphics” to apply the effect to your clip. Your clip will be highlighted with a yellow box, adjust it to set the time duration of the effect.
Click the “Shop” icon to visit the Asset store. Here you can find many cool Effects, clip graphics, transitions, and sound effects. Download them to use in your project.
Click the Layer clip to edit it. Here you can do chroma key, keyframing, or apply animation.
Export: Click the “Export” icon on the top-right corner of the app to open the export screen. Select the desired resolution and frame rate then click “Save as video” to export it.
Power Director:
It is available on IOS and Android both.
It is a paid but quite advanced video editor available for androids and IOS both. Like its PC version mobile version is also packed with many great features. It is compact and easy to use. It supports multiple video and audio layers. Have many cool filters and transitions. Can also do basic color corrections. To complete post-production work it also has audio editing tools and effects. It also has hundreds of title designs. Its UI is easy to use and supports both portrait and landscape orientation for editing. Most of its features can be used for free with a watermark on export. To remove the watermark you need to purchase the premium version.


~Features:
- It supports up to 4K resolution at 60fps. (compatible on most devices)
- Supports both Portrait and Landscape orientation for editing.
- Supports Key framing and video stabilization also.
- Supports multiple audio and video layers.
- Can edit videos in different aspect ratios.
- Have a vast stock library.


~Cons:
- Can’t export 4K videos on many devices.
- Can apply keyframing and chroma key to layers only.
- Software lags sometimes.
~Price:
Its Premium version is available for $4.9/month or $29.9/year.
~Steps:
Import: Open “Power Director”. Click “New Project” then select Aspect Ratio to start editing. Select clips from the media library Then click the “blue tick” button to add them to the timeline. Click the “+” icon to import more clips. From the bottom bar (in portrait mode), Select the video, image, audio, or effect icon to add them as a layer. In Landscape Mode bar it is situated on the left side of the screen.
Edit: Select and drag the clip from the corner to trim it. Select a clip to open edit tools. From here you can do audio editing, color correction, cropping, stabilization, and speed change.
Here you get more features to edit a layer or an overlay such as chroma key, masking, transform keyframe, e.t.c. To do keyframing, select a layer, then click the “diamond” icon located on the right side above the timeline to add keyframes then rotate, zoom or change the position of the clip with time to add more keyframes. You can also do keyframing for other features like adjustment, mask, blend, and opacity.
Speed Ramping: To Change speed, select a clip or a layer click the “speed” button then move the slider to change its speed. To do speed ramping split the clip into small parts and change their speed respectively. Click the “ease-in” and “ease-out” buttons to smooth the jump between the clips.
Effects: Click the grey box between the clips to add a transition and move the slider to change its duration if you want.
Select a clip, then choose a filter or an effect to apply to the selected clip.
Export: To Export the finished product, click the “export” icon on the top-right side of the screen then click “Produce and Share” to select the video resolution or click the “Settings” icon to change the storage path and frame rate. Then click “Produce”.
LumaFusion:
It is available on IOS and Mac (with an m1 processor).
As a content creator, have you ever wished for creating your own cinematic masterpiece, but the thing holding you back is that you don’t have a powerful workstation or expensive software then don’t worry. You can do professional-level editing on your iPhone with the software named “LumaFusion. It is one of the most powerful and advanced video editors available for your iPhone or iPad.
It is a multi-track video editor with many useful features like the Chroma key, keyframing, color grading, and color LUTs. Have powerful color grading tools and an audio editor. It also has a lock and load stabilizer. You have to purchase the software before using it. It doesn’t have any free version to try.

Credits: Pic by Luma touch website.
~Features:
- It supports up to 4K video resolution at a max of 240 fps.
- Can also edit and export 360 videos.
- Have powerful color correction tools. You can also import your own color LUTs.
- Supports Keyframing on almost all the editing tools within the software.
- You can add some third-party audio plugins.
- Supports up to 6 audio and video layers.
- Have “Storyblock” stock library. (Many of its contents are free to use)
- Supports external monitor for display.

Credits: Pic by Luma touch website.
~Cons:
- Not available for Android devices.
- Being an advanced software, it doesn’t have masking and speed ramping features.
- Doesn’t have a free version to try on.
~Price:
It is available for purchase at $29.99.
~Steps:
Import: Click the “+” button on the bottom of the screen to start a new project. A small tab will appear, change the settings if you want, then click the “+” button on the top-right side of the tab to start your project.
Click the “flower icon” on the top-right side of the screen to open the source menu (Its icon changes depending on the present tab), Click “Photos” to open folders and files. Click and drag files to add them to the timeline. Click and drag the clips on the top of the primary clip to add them as a layer.
Edit: Click and drag the clips from the corner to trim them. On the bar at the bottom of the screen, you will find basic tools. Click the clip, to open editing tools on the same bar.
Click the “+” icon on the bottom bar or select “Titles” on the source menu to open the Titles menu. Drag and drop the titles to use them. Double-click the text to open the edit menu.
Double-click the clip to open the edit menu. Here you can transform the clip, change its speed, Stabilize your clips, do color grading, add an effect and perform audio editing.
Speed Ramping: In the edit mode, click the “speed and reverse” button and move the slider back or forth to change the speed of the whole video. To do speed ramping, split the video into parts and apply different speeds to create a speed ramp effect. This method is not perfect but it gets the job done.
Effects: Select the “Transitions” icon on the source menu to open the transition menu. Drag and drop a transition on a clip to use it.
Double click a clip to open the edit menu. Then in the “Color & Effects” tab select any effects and apply them to your clip.
To do keyframing, on the edit menu, click the “circle” icon on the bottom-right side below the display to start keyframing. then change the settings with time to add further keyframes.
Export: To Export your file, click the “Export” icon on the bottom-right corner of the screen to open the export menu then click the “movie” icon to select the file destination. Select the desired export settings then click the “Export” icon on the top of the menu to export your finished product.
Which One Should I Choose Free or Paid iPhone Video speeding Softwares?
It usually depends on your needs. If you just want a speed editor to make slow-mo or timelapse videos for your social media then you should go for free video editors, as they are easy to use and provide better speed ramping features than some paid video editors mentioned here.
But as a content creator if you want more features alongside speed ramping then you should go for paid softwares mentioned above. As mobile video editors are quite affordable and some of them have features like that of some PC softwares.
FAQs about Speed ramping feature and softwares:
- Q) What is Speed Ramping and where it is used?
Speed Ramping is different from just changing the speed of the whole clip. It means changing the speed of the video gradually, so the clip doesn’t feel jumpy.
It is done to give viewers a smooth experience between different parts of the clip. like the fast-forward clip is used to show the passage of time. and the slow-mo is used to emphasize something or produce tension, while a mix of both is used in ads and action scenes, e.t.c.
- Q) How to do Speed Ramping?
Speed Ramping methods vary from software to software. Either you can do it by adding keyframes and changing speed with time or you can add or adjust curves for speed change. If your software doesn’t support the speed ramping feature, you can split a clip into parts and apply speed change to them differently. For some of the best iPhone softwares, we have mentioned the speed ramping steps above.
- Q) What FPS is best for Slo-mo videos?
Shooting at 60 Fps is ideal as it gives a smooth and crisp video and you can make slow motion easily if required, you can slow it down up to 40% of its speed while maintaining the quality. It is supported in almost most devices nowadays. And if you want to create super slo-mo for your cinematics or product video then 120 or 240 fps is preferable. But higher fps often have disadvantages as it is harder to apply visual effects or masks. So choose the frame rate according to your requirements.
- Q) Does changing the speed of video affect its audio?
Yes, changing the speed of video affects the audio, It affects its pitch (tempo). Increasing its speed increases the pitch of the audio making it sound shrill while decreasing the speed of the video or making slow-mo decreases the pitch making it sound deep.
Although, some softwares provide the feature to maintain the pitch while changing the speed of the clip.
~Cons:
- Its UI doesn’t support editing in landscape orientation.
- It doesn’t support 4k video resolution.


~Steps:
Import: Open Filmora Go, Click “New project” to start a new project, or Choose the previous one from the “Draft” portion. Select videos or images to import to your timeline. Hold and drag the clip to change its arrangement.
Edit: You can add text, effects, stickers, layers, e.t.c. by clicking their icon, present on the bar at the bottom.
Click and Drag a clip from the corner to trim it.
Click the “PiP” icon to add image or video layers, you also can add multiple layers.
Select a clip to edit it. Different editing tools appear on the bottom bar. Here you can change its opacity, its speed, or add animations.
Click the diamond icon above the timeline to add keyframes. Zoom, move, or rotate the clip to add keyframes with the passage of time.
Speed Ramping: To Change the speed of a clip, select it then click the “Speed” icon on the bottom bar of the screen. Move the slider to change the speed of the whole clip. To do speed ramping, click the “curves” option to choose a preset or create your own. Click a preset to apply it, and click again to open its edit menu. drag the beats up and down to change speed or add or delete a beat if you want.
Effects: Click the “Effects” icon to open the effects menu. Select an effect to apply to your clip.
Click the white box between two clips to add transitions.
Export: Click the “Export” button to export your file. Select your desired resolution and frame rate to export your clip.


Some Free Video speeding Softwares for iPhone:
If you are short on budget or don’t want to spend much on video editing softwares then you can try these free softwares. They are free that doesn’t mean that they are useless, they are quite good for beginners or moderate users although some of them are designed for professionals also. If you don’t believe me, go and try it yourself. Apart from just changing the speed, they are good in other editing aspects also.
Adobe Premiere Rush:
It is available on IOS and Android both.
If you are looking for free but good speed ramping software then why go anywhere also when you have an amazing video editor made by a well-known software company “Adobe”. Like premiere pro, they have designed a compact version for phones named “Premiere Rush”.
It is a free video editor that has all the tools needed for video editing, from video effects to color grading and audio editing. Its UI is a bit similar to PC video editors. It is a free video editor with no watermarks. Although it takes some time to understand it. But once mastered, you can do editing quickly.
~Features:
- It is a free video editor with no watermark.
- It supports up to 4K resolution at 60fps.
- You can extract audio and can do voiceover directly from the software.
- It has hundreds of filters, overlays, and title designs.
- It has basic color grading tools.
- It also has a motion tracking feature. (in Paid version)
- It supports multiple audio, video, and text layers.


~Cons:
- It only runs on high-end devices. ( It is not supported in most mid-range phones)
- Not suitable for beginners. Its UI is quite hard to understand.
- Doesn’t have common features like the chroma key, masking, e.t.c.


~Price:
Its Premium version is available for 9.99/month. It includes some premium features. Or you can purchase the “All Apps Bundle” at $54.99/month for the annual plan.
~Steps:
Import: Open “Adobe Premiere Rush”, Click the “+” sign at the bottom to create a new project. in the media location, select the clips, then click the blue “create” button to start editing.
Click the blue “+” button at the bottom-left corner to add clips, audio, or graphics.
Hold and drag the clips upward to add them as a layer.
Edit: Scroll over a clip to select it. Clicking again shows a pop-up above the selected clip. Here you get 4 options: split, duplicate, separate audio, and delete.
A number of edit options appear on the bottom line of the screen:
Graphics: Click the “Graphics” button to add animated titles, transition graphics, and overlays as a layer. Select to customize its design.
Effects: Click the “Effects” button to add transitions or motion effect. Select a clip to apply transition at both ends. or select a corner of the clip to apply on it only. And change the duration of transition if you want.
Color: Here you can color grade your clips, Apply a preset or color grade manually by using sliders. You can also create your presets.
Transform: Here you can resize, rotate, crop, or change the position of the clip.
Audio: Here you can edit the audio, select a clip to edit its audio.
Speed Ramping: Click the “Speed” button to edit its speed. Select the range option to speed ramp a specific part of the clip. Select the ramp option to create a smooth speed curve. Or Set the clip duration to change its speed accordingly.
Export: To Export your clip, click the “Export” icon on top of the screen. Click “Quality Settings” to adjust export settings then click “Export” to save your file.
CapCut:
It is available on IOS and Android both.
If you are looking for a free but good speed ramping software to help you create slo-mo videos easily anywhere, anytime you want, then “CapCut” can be the right choice for you. It is a free mobile video editing software with many interesting features like keyframing, chroma-key, masking e.t.c. It also supports video and image layers. It has one of the best speed ramping features among other mobile video editors. It provides curves to smoothly speed ramp your clips. It can edit landscape, portrait, and even square video formats. It has many amazing effects and filters, it also has some stock clips.


~Features:
- It is completely free and has no watermarks.
- It supports up to 4K video resolution.
- Has curves for speed ramping.
- Has keyframes for animation.
- It has hundreds of effects, overlays, and titles.


~Cons:
- Its UI doesn’t support editing in landscape orientation.
- Lacks some common editing tools.
~Steps:
Import: Open Capcut, then click “New Project” to start a new project. Select files then click “Add” to import them. Click the white box with the “+” sign to add more clips. Hold and drag to rearrange the clips.
Click the “Add overlay” button to add photos or videos as layers.
Edit: On the bottom of the screen, you can find a bunch of tools for editing. From here you can add overlays, effects, filters, titles e.t.c to the timeline.
Select a clip to open the edit menu situated at the bottom of the screen. Here you can do the following tasks:
Split the clip; Change its speed, remove background, edit audio, do color correction, apply filters, stabilize the clip, e.t.c.
We have more edit features for the layers only which include: Spice (Blending), Animation, Masking, Chroma key, freeze frame, change opacity e.t.c.
Click the “Keyframe” icon (Diamond shaped) below the playback screen to apply keyframes to the layer. Pinch and zoom or rotate to transform the clip. Use the “Graphs” button in the edit menu to customize the keyframe animation.
Speed Ramping: To Change the speed of a clip, select it then click the “Speed” icon on the bottom bar of the screen. Move the slider to change the speed of the whole clip. To do speed ramping, click the “curves” option to choose a preset or create your own. Click a preset to apply it, and click again to open its edit menu. drag the beats up and down to change speed or add or delete a beat if you want.
Effects: Click the “+” sign between the two clips to add a transition between them, and drag the slider to change its duration.
Select the effects, filters, or titles icon to add them as a layer.
Export: Click the “Export” button on the top-right side of the screen to export your clip. Or click the button, left to the “Export” button to change its resolution and frame rate.
iMovie:
It is available on IOS and Mac.
If you are an Apple fan and own everything Apple then what’s better than getting your hands on a video editor designed by Apple. It is simple and easy to use. It has all the basic editing tools to enhance your video like crop, trim, transitions, effects, e.t.c. It also has a speed ramping feature which let you change the speed at different points of a clip. It’s AI mode “Magic Movie” lets you select clips and a style and software will make the final product for you.
Its “Storyboards” mode is a creative way of learning production and post-production skills. It lets you choose a theme from many famous Genres available, then it will guide you through the production process like capturing footage, arranging your shots, and creating cinematic titles to enhance your story.


~Features:
- It is free and easy to use.
- Let you do speed ramping by changing the speed of different parts of the clip .
- Supports Raw files.
- It’s AI mode creates videos for you on its own.
- The “Storyboarding” feature helps you through the production process.


~Cons:
- It only works on IOS and Mac.
- Not suitable for professional projects.
~Steps:
Import: Open “iMovie” then click “Start New Project” and select one of the 3 following modes to start editing:
- Magic Movie: Select the clips for editing, then click “Create Magic Movie” to let iMovie create a movie for you, which you can customize according to your liking.
- Storyboard: Click “Storyboard” then select Template and a genre or a style then click “Create” to start the project. iMovie will guide you and let you add the clip or title according to the pattern.
- Movie: In “Movie” mode, select the clips from the media browser then click “Create Movie” to start editing.
Edit: Select a clip to edit it. A bunch of tools will appear at the bottom of the screen.
Click the “scissors” icon to split, duplicate, delete the clip, or to detach the audio.
Click the “volume” icon to change the volume of the clip.
Click the “Title” icon to add a title design. Click the text (on the playback window) to edit it.
Click the “Filters” icon to apply it to the selected clip and move the slider to change its intensity.
Speed Ramping: Click the “Speed” icon to change its speed. Move the yellow slider to change the speed of the whole clip. Or click the “Add” button to add partitions (in yellow color) to the selected clip. Select a partition to change its speed only. And click the “Freeze” button to add a freeze-frame.
Effects: Select the black box between two clips to add a transition. Select a transition to apply it and change its time duration if you want.
Export: Click the “Done” button on the top-left corner of the screen to save the clip, then click the “Export” icon on the bottom of the screen to save your file.
Some Paid Video speeding Softwares for iPhone:
If you do most of your video editing from your phone and want to invest some money in it then you should check the softwares mentioned below. They are quite affordable and are worthy of investment. As they are packed with many cool features. But if you aren’t sure which software to use then don’t worry as most of these softwares have a free version to try on but they have some limited features and they provide a watermark on export. But it is a great option to get your hands on new software and once you are comfortable with it, you can purchase its premium version.
Kinemaster:
It is available on IOS and Android both.
If you want to do more than just trimming and cropping to your videos then you should try Kinemaster. For editors, who want to do some advanced-level video editing on their phone, then you must have Kinemaster on your phone. It is a paid software, which is packed with many useful features. It has many video and audio effects. It also has an amazing audio editor. It also has many title designs and basic color correction tools. It has hundreds of effects and transitions + more can be downloaded from its asset store. Its UI is suitable for beginners and content creators both. It is a paid software, but all its features are completely free to use, but the free version leaves a watermark on export.

~Features:
- It supports up to 4K resolution at 60fps. (depending on mobile configuration)
- Have amazing features like chroma key, keyframing, blend e.t.c
- Has built-in audio and video recorder.
- Supports multiple texts and video layers with different resolutions depending on the capability of the mobile phone.
- Has UI like a PC video editor and supports landscape orientation for editing.
- Have an asset store with 100s of free effects, transitions, and stock material.


~Cons:
- Can’t export 4K videos on most devices.
- Can’t apply keyframes and chroma key to the main video. (can be done on layers only)
~Price:
Its Premium version is available for $4.9/month or $39.9/year. It also includes all the premium assets.

~Steps:
Import: Open Kinemaster, then click “New Project” to start a new project. Select the desired aspect ratio then click “Create” to start editing. Or click the “import” button on top to import an existing file to continue editing.
Media Browser will be opened. Select the clips to add them to the timeline. Click the “X” button on the top-right corner to close the media browser.
Edit: Drag the clip from the corner to trim it. Select a clip to open its editing menu. Here you can change its speed, add filters, do color correction, edit its audio, e.t.c.
On the right side, you will see a bunch of icons. Click the “Layer” button to add a media file, text, or effect as a layer. Click the “Audio” button to add an audio file. Or click the “Rec” button to do a voice-over.
Click the “+” symbol between two clips to add a transition between them, then adjust its time duration if you want.
Speed Ramping: Select the “Speed” option to change its speed. Here you can only do linear speed change. To create a speed ramp effect, split the clip into different parts and then change their speed according to your liking. Apply a crossfade transition of about 0.1 sec to smooth the jump cut between clips.
Effects: Select a clip then click “Clip Graphics” to apply the effect to your clip. Your clip will be highlighted with a yellow box, adjust it to set the time duration of the effect.
Click the “Shop” icon to visit the Asset store. Here you can find many cool Effects, clip graphics, transitions, and sound effects. Download them to use in your project.
Click the Layer clip to edit it. Here you can do chroma key, keyframing, or apply animation.
Export: Click the “Export” icon on the top-right corner of the app to open the export screen. Select the desired resolution and frame rate then click “Save as video” to export it.
Power Director:
It is available on IOS and Android both.
It is a paid but quite advanced video editor available for androids and IOS both. Like its PC version mobile version is also packed with many great features. It is compact and easy to use. It supports multiple video and audio layers. Have many cool filters and transitions. Can also do basic color corrections. To complete post-production work it also has audio editing tools and effects. It also has hundreds of title designs. Its UI is easy to use and supports both portrait and landscape orientation for editing. Most of its features can be used for free with a watermark on export. To remove the watermark you need to purchase the premium version.


~Features:
- It supports up to 4K resolution at 60fps. (compatible on most devices)
- Supports both Portrait and Landscape orientation for editing.
- Supports Key framing and video stabilization also.
- Supports multiple audio and video layers.
- Can edit videos in different aspect ratios.
- Have a vast stock library.


~Cons:
- Can’t export 4K videos on many devices.
- Can apply keyframing and chroma key to layers only.
- Software lags sometimes.
~Price:
Its Premium version is available for $4.9/month or $29.9/year.
~Steps:
Import: Open “Power Director”. Click “New Project” then select Aspect Ratio to start editing. Select clips from the media library Then click the “blue tick” button to add them to the timeline. Click the “+” icon to import more clips. From the bottom bar (in portrait mode), Select the video, image, audio, or effect icon to add them as a layer. In Landscape Mode bar it is situated on the left side of the screen.
Edit: Select and drag the clip from the corner to trim it. Select a clip to open edit tools. From here you can do audio editing, color correction, cropping, stabilization, and speed change.
Here you get more features to edit a layer or an overlay such as chroma key, masking, transform keyframe, e.t.c. To do keyframing, select a layer, then click the “diamond” icon located on the right side above the timeline to add keyframes then rotate, zoom or change the position of the clip with time to add more keyframes. You can also do keyframing for other features like adjustment, mask, blend, and opacity.
Speed Ramping: To Change speed, select a clip or a layer click the “speed” button then move the slider to change its speed. To do speed ramping split the clip into small parts and change their speed respectively. Click the “ease-in” and “ease-out” buttons to smooth the jump between the clips.
Effects: Click the grey box between the clips to add a transition and move the slider to change its duration if you want.
Select a clip, then choose a filter or an effect to apply to the selected clip.
Export: To Export the finished product, click the “export” icon on the top-right side of the screen then click “Produce and Share” to select the video resolution or click the “Settings” icon to change the storage path and frame rate. Then click “Produce”.
LumaFusion:
It is available on IOS and Mac (with an m1 processor).
As a content creator, have you ever wished for creating your own cinematic masterpiece, but the thing holding you back is that you don’t have a powerful workstation or expensive software then don’t worry. You can do professional-level editing on your iPhone with the software named “LumaFusion. It is one of the most powerful and advanced video editors available for your iPhone or iPad.
It is a multi-track video editor with many useful features like the Chroma key, keyframing, color grading, and color LUTs. Have powerful color grading tools and an audio editor. It also has a lock and load stabilizer. You have to purchase the software before using it. It doesn’t have any free version to try.

Credits: Pic by Luma touch website.
~Features:
- It supports up to 4K video resolution at a max of 240 fps.
- Can also edit and export 360 videos.
- Have powerful color correction tools. You can also import your own color LUTs.
- Supports Keyframing on almost all the editing tools within the software.
- You can add some third-party audio plugins.
- Supports up to 6 audio and video layers.
- Have “Storyblock” stock library. (Many of its contents are free to use)
- Supports external monitor for display.

Credits: Pic by Luma touch website.
~Cons:
- Not available for Android devices.
- Being an advanced software, it doesn’t have masking and speed ramping features.
- Doesn’t have a free version to try on.
~Price:
It is available for purchase at $29.99.
~Steps:
Import: Click the “+” button on the bottom of the screen to start a new project. A small tab will appear, change the settings if you want, then click the “+” button on the top-right side of the tab to start your project.
Click the “flower icon” on the top-right side of the screen to open the source menu (Its icon changes depending on the present tab), Click “Photos” to open folders and files. Click and drag files to add them to the timeline. Click and drag the clips on the top of the primary clip to add them as a layer.
Edit: Click and drag the clips from the corner to trim them. On the bar at the bottom of the screen, you will find basic tools. Click the clip, to open editing tools on the same bar.
Click the “+” icon on the bottom bar or select “Titles” on the source menu to open the Titles menu. Drag and drop the titles to use them. Double-click the text to open the edit menu.
Double-click the clip to open the edit menu. Here you can transform the clip, change its speed, Stabilize your clips, do color grading, add an effect and perform audio editing.
Speed Ramping: In the edit mode, click the “speed and reverse” button and move the slider back or forth to change the speed of the whole video. To do speed ramping, split the video into parts and apply different speeds to create a speed ramp effect. This method is not perfect but it gets the job done.
Effects: Select the “Transitions” icon on the source menu to open the transition menu. Drag and drop a transition on a clip to use it.
Double click a clip to open the edit menu. Then in the “Color & Effects” tab select any effects and apply them to your clip.
To do keyframing, on the edit menu, click the “circle” icon on the bottom-right side below the display to start keyframing. then change the settings with time to add further keyframes.
Export: To Export your file, click the “Export” icon on the bottom-right corner of the screen to open the export menu then click the “movie” icon to select the file destination. Select the desired export settings then click the “Export” icon on the top of the menu to export your finished product.
Which One Should I Choose Free or Paid iPhone Video speeding Softwares?
It usually depends on your needs. If you just want a speed editor to make slow-mo or timelapse videos for your social media then you should go for free video editors, as they are easy to use and provide better speed ramping features than some paid video editors mentioned here.
But as a content creator if you want more features alongside speed ramping then you should go for paid softwares mentioned above. As mobile video editors are quite affordable and some of them have features like that of some PC softwares.
FAQs about Speed ramping feature and softwares:
- Q) What is Speed Ramping and where it is used?
Speed Ramping is different from just changing the speed of the whole clip. It means changing the speed of the video gradually, so the clip doesn’t feel jumpy.
It is done to give viewers a smooth experience between different parts of the clip. like the fast-forward clip is used to show the passage of time. and the slow-mo is used to emphasize something or produce tension, while a mix of both is used in ads and action scenes, e.t.c.
- Q) How to do Speed Ramping?
Speed Ramping methods vary from software to software. Either you can do it by adding keyframes and changing speed with time or you can add or adjust curves for speed change. If your software doesn’t support the speed ramping feature, you can split a clip into parts and apply speed change to them differently. For some of the best iPhone softwares, we have mentioned the speed ramping steps above.
- Q) What FPS is best for Slo-mo videos?
Shooting at 60 Fps is ideal as it gives a smooth and crisp video and you can make slow motion easily if required, you can slow it down up to 40% of its speed while maintaining the quality. It is supported in almost most devices nowadays. And if you want to create super slo-mo for your cinematics or product video then 120 or 240 fps is preferable. But higher fps often have disadvantages as it is harder to apply visual effects or masks. So choose the frame rate according to your requirements.
- Q) Does changing the speed of video affect its audio?
Yes, changing the speed of video affects the audio, It affects its pitch (tempo). Increasing its speed increases the pitch of the audio making it sound shrill while decreasing the speed of the video or making slow-mo decreases the pitch making it sound deep.
Although, some softwares provide the feature to maintain the pitch while changing the speed of the clip.
Top 10 Secret Tips & Tricks to Use in Wondershare Filmora
Wondershare Filmora is a great video editing software with millions of users worldwide. It has many features that it provides to its users. However, there are some other features hidden up its sleeve.
This article will share some “secrets” of Wondershare Filmora features you may not know that they exist in Filmora. Scroll below to see the features that level up your editing skills.
Part 1. Shared Media Folder
You might have had the hassle of importing the same videos for a considerable time in a different project. It can become a problem for you. It may be fine if you have organized your videos from the start.
Shared Media Folder in Filmora, now called the Global Media Folder, can store video and audio that you’ve imported for future projects. So you don’t have to keep re-importing your media for future videos.

Moreover, when you have imported files into the Shared Media Folder, you can create new Sub-Folders. You can name these folders according to the types of media you are going to use.
Suppose you are a content creator and want to spice up your content with memes. You can create a meme folder to import recent memes into your videos.
Once you have imported them into the Wondershare Filmora’s Shared Media Folder, you can access them anytime. Doing so will allow you to save time and build a base for your future projects.
Free Download For Win 7 or later(64-bit)
Free Download For macOS 10.14 or later
Part 2. Customize Proxy Files
Before understanding the custom proxy settings, let us know what proxy files are.
Proxy Files
Proxy files in Wondershare Filmora allow you to render and edit 4K and other higher-resolution videos easily, regardless of your computer’s processing power.
No one wants to compromise PC performance when editing videos. But if you are importing a video with a higher resolution than your PC, you can only play it sometimes. Other than that, your PC might get stuck and slow down.
If your PC has a built-in resolution of 1080p, but the video you are going to import is 2160p, you can encounter rendering and performance problems. But in the case of Wondershare Filmora Proxy files, you can smoothly edit your videos without any trouble.
How to Customize Proxy Files in Filmora
Although Wondershare Filmora automatically creates proxy files when it encounters resolutions more significant than the PC performance. But you can also set them to your preference.
And customize your proxy files takes some simple and easy steps. But first, follow the steps mentioned below.
Step1 Find the File option on the top left corner of the Wonderhsare Filmora home interface.
Step2 Click on Files and go to Preferences.
Step3 A window will pop up, and here you can see multiple options.
Step4 Go to the performance.
Step5 In the performance tab, scroll down till your see Proxy.
Step6 Here check the box that says, “Automatically create proxies when resolution higher than:”

Step7 Below you can see multiple options. In these options, select the resolution that you want.
Step8 You can also click on the box below to automatically delete the proxies when you close your project.
Now, whenever you encounter a resolution of a higher video than the one you selected, Wondershare Filmora will do its magic.
Part 3. Delete Project Render Cache
Another hack you can use to save space on your hard drive is Deleting the Render cache. But before we do that, let us understand what Render cache is!
What is Render Cache?
Rendering can be a giant leap to give you a smooth performance experience. However, when you import your videos into the timeline, you can always render to have an uninterrupted playback experience.
Doing so will allow you to work in your zone quickly and efficiently. You can do a manual rendering before you begin the editing process. Or you can also opt to choose automatic rendering. In the automatic rendering option, you can continue your editing process. In the meantime, your timeline will be rendered.
How to Delete Render Cache in Filmora
To save up storage space on your computer, you can delete your render cache by following the steps.
Step1 Click on files in the top left corner of the Wondershare Filmora home interface.
Step2 Go to Preferences.
Step3 A window will pop up and go to Performance.
Step4 In the performance tab, scroll down below to the Preview Render.
Step5 Check the box saying, “Automatically delete render files when a project is closed.”

Step6 Click on OK to save your changes.
Now, whenever you close your project, your render cache will be deleted and would have given you extra space on your computer.
Part 4. Remove Split Button on Playhead
In some instances, when you are moving the playhead on the timelines, it can distract you from doing your editing. Or even more, you can mistakenly click on the Split button to split the clips you don’t want them to.
Well, no worries at all! Wondershare Filmora takes care of that for you. You can hide or remove the Split button on the playhead. It only takes a few simple and easy steps. Follow the steps mentioned below to remove the Split button:
Step1 You will notice the File option on the top left corner of the Wonderhsare Filmora home interface.
Step2 Click on Files and go to Preferences.
Step3 A window will pop up, and here you can see multiple options.
Step4 Go to the editing
Step5 In the editing tab, scroll down till your see the Split button.

Step6 Check the box. Then, click OK to save your changes.
Doing so would have removed the Split button from your playhead. So now you can edit your videos without any distractions.
Part 5. Copy and Paste Effects
Copy and paste are one of the oldest tricks in editing procedures. Wondershare Filmora comes with a range of commands and features that allow you to save time and be reliable.
Suppose you want to add an effect to a video clip in the timeline. Then, after adding the effect to your video, make custom changes to make it look more closely to the style you want. You can now use the copy-and-paste function to add the same effect to another clip. That helps you save a lot of time from tedious and time-consuming work.
How to Copy and Paste Effects
While editing, you will need to ensure that your editing process is as clean as possible and that you have all the time on hand.
But there is a solution! You can easily copy and paste the effects you placed on one video clip to another. Just follow the steps mentioned, and you will be good to go:
Step1 Right-click on the video to you added the effects too.
Step2 A drop-down column will pop up.
Step3 In the options below, you will notice an option called “Copy Effects.”
Step4 Click on the “Copy Effects” option.
Step5 Now move the playhead to the video clip on which you want to paste the effects.
Step6 Right-click on the video that you want to place the effect on.
Step7 In the pop-up column, select the Paste Effect
Step8 It adjusts the video clip according to the changes of the prior one.
You can save editing time by simply copying and pasting video effects.

Part 6. Timeline Snap
You might have added multiple videos in the same timeline track. If you removed the video ahead of the video clip, you have to close the gap in between.
So, arranging and moving clips in the timeline are hectic and time-consuming. However, that is the case without timeline snapping.
How to Apply Timeline Snap in Filmora
Timeline snapping will allow you to arrange video clips side by side without any breaks and cut-offs. Also, it will enable you to place it precisely above other video and audio gaps in the timeline.
In most cases, Timeline snapping is enabled from the start. But if you are encountering some problems managing your videos. Or if you want to remove the Timeline snap feature. Follow the steps mentioned below:
Step1 Right-click on the Timeline.
Step2 A pop will open up, giving you multiple options.
Step3 Click on timeline Snapping to either enable it or disable it.

Now you can easily enable and disable timeline snapping according to your choice!
Part 7. Color Code Video Clips
When editing footage from multiple cameras, you might want to organize which media is from which source in the timeline. You can do this by color coding your clips.
Steps to Color Code Your Videos
Color coding allows you to edit all the clips marked with a particular color to be selected simultaneously without selecting them manually in the timeline.
To color code a video, follow the steps as mentioned:
Step1 Select the clips you want to color code, right-click, and choose from the available colors.
Step2 Once you’ve color coded your clips, you can right-click on the clip again and choose to select all clips from the color mark option.
Step3 And all the clips marked with that color will be selected.

Part 8. Group Clips Together
Now in an editing timeline, you might encounter a situation where you want to arrange a video clip with specific audio. Again, it allows you to stay organized and save up a lot of time.
Grouping clips together can also be helpful when you want to edit multiple clips in the timeline but want to maintain a particular order. The group will remain in its place and allow you to edit your other video clips quickly.
Stepwise Guide to Grouping the Clips in Filmora
You can group video and audio clips in straightforward steps. Just follow the actions ahead, and you will be good to go:
Step1 Hold Left-click and drag across the clips that you want to select.
Step2 When you are done, Right-click on the clip to open the options tab.
Step3 Scroll down, and you will see a “” option.
Step4 Select Group, and that’s done.

Your whole group will be selected whenever you select a video clip or an audio clip.
Part 9. Pan and Zoom Shortcut
Editing shortcuts are excellent. They allow you to save up a lot of time. Some people prefer to use a mouse only to edit their videos, but professionals always use a keyboard.
But there are some other shortcuts too! In these shortcuts, you would not necessarily need a keyboard; only a mouse will work and give a good outcome.
You might have seen those videos in which a specific screen ratio moves over a picture. Or, in some cases when you have to pan and zoom to create a flow effect.
Instead of manually adjusting the ratio of your videos and photos, Pan and Zoom shortcuts will allow you to use multiple features. These features allow you to select where your video or photo will start, zoom, and end.
These shortcuts are so easy to apply. Just go through the steps below, and you will accomplish the following:
Step1 Right-click on a photo or a video clip.
Step2 Go to the crop and zoom tab above the timeline.
Step3 In the window that opens up, you will see a pan and zoom option in the top left corner. Click on it.
Step4 And on the bottom right corner of the window, you can see the pan and zoom shortcuts available.
Step5 Please select any of them you want and then click on OK.

Part 10. New Feature Request
One of the significant features of Wondershare Filmora that sets it among the best is its capability to listen to the users. When you have been using Wondershare Filmora for a long time, there will come a time when you wish for a feature. You can also do so in a few simple steps. Just follow the steps mentioned:
Step1 Multiple options are available on the top left corner of the Wondershare Filmora home interface. Click on help.
Step2 A drop-down box will open up.
Step3 In the options offered to you, select suggest a feature.

Step4 It automatically directs you to your default browser, where you can see the multiple feature requests.
Step5 You can vote for a feature you want in the next update.
Step6 Or you can also create a request for another particular feature.

Summing Up
Wondershare Filmora is the best in the business regarding editing your videos. It has such creative and easy-to-use software that even a beginner efficiently edits videos.
There are a lot of features that Wondershare Filmora provides. But now, with these secret and hidden tips, you can edit your videos more creatively.
Free Download For macOS 10.14 or later
Part 2. Customize Proxy Files
Before understanding the custom proxy settings, let us know what proxy files are.
Proxy Files
Proxy files in Wondershare Filmora allow you to render and edit 4K and other higher-resolution videos easily, regardless of your computer’s processing power.
No one wants to compromise PC performance when editing videos. But if you are importing a video with a higher resolution than your PC, you can only play it sometimes. Other than that, your PC might get stuck and slow down.
If your PC has a built-in resolution of 1080p, but the video you are going to import is 2160p, you can encounter rendering and performance problems. But in the case of Wondershare Filmora Proxy files, you can smoothly edit your videos without any trouble.
How to Customize Proxy Files in Filmora
Although Wondershare Filmora automatically creates proxy files when it encounters resolutions more significant than the PC performance. But you can also set them to your preference.
And customize your proxy files takes some simple and easy steps. But first, follow the steps mentioned below.
Step1 Find the File option on the top left corner of the Wonderhsare Filmora home interface.
Step2 Click on Files and go to Preferences.
Step3 A window will pop up, and here you can see multiple options.
Step4 Go to the performance.
Step5 In the performance tab, scroll down till your see Proxy.
Step6 Here check the box that says, “Automatically create proxies when resolution higher than:”

Step7 Below you can see multiple options. In these options, select the resolution that you want.
Step8 You can also click on the box below to automatically delete the proxies when you close your project.
Now, whenever you encounter a resolution of a higher video than the one you selected, Wondershare Filmora will do its magic.
Part 3. Delete Project Render Cache
Another hack you can use to save space on your hard drive is Deleting the Render cache. But before we do that, let us understand what Render cache is!
What is Render Cache?
Rendering can be a giant leap to give you a smooth performance experience. However, when you import your videos into the timeline, you can always render to have an uninterrupted playback experience.
Doing so will allow you to work in your zone quickly and efficiently. You can do a manual rendering before you begin the editing process. Or you can also opt to choose automatic rendering. In the automatic rendering option, you can continue your editing process. In the meantime, your timeline will be rendered.
How to Delete Render Cache in Filmora
To save up storage space on your computer, you can delete your render cache by following the steps.
Step1 Click on files in the top left corner of the Wondershare Filmora home interface.
Step2 Go to Preferences.
Step3 A window will pop up and go to Performance.
Step4 In the performance tab, scroll down below to the Preview Render.
Step5 Check the box saying, “Automatically delete render files when a project is closed.”

Step6 Click on OK to save your changes.
Now, whenever you close your project, your render cache will be deleted and would have given you extra space on your computer.
Part 4. Remove Split Button on Playhead
In some instances, when you are moving the playhead on the timelines, it can distract you from doing your editing. Or even more, you can mistakenly click on the Split button to split the clips you don’t want them to.
Well, no worries at all! Wondershare Filmora takes care of that for you. You can hide or remove the Split button on the playhead. It only takes a few simple and easy steps. Follow the steps mentioned below to remove the Split button:
Step1 You will notice the File option on the top left corner of the Wonderhsare Filmora home interface.
Step2 Click on Files and go to Preferences.
Step3 A window will pop up, and here you can see multiple options.
Step4 Go to the editing
Step5 In the editing tab, scroll down till your see the Split button.

Step6 Check the box. Then, click OK to save your changes.
Doing so would have removed the Split button from your playhead. So now you can edit your videos without any distractions.
Part 5. Copy and Paste Effects
Copy and paste are one of the oldest tricks in editing procedures. Wondershare Filmora comes with a range of commands and features that allow you to save time and be reliable.
Suppose you want to add an effect to a video clip in the timeline. Then, after adding the effect to your video, make custom changes to make it look more closely to the style you want. You can now use the copy-and-paste function to add the same effect to another clip. That helps you save a lot of time from tedious and time-consuming work.
How to Copy and Paste Effects
While editing, you will need to ensure that your editing process is as clean as possible and that you have all the time on hand.
But there is a solution! You can easily copy and paste the effects you placed on one video clip to another. Just follow the steps mentioned, and you will be good to go:
Step1 Right-click on the video to you added the effects too.
Step2 A drop-down column will pop up.
Step3 In the options below, you will notice an option called “Copy Effects.”
Step4 Click on the “Copy Effects” option.
Step5 Now move the playhead to the video clip on which you want to paste the effects.
Step6 Right-click on the video that you want to place the effect on.
Step7 In the pop-up column, select the Paste Effect
Step8 It adjusts the video clip according to the changes of the prior one.
You can save editing time by simply copying and pasting video effects.

Part 6. Timeline Snap
You might have added multiple videos in the same timeline track. If you removed the video ahead of the video clip, you have to close the gap in between.
So, arranging and moving clips in the timeline are hectic and time-consuming. However, that is the case without timeline snapping.
How to Apply Timeline Snap in Filmora
Timeline snapping will allow you to arrange video clips side by side without any breaks and cut-offs. Also, it will enable you to place it precisely above other video and audio gaps in the timeline.
In most cases, Timeline snapping is enabled from the start. But if you are encountering some problems managing your videos. Or if you want to remove the Timeline snap feature. Follow the steps mentioned below:
Step1 Right-click on the Timeline.
Step2 A pop will open up, giving you multiple options.
Step3 Click on timeline Snapping to either enable it or disable it.

Now you can easily enable and disable timeline snapping according to your choice!
Part 7. Color Code Video Clips
When editing footage from multiple cameras, you might want to organize which media is from which source in the timeline. You can do this by color coding your clips.
Steps to Color Code Your Videos
Color coding allows you to edit all the clips marked with a particular color to be selected simultaneously without selecting them manually in the timeline.
To color code a video, follow the steps as mentioned:
Step1 Select the clips you want to color code, right-click, and choose from the available colors.
Step2 Once you’ve color coded your clips, you can right-click on the clip again and choose to select all clips from the color mark option.
Step3 And all the clips marked with that color will be selected.

Part 8. Group Clips Together
Now in an editing timeline, you might encounter a situation where you want to arrange a video clip with specific audio. Again, it allows you to stay organized and save up a lot of time.
Grouping clips together can also be helpful when you want to edit multiple clips in the timeline but want to maintain a particular order. The group will remain in its place and allow you to edit your other video clips quickly.
Stepwise Guide to Grouping the Clips in Filmora
You can group video and audio clips in straightforward steps. Just follow the actions ahead, and you will be good to go:
Step1 Hold Left-click and drag across the clips that you want to select.
Step2 When you are done, Right-click on the clip to open the options tab.
Step3 Scroll down, and you will see a “” option.
Step4 Select Group, and that’s done.

Your whole group will be selected whenever you select a video clip or an audio clip.
Part 9. Pan and Zoom Shortcut
Editing shortcuts are excellent. They allow you to save up a lot of time. Some people prefer to use a mouse only to edit their videos, but professionals always use a keyboard.
But there are some other shortcuts too! In these shortcuts, you would not necessarily need a keyboard; only a mouse will work and give a good outcome.
You might have seen those videos in which a specific screen ratio moves over a picture. Or, in some cases when you have to pan and zoom to create a flow effect.
Instead of manually adjusting the ratio of your videos and photos, Pan and Zoom shortcuts will allow you to use multiple features. These features allow you to select where your video or photo will start, zoom, and end.
These shortcuts are so easy to apply. Just go through the steps below, and you will accomplish the following:
Step1 Right-click on a photo or a video clip.
Step2 Go to the crop and zoom tab above the timeline.
Step3 In the window that opens up, you will see a pan and zoom option in the top left corner. Click on it.
Step4 And on the bottom right corner of the window, you can see the pan and zoom shortcuts available.
Step5 Please select any of them you want and then click on OK.

Part 10. New Feature Request
One of the significant features of Wondershare Filmora that sets it among the best is its capability to listen to the users. When you have been using Wondershare Filmora for a long time, there will come a time when you wish for a feature. You can also do so in a few simple steps. Just follow the steps mentioned:
Step1 Multiple options are available on the top left corner of the Wondershare Filmora home interface. Click on help.
Step2 A drop-down box will open up.
Step3 In the options offered to you, select suggest a feature.

Step4 It automatically directs you to your default browser, where you can see the multiple feature requests.
Step5 You can vote for a feature you want in the next update.
Step6 Or you can also create a request for another particular feature.

Summing Up
Wondershare Filmora is the best in the business regarding editing your videos. It has such creative and easy-to-use software that even a beginner efficiently edits videos.
There are a lot of features that Wondershare Filmora provides. But now, with these secret and hidden tips, you can edit your videos more creatively.
How to Correct Lens Distortion With Filmora
The distortion in your video may irritate you when you’re working on the video’s edit. When you take images or record sound, you frequently end up with distorted results due to lens distortion. In this article, we will discuss what lens distortion is, how it may be fixed, and the factors you need to pay attention to avoid lens distortion when taking or recording videos.
Part 1: Basic introduction to lens distortion
1. What is lens distortion
Distortion means that the straight rectilinear projection is not straight. In the pinhole camera model, lens distortion is measured by how far from the image’s ideal projection is. From a geometric optics point of view, the scene’s straight lines don’t look straight in the image.
When you take a picture, the camera lens can somehow change the shape of the image. It is called camera lens distortion. In simple terms, we can tell you that this is the case because distortion in-camera is when the lens makes curved lines in an image and doesn’t show the straight lines from the scene.
2. What cause it
Lens distortion happens with all lenses. It is because of several things, such as how the lens is curved, how far away the subject is, and the angle at which the photo was taken. Furthermore, it changes the image in many ways, but you can see it most when straight lines at the frame’s edges are no longer parallel.
Most geometric lens distortions happen when the focal distance is short (barrel distortion), long (pincushion distortion), or when a fish-eye lens is used to take a picture from a low angle (keystone distortion).
Part 2: How to correct a distorted lens?
A lot of times, with lower-end wide-angle lenses, especially action cams like GoPro, you get pretty gnarly distortion when you’re filming. As we know, the Earth is round, but it shouldn’t look like this when you take a picture. Indeed, it’s very distorted, it has the horizon line bending all over the place, and basically, all of the lines in the video have some level of curvature.
Hence, follow all the steps below to know how to fix it:
Step1 Import your video to Filmora .

Free Download For Win 7 or later(64-bit)
Free Download For macOS 10.14 or later
Step2 Click on the clip and head over to the lens correction. Choose the “Camera model” based on what you used, but in this tutorial, the video was taken with a GoPro Hero 7. However, you can choose some other camera model options there.

Step3 To adjust the distortion, you can slide the bar to the left or the right. If you slide the bar to the right (maximum level), there will be no adjustment. However, if you slide the bar to the left, you can see it pulling those lines as high up as possible.
You can see a bit of curvature, but it looks much more natural, and all of the lines in the video look so much better.

Step4 Lastly, if you play the video back, you will see the video look much better than before.

Part 3: How to avoid distorted lens while shooting?
1. Avoid very wide-angle lenses
The more distortion there is in a lens, like a 15mm prime, the wider it is. Sometimes you need a very wide-angle lens, and distortion is unavoidable. If you have room to move back, you could try using a lens with a different focal length.
2. Avoid getting too close
Doing so will enhance optical distortion in many lenses and the likelihood of perspective distortion in all lenses.
3. Be mindful of your composition
There are numerous instances where distortion is acceptable or even intended. Others must be carefully examined, such as utilizing a wide-angle lens to photograph a row of people. When you get too close to a group, the distortion makes the people at each end appear considerably wider! Therefore, consider your composition. Stand back and add space around your group; if necessary, you can trim the image afterward.
4. Use a 50mm lens
50mm lenses are often called “all-purpose” lenses. There is a good reason
for this. A 50mm lens is great for portraits, street photography, and many other kinds of photography, including architecture. If your subject is big, you just need space to stand back. You will see that a 50mm lens rarely distorts the image.
Free Download For macOS 10.14 or later
Step2 Click on the clip and head over to the lens correction. Choose the “Camera model” based on what you used, but in this tutorial, the video was taken with a GoPro Hero 7. However, you can choose some other camera model options there.

Step3 To adjust the distortion, you can slide the bar to the left or the right. If you slide the bar to the right (maximum level), there will be no adjustment. However, if you slide the bar to the left, you can see it pulling those lines as high up as possible.
You can see a bit of curvature, but it looks much more natural, and all of the lines in the video look so much better.

Step4 Lastly, if you play the video back, you will see the video look much better than before.

Part 3: How to avoid distorted lens while shooting?
1. Avoid very wide-angle lenses
The more distortion there is in a lens, like a 15mm prime, the wider it is. Sometimes you need a very wide-angle lens, and distortion is unavoidable. If you have room to move back, you could try using a lens with a different focal length.
2. Avoid getting too close
Doing so will enhance optical distortion in many lenses and the likelihood of perspective distortion in all lenses.
3. Be mindful of your composition
There are numerous instances where distortion is acceptable or even intended. Others must be carefully examined, such as utilizing a wide-angle lens to photograph a row of people. When you get too close to a group, the distortion makes the people at each end appear considerably wider! Therefore, consider your composition. Stand back and add space around your group; if necessary, you can trim the image afterward.
4. Use a 50mm lens
50mm lenses are often called “all-purpose” lenses. There is a good reason
for this. A 50mm lens is great for portraits, street photography, and many other kinds of photography, including architecture. If your subject is big, you just need space to stand back. You will see that a 50mm lens rarely distorts the image.
How To Quickly Create A Screen Print Effect In Photoshop: Detailed Gui
Screen printing is a unique method that uses a mesh to transfer ink onto a surface and is commonly used to print designs onto t-shirts or other garments, such as hoodies, tote bags, and even sneakers.
Nowadays, digital means such as Photoshop or Illustrator are used to create the screen print effect, which is achieved by using a layer mask to cut out a portion of the image and filling it with the color or pattern of your choice. The design is then printed onto fabric using water-based CMYK (cyan, magenta, yellow, black) inks with inkjet printers.
Suppose you’ve ever wanted to create the screen print effect in Photoshop to give that artistic look to your pictures and embed them in your clothes or other accessories but don’t know where to start or are not familiar with the process. In that case, this guide can surely help you figure this out quickly!
So without any delay, let’s get on with it!
How To Use Photoshop To Create The Print Effect
Below we’ve provided a detailed guide using Adobe Photoshop to create the print effect with easy step-by-step instructions.
What Are The Requirements For Creating the Print Effect In PhotoShop?
Before we discuss the complete process of creating the print effect while using Photoshop, here are the resources you have to arrange.
- Picture of the object: We will cut out the object from the original image using the Lasso tool and unsaturate it. However, you have to ensure that the object is clear and easily detectable within the picture.
- A background image: You will need a background image to add the object to. For this, you can use a solid background, capture scenery, etc.
- Fonts: You can also add fonts to the final image to add your ideas or thoughts, making your final project more eye-catching and engaging.
- Photoshop latest version: For this tutorial, we will use the Photoshop CC 2021 version, so make sure to download and install it to your computer immediately!
What Are The Steps To Create Print Effect in PhotoShop?
Now that you know the necessary resources, the following are the steps to create the print effect in Photoshop:
Step1 Launch thePhotoshop program on your laptop/desktop and click “Create New” on the software dashboard. Next, select the page size, such as “letter,” and click “Open.”

Now, click the “File” option in the top toolbar, and from the drop-down menu, select “Open.” Next, choose the image you want to apply the screen print effect by browsing to its location on your computer.

Step2 Next, click the “Lasso” tool from the left-side menu to create the selection around the object in the image.

Press the CMD/Ctrl + C on your computer’s keyboard to copy the selection. Next, click the “Layer“ option in the top toolbar, select “New,” and click “Layer via Copy.”

Step3 Now, hide the background layer in the “Layers” panel on the right-hand side, and you will get your object without any BG. Click the “Image” option in the top toolbar and select “Adjustments.”
Click “Threshold…” from the drop-down menu, and set the “Threshold level.” Alternatively, you can click “Cmd/ctrl+Shift+U” on the keyboard to desaturate the image.

Step4 Next, select the “Magic Eraser Tool” from the left-side menu and remove the white parts to smooth down the background. Afterward, choose the “Move Tool” from the menu and drag your object to a new layer.
To add the background image, click “File” and select “Open.” Next, select the file and again click “Open.”
Step5 Select the object using the “Move Tool” and drag it to the background image layer. If the thing is too large and you want to resize it, select the object using the “CMD/Ctrl” key and click “Edit” from the top toolbar. From the drop-down menu, choose “Transform” and click “Scale.”

Next, drag the handles to adjust the size of the object on the Background image.
Step6 Click the “T” icon from the left-hand side menu and set the font style, color, and size. You can also click the “3D” option to convert your text to a three-dimensional form.

Try removing the left-out white patches on the object using the “Magic Eraser Tool” to give a polished look to the print screen effect. Once you are satisfied, click the “File” option from the top toolbar panel and select “Save As.”
Type in the file name and select the file type from the drop-down menu next to “Save As Type.” Choose the storage location, click “Save” to export your final project, and you’re done!
Conclusion
In this article, we’ve explored what the screen print effect is and how it is used in digital art. We’ve also discussed the requirements and resources you need to use and then demonstrated a step-by-step process of how to create the screen print effect in Photoshop with simple and easy-to-follow instructions.
To make things easy for you, we also added original screenshots while creating a sample project on the software.
Hopefully, this article helped resolve your queries, and you can now give a vintage or retro look to your images using the screen print effect in Photoshop.
Free Download For Win 7 or later(64-bit)
Free Download For macOS 10.14 or later
Free Download For macOS 10.14 or later
Also read:
- In 2024, General Information That You Need To Know About MKV Format
- New 2024 Approved Easy Step by Step Tutorial on Creating a Lightroom Collage
- New This Article Talks in Detail About Why People Look for a Free Title Maker, and 8 Options that Will Benefit Their Work. It Includes Tools Like SEMrush Title Generator, Hubspot Title Generator, and More. Check Out
- New How to Make Stunning Glitch Effect in Photoshop? Ultimate Guide
- New Do You Want to Know How to Add Captivating Audio in Simple Videos? Nothing to Be Concerned About because This Article Will Help You in This Matter for 2024
- New 2024 Approved IMovie Review – Is It The Best Video Editor for Mac Users
- New Create Perfect Slow Motion Videos With The Best CapCut Templates
- 2024 Approved 7 Best GoPro Video Editors for Mac
- New In 2024, Perfectly Use the Audio Mixer in Filmora
- New In 2024, Learning How to Slow Down a Video on iPhone Properly
- With Everything Centered Around Videos on the Digital Platform, the Use and the Need for AI-Based Editing Tools Have Also Increased Manifold. We Have Curated a List of the Top Programs that Can Help You with AI Video Editing for 2024
- Updated 2024 Approved Finding The Best Filmic Pro LUTs For Video Editing
- New How to Create a Freeze Frame Sequence Effect for 2024
- Learn How to Convert MP4 Videos to 60 FPS GIFs with This Easy-to-Follow Tutorial. Get Smooth and Crisp Motion in Your GIFs in Just a Few Simple Steps
- New What Is MKV Format and How To Play MKV Video for 2024
- New 2024 Approved How to Perfect Quick and Efficient Video Editing | Keyboard Shortcuts in Filmora
- How to Resize FLV Videos EfficientlyWindows, Mac, Android, iPhone & Online for 2024
- New Do You Want to Apply BRAW LUTs to Your Pictures and Video Footage? Here We Will Discuss some of the Best Options Available to Help You Choose the Right One for 2024
- Browse the List of the Best 8 Scanners or Converters for Converting the Slides to Digital Images. Also, Know the Other Important Information of Slides to Digital Conversion for 2024
- 2024 Approved How to Windows Online Movie Maker Complete Guide
- New Learn How to Create Your Own Unique Video in Cinematic Text Intro in Filmora. Its a Simple Process that Will Offer Professional-Level Intros of Your Own
- New Guide To Selecting and Using the Best Braw Luts for 2024
- Find The Best Free Canon LUTs for 2024
- In 2024, Lock Your Realme GT 5 Pro Phone in Style The Top 5 Gesture Lock Screen Apps
- Why Your ZTE Nubia Z60 Ultra Screen Might be Unresponsive and How to Fix It | Dr.fone
- In 2024, Proven Ways in How To Hide Location on Life360 For Tecno Pova 6 Pro 5G | Dr.fone
- In 2024, What is the best Pokemon for pokemon pvp ranking On Poco F5 5G? | Dr.fone
- 9 Solutions to Fix Lava Blaze 2 System Crash Issue | Dr.fone
- In 2024, How To Leave a Life360 Group On Apple iPhone 11 Without Anyone Knowing? | Dr.fone
- Repair damaged, unplayable video files of G42 5G on Mac
- In 2024, Top 10 Samsung Galaxy XCover 7 Android SIM Unlock APK
- New What Is AI Background Generator?
- In 2024, Best Anti Tracker Software For Realme 11X 5G | Dr.fone
- In 2024, How To Unlink Apple ID From iPhone 12 mini
- How to Transfer Data After Switching From Vivo V30 Lite 5G to Latest Samsung | Dr.fone
- How to Reset your Samsung Galaxy Z Fold 5 Lock Screen Password
- In 2024, How to Remove and Reset Face ID on Apple iPhone 12 Pro Max | Dr.fone
- Bypass Activation Lock From Apple iPhone XS Max - 4 Easy Ways
- How to Unlock iPhone 13 Pro Passcode Screen? | Dr.fone
- How to get back lost contacts from Infinix Note 30 VIP Racing Edition.
- In 2024, How to Change/Add Location Filters on Snapchat For your Poco M6 5G | Dr.fone
- How to Fix My Motorola G24 Power Location Is Wrong | Dr.fone
- How to recover old videos from your Itel P55+
- How to Track a Lost HTC U23 Pro for Free? | Dr.fone
- Top 4 Android System Repair Software for Vivo Y78+ Bricked Devices | Dr.fone
- OnePlus 12 Tutorial - Bypass Lock Screen,Security Password Pin,Fingerprint,Pattern
- Title: Updated 11 Apps To Speed Up A Video On iPhone for 2024
- Author: Morgan
- Created at : 2024-05-19 05:12:48
- Updated at : 2024-05-20 05:12:48
- Link: https://ai-video-editing.techidaily.com/updated-11-apps-to-speed-up-a-video-on-iphone-for-2024/
- License: This work is licensed under CC BY-NC-SA 4.0.

