
:max_bytes(150000):strip_icc():format(webp)/safari-photo--canon-and-nikon-digital-cameras-and-lenses--masai-mara-game-reserve--kenya--769713645-5bde071546e0fb0026a2c012.jpg)
Updated 15 Must-Use Gifs Editors
15 Must-Use Gifs Editors
15 Must-Use Gifs Editors in 2024
An easy yet powerful editor
Numerous effects to choose from
Detailed tutorials provided by the official channel
Several websites and companies use the graphics interchange format that is the GIF. It can be seen to be used by a wide number of people on the internet and its format is supported by all platforms. The common goal of all the users can be satisfied.
Are you looking to create and edit gifs online or on your laptop but cannot find a suitable way out?
Finding the best and most user friendly GIF maker is not very hard, especially considering that free gif editor software is offered by so many providers. But if you’re only starting your journey with apps to make GIFs, it can be a difficult choice.
In this article
01 [How to Make GIF Interesting?](#Part 1)
02 [Top 5 Editors for Windows](#Part 2)
03 [Top 5 Editors for iPhone/Android](#Part 3)
04 [Top 5 Editors for Animated GIF Editing](#Part 4)
Part 1 How to Make GIF Interesting?
There are several ways by which a GIF can be made interesting. You can use colorful graphics and drop duplicate frames. Using fewer colors lets you make longer and more involved gifs.
Part 2 Top 5 Editors for Windows
Below are the top 5 editors which will help you to form GIFs for Windows: -
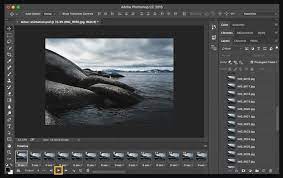
01Adobe Photoshop
Adobe Photoshop could be a useful device for making videos, image redaction, and GIF editing. This GIF code for Windows can allow you to import a GIF file so begin with the modification process.
Therefore, GIF editing is a breeze as you’ll alter the effects, modification the frame animation within the Timeline section, and do plenty a lot with this tool. You’ll simply utilize the free trial version to urge accustomed to the tool initial and then opt for the premium version to try to a lot more.
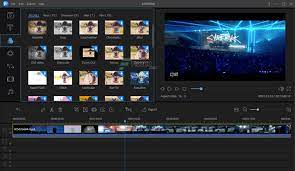
02EaseUS Video Editor
In the context of GIF makers, EaseUS Video Editor can also be said as one of the best. Free templates of texts, filters, elements, overlays, transitions, and music are available here which its users create GIF images with easily. You can also create lively and fully animated images, convert MP4 to GIFs and share it on YouTube, or other social media platforms.
The capabilities of this animated GIF maker for Windows are not restrained to this alone, as it can be used to edit all kinds of images, audio, and videos.
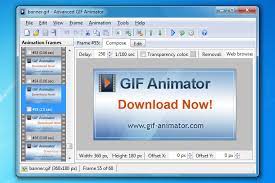
03GIF Animator
GIF animator editor is one of the first-rate GIF makers and is an awesome device for you if you desire to create GIF images, banners, buttons, and GIF videos. The device is very convenient to use and is a favorite of animators and designers.
The measurement of the photo can be modified and alongside that, it is feasible to control the frames, hastily cross texts, and enhance. Corrections to the movies can be brought and the built-in photograph editor can be used to rectify photographs and pictures, you can draw on them and you can convert movies to GIFs by the usage of the fragmented section of the video files.
04**Wondershare Filmora Video Editor **
If you are searching for nice animated GIF makers for Windows computers, then Wondershare Filmora’s animated movies and GIF editor device may want to be a brilliant choice. That’s due to the fact with this GIF maker Windows device lets you add a video, convert it to the GIF structure and then edit it later with its super features.
The interactive UI helps customers manner greater than one hundred fifty file codecs easily. With this device, you can crop, pace up a video, alter the body size, and caption it. Additionally, you add texts, add animation consequences to the images, and alter the pictures and movies in a few steps.

Wondershare Filmora - Best Video Editor for Mac/Windows
5,481,435 people have downloaded it.
Build unique custom animations without breaking a sweat.
Focus on creating epic stories and leave the details to Filmora’s auto features.
Start a creative adventure with drag & drop effects and endless possibilities.
Filmora simplifies advanced features to save you time and effort.
Filmora cuts out repetition so you can move on to your next creative breakthrough.
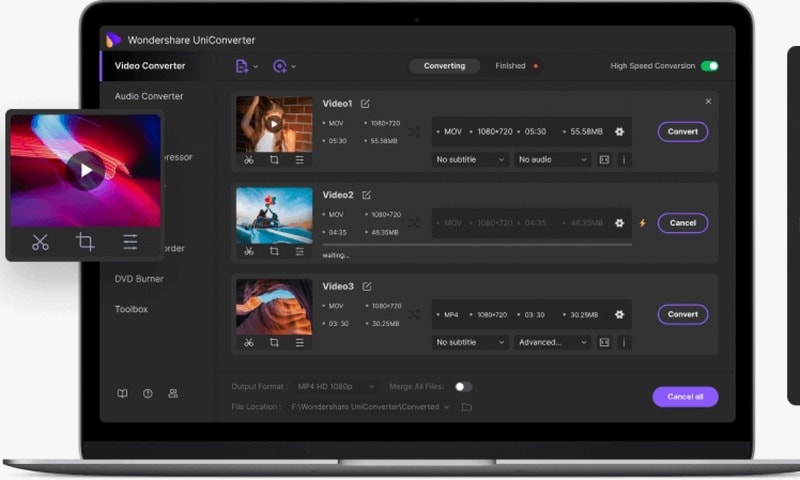
05Wondershare UniConverter
Wondershare UniConverter is one of the fine image, audio, and video editor and converter out there, and ranked the excellent GIF maker here. This GIF editor app is easy for customers and will furnish a pleasant platform for novices to operate their tasks. And when performed to create and edit GIF files, a person can export the GIF archives to both Android or iPhone barring having to use iTunes.
Part 3 Top 5 Editors for iPhone/Android
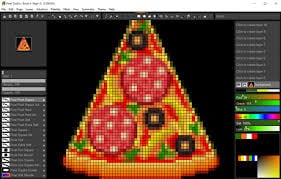
01PixelStudio
Pixel Studio is an animation app for pixel artwork fans. You can draw your little creations with pixel art. It additionally comes with a textual content tool, aid for matters like Samsung S-Pen, and it auto-saves so you don’t lose work. You can export your creations to GIF as nicely and that makes Pixel Studio one of the quality apps for customized GIFs. It’s normally an artwork app so meme lords may additionally want to put in a little greater effort than usual, however, the consequences are normally well worth it.
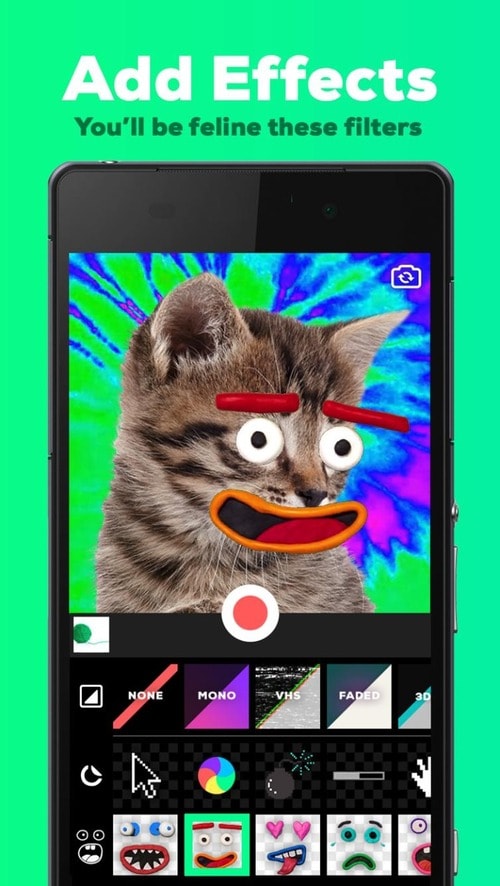
02Giphy Cam
Giphy Cam is one of the more recent gif editing apps. The digicam data is a brief phase of video. You can alter that video with lots of filters, different effects, stickers, text, and more. It additionally has a five-shot burst mode alongside its video mode. This is likely the excellent GIF/camera app hybrid. It doesn’t have any digital camera features; however, it does GIFs higher than the others by way of a large margin. It’s free with no in-app purchases.
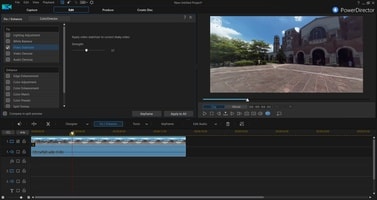
03PowerDirector
PowerDirector is one of many videos modifying apps with GIF support. This one simply takes place to be higher than most of the different ones. It’s a video editor app. Thus, it’ll have comparable features. However, two of the export codecs encompass GIF nonetheless pix and animated GIFs. This will work first-class for turning a video into a shorter GIF. The app is free to download and play with. You may additionally want to buy extra aspects by using in-app purchases.
04ImgPlay – GIF Maker
ImgPlay is a popular GIF editing app that is available for Android and iOS. You have the option of using an existing video or shooting one using your phone’s camera. In GIFs, you can apply 30 effects, crop a portion of your choice, and modify the frame rate.
05Motion Stills
Motion Stills is a Google app that allows you to record short films and turn them into looping GIFs. You can use the app to take a short 3s clip with a single tap or utilize the Fast Forward feature to condense an existing video into a short one. To make yips GIFs even better, you may add motion text and emoticons. After that, save it as a GIF and send it to your friends.
Part 4 Top 5 Editors for Animated GIF Editing
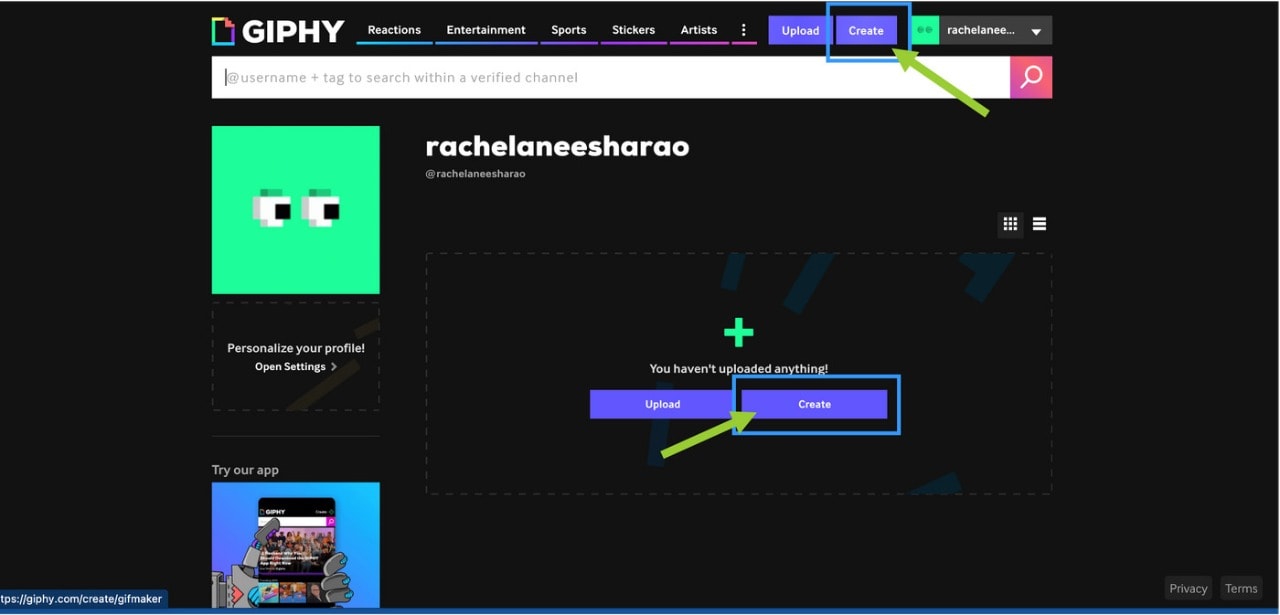
01Giphy
GIPHY is a designing tool that helps customers to create extraordinary GIFs, stickers, and backdrops. You can edit your plan with filters, captions, stickers, and different plan elements. The popular codecs for GIF uploads are JPG, PNG, GIF, MP4, or MOV, whilst the conventional file codecs to convert to stickers are JPG or PNG.
GIPHY permits you to paste URLs from specific sources such as Vimeo, YouTube, GIPHY, and others. The animated GIF maker software program makes it convenient for customers to edit and organize the uploaded archives in the favored order.
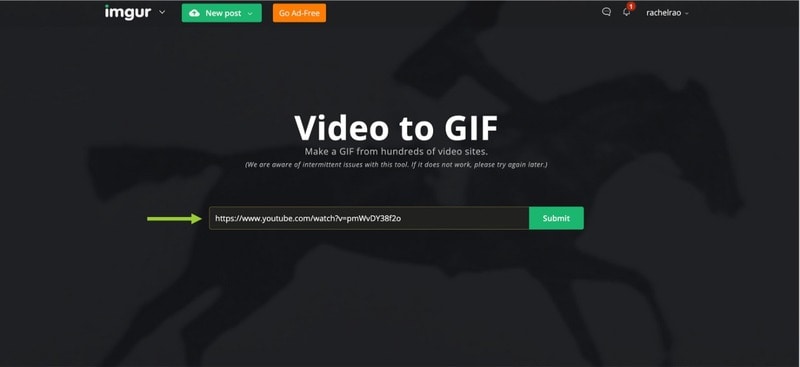
02Imgur
It’s a website that makes it simple to make GIFs. Simply paste the video URL into the web app and wait for it to process. After that, all you must do now is set the start time and duration of your GIF.
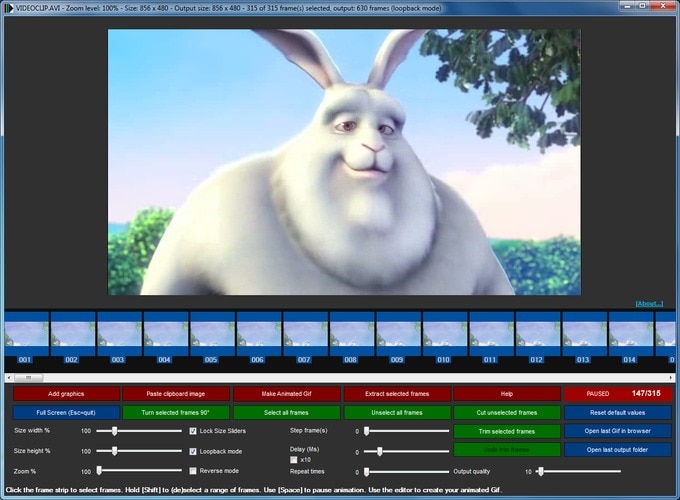
03KickMyGraphics
The utility comes with a humble person interface and it approves you to create animated GIFs from neighborhood images. In addition, you can additionally paste snapshots from your clipboard at once to the application. The utility additionally helps video files; however, you want to convert the video earlier than you can edit it. The utility affords a stay preview so you can see how your animation appears at any time. You can additionally see all handy frames and dispose of useless frames with ease.
As for editing, you can’t add your textual content or alter the brightness of your frames, however, you can trade their width, peak, and zoom level. You can additionally allow Loopback or Reverse mode and set delay, step frames, and a variety of repeats. You can additionally configure output first-class right from the application.
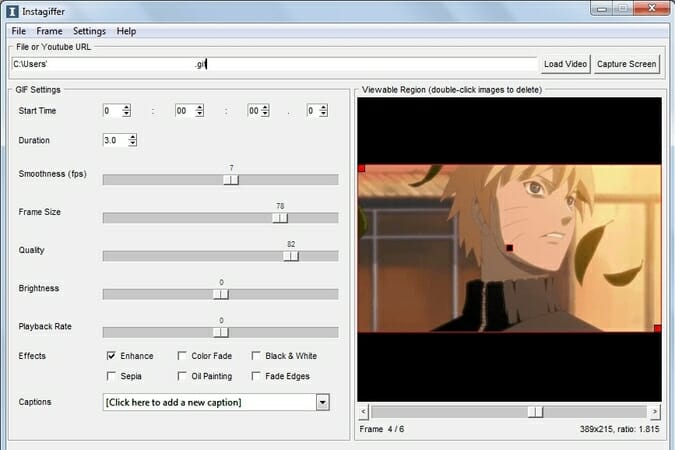
04Instagiffer
Instagiffer is some other easy software that lets you create animated GIFs on your PC. This utility affords a humble consumer interface; however, it makes up for it with an extensive variety of features. The software approves you to convert nearby movies to GIFs, however, you can additionally paste a YouTube URL and convert an online video to GIF with ease. According to the developer, the software additionally works with different video web hosting websites.
05GIMP
The software is free, so you can download and use it except for any restrictions. GIMP is best for picture designers and it comes with all preferences that an image editor needs. You can without problems edit your images, exchange their color, hue, saturation, or brightness, and add exceptional outcomes to them.
In addition, you can create special creations thanks to the built-in layer system. It’s worth citing that the software additionally helps programming algorithms so you can effortlessly edit your photos with the use of scripts.

● Key Takeaways from This Episode →
● If you are typically worried about how you can be able to come up with fascinating GIFs, you ought to hold in thought that you don’t have to create them from scratch.
● You can be capable to advance inspiring GIFs from current movies and photos eight after GIF editor software program free download.
● Hopefully, you are now capable to pick out a perfect GIF creator to use for your modifying tasks.
Several websites and companies use the graphics interchange format that is the GIF. It can be seen to be used by a wide number of people on the internet and its format is supported by all platforms. The common goal of all the users can be satisfied.
Are you looking to create and edit gifs online or on your laptop but cannot find a suitable way out?
Finding the best and most user friendly GIF maker is not very hard, especially considering that free gif editor software is offered by so many providers. But if you’re only starting your journey with apps to make GIFs, it can be a difficult choice.
In this article
01 [How to Make GIF Interesting?](#Part 1)
02 [Top 5 Editors for Windows](#Part 2)
03 [Top 5 Editors for iPhone/Android](#Part 3)
04 [Top 5 Editors for Animated GIF Editing](#Part 4)
Part 1 How to Make GIF Interesting?
There are several ways by which a GIF can be made interesting. You can use colorful graphics and drop duplicate frames. Using fewer colors lets you make longer and more involved gifs.
Part 2 Top 5 Editors for Windows
Below are the top 5 editors which will help you to form GIFs for Windows: -
01Adobe Photoshop
Adobe Photoshop could be a useful device for making videos, image redaction, and GIF editing. This GIF code for Windows can allow you to import a GIF file so begin with the modification process.
Therefore, GIF editing is a breeze as you’ll alter the effects, modification the frame animation within the Timeline section, and do plenty a lot with this tool. You’ll simply utilize the free trial version to urge accustomed to the tool initial and then opt for the premium version to try to a lot more.
02EaseUS Video Editor
In the context of GIF makers, EaseUS Video Editor can also be said as one of the best. Free templates of texts, filters, elements, overlays, transitions, and music are available here which its users create GIF images with easily. You can also create lively and fully animated images, convert MP4 to GIFs and share it on YouTube, or other social media platforms.
The capabilities of this animated GIF maker for Windows are not restrained to this alone, as it can be used to edit all kinds of images, audio, and videos.
03GIF Animator
GIF animator editor is one of the first-rate GIF makers and is an awesome device for you if you desire to create GIF images, banners, buttons, and GIF videos. The device is very convenient to use and is a favorite of animators and designers.
The measurement of the photo can be modified and alongside that, it is feasible to control the frames, hastily cross texts, and enhance. Corrections to the movies can be brought and the built-in photograph editor can be used to rectify photographs and pictures, you can draw on them and you can convert movies to GIFs by the usage of the fragmented section of the video files.
04**Wondershare Filmora Video Editor **
If you are searching for nice animated GIF makers for Windows computers, then Wondershare Filmora’s animated movies and GIF editor device may want to be a brilliant choice. That’s due to the fact with this GIF maker Windows device lets you add a video, convert it to the GIF structure and then edit it later with its super features.
The interactive UI helps customers manner greater than one hundred fifty file codecs easily. With this device, you can crop, pace up a video, alter the body size, and caption it. Additionally, you add texts, add animation consequences to the images, and alter the pictures and movies in a few steps.
Wondershare Filmora - Best Video Editor for Mac/Windows
5,481,435 people have downloaded it.
Build unique custom animations without breaking a sweat.
Focus on creating epic stories and leave the details to Filmora’s auto features.
Start a creative adventure with drag & drop effects and endless possibilities.
Filmora simplifies advanced features to save you time and effort.
Filmora cuts out repetition so you can move on to your next creative breakthrough.
05Wondershare UniConverter
Wondershare UniConverter is one of the fine image, audio, and video editor and converter out there, and ranked the excellent GIF maker here. This GIF editor app is easy for customers and will furnish a pleasant platform for novices to operate their tasks. And when performed to create and edit GIF files, a person can export the GIF archives to both Android or iPhone barring having to use iTunes.
Part 3 Top 5 Editors for iPhone/Android
01PixelStudio
Pixel Studio is an animation app for pixel artwork fans. You can draw your little creations with pixel art. It additionally comes with a textual content tool, aid for matters like Samsung S-Pen, and it auto-saves so you don’t lose work. You can export your creations to GIF as nicely and that makes Pixel Studio one of the quality apps for customized GIFs. It’s normally an artwork app so meme lords may additionally want to put in a little greater effort than usual, however, the consequences are normally well worth it.
02Giphy Cam
Giphy Cam is one of the more recent gif editing apps. The digicam data is a brief phase of video. You can alter that video with lots of filters, different effects, stickers, text, and more. It additionally has a five-shot burst mode alongside its video mode. This is likely the excellent GIF/camera app hybrid. It doesn’t have any digital camera features; however, it does GIFs higher than the others by way of a large margin. It’s free with no in-app purchases.
03PowerDirector
PowerDirector is one of many videos modifying apps with GIF support. This one simply takes place to be higher than most of the different ones. It’s a video editor app. Thus, it’ll have comparable features. However, two of the export codecs encompass GIF nonetheless pix and animated GIFs. This will work first-class for turning a video into a shorter GIF. The app is free to download and play with. You may additionally want to buy extra aspects by using in-app purchases.
04ImgPlay – GIF Maker
ImgPlay is a popular GIF editing app that is available for Android and iOS. You have the option of using an existing video or shooting one using your phone’s camera. In GIFs, you can apply 30 effects, crop a portion of your choice, and modify the frame rate.
05Motion Stills
Motion Stills is a Google app that allows you to record short films and turn them into looping GIFs. You can use the app to take a short 3s clip with a single tap or utilize the Fast Forward feature to condense an existing video into a short one. To make yips GIFs even better, you may add motion text and emoticons. After that, save it as a GIF and send it to your friends.
Part 4 Top 5 Editors for Animated GIF Editing
01Giphy
GIPHY is a designing tool that helps customers to create extraordinary GIFs, stickers, and backdrops. You can edit your plan with filters, captions, stickers, and different plan elements. The popular codecs for GIF uploads are JPG, PNG, GIF, MP4, or MOV, whilst the conventional file codecs to convert to stickers are JPG or PNG.
GIPHY permits you to paste URLs from specific sources such as Vimeo, YouTube, GIPHY, and others. The animated GIF maker software program makes it convenient for customers to edit and organize the uploaded archives in the favored order.
02Imgur
It’s a website that makes it simple to make GIFs. Simply paste the video URL into the web app and wait for it to process. After that, all you must do now is set the start time and duration of your GIF.
03KickMyGraphics
The utility comes with a humble person interface and it approves you to create animated GIFs from neighborhood images. In addition, you can additionally paste snapshots from your clipboard at once to the application. The utility additionally helps video files; however, you want to convert the video earlier than you can edit it. The utility affords a stay preview so you can see how your animation appears at any time. You can additionally see all handy frames and dispose of useless frames with ease.
As for editing, you can’t add your textual content or alter the brightness of your frames, however, you can trade their width, peak, and zoom level. You can additionally allow Loopback or Reverse mode and set delay, step frames, and a variety of repeats. You can additionally configure output first-class right from the application.
04Instagiffer
Instagiffer is some other easy software that lets you create animated GIFs on your PC. This utility affords a humble consumer interface; however, it makes up for it with an extensive variety of features. The software approves you to convert nearby movies to GIFs, however, you can additionally paste a YouTube URL and convert an online video to GIF with ease. According to the developer, the software additionally works with different video web hosting websites.
05GIMP
The software is free, so you can download and use it except for any restrictions. GIMP is best for picture designers and it comes with all preferences that an image editor needs. You can without problems edit your images, exchange their color, hue, saturation, or brightness, and add exceptional outcomes to them.
In addition, you can create special creations thanks to the built-in layer system. It’s worth citing that the software additionally helps programming algorithms so you can effortlessly edit your photos with the use of scripts.
● Key Takeaways from This Episode →
● If you are typically worried about how you can be able to come up with fascinating GIFs, you ought to hold in thought that you don’t have to create them from scratch.
● You can be capable to advance inspiring GIFs from current movies and photos eight after GIF editor software program free download.
● Hopefully, you are now capable to pick out a perfect GIF creator to use for your modifying tasks.
How Can I Control Speed of a Video
Speed doesn’t course at the same level for everyone. You can change momentum. You can slow it down and speed it up to convey a particular mood. In this article, you will learn how and when to control the speed of the video and its importance.
Importance of Speeding up/Slowing Down Your video?
Speeding up or slowing it down, known as slow or fast motion, can make your video faster or slower than its actual speed, called speed ramping. Overall, adjusting the speed of video clips can enhance the video’s visual effects, especially if you want to convey a particular mood to the audience. Speeding up your video may create a comical and dramatic impact, while slowing down your video can give viewers a time-lapse feel or an emotional mood.
This video speed controlling software can instantly speed up video up to 50x times. On the contrary, you can also slow down the video up to 0.1x, which means a one-minute video will run for 10 minutes.
How important is this Feature? The technique plays an essential role in adjusting the video’s speed. You will appreciate this technique once you’ve started editing your video. At first, controlling the speed of your video without music will give you a plain or bare impression. Based on my experience, I cannot quickly identify which video part needs to control the speed. Still, once you’ve added music at the start, you can quickly determine when and where you should maintain the momentum based on the beat of the music.
How to Speed up/Slow down a Video?
Nowadays, most video editing software offers an effortless way of giving special cinematic effects through speed ramping? Speed ramping is an approach to adjusting the clip’s speed to send the message across and provide the audience with an element of confusion. Since speed ramp is a gradual increase in the acceleration or deceleration of a video clip, reasons to slow down or speed up video vary from merely decorative to practical, but whatever your reasons, speed effects can add some production value to your projects.
This article gives you a guide on how to slow down or speed up video on your video editing software, for example, using Wondershare Filmora on your device.
In this tutorial, you will learn how to change the speed of your video using Wondershare Filmora
Free Download For Win 7 or later(64-bit)
Free Download For macOS 10.14 or later
Step1 Open your Video editing software
Launch Wondershare Filmora from your system and select New Project.

Import the selected videos and open them in the program to enhance the speed and duration of the video. The video can also be dragged and dropped to the interface.

Drag the selected video clip on Timeline Panel. You can click the + button or drag the video.
Step2 Change the Speed of your video
In Wondershare Filmora there are two available features you can use, first is using the Uniform Speed Feature.
Uniform Speed - Uniform Speed feature in Filmora is used to change the speed of your video or audio clips. Compared to Speed Ramping function, Uniform speed will change the whole clip’s speed evenly, instead of parts of your clips. How to use this Feature?
Using the Uniform Speed
- After adding the video on your timeline, drag the play head line and choose where will the uniform speed start.

- Right-click on the video or audio clip, or go to Speed>Uniform Speed then choose Uniform Speed.

- Uniform Speed window will pop up then adjust the slider to your desired speed. Click ok once you’re done.

- You can observe that the video from where you set your playback has indicator of how fast does the video will play which is 6.50x.

- You can also revert back or customize the set Uniform Speed by clicking the arrow down on the Uniform Speed Indicator or click the Speed button on the left side of the screen. There are also options whether you want to set the speed to slow, fast and normal.

Speed ramping - In Filmora, you can choose to change speed uniformly or speedily. To change the rate of the video or audio clip speed, you need to use the Filmora Speed Ramping feature.
In the Speed Ramping panel, you can customize the speed or select the speed preset such as Montage, Hero Moment, Bullet Time, Jumper, Flash in, and Flash out. You can choose the Preset speed ramps.
Evenly change the speed of the video clip to match another clip. Much software available will give you the option to speed ramp.
The importance of speed controls Having control over the speed of your motors and machinery is vital for you to get the full potential of your tools. Giving yourself complete speed control will ensure you experience little to no tool chatter and a perfect machined finish every time.
Playing with speed controls can help displeasure interest and guide focus when editing your video. You might have used slow motion to overemphasize a scene, or maybe you’ve sped up a clip to create a time-lapse—but have you tried to speed ramping?

If you want to add cinematic to your video. The speed ramp effect describes a smooth transition between speeds, resulting in a video that dips in and out of slow-mo. and high-speed playback. You can ramp up, down, or do a mix of both for multiple speed adjustments throughout a video!
Visualize you’re trying to bring a simple pan shot of a product to life, energize the transitions in your latest travel video, emphasize the beat drop in a music video, or keep eyes affix to your content.
Speed ramping can give your video. style. It can help you do anything from excitement up B-roll to infuse otherwise unremarkable footage with personality.
Proper timing and speed make videos more useful and spectacular. You can enable slow motion to add enthusiasm to dramatics or speed up a video to spur the action. No matter your idea, you can fulfill it with some video editing software.
Free Download For Win 7 or later(64-bit)
Free Download For macOS 10.14 or later
Free Download For macOS 10.14 or later
Step1 Open your Video editing software
Launch Wondershare Filmora from your system and select New Project.
Import the selected videos and open them in the program to enhance the speed and duration of the video. The video can also be dragged and dropped to the interface.
Drag the selected video clip on Timeline Panel. You can click the + button or drag the video.
Step2 Change the Speed of your video
In Wondershare Filmora there are two available features you can use, first is using the Uniform Speed Feature.
Uniform Speed - Uniform Speed feature in Filmora is used to change the speed of your video or audio clips. Compared to Speed Ramping function, Uniform speed will change the whole clip’s speed evenly, instead of parts of your clips. How to use this Feature?
Using the Uniform Speed
- After adding the video on your timeline, drag the play head line and choose where will the uniform speed start.
- Right-click on the video or audio clip, or go to Speed>Uniform Speed then choose Uniform Speed.
- Uniform Speed window will pop up then adjust the slider to your desired speed. Click ok once you’re done.
- You can observe that the video from where you set your playback has indicator of how fast does the video will play which is 6.50x.
- You can also revert back or customize the set Uniform Speed by clicking the arrow down on the Uniform Speed Indicator or click the Speed button on the left side of the screen. There are also options whether you want to set the speed to slow, fast and normal.
Speed ramping - In Filmora, you can choose to change speed uniformly or speedily. To change the rate of the video or audio clip speed, you need to use the Filmora Speed Ramping feature.
In the Speed Ramping panel, you can customize the speed or select the speed preset such as Montage, Hero Moment, Bullet Time, Jumper, Flash in, and Flash out. You can choose the Preset speed ramps.
Evenly change the speed of the video clip to match another clip. Much software available will give you the option to speed ramp.
The importance of speed controls Having control over the speed of your motors and machinery is vital for you to get the full potential of your tools. Giving yourself complete speed control will ensure you experience little to no tool chatter and a perfect machined finish every time.
Playing with speed controls can help displeasure interest and guide focus when editing your video. You might have used slow motion to overemphasize a scene, or maybe you’ve sped up a clip to create a time-lapse—but have you tried to speed ramping?
If you want to add cinematic to your video. The speed ramp effect describes a smooth transition between speeds, resulting in a video that dips in and out of slow-mo. and high-speed playback. You can ramp up, down, or do a mix of both for multiple speed adjustments throughout a video!
Visualize you’re trying to bring a simple pan shot of a product to life, energize the transitions in your latest travel video, emphasize the beat drop in a music video, or keep eyes affix to your content.
Speed ramping can give your video. style. It can help you do anything from excitement up B-roll to infuse otherwise unremarkable footage with personality.
Proper timing and speed make videos more useful and spectacular. You can enable slow motion to add enthusiasm to dramatics or speed up a video to spur the action. No matter your idea, you can fulfill it with some video editing software.
Free Download For Win 7 or later(64-bit)
Free Download For macOS 10.14 or later
How to Color Grading in Final Cut Pro
Have you ever questioned the purpose of those odd video scopes or how to build super grades from the start in Final Cut Pro? In contrast to editing talents, color grading is a technical and difficult ability that takes practice.
In order to help, we decided to compile a thorough beginner’s article to color grading in Final Cut Pro.
With that said, let’s begin!
1. Discover how you color grade in Final Cut Pro
Color grading may be a tedious and time-consuming operation, therefore it’s a skill set that calls for a lot of patience. Some editors won’t conduct any color grading or correction beyond the bare minimum. But even mundane-looking film may look remarkable if you know how to give it a dramatic touch.
A more cinematic grade requires a number of procedures, and there is no one method that works for all situations. We’ll therefore walk you through the process of creating a cinematic color grade in Final Cut Pro, but depending on your material, you might need to add or omit some phases.
Step1Filming
Since the raw video is essential for producing a cinematic image, an outstanding grade begins with the camera.
Use the greatest quality settings your camera offers while recording your video; the more information in your picture, the more you can manipulate it during grading.
While it may seem preferable to shoot with as much color as you can, using a duller color profile is very necessary. Your camera will have color settings, and although the washed-out, drab appearance may not inspire confidence in you, it will offer you a lot more editing possibility.
Step2Create a color profile
After importing your film, you may be concerned about the general dull look of your recordings. The reason for that is because you have not yet matched the color profile of your sequence to the one of your camera. To start on this process, it goes as follows.
- Drag your clip onto your timeline and make sure it is selected. Click on the Inspector icon.
- Then click on the Information tab of the clip.
- Navigate all the way down through the options to find the Color LUT option.
- Then choose the Color profile that matches your clip based on the camera it is filmed with.
- You’re done!
Step3Checking the scopes
The Scopes in Final Cut Pro are panels that display the color information of your shots. They are quite complicated and can be difficult to comprehend if you did not use them ever before. You can activate Video Scopes by clicking View > Show in Viewer > Video Scopes from the View menu. The three components of grading are the highlights, mid-tones, and shadows. Your highlights are shown at the top and your shadows are at the bottom in all grading tools and scopes.
2. Include Color Wheels
Now that your setup is complete, you can begin grading your footage. Grading is done in multiple layers stacked on top of each other. It may take multiple levels to create the desired look. Follow the instructions below to modify your settings to match your clip if you want to give your footage a cinematic look.
You may access a wider range of color manipulation tools with the built-in color wheels, exposure adjustments, including isolation of color selection, RGB modifications across tone ranges, and simple masking.
3. Color board
A vertical color spectrum is shown on the Color Board, and it is intersected by a horizontal line that features four nodes. These are the ranges of the footage that are designated as the Highlights, Midtones, and Shadows, respectively.
Adjusting a node to a new color space has an immediate and noticeable impact on the corresponding section of the image. If you move above the horizontal line, it will increase, and if you go below the line, it will decrease.
You also have control over the Saturation and Exposure settings. These are wonderful to have if you want to increase the contrast in your photographs and make particular colors more vivid or muted.
4. Masks
Using the Shape Masks feature, each of these individual effects can be perfect for particular regions of your footage. In addition, by utilizing a Color Mask, you can alter the appearance of a specific color. It is possible to apply multiple iterations of each color adjustment to a clip and find it listed under the Effect heading.
The order can be changed by dragging and dropping, and either method can be disabled or enabled. Utilizing keyframes allows for the effects of color grading to be specifically timed as well. Last but not least, keep in mind that the quality and color sample depth of the clips determine how much of an overall adjustment you are capable of making to a color.
5. Color Curves
If you are experienced with more advanced picture editing software, such as Adobe Photoshop, you will benefit greatly from using color curves. Adjustments can be made independently to both the Luma (the brightest areas) and the primary composite colors (red, blue, and green).
6. Match Colors
Match Color is an additional choice that may be made from the improvement’s menu. This function will try to replicate the visual style of one video clip in another. First, choose the clip whose color you want to change, click on that clip that has the desired appearance, and last, choose Match Color.
You will still be able to utilize these settings as shortcuts even after you have gained more experience with manual grading and are comfortable making finer adjustments manually. It is important to keep in mind that while using Final Cut Pro X for color grading, effects can be layered on top of one another.
It’s not likely that a single tool or adjustment will solve an issue or produce the desired result; rather, it’s more likely that a number of different impacts will be required. In the same way that different visual effects in Final Cut Pro X may be toggled on and off, any layers that you add to a clip can have their visibility controlled from the Inspector window.
Conclusion
In Final Cut Pro X, you may choose from a wide variety of grading plugins, ranging from more affordable solutions like FCPeffects to more expensive ones like Magic Bullet Looks, which are designed specifically for feature film-style grades.
Additionally, there is a variety of stand-alone applications for color grading, such as DaVinci Resolve and FilmConvert. You might be comfortable with their gear, but you should also know that their professional-grade color package includes some rather complex editing options.
Beginning to experiment with all of Final Cut Pro X’s functions and determining which ones are most useful to you is the best method to gain an understanding of the program’s color grading capabilities. If you don’t currently have a project that requires your attention, you can download stock footage and experiment with it.
Free Download For Win 7 or later(64-bit)
Free Download For macOS 10.14 or later
Free Download For macOS 10.14 or later
5 Methods to Denoise a Video
In today’s world, the quality of digital product such as photos and videos increase day by day, prompting us to create our content crystal clear and keep it that way. Of course, different kinds of effects and filters are great, and something called “noise” is one of them, but sometimes it is actually unwanted and makes our footage less likable. What is noise, or denoising, anyway? Well, instead of clear video, it’s something quite different – the footage looks grainy, sometimes excessively, and makes our eyes hurt, or simply, more difficult to see what’s going on on the screen. And if you didn’t decide to use a noise effect, then from where does it appear?..
Noise means a mix of different variations of brightness or color information in the shot. It is likely to show up when there is a low light, and/or when the video is taken with small sensors such as smartphones and action cameras. It works as follows: if someone tries to compensate for low-light settings with gain and ISO, more noise is produced.
But, as our readers already know, almost nothing is ever impossible to solve. There is a way to get rid of this annoying grain, and it is called, as pretty obvious, denoising. Hence, denoising in image and video production is used as a technique to take footage from grainy to crystal-clear. And, as you may already agree, it improves a viewer’s quality of experience. And how does this happen? - There are varied techniques, and each of them uses different mathematical and statistical models.
What is considered a good noise reduction? The technique is successful when it suppresses noise effectively in uniform regions; preserves edges and other characteristics, such as fine details and textures; and provides a visually natural experience.
and here you will learn 5 ways, as in 5 software to denoise a video. We’ll touch upon the following ones: Final Cut Pro, Adobe After Effects, Adobe Premiere Pro, DaVinci Resolve and Movavi Video Editor. But, we are not limited to these ones, so maybe there is one more you could use? You’ll find out in the article!
- Final Cut Pro
Noise that appears as unwanted grain or artifacts in the video image can be removed in Final Cut Pro pretty easily, you just have to follow the little steps for it. Keep in mind that Final Cut Pro is not eligible for PC, this editor is only available for Mac (but Windows users, tune in for the editors functioning on PC’s!)
So, you have your grained footage, which you already chose to denoise, and for which you will need a video reduction effect.
First, you will need to open Final Cut Pro and import abovementioned video. Select this clip in the timeline,

and position the play head in a way that the clip appears in the viewer, that is, on the big screen - for you to see well.

Click the Effects button in the top-right corner of the timeline, or, to use the shortcut, press Command & 5.

In the Effects browser, select the Basics category in the list of Video effects on the left, then select the Noise Reduction effect. For 360° clips, select the 360° category, then select the 360° Noise Reduction effect.
And you will need to do one of the following:
Drag the effect to the timeline clip you want to apply it to, or double-click the effect thumbnail to apply the effect to the selected clip.
When the effect is applied, Final Cut Pro analyzes the clip for noise, so you might need to wait for a little while the process is complete and only then see the result.
Interesting tip you can remember is that if you are using several effects to your video clip, then adding Noise Reduction as the first effect would guarantee the best results for you. So, Mac users, you can start denoising your videos in Final Cut Pro now!
- Adobe After Effects
Adobe After Effects is a digital visual effects, motion graphics, and compositing application… Pretty intense, right? This very software has endless powers, and one of them is, you guessed correctly – denoising the video! So, how are we going to do that in this monster of the industry?
Sometimes what’s annoying about this kind of programs is that you need plugins, so let’s try to find a way to achieve our desired result without using anything external.
So, first of all (as in all cases!) import your video into After Effects. Then, you will need to find Effect in the menu, and find: Noise and Grain. There, you will choose Remove Grain and click on it.

On the left side of the program layout, the Effects Control will be opened. Now, you see viewing mode, where you need to change Preview to Final Output.

So, this will be the video with Preview checked:

Which will look like this when Final Output is checked:

Somewhat different and looking better, right?..
By the way, you can watch the whole process video here !
- Adobe Premiere Pro
Adobe Premiere Pro is one of the most and sophisticated video editor. So, of course, there is a way to reduce noise in this software as well, and this can be reached using effect called Median.
First of all, you add your footage to the Timeline in Premiere Pro and then go find the Effects Panel, where Median can be found. You need to drag and drop the Median effect to your video clip.

The next step is to make sure that adding the effect to the grainiest parts of the clip, which can be done using masks. So, in the Effects Control panel, you’ll need to select the mask shape for your clip – you can either choose rectangle, circle, or pen tool. With the latter you can move the Mask around the screen and resize it to cover the area.

And if you Change the Feather setting to 100, the effect will not have a very visible edge and some smoothness will cover for it.

You will need to repeat the process with more than one mask, if you would like to have covered all of the grainy area of your shot.
Lastly, you’ll need to adjust the effect settings to reduce the noise.

The Median effect doesn’t actually take away the graininess, it just blurs it. You’ll need to experiment with the Radius settings until you are happy with the result.
- DaVinci Resolve
When it comes to DaVinci Resolve, the process is somewhat different in the free version of it. So, first of all, off course, you add your footage into the timeline. Then,you are going to find the fusion tab underneath the timeline panel.

You will see MediaIn1 and MediaOut1, you click on MediaIn1, which will ensure the scene appears in the first viewer – and MediaOut1 by default is appearing in the second. So, now you stay on MediaIn1, hit shift+spacebar, and find the option which says: Remove Noise (RN) and then click Add, which adds the Remove Noise1 node. On the top right corner you will find Inspector, and if you click on it, you will see all the properties you can modify.
After going only into the second viewer, and in the top bar we can find channel icons. We open it and click on red, which makes the footage black and white for a while. Then, we go back to the Inspector, increase Softness Red and Detail Red.

This removes much grain from the red channel. Then we repeat the same for green, as well as for blue channel. Once you finish, you go to the same channel button in the bar and change it to “back to color”. So, the footage will have its colors back and you will see that it has become clearer, compared to the first viewer.

You can play around with the Chroma and Luma channels in the Inspector, if that is something you have ever had experience with!
- Movavi Video Editor
In Movavi Video Editor, it is pretty straightforward – unlike DaVinci Resolve, of course! So, getting to the point: the first thing you need to do is Entering the Edit Mode. In order to achieve it, you’ll need to click the Edit button next to the file you want to adjust or select Adjustments in the Tools tab.

After this, you will be able to select the Noise removal option, and then, move the Noise level slider to reflect the amount of noise you can see in the preview. The more noise you need to remove, the higher the Noise level, and vice versa.

When you’re finished removing the noise, click Apply, but in case you need to remove noise from several files, select Apply to all files, which ensures the same noise level will be applied on all your files there.
Lastly, of course, Wondershare Filmora X offers the same option as well. The steps are ase follows: You need to go to the Effects panel and type: “Smart Denoise”. Then, right-click on the video and choose Edit Properties.

This will make sure you go inside the Smart Denoise, where you can change opacity of the clip, threshold and radius.

You should reduce Opacity until you are satisfied with the result. Then, you can use the box next to Smart Denoise in order to see the scene before and after noise and grain removal.
So, that’s it! – We learned how to remove/reduce noise and grain from the videos, using several video editors. So you might as well start making your video clips look better right away!
Noise that appears as unwanted grain or artifacts in the video image can be removed in Final Cut Pro pretty easily, you just have to follow the little steps for it. Keep in mind that Final Cut Pro is not eligible for PC, this editor is only available for Mac (but Windows users, tune in for the editors functioning on PC’s!)
So, you have your grained footage, which you already chose to denoise, and for which you will need a video reduction effect.
First, you will need to open Final Cut Pro and import abovementioned video. Select this clip in the timeline,
and position the play head in a way that the clip appears in the viewer, that is, on the big screen - for you to see well.
Click the Effects button in the top-right corner of the timeline, or, to use the shortcut, press Command & 5.
In the Effects browser, select the Basics category in the list of Video effects on the left, then select the Noise Reduction effect. For 360° clips, select the 360° category, then select the 360° Noise Reduction effect.
And you will need to do one of the following:
Drag the effect to the timeline clip you want to apply it to, or double-click the effect thumbnail to apply the effect to the selected clip.
When the effect is applied, Final Cut Pro analyzes the clip for noise, so you might need to wait for a little while the process is complete and only then see the result.
Interesting tip you can remember is that if you are using several effects to your video clip, then adding Noise Reduction as the first effect would guarantee the best results for you. So, Mac users, you can start denoising your videos in Final Cut Pro now!
- Adobe After Effects
Adobe After Effects is a digital visual effects, motion graphics, and compositing application… Pretty intense, right? This very software has endless powers, and one of them is, you guessed correctly – denoising the video! So, how are we going to do that in this monster of the industry?
Sometimes what’s annoying about this kind of programs is that you need plugins, so let’s try to find a way to achieve our desired result without using anything external.
So, first of all (as in all cases!) import your video into After Effects. Then, you will need to find Effect in the menu, and find: Noise and Grain. There, you will choose Remove Grain and click on it.
On the left side of the program layout, the Effects Control will be opened. Now, you see viewing mode, where you need to change Preview to Final Output.
So, this will be the video with Preview checked:
Which will look like this when Final Output is checked:
Somewhat different and looking better, right?..
By the way, you can watch the whole process video here !
- Adobe Premiere Pro
Adobe Premiere Pro is one of the most and sophisticated video editor. So, of course, there is a way to reduce noise in this software as well, and this can be reached using effect called Median.
First of all, you add your footage to the Timeline in Premiere Pro and then go find the Effects Panel, where Median can be found. You need to drag and drop the Median effect to your video clip.
The next step is to make sure that adding the effect to the grainiest parts of the clip, which can be done using masks. So, in the Effects Control panel, you’ll need to select the mask shape for your clip – you can either choose rectangle, circle, or pen tool. With the latter you can move the Mask around the screen and resize it to cover the area.
And if you Change the Feather setting to 100, the effect will not have a very visible edge and some smoothness will cover for it.
You will need to repeat the process with more than one mask, if you would like to have covered all of the grainy area of your shot.
Lastly, you’ll need to adjust the effect settings to reduce the noise.
The Median effect doesn’t actually take away the graininess, it just blurs it. You’ll need to experiment with the Radius settings until you are happy with the result.
- DaVinci Resolve
When it comes to DaVinci Resolve, the process is somewhat different in the free version of it. So, first of all, off course, you add your footage into the timeline. Then,you are going to find the fusion tab underneath the timeline panel.
You will see MediaIn1 and MediaOut1, you click on MediaIn1, which will ensure the scene appears in the first viewer – and MediaOut1 by default is appearing in the second. So, now you stay on MediaIn1, hit shift+spacebar, and find the option which says: Remove Noise (RN) and then click Add, which adds the Remove Noise1 node. On the top right corner you will find Inspector, and if you click on it, you will see all the properties you can modify.
After going only into the second viewer, and in the top bar we can find channel icons. We open it and click on red, which makes the footage black and white for a while. Then, we go back to the Inspector, increase Softness Red and Detail Red.
This removes much grain from the red channel. Then we repeat the same for green, as well as for blue channel. Once you finish, you go to the same channel button in the bar and change it to “back to color”. So, the footage will have its colors back and you will see that it has become clearer, compared to the first viewer.
You can play around with the Chroma and Luma channels in the Inspector, if that is something you have ever had experience with!
- Movavi Video Editor
In Movavi Video Editor, it is pretty straightforward – unlike DaVinci Resolve, of course! So, getting to the point: the first thing you need to do is Entering the Edit Mode. In order to achieve it, you’ll need to click the Edit button next to the file you want to adjust or select Adjustments in the Tools tab.
After this, you will be able to select the Noise removal option, and then, move the Noise level slider to reflect the amount of noise you can see in the preview. The more noise you need to remove, the higher the Noise level, and vice versa.
When you’re finished removing the noise, click Apply, but in case you need to remove noise from several files, select Apply to all files, which ensures the same noise level will be applied on all your files there.
Lastly, of course, Wondershare Filmora X offers the same option as well. The steps are ase follows: You need to go to the Effects panel and type: “Smart Denoise”. Then, right-click on the video and choose Edit Properties.
This will make sure you go inside the Smart Denoise, where you can change opacity of the clip, threshold and radius.
You should reduce Opacity until you are satisfied with the result. Then, you can use the box next to Smart Denoise in order to see the scene before and after noise and grain removal.
So, that’s it! – We learned how to remove/reduce noise and grain from the videos, using several video editors. So you might as well start making your video clips look better right away!
Also read:
- Srt File Creator
- Updated In 2024, Want to Apply a Filter on Your Video Using Your iPhone or Mac? Here Are the Simple Steps to Put Add Filters on iMovie. Find Out a Better iMovie Alternative with More Filters
- Easy Way to Add Transitions to Videos for 2024
- Updated 2024 Approved Final Cut Pro for iPad
- Updated If You Do Not Know How to Blur Faces in a Video on iPhone, You Are in the Right Place. We Have Provided You with All the Details You Need to Learn How to Blur Part of Your Video on Your iOS Device for 2024
- Updated In This Article, We Will Introduce You Our Top 5 Picks of Websites and Software Converter Online to Convert Powerpoint to Mp4
- Updated In 2024, Best Tricks for Learning Photo Slideshow
- New Do You Wish to Create High-Quality Videos and Experience Effective Videos with Editing? No Problem at All because the Keyboard Shortcuts Listed Here Will Assist You for 2024
- Updated 6 Instant Mp4 to GIF Online Tools for 2024
- Updated In 2024, 5 Ways to Make a Fake Facetime Call Video
- New How To Make a Photo Collage in Microsoft Word — Step by Step Guide
- If You Want an App to Make Videos with Pictures and Music for Social Media Posts, We Are with the Best Apps to Make Videos with Music and Pictures for 2024
- In 2024, Do You Want to Create Slow-Motion Videos? This Article Shows Methods to Create Slow-Mo Videos without Changing the Medias Quality
- New 2024 Approved Fast Method to Match Color in Photoshop
- Updated In 2024, Create Stunning Videos Like a Pro with Filmora. Learn About Its Benefits and some Amazing Video and Audio Editing Features Such as Split Screens, Keyframing, Etc
- Updated If You Want to Know More About the Basics of Final Cut Pro, It Would Be Helpful to Watch a Beginner Tutorial, with the Length of only 20 Minutes, an Introduction of the Whole Program
- Updated Easy Steps to Loop YouTube Videos on iPhone for 2024
- Updated In 2024, This Article Talks About Pixel Art Wallpapers. It Gives Examples of Different Pixel Art to Show You How to Customize Your Own Pixel Art Wallpapers, and How to Make a Pixel Art Gif on Filmora
- New Thousands Already Know Ezgif and So Can You
- In 2024, How to Trim/Crop Video in Microsoft Powerpoint
- In 2024, 3 Best Effects to Appear on Camera Made with Filmora
- New | Change Speed of a Video on iPhone for 2024
- Premiere Pro Best Slow Motion Effects To Use
- Updated An Ultimate Guide To Edit a Music Video Aspect Ratio and First Cut
- 3 Best Tools to Hard Reset Xiaomi Redmi K70E | Dr.fone
- In 2024, Which Pokémon can Evolve with a Moon Stone For Tecno Pova 6 Pro 5G? | Dr.fone
- In 2024, 6 Proven Ways to Unlock Vivo S18 Pro Phone When You Forget the Password
- Top 9 Xiaomi Redmi 13C Monitoring Apps for Parental Controls | Dr.fone
- Ultimate Guide on Samsung Galaxy Z Flip 5 FRP Bypass
- Top 6 Apps/Services to Trace Any Oppo Reno 8T Location By Mobile Number | Dr.fone
- How to Spy on Text Messages from Computer & Apple iPhone 15 Plus | Dr.fone
- In 2024, Hassle-Free Ways to Remove FRP Lock on Xiaomi 14with/without a PC
- Top 9 Xiaomi 14 Monitoring Apps for Parental Controls | Dr.fone
- Possible ways to recover deleted files from Asus ROG Phone 8
- How to Downgrade iPhone SE without iTunes? | Dr.fone
- Title: Updated 15 Must-Use Gifs Editors
- Author: Morgan
- Created at : 2024-05-19 05:11:46
- Updated at : 2024-05-20 05:11:46
- Link: https://ai-video-editing.techidaily.com/updated-15-must-use-gifs-editors/
- License: This work is licensed under CC BY-NC-SA 4.0.
