
:max_bytes(150000):strip_icc():format(webp)/GettyImages-1353420724-65161751b9924195880d3273e327cb54.jpg)
Updated 2024 Approved 10 Best Websites to Discover Free Premiere Pro Video Templates
10 Best Websites to Discover Free Premiere Pro Video Templates
The Premiere Pro templates are a great help to start working on the video right away. You don’t need to create your video from scratch thus, saving time. Moreover, there are fully adaptable features that make your video eye-catching. The article provides knowledge about 10 free Premiere Pro templates. So, let us commence this! Are you with us?
Part 1: 10 Popular Websites to Find Premiere Pro Templates
There is an extensive range of websites to access the free Adobe Premiere templates. It is important to know the workability of such websites and what they bring to the house. Therefore, the sub-section of this write-up would shed light on 10 of such websites where you can download Adobe Premiere templates and find them compatible with the software.
So, what are we waiting for? Let us begin the process!
1. Envato Elements
The first website offering Adobe Premiere templates is known as Envato Elements. One can count on this webpage to access millions of creative assets. Envato Elements comes up with Adobe Premiere Pro templates free, stock videos, graphic templates, photos, and website templates.
Moreover, if you are into print and website design, you will find Envato Elements beside you. The search bar makes the search effective as you can choose between categories or applications. The search filter has made life easy for designers and creators.

2. Storyblocks
Storyblocks are the next big thing if you need to download Premiere templates without much effort. This website presents an awful load of green screen footage, music and sound effects, animated backgrounds, royalty stock footage, and templates for Premiere Pro. It also has a Maker, enabling the user to make the professional video in seconds.
The filtering option of Storyblocks is to die for. Style or software can filter the templates and effects to have what we need without wasting much time.

3. MotionElements
The third royalty-free marketplace making a brand name for itself is MotionElements. The website offers more than 3 million assets for its users in different industry sectors. You can access Premiere Pro templates free download with other stock videos and audio files.
From images, music, templates, effects to transitions, logos, and animations, MotionElements has covered its basis. The search filter gives multiple categories, including software, category, and style.

4. Motion Array
Claiming to be an all-in-one video and filmmaker’s platform, Motion Array takes complete responsibility for making your projects successful. The website takes the raw concept of your project and turns it into completion. Adobe Premiere Pro templates can be downloaded via Motion Array with other effects.
You can have Adobe Premiere Pro, Final Cut, DaVinci, and After Effects templates. The stock motion graphics, sound effects, videos, and photos are some of the strengths of Motion Array. The unlimited downloads save you from emptying your wallet.

5. Adobe Stock
While we are on the subject of template Adobe Premiere free, how can we forget about Adobe Stock? Adobe Stock is a serious archive for templates, especially for Adobe Creative Suite applications. Moreover, getting hands-on an impeccable library of stock photos, audio, and videos, is one of the strongest traits of Adobe Stock.
The search filter has different options to make the search easier, for instance, application, categories, transitions, and whatnot. If you type free in the search bar, you will find Premiere Pro video templates so that downloading them wouldn’t cost a penny.

6. Mixkit
Mixkit is the top choice for getting Premiere Pro split-screen template among other royalty-free assets. Mixkit offers free Premiere Pro templates with After Effects, Final Cut Pro, DaVinci Resolve, and much more.
Moreover, Mixkit can be used for stock videos, music, sound effects, and music tracks. The quality is always high, so you don’t need to worry about that.

7. VideoHive
VideoHive offers the best quality and fast researched Premiere Pro templates. With more than 9,100 free Adobe Premiere templates, VideoHive helps add motion graphics and effects to your videos. Most filmmakers prefer the usage of motion graphics as it improves time and cost-effectiveness and enhances ease in adding animations to the projects.
If you are interested in making a slideshow, animated title, transition, or logo stings, you will find VideoHive there for you.

8. Videezy
Videezy is a fair choice if you need to access Premiere templates free in the most effortless fashion. The search bar of Videezy stock marketplace has interactive filter options. The user is free to navigate by sorting the results based on their presence on the website. Moreover, you can choose between the file type and bring productivity to the media industry.
The resolution can also be decided as Videezy offers SD, HD 720, HD 1080, 4K, and Ultra HD. Doesn’t it feel like a dream come true?

9. Videvo
Videvo is the right shop for you if you prefer the ease-of-use over-complicated workability. Offering an interactive interface and progressive search results, Videvo boosts the production value of your projects multifold. Furthermore, this free Premiere Pro templates provider is an allrounder from the video footage, motion graphics, templates, music, and sound effects.
The user is free to customize titles, intros, typographs, overlays, and transitions. Launch the website, download the template, and get into the process.

10. Monsterone
Offering Trending, Newest, Popular, and Undiscovered filtering options and choosing the right tags, Monsterone has made it to the bucket list of professionals in the field. More than 400 Premiere Pro templates can be downloaded to start working on the deadline right away.
The templates can be effortlessly previewed and launched before accessing them. It helps the user make a conscious choice. The resolution can also be set as the user deems necessary.

The Bottom Line
We are surrounded by videos 24/7. It is true for most creative professionals in the industry who are expected to edit the video to make it more captivating and attractive. One needs to have access to free Premiere Pro templates to obtain a sense of originality as we save money and time on making videos from scratch.
For this very reason, the article discussed 10 compatible and popular websites where Premiere templates free are found. We expect the user to make the right choice based on their niche in the industry. The video editing process can be accelerated by using a phenomenal tool which is Wondershare Filmora.
Filmora has the right toolbox set to make video editing easier and flawless. From cropping to flipping and motion tracking to adding keyframes, Filmora knows it all. One can also count on this tool to add backgrounds in Hollywood effect to gain innovation at all costs.
Wondershare Filmstock is your one-stop shop for royalty-free effects, video footage, clips, video effects, and audio tracks. Do not forget to review Filmora and Filmstock about their workability in the flesh.
Click here to find 10 Free After Effects Logo Templates .
Wondershare Filmora
Get started easily with Filmora’s powerful performance, intuitive interface, and countless effects!
Try It Free Try It Free Try It Free Learn More >

5 Ways to Make a Fake Facetime Call Video
Creating fake video call clips for entertainment has been a new norm on social media platforms. If you are looking for a software to create a fake Facetime call video, then let’s get started:
5 ways to make a fake facetime call video
1. Filmora
Compatibility: Windows/Mac
Wondershare Filmora is the greatest video editor on the market, without a doubt, and it deserves to be at the top of our list.
You’ll discover some professional tools to help you improve video quality and over 300 creative filters and effects to give your movie a new, fresh look without putting in a lot of effort with the Filmora video editor. This tool is one of the most dependable, aside from the features that allow you to modify video rotation easily.
Steps
Step 1: Import the photo or video files
Import all your media files, including video, photos, and music. You have two options for importing your videos: drag and drop directly into our software or click import to select the media files you wish to upload.

Step 2: Edit the video
Wondershare Filmora’s video templates can be added. You can apply music, text, filters and overlays, and motion effects by right-clicking on them and selecting apply. After adding video resources such as text and elements, you may customize the texts by changing the size, placement, etc.
Also, you can add overlay video clips using templates of a video call to make it look like a real call.

Step 3: Export and Save
Quickly export your project to a new video. After you’ve applied the video resources to your videos and clicked Export, you’ll have a whole new video that you can share at birthday parties, weddings, or for marketing purposes, just like any other video you’ve created.

2. Kapwing
Compatibility: Online
Kapwing is a powerful online video editor with a non-linear editing methodology. Upload photos, audio, and video files, then edit them all in one spot.
Creators may view and alter their content from any device or location because Kapwing is entirely online. Work is automatically saved in the cloud, eliminating the need to transfer data locally. When you’re ready to export, sit back and relax because everything is handled in the cloud.
This template allows you to blend two videos into one like an iPhone Facetime call. First, put two videos in a photo and arrange them in a picture arrangement. Then, as a video overlay in the upper corner, layer one on top of the other.
Steps
Step 1: Open Kapwing Fake Video Call Template

Step 2: Import video files
Click on ‘Add Media’ to add video clips.


Step 3: Save and Export Video
Once you are done editing the template with the images you want, click on ‘Export Project’ to Export and save the video.

3. VITA App
Compatibility: Android/Mac

VITA is a program that allows you to make visually appealing videos by combining several filters and other features. The program comes with a large template library, so making films will be a breeze. The best part is that no prior experience is required.
All of VITA’s templates are divided into categories is one of its most noticeable features. This makes it simple to locate the desired impact. It’s critical to stress that you must have all the audiovisual materials you intend to use in your smartphone’s gallery. VITA also allows you to include text in your designs, making them fascinating.
Steps
Step 1: Import the file
Download the application from Google Play Store or Apple Store. Then, launch the application and import the video files.

Step 2: Edit the video
Download PNG images that will help you add all the call elements. Choose a picture-in-picture template. Add Subtitles.

Step 3: Export the video
Once you are done with editing, you can export the file by selecting the ‘Export’ option on the top right corner of the screen.

4. Clipchamp
Compatibility: Windows/Mac
Clipchamp is a free online video editor that makes movie creation simple for anyone, even if they have no prior editing knowledge. It lets you blend films, photos, and audio files and add text and effects before saving the finished product to your computer.
Steps
Step 1: To get started, log into your Clipchamp account or create a free account.

Step 2: Click the ‘Create a video’ button on the left sidebar. There are five different forms from which to pick. First, choose the video aspect ratio that works best for your project. For example, if you wish to upload to YouTube, we recommend shooting in widescreen 16:9.

Step 3: Click ‘Add media’ and drag and drop your films, audio, and photographs into the media box if you already have filmed footage you’d like to utilize in your project. You may also add media by clicking ‘Browse my files.’ If you wish to use free stock footage, go to ‘Stock’ and upload your films to the project by clicking the ‘+’ button. All your films will be saved in your library.

Step 4: You can now find your videos in your media library. Drag and drop the picture-in-picture videos you want to alter to the editing timeline. As shown in the sample below, arrange the two videos one over the other. Make sure both clips are precisely underneath one another.

Step 5: Now that your movies are aligned, select the one you want to shrink. The video you’re reducing must be at the top of the screen. To move it from the bottom to the top, drag and drop it. A small box will appear on the timeline in the bottom left corner of the clip. The clip will shrink when you click the box once. When you click the box once again, modifying choices will appear. You can move the smaller video around and increase or decrease its size.

Step 6: Export your project once you’ve completed editing your video. Save to your preferred place or folder. You can share the video straight on social media or embed it in a document.

5. Movavi
Compatibility: Windows/Mac
Movavi Video Editor is a video editing tool for Windows that is powerful and simple to use. Apply stunning video effects and filters, add music and titles, and more! Yet, despite its enormous features, Movavi’s video editing program is quite simple to use: add a sprinkle of fantasy and some spare time, and you’ll have a Hollywood-style video with far less effort.
Steps
Step 1: Download the software.
Download the installation file and run it. Follow the on-screen directions. Following the setup, the PiP editor will launch.
Step 2: Import files
Select two files: the one you want to use as a background and the one you want to display over it by clicking Add Files.

Step 3: Create a video track
Make an extra video track before you begin video editing. To do so, go to the Plus menu and select Add Video Track. Then, drag one of the videos to the secondary track and the other to the primary track.
From the menu, select the Picture in Picture option. To change the size of the video, drag the boundaries. Then, drag it to the desired location on the background video by clicking and holding.

Step 4: Export and Save
Save your PiP video once you’ve finished editing it. First, select the video format, quality, and folder where the file will be saved by clicking Export and adjusting the parameters in the display popup. Then press the Start button. The picture-in-picture video editor will open the folder holding the file after the Export is complete.

FAQs
1. How do you make a facetime video call?
Tap New FaceTime towards the top of the screen in FaceTime.
Tap to make a video call or an audio call after typing the name or number you wish to call in the top field (not available in all countries or regions). You can also tap instead.
2. How do you add a virtual background on Facetime?
To change the background, use a filter: s
- Tap your tile, then tap during a FaceTime video call (supported models).
- Open the filters by tapping.
- Select your look by tapping a filter at the bottom of the screen (swipe left or right to preview them).
4. Does Facetime have virtual backgrounds?
No. Facetime does have virtual backgrounds, but it allows the users to blur the background.
5. Can you get fake facetime calls?
There is less probability of getting fake facetime calls, but you might spam FaceTime calls from random numbers.
6. Can you Facetime a random number?
FaceTime isn’t any different. A caller could try their luck by FaceTime a random phone number or email address, and if they belong to an iPhone user or an Apple ID, the FaceTime call will be accepted.
7. Can you Facetime from an unknown number?
Switching to your email address for FaceTime audio and video chats is the way to go if you always want to keep your phone number private. You may even go a step further and only receive FaceTime calls via email, with your phone number serving as your FaceTime caller ID.
8. How do I call someone on Facetime?
Launch FaceTime. In the search field, type the names, phone numbers, or email addresses of the persons you wish to contact. Then, click the video or audio icon, depending on the type of call you wish to make. To begin the call, press the video or audio button in the screen’s bottom-left corner.
9. Can you create a background on Facetime?
No. However, FaceTime allows you to apply camera effects on video calls.
Step 2: Edit the video
Wondershare Filmora’s video templates can be added. You can apply music, text, filters and overlays, and motion effects by right-clicking on them and selecting apply. After adding video resources such as text and elements, you may customize the texts by changing the size, placement, etc.
Also, you can add overlay video clips using templates of a video call to make it look like a real call.
Step 3: Export and Save
Quickly export your project to a new video. After you’ve applied the video resources to your videos and clicked Export, you’ll have a whole new video that you can share at birthday parties, weddings, or for marketing purposes, just like any other video you’ve created.
2. Kapwing
Compatibility: Online
Kapwing is a powerful online video editor with a non-linear editing methodology. Upload photos, audio, and video files, then edit them all in one spot.
Creators may view and alter their content from any device or location because Kapwing is entirely online. Work is automatically saved in the cloud, eliminating the need to transfer data locally. When you’re ready to export, sit back and relax because everything is handled in the cloud.
This template allows you to blend two videos into one like an iPhone Facetime call. First, put two videos in a photo and arrange them in a picture arrangement. Then, as a video overlay in the upper corner, layer one on top of the other.
Steps
Step 1: Open Kapwing Fake Video Call Template
Step 2: Import video files
Click on ‘Add Media’ to add video clips.
Step 3: Save and Export Video
Once you are done editing the template with the images you want, click on ‘Export Project’ to Export and save the video.
3. VITA App
Compatibility: Android/Mac
VITA is a program that allows you to make visually appealing videos by combining several filters and other features. The program comes with a large template library, so making films will be a breeze. The best part is that no prior experience is required.
All of VITA’s templates are divided into categories is one of its most noticeable features. This makes it simple to locate the desired impact. It’s critical to stress that you must have all the audiovisual materials you intend to use in your smartphone’s gallery. VITA also allows you to include text in your designs, making them fascinating.
Steps
Step 1: Import the file
Download the application from Google Play Store or Apple Store. Then, launch the application and import the video files.
Step 2: Edit the video
Download PNG images that will help you add all the call elements. Choose a picture-in-picture template. Add Subtitles.
Step 3: Export the video
Once you are done with editing, you can export the file by selecting the ‘Export’ option on the top right corner of the screen.
4. Clipchamp
Compatibility: Windows/Mac
Clipchamp is a free online video editor that makes movie creation simple for anyone, even if they have no prior editing knowledge. It lets you blend films, photos, and audio files and add text and effects before saving the finished product to your computer.
Steps
Step 1: To get started, log into your Clipchamp account or create a free account.
Step 2: Click the ‘Create a video’ button on the left sidebar. There are five different forms from which to pick. First, choose the video aspect ratio that works best for your project. For example, if you wish to upload to YouTube, we recommend shooting in widescreen 16:9.
Step 3: Click ‘Add media’ and drag and drop your films, audio, and photographs into the media box if you already have filmed footage you’d like to utilize in your project. You may also add media by clicking ‘Browse my files.’ If you wish to use free stock footage, go to ‘Stock’ and upload your films to the project by clicking the ‘+’ button. All your films will be saved in your library.
Step 4: You can now find your videos in your media library. Drag and drop the picture-in-picture videos you want to alter to the editing timeline. As shown in the sample below, arrange the two videos one over the other. Make sure both clips are precisely underneath one another.
Step 5: Now that your movies are aligned, select the one you want to shrink. The video you’re reducing must be at the top of the screen. To move it from the bottom to the top, drag and drop it. A small box will appear on the timeline in the bottom left corner of the clip. The clip will shrink when you click the box once. When you click the box once again, modifying choices will appear. You can move the smaller video around and increase or decrease its size.
Step 6: Export your project once you’ve completed editing your video. Save to your preferred place or folder. You can share the video straight on social media or embed it in a document.
5. Movavi
Compatibility: Windows/Mac
Movavi Video Editor is a video editing tool for Windows that is powerful and simple to use. Apply stunning video effects and filters, add music and titles, and more! Yet, despite its enormous features, Movavi’s video editing program is quite simple to use: add a sprinkle of fantasy and some spare time, and you’ll have a Hollywood-style video with far less effort.
Steps
Step 1: Download the software.
Download the installation file and run it. Follow the on-screen directions. Following the setup, the PiP editor will launch.
Step 2: Import files
Select two files: the one you want to use as a background and the one you want to display over it by clicking Add Files.
Step 3: Create a video track
Make an extra video track before you begin video editing. To do so, go to the Plus menu and select Add Video Track. Then, drag one of the videos to the secondary track and the other to the primary track.
From the menu, select the Picture in Picture option. To change the size of the video, drag the boundaries. Then, drag it to the desired location on the background video by clicking and holding.
Step 4: Export and Save
Save your PiP video once you’ve finished editing it. First, select the video format, quality, and folder where the file will be saved by clicking Export and adjusting the parameters in the display popup. Then press the Start button. The picture-in-picture video editor will open the folder holding the file after the Export is complete.
FAQs
1. How do you make a facetime video call?
Tap New FaceTime towards the top of the screen in FaceTime.
Tap to make a video call or an audio call after typing the name or number you wish to call in the top field (not available in all countries or regions). You can also tap instead.
2. How do you add a virtual background on Facetime?
To change the background, use a filter: s
- Tap your tile, then tap during a FaceTime video call (supported models).
- Open the filters by tapping.
- Select your look by tapping a filter at the bottom of the screen (swipe left or right to preview them).
4. Does Facetime have virtual backgrounds?
No. Facetime does have virtual backgrounds, but it allows the users to blur the background.
5. Can you get fake facetime calls?
There is less probability of getting fake facetime calls, but you might spam FaceTime calls from random numbers.
6. Can you Facetime a random number?
FaceTime isn’t any different. A caller could try their luck by FaceTime a random phone number or email address, and if they belong to an iPhone user or an Apple ID, the FaceTime call will be accepted.
7. Can you Facetime from an unknown number?
Switching to your email address for FaceTime audio and video chats is the way to go if you always want to keep your phone number private. You may even go a step further and only receive FaceTime calls via email, with your phone number serving as your FaceTime caller ID.
8. How do I call someone on Facetime?
Launch FaceTime. In the search field, type the names, phone numbers, or email addresses of the persons you wish to contact. Then, click the video or audio icon, depending on the type of call you wish to make. To begin the call, press the video or audio button in the screen’s bottom-left corner.
9. Can you create a background on Facetime?
No. However, FaceTime allows you to apply camera effects on video calls.
How to Zoom Picture in Picture [Easy Solution]
Zoom is one of the greatest options on the market for video conferencing. It doesn’t matter whether you use it at home or in an office environment; it will quickly link the team members. One of the most popular video conferencing programs is Zoom. When in-person meetings aren’t feasible, it enables you to communicate electronically with employees, and it’s been a major popularity for social occasions as well. In case you’re not acquainted, picture-in-picture mode enables you to watch videos from one app while using your PC normally. The movie will keep playing in a tiny thumbnail window so that two applications may work simultaneously on your smartphone.
You may create virtual audio and video conferences, webinars, live chats, screen sharing, and other collaboration tools with Zoom, a cloud-based video communications solution. Zoom’s most recent iPhone apps let you dismiss a Zoom Meeting while keeping the Zoom video call open in a picture-in-picture mode. To join a Zoom conference, you don’t need an account, and because the software works with Mac, Windows, Linux, iOS, and Android devices, nearly anybody can use it. Since using Zoom’s picture-in-picture mode is the same as using it with other applications, you shouldn’t have any trouble if you often use PiP mode. Here are the top 4 methods you can refer to picture in picture in Zoom.
Method 1: Swap Shared Screen with Video
You may move the Zoom Meeting PiP window across the screen, change the thumbnail’s size, and utilize other applications while it remains open, just like any other picture-in-picture window. Before leaving the meeting if you’re not giving a presentation or speaking, you should definitely mute Zoom on your iPhone to prevent noises from your typing or other activities from entering the conversation. Additionally, keep in mind to switch off the camera if you’re engaged in something distracting, at least for the duration of your activity. To reopen the Zoom Meeting and go back to the Zoom app, touch the Picture-in-Picture mode pane. Here are some actions to keep in mind:
Steps to Swap Shared Screen for Zoom Picture in Picture
Step1Launch or enter a Zoom meeting. Keep the video on your main screen at all times, closing the chat and participant list as necessary.
Step2Tap the Home button or swipe up from the bottom of the screen.
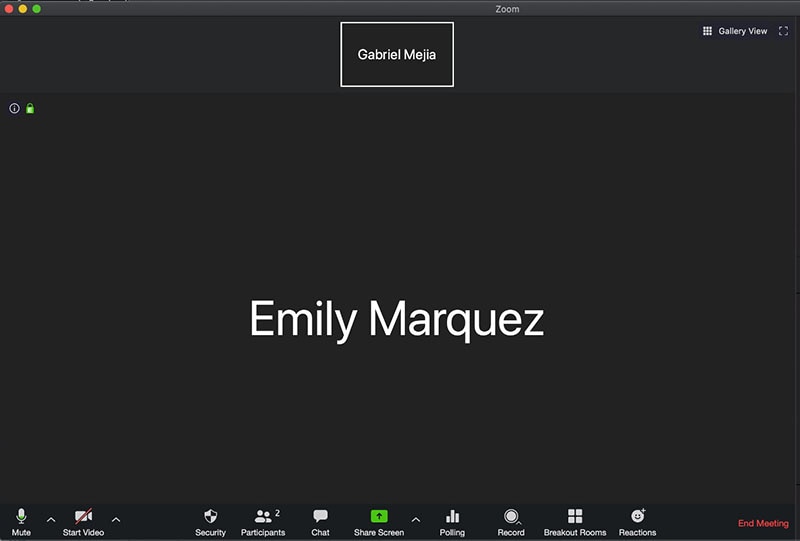
Step3Picture-in-picture mode should be activated automatically throughout the meeting.
Method 2: Use Ecamm Live
Live streaming is a fantastic way to provide original content and stand out from the crowd. To prevent any operational difficulties, a more sophisticated virtual camera is absolutely necessary. You now have magical abilities thanks to Ecamm virtual cam, including the ability to add text, animations, observe a live stream, post viewer comments, play music, share your screen, use sound effects, and many more. It offers the Ecamm live virtual camera zoom function for video conferences so you may improve your Zoom discussions by sending output to other PC programs. You could see a quality difference between what you view in Ecamm Live and what your Zoom visitors see while utilizing virtual camera with Zoom. The quality of a Zoom video stream cannot be improved using Ecamm Live. Simply broadcast the Zoom app using Ecamm Live’s Screen Share mode to utilize Ecamm Live for picture-in-picture virtual presentations on Zoom.
Steps to Use Ecamm Live for Zoom Picture in Picture
Step1Download the Ecamm Application
Install Ecamm Live on your computer, then choose the center button in the source switcher at the top of the main window to enter Screen Share mode.
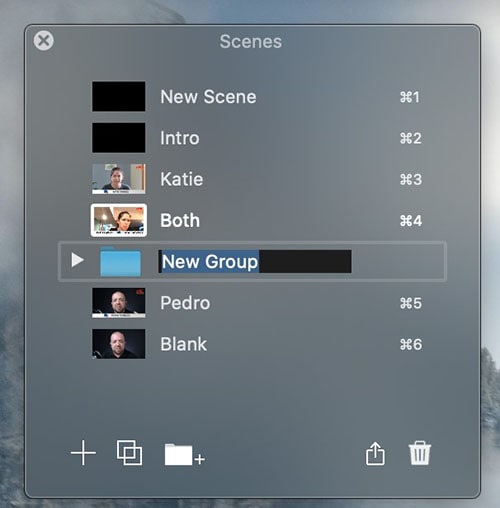
Step2Create Scenes
With the use of Ecamm Live’s Virtual Camera and Virtual Mic capabilities, you may transfer Ecamm Live’s output to almost any other Mac software, including Zoom. After setting, create the scenes in the program to quickly switch between various cameras.
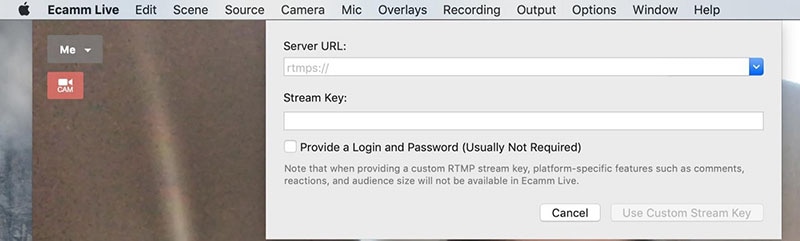
Step3Select Ecamm on Zoom
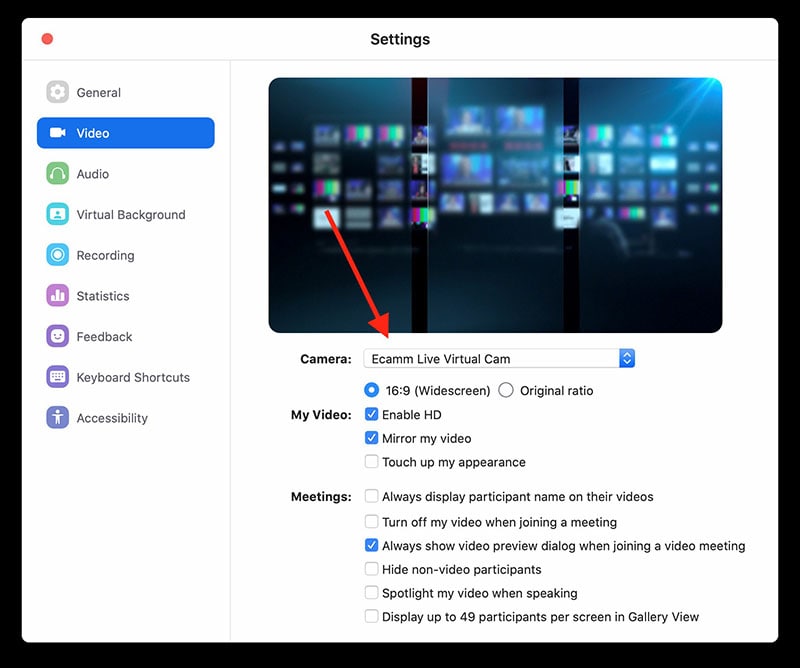
You may also utilize Ecamm Live’s Sharing Window capability to feed Ecamm Live output into Zoom. Simply activate the virtual camera, and then, as seen below, choose Ecamm Live Virtual Camera in Zoom’s video settings:
Step4Begin Your Presentation
Finally, click the PC share option to show your Zoom app to your audience. To conceal a picture-in-picture window that displays your camera image while live streaming, click the PIP button.
Method 3: Use Filmora as A Switcher
Zoom has solutions that will make your meetings simple and secure. It gives your remote staff a secure setting to interact and share crucial information. Ideal control over your film and configuration options to make them aesthetically pleasing is something Zoom lacks. To overcome the drawbacks and improve the quality of your online meetings, you may take use of the capabilities of Zoom in conjunction with Filmora. Filmora was developed with the intention of easing user burden and supporting applications. Though complicated, the program is simple to use. The perhaps most popular web information that may be saved on your computer can be easily captured by just angling your screen. For more information on how to record and save your Zoom for picture in picture, see the guide here.
To broadcast a variety of situations in a grid style, you may also combine inputs from your camera, microphone, computer screen, and web conferencing software. Wondershare -the finest desktop application for recording a Zoom Picture in Picture meeting- is Filmora. With the majority of cameras, this app’s screen recording capability is both user-friendly and feature-rich. Here, users may either choose a particular region to record or record their zoom meetings in Fullscreen mode. Additionally, you may choose the camera and input microphone that will be used while recording a video overlay. The addition of relevant comments like phrases, lines, drawings, symbols, etc. is also possible by users. The detailed procedure for recording a Zoom Picture-in-Picture meeting using a Filmora recorder is given below:
Free Download For Win 7 or later(64-bit)
Free Download For macOS 10.14 or later
Step1Download and Install Filmora Zoom Recorder
You may find both types, i.e., the most recent Windows and Mac versions, by first visiting the usual website and then using this Zoom. Install the program on your computer once you download it to get started.

Step2Initiate Filmora Recorder
After finishing the installation process for this Reside Zoom recorder, launch it from the main menus and choose “New Task” when prompted. It will take you to Filmora’s streamlined user interface where you can immediately start filming. Then, as seen in the picture below, you may adjust the screen recording using your preferred camera, microphone, and system settings:

Step3Begin/End the Recording
When you are through configuring this Zoom picture in picture recorder, click the Record button, and it will immediately begin recording your customized screen. Similar to that, after you’re done recording, click Stop, which will take you inside the video editor where you may edit your recorded information.

Step4Share Recordings
When you have everything ready, export your recording right away. After you’re done with the editing part, you do have a lot of options to choose from when displaying your screen capture and webcam stories. To do so, click the Export button in the item user interface’s top-right corner as shown below:
You may easily choose your preferred way to share from there if you choose to upload your work of zoom picture in picture recordings straight to the YouTube or other reputable websites right now. Simply refer to the Sharing plug-ins in the Export window to find out more.
Method 4: Use Hardware Switcher ATEM Mini Pro
Particularly on Zoom, the ATEM Mini is excellent for video conferences. The Blackmagic ATEM Mini is a USB video interface and HDMI switcher. Four HDMI inputs, or four cameras that can produce an HDMI video stream, may be switched between live. This device integrates Zoom meetings fast and makes it incredibly simple to set up your audio, a sometimes-forgotten aspect of video broadcasting. This sophisticated video switcher promises to offer broadcast-quality multi-camera footage with ease and is targeted at gamers, streamers, and online reviewers. It connects to a computer via a USB-C to USB-A connection. The video feed may then be sent to distant colleagues via a number of well-liked videos streaming services, including Zoom.
Step1The ATEM Mini Pro is a basic control switcher with pro-broadcast performance. Your ATEM Mini Pro is really simple to set up. You can connect a full setup with several cameras and microphones in around 30 minutes.
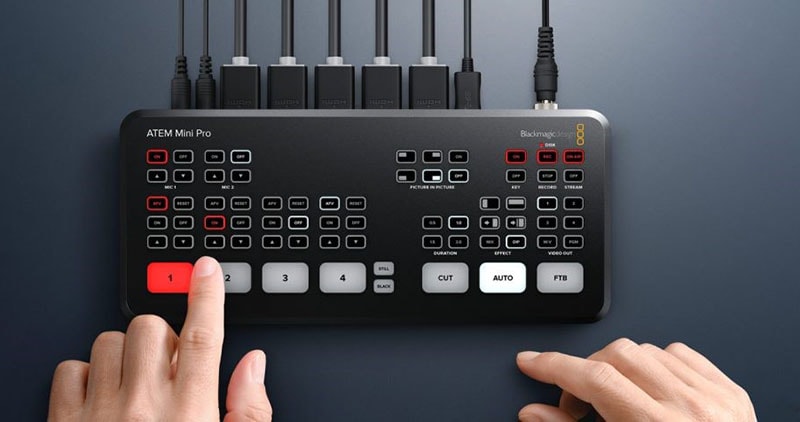
Step2You may connect several camera sources to the inputs of the ATEM Mini Pro. The 4 HDMI inputs each have a separate standards converter built in. As a result, the ATEM Mini can automatically convert inputs that are 1080p, 1080i, or 720p to the switcher’s video standard. You may make quick changes between inputs with no latency or disruption to your video output by using the ergonomic buttons.
Step3As a third option, Zoom offers ATEM Mini, which enables you to switch between several inputs, add custom visuals, and adjust audio levels all from a single interface. To improve the quality of your production, you may even use smooth transitions like wipes or fades. You can even test any input stream before making it live.
Conclusion
When you are doing a Zoom Meeting and share your screen, only to discover that what the other attendees see is a split screen with your material and the other Attendee cams, it is highly annoying. You may move the Zoom Meeting PiP window across the screen, change the thumbnail’s size, and utilize other applications while it remains open, just like any other picture-in-picture window. Someone must be sharing information in the Zoom conference for the Picture in Picture, or “Split Screen” option, to be active. We’ve listed the top techniques for doing it effectively above. To do this work without difficulty, use them as your guide.
Free Download For macOS 10.14 or later
Step1Download and Install Filmora Zoom Recorder
You may find both types, i.e., the most recent Windows and Mac versions, by first visiting the usual website and then using this Zoom. Install the program on your computer once you download it to get started.
Step2Initiate Filmora Recorder
After finishing the installation process for this Reside Zoom recorder, launch it from the main menus and choose “New Task” when prompted. It will take you to Filmora’s streamlined user interface where you can immediately start filming. Then, as seen in the picture below, you may adjust the screen recording using your preferred camera, microphone, and system settings:
Step3Begin/End the Recording
When you are through configuring this Zoom picture in picture recorder, click the Record button, and it will immediately begin recording your customized screen. Similar to that, after you’re done recording, click Stop, which will take you inside the video editor where you may edit your recorded information.
Step4Share Recordings
When you have everything ready, export your recording right away. After you’re done with the editing part, you do have a lot of options to choose from when displaying your screen capture and webcam stories. To do so, click the Export button in the item user interface’s top-right corner as shown below:
You may easily choose your preferred way to share from there if you choose to upload your work of zoom picture in picture recordings straight to the YouTube or other reputable websites right now. Simply refer to the Sharing plug-ins in the Export window to find out more.
Method 4: Use Hardware Switcher ATEM Mini Pro
Particularly on Zoom, the ATEM Mini is excellent for video conferences. The Blackmagic ATEM Mini is a USB video interface and HDMI switcher. Four HDMI inputs, or four cameras that can produce an HDMI video stream, may be switched between live. This device integrates Zoom meetings fast and makes it incredibly simple to set up your audio, a sometimes-forgotten aspect of video broadcasting. This sophisticated video switcher promises to offer broadcast-quality multi-camera footage with ease and is targeted at gamers, streamers, and online reviewers. It connects to a computer via a USB-C to USB-A connection. The video feed may then be sent to distant colleagues via a number of well-liked videos streaming services, including Zoom.
Step1The ATEM Mini Pro is a basic control switcher with pro-broadcast performance. Your ATEM Mini Pro is really simple to set up. You can connect a full setup with several cameras and microphones in around 30 minutes.
Step2You may connect several camera sources to the inputs of the ATEM Mini Pro. The 4 HDMI inputs each have a separate standards converter built in. As a result, the ATEM Mini can automatically convert inputs that are 1080p, 1080i, or 720p to the switcher’s video standard. You may make quick changes between inputs with no latency or disruption to your video output by using the ergonomic buttons.
Step3As a third option, Zoom offers ATEM Mini, which enables you to switch between several inputs, add custom visuals, and adjust audio levels all from a single interface. To improve the quality of your production, you may even use smooth transitions like wipes or fades. You can even test any input stream before making it live.
Conclusion
When you are doing a Zoom Meeting and share your screen, only to discover that what the other attendees see is a split screen with your material and the other Attendee cams, it is highly annoying. You may move the Zoom Meeting PiP window across the screen, change the thumbnail’s size, and utilize other applications while it remains open, just like any other picture-in-picture window. Someone must be sharing information in the Zoom conference for the Picture in Picture, or “Split Screen” option, to be active. We’ve listed the top techniques for doing it effectively above. To do this work without difficulty, use them as your guide.
2 Effective Ways to Add Text Behind Objects
Adding text behind objects in your videos can be a great way to start your videos. For example, you can do so to create an attractive intro or startup a video. So, if you hope to make a video like a pro, let’s learn how to add text behind objects in your videos by Filmora.

Part 1. What Are The Benefits of Adding Text Behind Objects in Videos?
Your videos must maintain quality to create content worthy of a huge audience. You may have a YouTube channel or be starting down the road. Then you must give this a try because
Give a cool look
Adding text behind an object in a video looks cool! Now, your object could be a silhouette of a person or a huge skyscraper. You can add a text tile behind the object, creating the illusion. Due to this, the text will be flying in real-time.
Show creativity
Blasting your channel with innovative and creative content is the key to building a big audience. But, of course, you can always opt for many ways to create a video showing your creativity. One of those ways is to add text behind your object.
You can create an attractive intro by adding text behind objects that captivate the viewer. It ensures that your subscribers stay tuned to your channel and your content.
Build up a solid audience
Every day can be a real struggle if you are a daily content creator on YouTube. The audience demands good content. But your daily videos can get boring if you do not use new methods to edit your videos.
You can add text behind videos to spice up your intros and hook your daily audience even more. That will show the audience that you are genuinely putting in the effort.
Part 2. What Will You Need To Add Text Behind Videos?
Now there are a few things that you will need to add text behind videos. First, take a look at the basic priorities to perform this feature.
1. A Static Object Video
Adding text behind an object can be tricky if the object isn’t static. For example, the effect will be ruined if an object moves around a lot in a video.
Our goal is to create a smooth text behind the video effect. And this can only be achieved if the target object remains static in the video and does not move about its position.
2. A Video Editing Software - Wondershare Filmora
Once you select a video source, you aim to add it to a video editor. For this purpose, Wondershare Filmora would be your best choice. Wondershare Filmora allows you to create innovative and attractive videos.
Free Download For Win 7 or later(64-bit)
Free Download For macOS 10.14 or later
It has a very engaging system UI, allowing even beginner users to get their hands on it instantly. You will learn how to add text behind your videos with a few simple steps.

Now that you know the requirements for the video, let’s move on to the step-by-step guide to add text to your video.
Part 3. Step-by-Step Guide To Add Text Behind Videos
We look at two examples of how to add text behind videos in Wondershare Filmora.
- A static video with an object that can be easily masked out.
- A video with high contrast and a clean background.
Add Text behind a Static Video
First, we will go with adding text behind a static object. For this, scroll more to get the step-by-step process.
Step1 Download Wondershare Filmora
If you are a beginner just starting in the video editing business, Wondershare Filmora is the best choice. Follow the steps below to download the free version of Wondershare Filmora:
- First, download the Wondershare Filmora on your PC or Mac.
- Open the setup and install the Wondershare Filmora.
After downloading the Wondershare Filmora software, let’s edit the video. Scroll below to learn how to start the editing process!
Step2 Add the Video to the Timeline
We will first look at the static video example. For this, follow the below instructions:
- You have to start by importing your video in the import library.
- From the import library, you can click on the video and drag it down below to the timeline.

![]()
Note: Adding video to the timelines will allow you to create a workspace to edit your video.
Now let’s move on to how we will add the text tile to our video.
Step3 Add the Text Tile
It is time to add the text tile you will animate behind the object. To do that, follow the steps mentioned as such.:
- Go to the Titles icon on the bar above the import library.
- A drop-down option will be available on the left side.
- Scroll down to the Plain text.
- Here, you can see many text tiles to add to your video.
- You can choose anyone you like.
- The most commonly used tile is the Basic 6.
- When you add the text tile to the timeline, you must ensure that the text is of equal length to the video.
- To do that, drag the right corner of the text tile and drag it to the right to match the length of the video.

Step4 Edit the Text Tile
After you have added the text tile you desire, you need to type in the text. For this article, we will keep it simple. We will be typing a simple statement such as “Hello, World.“
- Double-click the Text tile to open the settings menu.
- After the settings menu is opened, type in the text box on the import window.
You will notice changes on the main window that your text has changed.

- After the text appears, you can make the font look as desired.
- Look above the text window, and you will see the type of text font selected.
- Click on the drop-down option and choose whatever you like.
Let’s move on to animate the text tile.
Step5 Animate the text tile
After adding text, it is time to animate it. This animation will decide how your text will appear behind the target object.
- First, you must open the text settings by double-clicking on the text tile in the timeline.
- In the settings opened in the import window, you will have to click on the animation tab in the upper left corner, aside from the Preset
- Now scroll down to where you will see the Right Roll
- Click on Right Roll and then click on the OK in the bottom right corner of the import window.

![]()
Note: You may notice now that the text appears in front of our object. Don’t worry now! We are getting there. With a few simple steps, we will see the results.
Now let us move on to the more significant part of the editing, masking the object. Again, look ahead to see how you can mask the object!
Step6 Mask the Object
To mask our object, we will need to be technical. We will begin by adding the same footage of the static object on our timeline. Follow the steps mentioned below:
- Drag and drop the static object footage above the timeline text. Make sure the text stays in the middle of the sandwich.

- We will hide the video in the first track to simplify things. In addition, this will make our editing easier.
- We will have to look in the effects library to insert the masking effect.
- You can see the Effects icon on the bar at the top.
- Click on the Effects.
- You will see the search bar at the top of the import window.
- In the search bar, type in Image mask.
- Drag the Image mask effect on the video above the text tile.
Now the masking effect has been added. But we would have to adjust so that it stays upon our object.
- Double-click on the video and the settings option will open up.
- Go into the Effects
![]()
Note: You must select your target object’s mask shape exactly as its shape.
- We have to mask out a building, so that we will need a vertical rectangle.

- After you have selected the shape of your object, we will need to convert it to the object’s size so that it only masks the building.
- To do that, scroll down below the import window to the settings.
- Here you can see the X, Y, and width settings.
- First, move the width bar so that it matches the width of the building.

- Now drag the X bar until the mask is confined to the building. You would have created the mask only limited to the building.

- Once you complete this step, click OK in the bottom right corner.
- Now un-hide the original video that you imported in the beginning.
Finally, play the video in the main play window from the beginning.

You have successfully created a text behind the object effect. Now that you know how to add text behind static objects let us move to learn how to add text to a video that has high contrast and a clean background.
Add text behind a high contrast and clean background
Besides the text can be added behind a static object, it can also be added to a clean background with high contrast. But how is it? Let’s dive into it.
Step1 Import the video into the timeline
- Import the video from the location in your PC media.
- When imported, drag and drop it onto the timeline.

Step2 Add the text tile
To add the text to your video, follow the steps mentioned below.
- Click on the titles icon on the bar above the import window.
- On the left drop-down option, scroll down to the titles.
- Select the Plain text option.
- You will notice that multiple options will pop up in the import window.
- Select the text title that suits you best.
- After you have selected the text style, drag and drop it down above your video in the timeline.

- Our next step would be to add the text.
- Double-click on the text tile. Doing so will open the settings menu in the import window.
- Type in the text that you want. For reference, we will keep it simple such as, “Hello world.”
- You can also adjust the font of your text.
- Above the type box, a drop-down option will show you the range of fonts available.
- Select the font you desire.

Now that you have added the text, it is time to animate it.
Step3 Take a snapshot
After typing in the text, you will notice in the main play window that your text still appears in front of your object. Therefore, we want to take it behind the object. To do so, first, you will need to take a snapshot.
Follow the steps mentioned to take a snapshot:
- Hide the main video. You can see the Eye icon aside from your main video in the edit column on the left side of the timeline.
- Click on the Eye icon to hide the main video.
- In the main play window, you will notice that the screen turns black, which leaves only the text on the screen.

- In the main play screen, you can notice a small camera icon.
- This camera icon is used to take snapshots of your screen.
- Click on the camera icon to take a snapshot of your screen.
- Your snapshot will now be saved in the main import window.

Now that we have taken a snapshot, we will need to import it into the timeline. Scroll below for more.
Step4 Add the snapshot
After taking it, your goal is to import it into the timeline. To perform this action, perform the following steps:
- Before adding the snapshot to the timeline, we must delete the main text tile.
- Then drag and drop the snapshot from the import library into the timeline above the video.
- Make sure that the snapshot is aligned well with the length of the video.
- If it is longer than the video, drag it from the right to match the length of the video.
- If its length is smaller than the video, drag it to the right to increase its length.

After adding the snapshot, we will have to change its blending mode.
Step5 Change the blending of the snapshot
To create the effect of your text behind the video, you must alter the main text’s blending mode. In this case, it will be the snapshot we took.
![]()
Note: Changing the blending mode of the snapshot will allow it to blend with the transparent background and will create the effect of the text behind the object in the video.
Follow the steps mentioned below to change the blending of the snapshot:
- Double-click the snapshot.
- If you select the compositing tab, the blending options will pop up.
- From default, it would be set to Normal. Click on the Normal
- It will show a drop-down option.
- Scroll down below until you can see an option labeled Then click on Overlay.

- And press OK in the bottom right corner to confirm your changes.
The text can be blended with the background.
- Click on the Eye icon to un-hide the video from the timeline.
- Now play the video from the start from the main play screen to see the final changes.

Congratulations! The above steps allow you to add text behind objects in your videos.
Conclusion
Modern media is full of creative content. And if you are a content creator that wants to make it through the world of YouTube and video creating, you need to be the best. You can only be the best at what you do if you keep pushing the boundaries of your creativity.
Adding text behind objects could be the first step in making your intros shine with creativity and innovation. It allows you to maintain and build your viewing audience. The more the audience, the more your content gets watched!
Free Download For macOS 10.14 or later
It has a very engaging system UI, allowing even beginner users to get their hands on it instantly. You will learn how to add text behind your videos with a few simple steps.
Now that you know the requirements for the video, let’s move on to the step-by-step guide to add text to your video.
Part 3. Step-by-Step Guide To Add Text Behind Videos
We look at two examples of how to add text behind videos in Wondershare Filmora.
- A static video with an object that can be easily masked out.
- A video with high contrast and a clean background.
Add Text behind a Static Video
First, we will go with adding text behind a static object. For this, scroll more to get the step-by-step process.
Step1 Download Wondershare Filmora
If you are a beginner just starting in the video editing business, Wondershare Filmora is the best choice. Follow the steps below to download the free version of Wondershare Filmora:
- First, download the Wondershare Filmora on your PC or Mac.
- Open the setup and install the Wondershare Filmora.
After downloading the Wondershare Filmora software, let’s edit the video. Scroll below to learn how to start the editing process!
Step2 Add the Video to the Timeline
We will first look at the static video example. For this, follow the below instructions:
- You have to start by importing your video in the import library.
- From the import library, you can click on the video and drag it down below to the timeline.
![]()
Note: Adding video to the timelines will allow you to create a workspace to edit your video.
Now let’s move on to how we will add the text tile to our video.
Step3 Add the Text Tile
It is time to add the text tile you will animate behind the object. To do that, follow the steps mentioned as such.:
- Go to the Titles icon on the bar above the import library.
- A drop-down option will be available on the left side.
- Scroll down to the Plain text.
- Here, you can see many text tiles to add to your video.
- You can choose anyone you like.
- The most commonly used tile is the Basic 6.
- When you add the text tile to the timeline, you must ensure that the text is of equal length to the video.
- To do that, drag the right corner of the text tile and drag it to the right to match the length of the video.
Step4 Edit the Text Tile
After you have added the text tile you desire, you need to type in the text. For this article, we will keep it simple. We will be typing a simple statement such as “Hello, World.“
- Double-click the Text tile to open the settings menu.
- After the settings menu is opened, type in the text box on the import window.
You will notice changes on the main window that your text has changed.
- After the text appears, you can make the font look as desired.
- Look above the text window, and you will see the type of text font selected.
- Click on the drop-down option and choose whatever you like.
Let’s move on to animate the text tile.
Step5 Animate the text tile
After adding text, it is time to animate it. This animation will decide how your text will appear behind the target object.
- First, you must open the text settings by double-clicking on the text tile in the timeline.
- In the settings opened in the import window, you will have to click on the animation tab in the upper left corner, aside from the Preset
- Now scroll down to where you will see the Right Roll
- Click on Right Roll and then click on the OK in the bottom right corner of the import window.
![]()
Note: You may notice now that the text appears in front of our object. Don’t worry now! We are getting there. With a few simple steps, we will see the results.
Now let us move on to the more significant part of the editing, masking the object. Again, look ahead to see how you can mask the object!
Step6 Mask the Object
To mask our object, we will need to be technical. We will begin by adding the same footage of the static object on our timeline. Follow the steps mentioned below:
- Drag and drop the static object footage above the timeline text. Make sure the text stays in the middle of the sandwich.
- We will hide the video in the first track to simplify things. In addition, this will make our editing easier.
- We will have to look in the effects library to insert the masking effect.
- You can see the Effects icon on the bar at the top.
- Click on the Effects.
- You will see the search bar at the top of the import window.
- In the search bar, type in Image mask.
- Drag the Image mask effect on the video above the text tile.
Now the masking effect has been added. But we would have to adjust so that it stays upon our object.
- Double-click on the video and the settings option will open up.
- Go into the Effects
![]()
Note: You must select your target object’s mask shape exactly as its shape.
- We have to mask out a building, so that we will need a vertical rectangle.
- After you have selected the shape of your object, we will need to convert it to the object’s size so that it only masks the building.
- To do that, scroll down below the import window to the settings.
- Here you can see the X, Y, and width settings.
- First, move the width bar so that it matches the width of the building.
- Now drag the X bar until the mask is confined to the building. You would have created the mask only limited to the building.
- Once you complete this step, click OK in the bottom right corner.
- Now un-hide the original video that you imported in the beginning.
Finally, play the video in the main play window from the beginning.
You have successfully created a text behind the object effect. Now that you know how to add text behind static objects let us move to learn how to add text to a video that has high contrast and a clean background.
Add text behind a high contrast and clean background
Besides the text can be added behind a static object, it can also be added to a clean background with high contrast. But how is it? Let’s dive into it.
Step1 Import the video into the timeline
- Import the video from the location in your PC media.
- When imported, drag and drop it onto the timeline.
Step2 Add the text tile
To add the text to your video, follow the steps mentioned below.
- Click on the titles icon on the bar above the import window.
- On the left drop-down option, scroll down to the titles.
- Select the Plain text option.
- You will notice that multiple options will pop up in the import window.
- Select the text title that suits you best.
- After you have selected the text style, drag and drop it down above your video in the timeline.
- Our next step would be to add the text.
- Double-click on the text tile. Doing so will open the settings menu in the import window.
- Type in the text that you want. For reference, we will keep it simple such as, “Hello world.”
- You can also adjust the font of your text.
- Above the type box, a drop-down option will show you the range of fonts available.
- Select the font you desire.
Now that you have added the text, it is time to animate it.
Step3 Take a snapshot
After typing in the text, you will notice in the main play window that your text still appears in front of your object. Therefore, we want to take it behind the object. To do so, first, you will need to take a snapshot.
Follow the steps mentioned to take a snapshot:
- Hide the main video. You can see the Eye icon aside from your main video in the edit column on the left side of the timeline.
- Click on the Eye icon to hide the main video.
- In the main play window, you will notice that the screen turns black, which leaves only the text on the screen.
- In the main play screen, you can notice a small camera icon.
- This camera icon is used to take snapshots of your screen.
- Click on the camera icon to take a snapshot of your screen.
- Your snapshot will now be saved in the main import window.
Now that we have taken a snapshot, we will need to import it into the timeline. Scroll below for more.
Step4 Add the snapshot
After taking it, your goal is to import it into the timeline. To perform this action, perform the following steps:
- Before adding the snapshot to the timeline, we must delete the main text tile.
- Then drag and drop the snapshot from the import library into the timeline above the video.
- Make sure that the snapshot is aligned well with the length of the video.
- If it is longer than the video, drag it from the right to match the length of the video.
- If its length is smaller than the video, drag it to the right to increase its length.
After adding the snapshot, we will have to change its blending mode.
Step5 Change the blending of the snapshot
To create the effect of your text behind the video, you must alter the main text’s blending mode. In this case, it will be the snapshot we took.
![]()
Note: Changing the blending mode of the snapshot will allow it to blend with the transparent background and will create the effect of the text behind the object in the video.
Follow the steps mentioned below to change the blending of the snapshot:
- Double-click the snapshot.
- If you select the compositing tab, the blending options will pop up.
- From default, it would be set to Normal. Click on the Normal
- It will show a drop-down option.
- Scroll down below until you can see an option labeled Then click on Overlay.
- And press OK in the bottom right corner to confirm your changes.
The text can be blended with the background.
- Click on the Eye icon to un-hide the video from the timeline.
- Now play the video from the start from the main play screen to see the final changes.
Congratulations! The above steps allow you to add text behind objects in your videos.
Conclusion
Modern media is full of creative content. And if you are a content creator that wants to make it through the world of YouTube and video creating, you need to be the best. You can only be the best at what you do if you keep pushing the boundaries of your creativity.
Adding text behind objects could be the first step in making your intros shine with creativity and innovation. It allows you to maintain and build your viewing audience. The more the audience, the more your content gets watched!
Also read:
- In 2024, How to Edit FLV Video Files with FLV Editor Windows, Mac,Android, iPhone & Online
- New Want to Know How to Slow Down a Video on iPhone or Speed It Up? This Guide Provides Step by Step Method to Do so Using Simple Techniques. Find Out More About It
- New Are You Searching for Professional Subtitle Apps? Read This Article to Explore Various Compatible Subtitle Apps that You Can Run on Multiple Platforms
- OpenCV Object Tracking The Complete Guide for 2024
- In 2024, Logo Intro Videos Are the Hottest Trend in Town and Are Gaining Popularity Quickly. Keep Reading This Article to Learn Their Importance and How to Design One
- In 2024, What Is Color Finale
- Step by Step to Resize Video in Davinci Resolve
- Updated Spooky Halloween Best 15+ Halloween Countdown Video Clips
- New How to Overlay Video in Premiere Pro for 2024
- Top 9 AMV Makers for Computer
- New Best Cinematic LUTs For Premiere Pro You Can Come Across
- Updated In 2024, Best Tricks for Learning Photo Slideshow
- New If You Do Not Know How to QuickTime Trim Video Clips, You Are in the Right Place. We Have Provided Information that Will Help You Trim Videos with This Application and Make Them Engaging for Viewers for 2024
- New Here Is a Complete Overview of VSCO Video Editor; the Best Photo-Editing App that Helps You Adjust Your Pictures Right After You Capture Them
- Updated Want to Speed up Your Video to Shorten Its Duration and Make It More Entertaining? Here Is How to Speed up Videos in Final Cut Pro. Get a Better Alternative to FCP to Speed up Videos
- New AVI Editors for Windows 11/10/8.1/8/7 Easily Edit AVI Files on PC for 2024
- In 2024, This Blog Post Shows How to Create an Eye-Catching Paper Rip Effect for Your Videos Using Wondershare Filmora with These Easy-to-Follow Steps
- New Learn How to Blur a Still or Moving Part of Video
- In 2024, Mastering Android Device Manager The Ultimate Guide to Unlocking Your Vivo S17 Device
- In 2024, How To Bypass Asus ROG Phone 7 FRP In 3 Different Ways
- In 2024, How Can I Catch the Regional Pokémon without Traveling On Honor 90 GT | Dr.fone
- Process of Screen Sharing Poco X6 to PC- Detailed Steps | Dr.fone
- 7 Ways to Lock Apps on iPhone X and iPad Securely
- Bypass iCloud Activation Lock with IMEI Code On your iPhone 11 Pro Max
- How to Share/Fake Location on WhatsApp for Realme Narzo 60x 5G | Dr.fone
- The Ultimate Guide to Bypassing iCloud Activation Lock from Apple iPhone 6s
- 7 Solutions to Fix Error Code 963 on Google Play Of Poco C55 | Dr.fone
- In 2024, How to Screen Mirroring OnePlus Ace 3 to PC? | Dr.fone
- Recover your photos after Galaxy S23 has been deleted.
- In 2024, Why Your WhatsApp Location is Not Updating and How to Fix On Apple iPhone 14 Pro Max | Dr.fone
- In 2024, How PGSharp Save You from Ban While Spoofing Pokemon Go On Vivo Y100i? | Dr.fone
- Title: Updated 2024 Approved 10 Best Websites to Discover Free Premiere Pro Video Templates
- Author: Morgan
- Created at : 2024-05-19 05:12:47
- Updated at : 2024-05-20 05:12:47
- Link: https://ai-video-editing.techidaily.com/updated-2024-approved-10-best-websites-to-discover-free-premiere-pro-video-templates/
- License: This work is licensed under CC BY-NC-SA 4.0.
