
:max_bytes(150000):strip_icc():format(webp)/samsung-unveils-new-products-at-its-annual-unpacked-event-1200186175-0a17180ae84e47f488f43d3afbb7daa6.jpg)
Updated 2024 Approved Best Video Editors to Add Text to a Video
Best Video Editors to Add Text to a Video
While it can be very easy to add text to an image, the same cannot be said when it comes to adding even the simplest text to a video. You will need video editing software that is designed with the necessary features to help you add text to your video.
There are very many programs in the market that can technically be used to add text to a video. But the ones we will look at are video editors that make the process easy, but also give you a wide range of options to customize your text in numerous ways.
Filmora
Filmora by Wondershare is one of the best video editors in the market. Its user interface is so easy to use that adding text to the video is a simple 3-step process. Aside from adding text to the video, Filmora also allows you to edit other aspects of the video including adding transitions, overlays, and animations to any section of the video.

Key Features:
- You can use Filmora to add text to any section of the video
- It gives you the freedom to move the text to any section of the video
- Customizing the text, you add to the video can be done in numerous ways including changing the color, and font and adding animations to the text.
- It offers numerous templates to choose from and different font styles that you can use
- It has a simple user interface that makes the video editing process very easy
- It has numerous other video editing capabilities that allow you to create and edit videos in different ways including splitting videos, trimming videos, and even merging videos clips into one
- You can upload the videos directly to YouTube after editing.
After Effects
Adobe After Effects is a motion picture editing program that you can also use to add text and other animations to your video. While you can use it to add simple text to the video, it is an ideal solution when your goal is to add advanced text animations. It is however by no means a simple solution, especially for beginners who may find it hard to get going with After Effects.

Key Features:
- You can add simple lines of text to any section of the video
- Text is easily customizable by changing the color, font, and size of the text
- You can also choose to change the entire text layer and add advanced animations and effects
- There are a lot of text, animations, and effects templates to choose from
- You can easily copy text from other Adobe applications to use in After Effects
Movavi Editor
Movavi video editor is another great video editor that you can use to add and edit text on a video. Like most similar tools it is designed to simplify the process, allowing you to add text to any section of the document, move the text to any location on the video and even add text effects to customize the text. It has a very simple user interface that allows you to do that quickly and easily.

Key Features:
- You can add text to any section of the video
- Customizing the text by changing the font, color and size is also very easy
- The user interface is very easy to use, allowing you to add even blocks of text very quickly
- You also have additional options to edit the video including splitting and merging the video or adjusting the brightness, saturation, and color.
iMovie
This is a built-in video editor that you will find on macOS and iOS devices. Even though it is free, iMovie has a lot of features that come in handy when you want to add and edit text on a video. The fact that it can be used on iOS devices is an added advantage when you want to edit videos on the go.

Key Features:
- It allows users to add transitions and effects to the text you add to the video
- It comes with a lot of title templates to choose from
- Adding animated text is also very simple including Sideways Drift, Lens Flare, and more
- You can customize the text in very many ways including adding fonts, drop shadows, changing the color, and even resizing or repositioning the text.
Camtasia
TechSmith Camtasia is one of the most popular tools to create and edit videos. Of the numerous features that you get when you choose to use Camtasia is adding and editing text to the video. It has numerous templates that can be used to customize the text you add in various ways.

Key Features:
- It gives you numerous options to add text to the images including text boxes, templates, and effects
- It has a speech-to-text feature that is perfect for adding captions and subtitles to the video
- You can easily customize the text by adding transitions and effects or even by simply changing the font, color, and size of the text
- The text can be moved to any section of the video
Typito
Typito is an online video editor with simple tools that can help you make changes to any video. designed to help YouTube content creators and video editors, Typito can be used to add all kinds of text and text effects to any video. It is accessible on all browsers and it is also very easy to use.
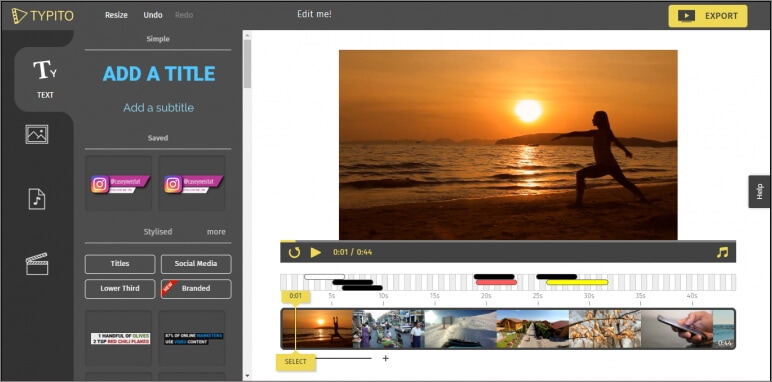
Key Features:
- It is very easy to use, allowing you to add text to any video in a few simple steps
- It has numerous templates to choose from
- Changing the font size, color, and style of the text is very easy
- You can publish videos directly to numerous video-sharing sites after editing
- It allows users to add animations, transitions, and effects to the text
Splice
Splice is an iOS app designed to help you add text to videos on iOS devices. Adding text to any video using Splice can be easily done using the overlay feature. It also has numerous other video editing features including allowing you to easily synchronize your videos and music, adding filters and transitions, and more.

Key Features:
- it has a simple user interface that makes adding text very easy
- You can customize the text in various ways including changing the font size, color and style or even adding various text effects
- Videos can be saved on the device or shared directly on social media apps like Facebook, Instagram, and YouTube
- It has numerous other video editing features including filters and animations
Clipomatic
If the text you want to add to the video is in the form of captions or subtitles, then Clipomatic is perhaps the best choice. It supports various languages including German, French, Portuguese, and even Chinese. You can also use it to add regular text to any video, reposition the text on any section of the video and customize the text in various ways.

Key Features:
- It is available for both Android and iOS
- Adding text to the video is very easy
- You can easily customize the text by changing the font color, and size and adding transitions and text effects
- It supports various languages, making it ideal for captions and subtitles
MySubtitle
MySubtitle is a simple but highly effective app that you can use to add text to your video. As the name suggests, this tool is ideal for adding subtitles and you can do that very easily by simply typing in the text and syncing the text to the video’s content.

Key Features:
- It is available for both iOS and Android devices
- You can type in your subtitles directly on the video
- Subtitles can then be paced to suit the video’s playback speed
- It is completely free to use
- You can share the videos you edit directly on various social media platforms
Free Download For Win 7 or later(64-bit)
Free Download For macOS 10.14 or later
Free Download For macOS 10.14 or later
How to Brighten a Video in Windows 10 Easily
Create High-Quality Video - Wondershare Filmora
An easy and powerful YouTube video editor
Numerous video and audio effects to choose from
Detailed tutorials provided by the official channel
Have you ever had a video with good audio but poor visual quality? Maybe it was a recorded talk, and the presenter was sitting in front of a poorly lit screen, or it might as well be your own home video. There are many reasons why your video could look dark and unappealing. Brightening a video is a great way to remove your editing mistakes and add some artistic flair to your videos. Some editing software has this option built-in, but if you use Windows 10 to edit, it’s hard to find out how to brighten a video in Windows 10 without the help of additional software.
We sometimes know video quality can affect the way content is perceived. That can be particularly frustrating, especially with all the hi-res content online now. Are you in a situation where you need to brighten up a video that has been recorded in low light? If so, look no further. It’s now a breeze to adjust the brightness of your videos on Windows 10. This article will show you how to brighten a video windows 10.
In this article
01 Does Windows 10 have built-in video editing software?
02 3 Simple Methods to Brighten a Video on iPhone
03 Adjust your video brightness and more using Filmora on PC/Mac
Does Windows 10 have built-in video editing software?
The answer is yes. Windows 10 has an easy-to-use video editing app. This is handy for simple home video editing, but it doesn’t work well for professional movie making. Windows Movie Maker was how we edited video in the old days of Windows XP and Vista. Today, Movie Maker is still available on Windows 10, but the new video editor is built-in to the operating system.
You can use it to trim videos or create your own home movies and slideshows. You can even have it create videos automatically by taking photos as you go. Forget about buying expensive editing software. With Windows 10, you have a free video editor built into the operating system where you can trim videos, create home movies, and even create automatic montages. You’ll be surprised at what you can do without ever leaving the Windows 10 Photos app.
Some people say that windows video editor has a very simple interface and it only has very basic features. In this case, having something is more important than not having anything at all. Also, you should keep in mind that not everyone needs a fully-fledged video editor . Some people have to do just basic tasks like trimming a video and increasing the brightness of a video. It is not feasible for them to purchase expensive video editing software for that purpose. So the Windows 10 video editor is the best in this case.
How To Brighten A Video In Windows 10 Easily
This article will discuss two different methods using which you can easily brighten your videos in Windows 10. So, without wasting any more time, let’s get started.
1. Using Filmora to brighten a video in Windows 10
You may think that all video editing software is created equal, but that’s where you’re wrong. The best video editor for your needs is drastically different depending on what you want to do with the end product. Some people want a quick way to make a trailer or showcase their products, and others want to put together an amateur movie.
Filmora is one of the best video editing software for Windows that can improve or fix your dark videos. Filmora is an all-in-one video editor for Windows and Mac. With Filmora, you can easily edit videos and make simple videos with transitions and effects, and you can give any video a professional touch. It’s a great piece of software that works incredibly smoothly. Filmora is an attractive and easy-to-use application that will give your video the final polish it needs. If you’ve ever had a video that looked too dark to use, there are ways to fix it aside from taking an entirely new video.
If you’ve ever had a video that looked too dark to use, then you can easily brighten it up using Filmora. Just follow the steps given below:
Step 1
First of all, make sure that you have installed the latest version of Filmora on your computer. If you haven’t already installed it, then you can download it easily from the official website of Wondershare.
Step 2
Upon starting Wondershare Filmora, click the “Import” button. The import media item window will open and show you all the files on your computer. The program will now display a thumbnail of your selected video in its media area. Drag the video from the media library and drop it into the Filmora timeline.

Step 3
You will see the editing interface when you double-click the video in the Timeline. You can switch between the Video, Audio, Color, and Motion tabs from here. You can change how the clip looks with the Rotate, Flip, Scale, and Position settings in the Video tab. When you select the Color tab, you will be presented with the White Balance, Tone, and 3D LUT options.

Step 4
You can increase the brightness of the video by dragging the Brightness slider in the Tone option to the right. Click the spacebar to play the video to see the real-time result. The video will appear brighter as a result of your operation. Repeat the previous step if the video remains dark. You will see a brighter video each time you increase its brightness and contrast.

Step 5
Click “Export” to save the result when you’re satisfied with it. You can export videos in any popular format from the “Format” tab, including AVI, FLV, MKV, MP4, M4V, PSP, 3GP, MOV, and more. The video can be viewed on mobile devices such as an iPhone, iPad, or iPod by clicking “Device” and choosing a device. You can burn DVDs as well as upload videos directly to YouTube and Vimeo.
For Win 7 or later (64-bit)
For macOS 10.12 or later
2. Using Windows Video Editor to brighten a video
Windows video editor is an easy-to-use tool in which you can do basic video editing. This simple tool can easily cut, trim, and merge different video clips. The best thing about windows video editor is that it comes as built-in software in windows ten, so you won’t need to download any additional programs and plugins. Suppose you are just a beginner, and you need to perform basic video editing functions. In that case, you can easily use this app without worrying about purchasing expensive video editing programs. To increase the brightness of a video in the windows video editor, follow the steps given below:
Step 1
Go to the search section of windows 10 present right after the start menu icon and type “video editor.” Click the search icon and then open the video editor app.

Step 2
A new interface will appear on your screen. Just click on the new project button to start a new project. From the project library, click on the add new project button and select the video from your computer that you want to edit.

Step 3
Click on the video icon in the project library and then click on the “add to storyboard” button. It will open all the editing options for the video.

Step 4
From the menu present at the bottom of the screen, click on the filters option, and it will open a lot of filters on your screen. Click on the filters one by one and check which filter brightens your video.

Step 5
Once you have added the filter, click on the done button and export the video by clicking on the finish button. You can also select your desired resolution in which you want to export your video.

Conclusion
● As you can see, it’s very easy to brighten a video on Windows 10. You have many options depending on what you want to do with your videos after editing them. The point is that you no longer need complex video editing software to get the job done because there are many other options available to help you achieve your desired look and feel. We have described two different methods in this article. Give one a try if you feel like your videos could use a brighter touch.
Have you ever had a video with good audio but poor visual quality? Maybe it was a recorded talk, and the presenter was sitting in front of a poorly lit screen, or it might as well be your own home video. There are many reasons why your video could look dark and unappealing. Brightening a video is a great way to remove your editing mistakes and add some artistic flair to your videos. Some editing software has this option built-in, but if you use Windows 10 to edit, it’s hard to find out how to brighten a video in Windows 10 without the help of additional software.
We sometimes know video quality can affect the way content is perceived. That can be particularly frustrating, especially with all the hi-res content online now. Are you in a situation where you need to brighten up a video that has been recorded in low light? If so, look no further. It’s now a breeze to adjust the brightness of your videos on Windows 10. This article will show you how to brighten a video windows 10.
In this article
01 Does Windows 10 have built-in video editing software?
02 3 Simple Methods to Brighten a Video on iPhone
03 Adjust your video brightness and more using Filmora on PC/Mac
Does Windows 10 have built-in video editing software?
The answer is yes. Windows 10 has an easy-to-use video editing app. This is handy for simple home video editing, but it doesn’t work well for professional movie making. Windows Movie Maker was how we edited video in the old days of Windows XP and Vista. Today, Movie Maker is still available on Windows 10, but the new video editor is built-in to the operating system.
You can use it to trim videos or create your own home movies and slideshows. You can even have it create videos automatically by taking photos as you go. Forget about buying expensive editing software. With Windows 10, you have a free video editor built into the operating system where you can trim videos, create home movies, and even create automatic montages. You’ll be surprised at what you can do without ever leaving the Windows 10 Photos app.
Some people say that windows video editor has a very simple interface and it only has very basic features. In this case, having something is more important than not having anything at all. Also, you should keep in mind that not everyone needs a fully-fledged video editor . Some people have to do just basic tasks like trimming a video and increasing the brightness of a video. It is not feasible for them to purchase expensive video editing software for that purpose. So the Windows 10 video editor is the best in this case.
How To Brighten A Video In Windows 10 Easily
This article will discuss two different methods using which you can easily brighten your videos in Windows 10. So, without wasting any more time, let’s get started.
1. Using Filmora to brighten a video in Windows 10
You may think that all video editing software is created equal, but that’s where you’re wrong. The best video editor for your needs is drastically different depending on what you want to do with the end product. Some people want a quick way to make a trailer or showcase their products, and others want to put together an amateur movie.
Filmora is one of the best video editing software for Windows that can improve or fix your dark videos. Filmora is an all-in-one video editor for Windows and Mac. With Filmora, you can easily edit videos and make simple videos with transitions and effects, and you can give any video a professional touch. It’s a great piece of software that works incredibly smoothly. Filmora is an attractive and easy-to-use application that will give your video the final polish it needs. If you’ve ever had a video that looked too dark to use, there are ways to fix it aside from taking an entirely new video.
If you’ve ever had a video that looked too dark to use, then you can easily brighten it up using Filmora. Just follow the steps given below:
Step 1
First of all, make sure that you have installed the latest version of Filmora on your computer. If you haven’t already installed it, then you can download it easily from the official website of Wondershare.
Step 2
Upon starting Wondershare Filmora, click the “Import” button. The import media item window will open and show you all the files on your computer. The program will now display a thumbnail of your selected video in its media area. Drag the video from the media library and drop it into the Filmora timeline.
Step 3
You will see the editing interface when you double-click the video in the Timeline. You can switch between the Video, Audio, Color, and Motion tabs from here. You can change how the clip looks with the Rotate, Flip, Scale, and Position settings in the Video tab. When you select the Color tab, you will be presented with the White Balance, Tone, and 3D LUT options.
Step 4
You can increase the brightness of the video by dragging the Brightness slider in the Tone option to the right. Click the spacebar to play the video to see the real-time result. The video will appear brighter as a result of your operation. Repeat the previous step if the video remains dark. You will see a brighter video each time you increase its brightness and contrast.
Step 5
Click “Export” to save the result when you’re satisfied with it. You can export videos in any popular format from the “Format” tab, including AVI, FLV, MKV, MP4, M4V, PSP, 3GP, MOV, and more. The video can be viewed on mobile devices such as an iPhone, iPad, or iPod by clicking “Device” and choosing a device. You can burn DVDs as well as upload videos directly to YouTube and Vimeo.
For Win 7 or later (64-bit)
For macOS 10.12 or later
2. Using Windows Video Editor to brighten a video
Windows video editor is an easy-to-use tool in which you can do basic video editing. This simple tool can easily cut, trim, and merge different video clips. The best thing about windows video editor is that it comes as built-in software in windows ten, so you won’t need to download any additional programs and plugins. Suppose you are just a beginner, and you need to perform basic video editing functions. In that case, you can easily use this app without worrying about purchasing expensive video editing programs. To increase the brightness of a video in the windows video editor, follow the steps given below:
Step 1
Go to the search section of windows 10 present right after the start menu icon and type “video editor.” Click the search icon and then open the video editor app.
Step 2
A new interface will appear on your screen. Just click on the new project button to start a new project. From the project library, click on the add new project button and select the video from your computer that you want to edit.
Step 3
Click on the video icon in the project library and then click on the “add to storyboard” button. It will open all the editing options for the video.
Step 4
From the menu present at the bottom of the screen, click on the filters option, and it will open a lot of filters on your screen. Click on the filters one by one and check which filter brightens your video.
Step 5
Once you have added the filter, click on the done button and export the video by clicking on the finish button. You can also select your desired resolution in which you want to export your video.
Conclusion
● As you can see, it’s very easy to brighten a video on Windows 10. You have many options depending on what you want to do with your videos after editing them. The point is that you no longer need complex video editing software to get the job done because there are many other options available to help you achieve your desired look and feel. We have described two different methods in this article. Give one a try if you feel like your videos could use a brighter touch.
Top 5 Video Filter Software: Enhance Your Videos
In today’s tech-savvy world, whether you’re a budding content creator or a seasoned pro, creating eye-catching videos is a must.
And what’s the secret sauce to make your videos stand out? You guessed it – video filters! These nifty tools can transform your raw footage into a visual masterpiece.
So, if you’re ready to take your video editing game up a notch, you’re in the right place.
In this article, we’ll dig into the top 5 video filter software of 2024 that are worth your attention.
Before we jump into the juicy details, let’s get down to basics.
Part 1: Introduction
What exactly are video filters, you ask?
Well, video filters are like Instagram filters for your videos but with much more finesse.
They allow you to tweak various aspects of your video’s appearance, such as color, contrast, saturation, and more, to achieve the desired visual style.
The beauty of video filter software lies in its ability to enhance your video’s overall look and feel. Let’s explore the top contenders in the video filter software arena.
Part 2: Top 5 Video Filter Software
01 Filmora

Our first contender in the world of video filter software is Filmora. Designed with a user-friendly interface, Filmora is the ideal choice for those who want to enhance their videos effortlessly. Let’s take a closer look at what makes it stand out.
Advantages:
- Filmora’s intuitive interface makes it a breeze for beginners to get started. You don’t need to be a tech whiz to dive into video editing; Filmora guides you through the process seamlessly.
- Filmora boasts an extensive library of video presets and color grading presets. This treasure trove of pre-made styles allows you to give your videos that extra flair without the need for in-depth editing skills.
- Time is precious, and Filmora respects that. It offers quick rendering speeds, so you can see the results of your editing efforts in no time.
- Filmora’s simplicity is its strength, but it doesn’t mean it lacks creative potential. You can still go into more advanced features when you’re ready to level up your video editing game. This software gracefully balances accessibility and functionality.
Disadvantages:
So, you might be wondering, what about the downsides? Well, Filmora is so user-friendly that it can make you addicted to editing!
You might find yourself spending hours perfecting your videos, which, to be honest, is more of an advantage disguised as a disadvantage. Who wouldn’t want to get lost in the world of video editing, creating stunning content effortlessly?
02 DaVinci Resolve

When it comes to professional video editing and color correction, DaVinci Resolve stands as a true powerhouse in the world of video filter software.
Renowned for its robust feature set and precision, it’s the go-to choice for filmmakers, colorists, and anyone who demands the highest level of control over their video projects.
Advantages:
- DaVinci Resolve is unrivaled in its color correction and grading capabilities. Whether you’re aiming for a cinematic look or a specific color scheme, the software provides an extensive suite of tools to fine-tune every detail. Its color wheels, curves, and advanced grading panels allow you to achieve the exact visual style you envision.
- It provides a lot of cool stuff for editing sound and video, like fancy tools for fixing audio, working with multiple cameras, and working together with others on the same project. This makes it an all-in-one solution for every aspect of video post-production.
- In a world where teamwork is essential, DaVinci Resolve shines with its collaboration features. Many people can work on a project together at the same time, making it easier for teams working on big video projects to edit smoothly.
Disadvantages:
DaVinci Resolve can be resource-intensive, demanding a powerful computer setup for smooth operation. This could be a great advantage for people with really good computers, but it might be a bit tough for folks with older or less powerful ones.
03 HitFilm Express

If you’re an aspiring filmmaker or content creator looking to dive into the world of video editing and visual effects, HitFilm Express is your ticket to boundless creativity.
This versatile software combines video editing and visual effects seamlessly, allowing you to create stunning, professional-quality videos without breaking the bank.
Advantages:
- HitFilm Express excels in merging video editing and visual effects into one unified platform. This means you can effortlessly incorporate jaw-dropping visual effects into your videos without the need for additional software. Whether you’re adding explosions, futuristic CGI, or enchanting motion graphics, HitFilm Express has you covered.
- It offers a free version that provides access to its fundamental video filter features and VFX capabilities. This is a fantastic opportunity for budding content creators to dip their toes into the world of video editing without any financial commitment.
- HitFilm Express comes with an extensive library of tutorials, making it incredibly user-friendly for those who are new to video editing or visual effects. These tutorials guide you through the software’s features and help you create eye-catching effects like a pro.
Disadvantages:
As for potential downsides, the free version of HitFilm Express may have some limitations compared to the paid version.
While it provides access to essential features, you may find certain advanced options restricted.
However, this can be seen as an advantage because it allows you to explore the software without any upfront costs.
04 Adobe Premiere Pro

Adobe Premiere Pro is a name that resonates deeply within the video editing community. It’s renowned for its versatility and rich feature set, making it a go-to choice for professional video editors and content creators alike.
Advantages:
- When it comes to customization, Adobe Premiere Pro truly shines. The software offers an extensive library of plugins and extensions, allowing you to tailor your video filter effects to your precise liking. Whether you’re into color grading, visual effects, or audio enhancement, you’ll find the tools you need within Adobe’s vast ecosystem.
- If you’re already a part of the Adobe Creative family, you’ll appreciate Premiere Pro’s seamless integration with other Adobe software. Easily import and export assets from Adobe Photoshop or Adobe After Effects, enhancing your workflow and saving you time.
- Adobe is committed to keeping Premiere Pro at the forefront of video editing technology. With regular updates, you can expect a constant influx of new features, improvements, and bug fixes. This ensures that your editing experience remains cutting-edge.
Disadvantages:
There are a few considerations to keep in mind. Adobe Premiere Pro operates on a subscription-based model, which means you’ll need to pay a monthly or annual fee to access the software. While this provides you with ongoing updates and support, it might not be the best fit for those on a strict budget.
Adobe Premiere Pro’s extensive feature set can be overwhelming for beginners. If you’re new to video editing, you may find the learning curve a bit steep. However, with dedication and a wealth of online tutorials available, mastering the software is within reach.
05 Final Cut Pro

If you’re a proud owner of a Mac, Final Cut Pro should be on your radar as the ultimate video filter software. This Apple-exclusive gem is tailored to take your video editing experience to the next level, offering seamless integration with the macOS ecosystem.
Advantages:
- A standout feature of Final Cut Pro is how well it works together with other Apple devices and software, making everything run smoothly. Whether you’re working on your Macbook, iPad, or iPhone, Final Cut Pro keeps your workflow smooth and consistent. This synergy allows you to transfer projects effortlessly between devices, making it a go-to choice for Apple enthusiasts.
- Final Cut Pro is a powerhouse when it comes to handling high-resolution videos. Whether you’re working with 4K or 8K footage, this software handles it with grace and precision. Expect smooth playback and rapid rendering, even with the most demanding video projects.
- Mac users will feel right at home with Final Cut Pro’s sleek and user-friendly interface. The software’s design prioritizes ease of use without compromising on functionality. You can focus on your creative vision rather than wrestling with a complex interface.
Disadvantages:
It’s important to mention that Final Cut Pro is quite expensive, which might not be affordable for people on a tight budget.
Final Cut Pro is exclusive to macOS, which means Windows users will have to explore alternative software options. If you’re committed to the Apple ecosystem and prioritize top-notch video editing, Final Cut Pro is a wise investment.
Part 3: Summary
In a world where visual content rules supreme, having the right video filter software can make all the difference.
Your choice depends on your skill level, preferences, and budget. Whether you’re a newbie or a seasoned pro, there’s a video filter software out there that’s perfect for you. Feel free to dive in, experiment, and let your creativity sparkle in your videos!
Part 1: Introduction
What exactly are video filters, you ask?
Well, video filters are like Instagram filters for your videos but with much more finesse.
They allow you to tweak various aspects of your video’s appearance, such as color, contrast, saturation, and more, to achieve the desired visual style.
The beauty of video filter software lies in its ability to enhance your video’s overall look and feel. Let’s explore the top contenders in the video filter software arena.
Part 2: Top 5 Video Filter Software
01 Filmora
Our first contender in the world of video filter software is Filmora. Designed with a user-friendly interface, Filmora is the ideal choice for those who want to enhance their videos effortlessly. Let’s take a closer look at what makes it stand out.
Advantages:
- Filmora’s intuitive interface makes it a breeze for beginners to get started. You don’t need to be a tech whiz to dive into video editing; Filmora guides you through the process seamlessly.
- Filmora boasts an extensive library of video presets and color grading presets. This treasure trove of pre-made styles allows you to give your videos that extra flair without the need for in-depth editing skills.
- Time is precious, and Filmora respects that. It offers quick rendering speeds, so you can see the results of your editing efforts in no time.
- Filmora’s simplicity is its strength, but it doesn’t mean it lacks creative potential. You can still go into more advanced features when you’re ready to level up your video editing game. This software gracefully balances accessibility and functionality.
Disadvantages:
So, you might be wondering, what about the downsides? Well, Filmora is so user-friendly that it can make you addicted to editing!
You might find yourself spending hours perfecting your videos, which, to be honest, is more of an advantage disguised as a disadvantage. Who wouldn’t want to get lost in the world of video editing, creating stunning content effortlessly?
02 DaVinci Resolve
When it comes to professional video editing and color correction, DaVinci Resolve stands as a true powerhouse in the world of video filter software.
Renowned for its robust feature set and precision, it’s the go-to choice for filmmakers, colorists, and anyone who demands the highest level of control over their video projects.
Advantages:
- DaVinci Resolve is unrivaled in its color correction and grading capabilities. Whether you’re aiming for a cinematic look or a specific color scheme, the software provides an extensive suite of tools to fine-tune every detail. Its color wheels, curves, and advanced grading panels allow you to achieve the exact visual style you envision.
- It provides a lot of cool stuff for editing sound and video, like fancy tools for fixing audio, working with multiple cameras, and working together with others on the same project. This makes it an all-in-one solution for every aspect of video post-production.
- In a world where teamwork is essential, DaVinci Resolve shines with its collaboration features. Many people can work on a project together at the same time, making it easier for teams working on big video projects to edit smoothly.
Disadvantages:
DaVinci Resolve can be resource-intensive, demanding a powerful computer setup for smooth operation. This could be a great advantage for people with really good computers, but it might be a bit tough for folks with older or less powerful ones.
03 HitFilm Express
If you’re an aspiring filmmaker or content creator looking to dive into the world of video editing and visual effects, HitFilm Express is your ticket to boundless creativity.
This versatile software combines video editing and visual effects seamlessly, allowing you to create stunning, professional-quality videos without breaking the bank.
Advantages:
- HitFilm Express excels in merging video editing and visual effects into one unified platform. This means you can effortlessly incorporate jaw-dropping visual effects into your videos without the need for additional software. Whether you’re adding explosions, futuristic CGI, or enchanting motion graphics, HitFilm Express has you covered.
- It offers a free version that provides access to its fundamental video filter features and VFX capabilities. This is a fantastic opportunity for budding content creators to dip their toes into the world of video editing without any financial commitment.
- HitFilm Express comes with an extensive library of tutorials, making it incredibly user-friendly for those who are new to video editing or visual effects. These tutorials guide you through the software’s features and help you create eye-catching effects like a pro.
Disadvantages:
As for potential downsides, the free version of HitFilm Express may have some limitations compared to the paid version.
While it provides access to essential features, you may find certain advanced options restricted.
However, this can be seen as an advantage because it allows you to explore the software without any upfront costs.
04 Adobe Premiere Pro
Adobe Premiere Pro is a name that resonates deeply within the video editing community. It’s renowned for its versatility and rich feature set, making it a go-to choice for professional video editors and content creators alike.
Advantages:
- When it comes to customization, Adobe Premiere Pro truly shines. The software offers an extensive library of plugins and extensions, allowing you to tailor your video filter effects to your precise liking. Whether you’re into color grading, visual effects, or audio enhancement, you’ll find the tools you need within Adobe’s vast ecosystem.
- If you’re already a part of the Adobe Creative family, you’ll appreciate Premiere Pro’s seamless integration with other Adobe software. Easily import and export assets from Adobe Photoshop or Adobe After Effects, enhancing your workflow and saving you time.
- Adobe is committed to keeping Premiere Pro at the forefront of video editing technology. With regular updates, you can expect a constant influx of new features, improvements, and bug fixes. This ensures that your editing experience remains cutting-edge.
Disadvantages:
There are a few considerations to keep in mind. Adobe Premiere Pro operates on a subscription-based model, which means you’ll need to pay a monthly or annual fee to access the software. While this provides you with ongoing updates and support, it might not be the best fit for those on a strict budget.
Adobe Premiere Pro’s extensive feature set can be overwhelming for beginners. If you’re new to video editing, you may find the learning curve a bit steep. However, with dedication and a wealth of online tutorials available, mastering the software is within reach.
05 Final Cut Pro
If you’re a proud owner of a Mac, Final Cut Pro should be on your radar as the ultimate video filter software. This Apple-exclusive gem is tailored to take your video editing experience to the next level, offering seamless integration with the macOS ecosystem.
Advantages:
- A standout feature of Final Cut Pro is how well it works together with other Apple devices and software, making everything run smoothly. Whether you’re working on your Macbook, iPad, or iPhone, Final Cut Pro keeps your workflow smooth and consistent. This synergy allows you to transfer projects effortlessly between devices, making it a go-to choice for Apple enthusiasts.
- Final Cut Pro is a powerhouse when it comes to handling high-resolution videos. Whether you’re working with 4K or 8K footage, this software handles it with grace and precision. Expect smooth playback and rapid rendering, even with the most demanding video projects.
- Mac users will feel right at home with Final Cut Pro’s sleek and user-friendly interface. The software’s design prioritizes ease of use without compromising on functionality. You can focus on your creative vision rather than wrestling with a complex interface.
Disadvantages:
It’s important to mention that Final Cut Pro is quite expensive, which might not be affordable for people on a tight budget.
Final Cut Pro is exclusive to macOS, which means Windows users will have to explore alternative software options. If you’re committed to the Apple ecosystem and prioritize top-notch video editing, Final Cut Pro is a wise investment.
Part 3: Summary
In a world where visual content rules supreme, having the right video filter software can make all the difference.
Your choice depends on your skill level, preferences, and budget. Whether you’re a newbie or a seasoned pro, there’s a video filter software out there that’s perfect for you. Feel free to dive in, experiment, and let your creativity sparkle in your videos!
How to Do Masking in After Effects [Alternative Provided]
Masking is a powerful feature in After Effects that allows you to hide, reveal, or manipulate specific parts of a layer. Whether creating animations, visual effects, or enhancing your video content, masking can be a valuable tool in your arsenal. However, it can be intimidating for beginners, as it requires a good understanding of key concepts and techniques.
This article aims to demystify masking in After Effects and provide a comprehensive guide on getting started. Whether a beginner or an experienced user, you’ll find useful tips, tricks, and a creative alternative to masking that will take your skills to the next level. So let’s dive in and discover the art of masking in After Effects!

Overview of Masking in After Effects
Masking in After Effects hides or reveals certain layer parts, such as an image or video. This is achieved through masks, paths that determine the visibility of specific layer parts. Masks are an incredibly versatile tool in Adobe After Effects, allowing users to cut out and combine elements, create professional transitions, isolate objects in photos or videos, and build shapes, among other things.
Masks in After Effects are made up of two parts: the mask and the fill. The mask controls what is visible, while the fill determines the color or image used to fill the masked area.
By default, when a mask is created, it is set to “inverted,” meaning the masked area is visible, and the rest is hidden. However, this can easily be changed by pressing “M” to access the mask settings in the timeline and selecting the invert checkmark. Alternatively, the mode can be changed to subtract.
Overall, masks are an essential tool in After Effects, and it’s worth taking the time to learn as much as possible about them. The possibilities are endless, and mastering masks can greatly enhance your projects.
How To Do Masking in AE Using Shape Tools
Shape tools provide a quick and easy way to create masks in AE and are a great starting point for beginners. With these tools, you can easily create masks in various shapes and sizes to hide, reveal, or manipulate parts of a layer. We’ll guide you through creating masks using different shape tools, including the rectangle, ellipse, and polygon tools. So let’s get started!
Step1 Choose the layer to which you want to apply the mask.

Step2 Choose one of the shape tools from the toolbar.

Step3 Drag the mouse and select the area you want to apply the shape tool mask.

![]()
Note:
- Holding down the “CTRL“ key for Windows or the “CMD“ key for Mac will draw the shape from the center.
- Holding down the “Shift“ key will maintain equal sides and create symmetrical shapes such as squares or circles.
How To Use Pen Tool for Masking in After Effects
The Pen Tool in After Effects is a powerful, flexible option for creating masks. This section will explore using the Pen Tool to create masks in After Effects.
Whether you need to create a complex or a simple mask, the Pen Tool provides precise control over the mask shape and can create any shape you desire. From freehand masks to geometric shapes, the Pen Tool is the tool of choice for many After Effects users. Let’s take a closer look at how to use the Pen Tool for masking in After Effects.
Step1 Import image to project and add to timeline.

Step2 Click on the “Pen“ icon to activate Pen Tool, and use it to mask out the background.

Step3 Place a new image behind a masked image for a new background.

Step4 Add a masked image feather if needed.

Step5 Add text, and create a “shape layer“ to place on the text.

Step6 Use “Alpha Inverted Matte“ to mask the text.

Wondershare Filmora - A Great Alternative to After Effects Masking
Wondershare Filmora is a popular video editing software that offers a range of features and tools for video editing. One of the most useful features is its masking capability, which provides a great alternative to the masking feature in Adobe After Effects.
Filmora’s masking feature is designed to be user-friendly, making it ideal for both beginner and advanced users. With its intuitive interface, users can easily create masks to hide, reveal, or manipulate parts of a video. The software offers a range of masking tools, including shape, freehand, and gradient masks, providing a wide range of options.
Free Download For Win 7 or later(64-bit)
Free Download For macOS 10.14 or later
In addition to its masking feature, Filmora offers various tools and features that make it a great choice for video editing. Its keyframe animation allows users to create smooth and professional transitions, and its audio editing features allow users to add music, sound effects, and voiceovers easily. The software also supports various file formats, making it easy to import and export videos for sharing and distribution.
Overall, Wondershare Filmora is a great alternative to After Effects, particularly for users looking for a more user-friendly and affordable video editing and masking option. With its comprehensive features, Filmora provides an excellent option for users who want to create professional-looking videos without needing advanced technical skills.
How To Use Shape Tool In Masking Using Filmora
The Shape Tool in Filmora is a feature in the video editing software Wondershare Filmora, which allows users to create masks with various shapes such as rectangles, circles, double lines, single lines, love, and star, as well as custom shapes using the draw mask feature. Masks in Filmora can hide or reveal specific parts of a video clip, add animations, and create composite images and videos.
Discover how to use the Shape Tool in Wondershare Filmora for masking, a great alternative to After Effects masking. Easy to use for beginners and advanced users alike, Filmora’s Shape Tool provides options for creating masks to manipulate video content.
Step1 Enter the Video panel, and switch to the Mask tab in Wondershare Filmora. Choose from basic mask shapes or create your own.

Step2 Select a shape; see only the masked area in the Preview window.

Step3 Add keyframes to animate the mask and adjust position, rotation, size, and blur strength.

How To Use Pen Tool In Masking Using Filmora
Pen Tool in Masking Using Filmora is a feature that enables users to create complex masks by dragging control points and modifying B-Splines. The tool allows users to draw the mask shape precisely by zooming in and out on the player screen and to create smooth curves by holding the Alt/Option key to adjust the Bessel curve for drawn masks.
The mask created using the Pen Tool can be edited, resized, repositioned, and adjusted using sliders and handles in the Preview window. The tool also enables users to invert the mask, making the original visible part invisible and the hidden part visible.
Learn how to use the Pen Tool in Wondershare Filmora for masking, a versatile alternative to After Effects masking. With the Pen Tool, you can easily outline and manipulate specific areas in your video to create unique and professional effects.

Step1 Create a project and add the media to the timeline**. Enter** the Mask tab.
Step2 Edit the mask by adjusting the sliders in the Mask tab to resize, reposition, and change orientation. Also, adjust the blur strength, width, height, and radius, or invert the mask.

Conclusion
Masking is an important aspect of video editing and opens up a new world of creative possibilities. After Effects provides a comprehensive set of tools for masking, and Filmora is a great alternative for those looking for a more user-friendly option.
Whether you’re using After Effects or Filmora, you can use masks to control the visibility of parts of your image, make shapes, build transitions, and much more. Following this article’s simple steps, you can start masking and bringing your creative vision to life.
- Holding down the “CTRL“ key for Windows or the “CMD“ key for Mac will draw the shape from the center.
- Holding down the “Shift“ key will maintain equal sides and create symmetrical shapes such as squares or circles.
How To Use Pen Tool for Masking in After Effects
The Pen Tool in After Effects is a powerful, flexible option for creating masks. This section will explore using the Pen Tool to create masks in After Effects.
Whether you need to create a complex or a simple mask, the Pen Tool provides precise control over the mask shape and can create any shape you desire. From freehand masks to geometric shapes, the Pen Tool is the tool of choice for many After Effects users. Let’s take a closer look at how to use the Pen Tool for masking in After Effects.
Step1 Import image to project and add to timeline.
Step2 Click on the “Pen“ icon to activate Pen Tool, and use it to mask out the background.
Step3 Place a new image behind a masked image for a new background.
Step4 Add a masked image feather if needed.
Step5 Add text, and create a “shape layer“ to place on the text.
Step6 Use “Alpha Inverted Matte“ to mask the text.
Wondershare Filmora - A Great Alternative to After Effects Masking
Wondershare Filmora is a popular video editing software that offers a range of features and tools for video editing. One of the most useful features is its masking capability, which provides a great alternative to the masking feature in Adobe After Effects.
Filmora’s masking feature is designed to be user-friendly, making it ideal for both beginner and advanced users. With its intuitive interface, users can easily create masks to hide, reveal, or manipulate parts of a video. The software offers a range of masking tools, including shape, freehand, and gradient masks, providing a wide range of options.
Free Download For Win 7 or later(64-bit)
Free Download For macOS 10.14 or later
In addition to its masking feature, Filmora offers various tools and features that make it a great choice for video editing. Its keyframe animation allows users to create smooth and professional transitions, and its audio editing features allow users to add music, sound effects, and voiceovers easily. The software also supports various file formats, making it easy to import and export videos for sharing and distribution.
Overall, Wondershare Filmora is a great alternative to After Effects, particularly for users looking for a more user-friendly and affordable video editing and masking option. With its comprehensive features, Filmora provides an excellent option for users who want to create professional-looking videos without needing advanced technical skills.
How To Use Shape Tool In Masking Using Filmora
The Shape Tool in Filmora is a feature in the video editing software Wondershare Filmora, which allows users to create masks with various shapes such as rectangles, circles, double lines, single lines, love, and star, as well as custom shapes using the draw mask feature. Masks in Filmora can hide or reveal specific parts of a video clip, add animations, and create composite images and videos.
Discover how to use the Shape Tool in Wondershare Filmora for masking, a great alternative to After Effects masking. Easy to use for beginners and advanced users alike, Filmora’s Shape Tool provides options for creating masks to manipulate video content.
Step1 Enter the Video panel, and switch to the Mask tab in Wondershare Filmora. Choose from basic mask shapes or create your own.
Step2 Select a shape; see only the masked area in the Preview window.
Step3 Add keyframes to animate the mask and adjust position, rotation, size, and blur strength.
How To Use Pen Tool In Masking Using Filmora
Pen Tool in Masking Using Filmora is a feature that enables users to create complex masks by dragging control points and modifying B-Splines. The tool allows users to draw the mask shape precisely by zooming in and out on the player screen and to create smooth curves by holding the Alt/Option key to adjust the Bessel curve for drawn masks.
The mask created using the Pen Tool can be edited, resized, repositioned, and adjusted using sliders and handles in the Preview window. The tool also enables users to invert the mask, making the original visible part invisible and the hidden part visible.
Learn how to use the Pen Tool in Wondershare Filmora for masking, a versatile alternative to After Effects masking. With the Pen Tool, you can easily outline and manipulate specific areas in your video to create unique and professional effects.
Step1 Create a project and add the media to the timeline**. Enter** the Mask tab.
Step2 Edit the mask by adjusting the sliders in the Mask tab to resize, reposition, and change orientation. Also, adjust the blur strength, width, height, and radius, or invert the mask.
Conclusion
Masking is an important aspect of video editing and opens up a new world of creative possibilities. After Effects provides a comprehensive set of tools for masking, and Filmora is a great alternative for those looking for a more user-friendly option.
Whether you’re using After Effects or Filmora, you can use masks to control the visibility of parts of your image, make shapes, build transitions, and much more. Following this article’s simple steps, you can start masking and bringing your creative vision to life.
Also read:
- New Create a Stunning Light Sweep Effect in Filmora. Use Simple and Easy Steps to Export a High-Quality Video that Will Impress Even Pro Video Editors for 2024
- Updated In 2024, So, in This Short Tutorial, Well Learn How to Create a Vintage 1980-Style Video with a Retro Effect that Will Leave Your Audience Yearning for More
- New Best Free Slow Motion Apps For Android and iPhone for 2024
- New 2024 Approved Slow-Motion Innovation with Sony S&Q Feature
- Updated Video Inspiration for Birthday Slideshow for 2024
- New Detailed Steps to Rotate Videos in Davinci Resolve
- Updated 2024 Approved How I Got Free After Effects Templates Slideshow with Simple Trick
- New How to Make Double Exposure Effect in Filmora for 2024
- Updated What Should Be Considered to Choose A Nice GoPro for Vlogging?
- How to Add Motion Titles
- Top List Best VHS Sound Effect That You Can Use in Video Making for 2024
- Updated In 2024, 7 Best MP4 Editors on Mac Edit MP4 in Mac
- 7 Tips to Create Teaching Videos
- New Detailed Steps to Rotate Video Using KMPlayer for 2024
- In 2024, | Live Stream on YouTube Using Zoom
- New Top 8 Augmented Reality Video Games
- You Are Planning to Convert an AVI to GIF Online but You Are Not Sure How? If You Are Looking for an Idea on How to Do It, You Have Come to the Right Place
- Updated 2024 Approved Wondering How to Replace Sky in After Effects? Learn How
- New In 2024, The Complete Guide to Converting GIF to SVG With Ease
- 2024 Approved How to Make Coin Magic With Filmora
- New How to Create a Smooth Cut Transition Effect, In 2024
- New Detailed Steps to Rotate Videos Using Kdenlive for 2024
- How To Fake GPS On Apple iPhone 11 Pro Max For Mobile Legends? | Dr.fone
- In 2024, How To Change Your SIM PIN Code on Your Samsung Galaxy S23 FE Phone
- What To Do When Motorola Edge 40 Neo Has Black Screen of Death? | Dr.fone
- In 2024, How to Change Credit Card on Your Apple iPhone 13 Pro Apple ID and Apple Pay
- In 2024, How to Remove Find My iPhone without Apple ID On your Apple iPhone 13 mini?
- In 2024, Does Airplane Mode Turn off GPS Location On Tecno Spark 20 Pro? | Dr.fone
- How To Transfer Data From iPhone 8 To Other iPhone 11 devices? | Dr.fone
- How to Sign a .txt file document online
- How to Reset Apple iPhone 8 Plus to Factory Settings? | Dr.fone
- 9 Solutions to Fix Process System Isnt Responding Error on Nokia 105 Classic | Dr.fone
- New In 2024, 15 Animated Characters We All Had A Crush On
- Full Guide to Bypass Honor 70 Lite 5G FRP
- Why Does My Samsung Galaxy S23 FE Keep Turning Off By Itself? 6 Fixes Are Here | Dr.fone
- Top 10 Best Spy Watches For your Samsung Galaxy S23 Ultra | Dr.fone
- Title: Updated 2024 Approved Best Video Editors to Add Text to a Video
- Author: Morgan
- Created at : 2024-04-24 01:04:43
- Updated at : 2024-04-25 01:04:43
- Link: https://ai-video-editing.techidaily.com/updated-2024-approved-best-video-editors-to-add-text-to-a-video/
- License: This work is licensed under CC BY-NC-SA 4.0.
