
:max_bytes(150000):strip_icc():format(webp)/GettyImages-966273172-fbc5e7e0e68a48f69a1a5ddc0d6df827.jpg)
Updated 2024 Approved Do You Want to Know How to Add LUTs to Premiere Pro? In This Guide, You Will Find Details and Easy Steps to Proceed with Using LUTs in Premiere Pro
Do You Want to Know How to Add LUTs to Premiere Pro? In This Guide, You Will Find Details and Easy Steps to Proceed with Using LUTs in Premiere Pro
LUTs, fully known as look-up tables, are essential video editing elements. By using LUTs, you can enhance your video quality with improved color grading. Talking about its configuration, LUTs are made of different effects and styles for providing unique visualization.
There is a buzz around adding LUTs to Premiere Pro. Many people often fail to use LUTs due to their complexities. This article comprises detailed information and steps to add LUTs with ease.
Part 1: Why are LUTs Important in Video Editing?
Video editing becomes easier and smarter with LUTs. This specific utility can ensure upscaling video content with improved quality. But why are LUTs important? Here is why:
1. Creative Color Grading
LUTs are known to provide consistent color grading within a video. There are color palettes that are applied to every visual part. Thus, an appropriate visual style is applied to your content, making it more impressive. Moreover, with several creative options, LUTs are adjusted and enhanced to perfection. Color grading becomes special with them.
2. Flexibility and Accuracy
You can change LUTs within desired intensity, blur, sharpness, and lightning. There are also color adjustments with the most flexibility. You can transform your video color gradients as required. The important thing is colors are applied with accuracy and proper details. This way, your video will be more consistent in colors.
3. Advanced AI Functionality
With technological advancement, LUTs are also upgrading with time. The implementation of AI functionality into LUTs makes them more special. The color grading process is fully automated. Thus, videos are analyzed, and LUTs are applied based on the required color criteria. LUTs are also integrated with AI augmented reality to provide realistic experiences.
4. Saves Time
Applying LUT doesn’t take time, and it instantly improves color grading. This way, you don’t need to spend hours on video editing. After all, with LUTs, you can effortlessly upscale video colors and quality. The pre-designed color presets are effective and efficient.
Empower your videos with a new mood using different LUTs. Filmora now offers 100+ top-quality 3D LUTs cover a broad range of scenarios. Transform your videos with Filmora’s powerful 3D LUTs.
Apply LUT on Videos Apply LUT on Videos Learn More


Part 2: How to Add LUTs in Premiere Pro?
LUTs are great video editing tools with extended color grading and schemas. Premiere Pro is a commonly consumed video editing tool with extensive features. Being a new user, you might not be aware of the functionality of LUTs in the platform. To add LUTs to Premiere Pro, you need to follow simple steps:
Step 1: Launch and open Adobe Premiere Pro on your device. Proceed to add the video clip that needs to be edited on the timeline. Navigate to the “Color” workspace from the screen’s top.

Step 2: From the project window on the bottom left, press the “New Item” tab and choose “Adjustment Layer.” Adjust video settings from the available panel, including the “Width,” “Height,” “Timebase,” and “Pixel Aspect Ratio,” and click “OK.”

Step 3: Drag and drop the created adjustment layer from the project window into the timeline and set the length adjacent to the video. Select the adjustment layer, and press “Lumetri Color” from the top in the right-hand panel. From the “Basic Correction” category, set “Input LUT” and proceed to click the “Browse” option from the drop-down menu. Navigate your LUT from the folder and click “Open” to apply desired LUT to the video.

Part 3: What are the Future Prospects of LUTs in Video Editing?
LUTs are already transforming video editing functionalities with automated color grading. This means users don’t have to edit colors, styles, and other elements manually. In the future, LUTs will have amazing prospects. Let’s discuss some of them:
- Cloud Infrastructure: Sharing and collaboration on customized LUTs will be easier in the future. This will be possible due to cloud infrastructure. Hence, video editors worldwide can collaborate and share color insights on projects.
- User-Friendly Interface: LUTs will become more user-friendly in the future. This will make them easy to use and implement in projects. Even beginners will minimal editing knowledge will be able to use them. In contrast, professional editors will streamline their workflows with fast processing.
- Real-time Preview: Using LUTs, users would be able to preview color grading. This way, they will know what their video after LUT would look like. Hence, they can preview different LUT presets and proceed with the desired one.
- Wide Compatibility: The platform compatibility of LUTs will also enhance. After all, you will access them on mobile, web, and desktop devices without problems. You can use LUTs in everyday life by applying them to visual content.
Bonus Part: Wondershare Filmora – An Alternative Haven for Adding LUTs
LUTs are great utility when it comes to video editing environments. Apart from Premiere Pro, several other tools are working to improve the industry. Wondershare Filmora is a video editing software where you can upgrade your videos. You can add different elements, effects, and transitions in Filmora. You can also use and apply LUT presets within Filmora.
Add LUTs on Video For Win 7 or later(64-bit)
Add LUTs on Video For macOS 10.14 or later
There are approximately 100+ LUTs presets in the current version of Filmora. Users can use them to enlighten the colors of videos. Meanwhile, in the new version, there would be additional 100 LUTs. So, in total, you will be getting 200+ LUTs in the new updates provided by Wondershare Filmora. Each LUT is unique in its kind and style.

Key Features of Wondershare Filmora
- Intensity Setting: You can also modify the intensity of your applied colors. This way, you can adjust color saturation on a 0 – 100% scale range. With intensity, there is an option to customize color grading.
- Color Wheel: Within Wondershare Filmora, there is a color wheel for adjusting video colors. Thus, users can set color pallets within their required style. The color grading is then enhanced with the desired customization.
- Optimized Export: The video export facility is optimized with fast processing. You can also set the video format, select resolution, and adjust other settings. The video is exported in the highest of qualities.
- Preview Render: After editing your videos with LUT presets, check color styles using render preview. Render preview allows previewing your final project before exporting it to the device.
Conclusion
Videos are close to all of us, as they store our important visual data. This is why video editing is essential to enhance color grading and schemas. Meanwhile, installing LUTs in Premiere Pro can help improve video quality with minimal effort. A good tool for using LUTs is Wondershare Filmora. After all, Filmora offers 100+ LUT presets, with 100 more to follow soon.
Add LUTs on Video For Win 7 or later(64-bit)
Add LUTs on Video For macOS 10.14 or later
Apply LUT on Videos Apply LUT on Videos Learn More
Part 2: How to Add LUTs in Premiere Pro?
LUTs are great video editing tools with extended color grading and schemas. Premiere Pro is a commonly consumed video editing tool with extensive features. Being a new user, you might not be aware of the functionality of LUTs in the platform. To add LUTs to Premiere Pro, you need to follow simple steps:
Step 1: Launch and open Adobe Premiere Pro on your device. Proceed to add the video clip that needs to be edited on the timeline. Navigate to the “Color” workspace from the screen’s top.
Step 2: From the project window on the bottom left, press the “New Item” tab and choose “Adjustment Layer.” Adjust video settings from the available panel, including the “Width,” “Height,” “Timebase,” and “Pixel Aspect Ratio,” and click “OK.”
Step 3: Drag and drop the created adjustment layer from the project window into the timeline and set the length adjacent to the video. Select the adjustment layer, and press “Lumetri Color” from the top in the right-hand panel. From the “Basic Correction” category, set “Input LUT” and proceed to click the “Browse” option from the drop-down menu. Navigate your LUT from the folder and click “Open” to apply desired LUT to the video.
Part 3: What are the Future Prospects of LUTs in Video Editing?
LUTs are already transforming video editing functionalities with automated color grading. This means users don’t have to edit colors, styles, and other elements manually. In the future, LUTs will have amazing prospects. Let’s discuss some of them:
- Cloud Infrastructure: Sharing and collaboration on customized LUTs will be easier in the future. This will be possible due to cloud infrastructure. Hence, video editors worldwide can collaborate and share color insights on projects.
- User-Friendly Interface: LUTs will become more user-friendly in the future. This will make them easy to use and implement in projects. Even beginners will minimal editing knowledge will be able to use them. In contrast, professional editors will streamline their workflows with fast processing.
- Real-time Preview: Using LUTs, users would be able to preview color grading. This way, they will know what their video after LUT would look like. Hence, they can preview different LUT presets and proceed with the desired one.
- Wide Compatibility: The platform compatibility of LUTs will also enhance. After all, you will access them on mobile, web, and desktop devices without problems. You can use LUTs in everyday life by applying them to visual content.
Bonus Part: Wondershare Filmora – An Alternative Haven for Adding LUTs
LUTs are great utility when it comes to video editing environments. Apart from Premiere Pro, several other tools are working to improve the industry. Wondershare Filmora is a video editing software where you can upgrade your videos. You can add different elements, effects, and transitions in Filmora. You can also use and apply LUT presets within Filmora.
Add LUTs on Video For Win 7 or later(64-bit)
Add LUTs on Video For macOS 10.14 or later
There are approximately 100+ LUTs presets in the current version of Filmora. Users can use them to enlighten the colors of videos. Meanwhile, in the new version, there would be additional 100 LUTs. So, in total, you will be getting 200+ LUTs in the new updates provided by Wondershare Filmora. Each LUT is unique in its kind and style.
Key Features of Wondershare Filmora
- Intensity Setting: You can also modify the intensity of your applied colors. This way, you can adjust color saturation on a 0 – 100% scale range. With intensity, there is an option to customize color grading.
- Color Wheel: Within Wondershare Filmora, there is a color wheel for adjusting video colors. Thus, users can set color pallets within their required style. The color grading is then enhanced with the desired customization.
- Optimized Export: The video export facility is optimized with fast processing. You can also set the video format, select resolution, and adjust other settings. The video is exported in the highest of qualities.
- Preview Render: After editing your videos with LUT presets, check color styles using render preview. Render preview allows previewing your final project before exporting it to the device.
Conclusion
Videos are close to all of us, as they store our important visual data. This is why video editing is essential to enhance color grading and schemas. Meanwhile, installing LUTs in Premiere Pro can help improve video quality with minimal effort. A good tool for using LUTs is Wondershare Filmora. After all, Filmora offers 100+ LUT presets, with 100 more to follow soon.
Add LUTs on Video For Win 7 or later(64-bit)
Add LUTs on Video For macOS 10.14 or later
How To Fade Audio With Movavi Editor
Movavi Video Editor Plus is the best option if you want to use its user-friendly Movavi fade audio feature set with plenty of functionality. There are versions of the app on Mac and Windows. For all intents and purposes, Movavi fade out music functionality is an excellent piece of this video editing software. The Movavi Video Editor Plus package comes with standard advanced features and functionality. You may also store your work and share your Movavi fade out audio exports across devices that have the software installed.
Looking for how to fade out music in Movavi? We’ve got you solutions to it. The ability to quickly and simply check that the beginning and conclusion of any audio is one of the best Movavi fade audio features. Prior to the audio, there must be a distinct period of quiet. Finding the program, like Movavi Audio fade out, that best suits your requirements is essential whether you want to fade-in, fad-out, trim, crop, clip, or combine audio files or segments of a music. Find out the details in the upcoming sections.
Part 1. How to Fade Audio with Movavi Editor
When the song’s ending is not featured in the video, fade-out is used to provide an added level of professionalism. Even if you’ve never altered a video before, using Movavi Video Editor Plus is simple. A step-by-step tutorial that walks you through all the tools you’ll need is shown to you when the software initially launches. Additionally, you may always search the Movavi official website for advice.
Steps to use Movavi Fade Audio:
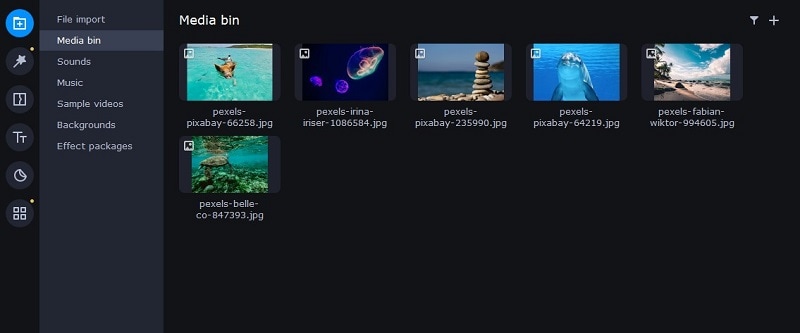
Step1The first step is to import the audio and video files you want to utilize. Drag and drop the files into the software or choose “Add Files” from the Media Bin area to do this. Drag and drop the clip into the timeline after that.
Step2Select the disconnect audio option from the edit menu. Additionally, you can see that the audio and video will no longer be connected by a little connection. Your titles’ location, color, and font may all be changed.
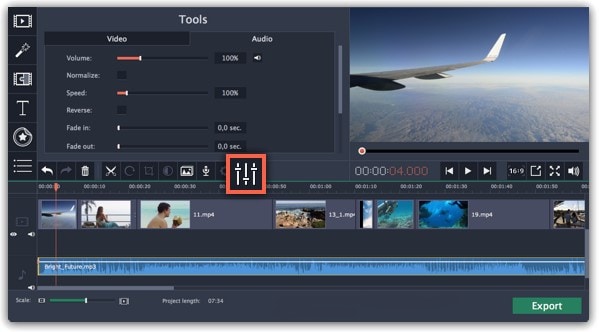
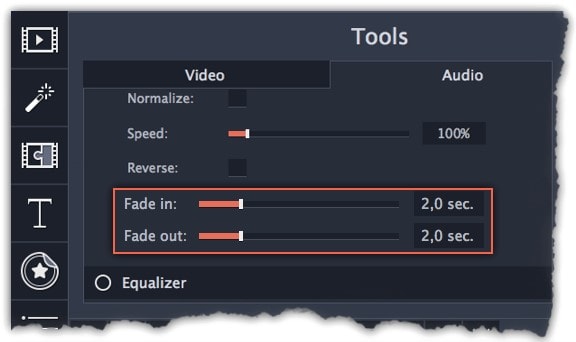
Step3Use the sliders on the Audio tab to set the fade duration by referring to the Audio Properties. Additional options may be used to increase the audio’s loudness, eliminate ambient noise, or even create an echo effect.
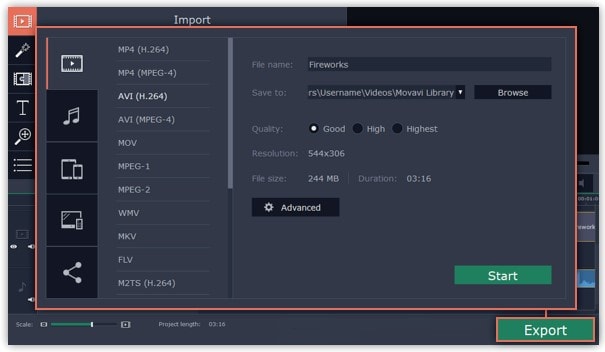
Step4Click on the export option to save this audio as an MP3. Select Audio Export. The MP3 choice is used by default. Select the Save Audio File tab after clicking the Export button. Choose the preferred format and press Start.
Part 2. Movavi Alternative to Fade Audio
Look no further than Filmora by Wondershare if you’re seeking for an effective and user-friendly Movavi audio fade out substitute. This program has all the tools you need to edit, apply special effects, and make titles for videos of a professional caliber. In contrast to Movavi, Filmora gives you the ability to create fade out music without requiring you to install a separate extension. In order to help you understand how to use this function using the Filmora video editing interface, we have enlisted the step-by-step guide for you as well.
Although there are several video editors on the market, Filmora has successfully carved out a position for itself with a variety of intriguing features. The application is appropriate for both new and more experienced users and was designed with novice users in mind. Its user interface (UI), which is rather simple when compared to professional applications. Among all the free video editing programs for beginners, Filmora also offers a far larger selection of effects, customizability, and correction tools, and its screen-splitting capability is much handier than Movavi fade audio feature.
Steps to Fade Out Audio in Filmora:
Step1Install Wondershare Filmora
The straightforward platform to start editing your audio and music files is Filmora, which is available for free. You must first download and install this application on your windows computer in order to utilize it without difficulty. Download the most current edition of this application first. It’s now time to install it on your computer when you’ve completed that. Simply install this program on your computer by following the standard setup instructions if you want to do it fast.
Step2Open Filmora Editor and Import Audio Files
In the step that follows, we’ll show you how to use this platform to fade in and out audio. Filmora may be immediately launched from your desktop or the search bar, then opened as seen below to begin going. By choosing the Video Editor option from the software’s home screen, you may now investigate the basic principles of editing. This will bring up the main interface for Filmora. To import your music and video files, just choose the Import button from the software’s main screen, as seen below:

Step3Load Built-in Audio Editor
You must drag the media files into the program’s timeline after importing them into Filmora. You may modify your media files using every tool in the timeline. To utilize the audio editor in Filmora, just right-click on the specific audio file and choose “Edit Audio” from the list, as seen below.

Step4Use Audio Fade-in/Fade-out
The initial step is to learn how to use Filmora to start fading in and, afterwards, fading out your audio recordings. The best aspect of Filmora is how simple it is to employ these techniques from the timeline. To achieve this, focus on the audio file that you want to change in the timeline; after you’ve picked it, the two icons will show up above the audio file. Drag the first one to the desired duration for the audio fade-in option, as demonstrated:

Step5Edit and Share Video/Sound
In addition to an audio editor, Filmora has a built-in toolset for video editing. You may utilize basic to sophisticated editing techniques inside the program. To choose the basic editor, just click on the video file within the timeline as seen below. There is support for all widely used video and audio formats, including MP3. Click “Export” and choose “File Format” to do this.
By pressing the Format button, choose the required configuration from the list. On a computer, the particular document will be saved to the designated directory.
The Bottom Line
Have you learned how to fade out music in Movavi? If so, then you would also find out that the Movavi fade audio alternative, Filmora , provides a selection of audio editing options in addition to video editing features. The Movavi editor is capable of spicing up your videos and audios, however; Filmora’s workflow is a little more established and well-defined than Movavi’s, which is what propels it to the top of the audio editing field. As a result, Filmora would be the better option if you intend to work as a video editor for a long time.
Free Download For Win 7 or later(64-bit)
Free Download For macOS 10.14 or later
End Screen Makers
A YouTube end screen is the final section of a YouTube video and generally makes up the final 5-20 seconds of the video. Video creators often use this section of the video to add calls-to-action, playlists, links to videos, and more.
It can therefore be a very crucial 5-20 seconds and you may want to make sure that the end screen works for your brand. To do that, you need to make use of a good end screen maker that will ensure you are taking full advantage of this final part of the video. Here, we will look at some of the best end screen makers for you to choose from.
Best End Screen Makers
The following are the best end screen makers that you can use to finish your YouTube videos in style;
Filmora
Wondershare Filmora is one of the best video creation and editing tools in the market and as such you can be sure that it has all the necessary features to help you create and edit an end screen for your YouTube video that users will interact with. It has a lot of different features that make the process easy and allows you to customize our video in so many ways.

You can add all kinds of assets to the video project including images, video clips, text, and more, and use Filmora’s filters, animated elements, and video effects to put them together. All these features come in a very simple-to-use interface that makes the often-complicated process of creating and editing videos very easy.
For Win 7 or later (64-bit)
For macOS 10.12 or later
Key Features
- You can export the completed video in very high quality
- It can be used to create and edit GIFs
- It has numerous editing tools including noise removal options, advanced color tuning, advanced text editor, scene stabilization, and more.
- You can add audio including voiceover and music to the video
- It has a very simple user interface that makes it very easy to use
Canva
Canva is a simple-to-use animated YouTube end screen maker that has a large library of resources ideal for creating different types of end screens. One of the best things about Canva is the numerous templates that you can choose from, along with effects and media files including stock photos that can be very useful when creating your video.

Although most of the features, including many of the templates, are free, the best resources are only available on the premium plan. Using a premium photo or template will mean that a watermark is added to your design.
Key Features
- Most of the resources you need to create your end screen on Canva are free
- The interface is very easy to use, with tutorials that can help when you get stuck.
- It has many great resources including stock images and unique templates
- You can add many effects to the end screen
Fotor
Fotor is another great solution that can be very useful in creating the YouTube end screen. It comes with a lot of different templates to choose from, allowing you to customize the end screen for maximum engagement. You can also upload your images to use in the project or choose from the Fotor library which offers options for different kinds of videos.

Key Features
- Most of the templates that you can choose are completely free to use
- The templates also come in different sizes to suit all needs
- You can use one of the many effects to further customize the end screen.
- The templates and effects are also customizable
Snappa
Snappa can also be a good way to create the perfect end screen for your YouTube video. It is a versatile solution with a lot of options to help you customize the end screen to suit your brand and targets. One such resource is the huge library of stock images as well as icons and shapes that you can choose from. Snappa makes the process much easier by allowing you to start from a suitable template that you can then customize as desired.

Key Features
- There are a lot of templates to choose from
- You can import your media files to customize the design
- You can also start from a blank canvas and work from there
- There is also a large library of stock photos that you can choose from
Placeit.net
This is an online solution that is one of the best ways to create an end screen for your YouTube video. The user interface is very simple to navigate and very well designed, allowing you to easily create the end screen even if you are a beginner.

You can upload your images to add to the design or choose from the large library of resources that Placeit.net provides. You also have numerous export options to choose from.
Key Features
- There are numerous templates to choose from
- You can export the end screen with transparency
- The interface is very easy to use
- Most of the resources are available for free
Kapwing
Kapwing is an online video editing solution that you can also use to create an end screen for your YouTube video. It has extensive features that can allow you to customize your end screen any way you want to. It has numerous templates to choose from and the simple drag-and-drop interface makes creating the end screen very easy.

Key Features
- You can choose the size of the end screen to use
- There are a lot of templates to choose from
- You can upload your images and other elements to the project
- You get to choose the duration of the end screen before you begin the project
How to Make an End Screen with Filmora
Creating an end screen for your YouTube video using Filmora is a very simple process. Use these steps to do it;
Step 1: The first thing you need to do is install Filmora on your computer. You can download the setup file from the main website and then follow the instructions on the setup wizard to install the program.
Once the installation is complete, open the program and click on “New Project” to start.
Step 2: Click on the “Titles” section and search for “End Screen” using the search bar. Select the best template for your end screen and drag it into the timeline.
Step 3: Now you are ready to add elements to the end screen. Add your profile picture on a new track across the timeline and stretch it to fit the screen as desired.
Step 4: Click on “Effects” and use the search function to search for the “Mask” effect. When you find it, add it across the timeline and double-click on it to open its settings and adjust the effect accordingly.
Step 5: You may also want to add your social media handles to the end screen. To do that, use the “Titles” tab to find the different social media handles and add each one to the timeline.
You are now ready to save and export the end screen and add it to your YouTube video.
Related FAQs About End Screen Maker
1. How Do You Make an End Screen?
Making an end screen is different depending on the tool that you use to create the end screen as well as the number of elements that you choose to add to it. But usually, you would start with a template and begin adding elements to the project one by one.
2.What is the Best Free Outro Maker?
The best tool to create an end screen for YouTube videos is Filmora simply because it makes the process very easy while allowing you to customize your creation as much as you need. But even though it has a free trial version, most of the features you need to create a unique end screen are not available on the free plan.
A good free solution would be Canva because it has numerous free resources that can create a decent end screen. Although we must point out that many of the best templates and elements on Canva are also not available for free.
3.How Long can a YouTube End Screen Be?
A typical end screen is often 5-20 seconds long. You don’t need any more than 20 seconds because it is only used as a way to promote additional content or add a call to action. So when creating an End screen, ensure that all elements are clear enough as your audience will have only 20 seconds to see it.
Even though it is just 20 seconds long, the end screen of your YouTube video can be the most important aspect of the entire video. It is a great way to further engage with your audience and with the tools on
this list, you can now create the best end screen for your video.
For macOS 10.12 or later
Key Features
- You can export the completed video in very high quality
- It can be used to create and edit GIFs
- It has numerous editing tools including noise removal options, advanced color tuning, advanced text editor, scene stabilization, and more.
- You can add audio including voiceover and music to the video
- It has a very simple user interface that makes it very easy to use
Canva
Canva is a simple-to-use animated YouTube end screen maker that has a large library of resources ideal for creating different types of end screens. One of the best things about Canva is the numerous templates that you can choose from, along with effects and media files including stock photos that can be very useful when creating your video.
Although most of the features, including many of the templates, are free, the best resources are only available on the premium plan. Using a premium photo or template will mean that a watermark is added to your design.
Key Features
- Most of the resources you need to create your end screen on Canva are free
- The interface is very easy to use, with tutorials that can help when you get stuck.
- It has many great resources including stock images and unique templates
- You can add many effects to the end screen
Fotor
Fotor is another great solution that can be very useful in creating the YouTube end screen. It comes with a lot of different templates to choose from, allowing you to customize the end screen for maximum engagement. You can also upload your images to use in the project or choose from the Fotor library which offers options for different kinds of videos.
Key Features
- Most of the templates that you can choose are completely free to use
- The templates also come in different sizes to suit all needs
- You can use one of the many effects to further customize the end screen.
- The templates and effects are also customizable
Snappa
Snappa can also be a good way to create the perfect end screen for your YouTube video. It is a versatile solution with a lot of options to help you customize the end screen to suit your brand and targets. One such resource is the huge library of stock images as well as icons and shapes that you can choose from. Snappa makes the process much easier by allowing you to start from a suitable template that you can then customize as desired.
Key Features
- There are a lot of templates to choose from
- You can import your media files to customize the design
- You can also start from a blank canvas and work from there
- There is also a large library of stock photos that you can choose from
Placeit.net
This is an online solution that is one of the best ways to create an end screen for your YouTube video. The user interface is very simple to navigate and very well designed, allowing you to easily create the end screen even if you are a beginner.
You can upload your images to add to the design or choose from the large library of resources that Placeit.net provides. You also have numerous export options to choose from.
Key Features
- There are numerous templates to choose from
- You can export the end screen with transparency
- The interface is very easy to use
- Most of the resources are available for free
Kapwing
Kapwing is an online video editing solution that you can also use to create an end screen for your YouTube video. It has extensive features that can allow you to customize your end screen any way you want to. It has numerous templates to choose from and the simple drag-and-drop interface makes creating the end screen very easy.
Key Features
- You can choose the size of the end screen to use
- There are a lot of templates to choose from
- You can upload your images and other elements to the project
- You get to choose the duration of the end screen before you begin the project
How to Make an End Screen with Filmora
Creating an end screen for your YouTube video using Filmora is a very simple process. Use these steps to do it;
Step 1: The first thing you need to do is install Filmora on your computer. You can download the setup file from the main website and then follow the instructions on the setup wizard to install the program.
Once the installation is complete, open the program and click on “New Project” to start.
Step 2: Click on the “Titles” section and search for “End Screen” using the search bar. Select the best template for your end screen and drag it into the timeline.
Step 3: Now you are ready to add elements to the end screen. Add your profile picture on a new track across the timeline and stretch it to fit the screen as desired.
Step 4: Click on “Effects” and use the search function to search for the “Mask” effect. When you find it, add it across the timeline and double-click on it to open its settings and adjust the effect accordingly.
Step 5: You may also want to add your social media handles to the end screen. To do that, use the “Titles” tab to find the different social media handles and add each one to the timeline.
You are now ready to save and export the end screen and add it to your YouTube video.
Related FAQs About End Screen Maker
1. How Do You Make an End Screen?
Making an end screen is different depending on the tool that you use to create the end screen as well as the number of elements that you choose to add to it. But usually, you would start with a template and begin adding elements to the project one by one.
2.What is the Best Free Outro Maker?
The best tool to create an end screen for YouTube videos is Filmora simply because it makes the process very easy while allowing you to customize your creation as much as you need. But even though it has a free trial version, most of the features you need to create a unique end screen are not available on the free plan.
A good free solution would be Canva because it has numerous free resources that can create a decent end screen. Although we must point out that many of the best templates and elements on Canva are also not available for free.
3.How Long can a YouTube End Screen Be?
A typical end screen is often 5-20 seconds long. You don’t need any more than 20 seconds because it is only used as a way to promote additional content or add a call to action. So when creating an End screen, ensure that all elements are clear enough as your audience will have only 20 seconds to see it.
Even though it is just 20 seconds long, the end screen of your YouTube video can be the most important aspect of the entire video. It is a great way to further engage with your audience and with the tools on
this list, you can now create the best end screen for your video.
Doable Ways to Create Transparent Background in Procreate
Doable Ways to Make Transparent Background in Procreate
An easy yet powerful editor
Numerous effects to choose from
Detailed tutorials provided by the official channel
Figuring out the crucial steps to make the canvas excellent is one of the loveliest things users are performing for exporting the closing Procreate-projects. Once after getting expert with things trick you can be able to position the canvas surprisingly on great back for a memorable moment. You can make the most of it for your procreate mission that you have created.
Out of many essentials tools you have ever used for experiencing the benefits of equipment & skills, the Procreate is a kind of solution that comes with one of the most trustworthy as well as brilliant capability to erase the undesired background from the pictures. It is more than a general tool and there are some specified approaches to do so, but in today possible scenario, you can easily focus around choice of right selections to erase a background at ease. People can explore the chances of creating various attractive methods to work in the PNG structure after removing the desired background.
In this article
01 [How to Delete a White Background with Procreate for the IPad?](#Part 1)
02 [How to Make Transparent Background with Procreate for iPhone?](#Part 2)
03 [How to Create Popping Thumbnails or Profile Photos](#Part 3)
Part 1 How to Delete a White Background with Procreate for the IPad?

In case you are facing discoloration problem too then it is always a better idea to cast image with desired background and remove the objects.
Now turning your background with a lovely image or your own is just a matter of few clicks. With great transparent background procreate, you will be heading towards the satisfaction of obtaining transparent background. With few crucial steps you can stay from the other competitors or it will make your posts viral. With stepwise guidelines on removing the background as well as replacing it with a transparent one in Procreate is what you need the most today.
When it comes to deleting the white-background with a Procreate, then with great selection of tools you can easily create amazing performance for your post. If you are still in a dilemma to make use of the white coloured Background. After tapping on the top-left corner of the screen, you can open-up brilliant level of opportunities to make the most out of it. Are you ready to begin? Next you will learn about how to turn the background into a desired canvas for all your Instagram stories.
The following steps will provide you a quick walkthrough of entire process, stepwise:-
Step 1: First you are required to open the picture with Procreate. Get your desired image for the edit or open your picture & turn-off the overall visibility of background layer by layers-icon, tap it, it is presented on the top-right corner. Here, you will see layer labelled as the background, you need to uncheck the layer’s box for turning-off overall visibility at the bottom of Layers menu.
It is an important step to perform as if you want to deleting any white background from the image otherwise background will be treated as transparent with white-background showing through, thus you will experience no changes to the document. You are not required to remove background from image procreate if your image is not having a background layer.
Step 2: Create the selection at around white area of an image & delete background
For you to perform the step of procreate remove white background, you are required to make selection around white area. For this, open-up the selection-menu and it is placed in the form round icon named ‘S’ at the top-left-corner of the screen. At this menu, choose auto & Add. To create such level of perfection in selection, just hold & tap over any area of white-background at this screen. You can also increase threshold of your selection by moving the fingers/stylus at the right. For the opposite process, you can move the same to the left.You need to adjust the desired threshold until selection-area on your screen lines-up in accordance with an edges of the subject. You are now heading towards the process of make background transparent procreatefor your desired image quickly.
With your current selection still in active state, just tap on wrench-icon it the top-left area of your screen, then navigate to Add-menu, and here tap on the Cut option. Congrats, you have effectively deleted the background from an image.
**Step 3:**Just release the selection in the form of tapping on Selection-menu icon and repeat the process again for negative space-areas & at last clean-up stray-pixels with through an Eraser. You can repeat the process further from the step-2 in case any stray pixels still remains there as it is a normal situation to face while removing the pixels background with ‘remove background on procreate’ option.You can also take the Eraser & then manually erase those stray-pixels in there is any.
Step 4: Export your final work as PNG-file to preserve the transparency
After finishing the task of deleting background from the picture you can easily export your work to a desirable file format. The image you want to export can be in the form of PNG to retain the transparency. Other useful formats you can choose is JPEG but this doesn’tsupport transparency. So, be wise & be careful while choose your file formats.You are now having procreate export transparent backgroundand can also place the same to any sort of backdrop like an app, website, or any other workspace.
Part 2 How to Make Transparent Background with Procreate for iPhone?

Let’s dive-in quickly into the process of making the background transparent with procreate, if you are an iPhone User.
● GO Into an option of Canvas
It is up-to you whether you want to create a new canvas or want to work-upon already saved canvas. In your device through procreate app, you can do the same without any worries.
● Tap onto the option of Layers Panel
This option is located at the top-right corner of your toolbar. This option looks similar to the two-squares on the top of one another.
● Replace dull looking background with transparent background
You can quickly go down to the layers-panel placed at the bottom to choose the background color.Transparent background in procreateis always a good option to consider.
● Put uncheck before the box
At the right of toolbar you can be able to see words ‘Background color’ and if it is checked then you need to uncheck it. Now your goal to make the background completely transparent with procreate make background transparent tool, will be achieved. Now your background is completely transparent and ready to use.
Part 3 How to Create Popping Thumbnails or Profile Photos

There are various tools available in the market to make a popping thumbnail for your YouTube or Instagram pages. Thumbnail maker like Filmora can be an interesting option to choose as it is quick and effective. You can also customized as well as download the thumbnails at no cost with the same. However, they comes with certain limitations like overall size of the image to be downloaded. For better versions you can use premium tools. With better creativity and great imagination you can make the thumbnail as crisp as possible.
● Upload your desired photo to Filmora’s thumbnail maker templates.
You can easily create your video thumbnail, but you need some inspiration and for that you can make use of amazing tool like Filmora. With access to more than 50 free templates you can achieve your goal of making popping thumbnails.
● Adding text, clipart, or perfect quality of background can give it a boost
After picking your template, one can make use of thumbnail to stand out different in terms of adding text, clipart or background. For adding custom background to your thumbnail you can make use of procreate that can remove the background with procreateremove white backgroundfeatures and give you better featured image with nice background. Also to clarify the objectives of your thumbnail you can add titles, and also consider placing the same on the top of any dark color background if your thumbnail is light in color. For making the background darker just choose remove white background procreateas discussed above.
● Just Download your finished product to your device
After polishing the thumbnails with creative stuff, you can download the same to your device or export it to your smartphone.
Voila, you just have create your own custom popping thumbnail. With remove background on procreate, you can never feel disappointed.
****Wondershare Filmora Video Editor App to Remove Unwanted Background Easily**
For Win 7 or later (64-bit)
For macOS 10.12 or later
In case you are searching for any professional tool to remove het background and replace the one with any of your favorite picture then there is a tool for you to consider. With greater different functionalities, you can make any Instagram post or story interesting through the help of Fillmora App. This has set of brilliant solutions to provide with most brilliant picture and video editing features. It is interesting, fun-loving as well as attractive enough to turn any moments extraordinary.
Handy features to enjoy:-
● You can make use of this tool to create custom thumbnails for your YouTube or Instagram page.
● Great varieties of templates for making popping thumbnails
● Greater capability to beautifully construct picture editing animations
● Varieties of Effects for every age group
● Attractive filters, GIFs packs and images to turn any dull looking background into an amazing moment.
● Delete white background quickly
● Right selection of tools to make the editing effective
● Flawless features to crop, cut-up, cut, trim & mix operations.
● Single click operation to turn the images into a beauty mode
● Options to save your creations into your device or virtual space
● Share your creations to your community, to your friends via Facebook, Instagram, YouTube, and Twitter quickly.
It is a greater idea to try this app for making use of its image editing features for deleting the white background in an easy manner.
● Ending Thoughts →
● With great varieties of features it is now very easy for you to create some automated selections in just single tap.
● Deleting the white background through a pro-tool like Procreate is smart, quick & seamless process.
● You are not going to get confused, even if you are using it for the very first time.
● It is the trend that every Instagram user is following for posting better images with nice background options.
Figuring out the crucial steps to make the canvas excellent is one of the loveliest things users are performing for exporting the closing Procreate-projects. Once after getting expert with things trick you can be able to position the canvas surprisingly on great back for a memorable moment. You can make the most of it for your procreate mission that you have created.
Out of many essentials tools you have ever used for experiencing the benefits of equipment & skills, the Procreate is a kind of solution that comes with one of the most trustworthy as well as brilliant capability to erase the undesired background from the pictures. It is more than a general tool and there are some specified approaches to do so, but in today possible scenario, you can easily focus around choice of right selections to erase a background at ease. People can explore the chances of creating various attractive methods to work in the PNG structure after removing the desired background.
In this article
01 [How to Delete a White Background with Procreate for the IPad?](#Part 1)
02 [How to Make Transparent Background with Procreate for iPhone?](#Part 2)
03 [How to Create Popping Thumbnails or Profile Photos](#Part 3)
Part 1 How to Delete a White Background with Procreate for the IPad?
In case you are facing discoloration problem too then it is always a better idea to cast image with desired background and remove the objects.
Now turning your background with a lovely image or your own is just a matter of few clicks. With great transparent background procreate, you will be heading towards the satisfaction of obtaining transparent background. With few crucial steps you can stay from the other competitors or it will make your posts viral. With stepwise guidelines on removing the background as well as replacing it with a transparent one in Procreate is what you need the most today.
When it comes to deleting the white-background with a Procreate, then with great selection of tools you can easily create amazing performance for your post. If you are still in a dilemma to make use of the white coloured Background. After tapping on the top-left corner of the screen, you can open-up brilliant level of opportunities to make the most out of it. Are you ready to begin? Next you will learn about how to turn the background into a desired canvas for all your Instagram stories.
The following steps will provide you a quick walkthrough of entire process, stepwise:-
Step 1: First you are required to open the picture with Procreate. Get your desired image for the edit or open your picture & turn-off the overall visibility of background layer by layers-icon, tap it, it is presented on the top-right corner. Here, you will see layer labelled as the background, you need to uncheck the layer’s box for turning-off overall visibility at the bottom of Layers menu.
It is an important step to perform as if you want to deleting any white background from the image otherwise background will be treated as transparent with white-background showing through, thus you will experience no changes to the document. You are not required to remove background from image procreate if your image is not having a background layer.
Step 2: Create the selection at around white area of an image & delete background
For you to perform the step of procreate remove white background, you are required to make selection around white area. For this, open-up the selection-menu and it is placed in the form round icon named ‘S’ at the top-left-corner of the screen. At this menu, choose auto & Add. To create such level of perfection in selection, just hold & tap over any area of white-background at this screen. You can also increase threshold of your selection by moving the fingers/stylus at the right. For the opposite process, you can move the same to the left.You need to adjust the desired threshold until selection-area on your screen lines-up in accordance with an edges of the subject. You are now heading towards the process of make background transparent procreatefor your desired image quickly.
With your current selection still in active state, just tap on wrench-icon it the top-left area of your screen, then navigate to Add-menu, and here tap on the Cut option. Congrats, you have effectively deleted the background from an image.
**Step 3:**Just release the selection in the form of tapping on Selection-menu icon and repeat the process again for negative space-areas & at last clean-up stray-pixels with through an Eraser. You can repeat the process further from the step-2 in case any stray pixels still remains there as it is a normal situation to face while removing the pixels background with ‘remove background on procreate’ option.You can also take the Eraser & then manually erase those stray-pixels in there is any.
Step 4: Export your final work as PNG-file to preserve the transparency
After finishing the task of deleting background from the picture you can easily export your work to a desirable file format. The image you want to export can be in the form of PNG to retain the transparency. Other useful formats you can choose is JPEG but this doesn’tsupport transparency. So, be wise & be careful while choose your file formats.You are now having procreate export transparent backgroundand can also place the same to any sort of backdrop like an app, website, or any other workspace.
Part 2 How to Make Transparent Background with Procreate for iPhone?
Let’s dive-in quickly into the process of making the background transparent with procreate, if you are an iPhone User.
● GO Into an option of Canvas
It is up-to you whether you want to create a new canvas or want to work-upon already saved canvas. In your device through procreate app, you can do the same without any worries.
● Tap onto the option of Layers Panel
This option is located at the top-right corner of your toolbar. This option looks similar to the two-squares on the top of one another.
● Replace dull looking background with transparent background
You can quickly go down to the layers-panel placed at the bottom to choose the background color.Transparent background in procreateis always a good option to consider.
● Put uncheck before the box
At the right of toolbar you can be able to see words ‘Background color’ and if it is checked then you need to uncheck it. Now your goal to make the background completely transparent with procreate make background transparent tool, will be achieved. Now your background is completely transparent and ready to use.
Part 3 How to Create Popping Thumbnails or Profile Photos
There are various tools available in the market to make a popping thumbnail for your YouTube or Instagram pages. Thumbnail maker like Filmora can be an interesting option to choose as it is quick and effective. You can also customized as well as download the thumbnails at no cost with the same. However, they comes with certain limitations like overall size of the image to be downloaded. For better versions you can use premium tools. With better creativity and great imagination you can make the thumbnail as crisp as possible.
● Upload your desired photo to Filmora’s thumbnail maker templates.
You can easily create your video thumbnail, but you need some inspiration and for that you can make use of amazing tool like Filmora. With access to more than 50 free templates you can achieve your goal of making popping thumbnails.
● Adding text, clipart, or perfect quality of background can give it a boost
After picking your template, one can make use of thumbnail to stand out different in terms of adding text, clipart or background. For adding custom background to your thumbnail you can make use of procreate that can remove the background with procreateremove white backgroundfeatures and give you better featured image with nice background. Also to clarify the objectives of your thumbnail you can add titles, and also consider placing the same on the top of any dark color background if your thumbnail is light in color. For making the background darker just choose remove white background procreateas discussed above.
● Just Download your finished product to your device
After polishing the thumbnails with creative stuff, you can download the same to your device or export it to your smartphone.
Voila, you just have create your own custom popping thumbnail. With remove background on procreate, you can never feel disappointed.
****Wondershare Filmora Video Editor App to Remove Unwanted Background Easily**
For Win 7 or later (64-bit)
For macOS 10.12 or later
In case you are searching for any professional tool to remove het background and replace the one with any of your favorite picture then there is a tool for you to consider. With greater different functionalities, you can make any Instagram post or story interesting through the help of Fillmora App. This has set of brilliant solutions to provide with most brilliant picture and video editing features. It is interesting, fun-loving as well as attractive enough to turn any moments extraordinary.
Handy features to enjoy:-
● You can make use of this tool to create custom thumbnails for your YouTube or Instagram page.
● Great varieties of templates for making popping thumbnails
● Greater capability to beautifully construct picture editing animations
● Varieties of Effects for every age group
● Attractive filters, GIFs packs and images to turn any dull looking background into an amazing moment.
● Delete white background quickly
● Right selection of tools to make the editing effective
● Flawless features to crop, cut-up, cut, trim & mix operations.
● Single click operation to turn the images into a beauty mode
● Options to save your creations into your device or virtual space
● Share your creations to your community, to your friends via Facebook, Instagram, YouTube, and Twitter quickly.
It is a greater idea to try this app for making use of its image editing features for deleting the white background in an easy manner.
● Ending Thoughts →
● With great varieties of features it is now very easy for you to create some automated selections in just single tap.
● Deleting the white background through a pro-tool like Procreate is smart, quick & seamless process.
● You are not going to get confused, even if you are using it for the very first time.
● It is the trend that every Instagram user is following for posting better images with nice background options.
Also read:
- Updated In 2024, Find a Video Background Change Online that Works for You. This Article Contains Tools that Can Edit Video Backgrounds Online with Little Effort
- 2024 Approved How to Do Censor Effects with Filmora
- Making Creative and Engaging Youtube Videos Is Now Easy with Several Tools. Now, YouTube Also Offers You Its Own Built-In Video Editor Through Which You Can Edit and Enhance the Video Quality
- Updated Experience Time Differently with The Top Slow-Motion Applications for 2024
- 2024 Approved How to Vlog? A Beginners Guide to Start Vlogging
- Looking for the Best Online Video Editors to Add Filter to Your Video? Here Is the List of the Best Video Editors to Add Filter Video Online in Simple Steps for 2024
- 2024 Approved Why Your Transparent GIF Is Hard to Remove
- Detailed Tutorial to Resize Your Video in VLC for 2024
- New Add Emoji to Linkedin Post – 5 Tips You Need to Know for 2024
- How to Add Adjustment Layer in Premiere Pro for 2024
- Updated How to Use LUTs in VN Editor – Complete Guide and Best LUTs Download for 2024
- New Movavi Video Editor Plus Review
- New 2024 Approved Add Emoji to Linkedin Post – 5 Tips You Would Like to Know
- 2024 Approved The Best Laptops For Video Editing
- New In 2024, How To Make a Video Podcast
- New Freeze Frame Clone Effect Is a Creative Effect to Use for Many Video Creators. This Article Will Show You How to Use Filmora to Make a Frozen Frame Clone Video Effect for 2024
- How to Create a Glitch Text Effect for 2024
- Updated Want to Make a Fun and Cinematic Video with an Introductory Text Title? Learn the Stages of Editing with Filmora for This Effect Here
- Updated How to Denoise in After Effects – Audio and Video Noise Removal
- New 5 Tools to Create a Time-Lapse Video Online
- New Create Intro Video with Flixpress for 2024
- Updated How to Overlay Video in Premiere Pro
- New 2024 Approved 3 Actionable Ways to Create Countdown Animation for Videos
- How to Make Your CSGO Montage Impressive
- Updated Top 11 Best Video Editing Apps for iPhone for 2024
- New 2024 Approved Repeated Text Animation Tutorial in Filmora
- New 2024 Approved Finding The Best LUTs for Wondershare Filmora
- New Top 10 Sound Extractors to Extract Sound From Video
- New In 2024, 10 Catchy Pixel Art Wallpapers and How to Custom Your Own with Ease
- Updated 2024 Approved Tiktok Aspect Ratio Is a Crucial Element to Succeeding in the Tiktok Algorithm. Here Are some Suggestions to Improve Video Quality and Land on the for You Page
- Updated The Glitch Filter Is Similar to an Error or a Distorted Effect in the Video. The Article Enables the Users to Get the VHS Filter in One of Their Travel Videos and Instagram Accounts
- New Discord Is Becoming More Popular with Time with Millions of Users. Are You Thinking of Getting a GIF for Discord Profile? If Yes, Learn From This Piece Since We Have a Conclusive Summary of Getting a GIF Profile Picture for Discord for 2024
- New In 2024, Do You Want to Make Your Video Look Like Its From the 90S? Then, Make Sure to Add Vintage Overlays and VHS Sound Effects to Give It the Old Feel
- New How to Make a Video by Mouse with Filmora
- New 3 Best Motion Blur Plugins for Adobe After Effects for 2024
- Consider a LUT to Be a Color Preset that a Filmmaker Can Use to Start Working on a Project Quickly. Sony Engineers Have Developed LUTs to Help Filmmakers Perform Specific Tasks. All of These Are Available for Free for 2024
- Updated How to Overlay Video in Premiere Pro for 2024
- Updated So, without Further Dilly-Dallying, Lets Learn How to Create a Retro 1950-Style Video with This Simple Filmora Tutorial
- Are You Looking for Dark LUTs Premiere Pro Free? This Article Discusses the Dark Moody LUTs with Top Recommendations for Beginning Visual Editing
- Making a Countdown Timer Video Like a Pro Isnt a Problem Anymore. Follow the Steps Mentioned in This Guide and Create an Impressive Countdown Timer for Your Videos for 2024
- Updated Do You Want to Add Subtitles to Your MKV Files Easily? This Article Will Introduce 7 Simple Ways Through Which You Can Add Subtitles to MKV on Different Devices
- In 2024, Read on to Learn About Multi Object Tracking, Its Types, and Requirements. Youll Also Learn About the Different Approaches Toward Object Tracking
- New 2024 Approved What Are The Stages Of Film Production - 2023
- Updated How to Use Frame Blending in Adobe Premiere Pro for 2024
- New The Craziest 10 AI Editors Youve Seen for 2024
- New We Are Going to Share a Detailed Insight Into How AR Integration Can Help the Entire Edtech World. Well Also Share some of the Real-World Examples of Augmented Reality (AR) in Teaching so that You Can Understand Its Benefits in the Education Sector
- New 2024 Approved Best Slow Motion Camera Apps for Best Content Creation
- 2024 Approved Tactics to Create Transparent Image in Minimal Steps
- Your Search for the Best GIF Creator Tools Ends Here
- How To Fix Part of the Touch Screen Not Working on Oppo Reno 10 Pro 5G | Dr.fone
- How Can You Cast Your Apple iPhone 6s to Windows PC With Ease? | Dr.fone
- 7 Solutions to Fix Chrome Crashes or Wont Open on Oppo Find X6 | Dr.fone
- Top 4 Ways to Trace Samsung Galaxy S23 Location | Dr.fone
- 8 Best Apps for Screen Mirroring Tecno Camon 30 Pro 5G PC | Dr.fone
- In 2024, How to Mirror PC Screen to Poco X5 Phones? | Dr.fone
- 2024 Approved Register | Online
- New In 2024, Create AI Avatar Video with AI Script
- How to Transfer Data from Xiaomi Redmi A2 to Any iOS Devices | Dr.fone
- Process of Screen Sharing Vivo Y27 4G to PC- Detailed Steps | Dr.fone
- Why is iPogo not working On Apple iPhone 14 Pro? Fixed | Dr.fone
- How to Transfer Data from Google Pixel 8 to Any iOS Devices | Dr.fone
- Guide on How To Change Your Apple ID Email Address On iPhone 15 | Dr.fone
- In 2024, Where Is the Best Place to Catch Dratini On Vivo X Flip | Dr.fone
- In 2024, Simple and Effective Ways to Change Your Country on YouTube App Of your Honor Magic 5 | Dr.fone
- Samsung Galaxy M54 5G Video Recovery - Recover Deleted Videos from Samsung Galaxy M54 5G
- All Things You Need to Know about Wipe Data/Factory Reset For Samsung Galaxy S24 | Dr.fone
- In 2024, Proven Ways in How To Hide Location on Life360 For Nokia C12 Pro | Dr.fone
- Your Complete Guide To Reset Nokia C210 | Dr.fone
- In 2024, How to Use Life360 on Windows PC For Xiaomi 13 Ultra? | Dr.fone
- My Videos Arent Playing on OnePlus 12R – What Can I Do? | Dr.fone
- How to Fake GPS on Android without Mock Location For your Nokia C22 | Dr.fone
- In 2024, Complete Review & Guide to Techeligible FRP Bypass and More For Oppo A38
- Solved How To Transfer From Apple iPhone 6s Plus to iPhone 15 | Dr.fone
- In 2024, Top-Notch Solutions for Disabled Apple ID From iPhone X Making It Possible
- In 2024, The Best Android Unlock Software For Samsung Galaxy M14 5G Device Top 5 Picks to Remove Android Locks
- 8 Ultimate Fixes for Google Play Your Honor 100 Pro Isnt Compatible | Dr.fone
- The Best 8 VPN Hardware Devices Reviewed On Infinix Hot 30i | Dr.fone
- In 2024, AddROM Bypass An Android Tool to Unlock FRP Lock Screen For your Nokia 130 Music
- Fixing Persistent Pandora Crashes on Vivo Y27s | Dr.fone
- How to Stream Apple iPhone 12 to Computer? | Dr.fone
- In 2024, Here are Some Pro Tips for Pokemon Go PvP Battles On Oppo Find X7 Ultra | Dr.fone
- In 2024, Easy Fixes How To Recover Forgotten iCloud Password From your Apple iPhone 7
- 3 Easy Solutions to Hard Reset Vivo Y200 | Dr.fone
- In 2024, Top 10 Telegram Spy Tools On Oppo Reno 10 Pro 5G for Parents | Dr.fone
- In 2024, 3 Effective Ways to Bypass Activation Lock from Apple iPhone 8
- What Legendaries Are In Pokemon Platinum On Lava Storm 5G? | Dr.fone
- 4 Methods to Turn off Life 360 On Tecno Pova 5 Pro without Anyone Knowing | Dr.fone
- In 2024, How to Bypass Google FRP Lock from Xiaomi Redmi 13C 5G Devices
- In 2024, Everything You Need to Know about Lock Screen Settings on your Infinix Note 30 VIP Racing Edition
- Can Life360 Track Or See Text Messages? What Can You Do with Life360 On OnePlus Nord 3 5G? | Dr.fone
- Vivo Y100i Video Recovery - Recover Deleted Videos from Vivo Y100i
- Useful ways that can help to effectively recover deleted files from Realme GT Neo 5 SE
- 7 Fixes for Unfortunately, Phone Has Stopped on Xiaomi Redmi 12 5G | Dr.fone
- How to restore wiped videos on Oppo Find X6
- Title: Updated 2024 Approved Do You Want to Know How to Add LUTs to Premiere Pro? In This Guide, You Will Find Details and Easy Steps to Proceed with Using LUTs in Premiere Pro
- Author: Morgan
- Created at : 2024-04-24 01:09:18
- Updated at : 2024-04-25 01:09:18
- Link: https://ai-video-editing.techidaily.com/updated-2024-approved-do-you-want-to-know-how-to-add-luts-to-premiere-pro-in-this-guide-you-will-find-details-and-easy-steps-to-proceed-with-using-luts-in-p/
- License: This work is licensed under CC BY-NC-SA 4.0.
