
:max_bytes(150000):strip_icc():format(webp)/GettyImages-944229620-9cff560054804b72a431e9492c7445b4.jpg)
Updated 2024 Approved Guide Create The Perfect VHS Effect Look in Premiere Pro
Guide: Create The Perfect VHS Effect Look in Premiere Pro
Adobe Premiere Pro is an excellent tool for video editing. It is a tool that can edit, create effects and filters, and do much more. In addition to this, you can even add different effects, such as VHS. The VHS effect in recent years has become significantly important due to its usage. This effect creates an old and jittery look to your video.
VHS effect has characteristics of old video tapes with lines and scales. It also adds distortion, noise, and color shifting to your videos. There are many filters and overlays that you can apply to get the VHS look. However, if you are using a PC tool, such as Premiere Pro, then you have to learn how to apply it. You can easily create a VHS effect Premiere look once you learn to add the effect to your video.
Part 1: What Are The Benefits of Using VHS Effects in Video?
Using VHS effects in your videos can bring several benefits. You can easily use multiple VHS effects in Premiere Pro. However, firstly, explore why incorporating VHS effects can be advantageous:
- Nostalgic Appeal: VHS effects can take your audience back to the era of VHS tapes. It creates a feeling of nostalgia and familiarity. Such effects also take you back to the 90s era by creating a similar look.
- Authenticity: Applying such effects mimics the characteristics of old tapes by adding imperfections. These effects also add color bleeding, distortion, and noise to your videos. It creates a sense of authenticity, looking like the video was recorded on genuine VHS tapes.
- Creative Style: These effects offer a unique style in terms of the video’s appeal. It further enhances the storytelling and allows for artistic expression. They can set a particular mood, add decay, and contribute to specific genres like retro.
- Enhancing Period Settings: If your video is set in a specific time period, then these effects can help. By using VHS effects, you can make the video more authentic. Additionally, this reinforces the historical context of the narrative.
- Attention-Grabbing: In a world of crisp and high-definition visuals, uniqueness matters. Intentionally using VHS effects for your video, you can make your video stand out. The distinct and unconventional look captures viewers’ attention.
- Cost-Effective Solution: You can use such effects to cut down your cost. Instead of investing in expensive props, VHS effects offer a more cost-effective solution. Digital software and plugins can apply these effects, eliminating the need for physical equipment.
Add VHS Effect to Video
Simply add video effects on Video with Filmora Video Effect Editor ! Experience the magic of cool yet outstanding video effects, where your videos come to life in beautiful visuals.
Apply VHS Effect Apply VHS Effect Learn More >


Part 2: How To Add VHS Effect in Premiere Pro: An Overview
Do you know how you can add the VHS effect in Premiere Pro? Don’t worry because this guideline will provide you with the required information. These simple steps will let you add your favorite VHS look to your video using Premiere Pro.
Step 1: Import your video into Adobe Premiere Pro. Open the “Lumetri Color” panel by clicking “Color” in the main toolbar. Further, choose “Lumetri Scopes” to access the graph window. Then, adjust the basic settings in the “Lumetri Color” panel. Continue to decrease the value of “Whites,” increase the “Contrast,” and set the “Blacks” to 10 on the graph.

Step 2: Navigate to the “Creative” tab in the “Lumetri Color” panel. Increase the “Faded Film” and decrease the “Sharpness,” “Saturation,” and “Vibrance” to your liking. Use the color wheels in the “Color Wheels & Match” section to give the right tone. Further, proceed to increase the “Vignette” value from the same tab.

Step 3: Enable editing mode by selecting “Editing” in the main bar. Choose “Edit” from the lower section and search for the “Channel Blur” effect. Apply the effect by dragging and dropping it onto your video clip. Place the effect above previous adjustments and effects.

Step 4: In the “Channel Blur” effect tab, enable “Repeat Edge Pixel” and increase “Red Blurriness” to 30. Repeat the same step but this time increase “Blue Blurriness” to 30 and “Red Blurriness” to 15 and change “Blur Dimensions” to “Vertical.”

Step 5: Continue to add the “Unsharp Mask” and “Color Emboss” effects from the “Effect” tab. Proceed and change “Amount” and “Radius” for “Unsharp Mask” to 85 and 20, respectively. Slightly increase the “Relief” values for the “Color Emboss” effect.

Proceed to apply the “Noise” effect from the “Noise & Grain” section and further adjust the “Amount of Noise” to your preference. Induce the “Wave Warp” effect and set the parameters of “Wave Height” to 2 and “Wave Width” to 1000. Change “Direction” to 0 and “Pinning” to “Horizontal Edges.”

Step 6: You can crop your video to a 4:3 aspect ratio to give your video more authenticity. To do this, create two “Color Matte” layers using the “New Item” icon. Name and place them over the video clip. Apply the “Crop” effect to both layers. Set the “Left” option to 86 for the first layer and the “Right” option to 86 for the second layer. Set the “Edge Feather” to 30 for both layers.

Make sure to save your VHS effect as a preset for future use by right-clicking and selecting “Save Preset.” Finally, export your VHS effect Premiere Pro video to your desired format.

Part 3: Using Wondershare Filmora to Add The Perfect VHS Effect in No Time
Wondershare has provided us with so many tools and applications for different purposes. It has provided an amazing video editing tool called Filmora. Wondershare Filmora Video Editor provides easy editing options for the user. You can create highly professional videos with impressive results using Filmora. This tool offers multiple overlays, video effects , and filters to use.
Add VHS Effect For Win 7 or later(64-bit)
Add VHS Effect For macOS 10.14 or later
If you want to add VHS effect Vegas Pro overlays using Filmora, you can. In order to apply such effects to your videos, you need to follow the guide. There are 4 simple steps to add the perfect VHS look to your video in no time.
Step 1xxx
To apply a similar VHS overlay Premiere effect to your video, first access Wondershare Filmora on your computer. Then, click on the “New Project” tab in the main interface, which will take you to a new window.

Step 2Import and Arrange Your Video
Next, import your video by either dragging and dropping it into the software or using the import media option. Once imported, drag and drop your video into the timeline area to begin working with it.

Step 3Apply VHS Effects
Access the “Effects” option from the top bar of the software. Search for “VHS” in the Effects panel to explore the various VHS effects available. Choose the desired effect that fits your style, then drag and drop your video on top of the timeline.

Step 4Adjust Opacity and Export
To refine the intensity of the VHS effect, go to the “Effects” tab located on the right side of the screen. From there, you can adjust the effect’s opacity by changing its transparency. Then, click “Export” at the top left of the screen to save your video with the applied VHS effects.

Conclusion
To conclude, there are many different overlays, effects, and filters that you can use. However, VHS effects are some of the most popular ones. People use different VHS filters in Premiere Pro to give their content a distinctive look. You can add these effects using different online and offline tools. One of the most popular tools is Wondershare Filmora which helps you add the VHS look to your video.
Apply VHS Effect Apply VHS Effect Learn More >
Part 2: How To Add VHS Effect in Premiere Pro: An Overview
Do you know how you can add the VHS effect in Premiere Pro? Don’t worry because this guideline will provide you with the required information. These simple steps will let you add your favorite VHS look to your video using Premiere Pro.
Step 1: Import your video into Adobe Premiere Pro. Open the “Lumetri Color” panel by clicking “Color” in the main toolbar. Further, choose “Lumetri Scopes” to access the graph window. Then, adjust the basic settings in the “Lumetri Color” panel. Continue to decrease the value of “Whites,” increase the “Contrast,” and set the “Blacks” to 10 on the graph.
Step 2: Navigate to the “Creative” tab in the “Lumetri Color” panel. Increase the “Faded Film” and decrease the “Sharpness,” “Saturation,” and “Vibrance” to your liking. Use the color wheels in the “Color Wheels & Match” section to give the right tone. Further, proceed to increase the “Vignette” value from the same tab.
Step 3: Enable editing mode by selecting “Editing” in the main bar. Choose “Edit” from the lower section and search for the “Channel Blur” effect. Apply the effect by dragging and dropping it onto your video clip. Place the effect above previous adjustments and effects.
Step 4: In the “Channel Blur” effect tab, enable “Repeat Edge Pixel” and increase “Red Blurriness” to 30. Repeat the same step but this time increase “Blue Blurriness” to 30 and “Red Blurriness” to 15 and change “Blur Dimensions” to “Vertical.”
Step 5: Continue to add the “Unsharp Mask” and “Color Emboss” effects from the “Effect” tab. Proceed and change “Amount” and “Radius” for “Unsharp Mask” to 85 and 20, respectively. Slightly increase the “Relief” values for the “Color Emboss” effect.
Proceed to apply the “Noise” effect from the “Noise & Grain” section and further adjust the “Amount of Noise” to your preference. Induce the “Wave Warp” effect and set the parameters of “Wave Height” to 2 and “Wave Width” to 1000. Change “Direction” to 0 and “Pinning” to “Horizontal Edges.”
Step 6: You can crop your video to a 4:3 aspect ratio to give your video more authenticity. To do this, create two “Color Matte” layers using the “New Item” icon. Name and place them over the video clip. Apply the “Crop” effect to both layers. Set the “Left” option to 86 for the first layer and the “Right” option to 86 for the second layer. Set the “Edge Feather” to 30 for both layers.
Make sure to save your VHS effect as a preset for future use by right-clicking and selecting “Save Preset.” Finally, export your VHS effect Premiere Pro video to your desired format.
Part 3: Using Wondershare Filmora to Add The Perfect VHS Effect in No Time
Wondershare has provided us with so many tools and applications for different purposes. It has provided an amazing video editing tool called Filmora. Wondershare Filmora Video Editor provides easy editing options for the user. You can create highly professional videos with impressive results using Filmora. This tool offers multiple overlays, video effects , and filters to use.
Add VHS Effect For Win 7 or later(64-bit)
Add VHS Effect For macOS 10.14 or later
If you want to add VHS effect Vegas Pro overlays using Filmora, you can. In order to apply such effects to your videos, you need to follow the guide. There are 4 simple steps to add the perfect VHS look to your video in no time.
Step 1xxx
To apply a similar VHS overlay Premiere effect to your video, first access Wondershare Filmora on your computer. Then, click on the “New Project” tab in the main interface, which will take you to a new window.
Step 2Import and Arrange Your Video
Next, import your video by either dragging and dropping it into the software or using the import media option. Once imported, drag and drop your video into the timeline area to begin working with it.
Step 3Apply VHS Effects
Access the “Effects” option from the top bar of the software. Search for “VHS” in the Effects panel to explore the various VHS effects available. Choose the desired effect that fits your style, then drag and drop your video on top of the timeline.
Step 4Adjust Opacity and Export
To refine the intensity of the VHS effect, go to the “Effects” tab located on the right side of the screen. From there, you can adjust the effect’s opacity by changing its transparency. Then, click “Export” at the top left of the screen to save your video with the applied VHS effects.
Conclusion
To conclude, there are many different overlays, effects, and filters that you can use. However, VHS effects are some of the most popular ones. People use different VHS filters in Premiere Pro to give their content a distinctive look. You can add these effects using different online and offline tools. One of the most popular tools is Wondershare Filmora which helps you add the VHS look to your video.
Add Emoji to Linkedin Post – 5 Tips You Need to Know
Add Emoji to Linkedin Post - 5 Tips You Need to Know
An easy yet powerful editor
Numerous effects to choose from
Detailed tutorials provided by the official channel
Emojis are fun loving symbols as they represent your real emotions. Adding emojis to your LinkedIn can add personality to your posts. If you want to stand out your posts from others – use emojis.
In this article
01 [Why Emojis Matter](#Part 1)
02 [5 Tips for You to Add Emoji to Linkedin Posts](#Part 2)
03 [Add Emoji to Linkedin Post Q&A](#Part 3)
Part 1 Why Emojis Matter
Emojis are a visual portrayal of an emotion, object, sign and symbol. Emojis are very helpful in expressing our actual feelings to anyone. Sometimes you want to express anything to anyone but you cannot express them with your words. This is where emojis help you in portraying the actual meaning of the message. Emojis expresses their feelings better than words.
Emojis are becoming the common language in the 21st century. “A picture is worth a thousand words” is totally relevant in today’s time. Language is evolving day by day and emojis are a part of this evolvement as you don’t have to write long sentences, emojis convey the content in fewer words. Thus, they are now also used in the professional environment. They make the posts more engaging and also make other remember you. Emojis in some or the other way also make you popular and appear to be friendly.

Here is why they are important.
01Make your LinkedIn profile more intelligible
Using emojis in your LinkedIn bio will catch more attention from the viewers and make them to read your LinkedIn profile. However, it is essential to add the right emoji at the right place. Reading a bio which is of (2800) characters is boring and hardly any viewer is going to invest time in reading it. If you will add some emoji it will add more value to your bio and will also make your bio interesting.
Thus, it is one of the best ways to make your content much more interactive and engaging by adding emojis to it. Emojis are more advanced form of texts, which makes the reader engaged.
02Using emoji to support branding
You can use emojis to connect to your audience and it makes them feel more relatable because it is what they are using in their daily lives. You can use a perfect skin tone of emoji to expresses your brand logo.
Using an emoji as a symbol which is relevant to your brand, again and again will help the viewers to recognize the brand whenever they will see that emoji. This is how an emoji helps you to support your brand. Writing only text makes it boring and decreases the audience viewership. Adding emojis is a creative idea as they will amplify your content and make it more interesting.
03Portraying your personality
Linkedin is a professional online platform where how you represent yourself is very important. Putting anything can affect your personality as it shows who you are, what are your beliefs or your values. Use emojis which are relevant, according to your personality. It makes your personality more impactful. Adding emojis is a creative aspect of job search.
04Universality of emojis
If you are from other country and writing things which are known to your location and unknown to other person from different country, how will he/she be able to understand? A simple solution to this is, use of emojis because they are universal and known to everyone. It can be understood easily as they represent what you want to express.
Part 2 5 Tips for you to Add Emoji to Linkedin Post
● Adding an emoji helps you to express what you want to say. Sometimes texts can be monotonous, so adding an emojis which are relevant can be helpful. Texts are not enough sometimes to actually express what we are trying to say. Adding emoji to it will be a great idea but don’t stuff a lot emojis.
● Using the perfect emoji depending on the situation is a thing you should always keep in mind. There are varieties of emojis from which you can choose. Selection of perfect emoji which portrays your actual situation is actually very important.
● Using the wrong emoji that doesn’t suit the situation can offend anyone. For example, if a person is having a bad day and he/she is telling it to you and you send them a laughing emoji, it can make them feel bad and insulted.
● Placing an emoji on the right place plays an important role. Suppose if content is funny and on the other side you are putting a sad emoji then your content representation will go out of context. So the placement of an emoji on the right place is important.
● Emojis work as an upliftment of your content so placing them in wrong place will not make a match between your content and emoji. The result is it will mislead the audience. If you will use wrong emojis, viewers will stop relating to your content. So, it is important to keep in mind that you don’t have to stuff emojis anywhere, place them where you think it’s relevant to the content.
Part 3 Add Emoji to Linkedin Post Q&A
ADD EMOJI TO LINKEDIN POST Q&A
How can you add an emoji to your linkedin post?
A. You can insert an emoji to your linkedin post, emails or in a message by using a keyboard shortcut CTRL + CMD + SPACE..
Is it a good idea to use emojis on linkedin?
A. You can add emojis to your Linkedin profile as well as posts as it makes your linkedin profile more readable. If you will use emojis people will notice your posts and it will stand out from the crowd. Adding emojis to your post will give you more exposure on your profile. Emojis are helpful in adding actual emotions to your online communication.
Using emojis at work is professional or unprofessional?
A. Some people think that using emojis at work is professional because sometimes only content is not enough to explain what you wanted to convey. Adding an emoji to your work will add more value to it and will make it readable to the audience. While some people think that using emojis at work is highly unprofessional as it breaks the bar of professionalism and makes it look more casual.
What is the advantage of adding emojis to your communication?
A. Emojis express the facial expression, gestures and emotions. Having a communication online and adding emojis to it will make the communication stronger, as it represents what you want to say with what expression and emotions. It will add feelings to your communication.
What will be the best software to access latest emojis?
A. You can consider using Filmora. Filmora is editing and video creation software which was developed by Wondershare and it is the best software and it has its own built-in animated emoji library. In Wondershare Filmora Video Editor click on the elements option, as it contains various categories such as shapes, badges and emojis. Click on the emoji category and select any according to your content. Drag and drop the emoji where you want to place it then adjust the duration and size according to you.
For Win 7 or later (64-bit)
For macOS 10.12 or later
● Ending Thoughts →
● Emoji expresses your gestures, facial expressions, and your actual emotions. Adding emoji will add more value to your content and make you stand out from others.
● It can also be used professionally if you know what will be the right emoji and place to insert it. It helps you to covey your message correctly and makes your linkedin posts readable.
● You can consider using Filmora as it has its own built-in animated emoji library and variety of emojis from which you can choose and place them wherever you want.
Emojis are fun loving symbols as they represent your real emotions. Adding emojis to your LinkedIn can add personality to your posts. If you want to stand out your posts from others – use emojis.
In this article
01 [Why Emojis Matter](#Part 1)
02 [5 Tips for You to Add Emoji to Linkedin Posts](#Part 2)
03 [Add Emoji to Linkedin Post Q&A](#Part 3)
Part 1 Why Emojis Matter
Emojis are a visual portrayal of an emotion, object, sign and symbol. Emojis are very helpful in expressing our actual feelings to anyone. Sometimes you want to express anything to anyone but you cannot express them with your words. This is where emojis help you in portraying the actual meaning of the message. Emojis expresses their feelings better than words.
Emojis are becoming the common language in the 21st century. “A picture is worth a thousand words” is totally relevant in today’s time. Language is evolving day by day and emojis are a part of this evolvement as you don’t have to write long sentences, emojis convey the content in fewer words. Thus, they are now also used in the professional environment. They make the posts more engaging and also make other remember you. Emojis in some or the other way also make you popular and appear to be friendly.
Here is why they are important.
01Make your LinkedIn profile more intelligible
Using emojis in your LinkedIn bio will catch more attention from the viewers and make them to read your LinkedIn profile. However, it is essential to add the right emoji at the right place. Reading a bio which is of (2800) characters is boring and hardly any viewer is going to invest time in reading it. If you will add some emoji it will add more value to your bio and will also make your bio interesting.
Thus, it is one of the best ways to make your content much more interactive and engaging by adding emojis to it. Emojis are more advanced form of texts, which makes the reader engaged.
02Using emoji to support branding
You can use emojis to connect to your audience and it makes them feel more relatable because it is what they are using in their daily lives. You can use a perfect skin tone of emoji to expresses your brand logo.
Using an emoji as a symbol which is relevant to your brand, again and again will help the viewers to recognize the brand whenever they will see that emoji. This is how an emoji helps you to support your brand. Writing only text makes it boring and decreases the audience viewership. Adding emojis is a creative idea as they will amplify your content and make it more interesting.
03Portraying your personality
Linkedin is a professional online platform where how you represent yourself is very important. Putting anything can affect your personality as it shows who you are, what are your beliefs or your values. Use emojis which are relevant, according to your personality. It makes your personality more impactful. Adding emojis is a creative aspect of job search.
04Universality of emojis
If you are from other country and writing things which are known to your location and unknown to other person from different country, how will he/she be able to understand? A simple solution to this is, use of emojis because they are universal and known to everyone. It can be understood easily as they represent what you want to express.
Part 2 5 Tips for you to Add Emoji to Linkedin Post
● Adding an emoji helps you to express what you want to say. Sometimes texts can be monotonous, so adding an emojis which are relevant can be helpful. Texts are not enough sometimes to actually express what we are trying to say. Adding emoji to it will be a great idea but don’t stuff a lot emojis.
● Using the perfect emoji depending on the situation is a thing you should always keep in mind. There are varieties of emojis from which you can choose. Selection of perfect emoji which portrays your actual situation is actually very important.
● Using the wrong emoji that doesn’t suit the situation can offend anyone. For example, if a person is having a bad day and he/she is telling it to you and you send them a laughing emoji, it can make them feel bad and insulted.
● Placing an emoji on the right place plays an important role. Suppose if content is funny and on the other side you are putting a sad emoji then your content representation will go out of context. So the placement of an emoji on the right place is important.
● Emojis work as an upliftment of your content so placing them in wrong place will not make a match between your content and emoji. The result is it will mislead the audience. If you will use wrong emojis, viewers will stop relating to your content. So, it is important to keep in mind that you don’t have to stuff emojis anywhere, place them where you think it’s relevant to the content.
Part 3 Add Emoji to Linkedin Post Q&A
ADD EMOJI TO LINKEDIN POST Q&A
How can you add an emoji to your linkedin post?
A. You can insert an emoji to your linkedin post, emails or in a message by using a keyboard shortcut CTRL + CMD + SPACE..
Is it a good idea to use emojis on linkedin?
A. You can add emojis to your Linkedin profile as well as posts as it makes your linkedin profile more readable. If you will use emojis people will notice your posts and it will stand out from the crowd. Adding emojis to your post will give you more exposure on your profile. Emojis are helpful in adding actual emotions to your online communication.
Using emojis at work is professional or unprofessional?
A. Some people think that using emojis at work is professional because sometimes only content is not enough to explain what you wanted to convey. Adding an emoji to your work will add more value to it and will make it readable to the audience. While some people think that using emojis at work is highly unprofessional as it breaks the bar of professionalism and makes it look more casual.
What is the advantage of adding emojis to your communication?
A. Emojis express the facial expression, gestures and emotions. Having a communication online and adding emojis to it will make the communication stronger, as it represents what you want to say with what expression and emotions. It will add feelings to your communication.
What will be the best software to access latest emojis?
A. You can consider using Filmora. Filmora is editing and video creation software which was developed by Wondershare and it is the best software and it has its own built-in animated emoji library. In Wondershare Filmora Video Editor click on the elements option, as it contains various categories such as shapes, badges and emojis. Click on the emoji category and select any according to your content. Drag and drop the emoji where you want to place it then adjust the duration and size according to you.
For Win 7 or later (64-bit)
For macOS 10.12 or later
● Ending Thoughts →
● Emoji expresses your gestures, facial expressions, and your actual emotions. Adding emoji will add more value to your content and make you stand out from others.
● It can also be used professionally if you know what will be the right emoji and place to insert it. It helps you to covey your message correctly and makes your linkedin posts readable.
● You can consider using Filmora as it has its own built-in animated emoji library and variety of emojis from which you can choose and place them wherever you want.
Add Green Screen Video on TikTok
TikTok is the most popular platform for making short videos. You can create creative short videos and upload to TikTok so that they can entertain your followers and make your videos go viral. To add variety to your video content, the use of green screen in short videos is a great idea. You can replace the green screen with any background in your TikTok video. You need to know how to add green screen video on TikTok.
Adding green screen on TikTok videos has become a trend now as there are several green screen TikTok videos that have gone viral. In fact, creative green screen videos are extremely popular on social media platforms. Instead of replacing the green screen in your video with a single photo, you can replace it with multiple pictures on TikTok. We will illustrate how to add multiple pictures on TikTok green screen.
Part 1. How to Add Green Screen on TikTok?
To add green screen on TikTok video, you need to have a background of uniform color. It does not necessarily have to be a green screen. For example, if you are shooting a video of your legs and the floor tiles have uniform color, you can use green screen on TikTok to replace the tiles with any picture. Instead of using one picture on TikTok short video, you can use multiple pictures in the background to create stunning TikTok videos. Here are the steps on how to add multiple pictures to TikTok green screen.
Step1 Open TikTok app on your phone. Tap on Plus icon located at the bottom of the app screen to make a new video.
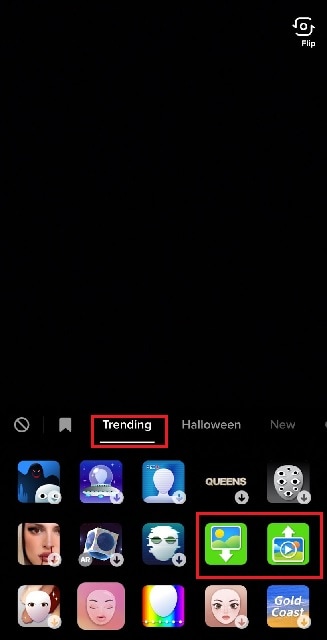
Step2 Choose the duration of the video as per your preference. Thereafter, tap on Effects option located at the bottom-left corner to see the different effects available on TikTok.
![]()
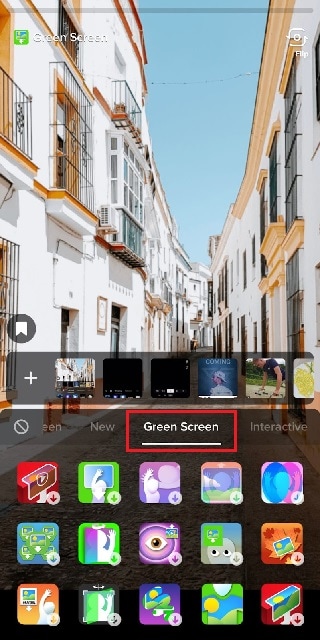
Step3 Go to Trending tab and you will see Green Screen and Green Screen Video icons. If you want your video to have green screen photo, tap on Green Screen icon. If you want your video to have green screen video, tap on Green Screen Video icon.
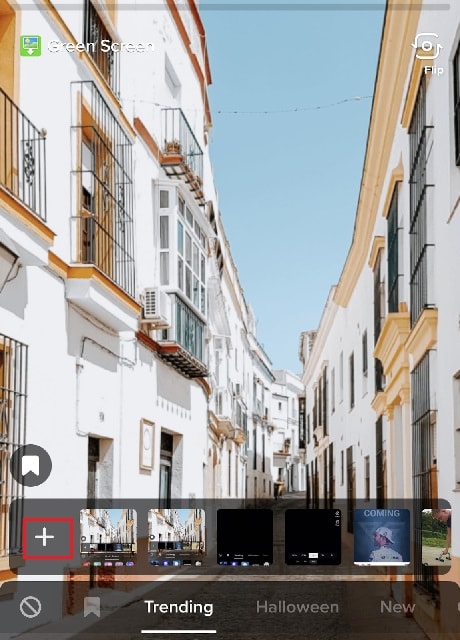
Step4 You will get a generic background and you can choose any preset background or select photo or video from your phone gallery by tapping on Plus icon. Once you are done, tap on Record button.
Step5 In order to use multiple pictures, you should stop recording in between and change your green screen image to anything you desire. Then tap on Record button again. TikTok will string your clips and it would appear that you have been changing multiple pictures of your background for your video.
If you want to experiment with green scree effects, you can scroll down after tapping on Green Screen icon under Effects. You will see different types of green screen videos possible on TikTok to choose from.
Part 2. Creative Ideas to Make TikTok Green Screen Video
Now that you know how to add a video on TikTok green screen, you have to make the most out of it. If you are wondering how you can use green screen in your TikTok videos, here are some creative ideas for you.
Walking Out Videos – You can use green screen effect to show that you are walking out of plane, walking vertically on the wall like inception, walking on the roof of a building. In fact, you can show that you are walking out of popular monuments and palaces and trick your viewers into thinking that you were actually there.
Photoshoot Location – Create a TikTok video showing your favorite locations across the world where you dream of doing photoshoot. You can pose differently and place the location in your background through green screen effect.
How-To Video – If your TikTok channel is about tutorial and learning videos, you can explain things better by putting screenshots and multiple relevant pictures in the background so that viewers can get a pictorial representation of what you are speaking to them.
Mystery Story – You can a create short video describing unknowing facts and mysteries around certain places in the world. You can put photos or video clips of those mysterious places in your background to keep your viewers hooked and related to your narration.
Rate Them Video – You can use green screen effect to showcase your old Instagram photos or videos and rate them. This is an extremely popular trend in TikTok where people show their old photos, display work from the past, and rate them today.
Reveal Your Creation – Share your secrets or interesting stories behind some of the photos or videos you took in the past. You can talk about how creatively you took certain photos and put those photos in the background while discussing them.
Part 3. How to Make Green Screen Video on Computer?
If you have a computer and a webcam, you can record a green screen video on your computer. You can place the green screen in the background perfectly and place the webcam so that the background stays within the green screen. You will need a video recorder and a video editor to make green screen video as well as replace the green screen with any photo or video. We recommend Wondershare Filmora where you can record as well as edit green screen video.
Filmora is a professional video editor where you can record your computer screen as well as your webcam video with green screen background in Picture-in-Picture mode. After recording the video, you can replace the green screen with any video clip or photo instantly in a few steps. You can also fine-tune green screen effect for perfection. Therefore, you can save the video in any resolution and file format as per your preference.

Free Download For Win 7 or later(64-bit)
Free Download For macOS 10.14 or later
Conclusion
Adding green screen effect on TikTok videos can make your videos stand out. We have illustrated how to add multiple green screen videos on TikTok and your videos will have a better chance of getting viral. Keep the green screen ideas in mind while making TikTok green screen videos. If you want to make and edit green screen videos on computer, Wondershare Filmora is the best application available for Windows and Mac users.
Guide to Make Timelapse Video with iMovie
Are you in search of how to time-lapse a video on iMovie? You very well would have known that the method in which the film frames are often taken is mainly due to the timelapse. The way the time-lapse film is played is quite similar to how faster-paced videos are presented. The time-lapse aspect of a video may be created simply by speeding up the footage. It is always wonderful to see a time-lapse movie being captured.
Making time-lapse images and films may be done in a variety of methods, such as by fusing many images or utilizing pre-existing video. Time-lapse films may be made using a variety of software. When we watched a film at regular speed, it seemed like time was slipping away and moving. A fascinating perspective is created by the motion and the ability to witness hours of film condensed into a few seconds.
Part 1. How to Make Timelapse Video with iMovie iPhone
All iOS devices come with the iMovie software, which may speed up videos. iMovie makes it simple to turn a movie into a time-lapse. To transform a movie into a time-lapse, just launch iMovie. If you want a simpler solution, we advise using Slow fast Slow, a tool that speeds up playback. You must correctly configure your phone to capture time-lapse films. The camera app is aware of everything it does.
Steps to Make Timelapse Video with iMovie iPhone:
Step1 Record the Footage
In the first step, open our camera app to select the Time-lapse from the slider. You need to tap the video in the timeline and then click the icon button on the bottom-left of the corner until you find the time-lapse option. and then select it and press the record button. When you made a video and it’s done, just click on the record button again.

Step2 Launch iMovie on iPhone
Open the iMovie app on your iPhone, swipe up right then select a camera and click the “Projects” tab on top and start to “Create Project” to load the video clip whatever you want to make an iMovie lapse.

Step3 Customize the Recorded Footage
The titles, text, and even music is uploaded based on your liking or choice from the built-in royalty-free library, which offers hundreds of songs. The total length of the source video segments may vary depending on how long you want the time-lapse movie to be. The impression of increased movement or the speeding up of time is the most important component of a time-lapse.

Step4 Create Time-lapse and Save
To create the ideal iMovie time-lapse, adjust the speed and examine the movie. To save and distribute the iMovie time-lapse, click the “Done” button!

Part 2. Make Timelapse Video with iMovie on Mac
The idea behind an iMovie time-lapse is to capture anything that is moving slightly and then speed it up so you can notice the movement. A time-lapse movie only captures 1 to 2 frames per second, while video typically captures numerous. Learn how to utilize the app’s time-lapse mode and use iMovie to transform standard iPhone footage into a time-lapse movie. Here are the fundamental instructions for utilizing images and video clips in Apple iMovie:
Steps to Make a Timelapse Video with iMovie on Mac:
Step1 Download iMovie
iMovie is a free app. It comes with a new apple series computer and mobile. You can use that app to create real-time-lapse videos, with a small workaround. On your Mac, launch iMovie and import the video clip from the ‘Library’ that you want to use for your time-lapse. In the timeline, drag the video.

Step2 Select the Timelapse
Decide the clip you wish to modify the speed of. On the preview window’s upper right, tap the clock symbol. Next, you need to pick Speed > Fast, where you may set a frame rate such as “8x” or “20x.” You may watch the time-lapse video till you’re good to go.

Step3 Apply Editing
The time-lapse options in iMovie allow you to add video effects, trim, edit, and combine video clips, although doing so may degrade the quality of the final product. If you are using iMovie 9, creating a time-lapse film is a little challenging. To change the “Speed” option in the preview windows, double-click on the video clip in the timeline.

Step4 Save the Video
Due to the amount of space, it will take up on your Mac, this is the quickest method to produce time-lapses with iMovie for Mac. When you click the “Share” button straight above, you can decide whether to preserve or immediately share the iMovie time-lapse.

Part 3. iMovie Alternative to Create Timelapse video on Mac
When you record the time-lapse video, the video movements are much more noticeable and they become the focus of it. With the wide range of its features interface and wizard, the best alternative to make the iMovie time-lapse is by Filmora . It has Advanced editing features that help you create slow-motion in addition to time-lapse videos. Also, you can enhance the video too much extent.
Time-lapse is now a very popular feature for editing videos where you can speed up as you want for a clip up to X times. Filmora makes it even more compelling. As with this toolkit, all kinds of time-lapse videos can be made by Filmora’s time-lapse techniques. What’s more, the software lets you finish the video with a color grading edit. The feasibility of making a time-lapse video is at full-scale with software like Filmora.
Free Download For Win 7 or later(64-bit)
Free Download For macOS 10.14 or later
How to Make a Timelapse Video on Mac with Filmora
Step1 Install and Launch Filmora
Visit the official website to get the most recent version of Filmora on your PC as the first step. The installation procedure may then be started by launching the installer. You will then be sent to the Filmora launcher as seen below:

Step2 Add video to the Timeline
Please make sure the software has been launched and is in “Full Features Mode” before beginning. Use the “Import” option to add the desired movie or photographs to the media library. Drag it to the Timeline after that.

Step3 Divide and Edit Your Video
To produce the timelapse effect, move the slider bar to the desired location. Then, click the “Split” button to split the video into two halves. To split the video into numerous segments, repeat this step.

Step4 Make the Time-lapse
A window will appear when you double-click on the video clip you want to speed up. To speed up the movie, choose the “Speed” option and move the slider to the right. Up to 100x rapid motion and 0.01x slow motion are supported by this software.

Step5 Render and Export the Timelapse Movie
Right after the editing, render by hitting the icon in the timeline, and then you can get a stunning, high-quality movie on Filmora that is up to 4K. After completing the aforementioned parameters, click “Export” to choose an output format for exporting and storing the freshly made time-lapse movie on Mac.

Part 4: Related FAQs of Timelapse Video
1. How Do You Speed-up videos on iMovie?
The speed of the video can be changed until you get a perfect iMovie time-lapse. The speed of your time-lapse video is to use the slider to change. Drag the slider right to make it faster, or left to make it slow down. Select and click the “Done” button to save and you can share the iMovie time-lapse with the others.
2. How Do You Create a time-lapse video?
Select then tap the video in the timeline and then click the icon button on the bottom-left of the corner until you find the time-lapse option. and then select it and press the record button. When you made a video and it’s done, just click on the record button again.
3. How Long Can a Time-Lapse video on iPhone be?
There is no limit to how long time-lapse videos you can shoot. the only limitation with the iPhone. Time-lapse videos depending on the length of the original videos that you make on your iPhone can last up to 20 to 40 seconds, whether you shoot for 30 minutes or 30 hours. How long did you record the video, it won’t go over 40 seconds.
Conclusion
The iMovie time-lapse will consume very little time to create your videos and movie. When this technique is used in photography to make time-lapse videos in iMovie, time seems to be fast-moving. Time-lapse on your iPhone has never been simpler, thanks to the features of the camera app. Also, if you’re looking for easy and efficient software to create attractive time-lapses, Filmora is your best go-to software.
Free Download For macOS 10.14 or later
How to Make a Timelapse Video on Mac with Filmora
Step1 Install and Launch Filmora
Visit the official website to get the most recent version of Filmora on your PC as the first step. The installation procedure may then be started by launching the installer. You will then be sent to the Filmora launcher as seen below:
Step2 Add video to the Timeline
Please make sure the software has been launched and is in “Full Features Mode” before beginning. Use the “Import” option to add the desired movie or photographs to the media library. Drag it to the Timeline after that.
Step3 Divide and Edit Your Video
To produce the timelapse effect, move the slider bar to the desired location. Then, click the “Split” button to split the video into two halves. To split the video into numerous segments, repeat this step.
Step4 Make the Time-lapse
A window will appear when you double-click on the video clip you want to speed up. To speed up the movie, choose the “Speed” option and move the slider to the right. Up to 100x rapid motion and 0.01x slow motion are supported by this software.
Step5 Render and Export the Timelapse Movie
Right after the editing, render by hitting the icon in the timeline, and then you can get a stunning, high-quality movie on Filmora that is up to 4K. After completing the aforementioned parameters, click “Export” to choose an output format for exporting and storing the freshly made time-lapse movie on Mac.
Part 4: Related FAQs of Timelapse Video
1. How Do You Speed-up videos on iMovie?
The speed of the video can be changed until you get a perfect iMovie time-lapse. The speed of your time-lapse video is to use the slider to change. Drag the slider right to make it faster, or left to make it slow down. Select and click the “Done” button to save and you can share the iMovie time-lapse with the others.
2. How Do You Create a time-lapse video?
Select then tap the video in the timeline and then click the icon button on the bottom-left of the corner until you find the time-lapse option. and then select it and press the record button. When you made a video and it’s done, just click on the record button again.
3. How Long Can a Time-Lapse video on iPhone be?
There is no limit to how long time-lapse videos you can shoot. the only limitation with the iPhone. Time-lapse videos depending on the length of the original videos that you make on your iPhone can last up to 20 to 40 seconds, whether you shoot for 30 minutes or 30 hours. How long did you record the video, it won’t go over 40 seconds.
Conclusion
The iMovie time-lapse will consume very little time to create your videos and movie. When this technique is used in photography to make time-lapse videos in iMovie, time seems to be fast-moving. Time-lapse on your iPhone has never been simpler, thanks to the features of the camera app. Also, if you’re looking for easy and efficient software to create attractive time-lapses, Filmora is your best go-to software.
Also read:
- 2024 Approved Why Vimeo Slideshow Maker Become More and More Popular
- 2024 Approved How To Make Transparent Background On Picsart
- Updated Let Us Help You with Something that You Might Not Know. Have You Ever Worked with MOV File Format Before? Or Do You Know What that Is? Lets Talk About It
- 2024 Approved Best GIF to Video Converters
- New 2024 Approved Do You Need to Make Your Video More Immersive? You Can Make It 60 FPS to Achieve That. And Here Are the 5 Best Tools that You Can Use
- Being a Content Creator Means Creating a Slow-Mo at some Point. Study This Piece to Learn How to Play a Video in Slow Motion on iPhone
- In 2024, 10 Matching Color Combination That Works Together
- New A Complete Guide to the Best Brand Story Videos
- Updated Learn to Merge Clips in DaVinci Resolve with Simple Steps for 2024
- How to Make First Impression Review Video
- Find Out The Best Dark Moody LUTs During Editing
- How To Zoom In On TikTok Videos for 2024
- In 2024, How to Create The Best Video Collages ?
- New In 2024, Top Applications That Can Help Apply The Best VHS Camera Effect
- New In 2024, Easiest Fix Included! Top 5 Ways to Convert HDR to SDR Videos
- In 2024, Makeup Video Is One of the Video Types that Many Vloggers Are Creating. If You Are Also the One Who Wants to Share Makeup Experiences in Videos, Then You Can Follow the Guide Below to Make a Makeup Video with Simple Steps
- Want to Come up with Exciting Sony Vegas Slideshow Templates for Your Next Project on YouTube and Other Mediums Then There Is Something for You for 2024
- Things About Transparent PNG Remove and Convert
- Updated Here We Will Investigate AI-Based Video Interview, How It Is Being Used, and How to Master an Artificial Intelligence Video Interview Act for 2024
- New Best Way To Color Grading & Color Correction in Filmora
- Have You Ever Heard Bokeh Effects for Videos? Do You Know that You Can Make Your Own Bokeh Video Easily with some Software. This Article Will Introduce You How to Make a Bokeh Effect Video with Steps for 2024
- In 2024, How to Get Zoom on TV Easy Solutions
- Updated Here You Can Lean About the Different Ways for GIMP Transparent Background PNG Format Files
- New Best Method to Split the Video Into Parts Online for 2024
- New In 2024, Best AR Video App - Top 10 Picks
- How to Make Split Screen Videos in Filmora for 2024
- Updated In 2024, 10 Matching Color Combination That Works Together Greatly
- 2024 Approved How to Create a Custom Slide Show in PowerPoint
- In 2024, How to Make GIFs From Videos on Mac
- New In 2024, Using One of the Best Converter Tools to Turn GIFs Into PNG or JPG. Here, Learn About the Ten Best Ones for Different Operating Systems, with Details on Features, Prices, and More
- Updated Useful Tips for Tiktok Video Aspect Ratio Included
- Split Videos in the Lightworks Step by Step
- In 2024, How to Use LUTS to Color Grade on Your iPhone
- In 2024, Top 8 Augmented Reality Video Games
- Find The Best Free Canon LUTs for 2024
- 5 Most Effective Methods to Unlock iPhone 12 Pro in Lost Mode
- Here are Some Pro Tips for Pokemon Go PvP Battles On Apple iPhone 6s | Dr.fone
- In 2024, How to Unlock iPhone 12 Pro Online? Here are 6 Easy Ways
- Failed to play MOV movies on Motorola Edge 2023
- In 2024, Reasons why Pokémon GPS does not Work On Samsung Galaxy M14 5G? | Dr.fone
- Delete Gmail Account With/Without Password On Honor X50
- Undelete lost messages from Realme 11 Pro+
- Repair damaged, unplayable video files of Tecno Spark 20 Pro
- In 2024, Recommended Best Applications for Mirroring Your Oppo Reno 8T 5G Screen | Dr.fone
- Methods to Change GPS Location On Samsung Galaxy M34 5G | Dr.fone
- In 2024, Mastering Android Device Manager The Ultimate Guide to Unlocking Your Poco X6 Pro Device
- 11 Best Location Changers for Vivo S17 | Dr.fone
- How does the stardust trade cost In pokemon go On Oppo A78 5G? | Dr.fone
- Title: Updated 2024 Approved Guide Create The Perfect VHS Effect Look in Premiere Pro
- Author: Morgan
- Created at : 2024-04-24 01:05:19
- Updated at : 2024-04-25 01:05:19
- Link: https://ai-video-editing.techidaily.com/updated-2024-approved-guide-create-the-perfect-vhs-effect-look-in-premiere-pro/
- License: This work is licensed under CC BY-NC-SA 4.0.
