
:max_bytes(150000):strip_icc():format(webp)/GettyImages-Macys-59e6c3699abed500118af858.jpg)
Updated 2024 Approved How to Make Strobe Light Text Effect?
How to Make Strobe Light Text Effect?
In video editing, professionals put in different types of effects to create a unique feel to the visuals. In fact, there are different styles available that you can use in videos to create a specific feel in the viewers—case in point, strobe lights.
This technique involves a series of intense short flashes of light in sections of the clip that create a suspenseful or thrilling ambiance, amping up the horror feel in viewers and more. You might have seen many examples of this in horror movies, thrillers, suspense or action-filled movies, sci-fi films, etc. Similarly, adding the effect to the titles gives a cinematic feel to them.
As a film or video editor, are you interested in adding this effect to your own project as well? Luckily, you do not need significant technical know-how or invest in different types of high-grade equipment to manage it - Wondershare Filmora allows users to add the effect easily in the titles. Want to know how? Read ahead.
Launch the software first
Of course, before you can begin adding the effect to your video, you must have the software. The downloading process for Wondershare Filmora 11 is very straightforward as long as you have a Mac or Windows PC.
Free Download For Win 7 or later(64-bit)
Free Download For macOS 10.14 or later
First, visit the official website to download the software. The Download button at the top of the screen or the description box is available to click on. That will instantly allow the Filmora installer to download into your device.

Double-click on the installer from your notifications or browser downloads section, then click Install. Allow the prompt for permission approval when it comes up, and the installation process will begin. This would take a little bit of time, and you can tap on the Start Now button at the last window that opens.

Add the title
The editor will open automatically next. You have to tap on the Create New Project button to access the editing screen, tap on the Titles tab, and choose the Default Title. If you prefer another version, browse through the different title presets available as options and download the one you prefer.

Then, drag the title from this section and drop it into the editing timeline. Double-click on the title in the timeline to open the title editing window. Insert the text you want to add as the title in the text field and adjust the size, font, and other font modifications here.
Edit the title and click snapshots
Then, you should drag the title clip you added to the timeline to an upper section and click on the Media tab following that. Then, choose the Sample Color option from the listed menu and tap on the Black color choice. After doing so, drag it down to the timeline onto the track under the Default Title clip you added and moved up.
Consequently, click on the Snapshot icon at the right side of the toolbar just above the timeline. This will take a screenshot of the black color picture you added second.

Then you should double-click on the original Default Title you added and start editing your title text once more. This time, add the term you want to appear under your original title here. Adjust the font for it as something other than the original one. For example, if you put Motor Oil 1937 M54 as the first title font, set the second as Montserrat SemBold. Make more adjustments, if necessary, to the font. Then, retake a snapshot of it.

Insert the snapshots
Remove the two title clips you added to the timeline. You have to work with the Snapshots you took now.
It is possible that you will not see the Snapshots saved in your media folder. In this case, tap on the “Click here to insert media” section and go to the device library. It will open in the Wondershare Filmora folder; if not, search for it and access it.
In the folder, double-click on the Snapshot folder. Choose both of the Snapshots you saved right now from here and tap on Open to import them into Filmora.

Import additional music and background visuals
After you have imported the snapshots to Filmora, you have to tap on the Import File option again. Go to the folder where you saved specific files like Lens flare, background video, particles, and sound effect clips. If you have these previously saved in other folders, make sure to keep them all in one folder ahead of time and open that one here.
Choose all files and click on Open to add them to the Filmora software. Now starts the process of merging them all into one cohesive effect.

Drag the files into the timeline
The background video is the first file you will drag and drop to the timeline. For the best effect, choose a flashing light background video. Next, drag the first title you edited into Track 2, right above the first one. Make sure to adjust the length of the clip to match the background video length. Repeat the same for the second snapshot, adding it above the first snapshot in the timeline.

Edit the snapshots via Chroma Key and Composting
You must hide the second snapshot you added, i.e., the one in the 3rd Track on the timeline. After that, click on snapshot 1 and tap on the Chroma Key icon in the toolbar right above the timeline.
When the Chroma Key window opens, tap on the Select Color option and go to the “More…” option. Tap on the basic white color and click on OK.
Following it, move the slider for Edge Thickness to extend it and see the preview to know if you are satisfied with the amount. Then, click on the unhide icon for the second snapshot. Right-click on it and tap on the Composting option. Under the Blending Mode parameter, change the option to Screen. The title background will remove automatically.
Press OK.

Add the sound effect
Again, you must hide the second snapshot in the timeline with the same step as before. Then, drag the sound effect to the audio track timeline next. Tap on the Play button under the Preview to see how the effect looks with the sound. Cut out the extra second of the sound effect clip to align it with the ending section of all of the other clips.
Add the initial keyframes
Choose the first snapshot in the timeline, below the second snapshot, and above the background video clip. Then, double-click on it to open the editor window and choose the Animation tab this time instead of Image.
Add the keyframe here and change the value of the Scale parameter to 400 or something high like that. In the preview, you will see that most of the font in this title is out of frame. After this, click on Rotate and turn the font to 45 degrees.

Move your playhead on this snapshot clip in the timeline by at least 1 second. Then, add another keyframe in this location by tapping the Add button. Here, reset the Scale and Rotate parameters and press the OK button to end.
Add the lens flare and particle video
Next, go back to the media section where all the files you added are present and drag your lens flare clip to the timeline, right on the track above the last one you added. Drop it here and adjust the length of it to match others if it does not show that automatically.
Above it, drag and drop the Particles video from the media files you added previously onto the track above the lens flare one. Do the same to delete the spare part by moving the play head to that point, clicking on the scissor icon, and removing the extra part.
Then, double-click on this Particles video clip on the timeline and go to the Compositing section. Tap on the Blending Mode drop-down choice and choose the Screen option. Press OK. Next, repeat the same for the lens flare video and tap the OK button.
Now, play the preview again.

Adjust the second title, again
Remember how you clicked on the hide button for the second snapshot for title 2? Now, you have to click on the unhide icon beside it.
Move the play head to the 3-second mark from the beginning. If you need clarification on this, check if the lens flare effect is beginning to start below the first title at this point. Move your playhead to that point for the second snapshot.
Here, tap on the Split icon and remove the clip’s first half. Then, double-click on the second half and go to Animation. Press the Add button to insert a keyframe here and change the scale and position of the title at this point. Move it to the placement you want, right above the lens flare. Also, drag the slider for the Opacity parameter to zero at this point.

Subsequently, move the play head to the point when the lens flare effect stop, which is around 2 seconds more. At this point, you have to add another keyframe and change the Opacity to 100.
Play the preview of the whole thing to see how the effect looks in completion.
Conclusion
Indeed, the strobe light effect in the title of movies or videos of different lengths can effectively create a heart-stopping moment on the screen. Moreover, it can work to incite a feeling of anticipation in viewers, especially with the right music beat in the backdrop.
Using Filmora will allow you to add the cinematic effect quickly and efficiently with simple, quick steps. Follow the phases mentioned in this post while trying out different variations before settling on your final shot choice.
Free Download For macOS 10.14 or later
First, visit the official website to download the software. The Download button at the top of the screen or the description box is available to click on. That will instantly allow the Filmora installer to download into your device.
Double-click on the installer from your notifications or browser downloads section, then click Install. Allow the prompt for permission approval when it comes up, and the installation process will begin. This would take a little bit of time, and you can tap on the Start Now button at the last window that opens.
Add the title
The editor will open automatically next. You have to tap on the Create New Project button to access the editing screen, tap on the Titles tab, and choose the Default Title. If you prefer another version, browse through the different title presets available as options and download the one you prefer.
Then, drag the title from this section and drop it into the editing timeline. Double-click on the title in the timeline to open the title editing window. Insert the text you want to add as the title in the text field and adjust the size, font, and other font modifications here.
Edit the title and click snapshots
Then, you should drag the title clip you added to the timeline to an upper section and click on the Media tab following that. Then, choose the Sample Color option from the listed menu and tap on the Black color choice. After doing so, drag it down to the timeline onto the track under the Default Title clip you added and moved up.
Consequently, click on the Snapshot icon at the right side of the toolbar just above the timeline. This will take a screenshot of the black color picture you added second.
Then you should double-click on the original Default Title you added and start editing your title text once more. This time, add the term you want to appear under your original title here. Adjust the font for it as something other than the original one. For example, if you put Motor Oil 1937 M54 as the first title font, set the second as Montserrat SemBold. Make more adjustments, if necessary, to the font. Then, retake a snapshot of it.
Insert the snapshots
Remove the two title clips you added to the timeline. You have to work with the Snapshots you took now.
It is possible that you will not see the Snapshots saved in your media folder. In this case, tap on the “Click here to insert media” section and go to the device library. It will open in the Wondershare Filmora folder; if not, search for it and access it.
In the folder, double-click on the Snapshot folder. Choose both of the Snapshots you saved right now from here and tap on Open to import them into Filmora.
Import additional music and background visuals
After you have imported the snapshots to Filmora, you have to tap on the Import File option again. Go to the folder where you saved specific files like Lens flare, background video, particles, and sound effect clips. If you have these previously saved in other folders, make sure to keep them all in one folder ahead of time and open that one here.
Choose all files and click on Open to add them to the Filmora software. Now starts the process of merging them all into one cohesive effect.
Drag the files into the timeline
The background video is the first file you will drag and drop to the timeline. For the best effect, choose a flashing light background video. Next, drag the first title you edited into Track 2, right above the first one. Make sure to adjust the length of the clip to match the background video length. Repeat the same for the second snapshot, adding it above the first snapshot in the timeline.
Edit the snapshots via Chroma Key and Composting
You must hide the second snapshot you added, i.e., the one in the 3rd Track on the timeline. After that, click on snapshot 1 and tap on the Chroma Key icon in the toolbar right above the timeline.
When the Chroma Key window opens, tap on the Select Color option and go to the “More…” option. Tap on the basic white color and click on OK.
Following it, move the slider for Edge Thickness to extend it and see the preview to know if you are satisfied with the amount. Then, click on the unhide icon for the second snapshot. Right-click on it and tap on the Composting option. Under the Blending Mode parameter, change the option to Screen. The title background will remove automatically.
Press OK.
Add the sound effect
Again, you must hide the second snapshot in the timeline with the same step as before. Then, drag the sound effect to the audio track timeline next. Tap on the Play button under the Preview to see how the effect looks with the sound. Cut out the extra second of the sound effect clip to align it with the ending section of all of the other clips.
Add the initial keyframes
Choose the first snapshot in the timeline, below the second snapshot, and above the background video clip. Then, double-click on it to open the editor window and choose the Animation tab this time instead of Image.
Add the keyframe here and change the value of the Scale parameter to 400 or something high like that. In the preview, you will see that most of the font in this title is out of frame. After this, click on Rotate and turn the font to 45 degrees.
Move your playhead on this snapshot clip in the timeline by at least 1 second. Then, add another keyframe in this location by tapping the Add button. Here, reset the Scale and Rotate parameters and press the OK button to end.
Add the lens flare and particle video
Next, go back to the media section where all the files you added are present and drag your lens flare clip to the timeline, right on the track above the last one you added. Drop it here and adjust the length of it to match others if it does not show that automatically.
Above it, drag and drop the Particles video from the media files you added previously onto the track above the lens flare one. Do the same to delete the spare part by moving the play head to that point, clicking on the scissor icon, and removing the extra part.
Then, double-click on this Particles video clip on the timeline and go to the Compositing section. Tap on the Blending Mode drop-down choice and choose the Screen option. Press OK. Next, repeat the same for the lens flare video and tap the OK button.
Now, play the preview again.
Adjust the second title, again
Remember how you clicked on the hide button for the second snapshot for title 2? Now, you have to click on the unhide icon beside it.
Move the play head to the 3-second mark from the beginning. If you need clarification on this, check if the lens flare effect is beginning to start below the first title at this point. Move your playhead to that point for the second snapshot.
Here, tap on the Split icon and remove the clip’s first half. Then, double-click on the second half and go to Animation. Press the Add button to insert a keyframe here and change the scale and position of the title at this point. Move it to the placement you want, right above the lens flare. Also, drag the slider for the Opacity parameter to zero at this point.
Subsequently, move the play head to the point when the lens flare effect stop, which is around 2 seconds more. At this point, you have to add another keyframe and change the Opacity to 100.
Play the preview of the whole thing to see how the effect looks in completion.
Conclusion
Indeed, the strobe light effect in the title of movies or videos of different lengths can effectively create a heart-stopping moment on the screen. Moreover, it can work to incite a feeling of anticipation in viewers, especially with the right music beat in the backdrop.
Using Filmora will allow you to add the cinematic effect quickly and efficiently with simple, quick steps. Follow the phases mentioned in this post while trying out different variations before settling on your final shot choice.
How to Rotate a Video in Windows 10
There are times where you may need to rotate a video into landscape if the video is shot in portrait. This is because watching a video in portrait orientation on a computer is horrible as the video screen size is compressed and the two sides have black screen. Instead, you can rotate video Windows into landscape, you can watch the same video comfortably. Besides, there are times when the entire video is shot at a certain angle as the video device was not properly aligned.
If you are a Windows user, rotating a video in Windows through Windows Media Player is not possible. However, Windows 10 comes with Photos app that contains a video editor to rotate a video and save it permanently. If you use VLC Media Player, you can rotate any video temporarily as well permanently at any desired angle. You can also rotate a video online without installing any software. In this article, we will illustrate how to rotate a video in Windows.
Way 1. Use Photos App
If you are a Windows 10, you can use the pre-installed Photos app to rotate a video and save it permanently. Photos app comes with an inbuilt video editor where rotating a video in Windows 10 is so easy. If you are using an older version of Windows, you can relate Photos app with Windows Movie Maker. Anyway, here are the steps to rotate any video on Photos app.
Step 1: From Start menu, search for “Photos” and open Photos app.

Step 2: Select Video Editor option which is available at the top of the screen. Once, Video Editor opens, click on New Video Project button.

Step 3: Put a name for the project and click on Ok. Thereafter, click on Add button and select the video file from your hard drive that you want to rotate.

Step 4: Drag and drop the video file into Timeline. Thereafter, Click on Rotate icon to turn the video by 90 degrees. You can click again to rotate the video further by 90 degrees again.

Step 5: Once done, click on Finish Video option and save the video file in the destination folder.
Way 2. Use Filmora
The best software on how to rotate a video in Windows 10 to Windows 7 is Wondershare Filmora . It is a professional video editor and there are loads of features to edit the video including rotation. You can make a video more attractive and crisp to publish on professional platforms like YouTube. Here are the steps to rotate a video on Filmora.
Step 1: Download and install Filmora. Open the software and import the video file that you want to rotate. Then drag and drop it on Timeline.
For Win 7 or later (64-bit)
For macOS 10.12 or later
Step 2: From Video Editing panel, expand Transform option and use the slider on Rotate option to rotate the video at any angle. Once done, click on OK button.

Step 3: Go to Export option and click on Export button. The new video files with its new rotation will be saved in the destination folder.

Way 3. Use VLC Media Player
Most Windows users generally install VLC Media Player to watch movies. This is because Windows Media Player supports only limited file formats. Most movie files that you download online are supported by VLC but not on Windows Media Player. Here are the steps on how to rotate a video in Windows temporarily using VLC Media Player.
Step 1: Open VLC Media Player. Go to Media menu and click on Open File option. Select the video file from your hard drive that you want to rotate.
Step 2: Once the video opens, go to Tools menu and click on Effects and Filters option.

Step 3: On Adjustments and Effects window, click on Video Effects tab.
Step 4: Under Video Effects tab, click on Geometry tab.
Step 5: Turn of Transform checkbox and click on drop-down menu to select the required option. You can rotate the video by 90 degrees, 180 degrees and 270 degrees.

Step 6: To rotate the video at any desired angle, turn on Rotate checkbox and select the desired angle.

Step 7: Finally, click on Save and then Close button.

Please note that when you rotate a video temporarily, it is for a one-time watch only. When you open the video again in any other media player, it will have the original orientation.
Way 4. Use EZGIF Online Tool
If you have short video files and you want to upload them on social media platforms, you can convert them into GIF files. You can convert any video file to EZGIF. Therefore, instead of video files, if you want to rotate GIF files, EZGIF is highly useful as an online tool. In fact, you can also convert GIF files into MP4 files. Here are the steps to follow to rotate short video files using EZGIF online tool.
Step 1: Open your web browser and open Ezgif.com.
Step 2: Click on Video to GIF option.
Step 3: Click on Choose File button and select the short video file from your hard drive.

Step 4: Click on Upload Video button and wait for the conversion. Thereafter, download the GIF file.
Step 5: To rotate the GIF file, go to Rotate option. Click on Choose File button.

Step 6: Select the GIF file and click on Upload.
Step 7: You can select from provided rotation options or mention rotation angle explicitly and click on Apply Rotation button.

Wait for the rotation effect and download the file on your hard drive.
FAQs about Rotate Video in Windows 10
1. How do I rotate a video in Windows 10?
To rotate a video in Windows 10, you can use the built-in Photos app. Open the app and select the video you want to rotate. Click on the Edit & Create button at the top of the screen and select Rotate left or Rotate right to adjust the video orientation.
2. Can I rotate a video in Windows Media Player?
No, you can’t rotate a video in Windows Media Player. This feature is only available in the Photos app. However, you can use a third-party video editing software to rotate your videos.
3. How do I save the rotated video?
After rotating the video in the Photos app, click on the Save a copy button at the top of the screen. You can then choose the destination folder and file name for the newly rotated video.
4. What should I do if the video is upside down after rotating it?
If the video is upside down after rotating it, you may have rotated it in the wrong direction. Try rotating it in the opposite direction and see if that fixes the issue. If not, you may need to use a third-party video editing software to rotate the video.
5. Can I rotate a video without losing quality?
Rotating a video can sometimes result in a loss of quality, especially if the video is compressed or low-resolution. However, using a good video editing software can help minimize the loss of quality. Make sure to save the rotated video in the same format and resolution as the original file to avoid further loss of quality.
Conclusion
We have provided you all the possible ways to rotate video Windows. If you want to rotate with pre-installed software, you have Photos app. If you have VLC Media Player installed, you can do the rotation temporarily and permanently. You can also use Ezgif online tool to rotate animated files without installing any
For macOS 10.12 or later
Step 2: From Video Editing panel, expand Transform option and use the slider on Rotate option to rotate the video at any angle. Once done, click on OK button.
Step 3: Go to Export option and click on Export button. The new video files with its new rotation will be saved in the destination folder.
Way 3. Use VLC Media Player
Most Windows users generally install VLC Media Player to watch movies. This is because Windows Media Player supports only limited file formats. Most movie files that you download online are supported by VLC but not on Windows Media Player. Here are the steps on how to rotate a video in Windows temporarily using VLC Media Player.
Step 1: Open VLC Media Player. Go to Media menu and click on Open File option. Select the video file from your hard drive that you want to rotate.
Step 2: Once the video opens, go to Tools menu and click on Effects and Filters option.
Step 3: On Adjustments and Effects window, click on Video Effects tab.
Step 4: Under Video Effects tab, click on Geometry tab.
Step 5: Turn of Transform checkbox and click on drop-down menu to select the required option. You can rotate the video by 90 degrees, 180 degrees and 270 degrees.
Step 6: To rotate the video at any desired angle, turn on Rotate checkbox and select the desired angle.
Step 7: Finally, click on Save and then Close button.
Please note that when you rotate a video temporarily, it is for a one-time watch only. When you open the video again in any other media player, it will have the original orientation.
Way 4. Use EZGIF Online Tool
If you have short video files and you want to upload them on social media platforms, you can convert them into GIF files. You can convert any video file to EZGIF. Therefore, instead of video files, if you want to rotate GIF files, EZGIF is highly useful as an online tool. In fact, you can also convert GIF files into MP4 files. Here are the steps to follow to rotate short video files using EZGIF online tool.
Step 1: Open your web browser and open Ezgif.com.
Step 2: Click on Video to GIF option.
Step 3: Click on Choose File button and select the short video file from your hard drive.
Step 4: Click on Upload Video button and wait for the conversion. Thereafter, download the GIF file.
Step 5: To rotate the GIF file, go to Rotate option. Click on Choose File button.
Step 6: Select the GIF file and click on Upload.
Step 7: You can select from provided rotation options or mention rotation angle explicitly and click on Apply Rotation button.
Wait for the rotation effect and download the file on your hard drive.
FAQs about Rotate Video in Windows 10
1. How do I rotate a video in Windows 10?
To rotate a video in Windows 10, you can use the built-in Photos app. Open the app and select the video you want to rotate. Click on the Edit & Create button at the top of the screen and select Rotate left or Rotate right to adjust the video orientation.
2. Can I rotate a video in Windows Media Player?
No, you can’t rotate a video in Windows Media Player. This feature is only available in the Photos app. However, you can use a third-party video editing software to rotate your videos.
3. How do I save the rotated video?
After rotating the video in the Photos app, click on the Save a copy button at the top of the screen. You can then choose the destination folder and file name for the newly rotated video.
4. What should I do if the video is upside down after rotating it?
If the video is upside down after rotating it, you may have rotated it in the wrong direction. Try rotating it in the opposite direction and see if that fixes the issue. If not, you may need to use a third-party video editing software to rotate the video.
5. Can I rotate a video without losing quality?
Rotating a video can sometimes result in a loss of quality, especially if the video is compressed or low-resolution. However, using a good video editing software can help minimize the loss of quality. Make sure to save the rotated video in the same format and resolution as the original file to avoid further loss of quality.
Conclusion
We have provided you all the possible ways to rotate video Windows. If you want to rotate with pre-installed software, you have Photos app. If you have VLC Media Player installed, you can do the rotation temporarily and permanently. You can also use Ezgif online tool to rotate animated files without installing any
You Can Easily Film Rotating Video Illusions From Your Smartphone and Edit Them on Wondershare Filmora in Just a Few Clicks
Controlling camera direction to the subject’s hands and filming is trending nowadays. Create this effect by using easy film hacks, as shown in this article.
Many users make rotating illusion videos for TikTok or any branding video. The foremost items to record are explained in this article with detailed instructions. The best editing tool is also clarified below for instant results. So keep reading to get a hand with filming and editing a professional rotating transition video!
Part 1. What is a Rotating Video Illusion/Effect
Rotating transition video is a trending feature used by models and influencers. The brands also use this style to record the model’s videos in advertisements. It could be any makeup transition or clothing transition video.

It helps to indulge the audience with your content and show the after and before transitions. You can try this with any object or any character. But first, let’s figure out the requirements for rotating effects.
Part 2. Prerequisites to Make a Rotating Video Effect
You will need a few items to create a rotating transition video. First, look at the fundamental priorities for creating this feature.
The Subject Matters
To record a successful rotating video, you need a person or a subject to perform in front of the camera. It can be a model hired by a brand, a social influencer, or maybe it’s you. Keep in mind the following things before recording:
- The person should get two different costumes.
- All the actions need to be rehearsed before shooting
- Show affinity and control of the camera.

Shotting Equipment
To record a professional video, you need a good camera. You can use a smartphone to record this footage. There is no need to have a tripod stand or any gear to hold the camera because the camera will be in a rotating position, the same as the subject’s hand.
For this, you need a filmmaker or any person living with you. Just give instructions as shown below to him to record a perfect video for yourself:
- Record the whole video in just one direction.
- Don’t shake the camera because it gives blurry footage.
- Ensure to focus on the subject during recording.
- Don’t zoom in or out while recording the video.
- Keep the subject in the middle of the frame during the recording process.
- The hand rotation timing is the same as the camera’s rotation.
![]()
Note: Ensure to record one footage multiple times so that you can choose the perfect one later for editing.

Filming of the First Footage
To make the footage for the rotating video illusion, we have to record it at least twice to get crystal clear and high-resolution results. Therefore, ensure that we have camera movement in the same direction during all recording times.
![]()
Note: You can film the video either in the vertical format of the camera or in horizontal format. It all depends upon your script!
Follow the below-mentioned steps to record the first footage for the video:
- Hold the camera in a perfect format, whatever you choose.
- Let the subject stand or sit in the middle of the frame.
- The filmmaker can rotate the camera when the subject’s hand rotates.
- Try your best to rotate the camera 180 degrees.
- Ensure that the camera lens faces the ground at the end of the rotation.

After filming the first footage for the video, it’s time to record the second footage to transition between the two.
Filming of the Second Footage
To create a second shot, you have to remember that the costume and location of the filming are different from the first footage. Follow the below steps to record it:
- The first step is to hold the camera in the same direction as the first footage.
- When editing, make sure the subject’s position matches the first footage.
- Make sure the subject’s hand movement is in the opposite direction from the first shot.

Now you have both scenes and footage ready. Next, you have to edit them by inserting them into editing software. Follow the step guides below to perform this action!
Part 3. Step-by-Step Guide to Edit on Filmora
To create a professional rotating video illusion, Wondershare Filmora is an ideal tool. Even beginners can quickly get the hang of it due to its highly engaging system user interface (UI). You will discover how to create a rotating video effect in a few clicks.
Free Download For Win 7 or later(64-bit)
Free Download For macOS 10.14 or later

Step1 Download Wondershare Filmora
To edit your video like a pro, download the most recent version of Wondershare Filmora.
- Download and open Wondershare Filmora on your PC or Mac.
Step2 Import the Footage
Import recorded footage to start the editing process. It is better to have all your footage in one folder before importing all the clips. The main import window locates in the upper left corner when it is first launched.
- Click on the Import icon in the import window’s center.
- Wondershare Filmora will then immediately point you toward your PC
- Navigate to the location where your preferred Videos and Photos are kept.
- Choose every footage you wish to import.
- Once you click Open, the files will import.

It’s time to prepare the footage for editing after inserting it into the Filmora. Follow the next steps to do this!
Step3 Add Footage to the Timeline
The videos you’ve imported will be added to the timeline after that. You can import both footages at once and put them all at once into the timeline.
Alternatively, you can add them one at a time as needed. Follow the procedures as shown to add an item to your timeline.
- To choose a photo or movie, use the right-click
- Holding the Right-click, and move it to the timeline from the bottom.

Your images and videos have been imported into the timeline; now it’s time to trim them according to requirements.
Step4 Trim the Clips
To insert transition effects, you must trim the clip at a specific point and speed up the clip at the required duration. For this, follow the next actions as shown below:
- Playback clips and stop the playhead where you want by pressing the Space button from the Keyboard.
- Then, click on the Split icon present on the playhead.
- It will trim the clip from that point and separate it from its former one.

After splitting or trimming the clips, you now have to adjust the speed of the clips, as shown below!
Step5 Adjust Speed and Duration
There is a need to increase the speed of some scenes where the transition starts or ends. For this, follow the below actions:
- Find the section which needs to speed up, such as in the last half of each rotation.
- Right-click on the section of the clip in the timeline.
- Then, select the Speed option as shown in the icon of the timer present on the upper tab of the timeline.
- Select the Fast option, and if you want to lower the speed, select the Slow option**.**
- Choose the speed range according to your requirement.
- Select that required option and play it back to check if it is correct.

The video is all set; give it the final touches by following the last step, as shown below!
Step6 Playback the Video
After adding and adjusting all the features, double-check the video by playback. If you find any duration issue, review it and adjust it according to your requirement.
You can playback the video by clicking on the Play button. Perform this a few more times to ensure the speed looks okay and adjust if it is too slow or too fast.

You can also view it in full screen by selecting the last option on the tab. If there is no problem, you can export it locally or directly share it on TikTok or anywhere you want to gain views and attract an audience. You can also use it as a magic trick to inspire other people or as a transition for videos!
Conclusion
Keep creating and experimenting with other features on Wondershare Filmora. For example, you can use different effects, try on stock media, and then create or film your own. In this way, you’ll get professional results.
If you are showing new strategies daily to your viewers, they will hook up with you, and it’ll assist in the algorithm working by your side. That’s why keep doing it and enjoying the rest!
Filming of the First Footage
To make the footage for the rotating video illusion, we have to record it at least twice to get crystal clear and high-resolution results. Therefore, ensure that we have camera movement in the same direction during all recording times.
![]()
Note: You can film the video either in the vertical format of the camera or in horizontal format. It all depends upon your script!
Follow the below-mentioned steps to record the first footage for the video:
- Hold the camera in a perfect format, whatever you choose.
- Let the subject stand or sit in the middle of the frame.
- The filmmaker can rotate the camera when the subject’s hand rotates.
- Try your best to rotate the camera 180 degrees.
- Ensure that the camera lens faces the ground at the end of the rotation.
After filming the first footage for the video, it’s time to record the second footage to transition between the two.
Filming of the Second Footage
To create a second shot, you have to remember that the costume and location of the filming are different from the first footage. Follow the below steps to record it:
- The first step is to hold the camera in the same direction as the first footage.
- When editing, make sure the subject’s position matches the first footage.
- Make sure the subject’s hand movement is in the opposite direction from the first shot.
Now you have both scenes and footage ready. Next, you have to edit them by inserting them into editing software. Follow the step guides below to perform this action!
Part 3. Step-by-Step Guide to Edit on Filmora
To create a professional rotating video illusion, Wondershare Filmora is an ideal tool. Even beginners can quickly get the hang of it due to its highly engaging system user interface (UI). You will discover how to create a rotating video effect in a few clicks.
Free Download For Win 7 or later(64-bit)
Free Download For macOS 10.14 or later
Step1 Download Wondershare Filmora
To edit your video like a pro, download the most recent version of Wondershare Filmora.
- Download and open Wondershare Filmora on your PC or Mac.
Step2 Import the Footage
Import recorded footage to start the editing process. It is better to have all your footage in one folder before importing all the clips. The main import window locates in the upper left corner when it is first launched.
- Click on the Import icon in the import window’s center.
- Wondershare Filmora will then immediately point you toward your PC
- Navigate to the location where your preferred Videos and Photos are kept.
- Choose every footage you wish to import.
- Once you click Open, the files will import.
It’s time to prepare the footage for editing after inserting it into the Filmora. Follow the next steps to do this!
Step3 Add Footage to the Timeline
The videos you’ve imported will be added to the timeline after that. You can import both footages at once and put them all at once into the timeline.
Alternatively, you can add them one at a time as needed. Follow the procedures as shown to add an item to your timeline.
- To choose a photo or movie, use the right-click
- Holding the Right-click, and move it to the timeline from the bottom.
Your images and videos have been imported into the timeline; now it’s time to trim them according to requirements.
Step4 Trim the Clips
To insert transition effects, you must trim the clip at a specific point and speed up the clip at the required duration. For this, follow the next actions as shown below:
- Playback clips and stop the playhead where you want by pressing the Space button from the Keyboard.
- Then, click on the Split icon present on the playhead.
- It will trim the clip from that point and separate it from its former one.
After splitting or trimming the clips, you now have to adjust the speed of the clips, as shown below!
Step5 Adjust Speed and Duration
There is a need to increase the speed of some scenes where the transition starts or ends. For this, follow the below actions:
- Find the section which needs to speed up, such as in the last half of each rotation.
- Right-click on the section of the clip in the timeline.
- Then, select the Speed option as shown in the icon of the timer present on the upper tab of the timeline.
- Select the Fast option, and if you want to lower the speed, select the Slow option**.**
- Choose the speed range according to your requirement.
- Select that required option and play it back to check if it is correct.
The video is all set; give it the final touches by following the last step, as shown below!
Step6 Playback the Video
After adding and adjusting all the features, double-check the video by playback. If you find any duration issue, review it and adjust it according to your requirement.
You can playback the video by clicking on the Play button. Perform this a few more times to ensure the speed looks okay and adjust if it is too slow or too fast.
You can also view it in full screen by selecting the last option on the tab. If there is no problem, you can export it locally or directly share it on TikTok or anywhere you want to gain views and attract an audience. You can also use it as a magic trick to inspire other people or as a transition for videos!
Conclusion
Keep creating and experimenting with other features on Wondershare Filmora. For example, you can use different effects, try on stock media, and then create or film your own. In this way, you’ll get professional results.
If you are showing new strategies daily to your viewers, they will hook up with you, and it’ll assist in the algorithm working by your side. That’s why keep doing it and enjoying the rest!
Step-by-Step Guide to Storyboard
Step-by-Step Guide to Storyboard
An easy yet powerful editor
Numerous effects to choose from
Detailed tutorials provided by the official channel
In this article
01 [The Fundamentals to Get You Started on Storyboard](#Part 1)
02 [How to Turn a Script into a Storyboard?](#Part 2)
03 [Storyboard Q&A](#Part 3)
Part 1 The Fundamentals to Get You Started on Storyboard
Speaking in the light of blooming your creative skills and abilities, the realm of graphic and video editing has managed to unleash a never ending and dimensionless canvas to experiment with your skills. Talking of the most recent add-ons to the already long list of utilities, storyboards have emerged as a revolution in the field of motion graphic customization and design.
Diving a bit deeper into understanding the credibility of storyboards, let us move ahead with having an insight of different aspects and elements of the same in the upcoming sections of this article:
What is a Storyboard?
Attempting to define a storyboard, you can regard the utility as a sequential setup of sketches, images, elements and illustrations that create a road map to address a video editing task. Dividing the entire process into a series of individual processes, the aforesaid facility caters to ease out the video creation task.
Moving ahead to draft a technical explanation of storyboards, they are a collection of chronologically arranged drawings, supplemented with video customization elements, such as dialogues, camera direction and other allied detailing. The fundamental merit of these visual arrangements lies in the sequential and scene unfolding of a video footage.
This in turn, works to simplify the film creation process, while ensuring the latter’s cohesiveness and facilitating the elimination of errors and inconsistencies. It is a common mistake to regard storyboards as a midway and optional utility, these trial and error representations are quite essential to ensure a flawless video output in the final stage of design. The facility works additionally to minimize unnecessary production delays, while significantly cutting down on the overall creation cost.
Having a visibility more or less similar to a comic strip, storyboards have a varying scale of design, ranging from being modestly simple to explicitly complex, in cohesion with the specific creation requirements. These visual scripts are mostly hand crafted, through there are a host of storyboard creation software packages and programs available in the IT design market, as well as across the web.
Extending our discussion a bit further, let us have a walk-through of the essential storyboard categories and types in what follows next:
● Traditional Storyboards
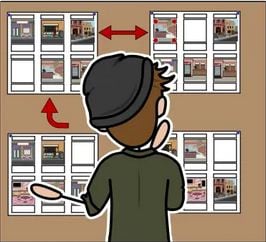
These are a logically placed sequence of hand crafted drawings in ink or pencil for representing the video filming chronology, prior to the start of the actual creation process. You can conveniently observe the sequential arrangement of your video elements through these storyboards by placing them at a suitable space, like your studio wall.
You are granted the liberty to add as much detailing to these drawings as you wish, while using them for filming either a single or a series of film shots. These easily editable storyboards are often supplemented with written text notes for describing the events of a specific scene.

● Thumbnail Storyboards
These are rather small storyboards, mostly of a postage stamp size, that depict a sequence of the video elements and scenes on separate paper pieces. Owing to their miniature size, these storyboards are relatively easier to craft, require a lesser creation time and have much fewer details in comparison to their traditional counterparts.
This category of storyboards comes credible in catering a quick jot down of video creation ideas, before you proceed to analyze each element in a more comprehensive manner through the traditional alternatives.
● Animated Storyboards
This class of storyboards comes into play when you aim to craft complex video outlines, while supplementing the same with additional elements of music and dialogues. These are designed essentially to depict the general scene flow through the characteristics of time and pace in a series of animated sketches.
As of creating these storyboards, there is a diversity of online and software based utilities to address the concern. Such facilities work to integrate the images within a sketch into a single video, while adding life to the footage within a span of several minutes. The creation process is quite simple, without a download or software learning requirement.
01What are the Advantages of Using a Storyboard?
Now that you have developed a fundamental understanding of what is a storyboard, it is of great importance to know the utility is not just limited to crafting a sequential video script. There are a heap of additional merits that come at your disposal when you opt to create an outline for a visual footage with the facility. Discussing along the line, let us have a walk-through of the benefits of working with storyboards in what follows next:
02Merits of Using Storyboards
● Cut Down on Errors and Unnecessary Costs
Encountering mistakes in the video creation process is a rather common incident, but can cause serious and undesired financial implications. While using the storyboard facility does not absolutely guarantee the absence of errors, it can work to potentially reduce the intensity and financial impact involved in fixing the issue. With a little bit of extra effort and employing your creative assets, you can bring down the cumulative video creation cost to a significant level.
● Get a Futuristic Preview of Your Video
When you have crafted a storyboard for a video you are about to create, it becomes quite easy to visualize the sequential flow of the latter’s elements and scenes. This in turn, grants you the liberty to decide on the suitability of particular shots in a close observation. While you can choose to retain the perfect ones, there is a chance to improvise the video pieces that fall short of the credibility mark.
You are additionally facilitated with the scope of crafting a series of storyboards for a specific video creation idea. This allows a comparative analysis of the different film design prospects, so that you can easily pick the best and most cohesive presentation sequence and style with respect to the liking and interest of your target audience.
● Simplify the Video Creation Process
The storyboard utility is advantageous in providing you with a clear and targeted vision to proceed with the video production process. Functioning more like a road map, the utility caters to guide you at every step of creating, styling, customizing and animating your footage. The overall impact of using the facility is an improved working efficiency, surety of following the right direction and saving a lot of precious time.
● Develop an Enhanced Collaboration with Your Creative Team
If you are working with software based storyboarding assets, most of the times you may be facilitated with an option to share and collaborate your work. Apart from being the perfect stage to discuss the different ideas of video production, storyboard collaboration works to extend a cohesive response from your creative team to deliver a high end video production output by having enough to discuss about crafting, improving and styling the footage.
● Bring In Potential Investors
A well-crafted storyboard is a concise and futuristic representation of a video or film creation project that you are planning to take on the floors. You can use these cost effective ideas to put forward the blueprint of your craft, production creativity and vision in front of your targeted project investors.
This will in turn, give you an exact idea of their funding constraints, while simultaneously letting the investors have a deep insight about what to expect in the final production output. What’s best is, you don’t need high end accessories to showcase your art. An normal paper and pencil drawing will work fine.
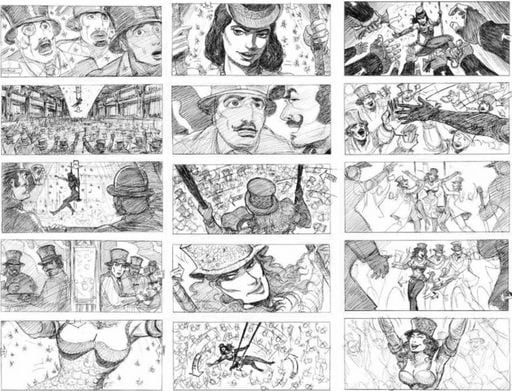
03Great and Rare Storyboard Examples
Walking through the significance and benefits of working with storyboards can be a sufficient motivation to try hands at crafting out your own art pieces with the facility. It is however, always a smart choice to observe and study some actual creation examples to improvise your understanding of the concept to proceed with a greater confidence towards the production process.
Adhering to the concern, here are a few state of the art storyboard creation examples to boost up your familiarity and confidence to work with these video scripts. You can additionally draw out a diversity of ideas and thoughts to use in your project from these examples.
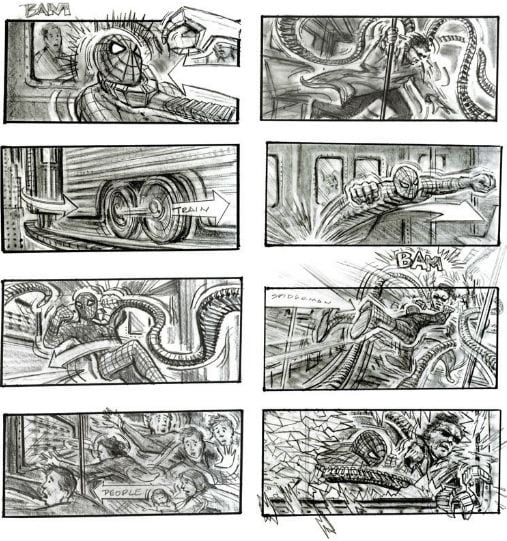
● Spiderman 2 Action Sequence
The following is an animated storyboard example from the classic Spiderman 2 movie released in 2004. The drawing represents a fight sequence between the hero Spiderman and Dr Octopus, his villainous counterpart at the top of a high speed moving train. Being a visually spectacular piece of graphic art, the video script aims to showcase a clear depiction of the moving elements within each of the sequentially arranged shots in a specific direction. This facilitates a concise and exact understanding of the final production output requirement by the video creation team.
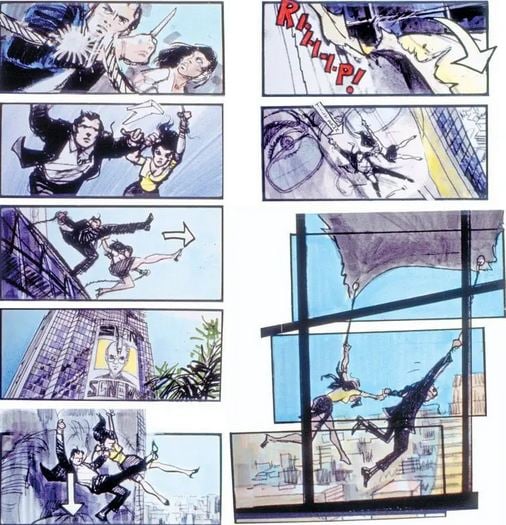
● Tomorrow Never Dies
The following video storyboard aims at depicting an escape sequence from the Tomorrow Never Dies flick, centered on the adventures of James Bond, the epic fictional detective. While the latter is customary to dramatic refuges, this one claims to be an inaugural attempt under a big production banner.
Extending the lineage of the top rated storyboards, this video script also targets the depiction of the pivotal shots to be filmed out. A few of the elements include James Bond attempting to cut through the rope with a gigantic knife, an inversely panned shot of a banner being torn from the center, and the mid-air swinging of James Bond with his lady love.
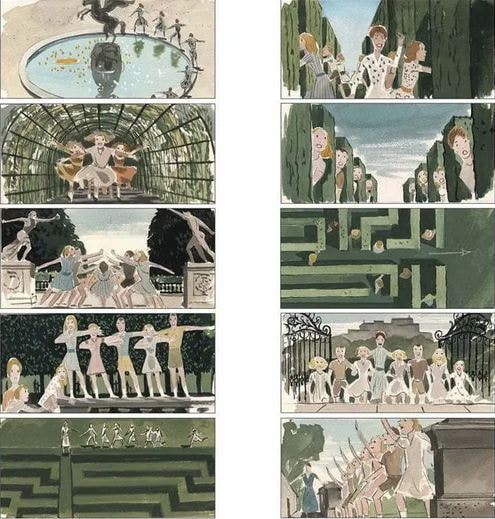
● The Sound of Music
If you are fascinated towards creating musical video and film production, referring the following storyboard can present before you an expansive and impressive set of ideas. This storyboard was essentially crafted by Maurice Zuberano for sketching out the musical and dance sequences of the movie, The Sound of Music. While the aforesaid storyboard bears the closest possible resemblance to the original scene in the film, you can take a look at the same to achieve a notable perfection in video scripting.
Part 2 How to Turn a Script into a Storyboard?
Crafting storyboards for video production is a wise step to avail a series of economic and design centered benefits. While the utility works to define a sequential arrangement of shots and elements in a specific video scene, the real effort lies in converting a text centered movie or scene script into a storyboard. Talking of the ways to address this concern, let us discuss about these storyboard essentials in some detail in what follows next:
What Comes First – Script or Storyboard?
Before beginning to comment on the sequence of the aforesaid elements within a film production process, let us first proceed to have an understanding of the terms in a fundamental sense. A script is essentially a text based document that presents a cumulative picture of the video story by unveiling the latter’s storyline and theme. Storyboards on the other hand, are pictorial representations of sequentially arranged shots of the movie with a much more comprehensive detailing.
Going through the above definitions, the obvious and logical sequence of filming out a video is quite clear with scripts preceding the storyboards. Talking a bit on the credibility aspect of these video production stages, the film’s script caters to provide an elementary insight into some of the most essential visual commands. Crafting a storyboard on the other hand, is dedicated towards depicting a detailed follow through of each shot in line with the events described in the script.
Working towards a classic and professional video production task, hence demands a drafting of the latter’s script, which is then succeeded by crafting a storyboard. This facilitates a seamless and easy video creation process with lesser ambiguities. Having talked enough about scripts and storyboards, let us now move ahead with creating storyboards from a film script in the following section:
User’s Guide to Transform a Script into a Storyboard
Step 1: Identify and Pen Down an Amazing Content Idea
Begin with identifying a captivating story idea that you desire of implementing into a video production.

When you have found one, proceed to jot down the same in relatable and cohesive text to keep a record of the same.

This will help you to structurize the plot of your story and decide the flow of the events occurring within.
Step 2: Let’s Start Storyboarding!
Move ahead to planning the sequential placement of shots and scenes of the story in line with the script that you have just created. It is a great idea to pick an array of 4-6 movement shots for a particular scene, so that you can have a sufficient cell spacing to expand the detailing of shot elements. This further caters to a convenient and spatial arrangement of the cells on a standard sized paper.
You can now start to create your storyboard by adding labels to the scenes, penning down the directions, including the specific character dialogues and suitable images.
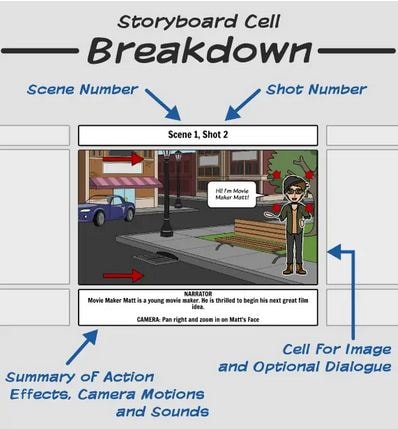
Step 3: Prepare a Layout of Your Storyboards
When you are done with adding all the elements of the script into the storyboard cells, proceed to lay them out in a specific pattern. This step comes quite handy in checking for the continuity and detailing accuracy of the depicted shots. You can further, improvise the elements if needed, or advance to the next step if everything seems fine.
,
Step 4: Revise Your Craft
Being an experienced and professional worker, you may well proceed to start filming your video at this stage. In an otherwise case however, you may need to make a revision of the crafted storyboard for a much more detailed and comprehensive observation. You can work to include an elusive paly of effects, lighting cues, background music and characters, camera motions, and a series of additional elements that seem to uplift your creation.
Paying attention to the aspect or revising your storyboards caters to a much more improvised and professionally sound presentation of your video production idea in front of the target audience. If not so, you can make your roughly crafted storyboard shine on with a little bit of extra and finer detailing, and that is it! Your story is ready to strike the floors!
How Can I Get Better at Storyboarding?
Speaking in the light of film production assets and utilities, storyboarding is more of a creative art rather than a customary process or production stage. While it requires consistent effort and practice to master the craft, adhering to some handy tips and tricks can be of great help to improve your skills at creating expressive and finely detailed storyboards.
Heading towards sorting the aforesaid query, the following section presents a concise description of a few amazing and unique storyboard creation guidelines and tricks to present the storyboarding craft at its best:
● Stop Aiming to Become a Perfectionist
Considering the fact that you are crafting the storyboard just for the purpose of depicting a sequence of video shots, do not aim at defining every element in comprehensive detail. Instead of making a fresh attempt to depict every minor change, pay more attention towards highlighting the significant points of action within a particular scene.
● Prefer Numbering the Storyboard Panels
Since the storyboard you are creating works as a blueprint for the video creation team, it should be convenient to understand and navigate through. Presenting the cells of your storyboard in a numbered sequence tends to provide an easy follow through of the same to the rest of your viewers.
● Explore Your Imagination
Your storyboard happens to be the inaugural representation of your video production idea and script in front of the potential audience. You should hence, proceed with the latter’s crafting process while keeping a close reference with the drafted script. Also, it becomes greatly important to add the imaginative element to your creation to avoid creating an bland and customary impression on the audience.
● Feedback Has a Great Importance
Make sure to showcase your storyboard to your project investors, prior to beginning with the film creation process. This will aid you with an escape from the unnecessary changes that can pop out from the audience at the last minute, leading to an unwanted financial expense. Pay attention to gather and work on the feedback of the viewers and start the actual creation process only after everything seems to be well settled.
● Enjoy Your Work
Enjoying the different aspects of your work is the key to achieve mastery at your craft and a welcoming response from the audience. Accepted that the storyboarding process is mind straining and time consuming, but taking on the challenge with a fun centered attitude will let your hard work shine on in front of the viewers.
Creating Storyboards with Wondershare Filmora
Creating storyboards in the traditional paper and pencil format is undoubtedly an absolute fun activity, but it has the limitations of a customary image drawing. If you want to supplement the contents of your storyboard with additional elements of animations, effects, background themes and music, it would be better to work with storyboard creator software.
Browsing through the heap of alternatives across the web and the IT market, you can conveniently choose to work with the Wondershare Wondershare Filmora Video Editor to address the concern. The obvious reason behind the huge preference ratio of the software is its feature rich library. The editor’s customization space houses a plethora of theme centered storyboard templates, along with extensive diversities of audio-visual effects, filters and elements to adorn your craft with elegance and appropriate detailing at the same time.
For Win 7 or later (64-bit)
For macOS 10.12 or later
Part 3 Storyboard Q&A
● How can the storyboard creation process be quickly addressed?
When aiming to quickly address the concern of creating storyboards, picking up an online template is a better option in comparison to the traditional pencil and paper drawing. As of working with the web based alternatives, you can add sketches, scripts and notes within the storyboard cells to make them more impressive and detailed.
● What should be the ideal expanse of a storyboard?
There is no hard and fast rule to decide the optimum number of cells or pages for your storyboard. The page count may have variations in line with the content and detailing of the scenes they are crafted to showcase.
● Is it essential to include every shot within the storyboard?
On a general note, every shot within your script does not require an inclusion within the storyboard. The answer to this query however, largely depends on the intensity of detailing you wish to add and the diversity of ideas and elements you want to incorporate within the storyboard of a specific film scene.
● What are the essentials of a good storyboard?
When attempting to create a good storyboard, pay attention to the fluent transition of the text centered ideas into pictorial representations. Your video script should possess the right quantity of information to make anyone easily understand the content depiction without having a prior walk-through of your script. Abstain from creating an information overflow either, lest you would end up hiding away the relevant details.
● What are the major parts of a storyboard?
A well-crafted storyboard comprises of 4 important elements. There are namely, the subject of the shot or scene, a suitable and cohesive background, a properly angled camera shot of the main character within the scene and a responsive camera movement.
● Ending Thoughts →
● Storyboards are considered as crucial elements of the video customization process with the domain of professional film production.
● When turning your text based script into a storyboard, pay enough heed towards assuring a seamless transition of words into relevant images.
● If you are concerned about choosing a reliable software alternative to work with crafting storyboards, you can end your search by picking the Wondershare Filmora editor program.
In this article
01 [The Fundamentals to Get You Started on Storyboard](#Part 1)
02 [How to Turn a Script into a Storyboard?](#Part 2)
03 [Storyboard Q&A](#Part 3)
Part 1 The Fundamentals to Get You Started on Storyboard
Speaking in the light of blooming your creative skills and abilities, the realm of graphic and video editing has managed to unleash a never ending and dimensionless canvas to experiment with your skills. Talking of the most recent add-ons to the already long list of utilities, storyboards have emerged as a revolution in the field of motion graphic customization and design.
Diving a bit deeper into understanding the credibility of storyboards, let us move ahead with having an insight of different aspects and elements of the same in the upcoming sections of this article:
What is a Storyboard?
Attempting to define a storyboard, you can regard the utility as a sequential setup of sketches, images, elements and illustrations that create a road map to address a video editing task. Dividing the entire process into a series of individual processes, the aforesaid facility caters to ease out the video creation task.
Moving ahead to draft a technical explanation of storyboards, they are a collection of chronologically arranged drawings, supplemented with video customization elements, such as dialogues, camera direction and other allied detailing. The fundamental merit of these visual arrangements lies in the sequential and scene unfolding of a video footage.
This in turn, works to simplify the film creation process, while ensuring the latter’s cohesiveness and facilitating the elimination of errors and inconsistencies. It is a common mistake to regard storyboards as a midway and optional utility, these trial and error representations are quite essential to ensure a flawless video output in the final stage of design. The facility works additionally to minimize unnecessary production delays, while significantly cutting down on the overall creation cost.
Having a visibility more or less similar to a comic strip, storyboards have a varying scale of design, ranging from being modestly simple to explicitly complex, in cohesion with the specific creation requirements. These visual scripts are mostly hand crafted, through there are a host of storyboard creation software packages and programs available in the IT design market, as well as across the web.
Extending our discussion a bit further, let us have a walk-through of the essential storyboard categories and types in what follows next:
● Traditional Storyboards
These are a logically placed sequence of hand crafted drawings in ink or pencil for representing the video filming chronology, prior to the start of the actual creation process. You can conveniently observe the sequential arrangement of your video elements through these storyboards by placing them at a suitable space, like your studio wall.
You are granted the liberty to add as much detailing to these drawings as you wish, while using them for filming either a single or a series of film shots. These easily editable storyboards are often supplemented with written text notes for describing the events of a specific scene.
● Thumbnail Storyboards
These are rather small storyboards, mostly of a postage stamp size, that depict a sequence of the video elements and scenes on separate paper pieces. Owing to their miniature size, these storyboards are relatively easier to craft, require a lesser creation time and have much fewer details in comparison to their traditional counterparts.
This category of storyboards comes credible in catering a quick jot down of video creation ideas, before you proceed to analyze each element in a more comprehensive manner through the traditional alternatives.
● Animated Storyboards
This class of storyboards comes into play when you aim to craft complex video outlines, while supplementing the same with additional elements of music and dialogues. These are designed essentially to depict the general scene flow through the characteristics of time and pace in a series of animated sketches.
As of creating these storyboards, there is a diversity of online and software based utilities to address the concern. Such facilities work to integrate the images within a sketch into a single video, while adding life to the footage within a span of several minutes. The creation process is quite simple, without a download or software learning requirement.
01What are the Advantages of Using a Storyboard?
Now that you have developed a fundamental understanding of what is a storyboard, it is of great importance to know the utility is not just limited to crafting a sequential video script. There are a heap of additional merits that come at your disposal when you opt to create an outline for a visual footage with the facility. Discussing along the line, let us have a walk-through of the benefits of working with storyboards in what follows next:
02Merits of Using Storyboards
● Cut Down on Errors and Unnecessary Costs
Encountering mistakes in the video creation process is a rather common incident, but can cause serious and undesired financial implications. While using the storyboard facility does not absolutely guarantee the absence of errors, it can work to potentially reduce the intensity and financial impact involved in fixing the issue. With a little bit of extra effort and employing your creative assets, you can bring down the cumulative video creation cost to a significant level.
● Get a Futuristic Preview of Your Video
When you have crafted a storyboard for a video you are about to create, it becomes quite easy to visualize the sequential flow of the latter’s elements and scenes. This in turn, grants you the liberty to decide on the suitability of particular shots in a close observation. While you can choose to retain the perfect ones, there is a chance to improvise the video pieces that fall short of the credibility mark.
You are additionally facilitated with the scope of crafting a series of storyboards for a specific video creation idea. This allows a comparative analysis of the different film design prospects, so that you can easily pick the best and most cohesive presentation sequence and style with respect to the liking and interest of your target audience.
● Simplify the Video Creation Process
The storyboard utility is advantageous in providing you with a clear and targeted vision to proceed with the video production process. Functioning more like a road map, the utility caters to guide you at every step of creating, styling, customizing and animating your footage. The overall impact of using the facility is an improved working efficiency, surety of following the right direction and saving a lot of precious time.
● Develop an Enhanced Collaboration with Your Creative Team
If you are working with software based storyboarding assets, most of the times you may be facilitated with an option to share and collaborate your work. Apart from being the perfect stage to discuss the different ideas of video production, storyboard collaboration works to extend a cohesive response from your creative team to deliver a high end video production output by having enough to discuss about crafting, improving and styling the footage.
● Bring In Potential Investors
A well-crafted storyboard is a concise and futuristic representation of a video or film creation project that you are planning to take on the floors. You can use these cost effective ideas to put forward the blueprint of your craft, production creativity and vision in front of your targeted project investors.
This will in turn, give you an exact idea of their funding constraints, while simultaneously letting the investors have a deep insight about what to expect in the final production output. What’s best is, you don’t need high end accessories to showcase your art. An normal paper and pencil drawing will work fine.
03Great and Rare Storyboard Examples
Walking through the significance and benefits of working with storyboards can be a sufficient motivation to try hands at crafting out your own art pieces with the facility. It is however, always a smart choice to observe and study some actual creation examples to improvise your understanding of the concept to proceed with a greater confidence towards the production process.
Adhering to the concern, here are a few state of the art storyboard creation examples to boost up your familiarity and confidence to work with these video scripts. You can additionally draw out a diversity of ideas and thoughts to use in your project from these examples.
● Spiderman 2 Action Sequence
The following is an animated storyboard example from the classic Spiderman 2 movie released in 2004. The drawing represents a fight sequence between the hero Spiderman and Dr Octopus, his villainous counterpart at the top of a high speed moving train. Being a visually spectacular piece of graphic art, the video script aims to showcase a clear depiction of the moving elements within each of the sequentially arranged shots in a specific direction. This facilitates a concise and exact understanding of the final production output requirement by the video creation team.
● Tomorrow Never Dies
The following video storyboard aims at depicting an escape sequence from the Tomorrow Never Dies flick, centered on the adventures of James Bond, the epic fictional detective. While the latter is customary to dramatic refuges, this one claims to be an inaugural attempt under a big production banner.
Extending the lineage of the top rated storyboards, this video script also targets the depiction of the pivotal shots to be filmed out. A few of the elements include James Bond attempting to cut through the rope with a gigantic knife, an inversely panned shot of a banner being torn from the center, and the mid-air swinging of James Bond with his lady love.
● The Sound of Music
If you are fascinated towards creating musical video and film production, referring the following storyboard can present before you an expansive and impressive set of ideas. This storyboard was essentially crafted by Maurice Zuberano for sketching out the musical and dance sequences of the movie, The Sound of Music. While the aforesaid storyboard bears the closest possible resemblance to the original scene in the film, you can take a look at the same to achieve a notable perfection in video scripting.
Part 2 How to Turn a Script into a Storyboard?
Crafting storyboards for video production is a wise step to avail a series of economic and design centered benefits. While the utility works to define a sequential arrangement of shots and elements in a specific video scene, the real effort lies in converting a text centered movie or scene script into a storyboard. Talking of the ways to address this concern, let us discuss about these storyboard essentials in some detail in what follows next:
What Comes First – Script or Storyboard?
Before beginning to comment on the sequence of the aforesaid elements within a film production process, let us first proceed to have an understanding of the terms in a fundamental sense. A script is essentially a text based document that presents a cumulative picture of the video story by unveiling the latter’s storyline and theme. Storyboards on the other hand, are pictorial representations of sequentially arranged shots of the movie with a much more comprehensive detailing.
Going through the above definitions, the obvious and logical sequence of filming out a video is quite clear with scripts preceding the storyboards. Talking a bit on the credibility aspect of these video production stages, the film’s script caters to provide an elementary insight into some of the most essential visual commands. Crafting a storyboard on the other hand, is dedicated towards depicting a detailed follow through of each shot in line with the events described in the script.
Working towards a classic and professional video production task, hence demands a drafting of the latter’s script, which is then succeeded by crafting a storyboard. This facilitates a seamless and easy video creation process with lesser ambiguities. Having talked enough about scripts and storyboards, let us now move ahead with creating storyboards from a film script in the following section:
User’s Guide to Transform a Script into a Storyboard
Step 1: Identify and Pen Down an Amazing Content Idea
Begin with identifying a captivating story idea that you desire of implementing into a video production.
When you have found one, proceed to jot down the same in relatable and cohesive text to keep a record of the same.
This will help you to structurize the plot of your story and decide the flow of the events occurring within.
Step 2: Let’s Start Storyboarding!
Move ahead to planning the sequential placement of shots and scenes of the story in line with the script that you have just created. It is a great idea to pick an array of 4-6 movement shots for a particular scene, so that you can have a sufficient cell spacing to expand the detailing of shot elements. This further caters to a convenient and spatial arrangement of the cells on a standard sized paper.
You can now start to create your storyboard by adding labels to the scenes, penning down the directions, including the specific character dialogues and suitable images.
Step 3: Prepare a Layout of Your Storyboards
When you are done with adding all the elements of the script into the storyboard cells, proceed to lay them out in a specific pattern. This step comes quite handy in checking for the continuity and detailing accuracy of the depicted shots. You can further, improvise the elements if needed, or advance to the next step if everything seems fine.
,
Step 4: Revise Your Craft
Being an experienced and professional worker, you may well proceed to start filming your video at this stage. In an otherwise case however, you may need to make a revision of the crafted storyboard for a much more detailed and comprehensive observation. You can work to include an elusive paly of effects, lighting cues, background music and characters, camera motions, and a series of additional elements that seem to uplift your creation.
Paying attention to the aspect or revising your storyboards caters to a much more improvised and professionally sound presentation of your video production idea in front of the target audience. If not so, you can make your roughly crafted storyboard shine on with a little bit of extra and finer detailing, and that is it! Your story is ready to strike the floors!
How Can I Get Better at Storyboarding?
Speaking in the light of film production assets and utilities, storyboarding is more of a creative art rather than a customary process or production stage. While it requires consistent effort and practice to master the craft, adhering to some handy tips and tricks can be of great help to improve your skills at creating expressive and finely detailed storyboards.
Heading towards sorting the aforesaid query, the following section presents a concise description of a few amazing and unique storyboard creation guidelines and tricks to present the storyboarding craft at its best:
● Stop Aiming to Become a Perfectionist
Considering the fact that you are crafting the storyboard just for the purpose of depicting a sequence of video shots, do not aim at defining every element in comprehensive detail. Instead of making a fresh attempt to depict every minor change, pay more attention towards highlighting the significant points of action within a particular scene.
● Prefer Numbering the Storyboard Panels
Since the storyboard you are creating works as a blueprint for the video creation team, it should be convenient to understand and navigate through. Presenting the cells of your storyboard in a numbered sequence tends to provide an easy follow through of the same to the rest of your viewers.
● Explore Your Imagination
Your storyboard happens to be the inaugural representation of your video production idea and script in front of the potential audience. You should hence, proceed with the latter’s crafting process while keeping a close reference with the drafted script. Also, it becomes greatly important to add the imaginative element to your creation to avoid creating an bland and customary impression on the audience.
● Feedback Has a Great Importance
Make sure to showcase your storyboard to your project investors, prior to beginning with the film creation process. This will aid you with an escape from the unnecessary changes that can pop out from the audience at the last minute, leading to an unwanted financial expense. Pay attention to gather and work on the feedback of the viewers and start the actual creation process only after everything seems to be well settled.
● Enjoy Your Work
Enjoying the different aspects of your work is the key to achieve mastery at your craft and a welcoming response from the audience. Accepted that the storyboarding process is mind straining and time consuming, but taking on the challenge with a fun centered attitude will let your hard work shine on in front of the viewers.
Creating Storyboards with Wondershare Filmora
Creating storyboards in the traditional paper and pencil format is undoubtedly an absolute fun activity, but it has the limitations of a customary image drawing. If you want to supplement the contents of your storyboard with additional elements of animations, effects, background themes and music, it would be better to work with storyboard creator software.
Browsing through the heap of alternatives across the web and the IT market, you can conveniently choose to work with the Wondershare Wondershare Filmora Video Editor to address the concern. The obvious reason behind the huge preference ratio of the software is its feature rich library. The editor’s customization space houses a plethora of theme centered storyboard templates, along with extensive diversities of audio-visual effects, filters and elements to adorn your craft with elegance and appropriate detailing at the same time.
For Win 7 or later (64-bit)
For macOS 10.12 or later
Part 3 Storyboard Q&A
● How can the storyboard creation process be quickly addressed?
When aiming to quickly address the concern of creating storyboards, picking up an online template is a better option in comparison to the traditional pencil and paper drawing. As of working with the web based alternatives, you can add sketches, scripts and notes within the storyboard cells to make them more impressive and detailed.
● What should be the ideal expanse of a storyboard?
There is no hard and fast rule to decide the optimum number of cells or pages for your storyboard. The page count may have variations in line with the content and detailing of the scenes they are crafted to showcase.
● Is it essential to include every shot within the storyboard?
On a general note, every shot within your script does not require an inclusion within the storyboard. The answer to this query however, largely depends on the intensity of detailing you wish to add and the diversity of ideas and elements you want to incorporate within the storyboard of a specific film scene.
● What are the essentials of a good storyboard?
When attempting to create a good storyboard, pay attention to the fluent transition of the text centered ideas into pictorial representations. Your video script should possess the right quantity of information to make anyone easily understand the content depiction without having a prior walk-through of your script. Abstain from creating an information overflow either, lest you would end up hiding away the relevant details.
● What are the major parts of a storyboard?
A well-crafted storyboard comprises of 4 important elements. There are namely, the subject of the shot or scene, a suitable and cohesive background, a properly angled camera shot of the main character within the scene and a responsive camera movement.
● Ending Thoughts →
● Storyboards are considered as crucial elements of the video customization process with the domain of professional film production.
● When turning your text based script into a storyboard, pay enough heed towards assuring a seamless transition of words into relevant images.
● If you are concerned about choosing a reliable software alternative to work with crafting storyboards, you can end your search by picking the Wondershare Filmora editor program.
Also read:
- Tips That Show Anybody How To Make Youtube Slideshow – Guaranteed for 2024
- Updated 2024 Approved Discover the Best Video Frame Rate Converters for Smooth Playback, Including Online and Offline Options. Learn How to Convert Frame Rates for Free and Elevate Your Video Quality with These Top 8 Tools
- New In 2024, Do You Want to Create Slow-Motion Videos? This Article Shows Methods to Create Slow-Mo Videos without Changing the Medias Quality
- Updated Do You Want to Know How to Add LUTs to Premiere Pro? In This Guide, You Will Find Details and Easy Steps to Proceed with Using LUTs in Premiere Pro for 2024
- Updated 2024 Approved Want to Make a Fun and Cinematic Video with an Introductory Text Title? Learn the Stages of Editing with Filmora for This Effect Here
- VLC Media Player How to Merge Audio and Video Like a Pro for 2024
- In 2024, Using This Article as a Reference, the Users Would Create a Café Meal Intro and YouTube End Screen While Knowing Multiple Ways to Download Cooking Background Music
- In 2024, How to Create a Freeze Frame Sequence Effect
- New Do You Know You Can Add LUTs for Cinematic Color Grading on Your Smartphones? With VN Editor You Can, You Can Add LUTs. Choose the Option VN LUTs Free Download
- New In 2024, Hyperlapse VS Timelapse Videos
- 2024 Approved 6 Instant Ways to Create Windows 10 Slideshow
- Updated 2024 Approved A Detailed Guide to Do Color Correction in OBS
- Updated 3 In-Camera Transitions Tricks To Make Videos Like a Pro
- Updated 2024 Approved This Article Will Show You How to Make a Tattoo Disappear on Your Body Magically
- Updated 2024 Approved 10 Best Free Spanish Text To Speech Converter Software Windows, Mac, Android, iPhone, & Online
- 5 Tried-And-True Methods to GIF Making for 2024
- Updated How to Use Motion Tracking in Video Editing for 2024
- New How to Speed Up and Slow Down a Video
- Updated In 2024, Top 10 Secret Tips & Tricks to Use in Wondershare Filmora
- New 2024 Approved Easily Combine Videos and Audios with 5 Simple Online Tools
- Updated Have You Ever Created a Slow Motion Video on Your Phonr or Camera? This Article Will Show You some Knowledge About Slow Motion Photography for 2024
- New How to Download and Use Vegas Pro for 2024
- 2024 Approved How to Add Subtitles to MKV Videos on All Platforms
- How To Make Ninja Jump Effect with Filmora
- Updated In 2024, Best Green Screen Software for Beginner on Mac
- New Top 10 Old Film Overlays to Make Your Videos Look Vintage
- In 2024, For Artists Who Are Making Videos for Show Their Knowledge or Projects, Add some Effects for the Video Can Always Provoke Interests and Attention. This Article Will Show You How to Do that Easily
- New Time Lapse Video Is Very Interesting and Creative, Which Usually Attracts More Attention. This Article Will Show You How to Make a Time Lapse Video with Adobe After Effects
- In 2024, While Emojis Have High End Credibility Towards Different Media Utilities, People Also Ask About Ways and Methods to Add Emoji to iPhone. Be Here to Get the Easiest Solutions to the Query
- New 2024 Approved You Might Have Difficulty Rotating a Video without an Efficient Media Player or Editing Tool. Below Is a Detailed Guide on Rotating a Video on Any Axes
- Do You Want to Create Slow-Motion Videos? This Article Shows Methods to Create Slow-Mo Videos without Changing the Medias Quality
- New Record Slow Motion Videos With Phantom Slow-Mo Camera
- How to Make a Slow Motion Video Complete Guide
- Updated Mastering Video Speed Control Slow Down, Speed Up, and Edit with Ease
- SBV to SRT How to Convert YouTube SBV Subtitle to SRT Format
- How to Create a Makeup Video
- Updated Motion Blur Photo With GIMP Step-By-Step Guide for 2024
- New Video Inspiration for Birthday Slideshow for 2024
- New Ideas That Will Help You Out in Making Transparent Image for 2024
- Step-by-Step Guide to Speed Up and Slow Down a Video for 2024
- Updated Learn How to Make Interactive and Fun Video Collages Using Kapwing Collage Maker, an Easy-to-Use Tool for All Your Collage-Making Needs for 2024
- Have You Ever Used the Path Blur Effect in Your Photos? This Article Will Address How to Use Path Blur in Photoshop to Generate Appealing Results Accurately
- In 2024, Lets Create a New Premiere Pro Project, Import some Video, and Control Video Playback Speed. Also, Find Alternative Software (WonderShare Filmora) to Control Playback Speed in Minutes
- New In 2024, 10 Best Audio Visualizers Windows, Mac, Android, iPhone & Online
- Track Mattes The Ultimate Guide For After Effects
- Top 10 3D Slideshow Software Review for 2024
- iPogo will be the new iSpoofer On Poco C51? | Dr.fone
- How to Show Wi-Fi Password on Nubia Red Magic 8S Pro+
- How to Bypass FRP from Oppo Reno 11 Pro 5G?
- 3 Ways to Track Samsung Galaxy M54 5G without Them Knowing | Dr.fone
- The Best iSpoofer Alternative to Try On Vivo Y36 | Dr.fone
- In 2024, Apple iPhone 7 Plus Backup Password Never Set But Still Asking? Heres the Fix
- How to retrieve erased music from Google Pixel 8
- 11 Ways to Fix it When My Vivo S17t Wont Charge | Dr.fone
- In 2024, The Ultimate Guide to Vivo G2 Pattern Lock Screen Everything You Need to Know
- In 2024, How Can I Create My Pokemon Overworld Maps On Apple iPhone 13 Pro Max? | Dr.fone
- How to Unlock a Network Locked Itel P55+ Phone?
- In 2024, Hassle-Free Ways to Remove FRP Lock on Vivo X100 Pro Phones with/without a PC
- Getting the Pokemon Go GPS Signal Not Found 11 Error in Vivo S17e | Dr.fone
- Undelete lost call logs from Lava Yuva 3 Pro
- 6 Methods for Switching from Apple iPhone X to Samsung | Dr.fone
- How to Bypass iPhone 12 Pro Passcode Easily Video Inside
- Top 4 SIM Location Trackers To Easily Find Your Lost Nubia Device
- In 2024, How to Mirror Your Lava Agni 2 5G Screen to PC with Chromecast | Dr.fone
- Complete Guide For iPhone XS Max Lock Screen
- Updated In 2024, What Is an AI Text Generator? | Wondershare Virbo Glossary
- How to Hide/Fake Snapchat Location on Your Vivo Y100A | Dr.fone
- In 2024, Full Guide to Catch 100 IV Pokémon Using a Map On Tecno Spark 20C | Dr.fone
- In 2024, How to Unlock Apple iPhone 12 mini with a Mask On | Dr.fone
- Best Ways on How to Unlock/Bypass/Swipe/Remove Honor X9b Fingerprint Lock
- In 2024, Finest Text-to-Speech Male Voice Tools for Natural Output
- Solutions to restore deleted files from Tecno Spark 10C
- Title: Updated 2024 Approved How to Make Strobe Light Text Effect?
- Author: Morgan
- Created at : 2024-04-24 01:06:20
- Updated at : 2024-04-25 01:06:20
- Link: https://ai-video-editing.techidaily.com/updated-2024-approved-how-to-make-strobe-light-text-effect/
- License: This work is licensed under CC BY-NC-SA 4.0.
