
:max_bytes(150000):strip_icc():format(webp)/the-17-best-graphic-design-software-2024-1dd6c15b34124b25b65e4b096e4e6ba4.jpg)
Updated 2024 Approved How to Merge Audio and Video Using FFmpeg
How to Merge Audio and Video Using FFmpeg
Welcome to the world of video production! Whether you’re a beginner or an experienced video creator, one of the most important skills to master is merging audio and video seamlessly. In this article, we’ll focus on FFmpeg, a powerful command-line tool that can help you easily merge audio and video.
FFmpeg is open-source software that allows you to convert, edit, and stream multimedia files. It’s widely used by professionals and enthusiasts and has many capabilities, including merging audio and video files. This guide will walk you through merging audio and video using FFmpeg. So, whether you’re creating a YouTube video, a podcast, or a movie, you’ll have the skills to make it sound and look great.

Preparation
Are you ready to master the art of merging audio and video? Then let’s dive into the world of FFmpeg, a powerful and versatile tool that can help you achieve professional results.
With FFmpeg, you can record, convert, and stream audio and video files in any format, making it a complete and cross-platform solution. It’s also a great tool for decoding, encoding, transcoding, muxing, demuxing, streaming, filtering, and playing any media type.
But before we start merging video files using FFmpeg, it’s important to understand the basics of container formats and video codecs. These are the building blocks of your videos, and the specific types you’re working with will determine the method you’ll use to merge them. So, buckle up, and let’s get started!
How To Combine Video With Two Audio Using FFmpeg
Are you looking to add multiple audio tracks to your video? With FFmpeg, you can easily combine video with two audio streams. Whether creating a foreign-language version of your video or adding an alternate audio track, this method will help you achieve professional results. This section will guide you through combining video with two audio streams using FFmpeg’s command-line interface. So, let’s get started!
Mixing Two Audios Into a Video
Combining multiple audio tracks into one video can be done easily with FFmpeg’s command-line interface. In this example, we will combine two audio tracks into one video so that the voiceover will play over the background music. Here’s the step-by-step process:
Step1 Open your command prompt or terminal and navigate to the directory where your video and audio files are located.
Step2 Replace “video1.mp4“ and “audio1.mp3“ with the names of your actual video and audio files.
ffmpeg \
-i video1.mp4 -i audio1.mp3 \
Step3 The -c:v copy flag tells FFmpeg to copy the video stream from the source file without re-encoding it. This helps to speed up the process and avoid quality loss.
-c:v copy \
-filter_complex “ \
Step4 The command “amix=inputs=2:duration=longest“ tells amix to accept 2 inputs (0:a and 1:a) and combine them into an output stream called audio_out, with the duration of the longest input.
[0:a][1:a] amix=inputs=2:duration=longest [audio_out] \
Step5 Map the video stream (0:v) and the mixed audio stream (audio_out) into the final output video.
-map 0:v -map “[audio_out]“ \
Step6 The -y flag tells FFmpeg to overwrite the output file if it already exists.
-y output.mp4
Once complete, you’ll find the newly created video file with the mixed audio in the specified output location.
Mixing Two Audios Into a Video Adjusting Volume
We will be taking a step further and show you how to merge two audio tracks into a video while adjusting the volume of one of the audio tracks. This can be useful when you want to emphasize one audio track over the other, for example, to make the voiceover more prominent in a video.
And here’s the step-by-step process:
Step1 Start the command by specifying the input files.
ffmpeg \
-i video1.mp4 -i audio1.mp3 \
Step2 Use the filter_complex option to specify a filter graph.
-filter_complex “ \
[0:a] volume=0.5 [music];
Step3 Use the amix filter to take the “music“ stream and audio1.mp3 and mix them.
[music][1:a] amix=inputs=2:duration=longest [audio_out] \
“ \
Step4 Use the map option to specify which streams from the input files should be included in the output file.
-map 0:v -map “[audio_out]“ \
Step5 Specify the output file name as “output.mp4“ and the -y flag to overwrite the output file without asking for confirmation if it already exists.
-y output.mp4
Mixing Two Audios Into a Video With Delay
When creating videos, sometimes the audio needs to be synced with the video, or you want to add a delay to the audio track. Here’s how to add delay to an audio track using FFmpeg.
Step1 Use the adelay filter to add delay to the audio track.
[1:a] adelay=2100|2100 [voice];
Step2 Mix the delayed audio track with the original audio track
[0:a][voice] amix=inputs=2:duration=longest [audio_out]
Step3 Map the video and audio tracks to the output file
-map 0:v -map “[audio_out]“
Step4 Use the -y flag to overwrite the output file
-y output.mp4
The final command would look like this:
ffmpeg \
-i video1.mp4 -i audio1.mp3 \
-filter_complex “ \
[1:a] adelay=2100|2100 [voice]; \
[0:a][voice] amix=inputs=2:duration=longest [audio_out] \
“ \
-map 0:v -map “[audio_out]“ \
-y output.mp4
This command will delay the audio track by 2100 milliseconds and then mix it with the original audio track, resulting in a new video file with the delayed audio.
It May Interest You - Merge Audio and Video Files With Filmora
While FFmpeg is a powerful tool for merging audio and video files, its learning curve can be steep for some users. If you’re looking for an easier option, you may consider using video editing software like Filmora.
What Is Filmora?
Wondershare Filmora is a video editing software that allows users to create professional-looking videos easily. It offers a user-friendly interface, making it an excellent option for those needing a more extensive video editing experience.
Free Download For Win 7 or later(64-bit)
Free Download For macOS 10.14 or later
This software offers an intuitive interface and a wide range of features that make it easy to merge audio and video files, even for beginners. In addition, Filmora provides various options for editing and enhancing the audio and video files, giving you more control over the final output. Filmora is a great alternative to FFmpeg for those who want to merge audio and video files quickly and easily.
How To Combine Audio and Video Files Using Filmora
Filmora is a user-friendly video editing software that allows you to easily combine audio and video files to create a polished and professional final product. So here’s the step-by-step process of combining audio and video files using Filmora.
Step1 Import audio and video files into Filmora using drag-and-drop or the “Import Media“ button.

Step2 Place the media files in the timeline and align the video with the audio.

Step3 Replace the original audio by right-clicking the video, selecting “Detach Audio,” deleting the original audio, and replacing it with new audio.

Step4 Export the final video by selecting a format and clicking “Export,” or publish directly to YouTube or burn to DVD.

People Also Ask
Here are some frequently asked questions regarding the merging function of FFmpeg and other related topics:
Q1. How To Merge Image and Video in FFmpeg?
To merge an image and a video using FFmpeg, first, use the -loop option on the image to loop it for the duration of the video, then use the overlay filter to overlay the image on the video. The command would look like this:
ffmpeg -i video.mp4 -i image.jpg -filter_complex “[0:v][1:v] overlay=0:0” -pix_fmt yuv420p -c:a copy output.mp4
This command takes the input video and image, applies the overlay filter to overlay the image on the video starting at the top left corner (0:0), and outputs the result to output.mp4. The -pix_fmt yuv420p and -c:a copy options ensure compatibility with most devices.
Q2. Can I Merge 2 MP4 Files Into 1?
Yes, you can merge two MP4 files into one using Filmora. To do this, follow these steps:
Step1 Open Filmora and import the video files
Step2 Drag the videos to the timeline
Step3 Align the second video with the first without leaving any gaps
Step4 Click “Export“ and select desired settings
Step5 Click “Export“ again to save the combined video on your computer.
Q3. How Can I Merge the Video and Subtitle?
To merge video and subtitle in Filmora, follow these steps:
Step1 Open Filmora and import your SRT subtitle file.
Step2 Place the SRT file on the timeline and right-click on it. Select “Advanced Edit“ from the options.
Step3 Adjust the subtitle’s time code, text, color, font, and other settings. When finished, choose “Export Subtitle file“ to save the changes.
Still want to learn more tricks about adding subtitles to your video? Check out the video below:
Conclusion
Using FFmpeg and Filmora, you can easily combine video with audio, merge multiple video files, and add subtitles to your videos. Both tools offer different features and learning curves, so it’s important to understand what you need before choosing one. Filmora is a great option for beginners and those who want a user-friendly interface, while FFmpeg is a powerful command-line tool for advanced users.
- “-i INPUT_FILE.mp4“ flag specifies INPUT_FILE.mp4 as the input source.
- “-i AUDIO.wav,” tells FFmpeg to take AUDIO.wav as an input source.
- The “-c:v copy“ flag is a short form of “-codec:v copy,” which means to copy the video stream from the source files to the destination file.
- The “-c:a aac“ flag means selecting all the audio streams from the source files and then encoding them with the AAC encoder.
- “mp4“ specifies the name of the output file.
Step3 In case you don’t want any audio conversion, drop the aac part in the command and replace it with copy; the command would look like this:
ffmpeg -i INPUT_FILE.mp4 -i AUDIO.aac -c:v copy -c:a copy OUTPUT_FILE.mp4
-->
How To Combine Video With Two Audio Using FFmpeg
Are you looking to add multiple audio tracks to your video? With FFmpeg, you can easily combine video with two audio streams. Whether creating a foreign-language version of your video or adding an alternate audio track, this method will help you achieve professional results. This section will guide you through combining video with two audio streams using FFmpeg’s command-line interface. So, let’s get started!
Mixing Two Audios Into a Video
Combining multiple audio tracks into one video can be done easily with FFmpeg’s command-line interface. In this example, we will combine two audio tracks into one video so that the voiceover will play over the background music. Here’s the step-by-step process:
Step1 Open your command prompt or terminal and navigate to the directory where your video and audio files are located.
Step2 Replace “video1.mp4“ and “audio1.mp3“ with the names of your actual video and audio files.
ffmpeg \
-i video1.mp4 -i audio1.mp3 \
Step3 The -c:v copy flag tells FFmpeg to copy the video stream from the source file without re-encoding it. This helps to speed up the process and avoid quality loss.
-c:v copy \
-filter_complex “ \
Step4 The command “amix=inputs=2:duration=longest“ tells amix to accept 2 inputs (0:a and 1:a) and combine them into an output stream called audio_out, with the duration of the longest input.
[0:a][1:a] amix=inputs=2:duration=longest [audio_out] \
Step5 Map the video stream (0:v) and the mixed audio stream (audio_out) into the final output video.
-map 0:v -map “[audio_out]“ \
Step6 The -y flag tells FFmpeg to overwrite the output file if it already exists.
-y output.mp4
Once complete, you’ll find the newly created video file with the mixed audio in the specified output location.
Mixing Two Audios Into a Video Adjusting Volume
We will be taking a step further and show you how to merge two audio tracks into a video while adjusting the volume of one of the audio tracks. This can be useful when you want to emphasize one audio track over the other, for example, to make the voiceover more prominent in a video.
And here’s the step-by-step process:
Step1 Start the command by specifying the input files.
ffmpeg \
-i video1.mp4 -i audio1.mp3 \
Step2 Use the filter_complex option to specify a filter graph.
-filter_complex “ \
[0:a] volume=0.5 [music];
Step3 Use the amix filter to take the “music“ stream and audio1.mp3 and mix them.
[music][1:a] amix=inputs=2:duration=longest [audio_out] \
“ \
Step4 Use the map option to specify which streams from the input files should be included in the output file.
-map 0:v -map “[audio_out]“ \
Step5 Specify the output file name as “output.mp4“ and the -y flag to overwrite the output file without asking for confirmation if it already exists.
-y output.mp4
Mixing Two Audios Into a Video With Delay
When creating videos, sometimes the audio needs to be synced with the video, or you want to add a delay to the audio track. Here’s how to add delay to an audio track using FFmpeg.
Step1 Use the adelay filter to add delay to the audio track.
[1:a] adelay=2100|2100 [voice];
Step2 Mix the delayed audio track with the original audio track
[0:a][voice] amix=inputs=2:duration=longest [audio_out]
Step3 Map the video and audio tracks to the output file
-map 0:v -map “[audio_out]“
Step4 Use the -y flag to overwrite the output file
-y output.mp4
The final command would look like this:
ffmpeg \
-i video1.mp4 -i audio1.mp3 \
-filter_complex “ \
[1:a] adelay=2100|2100 [voice]; \
[0:a][voice] amix=inputs=2:duration=longest [audio_out] \
“ \
-map 0:v -map “[audio_out]“ \
-y output.mp4
This command will delay the audio track by 2100 milliseconds and then mix it with the original audio track, resulting in a new video file with the delayed audio.
It May Interest You - Merge Audio and Video Files With Filmora
While FFmpeg is a powerful tool for merging audio and video files, its learning curve can be steep for some users. If you’re looking for an easier option, you may consider using video editing software like Filmora.
What Is Filmora?
Wondershare Filmora is a video editing software that allows users to create professional-looking videos easily. It offers a user-friendly interface, making it an excellent option for those needing a more extensive video editing experience.
Free Download For Win 7 or later(64-bit)
Free Download For macOS 10.14 or later
This software offers an intuitive interface and a wide range of features that make it easy to merge audio and video files, even for beginners. In addition, Filmora provides various options for editing and enhancing the audio and video files, giving you more control over the final output. Filmora is a great alternative to FFmpeg for those who want to merge audio and video files quickly and easily.
How To Combine Audio and Video Files Using Filmora
Filmora is a user-friendly video editing software that allows you to easily combine audio and video files to create a polished and professional final product. So here’s the step-by-step process of combining audio and video files using Filmora.
Step1 Import audio and video files into Filmora using drag-and-drop or the “Import Media“ button.
Step2 Place the media files in the timeline and align the video with the audio.
Step3 Replace the original audio by right-clicking the video, selecting “Detach Audio,” deleting the original audio, and replacing it with new audio.
Step4 Export the final video by selecting a format and clicking “Export,” or publish directly to YouTube or burn to DVD.
People Also Ask
Here are some frequently asked questions regarding the merging function of FFmpeg and other related topics:
Q1. How To Merge Image and Video in FFmpeg?
To merge an image and a video using FFmpeg, first, use the -loop option on the image to loop it for the duration of the video, then use the overlay filter to overlay the image on the video. The command would look like this:
ffmpeg -i video.mp4 -i image.jpg -filter_complex “[0:v][1:v] overlay=0:0” -pix_fmt yuv420p -c:a copy output.mp4
This command takes the input video and image, applies the overlay filter to overlay the image on the video starting at the top left corner (0:0), and outputs the result to output.mp4. The -pix_fmt yuv420p and -c:a copy options ensure compatibility with most devices.
Q2. Can I Merge 2 MP4 Files Into 1?
Yes, you can merge two MP4 files into one using Filmora. To do this, follow these steps:
Step1 Open Filmora and import the video files
Step2 Drag the videos to the timeline
Step3 Align the second video with the first without leaving any gaps
Step4 Click “Export“ and select desired settings
Step5 Click “Export“ again to save the combined video on your computer.
Q3. How Can I Merge the Video and Subtitle?
To merge video and subtitle in Filmora, follow these steps:
Step1 Open Filmora and import your SRT subtitle file.
Step2 Place the SRT file on the timeline and right-click on it. Select “Advanced Edit“ from the options.
Step3 Adjust the subtitle’s time code, text, color, font, and other settings. When finished, choose “Export Subtitle file“ to save the changes.
Still want to learn more tricks about adding subtitles to your video? Check out the video below:
Conclusion
Using FFmpeg and Filmora, you can easily combine video with audio, merge multiple video files, and add subtitles to your videos. Both tools offer different features and learning curves, so it’s important to understand what you need before choosing one. Filmora is a great option for beginners and those who want a user-friendly interface, while FFmpeg is a powerful command-line tool for advanced users.
How to Zoom Picture in Picture [Easy Solution]
Zoom is one of the greatest options on the market for video conferencing. It doesn’t matter whether you use it at home or in an office environment; it will quickly link the team members. One of the most popular video conferencing programs is Zoom. When in-person meetings aren’t feasible, it enables you to communicate electronically with employees, and it’s been a major popularity for social occasions as well. In case you’re not acquainted, picture-in-picture mode enables you to watch videos from one app while using your PC normally. The movie will keep playing in a tiny thumbnail window so that two applications may work simultaneously on your smartphone.
You may create virtual audio and video conferences, webinars, live chats, screen sharing, and other collaboration tools with Zoom, a cloud-based video communications solution. Zoom’s most recent iPhone apps let you dismiss a Zoom Meeting while keeping the Zoom video call open in a picture-in-picture mode. To join a Zoom conference, you don’t need an account, and because the software works with Mac, Windows, Linux, iOS, and Android devices, nearly anybody can use it. Since using Zoom’s picture-in-picture mode is the same as using it with other applications, you shouldn’t have any trouble if you often use PiP mode. Here are the top 4 methods you can refer to picture in picture in Zoom.
Method 1: Swap Shared Screen with Video
You may move the Zoom Meeting PiP window across the screen, change the thumbnail’s size, and utilize other applications while it remains open, just like any other picture-in-picture window. Before leaving the meeting if you’re not giving a presentation or speaking, you should definitely mute Zoom on your iPhone to prevent noises from your typing or other activities from entering the conversation. Additionally, keep in mind to switch off the camera if you’re engaged in something distracting, at least for the duration of your activity. To reopen the Zoom Meeting and go back to the Zoom app, touch the Picture-in-Picture mode pane. Here are some actions to keep in mind:
Steps to Swap Shared Screen for Zoom Picture in Picture
Step1Launch or enter a Zoom meeting. Keep the video on your main screen at all times, closing the chat and participant list as necessary.
Step2Tap the Home button or swipe up from the bottom of the screen.
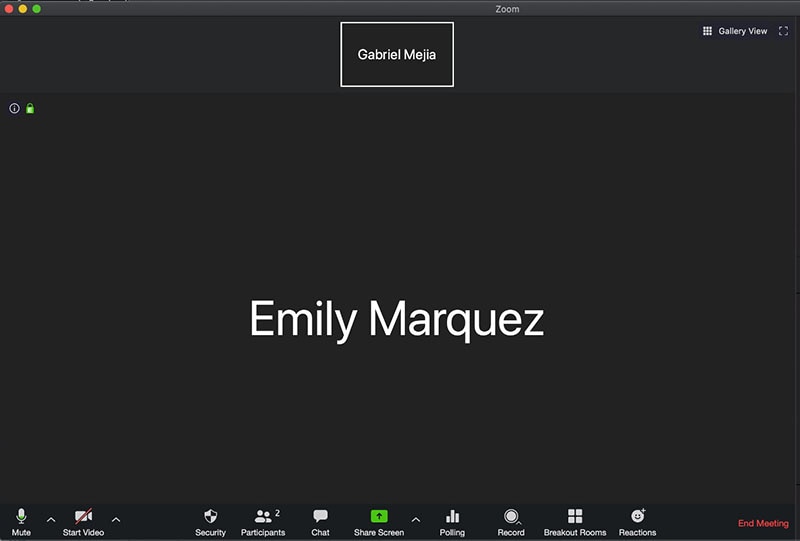
Step3Picture-in-picture mode should be activated automatically throughout the meeting.
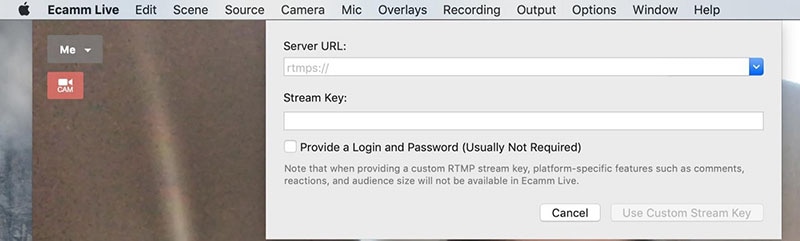
Method 2: Use Ecamm Live
Live streaming is a fantastic way to provide original content and stand out from the crowd. To prevent any operational difficulties, a more sophisticated virtual camera is absolutely necessary. You now have magical abilities thanks to Ecamm virtual cam, including the ability to add text, animations, observe a live stream, post viewer comments, play music, share your screen, use sound effects, and many more. It offers the Ecamm live virtual camera zoom function for video conferences so you may improve your Zoom discussions by sending output to other PC programs. You could see a quality difference between what you view in Ecamm Live and what your Zoom visitors see while utilizing virtual camera with Zoom. The quality of a Zoom video stream cannot be improved using Ecamm Live. Simply broadcast the Zoom app using Ecamm Live’s Screen Share mode to utilize Ecamm Live for picture-in-picture virtual presentations on Zoom.
Steps to Use Ecamm Live for Zoom Picture in Picture
Step1Download the Ecamm Application
Install Ecamm Live on your computer, then choose the center button in the source switcher at the top of the main window to enter Screen Share mode.
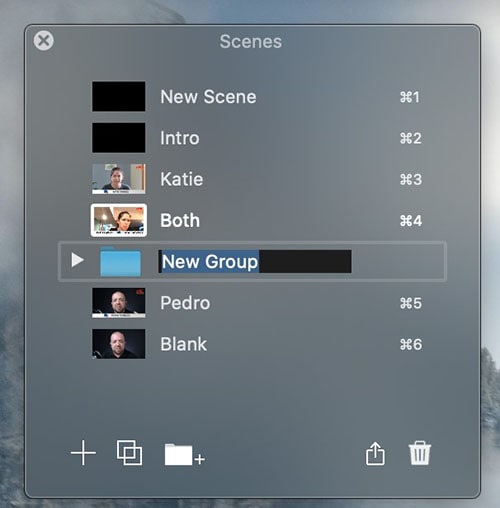
Step2Create Scenes
With the use of Ecamm Live’s Virtual Camera and Virtual Mic capabilities, you may transfer Ecamm Live’s output to almost any other Mac software, including Zoom. After setting, create the scenes in the program to quickly switch between various cameras.
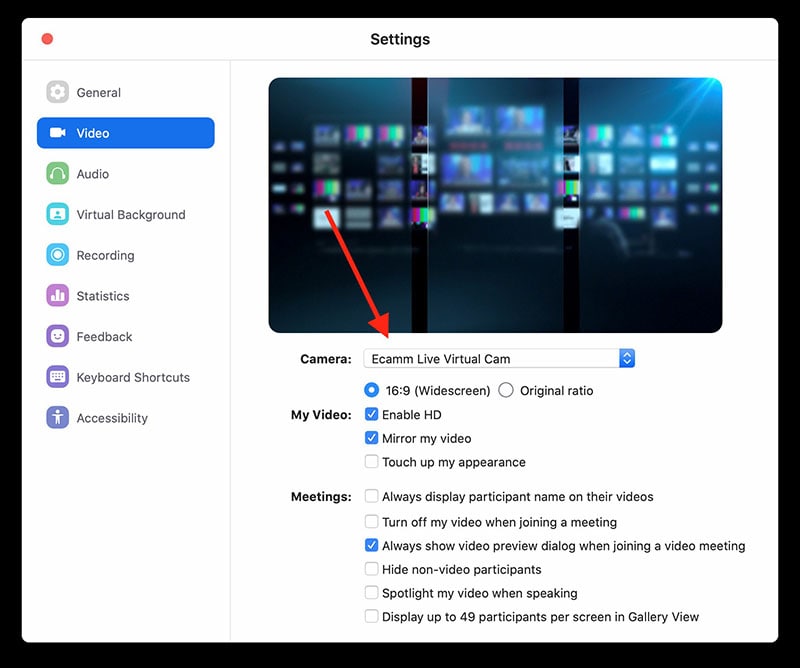
Step3Select Ecamm on Zoom
You may also utilize Ecamm Live’s Sharing Window capability to feed Ecamm Live output into Zoom. Simply activate the virtual camera, and then, as seen below, choose Ecamm Live Virtual Camera in Zoom’s video settings:
Step4Begin Your Presentation
Finally, click the PC share option to show your Zoom app to your audience. To conceal a picture-in-picture window that displays your camera image while live streaming, click the PIP button.
Method 3: Use Filmora as A Switcher
Zoom has solutions that will make your meetings simple and secure. It gives your remote staff a secure setting to interact and share crucial information. Ideal control over your film and configuration options to make them aesthetically pleasing is something Zoom lacks. To overcome the drawbacks and improve the quality of your online meetings, you may take use of the capabilities of Zoom in conjunction with Filmora. Filmora was developed with the intention of easing user burden and supporting applications. Though complicated, the program is simple to use. The perhaps most popular web information that may be saved on your computer can be easily captured by just angling your screen. For more information on how to record and save your Zoom for picture in picture, see the guide here.
To broadcast a variety of situations in a grid style, you may also combine inputs from your camera, microphone, computer screen, and web conferencing software. Wondershare -the finest desktop application for recording a Zoom Picture in Picture meeting- is Filmora. With the majority of cameras, this app’s screen recording capability is both user-friendly and feature-rich. Here, users may either choose a particular region to record or record their zoom meetings in Fullscreen mode. Additionally, you may choose the camera and input microphone that will be used while recording a video overlay. The addition of relevant comments like phrases, lines, drawings, symbols, etc. is also possible by users. The detailed procedure for recording a Zoom Picture-in-Picture meeting using a Filmora recorder is given below:
Free Download For Win 7 or later(64-bit)
Free Download For macOS 10.14 or later
Step1Download and Install Filmora Zoom Recorder
You may find both types, i.e., the most recent Windows and Mac versions, by first visiting the usual website and then using this Zoom. Install the program on your computer once you download it to get started.

Step2Initiate Filmora Recorder
After finishing the installation process for this Reside Zoom recorder, launch it from the main menus and choose “New Task” when prompted. It will take you to Filmora’s streamlined user interface where you can immediately start filming. Then, as seen in the picture below, you may adjust the screen recording using your preferred camera, microphone, and system settings:

Step3Begin/End the Recording
When you are through configuring this Zoom picture in picture recorder, click the Record button, and it will immediately begin recording your customized screen. Similar to that, after you’re done recording, click Stop, which will take you inside the video editor where you may edit your recorded information.

Step4Share Recordings
When you have everything ready, export your recording right away. After you’re done with the editing part, you do have a lot of options to choose from when displaying your screen capture and webcam stories. To do so, click the Export button in the item user interface’s top-right corner as shown below:
You may easily choose your preferred way to share from there if you choose to upload your work of zoom picture in picture recordings straight to the YouTube or other reputable websites right now. Simply refer to the Sharing plug-ins in the Export window to find out more.
Method 4: Use Hardware Switcher ATEM Mini Pro
Particularly on Zoom, the ATEM Mini is excellent for video conferences. The Blackmagic ATEM Mini is a USB video interface and HDMI switcher. Four HDMI inputs, or four cameras that can produce an HDMI video stream, may be switched between live. This device integrates Zoom meetings fast and makes it incredibly simple to set up your audio, a sometimes-forgotten aspect of video broadcasting. This sophisticated video switcher promises to offer broadcast-quality multi-camera footage with ease and is targeted at gamers, streamers, and online reviewers. It connects to a computer via a USB-C to USB-A connection. The video feed may then be sent to distant colleagues via a number of well-liked videos streaming services, including Zoom.
Step1The ATEM Mini Pro is a basic control switcher with pro-broadcast performance. Your ATEM Mini Pro is really simple to set up. You can connect a full setup with several cameras and microphones in around 30 minutes.
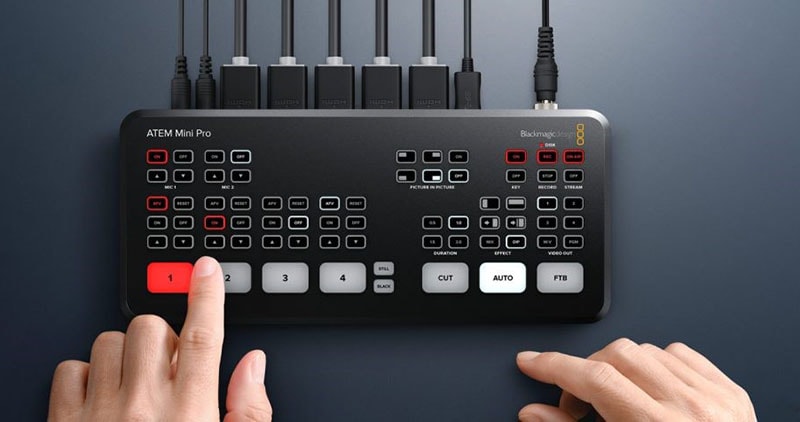
Step2You may connect several camera sources to the inputs of the ATEM Mini Pro. The 4 HDMI inputs each have a separate standards converter built in. As a result, the ATEM Mini can automatically convert inputs that are 1080p, 1080i, or 720p to the switcher’s video standard. You may make quick changes between inputs with no latency or disruption to your video output by using the ergonomic buttons.
Step3As a third option, Zoom offers ATEM Mini, which enables you to switch between several inputs, add custom visuals, and adjust audio levels all from a single interface. To improve the quality of your production, you may even use smooth transitions like wipes or fades. You can even test any input stream before making it live.
Conclusion
When you are doing a Zoom Meeting and share your screen, only to discover that what the other attendees see is a split screen with your material and the other Attendee cams, it is highly annoying. You may move the Zoom Meeting PiP window across the screen, change the thumbnail’s size, and utilize other applications while it remains open, just like any other picture-in-picture window. Someone must be sharing information in the Zoom conference for the Picture in Picture, or “Split Screen” option, to be active. We’ve listed the top techniques for doing it effectively above. To do this work without difficulty, use them as your guide.
Free Download For macOS 10.14 or later
Step1Download and Install Filmora Zoom Recorder
You may find both types, i.e., the most recent Windows and Mac versions, by first visiting the usual website and then using this Zoom. Install the program on your computer once you download it to get started.
Step2Initiate Filmora Recorder
After finishing the installation process for this Reside Zoom recorder, launch it from the main menus and choose “New Task” when prompted. It will take you to Filmora’s streamlined user interface where you can immediately start filming. Then, as seen in the picture below, you may adjust the screen recording using your preferred camera, microphone, and system settings:
Step3Begin/End the Recording
When you are through configuring this Zoom picture in picture recorder, click the Record button, and it will immediately begin recording your customized screen. Similar to that, after you’re done recording, click Stop, which will take you inside the video editor where you may edit your recorded information.
Step4Share Recordings
When you have everything ready, export your recording right away. After you’re done with the editing part, you do have a lot of options to choose from when displaying your screen capture and webcam stories. To do so, click the Export button in the item user interface’s top-right corner as shown below:
You may easily choose your preferred way to share from there if you choose to upload your work of zoom picture in picture recordings straight to the YouTube or other reputable websites right now. Simply refer to the Sharing plug-ins in the Export window to find out more.
Method 4: Use Hardware Switcher ATEM Mini Pro
Particularly on Zoom, the ATEM Mini is excellent for video conferences. The Blackmagic ATEM Mini is a USB video interface and HDMI switcher. Four HDMI inputs, or four cameras that can produce an HDMI video stream, may be switched between live. This device integrates Zoom meetings fast and makes it incredibly simple to set up your audio, a sometimes-forgotten aspect of video broadcasting. This sophisticated video switcher promises to offer broadcast-quality multi-camera footage with ease and is targeted at gamers, streamers, and online reviewers. It connects to a computer via a USB-C to USB-A connection. The video feed may then be sent to distant colleagues via a number of well-liked videos streaming services, including Zoom.
Step1The ATEM Mini Pro is a basic control switcher with pro-broadcast performance. Your ATEM Mini Pro is really simple to set up. You can connect a full setup with several cameras and microphones in around 30 minutes.
Step2You may connect several camera sources to the inputs of the ATEM Mini Pro. The 4 HDMI inputs each have a separate standards converter built in. As a result, the ATEM Mini can automatically convert inputs that are 1080p, 1080i, or 720p to the switcher’s video standard. You may make quick changes between inputs with no latency or disruption to your video output by using the ergonomic buttons.
Step3As a third option, Zoom offers ATEM Mini, which enables you to switch between several inputs, add custom visuals, and adjust audio levels all from a single interface. To improve the quality of your production, you may even use smooth transitions like wipes or fades. You can even test any input stream before making it live.
Conclusion
When you are doing a Zoom Meeting and share your screen, only to discover that what the other attendees see is a split screen with your material and the other Attendee cams, it is highly annoying. You may move the Zoom Meeting PiP window across the screen, change the thumbnail’s size, and utilize other applications while it remains open, just like any other picture-in-picture window. Someone must be sharing information in the Zoom conference for the Picture in Picture, or “Split Screen” option, to be active. We’ve listed the top techniques for doing it effectively above. To do this work without difficulty, use them as your guide.
Detailed Guide to Rotate Videos in Blender
Blender is a 3D animation software that can be used to create stunning 3D models and videos. It is free and open source, which means that it is available to anyone who wants to use it. Blender is also very versatile, and can be used to create anything from simple 3D models to full-blown 3D movies.
One of the biggest benefits of Blender is that it is easy to learn. The interface is intuitive and user-friendly, and there are plenty of tutorials available online that can help you get started. Blender also has a very active community, so if you ever get stuck, there is likely someone out there who can help you. It is a complex software, but there are many online tutorials like this article that can help you get started.
To download Blender, go to https://www.blender.org/download/ . Click on the link that says “Download Blender” and then select the version that you want to download. After you have downloaded Blender, install it on your computer.
Step-by-Step on how to rotate videos in Blender
The first way to rotate a video in Blender is by using the Strip option.
Step 1: To do this, open the video that you want to rotate in Blender.

Step 2: Then, click on the “Strip” menu and select “Transform.”

Step 3: In the Transform Properties window, you will see a list of different tools for the video. Scroll down until you see the “Rotation” property. This is where you can manually rotate the video.

Step 4: Click on Enter to save the rotation of the video.
The second way to rotate a video in Blender is by using the Transform Properties window. To do this…
Step 1: Open the video that you want to rotate in Blender.

Step 2: Next, go to ‘Transform’ in the Active Tool portion of the screen.
Figure 5
Step 3: Go to the ‘Transform’ option in the properties window and adjust based on the rotational angle that you want.

Step 4: Click on ‘Enter’ to apply it to the video.
In this tutorial, we have shown you two different ways to rotate a video in Blender. The first way is by using the Transform Properties window, and the second way is by using the 3D Viewport.
Which method you use is up to you. However, we recommend using the 3D Viewport method, as it is more accurate.
Rotating a video in Blender can be used for other purposes than just rotating it.
Here are some other things that you can do with a rotated video:
- Scale the video up or down
- Flip the video horizontally or vertically
- Change the position of the video in the 3D Viewport
How to rotate videos in Filmora
Meanwhile, you can also use Filmora Video Editor to rotate a video without any watermark. Filmora is a video editing software that lets you rotate videos easily. It is simple to use, and has many powerful features that let you edit your videos like a pro. It also has a built-in video converter that lets you convert your videos to different formats, so they can be played on any device. You can also export your videos in 4K resolution, so they look great no matter what device you are watching them on.
For Win 7 or later (64-bit)
For macOS 10.14 or later
There are two main ways to rotate video in Filmora: through the use of keyframes or by using the Transform Tool.
Step-by-step on how to rotate videos in Filmora
To rotate a video clip using keyframes…
Step 1: Import the video clip you want to rotate to your project.

Step 2: In the timeline, place the playhead at the beginning of the clip.

Step 3: With the playhead still at the beginning of the clip, drag the rotation handle in the preview window to rotate the video.

Step 4: Move the playhead to the end of the clip and drag the rotation handle again to rotate it further.

To rotate a video clip using the Transform Tool…
Select the “Edit” tool from the toolbar.

Go to the “Transform” selection, then select the rotate option.

Adjust the rotation angle using the tool.

Both methods are fairly straightforward and easy to use. Experiment with each to see which works best for your project.
Step 2: Then, click on the “Strip” menu and select “Transform.”
Step 3: In the Transform Properties window, you will see a list of different tools for the video. Scroll down until you see the “Rotation” property. This is where you can manually rotate the video.
Step 4: Click on Enter to save the rotation of the video.
The second way to rotate a video in Blender is by using the Transform Properties window. To do this…
Step 1: Open the video that you want to rotate in Blender.
Step 2: Next, go to ‘Transform’ in the Active Tool portion of the screen.
Figure 5
Step 3: Go to the ‘Transform’ option in the properties window and adjust based on the rotational angle that you want.
Step 4: Click on ‘Enter’ to apply it to the video.
In this tutorial, we have shown you two different ways to rotate a video in Blender. The first way is by using the Transform Properties window, and the second way is by using the 3D Viewport.
Which method you use is up to you. However, we recommend using the 3D Viewport method, as it is more accurate.
Rotating a video in Blender can be used for other purposes than just rotating it.
Here are some other things that you can do with a rotated video:
- Scale the video up or down
- Flip the video horizontally or vertically
- Change the position of the video in the 3D Viewport
How to rotate videos in Filmora
Meanwhile, you can also use Filmora Video Editor to rotate a video without any watermark. Filmora is a video editing software that lets you rotate videos easily. It is simple to use, and has many powerful features that let you edit your videos like a pro. It also has a built-in video converter that lets you convert your videos to different formats, so they can be played on any device. You can also export your videos in 4K resolution, so they look great no matter what device you are watching them on.
For Win 7 or later (64-bit)
For macOS 10.14 or later
There are two main ways to rotate video in Filmora: through the use of keyframes or by using the Transform Tool.
Step-by-step on how to rotate videos in Filmora
To rotate a video clip using keyframes…
Step 1: Import the video clip you want to rotate to your project.
Step 2: In the timeline, place the playhead at the beginning of the clip.
Step 3: With the playhead still at the beginning of the clip, drag the rotation handle in the preview window to rotate the video.
Step 4: Move the playhead to the end of the clip and drag the rotation handle again to rotate it further.
To rotate a video clip using the Transform Tool…
Select the “Edit” tool from the toolbar.
Go to the “Transform” selection, then select the rotate option.
Adjust the rotation angle using the tool.
Both methods are fairly straightforward and easy to use. Experiment with each to see which works best for your project.
How to Color Grade Your Picture in LightRoom
Create High-Quality Video - Wondershare Filmora
An easy and powerful YouTube video editor
Numerous video and audio effects to choose from
Detailed tutorials are provided by the official channel
Every budding photographer knows what Photoshop is Adobe Lightroom (officially Adobe Photoshop Lightroom) is the newer and more advanced version of Photoshop. Compared with other alternatives of Lightroom , Lightroom helps photographers import, modify, manipulate, find, organize, and manage their images as an image editing software. Lightroom combines photo management and photo editing in one.
One of the most amazing things about Lightroom is its autosave or nondestructive feature. Once you edit your photos, Lightroom instantly saves and stores them in your Lightroom catalog. With its inbuilt-presets, Lightroom makes working on your project so much easy and fun.
You can leverage Lightroom’s unique features to perform different types of tasks. However, in this article, you’ll learn color grading in Lightroom and how to make it work.
In this article
03 How To Color Grade Your Picture in LightRoom
What Is Color Grading?
Color grading is one of the essential processes for creating the perfect video and image content. Like with color correction, color grading helps enhance the appearance of your image or video and makes it appealing to viewers. However, unlike color correction, it focuses on creating stylistic or cinematic effects rather than rectifying mistakes in the image.
Color grading enhances an already edited or otherwise perfect image or video. So, in color grading, you are not trying to balance out colors or make your pictures look natural to the human eyes. Color correction does all that. Instead, with color grading, you aim to “paint over” a color-corrected content to evoke specific emotions or moods in the viewers.
Colors carry different emotions or visual tones. So, they’re essential in the post-production process to manipulate viewers into specific moods that tell your story best. In other words, color grading aligns your viewer’s emotions to the central theme in your story.

For example, if your image or video’s theme is passion, power, violence, or danger, red portrays them perfectly. Meanwhile, blue does it when you wish to evoke calmness and melancholy in your viewers.
Other examples include:
- pink for beauty, innocence, and femininity,
- Green for nature, darkness, and corruption
- Purple for fantasies, and the mystical
- Yellow for obsession, sickness, and naivety
- Orange for warmth, friendliness, youth, and happiness
Have you noticed that turning your pictures black and white makes them look timeless? That’s color grading in action.
Color Grading in LightRoom
Are you amazed by the thrilling power of color grading to manipulate viewers’ emotions? Are you wondering how you can achieve that effect seamlessly? Then, you don’t need to worry about it. With Adobe Photoshop Lightroom, you too can make magic.
Since Lightroom is an advanced photo editor, it has a lot to offer in features. Unfortunately, this may also mean that it can be complex to understand, especially if you’re new to photo editing. So, first things first, you must understand the color grading panel in Lightroom to appreciate it better.
Lightroom’s color grading panel is right beneath the HSL panel in the Develop Panel. It serves as a replacement for the Split Toning Panel from earlier versions, so it’s pretty easy to find.
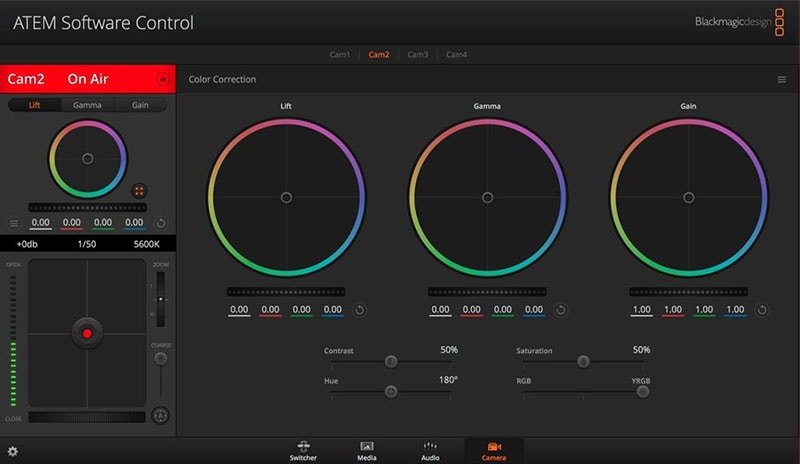
The color grading panel comprises five small icons, three color wheels, and a blending/balance slider:
● The Five Small Icons
Lightroom’s small icons are a 3-way default layout, shadows, mid-tones, highlights, and global. With 3-way, you can manipulate the highlights, shadows, and mid-tones. Mid-tones, highlights, and shadows hide all color wheels, excluding the necessary ones that adjust them.
Meanwhile, Global combines and blends the highlights, mid-tones, and shadow adjustments no matter the luminosity. Global ensures that the color wheels work harmoniously.
When adjusting icons, it’s best to use each color wheel one after another one. You’ll get better and more precise outcomes that way compared to using them together.
● Lightroom’s Color Wheels
You can view Lightroom’s three-color wheels through the 3-way default layout. The color wheels help to enhance distinct image parts by providing various color hues. It also allows you to introduce saturation through an adjustable knob.
Each lightroom’s color wheels feature a luminance slide beneath them that adjusts color brightness. Between the luminance slide and the wheel is a visible eye icon that you can use to turn the effects on or off.
● The Blending and Balance Slider
The blending and balance sliders offer you advanced control over how your colors look after introducing them. With the blending slider, you can control the color distinctiveness between highlights and shadows. In other words, this feature helps to merge colors to produce a much more balanced and beautiful result.
The balance slider adjusts altered mid-tones, highlights, and shadows to balance the effects. By default, the slider is set at 0 in the middle and allows you to move it in opposite directions for distinct effects. For example, you can use this tool to balance shadows with over-concentrated colors.
While the above features are visible to everyone in the 3-way view, there are two more hidden sliders. You may only view them when editing highlights, shadows, mid-tones, or the global color wheels. They’re the hue and saturation sliders that you can only uncover by clicking on the arrow below the eye icon.
There’s no idea why the hue and saturation sliders aren’t visible in the 3-way view. That’s especially when you discover that they do the all-important job of making minor but precise changes to final adjustments. This produces an excellent fine-tuned outcome and gives your image a professional finish.

How To Color Grade Your Picture in LightRoom
If you wish to use the color grading Lightroom tool to enhance photos, here’s a comprehensive guide for you. You’ll learn the best practices to apply when using the specific Lightroom features to produce your desired effects:
● Pick Your Color Scheme
What’s color grading without the right colors? Choosing an appropriate color scheme is one of the essential steps in Lightroom color grading. That’s because it sets the tone for the next steps. If you choose the wrong colors, you won’t get the excellent result you desire no matter how hard you try.
First, take a good look at your picture and its visible colors. Then think of the colors that compliment or contrast with them. For example, you should base images with red highlights around red. You can also try colors close to red in the color wheel, like orange.
Once you’ve found the colors that suit your image, you’re ready for the next steps in your color grading process. However, more than just adding colors, you must also pay attention to contrasting colors during processing. If you find such unwanted colors, use the HSL panel to pale them out.
● Prioritize Precision
In earlier paragraphs, you learned that working with the highlights, shadows, and mid-tones individually is best. That’s because individual adjustments are a painstaking process that guarantees the most accurate results. This makes a lot of difference in the final product compared to when you work with the wheel.
Working on the shadows, highlights, and mid-tones individually also connects to the hue and saturation sliders. So you remember how vital these hidden sliders are? You wouldn’t be able to access them by working on the tools one after another. Take that as your reward for being detail-oriented.
● Increase Saturation Values
Sometimes, the effect of one tool tells on another. For example, leaving your saturation values below may render your hue slider ineffective. To avoid that confusion, it’s best to increase your saturation levels to some values higher than your preferred one.
Yes, it wouldn’t look nice initially as you adjust the hue. However, it will ensure that you get the perfect color for your image. You can always go back to adjust the saturation to your choice values later on.
● Use Color Wheels To Find Color, Use Shadows to Refine
When discussing how to choose your color scheme, you must have understood how vital the color wheel is in finding harmonious hues. However, picking your preferred color isn’t the complete process. You must learn to fine-tune your chosen color by using the hue slider. Do this after adjusting the saturation to your preferred level as in the previous step. The result is always mind-blowing.

● Learn the Short Cuts
There are some shortcuts to learn when color grading in Lightroom to enhance accuracy and convenience. For example, option (Mac)/Alt (Windows) gives you better control over your image’s outcomes. Option/Alt + Up will increase saturation by one while the shift key adjusts it. You can use Command (Mac)/Ctrl (Windows) to adjust the hue. Also, the reset button on the right side of your panel takes you back to your initial image.
● Extra Tips
These best practices will help you to achieve excellent results:
- Don’t color grade without understanding the psychology of colors. Know what colors convey different moods or emotions.
- Be sure to work with high-quality pictures. Color grading isn’t magic; it wouldn’t correct an already lousy image.
- Shooting your pictures in RAW gives you more color control.
Conclusion
● Now that you’ve learned how to color grade using Lightroom, there’s no limit to what you can achieve. You can now explore your creative side with so much fun. However, know that you will likely not get it right the first time. Perfection comes with consistent practice or trial and error.
Every budding photographer knows what Photoshop is Adobe Lightroom (officially Adobe Photoshop Lightroom) is the newer and more advanced version of Photoshop. Compared with other alternatives of Lightroom , Lightroom helps photographers import, modify, manipulate, find, organize, and manage their images as an image editing software. Lightroom combines photo management and photo editing in one.
One of the most amazing things about Lightroom is its autosave or nondestructive feature. Once you edit your photos, Lightroom instantly saves and stores them in your Lightroom catalog. With its inbuilt-presets, Lightroom makes working on your project so much easy and fun.
You can leverage Lightroom’s unique features to perform different types of tasks. However, in this article, you’ll learn color grading in Lightroom and how to make it work.
In this article
03 How To Color Grade Your Picture in LightRoom
What Is Color Grading?
Color grading is one of the essential processes for creating the perfect video and image content. Like with color correction, color grading helps enhance the appearance of your image or video and makes it appealing to viewers. However, unlike color correction, it focuses on creating stylistic or cinematic effects rather than rectifying mistakes in the image.
Color grading enhances an already edited or otherwise perfect image or video. So, in color grading, you are not trying to balance out colors or make your pictures look natural to the human eyes. Color correction does all that. Instead, with color grading, you aim to “paint over” a color-corrected content to evoke specific emotions or moods in the viewers.
Colors carry different emotions or visual tones. So, they’re essential in the post-production process to manipulate viewers into specific moods that tell your story best. In other words, color grading aligns your viewer’s emotions to the central theme in your story.
For example, if your image or video’s theme is passion, power, violence, or danger, red portrays them perfectly. Meanwhile, blue does it when you wish to evoke calmness and melancholy in your viewers.
Other examples include:
- pink for beauty, innocence, and femininity,
- Green for nature, darkness, and corruption
- Purple for fantasies, and the mystical
- Yellow for obsession, sickness, and naivety
- Orange for warmth, friendliness, youth, and happiness
Have you noticed that turning your pictures black and white makes them look timeless? That’s color grading in action.
Color Grading in LightRoom
Are you amazed by the thrilling power of color grading to manipulate viewers’ emotions? Are you wondering how you can achieve that effect seamlessly? Then, you don’t need to worry about it. With Adobe Photoshop Lightroom, you too can make magic.
Since Lightroom is an advanced photo editor, it has a lot to offer in features. Unfortunately, this may also mean that it can be complex to understand, especially if you’re new to photo editing. So, first things first, you must understand the color grading panel in Lightroom to appreciate it better.
Lightroom’s color grading panel is right beneath the HSL panel in the Develop Panel. It serves as a replacement for the Split Toning Panel from earlier versions, so it’s pretty easy to find.
The color grading panel comprises five small icons, three color wheels, and a blending/balance slider:
● The Five Small Icons
Lightroom’s small icons are a 3-way default layout, shadows, mid-tones, highlights, and global. With 3-way, you can manipulate the highlights, shadows, and mid-tones. Mid-tones, highlights, and shadows hide all color wheels, excluding the necessary ones that adjust them.
Meanwhile, Global combines and blends the highlights, mid-tones, and shadow adjustments no matter the luminosity. Global ensures that the color wheels work harmoniously.
When adjusting icons, it’s best to use each color wheel one after another one. You’ll get better and more precise outcomes that way compared to using them together.
● Lightroom’s Color Wheels
You can view Lightroom’s three-color wheels through the 3-way default layout. The color wheels help to enhance distinct image parts by providing various color hues. It also allows you to introduce saturation through an adjustable knob.
Each lightroom’s color wheels feature a luminance slide beneath them that adjusts color brightness. Between the luminance slide and the wheel is a visible eye icon that you can use to turn the effects on or off.
● The Blending and Balance Slider
The blending and balance sliders offer you advanced control over how your colors look after introducing them. With the blending slider, you can control the color distinctiveness between highlights and shadows. In other words, this feature helps to merge colors to produce a much more balanced and beautiful result.
The balance slider adjusts altered mid-tones, highlights, and shadows to balance the effects. By default, the slider is set at 0 in the middle and allows you to move it in opposite directions for distinct effects. For example, you can use this tool to balance shadows with over-concentrated colors.
While the above features are visible to everyone in the 3-way view, there are two more hidden sliders. You may only view them when editing highlights, shadows, mid-tones, or the global color wheels. They’re the hue and saturation sliders that you can only uncover by clicking on the arrow below the eye icon.
There’s no idea why the hue and saturation sliders aren’t visible in the 3-way view. That’s especially when you discover that they do the all-important job of making minor but precise changes to final adjustments. This produces an excellent fine-tuned outcome and gives your image a professional finish.
How To Color Grade Your Picture in LightRoom
If you wish to use the color grading Lightroom tool to enhance photos, here’s a comprehensive guide for you. You’ll learn the best practices to apply when using the specific Lightroom features to produce your desired effects:
● Pick Your Color Scheme
What’s color grading without the right colors? Choosing an appropriate color scheme is one of the essential steps in Lightroom color grading. That’s because it sets the tone for the next steps. If you choose the wrong colors, you won’t get the excellent result you desire no matter how hard you try.
First, take a good look at your picture and its visible colors. Then think of the colors that compliment or contrast with them. For example, you should base images with red highlights around red. You can also try colors close to red in the color wheel, like orange.
Once you’ve found the colors that suit your image, you’re ready for the next steps in your color grading process. However, more than just adding colors, you must also pay attention to contrasting colors during processing. If you find such unwanted colors, use the HSL panel to pale them out.
● Prioritize Precision
In earlier paragraphs, you learned that working with the highlights, shadows, and mid-tones individually is best. That’s because individual adjustments are a painstaking process that guarantees the most accurate results. This makes a lot of difference in the final product compared to when you work with the wheel.
Working on the shadows, highlights, and mid-tones individually also connects to the hue and saturation sliders. So you remember how vital these hidden sliders are? You wouldn’t be able to access them by working on the tools one after another. Take that as your reward for being detail-oriented.
● Increase Saturation Values
Sometimes, the effect of one tool tells on another. For example, leaving your saturation values below may render your hue slider ineffective. To avoid that confusion, it’s best to increase your saturation levels to some values higher than your preferred one.
Yes, it wouldn’t look nice initially as you adjust the hue. However, it will ensure that you get the perfect color for your image. You can always go back to adjust the saturation to your choice values later on.
● Use Color Wheels To Find Color, Use Shadows to Refine
When discussing how to choose your color scheme, you must have understood how vital the color wheel is in finding harmonious hues. However, picking your preferred color isn’t the complete process. You must learn to fine-tune your chosen color by using the hue slider. Do this after adjusting the saturation to your preferred level as in the previous step. The result is always mind-blowing.
● Learn the Short Cuts
There are some shortcuts to learn when color grading in Lightroom to enhance accuracy and convenience. For example, option (Mac)/Alt (Windows) gives you better control over your image’s outcomes. Option/Alt + Up will increase saturation by one while the shift key adjusts it. You can use Command (Mac)/Ctrl (Windows) to adjust the hue. Also, the reset button on the right side of your panel takes you back to your initial image.
● Extra Tips
These best practices will help you to achieve excellent results:
- Don’t color grade without understanding the psychology of colors. Know what colors convey different moods or emotions.
- Be sure to work with high-quality pictures. Color grading isn’t magic; it wouldn’t correct an already lousy image.
- Shooting your pictures in RAW gives you more color control.
Conclusion
● Now that you’ve learned how to color grade using Lightroom, there’s no limit to what you can achieve. You can now explore your creative side with so much fun. However, know that you will likely not get it right the first time. Perfection comes with consistent practice or trial and error.
Also read:
- New In 2024, This Article Aims to Show You How to Export Videos in Filmora
- Updated 2024 Approved Best Video Grabbers for Chrome
- New Create Intro Video with Flixpress for 2024
- Are You Aware that You Can Create Your Own Lower Thirds for Video? Read This Article for a Tutorial on How to Customize One
- New 2024 Approved Some Top Methods to Create AI Slow Motion Videos
- How to Add Text Behind Objects in Video
- Updated Useful Tips for Tiktok Video Aspect Ratio Included
- New Guide to Create Intro Video with KineMaster
- New How to Create Discord Emoji GIF
- This Article Talks in Detail About Why People Look for a Free Title Maker, and 8 Options that Will Benefit Their Work. It Includes Tools Like SEMrush Title Generator, Hubspot Title Generator, and More. Check Out
- Techniques You Never Heard of for Learning AI Marketing YouTube for 2024
- New Create Stunning Videos Like a Pro with Filmora. Learn About Its Benefits and some Amazing Video and Audio Editing Features Such as Split Screens, Keyframing, Etc
- 2024 Approved Want to Feather Shapes in After Effects? Read This
- Updated In 2024, Top List of Best VHS Video Effect Makers
- Updated 2024 Approved Can You Enhance Your Drone Footage with Cinematic Drone LUTs? This Article Discusses Top Drone LUTs Recommendations to Simplify Video Editing
- New In 2024, Learning How to Slow Down a Video on iPhone Properly
- Updated 2024 Approved How to Combine Several Xvid Files Into One Windows, Mac,Android, iPhone & Online
- Updated In 2024, How to Use Filmora Slideshow Maker for Making Slideshow? What Is Slideshow Filmora? Know the Steps to Make Filmora Slideshow. What Are Steps to Make Filmora Slideshow Template?
- Updated In 2024, Do You Wish to Make Your Discord PFP an Attention-Seeker? If Yes, Try the Animated Discord PFP. Lets Go over Essential Facts on the Topic, Including How to Get an Animated Discord PFP
- New Blender Is a 3D Animation Software that Can Be Used to Create Stunning 3D Models and Videos for 2024
- New 2024 Approved 4 Solutions to Resize a WebM File
- In 2024, How Do I SIM Unlock My Apple iPhone 13 Pro Max?
- In 2024, Android to Apple How To Transfer Photos From Itel P40+ to iPad Easily | Dr.fone
- 4 Ways to Unlock Apple iPhone SE (2022) to Use USB Accessories Without Passcode | Dr.fone
- How To Do Motorola Moto G04 Screen Sharing | Dr.fone
- In 2024, Latest way to get Shiny Meltan Box in Pokémon Go Mystery Box On Honor Play 40C | Dr.fone
- 10 Free Location Spoofers to Fake GPS Location on your Realme Note 50 | Dr.fone
- How to Unlock Realme Bootloader Easily
- In 2024, Which Pokémon can Evolve with a Moon Stone For Poco X5? | Dr.fone
- In 2024, Does Life360 Notify When You Log Out On Motorola Moto G24? | Dr.fone
- Best Methods for Vivo V30 Lite 5G Wont Turn On | Dr.fone
- How to Track Poco X6 Pro Location without Installing Software? | Dr.fone
- In 2024, 5 Ways to Track Oppo A78 without App | Dr.fone
- In 2024, 3 Ways to Change Location on Facebook Marketplace for Oppo A38 | Dr.fone
- Title: Updated 2024 Approved How to Merge Audio and Video Using FFmpeg
- Author: Morgan
- Created at : 2024-04-24 01:02:51
- Updated at : 2024-04-25 01:02:51
- Link: https://ai-video-editing.techidaily.com/updated-2024-approved-how-to-merge-audio-and-video-using-ffmpeg/
- License: This work is licensed under CC BY-NC-SA 4.0.
