

Updated 2024 Approved How to Shoot Cinematic Footage with Phone
How to Shoot Cinematic Footage with Phone
Creating cinematic videos is easy if you have expensive equipment like a film set with high-quality cameras. But many of us can’t afford this, so read this article to get an alternative.
You can use smartphones to record cinematic shots if you don’t have expensive lenses. You’ll learn about filming and editing those shots into Wondershare Filmora to get professional results in the below lines.
But before we get into the filming process, having a general idea about the topic can help a lot. So first, let’s understand what cinematic videos are!
Part 1. What Is a Cinematic Video?
The world of cinema has developed and has high recording quality. A cinematic video is a video that is recorded to look more like a movie. These shots excel in all aspects of a video, such as Color, aspect ratio, and lighting techniques.
Most of the cinematic footage required unique cameras, i.e., IMAX cameras for movies. But these cameras are really costly and only suitable for large-scale production.
With the understanding of cinematic videos, you can now use alternative ways to record a cinematic video without an expensive camera. You can also record a cinematic video using only a smartphone with a few requirements.
Scroll below to learn more about what you need to record a cinematic video!
Part 2. Requirements to Record a Cinematic Video
To record a professional video with cinematic effects, you must have the following equipment in your studio:
1. A Gimbal Stabilizer
When you are recording footage from your smartphone, a significant issue that can disturb your video quality is the shaking of your phone. You may have to record while walking, or it could even be a static shot.
If the phone is held in your hands without support, you will end up with shaky footage. This will eventually ruin your video.
A gimbal stabilizer allows you to stabilize your footage with a handheld stand. Many gimbal stabilizers are available in the market, but for reference, we would be looking at the Q3 Gimbal from Zhiyun.

You can also connect the Gimbal from its app. Scroll below to learn more about the app!
Zhiyun Cami App
Zhiyun Q3 stabilizer also connects with the Zhiyun cami app. This app will allow users to access the filming features more intuitively and comprehensively. You can connect your Gimbal with the app via Bluetooth.

Zhiyun Stabilizer Shooting Modes
There are many modes on different Gimbals, but the Locking and the POV mode are the most useful, which are illustrated as shown below:
- The Locking mode: This mode allows you to lock all three motors of the Gimbal and allows your phone to remain fixed at a certain angle. Due to this, you can shoot your footage from multiple positions while keeping the camera fixed at one angle.
- The POV mode will allow you to unlock all the axes. This mode will also adjust in all three axes when moving around. This feature gives you more freedom of movement.

Extra Features of Zhiyun Q3 Stabilizer
When you are shooting a video using the Gimbal stabilizer, you come across a point where you want extra light. Thus, the Q3 stabilizer comes with a built-in flashlight.
This flashlight will not only light up those small corners of a dark room but also make a huge difference. If you are recording to focus on an object, such as a product, this flashlight will greatly help you.

You can also turn the flashlight towards yourself if you are recording a Vlog or taking a selfie. The light’s temperature is 4300K, giving a relatively warm light on the subject.

2. A Good Smartphone
Most smartphones these days are equipped with cameras with varying powers of recording. Some smartphone cameras focus on Mega Pixels, while others focus on the capture sensor. You need a smartphone camera that balances out all these qualities to record cinematic footage.
The recently released iPhone 14 pro camera is an excellent example of a good quality camera you can use to record cinematic videos.

3. Video Editing Software
There is no better software in the video editing field than the infamous Wondershare Filmora. It allows you to edit high-quality videos with creative features.
Wondershare Filmora allows access to the range of effects and filters you can apply to your videos to give them a more cinematic look. It also allows you to access the vast library of audio to utilize in your videos. Moreover, its engaging UI allows beginners to access to features of Wondershare Filmora easily.

Now that we have learned about the requirements for recording a cinematic video. Let’s look at the different cinematic movements you can use to record from your Smartphone.
Part 3. Top 3 Cinematic Movements to Record From a Smartphone
You may have watched many movies or TV shows, but the general audience usually ignores the effort put into a shot. Only an experienced videographer can detect the difference between a great cinematic shot and a poor one.
Of the great cinematic shots, some are described in this article. These shots can easily record by using a smartphone. The cinematic movements explained below are the best choice. Here we will look at the three camera movements you can record on your smartphone.
- The Reveal Movement.
- The 180° Presentation Movement.
- The Following Movement.
First, let’s take a look at the Reveal movement.
1. The Reveal Movement
This is the most popular movement used in cinematic shooting from your smartphone. With a Gimbal, the Reveal movement is one of the easiest shots to master. But for this, you will need to learn it first.
The Reveal Movement is a shot taken with an object as a perspective. The shot starts from a static object in the foreground. It could be focused at first, but as the camera moves, the focus will be diverted to reveal our target object. This is known as the Reveal Movement.
To shoot the reveal movement, follow the steps mentioned as shown:
- First, ensure your phone is connected properly to the Gimbal.
- Align your Smartphone camera behind the static object.
- Guide the target individual to be ready as you move the camera to reveal them.
- Slowly move the camera, focusing on the static object to change its focus on your main object.

![]()
Note: Make sure to practice and experiment a lot with the steps. Try to be more creative and innovative. With every video you shoot, you gain experience with the errors.
Another thing to remember is that when you are shooting a Reveal movement using the Gimbal, it is best to put it in Locking mode. This mode works the best as it allows the camera to stay fixed in one frame making your footage seem balanced and of quality.

2. The 180° Presentation Movement
The next movement we will be looking at will be the 180° presentation movement. The 180° presentation will move in a half-circle fashion. It will move from one side of the subject to the other side. This will allow you to cover the overall subject’s view.
Apart from that, it will allow you to capture the background with much clarity and detail to maintain a general sense of the ambiance. Making a 180° presentation shot is fairly easy to do so. With its multiple uses, you can use this method in any scenario.
As we will move from one side to the other in a circular manner, we need to fix the frame of our video to move along. Using the POV mode of the Zhiyun Gimbal stabilizer will be the best option in this sense.

Setting the Gimbal in POV mode will allow you to shoot the video from more than one angle while keeping the video balanced. Follow the steps mentioned to shoot a 180° presentation video:
- First, start recording from one side of the subject while keeping the Gimbal in the POV mode.
- Slowly start moving in front of the subject in an arch.
- When you face the subject, do not stop and keep moving to complete the arch.
- When you reach the end of the arch, close the video.

By following the steps mentioned, you can create the 180° presentation movement using a smartphone. Now, move forward to learn about “The Following movement.”
3. The Following Movement
You can use “The following movement” when recording a scene in which the object moves in random directions. Or when there is a high degree of movement of your object in the video, and you want to fix the focus of your footage to that object.
The Following movement is not technically a movement, but a setting that will allow you to record the footage while keeping the object and the video frame focused. In this type of footage, we will use the Zhiyun Cami app to focus on our target object.

To focus on our subject in the video by Cami app, follow the steps mentioned below:
- When recording the video, make sure to put the Gimbal on a tripod stand.
- After that, open the Cami app and draw a square over the object you want to keep in focus.
- Now, the camera will shift its angle to its perspective wherever the object goes.

This is how you will create the following movement.
Part 4. Edit the Clips with Wondershare Filmora
Now that we have recorded our footage, it is time to arrange it and apply the finishing touches. We are going to use Wondershare Filmora for editing the recorded footage.
Free Download For Win 7 or later(64-bit)
Free Download For macOS 10.14 or later
Follow the steps mentioned below to edit on Wondershare Filmora!
Step1 Download Wondershare Filmora
To download Wondershare Filmora, follow the steps outlined below:
- First, download the Wondershare Filmora.
- When the download is finished, click on the setup.
- The Wondershare Filmora installer will begin to load.
- Then you will have installed Wondershare Filmora on your PC or Mac.
If you want to purchase the premium plan’s features, check out the Wondershare Filmora Premium plans.
Step2 Add clips to the timeline
After downloading the Wondershare Filmora app, we must create a workplace. To do so, follow the steps mentioned:
- First of all, click on the import icon in the upper left corner of the home interface of Wondershare Filmora. This will open up your PC library.
- Then Import your footage in the import window.
- Click and drag to drop the footage in the Timeline.

Step3 Trim the Video Clips
After you have added the clips to the timeline, you may have some extra footage you don’t want. Go through the clips you added and trim them according to your wish.
Step4 Add The Effects
After you have trimmed the clips now, you will have to add the finishing touches. To perform this, follow the below instructions:
- Go to the effects icon on the upper bar above the import window.
- Here, you can see the range of effects Wondershare Filmora Provides. Select the one you want for your video.
- You can also search for effects from the search bar.
- Once you have found the effect you want, download it if not been downloaded before.
- Click and drag it to drop below your clips to add the effect.
- Double-click on the effect that you added to adjust its settings.
- Here, you can adjust the opacity to your liking.

Now that we have added the Effects, it is time to add the Overlays!
Step5 Add Overlays
You can also add overlays on your videos to make them pop up even more. You can add Overlays by the following steps:
- In the effects icon on the bar above the import window, you can see the multiple effects of Wondershare Filmora.
- In the left column, you can also see the Filters and Overlays.
- Go to the Overlay
- Select the Overlay that you want.
- Then click and drag it above your video.
- You can also add a border to your video by searching “Border” in the search bar and dragging it below your clips.

Step6 Add Some Music
To finish off your editing, you can also add audio music from the Wondershare Filmora Audio library:
- Before adding the audio music, make sure to lower the volume of your video clips.
- You can do so by dragging below the audio tab on your video clips in the timeline.
- Go to the Audio icon on the bar above the import window.
- Here, you can see the multiple audio available.
- Browse through the library till you find suitable audio.
- Download it and drag it below on the timeline.

Now play the Video from the beginning to see the final looks.

Congratulations! You have now successfully created a cinematic video using Wondershare Filmora.
Conclusion
Using expensive equipment to record a cinematic video can be a reliable step. But it is not in everyone’s budget. You can also use a smartphone to record a cinematic video by the steps mentioned above and give it a professional look by editing on Wondershare Filmora.
Although it might seem strange initially, but the time is close when everyone will create cinematic videos from their smartphones.
Another thing to remember is that when you are shooting a Reveal movement using the Gimbal, it is best to put it in Locking mode. This mode works the best as it allows the camera to stay fixed in one frame making your footage seem balanced and of quality.
2. The 180° Presentation Movement
The next movement we will be looking at will be the 180° presentation movement. The 180° presentation will move in a half-circle fashion. It will move from one side of the subject to the other side. This will allow you to cover the overall subject’s view.
Apart from that, it will allow you to capture the background with much clarity and detail to maintain a general sense of the ambiance. Making a 180° presentation shot is fairly easy to do so. With its multiple uses, you can use this method in any scenario.
As we will move from one side to the other in a circular manner, we need to fix the frame of our video to move along. Using the POV mode of the Zhiyun Gimbal stabilizer will be the best option in this sense.
Setting the Gimbal in POV mode will allow you to shoot the video from more than one angle while keeping the video balanced. Follow the steps mentioned to shoot a 180° presentation video:
- First, start recording from one side of the subject while keeping the Gimbal in the POV mode.
- Slowly start moving in front of the subject in an arch.
- When you face the subject, do not stop and keep moving to complete the arch.
- When you reach the end of the arch, close the video.
By following the steps mentioned, you can create the 180° presentation movement using a smartphone. Now, move forward to learn about “The Following movement.”
3. The Following Movement
You can use “The following movement” when recording a scene in which the object moves in random directions. Or when there is a high degree of movement of your object in the video, and you want to fix the focus of your footage to that object.
The Following movement is not technically a movement, but a setting that will allow you to record the footage while keeping the object and the video frame focused. In this type of footage, we will use the Zhiyun Cami app to focus on our target object.
To focus on our subject in the video by Cami app, follow the steps mentioned below:
- When recording the video, make sure to put the Gimbal on a tripod stand.
- After that, open the Cami app and draw a square over the object you want to keep in focus.
- Now, the camera will shift its angle to its perspective wherever the object goes.
This is how you will create the following movement.
Part 4. Edit the Clips with Wondershare Filmora
Now that we have recorded our footage, it is time to arrange it and apply the finishing touches. We are going to use Wondershare Filmora for editing the recorded footage.
Free Download For Win 7 or later(64-bit)
Free Download For macOS 10.14 or later
Follow the steps mentioned below to edit on Wondershare Filmora!
Step1 Download Wondershare Filmora
To download Wondershare Filmora, follow the steps outlined below:
- First, download the Wondershare Filmora.
- When the download is finished, click on the setup.
- The Wondershare Filmora installer will begin to load.
- Then you will have installed Wondershare Filmora on your PC or Mac.
If you want to purchase the premium plan’s features, check out the Wondershare Filmora Premium plans.
Step2 Add clips to the timeline
After downloading the Wondershare Filmora app, we must create a workplace. To do so, follow the steps mentioned:
- First of all, click on the import icon in the upper left corner of the home interface of Wondershare Filmora. This will open up your PC library.
- Then Import your footage in the import window.
- Click and drag to drop the footage in the Timeline.
Step3 Trim the Video Clips
After you have added the clips to the timeline, you may have some extra footage you don’t want. Go through the clips you added and trim them according to your wish.
Step4 Add The Effects
After you have trimmed the clips now, you will have to add the finishing touches. To perform this, follow the below instructions:
- Go to the effects icon on the upper bar above the import window.
- Here, you can see the range of effects Wondershare Filmora Provides. Select the one you want for your video.
- You can also search for effects from the search bar.
- Once you have found the effect you want, download it if not been downloaded before.
- Click and drag it to drop below your clips to add the effect.
- Double-click on the effect that you added to adjust its settings.
- Here, you can adjust the opacity to your liking.
Now that we have added the Effects, it is time to add the Overlays!
Step5 Add Overlays
You can also add overlays on your videos to make them pop up even more. You can add Overlays by the following steps:
- In the effects icon on the bar above the import window, you can see the multiple effects of Wondershare Filmora.
- In the left column, you can also see the Filters and Overlays.
- Go to the Overlay
- Select the Overlay that you want.
- Then click and drag it above your video.
- You can also add a border to your video by searching “Border” in the search bar and dragging it below your clips.
Step6 Add Some Music
To finish off your editing, you can also add audio music from the Wondershare Filmora Audio library:
- Before adding the audio music, make sure to lower the volume of your video clips.
- You can do so by dragging below the audio tab on your video clips in the timeline.
- Go to the Audio icon on the bar above the import window.
- Here, you can see the multiple audio available.
- Browse through the library till you find suitable audio.
- Download it and drag it below on the timeline.
Now play the Video from the beginning to see the final looks.
Congratulations! You have now successfully created a cinematic video using Wondershare Filmora.
Conclusion
Using expensive equipment to record a cinematic video can be a reliable step. But it is not in everyone’s budget. You can also use a smartphone to record a cinematic video by the steps mentioned above and give it a professional look by editing on Wondershare Filmora.
Although it might seem strange initially, but the time is close when everyone will create cinematic videos from their smartphones.
How To Use Motion Blur On Video Star?
Many smartphone video editing apps provide quick services for creating content. However, few offer privileges of including features like motion blur within the videos. The motion blur effect is one of the most recommended features in a video to give it a realistic touch. Where many tools fail to offer this effect, Video Star stands in the line of applications that do not disappoint users.
For this article, we will work on a guideline for how to use motion blur on Video Star. Through the provided details, you can verify and work through a similar model for creating a perfect video.
Part 1: What is Video Star?
We will first review the Video Star application and its features for a better overview of the tool. Video Star is a video editing tool designed to present impressive music videos with appropriate lip-syncing and fan edits. While the application is known for its music editing, Video Star has embedded a variety of features in its package that makes the process interesting.
It includes the option of managing the color and animation in the video. You can also find the tool appropriate for enhancing, combining, and timing clips. Video Star is a complete package when it comes to creating videos on smartphones. With its free features and advanced functionalities, Video Star does not disappoint.
The application has multiple power packs available that can be bought from a subscription plan. With the authoritative control and connection offered, this application makes quite a mark regardless of its mobility.

Download: App Store
Key Features
There are options available on Video Star, which makes it a great video editing option. Those who are up for quick editing should try this option. For that, let’s check out its prominent features:
- You can customize the background and mode of the application according to your needs. Personalize the outlook of your Video Star application as per your desires.
- Add multiple songs of your choice within the video to perfection.
- The tool is integrated with iCloud, providing a dedicated button for connecting the application with the assorted data.
- Features an “Insider” page showing all essential details and updates about the application.
Review
The review of Video Star is quite promising; but mixed. You can add effects within your videos, such as motion blur. But the application still has some concerns which might need some addressing.
When it comes to updating and managing it, there are some drawbacks to its operation. Sometimes, it might even lag for no reason. Along with that, there are some complaints about the text effects included in the application. An overall review might sound good, but some tweaking is needed.
Part 2: How to Use Motion Blur on Video Star?
We will now look into some details about using the motion blur effect on Video Star. While you learn how to target the Video Star motion blur effect to perfection, a comparison in procedure will also be highlighted for better understanding. Look through the details to know more about how to use motion blur to perfection:
Steps to Perform Motion Blur Through Transform on Video Star
Step1 As you download and install Video Star, launch and tap the “+” icon on the top-right to add a video. You must select the “Edit Video” option to proceed further.

Step2 After adding the video, you must use the “Set Start” and “Set End” buttons to trim out the unnecessary part of the video. Select the “Make Video” button on the top and lead to the next part.

Step3 As the video is trimmed, tap the “New” button on the bottom-right and proceed to select “Transform” from the available options.

Step4 You must select the “Motion Blur” effect from the options below. As you are led into the parameter settings of the effect, you will find multiple things to cover on the screen. While you can set the blur element using the slider, set whether the effect will be “Trailing,” “Leading,” or “Both.”

Step5 You can set the video on a lower frame rate using the “Dial” icon. Set the slider under the “Blend” option and proceed to click the “Create” button.

Steps to Perform Motion Blur Through Re-Effects on Video Star
Step1 While you try another technique to perform motion blur on Video Star, you must import the video and set its starting and ending points. As you edit the video, select “New” and find the “Re-Effect” option.

Step2 Continue to the next screen and tap the “+” icon to add an effect. You can find the “Motion Blur” effect by using the “Search” icon present on the screen. As the motion blur effect is added, you have to set the effect using the slider.

Bonus Tips – Add Motion Blur with Filmora on Desktop
What if you search for a better option than the motion blur effect on Video Star? Though there are many tools, the quickest option to look for on the desktop is Wondershare Filmora . This easy-going, effective, and diverse software provides the smoothest experience in video editing. The variety of tools offered within the platform is exquisite.
Free Download For Win 7 or later(64-bit)
Free Download For macOS 10.14 or later
To learn more about Wondershare Filmora, you can also observe the features provided below:
- While you can add effects like motion blur, Filmora provides an extended list of effects to try out.
- There are multiple video resolution qualities offered while exporting the video. It also includes setting the video parameters according to a specific device or platform.
- Wondershare Filmora induces a high-quality result for the user in a simple environment. This makes it an easy tool to use with quality adjustments.
- Along with adding effects and transitions, Filmora provides an Instant Mode to help users create videos within minutes.
Steps For Adding Motion Blur to Wondershare Filmora on Desktop
We will now direct ourselves to discuss the steps for adding motion blur on Filmora with ease:
Step1 Launch Filmora and Create Video Project
You must launch Wondershare Filmora and click the “Create New Project” button to initiate a new project. Select the folder-like icon on the screen for importing the video file that is to be edited. On adding the file, drag and drop it on the timeline.

Step2 Split Video to Add Effect
With the help of the play head offered on the timeline, lead to the specific part where you wish to start adding the motion blur effect. Use the “Scissors” icon from the timeline to cut the video from the specific part.

Step3 Add the Motion Blur Effect
On splitting, navigate to the “Effects” tab on the top and find the “Blur” effects from the “Video Effects” category. After finding the right motion blur effect, drag and drop it on the part where the video was split.

Step4 Use Dissolve Transition and Export Video
Use the “Dissolve” transition from the “Transitions” tab to add more adjustments. Once the video is smoothened, click the “Export” button to get the edited file out.

Last Words
The article has provided a complete overview of the Video Star Motion Blur effect. With the provided details and a guideline on adding motion blur to a video, it is prominent how one can add the effect to make their video look realistic. For a better editing experience, you can consider using Wondershare Filmora on your desktop for better results.
Free Download For macOS 10.14 or later
To learn more about Wondershare Filmora, you can also observe the features provided below:
- While you can add effects like motion blur, Filmora provides an extended list of effects to try out.
- There are multiple video resolution qualities offered while exporting the video. It also includes setting the video parameters according to a specific device or platform.
- Wondershare Filmora induces a high-quality result for the user in a simple environment. This makes it an easy tool to use with quality adjustments.
- Along with adding effects and transitions, Filmora provides an Instant Mode to help users create videos within minutes.
Steps For Adding Motion Blur to Wondershare Filmora on Desktop
We will now direct ourselves to discuss the steps for adding motion blur on Filmora with ease:
Step1 Launch Filmora and Create Video Project
You must launch Wondershare Filmora and click the “Create New Project” button to initiate a new project. Select the folder-like icon on the screen for importing the video file that is to be edited. On adding the file, drag and drop it on the timeline.
Step2 Split Video to Add Effect
With the help of the play head offered on the timeline, lead to the specific part where you wish to start adding the motion blur effect. Use the “Scissors” icon from the timeline to cut the video from the specific part.
Step3 Add the Motion Blur Effect
On splitting, navigate to the “Effects” tab on the top and find the “Blur” effects from the “Video Effects” category. After finding the right motion blur effect, drag and drop it on the part where the video was split.
Step4 Use Dissolve Transition and Export Video
Use the “Dissolve” transition from the “Transitions” tab to add more adjustments. Once the video is smoothened, click the “Export” button to get the edited file out.
Last Words
The article has provided a complete overview of the Video Star Motion Blur effect. With the provided details and a guideline on adding motion blur to a video, it is prominent how one can add the effect to make their video look realistic. For a better editing experience, you can consider using Wondershare Filmora on your desktop for better results.
Add Green Screen Video on TikTok
TikTok is the most popular platform for making short videos. You can create creative short videos and upload to TikTok so that they can entertain your followers and make your videos go viral. To add variety to your video content, the use of green screen in short videos is a great idea. You can replace the green screen with any background in your TikTok video. You need to know how to add green screen video on TikTok.
Adding green screen on TikTok videos has become a trend now as there are several green screen TikTok videos that have gone viral. In fact, creative green screen videos are extremely popular on social media platforms. Instead of replacing the green screen in your video with a single photo, you can replace it with multiple pictures on TikTok. We will illustrate how to add multiple pictures on TikTok green screen.
Part 1. How to Add Green Screen on TikTok?
To add green screen on TikTok video, you need to have a background of uniform color. It does not necessarily have to be a green screen. For example, if you are shooting a video of your legs and the floor tiles have uniform color, you can use green screen on TikTok to replace the tiles with any picture. Instead of using one picture on TikTok short video, you can use multiple pictures in the background to create stunning TikTok videos. Here are the steps on how to add multiple pictures to TikTok green screen.
Step1 Open TikTok app on your phone. Tap on Plus icon located at the bottom of the app screen to make a new video.
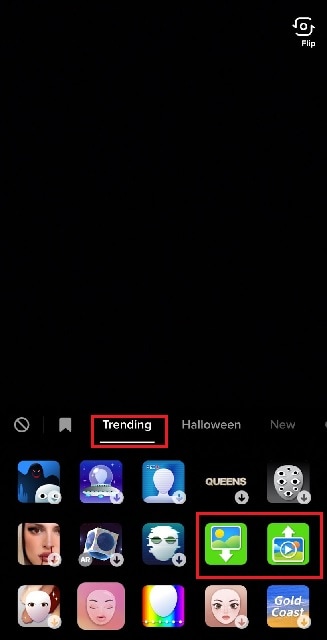
Step2 Choose the duration of the video as per your preference. Thereafter, tap on Effects option located at the bottom-left corner to see the different effects available on TikTok.
![]()
Step3 Go to Trending tab and you will see Green Screen and Green Screen Video icons. If you want your video to have green screen photo, tap on Green Screen icon. If you want your video to have green screen video, tap on Green Screen Video icon.
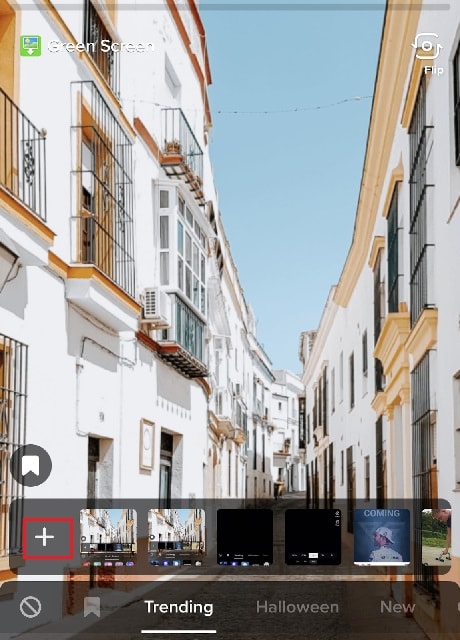
Step4 You will get a generic background and you can choose any preset background or select photo or video from your phone gallery by tapping on Plus icon. Once you are done, tap on Record button.
Step5 In order to use multiple pictures, you should stop recording in between and change your green screen image to anything you desire. Then tap on Record button again. TikTok will string your clips and it would appear that you have been changing multiple pictures of your background for your video.
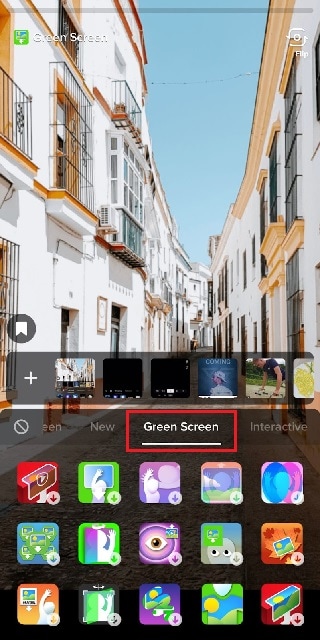
If you want to experiment with green scree effects, you can scroll down after tapping on Green Screen icon under Effects. You will see different types of green screen videos possible on TikTok to choose from.
Part 2. Creative Ideas to Make TikTok Green Screen Video
Now that you know how to add a video on TikTok green screen, you have to make the most out of it. If you are wondering how you can use green screen in your TikTok videos, here are some creative ideas for you.
Walking Out Videos – You can use green screen effect to show that you are walking out of plane, walking vertically on the wall like inception, walking on the roof of a building. In fact, you can show that you are walking out of popular monuments and palaces and trick your viewers into thinking that you were actually there.
Photoshoot Location – Create a TikTok video showing your favorite locations across the world where you dream of doing photoshoot. You can pose differently and place the location in your background through green screen effect.
How-To Video – If your TikTok channel is about tutorial and learning videos, you can explain things better by putting screenshots and multiple relevant pictures in the background so that viewers can get a pictorial representation of what you are speaking to them.
Mystery Story – You can a create short video describing unknowing facts and mysteries around certain places in the world. You can put photos or video clips of those mysterious places in your background to keep your viewers hooked and related to your narration.
Rate Them Video – You can use green screen effect to showcase your old Instagram photos or videos and rate them. This is an extremely popular trend in TikTok where people show their old photos, display work from the past, and rate them today.
Reveal Your Creation – Share your secrets or interesting stories behind some of the photos or videos you took in the past. You can talk about how creatively you took certain photos and put those photos in the background while discussing them.
Part 3. How to Make Green Screen Video on Computer?
If you have a computer and a webcam, you can record a green screen video on your computer. You can place the green screen in the background perfectly and place the webcam so that the background stays within the green screen. You will need a video recorder and a video editor to make green screen video as well as replace the green screen with any photo or video. We recommend Wondershare Filmora where you can record as well as edit green screen video.
Filmora is a professional video editor where you can record your computer screen as well as your webcam video with green screen background in Picture-in-Picture mode. After recording the video, you can replace the green screen with any video clip or photo instantly in a few steps. You can also fine-tune green screen effect for perfection. Therefore, you can save the video in any resolution and file format as per your preference.

Free Download For Win 7 or later(64-bit)
Free Download For macOS 10.14 or later
Conclusion
Adding green screen effect on TikTok videos can make your videos stand out. We have illustrated how to add multiple green screen videos on TikTok and your videos will have a better chance of getting viral. Keep the green screen ideas in mind while making TikTok green screen videos. If you want to make and edit green screen videos on computer, Wondershare Filmora is the best application available for Windows and Mac users.
Top-Rated Android Apps For Slowing Down Motion
Creating slow-motion videos has been a trend followed by millions across social platforms. For designing the perfect video as a slow-motion video, people seek a good option. Android slow motion video apps are one remedy to this requirement. Google Play Store offers a diversity of applications for making video slow motion Android.
This article is all about figuring out the top Android applications that can feature the best slow motion. For that, go through the content provided to find out the most suitable slow motion video in Android.
Slow Motion Video Maker Slow your video’s speed with better control of your keyframes to create unique cinematic effects!
Make A Slow Motion Video Make A Slow Motion Video More Features

Part 1. Top 10 Android Apps For Slowing Down Motion in Video
When searching for a slow motion video app for Android, there are many options to go by. Provided next is a composite list of mobile apps that serve the purpose of slow-motion video creation:
- Slow Motion Video – Fast&Slow Mo
- Slow Motion Video Maker
- Video Editor & Maker – InShot
- Video Maker & Editor - Vidma
- VivaVideo - Video Editor&Maker
- VivaVideo - Video Editor&Maker
- VivaVideo - Video Editor&Maker
- VivaVideo - Video Editor&Maker
- VivaVideo - Video Editor&Maker
- VivaVideo - Video Editor&Maker
1. Slow Motion Video – Fast&Slow Mo
This Android slow-motion video converter offers an intuitive user interface and simple functions. Users can craft slow motion via drag and adjust the action of the slider in a downward direction. The video’s playback speed is customizable, ranging from 0.25x to 4.0x. Additionally, the software empowers users to apply slow motion to specific video segments to enhance precision.

Key Features
- The application offers pre-installed filters and special effects to elevate visual aesthetics.
- It preserves video quality and transforms video resolution to high definition (HD).
- Incorporate high-quality music into your videos with its built-in music collection.
2. Slow Motion Video Maker
This slow-mo video Android editor offers advanced functionalities to craft perfect videos. With its timeline editing interface, it simplifies the application of slow-motion effects to specific scenes. The application showcases three distinct slow-motion speed options: 0.5x, 0.3x, and 0.25x, ensuring perfection.

Key Features
- Accelerate your videos up to 4x with its high-speed options and get high-quality results.
- The video trimming feature and timeline editing enable accurate segmentation of a video.
- It is equipped with pre-existing music tracks to create the perfect slow-motion video on Android.
3. Video Editor & Maker - InShot
Embark upon the journey to create video slow motion Android with this multifunctional app. It extends a straightforward approach to slow video speed through slider manipulation. Timeline editing and selective playhead options empower users to adjust the speed of specific segments. This exceeds the conventional approach of a slo-mo creation, unlocking creative possibilities.

Key Features
- Elevate the artistic expression of videos by integrating a wide range of animations and text.
- Enhance your reels with a collection of transition effects like Fade in, Fade out, basics, and more.
- This editor has AI capabilities and background removal options with a heightened level of accuracy.
4. Video Maker & Editor - Vidma
This slow-mo app for Android facilitates individuals seeking a video editor capable of producing convincing results. It acts as a Velocity Edit Maker, offering diverse playback speed and positioning controls. The interface resembles a velocity graph, providing a visual representation of speed adjustments.

Key Features
- Introduces an automated “Keep Audio Pitch” option, ensuring high-quality audio.
- Enhance the creative factor in your images and videos with its built-in text and stickers.
- Comes with a variety of visual filters with an intensity control option.
5. VivaVideo - Video Editor&Maker
If you are seeking the best Slomo app for Android, this editor provides diverse speed-setting presets for creating slow-motion and fast-motion effects. Among presets such as Montage, Hero, Bullet, and others, it offers a Custom preset option to help you adjust everything accordingly. With its ability to apply speed settings at specific periods, your slow motions are bound to be perfect.

Key Features
- The non-uniform timeline editor allows you to incorporate multiple assets at once.
- A range of texts, animations, themes, effects, and music tracks are in its Stock Library.
- This video maker also incorporates a Voice Editor to uphold the audio track’s quality.
6. Smart Video Crop - Video Cut
Although this video maker is specified for resizing videos, it also offers speed change options. To make a video slow motion on Android, you can change both playback speed and framerate. Once you have edited your video, you can make changes to the export options. In addition, the application updates its mechanism and shows compatibility with Android 4.4 and higher versions.

Key Features
- The application shows multi-format video support, i.e., MP4, 3GP, and AVI.
- Proposes multiple video crop options like 1:1, 4:3, 16:9, and 3:2.
- You can select to crop the whole video or apply the crop to a specific part of it.
7. Video Editor - Video.Guru
What would be better than a slow-motion video app for Android that can change speed and enhance video? To access this functionality, users need to switch to its PRO version. The speed change options that it offers are from 0.2x to 100x, with 0.2x being the slowest. In addition, the tool doesn’t decline video quality but enhances it to 4K.

Key Features
- If you are a YouTuber, then this editor affects and filters for Vloggers and offers to remove Watermark.
- You can crop a video into available ratios while keeping its HD quality.
- Can add 30+ video transition effects and incorporate music to enhance their quality.
8. Slow Motion - Slow Mo, Fast Mo
Make video slow motion Android effortlessly with this application, which is specified for speed change. It offers 10 playback speed options for creating slow motions with precision. The playback speed ranges from 0.95x to 0.1x. Once you have created a slow motion with it, you can easily preview it to observe if any changes are needed.

Key Features
- Along with precise slo-mo options, it also offers extensive fast motion option speed ranges.
- You can mix and match both fast and slow-motion effects in a video at once.
- It also offers a watermark removal option to avoid any visual weakening.
9. Slow Motion Video FX-camera
Not only video frame rates but also slow down your speech with this slow-motion app for Android. You can add dramatic or funny effects to your voices using the application. It offers to slow down video speed up to 0.25x. It uses the standard slider approach to manipulate the playback speed of your videos. You can apply the slow-mo effect to the overall video or to some specific parts of it.

Key Features
- An intuitive user interface with a velocity graph to observe the changes in speed and duration.
- Transform your low-quality videos to HD quality with this slow-motion app for Android.
- Use the application’s built-in music library to incorporate music tracks.
10. Slow Motion
Decrease your video speed up to 1/4th of its original speed with this Android slow-motion video editor. The speed options are customizable, and you can apply them to multiple video scenes. As the name indicates, the tool is specifically fashioned for slow-motion effects; hence, it offers an accessible user interface.

Key Features
- Export your videos in landscape or portrait mode; the choice is yours.
- In any mode, the application retains video quality and exports it in full resolution.
- It is excellent to slow down YouTube videos as there is no watermark addition.
Bonus Part: Wondershare Filmora: A Perfect Desktop Solution To Slow Down Video
Making slow motion videos in Android is like keeping creativity in your hand anywhere. This facility is good for basic effects but not for professional and advanced slow-motion effects. That’s where you need to shift to a more equipped alternative, which is Wondershare Filmora . Using Filmora means turning imagination into the real picture.
It is a video editing platform with artificial intelligence integration. You can create slow-motion videos with automation in Filmora. The interactive interface of Filmora caters to all users’ needs in simple steps. Freelancers, content creators, and educationists use this platform for diverse needs.
Free Download For Win 7 or later(64-bit)
Free Download For macOS 10.14 or later
How to Make Video Slow Motion Android in Filmora
As you are familiar with Filmora, let’s make a slow-motion video. It is quite easy if compared with Android slow-motion video making. Without further delay, delve into the given step-by-step guide:
Step 1Import Your Project After Successful Launch
Unleash your creativity in Filmora after downloading it. In this regard, you must go to Wondershare Filmora’s official site. Open the main interface of Filmora and tap “New Project” to enter the editing window. To start working, import a file in the media panel and drag it into the timeline section.

Step 2Slow Down the Video with Uniform Speed
After successful importing, right-click on your video and an extended list. Choose the “Uniform Speed” option from the list and find an editing panel towards your right. You will see the slider under the speed option. Hold on to the circle and drag it to the left if you want to slow down the videos. Move downward and toggle the “Ripple Edit” and “Maintain Pitch” for good results.

Step 3Enhance Video with Optical Flow
Towards the end, you will find the “AI Frame Interpolation.” Click on its downward symbol and select the “Optical Flow” option from the list. It will automatically boost your video quality. You can choose the “Reverse Speed” option if your video is required.

Step 4End Editing and Move to Export
Now, it’s up to you if you want to continue editing with Filmora or want to export the media. To end editing, you can hit the “Export” button from the top right.

Remarkable Key Functionalities of Filmora
If you want to understand the amazing features of Filmora better, this section is for you. Keep reading and find some integral functionalities of Filmora. This platform offers more than just creating slow-motion video Android:
1. AI Smart Cutout
Artificial intelligence in Filmora can amazingly assist you in making flawless videos. Unlike other tools, Filmora allows you to remove unwanted objects, people, and icons from videos. Besides, users can refine their cutout frame by frame using its’ advanced editing options. You can preview the modified media in four ways, such as Transparency grid and Alpha Mode.
2. AI Audio Stretch
This AI-based feature is new to the market and saves hours of rippling and cutting audio. It aims to match the length of your audio with videos. From Vlog videos to blockbuster audio effects, you can use this feature almost everywhere. This option allows you to re-time your audio tracks after detecting vocals in the music.
3. Speech-to-Text
Video captions make the content accessible to international viewers. That’s where Filmora proves vital in removing language barriers. It supports over 26 languages and adds subtitles to your videos with one click. This built-in feature in Filmora recognizes speech swiftly to guarantee accuracy. You can also export your SRT file of subtitles to make any edits.
4. AI Portrait
Beautify faces in your videos to set a new trend on social media with Filmora. To do so, an AI Portrait feature can automatically detect faces to apply changes. You can choose a sticker effect from more than 70 AI portrait AR stickers. Besides, it can remove video backgrounds by retaining the human beings there.
Conclusion
With all marked details, this article concludes with a note that there are always different calibers of tools that we can work with. While discovering the best Android application in the market, you got to know many slow motion videos on Android. Along with that, we also discussed DemoCreator as a comprehensive solution to the entire use of mobile apps.
Make A Slow Motion Video Make A Slow Motion Video More Features
Part 1. Top 10 Android Apps For Slowing Down Motion in Video
When searching for a slow motion video app for Android, there are many options to go by. Provided next is a composite list of mobile apps that serve the purpose of slow-motion video creation:
- Slow Motion Video – Fast&Slow Mo
- Slow Motion Video Maker
- Video Editor & Maker – InShot
- Video Maker & Editor - Vidma
- VivaVideo - Video Editor&Maker
- VivaVideo - Video Editor&Maker
- VivaVideo - Video Editor&Maker
- VivaVideo - Video Editor&Maker
- VivaVideo - Video Editor&Maker
- VivaVideo - Video Editor&Maker
1. Slow Motion Video – Fast&Slow Mo
This Android slow-motion video converter offers an intuitive user interface and simple functions. Users can craft slow motion via drag and adjust the action of the slider in a downward direction. The video’s playback speed is customizable, ranging from 0.25x to 4.0x. Additionally, the software empowers users to apply slow motion to specific video segments to enhance precision.
Key Features
- The application offers pre-installed filters and special effects to elevate visual aesthetics.
- It preserves video quality and transforms video resolution to high definition (HD).
- Incorporate high-quality music into your videos with its built-in music collection.
2. Slow Motion Video Maker
This slow-mo video Android editor offers advanced functionalities to craft perfect videos. With its timeline editing interface, it simplifies the application of slow-motion effects to specific scenes. The application showcases three distinct slow-motion speed options: 0.5x, 0.3x, and 0.25x, ensuring perfection.
Key Features
- Accelerate your videos up to 4x with its high-speed options and get high-quality results.
- The video trimming feature and timeline editing enable accurate segmentation of a video.
- It is equipped with pre-existing music tracks to create the perfect slow-motion video on Android.
3. Video Editor & Maker - InShot
Embark upon the journey to create video slow motion Android with this multifunctional app. It extends a straightforward approach to slow video speed through slider manipulation. Timeline editing and selective playhead options empower users to adjust the speed of specific segments. This exceeds the conventional approach of a slo-mo creation, unlocking creative possibilities.
Key Features
- Elevate the artistic expression of videos by integrating a wide range of animations and text.
- Enhance your reels with a collection of transition effects like Fade in, Fade out, basics, and more.
- This editor has AI capabilities and background removal options with a heightened level of accuracy.
4. Video Maker & Editor - Vidma
This slow-mo app for Android facilitates individuals seeking a video editor capable of producing convincing results. It acts as a Velocity Edit Maker, offering diverse playback speed and positioning controls. The interface resembles a velocity graph, providing a visual representation of speed adjustments.
Key Features
- Introduces an automated “Keep Audio Pitch” option, ensuring high-quality audio.
- Enhance the creative factor in your images and videos with its built-in text and stickers.
- Comes with a variety of visual filters with an intensity control option.
5. VivaVideo - Video Editor&Maker
If you are seeking the best Slomo app for Android, this editor provides diverse speed-setting presets for creating slow-motion and fast-motion effects. Among presets such as Montage, Hero, Bullet, and others, it offers a Custom preset option to help you adjust everything accordingly. With its ability to apply speed settings at specific periods, your slow motions are bound to be perfect.
Key Features
- The non-uniform timeline editor allows you to incorporate multiple assets at once.
- A range of texts, animations, themes, effects, and music tracks are in its Stock Library.
- This video maker also incorporates a Voice Editor to uphold the audio track’s quality.
6. Smart Video Crop - Video Cut
Although this video maker is specified for resizing videos, it also offers speed change options. To make a video slow motion on Android, you can change both playback speed and framerate. Once you have edited your video, you can make changes to the export options. In addition, the application updates its mechanism and shows compatibility with Android 4.4 and higher versions.
Key Features
- The application shows multi-format video support, i.e., MP4, 3GP, and AVI.
- Proposes multiple video crop options like 1:1, 4:3, 16:9, and 3:2.
- You can select to crop the whole video or apply the crop to a specific part of it.
7. Video Editor - Video.Guru
What would be better than a slow-motion video app for Android that can change speed and enhance video? To access this functionality, users need to switch to its PRO version. The speed change options that it offers are from 0.2x to 100x, with 0.2x being the slowest. In addition, the tool doesn’t decline video quality but enhances it to 4K.
Key Features
- If you are a YouTuber, then this editor affects and filters for Vloggers and offers to remove Watermark.
- You can crop a video into available ratios while keeping its HD quality.
- Can add 30+ video transition effects and incorporate music to enhance their quality.
8. Slow Motion - Slow Mo, Fast Mo
Make video slow motion Android effortlessly with this application, which is specified for speed change. It offers 10 playback speed options for creating slow motions with precision. The playback speed ranges from 0.95x to 0.1x. Once you have created a slow motion with it, you can easily preview it to observe if any changes are needed.
Key Features
- Along with precise slo-mo options, it also offers extensive fast motion option speed ranges.
- You can mix and match both fast and slow-motion effects in a video at once.
- It also offers a watermark removal option to avoid any visual weakening.
9. Slow Motion Video FX-camera
Not only video frame rates but also slow down your speech with this slow-motion app for Android. You can add dramatic or funny effects to your voices using the application. It offers to slow down video speed up to 0.25x. It uses the standard slider approach to manipulate the playback speed of your videos. You can apply the slow-mo effect to the overall video or to some specific parts of it.
Key Features
- An intuitive user interface with a velocity graph to observe the changes in speed and duration.
- Transform your low-quality videos to HD quality with this slow-motion app for Android.
- Use the application’s built-in music library to incorporate music tracks.
10. Slow Motion
Decrease your video speed up to 1/4th of its original speed with this Android slow-motion video editor. The speed options are customizable, and you can apply them to multiple video scenes. As the name indicates, the tool is specifically fashioned for slow-motion effects; hence, it offers an accessible user interface.
Key Features
- Export your videos in landscape or portrait mode; the choice is yours.
- In any mode, the application retains video quality and exports it in full resolution.
- It is excellent to slow down YouTube videos as there is no watermark addition.
Bonus Part: Wondershare Filmora: A Perfect Desktop Solution To Slow Down Video
Making slow motion videos in Android is like keeping creativity in your hand anywhere. This facility is good for basic effects but not for professional and advanced slow-motion effects. That’s where you need to shift to a more equipped alternative, which is Wondershare Filmora . Using Filmora means turning imagination into the real picture.
It is a video editing platform with artificial intelligence integration. You can create slow-motion videos with automation in Filmora. The interactive interface of Filmora caters to all users’ needs in simple steps. Freelancers, content creators, and educationists use this platform for diverse needs.
Free Download For Win 7 or later(64-bit)
Free Download For macOS 10.14 or later
How to Make Video Slow Motion Android in Filmora
As you are familiar with Filmora, let’s make a slow-motion video. It is quite easy if compared with Android slow-motion video making. Without further delay, delve into the given step-by-step guide:
Step 1Import Your Project After Successful Launch
Unleash your creativity in Filmora after downloading it. In this regard, you must go to Wondershare Filmora’s official site. Open the main interface of Filmora and tap “New Project” to enter the editing window. To start working, import a file in the media panel and drag it into the timeline section.
Step 2Slow Down the Video with Uniform Speed
After successful importing, right-click on your video and an extended list. Choose the “Uniform Speed” option from the list and find an editing panel towards your right. You will see the slider under the speed option. Hold on to the circle and drag it to the left if you want to slow down the videos. Move downward and toggle the “Ripple Edit” and “Maintain Pitch” for good results.
Step 3Enhance Video with Optical Flow
Towards the end, you will find the “AI Frame Interpolation.” Click on its downward symbol and select the “Optical Flow” option from the list. It will automatically boost your video quality. You can choose the “Reverse Speed” option if your video is required.
Step 4End Editing and Move to Export
Now, it’s up to you if you want to continue editing with Filmora or want to export the media. To end editing, you can hit the “Export” button from the top right.
Remarkable Key Functionalities of Filmora
If you want to understand the amazing features of Filmora better, this section is for you. Keep reading and find some integral functionalities of Filmora. This platform offers more than just creating slow-motion video Android:
1. AI Smart Cutout
Artificial intelligence in Filmora can amazingly assist you in making flawless videos. Unlike other tools, Filmora allows you to remove unwanted objects, people, and icons from videos. Besides, users can refine their cutout frame by frame using its’ advanced editing options. You can preview the modified media in four ways, such as Transparency grid and Alpha Mode.
2. AI Audio Stretch
This AI-based feature is new to the market and saves hours of rippling and cutting audio. It aims to match the length of your audio with videos. From Vlog videos to blockbuster audio effects, you can use this feature almost everywhere. This option allows you to re-time your audio tracks after detecting vocals in the music.
3. Speech-to-Text
Video captions make the content accessible to international viewers. That’s where Filmora proves vital in removing language barriers. It supports over 26 languages and adds subtitles to your videos with one click. This built-in feature in Filmora recognizes speech swiftly to guarantee accuracy. You can also export your SRT file of subtitles to make any edits.
4. AI Portrait
Beautify faces in your videos to set a new trend on social media with Filmora. To do so, an AI Portrait feature can automatically detect faces to apply changes. You can choose a sticker effect from more than 70 AI portrait AR stickers. Besides, it can remove video backgrounds by retaining the human beings there.
Conclusion
With all marked details, this article concludes with a note that there are always different calibers of tools that we can work with. While discovering the best Android application in the market, you got to know many slow motion videos on Android. Along with that, we also discussed DemoCreator as a comprehensive solution to the entire use of mobile apps.
Also read:
- This Article Aims to Show You How to Export Videos in Filmora for 2024
- What Are The Stages Of Film Production
- In 2024, Best PDF to GIF Converters
- 2024 Approved How to Make an Aesthetic Slideshow
- How to Add a Green Screen to Zoom
- In 2024, Create Promotional Video
- New Want Make a Slide Show Video? Heres How
- In 2024, Free 3D Intro Makers
- Through Speed Ramping, Create a Smooth Transition in Slow-Motion Videos. Follow This Guide and Learn About Premiere Pro Slow Motion and a Better Alternative
- Updated In 2024, Having Difficulty in Choosing the Most Affordable 3D Slideshow Software? Stay Here for the Best Application Choices of All Times to Create the Most Stunning Slideshows Ever
- New In 2024, How to Loop a Video with iMovie on Mac and iPhone
- Updated 2024 Approved How to Merge Audio and Video Using FFmpeg
- New In 2024, Cropping a Video in Davinci Resolve Step by Step
- Enhance Your Video Color Accuracy with Video Scopes for 2024
- Updated In 2024, Ultimate Guidelines to Help You Better Use VLC Media Player
- 2024 Approved How Can Filmora Create an Audio Visualizer Project for a Song? All Steps, From Launching the App to Editing the Text, Are Detailed Here
- In 2024, Slow Down the GIF to Emphasize Details Better. To Do so, Read This Guide and Learn to Use the Best Platforms for Slow-Motion GIFs
- Updated In 2024, Best Filmic Pro LUTs For Video Editing
- New 2024 Approved Some of the Top Sites to Replace a Sky Background in Videos
- How to Make Video Fade to Black in Movie Maker Easily for 2024
- New Follow a Few Simple Steps and Learn How to Create a Professional Glowing Edge Effect to Your Videos in Filmora for 2024
- New 2024 Approved 8 Frame Rate Video Converters You Must Try
- 2024 Approved Top 10 Secret Tips & Tricks to Use in Wondershare Filmora
- 2024 Approved Are You Looking for an Ideal Halloween Countdown Video Clip for Your Video? This Article Will Walk You Through the Best Ones You Can Use to Get the Job Done Perfectly
- 2024 Approved Are You Eager to Discover the Top-Rated and Reliable LUTs that Can Be Used in Shotcut? This Article Will Help You a Lot with This Matter
- Updated 2024 Approved Free Ways To Split Video For Whatsapp Status On All Platforms
- In This Article, We Will Review Movavi Video Editor and List Out Movavi Video Suites Features for 2024
- 2024 Approved Looking for a Way to Edit Your Profile Picture for Telegram? Heres an Easy and Quick Guide on How to Change, Delete and Hide Your Profile Picture with Simple Steps
- This Article Talks in Detail About Why People Look for a Free Title Maker, and 8 Options that Will Benefit Their Work. It Includes Tools Like SEMrush Title Generator, Hubspot Title Generator, and More. Check Out
- Updated In 2024, We Will Give You the Best-Suggested List of Color Match Generators to Help You Choose From an Efficient Collection Rather than Finding It Aimlessly
- Updated 2024 Approved Time Lapse Videos Play an Important Part in Videography. If You Want to Start Video Shooting, Then You Shouldnt Miss Time Lapse Video. This Article Will Show You some Ideas over This
- Updated In 2024, Best 5 PDF to GIF Converters You Should Know
- Updated 2024 Approved Liquid Water Text Reveal Intro Offers an Impressive Opening to Any Video Content. Go Through the Detailed Steps to Create Liquid Water Reveal Intro in Wondershare Filmora
- New In 2024, Detailed Steps to Rotate Videos in Blender
- New Top 10 Best Slideshow Makers with Music
- New A Complete Guide to the Best Brand Story Videos |2023|
- Reliable User Guide to Fix Honor 90 Pro Running Slow and Freezing | Dr.fone
- Top 6 Apps/Services to Trace Any OnePlus Nord CE 3 5G Location By Mobile Number | Dr.fone
- Easy Tutorial for Activating iCloud from iPhone SE (2022) Safe and Legal
- In 2024, How to use Snapchat Location Spoofer to Protect Your Privacy On Xiaomi Mix Fold 3? | Dr.fone
- In 2024, FRP Hijacker by Hagard Download and Bypass your Xiaomi Redmi 13C FRP Locks
- 7 Ways to Unlock a Locked Nubia Z50 Ultra Phone
- In 2024, Does Airplane Mode Turn off GPS Location On Honor 100? | Dr.fone
- Updated Live Shopping in China Major Changes in the Industry for 2024
- Guide on How To Change Your Apple ID Email Address On Apple iPhone 11 Pro Max
- Three Solutions to Hard Reset Honor Magic5 Ultimate? | Dr.fone
- In 2024, Ultimate Guide to Catch the Regional-Located Pokemon For OnePlus Nord CE 3 Lite 5G | Dr.fone
- Set Your Preferred Job Location on LinkedIn App of your Nokia C210 | Dr.fone
- Title: Updated 2024 Approved How to Shoot Cinematic Footage with Phone
- Author: Morgan
- Created at : 2024-06-08 08:36:50
- Updated at : 2024-06-09 08:36:50
- Link: https://ai-video-editing.techidaily.com/updated-2024-approved-how-to-shoot-cinematic-footage-with-phone/
- License: This work is licensed under CC BY-NC-SA 4.0.
