
:max_bytes(150000):strip_icc():format(webp)/how-to-view-instagram-without-an-account-5271416-505eeceaf0e142ed8674d2ce2244a8be.jpg)
Updated 2024 Approved MP3 Cutter Download for Computer and Mobile
MP3 Cutter Download for Computer and Mobile
MP3 cutter download is one of the most reliable tools for editing of music files in a fast and friendly way. MP3 cutter free download at the same time supports merging and cutting audio files like WAV, ACC, MP3 AC3, OPUS, OGG, among others. Cutter MP3 free download application is designed in a way to make editing of music so enjoyable, easy and fun. The application is usually free, it supports the split of large music files into shorter ones, the app can also be used to split a whole album to receive the original tracks without. MP3 cutter download is also used to support trimming by silent detection.
MP3 Cutter download is a free app for Android users available in the Audio File Players line of apps, part of Audio & Multimedia. The company that develops MP3 Cutter is called accountlab. The most current version released by the developer is 1.0. To upload MP3 Cutter on your Android operating system device, just click on the green Continue To App button to begin the installation process of this MP3 cutter application. The MP3 cutter download app has been listed on their website since 2021-10-21 and has had 1639 downloads. The app is made in such a way that it pre-checks a files safety before the download. Though for personal protection reasons, its recommended that one should scan the downloaded app using an antivirus before using the app. In some instances, there is a possibility of your antivirus detecting the MP3 cutter as malware, there is a contact page where one can connect to customer care for help.
1. MP3 Cutter Download for Windows
MP3 Cutter is a Windows desktop application that enables the user to cut and split a large MP3 or video to tiny audio pieces. While using the MP3 Cutter download for windows, you are capable of cutting and splitting a number of formats besides the MP3 like WAV, AMR, WMA, WMV, MPG4, AVI, MP4, 3GP, FLAC WMV, MOV and many more formats audio and video formats. The layout of bits generated from the audio data is called the audio coding format. A format can be compressed or depressed using an MP3 cutter for windows or any other right program. In some cases, the data can be a raw bit-stream in the audio coding format. However, it’s normally embedded in an audio data format with a specified storage layer. If you intend to cut such a file, you should do so without messing up the quality of the entire file. That’s exactly what MP3 Cutter download for windows does.
There are several reasons where someone would want to cut an MP3 file or a video file. For example, you may be having some nice audio tune or a video track that you may like to have as a ringtone, using an MP3 cutter for windows will enable you to extract the part you like most. The cut tune can be used for your morning alarm, SMS notification or ringtone. You can also use the cut a MP3 file for fixing files or broken and damaged songs. For example, you may have recorded a song from the radio then you realize there is a part that was not clearly captured or an information you don’t want, you’ll use MP3 cutter download to reorganize the music. Cutter download for MP3 allows you to manipulate your audio files without the degradation in their quality.
How to use Free MP3 Cutter Joiner
Step 1: Addition of a File
On the app’s interface, click the “Add “ button to enable you to import files. The chosen file will play automatically.
Step 2: Setting of a Start Point and End Point
By left clicking to drag the red line to quickly locate, then click on the button to set start point and end point
Tip: You can use the format hh:mm:ss.fff to directly input start point and end point in the blank edit control.
Step 3: Start Cuttting
You will simply click on the ‘CUT’ button to start cutting the file needed.
How to Join MP3 with Using Free MP3 Cutter Joiner
Step 1: Add File
You will be asked to click “Add “ button so as to enable you to import multi files.
Step 2: Click “Setting” button to set audio quality, channels, sample rate
Step 3: Start Join
Go to the button written join and click “Join” button to start the joining process.
2. MP3 Cutter Download for Android
MP3 Cutter download for Android is meant to help you to easily mix music, trim music, merge music and preciously clip out the wanted part of music and set it as a unique ringtone for every on the android device. Cutter MP3 download for android can be applied in the customization of your own alarm tone and other notifications. It also supports bitrate & volume adjustment to create the highest quality melody for you. Steps to follow while using MP3 Cutter Download for Android:
1. Make a choice of the music clip you want to cut from your phone/ SD card
2. Secondly make a selection of the length of music that you want to cut or trim
3. Edit and tag for the clip(Title, Format, Bitrate, Volume etc)
4. And lastly save as the cut music as a ringtone/Alarm/Notification or Share as desired
3. MP3 Cutter Download for iPhone
Are you looking for an app to make a ringtone on your iPhone device? MP3 cutter for iPhone is the best choice for you to make personalized ringtones, it supports aiff, m4a, mp3 and wav formats. A user can use this app to edit a recorded and it also supports trimming. Free MP3 cutter download for iPhone supports mp3, wav, aiff, m4a and other types of music formats. Mp3 download for iPhone is also referred to as music editor, ringtone cutter, alarm tone maker or notification tone creator in other instances.
MP3 download cutter for Iphone is the best application for cutting music. The cut mp3, m4a, and ringtone application will help you cut that favorite part of an audio tune or a music file. You can use the cut music as ringtone, notification tone or a music song and alarm tone. The cut pieces can be shared with friendly since the cut results are easily manageable.
Instead of buying or endlessly searching the web for a ringtone, you can rather easily make the desired ringtone yourself using the files already stored in your phone even those audios from a video. Our Online MP3 Cutter download for iPhone allows making custom ringtones from your favorite song, voice memo or video, it can then be exported in several formats. It can be used on iPhone and Android phones, Windows or Mac computers.
Below are the steps to follow while using an audio cutter for iPhone.
Step 1: Selecting a file
Open MP3 Cutter download for iPhone tool first. Then select the file you want to work with by clicking on “Choose file”. If you want to select it from Dropbox or Google Drive account where the file exists, tap on the small arrow.
If using a computer, you will just need to drag and drop the file onto the page.
Once you have selected your file, a progress bar will appear to show you the status of the upload. The speed of the upload will definitely depend on the file size or the available internet speed. It will be slower if the file is large or if the internet speed is slow.
Step 2: Editing the audio
As the representation of the audio bar appears, you can slide it to the left or to the right to choose the exact location to start cutting and where to end the ringtone clip. There is an additional feature that allows you to enter time stamps manually. The application also gives you an option of checking if you want to add a “Fade in” or “Fade out” effects.
When you are through with cropping the audio, you can decide on what file format to export. The app supports popular audio codecs such as MP3, AIFF, OGG and WAV. An Android device is capable of accepting a varied number of sound formats, but while exporting a file format, it is advisable to stick to OGG or MP3 formats.
After selecting the desired option, select “Cut” at the right bottom of the page.
Step 3: Preview and download your ringtone
The speed of processing an audio will be directly affected by the file size and the internet speed. After you shall have successfully completed the download, you can press on play button to preview or hear the audio file.
The completed file can be saved in downloads or it can alternatively be added to the Dropbox or sent to Google drive.
If you need tweaking or wants to edit a piece of audio, you’ll get back to the tool.
4. MP3 Cutter for Mac
Whether you are running a podcast or you are a musician who aspires to share audio files through Spotify, SoundCloud, YouTube, or any other platform and or a smartphone app, you need to do some editing to your MP3 files before the final product is ready. Having access to a reliable and feature-rich MP3 cutter for Mac enables you to edit the audio file in a manner that helps you in delivering the exceptional listening experience your audience expects.
It is the reason why it is important to wisely pick your MP3 cutter wisely while considering a variety of other factors. Some of these factors are reliability, cost, performance and ease of use.
Wondershare Filmora
It is feature-rich audio as well as a video editor that allows beginners to edit their audio and video files quickly and easily. It has been specially designed for audio editing amateurs with a simple and user-friendly layout that ensures there is an easy learning curve. With the help of Filmora, you can record your music and voice using a built-in feature and also use it to trim, merge, split, and cut your MP3 files.
Apart from that, you can also make necessary adjustments to volume, pitch, and speed ensuring that your audio has the clarity you need. You can use Filmora for personal use as well to create customized ringtones by cutting songs and add special sound effects to your presentation.
For Win 7 or later (64-bit)
For macOS 10.12 or later
Import audio file to Filmora. You can also import a video and then detach the MP3 file from it.

Right click on the audio and you’ll see a list out editing options, such as cut, reverse, speed change etc.
For macOS 10.12 or later
Import audio file to Filmora. You can also import a video and then detach the MP3 file from it.
Right click on the audio and you’ll see a list out editing options, such as cut, reverse, speed change etc.
For macOS 10.12 or later
Import audio file to Filmora. You can also import a video and then detach the MP3 file from it.
Right click on the audio and you’ll see a list out editing options, such as cut, reverse, speed change etc.
For macOS 10.12 or later
Import audio file to Filmora. You can also import a video and then detach the MP3 file from it.
Right click on the audio and you’ll see a list out editing options, such as cut, reverse, speed change etc.
Methods on How to Speed Up Video on Splice
Controlling the speed of the video enables viewers to engage with the content much more actively. There are instances when you may have a lengthy video scene or audio segment that includes little-to-no essential information, and you wish to speed it up. The whole video or audio file can be sped up or slowed down, or only specific sections can. It is simple to perform with a splice speed up video. As a result, the project size and duration are reduced, and viewers are given clearer instructions on how to speed up the video on Splice.

This article will emphasize how to speed up videos on Splice, covering the procedures and alternatives that will assist you in producing splice speed up videos.
Part I. Beginner’s Guide to Splice
Free video editing software for iPhone and iPad is called Splice. Users may edit HD photos and videos with this simple-to-use tool to create a polished film perfect for sharing online. Transitions, cuts, borders, audio effects, background music, and voiceover are just a few of the many capabilities offered by the program. Videos are a great method to grab a potential client’s interest when using online marketing strategies. Splice makes it simple to combine images and videos from your iPhone to create a professional-looking video that will impress your viewers.
Splice has many fantastic tools that make editing videos simple. It offers several choices that video producers would find useful. The essential features are as follows.
- Add Music
You have two options: choose a song from a streaming provider, or record your voiceovers. Additionally, the Splice app offers a huge selection of music from its catalog.
- Edit Videos
Other fundamental editing features include the ability to merge, change the speed, and trim.
- Add Text
Text can be added to your video to further illustrate a certain event.
- Add an Image or Video Overlay
By including picture overlays, you may get more creative.
- Apply Cutting-edge Effects
You may edit, chop, or even merge your films using Splice. Similarly, you may add titles, change the tempo, and even highlight particular moments by slowing down your videos. You can also add effects for even more attractive looks.
- Upload your Video to Social Media
This function is quite helpful for showcasing your writing abilities to friends and possible clients.
![]()
Note: For a thorough review of the Splice video editing app, visit this full review passage.
Part II. How to Change Video Speed Using Splice App
Users can generate eye-catching videos for usage and export with Splice’s various effects and tools.
Here are the steps on how to speed up the video on Splice.
Step1 Tap the video you want to modify the pace of in the timeline, and it turns blue.

Step2 From the editing toolbar, choose Speed. Utilize the slider beneath the timeline to change the speed.

Best Alternative to Splice Video Editor For Changing Speed Of Videos
Splice was distinctive during this time. It has significantly reduced peoples’ travel costs compared to desktop video editing software because you never have to take a heavy laptop with you. Splice is different from a desktop editing program. If you purchase a desktop app, you’ll have access to more sophisticated tools and the capacity to store your data. Splice will only work for you if you want to make lengthy movies with loads of intricate effects.
However, you can use alternative editing programs instead of utilizing them on your computer. The Filmora video editor is a unique example with sufficient effects and plugins. Filmora’s user-friendly interface allows you to swiftly edit whatever video to a professional standard. Use its extensive resource packs to make your video a specific result.
Free Download For Win 7 or later(64-bit)
Free Download For macOS 10.14 or later
Ultimate Guide to Customize Video Speed in Filmora
Method 1. Click the “Fast” or “Slow” Options to Change the Speed Automatically
Upon clicking your video clip, a tab will display several options to modify the speed of your video. You can choose from slow to fast options. Click each option to choose from the specific speed you want

Method 2. Change the Speed Uniformly with “Uniform Speed”
If you wish to change the uniform speed of your video clip, double-clip the video to access the Speed Panel. Adjust the speed slider based on your speed uniform preference.

Method 3. Use Speed Ramping In Filmora for Better Video Results
Speed ramping is evident as the action switches between slow, regular speed, and fast motion in innumerable action films and sports videos. When you progressively increase the pace of a video clip, this is called speed ramping. You have the option of changing pace swiftly or consistently in Filmora. It can vary the pace of the audio or video clips. Use the Speed Ramping feature in Filmora.
Double-click the media you want to speed up - choose Speed > Speed Ramping. Alternatively, right-click on the media and choose Speed Ramping. Another option is clicking the Speed icon > Speed Ramping in the toolbar.
The Speed Ramping tab will let you customize the speed line. Also, it provides you with 6 different templates you can use to enhance action footage. The templates are Bullet Time, Montage, Jumper, Hero Moment, Flash in, and Flash out. In case none of the templates appeal to you, you can create your own preset and save it.
The best thing about this feature is Filmora allows you to maintain the original audio pitch. Thus, it would not sound strange after speed-ramping the media.

Here’s how you can use the customization mode on the Speed Ramping panel.
- Click Customize.
- Place the playhead on the part of the video clip which you want to speed up or slow down.
- Click Add to add a speed keyframe in that spot. Filmora will mark Speed Ramping on the media.
- Drag the white dot in the adjustment panel to change the video speed. Drag it upwards to accelerate the video speed or downwards to decelerate it.

Splice Video Editor FAQs
1. Why can’t I upload projects when using Splice?
Relinking your Splice folder could help if you experience problems downloading or uploading projects. The cache folder in your Splice app can also be cleared to resolve most download problems. Splice may require more space than is available before exporting the movie, relying on your export preferences. Any stored files that are kept may also use space. For instance, the app may require up to 2 GB of storage space if your finished film is 1 GB.
If you’re experiencing trouble downloading samples from the website, check that your Splice account is logged in on both the website and the desktop client. If you’re not logged onto the same profile on both the website and the app, samples/packs you’ve purchased online won’t appear.
2. How to remove watermarks on my video saved from Splice?
- Android
You can choose between utilizing the Splice app and learning how to speed up video on the splice app or an online watermark removal tool to remove a watermark from Splice. Launch the application and choose the video you wish to modify. To erase any watermarks from your movie, click the three dots in the right corner of your screen and select “Watermarks.” Following that, you must submit your video to the software and adhere to the watermark removal instructions. Following that, you must submit your video to the software and adhere to the watermark removal instructions.
- iPhone
You must confirm that Splice is already loaded on your iPhone and is the most recent version. Open the program after installation, browse the project with the watermark and learn how to speed up video on iPhone with Splice. After selecting the watermark with a tap, click “Edit” from the menu in the screen’s top right-hand corner. You’ll now see a new tab labeled “Effects” immediately below the “Audio” tab; tap on it, and scroll down until you find the “Watermark” slider. To remove the watermark, slide it the entire way to the left. Your project is now free of the watermark.
Bottom Line
Most people need help to produce high-quality videos on their devices. Most often, they’ll need to transfer them to their computers for extensive editing and polishing. That’s no longer the case, particularly with the emergence of mobile editing programs like the Splice app. You can quickly and effortlessly produce high-quality video material with a few clicks.
Part II. How to Change Video Speed Using Splice App
Users can generate eye-catching videos for usage and export with Splice’s various effects and tools.
Here are the steps on how to speed up the video on Splice.
Step1 Tap the video you want to modify the pace of in the timeline, and it turns blue.
Step2 From the editing toolbar, choose Speed. Utilize the slider beneath the timeline to change the speed.
Best Alternative to Splice Video Editor For Changing Speed Of Videos
Splice was distinctive during this time. It has significantly reduced peoples’ travel costs compared to desktop video editing software because you never have to take a heavy laptop with you. Splice is different from a desktop editing program. If you purchase a desktop app, you’ll have access to more sophisticated tools and the capacity to store your data. Splice will only work for you if you want to make lengthy movies with loads of intricate effects.
However, you can use alternative editing programs instead of utilizing them on your computer. The Filmora video editor is a unique example with sufficient effects and plugins. Filmora’s user-friendly interface allows you to swiftly edit whatever video to a professional standard. Use its extensive resource packs to make your video a specific result.
Free Download For Win 7 or later(64-bit)
Free Download For macOS 10.14 or later
Ultimate Guide to Customize Video Speed in Filmora
Method 1. Click the “Fast” or “Slow” Options to Change the Speed Automatically
Upon clicking your video clip, a tab will display several options to modify the speed of your video. You can choose from slow to fast options. Click each option to choose from the specific speed you want
Method 2. Change the Speed Uniformly with “Uniform Speed”
If you wish to change the uniform speed of your video clip, double-clip the video to access the Speed Panel. Adjust the speed slider based on your speed uniform preference.
Method 3. Use Speed Ramping In Filmora for Better Video Results
Speed ramping is evident as the action switches between slow, regular speed, and fast motion in innumerable action films and sports videos. When you progressively increase the pace of a video clip, this is called speed ramping. You have the option of changing pace swiftly or consistently in Filmora. It can vary the pace of the audio or video clips. Use the Speed Ramping feature in Filmora.
Double-click the media you want to speed up - choose Speed > Speed Ramping. Alternatively, right-click on the media and choose Speed Ramping. Another option is clicking the Speed icon > Speed Ramping in the toolbar.
The Speed Ramping tab will let you customize the speed line. Also, it provides you with 6 different templates you can use to enhance action footage. The templates are Bullet Time, Montage, Jumper, Hero Moment, Flash in, and Flash out. In case none of the templates appeal to you, you can create your own preset and save it.
The best thing about this feature is Filmora allows you to maintain the original audio pitch. Thus, it would not sound strange after speed-ramping the media.
Here’s how you can use the customization mode on the Speed Ramping panel.
- Click Customize.
- Place the playhead on the part of the video clip which you want to speed up or slow down.
- Click Add to add a speed keyframe in that spot. Filmora will mark Speed Ramping on the media.
- Drag the white dot in the adjustment panel to change the video speed. Drag it upwards to accelerate the video speed or downwards to decelerate it.
Splice Video Editor FAQs
1. Why can’t I upload projects when using Splice?
Relinking your Splice folder could help if you experience problems downloading or uploading projects. The cache folder in your Splice app can also be cleared to resolve most download problems. Splice may require more space than is available before exporting the movie, relying on your export preferences. Any stored files that are kept may also use space. For instance, the app may require up to 2 GB of storage space if your finished film is 1 GB.
If you’re experiencing trouble downloading samples from the website, check that your Splice account is logged in on both the website and the desktop client. If you’re not logged onto the same profile on both the website and the app, samples/packs you’ve purchased online won’t appear.
2. How to remove watermarks on my video saved from Splice?
- Android
You can choose between utilizing the Splice app and learning how to speed up video on the splice app or an online watermark removal tool to remove a watermark from Splice. Launch the application and choose the video you wish to modify. To erase any watermarks from your movie, click the three dots in the right corner of your screen and select “Watermarks.” Following that, you must submit your video to the software and adhere to the watermark removal instructions. Following that, you must submit your video to the software and adhere to the watermark removal instructions.
- iPhone
You must confirm that Splice is already loaded on your iPhone and is the most recent version. Open the program after installation, browse the project with the watermark and learn how to speed up video on iPhone with Splice. After selecting the watermark with a tap, click “Edit” from the menu in the screen’s top right-hand corner. You’ll now see a new tab labeled “Effects” immediately below the “Audio” tab; tap on it, and scroll down until you find the “Watermark” slider. To remove the watermark, slide it the entire way to the left. Your project is now free of the watermark.
Bottom Line
Most people need help to produce high-quality videos on their devices. Most often, they’ll need to transfer them to their computers for extensive editing and polishing. That’s no longer the case, particularly with the emergence of mobile editing programs like the Splice app. You can quickly and effortlessly produce high-quality video material with a few clicks.
Detailed Tutorial to Resize Your Video in VLC
Videos are one of the most popular types of content on the internet. There are millions of videos uploaded to YouTube, Facebook, and other video-sharing sites each day. Sharing your videos with others is possible when you know how to resize them in VLC. VLC is a free media player that allows you to convert or compress your videos in order to make them smaller for uploading or downloading.
Videos are a great way to showcase your business, company, or product on social media sites like Facebook and Twitter. But what happens when you use the wrong size for your video? The whole thing looks distorted and low quality. It’s not very appealing.
Luckily, resizing videos in VLC is simple. All you need is the right software and the right steps.
This blog post will walk you through how to resize videos using VLC. We’ll cover what the default settings are for video resolutions, how to change them, and why it’s important to know what size of video you’re uploading before uploading it.
So without further ado, let’s get started!
Step by step to resize your video in VLC
Anyone who has a lot of videos on their computer knows how frustrating it can be to find the video you want among the hundreds of ones you have. Well, VLC makes it possible to resize your videos so they’ll fit onto your desktop. Here’s how:
Resizing by converting to a smaller file size
Because some video formats, such as MKV and AVI, take up too much space, it’s a good idea to convert videos to smaller formats, such as FLV, WMV, and so on. To lower the video size, you’ll be pleased to learn that VLC allows you to convert video/audio files without the need to install any other software. The video conversion guide for VLC can be found below.
Step 1: Launch the VLC Media Player.

Step 2: Go to the menu and pick Media > Convert/Save from the drop-down menu, then Add > Convert/Save from the drop-down menu.

Step 3: Choose a profile for the video you wish to convert.

Step 4: Select the Start button to start VLC video compression.
Resizing by cutting unnecessary video segment
Step 1: Launch the VLC Media Player

Step 2: Go to Menu > View Menu > Advanced Controls in VLC Media Player and select it from the menu.

Step 3: Play the video you want to crop and then click the Record button on the scene you want to crop and then the same button to pause the video where you want to crop it.

Step 4: In Windows 7, 8, and XP, the film will automatically save in Library > Videos, and in My Documents > My Videos in Windows 7.
VLC Media Player is unquestionably one of the greatest video players available for free. Nonetheless, it isn’t the finest video reduction because it just reduces the size of videos by using certain simple parameters rather than complex ones. As a result, we offer Fimora, an all-in-one video toolbox that can convert, compress, download, record, edit, burn, and more, as a better video compressor. You can change the video resolution, bit rate, encoder, format, and other settings to compress video and audio files in a variety of formats. Follow the simple steps below to get this VLC compressor replacement on your Windows/Mac for free.
An easier way to resize videos using Filmora
Filmora Video Editor is a powerful, yet easy to use video editor for PC and Mac. With the most intuitive and streamlined editing process out there, Filmora lets you cut and resize videos with just a few clicks of your mouse.
Through this part, we’ll show you how to resize videos using Filmora’s three-step process: import video files, select video clips, and edit them. We’ll also teach you some shortcuts for making the editing process as quick as possible!
A common challenge for beginner video editors is knowing where to start. With Filmora, you begin by importing your video files, selecting the clip you want to cut, and then editing it. It’s a three-step process that takes less than five minutes!
Once you have finished editing your video clip, Filmora will give you the option to share it on social media or export it in MP4 or AVI format.
Keep reading to learn more about how to cut and resize videos using Filmora’s three-step process!
For Win 7 or later (64-bit)
For macOS 10.14 or later
Step by Step on How to Resize Videos using Filmora
Resizing videos in Filmora is a quick and easy process. To resize videos, first make sure you have imported your video file into the editor.
Resizing by changing the dimensions
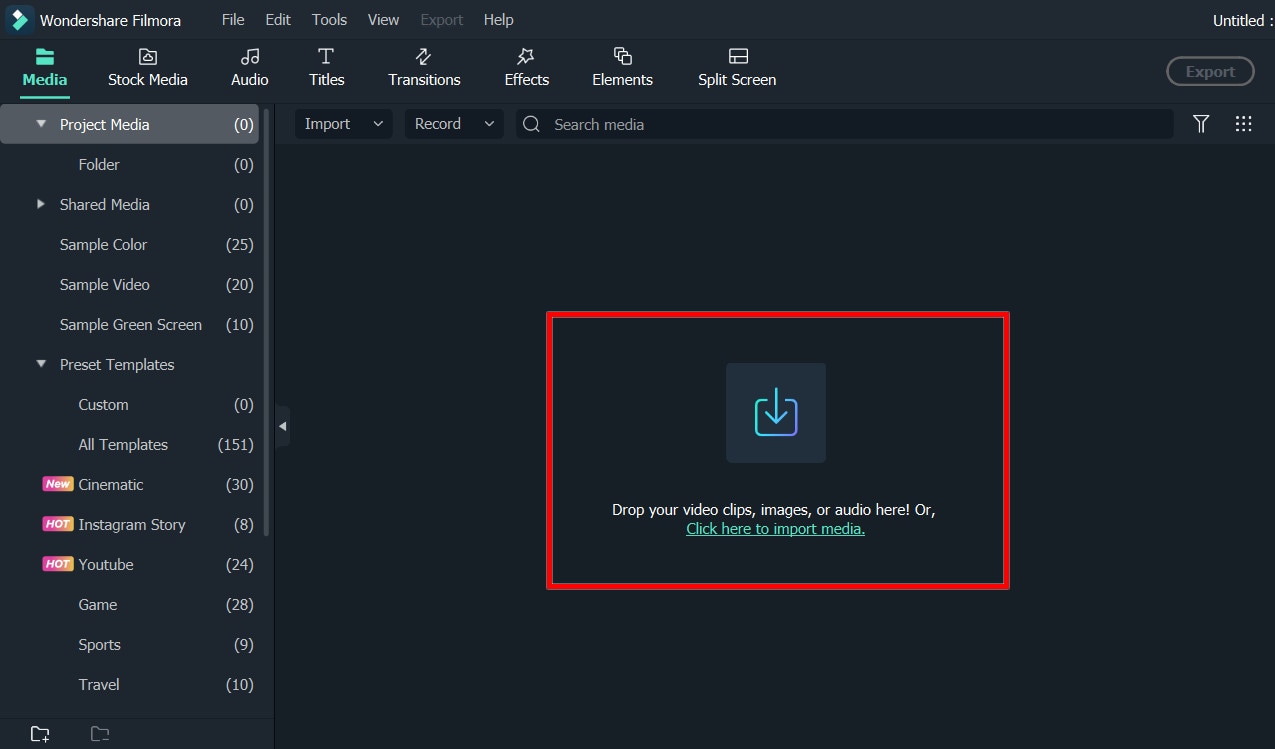
Step 1: To import a video file, either drag and drop the file on the screen or click on “Import Files” in the toolbar.

Step 2: Once you’ve imported your video, select the video clips that you want to resize by clicking on them; then, resizing them is as simple as dragging their borders!

Step 3: You can also use the size fields at the bottom of the frame to change their dimensions.
Step 4: Keep in mind that changing one dimension of a video clip will affect both its width and height proportionally. For example, if you enlarge a 16:9 widescreen clip to 720p (from 480p), it will be double its original proportions (720x480).
Resizing by shrinking video file size.
Step 1: To import a video file, either drag and drop it onto the screen or use the toolbar’s “Import Files” option.

Step 2: Open the video shrinker’s output window by clicking the “Export” button.

Step 3: Select the Format tab and keep the video in its original format as a result. Then, in the “Settings” panel, click the triangle button below to downsize the video by choosing a lower video resolution, frame rate, or bit rate. When it comes to video formats, you can choose among FLV, MP4, and other similar formats, which normally result in smaller files.

Step 4: The shrunk file should be exported.
Conclusion
So you’ve got this beautiful video you want to post on your social media page or website, but the dimensions are all wrong. No worries! There’s an easy solution to your problem. Filmora is a video editing software that is easy to use and versatile and powerful at the same time. Whether you’re just starting out or are a pro, Filmora is the perfect tool for the job. You don’t need to be an expert to edit videos in Filmora; it’s easy enough for beginners. With Filmora, you can resize your videos in seconds by following these simple steps above.
Step 2: Go to the menu and pick Media > Convert/Save from the drop-down menu, then Add > Convert/Save from the drop-down menu.
Step 3: Choose a profile for the video you wish to convert.
Step 4: Select the Start button to start VLC video compression.
Resizing by cutting unnecessary video segment
Step 1: Launch the VLC Media Player
Step 2: Go to Menu > View Menu > Advanced Controls in VLC Media Player and select it from the menu.
Step 3: Play the video you want to crop and then click the Record button on the scene you want to crop and then the same button to pause the video where you want to crop it.
Step 4: In Windows 7, 8, and XP, the film will automatically save in Library > Videos, and in My Documents > My Videos in Windows 7.
VLC Media Player is unquestionably one of the greatest video players available for free. Nonetheless, it isn’t the finest video reduction because it just reduces the size of videos by using certain simple parameters rather than complex ones. As a result, we offer Fimora, an all-in-one video toolbox that can convert, compress, download, record, edit, burn, and more, as a better video compressor. You can change the video resolution, bit rate, encoder, format, and other settings to compress video and audio files in a variety of formats. Follow the simple steps below to get this VLC compressor replacement on your Windows/Mac for free.
An easier way to resize videos using Filmora
Filmora Video Editor is a powerful, yet easy to use video editor for PC and Mac. With the most intuitive and streamlined editing process out there, Filmora lets you cut and resize videos with just a few clicks of your mouse.
Through this part, we’ll show you how to resize videos using Filmora’s three-step process: import video files, select video clips, and edit them. We’ll also teach you some shortcuts for making the editing process as quick as possible!
A common challenge for beginner video editors is knowing where to start. With Filmora, you begin by importing your video files, selecting the clip you want to cut, and then editing it. It’s a three-step process that takes less than five minutes!
Once you have finished editing your video clip, Filmora will give you the option to share it on social media or export it in MP4 or AVI format.
Keep reading to learn more about how to cut and resize videos using Filmora’s three-step process!
For Win 7 or later (64-bit)
For macOS 10.14 or later
Step by Step on How to Resize Videos using Filmora
Resizing videos in Filmora is a quick and easy process. To resize videos, first make sure you have imported your video file into the editor.
Resizing by changing the dimensions
Step 1: To import a video file, either drag and drop the file on the screen or click on “Import Files” in the toolbar.
Step 2: Once you’ve imported your video, select the video clips that you want to resize by clicking on them; then, resizing them is as simple as dragging their borders!
Step 3: You can also use the size fields at the bottom of the frame to change their dimensions.
Step 4: Keep in mind that changing one dimension of a video clip will affect both its width and height proportionally. For example, if you enlarge a 16:9 widescreen clip to 720p (from 480p), it will be double its original proportions (720x480).
Resizing by shrinking video file size.
Step 1: To import a video file, either drag and drop it onto the screen or use the toolbar’s “Import Files” option.
Step 2: Open the video shrinker’s output window by clicking the “Export” button.
Step 3: Select the Format tab and keep the video in its original format as a result. Then, in the “Settings” panel, click the triangle button below to downsize the video by choosing a lower video resolution, frame rate, or bit rate. When it comes to video formats, you can choose among FLV, MP4, and other similar formats, which normally result in smaller files.
Step 4: The shrunk file should be exported.
Conclusion
So you’ve got this beautiful video you want to post on your social media page or website, but the dimensions are all wrong. No worries! There’s an easy solution to your problem. Filmora is a video editing software that is easy to use and versatile and powerful at the same time. Whether you’re just starting out or are a pro, Filmora is the perfect tool for the job. You don’t need to be an expert to edit videos in Filmora; it’s easy enough for beginners. With Filmora, you can resize your videos in seconds by following these simple steps above.
Tips to Make Cinematic Color Grading
New modern color grading software allows you to do point-and-click color grading right in your browser. Color changes are as easy and intuitive as painting or sketching.
You can choose from many different look presets and movie emulations based on Hollywood movies plus real-time previews of your favorite LUTs with this software.
Part 1. What is Cinematic Color Grading?
The cinematic look is all the rage these days and aims to mimic images captured on real film rather than digitally created. To achieve this effect, film directors use various means from lighting to cinematic color gradation. The latter is a powerful tool for bringing a cool or warm tone to a video and providing smooth color transitions to fall on an image that doesn’t look too real but feels emotional.
This kind of post-production processing, which produces beautiful results when used by color magicians, requires a deep understanding of colors and their effect on our psyche and even physiology. It’s not enough to watch a color grading video and use a LUT to get where you want. You should at the very least have an understanding of:
- Color wheel
- Color quality
- Color harmony and discord
- Warm and cool colors
- Color context
Part 2. Tips to make cinematic color grading
Here are three helpful tips to create cinematic-looking images in DaVinci Resolve.
In my 10-year career as a colorist, I’ve worked on every type of content imaginable: short, long, commercial, educational, episodic—you name it. And while each of these formats requires its approach, the one constant that spans them all is the client’s desire for a cinematic look.
Virtually all of us aspire to more cinematic color, but we often come up short—in part because the term itself has become too broad to effectively target. To focus on the goal, I like to think of “cinematic” as “an image whose key visual properties are consistent with those of printed film.”
The print film was the primary medium through which we consumed cinematic images for the first century of filmmaking and is therefore at the very heart of cinematic aesthetics. In this video, I’ll show you my top three secrets to achieving this aesthetic quickly and consistently in Davinci Resolve.
Tips1: Create Color Density
The first secret to film color is to create color density. Another key aesthetic property of film images is that colors can be either highly saturated or highly luminescent but cannot be both.
We can mimic this visual characteristic by identifying strongly saturated colors in our image and using the Hue vs. Lum to reduce their brightness. This simple technique is especially effective on pure primary colors (red, green, and blue).
Tips2: Separation Beats Saturation
The second secret to film color is prioritizing separation over saturation. When you feel like an image lacks overall color or pop, it’s all too easy to reach for the saturation knob, but that’s not a very cinematic solution.
Instead, try using split toning—pushing cool colors into shadows and warm colors into highlights—to increase tonal separation and add depth to an image. This characteristic is present in virtually every film print and is deeply evocative when applied correctly.
Tips3: Strong Contrast is Your Friend
The third secret of film colors is a strong contrast. This is not always easy, as a higher contrast look inherently requires more precision with exposure placement. Too often we pump up some contrast, end up with an image that looks blown out or too crisp, and then immediately back away from editing.
However, if you stick with high contrast long enough to improve your exposure, you’ll get a very different result and be well on your way to a more cinematic image.
Part 3. How to add color cinematic grading by using Filmora?
New modern color grading software allows you to do point-and-click color grading right in your browser. Color changes are as easy and intuitive as painting or sketching.
You can choose from many different look presets and movie emulations based on Hollywood movies plus real-time previews of your favorite LUTs with this software.
Wondershare Filmora is an option if you want to easily change the colors of your projects. You may just double-click the media after dragging it onto the editing timeline to change the contrast, saturation, brightness, and hue.
Despite its speed, it also allows you to merge, edit audio, divide, rotate, and apply as many cool video effects as you like.
Step1Add the media
After installing Wondershare Filmora, click the New Project and Import button to easily find and load your videos.
Step2Correct the color [Basic and Advanced]
In the timeline, double-click the video editing window. Select the “Color” panel and make adjustments.
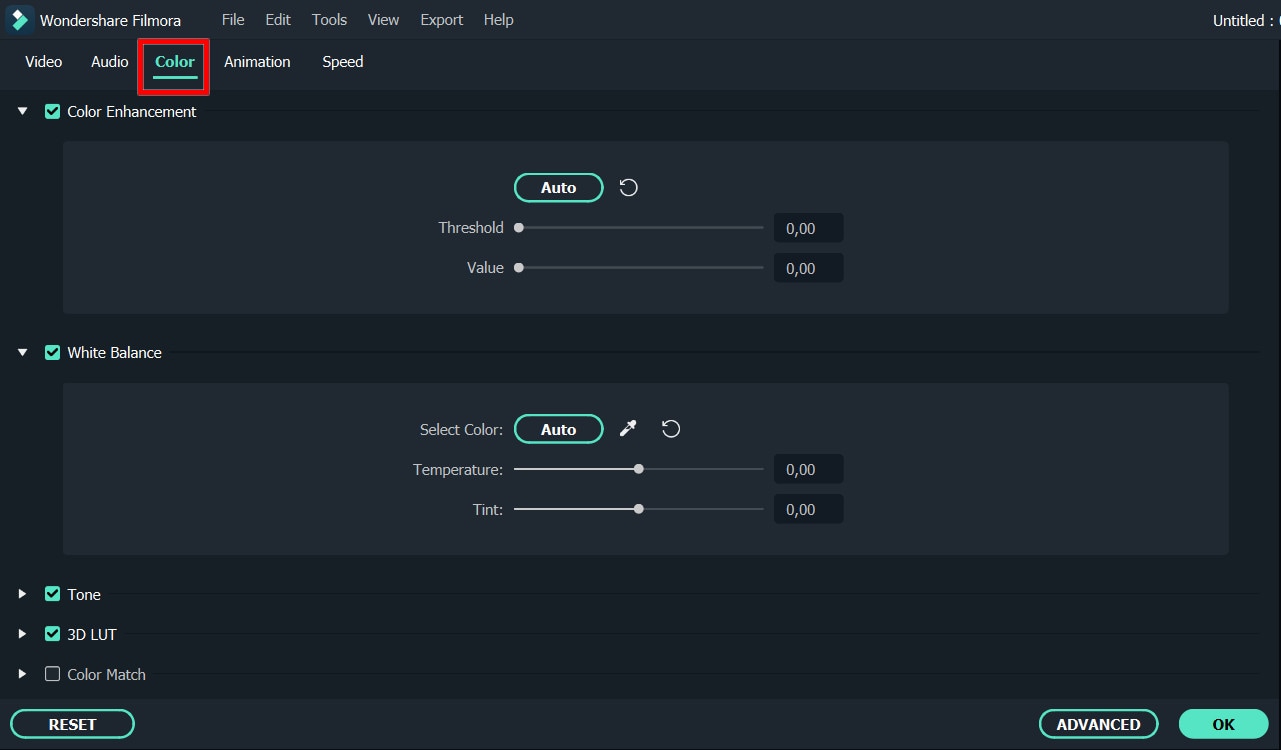
- Contrast: By adjusting this setting, you can control the brightness and color in different parts of the image.
- Saturation: This setting highlights the gray part of the video to a shade. You can adjust it to make the colors of the entire video image appear more saturated or more subdued.
- Brightness: You can change this setting to adjust the overall darkness and lightness of your project.
- Hue: Hue is generally the lightness of a color. Let’s say that when red is saturated with white, it creates a shade of pink.
- 3D LUT: 3D lookup tables provide your media with Hollywood movie color sets like the 007 series, Batman, Harry Porter, etc.
Hover over the indicator to adjust the color correction settings. Then left click on it and move the slider. The corresponding value stabilizes after releasing the mouse button.
With Filmora, you also have access to advanced color correction. Click the Advanced Color Tuning icon to enter the appropriate window where you can fine-tune the color or use preset templates.
The Preferences tab has a variety of templates, including Movie, Normal, 3D LUT, and Vignette. In the Edit tab, you can adjust color temperature, white balance, hue, 3D LUT, color, HSL, light, vignette, etc.
Step3Preview and save the new video
When you are satisfied with your creation, click “Export”. Then click the Settings button and save the new videos in different formats in the Format tab. You can also export the video directly to Vimeo or YouTube or burn it to DVD for better preservation.
Filmora’s color correction tools will make your videos look natural, more attractive, more vibrant, consistent, and professional.
Color Correction Presets
Color correction presets help your video achieve an enhanced cinematic look. Adjust gives you control over fine-tuning the colors in your shots. You can make various adjustments such as color temperature and exposure.
In the “Effects > LUT” tab, you’ll see an extensive selection of preset color settings. These include Vignettes, Movie Looks Like Old Movies, and Cinematic 3D LUT effects such as Harry Potter, Game of Thrones, House of Cards, and Mission Impossible.
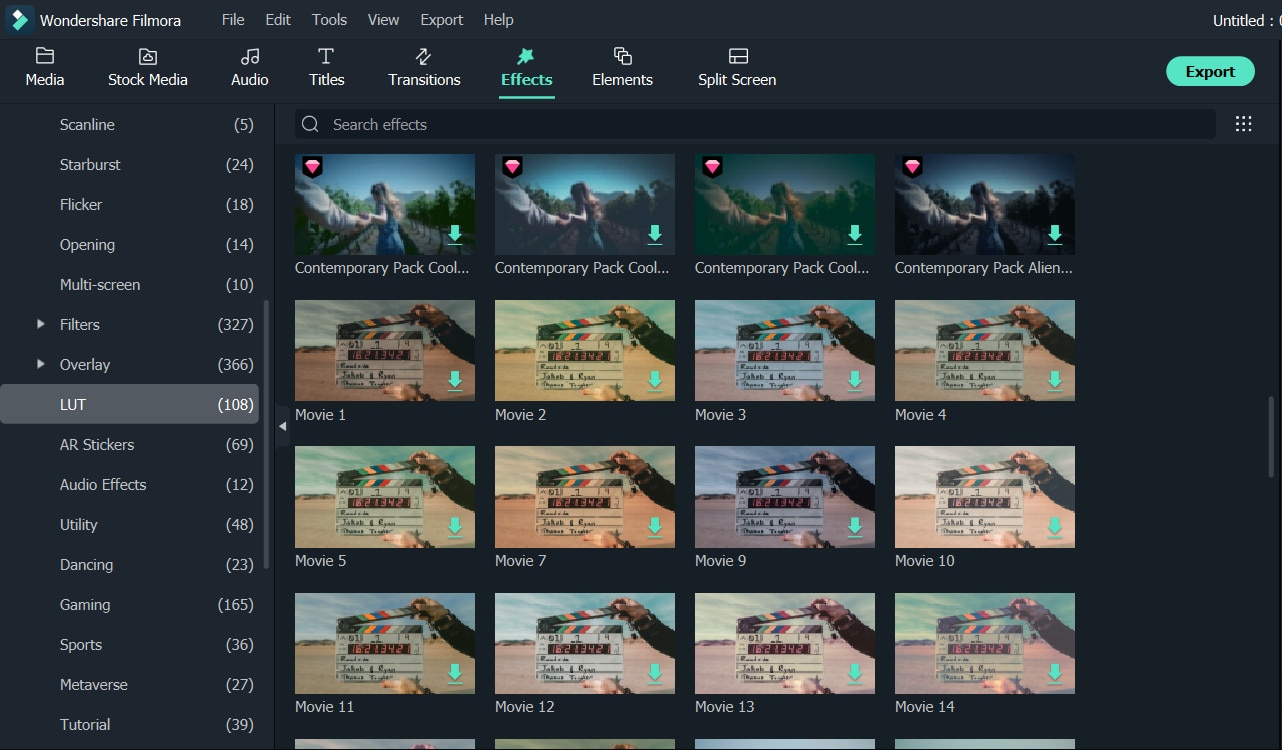
Filmora’s Color Correction Advanced Tool also categorizes your presets. Click on All Presents to see six categories: Favorites, Custom, 3D Lut, Common, Film, and Vignette.
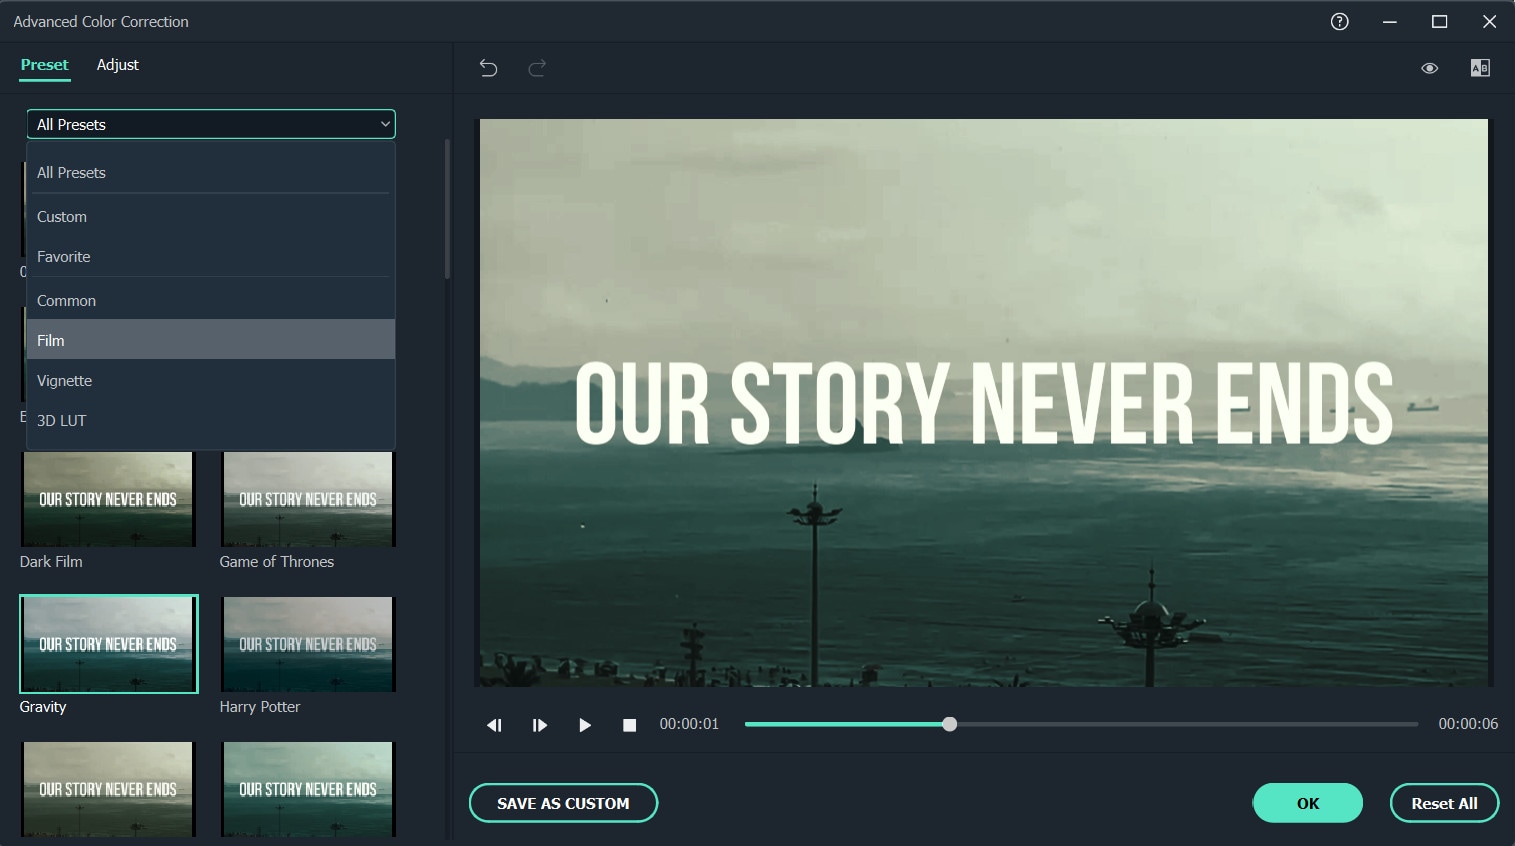
Double-click a preset to apply it to your video. You can see how it looks in the Advanced Color Correction preview window. If you are satisfied with the results, click OK.
Conclusion
Above are the steps to give your video a cinematic look using Wondershare Filmora, hope this helps if you are wondering how to do it. As we can see above, using Filmora video editor will make you more creative in making videos with a suitable emotional tone.
Free Download For Win 7 or later(64-bit)
Free Download For macOS 10.14 or later
Also read:
- New 2024 Approved Need to Learn About Halftone Effects? Learn How to Quickly Create a Halftone Effect in Adobe Photoshop with Simple, Easy-to-Follow Instructions
- Updated How to Add Camera Shake to Video in Adobe After Effects for 2024
- In 2024, If You Do Not Know How to QuickTime Trim Video Clips, You Are in the Right Place. We Have Provided Information that Will Help You Trim Videos with This Application and Make Them Engaging for Viewers
- Updated Do You Want to Professionally Blur the Background in Your Video? Read This Article to Find Out the Easiest Way to Blur the Background in Videos Using Adobe After Effects
- Updated Best Ever Ways Make Tiktok Slideshow Solved for 2024
- New Guide To Cropping and Combining Content in Wondershare Filmora Latest
- Updated Detailed Tutorial to Rotate Videos in Cyberlink PowerDirector
- In 2024, Finding The Best Filmic Pro LUTs For Video Editing
- Easy Ways to Edit Recorded Video for 2024
- Want to Sync Separate Audio with Video? Check Out This Guide to Do It in the Simplest Way Using the Video Editor - Wondershare Filmora
- Updated In 2024, Step by Step to Rotate Videos Using Kdenlive
- New Best Practical Tips to Improve Your Lighting in the Sun
- Updated Are You Trying to Create a Stunning Intro for Your Video for Free? This Article Will Show You How to Make an Intro Video Using InVideo in a Few Simple Steps for 2024
- New In 2024, Create Slow Motion Videos Using Final Cut Pro with Ease
- New 2024 Approved How To Speed Up Video With Lightworks Video Editor
- 2 Practical Ways to Combine Videos on TikTok for 2024
- 2024 Approved Creating a Slideshow Is Necessity of the Modern Time. Whether You Plan a Business Meeting or You Are Going to Do some Family Event with Slideshow Presentation, a Good Slideshow Maker Will Help You in This Direction
- 2024 Approved All You Need to Know About Transparent Logos and How You Can Make Them. Top Transparent Logos You Can Take Inspiration From
- New 2024 Approved Do You Want to Know About the DaVinci Resolve Adjustment Layer? Read This Article to Learn How to Use an Adjustment Layer (Clip) in DaVinci Resolve to Edit Videos
- New Top 15 Best Free MP4 Video Rotators Windows, Mac, Android, iPhone & Online
- How to Get Motion Blur in Valorant, In 2024
- 2024 Approved 5 Excellent Tools To Convert Video to 60 FPS
- Updated 2024 Approved Something That You Should Know About MP4 Video Format
- Are You Curious About Finding a Good iPhone Slow-Motion App? Discover the Top-Rated Applications in the Market that Will Help You Create the Perfect Video
- Updated How To Blur Background in Adobe Premiere Pro Detailed Guide
- Updated 2024 Approved What Are the Top 15 Slideshow Presentation Examples Your Audience Will
- Updated Know How to Create OBS Slideshow. Creating OBS Slideshow in Simple Steps; Application for Creating OBS Slideshow. Make OBS Slideshow Online for 2024
- Updated 2024 Approved Are You Looking for the Best Way to Add Subtitles to Your Video? The Top SRT File Creators Can Help You Do That
- Updated Guide To Creating the Best Video Collages for 2024
- Updated In 2024, Adding Shake Effects to Your Video With Alight Motion
- New 2024 Approved Step by Step to Crop Videos with CyberLink PowerDirector
- New How to Remove Motion Blur In Photoshop
- Updated Best Method to Split Video Into Parts Online
- 2024 Approved The Top 10 AI Video Analytics Companies at a Glance
- Updated In 2024, Have You Ever Tried to Remove Motion Blur From Photos? This Article Will Address How to Remove the Motion Blur Effect Using Photoshop and Its Alternatives
- In 2024, Are You Wondering How to Slow Down Videos or Speed Them up, Here Are Three Ways to Do It. Speed up or Slow Down Your Videos on PC, Online, and Phone
- 2024 Approved Secret Tips & Tricks to Use in Filmora
- How to Create Sports Intro and Outro for YouTube Video?
- Updated 2024 Approved Time Lapse Videos Play an Important Part in Videography. If You Want to Start Video Shooting, Then You Shouldnt Miss Time Lapse Video. This Article Will Show You some Ideas over This
- | Best WMV to GIF Converters for 2024
- New Detailed Steps to Rotate Video Using KMPlayer for 2024
- Updated Are You Surfing for some Way to Make Your Animated Emoji Discord Using Videos, GIFs, Images, or Text? Read Through This Article as Well Guide You Through the Process for 2024
- New 2024 Approved With Everything Centered Around Videos on the Digital Platform, the Use and the Need for AI-Based Editing Tools Have Also Increased Manifold. We Have Curated a List of the Top Programs that Can Help You with AI Video Editing
- All Things You Need to Know about Wipe Data/Factory Reset For Poco M6 5G | Dr.fone
- In 2024, How does the stardust trade cost In pokemon go On Poco X6? | Dr.fone
- Updated In 2024, AI Avatar | Wondershare Virbo Online
- Tips and Tricks for Setting Up your Samsung Galaxy A23 5G Phone Pattern Lock
- Best Methods for Oppo F25 Pro 5G Wont Turn On | Dr.fone
- In 2024, Unova Stone Pokémon Go Evolution List and How Catch Them For Poco X5 | Dr.fone
- In 2024, The Best Android Unlock Software For Motorola G24 Power Device Top 5 Picks to Remove Android Locks
- Unlock a disable iPhone 11 without a computer
- In 2024, A Step-by-Step Guide on Using ADB and Fastboot to Remove FRP Lock on your Samsung Galaxy S24 Ultra
- New 2024 Approved What Is Talking Avatar?
- Title: Updated 2024 Approved MP3 Cutter Download for Computer and Mobile
- Author: Morgan
- Created at : 2024-04-24 01:03:24
- Updated at : 2024-04-25 01:03:24
- Link: https://ai-video-editing.techidaily.com/updated-2024-approved-mp3-cutter-download-for-computer-and-mobile/
- License: This work is licensed under CC BY-NC-SA 4.0.
