
:max_bytes(150000):strip_icc():format(webp)/GettyImages-screen-mirroring-842272124-5a7897e104d1cf0037763c0a.jpg)
Updated 2024 Approved Right Tools for Converting 60FPS Frame Rate in Videos
Right Tools for Converting 60FPS Frame Rate in Videos
One of the primary things that differentiate a good video from a low-quality one is its frame rate or burst rate. This refers to the frequency of a series of images or frames consecutively appearing during display. A low frame rate per second or FPS causes issues in most display screens, so you will need a 60 FPS video converter to update it.
You need to convert or make video 60FPS online through tools and software to improve the sharpness of frame speed and make it suitable for streaming sites like YouTube that play 60FPS only or create UHD/4K videos. Plus, most high-definition screens for gaming, computers, tablets, and smartphones require high FPS.
This article will teach you the best solutions to make the conversion possible. Choose your option after a full evaluation.

Part I. What does 60 FPS mean?
Before discussing the best tools available for frame rate conversion, you should know what frame rate is. Also known as update rate, this signifies the frequency of the display of consecutive series of frames or images. The speed of how they appear determines the fluid play of the video with no interruption or lag.
In the context of video and film cameras, motion capture systems, and computer graphics, you should try to convert video to 60FPS. There are multiple types available, like the low 24FPS or 30FPS or the higher 60FPS or 120FPS. 60FPS is the most accepted option for diverse operating systems, screens, and graphics.
Differences between 24FPS, 30FPS, and 60FPS
Here are the differences you will note between the three common frame rates per second in videos. For a simple overview, these differences are expressed in tabular form.
| 24FPS | 30FPS | 60FPS | |
|---|---|---|---|
| Description | This universally acceptable frame rate choice is used for transferring video signals to film. | 30FPS is a slightly higher frame rate choice for animations and show videos that are suitable for television viewing and online platforms. | Videos at 60FPS have better fluency and smoother definition, with sharp videos that work during gaming, high-definition streaming, and UHD/4K video editing. |
| Types of videos | Older videos and films. | Online videos, TV shows, and news. | HD-quality movies, online videos, and games. |
| Users | Movie suppliers | Entertainment and Media professionals. | Movie producers, video editors, gaming software developers, etc. |
Why Should You Convert Videos into 60FPS?
In the context of video FPS, the three variations- 30FPS, 60FPS, and 24FPS are the most common. However, there are specific reasons why 60FPS is the best option you should use, and take the time to convert your files with this frame rate.
- Playing 24FPS or 30FPS videos on LCD screens have more prominent motion blur, the sharpness of transition is low and rough, etc.
- Well-known streaming sites like YouTube set their standard for videos at 60FPS. If you use a file with a higher FPS, it will compress to 60FPS automatically. Anything lower than that is unacceptable since it creates a laggy video transition.
- Creating high-quality movies in UHD or 4K resolution requires a high FPS like 60FPS. Movies shot with 24FPS do not assure the best display in the native frame rate and need pulldown conversion. This causes judder, which affects video quality. Converting the video to 60fps ai online is a better choice.
- Modern devices like computers, smartphones, and tablets have a high refresh rate. So, these, including some gaming monitors and television varieties, accept videos with 60FPS best.
- In animation, most creators run 3-4 images per drawing, which means 6 or 8 drawings per second. For the best transition between shorts and images, converting the animation videos to 60FPS is useful.
If you want to know more about these FPS options and which one to select for long-term usage, read through the comprehensive review .
Part II. How to convert A Video to 60fps?
If you plan to use a 60fps video converter, luckily, multiple capable choices are available in the market. Here, we present the top options you can use with an accurate conversion that occurs quickly and with limited errors.
1. Best Software Converters
The following are the best software-based platforms that you can try out.
One notable ai 60fps converter that users find extremely useful all around for optimized video editing is Wondershare UniConverter. The tool comes with varying AI-powered tools you can try to change.
With this software, you can easily make changes to the file during the conversion, like upgrading the FPS and bitrate of various video codecs, adjusting the contrast, contrast, etc., for output. Plus, it is possible to change the speed of the videos you are editing through the Editing timeline, between 0.25X - 3X speed options.

- User Base: Professional video editors, social media vloggers, businesses, students, beginner-level users, etc.
Watch this video to get a visual representation of how the tool works for FPS conversion and other editing functions.
How to use Wondershare UniConverter for converting FPS?
Step1 Download and launch the Wondershare UniConverter software on your device after completing all installation steps.
Step2 Click or drag and drop the video file of which you will change the frame rate.

Step3 To make changes to the video, click the Edit button and do them- like speed change, cutting sections, etc.
Step4 Then press the Settings button. Choose the Video option and then select the format like MP4.
Step5 Tap the setting icon beside the format choice and set the frame rate option as 60FPS. Then, press the Create button.

Step6 To convert the file further, click the Convert button and choose the destination file format. Press Convert.

Features:
- Convert between different file formats.
- Edit or split the files.
- Change the speed of the video between various speed modes.
- Download files at high resolution as per customization.
Pros
- Easy to use for non-technical users.
- The free software includes most of the conversion functions.
- Zero quality loss or lagging FPS playthrough in the converted file.
Cons
- GPU acceleration and High-Speed Conversion are available for Pro users only.
- You can resize the file for social media platforms like YouTube once using the Free Trial version.
Another FPS video maker and converter tool that you must try is Format Factory. This professional-quality video and audio converter tool are useful for various levels of video editing, including specifications like the frame rate per second.
You can clip and join your video section and do audio mixing steps. Easily adjust your video frame speed to ensure top-grade video playback with limited to no resolution loss. You can easily set the frame rate to 60FPS after downloading YouTube videos and making adjustments.

Pros
- Compress file size with settings changes for frame rate.
- Supports different video formats.
- Compatible with HEIC and WEBP formats for conversion.
Cons
- Only suitable for Windows users.
- Slightly complex to try for beginner-level users.
One of the best 60fps video editor options available in the market is MiniTool Video Converter. This Windows-based native software can make multiple advanced changes to your video file during conversion. Not to mention, it supports quick batch processing, with zero drop in quality after the process.
You can easily change the frame rate speed to 60FPS or other speed options during the exporting process. Adding effects will maintain a strong frame rate frequency that you can also preview.

Pros
- Supports a variety of video formats for conversion.
- Batch conversion is supported here.
- No loss of quality when you change the frame rate or bitrate.
Cons
- The process will lag if there is not at least 1 GB of free storage space in your device.
- Only works on Windows devices.
2. Best Online Converters
If you want to use a 60fps video converter online, there are tools available for that as well. These converters come with limited advanced mechanisms or features. However, in terms of changing the FPS of videos, web-based tools are easier to operate and do straightforward tasks.
Plus, you will not need to register or download third-party software here- the tools are accessible through any browser or device.
1) AI Video Frame Rate Converter
One of the best tools for online video frame rate conversion is the AI Video Frame Rate Converter. With this online tool, you can easily insert your file into the tool you access on any browser of your choice.
Then, choose the conversion FPS like 60FPS for your video and get high-resolution video quality in the final file. The software does not keep the file on the server, which assures good privacy protection for users with their files and data.

Pros
- No need to install the software.
- Easily choose the FPS option to convert the file.
- The quick conversion process.
Cons
- The free version only allows 5 credits for users to try.
- No tools to enhance video quality with the free tool.
2) Video2Edit
Another top 60fps converter online that users should give a chance is Video2Edit. This tool is accessible through any web browser and allows one to change various aspects of the video they are converting, including the frame rate.
You can choose 60FPS as the target frame rate choice for the video that you add to your device’s tool. It also supports 120FPS and other options lower than 60FPS- the final converter file is still a high definition.

Pros
- Choose the frame rate per second for your video.
- Make settings changes for your video audio additionally.
- The tool is easily accessible and free to use.
Cons
- You have to take more steps for customization instead of directly getting the FPS changing option.
- Cannot convert multiple files simultaneously.
3) Aconvert
Users can try out this online video to 60fps converter to change elements of videos quickly during conversion. You can insert your file from a cloud account, device, or URL and choose the video format to convert.
Plus, it is much easier to directly set the frame rate you want to change in the video. This tool supports up to 60FPS for the change, and you can choose a custom FPS if necessary.

Pros
- Can convert video codec settings like bitrate, etc., for different file formats.
- Easily add a file from the device, URL, or cloud.
- Quick processing speed for the conversion.
Cons
- No batch conversion for multiple files.
- Big files can get slow to convert.
Bonus Tip. Use Wondershare Filmora to Create High-Quality Videos with 60FPS Support
If you plan to make further edits to your video clips and directly create a project with 60FPS support, using a capable 60fps maker software is necessary. Wondershare Filmora is suitable software for video editing professionals and regular users to try to make videos easily.
Free Download For Win 7 or later(64-bit)
Free Download For macOS 10.14 or later
You can use the different features available for quick and customized video projects. Here, you can try the Instant Mode feature for instantaneous video edits or directly try out the editor timeline with diverse features like Edit icon or Speed Ramping to make changes. As for adjusting the frame rate, you can make those changes during export.
Watch this video to know how to use Filmora for further video editing.
How to Change Frame Rate to 60FPS in Filmora?
Step1 After you have completed all of the edits, click on the Export button in the editor timeline of Filmora.
Step2 Choose the output format you will download the video file, e.g., MP4, from the Local tab.

Step3 Click on the Settings button. Adjust the specification of the video, like frame rate, and change to 60FPS. Make other changes if needed, and press OK.

Step4 Click on Export to download the file or directly upload it via Vimeo or YouTube through those tabs.
Conclusion
Indeed, adjusting the frame rate of your video will help you create high-quality videos with a fluid and lag-less transition. You should convert your file to 60FPS if it is a lower version at the time to improve sharpness and make it compatible with most screen types, 4K movie playing, and streaming.
Use the available online and native software options to make these changes quickly and efficiently. Additionally, if you want to create a file directly at 60FPS, you can do so using Filmora.
Give these tools a try first to get a better experience with the features and process.
Why Should You Convert Videos into 60FPS?
In the context of video FPS, the three variations- 30FPS, 60FPS, and 24FPS are the most common. However, there are specific reasons why 60FPS is the best option you should use, and take the time to convert your files with this frame rate.
- Playing 24FPS or 30FPS videos on LCD screens have more prominent motion blur, the sharpness of transition is low and rough, etc.
- Well-known streaming sites like YouTube set their standard for videos at 60FPS. If you use a file with a higher FPS, it will compress to 60FPS automatically. Anything lower than that is unacceptable since it creates a laggy video transition.
- Creating high-quality movies in UHD or 4K resolution requires a high FPS like 60FPS. Movies shot with 24FPS do not assure the best display in the native frame rate and need pulldown conversion. This causes judder, which affects video quality. Converting the video to 60fps ai online is a better choice.
- Modern devices like computers, smartphones, and tablets have a high refresh rate. So, these, including some gaming monitors and television varieties, accept videos with 60FPS best.
- In animation, most creators run 3-4 images per drawing, which means 6 or 8 drawings per second. For the best transition between shorts and images, converting the animation videos to 60FPS is useful.
If you want to know more about these FPS options and which one to select for long-term usage, read through the comprehensive review .
Part II. How to convert A Video to 60fps?
If you plan to use a 60fps video converter, luckily, multiple capable choices are available in the market. Here, we present the top options you can use with an accurate conversion that occurs quickly and with limited errors.
1. Best Software Converters
The following are the best software-based platforms that you can try out.
One notable ai 60fps converter that users find extremely useful all around for optimized video editing is Wondershare UniConverter. The tool comes with varying AI-powered tools you can try to change.
With this software, you can easily make changes to the file during the conversion, like upgrading the FPS and bitrate of various video codecs, adjusting the contrast, contrast, etc., for output. Plus, it is possible to change the speed of the videos you are editing through the Editing timeline, between 0.25X - 3X speed options.
- User Base: Professional video editors, social media vloggers, businesses, students, beginner-level users, etc.
Watch this video to get a visual representation of how the tool works for FPS conversion and other editing functions.
How to use Wondershare UniConverter for converting FPS?
Step1 Download and launch the Wondershare UniConverter software on your device after completing all installation steps.
Step2 Click or drag and drop the video file of which you will change the frame rate.
Step3 To make changes to the video, click the Edit button and do them- like speed change, cutting sections, etc.
Step4 Then press the Settings button. Choose the Video option and then select the format like MP4.
Step5 Tap the setting icon beside the format choice and set the frame rate option as 60FPS. Then, press the Create button.
Step6 To convert the file further, click the Convert button and choose the destination file format. Press Convert.
Features:
- Convert between different file formats.
- Edit or split the files.
- Change the speed of the video between various speed modes.
- Download files at high resolution as per customization.
Pros
- Easy to use for non-technical users.
- The free software includes most of the conversion functions.
- Zero quality loss or lagging FPS playthrough in the converted file.
Cons
- GPU acceleration and High-Speed Conversion are available for Pro users only.
- You can resize the file for social media platforms like YouTube once using the Free Trial version.
Another FPS video maker and converter tool that you must try is Format Factory. This professional-quality video and audio converter tool are useful for various levels of video editing, including specifications like the frame rate per second.
You can clip and join your video section and do audio mixing steps. Easily adjust your video frame speed to ensure top-grade video playback with limited to no resolution loss. You can easily set the frame rate to 60FPS after downloading YouTube videos and making adjustments.
Pros
- Compress file size with settings changes for frame rate.
- Supports different video formats.
- Compatible with HEIC and WEBP formats for conversion.
Cons
- Only suitable for Windows users.
- Slightly complex to try for beginner-level users.
One of the best 60fps video editor options available in the market is MiniTool Video Converter. This Windows-based native software can make multiple advanced changes to your video file during conversion. Not to mention, it supports quick batch processing, with zero drop in quality after the process.
You can easily change the frame rate speed to 60FPS or other speed options during the exporting process. Adding effects will maintain a strong frame rate frequency that you can also preview.
Pros
- Supports a variety of video formats for conversion.
- Batch conversion is supported here.
- No loss of quality when you change the frame rate or bitrate.
Cons
- The process will lag if there is not at least 1 GB of free storage space in your device.
- Only works on Windows devices.
2. Best Online Converters
If you want to use a 60fps video converter online, there are tools available for that as well. These converters come with limited advanced mechanisms or features. However, in terms of changing the FPS of videos, web-based tools are easier to operate and do straightforward tasks.
Plus, you will not need to register or download third-party software here- the tools are accessible through any browser or device.
1) AI Video Frame Rate Converter
One of the best tools for online video frame rate conversion is the AI Video Frame Rate Converter. With this online tool, you can easily insert your file into the tool you access on any browser of your choice.
Then, choose the conversion FPS like 60FPS for your video and get high-resolution video quality in the final file. The software does not keep the file on the server, which assures good privacy protection for users with their files and data.
Pros
- No need to install the software.
- Easily choose the FPS option to convert the file.
- The quick conversion process.
Cons
- The free version only allows 5 credits for users to try.
- No tools to enhance video quality with the free tool.
2) Video2Edit
Another top 60fps converter online that users should give a chance is Video2Edit. This tool is accessible through any web browser and allows one to change various aspects of the video they are converting, including the frame rate.
You can choose 60FPS as the target frame rate choice for the video that you add to your device’s tool. It also supports 120FPS and other options lower than 60FPS- the final converter file is still a high definition.
Pros
- Choose the frame rate per second for your video.
- Make settings changes for your video audio additionally.
- The tool is easily accessible and free to use.
Cons
- You have to take more steps for customization instead of directly getting the FPS changing option.
- Cannot convert multiple files simultaneously.
3) Aconvert
Users can try out this online video to 60fps converter to change elements of videos quickly during conversion. You can insert your file from a cloud account, device, or URL and choose the video format to convert.
Plus, it is much easier to directly set the frame rate you want to change in the video. This tool supports up to 60FPS for the change, and you can choose a custom FPS if necessary.
Pros
- Can convert video codec settings like bitrate, etc., for different file formats.
- Easily add a file from the device, URL, or cloud.
- Quick processing speed for the conversion.
Cons
- No batch conversion for multiple files.
- Big files can get slow to convert.
Bonus Tip. Use Wondershare Filmora to Create High-Quality Videos with 60FPS Support
If you plan to make further edits to your video clips and directly create a project with 60FPS support, using a capable 60fps maker software is necessary. Wondershare Filmora is suitable software for video editing professionals and regular users to try to make videos easily.
Free Download For Win 7 or later(64-bit)
Free Download For macOS 10.14 or later
You can use the different features available for quick and customized video projects. Here, you can try the Instant Mode feature for instantaneous video edits or directly try out the editor timeline with diverse features like Edit icon or Speed Ramping to make changes. As for adjusting the frame rate, you can make those changes during export.
Watch this video to know how to use Filmora for further video editing.
How to Change Frame Rate to 60FPS in Filmora?
Step1 After you have completed all of the edits, click on the Export button in the editor timeline of Filmora.
Step2 Choose the output format you will download the video file, e.g., MP4, from the Local tab.
Step3 Click on the Settings button. Adjust the specification of the video, like frame rate, and change to 60FPS. Make other changes if needed, and press OK.
Step4 Click on Export to download the file or directly upload it via Vimeo or YouTube through those tabs.
Conclusion
Indeed, adjusting the frame rate of your video will help you create high-quality videos with a fluid and lag-less transition. You should convert your file to 60FPS if it is a lower version at the time to improve sharpness and make it compatible with most screen types, 4K movie playing, and streaming.
Use the available online and native software options to make these changes quickly and efficiently. Additionally, if you want to create a file directly at 60FPS, you can do so using Filmora.
Give these tools a try first to get a better experience with the features and process.
10 Best Video Editing Apps With Templates
Are you tired of spending hours trying to perfect your video edits? It’s time to upgrade to a video editing app with built-in templates. Not only do these apps save time and effort, but they also allow you to create professional-grade videos with a consistent look and feel. This article will showcase the 10 best video editing apps with templates that will take your editing skills to the next level.
But before we dive into the list, let’s discuss the benefits of using a video editing app with templates. Not only do templates save time and effort, but they also ensure that your videos have a cohesive and polished look. So whether you’re a beginner or a seasoned pro, a video editing app with templates is a must-have for any video creator.

- Filmora for Mobile (Formerly Known as Filmora) - Best for Beginners & Vloggers
- Promeo Video Making App With Templates for Mobile
- LumaFusion Video Editing App With Templates for iPhone/iPad
- KineMaster Video Editor Program With Templates
- VivaVideo
Benefits of Using Video Makers With Templates
There are many benefits to using a video maker with built-in templates. Here are just a few:
- Save time: Templates allow you to quickly and easily create professional-grade videos without starting from scratch.
- Consistent look and feel: Templates ensure that all your videos have a cohesive and polished look.
- Easy to use: Most video makers with templates are user-friendly and easy to learn, even for beginners.
- Wide variety of options: Many video makers offer a wide range of templates to choose from, covering a variety of styles and themes.
Overall, using a video maker with templates is a great way to save time and effort while creating professional-grade videos with a consistent look and feel. Whether a beginner or a seasoned pro, a video maker with templates is valuable in your video creation toolkit.
5 Best Video Editing Apps With Templates for iOS/Android
Looking for the best video editing app with templates for your iOS or Android device? Look no further! These apps are user-friendly, feature-rich, and offer many templates. Whether a beginner or a seasoned pro, you’ll find an app on this list that suits your needs.
1. Filmora for Mobile (Formerly Known as Filmora) - Best for Beginners & Vloggers

Filmora for Mobile (formerly known as Filmora) is a powerful and user-friendly video editing app with many templates to choose from.
Editor’s Verdict: It’s perfect for beginners and vloggers who want to create professional-grade videos on the go.
Ratings in App Store: 4.7 out of 5
Ratings in Google Play Store: 4.7 out of 5
Operating Systems: Android and iOS
Pricing: Free and offers In-App Purchases
In the app, you’ll find a variety of templates for different occasions, including holidays, birthdays, and more. You can easily customize these templates to fit your specific needs or create your own from scratch. Filmora for Mobile also offers a range of video editing tools, including trimming, splitting, and merging, as well as adding text, music, and other media to your videos.
2. Promeo Video Making App With Templates for Mobile

Promeo is a video-making app with many templates to choose from. Whether you’re looking to create a promotional video, a tutorial, or something else, you’ll find a template in Promeo that fits your needs.
Editor’s Verdict: The app’s templates are easy to use and customize, allowing you to create professional-grade videos with a consistent look and feel.
Ratings in App Store: 4.8 out of 5
Ratings in Google Play Store: 4.5 out of 5
Operating Systems: Android and iOS
Pricing: Free and offers In-App Purchases
Promeo’s templates are a great asset for anyone seeking to create top-notch videos on their mobile device. In addition to the templates, the app also provides various video editing tools such as cutting, separating, and combining clips and the option to insert text, music, and other elements into the videos.
3. LumaFusion Video Editing App With Templates for iPhone/iPad

LumaFusion is a powerful and feature-rich video editing app with templates for iPhone and iPad. It’s a favorite among professional video editors and has features that make it easy to create high-quality videos on the go.
Editor’s Verdict: LumaFusion’s templates are a valuable resource for anyone seeking to create professional videos on their iOS device.
Ratings in App Store: 4.8 out of 5
Ratings in Google Play Store: 4.5 out of 5
Operating Systems: Android and iOS
Pricing: $29.99 and offers In-App Purchases
One standout feature is the app’s collection of templates, which allow users to produce professional-grade videos with a cohesive look and feel quickly and easily. In addition to a wide selection of templates, LumaFusion also provides video editing tools such as trimming, splitting and merging.
4. KineMaster Video Editor Program With Templates

KineMaster is a full-featured video editor program with many templates to choose from. Whether you’re looking to create a promotional video, a tutorial, or something else, you’ll find a template in KineMaster that fits your needs.
Editor’s Verdict: The app’s templates are easy to use and customize, allowing you to create professional-grade videos with a consistent look and feel.
Ratings in App Store: 4.7 out of 5
Ratings in Google Play Store: 4.1 out of 5
Operating Systems: Android and iOS
Pricing: Free and offers In-App Purchases
KineMaster’s templates are easy to use and customize, making them a valuable tool for anyone looking to create high-quality videos on their mobile device. KineMaster is a feature-rich video editor program with templates perfect for beginners and professionals.
5. VivaVideo

VivaVideo is a fantastic video editing app that makes it easy to create professional-grade videos on your mobile device.
Editor’s Verdict: Whether a beginner or a seasoned pro, you’ll find VivaVideo’s templates easy to use and customize to fit your specific needs.
Ratings in App Store: 4.8 out of 5
Ratings in Google Play Store: 4.6 out of 5
Operating Systems: Android and iOS
Pricing: Free and offers In-App Purchases
One of the app’s standout features is its wide range of templates, which allow you to create polished and cohesive videos with just a few taps. Give VivaVideo a try and see how its templates can elevate your video editing game!
2 Best Video Makers With Templates for Desktop
If you’re looking to create professional-grade videos on your desktop computer, a video maker with templates is a must-have tool. These video makers are feature-rich and offer a wide range of templates to choose from, making it easy to create high-quality videos on your desktop.
6. Wondershare Filmora for Windows/Mac
Free Download For Win 7 or later(64-bit)
Free Download For macOS 10.14 or later

Wondershare Filmora is a top-notch video editor suitable for both beginners and more advanced users. It has a wide range of features that make it a valuable tool for video editing.
Editor’s Verdict: While some users may initially find the interface confusing, it is easy to learn and navigate. With Filmora, you’ll be able to start editing videos in no time.
Ratings from G2: 4.4 out of 5
Operating Systems: Windows and Mac
Pricing:
● $49.99 Filmora Annual
● $79.99 Filmora Perpetual
● $59.99 Filmora Cross-Platform Plan
Filmora is a versatile video editor available for both Mac and Windows platforms. It offers a wide range of tools suitable for novice editors and advanced features for more experienced users. With Filmora, you’ll have everything you need to create professional-grade videos.
7. PowerDirector 365 Business

PowerDirector is an extremely feature-rich video maker perfect for those who plan on regularly editing videos.
Editor’s Verdict: Its subscription service, offered by CyberLink, is a great value for those who will be using the app’s many features regularly.
Ratings from G2: 4.4 out of 5
Operating Systems: Windows and Mac
Pricing:
● $12.50 monthly subscription
PowerDirector offers great value subscriptions with regular feature updates, making it a flexible and adaptable choice for video editing. The app also includes free premium effects and plugins, adding even more value to its subscriptions.
3 Best Video Creators With Templates Online
Are you looking to create professional-grade videos online without downloading any software? A video creator with templates is the perfect solution! These video creators make it easy to create high-quality videos from the comfort of your web browser.
8. Canva

Canva is a feature-rich video creator with templates perfect for beginners and professionals.
Editor’s Verdict: Canva is a user-friendly and feature-rich video creator with many templates.
Ratings from G2: 4.7 out of 5
Pricing:
● $0 - Free subscription
● $12.99/month - Pro subscription
● $14.99/month - Team subscription
Canva’s templates are easy to use and customize, making them a valuable tool for creating high-quality videos online.
9. Animoto

With Animoto, creating stunning, professional-grade videos on your computer and mobile device is simple. Give it a try and see how easy it is to create high-quality videos with Animoto.
Editor’s Verdict: Any video from the template collection can be selected and modified to fit the user’s needs.
Ratings from G2: 4.4 out of 5
Pricing:
● $0 - Personal
● $8.00 /month - Basic
● $15.00/month - Professional
● $39.00/month - Business
Animoto’s pre-made templates are designed to make video marketing a breeze! Customizable with your photos, videos, text, and branding, these templates follow best practices and can be easily updated to fit your needs.
10. InVideo

InVideo is a powerful online video creator that provides users with a large collection of assets, including high-quality images and footage from industry leaders such as Shutterstock and iStock.
Editor’s Verdict: With its extensive collection of assets and powerful editing tools, InVideo is a valuable resource for businesses and professionals looking to create high-quality videos.
Ratings from G2: 4.7 out of 5
Pricing:
● $0 - Free
● $16.0/month - Basic
● $29.00/month - Professional
● $79.00/month - Professional Plus
InVideo enables full customization of the videos, providing options such as the addition of emojis, filters, animated transitions, special effects, and animated objects to make the videos more visually engaging and interesting.
How To Make a Video With Templates
Creating a professional-grade video with templates has always been challenging, thanks to video editing software such as Filmora. Whether a beginner or a seasoned pro, you’ll find this step-by-step guide easy to follow and customize to fit your specific needs. So let’s get started and learn how to make a video with Filmora’s templates!
l How To Create Video With Templetes Using Filmora for Desktop
Step1 Launch Filmora, click Instant Mode, and select the template you want for your video.

Step2 Import all your media and click “Auto Create.”

Step3 Edit your video with the “Quick Edit“ features.
Step4 After you edit, you can export your video to your device.
l How To Create Video With Templetes Using Filmora for Mobile
Step1 Download and install Filmora for Mobile from the App Store or Google Play Store.
Step2 Tap on the “Template” button at the bottom.

Step3 Select a desired template and tap on its icon.

Step4 Tap on “Make Video” icon to download the template.

Step5 Import your own footage/photo into the template.

Step6 Export the final video.

Conclusion
Creating a professional-grade video has always been challenging, thanks to the wide range of video editing software and templates available. Filmora is a great choice for easy-to-use yet feature-rich video editing software. Its wide range of templates and powerful editing tools make it easy to create high-quality videos quickly and easily. Whether you’re a beginner or a seasoned pro, Filmora’s template are a valuable resource for anyone looking to create professional-grade videos.
- Wondershare Filmora for Windows/Mac
- PowerDirector 365 Business
- 3 Best Video Creators With Templates Online
Benefits of Using Video Makers With Templates
There are many benefits to using a video maker with built-in templates. Here are just a few:
- Save time: Templates allow you to quickly and easily create professional-grade videos without starting from scratch.
- Consistent look and feel: Templates ensure that all your videos have a cohesive and polished look.
- Easy to use: Most video makers with templates are user-friendly and easy to learn, even for beginners.
- Wide variety of options: Many video makers offer a wide range of templates to choose from, covering a variety of styles and themes.
Overall, using a video maker with templates is a great way to save time and effort while creating professional-grade videos with a consistent look and feel. Whether a beginner or a seasoned pro, a video maker with templates is valuable in your video creation toolkit.
5 Best Video Editing Apps With Templates for iOS/Android
Looking for the best video editing app with templates for your iOS or Android device? Look no further! These apps are user-friendly, feature-rich, and offer many templates. Whether a beginner or a seasoned pro, you’ll find an app on this list that suits your needs.
1. Filmora for Mobile (Formerly Known as Filmora) - Best for Beginners & Vloggers
Filmora for Mobile (formerly known as Filmora) is a powerful and user-friendly video editing app with many templates to choose from.
Editor’s Verdict: It’s perfect for beginners and vloggers who want to create professional-grade videos on the go.
Ratings in App Store: 4.7 out of 5
Ratings in Google Play Store: 4.7 out of 5
Operating Systems: Android and iOS
Pricing: Free and offers In-App Purchases
In the app, you’ll find a variety of templates for different occasions, including holidays, birthdays, and more. You can easily customize these templates to fit your specific needs or create your own from scratch. Filmora for Mobile also offers a range of video editing tools, including trimming, splitting, and merging, as well as adding text, music, and other media to your videos.
2. Promeo Video Making App With Templates for Mobile
Promeo is a video-making app with many templates to choose from. Whether you’re looking to create a promotional video, a tutorial, or something else, you’ll find a template in Promeo that fits your needs.
Editor’s Verdict: The app’s templates are easy to use and customize, allowing you to create professional-grade videos with a consistent look and feel.
Ratings in App Store: 4.8 out of 5
Ratings in Google Play Store: 4.5 out of 5
Operating Systems: Android and iOS
Pricing: Free and offers In-App Purchases
Promeo’s templates are a great asset for anyone seeking to create top-notch videos on their mobile device. In addition to the templates, the app also provides various video editing tools such as cutting, separating, and combining clips and the option to insert text, music, and other elements into the videos.
3. LumaFusion Video Editing App With Templates for iPhone/iPad
LumaFusion is a powerful and feature-rich video editing app with templates for iPhone and iPad. It’s a favorite among professional video editors and has features that make it easy to create high-quality videos on the go.
Editor’s Verdict: LumaFusion’s templates are a valuable resource for anyone seeking to create professional videos on their iOS device.
Ratings in App Store: 4.8 out of 5
Ratings in Google Play Store: 4.5 out of 5
Operating Systems: Android and iOS
Pricing: $29.99 and offers In-App Purchases
One standout feature is the app’s collection of templates, which allow users to produce professional-grade videos with a cohesive look and feel quickly and easily. In addition to a wide selection of templates, LumaFusion also provides video editing tools such as trimming, splitting and merging.
4. KineMaster Video Editor Program With Templates
KineMaster is a full-featured video editor program with many templates to choose from. Whether you’re looking to create a promotional video, a tutorial, or something else, you’ll find a template in KineMaster that fits your needs.
Editor’s Verdict: The app’s templates are easy to use and customize, allowing you to create professional-grade videos with a consistent look and feel.
Ratings in App Store: 4.7 out of 5
Ratings in Google Play Store: 4.1 out of 5
Operating Systems: Android and iOS
Pricing: Free and offers In-App Purchases
KineMaster’s templates are easy to use and customize, making them a valuable tool for anyone looking to create high-quality videos on their mobile device. KineMaster is a feature-rich video editor program with templates perfect for beginners and professionals.
5. VivaVideo
VivaVideo is a fantastic video editing app that makes it easy to create professional-grade videos on your mobile device.
Editor’s Verdict: Whether a beginner or a seasoned pro, you’ll find VivaVideo’s templates easy to use and customize to fit your specific needs.
Ratings in App Store: 4.8 out of 5
Ratings in Google Play Store: 4.6 out of 5
Operating Systems: Android and iOS
Pricing: Free and offers In-App Purchases
One of the app’s standout features is its wide range of templates, which allow you to create polished and cohesive videos with just a few taps. Give VivaVideo a try and see how its templates can elevate your video editing game!
2 Best Video Makers With Templates for Desktop
If you’re looking to create professional-grade videos on your desktop computer, a video maker with templates is a must-have tool. These video makers are feature-rich and offer a wide range of templates to choose from, making it easy to create high-quality videos on your desktop.
6. Wondershare Filmora for Windows/Mac
Free Download For Win 7 or later(64-bit)
Free Download For macOS 10.14 or later
Wondershare Filmora is a top-notch video editor suitable for both beginners and more advanced users. It has a wide range of features that make it a valuable tool for video editing.
Editor’s Verdict: While some users may initially find the interface confusing, it is easy to learn and navigate. With Filmora, you’ll be able to start editing videos in no time.
Ratings from G2: 4.4 out of 5
Operating Systems: Windows and Mac
Pricing:
● $49.99 Filmora Annual
● $79.99 Filmora Perpetual
● $59.99 Filmora Cross-Platform Plan
Filmora is a versatile video editor available for both Mac and Windows platforms. It offers a wide range of tools suitable for novice editors and advanced features for more experienced users. With Filmora, you’ll have everything you need to create professional-grade videos.
7. PowerDirector 365 Business
PowerDirector is an extremely feature-rich video maker perfect for those who plan on regularly editing videos.
Editor’s Verdict: Its subscription service, offered by CyberLink, is a great value for those who will be using the app’s many features regularly.
Ratings from G2: 4.4 out of 5
Operating Systems: Windows and Mac
Pricing:
● $12.50 monthly subscription
PowerDirector offers great value subscriptions with regular feature updates, making it a flexible and adaptable choice for video editing. The app also includes free premium effects and plugins, adding even more value to its subscriptions.
3 Best Video Creators With Templates Online
Are you looking to create professional-grade videos online without downloading any software? A video creator with templates is the perfect solution! These video creators make it easy to create high-quality videos from the comfort of your web browser.
8. Canva
Canva is a feature-rich video creator with templates perfect for beginners and professionals.
Editor’s Verdict: Canva is a user-friendly and feature-rich video creator with many templates.
Ratings from G2: 4.7 out of 5
Pricing:
● $0 - Free subscription
● $12.99/month - Pro subscription
● $14.99/month - Team subscription
Canva’s templates are easy to use and customize, making them a valuable tool for creating high-quality videos online.
9. Animoto
With Animoto, creating stunning, professional-grade videos on your computer and mobile device is simple. Give it a try and see how easy it is to create high-quality videos with Animoto.
Editor’s Verdict: Any video from the template collection can be selected and modified to fit the user’s needs.
Ratings from G2: 4.4 out of 5
Pricing:
● $0 - Personal
● $8.00 /month - Basic
● $15.00/month - Professional
● $39.00/month - Business
Animoto’s pre-made templates are designed to make video marketing a breeze! Customizable with your photos, videos, text, and branding, these templates follow best practices and can be easily updated to fit your needs.
10. InVideo
InVideo is a powerful online video creator that provides users with a large collection of assets, including high-quality images and footage from industry leaders such as Shutterstock and iStock.
Editor’s Verdict: With its extensive collection of assets and powerful editing tools, InVideo is a valuable resource for businesses and professionals looking to create high-quality videos.
Ratings from G2: 4.7 out of 5
Pricing:
● $0 - Free
● $16.0/month - Basic
● $29.00/month - Professional
● $79.00/month - Professional Plus
InVideo enables full customization of the videos, providing options such as the addition of emojis, filters, animated transitions, special effects, and animated objects to make the videos more visually engaging and interesting.
How To Make a Video With Templates
Creating a professional-grade video with templates has always been challenging, thanks to video editing software such as Filmora. Whether a beginner or a seasoned pro, you’ll find this step-by-step guide easy to follow and customize to fit your specific needs. So let’s get started and learn how to make a video with Filmora’s templates!
l How To Create Video With Templetes Using Filmora for Desktop
Step1 Launch Filmora, click Instant Mode, and select the template you want for your video.
Step2 Import all your media and click “Auto Create.”
Step3 Edit your video with the “Quick Edit“ features.
Step4 After you edit, you can export your video to your device.
l How To Create Video With Templetes Using Filmora for Mobile
Step1 Download and install Filmora for Mobile from the App Store or Google Play Store.
Step2 Tap on the “Template” button at the bottom.
Step3 Select a desired template and tap on its icon.
Step4 Tap on “Make Video” icon to download the template.
Step5 Import your own footage/photo into the template.
Step6 Export the final video.
Conclusion
Creating a professional-grade video has always been challenging, thanks to the wide range of video editing software and templates available. Filmora is a great choice for easy-to-use yet feature-rich video editing software. Its wide range of templates and powerful editing tools make it easy to create high-quality videos quickly and easily. Whether you’re a beginner or a seasoned pro, Filmora’s template are a valuable resource for anyone looking to create professional-grade videos.
Change Background Color in After Effects
Adobe After Effects is a powerful video editor. After Effects is particularly popular for its special effects that you can add to your videos and blow the mind of your audience. In any video, the background plays a major role in enhancing the overall frame and scene. If you are planning to change background color After Effects or add special effects, you must shoot your video with a solid color background.
During the post-production phase, you can change the background uniformly to any color scheme or special effect as per the requirement of the scene. Since the learning curve for After Effects is slightly steeper, you should know the exact steps to change After Effects background color. We will explain the process in simple steps and provide you with an alternative way to change background color.
Part 1. How to change video BG color in After Effects?
After Effects is widely used for professionals to add animations and special effects to videos during video editing phase. Starting from editing social media videos and YouTube videos to short films and even movies, After Effects finds its application in every field of video editing. Changing background color in After Effects is super simple even though other video editing techniques could be slightly complex for beginners. Here are the steps on how to change background color in After Effects.
Step1 Open After Effects on your computer. Go to File> Import> File. Select the video file from your hard drive and it will appear under Project tab.
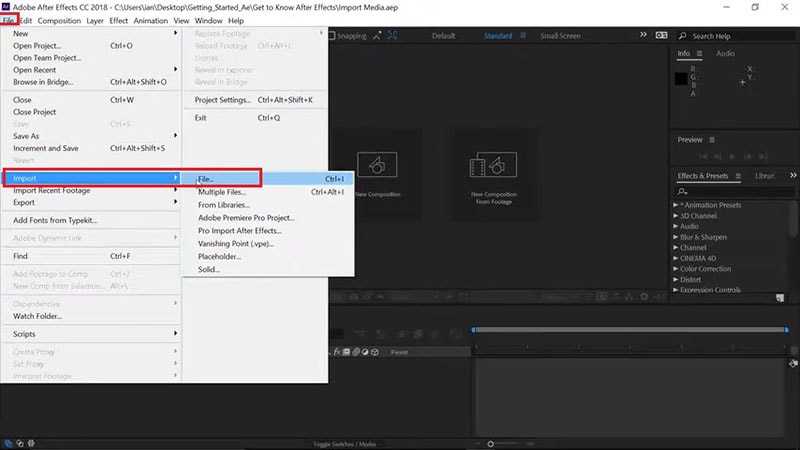
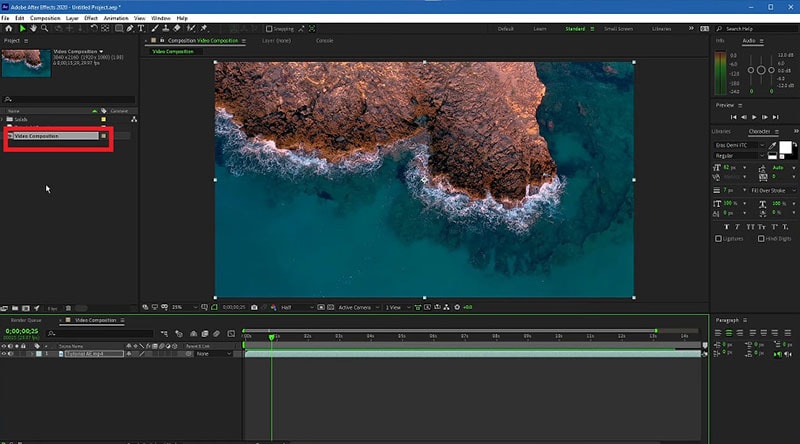
Step2 Drag and drop your video into Timeline. Select the video clip and right-click on Video Composition option located below Project tab.
Step3 From the menu, click on Composition Settings option. You can also use Ctrl + K(Windows) or Command + K(Mac) key combination to open Composition Settings directly.

Step4 On Composition Settings window, go to Background Color and set the color as per your preference. You can also use a color picker as well to select any color from the video directly.
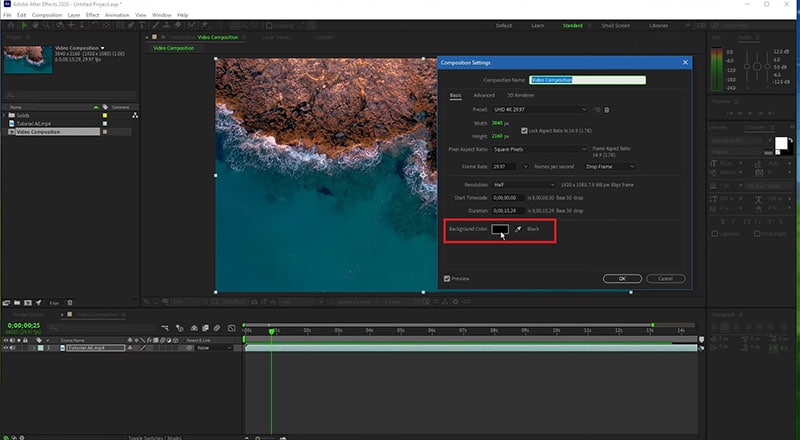
Step5 Click on Ok to set the new background color. Depending on the transparency of your video scene or the transition effect such as fade in and out, the background color will be more prominent.
Part 2. Alternative way to change background color
The best alternative to After Effects is Wondershare Filmora as Filmora has a wide range of special effects and animations. Filmora is a professional video editor where you can perform all basic as well as advanced video editing work. Most importantly, Filmora comes with an intuitive user interface so that even amateurs can use it easily.
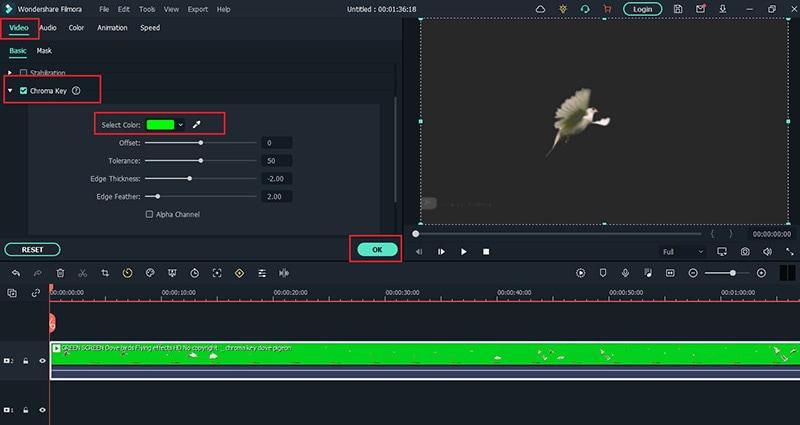
There are several ways you can change background color in your video. For example, you can remove background color even when you do not have a solid color. If your video has a solid color, you can change background color to any color or graphical element using Chroma key. Here are the steps to change background color in Filmora .
Free Download For Win 7 or later(64-bit)
Free Download For macOS 10.14 or later
Step1 Download and install Filmora and it is available for Windows and Mac. Launch Filmora and click on New Project.

Step2 Import your video under Project Media folder and drag and drop into Timeline.
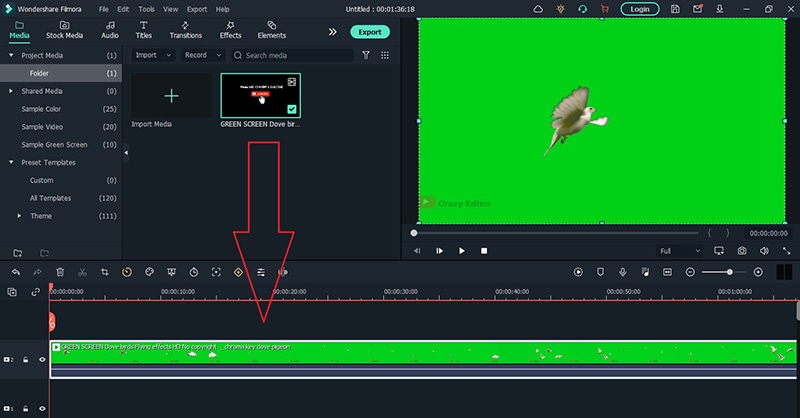
Step3 Double-click on the video clip and go to Video tab and turn on Chroma Key option. Select the solid color present in the background of the video and click on Ok button.
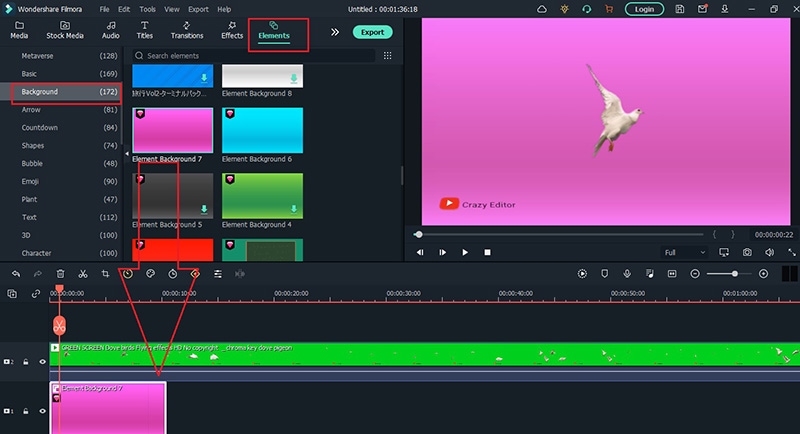
Step4 You will see the background color of the video disappear. Go to Elements> Background and drag and drop any background into Timeline. Make sure it is placed below the video clip and extend the duration of the background color as per your requirements.
Step5 Finally, play the video and click on Export button to save the video.
Part 3. FAQs about Video Background Colors
1. How do I remove background color in After Effects?
Import your video clip with a solid background color and place it on Timeline. Go to Effect menu> Keying> Keylight option. In Effects window and under Keylight, you will see Screen Colour option. Click on the eyedropper icon and select the background color you want to remove.
2. How do I change a solid background in After Effects?
The steps for After Effects how to change background color solid involve removing the background color and adding a layer of solid color to replace the transparency of the video. Go to Layer> New> Solid. Under Solid Settings window, go to Color and select the desired color from Color option and click on OK button. The new color will get reflected in the background of the video.
3. How do you add a white background in After Effects?
Go to Layer> New> Solid and add a white color solid first. However, this white color layer will not be visible unless you turn the background of your video transparent. Go to Effects & Presets and search for Luma Key and drop Luma Key on your video. Set Key type as Brighter and the threshold of the Lema key as per suitability on your video to see the white background appear.
Free Download For macOS 10.14 or later
Step1 Download and install Filmora and it is available for Windows and Mac. Launch Filmora and click on New Project.
Step2 Import your video under Project Media folder and drag and drop into Timeline.
Step3 Double-click on the video clip and go to Video tab and turn on Chroma Key option. Select the solid color present in the background of the video and click on Ok button.
Step4 You will see the background color of the video disappear. Go to Elements> Background and drag and drop any background into Timeline. Make sure it is placed below the video clip and extend the duration of the background color as per your requirements.
Step5 Finally, play the video and click on Export button to save the video.
Part 3. FAQs about Video Background Colors
1. How do I remove background color in After Effects?
Import your video clip with a solid background color and place it on Timeline. Go to Effect menu> Keying> Keylight option. In Effects window and under Keylight, you will see Screen Colour option. Click on the eyedropper icon and select the background color you want to remove.
2. How do I change a solid background in After Effects?
The steps for After Effects how to change background color solid involve removing the background color and adding a layer of solid color to replace the transparency of the video. Go to Layer> New> Solid. Under Solid Settings window, go to Color and select the desired color from Color option and click on OK button. The new color will get reflected in the background of the video.
3. How do you add a white background in After Effects?
Go to Layer> New> Solid and add a white color solid first. However, this white color layer will not be visible unless you turn the background of your video transparent. Go to Effects & Presets and search for Luma Key and drop Luma Key on your video. Set Key type as Brighter and the threshold of the Lema key as per suitability on your video to see the white background appear.
Finding The Finest Way to Add Subtitles to Videos | Filmora
Subtitles have displayed their importance in the video editing industry. They have displayed a diverse use case to the community. Adding subtitles to videos has been a work not known to many. However, video editors have changed the dynamics due to development in technology. The video editing community has realized the importance of using subtitles.
Along with understanding the dynamics of using subtitles in videos, you will also learn to add them. From people with professional video editing experience to people using TikTok, this article holds importance. This article introduces tools that can be used to delve into the depth of this particular system. Look through the steps to properly add subtitles with a great tool named Wondershare Filmora.
Part 1: Why Are Subtitles Important?
It is essential to understand the importance of adding subtitles to the video editing system. The use of subtitles, as stated, is quite important to address cross-racial individuals. For that, we will be aligning the points that will explain the importance of subtitles in video editing:
1. Breaking the Barriers of Language
Subtitles are a great way to bridge the barriers between the video’s original and the viewer’s language. Those who cannot understand the language of the video can consider the use of subtitles to be effective. International audiences can find the use of subtitles to be very convenient.
2. A Learning System
Using subtitles, you will understand more about the documentary you are watching. Additionally, it is a great way to learn about the subsidiaries involved in it. You can comprehend the content that is present in the videos, giving you room to learn. For instance, if you are learning a language, using subtitles can be a great way to learn more about it.
3. Viewing in Silence
Although it is a fun instance, adding subtitles to a video in such a case can be a great ease for viewers. If you are sitting in a room where you should not break the silence, having subtitles for your video stands out to be convenient. Also, the existence of subtitles can be a great aid for the deaf.
4. Accessible to A Broader Audience
The use of subtitles makes the content accessible to a bigger audience. Subtitles allow you not to restrict the content to the local audience only. Additionally, the producing party can arrange the transcript or subtitles for better engagement. In this way, they can outreach a bigger audience and engage their ideas with them.
5. Persistent Observation in Noisy Environment
Having subtitles for a video gives the viewer the leverage of understanding the occurrences of the video, even in a noisy environment. They can observe all the subtitles regardless of the environment. Thus, the viewers can understand what’s happening.
Add Subtitles to Video
Filmora Video Editor can automatically generate subtitles and captions for your video. Plus, you can add, edit and customize text as you want. Experience the magic of cool yet outstanding video effects, where your videos come to life in beautiful visuals.
Auto Generate Subtitles Auto Generate Subtitles Learn More >


Part 2: How Has The Use of Subtitles Improved Over the Years?
The evolution in the use of subtitles has been consistent over the years. Almost all kinds of movies come with proper subtitles that help the audience understand the motive. However, it is important to improvise the feasibility of how subtitles have improved over the years. Now even TikTok videos come with proper subtitles. For better understanding, we have highlighted some important points below explaining the improving use of subtitles:
1. Increase in Availability
As stated before, subtitles are available for a versatile set of movies. From movies to TV Shows, people do not consider watching them without subtitles. Usually, people belonging to other countries always consider having English subtitles with them. Thus, the providers have considered including subtitles as a standard feature of the movies.
2. Access to Multiple Languages
Subtitles are not available in a single language for the viewers. The improvement in subtitles has witnessed the availability of languages. Users who wish to view the movie in their native language can access subtitles in their language. Also, producers always consider creating more versions of subtitles in multiple languages.
3. Customization in Subtitles
With developments, different video editors have added the option of customizing subtitles. Users can now enhance, adjust, and improve the video’s subtitles according to their requirements. With such options, they can improve their viewing experience.
4. Real-Time Subtitling
Another improvement in the video ecosystem has been the addition of real-time subtitling. Video editors have included the option of adding subtitles. Users who wish to create their videos can also recreate the entire thing while adding subtitles.
Part 3: Wondershare Filmora: An Introduction to A Great Video Editor for Adding Subtitles
Wondershare Filmora is the best video editor for TikTok that lets you edit your videos in a go. This software allows you to edit, modify, transform, and share videos. It comes with a lot of editing and adjustment options. Additionally, you can change your video’s color tone, feel, and mood with its color correction features.
Add Subtiles to Video For Win 7 or later(64-bit)
Add Subtiles to Video For macOS 10.14 or later
You can even apply filters, effects, and other presets to change the color tone of your video. Even if you don’t like the background of your video, you can change it in no time using this tool. Moreover, adding subtitles to videos in Filmora is very simple and easy. Don’t like the title of your video? Simply go to the title section and choose the template of your liking.
Fimora Tutorial - How to Make Subtitles in Minutes
Key Features of Wondershare Filmora Video Editor
- Adjustment Layer: If you don’t want any changes to your original file, use an adjustment layer. With Filmora’s adjustment layer, you can make changes to the layer, and your video will not be modified.
- Speed Ramping: You can even modify the speed of your video at any duration. Simply add a keyframe and change the speed of your video at any particular instance.
- Motion Tracking: Wondershare Filmora will enable you to track your motion using AI technology. With this feature, the face of the subject will never be out of focus.
Part 4: How To Add Subtitles to Your TikTok Video Perfectly With Filmora?
If you don’t know how to add subtitles to TikTok videos, the guide will let you know. You can follow this step-by-step guide to learn how to add subtitles to your TikTok videos in Filmora.
Filmroa Tutorial – How to ADD SUBTITLES to a Movie / YouTube Video
Add Subtitles to Movie For Win 7 or later(64-bit)
Add Subtitles to Movie For macOS 10.14 or later
Step 1Import Video to Filmora
Open Wondershare Filmora on your computer and select the “New Project” button to open a new window. This opens a new window where you have to import the video having audio with it. Drag it to the timeline once you import it successfully with the “Import” button on the top.

Step 2Use Speech to Text Feature
Select the “Speech-to-Text” button present on the top to open the particular navigation. As this opens a new window, you need to define the language in which you want the transcript. After selecting the language, click “OK,” Filmora will automatically generate a subtitle file for you.

Step 3Lead to Subtitle Settings
The subtitle layer is present in the timeline of the video editor, where you have to double-click to open the “Subtitle Settings.”

Step 4Customize the Subtitles and Save

Conclusion
To conclude, videos are becoming essential for social platforms due to their popularity. Editing and polishing video is one thing; however, adding subtitles is equally important. TikTok is a popular social platform that allows you to create and share videos. Moreover, you can use Wondershare Filmora to add automated-generated subtitles to your videos.
Auto Generate Subtitles Auto Generate Subtitles Learn More >
Part 2: How Has The Use of Subtitles Improved Over the Years?
The evolution in the use of subtitles has been consistent over the years. Almost all kinds of movies come with proper subtitles that help the audience understand the motive. However, it is important to improvise the feasibility of how subtitles have improved over the years. Now even TikTok videos come with proper subtitles. For better understanding, we have highlighted some important points below explaining the improving use of subtitles:
1. Increase in Availability
As stated before, subtitles are available for a versatile set of movies. From movies to TV Shows, people do not consider watching them without subtitles. Usually, people belonging to other countries always consider having English subtitles with them. Thus, the providers have considered including subtitles as a standard feature of the movies.
2. Access to Multiple Languages
Subtitles are not available in a single language for the viewers. The improvement in subtitles has witnessed the availability of languages. Users who wish to view the movie in their native language can access subtitles in their language. Also, producers always consider creating more versions of subtitles in multiple languages.
3. Customization in Subtitles
With developments, different video editors have added the option of customizing subtitles. Users can now enhance, adjust, and improve the video’s subtitles according to their requirements. With such options, they can improve their viewing experience.
4. Real-Time Subtitling
Another improvement in the video ecosystem has been the addition of real-time subtitling. Video editors have included the option of adding subtitles. Users who wish to create their videos can also recreate the entire thing while adding subtitles.
Part 3: Wondershare Filmora: An Introduction to A Great Video Editor for Adding Subtitles
Wondershare Filmora is the best video editor for TikTok that lets you edit your videos in a go. This software allows you to edit, modify, transform, and share videos. It comes with a lot of editing and adjustment options. Additionally, you can change your video’s color tone, feel, and mood with its color correction features.
Add Subtiles to Video For Win 7 or later(64-bit)
Add Subtiles to Video For macOS 10.14 or later
You can even apply filters, effects, and other presets to change the color tone of your video. Even if you don’t like the background of your video, you can change it in no time using this tool. Moreover, adding subtitles to videos in Filmora is very simple and easy. Don’t like the title of your video? Simply go to the title section and choose the template of your liking.
Fimora Tutorial - How to Make Subtitles in Minutes
Key Features of Wondershare Filmora Video Editor
- Adjustment Layer: If you don’t want any changes to your original file, use an adjustment layer. With Filmora’s adjustment layer, you can make changes to the layer, and your video will not be modified.
- Speed Ramping: You can even modify the speed of your video at any duration. Simply add a keyframe and change the speed of your video at any particular instance.
- Motion Tracking: Wondershare Filmora will enable you to track your motion using AI technology. With this feature, the face of the subject will never be out of focus.
Part 4: How To Add Subtitles to Your TikTok Video Perfectly With Filmora?
If you don’t know how to add subtitles to TikTok videos, the guide will let you know. You can follow this step-by-step guide to learn how to add subtitles to your TikTok videos in Filmora.
Filmroa Tutorial – How to ADD SUBTITLES to a Movie / YouTube Video
Add Subtitles to Movie For Win 7 or later(64-bit)
Add Subtitles to Movie For macOS 10.14 or later
Step 1Import Video to Filmora
Open Wondershare Filmora on your computer and select the “New Project” button to open a new window. This opens a new window where you have to import the video having audio with it. Drag it to the timeline once you import it successfully with the “Import” button on the top.
Step 2Use Speech to Text Feature
Select the “Speech-to-Text” button present on the top to open the particular navigation. As this opens a new window, you need to define the language in which you want the transcript. After selecting the language, click “OK,” Filmora will automatically generate a subtitle file for you.
Step 3Lead to Subtitle Settings
The subtitle layer is present in the timeline of the video editor, where you have to double-click to open the “Subtitle Settings.”
Step 4Customize the Subtitles and Save
Conclusion
To conclude, videos are becoming essential for social platforms due to their popularity. Editing and polishing video is one thing; however, adding subtitles is equally important. TikTok is a popular social platform that allows you to create and share videos. Moreover, you can use Wondershare Filmora to add automated-generated subtitles to your videos.
Also read:
- In 2024, How to Create a DIY Green Screen Video Effect?
- In 2024, Video Editing Tips to Know Before Editing First Draft
- New In 2024, How Can You Get VHS Filter and Glitch Filter to Your Images or Videos?
- New 2024 Approved OBS Green Screen Guide
- Do You Want to Add an Adjustment Layer to Your Video for Easier Editing? Read This Article to Find Out How to Efficiently Add an Adjustment Layer in After Effects
- New 2024 Approved How to Slow Down Time-Lapse Videos on iPhone
- Updated 11 Apps To Speed Up A Video On iPhone for 2024
- New How to Do Datamoshing Effect in After Effects for 2024
- New 2024 Approved How to Create Discord Logo GIF
- Converting an SRT (SRT/Sorted Reader) Into a DOCX File Is a Process. Here We Will Discuss Converting a Set File to a Docx File and More Details About This for 2024
- Updated 2024 Approved Looking for the Best Quiz-Making Tools? Read Our Full Review to Find Out the 10 Best Video Quiz Makers Available
- 2024 Approved Want to Make an Epic CSGO Montage? You Are in the Right Place. This In-Depth Guide Will Explain How You Can Make an Attention-Grabbing Gaming Montage
- New 2024 Approved This Article Will Reveal the Secrets of Choosing a Location to Shoot Your Viral Music Video. As Well as Tips to Make an Energetic Schedule for Shooting Days
- Updated 2024 Approved To Help You Perform This Action, in This Article, We List the Steps You Will Need for Cropping Into Video Clips with PowerDirector. As an Added Bonus, We Have Also Included the Method to Perform the Same Actions in WonderShare Filmora
- New How To Change Text Color In Premiere Pro
- Updated 2024 Approved 4 Methods How To Make a Recap Video
- New 2024 Approved Premiere Pro Best Slow Motion Effects To Use
- New Create Promotional Video
- Updated Are You Aware that AV1 Has the Potential to Change the Way We Watch Videos Online? Read on to Learn More About AV1 and How It Could Impact Your Life
- 2024 Approved How to Remove Audio From Video Without Watermark?
- New The Ultimate Guide to Slideshow Maker with Music
- Updated Want to Learn How to Make a Fortnite Montage? This Guide Will Give You the Low-Down on Creating Epic Montage Fortnite Videos that You Can Share with Other Players on Social Media Platforms for 2024
- In 2024, Unlock Your Vivo S17es Potential The Top 20 Lock Screen Apps You Need to Try
- In 2024, How to Transfer Contacts from Honor Magic 6 Lite to Outlook | Dr.fone
- In 2024, Top 10 Password Cracking Tools For Vivo Y100i
- In 2024, Remove the Lock Screen Fingerprint Of Your Poco M6 5G
- How to Fix iPad or Apple iPhone 11 Stuck On Activation Lock?
- In 2024, How to Change Location On Facebook Dating for your Sony Xperia 10 V | Dr.fone
- In 2024, Is Fake GPS Location Spoofer a Good Choice On Poco X5 Pro? | Dr.fone
- Android Screen Stuck General Vivo S17t Partly Screen Unresponsive | Dr.fone
- In 2024, 4 solution to get rid of pokemon fail to detect location On Tecno Camon 20 | Dr.fone
- In 2024, 3 Easy Ways to Factory Reset a Locked Apple iPhone SE Without iTunes | Dr.fone
- In 2024, How to Bypass Android Lock Screen Using Emergency Call On Vivo X Flip?
- Title: Updated 2024 Approved Right Tools for Converting 60FPS Frame Rate in Videos
- Author: Morgan
- Created at : 2024-04-24 01:07:09
- Updated at : 2024-04-25 01:07:09
- Link: https://ai-video-editing.techidaily.com/updated-2024-approved-right-tools-for-converting-60fps-frame-rate-in-videos/
- License: This work is licensed under CC BY-NC-SA 4.0.
