
:max_bytes(150000):strip_icc():format(webp)/how-to-increase-internet-speed-5181475-b6fd84098c634a04a6934302184c5b1b.jpg)
Updated 2024 Approved Step by Step to Split Clips in VLC
Step by Step to Split Clips in VLC
The VLC media player is top-rated as it is freely available and operates on different platforms efficiently. Its framework helps play almost all the audios, videos, DVDs and various resources available on your systems. Even optimizing the videos and audio as the playback from your devices is possible. There is also a possibility of integrating a number of programs along with the streaming services.
You can even search the album covers. With the functionality of the playlist, you can play a number of films one after the other. This feature is helpful when you have downloaded the whole film in parts or watched different short films. The best part is to know it is not just a video player. It is an editor; yes, you heard it right. VLC is the correct choice for splitting or cutting your videos without facing any difficulties.
The article is a guide about the split of the videos in VLC. There is also a particular description of its alternative: Wondershare Filmora. It is suitable as well as reasonable.
How can you split the video clips in VLC?
VLC Media player has all the amazing tools for playing back the audios and videos regardless of the format. It is still on top of all the media players because of its simple interface. Below are the very easy steps to split the videos in the VLC media player.
Step 1: After completing the download, install the updated version of the VLC media player if it is not on your PC. Once it is installed, you need to double click on its icon for launching it.
Step 2: This step is the activation of the advanced controls in the media player. Click on “View” visible on the menu bar. Click on the “Advanced Controls” and appears the menu of four additional buttons more than the button for play or pause.

Step 3: Now, you can easily play the video simply by clicking the “Open File” option present in the media menu. The drag and drop option is available inside the VLC media player.
You should start playing the video now and recording the parts with the help of a decoder. Look for the position from where you want to begin the recording and press both Play and Pause buttons one after the other.
Even the Frame-by-Frame button is also available. It is the last one in the advance controls for navigating the actual frame from where you want to begin the recording.

Step 4:
Press the button “Record” again whenever you want the recording to stop. This is the final step for cutting the videos in VLC. The split video from the actual video saves automatically as the MP4 video file in the folder of Libraries or Videos if you are using Windows operating system.
Almost all, playing any video and audio format is possible in VLC media player. It includes AVI, MP4, FLV, WMV, RMVB and Quick time. You can even play the videos partially or preview them even before completing the downloads.

An easier way to split the video
The whole process of splitting the video into a VLC media player is extremely easy for managing and handling without any requirement of technical knowledge. But unfortunately, you can apply the frame-by-frame technique on the short videos. Monitoring is essential during the split and looking at the complete process whenever the recording is in VLC.
This causes the loss of quality. Here, the substitute that is also available is Filmora Video Editor . It is the recommendation of the graphic designers, web developers and videographers because it is freely available and lightweight software for the systems. You can apply its features to your images and videos. This includes the cutting, rotating and resizing of your videos along with the images.
For Win 7 or later (64-bit)
For macOS 10.14 or later
Features:
- There are 300+ special effects available
- Splitting of the screens and video clips
- Adding and tracking the motion graphics
- Unlimitedly sharing of the videos
- Addition of the transitional effects
- Dragging and dropping the video contents
- Customization of the effects
You can easily split and cut the large videos in Wondershare Filmora simply. There is no loss of video quality. Follow the steps below for splitting the video from Wondershare Filmora:
Step 1:
Import your videos to Filmora Video Cutter After installing the video cutter, launch it and select New Project to enter the video editing interface. Now, you need to import the video that needs to cut into several parts.

Step 2:
Drag and drop the videos in the timeline to start the splitting. Click the Split icon (scissor icon) on the toolbar or the Split button on the playhead to split the video

Apart from splitting the videos, you can even combine and merge different videos into one. Even the rotation of the videos is possible.
Therefore, Wondershare Filmora has received recognition due to its simple features. It is available for everyone, whether for individual, educational, or business purposes. It can help you in changing the look of your brand completely. Even adding the logos in the videos is also possible, along with adjusting the sizes. There is a huge range of features without any watermark, and all the upgrades are freely available.
Also, tech support is available for any assistance you need. Edit your images and videos on the social media platforms with ease, along with the adjusting tool. The perfect video editor is Wondershare Filmora, as it has compatibility with both Windows and Mac users. Correct and match the colour with the customization tools. Start using the Wondershare Filmora today without being concerned regarding the format of the video clips. You will definitely enjoy using it.
Step 3: Now, you can easily play the video simply by clicking the “Open File” option present in the media menu. The drag and drop option is available inside the VLC media player.
You should start playing the video now and recording the parts with the help of a decoder. Look for the position from where you want to begin the recording and press both Play and Pause buttons one after the other.
Even the Frame-by-Frame button is also available. It is the last one in the advance controls for navigating the actual frame from where you want to begin the recording.
Step 4:
Press the button “Record” again whenever you want the recording to stop. This is the final step for cutting the videos in VLC. The split video from the actual video saves automatically as the MP4 video file in the folder of Libraries or Videos if you are using Windows operating system.
Almost all, playing any video and audio format is possible in VLC media player. It includes AVI, MP4, FLV, WMV, RMVB and Quick time. You can even play the videos partially or preview them even before completing the downloads.
An easier way to split the video
The whole process of splitting the video into a VLC media player is extremely easy for managing and handling without any requirement of technical knowledge. But unfortunately, you can apply the frame-by-frame technique on the short videos. Monitoring is essential during the split and looking at the complete process whenever the recording is in VLC.
This causes the loss of quality. Here, the substitute that is also available is Filmora Video Editor . It is the recommendation of the graphic designers, web developers and videographers because it is freely available and lightweight software for the systems. You can apply its features to your images and videos. This includes the cutting, rotating and resizing of your videos along with the images.
For Win 7 or later (64-bit)
For macOS 10.14 or later
Features:
- There are 300+ special effects available
- Splitting of the screens and video clips
- Adding and tracking the motion graphics
- Unlimitedly sharing of the videos
- Addition of the transitional effects
- Dragging and dropping the video contents
- Customization of the effects
You can easily split and cut the large videos in Wondershare Filmora simply. There is no loss of video quality. Follow the steps below for splitting the video from Wondershare Filmora:
Step 1:
Import your videos to Filmora Video Cutter After installing the video cutter, launch it and select New Project to enter the video editing interface. Now, you need to import the video that needs to cut into several parts.
Step 2:
Drag and drop the videos in the timeline to start the splitting. Click the Split icon (scissor icon) on the toolbar or the Split button on the playhead to split the video
Apart from splitting the videos, you can even combine and merge different videos into one. Even the rotation of the videos is possible.
Therefore, Wondershare Filmora has received recognition due to its simple features. It is available for everyone, whether for individual, educational, or business purposes. It can help you in changing the look of your brand completely. Even adding the logos in the videos is also possible, along with adjusting the sizes. There is a huge range of features without any watermark, and all the upgrades are freely available.
Also, tech support is available for any assistance you need. Edit your images and videos on the social media platforms with ease, along with the adjusting tool. The perfect video editor is Wondershare Filmora, as it has compatibility with both Windows and Mac users. Correct and match the colour with the customization tools. Start using the Wondershare Filmora today without being concerned regarding the format of the video clips. You will definitely enjoy using it.
Top 8 Augmented Reality Video Games
Top 8 Augmented Reality Video Games
An easy yet powerful editor
Numerous effects to choose from
Detailed tutorials provided by the official channel
Augmented reality video games are the latest sensation in the gamer fraternity. Be here to know everything about the top 8 AR video games of all times!
In this article
01 [What Is AR in Gaming? Is AR the Future of Gaming?](#Part 1)
02 [What Is the Most Popular AR Game Now?](#Part 2)
03 [8 Best Augmented Reality Games (For iOS & Android)](#Part 3)
Part 1 What Is AR in Gaming? Is AR the Future of Gaming?
Before taking a dive into the most appealing augmented reality gaming alternatives, it would be better to have a generalized understanding of the concept behind the AR utility. Sticking to digital terms, augmented reality refers to an enhanced presentation of your real world environment with the use of suitable digital equipments. The most basic example in this regard is using your smartphone camera to view the nearby environment in a considerably upgraded graphic setting through an AR application.
When thinking to experiment with the diversity of graphic elements in augmented reality, you can explore the digital overlays by trying hands at one or more of the following enhancements:
● Changing the color perspectives of the screen backgrounds, along with applying suitable filters to produce the effect of high quality chromatic scaling in the graphic elements.
● Superimposition of 3D graphic models, images and other elements conveying snippets of digital information.
● Add labels to screen elements for precise recognition and convenient location, when using the augmented reality concept for gaming purposes.
● Integrate the AR concept to with social media platforms, like using SnapChat and Instagram’s image filters to modify the player’s appearance within the game surroundings.
Moving ahead to the specific discussion on augmented reality video games, the concept was introduced in 2016, with Pokemon GO being the inaugural AR experiment. Since then, the gaming fraternity is dedicated towards providing a real-time perception of different gaming environments with high quality graphic imagery, matchless storytelling and an exquisite range of gaming hardware.
About the latest trends in the domain, you will land across a diversity of immersive augmented reality games introduced by some of the most pronounced game developing companies. These games are a complete entertainment package, where you gave the surety of getting a maximized real-time gameplay experience with enhanced capacities of headsets and motion controls.
Most of the aforesaid games use a GPS tracking system to create a more responsive and realistic gaming environment, allowing the player to undertake a flawless transition amid the real world and its technological replica.
● Augmented Reality: The Future of Console Gaming
Talking about the modern day console gaming prospects, a lot needs to be owed to the revolutions encountered in the gaming technology in the past decade. While the integration of augmented reality into conventional video gaming has come up with upgraded concepts of real-time gaming that has definitely given a boost to the present time gaming aspects.
Augmented reality is being regarded as a potential candidate in the domain of computer based gaming platforms, considering the fact that the latter has brought about an integration of real-world elements into gaming alternatives with minimal prerequisites. As of now, AR based games are all set to provide you with the most immersive gaming experience you have ever had.
As far as the future if console gaming in the light of augmented reality is concerned, it would be a rather quick judgment to define the latter’s prospects within any constraints. With the technology being a relatively newer entrant to the world of gaming, the realm of feature-based enhancement is wide open.
All said and done, the bottom line of the discussion is that the future would have a huge storehouse of immersive gaming alternatives, with the most realistic AR approaches, which would further be supplemented by the day to day technological advancements in the IT and communication industry. The introduction of high tech 5G devices will further let players embrace the real world through their console, thus ensuring a perfect synchronization of virtual gaming technology with the real-time environment.
Part 2 What Is the Most Popular AR Game Now?
Since its advent in 2016, augmented reality gaming has mastered the art of ruling the hearts of gamers around the world. Right from graphical enhancement to real-time modulation, and top quality futures to convenient gameplay, AR gaming has everything to keep you glued to your consoles and smartphones for hours that refuse to end!
AR video games are the talk of the trend, and boast of presenting an enormous variety of gaming choices in front of dedicated players. While it is quite obvious to have a tough time choosing your best AR game, you can begin your gaming streak with Pokemon GO, the first and the most popular entry into the series, till you make a new choice.
Diving into the game specifications, Pokemon GO is a location centered, augmented reality game, which is conveniently compatible to any of your smartphones. The game marked the entry of the augmented reality concept into the realm of video game development with its release in July 2016 as a new member of the Pokemon franchise. Talking of the game’s popularity, the latter became successful in becoming an absolute favorite among global gamers and is known to have generated the maximum revenue at the time of its release, taking the credit of being recognized as the first mainstream console game based on augmented reality.
As reviewed by the players, Pokemon GO is loaded with excellent features of storyline flow, game controls and interface mechanics, sociability and of course, the undeniably appealing legacy of the Pokemon brand. Other attractions of the game with special reference to augmented reality include, a free access revenue model and adequate information safety.

Part 2 Best Augmented Reality Games (For iOS & Android)
Having discussed enough about the advent and credibility of augmented reality based console gaming, you might easily feel motivated to try hands at the popular and appealing integration of technology and entertainment. Adhering to the concern, let us browse through the most interactive choices of augmented reality infused games that you would love to relish on your iOS and Android devices:
01Knightfall AR
Set in the fictional region of The Knights Templar, this one is a combat oriented AR video game that tasks you with the responsibility of defending the land of Acre against a rival army invasion, while protecting the Holy Grail, which is the most valuable relic of Christianity. When playing the game, you will be grouped into teams of Knights and Warriors to proceed with the quest.
This AR game promises you of an everlasting real-time action gaming experience, where you can fire bullets to kill enemies, collect gold and reconstruct your defense system. You need to win battles, while unlocking features and challenges to proceed through the gameplay. You are also allowed to choose a character in the game’s Photo mode for entertainment purposes.

02Zombie, Run
If you have a soft corner for your morning jog routine, get ready dive into the most thrilling sporty adventure with the aforesaid augmented reality gaming application. The gameplay put you amid a world of attacking zombies, where you are required to run and simultaneously collect specified game items to escape the fatal attacks of the nasty creatures.
You are entitled to enjoy an amplified experience of your regular morning jogs with the game’s motivating narration and complementing background music that boosts your gaming as well as exercising willpower.

03Temple Treasure Hunt
This one is the perfect game for you if the idea of treasure hunting and mystery solving turns you on. Using the concept of geo-location to inculcate the augmented reality characteristic, Temple Treasure Hunt is a simple yet exciting game with a diversity of legends to hear, mysteries to solve and adventures to experience.
As a player of the game, you are allowed to make a choice between assuming the role of either a treasure protector or a hunter. While the former requires you to create challenging treasure tests that would make it difficult for the hunters to locate the same, the latter, on the other hand demands you to hunt the protected treasure to win the game. Regardless of the role you pick, you are required to follow a route map to proceed through the game.

04Jurassic World Alive
The aforesaid game is a treat for those who have always been the secret admirers of the gigantic creatures of the prehistoric period. The thrilling gameplay of Jurassic World Alive lets you have an encounter with the freely wandering prehistoric beings within the modern day civilizations. Packed with well designed graphics, the game is all set to give its players an exciting and unforgettable augmented reality experience.
Landing into the game, you are given the liberty to explore the diversity of elements in the realms of the Jurassic World, while completing the game’s task if collecting DNA samples of the giant mammoths, Pteranodons and dinosaurs. If that is not enough, you are free to create a customized raptor of your own, and share the same while competing with similar counterparts in real-time.

05Harry Potter: Wizards Unite
Who amongst us is not a die-hard fan of the magically fantasizing Harry Potter series! Thanks to augmented reality, the love of the same can now be relished in real-time. Talking of the aforesaid Wizards Unite edition, this one is a fantasy adventure game that requires the players to relieve Harry Potter’s magical universe from the drastic doom that has struck upon the land with an aim of ultimate destruction.
When playing the game, you are supposed to slip into the role of a Wizard and proceed through the game by overcoming challenges and combating enemies. With the integration of realistic graphics, players get to experience wizard magic in true sense.

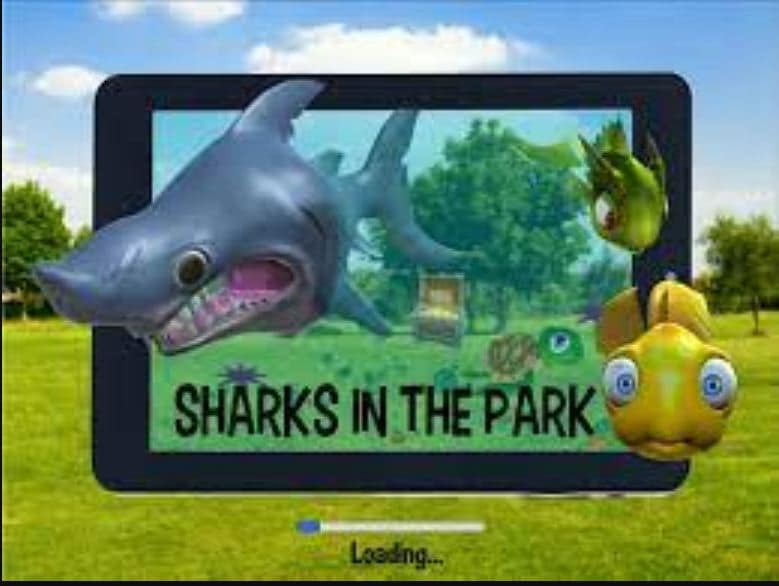
06Sharks in the Park
This one is a fun centered augmented reality game, set within an oceanic ecosystem. When traversing through the exquisite regions of the aquatic world, you will come across a hoard of newly found water species, which you need to interact with, in real-time for addressing the different aspects of the game quest.
The game accesses the GPS functionality of your smartphone to help you to walk through the ocean while you are on your expedition of discovering the different forms of aquatic life under the sea. The game further utilizes smartphone sensors for a synchronized movement tracking of the players, which means that your movements in real-time will be exactly replicated in the digital environment.
07Beer Pong AR
This game is conveniently regarded as the digital prototype of board games in the future and showcases the fusion of augmented reality into the already entertaining world of console gaming. The gameplay begins with the players getting a choice to select a preferred set of surroundings for installing the beer. This is followed by throwing ping pong balls from the most suitable angle.
Talking of the games another attraction is the perfect sync between the real and digital worlds and the non-messy post game experience. If you are keen on enjoying augmented reality gaming on an Android phone, Beer Pong AR is possibly the best alternative you can rely on.

08Dark: Subject One
If you are more comfortable in the adventure and mystery centered gameplay genres, consider trying hands at this game in the environment of augmented reality. The gameplay unfolds a horror storyline, where the player being the hero of the game, adheres to the task of searching for his disappeared friend. As the game progresses, the player is directed to a parallel universe, where he is welcomed by terrifying encounters.
Beating through the eerie landscapes and overcoming scary hurdles, the player lands across clues and hints to unravel the mystery of the case. The top class augmented reality elements promise you of an escalated horrid feel all through the gameplay.

09Experiencing Augmented Reality With Filmora
When looking for suitable alternatives to edit augmented reality video games, you can rely on the Wondershare Filmora Video Editor software without a second thought. Right from welcoming you with the most user-cohesive working interface to presenting a diverse library of top class video editing effects, this application has visibly everything that an editor of augmented reality video game will ever need.
For Win 7 or later (64-bit)
For macOS 10.12 or later
The software program even furnishes you with an additional in-built screen recorder program that allows you to record and edit video games with the most stunning audio-visual editing effects and filters within the app’s editing library.
● Ending Thoughts →
● The advent of augmented reality has put console gaming on a different level with the integration of real-time features.
● When looking for the best alternatives for landing into AR gaming, there are a variety of Android and iOS compatible games to choose from.
● To address the need of editing an AR video game, you can conveniently seek the help of Wondershare Filmora for the best quality editing output.
Augmented reality video games are the latest sensation in the gamer fraternity. Be here to know everything about the top 8 AR video games of all times!
In this article
01 [What Is AR in Gaming? Is AR the Future of Gaming?](#Part 1)
02 [What Is the Most Popular AR Game Now?](#Part 2)
03 [8 Best Augmented Reality Games (For iOS & Android)](#Part 3)
Part 1 What Is AR in Gaming? Is AR the Future of Gaming?
Before taking a dive into the most appealing augmented reality gaming alternatives, it would be better to have a generalized understanding of the concept behind the AR utility. Sticking to digital terms, augmented reality refers to an enhanced presentation of your real world environment with the use of suitable digital equipments. The most basic example in this regard is using your smartphone camera to view the nearby environment in a considerably upgraded graphic setting through an AR application.
When thinking to experiment with the diversity of graphic elements in augmented reality, you can explore the digital overlays by trying hands at one or more of the following enhancements:
● Changing the color perspectives of the screen backgrounds, along with applying suitable filters to produce the effect of high quality chromatic scaling in the graphic elements.
● Superimposition of 3D graphic models, images and other elements conveying snippets of digital information.
● Add labels to screen elements for precise recognition and convenient location, when using the augmented reality concept for gaming purposes.
● Integrate the AR concept to with social media platforms, like using SnapChat and Instagram’s image filters to modify the player’s appearance within the game surroundings.
Moving ahead to the specific discussion on augmented reality video games, the concept was introduced in 2016, with Pokemon GO being the inaugural AR experiment. Since then, the gaming fraternity is dedicated towards providing a real-time perception of different gaming environments with high quality graphic imagery, matchless storytelling and an exquisite range of gaming hardware.
About the latest trends in the domain, you will land across a diversity of immersive augmented reality games introduced by some of the most pronounced game developing companies. These games are a complete entertainment package, where you gave the surety of getting a maximized real-time gameplay experience with enhanced capacities of headsets and motion controls.
Most of the aforesaid games use a GPS tracking system to create a more responsive and realistic gaming environment, allowing the player to undertake a flawless transition amid the real world and its technological replica.
● Augmented Reality: The Future of Console Gaming
Talking about the modern day console gaming prospects, a lot needs to be owed to the revolutions encountered in the gaming technology in the past decade. While the integration of augmented reality into conventional video gaming has come up with upgraded concepts of real-time gaming that has definitely given a boost to the present time gaming aspects.
Augmented reality is being regarded as a potential candidate in the domain of computer based gaming platforms, considering the fact that the latter has brought about an integration of real-world elements into gaming alternatives with minimal prerequisites. As of now, AR based games are all set to provide you with the most immersive gaming experience you have ever had.
As far as the future if console gaming in the light of augmented reality is concerned, it would be a rather quick judgment to define the latter’s prospects within any constraints. With the technology being a relatively newer entrant to the world of gaming, the realm of feature-based enhancement is wide open.
All said and done, the bottom line of the discussion is that the future would have a huge storehouse of immersive gaming alternatives, with the most realistic AR approaches, which would further be supplemented by the day to day technological advancements in the IT and communication industry. The introduction of high tech 5G devices will further let players embrace the real world through their console, thus ensuring a perfect synchronization of virtual gaming technology with the real-time environment.
Part 2 What Is the Most Popular AR Game Now?
Since its advent in 2016, augmented reality gaming has mastered the art of ruling the hearts of gamers around the world. Right from graphical enhancement to real-time modulation, and top quality futures to convenient gameplay, AR gaming has everything to keep you glued to your consoles and smartphones for hours that refuse to end!
AR video games are the talk of the trend, and boast of presenting an enormous variety of gaming choices in front of dedicated players. While it is quite obvious to have a tough time choosing your best AR game, you can begin your gaming streak with Pokemon GO, the first and the most popular entry into the series, till you make a new choice.
Diving into the game specifications, Pokemon GO is a location centered, augmented reality game, which is conveniently compatible to any of your smartphones. The game marked the entry of the augmented reality concept into the realm of video game development with its release in July 2016 as a new member of the Pokemon franchise. Talking of the game’s popularity, the latter became successful in becoming an absolute favorite among global gamers and is known to have generated the maximum revenue at the time of its release, taking the credit of being recognized as the first mainstream console game based on augmented reality.
As reviewed by the players, Pokemon GO is loaded with excellent features of storyline flow, game controls and interface mechanics, sociability and of course, the undeniably appealing legacy of the Pokemon brand. Other attractions of the game with special reference to augmented reality include, a free access revenue model and adequate information safety.
Part 2 Best Augmented Reality Games (For iOS & Android)
Having discussed enough about the advent and credibility of augmented reality based console gaming, you might easily feel motivated to try hands at the popular and appealing integration of technology and entertainment. Adhering to the concern, let us browse through the most interactive choices of augmented reality infused games that you would love to relish on your iOS and Android devices:
01Knightfall AR
Set in the fictional region of The Knights Templar, this one is a combat oriented AR video game that tasks you with the responsibility of defending the land of Acre against a rival army invasion, while protecting the Holy Grail, which is the most valuable relic of Christianity. When playing the game, you will be grouped into teams of Knights and Warriors to proceed with the quest.
This AR game promises you of an everlasting real-time action gaming experience, where you can fire bullets to kill enemies, collect gold and reconstruct your defense system. You need to win battles, while unlocking features and challenges to proceed through the gameplay. You are also allowed to choose a character in the game’s Photo mode for entertainment purposes.
02Zombie, Run
If you have a soft corner for your morning jog routine, get ready dive into the most thrilling sporty adventure with the aforesaid augmented reality gaming application. The gameplay put you amid a world of attacking zombies, where you are required to run and simultaneously collect specified game items to escape the fatal attacks of the nasty creatures.
You are entitled to enjoy an amplified experience of your regular morning jogs with the game’s motivating narration and complementing background music that boosts your gaming as well as exercising willpower.
03Temple Treasure Hunt
This one is the perfect game for you if the idea of treasure hunting and mystery solving turns you on. Using the concept of geo-location to inculcate the augmented reality characteristic, Temple Treasure Hunt is a simple yet exciting game with a diversity of legends to hear, mysteries to solve and adventures to experience.
As a player of the game, you are allowed to make a choice between assuming the role of either a treasure protector or a hunter. While the former requires you to create challenging treasure tests that would make it difficult for the hunters to locate the same, the latter, on the other hand demands you to hunt the protected treasure to win the game. Regardless of the role you pick, you are required to follow a route map to proceed through the game.
04Jurassic World Alive
The aforesaid game is a treat for those who have always been the secret admirers of the gigantic creatures of the prehistoric period. The thrilling gameplay of Jurassic World Alive lets you have an encounter with the freely wandering prehistoric beings within the modern day civilizations. Packed with well designed graphics, the game is all set to give its players an exciting and unforgettable augmented reality experience.
Landing into the game, you are given the liberty to explore the diversity of elements in the realms of the Jurassic World, while completing the game’s task if collecting DNA samples of the giant mammoths, Pteranodons and dinosaurs. If that is not enough, you are free to create a customized raptor of your own, and share the same while competing with similar counterparts in real-time.
05Harry Potter: Wizards Unite
Who amongst us is not a die-hard fan of the magically fantasizing Harry Potter series! Thanks to augmented reality, the love of the same can now be relished in real-time. Talking of the aforesaid Wizards Unite edition, this one is a fantasy adventure game that requires the players to relieve Harry Potter’s magical universe from the drastic doom that has struck upon the land with an aim of ultimate destruction.
When playing the game, you are supposed to slip into the role of a Wizard and proceed through the game by overcoming challenges and combating enemies. With the integration of realistic graphics, players get to experience wizard magic in true sense.
06Sharks in the Park
This one is a fun centered augmented reality game, set within an oceanic ecosystem. When traversing through the exquisite regions of the aquatic world, you will come across a hoard of newly found water species, which you need to interact with, in real-time for addressing the different aspects of the game quest.
The game accesses the GPS functionality of your smartphone to help you to walk through the ocean while you are on your expedition of discovering the different forms of aquatic life under the sea. The game further utilizes smartphone sensors for a synchronized movement tracking of the players, which means that your movements in real-time will be exactly replicated in the digital environment.
07Beer Pong AR
This game is conveniently regarded as the digital prototype of board games in the future and showcases the fusion of augmented reality into the already entertaining world of console gaming. The gameplay begins with the players getting a choice to select a preferred set of surroundings for installing the beer. This is followed by throwing ping pong balls from the most suitable angle.
Talking of the games another attraction is the perfect sync between the real and digital worlds and the non-messy post game experience. If you are keen on enjoying augmented reality gaming on an Android phone, Beer Pong AR is possibly the best alternative you can rely on.
08Dark: Subject One
If you are more comfortable in the adventure and mystery centered gameplay genres, consider trying hands at this game in the environment of augmented reality. The gameplay unfolds a horror storyline, where the player being the hero of the game, adheres to the task of searching for his disappeared friend. As the game progresses, the player is directed to a parallel universe, where he is welcomed by terrifying encounters.
Beating through the eerie landscapes and overcoming scary hurdles, the player lands across clues and hints to unravel the mystery of the case. The top class augmented reality elements promise you of an escalated horrid feel all through the gameplay.
09Experiencing Augmented Reality With Filmora
When looking for suitable alternatives to edit augmented reality video games, you can rely on the Wondershare Filmora Video Editor software without a second thought. Right from welcoming you with the most user-cohesive working interface to presenting a diverse library of top class video editing effects, this application has visibly everything that an editor of augmented reality video game will ever need.
For Win 7 or later (64-bit)
For macOS 10.12 or later
The software program even furnishes you with an additional in-built screen recorder program that allows you to record and edit video games with the most stunning audio-visual editing effects and filters within the app’s editing library.
● Ending Thoughts →
● The advent of augmented reality has put console gaming on a different level with the integration of real-time features.
● When looking for the best alternatives for landing into AR gaming, there are a variety of Android and iOS compatible games to choose from.
● To address the need of editing an AR video game, you can conveniently seek the help of Wondershare Filmora for the best quality editing output.
How to Change Quicktime Player Speed on Mac?
Powerful Video Editor - Wondershare Filmora
An easy and powerful editor
Numerous effects to choose from
Detailed tutorials are provided by the official channel
Quicktime Player is an Apple Inc. software that is compatible with all current versions of macOS X as well as Windows.
The user interface of the Quicktime media player is straightforward to navigate. The majority of video formats may be supported, as well. Like VLC, you can quickly speed up or slow down videos with Quicktime player using specific hotkeys or by manually altering the speed of the video.

A broad number of formats may be handled by QuickTime, including music, graphics, and panoramic photography. All of your music and video files will play without a hitch, and it is a fully complete media player.
Many customers buy a Mac computer and instantly install QuickTime, the default video player, under the notion that it is a basic video player with few additional functions. In fact, the QuickTime player has a slew of hidden functions that are pretty useful, but only a few people are aware of it. The option to increase the Quicktime player speed is one of these hidden features’ which is most popular and helpful. This is particularly true if you have to sit through a presentation or lecture.
How to Speed up Videos in Quicktime Player?
If you want to watch your movies on Quicktime player as quickly as possible, go with a long-term solution. The pace of the clip may be raised or lowered from the toolbar, and the settings of the application can be altered.
Thus, in easy words when you download a video to your Mac, you can control the speed at which it plays back on your computer using Quicktime player.

There are two ways to achieve this goal, one is manually through settings whereas the second way is using hotkeys. Let’s discuss both by understanding how to increase QuickTime player speed manually.
Manually Setting Up Quicktime player speed
- Open the Quicktime player installed on your computer.
- Embedding video within the interface is recommended.
- Go to the Toolbar and choose the Windows tab from the drop-down menu.
- To access the A/V controls, press the A/V Controls button. There will be a dialogue box that appears.
- Locate the Playback Speed option and adjust the speed of the movie by increasing or decreasing it.
- Close the box and go to watch the video in its entirety.
Speeding Up playback Speed Quicktime Using Hotkeys
- There isn’t a special hotkey for Quicktime that allows you to speed up or slow down the video. Using your mouse and keyboard, on the other hand, you may do the task in an instant.
- Open the video in the Quicktime Player on your computer by clicking on it.
- Play the video clip, and then hit the “OPTIONS” key on your keyboard to stop it.
- Press the Fast Forward button on the player and the left mouse button at the same time. It will speed up the pace at which the video is played back.
- The tap will cause a 1.1x choice to appear at the top of the screen.

Increasing the speed is accomplished by repeatedly clicking until the desired speed is achieved.
However, keep in mind that there has been a glitch that has existed for years that causes the audio to stop working after you reach 2x speed. To get around this problem, just accelerate to 1.9x and then stop.
If you come across anything you like and want to view it again, you may stop the video by pressing the space bar twice. However, pressing the spacebar will cause the playing speed to be reset.
How to Slow Down Videos in Quicktime Player?
When viewing a movie on your Mac, you may discover that you need to slow it down on a frequent basis. You may discover a range of slow down video editing tools that can help you slow down a video on the internet. Furthermore, various video players may be able to let you quickly slow down your movie. QuickTime Player is one of those programs that may be customized to your individual needs.
We sometimes overlook the enormous capacity inherent inside the dependable and dependable QuickTime Player. QuickTime contains a number of key capabilities meant to help you deal with your media files and play video and audio files.
Steps to follow to slow down Quicktime Player speed
Like speeding up the QuickTime playback speed, the users can simultaneously slow down the playback speed as well. It can be done manually and through the use of specific keys already present on the keyboard.
Manual Setup
In order to manually slowdown QuickTime video, follow the below-mentioned steps:
- Launch the Quicktime player application
- Click on “File” and choose the video which is already saved or downloaded on your MAC.
- Once the video is loaded in the Quicktime player, click on “View” on the toolbar on the top.
- As you click on “View”, a drop-down menu will appear. Locate the “Playback speed” option from the drop-down menu.

- When you click on “Playback speed”, another dialogue box will appear right next to the drop-down menu, which will have options regarding the playback speed.

- Click on “Half speed” and press the play button to watch the video with a slower playback rate.

Slowdown QuickTime speed using Hotkeys
- Open the video or the clip you want to watch.
- If Quicktime is your default player, the video loads in it.
- Otherwise, launch the QuickTime application
- By clicking on “Open”, choose your specific clip or video.
- Once the video is loaded, press the ““OPTIONS”” key next to cmd and simultaneously press the rewind button on the task bar of Quicktime. It starts to slow down the playback speed of the video.
What If Quicktime Player Speed up With No Sound?
No sound may be heard when the video is played back if it was encoded in a format that QuickTime cannot understand. Verifying your QuickTime installation is the most obvious way to find out whether it has decoded all of the video files. Let’s investigate the issue to its root.
Updating Your Quicktime to the Latest Version
The user must carefully study the QuickTime player. For some reason, your QuickTime behaviour is out of whack.
People often neglect to keep their QuickTime software up-to-date, which results in problems with video playback, such as no sound or stuttering, among many other things. To fix this issue, just download and install the most latest release of QuickTime player.
Examine the System and Driver
Faulty speakers, audio issues in the system, and update failures will ultimately cause media playback difficulties.
To find the root cause, you should first check internally to see whether your speakers are working correctly. Speaking straight to Siri and hearing her reaction is the fastest and most straightforward option.
Another reason you may be hearing no sound on QuickTime is because of a recent system update. Apple, as we all know, often releases new operating systems, and you must keep track of the most current versions of updates in order to keep your system running effectively.
You just need to ensure that your machine is running the most recent version. As a result, your system will resume regular functioning, and QuickTime will be immediately fixed and restored.
Inspect if the File is Corrupted or not
Checking the file to see whether it has been corrupted is a good idea regardless of whether QuickTime and your system are up and running. To make matters worse, the lack of sound in QuickTime will be the consequence of a corrupted video file.
Try opening the file in a different programme or player to see if the issue may be resolved. If this is the case, your source video file is either destroyed or corrupted. You may wish to consider regaining access to the file in this situation. The likelihood of your file being corrupted by malware or a virus is relatively high. Remember to be patient if this does happen to you.
It is necessary to use third-party repair programmes to successfully fix the file. Consequently, using third-party software to recover and restore the source file should be considered if you are in a situation where the source file is crucial and do not have a backup. As we’ll see, there are a number of options available, including Filmora.
How to Play Videos at 2X Speed with Sound in Quicktime?
Follow the below-mentioned steps to play video at 2x speed with sound in Quicktime:
- Launch QuickTime.
- Click on Edit, which is located on the toolbar on the top. A drop-down menu will appear.
- From the drop-down menu, click on QuickTime Preferences.
- Then select Audio from the dialogue box.
- Then moving forward, change the music synthesizer to Promethean Audio Device, Promethean USB Audio or USB Audio Device. These options might vary depending on the user’s specific hardware.
- Click on Apply and then OK.
Use Quick Time Features in Filmora
What is Wondershare Filmora?
For users to quickly and easily create high-quality films using a variety of sophisticated editing tools, Wondershare Filmora provides an extensive set of powerful tools for video editors. Wondershare Filmora’s user-friendly interface makes it easy for anybody to become an expert video editor on Mac .
In addition to the usual video effects, Wondershare Filmora provides filters, animated components, and other video effects. In order to alter a movie, you may use filters and overlays to add a variety of effects and graphic overlays. There are several options for titles, openers, and bottom thirds to pick from in Wondershare Filmora.

Using Wondershare Filmora’s drag and drop, users may include moving graphics into their movies. Additionally, users may quickly combine many videos and photographs and choose the good royalty-free music from a wide range of options, all in one spot.
Among the many functions offered by Wondershare Filmora include the ability to edit in 4K and GIF format, noise reduction and colour correction, and an advanced text editor and an audio mixer. A wide range of operating systems can run Wondershare Filmora.
Although there are many other video editors out there vying for attention, Wondershare has been one of the few that has managed to stay relevant in an increasingly competitive industry saturated with old and new video editors all competing for the same consumer base.
Unique and Distinct Features of Filmora
Software is not nearly as good if it does not have the appropriate set of functionalities, and most users will not bother to use it if it does not include these features. Listed here are the most eagerly anticipated features of Filmora’s latest version:
Motion Tracking
The Motion Tracking module enables you to identify an object or point inside a video and then have the computer track that object or point to generate a moving path.
It allows you to capture the motion of a moving object in the frame and add text, subtitles, effects, and other components to the frame that follow the moving object’s motion as it moves around the screen. After you’ve constructed that path, you may link any other item to it and have it follow the initial object.
Colour Matching Feature
This team has always considered that Filmora’s colour grading and correction tools were excellent, but their most recent addition to the ‘Color Matching’ program has garnered them even more praise.
Colour matching is crucial when trying to merge several video images obtained by two different cameras. In this semi-automated module, you may match video from multiple sources or footage acquired at different times of day with one another.
Keyframing Feature
Keyframing is an essential feature for users who wish to boost the appeal of their video by incorporating critical animation sequences throughout the film.
It enables you to create custom animations and have fine-grained control over the effects you apply to your projects via the use of keyframes.
Keyframing becomes critical when creating special effects, custom title cards at the beginning or middle of a film or conjuring precise paths for visuals or picture-in-picture movies to follow.
Audio Ducking
Audio ducking is a method used in video editing and production that allows the narrator’s voice to be heard consistently and clearly over other sounds on the recording that are happening at the same time, such as background music, without being dominated.
Transitions and Vast Amount of Effects
Over 300 special effects, objects, overlays, transitions, and music and audio effects are available whenever and wherever you need them. The bundle includes 25 sound effects and 26 royalty-free recordings, making it a complete package.
Then there are 176 transitions, each of which may be customized to liven up your project. You may also alter and manipulate visuals and text to make your project more aesthetically appealing.
Hardcore Video Editing
Moving on to the heart of this application, Filmora latest version’s video editing features are both excellent and user-friendly. [pagebreak] The editing options in Filmora are comprehensive, with the most noticeable being cutting, audio manipulation, transition creation, visual effects, and a plethora of additional features and functions.
The above editing functions are simple to carry out by selecting a specific section of the video on your timeline, double-clicking it, waiting for it to appear in the preview section, and then applying effects and transitions, adding audio, stabilizing and correcting the video using any of the editing options available to you.
Simplified Exporting Of Your Masterpiece
Exporting a finished project is as simple as any other activity in Filmora latest version. Indeed, the option to export your completed project is clearly presented on the main page and instantly visible to the human eye. After you’ve completed making changes, all you have to do is click the ‘Export’ button.
How to change video playback speed in Filmora
When using fast-motion/slow-motion effects on a video, the clips are sped up or slowed down in comparison to their original speed.
If you’re looking for a “close up in time,” the slow-motion effect may be the best choice, while the fast-forward effect may be used to produce dramatic or amusing videos.
Filmora is widely praised and utilized by professionals throughout the globe because of its user-friendly design and uncomplicated editing features. For this, it is often chosen over other editing programs.
Steps
Follow the below-mentioned steps to change video speed in Filmora:
- A wide range of video formats is supported by Wondershare Filmora, including MP4 and AVI, WMV and MOV, and FLV and M4V, etc. Enter the media library and click Import to import videos from your PC. The software will use the video files on your computer. Drag and drop is also an option for adding files to the User’s Album.

- Right-click on the video track on the Timeline and then drag movies from your User’s Album into it to access the Speed and Duration choices.

- A pop-up window will be shown. The rapidity or sluggishness of the motion effects is denoted by speed numbers. Then you may go at your own speed. Just click on the preview box to test out effects like sped-up or slowed-down videos. 0.5 speed is a good choice if you think it’s too much.

Video playback speed similarly affects the audio playback speed. Delete the video’s audio if you want to maintain the original playing speed of the video’s audio.
You must first double-click the audio clip in the audio editing window in order to adjust it. Adding and deleting fade in/out effects and reducing background noise are all options.
After you’ve finished adjusting the video speed, click Export. To save your movie in a standard format, just choose Format from the File menu.

It’s also possible to publish your videos to YouTube and Vimeo or create a DVD if you’d like.
Choose Device from the drop-down box and choose the proper symbol to view your new video output on your iPod, iPhone, or iPad.
Conclusion
While watching a movie, you may want the audio to be slower or faster, and you may want to adjust the atmosphere with the help of the music track, either when merely a soundtrack is being played or while a movie is being watched. This article, which includes images, explains in great detail how Mac users can achieve this using playback speed Quicktime. It also explains how to alter the speed at which a video play by in Filmora. Filmora has a variety of easy and advanced editing options, as well as video effects like slow motion and fast motion.
Quicktime Player is an Apple Inc. software that is compatible with all current versions of macOS X as well as Windows.
The user interface of the Quicktime media player is straightforward to navigate. The majority of video formats may be supported, as well. Like VLC, you can quickly speed up or slow down videos with Quicktime player using specific hotkeys or by manually altering the speed of the video.
A broad number of formats may be handled by QuickTime, including music, graphics, and panoramic photography. All of your music and video files will play without a hitch, and it is a fully complete media player.
Many customers buy a Mac computer and instantly install QuickTime, the default video player, under the notion that it is a basic video player with few additional functions. In fact, the QuickTime player has a slew of hidden functions that are pretty useful, but only a few people are aware of it. The option to increase the Quicktime player speed is one of these hidden features’ which is most popular and helpful. This is particularly true if you have to sit through a presentation or lecture.
How to Speed up Videos in Quicktime Player?
If you want to watch your movies on Quicktime player as quickly as possible, go with a long-term solution. The pace of the clip may be raised or lowered from the toolbar, and the settings of the application can be altered.
Thus, in easy words when you download a video to your Mac, you can control the speed at which it plays back on your computer using Quicktime player.
There are two ways to achieve this goal, one is manually through settings whereas the second way is using hotkeys. Let’s discuss both by understanding how to increase QuickTime player speed manually.
Manually Setting Up Quicktime player speed
- Open the Quicktime player installed on your computer.
- Embedding video within the interface is recommended.
- Go to the Toolbar and choose the Windows tab from the drop-down menu.
- To access the A/V controls, press the A/V Controls button. There will be a dialogue box that appears.
- Locate the Playback Speed option and adjust the speed of the movie by increasing or decreasing it.
- Close the box and go to watch the video in its entirety.
Speeding Up playback Speed Quicktime Using Hotkeys
- There isn’t a special hotkey for Quicktime that allows you to speed up or slow down the video. Using your mouse and keyboard, on the other hand, you may do the task in an instant.
- Open the video in the Quicktime Player on your computer by clicking on it.
- Play the video clip, and then hit the “OPTIONS” key on your keyboard to stop it.
- Press the Fast Forward button on the player and the left mouse button at the same time. It will speed up the pace at which the video is played back.
- The tap will cause a 1.1x choice to appear at the top of the screen.
Increasing the speed is accomplished by repeatedly clicking until the desired speed is achieved.
However, keep in mind that there has been a glitch that has existed for years that causes the audio to stop working after you reach 2x speed. To get around this problem, just accelerate to 1.9x and then stop.
If you come across anything you like and want to view it again, you may stop the video by pressing the space bar twice. However, pressing the spacebar will cause the playing speed to be reset.
How to Slow Down Videos in Quicktime Player?
When viewing a movie on your Mac, you may discover that you need to slow it down on a frequent basis. You may discover a range of slow down video editing tools that can help you slow down a video on the internet. Furthermore, various video players may be able to let you quickly slow down your movie. QuickTime Player is one of those programs that may be customized to your individual needs.
We sometimes overlook the enormous capacity inherent inside the dependable and dependable QuickTime Player. QuickTime contains a number of key capabilities meant to help you deal with your media files and play video and audio files.
Steps to follow to slow down Quicktime Player speed
Like speeding up the QuickTime playback speed, the users can simultaneously slow down the playback speed as well. It can be done manually and through the use of specific keys already present on the keyboard.
Manual Setup
In order to manually slowdown QuickTime video, follow the below-mentioned steps:
- Launch the Quicktime player application
- Click on “File” and choose the video which is already saved or downloaded on your MAC.
- Once the video is loaded in the Quicktime player, click on “View” on the toolbar on the top.
- As you click on “View”, a drop-down menu will appear. Locate the “Playback speed” option from the drop-down menu.
- When you click on “Playback speed”, another dialogue box will appear right next to the drop-down menu, which will have options regarding the playback speed.
- Click on “Half speed” and press the play button to watch the video with a slower playback rate.
Slowdown QuickTime speed using Hotkeys
- Open the video or the clip you want to watch.
- If Quicktime is your default player, the video loads in it.
- Otherwise, launch the QuickTime application
- By clicking on “Open”, choose your specific clip or video.
- Once the video is loaded, press the ““OPTIONS”” key next to cmd and simultaneously press the rewind button on the task bar of Quicktime. It starts to slow down the playback speed of the video.
What If Quicktime Player Speed up With No Sound?
No sound may be heard when the video is played back if it was encoded in a format that QuickTime cannot understand. Verifying your QuickTime installation is the most obvious way to find out whether it has decoded all of the video files. Let’s investigate the issue to its root.
Updating Your Quicktime to the Latest Version
The user must carefully study the QuickTime player. For some reason, your QuickTime behaviour is out of whack.
People often neglect to keep their QuickTime software up-to-date, which results in problems with video playback, such as no sound or stuttering, among many other things. To fix this issue, just download and install the most latest release of QuickTime player.
Examine the System and Driver
Faulty speakers, audio issues in the system, and update failures will ultimately cause media playback difficulties.
To find the root cause, you should first check internally to see whether your speakers are working correctly. Speaking straight to Siri and hearing her reaction is the fastest and most straightforward option.
Another reason you may be hearing no sound on QuickTime is because of a recent system update. Apple, as we all know, often releases new operating systems, and you must keep track of the most current versions of updates in order to keep your system running effectively.
You just need to ensure that your machine is running the most recent version. As a result, your system will resume regular functioning, and QuickTime will be immediately fixed and restored.
Inspect if the File is Corrupted or not
Checking the file to see whether it has been corrupted is a good idea regardless of whether QuickTime and your system are up and running. To make matters worse, the lack of sound in QuickTime will be the consequence of a corrupted video file.
Try opening the file in a different programme or player to see if the issue may be resolved. If this is the case, your source video file is either destroyed or corrupted. You may wish to consider regaining access to the file in this situation. The likelihood of your file being corrupted by malware or a virus is relatively high. Remember to be patient if this does happen to you.
It is necessary to use third-party repair programmes to successfully fix the file. Consequently, using third-party software to recover and restore the source file should be considered if you are in a situation where the source file is crucial and do not have a backup. As we’ll see, there are a number of options available, including Filmora.
How to Play Videos at 2X Speed with Sound in Quicktime?
Follow the below-mentioned steps to play video at 2x speed with sound in Quicktime:
- Launch QuickTime.
- Click on Edit, which is located on the toolbar on the top. A drop-down menu will appear.
- From the drop-down menu, click on QuickTime Preferences.
- Then select Audio from the dialogue box.
- Then moving forward, change the music synthesizer to Promethean Audio Device, Promethean USB Audio or USB Audio Device. These options might vary depending on the user’s specific hardware.
- Click on Apply and then OK.
Use Quick Time Features in Filmora
What is Wondershare Filmora?
For users to quickly and easily create high-quality films using a variety of sophisticated editing tools, Wondershare Filmora provides an extensive set of powerful tools for video editors. Wondershare Filmora’s user-friendly interface makes it easy for anybody to become an expert video editor on Mac .
In addition to the usual video effects, Wondershare Filmora provides filters, animated components, and other video effects. In order to alter a movie, you may use filters and overlays to add a variety of effects and graphic overlays. There are several options for titles, openers, and bottom thirds to pick from in Wondershare Filmora.
Using Wondershare Filmora’s drag and drop, users may include moving graphics into their movies. Additionally, users may quickly combine many videos and photographs and choose the good royalty-free music from a wide range of options, all in one spot.
Among the many functions offered by Wondershare Filmora include the ability to edit in 4K and GIF format, noise reduction and colour correction, and an advanced text editor and an audio mixer. A wide range of operating systems can run Wondershare Filmora.
Although there are many other video editors out there vying for attention, Wondershare has been one of the few that has managed to stay relevant in an increasingly competitive industry saturated with old and new video editors all competing for the same consumer base.
Unique and Distinct Features of Filmora
Software is not nearly as good if it does not have the appropriate set of functionalities, and most users will not bother to use it if it does not include these features. Listed here are the most eagerly anticipated features of Filmora’s latest version:
Motion Tracking
The Motion Tracking module enables you to identify an object or point inside a video and then have the computer track that object or point to generate a moving path.
It allows you to capture the motion of a moving object in the frame and add text, subtitles, effects, and other components to the frame that follow the moving object’s motion as it moves around the screen. After you’ve constructed that path, you may link any other item to it and have it follow the initial object.
Colour Matching Feature
This team has always considered that Filmora’s colour grading and correction tools were excellent, but their most recent addition to the ‘Color Matching’ program has garnered them even more praise.
Colour matching is crucial when trying to merge several video images obtained by two different cameras. In this semi-automated module, you may match video from multiple sources or footage acquired at different times of day with one another.
Keyframing Feature
Keyframing is an essential feature for users who wish to boost the appeal of their video by incorporating critical animation sequences throughout the film.
It enables you to create custom animations and have fine-grained control over the effects you apply to your projects via the use of keyframes.
Keyframing becomes critical when creating special effects, custom title cards at the beginning or middle of a film or conjuring precise paths for visuals or picture-in-picture movies to follow.
Audio Ducking
Audio ducking is a method used in video editing and production that allows the narrator’s voice to be heard consistently and clearly over other sounds on the recording that are happening at the same time, such as background music, without being dominated.
Transitions and Vast Amount of Effects
Over 300 special effects, objects, overlays, transitions, and music and audio effects are available whenever and wherever you need them. The bundle includes 25 sound effects and 26 royalty-free recordings, making it a complete package.
Then there are 176 transitions, each of which may be customized to liven up your project. You may also alter and manipulate visuals and text to make your project more aesthetically appealing.
Hardcore Video Editing
Moving on to the heart of this application, Filmora latest version’s video editing features are both excellent and user-friendly. [pagebreak] The editing options in Filmora are comprehensive, with the most noticeable being cutting, audio manipulation, transition creation, visual effects, and a plethora of additional features and functions.
The above editing functions are simple to carry out by selecting a specific section of the video on your timeline, double-clicking it, waiting for it to appear in the preview section, and then applying effects and transitions, adding audio, stabilizing and correcting the video using any of the editing options available to you.
Simplified Exporting Of Your Masterpiece
Exporting a finished project is as simple as any other activity in Filmora latest version. Indeed, the option to export your completed project is clearly presented on the main page and instantly visible to the human eye. After you’ve completed making changes, all you have to do is click the ‘Export’ button.
How to change video playback speed in Filmora
When using fast-motion/slow-motion effects on a video, the clips are sped up or slowed down in comparison to their original speed.
If you’re looking for a “close up in time,” the slow-motion effect may be the best choice, while the fast-forward effect may be used to produce dramatic or amusing videos.
Filmora is widely praised and utilized by professionals throughout the globe because of its user-friendly design and uncomplicated editing features. For this, it is often chosen over other editing programs.
Steps
Follow the below-mentioned steps to change video speed in Filmora:
- A wide range of video formats is supported by Wondershare Filmora, including MP4 and AVI, WMV and MOV, and FLV and M4V, etc. Enter the media library and click Import to import videos from your PC. The software will use the video files on your computer. Drag and drop is also an option for adding files to the User’s Album.
- Right-click on the video track on the Timeline and then drag movies from your User’s Album into it to access the Speed and Duration choices.
- A pop-up window will be shown. The rapidity or sluggishness of the motion effects is denoted by speed numbers. Then you may go at your own speed. Just click on the preview box to test out effects like sped-up or slowed-down videos. 0.5 speed is a good choice if you think it’s too much.
Video playback speed similarly affects the audio playback speed. Delete the video’s audio if you want to maintain the original playing speed of the video’s audio.
You must first double-click the audio clip in the audio editing window in order to adjust it. Adding and deleting fade in/out effects and reducing background noise are all options.
After you’ve finished adjusting the video speed, click Export. To save your movie in a standard format, just choose Format from the File menu.
It’s also possible to publish your videos to YouTube and Vimeo or create a DVD if you’d like.
Choose Device from the drop-down box and choose the proper symbol to view your new video output on your iPod, iPhone, or iPad.
Conclusion
While watching a movie, you may want the audio to be slower or faster, and you may want to adjust the atmosphere with the help of the music track, either when merely a soundtrack is being played or while a movie is being watched. This article, which includes images, explains in great detail how Mac users can achieve this using playback speed Quicktime. It also explains how to alter the speed at which a video play by in Filmora. Filmora has a variety of easy and advanced editing options, as well as video effects like slow motion and fast motion.
Step by Step to Rotate Videos Using OBS
Obs is video editing software that is used to create and edit videos. It is a powerful tool that can be used to do a variety of things, such as add text, music, and special effects to videos. It also allows you to cut and trim videos, and to merge them with other videos. Additionally, obs allows you to live stream your videos, which can be a great way to share them with others. Overall, obs is a powerful tool that can be used to create and edit amazing videos.
The main interface of Obs Studio is relatively simple, and it is easy to use. The top of the screen contains a number of icons that allow you to access different features of the software, such as the video editor, the live streamer, and the settings. The bottom of the screen contains a timeline, which allows you to easily edit your videos. The timeline also contains a number of tools that allow you to trim your videos, add text and music, and more. Overall, the main interface of Obs Studio is simple and easy to use.
There are many benefits to using obs, including:
- It is free to download and use.
- It is a powerful tool that can be used to create and edit amazing videos.
- It allows you to live stream your videos, which can be a great way to share them with others.
- There are many online communities where you can find help and advice from other users.
- Overall, obs is a great program that can be used to create and edit amazing videos.
There are many reasons why you might want to rotate a video. For example, if you captured a video of a person or object upside down, you would want to rotate it so that it is right-side up. Or, if you recorded a video in landscape mode but want to view it in portrait mode, you would need to rotate the video.
Luckily, there are a number of ways to rotate videos on different devices. In this article, we will show you how to rotate videos using Obs.
Step-by-step on how to rotate videos using Obs
How to rotate using the rotate tool in the video editor?
First, to use the rotate tool in the Edit tab, simply follow the steps below:
Step 1: Open the video editor and drag your video to the editor.

Step 2: Click on the Edit > Transform > Rotate 90 degrees CW tool to rotate it 90 degrees clockwise.

Step 3: Click on the Edit > Transform > Rotate 90 degrees CW tool to rotate it 90 degrees counterclockwise.

Step 4: Click on the Edit > Transform > Rotate 180 degrees tool to rotate it 180 degrees.

How to rotate using the advance controls in obs?
Second, to use the filters in obs, follow the steps below:
Step 1: Open obs and click on the Edit tab > Transform > Edit transform. You can also click Ctrl + E.

Step 2: Go to the Rotation section.

Step 3: Select the rotation degree you want to use.

Step 4: Click on enter on your keyboard to rotate it.
How to rotate using right-clicking on the video?
Third, to use right-clicking on the video, follow the following:
Step 1: Open obs and right-click on the clip that you want to rotate.
Step 2: Click on the Transform > Rotate 90 degrees CW tool to rotate it 90 degrees clockwise.

Step 3: Click on the Transform > Rotate 90 degrees CW tool to rotate it 90 degrees counterclockwise.

Step 4: Click on the Edit > Transform > Rotate 180 degrees tool to rotate it 180 degrees.

An Easy Way to Rotate Videos Using Filmora
To conclude, there are a number of ways to rotate videos on different devices. In this article, we have shown you how to rotate videos using Obs. Meanwhile, we have another suggestion which is using Filmora Video Editor to rotate videos. Filmora is a Wondershare product that helps you to rotate videos without quality loss. With its easy-to-use interface, you can rotate videos with just a few clicks. If you are interested in it, please feel free to check the guide below:
For Win 7 or later (64-bit)
For macOS 10.14 or later
Step-by-step on how to rotate videos using Filmora
How to rotate videos using Filmora?
First, to rotate videos using Filmora, follow the steps below:
Step 1: Import the video you want to rotate into Filmora.

Step 2: Click on the “Edit” button in the toolbar.

Step 3: Go to Transform > Rotate.

Step 4: Select the rotation angle you want to use.

Step 5: Click on the ‘Ok’ to rotate it.

Second, if you want to rotate a video and flip it, follow the steps below:
Click on the flip option that you want to use, either upside down or sideways, vertically or horizontally.

Click on ‘Ok’ to apply the rotation and the flip.
Third, if you want to rotate a video by a specific number of degrees, follow the steps below:
To conclude, Filmora provides a number of ways for you to rotate your videos as well as using Obs. If you are looking for an easy way to rotate your videos without quality loss, then Filmora is the best option for you.
Step 2: Click on the Edit > Transform > Rotate 90 degrees CW tool to rotate it 90 degrees clockwise.
Step 3: Click on the Edit > Transform > Rotate 90 degrees CW tool to rotate it 90 degrees counterclockwise.
Step 4: Click on the Edit > Transform > Rotate 180 degrees tool to rotate it 180 degrees.
How to rotate using the advance controls in obs?
Second, to use the filters in obs, follow the steps below:
Step 1: Open obs and click on the Edit tab > Transform > Edit transform. You can also click Ctrl + E.
Step 2: Go to the Rotation section.
Step 3: Select the rotation degree you want to use.
Step 4: Click on enter on your keyboard to rotate it.
How to rotate using right-clicking on the video?
Third, to use right-clicking on the video, follow the following:
Step 1: Open obs and right-click on the clip that you want to rotate.
Step 2: Click on the Transform > Rotate 90 degrees CW tool to rotate it 90 degrees clockwise.
Step 3: Click on the Transform > Rotate 90 degrees CW tool to rotate it 90 degrees counterclockwise.
Step 4: Click on the Edit > Transform > Rotate 180 degrees tool to rotate it 180 degrees.
An Easy Way to Rotate Videos Using Filmora
To conclude, there are a number of ways to rotate videos on different devices. In this article, we have shown you how to rotate videos using Obs. Meanwhile, we have another suggestion which is using Filmora Video Editor to rotate videos. Filmora is a Wondershare product that helps you to rotate videos without quality loss. With its easy-to-use interface, you can rotate videos with just a few clicks. If you are interested in it, please feel free to check the guide below:
For Win 7 or later (64-bit)
For macOS 10.14 or later
Step-by-step on how to rotate videos using Filmora
How to rotate videos using Filmora?
First, to rotate videos using Filmora, follow the steps below:
Step 1: Import the video you want to rotate into Filmora.
Step 2: Click on the “Edit” button in the toolbar.
Step 3: Go to Transform > Rotate.
Step 4: Select the rotation angle you want to use.
Step 5: Click on the ‘Ok’ to rotate it.
Second, if you want to rotate a video and flip it, follow the steps below:
Click on the flip option that you want to use, either upside down or sideways, vertically or horizontally.
Click on ‘Ok’ to apply the rotation and the flip.
Third, if you want to rotate a video by a specific number of degrees, follow the steps below:
To conclude, Filmora provides a number of ways for you to rotate your videos as well as using Obs. If you are looking for an easy way to rotate your videos without quality loss, then Filmora is the best option for you.
Also read:
- Updated Do You Want to Replace the Sky in Your Media? Read the Article to Learn How to Change the Sky App on Your Mobile Phone
- New In 2024, Steps to Denoise in Final Cut Pro – Reduce Video and Audio Noise
- Wondering How to Edit a Video to Slow Motion on iPhone and Android Devices? Find Out How to Use Wondershare Filmora to Create and Edit Slo Mo Videos in a Few Clicks for 2024
- New 2024 Approved How to Use OBS Chroma Key With/Without Green Screen
- Updated Make Super Easy Coin Magic With Filmora
- New How to Create a Special Animated Transition in Filmora in Just 2 Minutes. This Simple Step-by-Step Guide Will Show You the Easy Way for 2024
- New 2024 Approved How-To Tutorials of Kapwing Collage Maker
- Updated In 2024, How to Perfect Quick and Efficient Video Editing | Keyboard Shortcuts in Filmora
- To Closely Observe the Content on Screen, We Often Zoom in to Catch the Details. This Article Will Provide You with a Brief Note on How to Zoom in on YouTube Videos Quickly on Your Devices
- New Stunning Glitch Effect and Its Creation Steps for Premiere Pro for 2024
- Best AR Video Apps
- 20 Best Text To Speech Software Windows, Mac, Android, iPhone & O
- In 2024, Looking for the Best Free Video Editing Software Reddit to Make Your Video Perfectly? Check Out Our List of the Best Video Editors for Reddit and You Can Choose Any of Them
- Updated Recording Videos with Your Smartphones Is Fun and Fantastic. But Did You Know that Recording in Slo-Mo Has Become a Trend Nowadays? Read More to Learn About How to Convert Videos to Slow Motion Here for 2024
- 2024 Approved How to Make Cool COD Warzone Thumbnail
- New 3 Best Effects to Appear on Camera Made with Filmora for 2024
- Updated Tutorial | How to Make a Smooth Speed Ramping in Premiere Pro for 2024
- New Best Online YouTube Video Trimmer
- In 2024, Top 10 Audio Visualizers Windows, Mac, Android, iPhone & Online
- Updated 5 Tried-And-True Ways to GIF Making for 2024
- Updated 2024 Approved Twitch Green Screen Guide
- New In 2024, The Way to Make Dynamic Video Collages?
- Updated 2024 Approved Adjust Background to Black for Your Product Review Video
- New How to Color Correct in OBS
- New 2024 Approved Do You Want to Add a Motion Blur Effect in Valorant? Read This Guide to Find Out How to Create a Motion Blur Effect in Valorant without Any Hassle
- New Learn How to Use and Download KineMaster Templates Like a Pro. Discover Alternative Video Templates to Elevate Your Video Creation for 2024
- In 2024, This Article Aim to Teach You How to Make a Night to Day Effect Video with Filmora. Follow the Steps to Figure It Out
- 2024 Approved The Best Peter McKinnon LUTs for Perfect Video Editing
- New Color Matching Is the Trickiest Part of Graphic Designing. Learn in Detail About Using Canva Color Match Ideally While Working on Your Pins, Social Media Posts, and Other Designs
- Updated In 2024, Top 10 Free Spanish Text To Speech Converter Websites
- Updated In 2024, Kdenlive Review – Is It The Best Video Editor?
- New 2024 Approved Magic Effects Video Making How To
- Updated 2024 Approved When the Talk Is About an Effective Slideshow Design, People Also Ask of Creating a Quick Windows 10 Slideshow. Keep Reading to Know About the Quickest Ways of Setting the Issue Straight
- 2024 Approved How to Create a Freeze Frame Sequence Effect
- New Stunning Glitch Effect and Its Creation Guideline for Premiere Pro for 2024
- Updated In 2024, How to Create Intro with Legend Intro Maker
- New In 2024, CapCut Lenta Template How It Benefits Slow Motion Video
- 2024 Approved Want to Create a Stunning Intro Video on Your Smartphone? Legend Intro Maker Is a Popular Choice. Learn the Steps to Design Intro Video Legend Intro Maker
- Updated In 2024, Top 15 Best Free MP4 Video Rotators Windows, Mac, Android, iPhone & Online
- In 2024, Mastering FFmpeg How to Merge Audio and Video with Ease
- 2024 Approved How To Edit Youtube Videos In Easy Steps
- New Before & After Editing Trick - Filmora for 2024
- 7 Ways to Unlock a Locked Samsung Galaxy S24 Ultra Phone
- Top 6 Apps/Services to Trace Any Apple iPhone 11 Pro Max Location By Mobile Number | Dr.fone
- 3 Ways to Track Honor X9b without Them Knowing | Dr.fone
- What is Fake GPS Location Pro and Is It Good On Apple iPhone 11 Pro Max? | Dr.fone
- Best Android Data Recovery - Undelete Lost Music from Redmi K70
- Latest Guide How To Bypass Samsung Galaxy A24 FRP Without Computer
- In 2024, How to use Snapchat Location Spoofer to Protect Your Privacy On Samsung Galaxy Z Fold 5? | Dr.fone
- In 2024, 5 Easy Ways to Copy Contacts from Lava Storm 5G to iPhone 14 and 15 | Dr.fone
- Undelete lost pictures from 11 Pro.
- In 2024, Full Guide to Bypass Asus FRP
- How to Fix Pokemon Go Route Not Working On Vivo Y77t? | Dr.fone
- How to Change Google Play Location On Motorola Edge+ (2023) | Dr.fone
- How Can We Bypass Xiaomi FRP?
- In 2024, A Step-by-Step Guide on Using ADB and Fastboot to Remove FRP Lock from your Xiaomi Redmi 12 5G
- In 2024, Here Are Some Reliable Ways to Get Pokemon Go Friend Codes For Realme GT 3 | Dr.fone
- How to Unlock iPhone XS Max without Passcode or Face ID
- All You Need To Know About Mega Greninja For Apple iPhone 14 Pro | Dr.fone
- What You Need To Know To Improve Your Motorola Edge 40 Pro Hard Reset | Dr.fone
- In 2024, How to Unlock iPhone 12 Passcode without iTunes without Knowing Passcode?
- Remove Nubia Lock Screen without Password(Nubia Red Magic 8S Pro)
- How to Use Life360 on Windows PC For Vivo Y56 5G? | Dr.fone
- How to Remove iPhone XS Face ID?
- 7 Fixes for Unfortunately, Phone Has Stopped on Poco C55 | Dr.fone
- In 2024, How to Unlock Apple iPhone 14 Plus Passcode Screen?
- How to Recover Files after iPhone 6s Plus Factory Reset? | Stellar
- How To Erase iPhone XR Data Permanently | Dr.fone
- Does Airplane Mode Turn off GPS Location On Samsung Galaxy S24 Ultra? | Dr.fone
- In 2024, How to Track a Lost Apple iPhone X for Free? | Dr.fone
- iPhone Is Disabled? Here Is The Way To Unlock Disabled Apple iPhone 6 Plus | Dr.fone
- How To Transfer Data From Apple iPhone 14 Plus To Other iPhone 13 Pro Max devices? | Dr.fone
- In 2024, The Most Useful Tips for Pokemon Go Ultra League On Nokia C12 Pro | Dr.fone
- Title: Updated 2024 Approved Step by Step to Split Clips in VLC
- Author: Morgan
- Created at : 2024-04-24 01:03:41
- Updated at : 2024-04-25 01:03:41
- Link: https://ai-video-editing.techidaily.com/updated-2024-approved-step-by-step-to-split-clips-in-vlc/
- License: This work is licensed under CC BY-NC-SA 4.0.
