
:max_bytes(150000):strip_icc():format(webp)/GettyImages-140173628BetsieVanDerMeer-5927117e5f9b5859509a476c.jpg)
Updated 3 Ways To Stream And Record At The Same Time
3 Ways To Stream And Record At The Same Time
The popularity of live streaming has exploded recently. A live stream is simply a video broadcast in real-time over the internet. It’s a great way to connect with people directly, whether for a gaming session, a cooking show, or a Q&A.
Many reasons are there for which why you might want to live stream and record at the same time. For instance, keep a record of your gameplay or stream highlights for future editing or use your live stream to generate content for your YouTube channel.
Whatever your reasons, this article will show you how to do live streaming and recording at the same time using three different methods.
Way 1. Use OBS To Stream And Record Video At The Same Time
OBS, or Open Broadcaster Software, is a free and open-source tool that allows you to stream and record video at the same time, which can be useful if you want to live-stream your gameplay on Twitch or record a tutorial for YouTube.
Key Features of OBS
- Compatible with Mac OS X, Linux, and Windows operating systems.
- Requires at least 4 GB of storage space and an Intel i5 2000-series processor or higher DirectX 10 capable graphics card.
- High-performance video capturing and mixing in real-time.
- With Custom Transitions, you can set up an unlimited number of scenes you can switch between seamlessly.
- Intuitive audio mixer.
- Easy-to-use and simple configuration options.
Steps
Here’s an easy and quick guide on how to use OBS Studio to stream and record videos simultaneously:
Step1 Download OBS Studio from the official website and install it on your computer or laptop.
Step2 Launch OBS Studio and go to the Settings menu. Find the Recording section under the Output tab.
Step3 Click “Start Recording” to manually start the recording or head to the General Tab and checkmark the box before “Automatically Record When Streaming.”
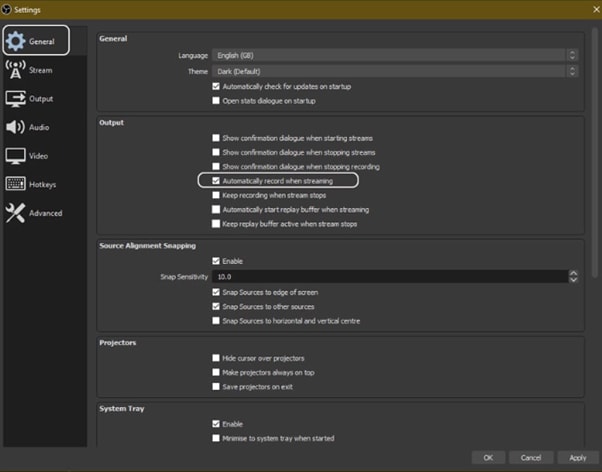
Step4 Finally, click “Apply” to save your settings. Now when you start your stream, the recording will also begin simultaneously.
Way 2. Use Twitch To Save Your Streams
Twitch is the most popular and best live streaming platform that allows gamers to broadcast their gameplay to a live audience and also gives them the ability to save their past broadcasts, or “streams.”
This feature can be useful to save your live stream for later viewing or share your stream with someone who missed it.
Features
Twitch offers a variety of features that make it a unique and powerful game streaming platform. Some of the most notable ones are:
- Live streaming: Twitch allows gamers to share their gameplay in real-time with other gamers around the world. This live aspect of the platform makes it unique and engaging.
- Social interaction: Twitch offers a variety of features that allow gamers to connect with each other, including chat rooms, forums, and user-generated content.
You can save your stream on Twitch in two ways:
- Use the “Highlights” feature, which allows you to save specific moments from your live stream.
- Download your stream’s entire VOD (video on demand) after it has ended.
Steps
Here are the quick steps to saving a stream on your PC from Twitch. But first, you need to enable Twitch VODs before starting your broadcast in the following way:
Step1 Visit Twitch and sign in to your account. Now, click the “Profile” icons and go to “Creator Dashboard.”
Step2 Head to Setting from the left-sidebar and click the “Stream” option. Scroll down and find the VOD Settings. Toggle the buttons next to “Store Past Broadcasts.”
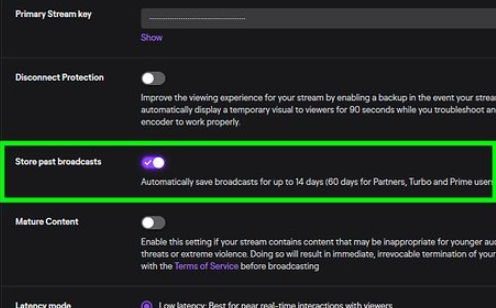
Step3 To publish your VODs instantly after broadcasting, toggle the button next to “Always Publish VODs.”
Now, to download the recordings of your broadcasts to your PC, do the following steps in sequence:
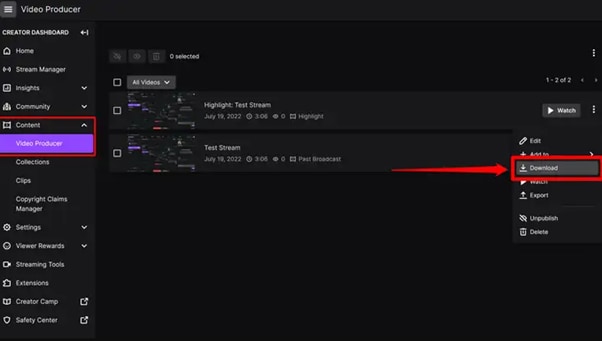
Step1 Head to the Creator Dashboard, find the “Content” section in the left sidebar, and click “Video Producer.”
Step2 Find the stream (VOD or Highlights) you want to download and on the right side, click the three dots.
Step3 Finally, click the “Download” option and let Twitch prepare your video. You will then get the stream’s recording in MP4 format.
Way 3. Use Screen Recorder To Record Your Streams
Using a screen recorder is a great way to record your live stream because it lets you capture the full screen of your PC. Although there are many different screen recorders to choose from, we recommend using Filmora.
Wondershare Filmora is a powerful editor with easy-to-use screen recording capabilities, giving you everything you need to record and stream your video at the same time. The software is free to use and has an intuitive interface.
Features of Filmora
- Support for both Mac OS X and Windows operating systems.
- Ability to record your PC screen, audio, and webcam all at once
- A variety of video editing features
- An easy-to-use interface
Steps
Here’s how to use Filmora for recording while streaming:
Step1 Head to the official Filmora website, download the software and install it on your PC.
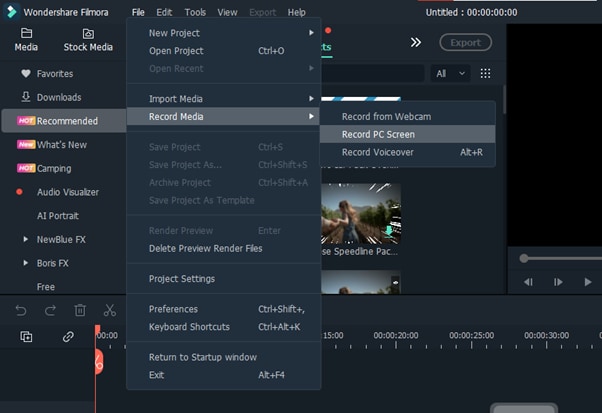
Step2 Launch Filmora 11 and click “New project” in the main interface. Click “File” from the top toolbar and scroll down to “Record media.” From the drop-down menu, select “Record PC Screen.”
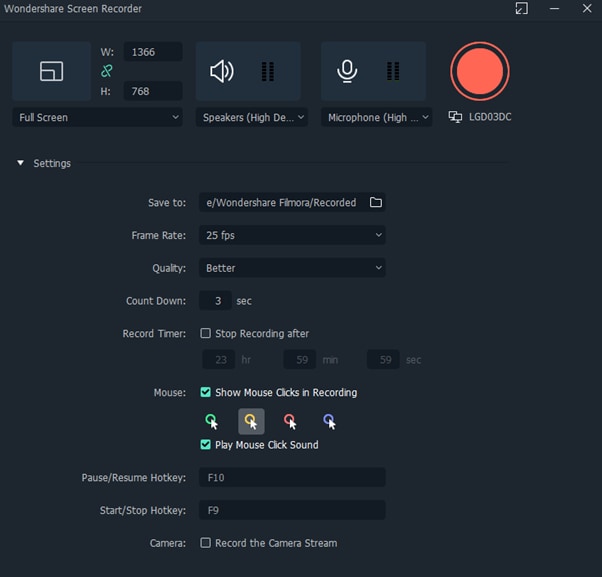
Step3 A new “Wondershare Screen Recorder” window will pop up. You can set up a full screen, custom or target screen recording, speaker, and microphone settings. If you want more Settings, click the drop-down icon.
Step4 Click the Start icon to begin your recording. Afterward, click the Stop icon to stop the recording, and your stream will be saved in the selected destination.
Conclusion
In this article, we’ve discussed three step-by-step methods to help you do live streaming and recording at the same time. With these solutions at your disposal, you’ll be able to save your VODs with ease.
It is best to choose only one software to start with to avoid the time-consuming trial-and-error process. If you want to add another tool, do so later; otherwise, you will waste your precious time and resources.
Give these methods a shot, and eventually, you will find your groove—and become accustomed to just how easy it is to record and stream a video simultaneously.
Free Download For Win 7 or later(64-bit)
Free Download For macOS 10.14 or later
Free Download For macOS 10.14 or later
Want to Speed up or Slow Down a Video to Make It Look Different? Here Are the Simple Steps to Change Video Speed in Lightworks Video Editor
You must have watched videos where certain parts have different speeds. Have you ever wondered why video creators change the speed of the video? The slow-motion video has some eye-pleasing effects. But the video creator’s intention could be to draw attention to the detail. Similarly, they speed up the video to go through boring parts faster than usual.
Apart from that, the speeding up of a video clip may make it look funny. Sometimes, speeding up a video is necessary to limit its duration. You will need a feature-rich video editor to speed up your video. Lightworks is a powerful video editor that can speed up or slow down your video. We will illustrate how to change video speed in Lightworks.

Part I. How to Speed Up Video in Lightworks
If you are making short-duration videos, you may need to speed up your video. You will come across many shorts and reels where sped-up videos look so funny. You can also speed up certain parts in your video where detail to attention is not required. Here are the steps for Lightworks to speed up a video.
Step1 Launch Lightworks and click the New A New Project option. Enter a name for your video project and click Create button.

Step2 Drag and drop your video clip to the video editor under the Edit tab. Drag and drop the video clip from the Edit tab to the timeline.

Step3 Right-click the video clip on the timeline. Click the Speed option from the menu.

Step4 You can select from any preset. To speed up, you need to select options above 100%. Click the Do It button to save the changes you have made.

Part II. How to Slow Down Video in Lightworks
More often than not, you will want to slow down your video speed. This is because slow-motion video is in trend. You may want to slow down your video so that the viewers pay attention to the detail. Besides, slowing down certain motions looks extremely eye-catching. Here are the steps to slow down video in Lightworks.
Step1 If you have dragged and dropped your video clip onto the timeline, right-click on the video clip.

Step2 Select the Speed option from the menu. You need to select a speed preset, but it has to be below 100% so that your video slows down.

Step3 Finally, click the Do It button and play the video to check out the outcome.
Part III. Bonus Tips for Changing Video Speed in Lightworks
Now that you know how to speed up video Lightworks, here are some important tips to pay attention to. These tips will help you edit your video better, especially when you are tweaking the speed factor.
Lightworks speed up part of a video - If you want to speed up only a certain part of your video, you need to split the video. All you need to do is reposition the playhead and click the “C” icon to split the video. Thereafter, you can select any split portion of the video and follow the steps to change the speed.
Audio Video Syncing - You can alter the speed of the video as well as the audio on Lightworks. When you are performing speed-up video in Lightworks, you should ideally change the speed of the audio. This will make the video and the audio stay in sync so that it does not sound awkward.
Work with Frame Rate - If you know beforehand that you will change the speed of a certain scene, you should set the frame rate accordingly. If you want to slow down a video, you should shoot it at a higher frame rate. Similarly, if you want to speed up your video, you should shoot it at a lower frame rate. This is because, after the change of speed in Lightworks, the frame rate will be usual rather than abnormal. The video will be soothing to the eyes of the viewers.
Part IV. Is There an Easier Way to Change Video Speed?
There is no doubt that most users find Lightworks difficult to operate. This is because the user interface is not tailor-made for beginners. It is more for advanced video creators who have experience in video editing. If you are looking for an easier way to change video speed, we recommend Wondershare Filmora.
Filmora is a professional video editor like Lightworks. However, Filmora has wider popularity because of its intuitive user interface. Anyone can use the video editor without prior experience, and they can easily locate the required options. In fact, Filmora has a better collection of stock media files, video effects, and graphical elements. You can also save the edited video file in different file formats as per your requirements.
As a matter of fact, Filmora offers more options than Lightworks on how to speed up the video. You can choose from presets, customize speed uniformly as well as vary the speed through the video through curvy graphs. We will illustrate all the different ways to change the speed of your video on Wondershare Filmora .
Methods to Change Video Speed in Filmora in Simple Steps
We have already stated that there are different ways to change video speed in Filmora. Now, we will illustrate the steps for every method. You can choose any of them to change the speed of the video as per your requirements.
You can watch the video to understand these methods in detail.
Method 1. Change The Speed of Video From Presets
We have stated how to speed up a video in Lightworks from presets. The same method is available on Filmora as well. You can choose from the different preset speed options. This is the easiest way to speed up or slow down your video. In comparison to Lightworks, Filmora has more preset options. Here are the steps to speed up video by choosing a preset in Filmora.
Free Download For Win 7 or later(64-bit)
Free Download For macOS 10.14 or later
Step1 Install Filmora on your computer. It is available for Windows and macOS. Launch Filmora and select Create New Project option.

Step2 You need to import the desired video file in Filmora. Go to File> Import Media and select the Import Media Files option. You can browse your computer to select the video file whose speed you want to change. The chosen video file will be included in the Project Media folder. You can even drag and drop the target video file from your computer to the Project Media folder.

Step3 Drop the video file onto the timeline. Click on the video clip on the timeline to select it. Click on the Speed icon located at the top of the timeline.

Step4 Go to Fast or Slow and select a speed preset as per your requirements. If you are satisfied with the video, click on the Export button.

Method 2. Customize The Change of Speed in Wondershare Filmora
You may want to set a speed that is not available on the preset list. Filmora has come up with the Uniform Speed option to let you customize the speed of the video as per your requirements. You can choose from 0.01X to 100X speed, and the chosen speed will be applied to the video uniformly. Here are the steps to follow.
Step1 Drag and drop the video file from the Project Media folder onto the timeline. Click on the Speed icon located at the top of the timeline.
Step2 From the menu, select the Uniform Speed option. You will see the Uniform Speed tab above the timeline.

Step3 You need to move the speed slider to set the desired speed for your video. You can play the video to see how the video speed changes.

Step4 If satisfied with the result, click on the Ok button. Thereafter, you can export the video file in any file format.
Method 3. Use Speed Ramping to Customize Your Video
Speed ramping is a unique way to change video speed. It is useful for advanced video editors that want to vary the speed differently for different sections of the video. You can set the graph with nodes as per your requirements. According to the graph you have designed, your video speed will vary. Here is how to use speed ramping to change the speed of your video.
Step1 Drag and drop the video file onto the timeline and click the Speed icon.
Step2 Click Speed Ramping option from the menu. You will see Speed Ramping tab above the timeline.

Step3 You can choose any preset available. If you want to customize the graph, select the Customize option and edit the nodes.
Step4 Play the video as you make the changes. Click the Ok button if the output is as per your expectation. Finally, click the Export button to save the video file.
Conclusion
We have illustrated how to speed up a video in Lightworks. However, you can only choose from the fixed presets available in Lightworks. If you want to customize the speed of your video, Wondershare Filmora is a better alternative to Lightworks. Several methods are available to change your video’s speed in Filmora. Therefore, you can get the desired video output in simpler steps.
Method 1. Change The Speed of Video From Presets
We have stated how to speed up a video in Lightworks from presets. The same method is available on Filmora as well. You can choose from the different preset speed options. This is the easiest way to speed up or slow down your video. In comparison to Lightworks, Filmora has more preset options. Here are the steps to speed up video by choosing a preset in Filmora.
Free Download For Win 7 or later(64-bit)
Free Download For macOS 10.14 or later
Step1 Install Filmora on your computer. It is available for Windows and macOS. Launch Filmora and select Create New Project option.
Step2 You need to import the desired video file in Filmora. Go to File> Import Media and select the Import Media Files option. You can browse your computer to select the video file whose speed you want to change. The chosen video file will be included in the Project Media folder. You can even drag and drop the target video file from your computer to the Project Media folder.
Step3 Drop the video file onto the timeline. Click on the video clip on the timeline to select it. Click on the Speed icon located at the top of the timeline.
Step4 Go to Fast or Slow and select a speed preset as per your requirements. If you are satisfied with the video, click on the Export button.
Method 2. Customize The Change of Speed in Wondershare Filmora
You may want to set a speed that is not available on the preset list. Filmora has come up with the Uniform Speed option to let you customize the speed of the video as per your requirements. You can choose from 0.01X to 100X speed, and the chosen speed will be applied to the video uniformly. Here are the steps to follow.
Step1 Drag and drop the video file from the Project Media folder onto the timeline. Click on the Speed icon located at the top of the timeline.
Step2 From the menu, select the Uniform Speed option. You will see the Uniform Speed tab above the timeline.
Step3 You need to move the speed slider to set the desired speed for your video. You can play the video to see how the video speed changes.
Step4 If satisfied with the result, click on the Ok button. Thereafter, you can export the video file in any file format.
Method 3. Use Speed Ramping to Customize Your Video
Speed ramping is a unique way to change video speed. It is useful for advanced video editors that want to vary the speed differently for different sections of the video. You can set the graph with nodes as per your requirements. According to the graph you have designed, your video speed will vary. Here is how to use speed ramping to change the speed of your video.
Step1 Drag and drop the video file onto the timeline and click the Speed icon.
Step2 Click Speed Ramping option from the menu. You will see Speed Ramping tab above the timeline.
Step3 You can choose any preset available. If you want to customize the graph, select the Customize option and edit the nodes.
Step4 Play the video as you make the changes. Click the Ok button if the output is as per your expectation. Finally, click the Export button to save the video file.
Conclusion
We have illustrated how to speed up a video in Lightworks. However, you can only choose from the fixed presets available in Lightworks. If you want to customize the speed of your video, Wondershare Filmora is a better alternative to Lightworks. Several methods are available to change your video’s speed in Filmora. Therefore, you can get the desired video output in simpler steps.
Detailed Steps to Rotate Video Using KMPlayer
Are you tired of watching videos upside down and don’t know how to figure it out? Or you have shot a video in Portrait mode which would have looked better in portrait mode but you can’t shoot it again? Well you’re at the right place and we might have a solution and an alternative method for you!
Did you know that KMPlayer has the ability to rotate videos? Learn how to rotate video using KMPlayer in this article, if you do not already know how. In this section, we will discuss how to make KMPlayer rotate videos while playing them, as well as how to fix KMPlayer not working when rotating videos. Continue reading to find out more.
Using KMPlayer to Rotate Video
In this section, we’ll show you how to rotate a video using KMPlayer. The following are the steps to take in order to complete the task:
The following are the steps to rotate a video in KMPlayer:
Step 1: First and foremost, download the software to your computer. Then you should install it there.
Step 2: After that, start the software on your computer.
Step 3: Launch KMPlayer and play the video that you’ll be rotating.

Step 4: After that, press the menu button and then select the “View” tab from the drop-down menu.
Step 5: Hover your mouse cursor over the tab to reveal a list of additional options.

Step 6: you must select the Rotate tab from the list of available options. This will allow you to choose another option.

Step 07: Use Flip Image 180 degree to flip the image.

Step 8: To rotate the video in correct position, use Mirror Image (180) tab. You can also change the angle at which the video is displayed.
Your video is ready to watch peacefully.
Troubleshooting Problems with KMPlayer if Rotate Video Not Working
Despite the fact that you’ve seen that KMPlayer can rotate and edit videos, there are some disadvantages to using this particular video player. The following are some of the most frequently encountered issues when using KMPlayer to rotate video.
- After rotating a video, the video appears without a black bar, which may be irritating to some of you who are used to seeing black bars. In addition, there is no workaround for this because it is the default setting of the software.
- You may occasionally receive an error message such as “class not registered,” which will cause your videos to be closed while you are watching them.
- Additionally, the screen may turn blue.
- The message “Login required” appears from time to time, which is a source of considerable irritation.
- It is also not uncommon to see that some portions of a media file are able to run while other portions of the same media file are unable to run.
If we talk about reliable and affordable alternatives to KM Player, Wonder Share Filmora is the best alternative for rotating videos.
Despite the fact that it is one of the most user-friendly pieces of software currently available, this video spinning software achieves its goal without sacrificing image quality in the process. People with little or no experience in video creation, on the other hand, will find the Filmora video editing application to be a simple and straightforward tool that anyone can use.
Users have been experiencing difficulties while editing films on the platform, according to the company, and the most recent update to Filmora includes a new manual rotation option in the video editing interface, which the company claims will alleviate this issue.
As a result, users no longer have to be concerned about films reverting to their original position when exporting videos to other formats because they can rotate videos to any angle they desire.
An Easier Way to Rotate Video with Filmora
After learning about the problems with KMPlayer, it’s very likely that you’re looking for a great alternative that will allow you to rotate your videos flawlessly. Don’t worry, because there’s a fantastic tool called Filmora Video Editor for Windows (or Filmora Video Editor for Mac) that can go the extra mile when it comes to video editing. You’ll be astounded by the extensive selection of video editing tools available in the software.
For Win 7 or later (64-bit)
For macOS 10.14 or later
Beginners will find it easy to use because it has a simple interface to begin with.
- It allows you to edit videos in any format and from any device.
- It provides you with simple tools to rotate, trim, combine, split, and crop videos.
- It includes free effects such as titles, filters, transitions, motion elements, face-off, and more.
- It is completely free.
Steps to rotate videos in Filmora:
Simply open the wonder share filmora editing app and import your desired video to time line.
Right click on the imported video and select Rotate 90ccw until video is on your desired direction and you can simply export the video and enjoy it!

Now we have to deal with the elephant in the room: is KM Player superior, or is Wonder Share Filmora more user-friendly in terms of operation and video rotation? In general, both softwares are equally effective at rotating videos and completing tasks, but Wonder Share Filmora appears to be a significantly better and more user-friendly option. Wonder Share Filmora is powerful video editing software that allows you to learn more about video editing and take your skills to a higher level of proficiency.
Step 4: After that, press the menu button and then select the “View” tab from the drop-down menu.
Step 5: Hover your mouse cursor over the tab to reveal a list of additional options.
Step 6: you must select the Rotate tab from the list of available options. This will allow you to choose another option.
Step 07: Use Flip Image 180 degree to flip the image.
Step 8: To rotate the video in correct position, use Mirror Image (180) tab. You can also change the angle at which the video is displayed.
Your video is ready to watch peacefully.
Troubleshooting Problems with KMPlayer if Rotate Video Not Working
Despite the fact that you’ve seen that KMPlayer can rotate and edit videos, there are some disadvantages to using this particular video player. The following are some of the most frequently encountered issues when using KMPlayer to rotate video.
- After rotating a video, the video appears without a black bar, which may be irritating to some of you who are used to seeing black bars. In addition, there is no workaround for this because it is the default setting of the software.
- You may occasionally receive an error message such as “class not registered,” which will cause your videos to be closed while you are watching them.
- Additionally, the screen may turn blue.
- The message “Login required” appears from time to time, which is a source of considerable irritation.
- It is also not uncommon to see that some portions of a media file are able to run while other portions of the same media file are unable to run.
If we talk about reliable and affordable alternatives to KM Player, Wonder Share Filmora is the best alternative for rotating videos.
Despite the fact that it is one of the most user-friendly pieces of software currently available, this video spinning software achieves its goal without sacrificing image quality in the process. People with little or no experience in video creation, on the other hand, will find the Filmora video editing application to be a simple and straightforward tool that anyone can use.
Users have been experiencing difficulties while editing films on the platform, according to the company, and the most recent update to Filmora includes a new manual rotation option in the video editing interface, which the company claims will alleviate this issue.
As a result, users no longer have to be concerned about films reverting to their original position when exporting videos to other formats because they can rotate videos to any angle they desire.
An Easier Way to Rotate Video with Filmora
After learning about the problems with KMPlayer, it’s very likely that you’re looking for a great alternative that will allow you to rotate your videos flawlessly. Don’t worry, because there’s a fantastic tool called Filmora Video Editor for Windows (or Filmora Video Editor for Mac) that can go the extra mile when it comes to video editing. You’ll be astounded by the extensive selection of video editing tools available in the software.
For Win 7 or later (64-bit)
For macOS 10.14 or later
Beginners will find it easy to use because it has a simple interface to begin with.
- It allows you to edit videos in any format and from any device.
- It provides you with simple tools to rotate, trim, combine, split, and crop videos.
- It includes free effects such as titles, filters, transitions, motion elements, face-off, and more.
- It is completely free.
Steps to rotate videos in Filmora:
Simply open the wonder share filmora editing app and import your desired video to time line.
Right click on the imported video and select Rotate 90ccw until video is on your desired direction and you can simply export the video and enjoy it!
Now we have to deal with the elephant in the room: is KM Player superior, or is Wonder Share Filmora more user-friendly in terms of operation and video rotation? In general, both softwares are equally effective at rotating videos and completing tasks, but Wonder Share Filmora appears to be a significantly better and more user-friendly option. Wonder Share Filmora is powerful video editing software that allows you to learn more about video editing and take your skills to a higher level of proficiency.
How to Make Discord GIF PFP
How to Make Discord GIF PFP? [Solved]
An easy yet powerful editor
Numerous effects to choose from
Detailed tutorials provided by the official channel
Recently, Discord has become quite popular among different communities, especially gamers. After all, it is a safe platform that delivers a convenient area to communicate with friends and family. Are you familiar with the forum? If yes, you understand some of its advantages and why many people settle for it. If not, here you will get complete information about discord gif PFP. Discord allows communication via text, video, audio, and files. It features a private chat section where you chat with your friends. Besides, it includes a free and paid version, depending on which suits you.
Despite its popularity, issues are still rising, especially on Discord GIF PFP. Besides, the idea of having a GIF as a PFP is unique and is rare among different platforms. Fortunately, this article has essential details about Discord animated PFP. Read through the content below to understand how to get an animated Discord PFP.
In this article
01 [How to Make Discord PFP a GIF? The Complete Guide](#Part 1)
02 [How to Fix GIF PFP not Working on Discord?](#Part 2)
03 [Discord GIF PFP: How to set GIF Profile Pic](#Part 3)
Part 1 How to Make Discord PFP a GIF? The Complete Guide
Let’s kick off with details on making a Discord PFP a GIF. The first thing you need to keep in mind is the requirements of a Discord PFP GIF. In other words, what are the things that Discord considers before agreeing to set up your profile? Note that the platform only allows file sizes of up-to 8Mbs. Anything above that is irrelevant. Its maximum resolution is 128 by 128 pixels. Consider these essential points to ensure that your PFP is accepted.
How do you save a GIF for Discord?
There are several ways to access Discord animated PFP. One is a Discord nitro, and the other is making one yourself. If you are a Nitro subscriber, the platform will prompt you with amazing Discord nitro PFP. However, regular users need to make the animated PFP for Discord. This section covers these individuals as we give simple steps to save a suitable GIF.
Step 1: Visit a GIF website with different options available such as Tenor and GIPHY, depending on your preference and taste
Step 2: Search for the ultimate GIF you need
Step 3: Click the animated GIF for Discord and open it on a new tab
Step 4: Right-click on the GIF and choose Save Image to name it and save it on your PC
How do you make a Discord GIF PFP?
Step 1: Visit powerful GIF websites such as the EZgif website
Step 2: Go to the editing option, Resize and upload your GIF by selecting the Upload icon
Step 3: For sizing, enter 128 as height and weight. Ensure that your Discord GIF PFP is 8Mbs and if it isn’t, go for the Gifsicle resize method.

Step 4: Select the resize option and save the necessary changes so that you can download your GIF on your PC.
After strictly following the steps above, you can easily make a Discord GIF PFP and upload it into your account. As a result, you will have an animated GIF PFP even without the Nitro subscription. Note that the Nitro option is bigger and better. After all, it has fewer requirement needs since the platform offers you the available choices. Try out Discord animated PFP today and experience powerful and eye-catching profiles.
Part 2 How to Fix GIF PFP not Working on Discord?
Discord is no secret a robust platform that makes communication among different communities more convenient for all. Are you new on Discord, or are you among the millions of users under the platform? Whatever your case is, you need the answers on dealing with an unresponsive Discord account. For instance, you can’t upload your Discord GIF PFP? GIF PFP is unresponsive in Discord? This section offers you some of the simplest ways to solve these problems.
01Ensure that you subscribe to Discord Nitro
Discord is the most sought-after platform for effective communication between different communities. It includes a free and paid option depending on your taste and preference. Of course, Discord Nitro is the paid version with many advantages that makes your experience bigger and better. Discord Nitro is the ultimate version when you wish to include GIF as your PFP since there are almost no restrictions. The platform prompts you with a conversation that assists you in setting up your PFP. Is it possible to get Discord animated GIF without Nitro? Yes. All you need is to get the GIF from other free websites. However, issues may arise, especially when meeting the requirements.
02Ensure you have a stable Internet connection
Like most networking applications, you need an internet connection to connect with your friends and family. Are you struggling with making the necessary changes for your animated Discord PFP? If yes, then ensure that you check your internet. After all, it is impossible to make the required changes without a stable network.
03Check the Discord PFP format and ensure it is GIF and not other formats such as WebM
From the information above, you can tell that Discord is quite a restrictive software when you wish to add a Discord GIF PFP without the Nitro subscription. Therefore, it is crucial to ensure that you get the correct format. Otherwise, your GIF upload will be unsuccessful. The only Discord format allowed is the GIF; hence ensure that yours meets this requirement.
04Suppose you are an IOS user, try to re-upload the GIF from your computer
Different operating systems tend to work differently. Are you an iOS user and having difficulty uploading your Discord GIF PFP from your mobile? If yes, try to re-upload it from your computer. It is a simple hack that can assist with an unresponsive Discord account.
05Reinstall or Update your Discord Application
Sometimes applications have issues because of pending updates. If you are trying to fix GIF PFP for an unresponsive Discord software, try reinstalling it or updating it. In most cases, upon making these updates, your app will automatically respond to the necessary changes.
Is your Discord having issues? Do you have a problem uploading animated GIFs for Discord? If yes, then follow the simple hacks above.
Part 3 Discord GIF PFP: How to set GIF Profile Pic?
Discord GIF PFP is a critical topic we often encounter in different online communities. After all, using GIFs as PFP is unique and makes your account gain the necessary attention. Why not when your PFP often reflects on your community. However, many questions often arise regarding animated PFP for Discord since few people are familiar with how to go about getting moving PFP discord. Luckily, several resourceful sources offer you the information you need. And this piece is one of them. This section explains the most straightforward steps to help you set a GIF Profile pic in Discord. Check it out!
You need to know that getting discord nitro is the most convenient way to get and set a GIF profile pic. Is it possible without the Nitro subscription? Yes. However, it has multiple limitations compared to Discord nitro.
Step 1: Discord Nitro
Get Discord Nitro. As mentioned above, Discord has a free and paid version. However, it is no secret that the latter version is more convenient. Discord Nitro requires you to pay a monthly fee of $4.99
Step 2: Discord GIF Picker
Use Discord GIF Picker to search for your ultimate GIF. You can access this feature from your app’s chat box right side. In this case, you need the desktop version.

Note: If you don’t get what you are looking for, consult external websites such as Tenor, Wondershare Filmora Video Editor and save the GIF of your choice. Of course, there are many free websites available hence you can settle for any of them.

Wondershare Filmora - Best Video Editor for Mac/Windows
5,481,435 people have downloaded it.
Build unique custom animations without breaking a sweat.
Focus on creating epic stories and leave the details to Filmora’s auto features.
Start a creative adventure with drag & drop effects and endless possibilities.
Filmora simplifies advanced features to save you time and effort.
Filmora cuts out repetition so you can move on to your next creative breakthrough.
Step 3: Settings
Change your PFP. For a successful process, you need to go to settings and User-Profile. Click on the available PFP and edit by selecting Change Avatar.

Step 4: Select GIF
Select your GIF from your PC and resize it to meet Discord’s requirements. Automatically, you will go to the editing page and apply the necessary changes. Select save changes and successfully change your PFP.
Step 5: Check Changes
View your Discord animated PFP to confirm the changes

Editing the animated GIF PFP is necessary, and you can use powerful editing software such as Filmora for the job. Filmora is a top editing platform that supports both video and GIF. Besides, it includes multiple features that assist in efficient editing. These features include noise removal, video stabilization, scene detection, 4k resolution support, image filters, etc. All these features blend to deliver a high-quality discord animated PFP.
● Ending Thoughts →
● Discord Nitro opens new possibilities for Discord users.
● Filmora is among the top editors you can use to get a great Discord moving PFP.
● It is possible to add GIF as PFP without Nitro. But the process is long and never delivers equally impressive results like those of Nitro.
● How to get animated Discord PFP is among the most popular topics about Discord. After all, almost everyone wants to have an exciting moving PFP Discord. Is it a straightforward process? Consider the details as above and learn more about Discord GIF PFP.
Recently, Discord has become quite popular among different communities, especially gamers. After all, it is a safe platform that delivers a convenient area to communicate with friends and family. Are you familiar with the forum? If yes, you understand some of its advantages and why many people settle for it. If not, here you will get complete information about discord gif PFP. Discord allows communication via text, video, audio, and files. It features a private chat section where you chat with your friends. Besides, it includes a free and paid version, depending on which suits you.
Despite its popularity, issues are still rising, especially on Discord GIF PFP. Besides, the idea of having a GIF as a PFP is unique and is rare among different platforms. Fortunately, this article has essential details about Discord animated PFP. Read through the content below to understand how to get an animated Discord PFP.
In this article
01 [How to Make Discord PFP a GIF? The Complete Guide](#Part 1)
02 [How to Fix GIF PFP not Working on Discord?](#Part 2)
03 [Discord GIF PFP: How to set GIF Profile Pic](#Part 3)
Part 1 How to Make Discord PFP a GIF? The Complete Guide
Let’s kick off with details on making a Discord PFP a GIF. The first thing you need to keep in mind is the requirements of a Discord PFP GIF. In other words, what are the things that Discord considers before agreeing to set up your profile? Note that the platform only allows file sizes of up-to 8Mbs. Anything above that is irrelevant. Its maximum resolution is 128 by 128 pixels. Consider these essential points to ensure that your PFP is accepted.
How do you save a GIF for Discord?
There are several ways to access Discord animated PFP. One is a Discord nitro, and the other is making one yourself. If you are a Nitro subscriber, the platform will prompt you with amazing Discord nitro PFP. However, regular users need to make the animated PFP for Discord. This section covers these individuals as we give simple steps to save a suitable GIF.
Step 1: Visit a GIF website with different options available such as Tenor and GIPHY, depending on your preference and taste
Step 2: Search for the ultimate GIF you need
Step 3: Click the animated GIF for Discord and open it on a new tab
Step 4: Right-click on the GIF and choose Save Image to name it and save it on your PC
How do you make a Discord GIF PFP?
Step 1: Visit powerful GIF websites such as the EZgif website
Step 2: Go to the editing option, Resize and upload your GIF by selecting the Upload icon
Step 3: For sizing, enter 128 as height and weight. Ensure that your Discord GIF PFP is 8Mbs and if it isn’t, go for the Gifsicle resize method.
Step 4: Select the resize option and save the necessary changes so that you can download your GIF on your PC.
After strictly following the steps above, you can easily make a Discord GIF PFP and upload it into your account. As a result, you will have an animated GIF PFP even without the Nitro subscription. Note that the Nitro option is bigger and better. After all, it has fewer requirement needs since the platform offers you the available choices. Try out Discord animated PFP today and experience powerful and eye-catching profiles.
Part 2 How to Fix GIF PFP not Working on Discord?
Discord is no secret a robust platform that makes communication among different communities more convenient for all. Are you new on Discord, or are you among the millions of users under the platform? Whatever your case is, you need the answers on dealing with an unresponsive Discord account. For instance, you can’t upload your Discord GIF PFP? GIF PFP is unresponsive in Discord? This section offers you some of the simplest ways to solve these problems.
01Ensure that you subscribe to Discord Nitro
Discord is the most sought-after platform for effective communication between different communities. It includes a free and paid option depending on your taste and preference. Of course, Discord Nitro is the paid version with many advantages that makes your experience bigger and better. Discord Nitro is the ultimate version when you wish to include GIF as your PFP since there are almost no restrictions. The platform prompts you with a conversation that assists you in setting up your PFP. Is it possible to get Discord animated GIF without Nitro? Yes. All you need is to get the GIF from other free websites. However, issues may arise, especially when meeting the requirements.
02Ensure you have a stable Internet connection
Like most networking applications, you need an internet connection to connect with your friends and family. Are you struggling with making the necessary changes for your animated Discord PFP? If yes, then ensure that you check your internet. After all, it is impossible to make the required changes without a stable network.
03Check the Discord PFP format and ensure it is GIF and not other formats such as WebM
From the information above, you can tell that Discord is quite a restrictive software when you wish to add a Discord GIF PFP without the Nitro subscription. Therefore, it is crucial to ensure that you get the correct format. Otherwise, your GIF upload will be unsuccessful. The only Discord format allowed is the GIF; hence ensure that yours meets this requirement.
04Suppose you are an IOS user, try to re-upload the GIF from your computer
Different operating systems tend to work differently. Are you an iOS user and having difficulty uploading your Discord GIF PFP from your mobile? If yes, try to re-upload it from your computer. It is a simple hack that can assist with an unresponsive Discord account.
05Reinstall or Update your Discord Application
Sometimes applications have issues because of pending updates. If you are trying to fix GIF PFP for an unresponsive Discord software, try reinstalling it or updating it. In most cases, upon making these updates, your app will automatically respond to the necessary changes.
Is your Discord having issues? Do you have a problem uploading animated GIFs for Discord? If yes, then follow the simple hacks above.
Part 3 Discord GIF PFP: How to set GIF Profile Pic?
Discord GIF PFP is a critical topic we often encounter in different online communities. After all, using GIFs as PFP is unique and makes your account gain the necessary attention. Why not when your PFP often reflects on your community. However, many questions often arise regarding animated PFP for Discord since few people are familiar with how to go about getting moving PFP discord. Luckily, several resourceful sources offer you the information you need. And this piece is one of them. This section explains the most straightforward steps to help you set a GIF Profile pic in Discord. Check it out!
You need to know that getting discord nitro is the most convenient way to get and set a GIF profile pic. Is it possible without the Nitro subscription? Yes. However, it has multiple limitations compared to Discord nitro.
Step 1: Discord Nitro
Get Discord Nitro. As mentioned above, Discord has a free and paid version. However, it is no secret that the latter version is more convenient. Discord Nitro requires you to pay a monthly fee of $4.99
Step 2: Discord GIF Picker
Use Discord GIF Picker to search for your ultimate GIF. You can access this feature from your app’s chat box right side. In this case, you need the desktop version.
Note: If you don’t get what you are looking for, consult external websites such as Tenor, Wondershare Filmora Video Editor and save the GIF of your choice. Of course, there are many free websites available hence you can settle for any of them.
Wondershare Filmora - Best Video Editor for Mac/Windows
5,481,435 people have downloaded it.
Build unique custom animations without breaking a sweat.
Focus on creating epic stories and leave the details to Filmora’s auto features.
Start a creative adventure with drag & drop effects and endless possibilities.
Filmora simplifies advanced features to save you time and effort.
Filmora cuts out repetition so you can move on to your next creative breakthrough.
Step 3: Settings
Change your PFP. For a successful process, you need to go to settings and User-Profile. Click on the available PFP and edit by selecting Change Avatar.
Step 4: Select GIF
Select your GIF from your PC and resize it to meet Discord’s requirements. Automatically, you will go to the editing page and apply the necessary changes. Select save changes and successfully change your PFP.
Step 5: Check Changes
View your Discord animated PFP to confirm the changes
Editing the animated GIF PFP is necessary, and you can use powerful editing software such as Filmora for the job. Filmora is a top editing platform that supports both video and GIF. Besides, it includes multiple features that assist in efficient editing. These features include noise removal, video stabilization, scene detection, 4k resolution support, image filters, etc. All these features blend to deliver a high-quality discord animated PFP.
● Ending Thoughts →
● Discord Nitro opens new possibilities for Discord users.
● Filmora is among the top editors you can use to get a great Discord moving PFP.
● It is possible to add GIF as PFP without Nitro. But the process is long and never delivers equally impressive results like those of Nitro.
● How to get animated Discord PFP is among the most popular topics about Discord. After all, almost everyone wants to have an exciting moving PFP Discord. Is it a straightforward process? Consider the details as above and learn more about Discord GIF PFP.
Also read:
- New In 2024, How to Do Masking in After Effects Alternative Provided
- 2024 Approved Using Montage In Movies | Learn to Use Montage With Movies
- How to Make Coin Magic With Filmora
- Updated In 2024, Every Compositor Should Know The Tips of Color Match in After Effects
- Updated Best 15 Subtitle Apps for 2024
- Updated In 2024, How to Use Adjustment Layer in Photoshop?
- Updated Explore the Advanced Tools to Help You Reshape the Art of Sky Replacement in Digital Imagery. Discover Methods to Enhance Your Visual Narratives Through AI for 2024
- New How to Create a Smooth Cut Transition Effect, In 2024
- Have You Ever Used Premiere Pro to Create Slow-Motion Effects? This Article Will Provide a Guide on Producing Slow-Motion Effects by Using Adobe Premiere Pro for 2024
- Have You Ever Used the Path Blur Effect in Your Photos? This Article Will Address How to Use Path Blur in Photoshop to Generate Appealing Results Accurately for 2024
- New Track Mattes The Ultimate Guide For After Effects
- New 2024 Approved Detailed Tutorial to Crop Videos Using Openshot?
- A Guide To Motion Tracking Using The Best Video Editors for 2024
- In 2024, Discover the Essential Steps for Editing a Music Video in This Guide. Learn About Aspect Ratio and the First Cut Process to Create a Visually Captivating Video
- New How to Change Video Thumbnail in Google Drive for 2024
- Stop Worrying if Your Adobe Premiere Playback Slows Down. This Guide Will Show You the Best Solutions to Resolve This Issue and a Perfect Alternative for 2024
- In 2024, Make Videos with Pictures and Music-10 Apps
- New 7 Solutions to Edit GoPro Video on Mac for 2024
- Top 7 Best GoPro Video Editors for Mac for 2024
- In 2024, Are You Eager to Discover the Method of Video Scaling in Filmora? You Are in the Right Place because This Discussion Will Cover the Content on This Matter
- Updated In 2024, How to Add Text in Adobe Rush
- Updated How to Remove or Mute Audio in Video with Android Phones, In 2024
- In 2024, Steps to Remove Background Noise From Video Sony Vegas
- Updated Top 8 AR Apps for Android and iOS | Help You See the World of AR
- New In 2024, While Emojis Have High End Credibility Towards Different Media Utilities, People Also Ask About Ways and Methods to Add Emoji to iPhone. Be Here to Get the Easiest Solutions to the Query
- Basic Knowledge About WMV Format and Best WMV Video Editor
- In 2024, A Full Review of Leeming LUT Pro
- New 2024 Approved How to Easily Create a Free Eye-Catching Intro Videos with Invideo
- Updated In 2024, Top 7 Best GoPro Video Editors for Mac
- New In 2024, Use Path Blur In Photoshop To Create Motion Effect
- In 2024, Find a Video Background Change Online that Works for You. This Article Contains Tools that Can Edit Video Backgrounds Online with Little Effort
- In 2024, How to Save As MP4 File on Windows Movie Maker?
- New How to Denoise in Final Cut Pro – Reduce Video and Audio Noise for 2024
- In 2024, This Article Talks in Detail About How to Export iMovie Video From iPhone, Mac, Etc. It Also Covers the Process of Using iMovie Alternative to Edit Videos on Mac. Check Out Now
- In 2024, Guide to Mirror Your Honor Magic 5 Pro to Other Android devices | Dr.fone
- 8 Ultimate Fixes for Google Play Your Realme C67 5G Isnt Compatible | Dr.fone
- How to Find iSpoofer Pro Activation Key On Apple iPhone SE (2022)? | Dr.fone
- How to Rescue Lost Messages from Y78+ (T1) Edition
- In 2024, Downloading SamFw FRP Tool 3.0 for Infinix Smart 8 Pro
- How to Fix Itel P40+ Find My Friends No Location Found? | Dr.fone
- In 2024, Complete Tutorial to Use GPS Joystick to Fake GPS Location On Samsung Galaxy F34 5G | Dr.fone
- How to Unlock iCloud Activation Lock and iCloud Account On iPhone 12 Pro Max?
- In 2024, How to View GPX Files Online and Offline Solutions Of Apple iPhone 14 Pro | Dr.fone
- In 2024, Ways to trade pokemon go from far away On Poco X6 Pro? | Dr.fone
- In 2024, Delete Gmail Account With/Without Password On Vivo X Fold 2
- How to unlock iPhone XS Max screen lock without losing data?
- How to use Pokemon Go Joystick on Nokia C300? | Dr.fone
- Rootjunky APK To Bypass Google FRP Lock For Samsung Galaxy F34 5G
- How to Detect and Stop mSpy from Spying on Your Motorola Edge 2023 | Dr.fone
- Apple iPhone 6 Plus Backup Password Never Set But Still Asking? Heres the Fix
- In 2024, The Ultimate Guide How to Bypass Swipe Screen to Unlock on Nubia Z50S Pro Device
- 4 Easy Ways for Your Honor Magic 6 Lite Hard Reset | Dr.fone
- Title: Updated 3 Ways To Stream And Record At The Same Time
- Author: Morgan
- Created at : 2024-05-19 05:11:46
- Updated at : 2024-05-20 05:11:46
- Link: https://ai-video-editing.techidaily.com/updated-3-ways-to-stream-and-record-at-the-same-time/
- License: This work is licensed under CC BY-NC-SA 4.0.
