

Updated 3 Ways To Stream And Record At The Same Time for 2024
3 Ways To Stream And Record At The Same Time
The popularity of live streaming has exploded recently. A live stream is simply a video broadcast in real-time over the internet. It’s a great way to connect with people directly, whether for a gaming session, a cooking show, or a Q&A.
Many reasons are there for which why you might want to live stream and record at the same time. For instance, keep a record of your gameplay or stream highlights for future editing or use your live stream to generate content for your YouTube channel.
Whatever your reasons, this article will show you how to do live streaming and recording at the same time using three different methods.
Way 1. Use OBS To Stream And Record Video At The Same Time
OBS, or Open Broadcaster Software, is a free and open-source tool that allows you to stream and record video at the same time, which can be useful if you want to live-stream your gameplay on Twitch or record a tutorial for YouTube.
Key Features of OBS
- Compatible with Mac OS X, Linux, and Windows operating systems.
- Requires at least 4 GB of storage space and an Intel i5 2000-series processor or higher DirectX 10 capable graphics card.
- High-performance video capturing and mixing in real-time.
- With Custom Transitions, you can set up an unlimited number of scenes you can switch between seamlessly.
- Intuitive audio mixer.
- Easy-to-use and simple configuration options.
Steps
Here’s an easy and quick guide on how to use OBS Studio to stream and record videos simultaneously:
Step1 Download OBS Studio from the official website and install it on your computer or laptop.
Step2 Launch OBS Studio and go to the Settings menu. Find the Recording section under the Output tab.
Step3 Click “Start Recording” to manually start the recording or head to the General Tab and checkmark the box before “Automatically Record When Streaming.”
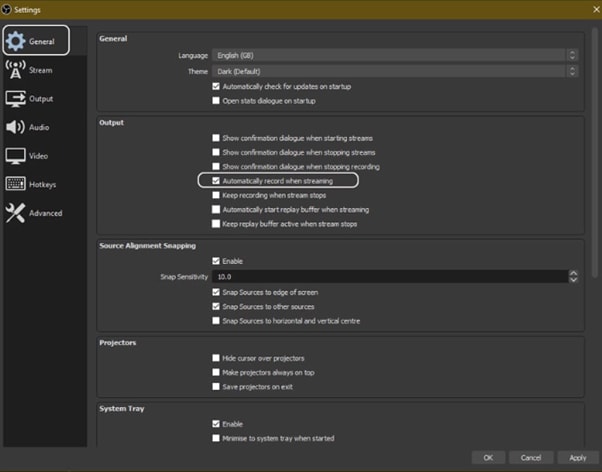
Step4 Finally, click “Apply” to save your settings. Now when you start your stream, the recording will also begin simultaneously.
Way 2. Use Twitch To Save Your Streams
Twitch is the most popular and best live streaming platform that allows gamers to broadcast their gameplay to a live audience and also gives them the ability to save their past broadcasts, or “streams.”
This feature can be useful to save your live stream for later viewing or share your stream with someone who missed it.
Features
Twitch offers a variety of features that make it a unique and powerful game streaming platform. Some of the most notable ones are:
- Live streaming: Twitch allows gamers to share their gameplay in real-time with other gamers around the world. This live aspect of the platform makes it unique and engaging.
- Social interaction: Twitch offers a variety of features that allow gamers to connect with each other, including chat rooms, forums, and user-generated content.
You can save your stream on Twitch in two ways:
- Use the “Highlights” feature, which allows you to save specific moments from your live stream.
- Download your stream’s entire VOD (video on demand) after it has ended.
Steps
Here are the quick steps to saving a stream on your PC from Twitch. But first, you need to enable Twitch VODs before starting your broadcast in the following way:
Step1 Visit Twitch and sign in to your account. Now, click the “Profile” icons and go to “Creator Dashboard.”
Step2 Head to Setting from the left-sidebar and click the “Stream” option. Scroll down and find the VOD Settings. Toggle the buttons next to “Store Past Broadcasts.”
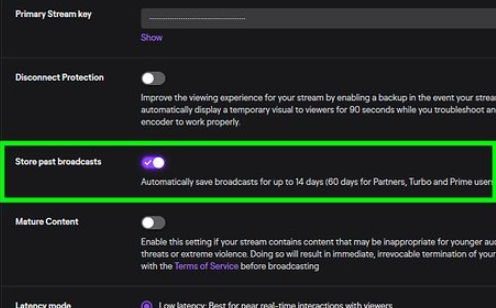
Step3 To publish your VODs instantly after broadcasting, toggle the button next to “Always Publish VODs.”
Now, to download the recordings of your broadcasts to your PC, do the following steps in sequence:
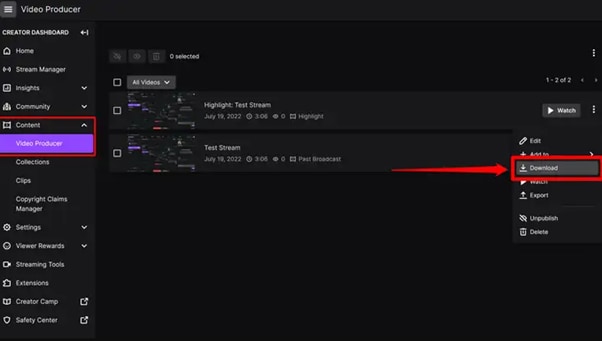
Step1 Head to the Creator Dashboard, find the “Content” section in the left sidebar, and click “Video Producer.”
Step2 Find the stream (VOD or Highlights) you want to download and on the right side, click the three dots.
Step3 Finally, click the “Download” option and let Twitch prepare your video. You will then get the stream’s recording in MP4 format.
Way 3. Use Screen Recorder To Record Your Streams
Using a screen recorder is a great way to record your live stream because it lets you capture the full screen of your PC. Although there are many different screen recorders to choose from, we recommend using Filmora.
Wondershare Filmora is a powerful editor with easy-to-use screen recording capabilities, giving you everything you need to record and stream your video at the same time. The software is free to use and has an intuitive interface.
Features of Filmora
- Support for both Mac OS X and Windows operating systems.
- Ability to record your PC screen, audio, and webcam all at once
- A variety of video editing features
- An easy-to-use interface
Steps
Here’s how to use Filmora for recording while streaming:
Step1 Head to the official Filmora website, download the software and install it on your PC.
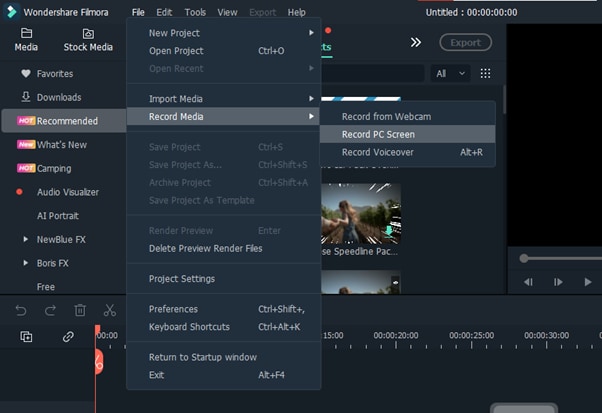
Step2 Launch Filmora 11 and click “New project” in the main interface. Click “File” from the top toolbar and scroll down to “Record media.” From the drop-down menu, select “Record PC Screen.”
Step3 A new “Wondershare Screen Recorder” window will pop up. You can set up a full screen, custom or target screen recording, speaker, and microphone settings. If you want more Settings, click the drop-down icon.
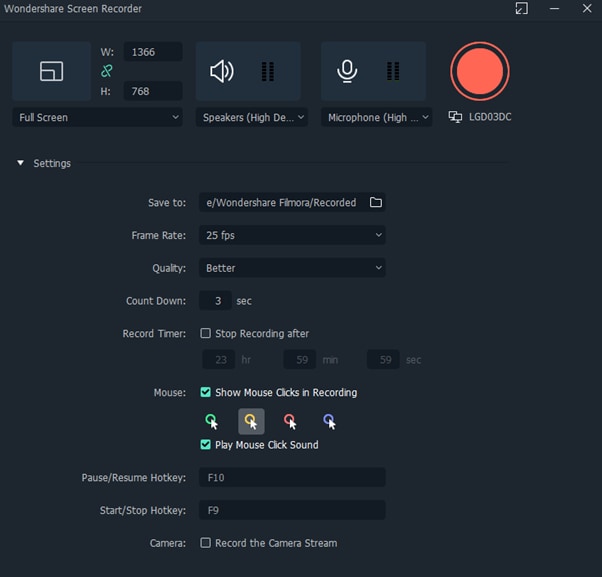
Step4 Click the Start icon to begin your recording. Afterward, click the Stop icon to stop the recording, and your stream will be saved in the selected destination.
Conclusion
In this article, we’ve discussed three step-by-step methods to help you do live streaming and recording at the same time. With these solutions at your disposal, you’ll be able to save your VODs with ease.
It is best to choose only one software to start with to avoid the time-consuming trial-and-error process. If you want to add another tool, do so later; otherwise, you will waste your precious time and resources.
Give these methods a shot, and eventually, you will find your groove—and become accustomed to just how easy it is to record and stream a video simultaneously.
Free Download For Win 7 or later(64-bit)
Free Download For macOS 10.14 or later
Free Download For macOS 10.14 or later
Expolring Top 6 Best Alternatives to Clownfish Voice Changer
Do you remember using the Taking Tom or Talking Angela app? I do because I was giggling so hard at how hilarious it was. Well, it was the easy and fun application of voice-changing technology. Imagine performing this in real-time while using different voice tones because voice-changing software will enable you to accomplish that.
These voice-changing apps have a variety of pre-programmed voice types, including cartoon, robotic, and alien sounds. With these apps, you can manually modify your voice’s pitch, frequency, tone, and other elements. In this article, we will talk about the most popular clownfish voice changer and its best alternative, so keep reading:
Try AI Voice Changer For Win 7 or later(64-bit)
Try AI Voice Changer For macOS 10.14 or later
Part 1: What’s the best part of the clownfish voice changer app?
You can modify your voice with the simple-to-use Clownfish Voice Changer app. It has various functional applications and is used for enjoyment and amusement. For instance, you can use it to ensure the speaker’s anonymity when making phone conversations or recording podcasts.

With the help of Clownfish Voice Changer, you can instantly alter your voice. It is incredibly effective and doesn’t require technical knowledge or expensive equipment. You can use it while gaming, making prank calls to random people, having fun with your buddies, or even altering your voice for professional purposes.

You can use a clownfish voice changer while gaming to change your voice. It can be fun, but it might help make your playing character more distinctive. You will need a robust and authoritative voice to sound like a Black Ops Unit Commander commander.
Features
- Clownfish Voice Changer can improve the quality and tone of your voice.
- You can modify your voice on various apps like Hangouts, Steam, Skype, ooVoo, Mumble, Ventrilo, Viber, Ekiga, TeamSpeak, Jitsi, Discord, etc.
- You can use different voice effects like Female pitch, Helium pitch, Radio, Robot, Custom pitch, Alien, Atari, Fast Mutation, Clone, Slow Mutation, Male pitch, Mutation, Silence, Baby pitch, etc.
- It supports various media formats and has better audio controls and playlist features for the music player.
- Clownfish Voice Changer has Virtual Studio Technology (VST) plugins.
Compatibility
Clownfish voice changer supports Windows Vista, 7, 8, 8.1, 10, and 11 operating systems.
Price
The clown voice changer is available for free.
Part 2: What’re the best alternatives for a clownfish voice changer?
If you are looking for the best alternatives to Clownfish voice changer, you can use the following apps:
Voxal
Voxal Voice Changer is a great and straightforward voice-changing application to record audio files and apply a variety of voice and sound effects in real time. Almost any software that uses a microphone, such as numerous games, Skype, TeamSpeak, etc., can use this to modify a user’s voice.
Voxal’s Voice Changer is the simplest method to alter your gender in speech chats, voice animations, fun team games with your pals, or make your unique voice modification effects.
All cutting-edge voice alteration tools, including basic audio editing, are accessible for a modest fee or a monthly membership.

Compatibility
Voxal is compatible with Windows 10, 8.1, 8, 7, XP, Vista (64-bit and 32-bit), and macOS 10.5 or above.
Price
During the 14-day trial period, a free version of Voxal is only accessible for non-commercial usage. You must pay $19.99 for a lifetime license if you want to keep using the program at home. The cost of the business license is $24.99. A quarterly subscription option is also available for $1.94 per month.
Voicemod
You should try Voicemod voice changer if you want a live voice changer app that can alter a user’s speech to sound like a robot, chipmunk, male, or female. With this app, you can prank friends and do real-time speech modification in live gaming and streaming. Voicemod has a vast library of pre-made voice filters that offers more than 90 voices. You can use it for PUBG, Fortnite, Discord, Grand Theft Auto, Zoom, Skye, ASMR, etc.

Compatibility
It supports Windows 10 and 11 (64-bit). Although the team is attempting to make this real-time voice changer more accessible, it is not intended for Xbox, macOS, or PS4.
Price
You download the Voicemod voice changer for free. Only pro users can access the full feature set and voice collection. Three subscription options are available: 3-month ($4.99), 1-year ($9.99), and lifetime ($19.99).
MorphVOX
MorphVOX voice changer is a practical real-time voice changer for PC. It alters the user’s original voice into many voices. Using the included sounds and effects, you can change your voice into that of a woman, man, child, and many more. It differs from other voice changers due to the extensive selection of preset voice libraries.

Compatibility
MorphVOX voice changer app supports Windows and Mac.
Price
You can test the features and functionality of this voice changer by downloading the free version. A $39.99 premium edition is advised if you want to unlock all valuable features.
UnicTool MagicVox
One of the most powerful real-time voice changers for PCs is UnicTool MagicVox. You can fake your voice to amuse friends and make gaming more enjoyable in real time, thanks to an extensive library of more than 200 voice effects. It has voice filters that use background noises to improve mood and atmosphere and make voice-changing results more dramatic.
It can work with many platforms, including Skype, Discord, Viber, and others that support live calls. The most fantastic feature is that it contains all the tools necessary to change voice in real-time, including voice customization, background sound, keybinding, etc.

Compatibility
MagicVox voice changer is compatible with Windows.
Price
You can download a free version of MagicVox or purchase a complete package at a reasonable cost of about $0.2 per day.
AV Voice Changer
An excellent substitute for Clownfish Voice Changer is AV Voice Changer. Using AV Voice Changer, you can adjust your voice’s pitch, speed, loudness, echo, etc. It can produce various effects, such as baby pitch, robot pitch, and helium pitch.
This voice changer has real-time pitch shifting that enables most effects, allowing you to alter your tone in the middle of a statement. There are more than a hundred built-in effects available. Using the built-in sound editor, you can also make your effect.

Compatibility
It is compatible with Windows Vista/7/8/8.1/10 (32-bit & 64-bit).
Price
You can purchase a full AV Voice Changer basic software license for $29.95.
MasqVox Voice Changer
MasqVox Voice Changer is one of the best real-time voice changers. It allows you to switch between voices when conversing on Skype. This app will enable you to change the pitch of someone else’s speech or audio.

Compatibility
It is compatible with Windows.
Price
You can use this voice changer for free.
Part 3: How to record and edit funny voice-changing videos?
If you are looking for the best app to record and edit funny voice-changing videos, then you should give Filmora 11 a try. Filmora is a powerful professional video and audio editing program for Windows and Mac computers. You can add a new audio track from the Audio Library, mute the audio, cut, copy, paste, or insert audio files using the built-in editing tools.

A variety of audio effects are available in the Filmora video editor. Choose a music track and audio effects from the audio library by clicking the Audio tab at the top of the screen. More than 50 free sound effects and soundtracks are available on Filmora. Choose where you want the audio to appear on the audio track by dragging and dropping the music from the audio library. After that, click the play button to see if the modifications were successful.
You can also add a voiceover anytime in the timeline by using the internal or external microphone on your computer to record one. With Filmora, you can adjust the audio speed by sliding the speed slider or typing a specific number.
Filmora screen recorder allows you to simultaneously record their screen and camera and the audio from their system and microphone. You can record games, tutorials, YouTube videos, etc., and export the videos to other devices, Vimeo and YouTube.
Free Download For Win 7 or later(64-bit)
Free Download For macOS 10.14 or later
Part 4: FAQs
Is Clownfish a good voice changer?
One of the most popular and well-known voice changers is Clownfish. It is excellent for people who want more from their voice changer than just altering sounds. Clownfish voice changer provides several features that are not offered by other apps.
Is Clownfish voice changer compatible with Chrome?
Yes, the clown fish voice changer is compatible with Chrome. Any Windows or Mac computer, as well as an Android or iOS device, can install a clown voice changer.
Is Clownfish voice changer free?
Clown fish voice changer is a 100% free tool. It doesn’t have any freemium constraints despite having a smaller selection of voice selections.
Try AI Voice Changer For Win 7 or later(64-bit)
Try AI Voice Changer For macOS 10.14 or later
Part 1: What’s the best part of the clownfish voice changer app?
You can modify your voice with the simple-to-use Clownfish Voice Changer app. It has various functional applications and is used for enjoyment and amusement. For instance, you can use it to ensure the speaker’s anonymity when making phone conversations or recording podcasts.
With the help of Clownfish Voice Changer, you can instantly alter your voice. It is incredibly effective and doesn’t require technical knowledge or expensive equipment. You can use it while gaming, making prank calls to random people, having fun with your buddies, or even altering your voice for professional purposes.
You can use a clownfish voice changer while gaming to change your voice. It can be fun, but it might help make your playing character more distinctive. You will need a robust and authoritative voice to sound like a Black Ops Unit Commander commander.
Features
- Clownfish Voice Changer can improve the quality and tone of your voice.
- You can modify your voice on various apps like Hangouts, Steam, Skype, ooVoo, Mumble, Ventrilo, Viber, Ekiga, TeamSpeak, Jitsi, Discord, etc.
- You can use different voice effects like Female pitch, Helium pitch, Radio, Robot, Custom pitch, Alien, Atari, Fast Mutation, Clone, Slow Mutation, Male pitch, Mutation, Silence, Baby pitch, etc.
- It supports various media formats and has better audio controls and playlist features for the music player.
- Clownfish Voice Changer has Virtual Studio Technology (VST) plugins.
Compatibility
Clownfish voice changer supports Windows Vista, 7, 8, 8.1, 10, and 11 operating systems.
Price
The clown voice changer is available for free.
Part 2: What’re the best alternatives for a clownfish voice changer?
If you are looking for the best alternatives to Clownfish voice changer, you can use the following apps:
Voxal
Voxal Voice Changer is a great and straightforward voice-changing application to record audio files and apply a variety of voice and sound effects in real time. Almost any software that uses a microphone, such as numerous games, Skype, TeamSpeak, etc., can use this to modify a user’s voice.
Voxal’s Voice Changer is the simplest method to alter your gender in speech chats, voice animations, fun team games with your pals, or make your unique voice modification effects.
All cutting-edge voice alteration tools, including basic audio editing, are accessible for a modest fee or a monthly membership.
Compatibility
Voxal is compatible with Windows 10, 8.1, 8, 7, XP, Vista (64-bit and 32-bit), and macOS 10.5 or above.
Price
During the 14-day trial period, a free version of Voxal is only accessible for non-commercial usage. You must pay $19.99 for a lifetime license if you want to keep using the program at home. The cost of the business license is $24.99. A quarterly subscription option is also available for $1.94 per month.
Voicemod
You should try Voicemod voice changer if you want a live voice changer app that can alter a user’s speech to sound like a robot, chipmunk, male, or female. With this app, you can prank friends and do real-time speech modification in live gaming and streaming. Voicemod has a vast library of pre-made voice filters that offers more than 90 voices. You can use it for PUBG, Fortnite, Discord, Grand Theft Auto, Zoom, Skye, ASMR, etc.
Compatibility
It supports Windows 10 and 11 (64-bit). Although the team is attempting to make this real-time voice changer more accessible, it is not intended for Xbox, macOS, or PS4.
Price
You download the Voicemod voice changer for free. Only pro users can access the full feature set and voice collection. Three subscription options are available: 3-month ($4.99), 1-year ($9.99), and lifetime ($19.99).
MorphVOX
MorphVOX voice changer is a practical real-time voice changer for PC. It alters the user’s original voice into many voices. Using the included sounds and effects, you can change your voice into that of a woman, man, child, and many more. It differs from other voice changers due to the extensive selection of preset voice libraries.
Compatibility
MorphVOX voice changer app supports Windows and Mac.
Price
You can test the features and functionality of this voice changer by downloading the free version. A $39.99 premium edition is advised if you want to unlock all valuable features.
UnicTool MagicVox
One of the most powerful real-time voice changers for PCs is UnicTool MagicVox. You can fake your voice to amuse friends and make gaming more enjoyable in real time, thanks to an extensive library of more than 200 voice effects. It has voice filters that use background noises to improve mood and atmosphere and make voice-changing results more dramatic.
It can work with many platforms, including Skype, Discord, Viber, and others that support live calls. The most fantastic feature is that it contains all the tools necessary to change voice in real-time, including voice customization, background sound, keybinding, etc.
Compatibility
MagicVox voice changer is compatible with Windows.
Price
You can download a free version of MagicVox or purchase a complete package at a reasonable cost of about $0.2 per day.
AV Voice Changer
An excellent substitute for Clownfish Voice Changer is AV Voice Changer. Using AV Voice Changer, you can adjust your voice’s pitch, speed, loudness, echo, etc. It can produce various effects, such as baby pitch, robot pitch, and helium pitch.
This voice changer has real-time pitch shifting that enables most effects, allowing you to alter your tone in the middle of a statement. There are more than a hundred built-in effects available. Using the built-in sound editor, you can also make your effect.
Compatibility
It is compatible with Windows Vista/7/8/8.1/10 (32-bit & 64-bit).
Price
You can purchase a full AV Voice Changer basic software license for $29.95.
MasqVox Voice Changer
MasqVox Voice Changer is one of the best real-time voice changers. It allows you to switch between voices when conversing on Skype. This app will enable you to change the pitch of someone else’s speech or audio.
Compatibility
It is compatible with Windows.
Price
You can use this voice changer for free.
Part 3: How to record and edit funny voice-changing videos?
If you are looking for the best app to record and edit funny voice-changing videos, then you should give Filmora 11 a try. Filmora is a powerful professional video and audio editing program for Windows and Mac computers. You can add a new audio track from the Audio Library, mute the audio, cut, copy, paste, or insert audio files using the built-in editing tools.
A variety of audio effects are available in the Filmora video editor. Choose a music track and audio effects from the audio library by clicking the Audio tab at the top of the screen. More than 50 free sound effects and soundtracks are available on Filmora. Choose where you want the audio to appear on the audio track by dragging and dropping the music from the audio library. After that, click the play button to see if the modifications were successful.
You can also add a voiceover anytime in the timeline by using the internal or external microphone on your computer to record one. With Filmora, you can adjust the audio speed by sliding the speed slider or typing a specific number.
Filmora screen recorder allows you to simultaneously record their screen and camera and the audio from their system and microphone. You can record games, tutorials, YouTube videos, etc., and export the videos to other devices, Vimeo and YouTube.
Free Download For Win 7 or later(64-bit)
Free Download For macOS 10.14 or later
Part 4: FAQs
Is Clownfish a good voice changer?
One of the most popular and well-known voice changers is Clownfish. It is excellent for people who want more from their voice changer than just altering sounds. Clownfish voice changer provides several features that are not offered by other apps.
Is Clownfish voice changer compatible with Chrome?
Yes, the clown fish voice changer is compatible with Chrome. Any Windows or Mac computer, as well as an Android or iOS device, can install a clown voice changer.
Is Clownfish voice changer free?
Clown fish voice changer is a 100% free tool. It doesn’t have any freemium constraints despite having a smaller selection of voice selections.
How to Make Stunning Glitch Effect in Photoshop?
Many of us are fascinated by glitch art. The aesthetic effect it adds to your content is unmatched. You can add color and class to your pictures with glitch picture effects. Someone who isn’t aware of the glitch effect is inspired by any technical mishap or digital error. The damage that the malfunctioning of a system causes is used as an art and an effect to beautify things.
You can add the glitch image effect to your photos easily. There are multiple cool templates available on the internet that could be used. You can also make your own stunning yet customized glitch effect Photoshop. If this has impressed you, then stay here because we will talk a lot about glitch photo editors.
In this article
01 Part 1. How Do You Do Photo Glitch Effect in Photoshop?
02 Part 2. 5 Awesome Glitch Effect Photoshop Actions.
Part 1. How Do You Do Photo Glitch Effect in Photoshop?
The jagged lines, the colorful pixels, frozen visuals, and also the distorted colors, everything perfectly blends to make a glitch effect. Usually, this is how all the glitch templates are, but if you get an opportunity to customize your image glitch effect and make your special effect, what will you do?
The best option to adopt in any such circumstances is Photoshop. With Photoshop, you can create a stunning and mind-blowing Photoshop VHS effect. If you want to learn about its steps, then continue reading.
Step 1: The process starts by importing the image to Photoshop on which you plan to add the photo glitch effect. Then you should always convert the image from colorful to black and white. This could be done quickly by going into the ‘Image’ menu from the menu bar. Next, go for the ‘Adjustments’ option and select ‘Desaturate.’

Step 2: Now duplicate the image by dragging it onto the New Layer icon in the Layers Panel. Then double click on the duplicated image. This will open a ‘Layer Style’ settings menu. Here, click on the icon for ‘R Channel’ and deselect it.

Step 3: Now, it’s time to add the first glitch element. For that, hold the ‘Shift’ key and move the image by using the left/right cursor keys on the keyboard. This will offset the image layer from the original.

Step 4: You can now select the ‘Mark’ tool from the left side. Make a rectangle anywhere on the image with the Mark tool and then switch back to the ‘Move’ tool. Then again, nudge the rectangular portion left or right to offset it. You can repeat this process multiple times on different areas of the image.

Step 5: At this point, make a New Layer and fill it with White. Now right-click on this white layer and select the option of ‘Convert to Smart Object.’

Step 6: Move to the menu bar at the top and go to the ‘Filter’ section. From there, select the option of ‘Filter Gallery.’ A new window will show up. Head to the ‘Sketch’ category, and there change the ‘Pattern Type’ to ‘Line.’ You can also play with the ‘Contrast’ and the ‘Size’ of the lines.

Step 7: Now, in the ‘Layers Panel,’ select the option of ‘Overlay’ from the dropdown menu so that the different layers can show through. You can adjust the visibility of the lines by adjusting the number on the scale.

Step 8: After setting everything for the glitch effect in your image, you can now add colors using the ‘Gradient Map.’ Or you can also import some graphic textures to Photoshop and add them to the image. Don’t forget to change the ‘Binding Mode’ to ‘Overlay.’ You can then play with the color and graphic settings.

Step 9: Once all the color adjustments have satisfied you, it’s time to add some text to your glitch image. For that, head to the ‘Text’ tool from the left menu and type in your text. Edit it as you did to your image so that you can make a cool glitch text effect Photoshop and with this, you are all done with making the most stunning glitch effect Photoshop.

Part 2. 5 Awesome Glitch Effect Photoshop Actions
With Photoshop, you can create your photo glitch effect as you prefer instead of using the available standard templates. What if you don’t have enough time to create the effect? Are you going to use the basic and standard templates?
If you are looking for some jaw-dropping glitch picture effects rather than using the basic effects, then this section of the article is perfect for you. We are going to talk about 5 fantastic glitch effects Photoshop action.
1. Distorted Glitch Photoshop Action
The first effect we will discuss is Distorted Glitch Photoshop Action. The effect is very easy to use. You can set it with just one click action. The effect allows you to do adjustment settings with very easy steps to edit it.
The effect has all the dark, distorted, and disturbance-related elements that make it an amazing effect to add glitch effect to image.

2. Geometric Glitch Photoshop Action
If glitch effect with lines is too mainstream for you, then this next effect will surely impress you. This effect is the Geometric Glitch Photoshop Action. You can edit this effect. All its colors, layers, and even elements are fully editable.
You can create a modern yet professional glitch image with this stunning effect. The effect lets you add shapes, abstract styles, and also glitch lines to make cool images.

3. Animated Glitch Photoshop Action
If you are looking for a glitch effect to add to animated content, then nothing is better than Animated Glitch Photoshop Action. The effect template is fully editable with 12 distinct color options. The animated effect has a very organized structure of layers, color coding, etc.
By using this effect, you can add a great vibe to your image. The template greatly shows the distortion, digital error, etc. You can play around with RGB to make it look crazy brilliant.

4. Futuristic Photoshop Action
The next effect in line to be discussed is Futuristic Photoshop Action. This effect has all the bright and neon colors. The effect could be added easily to your images regardless of the type of your content. Graphic designers and photographers use the Futuristic Effect to create stunning and professional glitch images.

5. Glitch Art Photoshop Action
The last effect template that we are going to shed light on is Glitch Art Photoshop Action. The effect is fully editable with 10 different abstract elements. The template has absolutely professional results. The effect delivers complete glitchy vibes.
The distortion, the abstract elements, the digital error, and everything else in effect represents all the glitchy vibes.

Final Words
This article is everything one person needs if they want to learn about glitch effect Photoshop. We have talked about creating a jaw-dropping glitch effect in Photoshop. The steps to create a stunning glitch effect have been mentioned above.
We then shared 5 incredible glitch effects that could be used in case you don’t want to create your own effect.
02 Part 2. 5 Awesome Glitch Effect Photoshop Actions.
Part 1. How Do You Do Photo Glitch Effect in Photoshop?
The jagged lines, the colorful pixels, frozen visuals, and also the distorted colors, everything perfectly blends to make a glitch effect. Usually, this is how all the glitch templates are, but if you get an opportunity to customize your image glitch effect and make your special effect, what will you do?
The best option to adopt in any such circumstances is Photoshop. With Photoshop, you can create a stunning and mind-blowing Photoshop VHS effect. If you want to learn about its steps, then continue reading.
Step 1: The process starts by importing the image to Photoshop on which you plan to add the photo glitch effect. Then you should always convert the image from colorful to black and white. This could be done quickly by going into the ‘Image’ menu from the menu bar. Next, go for the ‘Adjustments’ option and select ‘Desaturate.’
Step 2: Now duplicate the image by dragging it onto the New Layer icon in the Layers Panel. Then double click on the duplicated image. This will open a ‘Layer Style’ settings menu. Here, click on the icon for ‘R Channel’ and deselect it.
Step 3: Now, it’s time to add the first glitch element. For that, hold the ‘Shift’ key and move the image by using the left/right cursor keys on the keyboard. This will offset the image layer from the original.
Step 4: You can now select the ‘Mark’ tool from the left side. Make a rectangle anywhere on the image with the Mark tool and then switch back to the ‘Move’ tool. Then again, nudge the rectangular portion left or right to offset it. You can repeat this process multiple times on different areas of the image.
Step 5: At this point, make a New Layer and fill it with White. Now right-click on this white layer and select the option of ‘Convert to Smart Object.’
Step 6: Move to the menu bar at the top and go to the ‘Filter’ section. From there, select the option of ‘Filter Gallery.’ A new window will show up. Head to the ‘Sketch’ category, and there change the ‘Pattern Type’ to ‘Line.’ You can also play with the ‘Contrast’ and the ‘Size’ of the lines.
Step 7: Now, in the ‘Layers Panel,’ select the option of ‘Overlay’ from the dropdown menu so that the different layers can show through. You can adjust the visibility of the lines by adjusting the number on the scale.
Step 8: After setting everything for the glitch effect in your image, you can now add colors using the ‘Gradient Map.’ Or you can also import some graphic textures to Photoshop and add them to the image. Don’t forget to change the ‘Binding Mode’ to ‘Overlay.’ You can then play with the color and graphic settings.
Step 9: Once all the color adjustments have satisfied you, it’s time to add some text to your glitch image. For that, head to the ‘Text’ tool from the left menu and type in your text. Edit it as you did to your image so that you can make a cool glitch text effect Photoshop and with this, you are all done with making the most stunning glitch effect Photoshop.
Part 2. 5 Awesome Glitch Effect Photoshop Actions
With Photoshop, you can create your photo glitch effect as you prefer instead of using the available standard templates. What if you don’t have enough time to create the effect? Are you going to use the basic and standard templates?
If you are looking for some jaw-dropping glitch picture effects rather than using the basic effects, then this section of the article is perfect for you. We are going to talk about 5 fantastic glitch effects Photoshop action.
1. Distorted Glitch Photoshop Action
The first effect we will discuss is Distorted Glitch Photoshop Action. The effect is very easy to use. You can set it with just one click action. The effect allows you to do adjustment settings with very easy steps to edit it.
The effect has all the dark, distorted, and disturbance-related elements that make it an amazing effect to add glitch effect to image.
2. Geometric Glitch Photoshop Action
If glitch effect with lines is too mainstream for you, then this next effect will surely impress you. This effect is the Geometric Glitch Photoshop Action. You can edit this effect. All its colors, layers, and even elements are fully editable.
You can create a modern yet professional glitch image with this stunning effect. The effect lets you add shapes, abstract styles, and also glitch lines to make cool images.
3. Animated Glitch Photoshop Action
If you are looking for a glitch effect to add to animated content, then nothing is better than Animated Glitch Photoshop Action. The effect template is fully editable with 12 distinct color options. The animated effect has a very organized structure of layers, color coding, etc.
By using this effect, you can add a great vibe to your image. The template greatly shows the distortion, digital error, etc. You can play around with RGB to make it look crazy brilliant.
4. Futuristic Photoshop Action
The next effect in line to be discussed is Futuristic Photoshop Action. This effect has all the bright and neon colors. The effect could be added easily to your images regardless of the type of your content. Graphic designers and photographers use the Futuristic Effect to create stunning and professional glitch images.
5. Glitch Art Photoshop Action
The last effect template that we are going to shed light on is Glitch Art Photoshop Action. The effect is fully editable with 10 different abstract elements. The template has absolutely professional results. The effect delivers complete glitchy vibes.
The distortion, the abstract elements, the digital error, and everything else in effect represents all the glitchy vibes.
Final Words
This article is everything one person needs if they want to learn about glitch effect Photoshop. We have talked about creating a jaw-dropping glitch effect in Photoshop. The steps to create a stunning glitch effect have been mentioned above.
We then shared 5 incredible glitch effects that could be used in case you don’t want to create your own effect.
Easy Steps to Add Miniature Effect to Videos
Want to add selective blur to make everything look smaller? Don’t have any idea how to focus on specific mini-things? Then don’t worry! In this article, you’ll get a step-by-step process to add miniature effects to your video. At the end of the process, you’ll have cinematic shots. Then start with us now! Scroll more to get pro tips!
What Is a Miniature Effect?

But first, let’s learn the logic of making the miniature effect. As many video editing pros present on Tiktok, the miniature effect is a fun way to brighten up your photography or video shots. For example, when taking a video or a time-lapse of a landscape, we always have a bigger depth of field, so most objects in the frame are in focus.
However, when we film a miniature model, the depth of field is shallow. So, we only see some objects in focus, and the rest is blurry. This visual trick makes our brain believe that the big landscape we’re seeing is actually a tiny model.

To create a miniature look, we can use specific effects to fake a shallow depth of field, and then the landscape view will look like a tiny model. While some keys to notice before making the miniature effect are:
- It utilizes selective blur to make things appear like small
- The miniature effect works best for footage filmed from a high angle.
- The tiny effect is usually used in drone footage, time lapses, or landscape photography.
Are you all set to add miniature effects to your video and make film-like shots? Then scroll more and get the step-by-step process.
How to Make a Miniature effect?
You are excited to add a miniature effect, and enjoy the rest! Without any further delay, follow the below instructions and get results!
Step1 Download the Wondershare Filmora
- First of all, you have to download the Wondershare Filmora .
- It’s packed with new features and effects plugins that make editing more filmy and fun!
![]()
Note: filmora has a unique “stock media” option that enables us to use all these elements and more to boost our videos!
Step2 Choose any stock footage
If you don’t have good-quality footage, but want to boost your video, here is how. You can get the miniature effect without a big format view camera or specialized lens.
- Open Filmora and select any stock footage in Wondershare Filmora.

Move to the stock media folder on the above bar in the Wondershare Filmora. Or you can look towards the left window, where you will see the sample videos tab.
- Click on the sample videos tab, and a new window will appear on the library screen.
Here you will see almost more than 20 videos. So, instead of using the actual recorded footage, we’ll make do with what we have by default. After selecting and adding the stock footage of your choice. Then you have to follow the below process:
- First, hold the Stock Footage as shown in the folder section.
- Then Drag and Drop it to the timeline section for further editing.

Who will get Stock Media?
Want to get stock media? You can only have access to the stock media library if you already buy the license of Wondershare Filmora.
- The latest version has an unlimited stock library.
- After purchasing any plan, you can access Stock Media (Unsplash, Giphy, Pixabay, Pixel).
Step3 Head to the effect panel
As we are working on miniature effects, what do we need first? First, we ensure that we have a Blur effect on the video.

To add a blur effect from the panel, follow the below-mentioned steps:
- First of all, move toward the above tabs.
- Then click on the 5th section, which is Effect
- After selecting the effect tab, a new window will pop up.
- In this section, we have 500+ different effects.
- Then, click on the search bar.
- Search for the Blur effect.
- After that, click on the Blur 2
- Then Download this effect if you haven’t done this already.
Step4 Add the blur effect to the video
After selecting and downloading the blur effect, it’s time to add it to the video. Again, see how precise it turned out. To add effect, follow below steps:
- First, drag and Drop the effect toward the timeline.
- Then, make sure to release the effect on the video to give it a lens blur appearance.

Step5 Add the effect multiple times
Want to get an ideal blur level? If you need more blur level in your video and make it more cinematic, then follow the below steps:
- First, ensure that the opacity of the blur effect is 100%.
- Then, if you still want more blurriness, add Blur 2 effect multiple times on the video.
- Finally, add effect by just the Drag and Drop

Step6 Drop the same video clip
- Add the same video clip 2nd time on the timeline.
- Add it by just the Drag and Drop
- Make sure you add it to 2nd video track in the timeline above the first one.

Step7 Add masks on the Video
Now, it’s time to select a specific video portion and add a mask. Due to this, we will have a selective blur portion. For this, follow the below guidelines:
- Double-click on the video present in 2nd track.
- The settings tab will be open in the top left section.
- Then find the Mask section and click on it.
- After this, click on the Double-line.
- Set the mask on video according to your style and choice.

![]()
Note: you can adjust the mask size and position by rotating and changing its shape.
Watch the rotating and adjusting actions as shown below!

For example, when we add a mask in the below time-lapse video, follow the above mask adjustments. Unfortunately, we can’t get good results. Therefore, we will apply another way to add a mask by changing shape and position. Follow the instructions for modifications:

- Make a building or any object Blurry near the camera because it is not present within the depth of field.
- While the object is far from the camera, it is focused because it is in the depth of the field.
- Then adjust the mask, as per your choice.
Want to change the shape of the mask? Then follow the below steps:

- Double-click on the video present in 2nd video track.
- Settings will activate on the top left side.
- Then click on the Mask tab to open it.
- Select the Rectangular mask from the list and apply it.
![]()
Note: make sure you are masking the same extent and excluding the object you want to be out of focus.
Now, it’s time to mask the whole object, which is far, but we want to make it in focus! For this, follow these steps:
- Add the same stock video clip a third time on the third video track of the timeline.
- Then add a mask in a Rectangle shape on the building.
- Don’t blur the edge of this mask.

Step8 Final Look
You are excited now to see the final look of your miniature effect! Finally, it’s in front of you! Just modify it more if you want to make it more precise.

Have you tried to add a miniature effect before? If yes, then share your experience with us! Try with more mask shapes and add more blur effects. Make sure that you are using Wondershare Filmora to make more filmy shots. Feel free to try out different effects and enjoy the following results!
Free Download For Win 7 or later(64-bit)
Free Download For macOS 10.14 or later
Step2 Choose any stock footage
If you don’t have good-quality footage, but want to boost your video, here is how. You can get the miniature effect without a big format view camera or specialized lens.
- Open Filmora and select any stock footage in Wondershare Filmora.
Move to the stock media folder on the above bar in the Wondershare Filmora. Or you can look towards the left window, where you will see the sample videos tab.
- Click on the sample videos tab, and a new window will appear on the library screen.
Here you will see almost more than 20 videos. So, instead of using the actual recorded footage, we’ll make do with what we have by default. After selecting and adding the stock footage of your choice. Then you have to follow the below process:
- First, hold the Stock Footage as shown in the folder section.
- Then Drag and Drop it to the timeline section for further editing.
Who will get Stock Media?
Want to get stock media? You can only have access to the stock media library if you already buy the license of Wondershare Filmora.
- The latest version has an unlimited stock library.
- After purchasing any plan, you can access Stock Media (Unsplash, Giphy, Pixabay, Pixel).
Step3 Head to the effect panel
As we are working on miniature effects, what do we need first? First, we ensure that we have a Blur effect on the video.
To add a blur effect from the panel, follow the below-mentioned steps:
- First of all, move toward the above tabs.
- Then click on the 5th section, which is Effect
- After selecting the effect tab, a new window will pop up.
- In this section, we have 500+ different effects.
- Then, click on the search bar.
- Search for the Blur effect.
- After that, click on the Blur 2
- Then Download this effect if you haven’t done this already.
Step4 Add the blur effect to the video
After selecting and downloading the blur effect, it’s time to add it to the video. Again, see how precise it turned out. To add effect, follow below steps:
- First, drag and Drop the effect toward the timeline.
- Then, make sure to release the effect on the video to give it a lens blur appearance.
Step5 Add the effect multiple times
Want to get an ideal blur level? If you need more blur level in your video and make it more cinematic, then follow the below steps:
- First, ensure that the opacity of the blur effect is 100%.
- Then, if you still want more blurriness, add Blur 2 effect multiple times on the video.
- Finally, add effect by just the Drag and Drop
Step6 Drop the same video clip
- Add the same video clip 2nd time on the timeline.
- Add it by just the Drag and Drop
- Make sure you add it to 2nd video track in the timeline above the first one.
Step7 Add masks on the Video
Now, it’s time to select a specific video portion and add a mask. Due to this, we will have a selective blur portion. For this, follow the below guidelines:
- Double-click on the video present in 2nd track.
- The settings tab will be open in the top left section.
- Then find the Mask section and click on it.
- After this, click on the Double-line.
- Set the mask on video according to your style and choice.
![]()
Note: you can adjust the mask size and position by rotating and changing its shape.
Watch the rotating and adjusting actions as shown below!
For example, when we add a mask in the below time-lapse video, follow the above mask adjustments. Unfortunately, we can’t get good results. Therefore, we will apply another way to add a mask by changing shape and position. Follow the instructions for modifications:
- Make a building or any object Blurry near the camera because it is not present within the depth of field.
- While the object is far from the camera, it is focused because it is in the depth of the field.
- Then adjust the mask, as per your choice.
Want to change the shape of the mask? Then follow the below steps:
- Double-click on the video present in 2nd video track.
- Settings will activate on the top left side.
- Then click on the Mask tab to open it.
- Select the Rectangular mask from the list and apply it.
![]()
Note: make sure you are masking the same extent and excluding the object you want to be out of focus.
Now, it’s time to mask the whole object, which is far, but we want to make it in focus! For this, follow these steps:
- Add the same stock video clip a third time on the third video track of the timeline.
- Then add a mask in a Rectangle shape on the building.
- Don’t blur the edge of this mask.
Step8 Final Look
You are excited now to see the final look of your miniature effect! Finally, it’s in front of you! Just modify it more if you want to make it more precise.
Have you tried to add a miniature effect before? If yes, then share your experience with us! Try with more mask shapes and add more blur effects. Make sure that you are using Wondershare Filmora to make more filmy shots. Feel free to try out different effects and enjoy the following results!
Free Download For Win 7 or later(64-bit)
Free Download For macOS 10.14 or later
Also read:
- New How To Import and Adjust the Video Clips on Wondershare Filmora?
- Wondering How to Add Custom Transitions in OBS Studio? Here Are the Steps to Add Stinger Transitions to OBS. Get a Better OBS Alternative to Add Transitions for 2024
- 2024 Approved Do You Have a Sony Camera and Want to Try Different LUTs on Your Digital Content? Youre at the Right Place, as You Can Apply Sony HLG LUTs to Your Media
- Hard to Remove Black Background in After Effects?
- In 2024, General Knowledge About MP4 Format and Best MP4 Video Editor
- 2024 Approved Looking For the Best VHS Video Effect Makers? Get To Know the Top List
- Updated How to Animate Text in A Video
- 2024 Approved Everything About Adding Effects In Kinemaster
- Updated 22 Free Video Editing Software to Save Your Money and Time for 2024
- Updated Do You Have the Habit to Create Subtitle for Your Video? You Can Always Add Open and Close Subtitles to Your Video to Make It Perfect. Follow This Article to Learn More About It
- Updated In 2024, When It Comes to Video Editing, There Are Countless Software Options Available on the Market. However, Not All of Them Come with Useful Masking Tools. In This Article, We Will Be Discussing the Top 8 Video Editor with Useful Masking Tools
- Updated Are You Searching the Internet for Top Wedding LUTs Premiere Pro? This Article Provides Suggestions on the Best LUT Color Presets for 2024
- Updated How to Color Correct in OBS for 2024
- Zoom In and Zoom Out on YouTube for 2024
- New Minecraft Pixel Art Is a Trending Subject, and They Simply Consist of In-Game Pixel Artworks, Besides the Minecraft Houses, Farms, or Cities. Lets Explore the Fantastic World of Minecraft Pixel Art
- Updated In 2024, It Is Crucial to Introduce Your Kids to the Different Colors and Practice the Color Matching Game. So, Here Are the Various Factors Related to Color Matching for Your Child with a Tool to Help You in It Ideally
- New In 2024, Are You Eager to Discover All About Dynamic Videos? You Are in the Right Place because This Article Provides Insight Into Dynamic Video Collages
- In 2024, How to Change Lock Screen Wallpaper on Motorola Edge 2023
- In 2024, Top 4 Ways to Trace Realme 10T 5G Location | Dr.fone
- The Magnificent Art of Pokemon Go Streaming On Vivo V30 Pro? | Dr.fone
- How To Reset Your Apple iPhone 11 Pro? | Dr.fone
- Different Methods To Unlock Your iPhone SE (2020) | Dr.fone
- In 2024, 2 Ways to Monitor OnePlus Ace 2 Activity | Dr.fone
- Fix Unfortunately Settings Has Stopped on Tecno Spark Go (2023) Quickly | Dr.fone
- In 2024, iSpoofer is not working On Motorola G24 Power? Fixed | Dr.fone
- Best Pokemons for PVP Matches in Pokemon Go For Infinix Note 30 VIP | Dr.fone
- In 2024, How to Change Google Play Location On Motorola Moto G24 | Dr.fone
- In 2024, The Ultimate Guide to Bypassing iCloud Activation Lock from iPhone 8
- How to Track Apple iPhone XS Max Location by Number | Dr.fone
- Apple ID Locked or Disabled On iPhone 6 Plus? 7 Mehtods You Cant-Miss
- Edit and Send Fake Location on Telegram For your Nubia Z50 Ultra in 3 Ways | Dr.fone
- Title: Updated 3 Ways To Stream And Record At The Same Time for 2024
- Author: Morgan
- Created at : 2024-06-15 18:56:38
- Updated at : 2024-06-16 18:56:38
- Link: https://ai-video-editing.techidaily.com/updated-3-ways-to-stream-and-record-at-the-same-time-for-2024/
- License: This work is licensed under CC BY-NC-SA 4.0.
