
Updated 4 Ways to Add White Border to Video on Mobile and Desktop
4 Ways to Add White Border to Video on Mobile and Desktop
Would you like to add white borders to your videos?
Are you looking to put white backgrounds to your videos without cutting them?
You have seen many videos with attractive borders on different social media platforms (Instagram, YouTube, Facebook, LinkedIn, etc.) Adding borders allows you to create an evocative effect and also adjust the cropping issues. It plays a good role in redesigning a video. It should be noted that a border can change the entire style of the video.
There are hundreds of video editing software that allow adding borders to the videos for mobile and desktop. In this article, we shall discuss different ways to add white borders in movies used on different social media platforms.

4 Ways to Add White Borders to Video
The following 4 ways can be used to add white borders to the videos.
- Add a white border to the video on the computer (using Filmora)
- Add a white border to the video online
- Add a white border to the video on Android
- Add a white border to the video on iOS
Add a white border to the video on the computer (using Filmora)
Filmora Video Editor is one of the best video editing software. It allows editing the videos in a professional way. It has built-in editing features like splitting/cutting, trimming, cropping, adding watermark, changing speed, recording voice, and many more Along with this, you can rely on this application to add borders with different colors including white borders, black borders, colored border, and customized border. Add white borders on a computer, all this can be done in a few simple steps.
For Win 7 or later (64-bit)
For macOS 10.14 or later
Let’s download the free Wonder Share Filmora 11 software to proceed.
- Go to media, and import the video from your storage.
- Drag the video into the timeline.

- Select the video by clicking on the video.
- Hit the effects You can select the colorful effects from the panel.
- Now, write borders in the search engine. You will find various borders styles in the panel.
- Select the white border at the top of the panel.
- Simply drag and drop the border to the video/image.

- You will see the white border on the selected video.

- You can change the color of the border.
- Select the video by double-clicking on it.
- Hit the Effect tab from the Image and then click on Borders.
- Here you can change the color of your borders.
- Hit the OK

Add A White Border To The Video Online
You can change white borders without launching software by editing online. Kapwing is an online video editing tool that is used to edit videos, images, and GIFs. It is very easy to use and the good thing about Kapwing is, it’s free and you don’t need to sign up or add watermarks to your edited videos/images.
However, it allows you to edit a video up to 250MB or you can only upload a video of almost 7 minutes in length. What you would need is to have a good internet connection and a Web.
Let’s start editing to add white borders step by step:
- Visit Kapwing collage maker and hit start collage maker
- You will see the below window.

- Click on Add media and select the desired video or image.
- Drag and drop the video into the timeline.

- Click on the video and drag the 4 corners to resize your video.
- It will eventually provide you with a white background and you can use it as a white border.

- Hit the Lock ratio tab once you got satisfied with your image borders.
- Double click the border to set the background color.

- You can change the background colors of your choice.

Add a white border to the video on Android
You can add white borders to your videos using android. BeeCut is a very simple and useful application for video editing. It presents a lot of stylish and beautiful frames and effects to make your video amazing. Along with this, it allows you to add text, filters, transitions, and many features to make your video stand out. It is very easy to use as takes a few steps to add frames to your video in android. To start the process follow these steps;
- Launch BeeCut on your mobile/android.
- Open the app and click on Media.
- Hit on Import file.

- Drag the video into the timeline or hit the +
- Hit the overlays
- Select your desired border.

- Drag the desired overlay border over the timeline. Here you can edit your design (change color, effect, etc.)
- Now, hit the export tab and choose the quality and format of your video.
- Save the file on your android.
Add a white border to the video on iOS
The PicsArt app is commonly used to edit videos on iPhone as well as on android. It is a very simple app, even a layman can use PicsArt and make professional white borders. This app is familiar among Instagram users. It changes the rectangular video or image into a square format. The aspect ratio of 1:1 is used for Instagram videos. It not only adds borders to the videos but also provides editing features like cut, resize, rotate, trims, text, etc. Let’s start with step-by-step instructions to add white borders to the video.
- Go to the app store and download the PicsArt app.
- Open the app and select the desired video.
- Hit the Fit tab from the bottom center.

- Select the color tool from the bottom.
- Choose the white color for white borders and you can also choose the desired color.
- Hit the ütab and the video will be saved to your phone gallery or you can directly share the video on Instagram.

Conclusion:
In the above content, we have introduced four methods to add white borders in your videos using windows, android, iPhone, and online. All the methods are free to use.
Wonder Share Filmora 11 is highly recommended to get the best and most professional results. It not only allows you to add borders but also provides you with an advanced editing panel. You can easily edit your videos and share with your social circle.
4 Ways to Add White Borders to Video
The following 4 ways can be used to add white borders to the videos.
- Add a white border to the video on the computer (using Filmora)
- Add a white border to the video online
- Add a white border to the video on Android
- Add a white border to the video on iOS
Add a white border to the video on the computer (using Filmora)
Filmora Video Editor is one of the best video editing software. It allows editing the videos in a professional way. It has built-in editing features like splitting/cutting, trimming, cropping, adding watermark, changing speed, recording voice, and many more Along with this, you can rely on this application to add borders with different colors including white borders, black borders, colored border, and customized border. Add white borders on a computer, all this can be done in a few simple steps.
For Win 7 or later (64-bit)
For macOS 10.14 or later
Let’s download the free Wonder Share Filmora 11 software to proceed.
- Go to media, and import the video from your storage.
- Drag the video into the timeline.
- Select the video by clicking on the video.
- Hit the effects You can select the colorful effects from the panel.
- Now, write borders in the search engine. You will find various borders styles in the panel.
- Select the white border at the top of the panel.
- Simply drag and drop the border to the video/image.
- You will see the white border on the selected video.
- You can change the color of the border.
- Select the video by double-clicking on it.
- Hit the Effect tab from the Image and then click on Borders.
- Here you can change the color of your borders.
- Hit the OK
Add A White Border To The Video Online
You can change white borders without launching software by editing online. Kapwing is an online video editing tool that is used to edit videos, images, and GIFs. It is very easy to use and the good thing about Kapwing is, it’s free and you don’t need to sign up or add watermarks to your edited videos/images.
However, it allows you to edit a video up to 250MB or you can only upload a video of almost 7 minutes in length. What you would need is to have a good internet connection and a Web.
Let’s start editing to add white borders step by step:
- Visit Kapwing collage maker and hit start collage maker
- You will see the below window.
- Click on Add media and select the desired video or image.
- Drag and drop the video into the timeline.
- Click on the video and drag the 4 corners to resize your video.
- It will eventually provide you with a white background and you can use it as a white border.
- Hit the Lock ratio tab once you got satisfied with your image borders.
- Double click the border to set the background color.
- You can change the background colors of your choice.
Add a white border to the video on Android
You can add white borders to your videos using android. BeeCut is a very simple and useful application for video editing. It presents a lot of stylish and beautiful frames and effects to make your video amazing. Along with this, it allows you to add text, filters, transitions, and many features to make your video stand out. It is very easy to use as takes a few steps to add frames to your video in android. To start the process follow these steps;
- Launch BeeCut on your mobile/android.
- Open the app and click on Media.
- Hit on Import file.
- Drag the video into the timeline or hit the +
- Hit the overlays
- Select your desired border.
- Drag the desired overlay border over the timeline. Here you can edit your design (change color, effect, etc.)
- Now, hit the export tab and choose the quality and format of your video.
- Save the file on your android.
Add a white border to the video on iOS
The PicsArt app is commonly used to edit videos on iPhone as well as on android. It is a very simple app, even a layman can use PicsArt and make professional white borders. This app is familiar among Instagram users. It changes the rectangular video or image into a square format. The aspect ratio of 1:1 is used for Instagram videos. It not only adds borders to the videos but also provides editing features like cut, resize, rotate, trims, text, etc. Let’s start with step-by-step instructions to add white borders to the video.
- Go to the app store and download the PicsArt app.
- Open the app and select the desired video.
- Hit the Fit tab from the bottom center.
- Select the color tool from the bottom.
- Choose the white color for white borders and you can also choose the desired color.
- Hit the ütab and the video will be saved to your phone gallery or you can directly share the video on Instagram.
Conclusion:
In the above content, we have introduced four methods to add white borders in your videos using windows, android, iPhone, and online. All the methods are free to use.
Wonder Share Filmora 11 is highly recommended to get the best and most professional results. It not only allows you to add borders but also provides you with an advanced editing panel. You can easily edit your videos and share with your social circle.
Finding The Finest Way to Add Subtitles to Videos | Filmora
Subtitles have displayed their importance in the video editing industry. They have displayed a diverse use case to the community. Adding subtitles to videos has been a work not known to many. However, video editors have changed the dynamics due to development in technology. The video editing community has realized the importance of using subtitles.
Along with understanding the dynamics of using subtitles in videos, you will also learn to add them. From people with professional video editing experience to people using TikTok, this article holds importance. This article introduces tools that can be used to delve into the depth of this particular system. Look through the steps to properly add subtitles with a great tool named Wondershare Filmora.
Part 1: Why Are Subtitles Important?
It is essential to understand the importance of adding subtitles to the video editing system. The use of subtitles, as stated, is quite important to address cross-racial individuals. For that, we will be aligning the points that will explain the importance of subtitles in video editing:
1. Breaking the Barriers of Language
Subtitles are a great way to bridge the barriers between the video’s original and the viewer’s language. Those who cannot understand the language of the video can consider the use of subtitles to be effective. International audiences can find the use of subtitles to be very convenient.
2. A Learning System
Using subtitles, you will understand more about the documentary you are watching. Additionally, it is a great way to learn about the subsidiaries involved in it. You can comprehend the content that is present in the videos, giving you room to learn. For instance, if you are learning a language, using subtitles can be a great way to learn more about it.
3. Viewing in Silence
Although it is a fun instance, adding subtitles to a video in such a case can be a great ease for viewers. If you are sitting in a room where you should not break the silence, having subtitles for your video stands out to be convenient. Also, the existence of subtitles can be a great aid for the deaf.
4. Accessible to A Broader Audience
The use of subtitles makes the content accessible to a bigger audience. Subtitles allow you not to restrict the content to the local audience only. Additionally, the producing party can arrange the transcript or subtitles for better engagement. In this way, they can outreach a bigger audience and engage their ideas with them.
5. Persistent Observation in Noisy Environment
Having subtitles for a video gives the viewer the leverage of understanding the occurrences of the video, even in a noisy environment. They can observe all the subtitles regardless of the environment. Thus, the viewers can understand what’s happening.
Add Subtitles to Video
Filmora Video Editor can automatically generate subtitles and captions for your video. Plus, you can add, edit and customize text as you want. Experience the magic of cool yet outstanding video effects, where your videos come to life in beautiful visuals.
Auto Generate Subtitles Auto Generate Subtitles Learn More >


Part 2: How Has The Use of Subtitles Improved Over the Years?
The evolution in the use of subtitles has been consistent over the years. Almost all kinds of movies come with proper subtitles that help the audience understand the motive. However, it is important to improvise the feasibility of how subtitles have improved over the years. Now even TikTok videos come with proper subtitles. For better understanding, we have highlighted some important points below explaining the improving use of subtitles:
1. Increase in Availability
As stated before, subtitles are available for a versatile set of movies. From movies to TV Shows, people do not consider watching them without subtitles. Usually, people belonging to other countries always consider having English subtitles with them. Thus, the providers have considered including subtitles as a standard feature of the movies.
2. Access to Multiple Languages
Subtitles are not available in a single language for the viewers. The improvement in subtitles has witnessed the availability of languages. Users who wish to view the movie in their native language can access subtitles in their language. Also, producers always consider creating more versions of subtitles in multiple languages.
3. Customization in Subtitles
With developments, different video editors have added the option of customizing subtitles. Users can now enhance, adjust, and improve the video’s subtitles according to their requirements. With such options, they can improve their viewing experience.
4. Real-Time Subtitling
Another improvement in the video ecosystem has been the addition of real-time subtitling. Video editors have included the option of adding subtitles. Users who wish to create their videos can also recreate the entire thing while adding subtitles.
Part 3: Wondershare Filmora: An Introduction to A Great Video Editor for Adding Subtitles
Wondershare Filmora is the best video editor for TikTok that lets you edit your videos in a go. This software allows you to edit, modify, transform, and share videos. It comes with a lot of editing and adjustment options. Additionally, you can change your video’s color tone, feel, and mood with its color correction features.
Add Subtiles to Video For Win 7 or later(64-bit)
Add Subtiles to Video For macOS 10.14 or later
You can even apply filters, effects, and other presets to change the color tone of your video. Even if you don’t like the background of your video, you can change it in no time using this tool. Moreover, adding subtitles to videos in Filmora is very simple and easy. Don’t like the title of your video? Simply go to the title section and choose the template of your liking.
Fimora Tutorial - How to Make Subtitles in Minutes
Key Features of Wondershare Filmora Video Editor
- Adjustment Layer: If you don’t want any changes to your original file, use an adjustment layer. With Filmora’s adjustment layer, you can make changes to the layer, and your video will not be modified.
- Speed Ramping: You can even modify the speed of your video at any duration. Simply add a keyframe and change the speed of your video at any particular instance.
- Motion Tracking: Wondershare Filmora will enable you to track your motion using AI technology. With this feature, the face of the subject will never be out of focus.
Part 4: How To Add Subtitles to Your TikTok Video Perfectly With Filmora?
If you don’t know how to add subtitles to TikTok videos, the guide will let you know. You can follow this step-by-step guide to learn how to add subtitles to your TikTok videos in Filmora.
Filmroa Tutorial – How to ADD SUBTITLES to a Movie / YouTube Video
Add Subtitles to Movie For Win 7 or later(64-bit)
Add Subtitles to Movie For macOS 10.14 or later
Step 1Import Video to Filmora
Open Wondershare Filmora on your computer and select the “New Project” button to open a new window. This opens a new window where you have to import the video having audio with it. Drag it to the timeline once you import it successfully with the “Import” button on the top.

Step 2Use Speech to Text Feature
Select the “Speech-to-Text” button present on the top to open the particular navigation. As this opens a new window, you need to define the language in which you want the transcript. After selecting the language, click “OK,” Filmora will automatically generate a subtitle file for you.

Step 3Lead to Subtitle Settings
The subtitle layer is present in the timeline of the video editor, where you have to double-click to open the “Subtitle Settings.”

Step 4Customize the Subtitles and Save

Conclusion
To conclude, videos are becoming essential for social platforms due to their popularity. Editing and polishing video is one thing; however, adding subtitles is equally important. TikTok is a popular social platform that allows you to create and share videos. Moreover, you can use Wondershare Filmora to add automated-generated subtitles to your videos.
Auto Generate Subtitles Auto Generate Subtitles Learn More >
Part 2: How Has The Use of Subtitles Improved Over the Years?
The evolution in the use of subtitles has been consistent over the years. Almost all kinds of movies come with proper subtitles that help the audience understand the motive. However, it is important to improvise the feasibility of how subtitles have improved over the years. Now even TikTok videos come with proper subtitles. For better understanding, we have highlighted some important points below explaining the improving use of subtitles:
1. Increase in Availability
As stated before, subtitles are available for a versatile set of movies. From movies to TV Shows, people do not consider watching them without subtitles. Usually, people belonging to other countries always consider having English subtitles with them. Thus, the providers have considered including subtitles as a standard feature of the movies.
2. Access to Multiple Languages
Subtitles are not available in a single language for the viewers. The improvement in subtitles has witnessed the availability of languages. Users who wish to view the movie in their native language can access subtitles in their language. Also, producers always consider creating more versions of subtitles in multiple languages.
3. Customization in Subtitles
With developments, different video editors have added the option of customizing subtitles. Users can now enhance, adjust, and improve the video’s subtitles according to their requirements. With such options, they can improve their viewing experience.
4. Real-Time Subtitling
Another improvement in the video ecosystem has been the addition of real-time subtitling. Video editors have included the option of adding subtitles. Users who wish to create their videos can also recreate the entire thing while adding subtitles.
Part 3: Wondershare Filmora: An Introduction to A Great Video Editor for Adding Subtitles
Wondershare Filmora is the best video editor for TikTok that lets you edit your videos in a go. This software allows you to edit, modify, transform, and share videos. It comes with a lot of editing and adjustment options. Additionally, you can change your video’s color tone, feel, and mood with its color correction features.
Add Subtiles to Video For Win 7 or later(64-bit)
Add Subtiles to Video For macOS 10.14 or later
You can even apply filters, effects, and other presets to change the color tone of your video. Even if you don’t like the background of your video, you can change it in no time using this tool. Moreover, adding subtitles to videos in Filmora is very simple and easy. Don’t like the title of your video? Simply go to the title section and choose the template of your liking.
Fimora Tutorial - How to Make Subtitles in Minutes
Key Features of Wondershare Filmora Video Editor
- Adjustment Layer: If you don’t want any changes to your original file, use an adjustment layer. With Filmora’s adjustment layer, you can make changes to the layer, and your video will not be modified.
- Speed Ramping: You can even modify the speed of your video at any duration. Simply add a keyframe and change the speed of your video at any particular instance.
- Motion Tracking: Wondershare Filmora will enable you to track your motion using AI technology. With this feature, the face of the subject will never be out of focus.
Part 4: How To Add Subtitles to Your TikTok Video Perfectly With Filmora?
If you don’t know how to add subtitles to TikTok videos, the guide will let you know. You can follow this step-by-step guide to learn how to add subtitles to your TikTok videos in Filmora.
Filmroa Tutorial – How to ADD SUBTITLES to a Movie / YouTube Video
Add Subtitles to Movie For Win 7 or later(64-bit)
Add Subtitles to Movie For macOS 10.14 or later
Step 1Import Video to Filmora
Open Wondershare Filmora on your computer and select the “New Project” button to open a new window. This opens a new window where you have to import the video having audio with it. Drag it to the timeline once you import it successfully with the “Import” button on the top.
Step 2Use Speech to Text Feature
Select the “Speech-to-Text” button present on the top to open the particular navigation. As this opens a new window, you need to define the language in which you want the transcript. After selecting the language, click “OK,” Filmora will automatically generate a subtitle file for you.
Step 3Lead to Subtitle Settings
The subtitle layer is present in the timeline of the video editor, where you have to double-click to open the “Subtitle Settings.”
Step 4Customize the Subtitles and Save
Conclusion
To conclude, videos are becoming essential for social platforms due to their popularity. Editing and polishing video is one thing; however, adding subtitles is equally important. TikTok is a popular social platform that allows you to create and share videos. Moreover, you can use Wondershare Filmora to add automated-generated subtitles to your videos.
5 Ways to Denoise a Video
In today’s world, the quality of digital product such as photos and videos increase day by day, prompting us to create our content crystal clear and keep it that way. Of course, different kinds of effects and filters are great, and something called “noise” is one of them, but sometimes it is actually unwanted and makes our footage less likable. What is noise, or denoising, anyway? Well, instead of clear video, it’s something quite different – the footage looks grainy, sometimes excessively, and makes our eyes hurt, or simply, more difficult to see what’s going on on the screen. And if you didn’t decide to use a noise effect, then from where does it appear?..
Noise means a mix of different variations of brightness or color information in the shot. It is likely to show up when there is a low light, and/or when the video is taken with small sensors such as smartphones and action cameras. It works as follows: if someone tries to compensate for low-light settings with gain and ISO, more noise is produced.
But, as our readers already know, almost nothing is ever impossible to solve. There is a way to get rid of this annoying grain, and it is called, as pretty obvious, denoising. Hence, denoising in image and video production is used as a technique to take footage from grainy to crystal-clear. And, as you may already agree, it improves a viewer’s quality of experience. And how does this happen? - There are varied techniques, and each of them uses different mathematical and statistical models.
What is considered a good noise reduction? The technique is successful when it suppresses noise effectively in uniform regions; preserves edges and other characteristics, such as fine details and textures; and provides a visually natural experience.
and here you will learn 5 ways, as in 5 software to denoise a video. We’ll touch upon the following ones: Final Cut Pro, Adobe After Effects, Adobe Premiere Pro, DaVinci Resolve and Movavi Video Editor. But, we are not limited to these ones, so maybe there is one more you could use? You’ll find out in the article!
- Final Cut Pro
Noise that appears as unwanted grain or artifacts in the video image can be removed in Final Cut Pro pretty easily, you just have to follow the little steps for it. Keep in mind that Final Cut Pro is not eligible for PC, this editor is only available for Mac (but Windows users, tune in for the editors functioning on PC’s!)
So, you have your grained footage, which you already chose to denoise, and for which you will need a video reduction effect.
First, you will need to open Final Cut Pro and import abovementioned video. Select this clip in the timeline,

and position the play head in a way that the clip appears in the viewer, that is, on the big screen - for you to see well.

Click the Effects button in the top-right corner of the timeline, or, to use the shortcut, press Command & 5.

In the Effects browser, select the Basics category in the list of Video effects on the left, then select the Noise Reduction effect. For 360° clips, select the 360° category, then select the 360° Noise Reduction effect.
And you will need to do one of the following:
Drag the effect to the timeline clip you want to apply it to, or double-click the effect thumbnail to apply the effect to the selected clip.
When the effect is applied, Final Cut Pro analyzes the clip for noise, so you might need to wait for a little while the process is complete and only then see the result.
Interesting tip you can remember is that if you are using several effects to your video clip, then adding Noise Reduction as the first effect would guarantee the best results for you. So, Mac users, you can start denoising your videos in Final Cut Pro now!
- Adobe After Effects
Adobe After Effects is a digital visual effects, motion graphics, and compositing application… Pretty intense, right? This very software has endless powers, and one of them is, you guessed correctly – denoising the video! So, how are we going to do that in this monster of the industry?
Sometimes what’s annoying about this kind of programs is that you need plugins, so let’s try to find a way to achieve our desired result without using anything external.
So, first of all (as in all cases!) import your video into After Effects. Then, you will need to find Effect in the menu, and find: Noise and Grain. There, you will choose Remove Grain and click on it.

On the left side of the program layout, the Effects Control will be opened. Now, you see viewing mode, where you need to change Preview to Final Output.

So, this will be the video with Preview checked:

Which will look like this when Final Output is checked:

Somewhat different and looking better, right?..
By the way, you can watch the whole process video here !
- Adobe Premiere Pro
Adobe Premiere Pro is one of the most and sophisticated video editor. So, of course, there is a way to reduce noise in this software as well, and this can be reached using effect called Median.
First of all, you add your footage to the Timeline in Premiere Pro and then go find the Effects Panel, where Median can be found. You need to drag and drop the Median effect to your video clip.

The next step is to make sure that adding the effect to the grainiest parts of the clip, which can be done using masks. So, in the Effects Control panel, you’ll need to select the mask shape for your clip – you can either choose rectangle, circle, or pen tool. With the latter you can move the Mask around the screen and resize it to cover the area.

And if you Change the Feather setting to 100, the effect will not have a very visible edge and some smoothness will cover for it.

You will need to repeat the process with more than one mask, if you would like to have covered all of the grainy area of your shot.
Lastly, you’ll need to adjust the effect settings to reduce the noise.

The Median effect doesn’t actually take away the graininess, it just blurs it. You’ll need to experiment with the Radius settings until you are happy with the result.
- DaVinci Resolve
When it comes to DaVinci Resolve, the process is somewhat different in the free version of it. So, first of all, off course, you add your footage into the timeline. Then,you are going to find the fusion tab underneath the timeline panel.

You will see MediaIn1 and MediaOut1, you click on MediaIn1, which will ensure the scene appears in the first viewer – and MediaOut1 by default is appearing in the second. So, now you stay on MediaIn1, hit shift+spacebar, and find the option which says: Remove Noise (RN) and then click Add, which adds the Remove Noise1 node. On the top right corner you will find Inspector, and if you click on it, you will see all the properties you can modify.
After going only into the second viewer, and in the top bar we can find channel icons. We open it and click on red, which makes the footage black and white for a while. Then, we go back to the Inspector, increase Softness Red and Detail Red.

This removes much grain from the red channel. Then we repeat the same for green, as well as for blue channel. Once you finish, you go to the same channel button in the bar and change it to “back to color”. So, the footage will have its colors back and you will see that it has become clearer, compared to the first viewer.

You can play around with the Chroma and Luma channels in the Inspector, if that is something you have ever had experience with!
- Movavi Video Editor
In Movavi Video Editor, it is pretty straightforward – unlike DaVinci Resolve, of course! So, getting to the point: the first thing you need to do is Entering the Edit Mode. In order to achieve it, you’ll need to click the Edit button next to the file you want to adjust or select Adjustments in the Tools tab.

After this, you will be able to select the Noise removal option, and then, move the Noise level slider to reflect the amount of noise you can see in the preview. The more noise you need to remove, the higher the Noise level, and vice versa.

When you’re finished removing the noise, click Apply, but in case you need to remove noise from several files, select Apply to all files, which ensures the same noise level will be applied on all your files there.
Lastly, of course, Wondershare Filmora X offers the same option as well. The steps are ase follows: You need to go to the Effects panel and type: “Smart Denoise”. Then, right-click on the video and choose Edit Properties.

This will make sure you go inside the Smart Denoise, where you can change opacity of the clip, threshold and radius.

You should reduce Opacity until you are satisfied with the result. Then, you can use the box next to Smart Denoise in order to see the scene before and after noise and grain removal.
So, that’s it! – We learned how to remove/reduce noise and grain from the videos, using several video editors. So you might as well start making your video clips look better right away!
Noise that appears as unwanted grain or artifacts in the video image can be removed in Final Cut Pro pretty easily, you just have to follow the little steps for it. Keep in mind that Final Cut Pro is not eligible for PC, this editor is only available for Mac (but Windows users, tune in for the editors functioning on PC’s!)
So, you have your grained footage, which you already chose to denoise, and for which you will need a video reduction effect.
First, you will need to open Final Cut Pro and import abovementioned video. Select this clip in the timeline,
and position the play head in a way that the clip appears in the viewer, that is, on the big screen - for you to see well.
Click the Effects button in the top-right corner of the timeline, or, to use the shortcut, press Command & 5.
In the Effects browser, select the Basics category in the list of Video effects on the left, then select the Noise Reduction effect. For 360° clips, select the 360° category, then select the 360° Noise Reduction effect.
And you will need to do one of the following:
Drag the effect to the timeline clip you want to apply it to, or double-click the effect thumbnail to apply the effect to the selected clip.
When the effect is applied, Final Cut Pro analyzes the clip for noise, so you might need to wait for a little while the process is complete and only then see the result.
Interesting tip you can remember is that if you are using several effects to your video clip, then adding Noise Reduction as the first effect would guarantee the best results for you. So, Mac users, you can start denoising your videos in Final Cut Pro now!
- Adobe After Effects
Adobe After Effects is a digital visual effects, motion graphics, and compositing application… Pretty intense, right? This very software has endless powers, and one of them is, you guessed correctly – denoising the video! So, how are we going to do that in this monster of the industry?
Sometimes what’s annoying about this kind of programs is that you need plugins, so let’s try to find a way to achieve our desired result without using anything external.
So, first of all (as in all cases!) import your video into After Effects. Then, you will need to find Effect in the menu, and find: Noise and Grain. There, you will choose Remove Grain and click on it.
On the left side of the program layout, the Effects Control will be opened. Now, you see viewing mode, where you need to change Preview to Final Output.
So, this will be the video with Preview checked:
Which will look like this when Final Output is checked:
Somewhat different and looking better, right?..
By the way, you can watch the whole process video here !
- Adobe Premiere Pro
Adobe Premiere Pro is one of the most and sophisticated video editor. So, of course, there is a way to reduce noise in this software as well, and this can be reached using effect called Median.
First of all, you add your footage to the Timeline in Premiere Pro and then go find the Effects Panel, where Median can be found. You need to drag and drop the Median effect to your video clip.
The next step is to make sure that adding the effect to the grainiest parts of the clip, which can be done using masks. So, in the Effects Control panel, you’ll need to select the mask shape for your clip – you can either choose rectangle, circle, or pen tool. With the latter you can move the Mask around the screen and resize it to cover the area.
And if you Change the Feather setting to 100, the effect will not have a very visible edge and some smoothness will cover for it.
You will need to repeat the process with more than one mask, if you would like to have covered all of the grainy area of your shot.
Lastly, you’ll need to adjust the effect settings to reduce the noise.
The Median effect doesn’t actually take away the graininess, it just blurs it. You’ll need to experiment with the Radius settings until you are happy with the result.
- DaVinci Resolve
When it comes to DaVinci Resolve, the process is somewhat different in the free version of it. So, first of all, off course, you add your footage into the timeline. Then,you are going to find the fusion tab underneath the timeline panel.
You will see MediaIn1 and MediaOut1, you click on MediaIn1, which will ensure the scene appears in the first viewer – and MediaOut1 by default is appearing in the second. So, now you stay on MediaIn1, hit shift+spacebar, and find the option which says: Remove Noise (RN) and then click Add, which adds the Remove Noise1 node. On the top right corner you will find Inspector, and if you click on it, you will see all the properties you can modify.
After going only into the second viewer, and in the top bar we can find channel icons. We open it and click on red, which makes the footage black and white for a while. Then, we go back to the Inspector, increase Softness Red and Detail Red.
This removes much grain from the red channel. Then we repeat the same for green, as well as for blue channel. Once you finish, you go to the same channel button in the bar and change it to “back to color”. So, the footage will have its colors back and you will see that it has become clearer, compared to the first viewer.
You can play around with the Chroma and Luma channels in the Inspector, if that is something you have ever had experience with!
- Movavi Video Editor
In Movavi Video Editor, it is pretty straightforward – unlike DaVinci Resolve, of course! So, getting to the point: the first thing you need to do is Entering the Edit Mode. In order to achieve it, you’ll need to click the Edit button next to the file you want to adjust or select Adjustments in the Tools tab.
After this, you will be able to select the Noise removal option, and then, move the Noise level slider to reflect the amount of noise you can see in the preview. The more noise you need to remove, the higher the Noise level, and vice versa.
When you’re finished removing the noise, click Apply, but in case you need to remove noise from several files, select Apply to all files, which ensures the same noise level will be applied on all your files there.
Lastly, of course, Wondershare Filmora X offers the same option as well. The steps are ase follows: You need to go to the Effects panel and type: “Smart Denoise”. Then, right-click on the video and choose Edit Properties.
This will make sure you go inside the Smart Denoise, where you can change opacity of the clip, threshold and radius.
You should reduce Opacity until you are satisfied with the result. Then, you can use the box next to Smart Denoise in order to see the scene before and after noise and grain removal.
So, that’s it! – We learned how to remove/reduce noise and grain from the videos, using several video editors. So you might as well start making your video clips look better right away!
How to Windows Online Movie Maker [Complete Guide]
The likelihood is that video will soon play a significant role in your content marketing approach, if it hasn’t already – and for that using windows online movie maker is inevitable. You are an emerging brand, a sole proprietor, or even a podcaster. Knowing the importance of video marketing to content producers and agencies is second nature if you’re an astute digital marketer It may be costly and challenging to utilize video editing software. Fortunately, there are free online video editors available.
Before very recently, video editing needed highly specialized skills and was done manually using different tools. Windows Movie Maker used to be a standard component of every Windows user’s toolbox and was a highly recommended video editing product for novices. With the windows movie maker online, the application was well-liked for its ease of use and entertaining special effects, but most significantly - it was free. It came pre-installed on all Windows machines. You may do that with the help of our handy list of the top three online video creators.
Part 1. How to Make a Video Online [Use Movie Maker Windows Online]
Using the help of Movie Maker, you may create videos online with your browser. It enables you to create professional-caliber videos without having to purchase video editing tools at professional-caliber costs. For every genre and need, this web program includes stock video, animated text, audio tracks, and on-screen effects. Your own video clips are uploaded. Then, use the simple drag-and-drop online video editor in Movie Maker to edit footage and add special effects and music to make your movie shine.
Making fantastic compilation films from your already-existing photographs and videos doesn’t need you to be a skilled editor. Even for amateur video makers, the platform’s UI is simple to use and straightforward to navigate. The customizing choices in Movie Maker are many. You have the option of uploading your own fonts and logos. You may also watermark your films and alter the text’s color. Additionally, there are a ton of very unique components like stickers, vector shapes, and masks that may enhance the visual appeal of your video productions and widen your creative boundaries.
Steps to Make Video with Movie Maker Online
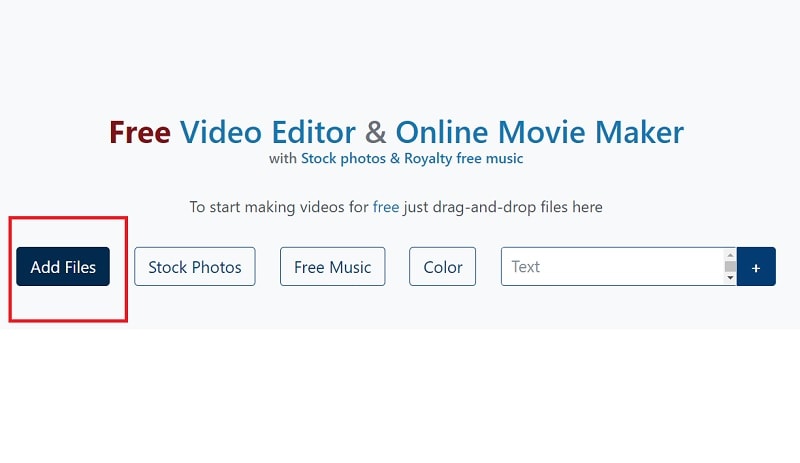
Step1 Go to Movie Maker Online
Using Movie Maker Online, you can quickly and easily make incredibly interesting compilation films using your already-posted photographs and videos. You’ll immediately be sent to the editor, where you can begin organizing your films. Here’s the official link to the toolkit:
Step2 Upload Files to Web
Your photographs, videos, and text may all be uploaded. If you like the default music, you may skip the step to change it; otherwise, you can choose another song from our library or upload your own MP3 file. Files from a variety of sources and devices may be added. Click the Import Media button to start importing your own media. Click Open after locating the video you wish to modify.
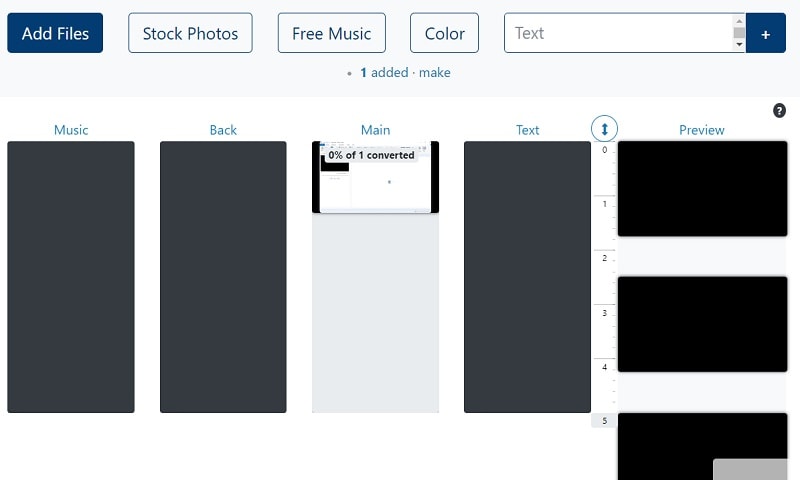
Step3 Create an online video
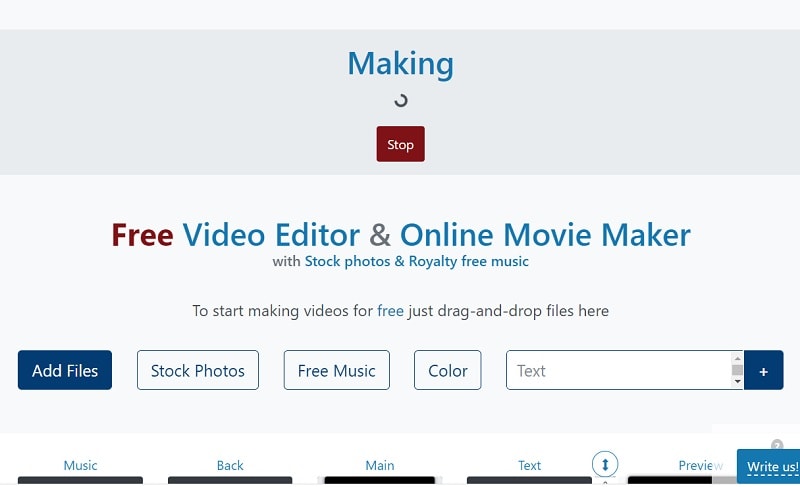
Add your music to your video compilation after all of your clips have been placed on the timeline. To accomplish that, choose a song depending on the genre or mood you want by clicking on the Music option on the left menu panel. To listen to the music track, click the little icon to the left of it. Text, colors, pictures, and video may all be customized to your heart’s delight. Add effects, drag, cut, etc. Press the Make Video button.
Step4 Save and Share with Others
Sharing your films on Facebook, Instagram, YouTube, and other platforms is made effortless. You may also send your loved ones the URLs to your videos. When you are happy with the changes, click the Save & Share option in the upper right corner, choose the quality you want to download your movie in, and then click the Export button. Download the updated video, then post it.
Part 2. Other Windows Online Movie Makers to Use [Top 3]
1. Kizoa
Link: Kizoa

Customizing the appearance of your film is one of the finest ways to make it seem like it is your own. With the Kizoa tool, you may trim, apply a crossfade effect, choose the required resolution, and format for an output video in addition to merging files. Utilize Kizoa’s online video creator to produce eye-catching videos that will hold your audience’s attention. Create any kind of video, from personal family video slideshows to expert films to advertise your company. With the drag-and-drop movie production tool from Kizoa, you can create your very own video in a matter of minutes.
Use a video template as your starting point if you need inspiration. Key framing, animated overlays, noise reduction, transitions, and titles are just a few of the features it provides to help you produce excellent footage. For rapid video editing, there is a video production wizard. Windows Movie Maker’s auto movie themes pale in comparison to those provided by this program. Its extensive collection of stock footage and audio tracks helps you to concentrate on the crucial elements without having to drastically decrease the length of your film or the number of scenes.
2. FlexClip
Link: FlexClip

With the aid of the online video effects tool FlexClip, you may quickly and easily make entertaining short films. It has a ton of video editing features that you may use without logging in or creating an account, like merging, compressing, compiling, adding text, creating memes, etc. For those that are muted, you may use FlexClip to add animated text that blends in with the style of your film. Additionally, you may add your logo so that everyone is aware of who created the masterpiece they just saw.
An online video editor called FlexClip is mainly focused on producing high-quality marketing, advertising, and promotional films for companies. Recording a single video that will function on all social networking and video-sharing websites is almost impossible. Instagram, YouTube, and Facebook Marketing are among the partners of FlexClip that have received expert approval. It is used by marketers and enthusiasts to quickly create looping movies and stop motion animation. But as it only provides very basic functionality, it may not be the greatest choice for more intricate, demanding editing.
3. Veed.Io
Link: Veed.Io

With only a few mouse clicks, users of the browser-based video editing program VEED may create professional-caliber movies. The greatest movie-making tools, including filters, effects, and stickers, are available on VEED. There are no intricate timelines, layers, or intricacy since it is a simple program that runs in your web browser. Simple drag-and-drop functionality is all you need to convey your tales. You may modify your video using its features. Using the video track below, you may combine, divide, or cut your files. Visit our website to see all of our filters, stickers, add-ons, and other tools.
Any device, whether an iPhone or Android phone, a MacBook, a Windows or Linux computer, may use VEED’s online video editor. You have access to all the resources you need to make amazing videos using VEED’s online video editor. Our user-friendly interface is very simple to use and is contemporary and intuitive. The native video sizes on each of the publishing sites, including Facebook, YouTube, and Vimeo, may all be altered using Veed. Finally, click “Export” in the editor’s upper-right corner, and your video will render quickly. Share some!
Conclusion
Use this editing list to produce more compelling video mashups for YouTube and other social media platforms in order to expand your audience, cultivate real connections with them, and eventually increase conversion rates. Because they combine the complex capabilities of the expensive, professional video suites with the user-friendliness and cost that appeal to novices, these online makers are a popular among editors of all skill levels. Make an investment in one of these video editing tools and own it.
Free Download For Win 7 or later(64-bit)
Free Download For macOS 10.14 or later
Part 1. How to Make a Video Online [Use Movie Maker Windows Online]
Using the help of Movie Maker, you may create videos online with your browser. It enables you to create professional-caliber videos without having to purchase video editing tools at professional-caliber costs. For every genre and need, this web program includes stock video, animated text, audio tracks, and on-screen effects. Your own video clips are uploaded. Then, use the simple drag-and-drop online video editor in Movie Maker to edit footage and add special effects and music to make your movie shine.
Making fantastic compilation films from your already-existing photographs and videos doesn’t need you to be a skilled editor. Even for amateur video makers, the platform’s UI is simple to use and straightforward to navigate. The customizing choices in Movie Maker are many. You have the option of uploading your own fonts and logos. You may also watermark your films and alter the text’s color. Additionally, there are a ton of very unique components like stickers, vector shapes, and masks that may enhance the visual appeal of your video productions and widen your creative boundaries.
Steps to Make Video with Movie Maker Online
Step1 Go to Movie Maker Online
Using Movie Maker Online, you can quickly and easily make incredibly interesting compilation films using your already-posted photographs and videos. You’ll immediately be sent to the editor, where you can begin organizing your films. Here’s the official link to the toolkit:
Step2 Upload Files to Web
Your photographs, videos, and text may all be uploaded. If you like the default music, you may skip the step to change it; otherwise, you can choose another song from our library or upload your own MP3 file. Files from a variety of sources and devices may be added. Click the Import Media button to start importing your own media. Click Open after locating the video you wish to modify.
Step3 Create an online video
Add your music to your video compilation after all of your clips have been placed on the timeline. To accomplish that, choose a song depending on the genre or mood you want by clicking on the Music option on the left menu panel. To listen to the music track, click the little icon to the left of it. Text, colors, pictures, and video may all be customized to your heart’s delight. Add effects, drag, cut, etc. Press the Make Video button.
Step4 Save and Share with Others
Sharing your films on Facebook, Instagram, YouTube, and other platforms is made effortless. You may also send your loved ones the URLs to your videos. When you are happy with the changes, click the Save & Share option in the upper right corner, choose the quality you want to download your movie in, and then click the Export button. Download the updated video, then post it.
Part 2. Other Windows Online Movie Makers to Use [Top 3]
1. Kizoa
Link: Kizoa
Customizing the appearance of your film is one of the finest ways to make it seem like it is your own. With the Kizoa tool, you may trim, apply a crossfade effect, choose the required resolution, and format for an output video in addition to merging files. Utilize Kizoa’s online video creator to produce eye-catching videos that will hold your audience’s attention. Create any kind of video, from personal family video slideshows to expert films to advertise your company. With the drag-and-drop movie production tool from Kizoa, you can create your very own video in a matter of minutes.
Use a video template as your starting point if you need inspiration. Key framing, animated overlays, noise reduction, transitions, and titles are just a few of the features it provides to help you produce excellent footage. For rapid video editing, there is a video production wizard. Windows Movie Maker’s auto movie themes pale in comparison to those provided by this program. Its extensive collection of stock footage and audio tracks helps you to concentrate on the crucial elements without having to drastically decrease the length of your film or the number of scenes.
2. FlexClip
Link: FlexClip
With the aid of the online video effects tool FlexClip, you may quickly and easily make entertaining short films. It has a ton of video editing features that you may use without logging in or creating an account, like merging, compressing, compiling, adding text, creating memes, etc. For those that are muted, you may use FlexClip to add animated text that blends in with the style of your film. Additionally, you may add your logo so that everyone is aware of who created the masterpiece they just saw.
An online video editor called FlexClip is mainly focused on producing high-quality marketing, advertising, and promotional films for companies. Recording a single video that will function on all social networking and video-sharing websites is almost impossible. Instagram, YouTube, and Facebook Marketing are among the partners of FlexClip that have received expert approval. It is used by marketers and enthusiasts to quickly create looping movies and stop motion animation. But as it only provides very basic functionality, it may not be the greatest choice for more intricate, demanding editing.
3. Veed.Io
Link: Veed.Io
With only a few mouse clicks, users of the browser-based video editing program VEED may create professional-caliber movies. The greatest movie-making tools, including filters, effects, and stickers, are available on VEED. There are no intricate timelines, layers, or intricacy since it is a simple program that runs in your web browser. Simple drag-and-drop functionality is all you need to convey your tales. You may modify your video using its features. Using the video track below, you may combine, divide, or cut your files. Visit our website to see all of our filters, stickers, add-ons, and other tools.
Any device, whether an iPhone or Android phone, a MacBook, a Windows or Linux computer, may use VEED’s online video editor. You have access to all the resources you need to make amazing videos using VEED’s online video editor. Our user-friendly interface is very simple to use and is contemporary and intuitive. The native video sizes on each of the publishing sites, including Facebook, YouTube, and Vimeo, may all be altered using Veed. Finally, click “Export” in the editor’s upper-right corner, and your video will render quickly. Share some!
Conclusion
Use this editing list to produce more compelling video mashups for YouTube and other social media platforms in order to expand your audience, cultivate real connections with them, and eventually increase conversion rates. Because they combine the complex capabilities of the expensive, professional video suites with the user-friendliness and cost that appeal to novices, these online makers are a popular among editors of all skill levels. Make an investment in one of these video editing tools and own it.
Free Download For Win 7 or later(64-bit)
Free Download For macOS 10.14 or later
Also read:
- New How to Add Adjustment Layer (Clip) in DaVinci Resolve, In 2024
- In 2024, Modern Silence Detection Tools Are Changing the Face of Video Editing. Use Them to Improve the Quality of Your Video Clips. Learn How These Tools Let You Detect Silence with Pinpoint Accuracy
- How to Make Boring Videos Look Cool By B Rolls for 2024
- New 2024 Approved AVI Editors for Windows 11/10/8.1/8/7 Easily Edit AVI Files on PC
- New 2024 Approved How to Brighten Video in Premiere Pro
- In 2024, Here, You Will Learn How to Add a Realistic Fire Effect Using Wondershare Filmora. That Will Help to Boost Your Channel and Decorate Your YouTube Channel with Creative and Unique Effects
- Magic Effects Video Making How To
- Updated 2024 Approved Top 10 Sound Extractors to Extract Sound From Video 2023
- New 10 Best Free Video Player for Windows 11 for 2024
- New 2024 Approved Applying and Creating Gif Background on Your Devices and Presentations Is Not Hard. Read Below to Learn How to Apply a GIF Background on All Devices
- New How to Use LUTS to Color Grade on Your iPhone for 2024
- Top 10 3D Slideshow Software Review
- In 2024, Want to Make a Single Video From Different Clips? Follow These Ways to Learn About How to Merge Clips in DaVinci Resolve
- 2024 Approved Denoise Video in Adobe Premiere Pro – Audio and Video Noise Removal
- In 2024, An Ultimate Guide on the Significance of Music in Videos and How to Choose the Right Music for Your Videos with Wondershare Filmora
- Updated Knowing All Ways To Slow Down Video With Adobe Premiere Pro
- New Come And Pick! Best MOV to GIF Converters
- New Create Your Slow Zoom TikTok in Minutes for 2024
- New 2024 Approved Mask Tracking Is Believed to Be a Helpful Procedure for Marking Proper Areas in Videos. Learn How to Perform Premiere Pro Mask Tracking in This Guide
- New In 2024, How to Change Aspect Ratio of Video?
- Updated How to Create Vintage Film Effect 1990S
- Updated In 2024, 4 Solutions to Resize a WebM File
- Updated 15 Best Free Cinematic LUTs for Your Film for 2024
- Why Is My Google Pixel Fold Offline? Troubleshooting Guide | Dr.fone
- In 2024, The Best iSpoofer Alternative to Try On Honor 90 Pro | Dr.fone
- How to recover deleted photos from Android Gallery after format on Samsung Galaxy Z Fold 5
- In 2024, How to Transfer Contacts from Samsung Galaxy S23 Tactical Edition to iPhone XS/11 | Dr.fone
- In 2024, Learn How To Lock Stolen Your Apple iPhone 11 Pro Max Properly
- In 2024, How to Bypass Google FRP Lock on Motorola Razr 40 Ultra Devices
- Identify malfunctioning hardware drivers with Windows Device Manager on Windows 11/10
- How to Cast Oppo Find X6 to Computer for iPhone and Android? | Dr.fone
- In 2024, Mastering Android Device Manager The Ultimate Guide to Unlocking Your ZTE Device
- In 2024, Process of Screen Sharing Nokia C12 Pro to PC- Detailed Steps | Dr.fone
- A Detailed VPNa Fake GPS Location Free Review On Vivo T2 Pro 5G | Dr.fone
- Complete guide for recovering pictures files on Pova 5.
- Bricked Your Nokia C12? Heres A Full Solution | Dr.fone
- How to Transfer Text Messages from Samsung Galaxy S23 Tactical Edition to New Phone | Dr.fone
- In 2024, How to Screen Mirroring Nokia 130 Music? | Dr.fone
- In 2024, How to Intercept Text Messages on Gionee F3 Pro | Dr.fone
- Title: Updated 4 Ways to Add White Border to Video on Mobile and Desktop
- Author: Morgan
- Created at : 2024-05-19 05:11:47
- Updated at : 2024-05-20 05:11:47
- Link: https://ai-video-editing.techidaily.com/updated-4-ways-to-add-white-border-to-video-on-mobile-and-desktop/
- License: This work is licensed under CC BY-NC-SA 4.0.
