:max_bytes(150000):strip_icc():format(webp)/Google-Cloud-Next-59a9cb4a03e644389e2ffa9939c420f8.jpg)
Updated 6 Free Tools To Radial Blur Photos Online for 2024

6 Free Tools To Radial Blur Photos Online
Radial blur is commonly used in photography and graphics to create a sense of movement or dynamism and help you simulate several different effects, such as a spinning wheel or a moving car. It’s also often used to create a dream-like or ethereal effect. Regardless of how you add it, radial blur can give a lot of visual interest to your otherwise static photos.
Therefore, if you’re looking for a way to add some dynamics to your photos, read on to learn about 6 free tools to create radial blur effects online!
What Is Radial Blur?
Radial blur is a blurring effect that starts from one point in an image and blurs outwards (or inwards) from (or to) that point. The word ‘radial’ means “arranged like rays that come from or go to a common center,” which is precisely how radial blur works.
Here are some common uses of the Radial motion blur effect:
- Create a sense of movement
- Add depth to a photo
- Simulate camera movement
- Create an interesting background
Best 6 Free Online Radial Blur Image Tools
If you want to create a radial blur effect on your photos but don’t have the required resources like storage space, budget, or the right software, we recommend you try using the following tools:
1.Pine Tools
Pine Tools is a terrific online program with many image editing features, such as invert color, blur, special filters, effects, crop images, and more.
Using its radial blur feature, you can quickly add depth to your images and apply the motion blur effect. To do so, visit the Pine Tools website, choose “Blur” from the left panel, and upload your image. Then, under the “Options” header, select “Radial Blur” and click “Apply.” The best thing about this online tool is that you can set different parameters before creating the effect.

Key Features:
- Numerous image editing tools
- Various parameters for creating radial blur effects, such as size, strongness, and axis (x, y)
- No editing knowledge is required to use the program
Pros
- Drag and drop interface
- Free to use
- No sign up required
Cons
- Takes time to finish the process
- UI is a bit old
2.Mass-images.pro
With Mass-images.pro tool, you can crop your images, do batch processing, or create memes in no time. Moreover, the program offers multiple image editing features to help you quickly apply basic changes to your pictures. These include Change BG, Auto Improve, Overlay image, Rotate, Swirl, Radial Blur, Text, Pixelization, and many more filters.
To create the radial motion blur effect on your images using the Mass-images.pro tool, you have to simply upload your file, set the radius and strength, and click “Download.” You can also configure the format and quality of your picture before downloading it.
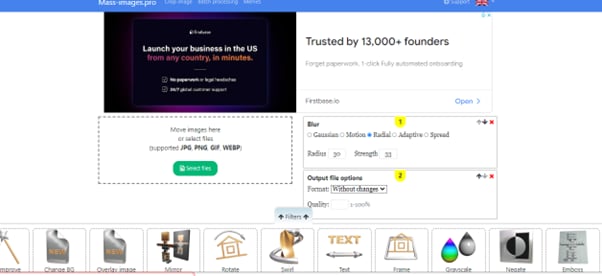
Key features:
- Offers multiple format options for uploading and downloading your images
- Can change the radius of blur and intensity effects
- Can process multiple photos at once
Pros
- Free to use
- Many input and output formats
- Simple and straightforward to use
- Image quality option
Cons
- No advanced image editing features
3. Font Meme
Font Meme is an online resource for fonts and typography. Still, it offers other image editing features, such as 3D Rotation, Bevel Effect, Glow Effect, Invert Colors, Blend Images, and Add Background, to help you create memes instantly.
You can also use the Font Meme to create a radial blur image by uploading the image and selecting the “Blur Type” from the drop-down menu. Next, set the blur amount and click “Generate.”
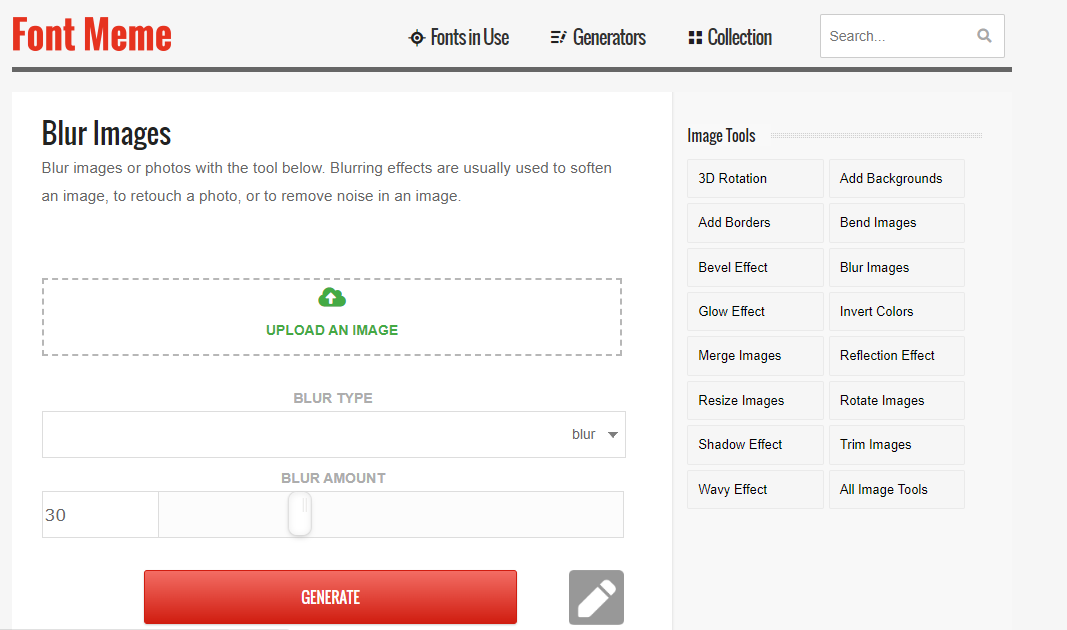
Key Features:
- Instantly creates the radial blur effect on images
- Offers multiple image editing options
- A Complete resource for font and typography
Pros
- Available for free
- Quick and easy to use
- Intuitive UI
Cons
- No advanced image editing features
4.IMGonline.com.ua
IMGonline is another free online tool that offers image resizing, converting, compression, EXIF editor, effects, and other tools.
IMGonline can also help you create beautiful radial blur images in the nick of time. It’s a great and easy platform to add an extra effect to your photos. Simply upload your picture, choose the amount of blur you want, click “OK,” and download the results.
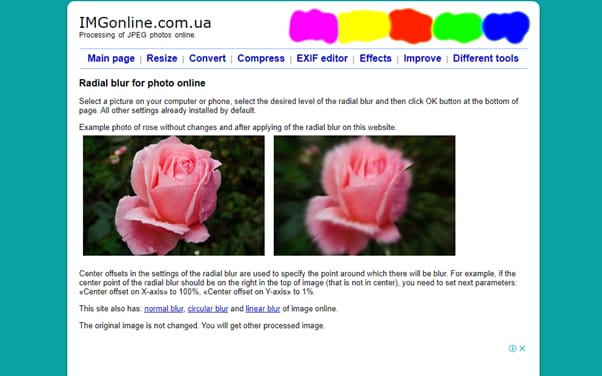
Key Features:
- Also has circular blur, usual blur, and linear blur features
- Does not change the original image during the process
- Multiple radial blur settings
- Offers JPEG and PNG as output formats
Pros
- Simple user interface
- Quick processing time
- Free
- Multiple image input formats
Cons
- Cannot process large image files
5.Pop Art Studio
Pop Art Studio is an effective online tool that allows you to create pop art images and offers numerous options for users to choose from, including different colors, fonts, and layouts. You can also upload your photos to the tool to convert them into pop art.
To use Pop Art Studio, simply upload an image to the website or paste the URL and then adjust the opacity and radius of the radial blur. Once you’re happy with the results, download the image.
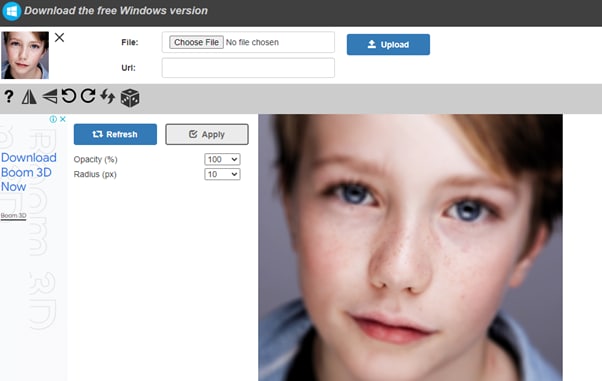
Key Features:
- Lets you paste the URL of the image
- Can configure the opacity and radius of the blur
- Instant process of the image
Pros
- Useful for creating and editing artwork
- Available for free
- Available as software
Cons
- Applies watermark to your images
6.Photokako
Photokako is a Japanese photo editor that creates radial motion blur effects in your images with just a few clicks by uploading them from your system or pulling the image from a URL.
Besides that, this tool offers several other advanced image editing features, including Transform, Illustrate, Reduce Colors, Parallel Universe, Retro, Ilusion, Frame, and Mood.
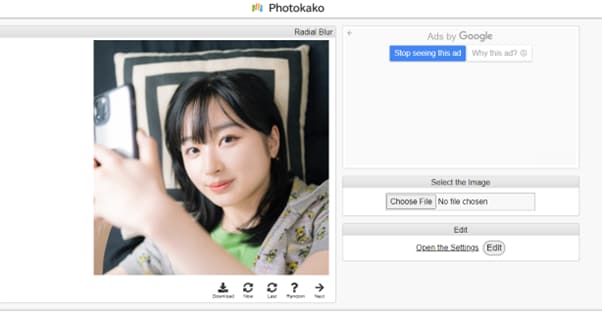
Key Features:
- Option to adjust blur smoothness and opacity
- Comes with Basic Settings to edit the image further
- Multiple output formats, including JPG, PNG-24, BMP, TIFF-24, TIFF-48, GIF, PNG-8, and PNG-32.
Pros
- Sophisticated online tool
- Multiple ways to upload a picture
- Free and easy to use
Cons
- The user interface is less intuitive
Bonus Tips – How To Add Radial Blur Effect To Images In Filmora
The programs mentioned above work only online and do not offer advanced features to add more customization options to the level of radial blurring or change its position on the images. Therefore, we recommend using the desktop software - Filmora.
Free Download For Win 7 or later(64-bit)
Free Download For macOS 10.14 or later
Filmora is a free and premium video editing software recommended by many content creators and professionals. With this software, you can create stunning radial effects on your images or memes with more customization options available.
Here’s how you can add the radial blur effect to images in Filmora by following three simple steps:
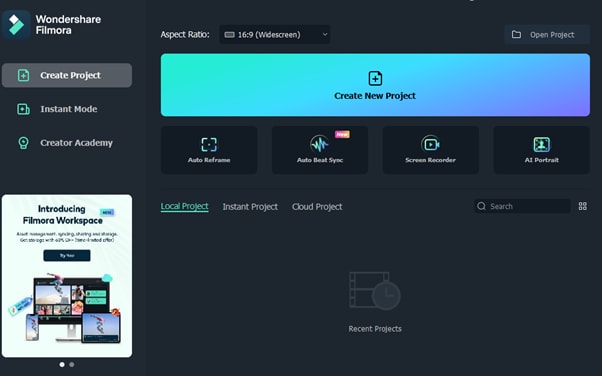
Step1 In the first step, go to the Filmora website, download the file, and install the software. Launch it and click the “Create New Project” option. Then drag & drop your file or click the “Click here to add Media file” to import it.
Step2 In the second step, go to the “Effects” tab, choose the Tilt-shift Circle for the radial blur effect, and add it to the timeline.
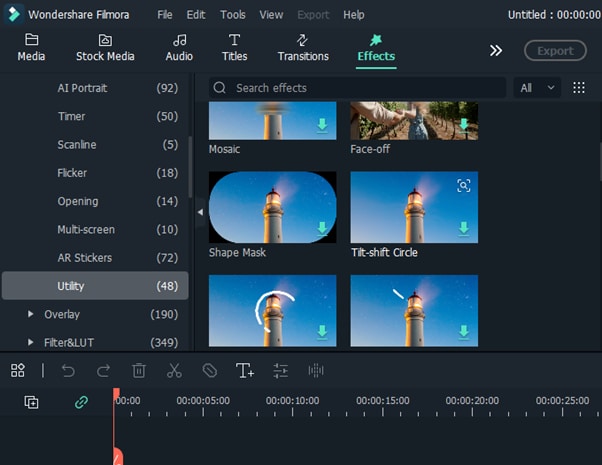
Step3 Finally, configure the size, X-axis, Y-axis, and intensity of the effect by double-clicking it in the timeline. You’re all set! Export your file by clicking on the “Export” button.
Last Words
In this article, we’ve provided the 6 best tools to create radial blur effects online for free and discussed their key features, pros, and cons to help you choose the right program.
In the end, we’ve provided a bonus tip to show you how to add the radial blur effect to images using the Wondershare Filmora software.
Hopefully, you’ve found this article helpful and can now quickly apply the radial motion effect to your pictures.
What Is Radial Blur?
Radial blur is a blurring effect that starts from one point in an image and blurs outwards (or inwards) from (or to) that point. The word ‘radial’ means “arranged like rays that come from or go to a common center,” which is precisely how radial blur works.
Here are some common uses of the Radial motion blur effect:
- Create a sense of movement
- Add depth to a photo
- Simulate camera movement
- Create an interesting background
Best 6 Free Online Radial Blur Image Tools
If you want to create a radial blur effect on your photos but don’t have the required resources like storage space, budget, or the right software, we recommend you try using the following tools:
1.Pine Tools
Pine Tools is a terrific online program with many image editing features, such as invert color, blur, special filters, effects, crop images, and more.
Using its radial blur feature, you can quickly add depth to your images and apply the motion blur effect. To do so, visit the Pine Tools website, choose “Blur” from the left panel, and upload your image. Then, under the “Options” header, select “Radial Blur” and click “Apply.” The best thing about this online tool is that you can set different parameters before creating the effect.

Key Features:
- Numerous image editing tools
- Various parameters for creating radial blur effects, such as size, strongness, and axis (x, y)
- No editing knowledge is required to use the program
Pros
- Drag and drop interface
- Free to use
- No sign up required
Cons
- Takes time to finish the process
- UI is a bit old
2.Mass-images.pro
With Mass-images.pro tool, you can crop your images, do batch processing, or create memes in no time. Moreover, the program offers multiple image editing features to help you quickly apply basic changes to your pictures. These include Change BG, Auto Improve, Overlay image, Rotate, Swirl, Radial Blur, Text, Pixelization, and many more filters.
To create the radial motion blur effect on your images using the Mass-images.pro tool, you have to simply upload your file, set the radius and strength, and click “Download.” You can also configure the format and quality of your picture before downloading it.

Key features:
- Offers multiple format options for uploading and downloading your images
- Can change the radius of blur and intensity effects
- Can process multiple photos at once
Pros
- Free to use
- Many input and output formats
- Simple and straightforward to use
- Image quality option
Cons
- No advanced image editing features
3. Font Meme
Font Meme is an online resource for fonts and typography. Still, it offers other image editing features, such as 3D Rotation, Bevel Effect, Glow Effect, Invert Colors, Blend Images, and Add Background, to help you create memes instantly.
You can also use the Font Meme to create a radial blur image by uploading the image and selecting the “Blur Type” from the drop-down menu. Next, set the blur amount and click “Generate.”

Key Features:
- Instantly creates the radial blur effect on images
- Offers multiple image editing options
- A Complete resource for font and typography
Pros
- Available for free
- Quick and easy to use
- Intuitive UI
Cons
- No advanced image editing features
4.IMGonline.com.ua
IMGonline is another free online tool that offers image resizing, converting, compression, EXIF editor, effects, and other tools.
IMGonline can also help you create beautiful radial blur images in the nick of time. It’s a great and easy platform to add an extra effect to your photos. Simply upload your picture, choose the amount of blur you want, click “OK,” and download the results.

Key Features:
- Also has circular blur, usual blur, and linear blur features
- Does not change the original image during the process
- Multiple radial blur settings
- Offers JPEG and PNG as output formats
Pros
- Simple user interface
- Quick processing time
- Free
- Multiple image input formats
Cons
- Cannot process large image files
5.Pop Art Studio
Pop Art Studio is an effective online tool that allows you to create pop art images and offers numerous options for users to choose from, including different colors, fonts, and layouts. You can also upload your photos to the tool to convert them into pop art.
To use Pop Art Studio, simply upload an image to the website or paste the URL and then adjust the opacity and radius of the radial blur. Once you’re happy with the results, download the image.

Key Features:
- Lets you paste the URL of the image
- Can configure the opacity and radius of the blur
- Instant process of the image
Pros
- Useful for creating and editing artwork
- Available for free
- Available as software
Cons
- Applies watermark to your images
6.Photokako
Photokako is a Japanese photo editor that creates radial motion blur effects in your images with just a few clicks by uploading them from your system or pulling the image from a URL.
Besides that, this tool offers several other advanced image editing features, including Transform, Illustrate, Reduce Colors, Parallel Universe, Retro, Ilusion, Frame, and Mood.

Key Features:
- Option to adjust blur smoothness and opacity
- Comes with Basic Settings to edit the image further
- Multiple output formats, including JPG, PNG-24, BMP, TIFF-24, TIFF-48, GIF, PNG-8, and PNG-32.
Pros
- Sophisticated online tool
- Multiple ways to upload a picture
- Free and easy to use
Cons
- The user interface is less intuitive
Bonus Tips – How To Add Radial Blur Effect To Images In Filmora
The programs mentioned above work only online and do not offer advanced features to add more customization options to the level of radial blurring or change its position on the images. Therefore, we recommend using the desktop software - Filmora.
Free Download For Win 7 or later(64-bit)
Free Download For macOS 10.14 or later
Filmora is a free and premium video editing software recommended by many content creators and professionals. With this software, you can create stunning radial effects on your images or memes with more customization options available.
Here’s how you can add the radial blur effect to images in Filmora by following three simple steps:
Step1 In the first step, go to the Filmora website, download the file, and install the software. Launch it and click the “Create New Project” option. Then drag & drop your file or click the “Click here to add Media file” to import it.

Step2 In the second step, go to the “Effects” tab, choose the Tilt-shift Circle for the radial blur effect, and add it to the timeline.

Step3 Finally, configure the size, X-axis, Y-axis, and intensity of the effect by double-clicking it in the timeline. You’re all set! Export your file by clicking on the “Export” button.
Last Words
In this article, we’ve provided the 6 best tools to create radial blur effects online for free and discussed their key features, pros, and cons to help you choose the right program.
In the end, we’ve provided a bonus tip to show you how to add the radial blur effect to images using the Wondershare Filmora software.
Hopefully, you’ve found this article helpful and can now quickly apply the radial motion effect to your pictures.
Mastering OpenCV Object Tracking: A Comprehensive Guide for Beginners and Experts
OpenCV Tracking is a popular method used for tracking objects in a video in real-time. OpenCV is a powerful library used for image processing and computer vision applications.
From real-time video analysis to Augmented Reality, OpenCV Tracking has a wide range of uses and can help both private and public sectors to detect and track the desired object in an image or video.
In this comprehensive guide, we’ll explore OpenCV Tracking and its pre-built trackers**.** We will use the OpenCV library and Python to implement this Object Tracking application.
- What Is OpenCV
- The Pre-Built Algorithms OpenCV Offers For Object Tracking
- Implementation In Python And OpenCV
Part 1. What Is Object Tracking?
Object Tracking determines the location of an object in a video and can be used for a variety of purposes, including surveillance, security, traffic control, digital forensics, anomaly detection, gesture recognition, visual surveillance, human-computer interaction, augmented reality, and robot vision.
Even though it may seem easy for an average person, object tracking is quite complex for computers because they have to analyze a set of frames and estimate the object’s trajectory based on numbers instead of images.
Because of how complicated it is, Object Tracking is considered one of the most difficult tasks in computer vision. Even though it’s a challenge, it’s not impossible to accomplish.
And there are two levels of Object Tracking that you should learn about:
1. SOT & MOT
- Single Object Tracking (SOT): SOT is a tracking algorithm that creates advanced appearance models and/or motion models to manage difficult issues like out-of-plane rotations, illumination variations, or scale changes.
- Multiple Object Tracking (MOT): MOT tracks every part of a video and is mainly concerned with mid-level tasks and serves as a foundation for high-level tasks.
2. The Difference Between Tracking And Detection
After knowing what Object Tracking is, there is another concept you should also be aware of - Object Detection.
The Object Tracking and Object Detection are two important methods in computer vision. Object Tracking tracks the position of a given object in an image in real-time, while Object Detection identifies and localizes objects in an image or video. That is the difference.
Part 2. Types Of Object Tracking
Image Tracking
Image tracking allows users to interact with digital content more naturally and helps users move and interact with digital objects in the same manner as they will with real-world physical objects.
Image tracking can be used in various augmented reality (AR) applications, such as AR gaming, shopping, and navigation. Moreover, you can also use it for educational purposes, such as teaching anatomy or providing instructions for a difficult task.
Video Tracking
Video tracking is the process of tracking objects in a video sequence and can be used for various applications, such as detecting and counting objects in a scene, understanding their motions, and recognizing activities.
Part 3. What Are The Difficulties Of Object Tracking?
As what has been mentioned above, the use of object tracking is versatile. However, there are some challenges associated with Object Tracking, such as:
Background Clutter: The background can impact extracting an object’s features. If the background is more densely populated, detecting or tracking the object of interest can be more difficult.
Occlusion: This is a phenomenon where the object being tracked is affected by the background or foreground. This causes the tracking algorithm to get confused due to multiple objects coming close together, hence, losing track of the object.
Varying spatial scales: Varying spatial scales refer to the target object being of a different size or shape, which can confuse the algorithm, leading to errors.
Training and Tracking Speed: If the object is moving too fast or is too small, it can be difficult to track. Therefore, the tracking module has to be designed to track, identify, and localize objects in a matter of seconds.
Part 4. Stages Of The Object Tracking Process
After the introduction of object tracking technically, let’s learn about its mechanism of it from two sides: periods of the working process and the way it tracks.
1. Stages Of The Object Tracking Process
Following are the stages of the Object Tracking process:
Target Initialization
Target initialization is the first step in Object Tracking and involves defining the targets or objects of interest and drawing a bounding box around them in the initial frame. After that, the tracker has to detect the position of the object in the frame while drawing the bounding box.
Appearance Modeling
Appearance modeling is important for understanding how an object will look under different circumstances. If the object being tracked changes appearance due to different lighting, angle, or speed, the tracking algorithm may lose its information and the object itself. Therefore, it has to be conducted to let the algorithm detect the changes and distortion.
Motion Estimation
Motion estimation entails the capacity of the model to anticipate an object’s future position with precision.
Target Positioning
Motion estimation is a process of approximating the most likely region where an object could be present. After the object’s location is approximated, a visual model can be used to determine the target’s location more accurately.
2. Methods Of Object Tracking
Here’re some methods of Object Tracking:
OpenCV-Based Object Tracking
OpenCV Object Tracking method is widely used because it offers several built-in functions designed specifically for this purpose, such as GOTURN, MIL, MediandFlow, and CSRT. The tracker type you select will depend on your specific application design. Each tracker has its pros and cons, so there is not a single type of tracker ideal for all applications.
MDNet
Multi-Domain Convolutional Neural Network Tracker is a convolutional neural-based visual tracker and has won the VOT2015 challenge. Moreover, it is composed of domain-specific layers, branches, and multiple shared layers.
The MDNetT tracker is a deep neural network that is trained on numerous Object Tracking datasets. The tracker is designed to work in multiple domains, including video, text, and images.
DeepSort
DeepSort algorithm can track objects in real-time and uses YOLO v3 to compute the bounding boxes around the objects in a frame.
DeepSort uses Kalman filter from Simple Online and Realtime Tracking algorithm and an identification model, ReID to interlink bounding boxes and object tracks.
ROLO
ROLO is a novel Object Tracking method that uses recurrent neural networks (RNNs) to learn object-specific Spatio-temporal representations. This method works with YOLO, an object detection algorithm, and an LTSM for determining the trajectory of an object.
Part 5. The powerful backup: OpenCV
We have demonstrated how powerful OpenCV Tracking is and how it works. However, do you wonder what OpenCV is? How it supports the tracking goals being achieved? In this part, we will focus on OpenCV and help you better understand the the underlying mechanisms.
1. What Is OpenCV?
OpenCV is a powerful library that allows you to perform image processing, deep learning, machine learning, and computer vision tasks on live video feeds. Moreover, it can be used to detect objects, track their movements, and recognize faces.
It can help process the data that have videos and images and has been used in various applications, such as object recognition and detection, autonomous cars, robots, medical image analysis, automated surveillance, and anomaly detection.
2. The Pre-Built Algorithms OpenCV Offers For Object Tracking
There are 8 pre-built algorithms that OpenCV offers for Objects Tracking. All of them have their uniquility and here we will present their pros and cons for your better understadning.
| Tracker | Pros | Cons |
|---|---|---|
| BOOSTING Tracker | Track objects accurately. | Relatively slow. Unable to stop when an object is lost. |
| MIL Tracker | Strong resistance to noise. Gives accurate results. | Low speed. Unable to stop tracking once the object is lost. |
| KCF Tracker | High speed and accuracy. Stops tracking when the object is lost. | Inability to continue tracking objects once lost. |
| TLD Tracker | Resistance to overlapping and object scaling. | Unstable in object detection and tracking. Constantly loses object. |
| MEDIANFLOW Tracker | High accuracy and speed. Accurate in determining the object’s loss. | Loses object quickly due to high speed. |
| GOTURN Tracker | Shows resistance to obstructions and noise. | If the speed of an object is high, it shifts to another object. |
| MOSSE Tracker | Able to continue tracking after the object is lost. High speed. | Loses object easily if very high speed. |
| CSRT Tracker | Good resistance to overlapping. High accuracy. | Low speed. Unstable when an object is lost. |
3. Implementation In Python And OpenCV
Now, after theoretical explanation of OpenCV and OpenCV Tracking, let’s learn Object Tracking OpenCV Python with coding and our simple and step-by-step instructions:
Install The Dependencies
Install the pycharm app on your PC, and launch it. Create a new project and go to Terminal. Install the opencv-contrib-python package by pasting the following command into the Terminal.
Set Up the Trackers
Now, create a Jupyter-notebook and set up the trackers with this code:
Tasks:
- cv2. version returns the OpenCV library version number.
- Save the name of the eight trackers.
- Check the list for the version you are working on and create a tracker object based on the number.
Capture The Video Input
For capturing the video input, write the following lines of code:
Tasks:
- Use the VideoCapture class to capture a video via the webcam or get a saved one from your PC.
- In VideoCapture - line 2, give the path to your video.
- Comment on the second line to use the webcam for tracking and uncomment the third one.
Creating The Bounding Box And Initializing The Tracker
Define an initial random bounding box or select the choices for the object you want to track with the following code:
Start The Tracker And Check The Output
Finally, write the below code lines to start the tracker:
Tasks
- Read each video frame.
- Start the timer and, through the tracker, determine the trajectory of the object.
- Use the trajectory to draw the bounding box.
- The program will start tracking. Afterward, press the space bar to stop tracking.
Video – Object Tracking with Opencv and Python
Conclusion
In this article, we’ve discussed Object Tracking in detail and how it compares with Object Detection. Furthermore, we explored the methods used for tracking objects and provided complete guidance on the OpenCV Tracking method and its built-in functionalities.
Hopefully, you find this guide helpful, and you can now track objects in real-time without any issues.
Free Download For Win 7 or later(64-bit)
Free Download For macOS 10.14 or later
- Image Tracking
- Video Tracking
- What Are The Difficulties Of Object Tracking
- Stages Of The Object Tracking Process
- What Is OpenCV
- The Pre-Built Algorithms OpenCV Offers For Object Tracking
- Implementation In Python And OpenCV
Part 1. What Is Object Tracking?
Object Tracking determines the location of an object in a video and can be used for a variety of purposes, including surveillance, security, traffic control, digital forensics, anomaly detection, gesture recognition, visual surveillance, human-computer interaction, augmented reality, and robot vision.
Even though it may seem easy for an average person, object tracking is quite complex for computers because they have to analyze a set of frames and estimate the object’s trajectory based on numbers instead of images.
Because of how complicated it is, Object Tracking is considered one of the most difficult tasks in computer vision. Even though it’s a challenge, it’s not impossible to accomplish.
And there are two levels of Object Tracking that you should learn about:
1. SOT & MOT
- Single Object Tracking (SOT): SOT is a tracking algorithm that creates advanced appearance models and/or motion models to manage difficult issues like out-of-plane rotations, illumination variations, or scale changes.
- Multiple Object Tracking (MOT): MOT tracks every part of a video and is mainly concerned with mid-level tasks and serves as a foundation for high-level tasks.
2. The Difference Between Tracking And Detection
After knowing what Object Tracking is, there is another concept you should also be aware of - Object Detection.
The Object Tracking and Object Detection are two important methods in computer vision. Object Tracking tracks the position of a given object in an image in real-time, while Object Detection identifies and localizes objects in an image or video. That is the difference.
Part 2. Types Of Object Tracking
Image Tracking
Image tracking allows users to interact with digital content more naturally and helps users move and interact with digital objects in the same manner as they will with real-world physical objects.
Image tracking can be used in various augmented reality (AR) applications, such as AR gaming, shopping, and navigation. Moreover, you can also use it for educational purposes, such as teaching anatomy or providing instructions for a difficult task.
Video Tracking
Video tracking is the process of tracking objects in a video sequence and can be used for various applications, such as detecting and counting objects in a scene, understanding their motions, and recognizing activities.
Part 3. What Are The Difficulties Of Object Tracking?
As what has been mentioned above, the use of object tracking is versatile. However, there are some challenges associated with Object Tracking, such as:
Background Clutter: The background can impact extracting an object’s features. If the background is more densely populated, detecting or tracking the object of interest can be more difficult.
Occlusion: This is a phenomenon where the object being tracked is affected by the background or foreground. This causes the tracking algorithm to get confused due to multiple objects coming close together, hence, losing track of the object.
Varying spatial scales: Varying spatial scales refer to the target object being of a different size or shape, which can confuse the algorithm, leading to errors.
Training and Tracking Speed: If the object is moving too fast or is too small, it can be difficult to track. Therefore, the tracking module has to be designed to track, identify, and localize objects in a matter of seconds.
Part 4. Stages Of The Object Tracking Process
After the introduction of object tracking technically, let’s learn about its mechanism of it from two sides: periods of the working process and the way it tracks.
1. Stages Of The Object Tracking Process
Following are the stages of the Object Tracking process:
Target Initialization
Target initialization is the first step in Object Tracking and involves defining the targets or objects of interest and drawing a bounding box around them in the initial frame. After that, the tracker has to detect the position of the object in the frame while drawing the bounding box.
Appearance Modeling
Appearance modeling is important for understanding how an object will look under different circumstances. If the object being tracked changes appearance due to different lighting, angle, or speed, the tracking algorithm may lose its information and the object itself. Therefore, it has to be conducted to let the algorithm detect the changes and distortion.
Motion Estimation
Motion estimation entails the capacity of the model to anticipate an object’s future position with precision.
Target Positioning
Motion estimation is a process of approximating the most likely region where an object could be present. After the object’s location is approximated, a visual model can be used to determine the target’s location more accurately.
2. Methods Of Object Tracking
Here’re some methods of Object Tracking:
OpenCV-Based Object Tracking
OpenCV Object Tracking method is widely used because it offers several built-in functions designed specifically for this purpose, such as GOTURN, MIL, MediandFlow, and CSRT. The tracker type you select will depend on your specific application design. Each tracker has its pros and cons, so there is not a single type of tracker ideal for all applications.
MDNet
Multi-Domain Convolutional Neural Network Tracker is a convolutional neural-based visual tracker and has won the VOT2015 challenge. Moreover, it is composed of domain-specific layers, branches, and multiple shared layers.
The MDNetT tracker is a deep neural network that is trained on numerous Object Tracking datasets. The tracker is designed to work in multiple domains, including video, text, and images.
DeepSort
DeepSort algorithm can track objects in real-time and uses YOLO v3 to compute the bounding boxes around the objects in a frame.
DeepSort uses Kalman filter from Simple Online and Realtime Tracking algorithm and an identification model, ReID to interlink bounding boxes and object tracks.
ROLO
ROLO is a novel Object Tracking method that uses recurrent neural networks (RNNs) to learn object-specific Spatio-temporal representations. This method works with YOLO, an object detection algorithm, and an LTSM for determining the trajectory of an object.
Part 5. The powerful backup: OpenCV
We have demonstrated how powerful OpenCV Tracking is and how it works. However, do you wonder what OpenCV is? How it supports the tracking goals being achieved? In this part, we will focus on OpenCV and help you better understand the the underlying mechanisms.
1. What Is OpenCV?
OpenCV is a powerful library that allows you to perform image processing, deep learning, machine learning, and computer vision tasks on live video feeds. Moreover, it can be used to detect objects, track their movements, and recognize faces.
It can help process the data that have videos and images and has been used in various applications, such as object recognition and detection, autonomous cars, robots, medical image analysis, automated surveillance, and anomaly detection.
2. The Pre-Built Algorithms OpenCV Offers For Object Tracking
There are 8 pre-built algorithms that OpenCV offers for Objects Tracking. All of them have their uniquility and here we will present their pros and cons for your better understadning.
| Tracker | Pros | Cons |
|---|---|---|
| BOOSTING Tracker | Track objects accurately. | Relatively slow. Unable to stop when an object is lost. |
| MIL Tracker | Strong resistance to noise. Gives accurate results. | Low speed. Unable to stop tracking once the object is lost. |
| KCF Tracker | High speed and accuracy. Stops tracking when the object is lost. | Inability to continue tracking objects once lost. |
| TLD Tracker | Resistance to overlapping and object scaling. | Unstable in object detection and tracking. Constantly loses object. |
| MEDIANFLOW Tracker | High accuracy and speed. Accurate in determining the object’s loss. | Loses object quickly due to high speed. |
| GOTURN Tracker | Shows resistance to obstructions and noise. | If the speed of an object is high, it shifts to another object. |
| MOSSE Tracker | Able to continue tracking after the object is lost. High speed. | Loses object easily if very high speed. |
| CSRT Tracker | Good resistance to overlapping. High accuracy. | Low speed. Unstable when an object is lost. |
3. Implementation In Python And OpenCV
Now, after theoretical explanation of OpenCV and OpenCV Tracking, let’s learn Object Tracking OpenCV Python with coding and our simple and step-by-step instructions:
Install The Dependencies
Install the pycharm app on your PC, and launch it. Create a new project and go to Terminal. Install the opencv-contrib-python package by pasting the following command into the Terminal.
Set Up the Trackers
Now, create a Jupyter-notebook and set up the trackers with this code:
Tasks:
- cv2. version returns the OpenCV library version number.
- Save the name of the eight trackers.
- Check the list for the version you are working on and create a tracker object based on the number.
Capture The Video Input
For capturing the video input, write the following lines of code:
Tasks:
- Use the VideoCapture class to capture a video via the webcam or get a saved one from your PC.
- In VideoCapture - line 2, give the path to your video.
- Comment on the second line to use the webcam for tracking and uncomment the third one.
Creating The Bounding Box And Initializing The Tracker
Define an initial random bounding box or select the choices for the object you want to track with the following code:
Start The Tracker And Check The Output
Finally, write the below code lines to start the tracker:
Tasks
- Read each video frame.
- Start the timer and, through the tracker, determine the trajectory of the object.
- Use the trajectory to draw the bounding box.
- The program will start tracking. Afterward, press the space bar to stop tracking.
Video – Object Tracking with Opencv and Python
Conclusion
In this article, we’ve discussed Object Tracking in detail and how it compares with Object Detection. Furthermore, we explored the methods used for tracking objects and provided complete guidance on the OpenCV Tracking method and its built-in functionalities.
Hopefully, you find this guide helpful, and you can now track objects in real-time without any issues.
Free Download For Win 7 or later(64-bit)
Free Download For macOS 10.14 or later
Makeup Video Is One of the Video Types that Many Vloggers Are Creating. If You Are Also the One Who Wants to Share Makeup Experiences in Videos, Then You Can Follow the Guide Below to Make a Makeup Video with Simple Steps
This topic is one of the videos you can easily find on YouTube, apart from the fact that it’s easy to make a video like this, there are many people who want to learn how to do their own makeup, that is why this is the most search content on YouTube. Makeup tutorial is effective through video, since viewers can see exactly how makeup are executed, what products they are using and where to buy.
This kind of video is about sharing makeup techniques, makeup inspiration and beauty product reviews. So, whether you are a makeup artist or a makeup enthusiast you can surely record yourself, make a video and share to your YouTube channel to inspire everyone to be beautiful on their own.
In this article I will sharing may setup and tips on how you can create a makeup video on your YouTube channel.
How to Setup for Making a Makeup Video
You don’t need to have expensive gear to start making this kind of content, also having a small space in your room, a smart phone and a natural lighting from your window is good enough to start your video. But if you are willing to invest there are a lot of online shop selling affordable gear for your great setup.
So, let’s take a look at some of the basic gears recommended:
Smart Phone / Camera
Right now, if you don’t have a digital camera yet, cellphone or mobile phone is good enough to start making your makeup video. This is the most convenient and affordable option for filming a makeup video. I’m sure now a days most of the camera built in mobile phone are quality for making a good video.
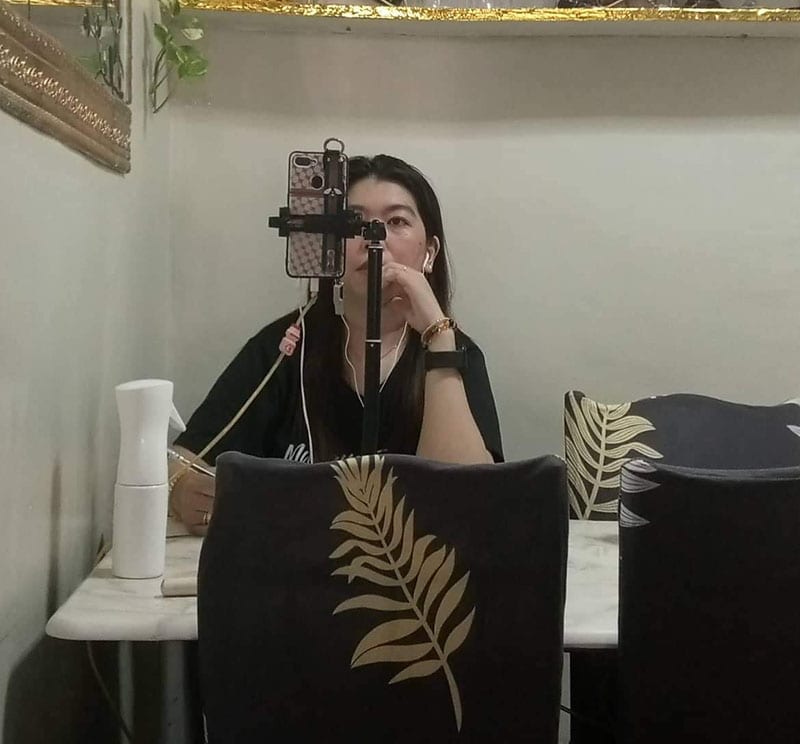
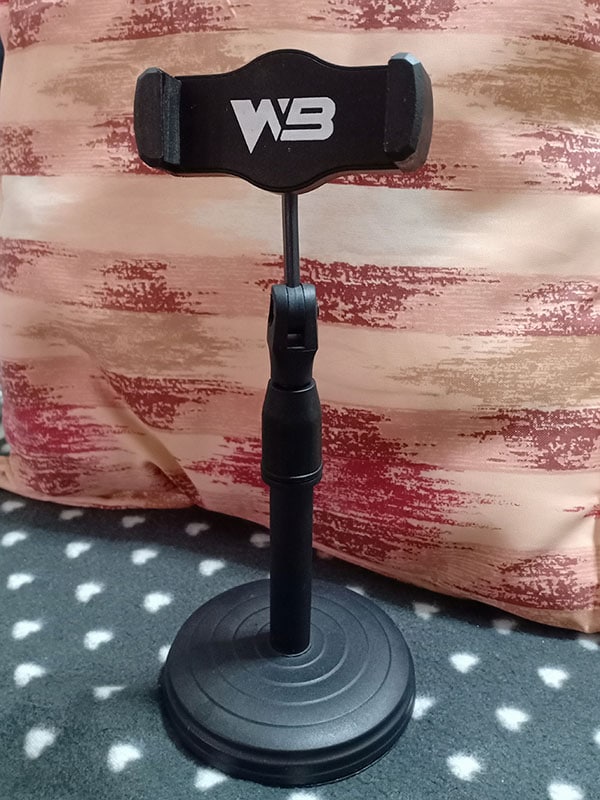
Cell Phone Stand
you must have a sturdy stand that allows to adjust height and rotation based on your needs.
If you don’t have a cell phone stand you can get anything that where you can put your camera on, but make sure that is just high enough that you can see your face for the tutorial.
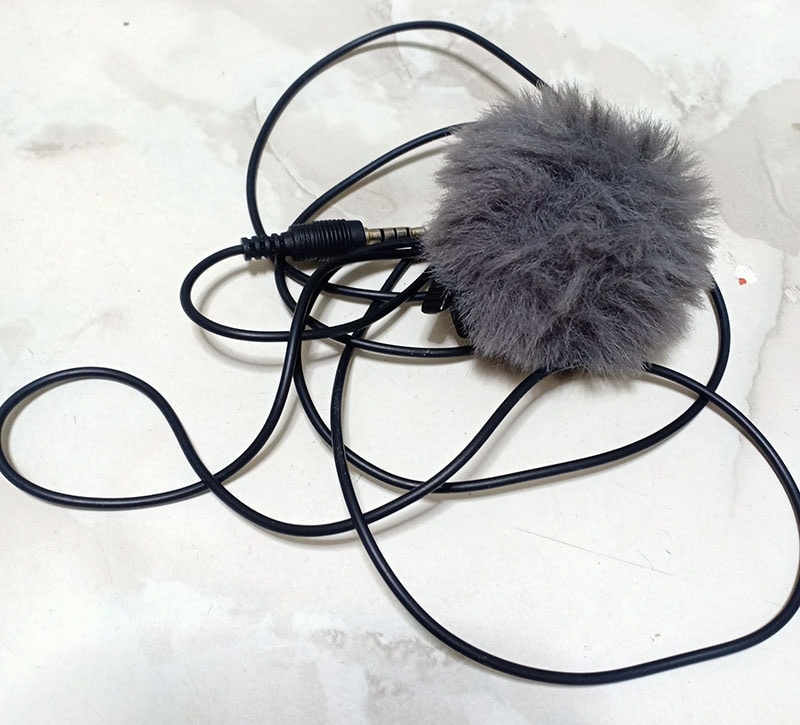
External Mic / Lapel Mic
To ensure you have both video and audio quality, it’s advisable to use an external microphone to record the audio separately, but there is lapel microphone that you can connect directly to your mobile phone make sure to use lapel mic that is compatible to your phone.
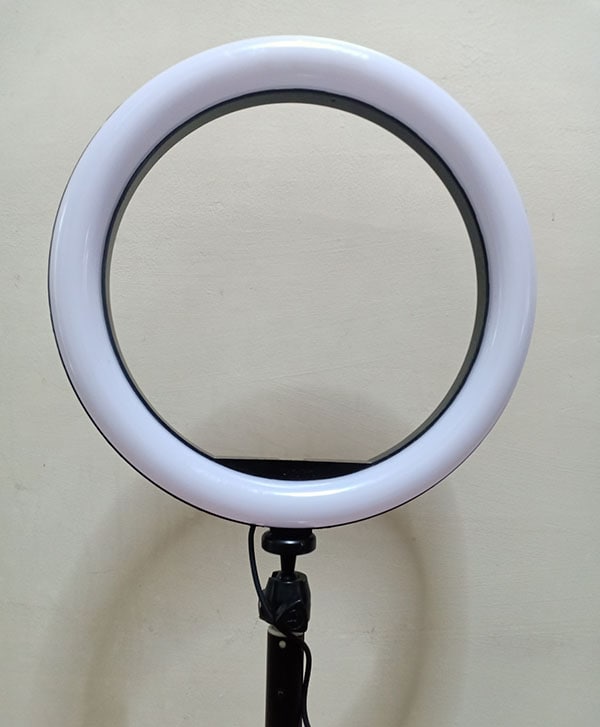
Ring Light
As I said natural lighting that comes from your window is your best friend when it comes to your lighting set up. Just find a window that the sun is shining through and use that light to your advantage.
but if you are willing to invest to have a quality video, just go with Ring Light. This light provides a soft, radial glow and its even capable as natural daylight. So, you don’t have to worry about flickers or distorts when filming, as the ring provides a continuous stream of light. Because you know lighting is one of the crucial setups for making all videos, especially to a makeup tutorial videos. You can always buy an affordable ring light online.
Editing Software
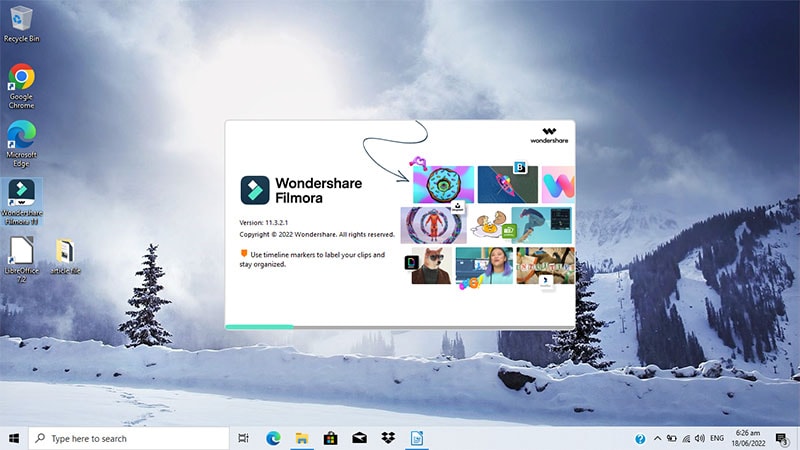
Other than the camera and the video footage itself, the video editing software is the mores essential steps as a content creator. There are usually awkward moments during filming that you may want to edit out, and you may also need to add effects and interesting transition. You can use a video editor that you can download from google.
Wondershare Filmora is a free, one of the easy-to-use software that most content creator used as their editing software. Filmora has editing tools like animation, effects, color change, transition, and overlays to make your video attractive and stands out to others.
Free Download For Win 7 or later(64-bit)
Free Download For macOS 10.14 or later
Step1Ready or set up your studio
A studio can be a corner of a room or if you have an extra space, you can dedicate an entire room to be your filming studio. Then get your camera or smart phone set up on a stable table with your cellphone stand to make it sturdy and make sure you have a suitable lighting. Dark video is not useful to anyone specially for something as detailed as applying a makeup.
Step2Create an outline
It may be helpful to create an outline or a script of your video beforehand so that you remember to do all the things your intent to do in your tutorial. This can also help you stay on track during filming so that you are remembering to demonstrate every part of your tutorial. Making a makeup tutorial video need also a step-by-step process so that you don’t forget anything that you will put or show in the video, you need to make a note or an outline for you to remember all because it so hustles to go back and record what you missed.
Step3Prepare Your Makeup
Before recording, prepare your makeup and make sure you use clean brushes. Set up the makeup you intent to use on the table or on you vanity near your filming setup. Lay out all you makeup and products that you want to use in this video. Have your makeup in front of you so that they are easily accessible during filming.
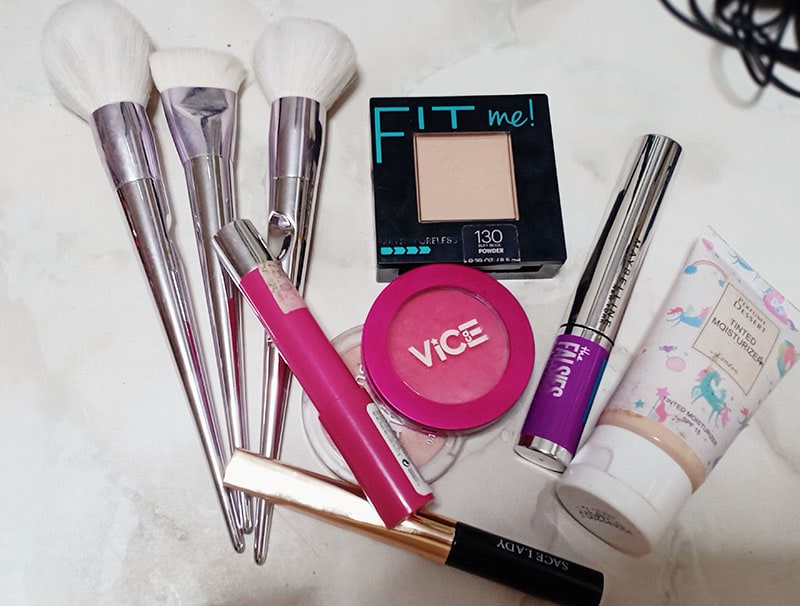
Make sure to have this thing in front of you before filming
- Makeup Brushes
- Skin and Eye Primer
- Moisturizer
- Foundation and Concealer
- Loose or Setting Powder
- Eyebrows Pencil or powder
- Contouring Palette
- Eyeshadow Palette
- Highlight powder
- Lipstick
- Setting Spray
Step4Concentrate and Film
Usually before filming I pray for guidance and knowledge. This is essential to me I do it before filming so that I can be guided and finish what I’m doing properly and less struggle.
If you are done the you can now start filming. Used your script to start talking to the camera, remember to be happy mood while doing this tutorial. Make your viewers feel good while watching you and don’t forget to tell them what product you are using. Also leave some comment to where they can buy the product you are using on your video.

Step5Edit and Upload
This is the last step for making a makeup video. Edit your video properly and make your video creative to attract more viewers. Cut the unwanted clips especially the part where you’re just talking. Because sometime viewers get bored if they only see you talking. Create a nice animation or transition to make your video stands out.
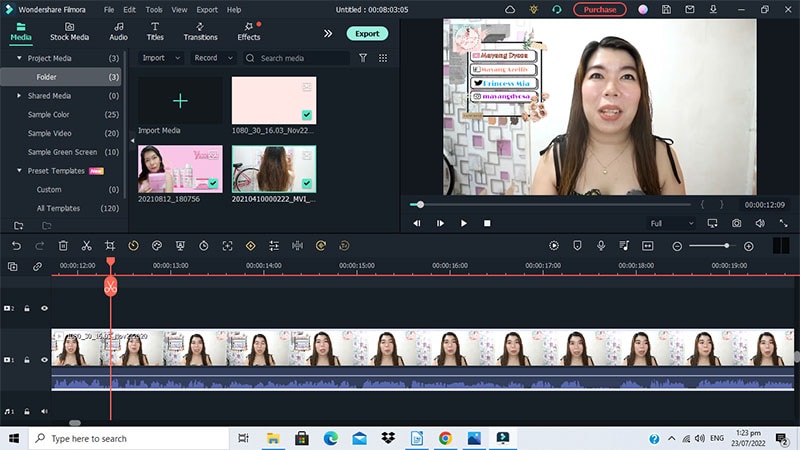
Then upload your finish video to your Youtube channel, make sure to public and promote your video so that more viewers will see how great you are in making this kind of videos. Remember to share your video to all your social media account to have more viewers and subscribers, don’t be shy to tell also your family and friends that you made a video so they can see the finished product of your hard work video tutorial and ask them to leave comment and suggestion if you have anything else to change or fix in making video, because for us content creator people’s feedback is very important so we can do better next time.
The Bottom Line
Now that you already knew the gear that you need to start setting up your studio for your makeup video and you also knew the step-by-step process, you are now ready to film a makeup video. But remember this you can’t just put makeup on your face style your hair and end the video. As a beauty vlogger, you’re an entertainer, so open dialogue is essential when filming. Ask your audience what they want to see, more importantly always remember to ask for feedback because for us content creator viewers feedback is very important so we can do better next time.If you’ve just started this inspiring journey of becoming a beauty Youtuber then hopefully these tips on how to create a makeup video will helped.
Free Download For Win 7 or later(64-bit)
Free Download For macOS 10.14 or later
Free Download For macOS 10.14 or later
Step1Ready or set up your studio
A studio can be a corner of a room or if you have an extra space, you can dedicate an entire room to be your filming studio. Then get your camera or smart phone set up on a stable table with your cellphone stand to make it sturdy and make sure you have a suitable lighting. Dark video is not useful to anyone specially for something as detailed as applying a makeup.

Step2Create an outline
It may be helpful to create an outline or a script of your video beforehand so that you remember to do all the things your intent to do in your tutorial. This can also help you stay on track during filming so that you are remembering to demonstrate every part of your tutorial. Making a makeup tutorial video need also a step-by-step process so that you don’t forget anything that you will put or show in the video, you need to make a note or an outline for you to remember all because it so hustles to go back and record what you missed.
Step3Prepare Your Makeup
Before recording, prepare your makeup and make sure you use clean brushes. Set up the makeup you intent to use on the table or on you vanity near your filming setup. Lay out all you makeup and products that you want to use in this video. Have your makeup in front of you so that they are easily accessible during filming.

Make sure to have this thing in front of you before filming
- Makeup Brushes
- Skin and Eye Primer
- Moisturizer
- Foundation and Concealer
- Loose or Setting Powder
- Eyebrows Pencil or powder
- Contouring Palette
- Eyeshadow Palette
- Highlight powder
- Lipstick
- Setting Spray
Step4Concentrate and Film
Usually before filming I pray for guidance and knowledge. This is essential to me I do it before filming so that I can be guided and finish what I’m doing properly and less struggle.
If you are done the you can now start filming. Used your script to start talking to the camera, remember to be happy mood while doing this tutorial. Make your viewers feel good while watching you and don’t forget to tell them what product you are using. Also leave some comment to where they can buy the product you are using on your video.

Step5Edit and Upload
This is the last step for making a makeup video. Edit your video properly and make your video creative to attract more viewers. Cut the unwanted clips especially the part where you’re just talking. Because sometime viewers get bored if they only see you talking. Create a nice animation or transition to make your video stands out.

Then upload your finish video to your Youtube channel, make sure to public and promote your video so that more viewers will see how great you are in making this kind of videos. Remember to share your video to all your social media account to have more viewers and subscribers, don’t be shy to tell also your family and friends that you made a video so they can see the finished product of your hard work video tutorial and ask them to leave comment and suggestion if you have anything else to change or fix in making video, because for us content creator people’s feedback is very important so we can do better next time.
The Bottom Line
Now that you already knew the gear that you need to start setting up your studio for your makeup video and you also knew the step-by-step process, you are now ready to film a makeup video. But remember this you can’t just put makeup on your face style your hair and end the video. As a beauty vlogger, you’re an entertainer, so open dialogue is essential when filming. Ask your audience what they want to see, more importantly always remember to ask for feedback because for us content creator viewers feedback is very important so we can do better next time.If you’ve just started this inspiring journey of becoming a beauty Youtuber then hopefully these tips on how to create a makeup video will helped.
Free Download For Win 7 or later(64-bit)
Free Download For macOS 10.14 or later
Free Download For macOS 10.14 or later
Step1Ready or set up your studio
A studio can be a corner of a room or if you have an extra space, you can dedicate an entire room to be your filming studio. Then get your camera or smart phone set up on a stable table with your cellphone stand to make it sturdy and make sure you have a suitable lighting. Dark video is not useful to anyone specially for something as detailed as applying a makeup.

Step2Create an outline
It may be helpful to create an outline or a script of your video beforehand so that you remember to do all the things your intent to do in your tutorial. This can also help you stay on track during filming so that you are remembering to demonstrate every part of your tutorial. Making a makeup tutorial video need also a step-by-step process so that you don’t forget anything that you will put or show in the video, you need to make a note or an outline for you to remember all because it so hustles to go back and record what you missed.
Step3Prepare Your Makeup
Before recording, prepare your makeup and make sure you use clean brushes. Set up the makeup you intent to use on the table or on you vanity near your filming setup. Lay out all you makeup and products that you want to use in this video. Have your makeup in front of you so that they are easily accessible during filming.

Make sure to have this thing in front of you before filming
- Makeup Brushes
- Skin and Eye Primer
- Moisturizer
- Foundation and Concealer
- Loose or Setting Powder
- Eyebrows Pencil or powder
- Contouring Palette
- Eyeshadow Palette
- Highlight powder
- Lipstick
- Setting Spray
Step4Concentrate and Film
Usually before filming I pray for guidance and knowledge. This is essential to me I do it before filming so that I can be guided and finish what I’m doing properly and less struggle.
If you are done the you can now start filming. Used your script to start talking to the camera, remember to be happy mood while doing this tutorial. Make your viewers feel good while watching you and don’t forget to tell them what product you are using. Also leave some comment to where they can buy the product you are using on your video.

Step5Edit and Upload
This is the last step for making a makeup video. Edit your video properly and make your video creative to attract more viewers. Cut the unwanted clips especially the part where you’re just talking. Because sometime viewers get bored if they only see you talking. Create a nice animation or transition to make your video stands out.

Then upload your finish video to your Youtube channel, make sure to public and promote your video so that more viewers will see how great you are in making this kind of videos. Remember to share your video to all your social media account to have more viewers and subscribers, don’t be shy to tell also your family and friends that you made a video so they can see the finished product of your hard work video tutorial and ask them to leave comment and suggestion if you have anything else to change or fix in making video, because for us content creator people’s feedback is very important so we can do better next time.
The Bottom Line
Now that you already knew the gear that you need to start setting up your studio for your makeup video and you also knew the step-by-step process, you are now ready to film a makeup video. But remember this you can’t just put makeup on your face style your hair and end the video. As a beauty vlogger, you’re an entertainer, so open dialogue is essential when filming. Ask your audience what they want to see, more importantly always remember to ask for feedback because for us content creator viewers feedback is very important so we can do better next time.If you’ve just started this inspiring journey of becoming a beauty Youtuber then hopefully these tips on how to create a makeup video will helped.
Free Download For Win 7 or later(64-bit)
Free Download For macOS 10.14 or later
Free Download For macOS 10.14 or later
Step1Ready or set up your studio
A studio can be a corner of a room or if you have an extra space, you can dedicate an entire room to be your filming studio. Then get your camera or smart phone set up on a stable table with your cellphone stand to make it sturdy and make sure you have a suitable lighting. Dark video is not useful to anyone specially for something as detailed as applying a makeup.

Step2Create an outline
It may be helpful to create an outline or a script of your video beforehand so that you remember to do all the things your intent to do in your tutorial. This can also help you stay on track during filming so that you are remembering to demonstrate every part of your tutorial. Making a makeup tutorial video need also a step-by-step process so that you don’t forget anything that you will put or show in the video, you need to make a note or an outline for you to remember all because it so hustles to go back and record what you missed.
Step3Prepare Your Makeup
Before recording, prepare your makeup and make sure you use clean brushes. Set up the makeup you intent to use on the table or on you vanity near your filming setup. Lay out all you makeup and products that you want to use in this video. Have your makeup in front of you so that they are easily accessible during filming.

Make sure to have this thing in front of you before filming
- Makeup Brushes
- Skin and Eye Primer
- Moisturizer
- Foundation and Concealer
- Loose or Setting Powder
- Eyebrows Pencil or powder
- Contouring Palette
- Eyeshadow Palette
- Highlight powder
- Lipstick
- Setting Spray
Step4Concentrate and Film
Usually before filming I pray for guidance and knowledge. This is essential to me I do it before filming so that I can be guided and finish what I’m doing properly and less struggle.
If you are done the you can now start filming. Used your script to start talking to the camera, remember to be happy mood while doing this tutorial. Make your viewers feel good while watching you and don’t forget to tell them what product you are using. Also leave some comment to where they can buy the product you are using on your video.

Step5Edit and Upload
This is the last step for making a makeup video. Edit your video properly and make your video creative to attract more viewers. Cut the unwanted clips especially the part where you’re just talking. Because sometime viewers get bored if they only see you talking. Create a nice animation or transition to make your video stands out.

Then upload your finish video to your Youtube channel, make sure to public and promote your video so that more viewers will see how great you are in making this kind of videos. Remember to share your video to all your social media account to have more viewers and subscribers, don’t be shy to tell also your family and friends that you made a video so they can see the finished product of your hard work video tutorial and ask them to leave comment and suggestion if you have anything else to change or fix in making video, because for us content creator people’s feedback is very important so we can do better next time.
The Bottom Line
Now that you already knew the gear that you need to start setting up your studio for your makeup video and you also knew the step-by-step process, you are now ready to film a makeup video. But remember this you can’t just put makeup on your face style your hair and end the video. As a beauty vlogger, you’re an entertainer, so open dialogue is essential when filming. Ask your audience what they want to see, more importantly always remember to ask for feedback because for us content creator viewers feedback is very important so we can do better next time.If you’ve just started this inspiring journey of becoming a beauty Youtuber then hopefully these tips on how to create a makeup video will helped.
Free Download For Win 7 or later(64-bit)
Free Download For macOS 10.14 or later
How To Unlink Audio and Video in DaVinci Resolve
There are various reasons why someone might want to remove audio from a video. Some of the film shots will have a lot of background noise, which might be distracting while watching the video. Some people like to include alternative audio or a soundtrack to make their films more presentable and attract people. So, whether you want to watch a silent video or one with a separate audio file, you’ll have to erase the original audio.
How To Detach Audio and Video in Da Vinci Resolve
DaVinci Resolve is a sound and video editing program for all types of files. It has numerous applications. Let’s begin with audio extraction from a video clip below:
- Launch the DaVinci Resolve and open the file from File>Open>Select video clip.
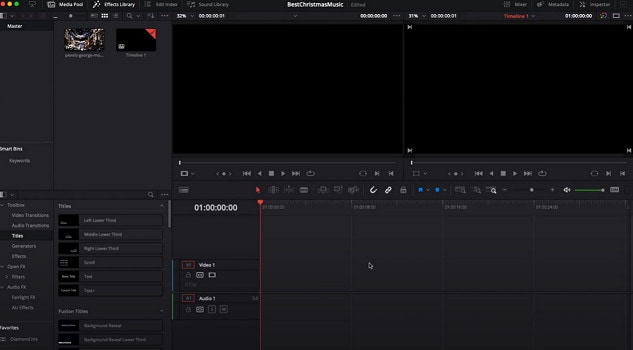
- All you have to do with DaVinci Resolve is tap on the chain link in the toolbar above to delete audio from any clip. Alternatively, you may just press down the “ctrl + shift + I” keys to connect and unlink the audio from your clip. Inspect the equalizer after that, and you’re done.
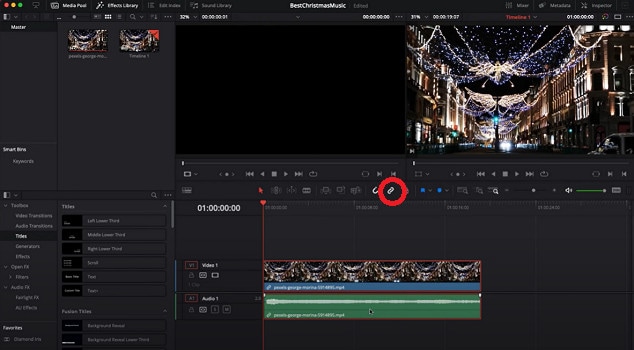
- You can now export the footage on your computer once you’ve finished editing and are pleased with the progress.
Other Alternatives
Suppose you find Da Vinci Resolve very complicated, and you get confused a lot while using it. I prepared a list of a few alternatives that you may use to detach the audio to your videos.
Besides extracting sound from video, the software listed below also has functionality for editing the audio file. Here are some of the most excellent and most popular audio separation and replacement tools:
#1: Wondershare Filmora – Overall Best
It is available on Windows and Mac.
Wondershare Filmora is a popular video editing program used all over the world. Filmora includes all the capabilities that will give you the most outstanding results, whether you’re doing easy video editing, advanced video editing, or even making movies. It also has specific editing features for social media videos.
Follow these steps below, and let’s look at how to detach audio from a video file with Filmora:
- Launch Filmora, then click on File-Import Media and load the video clip to the Media Library, wherein the sound needs to be deleted.
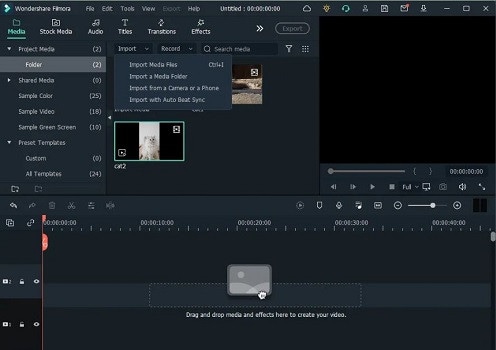
- Drag and drop using the mouse the video clips from the Media Library to the Timeline when it has been imported.
- Click Detach Audio from the context menu of the video file on the timeline.
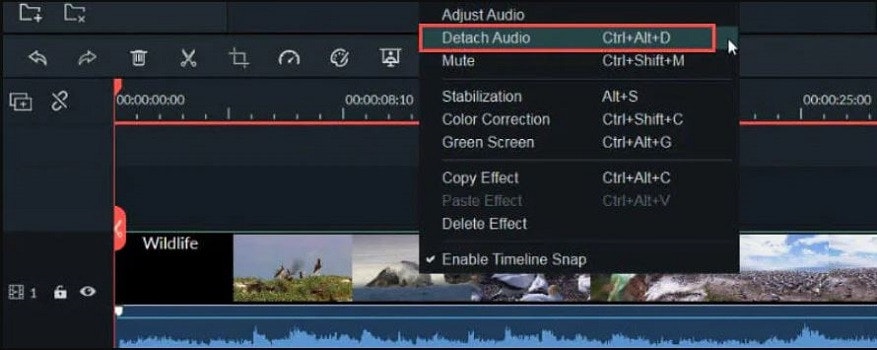
- The audio will now show on the audio track below in a different format.
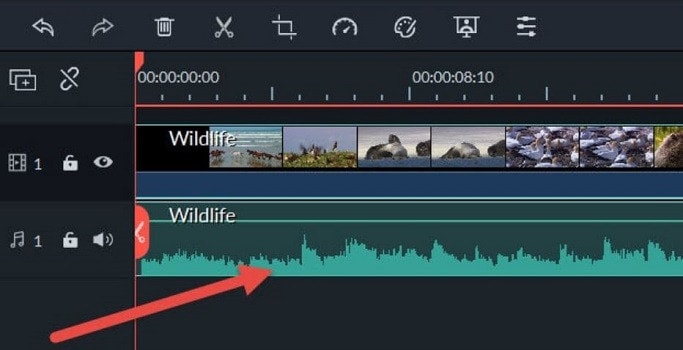
- To completely remove the audio file, press on it and simply tap the Delete icon.
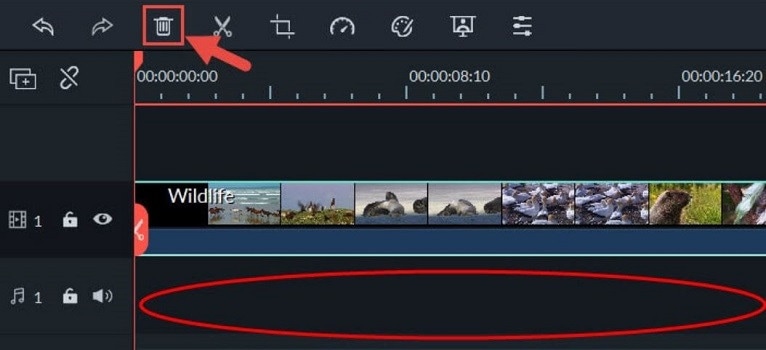
You may add a new sound to your video clip in the same manner, you did with the video (import, drag, and drop). Filmora also offers options that enable you to edit and add effects to an audio track.
#2: VSDC Video Editor
It is available on Windows and Mac.
VSDC is a popular video editing program that can handle high-resolution videos such as VR 360-degree, 4K UHD, and 3D films. It also allows users to capture speech and film from the screen and save the material in any format they want. Let’s look at how VSDC can be used to eliminate audio from video:
- Upload the clips you want to edit into VSDC.
- Pick the Properties option from the toolbar by right-clicking on the file with the cursor. A small window will drop down from the right side of the screen.
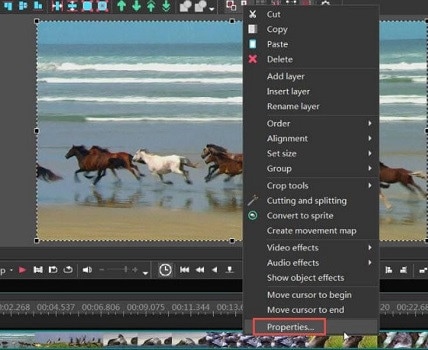
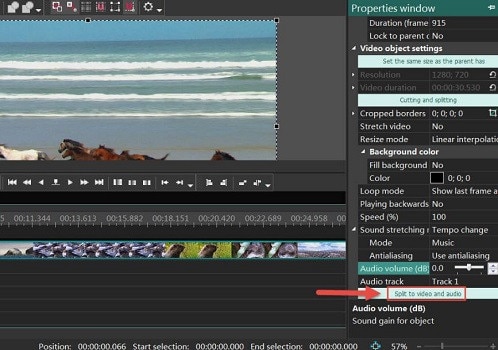
- You will find a Split to Audio and Video tab at the very bottom of the window; select it.
- On the timeline, the sound will now be divided from the video.
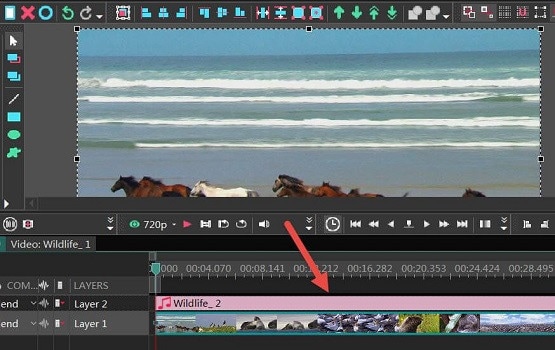
- Erase the audio file by clicking on it. Then, the video is now playable without audio.
VSDC also gives you the option of muting the audio rather than deleting it; however, deleting the audio is preferred.
#3: AudioRemover Tool
It is available on Windows, Mac, and Online.
The AudioRemover Tool is a program that allows you to eliminate audio from any video without having to re-encode it. It is an online service that can be accessed using a browser on Windows and Mac computers. The AudioRemover program can be used by those who do not want to download and install video editing software or just wish to remove audio from video files without additional editing. It can handle any video format, including MP4, MOV, and AVI.
Let’s look at how you can use this application to delete audio:
- Open the online AudioRemover.
- Choose the source video using the Browse tab, then press the Upload Video icon.

- You can save the media files (without audio) once the uploading is finished by clicking the Download File button next to the Completed indication.
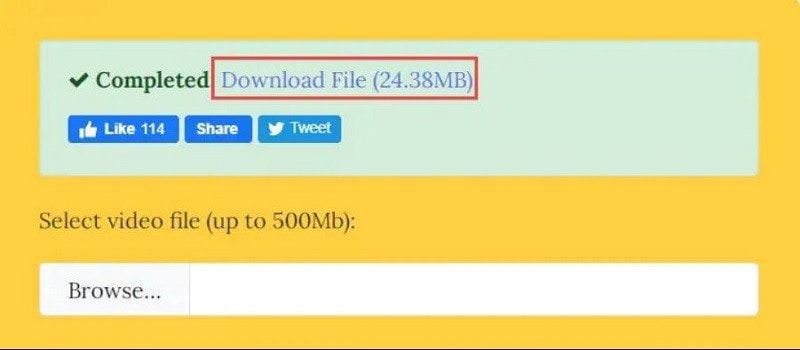
This program requires an active connection to the internet, and you cannot upload files larger than 500 MB.
#4: Windows Movie Maker
It is available on Windows.
Because it used to be included in the Windows Essentials software set, Windows Movie Maker is among the most popular accessible editing programs. Let’s have a look at how Movie Maker handles audio extraction.
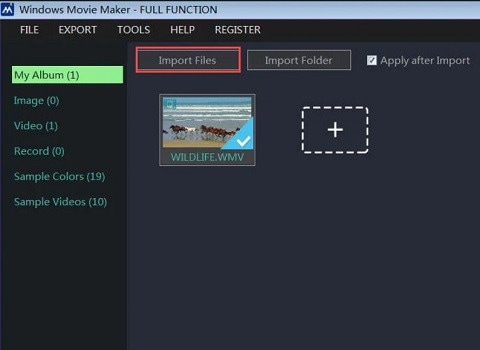
- Upload the video you want to modify into Windows Movie Maker.
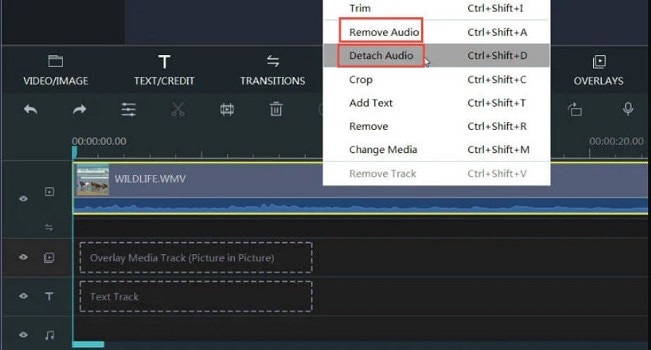
- Create a timeline for the video. Remove audio by right-clicking it (You may also click Detach Audio, and then it will detach the sound from the audio track)
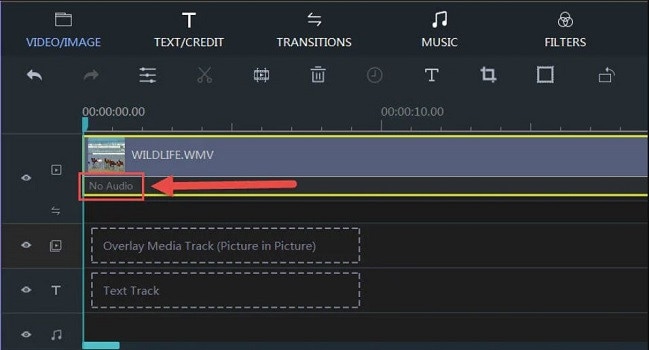
- It will immediately erase the sound, and it will not show any Audio input anymore.
Wrapping Things Up
People’s viewing experiences are greatly influenced by the audio accompanying a video. No matter how wonderful or perfect a video clip is, if the audio playing while watching it is terrible, it may be a very frustrating experience. So, we’ve gone over a few different software options for removing audio from a video file and replacing it with another audio in a couple of moments.
Frequently Asked Questions
How to Insert Audio to Video Clip in Da Vinci Resolve?
There may be times that your video may require the addition of music, background audio, or wooshing sounds.
To begin, open Resolve and import your audio clip:
- Navigate to the “Edit” page.
- Select the tab “Media Pool.”
- Right-click and choose “Import Media” or push “Ctrl + i.”
- Pick your audio clip and browse to your location.
- Select “Open.”
The audio clip is now imported into the “Media Pool.” After that, you’ll need to figure out which part of the audio track you’ll use.
Double-click the audio clip to play it. In the “Source Viewer,” it will appear.
Set the needed audio parts in (press I) and out (press O). Alternatively, if you need the entire soundtrack, there’s no need to set in and out.
Drag & drop the audio track (from the media pool) underneath the video you want to use. It will then add the sound file with the selected portion of the audio. You can now modify the audio to match the visual.
How to Link Your Audio and Video in DaVinci Resolve?
It’s best to link the soundtrack (music, sound effect, or background music) to the relevant video once you’ve adjusted the audio file.
Here’s how to connect audio and video in a timeline:
- Press “Ctrl” or “Cmd” to toggle both the video and audio.
- Right-click and choose “Link Clips.” You may also use the shortcuts “Ctrl + Alt + L” or “Option + Command + L.”
- The sound and visual are now both connected.
Thus, you can rest guaranteed that the audio will follow your movie wherever it goes. There will be no issues with out-of-sync!
How Do You Link Many Audio and Video Files Together in DaVinci Resolve?
Several video and audio segments can be linked together to form a single one. You can rearrange them anywhere in the timeline, and they will not be out of sync.
This is how you connect many clips:
- By holding down the “Ctrl” or “Cmd” key, you can choose all the video and audio clips you want.
- Right-click and choose “Link Clips.” You may also use the shortcut keys “Ctrl + Alt + L” or “Option + Command + L”.
- Now, all your video or audio files are linked together.
Is Any Music Available to Use for Editing?
Understanding copyright law can be complicated. It’s best to use free music for video editing if you don’t want to be accused of copyright violation.
Additionally, you can purchase two licenses to avoid copyright concerns. The producer controls the synchronization license, and the master license to use the song recording is managed by the publishing company.
If you don’t want to go into legal trouble, the only thing you need to remember is never to utilize any illegal video.
Is There Any Free Music in DaVinci Resolve?
DaVinci Resolve does not include any free music; however, it does include royalty-free sound effects noise. To get started, you can download and install the available sound package.
What Software Provides Free Music?
The Audio Collection in Wondershare Filmora has over 50 royalty-free audio tracks for videos, with more to come.
For video production, you can acquire free background music.
In addition, Filmora has 25 sound effects, including animal sounds, video game sounds, and beeps. With Filmora, you may use more advanced editing features like keyframing, background noise elimination, cut, trim, crop, PIP effects, green-screen effects, and more to add free-choice music to your film.
Filmora will enhance the appeal of your video by giving free background music. You may also tweak the background sound, such as speeding up and slowing down, fade-in and fade-out.

- All you have to do with DaVinci Resolve is tap on the chain link in the toolbar above to delete audio from any clip. Alternatively, you may just press down the “ctrl + shift + I” keys to connect and unlink the audio from your clip. Inspect the equalizer after that, and you’re done.

- You can now export the footage on your computer once you’ve finished editing and are pleased with the progress.
Other Alternatives
Suppose you find Da Vinci Resolve very complicated, and you get confused a lot while using it. I prepared a list of a few alternatives that you may use to detach the audio to your videos.
Besides extracting sound from video, the software listed below also has functionality for editing the audio file. Here are some of the most excellent and most popular audio separation and replacement tools:
#1: Wondershare Filmora – Overall Best
It is available on Windows and Mac.
Wondershare Filmora is a popular video editing program used all over the world. Filmora includes all the capabilities that will give you the most outstanding results, whether you’re doing easy video editing, advanced video editing, or even making movies. It also has specific editing features for social media videos.
Follow these steps below, and let’s look at how to detach audio from a video file with Filmora:
- Launch Filmora, then click on File-Import Media and load the video clip to the Media Library, wherein the sound needs to be deleted.

- Drag and drop using the mouse the video clips from the Media Library to the Timeline when it has been imported.
- Click Detach Audio from the context menu of the video file on the timeline.

- The audio will now show on the audio track below in a different format.

- To completely remove the audio file, press on it and simply tap the Delete icon.

You may add a new sound to your video clip in the same manner, you did with the video (import, drag, and drop). Filmora also offers options that enable you to edit and add effects to an audio track.
#2: VSDC Video Editor
It is available on Windows and Mac.
VSDC is a popular video editing program that can handle high-resolution videos such as VR 360-degree, 4K UHD, and 3D films. It also allows users to capture speech and film from the screen and save the material in any format they want. Let’s look at how VSDC can be used to eliminate audio from video:
- Upload the clips you want to edit into VSDC.
- Pick the Properties option from the toolbar by right-clicking on the file with the cursor. A small window will drop down from the right side of the screen.

- You will find a Split to Audio and Video tab at the very bottom of the window; select it.

- On the timeline, the sound will now be divided from the video.

- Erase the audio file by clicking on it. Then, the video is now playable without audio.
VSDC also gives you the option of muting the audio rather than deleting it; however, deleting the audio is preferred.
#3: AudioRemover Tool
It is available on Windows, Mac, and Online.
The AudioRemover Tool is a program that allows you to eliminate audio from any video without having to re-encode it. It is an online service that can be accessed using a browser on Windows and Mac computers. The AudioRemover program can be used by those who do not want to download and install video editing software or just wish to remove audio from video files without additional editing. It can handle any video format, including MP4, MOV, and AVI.
Let’s look at how you can use this application to delete audio:
- Open the online AudioRemover.
- Choose the source video using the Browse tab, then press the Upload Video icon.

- You can save the media files (without audio) once the uploading is finished by clicking the Download File button next to the Completed indication.

This program requires an active connection to the internet, and you cannot upload files larger than 500 MB.
#4: Windows Movie Maker
It is available on Windows.
Because it used to be included in the Windows Essentials software set, Windows Movie Maker is among the most popular accessible editing programs. Let’s have a look at how Movie Maker handles audio extraction.
- Upload the video you want to modify into Windows Movie Maker.

- Create a timeline for the video. Remove audio by right-clicking it (You may also click Detach Audio, and then it will detach the sound from the audio track)

- It will immediately erase the sound, and it will not show any Audio input anymore.

Wrapping Things Up
People’s viewing experiences are greatly influenced by the audio accompanying a video. No matter how wonderful or perfect a video clip is, if the audio playing while watching it is terrible, it may be a very frustrating experience. So, we’ve gone over a few different software options for removing audio from a video file and replacing it with another audio in a couple of moments.
Frequently Asked Questions
How to Insert Audio to Video Clip in Da Vinci Resolve?
There may be times that your video may require the addition of music, background audio, or wooshing sounds.
To begin, open Resolve and import your audio clip:
- Navigate to the “Edit” page.
- Select the tab “Media Pool.”
- Right-click and choose “Import Media” or push “Ctrl + i.”
- Pick your audio clip and browse to your location.
- Select “Open.”
The audio clip is now imported into the “Media Pool.” After that, you’ll need to figure out which part of the audio track you’ll use.
Double-click the audio clip to play it. In the “Source Viewer,” it will appear.
Set the needed audio parts in (press I) and out (press O). Alternatively, if you need the entire soundtrack, there’s no need to set in and out.
Drag & drop the audio track (from the media pool) underneath the video you want to use. It will then add the sound file with the selected portion of the audio. You can now modify the audio to match the visual.
How to Link Your Audio and Video in DaVinci Resolve?
It’s best to link the soundtrack (music, sound effect, or background music) to the relevant video once you’ve adjusted the audio file.
Here’s how to connect audio and video in a timeline:
- Press “Ctrl” or “Cmd” to toggle both the video and audio.
- Right-click and choose “Link Clips.” You may also use the shortcuts “Ctrl + Alt + L” or “Option + Command + L.”
- The sound and visual are now both connected.
Thus, you can rest guaranteed that the audio will follow your movie wherever it goes. There will be no issues with out-of-sync!
How Do You Link Many Audio and Video Files Together in DaVinci Resolve?
Several video and audio segments can be linked together to form a single one. You can rearrange them anywhere in the timeline, and they will not be out of sync.
This is how you connect many clips:
- By holding down the “Ctrl” or “Cmd” key, you can choose all the video and audio clips you want.
- Right-click and choose “Link Clips.” You may also use the shortcut keys “Ctrl + Alt + L” or “Option + Command + L”.
- Now, all your video or audio files are linked together.
Is Any Music Available to Use for Editing?
Understanding copyright law can be complicated. It’s best to use free music for video editing if you don’t want to be accused of copyright violation.
Additionally, you can purchase two licenses to avoid copyright concerns. The producer controls the synchronization license, and the master license to use the song recording is managed by the publishing company.
If you don’t want to go into legal trouble, the only thing you need to remember is never to utilize any illegal video.
Is There Any Free Music in DaVinci Resolve?
DaVinci Resolve does not include any free music; however, it does include royalty-free sound effects noise. To get started, you can download and install the available sound package.
What Software Provides Free Music?
The Audio Collection in Wondershare Filmora has over 50 royalty-free audio tracks for videos, with more to come.
For video production, you can acquire free background music.
In addition, Filmora has 25 sound effects, including animal sounds, video game sounds, and beeps. With Filmora, you may use more advanced editing features like keyframing, background noise elimination, cut, trim, crop, PIP effects, green-screen effects, and more to add free-choice music to your film.
Filmora will enhance the appeal of your video by giving free background music. You may also tweak the background sound, such as speeding up and slowing down, fade-in and fade-out.

- All you have to do with DaVinci Resolve is tap on the chain link in the toolbar above to delete audio from any clip. Alternatively, you may just press down the “ctrl + shift + I” keys to connect and unlink the audio from your clip. Inspect the equalizer after that, and you’re done.

- You can now export the footage on your computer once you’ve finished editing and are pleased with the progress.
Other Alternatives
Suppose you find Da Vinci Resolve very complicated, and you get confused a lot while using it. I prepared a list of a few alternatives that you may use to detach the audio to your videos.
Besides extracting sound from video, the software listed below also has functionality for editing the audio file. Here are some of the most excellent and most popular audio separation and replacement tools:
#1: Wondershare Filmora – Overall Best
It is available on Windows and Mac.
Wondershare Filmora is a popular video editing program used all over the world. Filmora includes all the capabilities that will give you the most outstanding results, whether you’re doing easy video editing, advanced video editing, or even making movies. It also has specific editing features for social media videos.
Follow these steps below, and let’s look at how to detach audio from a video file with Filmora:
- Launch Filmora, then click on File-Import Media and load the video clip to the Media Library, wherein the sound needs to be deleted.

- Drag and drop using the mouse the video clips from the Media Library to the Timeline when it has been imported.
- Click Detach Audio from the context menu of the video file on the timeline.

- The audio will now show on the audio track below in a different format.

- To completely remove the audio file, press on it and simply tap the Delete icon.

You may add a new sound to your video clip in the same manner, you did with the video (import, drag, and drop). Filmora also offers options that enable you to edit and add effects to an audio track.
#2: VSDC Video Editor
It is available on Windows and Mac.
VSDC is a popular video editing program that can handle high-resolution videos such as VR 360-degree, 4K UHD, and 3D films. It also allows users to capture speech and film from the screen and save the material in any format they want. Let’s look at how VSDC can be used to eliminate audio from video:
- Upload the clips you want to edit into VSDC.
- Pick the Properties option from the toolbar by right-clicking on the file with the cursor. A small window will drop down from the right side of the screen.

- You will find a Split to Audio and Video tab at the very bottom of the window; select it.

- On the timeline, the sound will now be divided from the video.

- Erase the audio file by clicking on it. Then, the video is now playable without audio.
VSDC also gives you the option of muting the audio rather than deleting it; however, deleting the audio is preferred.
#3: AudioRemover Tool
It is available on Windows, Mac, and Online.
The AudioRemover Tool is a program that allows you to eliminate audio from any video without having to re-encode it. It is an online service that can be accessed using a browser on Windows and Mac computers. The AudioRemover program can be used by those who do not want to download and install video editing software or just wish to remove audio from video files without additional editing. It can handle any video format, including MP4, MOV, and AVI.
Let’s look at how you can use this application to delete audio:
- Open the online AudioRemover.
- Choose the source video using the Browse tab, then press the Upload Video icon.

- You can save the media files (without audio) once the uploading is finished by clicking the Download File button next to the Completed indication.

This program requires an active connection to the internet, and you cannot upload files larger than 500 MB.
#4: Windows Movie Maker
It is available on Windows.
Because it used to be included in the Windows Essentials software set, Windows Movie Maker is among the most popular accessible editing programs. Let’s have a look at how Movie Maker handles audio extraction.
- Upload the video you want to modify into Windows Movie Maker.

- Create a timeline for the video. Remove audio by right-clicking it (You may also click Detach Audio, and then it will detach the sound from the audio track)

- It will immediately erase the sound, and it will not show any Audio input anymore.

Wrapping Things Up
People’s viewing experiences are greatly influenced by the audio accompanying a video. No matter how wonderful or perfect a video clip is, if the audio playing while watching it is terrible, it may be a very frustrating experience. So, we’ve gone over a few different software options for removing audio from a video file and replacing it with another audio in a couple of moments.
Frequently Asked Questions
How to Insert Audio to Video Clip in Da Vinci Resolve?
There may be times that your video may require the addition of music, background audio, or wooshing sounds.
To begin, open Resolve and import your audio clip:
- Navigate to the “Edit” page.
- Select the tab “Media Pool.”
- Right-click and choose “Import Media” or push “Ctrl + i.”
- Pick your audio clip and browse to your location.
- Select “Open.”
The audio clip is now imported into the “Media Pool.” After that, you’ll need to figure out which part of the audio track you’ll use.
Double-click the audio clip to play it. In the “Source Viewer,” it will appear.
Set the needed audio parts in (press I) and out (press O). Alternatively, if you need the entire soundtrack, there’s no need to set in and out.
Drag & drop the audio track (from the media pool) underneath the video you want to use. It will then add the sound file with the selected portion of the audio. You can now modify the audio to match the visual.
How to Link Your Audio and Video in DaVinci Resolve?
It’s best to link the soundtrack (music, sound effect, or background music) to the relevant video once you’ve adjusted the audio file.
Here’s how to connect audio and video in a timeline:
- Press “Ctrl” or “Cmd” to toggle both the video and audio.
- Right-click and choose “Link Clips.” You may also use the shortcuts “Ctrl + Alt + L” or “Option + Command + L.”
- The sound and visual are now both connected.
Thus, you can rest guaranteed that the audio will follow your movie wherever it goes. There will be no issues with out-of-sync!
How Do You Link Many Audio and Video Files Together in DaVinci Resolve?
Several video and audio segments can be linked together to form a single one. You can rearrange them anywhere in the timeline, and they will not be out of sync.
This is how you connect many clips:
- By holding down the “Ctrl” or “Cmd” key, you can choose all the video and audio clips you want.
- Right-click and choose “Link Clips.” You may also use the shortcut keys “Ctrl + Alt + L” or “Option + Command + L”.
- Now, all your video or audio files are linked together.
Is Any Music Available to Use for Editing?
Understanding copyright law can be complicated. It’s best to use free music for video editing if you don’t want to be accused of copyright violation.
Additionally, you can purchase two licenses to avoid copyright concerns. The producer controls the synchronization license, and the master license to use the song recording is managed by the publishing company.
If you don’t want to go into legal trouble, the only thing you need to remember is never to utilize any illegal video.
Is There Any Free Music in DaVinci Resolve?
DaVinci Resolve does not include any free music; however, it does include royalty-free sound effects noise. To get started, you can download and install the available sound package.
What Software Provides Free Music?
The Audio Collection in Wondershare Filmora has over 50 royalty-free audio tracks for videos, with more to come.
For video production, you can acquire free background music.
In addition, Filmora has 25 sound effects, including animal sounds, video game sounds, and beeps. With Filmora, you may use more advanced editing features like keyframing, background noise elimination, cut, trim, crop, PIP effects, green-screen effects, and more to add free-choice music to your film.
Filmora will enhance the appeal of your video by giving free background music. You may also tweak the background sound, such as speeding up and slowing down, fade-in and fade-out.

- All you have to do with DaVinci Resolve is tap on the chain link in the toolbar above to delete audio from any clip. Alternatively, you may just press down the “ctrl + shift + I” keys to connect and unlink the audio from your clip. Inspect the equalizer after that, and you’re done.

- You can now export the footage on your computer once you’ve finished editing and are pleased with the progress.
Other Alternatives
Suppose you find Da Vinci Resolve very complicated, and you get confused a lot while using it. I prepared a list of a few alternatives that you may use to detach the audio to your videos.
Besides extracting sound from video, the software listed below also has functionality for editing the audio file. Here are some of the most excellent and most popular audio separation and replacement tools:
#1: Wondershare Filmora – Overall Best
It is available on Windows and Mac.
Wondershare Filmora is a popular video editing program used all over the world. Filmora includes all the capabilities that will give you the most outstanding results, whether you’re doing easy video editing, advanced video editing, or even making movies. It also has specific editing features for social media videos.
Follow these steps below, and let’s look at how to detach audio from a video file with Filmora:
- Launch Filmora, then click on File-Import Media and load the video clip to the Media Library, wherein the sound needs to be deleted.

- Drag and drop using the mouse the video clips from the Media Library to the Timeline when it has been imported.
- Click Detach Audio from the context menu of the video file on the timeline.

- The audio will now show on the audio track below in a different format.

- To completely remove the audio file, press on it and simply tap the Delete icon.

You may add a new sound to your video clip in the same manner, you did with the video (import, drag, and drop). Filmora also offers options that enable you to edit and add effects to an audio track.
#2: VSDC Video Editor
It is available on Windows and Mac.
VSDC is a popular video editing program that can handle high-resolution videos such as VR 360-degree, 4K UHD, and 3D films. It also allows users to capture speech and film from the screen and save the material in any format they want. Let’s look at how VSDC can be used to eliminate audio from video:
- Upload the clips you want to edit into VSDC.
- Pick the Properties option from the toolbar by right-clicking on the file with the cursor. A small window will drop down from the right side of the screen.

- You will find a Split to Audio and Video tab at the very bottom of the window; select it.

- On the timeline, the sound will now be divided from the video.

- Erase the audio file by clicking on it. Then, the video is now playable without audio.
VSDC also gives you the option of muting the audio rather than deleting it; however, deleting the audio is preferred.
#3: AudioRemover Tool
It is available on Windows, Mac, and Online.
The AudioRemover Tool is a program that allows you to eliminate audio from any video without having to re-encode it. It is an online service that can be accessed using a browser on Windows and Mac computers. The AudioRemover program can be used by those who do not want to download and install video editing software or just wish to remove audio from video files without additional editing. It can handle any video format, including MP4, MOV, and AVI.
Let’s look at how you can use this application to delete audio:
- Open the online AudioRemover.
- Choose the source video using the Browse tab, then press the Upload Video icon.

- You can save the media files (without audio) once the uploading is finished by clicking the Download File button next to the Completed indication.

This program requires an active connection to the internet, and you cannot upload files larger than 500 MB.
#4: Windows Movie Maker
It is available on Windows.
Because it used to be included in the Windows Essentials software set, Windows Movie Maker is among the most popular accessible editing programs. Let’s have a look at how Movie Maker handles audio extraction.
- Upload the video you want to modify into Windows Movie Maker.

- Create a timeline for the video. Remove audio by right-clicking it (You may also click Detach Audio, and then it will detach the sound from the audio track)

- It will immediately erase the sound, and it will not show any Audio input anymore.

Wrapping Things Up
People’s viewing experiences are greatly influenced by the audio accompanying a video. No matter how wonderful or perfect a video clip is, if the audio playing while watching it is terrible, it may be a very frustrating experience. So, we’ve gone over a few different software options for removing audio from a video file and replacing it with another audio in a couple of moments.
Frequently Asked Questions
How to Insert Audio to Video Clip in Da Vinci Resolve?
There may be times that your video may require the addition of music, background audio, or wooshing sounds.
To begin, open Resolve and import your audio clip:
- Navigate to the “Edit” page.
- Select the tab “Media Pool.”
- Right-click and choose “Import Media” or push “Ctrl + i.”
- Pick your audio clip and browse to your location.
- Select “Open.”
The audio clip is now imported into the “Media Pool.” After that, you’ll need to figure out which part of the audio track you’ll use.
Double-click the audio clip to play it. In the “Source Viewer,” it will appear.
Set the needed audio parts in (press I) and out (press O). Alternatively, if you need the entire soundtrack, there’s no need to set in and out.
Drag & drop the audio track (from the media pool) underneath the video you want to use. It will then add the sound file with the selected portion of the audio. You can now modify the audio to match the visual.
How to Link Your Audio and Video in DaVinci Resolve?
It’s best to link the soundtrack (music, sound effect, or background music) to the relevant video once you’ve adjusted the audio file.
Here’s how to connect audio and video in a timeline:
- Press “Ctrl” or “Cmd” to toggle both the video and audio.
- Right-click and choose “Link Clips.” You may also use the shortcuts “Ctrl + Alt + L” or “Option + Command + L.”
- The sound and visual are now both connected.
Thus, you can rest guaranteed that the audio will follow your movie wherever it goes. There will be no issues with out-of-sync!
How Do You Link Many Audio and Video Files Together in DaVinci Resolve?
Several video and audio segments can be linked together to form a single one. You can rearrange them anywhere in the timeline, and they will not be out of sync.
This is how you connect many clips:
- By holding down the “Ctrl” or “Cmd” key, you can choose all the video and audio clips you want.
- Right-click and choose “Link Clips.” You may also use the shortcut keys “Ctrl + Alt + L” or “Option + Command + L”.
- Now, all your video or audio files are linked together.
Is Any Music Available to Use for Editing?
Understanding copyright law can be complicated. It’s best to use free music for video editing if you don’t want to be accused of copyright violation.
Additionally, you can purchase two licenses to avoid copyright concerns. The producer controls the synchronization license, and the master license to use the song recording is managed by the publishing company.
If you don’t want to go into legal trouble, the only thing you need to remember is never to utilize any illegal video.
Is There Any Free Music in DaVinci Resolve?
DaVinci Resolve does not include any free music; however, it does include royalty-free sound effects noise. To get started, you can download and install the available sound package.
What Software Provides Free Music?
The Audio Collection in Wondershare Filmora has over 50 royalty-free audio tracks for videos, with more to come.
For video production, you can acquire free background music.
In addition, Filmora has 25 sound effects, including animal sounds, video game sounds, and beeps. With Filmora, you may use more advanced editing features like keyframing, background noise elimination, cut, trim, crop, PIP effects, green-screen effects, and more to add free-choice music to your film.
Filmora will enhance the appeal of your video by giving free background music. You may also tweak the background sound, such as speeding up and slowing down, fade-in and fade-out.
Also read:
- Updated In 2024, Do You Want to Know All About Video Frame Rates and Speed? Wondershare Filmora Will Help You to Get More Information on This Matter
- New 2024 Approved Cropping Videos in VLC Step by Step
- Adobe Premiere Pro Download and Use Guide for 2024
- New Are You Looking to Finish Your YouTube Video in Style? The Following Are the Best End Screen Makers to Choose From for 2024
- New In 2024, How to Add VHS Green Screen to Your Video
- New 2024 Approved Video Course and Online Learning Are Very Popular Nowadays. Here We Are Going to Recommend some of the Best Video Websites for Teachers to Use
- New In 2024, Easy Way to Add Effects to Art Video
- In This Article, We Will Discuss What Lens Distortion Is, How It May Be Fixed, and the Factors You Need to Pay Attention to Avoid Lens Distortion when Taking or Recording Videos
- Deleting White Background in Photoshop Is Hard, In 2024
- 10 Best Free GIF Background Remover for PC and Online for 2024
- New How to Brighten a Video in Windows 10 | Step-By-Step Guide for 2024
- 2024 Approved How to Use Lumetri Color in Adobe After Effects
- Updated In 2024, Learn How to Create a Unique Repeated Text Animation in the Filmora Video Editor. Follow the Simple Step-by-Step Instructions
- New How to Denoise in After Effects – Audio and Video Noise Removal for 2024
- New TikTok Slow Zoom | Create Your Slow Zoom TikTok in Minutes for 2024
- New How to Create a DIY Green Screen Video Effect, In 2024
- 2024 Approved Discover the Top Slow Motion Camera App to Use
- New 2024 Approved Everything That You Need to Know About Video Montages- Ideas, Techniques, and Software
- Best Method to Split Video Into Parts Online for 2024
- New In 2024, Shotcut Review – Is It The Best Free Video Editor?
- New Top 8 Augmented Reality Video Games
- In 2024, Do You Want to Blur Faces in Your Videos? Read This Article to Find Out the Easiest Way to Blur the Faces in Videos Using Adobe Premiere Pro
- Updated How to Create Your Own LUTs for Your Video
- Updated How to Rotate a Video in Windows 10
- 2024 Approved Create Photoshop GIFs with Zero Hustle
- Video Editing Tips to Know Before Editing First Draft
- Updated 2024 Approved Easy Way to Add Effects to Art Video
- In 2024, Add Motion Blur in After Effects
- New In 2024, REVIEW Whats Top 10 Software to Make AI Upscaling Video
- New In 2024, Ultimate Guide to Countdown Animation in Videos
- How to Make Video Fade to Black in Movie Maker for 2024
- Updated Create Risograph Effect In Photoshop A Beginners Guide
- Updated Slideshow Makers Are On-Demand as They Come with Multiple Possibilities for Both Professional and Personal Uses. Gradually, the Best Software to Make Slideshows Is Always Welcomed to Save Time and Effort without Compromising the Quality
- New In 2024, Split Videos in the Lightworks Step by Step
- New In 2024, Reversing Time Lapse Videos on iPhone Using Top Applications
- Updated Best 5 GIF to Video Converters You Cant-Miss
- New In 2024, Planning and Storyboarding Is the Most Important Part of Creating a Music Video. Here Are some Easy Tips for Planning and Storyboarding a Music Video in Filmora
- 2024 Approved Top 10 Movie Trailer Voice Generators Windows, Mac, Android, iPhone
- Updated How to Add Background to Video With/Without a Green Screen for 2024
- In 2024, | Top GIF to MP4 Converters
- Updated Turn Your Text Into a Podcast Made Possible
- In 2024, How to Stabilize Videos for Free with Google Photos App
- 2024 Approved Kdenlive Review – Is It The Best Video Editor?
- In 2024, Rootjunky APK To Bypass Google FRP Lock For Vivo X100 Pro
- How do I reset my Infinix Hot 40i Phone without technical knowledge? | Dr.fone
- How to Detect and Stop mSpy from Spying on Your Oppo A56s 5G | Dr.fone
- In 2024, Network Locked SIM Card Inserted On Your Oppo Reno 11 5G Phone? Unlock It Now
- How to Fix My Realme 12 5G Location Is Wrong | Dr.fone
- Gmail Not Working on Tecno Spark Go (2023) 7 Common Problems & Fixes | Dr.fone
- In 2024, Top-Notch Solutions for Disabled Apple ID From Apple iPhone 11 Pro Making It Possible
- The way to get back lost videos from Nokia 130 Music
- How to Change GPS Location on Asus ROG Phone 7 Ultimate Easily & Safely | Dr.fone
- How to Transfer Photos from Motorola Edge 2023 to Laptop Without USB | Dr.fone
- Two Ways to Track My Boyfriends Vivo T2 Pro 5G without Him Knowing | Dr.fone
- In 2024, Set Your Preferred Job Location on LinkedIn App of your Samsung Galaxy M14 5G | Dr.fone
- In 2024, Apple iPhone 14 Plus Backup Password Never Set But Still Asking? Heres the Fix
- How to Bypass Android Lock Screen Using Emergency Call On Vivo Y78 5G?
- Title: Updated 6 Free Tools To Radial Blur Photos Online for 2024
- Author: Morgan
- Created at : 2024-05-19 05:12:52
- Updated at : 2024-05-20 05:12:52
- Link: https://ai-video-editing.techidaily.com/updated-6-free-tools-to-radial-blur-photos-online-for-2024/
- License: This work is licensed under CC BY-NC-SA 4.0.

