
:max_bytes(150000):strip_icc():format(webp)/5-things-to-consider-before-buying-a-gaming-laptop-5235493-145a8c941b9f46e99d9a90bdee387893.jpg)
Updated Add Text Animation to A Video Online
Add Text Animation to A Video Online
Do you want to make a creative video? Do you want your presentation or video to be easy to follow and entertaining? You can take the video to another level with the help of text animation. This article will discuss how to add text animation to online videos. You can use a good video editor from where you can select fresh styles and make the best video from there. One of the simplest ways to elevate your movie from good to excellent is with understandable text animation.
Text animation and short captions can broaden the audience for your content as more consumers view videos without sound these days. It matters what fonts you use in the videos, and they establish the mood and facilitate interaction with most viewers who rely on video captions. Add text, alter the font, add transitions, and use text effects to draw the user’s attention as they scroll. Please continue reading to discover how simple it is to make interactive video titles, words, and supers.
1. Use Kapwing animation text editor
(https://www.kapwing.com/animated-text-video-maker )
You can use the potent online editor Kapwing to add animated text to videos online, utilizing music, videos, GIFs, and images. There are no downloads required because everything is already present inside the browser. Kapwing is a capable tool for content production that is simple enough for everyone to use. The majority of video formats, GIF and image, including avi, png, jpg, gif, MOV, mp4, and more, are supported by Kapwing.
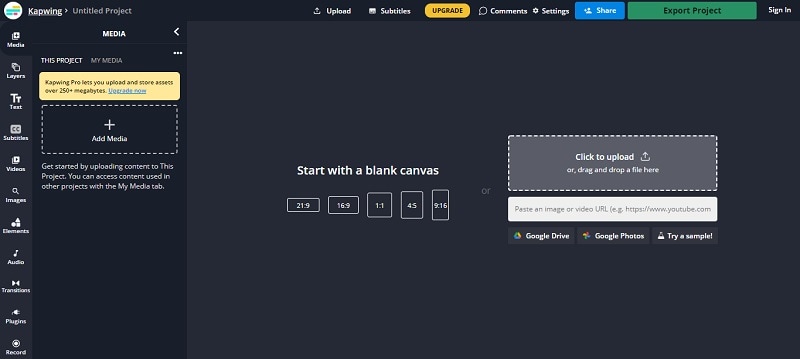
Step1 Upload the Video to Kapwing
You can open Kapwing with the device and tap on “Start Editing” to open up Kapwimg studio. After that, one can use the drag and drop option to upload the video in the studio. You can click on upload or use the link to upload.
If you have a more than 250 MB video, then you will require the Pro version.
Step2 Add the Text
When the video gets uploaded, now you can add your text. You must click the “Text” option on the left and type the text. After that, you can pick your favorite color, background, and color to add style.
You will always want that your text to get animated, but it doesn’t mean that you will have to use explosive fonts or funky or bright, which are very funky. The animation will make your text look attractive, and you can experiment with the colors and fonts to find the best combination.
Step3 Animate the Text
Now the fun part starts; choose the text box present on the right side and click on the “Animate” tab. It will allow the user to select animations like fade, flicker, hue rotates, and many more. Choose the speed according to your requirement, and if you want to change the background and color, you can do it too.
Use “Apply To” for applying this animation in the outro, intro, or both. It will help you to make the text fade out, fade in, or transition out and in with animation. Now the animation library has nine options:
- Drop: It appears on top of the text box
- Flicker: This one is like a candle’s flicker, and text flashes disappear and appear before staying.
- Fade: Opacity can be changed from 0% to 100%.
- Pop:- This grows the text more extensive than the text box and shrinks back to the place.
- Reveal:- Rolls from the left side to the right side
- Wipe:- Rolls from the left side to the right side with a colored background.
- Vibrate: The text box shakes in every direction.
- Hue rotates:- Colour of text cycles through the hue values..
You can use a timeline to adjust the animation’s termination when you set text animation. You can even drag that layer after the start time or use it on end/start time sliders to decrease or increase the time of your video. Text animation can get started when the cursor reaches the start time.
Step4 Export
The video with animated text is now ready to boom. You can click on “Export Video” present at the top and wait for the process. After that, you can download that video and use the links to share it on your social media platform.
2. Use veed.io text video editor
(https://www.veed.io/create/text-video-maker )
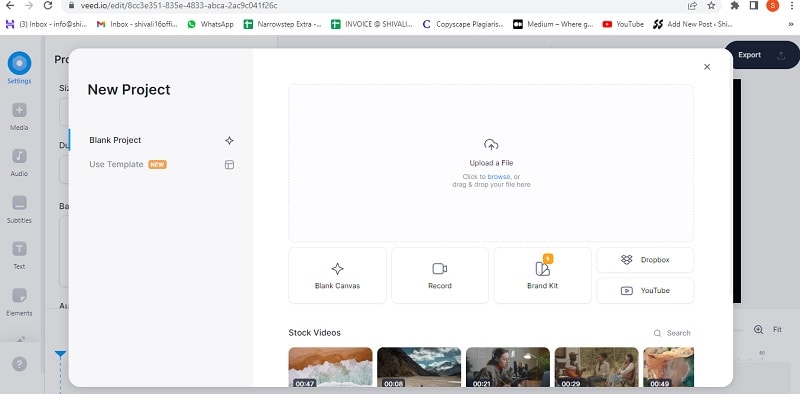
Veed is one of the best video editor text effects online, which allows you to add text to online videos. You can easily add style, color, text, and font in a few clicks. You can upload the video and tap the text to get started. Add title and text or select handwriting font. One can select it from templates. Change transparency, alignment, and font size of the text.
This online software is perfect for creating attractive videos on social media. This is free, which omits the usage of expensive software. It is much easier to avoid many complex video editor apps. With the help of VEED, you can create an excellent video without any experience and do it with a few clicks. Let’s see how to add animated text to photos online.
Step1 Upload the video
Tap on “Choose Video” and choose the file you want to upload on VEED. One can even use the drag and drop option from the folder to the editor.
Step2 Add text
After that, you can add the text by tapping on the “Text” option on the left menu. You can select the text style and start typing.
Step3 Export
Save the video with the text you placed by tapping on “Export.” The video gets saved in an MP4 file.
3. Use Animaker text maker
(https://www.animaker.com/text-animation-maker )
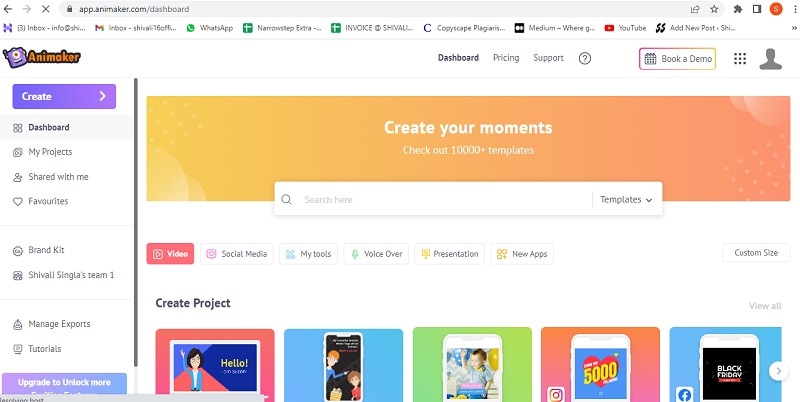
The Animaker is one of the best-animated video makers. This app offers the best collection of charts, BGs, and animated characters. With the help of Animaker, you can make the text disappear or appear off-screen in the best way. After you finish your video, you can download the format in MP4.
Step1 Upload the video clip
First, you can upload your video clip present on top that you wish to add text animation.
- Tap on the “Upload section” on the bottom left. You can upload your video where you wish to add the animated text.
- The video will get uploaded to “My Files.”
- Click on the uploaded video in the library to load it on the workspace.
Step2 Add text to the video
- You can add text in their text section
- In the next section, one can find two different text types. At the top, you will discover plain text options, and at the bottom, you can find pre-designed boxes seasoned at Animaker.
Let’s see how you can use pre-built text boxes.
- Tap on pre-built designs for your text animation. One can see the text appearing in the center of the workspace, and you can click it and type new text if you want to customize it.
- You can notice widespread options appearing with your text. It is known as the item menu. It will allow the user to modify their text. One can change font size, color, style, etc. Your text will come with pre-defined effects, which will help you to animate text instantly.
- You must have noticed that the purple color bar appears on the timeline, representing the duration of the text visible in the video. For example, if you want that text to get visible between 4rth to 8th seconds, then you will have to drag the edges of that purple bar to the same duration.
To see the scene, you must click on the play button on top of the timeline.
Let’s check the other ways of adding animated text to the video. In the previous one, you have seen how you can add text animation using pre-built boxes. Now you will get to know about doing it by using blank boxes.
- Start tapping the “text section”. Select the bank textbox.
- Click on them and then opt to add new text.
- Opt for clicking the cog icon that is there in the item menu.
- You will notice the settings tab that is on the screen’s right side.
- You can easily opt for the customization of the text in the way you wish. You can start by modifying the style of the font. One can change the size and color of the font as well.
- Use these options and opt for the application of enter and/or exit effects to text. Now, opt to click on the effect option to get more than 50 options. You can select the effect from there.
- Once the animation effect is applied to your timeline, you can notice the pink part in the bar i.e. purple. This completes creating text animation by using Animaker.
Step3 Download the Video
- You can visit the publish option in the right window to download the video.
- Tap on the “download video” option for downloading.
Conclusion
Now, you are aware of how to add text animation to video online and the three best video editors that will help you add animated text to your videos. At this point, you can choose the best one according to your needs and usage. These steps will help you create a unique and good video that will be easy to understand and entertaining.
Free Download For Win 7 or later(64-bit)
Free Download For macOS 10.14 or later
Free Download For macOS 10.14 or later
Detailed Tutorial to Rotate Videos in Cyberlink PowerDirector
Video Editing is a craft that is highly dependent on various characteristics of your video. But the way one presents it or goes about filming clips also has a profound effect on the end product. And as you may know, not every aspect of a video production activity always goes without hiccups. But editing can come in clutch as it can easily solve minor problems like skewed footage that was shot at the wrong angle or is upside down (an issue that can happen while using mobile phones).
Thus, with this article, we will be looking at steps to rotate a video in Cyberlink PowerDirector to help you when required. We have also mentioned the steps you will need to follow in Wondershare Filmora.
Note: We documented the steps in this guide with PowerDirector 365 and WonderShare Filmora X.
Steps to Rotate Videos with CyberLink PowerDirector
Put yourself in a situation where you’ve just finished filming a project with your smartphone but end up realizing that the footage isn’t in the right orientation by default. While the error has an easy fix on most smartphones, you can also perform this action with video editing tools.
Also, while this form of rotating might be the most basic implementation of the feature, you can often use the feature to add a dynamic nature to your video with Keyframes.
Definition: Keyframes in Video Editing is a software feature that allows an editor to set start and endpoints (denoted by In and Out Markers), presenting the opportunity to custom clip properties between the two positions. The set changes occur gradually as the playhead continues moving through the clip. Properties that can undergo modification with this method are zoom, rotation, colors, positions, etc.
The process of rotating clips is fairly straightforward; once you have PowerDirector 365 open, follow the steps listed below.
If you do not have CyberLink PowerDirector 365, download the software by visiting Cyberlink’s official website.
Step 1: Create a new video project in Cyberlink PowerDirector 365 and choose Full Mode.

Note: Full Mode in Cyberlink PowerDirector 365 will provide users access to a full-featured video editing tool similar in function to Wondershare Filmora. The other option available is Ad Designer.
Step 2: Now, import media onto the Timeline from the Media Library.
For this guide, we used the pre-existing stock footage in Cyberlink PowerDirector.

Step 3: Now, click on the video file on the Timeline; this will activate the video in the Preview Window. And it will provide you with access to the rotation circle, allowing you to change the orientation of the source file.

EXTRA
Rotation added in the PiP Designer will function as a keyframe-based rotation action. Right-click on the video in the preview window, choose Edit and then Modify to access this menu.

Following this, you can click on the Motion Tab, go into Rotation Settings, and modify the angle with greater precision. In the Preview Window, you will now be able to see the rotating video.

An Easier Way to Crop Video with Wondershare Filmora
Though Cyberlink PowerDirector 365 is a powerful video editing tool, we felt its menus were not as simple to navigate. Accessing the rotate function while available in the forefront, the use of PiP Designer didn’t feel intuitive.
In Wondershare Filmora Video Editor , rotating footage only happens via the Edit Option, and this straightforward approach felt simple. As for those who want to use Keyframes, the integration of this feature right above the Timeline is an appreciated convenience.
This emphasis on quick accessibility is present with almost every function in Filmora, and we believe this to be a significant advantage. The use of modern and unique iconography also increases familiarity, an aspect that will always be welcoming to new and budding creators.
If you do not already have Wondershare Filmora, you can download the software by visiting the official website.
To help you learn how to use the rotate function and show you an example of the easy accessibility in Filmora, here is how you can use the feature to get the output you desire.
For Win 7 or later (64-bit)
For macOS 10.14 or later
Once you have a new project open in Filmora, follow the steps listed below.
Step 1: Import a Media File to edit into your Video Project.

Step 2: Drag the video clip onto the Timeline and then select it with a mouse click to activate further interactions.

Step 3: Choose the Edit Option (marked in Red).
This will bring up the Edit Window in the left-top corner of your screen.

Step 4: Click on the Transform Menu and use the Rotation Slider to edit the orientation.

Having read this stretch of the guide, we believe you may have noticed how Filmora is more user-friendly and accessible due to its menu layout.
BONUS
Click on the Keyframe Button (marked in Green) to access the Keyframe Menu that allows you to set points between which a decided amount of rotation can happen.

The Bottom Line
This marks the end of our guide on how to rotate video in PowerDirector 365 and Wondershare Filmora X. Now, while both software are high-capable tools, we feel the keyframe-based working on rotation in Filmora is a lot more intuitive and easy to use. The ability to only have number-based rotation within the edit menu is also a positive, as rotating with a swivel like in PowerDirector isn’t always the most accurate.
And lastly, the modern iconography-based design of Wondershare Filmora is a factor to keep in mind, as this increases usability manifolds.
Note: Full Mode in Cyberlink PowerDirector 365 will provide users access to a full-featured video editing tool similar in function to Wondershare Filmora. The other option available is Ad Designer.
Step 2: Now, import media onto the Timeline from the Media Library.
For this guide, we used the pre-existing stock footage in Cyberlink PowerDirector.
Step 3: Now, click on the video file on the Timeline; this will activate the video in the Preview Window. And it will provide you with access to the rotation circle, allowing you to change the orientation of the source file.
EXTRA
Rotation added in the PiP Designer will function as a keyframe-based rotation action. Right-click on the video in the preview window, choose Edit and then Modify to access this menu.
Following this, you can click on the Motion Tab, go into Rotation Settings, and modify the angle with greater precision. In the Preview Window, you will now be able to see the rotating video.
An Easier Way to Crop Video with Wondershare Filmora
Though Cyberlink PowerDirector 365 is a powerful video editing tool, we felt its menus were not as simple to navigate. Accessing the rotate function while available in the forefront, the use of PiP Designer didn’t feel intuitive.
In Wondershare Filmora Video Editor , rotating footage only happens via the Edit Option, and this straightforward approach felt simple. As for those who want to use Keyframes, the integration of this feature right above the Timeline is an appreciated convenience.
This emphasis on quick accessibility is present with almost every function in Filmora, and we believe this to be a significant advantage. The use of modern and unique iconography also increases familiarity, an aspect that will always be welcoming to new and budding creators.
If you do not already have Wondershare Filmora, you can download the software by visiting the official website.
To help you learn how to use the rotate function and show you an example of the easy accessibility in Filmora, here is how you can use the feature to get the output you desire.
For Win 7 or later (64-bit)
For macOS 10.14 or later
Once you have a new project open in Filmora, follow the steps listed below.
Step 1: Import a Media File to edit into your Video Project.
Step 2: Drag the video clip onto the Timeline and then select it with a mouse click to activate further interactions.
Step 3: Choose the Edit Option (marked in Red).
This will bring up the Edit Window in the left-top corner of your screen.
Step 4: Click on the Transform Menu and use the Rotation Slider to edit the orientation.
Having read this stretch of the guide, we believe you may have noticed how Filmora is more user-friendly and accessible due to its menu layout.
BONUS
Click on the Keyframe Button (marked in Green) to access the Keyframe Menu that allows you to set points between which a decided amount of rotation can happen.
The Bottom Line
This marks the end of our guide on how to rotate video in PowerDirector 365 and Wondershare Filmora X. Now, while both software are high-capable tools, we feel the keyframe-based working on rotation in Filmora is a lot more intuitive and easy to use. The ability to only have number-based rotation within the edit menu is also a positive, as rotating with a swivel like in PowerDirector isn’t always the most accurate.
And lastly, the modern iconography-based design of Wondershare Filmora is a factor to keep in mind, as this increases usability manifolds.
Best 5 AI Music Video Examples and Makers to Make Them
Best 5 AI Music Video Examples and Makers to Make Them
An easy yet powerful editor
Numerous effects to choose from
Detailed tutorials provided by the official channel
Music videos are an excellent combination of interesting videos and music files and with double entertainment, the efforts to make these videos are also double. Creating and editing these tools manually is not only a tedious but also time-consuming task and to help with this there are an array of music video maker tools and software available. With the advancement in technology these days, a lot of tools, companies, and setups are also creating versatile AI-generated videos which are a treat to eyes as well as ears. To learn more about these AI music video and creation tools, this article will be a great read.

In this article
01 [Some Interesting Examples Of AI Music Videos](#Part 1)
02 [Top 5 Music Video Makers](#Part 2)
Part 1 Some Interesting Examples Of AI Music Videos
The AI generated music video are getting the attention of a lot of users these days and if you too are keen to check out some of these files, check out the list below of YouTube music ai files.
Part 2 Top 5 Music Video Makers
To help you create music videos in a hassle-free manner and like a pro, several music video makers are available. We have shortlisted the list of popular 5 as below.
01**Wondershare Filmora Video Editor **
This is one of the best tools for creating a music video on your Windows and Mac systems. Quick to download, the program comes with several features that can be further customized for creating your desired footage. The drag and drop function further make the task quick and easy. To ensure that along with customized videos, the audio quality is also great, the software support functions like automatic audio sync, audio compression, audio equalizer, and more. For video editing, you can add transitions, filters, effects, and many other elements. By the way, now, you can generate music for commercial use and seamlessly select sound effects with Filmora’s filtering features. The interface is simple and user-friendly which makes the software apt for beginners as well as pros.

02Rotor Videos
This is an online music video-making service that can help you create your desired music videos within your budget. The process of creating the footage is simple where you just need to add and upload your music file, select the video clips that go with the theme of the audio, add the lyrics, and then finally process. The video will be ready and can be downloaded for further use. The tool is capable of analyzing the tempo, beat, and other elements of the music file and if needed you can also pay for accessing the video stock collection.

04VideoFX Music Video Maker
This is an Android-based app developed by FuzeBits Inc that allows the creation of interesting music videos. Using the app, you can also record the lip-sync music and then customize it using over 50 filters like neon, mirror, thermal, and more. Preset shooting modes – fast motion, auto-pause, and stop motion is also sorted. Other editing functions include stickers, text, filters, and more.

05Mixxx
This is an interesting tool for creating professional-looking music videos using its advanced features. With the drag and drop function, using the tool becomes very easy and it supports the function where the places on the track can be marked using the Hot Keys. The tempo of the song can also be changed by controlling the pitch and its complete music mixer will let you create awesome DJ-type tracks.

● Ending Thoughts →
● Music videos are everywhere on digital media platforms and used for entertainment, promotion, and all other tasks.
● The latest technology has taken these videos to another level by creating AI-generated music videos.
● Several music video maker tools, apps, and software are available, and depending on what are your requirements, a selection can be done.
Music videos are an excellent combination of interesting videos and music files and with double entertainment, the efforts to make these videos are also double. Creating and editing these tools manually is not only a tedious but also time-consuming task and to help with this there are an array of music video maker tools and software available. With the advancement in technology these days, a lot of tools, companies, and setups are also creating versatile AI-generated videos which are a treat to eyes as well as ears. To learn more about these AI music video and creation tools, this article will be a great read.
In this article
01 [Some Interesting Examples Of AI Music Videos](#Part 1)
02 [Top 5 Music Video Makers](#Part 2)
Part 1 Some Interesting Examples Of AI Music Videos
The AI generated music video are getting the attention of a lot of users these days and if you too are keen to check out some of these files, check out the list below of YouTube music ai files.
Part 2 Top 5 Music Video Makers
To help you create music videos in a hassle-free manner and like a pro, several music video makers are available. We have shortlisted the list of popular 5 as below.
01**Wondershare Filmora Video Editor **
This is one of the best tools for creating a music video on your Windows and Mac systems. Quick to download, the program comes with several features that can be further customized for creating your desired footage. The drag and drop function further make the task quick and easy. To ensure that along with customized videos, the audio quality is also great, the software support functions like automatic audio sync, audio compression, audio equalizer, and more. For video editing, you can add transitions, filters, effects, and many other elements. By the way, now, you can generate music for commercial use and seamlessly select sound effects with Filmora’s filtering features. The interface is simple and user-friendly which makes the software apt for beginners as well as pros.
02Rotor Videos
This is an online music video-making service that can help you create your desired music videos within your budget. The process of creating the footage is simple where you just need to add and upload your music file, select the video clips that go with the theme of the audio, add the lyrics, and then finally process. The video will be ready and can be downloaded for further use. The tool is capable of analyzing the tempo, beat, and other elements of the music file and if needed you can also pay for accessing the video stock collection.
04VideoFX Music Video Maker
This is an Android-based app developed by FuzeBits Inc that allows the creation of interesting music videos. Using the app, you can also record the lip-sync music and then customize it using over 50 filters like neon, mirror, thermal, and more. Preset shooting modes – fast motion, auto-pause, and stop motion is also sorted. Other editing functions include stickers, text, filters, and more.
05Mixxx
This is an interesting tool for creating professional-looking music videos using its advanced features. With the drag and drop function, using the tool becomes very easy and it supports the function where the places on the track can be marked using the Hot Keys. The tempo of the song can also be changed by controlling the pitch and its complete music mixer will let you create awesome DJ-type tracks.
● Ending Thoughts →
● Music videos are everywhere on digital media platforms and used for entertainment, promotion, and all other tasks.
● The latest technology has taken these videos to another level by creating AI-generated music videos.
● Several music video maker tools, apps, and software are available, and depending on what are your requirements, a selection can be done.
How to Use Frame Blending in Adobe Premiere Pro
Create High-Quality Video - Wondershare Filmora
An easy and powerful YouTube video editor
Numerous video and audio effects to choose from
Detailed tutorials are provided by the official channel
Frame blending is a video editing technique used to create smooth transitions between two video frames. This process is often used to create special effects or transition between two different video clips. Frame blending can be done manually or with the help of software.
When frame blending is done manually, the editor will take two consecutive frames and blend them. This is done by using a process called cross-fading. Cross-fading is when the first frame gradually fades out while the second frame gradually fades in. The result is a seamless transition between the two frames.
Frame blending can also be done with the help of software. Many software programs offer frame blending capabilities Like Adobe Premiere Pro and more. These software programs typically have a user interface that allows the user to select the two frames that they want to blend. The software will then perform the cross-fading process automatically.

In this article
01 What is frame blending in Premiere Pro?
02 How to Choose from Frame Blending/ Frame Sampling/ Optical Flow
03 How to use Frame Blanding in Adobe Premiere Pro?
What is frame blending in Premiere Pro?
In Adobe Premiere Pro, frame blending is a built-in feature that can be used to create smooth transitions between two video frames. This feature can be accessed by selecting the “Effects” tab and choosing the “Frame Blending” option.
When using frame blending in Premiere Pro, the user will first need to select the two frames they want to blend. The user can then specify the amount of cross-fade they want to apply. The software will then automatically perform the frame blending process.

How to Choose from Frame Blending/ Frame Sampling/ Optical Flow
The different types of frame blending are:
- Frame Sampling: best for smooth movements, no image distortion.
- Optical Flow: smoother results but can cause image distortion.
- Frame Blending: a mix of the two, some image distortion but smoother results.
So, choosing which type of frame blending to use depends on the footage and the desired results. If you want smooth results with no image distortion, frame sampling is the best option. However, if you don’t mind some image distortion in exchange for smoother results, optical flow or frame blending would be better choices.
How to decide which option is the best for your use? Let’s explain more, and It depends on the footage and the desired results. If you want smooth results with no image distortion, frame sampling is the best option. However, if you don’t mind some image distortion in exchange for smoother results, optical flow or frame blending would be better choices.

How to use Frame Blanding in Adobe Premiere Pro?
Step 1\
Using frame blending in Adobe Premiere Pro is a simple process. First, the user will need to select the two frames that they want to blend. The user can then specify the amount of cross-fade they want to apply. The software will then automatically perform the frame blending process.
Open up Adobe Premiere Pro and load the two frames that you want to blend to get started. Once the frames are loaded, select the “Effects” tab and then choose the “Frame Blending” option.
Step 2\
Next, select the two frames that you want to blend. You can perform this by clicking on the first frame and then holding down the “Shift” key while clicking on the second frame.
Once the two frames are selected, specify the amount of cross-fade that you want to apply. You can do this by adjusting the “Crossfade Duration” slider. The software will then automatically perform the frame blending process.

Frame blending is a simple and effective way to create smooth transitions between two video frames. This technique can create a variety of different effects, such as dissolves, fades, and more. Frame blending is a built-in feature in Adobe Premiere Pro and can be accessed by selecting the “Effects” tab and then choosing the “Frame Blending” option. To use frame blending, simply select the two frames you want to blend and specify the amount of cross-fade you want to apply. The software will then automatically perform the frame blending process.
You can also consider Filmora for Blending Frame
Filmora is a video editing software that allows you to create, edit, and export videos. The software includes various features, such as the ability to add text, transitions, and effects. You can also use Filmora to create titles, lower thirds, etc.
How to use Filmora?
To use Filmora, simply load the video you want to edit and make the changes you want. Once you’re happy with the results, export the video, and it will be saved in the format of your choice.
How to use Frame Blending in Filmora?
There are things to keep in mind when using frame blending in Filmora.
First, the software only supports AVI and WMV files. Second, the frame blending feature is only available in the paid version of the software. Lastly, frame blending can only be used on two video frames at a time.
The video is made up of distinct layers blended together to create a unique and appealing look. There is a craft of making a running frame out of more than one video or picture. Even though the technique is considerably older, and individuals undertake it with much work, it has recently become simpler. We now have the easier method of combining two or more clips in a single frame, which we term Blend Modes.

How to composite with blending modes?
- Choose the videos and effects that you wish to overlay.
- Double-click the overlay clip on the timeline to view and adjust the video options for the split-screen effect.
- Go to the Compositing section and choose Blending Mode from the drop-down menu to apply an effect. Select Screen from the drop-down menu if you’d like to overlay an effect over a video.
Frame blending is a simple and effective way to create smooth transitions between two video frames. This technique can create a variety of different effects, such as dissolves, fades, and more. Frame blending is a built-in feature in Filmora and can be accessed by loading the video you want to edit and then making the changes you want. Once you’re happy with the results, export the video, and it will be saved in the format of your choice.
Advance features in Filmora 11
The latest version of Filmora (11.2.1) includes several new and improved features, such as:
- The ability to add textured background images
- An updated user interface
- A wider variety of title templates
- More video and audio effects
- Improved performance and stability
Filmora is a good choice for video editors who want to do more with their software. The program contains all of the essential functions of a video editor, such as the ability to add text, transitions, and effects. In addition, Filmora also includes some more advanced features, such as the ability to add textured background images and the ability to create titles, lower thirds, and more.
For Win 7 or later (64-bit)
For macOS 10.12 or later
Conclusion
● Frame blending is a simple and effective way to create smooth transitions between two video frames. This technique can be used to create a variety of different effects, such as dissolves, fades, and more. Frame blending is a built-in feature in Filmora and can be accessed by loading the video you want to edit and then making the changes you want. Once you’re happy with the results, export the video, and it will be saved in the format of your choice.
Frame blending is a video editing technique used to create smooth transitions between two video frames. This process is often used to create special effects or transition between two different video clips. Frame blending can be done manually or with the help of software.
When frame blending is done manually, the editor will take two consecutive frames and blend them. This is done by using a process called cross-fading. Cross-fading is when the first frame gradually fades out while the second frame gradually fades in. The result is a seamless transition between the two frames.
Frame blending can also be done with the help of software. Many software programs offer frame blending capabilities Like Adobe Premiere Pro and more. These software programs typically have a user interface that allows the user to select the two frames that they want to blend. The software will then perform the cross-fading process automatically.
In this article
01 What is frame blending in Premiere Pro?
02 How to Choose from Frame Blending/ Frame Sampling/ Optical Flow
03 How to use Frame Blanding in Adobe Premiere Pro?
What is frame blending in Premiere Pro?
In Adobe Premiere Pro, frame blending is a built-in feature that can be used to create smooth transitions between two video frames. This feature can be accessed by selecting the “Effects” tab and choosing the “Frame Blending” option.
When using frame blending in Premiere Pro, the user will first need to select the two frames they want to blend. The user can then specify the amount of cross-fade they want to apply. The software will then automatically perform the frame blending process.
How to Choose from Frame Blending/ Frame Sampling/ Optical Flow
The different types of frame blending are:
- Frame Sampling: best for smooth movements, no image distortion.
- Optical Flow: smoother results but can cause image distortion.
- Frame Blending: a mix of the two, some image distortion but smoother results.
So, choosing which type of frame blending to use depends on the footage and the desired results. If you want smooth results with no image distortion, frame sampling is the best option. However, if you don’t mind some image distortion in exchange for smoother results, optical flow or frame blending would be better choices.
How to decide which option is the best for your use? Let’s explain more, and It depends on the footage and the desired results. If you want smooth results with no image distortion, frame sampling is the best option. However, if you don’t mind some image distortion in exchange for smoother results, optical flow or frame blending would be better choices.
How to use Frame Blanding in Adobe Premiere Pro?
Step 1\
Using frame blending in Adobe Premiere Pro is a simple process. First, the user will need to select the two frames that they want to blend. The user can then specify the amount of cross-fade they want to apply. The software will then automatically perform the frame blending process.
Open up Adobe Premiere Pro and load the two frames that you want to blend to get started. Once the frames are loaded, select the “Effects” tab and then choose the “Frame Blending” option.
Step 2\
Next, select the two frames that you want to blend. You can perform this by clicking on the first frame and then holding down the “Shift” key while clicking on the second frame.
Once the two frames are selected, specify the amount of cross-fade that you want to apply. You can do this by adjusting the “Crossfade Duration” slider. The software will then automatically perform the frame blending process.
Frame blending is a simple and effective way to create smooth transitions between two video frames. This technique can create a variety of different effects, such as dissolves, fades, and more. Frame blending is a built-in feature in Adobe Premiere Pro and can be accessed by selecting the “Effects” tab and then choosing the “Frame Blending” option. To use frame blending, simply select the two frames you want to blend and specify the amount of cross-fade you want to apply. The software will then automatically perform the frame blending process.
You can also consider Filmora for Blending Frame
Filmora is a video editing software that allows you to create, edit, and export videos. The software includes various features, such as the ability to add text, transitions, and effects. You can also use Filmora to create titles, lower thirds, etc.
How to use Filmora?
To use Filmora, simply load the video you want to edit and make the changes you want. Once you’re happy with the results, export the video, and it will be saved in the format of your choice.
How to use Frame Blending in Filmora?
There are things to keep in mind when using frame blending in Filmora.
First, the software only supports AVI and WMV files. Second, the frame blending feature is only available in the paid version of the software. Lastly, frame blending can only be used on two video frames at a time.
The video is made up of distinct layers blended together to create a unique and appealing look. There is a craft of making a running frame out of more than one video or picture. Even though the technique is considerably older, and individuals undertake it with much work, it has recently become simpler. We now have the easier method of combining two or more clips in a single frame, which we term Blend Modes.
How to composite with blending modes?
- Choose the videos and effects that you wish to overlay.
- Double-click the overlay clip on the timeline to view and adjust the video options for the split-screen effect.
- Go to the Compositing section and choose Blending Mode from the drop-down menu to apply an effect. Select Screen from the drop-down menu if you’d like to overlay an effect over a video.
Frame blending is a simple and effective way to create smooth transitions between two video frames. This technique can create a variety of different effects, such as dissolves, fades, and more. Frame blending is a built-in feature in Filmora and can be accessed by loading the video you want to edit and then making the changes you want. Once you’re happy with the results, export the video, and it will be saved in the format of your choice.
Advance features in Filmora 11
The latest version of Filmora (11.2.1) includes several new and improved features, such as:
- The ability to add textured background images
- An updated user interface
- A wider variety of title templates
- More video and audio effects
- Improved performance and stability
Filmora is a good choice for video editors who want to do more with their software. The program contains all of the essential functions of a video editor, such as the ability to add text, transitions, and effects. In addition, Filmora also includes some more advanced features, such as the ability to add textured background images and the ability to create titles, lower thirds, and more.
For Win 7 or later (64-bit)
For macOS 10.12 or later
Conclusion
● Frame blending is a simple and effective way to create smooth transitions between two video frames. This technique can be used to create a variety of different effects, such as dissolves, fades, and more. Frame blending is a built-in feature in Filmora and can be accessed by loading the video you want to edit and then making the changes you want. Once you’re happy with the results, export the video, and it will be saved in the format of your choice.
Also read:
- New 2024 Approved Explore the Potential of Slow-Motion Video for Different Industries. Read This Guide and Choose the Best Slow-Motion Camera App to Create Stunning Videos
- Updated 2024 Approved How to Make a GIF With Transparent Background?
- New In 2024, General Knowledge About MP4 Format and Best MP4 Video Editor
- 2024 Approved Top Applications That Can Help Apply The Best VHS Camera Effect
- 2024 Approved Kdenlive Is a Free, Open-Source Video Editing Software Application. Kdenlive Is a Powerful Video Editor that Can Be Used to Create Professional-Quality Videos
- New In 2024, Boost Your Spirit Creating Motivational Status Videos
- Updated In 2024, How to Create Chroma Key Written Text Effects in Filmora
- Updated How to Make a PowerPoint Looping Slideshow
- New 2024 Approved This Article Introduce You the Best Video Trimmers to Use on Different Devices, Check Them Out and Choose Your Favoriate One
- New How to Add Selective Color Effect to Your Videos
- Updated Learn How to Effectively Use Masking in After Effects with This Comprehensive Guide. Includes Step-by-Step Instructions and an Alternative Masking Technique
- Updated In 2024, How to Use Zoom in Google
- New In 2024, Perfecting the Art of Slowing Down Video on Instagram
- New With Looping Videos, People Stay on Your Site Longer, Boosting Engagement. With Video Being Watched on Mobile over 3X More than Any Other Content, Its an Essential Part of Mobile Advertising for 2024
- In 2024, Make A Countdown Video
- New Top List The Best Slow Motion Video Editors Available for 2024
- Updated Discover the Top 10 Video Editing Apps with Templates for Professional-Grade Results. Edit Like a Pro with These Tools
- In 2024, How To Quick Guide for Creating Google Slideshows
- In 2024, Best Ideas on Using Green Screen with Filmora
- 2024 Approved How to Do Perfect Match Paint 100 the Simple Way
- 2024 Approved AI Features of Wondershare Filmora - Silence Detection in Videos
- New 2024 Approved Before & After Editing Trick | Wondershare Filmora Tutorial
- New 2024 Approved How Does Sonys S&Q Feature Help Recording Slow-Motion Video
- Updated 2024 Approved 4 Simple Methods for Making a High-Quality Recap Video
- New 2024 Approved Wondershare Filmora Has Introduced a New Feature - AI Portrait Effect that You Can Use to Remove Background From Various Videos and Images. Explore the Uses, Benefits, and Real-Life Scenarios of This Feature in a Comprehensive Guide
- New Detailed Guide to Rotate Videos in Blender for 2024
- New In 2024, How to Add Green Screen Effects In Phhotoshop
- Updated REVIEW Whats Best 10 Software to Make AI Upscaling Video
- New In 2024, Find a Solution for Effortless Sky Replacement Photoshop in This Comprehensive Guide. Also, Use the Easiest Video Editing Tool to Make Your Media Stunning
- New 2024 Approved Fun & Easy Masking Tricks Wondershare Filmora Tutorial
- Updated 2024 Approved Do You Have the Habit to Create Subtitle for Your Video? You Can Always Add Open and Close Subtitles to Your Video to Make It Perfect. Follow This Article to Learn More About It
- New 11 Tips to Make Product Ad Videos
- Updated 2024 Approved Looking for the Different Ar Video Effects to Include in Your Film? Check Out This Article for the Best 10 Augmented Reality Effects and the Fun Ar Effects in Filmora
- Updated In 2024, Best Cinematic LUTs For Premiere Pro Recommendation
- New In 2024, 5 Tips for Faster Editing in Filmora
- Updated Learn Color Correction in After Effects with These YouTube Videos
- New In 2024, Looking for the Ways by Which Subtitles Can Be Extracted From Your MKV Files without Affecting the File Quality? Look No Further as We Are Here to Help You Know the Best Tools that Can Easily Extract SRT From MKV
- 2024 Approved A Review On 3D LUT Creator
- New In 2024, How To Fade Audio In Kinemaster
- Updated In 2024, IMovie Review – Is It The Best Video Editor for Mac Users
- New 2024 Approved Want to Make a Fun and Cinematic Video with an Introductory Text Title? Learn the Stages of Editing with Filmora for This Effect Here
- Updated In 2024, Do You Know You Can Add LUTs for Cinematic Color Grading on Your Smartphones? With VN Editor You Can, You Can Add LUTs. Choose the Option VN LUTs Free Download
- A Detailed VPNa Fake GPS Location Free Review On Realme V30 | Dr.fone
- Spotify Keeps Crashing A Complete List of Fixes You Can Use on Vivo X Flip | Dr.fone
- Getting the Pokemon Go GPS Signal Not Found 11 Error in Realme 12+ 5G | Dr.fone
- In 2024, How to Unlock Poco Bootloader Easily
- In 2024, How to Change/Fake Your Samsung Galaxy A14 5G Location on Viber | Dr.fone
- Pokemon Go Error 12 Failed to Detect Location On Vivo Y100i Power 5G? | Dr.fone
- iCloud Unlocker Download Unlock iCloud Lock for your Apple iPhone 12 Pro
- In 2024, Easy Guide How To Bypass Itel FRP Android 10/11/12/13
- In 2024, CatchEmAll Celebrate National Pokémon Day with Virtual Location On Samsung Galaxy M14 4G | Dr.fone
- How to Reset Oppo Reno 11F 5G Without the Home Button | Dr.fone
- How to Unlock Nubia Red Magic 9 Pro Pattern Lock if Forgotten? 6 Ways
- Title: Updated Add Text Animation to A Video Online
- Author: Morgan
- Created at : 2024-05-19 05:11:51
- Updated at : 2024-05-20 05:11:51
- Link: https://ai-video-editing.techidaily.com/updated-add-text-animation-to-a-video-online/
- License: This work is licensed under CC BY-NC-SA 4.0.
