
:max_bytes(150000):strip_icc():format(webp)/TheOscarsStatue-33f6c30d7ffd4694a4dd1d1113de57f5.jpg)
Updated Adjust the TikTok Videos Length to Make Them Captivating
Adjust the TikTok Videos Length to Make Them Captivating
While shouting a TikTok video, sometimes uninvited people jump in the clip from nowhere. It is time taking and a wastage of energy to capture the video again from the start. Can you adjust the TikTok clip length? For sure, it is possible to change the video’s length and trim out unnecessary parts. But the question is how to adjust the length of clips on TikTok.
You can use TikTok’s built-in function to change the length of a video clip or use a third-party application. Making such adjustments will also help you to match the video length according to the duration of the added song. The following article will help you learn how to adjust the length of clips on TikTok and with the best third-party TikTok video editor.

Part 1. How to Adjust the Length of Uploaded Clips on TikTok
Mostly lengthy videos are scarcely watched, limiting the likes count on your TikTok video. For such reason, you should maintain the length of the TikTok video such that it is neither too short nor too long. You can easily create a concise video full of entertainment on TikTok by following the below given two methods:
Method 1: Use the In-Built Function to Adjust the Draft Video’s Length Directly
In this part of the article, you will learn how to adjust the length of clips on TikTok by using its built-in feature**:**
Step 1: Open the TikTok app on your mobile phone and press the “Profile” icon lying in the bottom toolbar. Access the TikTok drafts and select the draft whose length you want to adjust.

Step 2: Hit the “Edit” icon present at the first position of the right panel. Select the video present in the timeline and drag it to the required length using the sliders. After adjusting the length of the video, tap on the “Save” button and upload your TikTok video.

Method 2: How to Adjust the Length When Recording
Do you want to adjust the length of the TikTok video before recording it? It is possible to do that task by following the simple steps present underneath:
Step 1: Launch the TikTok application on your smartphone and hit the “Plus” icon. After the camera of TikTok opens, select the video length range by pressing the options available like 15s, 60s, 3m, and 10m options.

Step 2: Thereafter, press the “Capture” button available in red color. Your recording will automatically stop once the selected time gets completed. You can also use filters, a flashlight, beauty effects, a flip screen, and many other features for your recording.

Step 3: Afterwards, press the “Tick” icon and then the “Next” button. Now, you can use the hashtag and mention option to add a description to your video. Finally, press the “Post” icon to share the TikTok video with followers.

Part 2. Using The Third-party Tool to Adjust the Length Before Uploading to TikTok
The above-given steps are helpful in adjusting the clip length on TikTok, but what if TikTok does not support your created video? Yes, there are chances that the video you have created for TikTok cannot be uploaded straight away, mostly because the video length is too large.
For such a situation, it is best to adjust the length of the video according to the requirement of TikTok with a powerful mobile video called Wondershare Filmora .
Steps to Adjust the Length of Video Using Filmora
Filmora is a third-party app that can be used for editing videos in different styles. From this powerful application, you can adjust the length of the video in no time. In the following steps, you will know the procedure for adjusting the video length using Wondershare Filmora:
Step 1: Download Filmora on your Smartphone
Download Filmora mobile app and launch it on your smartphone. Tap the “New Project” and allow access to photos. Now select the TikTok clip by tapping on it. Hit the “Import” button to import it successfully on Filmora.

Step 2: Adjust the Video Length
Use the “Split” feature to adjust the video length. For that, select the video present in the timeline and drag it to the required length by keeping an eye on the length scale present above the timeline.

Step 3: Complete the Process and Upload
Select the part you want to remove and then press the “Delete”’ icon. After completing the process, hit the “Export” button and then post it on TikTok.

Bonus Tip: Requirements and Specifications of TikTok Video
If you are confused about the details related to the TikTok video specifications, then look at the following specs table:
| Resolution | 1080 x 1920 px |
|---|---|
| Aspect Ration | 9:16 (Recommended) |
| File Format | MP4 or MOV |
| Video Length | 15s, 60s, 3m, or 10m |
Part 3. The Common Reasons If You Can’t Adjust the Length of TikTok Video
Hope the above part will prove helpful to you in terms of adjusting the TikTok video using Wondershare Filmora. Now, let’s see what the common reasons which hinder users from adjusting the length of TikTok Videos are:
1. The Video is Too Short
Most TikTok users worry about why they can’t adjust TikTok clip length. The common reason behind this query is the short length of the video. If your video length is 3 seconds, then it would not be possible to shorten it further on TikTok. Thus, try to make a Video of at least 15 seconds to upload it on TikTok successfully.
2. The Video is Too Long
If you have recorded a too-long video, it would not be possible to adjust its length on TikTok. Too long videos, especially more than 10 minutes, are less likely to be modified by TikTok. For that, you can take the help of Filmora to adjust its size. Filmora will trim the video to a suitable length within seconds.
3. Using Green Screen or Other Incompatible Effects
Sometimes people use those effects in videos that are difficult to edit. For example, using a green screen creates some technical issues in your video, which gets weirder when you try to adjust the length of such a video. Due to this, proper adjustments in such videos are difficult to do on TikTok.
4. App Glitch
As many people are engaged in using TikTok, so sometimes the app slows down. It becomes pretty difficult to adjust the length of TikTok videos when the app shows glitches. However, on Filmora, the case is totally the opposite. You will never face any difficulty, no matter how many users are using it.
download filmora app for ios ](https://app.adjust.com/b0k9hf2%5F4bsu85t ) download filmora app for android ](https://app.adjust.com/b0k9hf2%5F4bsu85t )
Conclusion
From the above discussion, it is clear how to adjust the length of clips on TikTok and Filmora. Without a second thought, Filmora is the best application for trimming video size. Apart from size adjustment, it can also make other desirable changes to the TikTok video.
This video editing application is fast and free of bugs, thus allowing you to perform edits in no time. So, download Wondershare Filmora today on your smartphone and stand out on TikTok.
Things You Need to Know About Color Grading in Photography
Create High-Quality Video - Wondershare Filmora
An easy and powerful YouTube video editor
Numerous video and audio effects to choose from
Detailed tutorials provided by the official channel
Have you recognized how flat your images look when you take them with your camera? While the scenery may be beautiful and your photography skills may be amazing, there’s always something missing. That “thing” is color grading, and that may be why your favorite superstar’s pictures appear better than yours. You can color grade your videos to produce the same effect too.
Color grading photography refers to a post-production process that improves your images by altering their color. The result of an excellent color grading process is an image that looks more appealing and refined. It’s what gives a picture some professional touch.
If you want to learn more about color grading photography, this article will let you in on all you need to know. From essential color grading steps to terms, tools, etc., you can begin your journey to cool and exciting images after reading.
In this article
01 Don’t Confuse Color Grading With Color Correction
03 Common Steps To Color Grade a Photo
04 Tips For Color Grading Photography
Don’t Confuse Color Grading With Color Correction
The first way to fully appreciate color grading is by differentiating it from its closest term—color correction. Many people use both of them interchangeably, and that’s wrong. Although color grading and color correction are post-production processes that enhance image colors, they perform different roles.
Here’s how to differentiate color grading from color correction:
| Differentiating Factor | Color Grading ; | Color Correction |
|---|---|---|
| Definition | Color grading is a process that enhances an image’s color by stylizing or giving it a cinematic appearance. | Color correction is a process that adjusts color mistakes in an image by giving it a consistent appearance. This process balances colors by adjusting whites and blacks. |
| Purpose | The primary aim of color grading an image is to evoke specific emotions in the viewers. Color grading leverages the emotional and psychological effects of colors to manipulate the viewers’ moods. You can use color grading to give your images different tones or themes like fear, femininity, youthfulness, passion, anger, sadness, etc. | Unlike color grading, the color correction does very little in setting the tone or mood that an image carries. Instead, it corrects specific mistakes in the image to make it look as natural to the human eyes as possible. Generally, camera lenses and the human eyes view pictures differently. Color correction changes a photo’s look to make it more appealing to humans than the camera. It makes black colors appear darker and adds more white to whites to create the desired effect. |
| Stage in the production process | Color grading typically comes after color correction in the post-production process. That’s because the effects of color grading are more appealing on a color-corrected picture. | Color correction comes before color grading. This process does the major work of balancing colors and correcting errors. Color grading only fine-tunes what color correction has done, giving it a professional finish. |
| Example | One of the most obvious examples of color grading is in motion pictures. For example, Sci-Fi movies typically have a very saturated blue color. However, you will notice a little redder in romantic movies. Note that filmmakers can use different color grades in movies to draw attention to specific details or represent changes in the storyline. Color grading produces the same effects in pictures. | Color correction is most prominent in documentaries to make pictures and videos look more real to the human eye. Other times, color corrections just adjust one color to merge the rest of the image or video. |

Terms and Tools Used In Color Grading
These are the most common terminologies photo editors use when color grading an image:
● Hue
Hue is the general name for describing pure color. That means it defines color without alluding to its brightness, vividness, etc. It describes a color’s position in the color wheel.
● Saturation
When a photo editor talks about saturation, they refer to the hue concentration that defines a specific color. Saturation describes color shades and focuses on how colorful they are. Examples of colors with zero saturation are white, black, and grey.

● Luminance
Luminous describes how bright, well-lighted or dark a color is. Highlights, mids, and shadows can influence luminance.

● Additive Color
Additive colors are non-primary colors. However, they typically result from mixing primary colors (blue, red, green).
● Color Cast
Color cast means that the image’s coloring doesn’t look as natural as it should be. This usually happens when different light sources get mixed.
● Temperature
Temperature defines how cool or warm a color is. Cool temperatures typically describe blues and purples, while orange and red represent the warmth.
The essential tools for color grading include
● White Balance
White balance helps to make your photos look more natural by correcting color cast issues. After using white balance, the result is that the whites in your pictures would look exactly like the human eye will perceive it. White balance adjusts your image’s color cast to make them look warmer or cooler.
● Brightness and Contrast
Brightness and contrast are essential in color grading and are among the most used photo editing tools. Different sliders control brightness and contrast during editing. It’s important to note that your image’s brightness will affect the contrast and vice-versa. That’s why they usually appear together, even if they refer to different tools.
● The Three-Way Color Corrector
Many photographers refer to the three-way corrector as the color correction’s workhorse. That’s because this tool adjusts hue, saturation, brightness, and contrast in a single interface. The three-way corrector performs the job of three tools in one interface. Using the three-way corrector ensures that you work faster than usual.
● The Fast Color Corrector
The fast color corrector is like the three-way corrector. However, there are many limitations with the number of potential looks you can achieve with this tool. The fast color corrector primarily focuses on adjusting tint and saturation. Its major advantage over the three-way corrector is its user-friendliness and simplicity.
● Curves
While using curves is pretty complicated, the tool offers impressive functionality that you can’t refuse. Curves are very powerful and precise. Their main function is to overhaul or remove your image’s brightness altogether to give it a distinctive look.
● The Unsharp Mask and Sharpening Tools
With the unsharp mask and sharpening tools, you can give your picture’s edges a sharp illusion by modifying the contrast. This is typically useful for images that you shoot in dark conditions.
Sharp pictures are always a lovely sight. However, these tools can’t correct pictures taken out of focus. To get the best results from these tools. Then you can start moving them back till you get your desired sharpness.
● Color Match
As the make implies, color match tools modify a target picture’s colors to fit the reference image. This is an automatic process and helps to save time.
Common Steps To Color Grade a Photo
These are the essential stages for color grading your images:
● Step 1:
The first step in color grading is deciding how warm or cool you want your image to look. Then, modify the white balance to suit your desired warmth or coolness.
● Step 2:
After adjusting the white balance, the next step is to adjust saturation or hue.
● Step 3:
The next step is to focus on the histogram. A histogram is a common feature in many photo editing software that informs you of your image’s tonal values. The goal in this stage is to ensure equal color distribution. Keep adjusting your image till the colors are even.
● Step 4:
Work on your highlights and shadows by modifying the green, red, and blue curves. Also, adjust your vibrancy setting for a good effect.
● Step 5:
Explore split toning. Split toning is a process that involves adding colors to highlight and shadows independently. Learning how to split tone can make a difference in your photo editing.
Tips For Color Grading Photography
The following best practices will enhance your color grading:
- About oversaturation or under-saturation. Your saturation should be just right to produce the perfect result. So, always be sure to pay maximum attention to this process. This tip is particularly useful when working with portraits.
- Remember that color grading doesn’t fix a bad shot. So, be sure to improve your photography skills and take the best shots for excellent color grading results.
- Shoot your images in RAW. Doing this guarantees more control over your pictures’ colors.
- Always experiment with different looks until you get your precise effect. Lightroom is one of the best color grading apps to use.
- Exercise maximum caution when manipulating backgrounds. Don’t do too much, especially when you’re taking an indoor shot. That’s because manipulating indoor backgrounds too much can mismatch the foreground and background, making your portrait look weird.
Conclusion
● While your photography skills are essential in influencing your image’s outcome; your color grading skills will take it to another level. It’s one of the fastest ways to make a budding photo editor look like a pro.
● After reading this article, you can be sure that you have the basic information you need to achieve your editing goals. However, you mustn’t stop here. Continuous learning, especially through constant practice, is the way to go. You can visit Filmora today for the best color grading packages and tools.
Have you recognized how flat your images look when you take them with your camera? While the scenery may be beautiful and your photography skills may be amazing, there’s always something missing. That “thing” is color grading, and that may be why your favorite superstar’s pictures appear better than yours. You can color grade your videos to produce the same effect too.
Color grading photography refers to a post-production process that improves your images by altering their color. The result of an excellent color grading process is an image that looks more appealing and refined. It’s what gives a picture some professional touch.
If you want to learn more about color grading photography, this article will let you in on all you need to know. From essential color grading steps to terms, tools, etc., you can begin your journey to cool and exciting images after reading.
In this article
01 Don’t Confuse Color Grading With Color Correction
03 Common Steps To Color Grade a Photo
04 Tips For Color Grading Photography
Don’t Confuse Color Grading With Color Correction
The first way to fully appreciate color grading is by differentiating it from its closest term—color correction. Many people use both of them interchangeably, and that’s wrong. Although color grading and color correction are post-production processes that enhance image colors, they perform different roles.
Here’s how to differentiate color grading from color correction:
| Differentiating Factor | Color Grading ; | Color Correction |
|---|---|---|
| Definition | Color grading is a process that enhances an image’s color by stylizing or giving it a cinematic appearance. | Color correction is a process that adjusts color mistakes in an image by giving it a consistent appearance. This process balances colors by adjusting whites and blacks. |
| Purpose | The primary aim of color grading an image is to evoke specific emotions in the viewers. Color grading leverages the emotional and psychological effects of colors to manipulate the viewers’ moods. You can use color grading to give your images different tones or themes like fear, femininity, youthfulness, passion, anger, sadness, etc. | Unlike color grading, the color correction does very little in setting the tone or mood that an image carries. Instead, it corrects specific mistakes in the image to make it look as natural to the human eyes as possible. Generally, camera lenses and the human eyes view pictures differently. Color correction changes a photo’s look to make it more appealing to humans than the camera. It makes black colors appear darker and adds more white to whites to create the desired effect. |
| Stage in the production process | Color grading typically comes after color correction in the post-production process. That’s because the effects of color grading are more appealing on a color-corrected picture. | Color correction comes before color grading. This process does the major work of balancing colors and correcting errors. Color grading only fine-tunes what color correction has done, giving it a professional finish. |
| Example | One of the most obvious examples of color grading is in motion pictures. For example, Sci-Fi movies typically have a very saturated blue color. However, you will notice a little redder in romantic movies. Note that filmmakers can use different color grades in movies to draw attention to specific details or represent changes in the storyline. Color grading produces the same effects in pictures. | Color correction is most prominent in documentaries to make pictures and videos look more real to the human eye. Other times, color corrections just adjust one color to merge the rest of the image or video. |
Terms and Tools Used In Color Grading
These are the most common terminologies photo editors use when color grading an image:
● Hue
Hue is the general name for describing pure color. That means it defines color without alluding to its brightness, vividness, etc. It describes a color’s position in the color wheel.
● Saturation
When a photo editor talks about saturation, they refer to the hue concentration that defines a specific color. Saturation describes color shades and focuses on how colorful they are. Examples of colors with zero saturation are white, black, and grey.
● Luminance
Luminous describes how bright, well-lighted or dark a color is. Highlights, mids, and shadows can influence luminance.
● Additive Color
Additive colors are non-primary colors. However, they typically result from mixing primary colors (blue, red, green).
● Color Cast
Color cast means that the image’s coloring doesn’t look as natural as it should be. This usually happens when different light sources get mixed.
● Temperature
Temperature defines how cool or warm a color is. Cool temperatures typically describe blues and purples, while orange and red represent the warmth.
The essential tools for color grading include
● White Balance
White balance helps to make your photos look more natural by correcting color cast issues. After using white balance, the result is that the whites in your pictures would look exactly like the human eye will perceive it. White balance adjusts your image’s color cast to make them look warmer or cooler.
● Brightness and Contrast
Brightness and contrast are essential in color grading and are among the most used photo editing tools. Different sliders control brightness and contrast during editing. It’s important to note that your image’s brightness will affect the contrast and vice-versa. That’s why they usually appear together, even if they refer to different tools.
● The Three-Way Color Corrector
Many photographers refer to the three-way corrector as the color correction’s workhorse. That’s because this tool adjusts hue, saturation, brightness, and contrast in a single interface. The three-way corrector performs the job of three tools in one interface. Using the three-way corrector ensures that you work faster than usual.
● The Fast Color Corrector
The fast color corrector is like the three-way corrector. However, there are many limitations with the number of potential looks you can achieve with this tool. The fast color corrector primarily focuses on adjusting tint and saturation. Its major advantage over the three-way corrector is its user-friendliness and simplicity.
● Curves
While using curves is pretty complicated, the tool offers impressive functionality that you can’t refuse. Curves are very powerful and precise. Their main function is to overhaul or remove your image’s brightness altogether to give it a distinctive look.
● The Unsharp Mask and Sharpening Tools
With the unsharp mask and sharpening tools, you can give your picture’s edges a sharp illusion by modifying the contrast. This is typically useful for images that you shoot in dark conditions.
Sharp pictures are always a lovely sight. However, these tools can’t correct pictures taken out of focus. To get the best results from these tools. Then you can start moving them back till you get your desired sharpness.
● Color Match
As the make implies, color match tools modify a target picture’s colors to fit the reference image. This is an automatic process and helps to save time.
Common Steps To Color Grade a Photo
These are the essential stages for color grading your images:
● Step 1:
The first step in color grading is deciding how warm or cool you want your image to look. Then, modify the white balance to suit your desired warmth or coolness.
● Step 2:
After adjusting the white balance, the next step is to adjust saturation or hue.
● Step 3:
The next step is to focus on the histogram. A histogram is a common feature in many photo editing software that informs you of your image’s tonal values. The goal in this stage is to ensure equal color distribution. Keep adjusting your image till the colors are even.
● Step 4:
Work on your highlights and shadows by modifying the green, red, and blue curves. Also, adjust your vibrancy setting for a good effect.
● Step 5:
Explore split toning. Split toning is a process that involves adding colors to highlight and shadows independently. Learning how to split tone can make a difference in your photo editing.
Tips For Color Grading Photography
The following best practices will enhance your color grading:
- About oversaturation or under-saturation. Your saturation should be just right to produce the perfect result. So, always be sure to pay maximum attention to this process. This tip is particularly useful when working with portraits.
- Remember that color grading doesn’t fix a bad shot. So, be sure to improve your photography skills and take the best shots for excellent color grading results.
- Shoot your images in RAW. Doing this guarantees more control over your pictures’ colors.
- Always experiment with different looks until you get your precise effect. Lightroom is one of the best color grading apps to use.
- Exercise maximum caution when manipulating backgrounds. Don’t do too much, especially when you’re taking an indoor shot. That’s because manipulating indoor backgrounds too much can mismatch the foreground and background, making your portrait look weird.
Conclusion
● While your photography skills are essential in influencing your image’s outcome; your color grading skills will take it to another level. It’s one of the fastest ways to make a budding photo editor look like a pro.
● After reading this article, you can be sure that you have the basic information you need to achieve your editing goals. However, you mustn’t stop here. Continuous learning, especially through constant practice, is the way to go. You can visit Filmora today for the best color grading packages and tools.
Your Search for the Best GIF Creator Tools Ends Here
What are the 10 Best GIF Creator?
An easy yet powerful editor
Numerous effects to choose from
Detailed tutorials provided by the official channel
Stay tuned to find the most affordable GIF creator solutions.
In this article
01 [Why Gifs Are Essential for Every Marketer?](#Part 1)
02 [How to Make Your Own GIF?](#Part 2)
03 [What Are 10 Best GIF Creator to Find Brilliant Pre-made Gifs?](#Part 3)
Part 1 Why Gifs Are Essential for Every Marketer?
Everyone around you today is accustomed with the fact that GIFs are an interesting and impactful means of content sharing. These 3-5 second snippets are highly preferred and convenient ways to deliver information that is precise, clear and to the point. When it comes to time frames, short and quick GIFs are obvious choices over lengthy videos. Additionally, GIFs are eye-catchy and keep you captivated to see though the entire content within seconds, contradictory to those monotonous and often dull videos that sound more like a long, boring lecture.
These are an effective media tool that is not limited to sharing information that is chiefly entertainment based or fun centered. You can use them to deliver important content that addresses a specific purpose or audience. Owing to this, GIFs have become an essential marketing utility, here’s why:
● Improve Product Branding:
GIFs can serve as impressive branding tools for your products in the market. Markets today are considerably impacted by the ‘What You See is What You Buy’ concept, which puts forward the need to lay added stress on effective branding.
GIFs are ready to sort this out with their exciting range of features. From video editing choices to sound and color customization, GIFs are loaded with everything you need to improvise your product branding. All you have to do is explore your creativity to make the most of the GIF branding choices.
● Explain it Better
On a preference poll, most of us would shift to ‘watch’ over ‘read’ for a comprehensive understanding. An attractive motion visual is an even better treat. GIFs are pivotal in making viewers relate to the concept and message behind your product in a more enhanced manner.
Additionally, these are a continent means to introduce emotional mobility among your target audience with depictive emojis. You can use GIFs to develop effective content approaches to make the audience connect with your product viability, both practically band emotionally.
● Increase Visitor Attraction
Today’s changing times have brought about a rapid outlook towards everything. All of us are bounded by time constraints and when browsing the web, the prime need is to look for quick and accurate solutions to everything concerned.
Short and exact information delivery of GIFs is something that would keep visitors glued to your site because they will be assured of getting exactly what they search for and that too in an interesting and entertaining way.
Part 2 How to Make Your Own GIF?
Now that you are familiar with the creative marketing credibility of GIFs, you might naturally feel motivated towards creating a GIF of your own. In case you are, see through the following section of this article to find out interesting ways of creating interesting and catchy GIFs, either for impressive product marketing or just to make your social media posts leave your community peers in awe!
Looking for the best GIF creator solutions on the web, you can rely on GIPHY, one of the most preferred and convenient databases to create GIFs quickly. This is a smartphone compatible tool and works well with almost any device. Follow the steps given below to make GIFs with this tool:
Step 1:
Download and install the GIPHY app in your device.
Step 2:
Click on ‘Create’ in the app’s welcome screen. This will change (+) icon at the top-right corner to the ‘Camera’ symbol. You can also navigate to the ‘Profile’ at the bottom-right and tap the (+) or ‘Camera’ icon in the app’s account page.
Step 3:
Click on ‘Allow Camera Access’. You will receive two successive prompt messages from the app. Click on ‘Allow’ to grant access permissions to your device media. When you are done, click on ‘I Agree’.
Step 4:
GIFHY uses your device’s front camera for GIF creation. However, if you need to go for a camera switch, click on the ‘Camera’ sign at the bottom-right.
Step 5:
Choose a desired filter and effect for your GIF with a left or right swipe on the live feed toolbar. The app has 11 amazing and realistic effects, including VHS Static, 3D Glasses, etc.
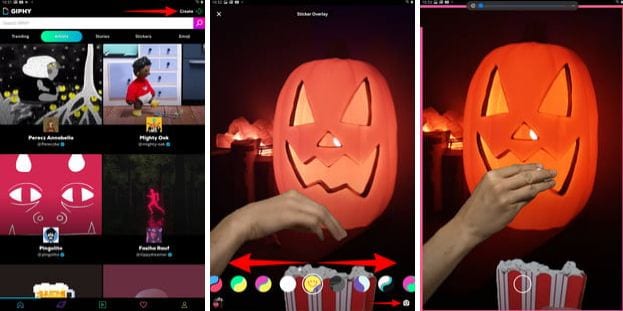
Step 6:
You can take up either of the following:
Press either of the ‘Filter’ or ‘Effect’ buttons to take static shots to create GIF from images, or press and hold the same to create animated GIF. For simply using effects, tap the white button.
In case you choose to create a motion GIF, the app forms a ‘visual timer’ around the editor screen. The motion recording stops once the line is in sync with the screen edges.
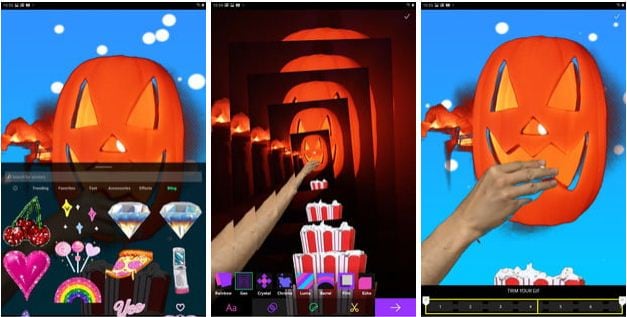
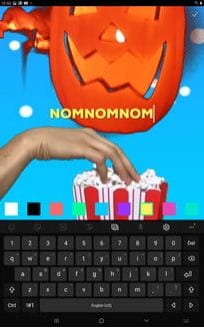
Step 7:
Having captured your perfect shot, you have the liberty to merge it with an image or video. However, do consider the following options to add some more elements to your capture: You can add relatable text in 9 color choices.
● Enhance your graphic presentation with 8 amazing effects like, ‘rainbow overlays’, BW film grains, etc.
● Choose from a never ending list of suitable stickers to add the feel through connect to your GIFs.
● Trim your animated GIFs to the ‘just perfect’ portion by adjusting the editing markers.
Relax; that’s no rocket science. Just tap on the respective buttons and there you go!
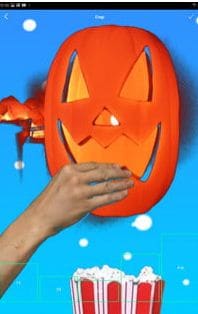
Step 8:
Set your GIF in a desired size frame by choosing the ‘Crop’ tool from the top-right corner of the editing screen. You are given a size flexibility of 1:1, 3:2, 16:9, 4:5 and 9:16.
Step 9:
Once you are satisfied with your creation, tap the ‘Right Arrow’ icon. In the interface that follows, add suitable share tags to the GIF.
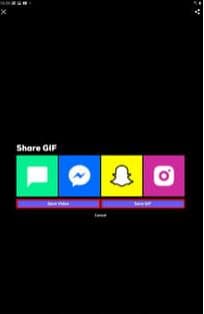
Step 10:
Tap ‘Share GIF’ to post your creation on social media platforms or share it through popular IM apps. To save your initially captured clip, click on ‘Save Video’ or tap ‘Save GIF’ to save your creation in your smartphone’s memory.
Part 1 What Are 10 Best GIF Creator to Find Brilliant Pre-made Gifs?
Having talked about GIF creation on the go, let’s take a dive into the best GIF creator solutions that are a storehouse of exciting pre-made GIFs. When browsing the web for an affordable GIF maker tool, you land across a pool of choices. Read through the further sections of this article to find out what’s best for you.
Described below are 10 best alternatives to get amazing pre-made GIFs:
● Wondershare Filmora Video Editor
This one is a popular, preferred and top rated application where you get to choose from an exciting range of pre-made GIFs under a variety of specific categories. All you need to do is, visit the app’s official site, browse to your favorite GIF category and select a desired GIF. Follow a few app instructions to save your selection and that’s it! Your selected GIF reaches your device memory within seconds.

Wondershare Filmora - Best Video Editor for Mac/Windows
5,481,435 people have downloaded it.
Build unique custom animations without breaking a sweat.
Focus on creating epic stories and leave the details to Filmora’s auto features.
Start a creative adventure with drag & drop effects and endless possibilities.
Filmora simplifies advanced features to save you time and effort.
Filmora cuts out repetition so you can move on to your next creative breakthrough.
Key Features
● This app is available to you absolutely free of cost.
● Has an intelligent and user cohesive interface.
● Loaded with tons of brilliant GIFs to choose from.
● The app supports GIF customization.
● GIFHY
Launched in 2013, this one is probably the best GIF maker and downloader tool available on the web today. It is a free tool, packed with enormous varieties of GIFs to choose from. What’s more interesting about the app is that you are free to play with your editing creativity to enhance your downloaded GIFs in the GIPHY editor.
Key Features
● It comes with an easy to use, convenient interface.
● You can edit downloaded GIFs with hundreds of effects and filters.
● The app provides you a direct sharing platform, allowing you to post GIFs to various social media platforms and also go for sharing via Instant Messaging applications.
● This is a fast processing tool that allows you to escape the notch of annoying and delayed download processes.
● Tenor
You can conveniently regard this one as the closest competitor to the GIPHY GIF creator and downloader tool. Needless to say, both are quite similar to each other in interface and usage respects. However, focusing on search results for a common keyword, you find diverse variations to your obvious surprise.
Key Features
● This is a free to use, interactive interface tool.
● It introduces a GIF Keyboard that allows you to search the most specific and relatable GIFs.
● It ensures a speedy and high quality GIF download.
● You can explore your editing skills to your heart’s content to improvise the downloaded GIFs with this tool.
● This tool gives you the liberty to directly share GIFs across different platforms.
If you like to spend ample time on choosing what’s perfect for you, refer this online tool for your GIF download solutions. It caters to your love of diversity with the most deep rooted and broad GIF range. However, this one comes with a little messy interface, demanding some patience from you to get to the right thing.
Key Features
● This tool provides you with almost all possible choices for a GIF category.
● It is available to you free of cost
● The tool site is loaded with rich and quality GIF content.
● This one is a direct save and export tool for your downloaded GIFs.
● Gfycat
You can prefer this one as a GIF hosting tool. Developed with a view to launch a common medium for GIF and HTML contents, this app ensures in-time and hassle free downloads and delivery. Though lacking a refined search bar, this tool promises you of excellence in content quality.
Key Features
● This comes to you as one of the most reliable GIF hosting tools.
● It is a free and quick content delivery tool.
● You are allowed to select the most suitable one from a variety of playback choices.
● This tool also gives you the flexibility of direct media sharing.
● GIFbin
If you are hung-over decade old nostalgia and the fever doesn’t seem to go away, you can check this site for some really satisfying retro and other similar content. This would definitely make you take a toll back to the times when MSN and Limewire were unparalleled market leaders in content sharing.
Key Features
● GIFbin is a storehouse of the best animated GIFs, that is on a continuous update to facilitate fresh and quality based content, every time you visit the site.
● It has an advanced, API enabled search mechanism.
● It boasts of having the handiest and convenient user interface.
● If you prefer GIFs of the comic genre, this tool is heaven for you.
● Imgflip
This is another GIF download site, commonly preferred for comedy and fun oriented content. Using this site, you can download and create a variety of GIF based memes that have the potential to flood your social media posts with likes and comments. This one is a complete GIF basket, suited to vast content varieties and user preferences. You will find the site’s official watermark on all its contents.
Key Features
● The site stands among the most preferred GIF-meme creation and sharing platforms.
● The tool is packed with loads of quality content under specific categories
● You can improvise the dimensions of your editing skills to modify downloaded GIFs.
● This site has a default media export feature that you can use to share your GIFs on social media.
● Imgur
Launched in 2009, this is among the most visited GIF sites, originally created for sharing meme based contents on social media. Its extensive search filters are dedicated to fetch the exact GIFs and memes you are looking for. If you are tired of browsing sites for particular content requirements, your search spree will definitely end here.
Key Features
● The site is known for its extensive and diversified content quality.
● It is a free, convenient and dependable GIF download tool.
● Imgur is highly preferred for content export across various media platforms.
● It is equipped with an advanced and updated search filter that assures you of getting fresh and top quality GIFs on almost every possible keyword.
● Tumblr
Claiming a launch date of 13 years back, this is quite a good GIF download option. You can find excellent quality GIF content on the site, particularly in the comic genre. Though not as popular as its online counterparts today, the site definitely enjoyed commendable visitor preferences at the time of its launch. You can certainly visit this site for a filling entertainment dose.
Key Features
● Tumblr is a free download site with a user friendly interface.
● The site is loaded with notable content varieties.
● You can go for direct media sharing through this site.
● Its comic GIFs are quite hilarious.
● Know Your Meme
This site uses the Wiki software to stock an inventory of classic GIFs and memes. Using this database for GIF downloads means that you don’t need to compromise on content and image quality. The site contents are periodically updated to ensure that visitors are not exposed to stale and outdated content.
Key Features
● The site offers fresh content having catchy and latest GIFs.
● This is a complete storehouse of GIFs and memes that can definitely keep you rolling.
● The site comes as a free tool and gas a user cohesive interface
● It hast the most efficient search filters that are regularly improvised to ensure quality content delivery.
● Key Takeaways from This Episode →
● GIFs are an effective and captivating means of quality content sharing and message delivery. Take them as a hilarious entertainment source or use them to enhance your marketing policies, GIFs can do it all.
● Influenced by the user credibility of GIFs, there are loads of GIF creator and download tools available online; among which Filmora by Wondershare is the current market leader. You can use this app to explore your GIF editing skills or download and share latest GIFs across media sharing platforms.
Stay tuned to find the most affordable GIF creator solutions.
In this article
01 [Why Gifs Are Essential for Every Marketer?](#Part 1)
02 [How to Make Your Own GIF?](#Part 2)
03 [What Are 10 Best GIF Creator to Find Brilliant Pre-made Gifs?](#Part 3)
Part 1 Why Gifs Are Essential for Every Marketer?
Everyone around you today is accustomed with the fact that GIFs are an interesting and impactful means of content sharing. These 3-5 second snippets are highly preferred and convenient ways to deliver information that is precise, clear and to the point. When it comes to time frames, short and quick GIFs are obvious choices over lengthy videos. Additionally, GIFs are eye-catchy and keep you captivated to see though the entire content within seconds, contradictory to those monotonous and often dull videos that sound more like a long, boring lecture.
These are an effective media tool that is not limited to sharing information that is chiefly entertainment based or fun centered. You can use them to deliver important content that addresses a specific purpose or audience. Owing to this, GIFs have become an essential marketing utility, here’s why:
● Improve Product Branding:
GIFs can serve as impressive branding tools for your products in the market. Markets today are considerably impacted by the ‘What You See is What You Buy’ concept, which puts forward the need to lay added stress on effective branding.
GIFs are ready to sort this out with their exciting range of features. From video editing choices to sound and color customization, GIFs are loaded with everything you need to improvise your product branding. All you have to do is explore your creativity to make the most of the GIF branding choices.
● Explain it Better
On a preference poll, most of us would shift to ‘watch’ over ‘read’ for a comprehensive understanding. An attractive motion visual is an even better treat. GIFs are pivotal in making viewers relate to the concept and message behind your product in a more enhanced manner.
Additionally, these are a continent means to introduce emotional mobility among your target audience with depictive emojis. You can use GIFs to develop effective content approaches to make the audience connect with your product viability, both practically band emotionally.
● Increase Visitor Attraction
Today’s changing times have brought about a rapid outlook towards everything. All of us are bounded by time constraints and when browsing the web, the prime need is to look for quick and accurate solutions to everything concerned.
Short and exact information delivery of GIFs is something that would keep visitors glued to your site because they will be assured of getting exactly what they search for and that too in an interesting and entertaining way.
Part 2 How to Make Your Own GIF?
Now that you are familiar with the creative marketing credibility of GIFs, you might naturally feel motivated towards creating a GIF of your own. In case you are, see through the following section of this article to find out interesting ways of creating interesting and catchy GIFs, either for impressive product marketing or just to make your social media posts leave your community peers in awe!
Looking for the best GIF creator solutions on the web, you can rely on GIPHY, one of the most preferred and convenient databases to create GIFs quickly. This is a smartphone compatible tool and works well with almost any device. Follow the steps given below to make GIFs with this tool:
Step 1:
Download and install the GIPHY app in your device.
Step 2:
Click on ‘Create’ in the app’s welcome screen. This will change (+) icon at the top-right corner to the ‘Camera’ symbol. You can also navigate to the ‘Profile’ at the bottom-right and tap the (+) or ‘Camera’ icon in the app’s account page.
Step 3:
Click on ‘Allow Camera Access’. You will receive two successive prompt messages from the app. Click on ‘Allow’ to grant access permissions to your device media. When you are done, click on ‘I Agree’.
Step 4:
GIFHY uses your device’s front camera for GIF creation. However, if you need to go for a camera switch, click on the ‘Camera’ sign at the bottom-right.
Step 5:
Choose a desired filter and effect for your GIF with a left or right swipe on the live feed toolbar. The app has 11 amazing and realistic effects, including VHS Static, 3D Glasses, etc.
Step 6:
You can take up either of the following:
Press either of the ‘Filter’ or ‘Effect’ buttons to take static shots to create GIF from images, or press and hold the same to create animated GIF. For simply using effects, tap the white button.
In case you choose to create a motion GIF, the app forms a ‘visual timer’ around the editor screen. The motion recording stops once the line is in sync with the screen edges.
Step 7:
Having captured your perfect shot, you have the liberty to merge it with an image or video. However, do consider the following options to add some more elements to your capture: You can add relatable text in 9 color choices.
● Enhance your graphic presentation with 8 amazing effects like, ‘rainbow overlays’, BW film grains, etc.
● Choose from a never ending list of suitable stickers to add the feel through connect to your GIFs.
● Trim your animated GIFs to the ‘just perfect’ portion by adjusting the editing markers.
Relax; that’s no rocket science. Just tap on the respective buttons and there you go!
Step 8:
Set your GIF in a desired size frame by choosing the ‘Crop’ tool from the top-right corner of the editing screen. You are given a size flexibility of 1:1, 3:2, 16:9, 4:5 and 9:16.
Step 9:
Once you are satisfied with your creation, tap the ‘Right Arrow’ icon. In the interface that follows, add suitable share tags to the GIF.
Step 10:
Tap ‘Share GIF’ to post your creation on social media platforms or share it through popular IM apps. To save your initially captured clip, click on ‘Save Video’ or tap ‘Save GIF’ to save your creation in your smartphone’s memory.
Part 1 What Are 10 Best GIF Creator to Find Brilliant Pre-made Gifs?
Having talked about GIF creation on the go, let’s take a dive into the best GIF creator solutions that are a storehouse of exciting pre-made GIFs. When browsing the web for an affordable GIF maker tool, you land across a pool of choices. Read through the further sections of this article to find out what’s best for you.
Described below are 10 best alternatives to get amazing pre-made GIFs:
● Wondershare Filmora Video Editor
This one is a popular, preferred and top rated application where you get to choose from an exciting range of pre-made GIFs under a variety of specific categories. All you need to do is, visit the app’s official site, browse to your favorite GIF category and select a desired GIF. Follow a few app instructions to save your selection and that’s it! Your selected GIF reaches your device memory within seconds.
Wondershare Filmora - Best Video Editor for Mac/Windows
5,481,435 people have downloaded it.
Build unique custom animations without breaking a sweat.
Focus on creating epic stories and leave the details to Filmora’s auto features.
Start a creative adventure with drag & drop effects and endless possibilities.
Filmora simplifies advanced features to save you time and effort.
Filmora cuts out repetition so you can move on to your next creative breakthrough.
Key Features
● This app is available to you absolutely free of cost.
● Has an intelligent and user cohesive interface.
● Loaded with tons of brilliant GIFs to choose from.
● The app supports GIF customization.
● GIFHY
Launched in 2013, this one is probably the best GIF maker and downloader tool available on the web today. It is a free tool, packed with enormous varieties of GIFs to choose from. What’s more interesting about the app is that you are free to play with your editing creativity to enhance your downloaded GIFs in the GIPHY editor.
Key Features
● It comes with an easy to use, convenient interface.
● You can edit downloaded GIFs with hundreds of effects and filters.
● The app provides you a direct sharing platform, allowing you to post GIFs to various social media platforms and also go for sharing via Instant Messaging applications.
● This is a fast processing tool that allows you to escape the notch of annoying and delayed download processes.
● Tenor
You can conveniently regard this one as the closest competitor to the GIPHY GIF creator and downloader tool. Needless to say, both are quite similar to each other in interface and usage respects. However, focusing on search results for a common keyword, you find diverse variations to your obvious surprise.
Key Features
● This is a free to use, interactive interface tool.
● It introduces a GIF Keyboard that allows you to search the most specific and relatable GIFs.
● It ensures a speedy and high quality GIF download.
● You can explore your editing skills to your heart’s content to improvise the downloaded GIFs with this tool.
● This tool gives you the liberty to directly share GIFs across different platforms.
If you like to spend ample time on choosing what’s perfect for you, refer this online tool for your GIF download solutions. It caters to your love of diversity with the most deep rooted and broad GIF range. However, this one comes with a little messy interface, demanding some patience from you to get to the right thing.
Key Features
● This tool provides you with almost all possible choices for a GIF category.
● It is available to you free of cost
● The tool site is loaded with rich and quality GIF content.
● This one is a direct save and export tool for your downloaded GIFs.
● Gfycat
You can prefer this one as a GIF hosting tool. Developed with a view to launch a common medium for GIF and HTML contents, this app ensures in-time and hassle free downloads and delivery. Though lacking a refined search bar, this tool promises you of excellence in content quality.
Key Features
● This comes to you as one of the most reliable GIF hosting tools.
● It is a free and quick content delivery tool.
● You are allowed to select the most suitable one from a variety of playback choices.
● This tool also gives you the flexibility of direct media sharing.
● GIFbin
If you are hung-over decade old nostalgia and the fever doesn’t seem to go away, you can check this site for some really satisfying retro and other similar content. This would definitely make you take a toll back to the times when MSN and Limewire were unparalleled market leaders in content sharing.
Key Features
● GIFbin is a storehouse of the best animated GIFs, that is on a continuous update to facilitate fresh and quality based content, every time you visit the site.
● It has an advanced, API enabled search mechanism.
● It boasts of having the handiest and convenient user interface.
● If you prefer GIFs of the comic genre, this tool is heaven for you.
● Imgflip
This is another GIF download site, commonly preferred for comedy and fun oriented content. Using this site, you can download and create a variety of GIF based memes that have the potential to flood your social media posts with likes and comments. This one is a complete GIF basket, suited to vast content varieties and user preferences. You will find the site’s official watermark on all its contents.
Key Features
● The site stands among the most preferred GIF-meme creation and sharing platforms.
● The tool is packed with loads of quality content under specific categories
● You can improvise the dimensions of your editing skills to modify downloaded GIFs.
● This site has a default media export feature that you can use to share your GIFs on social media.
● Imgur
Launched in 2009, this is among the most visited GIF sites, originally created for sharing meme based contents on social media. Its extensive search filters are dedicated to fetch the exact GIFs and memes you are looking for. If you are tired of browsing sites for particular content requirements, your search spree will definitely end here.
Key Features
● The site is known for its extensive and diversified content quality.
● It is a free, convenient and dependable GIF download tool.
● Imgur is highly preferred for content export across various media platforms.
● It is equipped with an advanced and updated search filter that assures you of getting fresh and top quality GIFs on almost every possible keyword.
● Tumblr
Claiming a launch date of 13 years back, this is quite a good GIF download option. You can find excellent quality GIF content on the site, particularly in the comic genre. Though not as popular as its online counterparts today, the site definitely enjoyed commendable visitor preferences at the time of its launch. You can certainly visit this site for a filling entertainment dose.
Key Features
● Tumblr is a free download site with a user friendly interface.
● The site is loaded with notable content varieties.
● You can go for direct media sharing through this site.
● Its comic GIFs are quite hilarious.
● Know Your Meme
This site uses the Wiki software to stock an inventory of classic GIFs and memes. Using this database for GIF downloads means that you don’t need to compromise on content and image quality. The site contents are periodically updated to ensure that visitors are not exposed to stale and outdated content.
Key Features
● The site offers fresh content having catchy and latest GIFs.
● This is a complete storehouse of GIFs and memes that can definitely keep you rolling.
● The site comes as a free tool and gas a user cohesive interface
● It hast the most efficient search filters that are regularly improvised to ensure quality content delivery.
● Key Takeaways from This Episode →
● GIFs are an effective and captivating means of quality content sharing and message delivery. Take them as a hilarious entertainment source or use them to enhance your marketing policies, GIFs can do it all.
● Influenced by the user credibility of GIFs, there are loads of GIF creator and download tools available online; among which Filmora by Wondershare is the current market leader. You can use this app to explore your GIF editing skills or download and share latest GIFs across media sharing platforms.
Recording gameplay on PC has been an essential part of operations for many streamers. This has led to developing several recording software dedicated to this specific purpose. With the market flooding with these tools, it is important to look at the quality instead of the quantity.
Let’s dive into the world of top game recorders for PC featuring services for the finest content creation. Take a look at their benefits, along with a simple and cost-effective alternative to make screen recording much easier on your PC.
Screen Recording Now For Win 7 or later(64-bit)
Screen Recording Now For macOS 10.14 or later
Part 1. Finding a Good Gameplay Recorder on PC? Get One Instantly
Now that you are aware of some top benefits that game recorders provide, it is time to learn how to reap these benefits. There are currently several apps to help you capture gameplay on PC. The following list provides an insight into the top 10 apps to record gameplay on your computer:
Top Gameplay Recorder Tools on PC:
1.Bandicam
2. OBS Studio
3.Xbox Game Bar
4.Action! – Game Recorder
5.XSplit Broadcaster
6.FBX
7.D3DGear
8.Geceta by Movavi
9.Radeon ReLive
10.ScreenPal
1.Bandicam
Bandicam stands amongst the top gameplay recorders available for PC today. It is an easy-to-use and free screen recording software that can capture anything you want on your screen.
Bandicam offers several useful features when it comes to screen recording. You can record audio, choose webcam overlay, draw real-time on the screen, and more. Bandicam also offers long-term screen recording, stretching as long as 24 hours. Besides recording gameplay, it is also suitable for recording lectures, webinars, video calls, and more.

2.OBS Studio
OBS Studio offers open-source software for recording and live-streaming videos. The game recorder for PC is available for download on Windows, Mac, and Linux. OBS allows real-time audio and video capturing abilities without compromising on performance. You can capture multiple sources simultaneously, including windows, text, images, webcams, and more.
The tool allows users to set unlimited scenes and seamlessly switch between them. You can easily choose custom transitions, duplicate screens, and tweak other aspects.

3.Xbox Game Bar
Your Windows PC will likely have an in-built Game Bar offered by Xbox. It is a customizable gaming overlay that makes gaming easier. Among other useful features, the Game Bar allows for real-time recording of any gameplay on the PC.
The Xbox Game Bar offers easy keyboard shortcuts that can be customized for various functions. The start and end of the recording are also narrated by the tool, so you can hear when changes are made. Game Bar can also help find new teammates with LFG (Looking For Group) and chat with other Xbox users.

4.Action! – Game Recorder
Action! – Game Recorder is one of the best software currently available for recording gameplay on PC. With smooth recordings and high-quality streaming, it is a reliable option for novice and expert gamers.
It can record HD gameplay at up to 120fps with low CPU usage. Users can easily get around its easy-to-use interface. You can export your videos directly to Facebook and YouTube. Action! also supports live streaming to Twitch, YouTube, and Upstream. You can even control the video recording on your PC via your smartphone.

5.XSplit Broadcaster
Another remarkable tool that offers simple yet powerful gameplay recording is XSplit. You can use tools to create content for popular platforms like Twitch, YouTube, and TikTok. XSplit Broadcaster comes as a feature-packed production studio for content creation.
XSplit offers unlimited customization options when it comes to recording gameplay. It offers flawless video and audio quality without putting additional load on the system. XSplit ensures lag-free gameplay, so your efficiency is not affected while recording.

6.FBX
If you want high-performance HD recordings without interruptions in your gameplay, FBX is a reliable option. It is a dedicated game recorder offering many useful features to users. FBX can save highlights of the best parts of your gameplay. You can customize hotkeys that instantly save short videos of your best action.
It can also capture high-quality screenshots for easy sharing. FBX also allows live streaming options with rapid setups. The tool can automatically adjust to your bandwidth to help eliminate jerky streams.

7.D3DGear
For fast and efficient recordings, you can opt for D3DGear. It is a high-quality game screen recorder for PC containing all the essentials for smooth recordings. The tool is available on Windows computers as a plugin and add-on software.
D3DGear can record gameplay smoothly without causing the game to drop much in the frame rate. It also allows users to live stream their gameplay to Twitch. D3DGear can also record Oculus Rift VR gameplay with HD SBS stereoscopic videos. Furthermore, it can produce Constant Frame Rate (CFR) movies, often required with Adobe software.

8.Gecata by Movavi
Movavi offers its state-of-the-art game recorder for PC in the form of Gecata. The tool is a lightweight and solid program for recording and streaming gameplay. You can use it to grab the best moments of your gaming experience and share them with your peers across the globe.
Gecata enables users to record and stream their games at the same time without any lag. You can also record webcam and microphone, in-game sound effects, music, and dialogues all in one click. Gecata provides full control, allowing you to customize overlays to monitor frame rate, bit count, and other metrics.

9.Radeon ReLive
Radeon ReLive by AMD certainly deserves a spot on this list of game recorder software for PCs. It is a user-friendly game recorder that helps users capture and share gameplay videos and screenshots. Radeon ReLive is configuring-friendly and has a minimal impact on the FPS rate.
The tool works on systems with AMD graphics cards. It allows users to tweak their game and display settings, allowing for seamless gameplay. Radeon also contains a switch for saving power and preventing the system from overheating.

10.ScreenPal
Formerly known as Screencast-o-Matic, ScreenPal is a user-friendly tool designed to capture and share screen recordings. You can record and edit your content on the same platform using this versatile tool. ScreenPal is available on Windows, Mac, iOS, Android, and Chromebook devices.
Besides recording gameplay on a PC, you can also use it for education, work, and other personal purposes. ScreenPal comes with a built-in editor that helps you tweak your videos after recording them. You can also host and share content on its easily accessible cloud.

[Cost-Effective] Screen Recording in Wondershare Filmora
The tools mentioned above are great for recording gameplay on PC. However, you might have noticed that many of these tools offer pricing plans that can prove heavy on the wallet. If you are looking for a cost-effective solution for recording gameplay, Wondershare Filmora is a stellar choice.
Filmora by Wondershare is an all-in-one solution when it comes to content creation. While other game recorders for PC often offer specific tools, Filmora offers a 360-degree approach. Besides recording the screen, Filmora also allows users to compile and edit their recorded gameplay without ever exiting the platform.
Anyone Can Create a Tutorial With These Easy Steps
Free Download For Win 7 or later(64-bit)
Free Download For macOS 10.14 or later
How to Record Gameplay Using Wondershare Filmora
The Screen Record feature on Filmora is a simple yet powerful function that can help you capture your computer’s screen and webcam. You can record audio using the microphone and the system at the same time.
Filmora also lets users customize the area of the screen they wish to capture. This makes it arguably the best game screen recorder for PC. To capture gameplay on PC using Filmora, follow the steps below:
Step1Open Screen Recorder on Filmora
Install and launch Wondershare Filmora on your PC. You can select the “Screen Recorder” feature from the startup window on Filmora.

Alternatively, you can also go to the “File” tab and select “Record Media” from the dropdown list, then choose to record the webcam, PC screen, or voiceover.

Step2Adjust Screen Recording Settings
Once the Screen Recorder panel opens, you can choose the recording ratio from the menu under the “Square” icon. The available options are to record the full screen, a target window, or any custom size. You can then toggle the switches next to the “Microphone,” “System Audio,” and “Camera” options to turn them on or off. Filmora also lets users adjust the frame rate, quality, and other parameters.

Step3 Adjust Screen Recording Settings
Once the Screen Recorder panel opens, you can choose the recording ratio from the menu under the “Square” icon. The available options are to record the full screen, a target window, or any custom size. You can then toggle the switches next to the “Microphone,” “System Audio,” and “Camera” options to turn them on or off. Filmora also lets users adjust the frame rate, quality, and other parameters.
Step4Record Through Filmora and Conclude
After specifying the settings, tap the “Record” button to start recording your gameplay. Filmora will ensure your gameplay is not affected by the recording. Hit the “Stop” button once you are done and edit the file in Filmora. Finally, export the recorded gameplay to a location of your choice.

Conclusion
Many dedicated software are available to help you capture gameplay on PC. The top game recording software for PC and their pricing plans are mentioned above for your convenience. However, our advice is to switch to Wondershare Filmora. Not only does Filmora offer a cost-effective solution, but it is also much easier to use and provides high-quality recordings without lag.
Screen Recording Now For Win 7 or later(64-bit)
Screen Recording Now For macOS 10.14 or later
Part 1. Finding a Good Gameplay Recorder on PC? Get One Instantly
Now that you are aware of some top benefits that game recorders provide, it is time to learn how to reap these benefits. There are currently several apps to help you capture gameplay on PC. The following list provides an insight into the top 10 apps to record gameplay on your computer:
Top Gameplay Recorder Tools on PC:
1.Bandicam
2. OBS Studio
3.Xbox Game Bar
4.Action! – Game Recorder
5.XSplit Broadcaster
6.FBX
7.D3DGear
8.Geceta by Movavi
9.Radeon ReLive
10.ScreenPal
1.Bandicam
Bandicam stands amongst the top gameplay recorders available for PC today. It is an easy-to-use and free screen recording software that can capture anything you want on your screen.
Bandicam offers several useful features when it comes to screen recording. You can record audio, choose webcam overlay, draw real-time on the screen, and more. Bandicam also offers long-term screen recording, stretching as long as 24 hours. Besides recording gameplay, it is also suitable for recording lectures, webinars, video calls, and more.
2.OBS Studio
OBS Studio offers open-source software for recording and live-streaming videos. The game recorder for PC is available for download on Windows, Mac, and Linux. OBS allows real-time audio and video capturing abilities without compromising on performance. You can capture multiple sources simultaneously, including windows, text, images, webcams, and more.
The tool allows users to set unlimited scenes and seamlessly switch between them. You can easily choose custom transitions, duplicate screens, and tweak other aspects.
3.Xbox Game Bar
Your Windows PC will likely have an in-built Game Bar offered by Xbox. It is a customizable gaming overlay that makes gaming easier. Among other useful features, the Game Bar allows for real-time recording of any gameplay on the PC.
The Xbox Game Bar offers easy keyboard shortcuts that can be customized for various functions. The start and end of the recording are also narrated by the tool, so you can hear when changes are made. Game Bar can also help find new teammates with LFG (Looking For Group) and chat with other Xbox users.
4.Action! – Game Recorder
Action! – Game Recorder is one of the best software currently available for recording gameplay on PC. With smooth recordings and high-quality streaming, it is a reliable option for novice and expert gamers.
It can record HD gameplay at up to 120fps with low CPU usage. Users can easily get around its easy-to-use interface. You can export your videos directly to Facebook and YouTube. Action! also supports live streaming to Twitch, YouTube, and Upstream. You can even control the video recording on your PC via your smartphone.
5.XSplit Broadcaster
Another remarkable tool that offers simple yet powerful gameplay recording is XSplit. You can use tools to create content for popular platforms like Twitch, YouTube, and TikTok. XSplit Broadcaster comes as a feature-packed production studio for content creation.
XSplit offers unlimited customization options when it comes to recording gameplay. It offers flawless video and audio quality without putting additional load on the system. XSplit ensures lag-free gameplay, so your efficiency is not affected while recording.
6.FBX
If you want high-performance HD recordings without interruptions in your gameplay, FBX is a reliable option. It is a dedicated game recorder offering many useful features to users. FBX can save highlights of the best parts of your gameplay. You can customize hotkeys that instantly save short videos of your best action.
It can also capture high-quality screenshots for easy sharing. FBX also allows live streaming options with rapid setups. The tool can automatically adjust to your bandwidth to help eliminate jerky streams.
7.D3DGear
For fast and efficient recordings, you can opt for D3DGear. It is a high-quality game screen recorder for PC containing all the essentials for smooth recordings. The tool is available on Windows computers as a plugin and add-on software.
D3DGear can record gameplay smoothly without causing the game to drop much in the frame rate. It also allows users to live stream their gameplay to Twitch. D3DGear can also record Oculus Rift VR gameplay with HD SBS stereoscopic videos. Furthermore, it can produce Constant Frame Rate (CFR) movies, often required with Adobe software.
8.Gecata by Movavi
Movavi offers its state-of-the-art game recorder for PC in the form of Gecata. The tool is a lightweight and solid program for recording and streaming gameplay. You can use it to grab the best moments of your gaming experience and share them with your peers across the globe.
Gecata enables users to record and stream their games at the same time without any lag. You can also record webcam and microphone, in-game sound effects, music, and dialogues all in one click. Gecata provides full control, allowing you to customize overlays to monitor frame rate, bit count, and other metrics.
9.Radeon ReLive
Radeon ReLive by AMD certainly deserves a spot on this list of game recorder software for PCs. It is a user-friendly game recorder that helps users capture and share gameplay videos and screenshots. Radeon ReLive is configuring-friendly and has a minimal impact on the FPS rate.
The tool works on systems with AMD graphics cards. It allows users to tweak their game and display settings, allowing for seamless gameplay. Radeon also contains a switch for saving power and preventing the system from overheating.
10.ScreenPal
Formerly known as Screencast-o-Matic, ScreenPal is a user-friendly tool designed to capture and share screen recordings. You can record and edit your content on the same platform using this versatile tool. ScreenPal is available on Windows, Mac, iOS, Android, and Chromebook devices.
Besides recording gameplay on a PC, you can also use it for education, work, and other personal purposes. ScreenPal comes with a built-in editor that helps you tweak your videos after recording them. You can also host and share content on its easily accessible cloud.
[Cost-Effective] Screen Recording in Wondershare Filmora
The tools mentioned above are great for recording gameplay on PC. However, you might have noticed that many of these tools offer pricing plans that can prove heavy on the wallet. If you are looking for a cost-effective solution for recording gameplay, Wondershare Filmora is a stellar choice.
Filmora by Wondershare is an all-in-one solution when it comes to content creation. While other game recorders for PC often offer specific tools, Filmora offers a 360-degree approach. Besides recording the screen, Filmora also allows users to compile and edit their recorded gameplay without ever exiting the platform.
Anyone Can Create a Tutorial With These Easy Steps
Free Download For Win 7 or later(64-bit)
Free Download For macOS 10.14 or later
How to Record Gameplay Using Wondershare Filmora
The Screen Record feature on Filmora is a simple yet powerful function that can help you capture your computer’s screen and webcam. You can record audio using the microphone and the system at the same time.
Filmora also lets users customize the area of the screen they wish to capture. This makes it arguably the best game screen recorder for PC. To capture gameplay on PC using Filmora, follow the steps below:
Step1Open Screen Recorder on Filmora
Install and launch Wondershare Filmora on your PC. You can select the “Screen Recorder” feature from the startup window on Filmora.
Alternatively, you can also go to the “File” tab and select “Record Media” from the dropdown list, then choose to record the webcam, PC screen, or voiceover.
Step2Adjust Screen Recording Settings
Once the Screen Recorder panel opens, you can choose the recording ratio from the menu under the “Square” icon. The available options are to record the full screen, a target window, or any custom size. You can then toggle the switches next to the “Microphone,” “System Audio,” and “Camera” options to turn them on or off. Filmora also lets users adjust the frame rate, quality, and other parameters.
Step3 Adjust Screen Recording Settings
Once the Screen Recorder panel opens, you can choose the recording ratio from the menu under the “Square” icon. The available options are to record the full screen, a target window, or any custom size. You can then toggle the switches next to the “Microphone,” “System Audio,” and “Camera” options to turn them on or off. Filmora also lets users adjust the frame rate, quality, and other parameters.
Step4Record Through Filmora and Conclude
After specifying the settings, tap the “Record” button to start recording your gameplay. Filmora will ensure your gameplay is not affected by the recording. Hit the “Stop” button once you are done and edit the file in Filmora. Finally, export the recorded gameplay to a location of your choice.
Conclusion
Many dedicated software are available to help you capture gameplay on PC. The top game recording software for PC and their pricing plans are mentioned above for your convenience. However, our advice is to switch to Wondershare Filmora. Not only does Filmora offer a cost-effective solution, but it is also much easier to use and provides high-quality recordings without lag.
Also read:
- In 2024, Top 11 Best Video Editing Apps for iPhone
- Updated In 2024, Top 20 Slideshow Makers for Win/Mac/Online Review
- Updated In 2024, Best Ways to Convert Video Frame Rate to 60FPS Software and Online Choices
- New Are You Aware that You Can Create Your Own Lower Thirds for Video? Read This Article for a Tutorial on How to Customize One
- New 2024 Approved How to Add Font Effect
- New How to Split a Video Into Parts on All Platforms for 2024
- Updated Best Tricks for Learning Photo Slideshow
- New How to Stabilize Videos for Free with Google Photos App
- New 2024 Approved Stunning Glitch Effect and Its Creation Steps for Premiere Pro
- Updated 2024 Approved Add Zoom Blur Effect In Photoshop Step by Step
- New How to Add Freeze Frame to Your Video From Any Device, In 2024
- 2024 Approved Do You Want to Know Which Are the Best Wondershare Filmora LUTs to Use? There Are Many LUTs that You Can Download, Each with a Different Tone and Style
- 2024 Approved 6 Instant Mp4 to GIF Online Tools
- Updated In 2024, Do You Know How AI Is Helping Video Editors and Enthusiasts? Many Video Editing Software Allows an Auto Reframe Option to Use that Can Help Manage Videos
- Updated Are You Searching for the Best Cinematic LUTs for Premiere Pro? You Are in the Right Place because This Article Is Dedicated to LUTs for 2024
- New Convert MP4 to 60 FPS GIF A Step-by-Step Guide for 2024
- 2024 Approved Use This Color Match Paint Technique to Find the Exact Shade of Any Hue You Have in Mind for Your Paint Project. Match the Paint to Your Desired Color Even without Knowing the Paint Name or Brand with Automotive Paint Matching
- Updated In 2024, Best 10 Tools to Convert a GIF Into a PDF
- Updated 2024 Approved Offering The Best Understanding of Performing iMovie Slow Motion Video
- New Which Is the Best Video Slideshow Maker Available Online? Methods to Prepare Custom Slideshows for Google Presentation. How to Make a Slide Show Video?
- Updated In 2024, Its Always a Cool Thing to Use a 3D Intro Maker to Create Intro Videos for Your Clips. This Post Will Introduce You 4 of the Best Intro Video Makers to Help You Improve Your Video
- New How to Customize Your Loading Text Effect?
- New In 2024, 3 Methods to Combine 2 or 3 Videos Into 1
- Updated How To Quickly Create A Screen Print Effect In Photoshop Detailed Gui for 2024
- Updated In This Article, We Are Going to Learn the Simplest Procedure on How to Cut And/Or Trim Videos Using VLC Media Player. Each Step Is Carefully Explained, with Screenshots Attached
- How to Fix Error 495 While Download/Updating Android Apps On HTC U23 | Dr.fone
- In 2024, How to Transfer Contacts from Realme C51 to Other Android Devices Using Bluetooth? | Dr.fone
- In 2024, Forgot Your Apple ID Password and Email From Apple iPhone 12 Pro? Heres the Best Fixes
- Best Android Data Recovery - Retrieve Lost Contacts from Oppo Find X6 Pro.
- In 2024, A Working Guide For Pachirisu Pokemon Go Map On Apple iPhone SE | Dr.fone
- In 2024, How to Bypass FRP from Infinix Hot 30i?
- How to Easily Hard reset my Oppo Reno 10 Pro+ 5G | Dr.fone
- In 2024, Different Methods To Unlock Your iPhone SE (2022) | Dr.fone
- Top 6 Apps/Services to Trace Any ZTE Blade A73 5G Location By Mobile Number | Dr.fone
- How to Stop Google Chrome from Tracking Your Location On Samsung Galaxy XCover 6 Pro Tactical Edition? | Dr.fone
- In 2024, How to Spy on Text Messages from Computer & Motorola Moto G84 5G | Dr.fone
- Ways to trade pokemon go from far away On Apple iPhone 15 Pro Max? | Dr.fone
- In 2024, 5 Ways to Track Apple iPhone 12 Pro without App | Dr.fone
- How To Change Your Apple ID on Apple iPhone XS Max With or Without Password
- Disable screen lock on Nokia 105 Classic
- Title: Updated Adjust the TikTok Videos Length to Make Them Captivating
- Author: Morgan
- Created at : 2024-05-19 05:11:51
- Updated at : 2024-05-20 05:11:51
- Link: https://ai-video-editing.techidaily.com/updated-adjust-the-tiktok-videos-length-to-make-them-captivating/
- License: This work is licensed under CC BY-NC-SA 4.0.
