:max_bytes(150000):strip_icc():format(webp)/sofya-NomETWcv2Fo-unsplash-be3fc2855a7e477db0273993fd22e822.jpg)
Updated Beginners Guide to Green Screen Keying for 2024

Beginners Guide to Green Screen Keying
Did they have dinner on Mars? Photographers are becoming more daring with their creations thanks to the advancement in editing software. For example, after effects green screen keying allows you to alter your image’s background during post-production.

The following is all you need to know about the green screen key effect and how to apply it using different video editing software. In addition, you will discover why the effect is popular with video editors. Keep reading to find out more.
Part1: What is keying in green screen?
Keying refers to a post-production process of separating and isolating an image’s aspects using color or brightness. Typically, filmmakers use it to remove green screens and make color corrections to add warmth to the subjects’ skin tones.
It involves identifying a color or brightness value that you will make transparent in the photo. In addition, you can use two types of keys during the keying process.
Chroma Keys
These allow you to select a specific color in your image and make everything that features the color transparent. Typically, chrome keys are best for images and videos featuring lots of green or blue backgrounds.
Luma Keys
Alternatively, you can use luma keys to determine which backgrounds will be transparent according to the brightness level. In addition, you can use them to designate the backgrounds you want opaque in your final image.
So, why do filmmakers prefer using a green screen? First, green is not a natural color in human skin tones. As such, it allows you more creative freedom with your shots. In addition, most digital cameras feature more green photosites allowing you to capture more details in your shots and making it the default choice for filmmakers.
However, you can also use a blue screen for your shots if green is your subject’s main color scheme. This is because blue is also rare among human subjects and allows you greater flexibility than any other background alternative.
Using a green screen key is an important skill to learn as a filmmaker. This is because it allows you more creative freedom resulting in more iconic images and photos. Although most video editing software allows you to apply the effect easily, it still requires finesse.
For example, using after effects green screen keying incorrectly can result in spill issues. This is when the green light from your screen bounces back to your subject. As such, you lose some subject detail, and the image appears messy.
Furthermore, not all video editing software includes the green screen key tool. Therefore, always check your software details before purchasing a copy. The next section contains step-by-step guides on performing green screen keying on some of the industry’s most popular software.
Part2: How to do Green Screen Keying in After Effects?
Adobe After Effects green screen keying tool is arguably one of the top favorites for filmmakers. It features a user-friendly interface, and several keying presets you can use to achieve incredible photo finishes. For example, the Keylight effect is an Academy Award-winning preset you can use to apply professional-quality color keying.
Follow these steps to do green screen keying using Adobe After Effects.
1. Upload your footage to Adobe After Effects

Launch the program from your macOS or Windows device, and click on the New Composition From Footage option. A pop-up window with your file locations will appear and click on the footage you want to import. Ensure the footage you use is shot using a green screen background to achieve the best results.
2. Using the green screen key presets
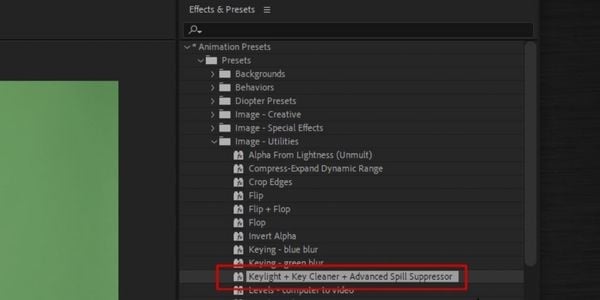
Once the footage is imported, click on the Window menu option on your workspace, and click on Effects & Presets from the sub-menu. Once the panel opens, tap Animation Presets and highlight the Keylight + Key Cleaner + Advanced Spill Suppressor preset from the Image-Utilities menu.
3. Drag and drop the preset to your footage
Then drag and drop the effect to your uploaded footage to begin the keying process. The green screen key preset applies three effects to your image:
- Keylight effect.
The effect allows you to select the background color you want to make transparent. First, select the green screen background by clicking on Screen Color and selecting Color Picker. Then apply the effect by clicking on the green background closest to your subject.
- Key cleaner effect.
The key cleaner effect sharpens your subject’s edges for a more detailed finish. In addition, you will rarely adjust its values because it automatically corresponds to the changes you make using the Keylight effect. However, you can adjust the Additional Edge Radius and Reduce Chatter options to decrease the visible noise of your image. Furthermore, you can use the Alpha Contrast adjustment to increase the sharpness of your subject’s edges.
- Advanced spill suppressor.
Sometimes your green screen background can spill to your subject’s edges resulting in a messy outline. For example, you may find a green outline on your subject’s hair or clothing. The Advanced Spill Suppressor eliminates these outlines automatically. You can enable the effect by clicking the check box next to the effect from the Animation Presets panel.
4. Apply a new background
Once you apply the green screen key effect, you can add any custom background to your footage. You need to Import the file to your After Effects library and then drag & drop it into your footage’s timeline.
Remember, you must have an active Adobe After Effects license to access the green screen keying feature. In addition, you get access to Adobe Creative Cloud, which offers access to creative asset libraries such as Behance and Adobe Fonts. Alternatively, you can check out the free 7-day trial available to all new users.
Part3: How to do Green Screen Keying in Filmora? [Free& Easy]
Filmora is another popular video editing software that features a green screen editor as part of its effects. The tool, officially known as Chroma Key, allows you to swap your image backgrounds using different colors or images from your internal library.
In addition, the tool is available as a free trial for Windows and macOS devices. However, you will only find it on Filmora version 9 and above. Here is a step-by-step guide on green screen keying using Chroma Key on Filmora.
1. Upload your footage to Filmora

Launch the program on your device and click on the New Project option. A window will open where you can Import your green screen footage and the desired background. Once done, you will Drag and Drop the clips to your project’s first and second tracks in the timeline.
2. Adjust your green screen settings
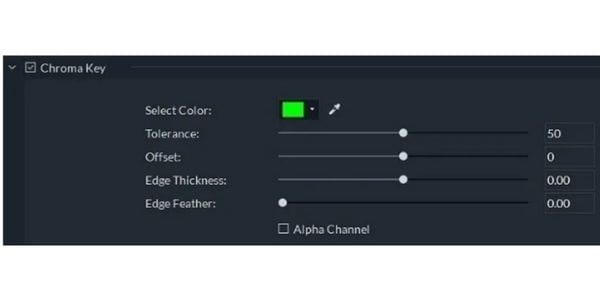
Then, double-click your green screen footage to open the Edit Panel. Select the Video Tab and check the Chroma Key box to enable the effect. Once done, you can use the following tools to edit your footage:
- Alpha Channel
The tool allows you to edit the footage’s borders, transparency, and shadows by displaying your image in black and white. The areas you have successfully keyed out will be in black and the rest in white or grey, depending on the severity.
- Offset
The offset tool allows you to change the visibility of your background.
- Edge Feathering.
You use this tool to soften your subject’s edges during green screen keying.
- Edge Thickness.
The edge thickness tool helps you increase the sharpness of your subject’s edges. As such, they appear more detailed resulting in a clear and well-balanced photo.
3. Merge the new background
Once you complete the green screen keying, merging the new background is next. You do this by seamlessly positioning the background to fit your green screen footage. Then, the Filmora Chroma key tool will merge the images or footage and make it appear as one clip.
4. Export your content
Finally, you can export your content in multiple formats to suit your desired platform. For example, you can export the file in either MP4, WMV, or MOV to share on most social media platforms.
Please note that you need an active Filmora subscription to use Chroma Key. In addition, you can subscribe to individual and business plans depending on your requirements. However, any creations using the Filmora Individual plan require you to mention the software in their description.
Part4: FAQs
1. Is there a difference between chroma keying and green screening?
No. There is no difference between chroma keying and green screening. Both processes involve you replacing a specific color in your image and replacing it with a new background. In addition, some filmmakers use the terms synonymously because green is the best color to use when chroma keying. However, you can also use other colors for your chroma keying, with blue being the next best alternative.
2. Can you create a green screen video without using a green screen background?
Yes. It is possible to create a green screen video without a green background. Several apps, including Zoom and Tik Tok, have in-built digital green screens, which you can use to customize your creations. However, you need to have a capable device to access the function.
Free Download For Win 7 or later(64-bit)
Free Download For macOS 10.14 or later
How to Use Twixtor Effect to Add Slow-Motion Effect to Video?
Twixtor is a plug-in program for the After Effects software that allows you to create slow-motion effects from any video clip by adjusting the settings of the plug-in software. But what Twixtor is and why it is utilized are the topics we will cover in this article.
In addition, we will learn how to manipulate its characteristics to get the best possible outcome for our working composition in the Premiere Pro and After Effects plug-ins. Without any further ado, let’s get straight to the business!
In this article
01 What is Twixtor and How Does It Work?
02 How to Use Twixtor to Create Super Slow-Mo in Adobe Premiere Pro?
03 How to Create Super Slow Motion in After Effects with Twixtor?
04 How to Get the Twixtor Style Effect on iPhone?
Part 1: What is Twixtor and How Does It Work?
Twixtor is a plug-in developed by RevisionFX. It is available for purchase. The plug-in gives users the ability to speed up, slow down, or convert the frame rate of picture sequences, all with special effects. Twixtor can visually estimate what a video is meant to look like in a slow-motion setting using video analysis and interoperability.
Due to the need for unparalleled image quality, RE: Vision Effects developed unique tracking technology that determines every individual pixel’s motion. This technology allows Twixtor to synthesize new innovative frames by warping and interpolating frames from the original sequence, resulting in unprecedented image quality.
Reset the clock to a single-speed setting. Always remember that you can customize the retiming on a frame-by-frame basis!
When items are crossing in the scene, Twixtor is more accurate and shows fewer artifacts than other rendering engines. This reduces the ripping and stretching of items when they cross the frame or exit it completely.
But how does Twixtor work is the million-dollar question! While Premiere includes the ability to slow down your film and has a newer, better-quality version dubbed Optical Flow, it cannot zoom in on your footage (called Pixel Motion in After Effects).
The slow-motion quality is undoubtedly superior to that of simple frame blending, but it is not the finest grade slow motion available. The TWIXTOR from Re: Vision Effects has long been the go-to solution for the most excellent post-slow motion. It is pricey, but it is well worth it.
The Pro edition provides you with the opportunity to fine-tune the pitch of the auto track, as well as the option to employ mattes and alphas to enrich your tracks and the ability to deal with motion vectors from a 3D system, among other features.
Part 2: How to Use Twixtor to Create Super Slow-Mo in Adobe Premiere Pro?
As we’ve already mentioned, we will be analyzing how Twixtor makes slow mos; we will be starting with the Adobe Premiere Pro. The following are the steps you need to learn to perform it yourself.
Step 1: After importing the video to the timeline, do some basic editing such as trimming and removing audio from the video.

Step 2: Nest the sequence to convert the video into a new sequence automatically.
Step 3: Go to the Effects tab and search for Twixtor, and then drop the Twixtor Pro to the video clip in the timeline.

Step 5: Right-click the video in the timeline again and scroll down to Show Clip Keyframes to enable the Speed option under Time Remapping. You can now enable the GPU acceleration to fast rendering.
Step 6: Click the Keyframe icon to mark the points where you want to begin with the slow-motion effect, and then mark the end part of the slow-motion effect video.

Step 7: Now, drag the line lower to add a slo-mo effect to video.

Remember that your video can sometimes lag if you set the video speed at a meager percentage. To avoid that, utilize settings in a better way to ensure your video works flawlessly.
Part 3: How to Create Super Slow Motion in After Effects with Twixtor?
When working with After Effects software, Twixtor is a convenient plug-in since it allows us to create slow-motion effects from any video source.
We’ll look at an example to better comprehend what we’re talking about in this post. Before we begin our study of the Twixtor plug-in, let us get acquainted with the software’s operating screen to quickly understand the content of this article as we go through our assessment of the Twixtor plug-in.
Step 1: When you launch After Effects, go to File>Import>File to import your footage. Here you can see the actual frame rate of your film. You may drag your film onto the timeline by right-clicking it and selecting New Comp from Selection.
Step 2: Select your video from the timeline in the composition, then go to Effects & Presets pane to search Twixtor, and you will find Twixtor or Twixtor Pro under RE: Vision plug-ins, depending on your version. Drag and drop it to the video in the timeline.

Step 3: In the Twixtor effect controls, enter the frame rate of the film you found previously. The faster and better your slowed footage will become, the higher the frame rate.
For organizational reasons, After Effects employs the “tree-ing“ concept, sometimes known as drop-down menus. Click on the yellow number next to Input: Frame Rate under Source Control. It should be set to 29.97 by default. Please set it to the frame rate you discovered previously in the tutorial.

You can then adjust the speed and time remap mode accordingly. For more information, you can watch the video tutorial below to find out how to create smooth Twixtor effects in Adobe After Effects.
Part 4: How to Get the Twixtor Style Effect on iPhone?
It is possible to shoot videos in slow motion and then play them back at average speed using SloPro – 1000fps Slow Motion Video from Sand Mountain Studios, a fantastic video editing effects tool.
Inserting slow motion cues and changing playback speeds without waiting is possible with renderless editing. It allows you to produce slow-motion films and enables you to insert extremely rapid sequences and cycle between various speeds.
SloPro even enables you to edit your films as they are being recorded, allowing you to choose between slow and fast motion while recording.
This program provides complete support for sharing through social media platforms such as Facebook, Twitter, and YouTube, allowing you to show off your impressive video creations to the rest of the world. It has already been established that SloPro is one of the few videos editing software that includes optical flow as a stand-alone effect.

Step 1: After you’ve imported your video, click on the red Edit button in the top-right corner of the screen to bring up the editing window.
Step 2: Trim the video down to the section that you wish to modify if required using the Clip In and Clip Out functions. It is divided into clips using the speed in and speeds out controls.
Step 3: Tap on the top-left box to bring up a list of fast and slow speed choices. Drag the cursor over the clip to bring up a fast and slow speed options list.
Step 4: If you want to use a slow speed, press the box in the upper right corner and choose Optical Flow from the menu.
This will render the clip with optical flow, resulting in the smooth Twixtor effect you are familiar with. There will be a watermark on your video if you use the program’s free version, but you can easily crop it out.
Conclusion
Slow-Mo videos are undoubtedly watch-worthy. They allow us to observe the fine details and appreciate the video content. But creating one isn’t child’s play. So, we decided to compile this article to inform our worthy readers on how they can get started using Twixtor on Adobe Premiere Pro and After Effects. We hope you had a fun time learning!
02 How to Use Twixtor to Create Super Slow-Mo in Adobe Premiere Pro?
03 How to Create Super Slow Motion in After Effects with Twixtor?
04 How to Get the Twixtor Style Effect on iPhone?
Part 1: What is Twixtor and How Does It Work?
Twixtor is a plug-in developed by RevisionFX. It is available for purchase. The plug-in gives users the ability to speed up, slow down, or convert the frame rate of picture sequences, all with special effects. Twixtor can visually estimate what a video is meant to look like in a slow-motion setting using video analysis and interoperability.
Due to the need for unparalleled image quality, RE: Vision Effects developed unique tracking technology that determines every individual pixel’s motion. This technology allows Twixtor to synthesize new innovative frames by warping and interpolating frames from the original sequence, resulting in unprecedented image quality.
Reset the clock to a single-speed setting. Always remember that you can customize the retiming on a frame-by-frame basis!
When items are crossing in the scene, Twixtor is more accurate and shows fewer artifacts than other rendering engines. This reduces the ripping and stretching of items when they cross the frame or exit it completely.
But how does Twixtor work is the million-dollar question! While Premiere includes the ability to slow down your film and has a newer, better-quality version dubbed Optical Flow, it cannot zoom in on your footage (called Pixel Motion in After Effects).
The slow-motion quality is undoubtedly superior to that of simple frame blending, but it is not the finest grade slow motion available. The TWIXTOR from Re: Vision Effects has long been the go-to solution for the most excellent post-slow motion. It is pricey, but it is well worth it.
The Pro edition provides you with the opportunity to fine-tune the pitch of the auto track, as well as the option to employ mattes and alphas to enrich your tracks and the ability to deal with motion vectors from a 3D system, among other features.
Part 2: How to Use Twixtor to Create Super Slow-Mo in Adobe Premiere Pro?
As we’ve already mentioned, we will be analyzing how Twixtor makes slow mos; we will be starting with the Adobe Premiere Pro. The following are the steps you need to learn to perform it yourself.
Step 1: After importing the video to the timeline, do some basic editing such as trimming and removing audio from the video.

Step 2: Nest the sequence to convert the video into a new sequence automatically.
Step 3: Go to the Effects tab and search for Twixtor, and then drop the Twixtor Pro to the video clip in the timeline.

Step 5: Right-click the video in the timeline again and scroll down to Show Clip Keyframes to enable the Speed option under Time Remapping. You can now enable the GPU acceleration to fast rendering.
Step 6: Click the Keyframe icon to mark the points where you want to begin with the slow-motion effect, and then mark the end part of the slow-motion effect video.

Step 7: Now, drag the line lower to add a slo-mo effect to video.

Remember that your video can sometimes lag if you set the video speed at a meager percentage. To avoid that, utilize settings in a better way to ensure your video works flawlessly.
Part 3: How to Create Super Slow Motion in After Effects with Twixtor?
When working with After Effects software, Twixtor is a convenient plug-in since it allows us to create slow-motion effects from any video source.
We’ll look at an example to better comprehend what we’re talking about in this post. Before we begin our study of the Twixtor plug-in, let us get acquainted with the software’s operating screen to quickly understand the content of this article as we go through our assessment of the Twixtor plug-in.
Step 1: When you launch After Effects, go to File>Import>File to import your footage. Here you can see the actual frame rate of your film. You may drag your film onto the timeline by right-clicking it and selecting New Comp from Selection.
Step 2: Select your video from the timeline in the composition, then go to Effects & Presets pane to search Twixtor, and you will find Twixtor or Twixtor Pro under RE: Vision plug-ins, depending on your version. Drag and drop it to the video in the timeline.

Step 3: In the Twixtor effect controls, enter the frame rate of the film you found previously. The faster and better your slowed footage will become, the higher the frame rate.
For organizational reasons, After Effects employs the “tree-ing“ concept, sometimes known as drop-down menus. Click on the yellow number next to Input: Frame Rate under Source Control. It should be set to 29.97 by default. Please set it to the frame rate you discovered previously in the tutorial.

You can then adjust the speed and time remap mode accordingly. For more information, you can watch the video tutorial below to find out how to create smooth Twixtor effects in Adobe After Effects.
Part 4: How to Get the Twixtor Style Effect on iPhone?
It is possible to shoot videos in slow motion and then play them back at average speed using SloPro – 1000fps Slow Motion Video from Sand Mountain Studios, a fantastic video editing effects tool.
Inserting slow motion cues and changing playback speeds without waiting is possible with renderless editing. It allows you to produce slow-motion films and enables you to insert extremely rapid sequences and cycle between various speeds.
SloPro even enables you to edit your films as they are being recorded, allowing you to choose between slow and fast motion while recording.
This program provides complete support for sharing through social media platforms such as Facebook, Twitter, and YouTube, allowing you to show off your impressive video creations to the rest of the world. It has already been established that SloPro is one of the few videos editing software that includes optical flow as a stand-alone effect.

Step 1: After you’ve imported your video, click on the red Edit button in the top-right corner of the screen to bring up the editing window.
Step 2: Trim the video down to the section that you wish to modify if required using the Clip In and Clip Out functions. It is divided into clips using the speed in and speeds out controls.
Step 3: Tap on the top-left box to bring up a list of fast and slow speed choices. Drag the cursor over the clip to bring up a fast and slow speed options list.
Step 4: If you want to use a slow speed, press the box in the upper right corner and choose Optical Flow from the menu.
This will render the clip with optical flow, resulting in the smooth Twixtor effect you are familiar with. There will be a watermark on your video if you use the program’s free version, but you can easily crop it out.
Conclusion
Slow-Mo videos are undoubtedly watch-worthy. They allow us to observe the fine details and appreciate the video content. But creating one isn’t child’s play. So, we decided to compile this article to inform our worthy readers on how they can get started using Twixtor on Adobe Premiere Pro and After Effects. We hope you had a fun time learning!
02 How to Use Twixtor to Create Super Slow-Mo in Adobe Premiere Pro?
03 How to Create Super Slow Motion in After Effects with Twixtor?
04 How to Get the Twixtor Style Effect on iPhone?
Part 1: What is Twixtor and How Does It Work?
Twixtor is a plug-in developed by RevisionFX. It is available for purchase. The plug-in gives users the ability to speed up, slow down, or convert the frame rate of picture sequences, all with special effects. Twixtor can visually estimate what a video is meant to look like in a slow-motion setting using video analysis and interoperability.
Due to the need for unparalleled image quality, RE: Vision Effects developed unique tracking technology that determines every individual pixel’s motion. This technology allows Twixtor to synthesize new innovative frames by warping and interpolating frames from the original sequence, resulting in unprecedented image quality.
Reset the clock to a single-speed setting. Always remember that you can customize the retiming on a frame-by-frame basis!
When items are crossing in the scene, Twixtor is more accurate and shows fewer artifacts than other rendering engines. This reduces the ripping and stretching of items when they cross the frame or exit it completely.
But how does Twixtor work is the million-dollar question! While Premiere includes the ability to slow down your film and has a newer, better-quality version dubbed Optical Flow, it cannot zoom in on your footage (called Pixel Motion in After Effects).
The slow-motion quality is undoubtedly superior to that of simple frame blending, but it is not the finest grade slow motion available. The TWIXTOR from Re: Vision Effects has long been the go-to solution for the most excellent post-slow motion. It is pricey, but it is well worth it.
The Pro edition provides you with the opportunity to fine-tune the pitch of the auto track, as well as the option to employ mattes and alphas to enrich your tracks and the ability to deal with motion vectors from a 3D system, among other features.
Part 2: How to Use Twixtor to Create Super Slow-Mo in Adobe Premiere Pro?
As we’ve already mentioned, we will be analyzing how Twixtor makes slow mos; we will be starting with the Adobe Premiere Pro. The following are the steps you need to learn to perform it yourself.
Step 1: After importing the video to the timeline, do some basic editing such as trimming and removing audio from the video.

Step 2: Nest the sequence to convert the video into a new sequence automatically.
Step 3: Go to the Effects tab and search for Twixtor, and then drop the Twixtor Pro to the video clip in the timeline.

Step 5: Right-click the video in the timeline again and scroll down to Show Clip Keyframes to enable the Speed option under Time Remapping. You can now enable the GPU acceleration to fast rendering.
Step 6: Click the Keyframe icon to mark the points where you want to begin with the slow-motion effect, and then mark the end part of the slow-motion effect video.

Step 7: Now, drag the line lower to add a slo-mo effect to video.

Remember that your video can sometimes lag if you set the video speed at a meager percentage. To avoid that, utilize settings in a better way to ensure your video works flawlessly.
Part 3: How to Create Super Slow Motion in After Effects with Twixtor?
When working with After Effects software, Twixtor is a convenient plug-in since it allows us to create slow-motion effects from any video source.
We’ll look at an example to better comprehend what we’re talking about in this post. Before we begin our study of the Twixtor plug-in, let us get acquainted with the software’s operating screen to quickly understand the content of this article as we go through our assessment of the Twixtor plug-in.
Step 1: When you launch After Effects, go to File>Import>File to import your footage. Here you can see the actual frame rate of your film. You may drag your film onto the timeline by right-clicking it and selecting New Comp from Selection.
Step 2: Select your video from the timeline in the composition, then go to Effects & Presets pane to search Twixtor, and you will find Twixtor or Twixtor Pro under RE: Vision plug-ins, depending on your version. Drag and drop it to the video in the timeline.

Step 3: In the Twixtor effect controls, enter the frame rate of the film you found previously. The faster and better your slowed footage will become, the higher the frame rate.
For organizational reasons, After Effects employs the “tree-ing“ concept, sometimes known as drop-down menus. Click on the yellow number next to Input: Frame Rate under Source Control. It should be set to 29.97 by default. Please set it to the frame rate you discovered previously in the tutorial.

You can then adjust the speed and time remap mode accordingly. For more information, you can watch the video tutorial below to find out how to create smooth Twixtor effects in Adobe After Effects.
Part 4: How to Get the Twixtor Style Effect on iPhone?
It is possible to shoot videos in slow motion and then play them back at average speed using SloPro – 1000fps Slow Motion Video from Sand Mountain Studios, a fantastic video editing effects tool.
Inserting slow motion cues and changing playback speeds without waiting is possible with renderless editing. It allows you to produce slow-motion films and enables you to insert extremely rapid sequences and cycle between various speeds.
SloPro even enables you to edit your films as they are being recorded, allowing you to choose between slow and fast motion while recording.
This program provides complete support for sharing through social media platforms such as Facebook, Twitter, and YouTube, allowing you to show off your impressive video creations to the rest of the world. It has already been established that SloPro is one of the few videos editing software that includes optical flow as a stand-alone effect.

Step 1: After you’ve imported your video, click on the red Edit button in the top-right corner of the screen to bring up the editing window.
Step 2: Trim the video down to the section that you wish to modify if required using the Clip In and Clip Out functions. It is divided into clips using the speed in and speeds out controls.
Step 3: Tap on the top-left box to bring up a list of fast and slow speed choices. Drag the cursor over the clip to bring up a fast and slow speed options list.
Step 4: If you want to use a slow speed, press the box in the upper right corner and choose Optical Flow from the menu.
This will render the clip with optical flow, resulting in the smooth Twixtor effect you are familiar with. There will be a watermark on your video if you use the program’s free version, but you can easily crop it out.
Conclusion
Slow-Mo videos are undoubtedly watch-worthy. They allow us to observe the fine details and appreciate the video content. But creating one isn’t child’s play. So, we decided to compile this article to inform our worthy readers on how they can get started using Twixtor on Adobe Premiere Pro and After Effects. We hope you had a fun time learning!
02 How to Use Twixtor to Create Super Slow-Mo in Adobe Premiere Pro?
03 How to Create Super Slow Motion in After Effects with Twixtor?
04 How to Get the Twixtor Style Effect on iPhone?
Part 1: What is Twixtor and How Does It Work?
Twixtor is a plug-in developed by RevisionFX. It is available for purchase. The plug-in gives users the ability to speed up, slow down, or convert the frame rate of picture sequences, all with special effects. Twixtor can visually estimate what a video is meant to look like in a slow-motion setting using video analysis and interoperability.
Due to the need for unparalleled image quality, RE: Vision Effects developed unique tracking technology that determines every individual pixel’s motion. This technology allows Twixtor to synthesize new innovative frames by warping and interpolating frames from the original sequence, resulting in unprecedented image quality.
Reset the clock to a single-speed setting. Always remember that you can customize the retiming on a frame-by-frame basis!
When items are crossing in the scene, Twixtor is more accurate and shows fewer artifacts than other rendering engines. This reduces the ripping and stretching of items when they cross the frame or exit it completely.
But how does Twixtor work is the million-dollar question! While Premiere includes the ability to slow down your film and has a newer, better-quality version dubbed Optical Flow, it cannot zoom in on your footage (called Pixel Motion in After Effects).
The slow-motion quality is undoubtedly superior to that of simple frame blending, but it is not the finest grade slow motion available. The TWIXTOR from Re: Vision Effects has long been the go-to solution for the most excellent post-slow motion. It is pricey, but it is well worth it.
The Pro edition provides you with the opportunity to fine-tune the pitch of the auto track, as well as the option to employ mattes and alphas to enrich your tracks and the ability to deal with motion vectors from a 3D system, among other features.
Part 2: How to Use Twixtor to Create Super Slow-Mo in Adobe Premiere Pro?
As we’ve already mentioned, we will be analyzing how Twixtor makes slow mos; we will be starting with the Adobe Premiere Pro. The following are the steps you need to learn to perform it yourself.
Step 1: After importing the video to the timeline, do some basic editing such as trimming and removing audio from the video.

Step 2: Nest the sequence to convert the video into a new sequence automatically.
Step 3: Go to the Effects tab and search for Twixtor, and then drop the Twixtor Pro to the video clip in the timeline.

Step 5: Right-click the video in the timeline again and scroll down to Show Clip Keyframes to enable the Speed option under Time Remapping. You can now enable the GPU acceleration to fast rendering.
Step 6: Click the Keyframe icon to mark the points where you want to begin with the slow-motion effect, and then mark the end part of the slow-motion effect video.

Step 7: Now, drag the line lower to add a slo-mo effect to video.

Remember that your video can sometimes lag if you set the video speed at a meager percentage. To avoid that, utilize settings in a better way to ensure your video works flawlessly.
Part 3: How to Create Super Slow Motion in After Effects with Twixtor?
When working with After Effects software, Twixtor is a convenient plug-in since it allows us to create slow-motion effects from any video source.
We’ll look at an example to better comprehend what we’re talking about in this post. Before we begin our study of the Twixtor plug-in, let us get acquainted with the software’s operating screen to quickly understand the content of this article as we go through our assessment of the Twixtor plug-in.
Step 1: When you launch After Effects, go to File>Import>File to import your footage. Here you can see the actual frame rate of your film. You may drag your film onto the timeline by right-clicking it and selecting New Comp from Selection.
Step 2: Select your video from the timeline in the composition, then go to Effects & Presets pane to search Twixtor, and you will find Twixtor or Twixtor Pro under RE: Vision plug-ins, depending on your version. Drag and drop it to the video in the timeline.

Step 3: In the Twixtor effect controls, enter the frame rate of the film you found previously. The faster and better your slowed footage will become, the higher the frame rate.
For organizational reasons, After Effects employs the “tree-ing“ concept, sometimes known as drop-down menus. Click on the yellow number next to Input: Frame Rate under Source Control. It should be set to 29.97 by default. Please set it to the frame rate you discovered previously in the tutorial.

You can then adjust the speed and time remap mode accordingly. For more information, you can watch the video tutorial below to find out how to create smooth Twixtor effects in Adobe After Effects.
Part 4: How to Get the Twixtor Style Effect on iPhone?
It is possible to shoot videos in slow motion and then play them back at average speed using SloPro – 1000fps Slow Motion Video from Sand Mountain Studios, a fantastic video editing effects tool.
Inserting slow motion cues and changing playback speeds without waiting is possible with renderless editing. It allows you to produce slow-motion films and enables you to insert extremely rapid sequences and cycle between various speeds.
SloPro even enables you to edit your films as they are being recorded, allowing you to choose between slow and fast motion while recording.
This program provides complete support for sharing through social media platforms such as Facebook, Twitter, and YouTube, allowing you to show off your impressive video creations to the rest of the world. It has already been established that SloPro is one of the few videos editing software that includes optical flow as a stand-alone effect.

Step 1: After you’ve imported your video, click on the red Edit button in the top-right corner of the screen to bring up the editing window.
Step 2: Trim the video down to the section that you wish to modify if required using the Clip In and Clip Out functions. It is divided into clips using the speed in and speeds out controls.
Step 3: Tap on the top-left box to bring up a list of fast and slow speed choices. Drag the cursor over the clip to bring up a fast and slow speed options list.
Step 4: If you want to use a slow speed, press the box in the upper right corner and choose Optical Flow from the menu.
This will render the clip with optical flow, resulting in the smooth Twixtor effect you are familiar with. There will be a watermark on your video if you use the program’s free version, but you can easily crop it out.
Conclusion
Slow-Mo videos are undoubtedly watch-worthy. They allow us to observe the fine details and appreciate the video content. But creating one isn’t child’s play. So, we decided to compile this article to inform our worthy readers on how they can get started using Twixtor on Adobe Premiere Pro and After Effects. We hope you had a fun time learning!
How to Change Aspect Ratio of Video?
Versatile Video Editor - Wondershare Filmora
Videos are a great way to complete the whole story in one go. In social media, videography, entertainment, educational video sharing, or many more areas, viewers and their viewing experience matter a lot. For instance, if a person visited YouTube to see some educational content but finds it out that the overall view of the video content is not up to the mark. Then, what will happen? That person will switch to another channel, which is not good for your business area. Thus, knowing the correct aspect ratio for your video is very important. Here, the aspect ratio refers to the ratio of width to the height of the Video or image visible on the screen. So, here you will learn about ways to change the ratio of a video and how to change video dimensions on premiere pro or iOS devices.

In this article
01 [Change aspect Ratio with Softwares](#Part 1)
02 [Change Video aspect Ratio Online](#Part 2)
03 [Make sure which aspect Ratio You Want to Change](#Part 3)
Part 1 Change aspect Ratio with Softwares
1.1 For beginners & most people
This part is for beginners or people who are not aware of the technicalities related to video size, dimensions, or changing the ratio of Video. A quick and easy-to-use application is Wondershare Filmora, one of the widely used platforms for video editing and adopting it s per the video requirement.
Thus, let’s try to understand how you can change the Video’s aspect ratio using Filmora.
Step1 Download and open the Software
First, visit the official link of Wondershare Filmora and download, install and lunch the tool on your system.
Step2 Set the aspect ratio and upload your file
Right from the main interface, you will find the aspect ratio option. Using the drop-down menu, select the desired one to change the ratio of Video. After that, click on the new project to upload your video file.
Step3 Save and Export
Now, when you upload the video file, it will automatically modify the chosen aspect ratio for the video. Then export the file to save at the desired location on your system.

1.2 For Professional People
Now, here comes the guidance to those professional videographers, movie maker who needs an advanced version to change video size or aspect ratio.
Since you are already aware of technicalities to a certain extent, it becomes easy to use some advanced tools to change the aspect ratio of Video using adobe and OBS Software.
● Adobe PR
The first tool that we shall discuss is Adobe PR, and we will learn how to use Adobe Premiere Pro to change the Video’s aspect ratio. This tool is valuable for worldwide users explicitly working in the video editing field or dedicated professionals who need some technical knowledge to understand the interface. Here are the required steps to handle the adobe PR to change aspect Ratio iPhone Video devices.
Open the ‘File’ Menu> then Go to the ‘New’ Folder > after that, visit the ‘Sequence’ (dialog box) That will give the option of ‘Settings,’ select it> then visit the ‘Video’ section. Then, from the Video section, you need to adjust the Frame size for height and the Horizontal value for width.
Then opt for ‘OK.’
● OBS Studio
Those who know are pretty aware of the professional OBS studio full of features and technical detailing. In this part, you shall see how to use OBS software to change the iMovie aspect ratio following the mentioned steps.
Here, you need to open the ‘Settings .’ Under the ‘Video’ subsection, you will see ‘Output Resolution’ (click on drop-down), then from the given aspect ratios, change the ratio of your Video. Then, press the OK button to apply the changes at the end. That’s it.
Using this professional software will make you able to change the aspect ratio on iPhone Video and change the aspect ratio MP4, MKV, FLV, or other formats. The only need is to have a basic understanding of the technical knowledge related to the software. If you’re already a professional video maker, this software will be the most option.
Part 2 Change Video aspect Ratio Online
Till now, we have covered different software as per the user requirements. Suppose you are not comfortable with downloading any software on your devices. In that case, there are some alternatives for Online Video Editors to change video aspect ratio with ease. Let’s take a look over some of the easy-to-use online tools to change the ratio of the Video. Such tools are quick to use and accessible worldwide. Some of them are mentioned below:
1. veed.io
You can effortlessly change the aspect ratio of your video using ‘Veed.io’. Which supports multiple video formats such as .wmv, .mp4, .mkv, .flv, .3gp and many more. While uploading the video, you need to mention the required width and height of the video and then click on the ‘Resize’ button.
2. Kapwing (kapwing.com)
Another helpful tool while searching for some quick tools to change the ratio of Video through online mode is Kapwing Online Convertor. You can scale, resize your Video by simply uploading your file or pasting the URL there. The interface is quite simple to use and changes the aspect ratio of MP4 or other format videosThere is noNo doubt accessing some online tools to change the Video’s aspect ratio in quick and easy steps. Though there exist certain limitations such as internet connection speed should be good to upload or download the Video. In addition, there is a certain limitation in terms of the size of the Video or other factors. Otherwise, it comes out to be a practical option for small files.
Part 3 Make sure which aspect Ratio You Want to Change
Technical specifications needed by different online platforms are different, such as YouTube, Instagram, Facebook, or other social media platform that needed a video with different aspect ratios to make them suitable s per their criteria. Thus, accordingly, you need to modify or change the aspect ratio on MP4 as per these social media requirements. Here are some famous social media platforms, and their aspect ratio requirements are listed. Let’s check them out one by one:
Twitter: The aspect ratio range that works for Twitter is between 1.1 to 2.1
Instagram: For it, the standard ratios are: 1.91:1, 4:5
Tiktok: Required ratio is 9:16 (Smartphone screen)
YouTube: Standard aspect Ratio for YouTube is 16:9. If the video uploaded is not in this ratio, then YouTube will make an internal adjustment and show the video with an outer band of the black or white strip around the video screen.
Vimeo: Both the options are available with Vimeo that is 16:9, 4:3
Wondershare Filmora
Get started easily with Filmora’s powerful performance, intuitive interface, and countless effects!
Try It Free Try It Free Try It Free Learn More >

Conclusion
Getting the correct information about the iMovie aspect ratio change and Adobe premiere pro-change aspect ratio is crucial to uplift the viewer base to your Video. Furthermore, to a great extent, it matters which platform your Video will launch on as different devices need different aspect ratios. Thus, this article focused on covering all the points covered under how to change the Aspect Ratio of MP4 videos. Thus, whether you are a novice in video making or a professional videographer, or a moviemaker, learn about changing the ratio of Video to open new vistas to your efforts with Wondershare Filmora, Adobe, and OBS web applications.
Videos are a great way to complete the whole story in one go. In social media, videography, entertainment, educational video sharing, or many more areas, viewers and their viewing experience matter a lot. For instance, if a person visited YouTube to see some educational content but finds it out that the overall view of the video content is not up to the mark. Then, what will happen? That person will switch to another channel, which is not good for your business area. Thus, knowing the correct aspect ratio for your video is very important. Here, the aspect ratio refers to the ratio of width to the height of the Video or image visible on the screen. So, here you will learn about ways to change the ratio of a video and how to change video dimensions on premiere pro or iOS devices.

In this article
01 [Change aspect Ratio with Softwares](#Part 1)
02 [Change Video aspect Ratio Online](#Part 2)
03 [Make sure which aspect Ratio You Want to Change](#Part 3)
Part 1 Change aspect Ratio with Softwares
1.1 For beginners & most people
This part is for beginners or people who are not aware of the technicalities related to video size, dimensions, or changing the ratio of Video. A quick and easy-to-use application is Wondershare Filmora, one of the widely used platforms for video editing and adopting it s per the video requirement.
Thus, let’s try to understand how you can change the Video’s aspect ratio using Filmora.
Step1 Download and open the Software
First, visit the official link of Wondershare Filmora and download, install and lunch the tool on your system.
Step2 Set the aspect ratio and upload your file
Right from the main interface, you will find the aspect ratio option. Using the drop-down menu, select the desired one to change the ratio of Video. After that, click on the new project to upload your video file.
Step3 Save and Export
Now, when you upload the video file, it will automatically modify the chosen aspect ratio for the video. Then export the file to save at the desired location on your system.

1.2 For Professional People
Now, here comes the guidance to those professional videographers, movie maker who needs an advanced version to change video size or aspect ratio.
Since you are already aware of technicalities to a certain extent, it becomes easy to use some advanced tools to change the aspect ratio of Video using adobe and OBS Software.
● Adobe PR
The first tool that we shall discuss is Adobe PR, and we will learn how to use Adobe Premiere Pro to change the Video’s aspect ratio. This tool is valuable for worldwide users explicitly working in the video editing field or dedicated professionals who need some technical knowledge to understand the interface. Here are the required steps to handle the adobe PR to change aspect Ratio iPhone Video devices.
Open the ‘File’ Menu> then Go to the ‘New’ Folder > after that, visit the ‘Sequence’ (dialog box) That will give the option of ‘Settings,’ select it> then visit the ‘Video’ section. Then, from the Video section, you need to adjust the Frame size for height and the Horizontal value for width.
Then opt for ‘OK.’
● OBS Studio
Those who know are pretty aware of the professional OBS studio full of features and technical detailing. In this part, you shall see how to use OBS software to change the iMovie aspect ratio following the mentioned steps.
Here, you need to open the ‘Settings .’ Under the ‘Video’ subsection, you will see ‘Output Resolution’ (click on drop-down), then from the given aspect ratios, change the ratio of your Video. Then, press the OK button to apply the changes at the end. That’s it.
Using this professional software will make you able to change the aspect ratio on iPhone Video and change the aspect ratio MP4, MKV, FLV, or other formats. The only need is to have a basic understanding of the technical knowledge related to the software. If you’re already a professional video maker, this software will be the most option.
Part 2 Change Video aspect Ratio Online
Till now, we have covered different software as per the user requirements. Suppose you are not comfortable with downloading any software on your devices. In that case, there are some alternatives for Online Video Editors to change video aspect ratio with ease. Let’s take a look over some of the easy-to-use online tools to change the ratio of the Video. Such tools are quick to use and accessible worldwide. Some of them are mentioned below:
1. veed.io
You can effortlessly change the aspect ratio of your video using ‘Veed.io’. Which supports multiple video formats such as .wmv, .mp4, .mkv, .flv, .3gp and many more. While uploading the video, you need to mention the required width and height of the video and then click on the ‘Resize’ button.
2. Kapwing (kapwing.com)
Another helpful tool while searching for some quick tools to change the ratio of Video through online mode is Kapwing Online Convertor. You can scale, resize your Video by simply uploading your file or pasting the URL there. The interface is quite simple to use and changes the aspect ratio of MP4 or other format videosThere is noNo doubt accessing some online tools to change the Video’s aspect ratio in quick and easy steps. Though there exist certain limitations such as internet connection speed should be good to upload or download the Video. In addition, there is a certain limitation in terms of the size of the Video or other factors. Otherwise, it comes out to be a practical option for small files.
Part 3 Make sure which aspect Ratio You Want to Change
Technical specifications needed by different online platforms are different, such as YouTube, Instagram, Facebook, or other social media platform that needed a video with different aspect ratios to make them suitable s per their criteria. Thus, accordingly, you need to modify or change the aspect ratio on MP4 as per these social media requirements. Here are some famous social media platforms, and their aspect ratio requirements are listed. Let’s check them out one by one:
Twitter: The aspect ratio range that works for Twitter is between 1.1 to 2.1
Instagram: For it, the standard ratios are: 1.91:1, 4:5
Tiktok: Required ratio is 9:16 (Smartphone screen)
YouTube: Standard aspect Ratio for YouTube is 16:9. If the video uploaded is not in this ratio, then YouTube will make an internal adjustment and show the video with an outer band of the black or white strip around the video screen.
Vimeo: Both the options are available with Vimeo that is 16:9, 4:3
Wondershare Filmora
Get started easily with Filmora’s powerful performance, intuitive interface, and countless effects!
Try It Free Try It Free Try It Free Learn More >

Conclusion
Getting the correct information about the iMovie aspect ratio change and Adobe premiere pro-change aspect ratio is crucial to uplift the viewer base to your Video. Furthermore, to a great extent, it matters which platform your Video will launch on as different devices need different aspect ratios. Thus, this article focused on covering all the points covered under how to change the Aspect Ratio of MP4 videos. Thus, whether you are a novice in video making or a professional videographer, or a moviemaker, learn about changing the ratio of Video to open new vistas to your efforts with Wondershare Filmora, Adobe, and OBS web applications.
Videos are a great way to complete the whole story in one go. In social media, videography, entertainment, educational video sharing, or many more areas, viewers and their viewing experience matter a lot. For instance, if a person visited YouTube to see some educational content but finds it out that the overall view of the video content is not up to the mark. Then, what will happen? That person will switch to another channel, which is not good for your business area. Thus, knowing the correct aspect ratio for your video is very important. Here, the aspect ratio refers to the ratio of width to the height of the Video or image visible on the screen. So, here you will learn about ways to change the ratio of a video and how to change video dimensions on premiere pro or iOS devices.

In this article
01 [Change aspect Ratio with Softwares](#Part 1)
02 [Change Video aspect Ratio Online](#Part 2)
03 [Make sure which aspect Ratio You Want to Change](#Part 3)
Part 1 Change aspect Ratio with Softwares
1.1 For beginners & most people
This part is for beginners or people who are not aware of the technicalities related to video size, dimensions, or changing the ratio of Video. A quick and easy-to-use application is Wondershare Filmora, one of the widely used platforms for video editing and adopting it s per the video requirement.
Thus, let’s try to understand how you can change the Video’s aspect ratio using Filmora.
Step1 Download and open the Software
First, visit the official link of Wondershare Filmora and download, install and lunch the tool on your system.
Step2 Set the aspect ratio and upload your file
Right from the main interface, you will find the aspect ratio option. Using the drop-down menu, select the desired one to change the ratio of Video. After that, click on the new project to upload your video file.
Step3 Save and Export
Now, when you upload the video file, it will automatically modify the chosen aspect ratio for the video. Then export the file to save at the desired location on your system.

1.2 For Professional People
Now, here comes the guidance to those professional videographers, movie maker who needs an advanced version to change video size or aspect ratio.
Since you are already aware of technicalities to a certain extent, it becomes easy to use some advanced tools to change the aspect ratio of Video using adobe and OBS Software.
● Adobe PR
The first tool that we shall discuss is Adobe PR, and we will learn how to use Adobe Premiere Pro to change the Video’s aspect ratio. This tool is valuable for worldwide users explicitly working in the video editing field or dedicated professionals who need some technical knowledge to understand the interface. Here are the required steps to handle the adobe PR to change aspect Ratio iPhone Video devices.
Open the ‘File’ Menu> then Go to the ‘New’ Folder > after that, visit the ‘Sequence’ (dialog box) That will give the option of ‘Settings,’ select it> then visit the ‘Video’ section. Then, from the Video section, you need to adjust the Frame size for height and the Horizontal value for width.
Then opt for ‘OK.’
● OBS Studio
Those who know are pretty aware of the professional OBS studio full of features and technical detailing. In this part, you shall see how to use OBS software to change the iMovie aspect ratio following the mentioned steps.
Here, you need to open the ‘Settings .’ Under the ‘Video’ subsection, you will see ‘Output Resolution’ (click on drop-down), then from the given aspect ratios, change the ratio of your Video. Then, press the OK button to apply the changes at the end. That’s it.
Using this professional software will make you able to change the aspect ratio on iPhone Video and change the aspect ratio MP4, MKV, FLV, or other formats. The only need is to have a basic understanding of the technical knowledge related to the software. If you’re already a professional video maker, this software will be the most option.
Part 2 Change Video aspect Ratio Online
Till now, we have covered different software as per the user requirements. Suppose you are not comfortable with downloading any software on your devices. In that case, there are some alternatives for Online Video Editors to change video aspect ratio with ease. Let’s take a look over some of the easy-to-use online tools to change the ratio of the Video. Such tools are quick to use and accessible worldwide. Some of them are mentioned below:
1. veed.io
You can effortlessly change the aspect ratio of your video using ‘Veed.io’. Which supports multiple video formats such as .wmv, .mp4, .mkv, .flv, .3gp and many more. While uploading the video, you need to mention the required width and height of the video and then click on the ‘Resize’ button.
2. Kapwing (kapwing.com)
Another helpful tool while searching for some quick tools to change the ratio of Video through online mode is Kapwing Online Convertor. You can scale, resize your Video by simply uploading your file or pasting the URL there. The interface is quite simple to use and changes the aspect ratio of MP4 or other format videosThere is noNo doubt accessing some online tools to change the Video’s aspect ratio in quick and easy steps. Though there exist certain limitations such as internet connection speed should be good to upload or download the Video. In addition, there is a certain limitation in terms of the size of the Video or other factors. Otherwise, it comes out to be a practical option for small files.
Part 3 Make sure which aspect Ratio You Want to Change
Technical specifications needed by different online platforms are different, such as YouTube, Instagram, Facebook, or other social media platform that needed a video with different aspect ratios to make them suitable s per their criteria. Thus, accordingly, you need to modify or change the aspect ratio on MP4 as per these social media requirements. Here are some famous social media platforms, and their aspect ratio requirements are listed. Let’s check them out one by one:
Twitter: The aspect ratio range that works for Twitter is between 1.1 to 2.1
Instagram: For it, the standard ratios are: 1.91:1, 4:5
Tiktok: Required ratio is 9:16 (Smartphone screen)
YouTube: Standard aspect Ratio for YouTube is 16:9. If the video uploaded is not in this ratio, then YouTube will make an internal adjustment and show the video with an outer band of the black or white strip around the video screen.
Vimeo: Both the options are available with Vimeo that is 16:9, 4:3
Wondershare Filmora
Get started easily with Filmora’s powerful performance, intuitive interface, and countless effects!
Try It Free Try It Free Try It Free Learn More >

Conclusion
Getting the correct information about the iMovie aspect ratio change and Adobe premiere pro-change aspect ratio is crucial to uplift the viewer base to your Video. Furthermore, to a great extent, it matters which platform your Video will launch on as different devices need different aspect ratios. Thus, this article focused on covering all the points covered under how to change the Aspect Ratio of MP4 videos. Thus, whether you are a novice in video making or a professional videographer, or a moviemaker, learn about changing the ratio of Video to open new vistas to your efforts with Wondershare Filmora, Adobe, and OBS web applications.
Videos are a great way to complete the whole story in one go. In social media, videography, entertainment, educational video sharing, or many more areas, viewers and their viewing experience matter a lot. For instance, if a person visited YouTube to see some educational content but finds it out that the overall view of the video content is not up to the mark. Then, what will happen? That person will switch to another channel, which is not good for your business area. Thus, knowing the correct aspect ratio for your video is very important. Here, the aspect ratio refers to the ratio of width to the height of the Video or image visible on the screen. So, here you will learn about ways to change the ratio of a video and how to change video dimensions on premiere pro or iOS devices.

In this article
01 [Change aspect Ratio with Softwares](#Part 1)
02 [Change Video aspect Ratio Online](#Part 2)
03 [Make sure which aspect Ratio You Want to Change](#Part 3)
Part 1 Change aspect Ratio with Softwares
1.1 For beginners & most people
This part is for beginners or people who are not aware of the technicalities related to video size, dimensions, or changing the ratio of Video. A quick and easy-to-use application is Wondershare Filmora, one of the widely used platforms for video editing and adopting it s per the video requirement.
Thus, let’s try to understand how you can change the Video’s aspect ratio using Filmora.
Step1 Download and open the Software
First, visit the official link of Wondershare Filmora and download, install and lunch the tool on your system.
Step2 Set the aspect ratio and upload your file
Right from the main interface, you will find the aspect ratio option. Using the drop-down menu, select the desired one to change the ratio of Video. After that, click on the new project to upload your video file.
Step3 Save and Export
Now, when you upload the video file, it will automatically modify the chosen aspect ratio for the video. Then export the file to save at the desired location on your system.

1.2 For Professional People
Now, here comes the guidance to those professional videographers, movie maker who needs an advanced version to change video size or aspect ratio.
Since you are already aware of technicalities to a certain extent, it becomes easy to use some advanced tools to change the aspect ratio of Video using adobe and OBS Software.
● Adobe PR
The first tool that we shall discuss is Adobe PR, and we will learn how to use Adobe Premiere Pro to change the Video’s aspect ratio. This tool is valuable for worldwide users explicitly working in the video editing field or dedicated professionals who need some technical knowledge to understand the interface. Here are the required steps to handle the adobe PR to change aspect Ratio iPhone Video devices.
Open the ‘File’ Menu> then Go to the ‘New’ Folder > after that, visit the ‘Sequence’ (dialog box) That will give the option of ‘Settings,’ select it> then visit the ‘Video’ section. Then, from the Video section, you need to adjust the Frame size for height and the Horizontal value for width.
Then opt for ‘OK.’
● OBS Studio
Those who know are pretty aware of the professional OBS studio full of features and technical detailing. In this part, you shall see how to use OBS software to change the iMovie aspect ratio following the mentioned steps.
Here, you need to open the ‘Settings .’ Under the ‘Video’ subsection, you will see ‘Output Resolution’ (click on drop-down), then from the given aspect ratios, change the ratio of your Video. Then, press the OK button to apply the changes at the end. That’s it.
Using this professional software will make you able to change the aspect ratio on iPhone Video and change the aspect ratio MP4, MKV, FLV, or other formats. The only need is to have a basic understanding of the technical knowledge related to the software. If you’re already a professional video maker, this software will be the most option.
Part 2 Change Video aspect Ratio Online
Till now, we have covered different software as per the user requirements. Suppose you are not comfortable with downloading any software on your devices. In that case, there are some alternatives for Online Video Editors to change video aspect ratio with ease. Let’s take a look over some of the easy-to-use online tools to change the ratio of the Video. Such tools are quick to use and accessible worldwide. Some of them are mentioned below:
1. veed.io
You can effortlessly change the aspect ratio of your video using ‘Veed.io’. Which supports multiple video formats such as .wmv, .mp4, .mkv, .flv, .3gp and many more. While uploading the video, you need to mention the required width and height of the video and then click on the ‘Resize’ button.
2. Kapwing (kapwing.com)
Another helpful tool while searching for some quick tools to change the ratio of Video through online mode is Kapwing Online Convertor. You can scale, resize your Video by simply uploading your file or pasting the URL there. The interface is quite simple to use and changes the aspect ratio of MP4 or other format videosThere is noNo doubt accessing some online tools to change the Video’s aspect ratio in quick and easy steps. Though there exist certain limitations such as internet connection speed should be good to upload or download the Video. In addition, there is a certain limitation in terms of the size of the Video or other factors. Otherwise, it comes out to be a practical option for small files.
Part 3 Make sure which aspect Ratio You Want to Change
Technical specifications needed by different online platforms are different, such as YouTube, Instagram, Facebook, or other social media platform that needed a video with different aspect ratios to make them suitable s per their criteria. Thus, accordingly, you need to modify or change the aspect ratio on MP4 as per these social media requirements. Here are some famous social media platforms, and their aspect ratio requirements are listed. Let’s check them out one by one:
Twitter: The aspect ratio range that works for Twitter is between 1.1 to 2.1
Instagram: For it, the standard ratios are: 1.91:1, 4:5
Tiktok: Required ratio is 9:16 (Smartphone screen)
YouTube: Standard aspect Ratio for YouTube is 16:9. If the video uploaded is not in this ratio, then YouTube will make an internal adjustment and show the video with an outer band of the black or white strip around the video screen.
Vimeo: Both the options are available with Vimeo that is 16:9, 4:3
Wondershare Filmora
Get started easily with Filmora’s powerful performance, intuitive interface, and countless effects!
Try It Free Try It Free Try It Free Learn More >

Conclusion
Getting the correct information about the iMovie aspect ratio change and Adobe premiere pro-change aspect ratio is crucial to uplift the viewer base to your Video. Furthermore, to a great extent, it matters which platform your Video will launch on as different devices need different aspect ratios. Thus, this article focused on covering all the points covered under how to change the Aspect Ratio of MP4 videos. Thus, whether you are a novice in video making or a professional videographer, or a moviemaker, learn about changing the ratio of Video to open new vistas to your efforts with Wondershare Filmora, Adobe, and OBS web applications.
10 Mind-Blowing Video Collage Maker for PC
10 Mind-Blowing Video Collage Maker for PC
An easy yet powerful editor
Numerous effects to choose from
Detailed tutorials provided by the official channel
Video collages are a great way to play multiple short videos at the same time. These collages can be used for different purposes and platforms like social media platforms, online video sharing sites, brand promotion, announcing an event or a service, and similar others.

Whatever may be the situation, you would need a good and feature-packed tool for creating such a collage so that videos look perfect in a frame, background audio can be added, and other customizations can be done. Keep reading below to learn about the best video collage maker for PC.
In this article
01 [Top 10 Video Collage Makers for Pc](#Part 1)
02 [Alternatives to Video Collage Maker for Pc](#Part 2)
Part 1 Top 10 video collage makers for PC
Among the long list of tools available, below we have shortlisted the top 10 PC tools that can be used for creating a video collage.
01**Wondershare Filmora Video Editor **
This Windows and Mac-based software is the best choice when it comes to creating a simple video collage in an effortless manner.
Key features
● Create a video collage using the split-screen feature of the software.
● Excellent video editing tool supporting advanced features for creating professional-looking videos.
● Support customizable animation options along with precise editing functions.
● Support to multiple audio-related features like automatic audio sync, audio compression, audio transitions, and more.
● Offers of stock collection of images, and other media files.
● Windows and Mac support.
For Win 7 or later (64-bit)
For macOS 10.12 or later
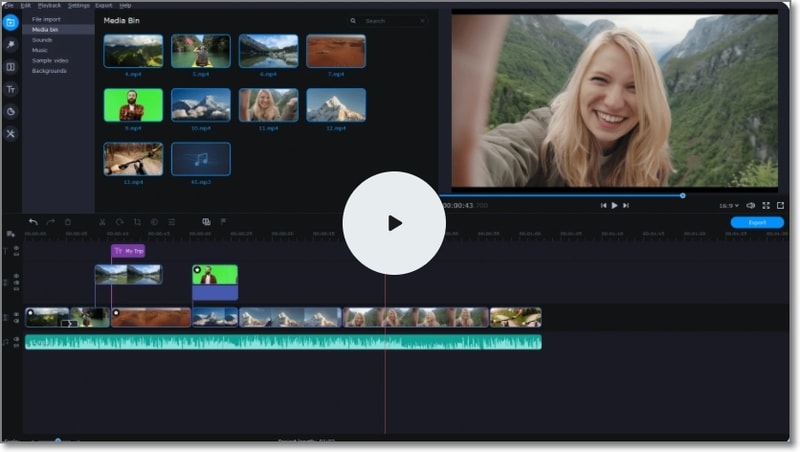
04Movavi Video Editor Plus
Unleash your creativity and make stunning videos including video collages using this excellent software.
Key features:
● Create stunning video collages with multiple video customization options.
● Allows adding titles, transitions, stickers, and filters.
● Option to apply chroma-key for changing the background.
● Option for creating automatic video collages.
● User-friendly interface.
● Windows and Mac support.
05Aiseesoft Video Converter Ultimate
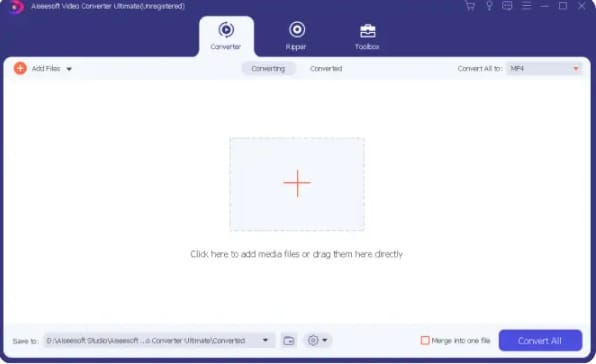
Though the name suggests the software to be a video conversion tool, it is a multi-tasking software that can perform a variety of functions including video collage making and thus can be considered as a decent video collage app for PC.
Key features
● A feature-rich program that can also be used for creating a video collage.
● Allows performing a variety of features like video conversion, editing, compression, and more.
● Option for editing the video effects and also editing ID3 info.
● Create interesting GIF animations.
● Simple and easy-to-understand layout.
● Windows and Mac support.
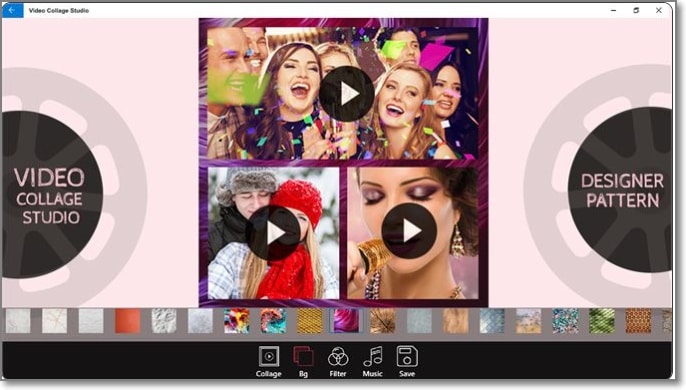
06Cidade Video Collage Studio
Using this intuitive tool, you can quickly create a video collage by combining all your favorite videos in one place.
Key features
● Create a video collage by combining multiple videos or creating a video grid.
● Intuitive and user-friendly interface.
● Multiple-grid options to choose from.
● Allows applying effects like Sepia, Lomo, and others.
● Background audio or music files can be added.
● Option to change the background color and also preview the video.
07Blu-ray Master Video Converter Ultimate
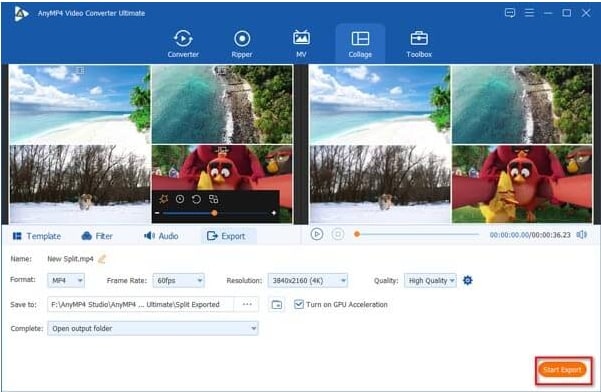
This is a video toolbox supporting multiple functions that also include creating a video collage.
Key feature
● Create a video collage using high-quality videos.
● Support customizing and editing videos using several built-in tools.
● Video conversion to over 500 formats supported.
● Multiple layouts and templates for video collage are available.
● Almost all video, image, and audio formats are supported.
08Adobe Premiere Elements
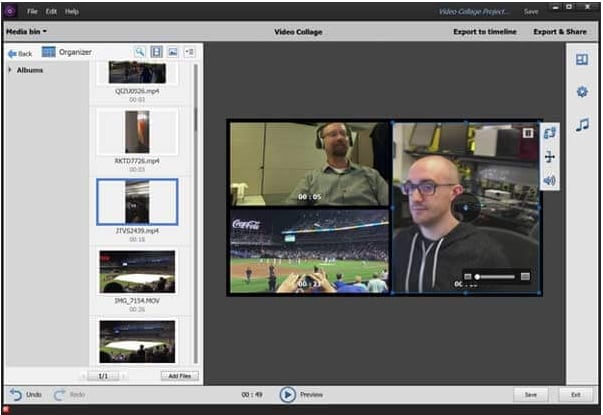
If you are looking for an advanced and professional tool for creating a video collage and for other video editing needs, this is the right choice.
Key features:
● Create professional-looking collages using high-quality video files.
● The interface is clean with support for advanced functions.
● Option for adding multiple video effects.
● Comes with help documents and guides to help you with the software functions.
● Windows and Mac support.
09Collage Maker
For creating a simple video collage on your Windows system this is a good tool to consider.
Key features
● Simple and basic collage-making tool.
● Comes with customizable and adjustable layout options.
● Option to add stickers ad text to the collage.
● Allows mixing videos, and images along with the music file.

1010. iMovie
For Mac users, iMovie is the default video editing tool that is pre-installed on the system. Besides editing functions, the tool can also perform other tasks like creating a video collage.
Key features:
● Allows to quickly create a video collage.
● Intuitive interface.
● Comes pre-installed with Mac systems.
● Transitions and other effects can be added.

Part 2 Alternatives to video collage maker for PC
If you do not want to download any additional software on your PC for creating a video collage, there are alternatives available in form of online tools and phone-based apps. The online tools are free and simple to use supporting all basic and needed functions. Some of the popular names in the category include FastReels, Typito, Kapwing, and more.
Apps are a great option when you want to create a collage on your mobile phone. Multiple apps for the task are available on the Google play store and Apple Store. Some of the widely used ones are PicStich, PicPlayPost Movie Video Editor, Mojo, and others.
● Ending Thoughts →
● Video collages are an interesting way to combine and play short multiple videos or play them in a grid.
● There are several PC-based video collage maker tools available like Wondershare Filmora, and others.
● As alternatives, you can use online tools or phone-based apps for creating a video collage.
Video collages are a great way to play multiple short videos at the same time. These collages can be used for different purposes and platforms like social media platforms, online video sharing sites, brand promotion, announcing an event or a service, and similar others.

Whatever may be the situation, you would need a good and feature-packed tool for creating such a collage so that videos look perfect in a frame, background audio can be added, and other customizations can be done. Keep reading below to learn about the best video collage maker for PC.
In this article
01 [Top 10 Video Collage Makers for Pc](#Part 1)
02 [Alternatives to Video Collage Maker for Pc](#Part 2)
Part 1 Top 10 video collage makers for PC
Among the long list of tools available, below we have shortlisted the top 10 PC tools that can be used for creating a video collage.
01**Wondershare Filmora Video Editor **
This Windows and Mac-based software is the best choice when it comes to creating a simple video collage in an effortless manner.
Key features
● Create a video collage using the split-screen feature of the software.
● Excellent video editing tool supporting advanced features for creating professional-looking videos.
● Support customizable animation options along with precise editing functions.
● Support to multiple audio-related features like automatic audio sync, audio compression, audio transitions, and more.
● Offers of stock collection of images, and other media files.
● Windows and Mac support.
For Win 7 or later (64-bit)
For macOS 10.12 or later
04Movavi Video Editor Plus
Unleash your creativity and make stunning videos including video collages using this excellent software.
Key features:
● Create stunning video collages with multiple video customization options.
● Allows adding titles, transitions, stickers, and filters.
● Option to apply chroma-key for changing the background.
● Option for creating automatic video collages.
● User-friendly interface.
● Windows and Mac support.

05Aiseesoft Video Converter Ultimate
Though the name suggests the software to be a video conversion tool, it is a multi-tasking software that can perform a variety of functions including video collage making and thus can be considered as a decent video collage app for PC.
Key features
● A feature-rich program that can also be used for creating a video collage.
● Allows performing a variety of features like video conversion, editing, compression, and more.
● Option for editing the video effects and also editing ID3 info.
● Create interesting GIF animations.
● Simple and easy-to-understand layout.
● Windows and Mac support.

06Cidade Video Collage Studio
Using this intuitive tool, you can quickly create a video collage by combining all your favorite videos in one place.
Key features
● Create a video collage by combining multiple videos or creating a video grid.
● Intuitive and user-friendly interface.
● Multiple-grid options to choose from.
● Allows applying effects like Sepia, Lomo, and others.
● Background audio or music files can be added.
● Option to change the background color and also preview the video.

07Blu-ray Master Video Converter Ultimate
This is a video toolbox supporting multiple functions that also include creating a video collage.
Key feature
● Create a video collage using high-quality videos.
● Support customizing and editing videos using several built-in tools.
● Video conversion to over 500 formats supported.
● Multiple layouts and templates for video collage are available.
● Almost all video, image, and audio formats are supported.

08Adobe Premiere Elements
If you are looking for an advanced and professional tool for creating a video collage and for other video editing needs, this is the right choice.
Key features:
● Create professional-looking collages using high-quality video files.
● The interface is clean with support for advanced functions.
● Option for adding multiple video effects.
● Comes with help documents and guides to help you with the software functions.
● Windows and Mac support.

09Collage Maker
For creating a simple video collage on your Windows system this is a good tool to consider.
Key features
● Simple and basic collage-making tool.
● Comes with customizable and adjustable layout options.
● Option to add stickers ad text to the collage.
● Allows mixing videos, and images along with the music file.

1010. iMovie
For Mac users, iMovie is the default video editing tool that is pre-installed on the system. Besides editing functions, the tool can also perform other tasks like creating a video collage.
Key features:
● Allows to quickly create a video collage.
● Intuitive interface.
● Comes pre-installed with Mac systems.
● Transitions and other effects can be added.

Part 2 Alternatives to video collage maker for PC
If you do not want to download any additional software on your PC for creating a video collage, there are alternatives available in form of online tools and phone-based apps. The online tools are free and simple to use supporting all basic and needed functions. Some of the popular names in the category include FastReels, Typito, Kapwing, and more.
Apps are a great option when you want to create a collage on your mobile phone. Multiple apps for the task are available on the Google play store and Apple Store. Some of the widely used ones are PicStich, PicPlayPost Movie Video Editor, Mojo, and others.
● Ending Thoughts →
● Video collages are an interesting way to combine and play short multiple videos or play them in a grid.
● There are several PC-based video collage maker tools available like Wondershare Filmora, and others.
● As alternatives, you can use online tools or phone-based apps for creating a video collage.
Video collages are a great way to play multiple short videos at the same time. These collages can be used for different purposes and platforms like social media platforms, online video sharing sites, brand promotion, announcing an event or a service, and similar others.

Whatever may be the situation, you would need a good and feature-packed tool for creating such a collage so that videos look perfect in a frame, background audio can be added, and other customizations can be done. Keep reading below to learn about the best video collage maker for PC.
In this article
01 [Top 10 Video Collage Makers for Pc](#Part 1)
02 [Alternatives to Video Collage Maker for Pc](#Part 2)
Part 1 Top 10 video collage makers for PC
Among the long list of tools available, below we have shortlisted the top 10 PC tools that can be used for creating a video collage.
01**Wondershare Filmora Video Editor **
This Windows and Mac-based software is the best choice when it comes to creating a simple video collage in an effortless manner.
Key features
● Create a video collage using the split-screen feature of the software.
● Excellent video editing tool supporting advanced features for creating professional-looking videos.
● Support customizable animation options along with precise editing functions.
● Support to multiple audio-related features like automatic audio sync, audio compression, audio transitions, and more.
● Offers of stock collection of images, and other media files.
● Windows and Mac support.
For Win 7 or later (64-bit)
For macOS 10.12 or later
04Movavi Video Editor Plus
Unleash your creativity and make stunning videos including video collages using this excellent software.
Key features:
● Create stunning video collages with multiple video customization options.
● Allows adding titles, transitions, stickers, and filters.
● Option to apply chroma-key for changing the background.
● Option for creating automatic video collages.
● User-friendly interface.
● Windows and Mac support.

05Aiseesoft Video Converter Ultimate
Though the name suggests the software to be a video conversion tool, it is a multi-tasking software that can perform a variety of functions including video collage making and thus can be considered as a decent video collage app for PC.
Key features
● A feature-rich program that can also be used for creating a video collage.
● Allows performing a variety of features like video conversion, editing, compression, and more.
● Option for editing the video effects and also editing ID3 info.
● Create interesting GIF animations.
● Simple and easy-to-understand layout.
● Windows and Mac support.

06Cidade Video Collage Studio
Using this intuitive tool, you can quickly create a video collage by combining all your favorite videos in one place.
Key features
● Create a video collage by combining multiple videos or creating a video grid.
● Intuitive and user-friendly interface.
● Multiple-grid options to choose from.
● Allows applying effects like Sepia, Lomo, and others.
● Background audio or music files can be added.
● Option to change the background color and also preview the video.

07Blu-ray Master Video Converter Ultimate
This is a video toolbox supporting multiple functions that also include creating a video collage.
Key feature
● Create a video collage using high-quality videos.
● Support customizing and editing videos using several built-in tools.
● Video conversion to over 500 formats supported.
● Multiple layouts and templates for video collage are available.
● Almost all video, image, and audio formats are supported.

08Adobe Premiere Elements
If you are looking for an advanced and professional tool for creating a video collage and for other video editing needs, this is the right choice.
Key features:
● Create professional-looking collages using high-quality video files.
● The interface is clean with support for advanced functions.
● Option for adding multiple video effects.
● Comes with help documents and guides to help you with the software functions.
● Windows and Mac support.

09Collage Maker
For creating a simple video collage on your Windows system this is a good tool to consider.
Key features
● Simple and basic collage-making tool.
● Comes with customizable and adjustable layout options.
● Option to add stickers ad text to the collage.
● Allows mixing videos, and images along with the music file.

1010. iMovie
For Mac users, iMovie is the default video editing tool that is pre-installed on the system. Besides editing functions, the tool can also perform other tasks like creating a video collage.
Key features:
● Allows to quickly create a video collage.
● Intuitive interface.
● Comes pre-installed with Mac systems.
● Transitions and other effects can be added.

Part 2 Alternatives to video collage maker for PC
If you do not want to download any additional software on your PC for creating a video collage, there are alternatives available in form of online tools and phone-based apps. The online tools are free and simple to use supporting all basic and needed functions. Some of the popular names in the category include FastReels, Typito, Kapwing, and more.
Apps are a great option when you want to create a collage on your mobile phone. Multiple apps for the task are available on the Google play store and Apple Store. Some of the widely used ones are PicStich, PicPlayPost Movie Video Editor, Mojo, and others.
● Ending Thoughts →
● Video collages are an interesting way to combine and play short multiple videos or play them in a grid.
● There are several PC-based video collage maker tools available like Wondershare Filmora, and others.
● As alternatives, you can use online tools or phone-based apps for creating a video collage.
Video collages are a great way to play multiple short videos at the same time. These collages can be used for different purposes and platforms like social media platforms, online video sharing sites, brand promotion, announcing an event or a service, and similar others.

Whatever may be the situation, you would need a good and feature-packed tool for creating such a collage so that videos look perfect in a frame, background audio can be added, and other customizations can be done. Keep reading below to learn about the best video collage maker for PC.
In this article
01 [Top 10 Video Collage Makers for Pc](#Part 1)
02 [Alternatives to Video Collage Maker for Pc](#Part 2)
Part 1 Top 10 video collage makers for PC
Among the long list of tools available, below we have shortlisted the top 10 PC tools that can be used for creating a video collage.
01**Wondershare Filmora Video Editor **
This Windows and Mac-based software is the best choice when it comes to creating a simple video collage in an effortless manner.
Key features
● Create a video collage using the split-screen feature of the software.
● Excellent video editing tool supporting advanced features for creating professional-looking videos.
● Support customizable animation options along with precise editing functions.
● Support to multiple audio-related features like automatic audio sync, audio compression, audio transitions, and more.
● Offers of stock collection of images, and other media files.
● Windows and Mac support.
For Win 7 or later (64-bit)
For macOS 10.12 or later
04Movavi Video Editor Plus
Unleash your creativity and make stunning videos including video collages using this excellent software.
Key features:
● Create stunning video collages with multiple video customization options.
● Allows adding titles, transitions, stickers, and filters.
● Option to apply chroma-key for changing the background.
● Option for creating automatic video collages.
● User-friendly interface.
● Windows and Mac support.

05Aiseesoft Video Converter Ultimate
Though the name suggests the software to be a video conversion tool, it is a multi-tasking software that can perform a variety of functions including video collage making and thus can be considered as a decent video collage app for PC.
Key features
● A feature-rich program that can also be used for creating a video collage.
● Allows performing a variety of features like video conversion, editing, compression, and more.
● Option for editing the video effects and also editing ID3 info.
● Create interesting GIF animations.
● Simple and easy-to-understand layout.
● Windows and Mac support.

06Cidade Video Collage Studio
Using this intuitive tool, you can quickly create a video collage by combining all your favorite videos in one place.
Key features
● Create a video collage by combining multiple videos or creating a video grid.
● Intuitive and user-friendly interface.
● Multiple-grid options to choose from.
● Allows applying effects like Sepia, Lomo, and others.
● Background audio or music files can be added.
● Option to change the background color and also preview the video.

07Blu-ray Master Video Converter Ultimate
This is a video toolbox supporting multiple functions that also include creating a video collage.
Key feature
● Create a video collage using high-quality videos.
● Support customizing and editing videos using several built-in tools.
● Video conversion to over 500 formats supported.
● Multiple layouts and templates for video collage are available.
● Almost all video, image, and audio formats are supported.

08Adobe Premiere Elements
If you are looking for an advanced and professional tool for creating a video collage and for other video editing needs, this is the right choice.
Key features:
● Create professional-looking collages using high-quality video files.
● The interface is clean with support for advanced functions.
● Option for adding multiple video effects.
● Comes with help documents and guides to help you with the software functions.
● Windows and Mac support.

09Collage Maker
For creating a simple video collage on your Windows system this is a good tool to consider.
Key features
● Simple and basic collage-making tool.
● Comes with customizable and adjustable layout options.
● Option to add stickers ad text to the collage.
● Allows mixing videos, and images along with the music file.

1010. iMovie
For Mac users, iMovie is the default video editing tool that is pre-installed on the system. Besides editing functions, the tool can also perform other tasks like creating a video collage.
Key features:
● Allows to quickly create a video collage.
● Intuitive interface.
● Comes pre-installed with Mac systems.
● Transitions and other effects can be added.

Part 2 Alternatives to video collage maker for PC
If you do not want to download any additional software on your PC for creating a video collage, there are alternatives available in form of online tools and phone-based apps. The online tools are free and simple to use supporting all basic and needed functions. Some of the popular names in the category include FastReels, Typito, Kapwing, and more.
Apps are a great option when you want to create a collage on your mobile phone. Multiple apps for the task are available on the Google play store and Apple Store. Some of the widely used ones are PicStich, PicPlayPost Movie Video Editor, Mojo, and others.
● Ending Thoughts →
● Video collages are an interesting way to combine and play short multiple videos or play them in a grid.
● There are several PC-based video collage maker tools available like Wondershare Filmora, and others.
● As alternatives, you can use online tools or phone-based apps for creating a video collage.
Also read:
- New How to Use GIMP GREEN SCREEN for 2024
- Updated Do You Like Clouds or Sky and Want to Use Them as a Video Background? Explore This Article to Learn About the Sky Change Video in Filmora
- How to Make an Intro Video Easy Solution for 2024
- New SRT Not Displaying How to Open and Use SRT File in VLC for 2024
- Do You Want to Know Where You Can Find Online Video Editing Courses? In This Article, We Have Provided 15 Options for Your Various Demand. We Also Recommend a Great Video Editor to Help You Start Your Video Editing Journey with Ease for 2024
- 4 Solutions to Crop a Video on Android Easily for 2024
- Updated In 2024, The Best GIF Editors Weve Tested Heres What We Learned
- Updated Add Neon Effects to Your Dance Videos with the Help of Wondershare Filmora After Reading This Article. It Will Give a More Thrilling and Exciting Appearance for 2024
- Updated How to Create a Glitch Text Effect?
- New 2024 Approved Step by Step to Rotate Videos Using Kdenlive
- Updated In 2024, Create Stunning Videos Like a Pro with Filmora. Learn About Its Benefits and some Amazing Video and Audio Editing Features Such as Split Screens, Keyframing, Etc
- New This Article Aims to Show You How to Export Videos in Filmora for 2024
- Updated | How to Change Quicktime Player Speed on Mac for 2024
- New 2024 Approved To Add SRT to MP4 Is Not as Hard as You Might Think. All You Just Need Is the Right Tool to Help You Get the Job Done. Read This Article and Learn the 8 Latest Methods to Merge SRT with MP4 Effortlessly
- New In 2024, Do You Wish to Learn About some Tools to Slow Down a Video? Discover How to Slow Down Time Lapse on iPhone Throughout This Article
- New How to Build A Video Editing Career
- 15 Camera Shake Preset for Premiere Pro for 2024
- Everything You Need to Know About Color Grading in Photography
- 2024 Approved What Is Color Finale
- 2024 Approved Templates Take Your Music Video From Drab to Fab and Add some Spice to the Catchy Song. Here Are some Templates You Could Use to Make Your Music Video Popular
- Updated How to Use Deep Fried Meme Maker
- Updated 2024 Approved How to Combine Multiple Videos Into One on Instagram
- New In 2024, Do You Want to Add Subtitles to Your MKV Files Easily? This Article Will Introduce 7 Simple Ways Through Which You Can Add Subtitles to MKV on Different Devices
- New Useful Guide to Speed Up/Down Videos in VLC for 2024
- New 2024 Approved Using Montage In Movies | Learn to Use Montage With Movies
- Updated In This Article, You Will Learn About the Top 5 Editors for Windows, Top 5 Editors for iPhone/Android, and Top 5 Editors for Animated GIF Editing for 2024
- New Here, You Will Get the Basic Steps to Use the Speed Ramping Effect in Your Videos by Wondershare Filmora Software. In This Article, You Get a Guide to Adding the BCC Glitch Effect to Give Your Sports Montages a More Professional Look
- In 2024, Get to Know How Excellent Sparkle Video Effects Can Significantly Impact Different Projects. Its Miraculous. Read Below to Learn More and Add Sparkle Effect to Your Videos
- Detailed Guide to Rotate Videos in Blender for 2024
- 2024 Approved Are You Looking for Dark LUTs Premiere Pro Free? This Article Discusses the Dark Moody LUTs with Top Recommendations for Beginning Visual Editing
- Updated In 2024, Read and Learn How to Convert a Slow-Motion Video to Normal in This Guide. Besides, Find the Best Desktop Solution to Adjust Video Speed Quickly and Easily
- New How to Make an Aesthetic Slideshow for 2024
- In 2024, Have You Ever Watched a Movie Where You Felt the Filmmakers Left You Hanging? Yea, Thats What Freeze Frame Does. Here We Will Enlighten You on What It Is, Freeze Frame Examples Where It Has Been Helpful to Drive Our Point Home
- Updated Beginners Guide About WMV Format and Best WMV Video Editor for 2024
- Updated How to Merge Videos in HandBrake? Expectation Vs. Reality
- Updated 2024 Approved A Detailed Guide to Do Color Correction in OBS
- Updated Zoom In and Out on Snapchat
- New 2024 Approved Experience Time Differently with The Top Slow-Motion Applications
- Updated In 2024, Do You Want to Apply BRAW LUTs to Your Pictures and Video Footage? Here We Will Discuss some of the Best Options Available to Help You Choose the Right One
- New 2024 Approved Ways to Make Sure Your Recording Slideshow in Powerpoint Is Not Wrong
- 2024 Approved How to Easily Add VHS Green Screen to Your Video
- Updated 10 Apps to Make Videos with Pictures and Music
- 2024 Approved Vintage Film Effect 1920S - How to Make
- New In 2024, Techniques You Never Heard of for Learning AI Marketing YouTube
- How To Transfer Data From iPhone SE (2022) To Other iPhone 13 devices? | Dr.fone
- In 2024, Best Infinix Hot 40i Pattern Lock Removal Tools Remove Android Pattern Lock Without Losing Data
- Locked Out of Apple iPhone 6? 5 Ways to get into a Locked Apple iPhone 6
- In 2024, How to Transfer Contacts from Honor Play 8T to Outlook | Dr.fone
- 10 Fake GPS Location Apps on Android Of your Tecno Spark 20 Pro | Dr.fone
- How to Factory Reset Nokia XR21 in 5 Easy Ways | Dr.fone
- How to Screen Mirroring Infinix Zero 5G 2023 Turbo to PC? | Dr.fone
- How to K11x Get Deleted Pictures Back with Ease and Safety?
- New 2024 Approved Speech-to-Speech Voice Cloning A Breakthrough in AI Voice Industry
- Top 5 Car Locator Apps for Oppo A1x 5G | Dr.fone
- In 2024, Ultimate guide to get the meltan box pokemon go For Poco M6 5G | Dr.fone
- Android Unlock Code Sim Unlock Your Motorola Moto G24 Phone and Remove Locked Screen
- In 2024, Additional Tips About Sinnoh Stone For Honor X9b | Dr.fone
- Everything You Need to Know about Lock Screen Settings on your Samsung Galaxy S23 Tactical Edition
- Title: Updated Beginners Guide to Green Screen Keying for 2024
- Author: Morgan
- Created at : 2024-05-19 05:13:00
- Updated at : 2024-05-20 05:13:00
- Link: https://ai-video-editing.techidaily.com/updated-beginners-guide-to-green-screen-keying-for-2024/
- License: This work is licensed under CC BY-NC-SA 4.0.

