
:max_bytes(150000):strip_icc():format(webp)/5-things-to-consider-before-buying-a-gaming-laptop-5235493-145a8c941b9f46e99d9a90bdee387893.jpg)
Updated Best Ideas on Using Filmora Green Screen
Best Ideas on Using Filmora Green Screen
Green screener chroma key is commonly used in film, tv shows, and social media videos nowadays. This article will show you how to light film and edit a green screen. Additionally, you can have some fun ideas with a chroma key. Therefore, keep reading this article to know all the information.
Part 1: Cool Ideas to Use Green Screen
1. The Magic Box

2. Liquid Transformation

3. Key Out a Body Part

4. T-shirt TV Screen

Part 2: Setting Up The Green Screen
Filming with the green screen is getting easier and easier. Anyone can do it, but before you get started, we will share some do’s and don’ts to help you get the best results.
In fact, there are many ways to set up a green screen, but the most cost-efficient way is with a green screen fabric. If you are using a green fabric as a DIY green screen, make sure you steam or iron it out, whether taping it to a wall or hanging it off the rack. Keep in mind the green screen should not leave any wrinkles.
It is because wrinkles will make lighting the green screen a nightmare, and uneven lighting will leave you with shadows and disappointing results. It would help if you also pulled the green screen tight to get a seamless background. The better you do with the setup, the easier it will be the key it out later
Part 3: Lighting a Green Screen
It doesn’t matter how nice your green screen is. You won’t get good results if you don’t light it properly. When you light a green screen, be aware of these things.
- Make sure there are at least six feet of space between you and your green screen; therefore, you’re not casting a shadow that cannot be keyed out later.
- Remember, any shadow on the green screen is bad. The lighting on the screen should be flat, even, and one-dimensional meaning. Please don’t place the screen leaning at an angle since they’ll make it harder to light evenly.
- Do light yourself and your background separately. It will ensure your subject wouldn’t bleed into the green, which will create a halo around them.
- After you key out the green screen and lighting, your subjects should emulate the lighting from your final footage. For example, if you know sunlight is coming from the left light, your subject is from the left direction as well.
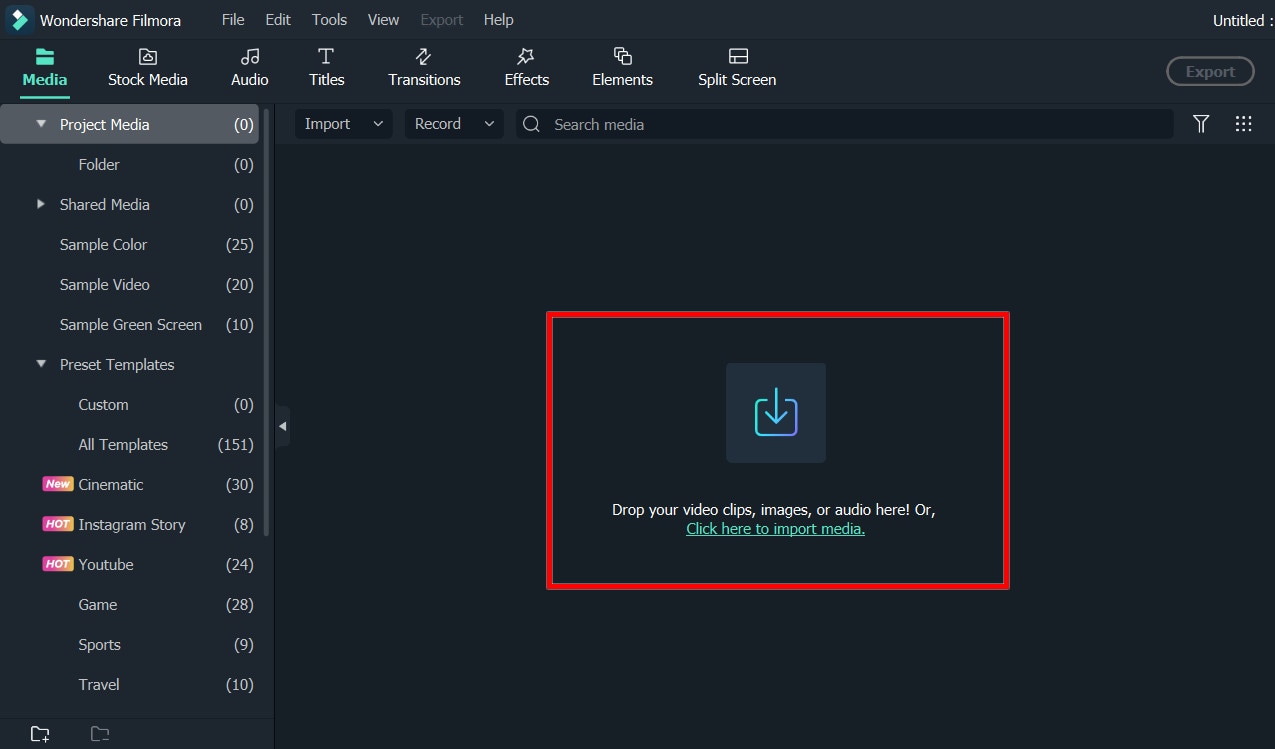
Part 4. Keying out your green screen
Once your footage is good, go into Filmora and import it into your timeline, then double-click it to find the chroma key menu. However, don’t stop there. Clicking the chroma key button is not enough to guarantee perfectly keyed footage, so play around with the offset tolerance edge thickness and edge feather. Lastly, adjust it to make sure your edit looks as good as possible.
Free Download For Win 7 or later(64-bit)
Free Download For macOS 10.14 or later

Summary
Aside from a video background, there are many things you can use chrome key effects on. For example, you can make liquid transformation, you can make a magic box, etc. In the meantime, it doesn’t matter how good your green screen, it won’t have a good results if are not light it properly. You can use Filmora to keying out your green screen. It just take a few clicks to be able keying out your green screen by following the tutorial above.
Free Download For macOS 10.14 or later
Summary
Aside from a video background, there are many things you can use chrome key effects on. For example, you can make liquid transformation, you can make a magic box, etc. In the meantime, it doesn’t matter how good your green screen, it won’t have a good results if are not light it properly. You can use Filmora to keying out your green screen. It just take a few clicks to be able keying out your green screen by following the tutorial above.
Tips to Make Cinematic Color Grading
New modern color grading software allows you to do point-and-click color grading right in your browser. Color changes are as easy and intuitive as painting or sketching.
You can choose from many different look presets and movie emulations based on Hollywood movies plus real-time previews of your favorite LUTs with this software.
Part 1. What is Cinematic Color Grading?
The cinematic look is all the rage these days and aims to mimic images captured on real film rather than digitally created. To achieve this effect, film directors use various means from lighting to cinematic color gradation. The latter is a powerful tool for bringing a cool or warm tone to a video and providing smooth color transitions to fall on an image that doesn’t look too real but feels emotional.
This kind of post-production processing, which produces beautiful results when used by color magicians, requires a deep understanding of colors and their effect on our psyche and even physiology. It’s not enough to watch a color grading video and use a LUT to get where you want. You should at the very least have an understanding of:
- Color wheel
- Color quality
- Color harmony and discord
- Warm and cool colors
- Color context
Part 2. Tips to make cinematic color grading
Here are three helpful tips to create cinematic-looking images in DaVinci Resolve.
In my 10-year career as a colorist, I’ve worked on every type of content imaginable: short, long, commercial, educational, episodic—you name it. And while each of these formats requires its approach, the one constant that spans them all is the client’s desire for a cinematic look.
Virtually all of us aspire to more cinematic color, but we often come up short—in part because the term itself has become too broad to effectively target. To focus on the goal, I like to think of “cinematic” as “an image whose key visual properties are consistent with those of printed film.”
The print film was the primary medium through which we consumed cinematic images for the first century of filmmaking and is therefore at the very heart of cinematic aesthetics. In this video, I’ll show you my top three secrets to achieving this aesthetic quickly and consistently in Davinci Resolve.
Tips1: Create Color Density
The first secret to film color is to create color density. Another key aesthetic property of film images is that colors can be either highly saturated or highly luminescent but cannot be both.
We can mimic this visual characteristic by identifying strongly saturated colors in our image and using the Hue vs. Lum to reduce their brightness. This simple technique is especially effective on pure primary colors (red, green, and blue).
Tips2: Separation Beats Saturation
The second secret to film color is prioritizing separation over saturation. When you feel like an image lacks overall color or pop, it’s all too easy to reach for the saturation knob, but that’s not a very cinematic solution.
Instead, try using split toning—pushing cool colors into shadows and warm colors into highlights—to increase tonal separation and add depth to an image. This characteristic is present in virtually every film print and is deeply evocative when applied correctly.
Tips3: Strong Contrast is Your Friend
The third secret of film colors is a strong contrast. This is not always easy, as a higher contrast look inherently requires more precision with exposure placement. Too often we pump up some contrast, end up with an image that looks blown out or too crisp, and then immediately back away from editing.
However, if you stick with high contrast long enough to improve your exposure, you’ll get a very different result and be well on your way to a more cinematic image.
Part 3. How to add color cinematic grading by using Filmora?
New modern color grading software allows you to do point-and-click color grading right in your browser. Color changes are as easy and intuitive as painting or sketching.
You can choose from many different look presets and movie emulations based on Hollywood movies plus real-time previews of your favorite LUTs with this software.
Wondershare Filmora is an option if you want to easily change the colors of your projects. You may just double-click the media after dragging it onto the editing timeline to change the contrast, saturation, brightness, and hue.
Despite its speed, it also allows you to merge, edit audio, divide, rotate, and apply as many cool video effects as you like.
Step1Add the media
After installing Wondershare Filmora, click the New Project and Import button to easily find and load your videos.
Step2Correct the color [Basic and Advanced]
In the timeline, double-click the video editing window. Select the “Color” panel and make adjustments.
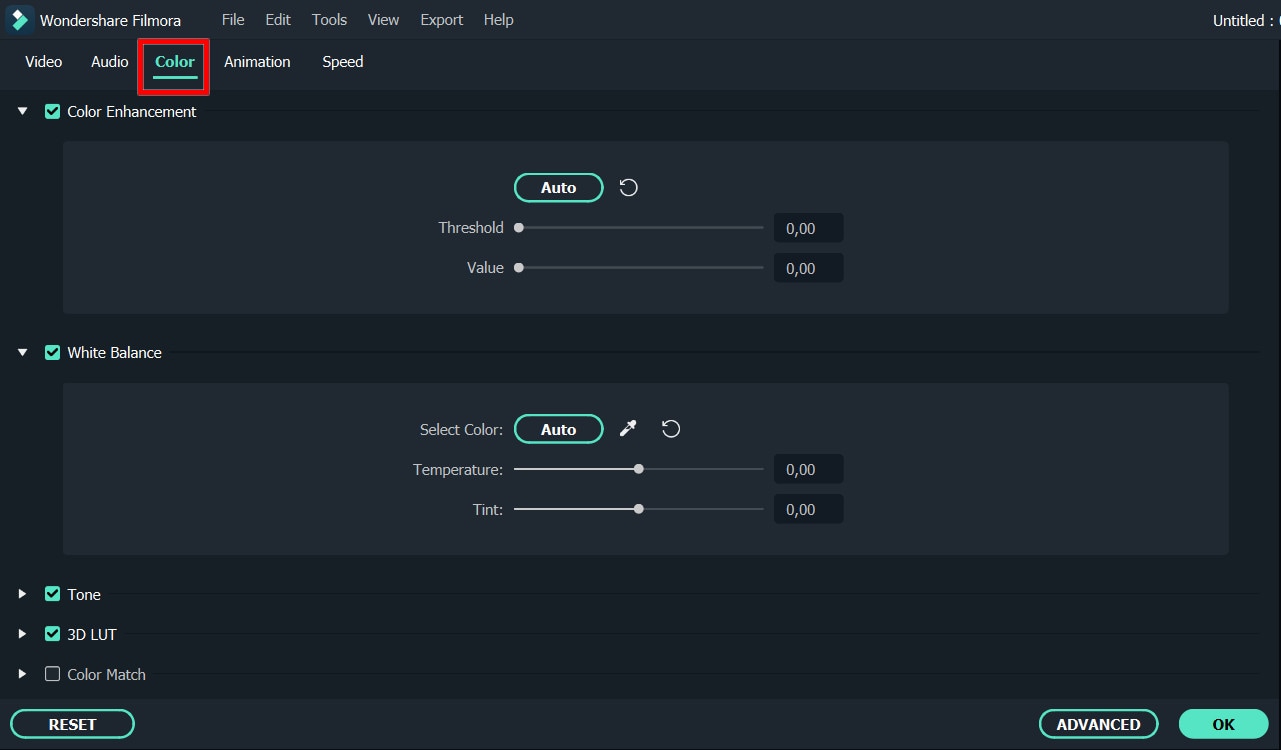
- Contrast: By adjusting this setting, you can control the brightness and color in different parts of the image.
- Saturation: This setting highlights the gray part of the video to a shade. You can adjust it to make the colors of the entire video image appear more saturated or more subdued.
- Brightness: You can change this setting to adjust the overall darkness and lightness of your project.
- Hue: Hue is generally the lightness of a color. Let’s say that when red is saturated with white, it creates a shade of pink.
- 3D LUT: 3D lookup tables provide your media with Hollywood movie color sets like the 007 series, Batman, Harry Porter, etc.
Hover over the indicator to adjust the color correction settings. Then left click on it and move the slider. The corresponding value stabilizes after releasing the mouse button.
With Filmora, you also have access to advanced color correction. Click the Advanced Color Tuning icon to enter the appropriate window where you can fine-tune the color or use preset templates.
The Preferences tab has a variety of templates, including Movie, Normal, 3D LUT, and Vignette. In the Edit tab, you can adjust color temperature, white balance, hue, 3D LUT, color, HSL, light, vignette, etc.
Step3Preview and save the new video
When you are satisfied with your creation, click “Export”. Then click the Settings button and save the new videos in different formats in the Format tab. You can also export the video directly to Vimeo or YouTube or burn it to DVD for better preservation.
Filmora’s color correction tools will make your videos look natural, more attractive, more vibrant, consistent, and professional.
Color Correction Presets
Color correction presets help your video achieve an enhanced cinematic look. Adjust gives you control over fine-tuning the colors in your shots. You can make various adjustments such as color temperature and exposure.
In the “Effects > LUT” tab, you’ll see an extensive selection of preset color settings. These include Vignettes, Movie Looks Like Old Movies, and Cinematic 3D LUT effects such as Harry Potter, Game of Thrones, House of Cards, and Mission Impossible.
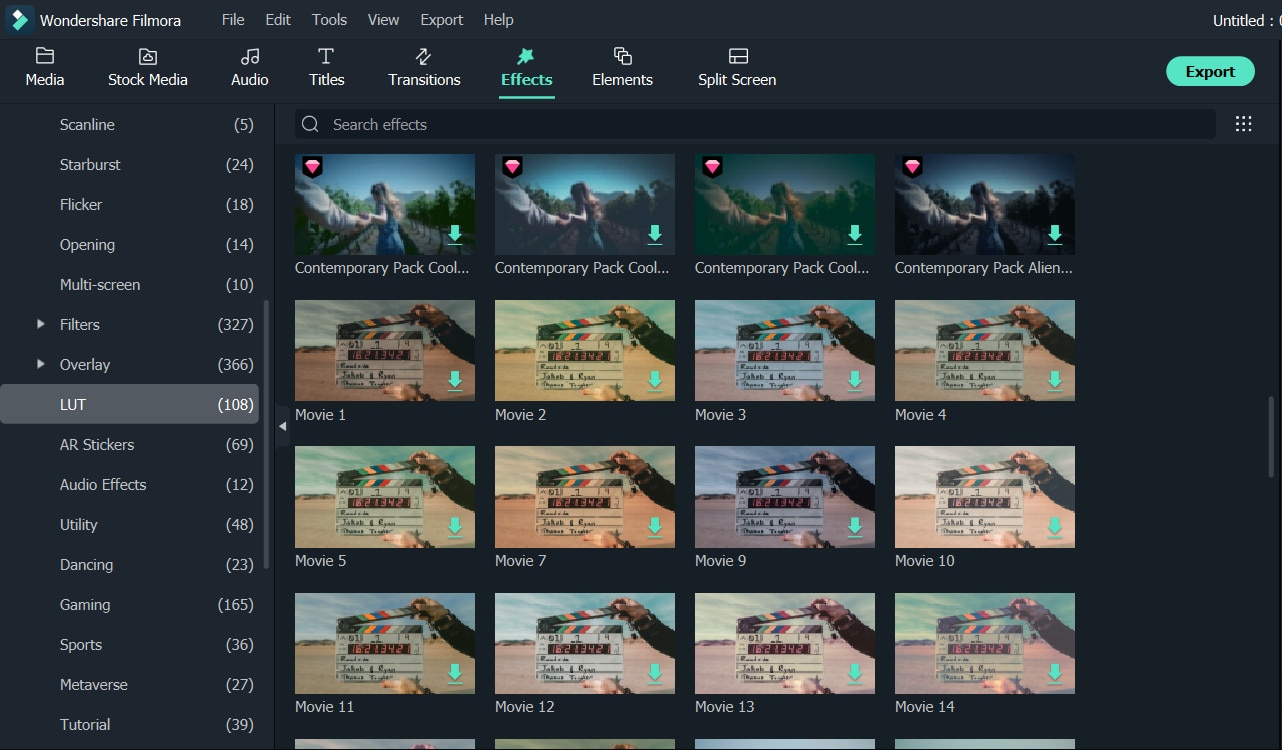
Filmora’s Color Correction Advanced Tool also categorizes your presets. Click on All Presents to see six categories: Favorites, Custom, 3D Lut, Common, Film, and Vignette.
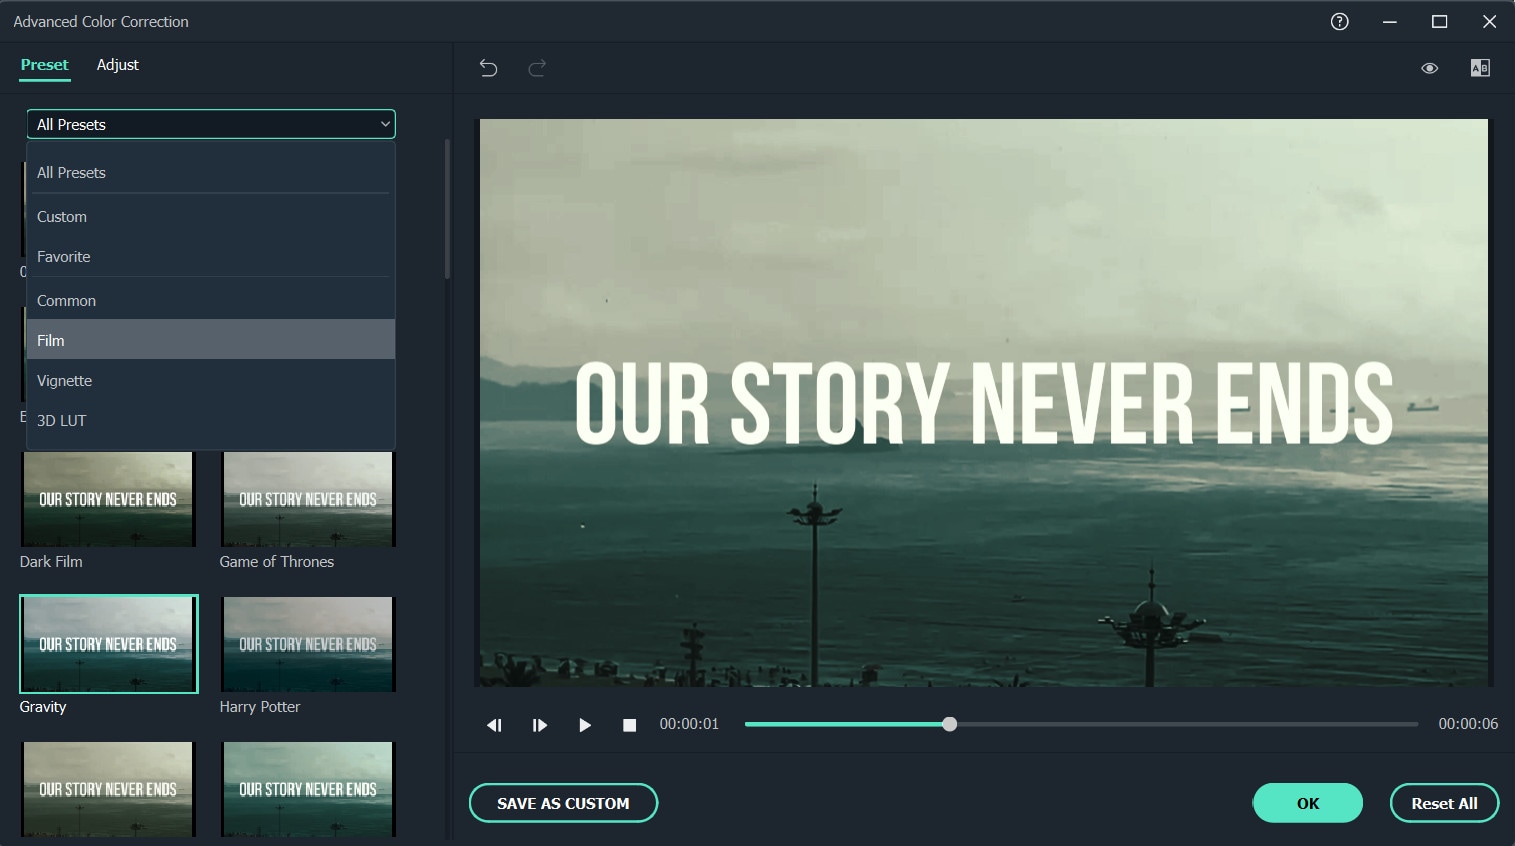
Double-click a preset to apply it to your video. You can see how it looks in the Advanced Color Correction preview window. If you are satisfied with the results, click OK.
Conclusion
Above are the steps to give your video a cinematic look using Wondershare Filmora, hope this helps if you are wondering how to do it. As we can see above, using Filmora video editor will make you more creative in making videos with a suitable emotional tone.
Free Download For Win 7 or later(64-bit)
Free Download For macOS 10.14 or later
Detailed Steps to Rotate Videos in Lightworks
Lightworks is a professional non-linear video editing software application developed by EditShare. It supports Windows and Linux, and macOS.
Lightworks has a very simple and intuitive user interface. The basic workflow is: import your media files into the project, then edit them using the various tools available. When you’re finished, export your project as a video file.
Lightworks can be used for a variety of purposes, including creating videos for social media, corporate videos, documentaries, and more. It’s also been used to edit some major Hollywood films, such as The Wolf of Wall Street and The King’s Speech.
In this article, we will discuss how to rotate videos in the Lightworks application. Below is a way to rotate videos in Lightworks manually, here, we will use the Z-axis rotation.
Step-by-step on how to rotate videos in Lightworks
How to Manually Rotate a Video in Lightworks
To manually rotate a video in Lightworks, follow these steps:
Step 1: Import your video into the project.

Step 2: Choose the portion of the video you want to rotate; if you want to rotate the entire movie, simply choose the entire video instead of a specific portion.

Step 3: Click on the “VFX” tab and go to the “3D DVE” section.

Step 4: Choose the Z axis and rotate the video to the desired degree. You can also modify the orientation of the video by entering a value in the box provided in front of the Z-axis.

Step 5: Click on the Enter in the keyboard button.

Your video will now be rotated by the selected number of degrees.
How to Rotate Videos in Filmora
On the other hand, Lightworks has an alternative video editing tool which is Filmora Video Editor . If you are looking for a lightweight video editor with an easy-to-use interface, then Filmora is the best option for you. It offers powerful features such as motion graphics, text editing, and audio editing, while still being very easy to use.
You can try it for free by downloading the trial version from the Filmora website. Filmora also offers a wide range of export options, so you can easily share your videos with others. You can export your video as an MP4 or MOV file, or upload it directly to YouTube or Facebook.
For Win 7 or later (64-bit)
For macOS 10.14 or later
Step-by-step on how to rotate videos in Filmora
How to Manually Rotate a Video in Filmora
To rotate videos in Filmora manually…
Step 1: Import your video into the project.

Step 2: Click the video clip you want to rotate.

Step 3: Click on the “Edit” tool above the timeline and go to the “Transform” section. Then, select the “Rotate” option.


Step 4: Select the desired rotation option.

Step 5: Click on the “Ok” button.

Your video will now be rotated by the selected number of degrees.
In conclusion, Lightworks is a powerful video editing application that offers a lot of features and options. If you’re looking for something with all the features you need, then it’s a great choice. However, if you’re on a tight budget, there are other applications available that may be more suitable for your needs.
Filmora is a lightweight video editor that is easy to use and offers powerful features such as motion graphics, text editing, and audio editing. You can try it for free by downloading the trial version from the Filmora website.
Step 2: Choose the portion of the video you want to rotate; if you want to rotate the entire movie, simply choose the entire video instead of a specific portion.
Step 3: Click on the “VFX” tab and go to the “3D DVE” section.
Step 4: Choose the Z axis and rotate the video to the desired degree. You can also modify the orientation of the video by entering a value in the box provided in front of the Z-axis.
Step 5: Click on the Enter in the keyboard button.
Your video will now be rotated by the selected number of degrees.
How to Rotate Videos in Filmora
On the other hand, Lightworks has an alternative video editing tool which is Filmora Video Editor . If you are looking for a lightweight video editor with an easy-to-use interface, then Filmora is the best option for you. It offers powerful features such as motion graphics, text editing, and audio editing, while still being very easy to use.
You can try it for free by downloading the trial version from the Filmora website. Filmora also offers a wide range of export options, so you can easily share your videos with others. You can export your video as an MP4 or MOV file, or upload it directly to YouTube or Facebook.
For Win 7 or later (64-bit)
For macOS 10.14 or later
Step-by-step on how to rotate videos in Filmora
How to Manually Rotate a Video in Filmora
To rotate videos in Filmora manually…
Step 1: Import your video into the project.
Step 2: Click the video clip you want to rotate.
Step 3: Click on the “Edit” tool above the timeline and go to the “Transform” section. Then, select the “Rotate” option.
Step 4: Select the desired rotation option.
Step 5: Click on the “Ok” button.
Your video will now be rotated by the selected number of degrees.
In conclusion, Lightworks is a powerful video editing application that offers a lot of features and options. If you’re looking for something with all the features you need, then it’s a great choice. However, if you’re on a tight budget, there are other applications available that may be more suitable for your needs.
Filmora is a lightweight video editor that is easy to use and offers powerful features such as motion graphics, text editing, and audio editing. You can try it for free by downloading the trial version from the Filmora website.
General Knowledge About MP4 Format and Best MP4 Video Editor
You all must have taken pictures and made videos at various occasions of life, and it might be someone’s wedding, birthday, or any other party. The images and videos are saved in different file formats, and sometimes sharing file across different platforms get difficult because of this.
What if you want to edit your MP4 video but don’t know much about the MP4 file format? The following article will help you learn more about it. From the introduction to the technical descriptions, all are discussed in detail below.
In this article
02 Why MP4 Video Format Is the Most Popular Video File?
03 Best MP4 Video Editor- Filmora Video Editor
04 How to Edit MP4 Video Files?
05 MOV VS. MP4: What’s the Difference?
Part 1. What Is MP4 Video Format?
MP4 file format is mostly used for video files. The original data is not in MP4 format. The format can also contain audio, video, subtitles, or image data in different streams. All the streams can be decoded by different decoders.

MP4 video format is developed by the Moving Picture Expert Group (MPEG). MP4 file format is compatible with a wide range of software and devices. It has relatively high post-compressed video quality thus takes less space than other formats.
Part 2. Why MP4 Video Format Is the Most Popular Video File?
You all must have heard about various file formats, but can you name the most popular format? Well, it’s MP4 format. Now that you know about the MP4 format, let’s tell you why it’s famous among other formats:
· Compatibility
Do you know something about MP4 compatibility? The file format is extremely compatible with online and also mobile internet browsers. Moreover, you can also find its compatibility with various social media like Facebook, Twitter, Instagram.
· Codecs
The MP4 containers can use codecs like MPEG-4, , . MP4 file format is also suitable for images and audio files.
· Size
Do you know another reason why the MP4 video format is famous? It’s because of the size. MP4 format delivers high-quality video but in a relatively smaller size.
Part 3. Best MP4 Video Editor- Filmora Video Editor
When we talk about MP4 video format editing, Wondershare Filmora Video Editor is the best choice you could ever have. The video editor is easy and straightforward for beginners, and you don’t need any technical expertise to use the Filmora video editor. Moreover, the interface is very clean and intuitive. The software offers a precision cutter.

For Win 7 or later (64-bit)
For macOS 10.12 or later
Do you know any video editor that supports 4k? Filmora does support 4K video resolution and also high definition image quality. Additionally, Filmora has a media library; you can get cool and stunning editing elements, titles, effects, transitions, and a lot more things. Wondershare Filmora offers a wide range of features; let’s discuss a few:
Green Screen Effect
Distractions in videos are very annoying, but with Filmora, you can get rid of this. The Green Screen Effect offered by Filmora helps in removing all the distractions from your video like any unwanted person, irritating light, or whatever.
Motion Tracking
It’s tough to find good software that offers features like motion tracking. Luckily, you have Wondershare Filmora to use the feature. Motion Tracking is among the most anticipated and prominent features of the video editor, which help you track movements in the video.
Split Screen
Are you creating a tutorial? Do try the Split Screen feature of Filmora for creating tutorials, commentary, or even interviews. This classical feature is fantastic and makes your video unique. You can switch between 4 to 6 screen panels.
Transitions and Effects
Video Editing is incomplete without effects and transitions. If you are using Filmora Video Editor, you will get a lot of brilliant transitions and effects to add to your video and make it shine. You also get a variety of title and text templates.
Part 4. How to Edit MP4 Video Files?
If you are worried about editing your videos in MP4 file format, let’s share something that will help you. Read the following section of this article to learn more about some tips regarding MP4 editing.
1. Cut the Video
If your video has any rough or extra content, remove it. You can easily cut your MP4 video and remove unwanted parts. Filmora Video Editor offers a ‘Cut’ feature that could be used for this purpose.

2. Join MP4 Videos
Do you know what else you can do? With Filmora, you can join and combine several MP4 videos with great ease. The software lets you create cool joined videos that look like an entire movie. The feature lets you add your desired videos.

3. Edit Audio of MP4 Video
Can you edit audio from Filmora Video Editor? Surprisingly, yes, you can also edit the audio of your MP4 video from this editor. The software lets you adjust the different features of the audio like its Pitch, Speed, Volume, etc.

4. Add Effects, Titles, and Transitions
You can also add stunning effects to your MP4 video while editing it. Moreover, explore Filmora and find the perfect title for your video. Apart from this, you also get tons of cool transitions that you can add for smooth transitioning effects.

Part 5. MOV VS. MP4: What’s the Difference?
There are multiple types of documents that you can have your material saved into. Among them exists MOV and MP4. Do you know the difference between these two? Allow us to help you out by sharing the qualities of MOV and MP4.

MP4
Let us tell you about MP4 first. MP4 is a multimedia storage format mainly used to store videos. It is widely used and can be used is multiple devices. MP4 is the wrapper around the video, not the video itself. If we talk technically, MP4 contains the compressed video data and necessary data files that are required to play the video. MP4 is more compressed than other files types, thus taking less space.
MOV
MOV is a file-saving format that Apple owns. It would not be wrong to say that MOV works best in iOS and macOS devices. MOV files can be converted into MP4 and vices versa if needed. MOV has the best video quality and sound under the same compression level. MOV files are also decoded by MPEG-4 codec, the same as MP4.
Final Words
After reading and learning from the above article, we hope that you have increased your knowledge about the MP4 video format. The article shared various things about MP4, like the factors for its popularity, editing MP4 video, etc. We also introduced a great video editor to edit your MP4 file format videos.
Wondershare Filmora is the best editor for videos when you want to create unique and stunning content. The editor offers a whole new editing world with limitless features. Do you know any good software for Color Match? Its Filmora! The easy-to-use, multi-track, drag, and drop video editor will change your editing game.
If you want to stun your viewers with your videos, then try Wondershare Filmora. You can add brilliant transitions, effects, titles to your video. Apart from this, you also get features like cut, crop, trim, join, split, and many more.
Wondershare Filmora
Get started easily with Filmora’s powerful performance, intuitive interface, and countless effects!
Try It Free Try It Free Try It Free Learn More >

02 Why MP4 Video Format Is the Most Popular Video File?
03 Best MP4 Video Editor- Filmora Video Editor
04 How to Edit MP4 Video Files?
05 MOV VS. MP4: What’s the Difference?
Part 1. What Is MP4 Video Format?
MP4 file format is mostly used for video files. The original data is not in MP4 format. The format can also contain audio, video, subtitles, or image data in different streams. All the streams can be decoded by different decoders.
MP4 video format is developed by the Moving Picture Expert Group (MPEG). MP4 file format is compatible with a wide range of software and devices. It has relatively high post-compressed video quality thus takes less space than other formats.
Part 2. Why MP4 Video Format Is the Most Popular Video File?
You all must have heard about various file formats, but can you name the most popular format? Well, it’s MP4 format. Now that you know about the MP4 format, let’s tell you why it’s famous among other formats:
· Compatibility
Do you know something about MP4 compatibility? The file format is extremely compatible with online and also mobile internet browsers. Moreover, you can also find its compatibility with various social media like Facebook, Twitter, Instagram.
· Codecs
The MP4 containers can use codecs like MPEG-4, , . MP4 file format is also suitable for images and audio files.
· Size
Do you know another reason why the MP4 video format is famous? It’s because of the size. MP4 format delivers high-quality video but in a relatively smaller size.
Part 3. Best MP4 Video Editor- Filmora Video Editor
When we talk about MP4 video format editing, Wondershare Filmora Video Editor is the best choice you could ever have. The video editor is easy and straightforward for beginners, and you don’t need any technical expertise to use the Filmora video editor. Moreover, the interface is very clean and intuitive. The software offers a precision cutter.
For Win 7 or later (64-bit)
For macOS 10.12 or later
Do you know any video editor that supports 4k? Filmora does support 4K video resolution and also high definition image quality. Additionally, Filmora has a media library; you can get cool and stunning editing elements, titles, effects, transitions, and a lot more things. Wondershare Filmora offers a wide range of features; let’s discuss a few:
Green Screen Effect
Distractions in videos are very annoying, but with Filmora, you can get rid of this. The Green Screen Effect offered by Filmora helps in removing all the distractions from your video like any unwanted person, irritating light, or whatever.
Motion Tracking
It’s tough to find good software that offers features like motion tracking. Luckily, you have Wondershare Filmora to use the feature. Motion Tracking is among the most anticipated and prominent features of the video editor, which help you track movements in the video.
Split Screen
Are you creating a tutorial? Do try the Split Screen feature of Filmora for creating tutorials, commentary, or even interviews. This classical feature is fantastic and makes your video unique. You can switch between 4 to 6 screen panels.
Transitions and Effects
Video Editing is incomplete without effects and transitions. If you are using Filmora Video Editor, you will get a lot of brilliant transitions and effects to add to your video and make it shine. You also get a variety of title and text templates.
Part 4. How to Edit MP4 Video Files?
If you are worried about editing your videos in MP4 file format, let’s share something that will help you. Read the following section of this article to learn more about some tips regarding MP4 editing.
1. Cut the Video
If your video has any rough or extra content, remove it. You can easily cut your MP4 video and remove unwanted parts. Filmora Video Editor offers a ‘Cut’ feature that could be used for this purpose.
2. Join MP4 Videos
Do you know what else you can do? With Filmora, you can join and combine several MP4 videos with great ease. The software lets you create cool joined videos that look like an entire movie. The feature lets you add your desired videos.
3. Edit Audio of MP4 Video
Can you edit audio from Filmora Video Editor? Surprisingly, yes, you can also edit the audio of your MP4 video from this editor. The software lets you adjust the different features of the audio like its Pitch, Speed, Volume, etc.
4. Add Effects, Titles, and Transitions
You can also add stunning effects to your MP4 video while editing it. Moreover, explore Filmora and find the perfect title for your video. Apart from this, you also get tons of cool transitions that you can add for smooth transitioning effects.
Part 5. MOV VS. MP4: What’s the Difference?
There are multiple types of documents that you can have your material saved into. Among them exists MOV and MP4. Do you know the difference between these two? Allow us to help you out by sharing the qualities of MOV and MP4.
MP4
Let us tell you about MP4 first. MP4 is a multimedia storage format mainly used to store videos. It is widely used and can be used is multiple devices. MP4 is the wrapper around the video, not the video itself. If we talk technically, MP4 contains the compressed video data and necessary data files that are required to play the video. MP4 is more compressed than other files types, thus taking less space.
MOV
MOV is a file-saving format that Apple owns. It would not be wrong to say that MOV works best in iOS and macOS devices. MOV files can be converted into MP4 and vices versa if needed. MOV has the best video quality and sound under the same compression level. MOV files are also decoded by MPEG-4 codec, the same as MP4.
Final Words
After reading and learning from the above article, we hope that you have increased your knowledge about the MP4 video format. The article shared various things about MP4, like the factors for its popularity, editing MP4 video, etc. We also introduced a great video editor to edit your MP4 file format videos.
Wondershare Filmora is the best editor for videos when you want to create unique and stunning content. The editor offers a whole new editing world with limitless features. Do you know any good software for Color Match? Its Filmora! The easy-to-use, multi-track, drag, and drop video editor will change your editing game.
If you want to stun your viewers with your videos, then try Wondershare Filmora. You can add brilliant transitions, effects, titles to your video. Apart from this, you also get features like cut, crop, trim, join, split, and many more.
Wondershare Filmora
Get started easily with Filmora’s powerful performance, intuitive interface, and countless effects!
Try It Free Try It Free Try It Free Learn More >
Also read:
- New Are You Looking for Ways to Add Background to Green Screen Video Online? Worry Not, as in This Article; We Shall Discuss Using a Green Screen Background Adder in Filmora
- Updated Top 10 Online And PC Cartoon Video Maker 2022 For Beginner for 2024
- Updated Change Speed of a Video on iPhone for 2024
- Updated Best Video Grabbers for Chrome for 2024
- Updated Advancements in Game Recording Software A Comprehensive Overview for 2024
- Updated 2024 Approved How Do You Create In-Camera Transitions in Your Videos? A Complete Guide for Beginners to Create These Transitions Using Their Camera at Home
- New In 2024, Are You Searching for Professional Subtitle Apps? Read This Article to Explore Various Compatible Subtitle Apps that You Can Run on Multiple Platforms
- Updated 11 Tools To Create Radial Blur Photo Mobile And Desktop for 2024
- How to Crop a Video in Davinci Resolve Step by Step for 2024
- Updated 2024 Approved This Article Introduces How Sheila Become a Youtuber and How She Started Video Editing
- Updated This Blog Post Shows How to Create an Eye-Catching Paper Rip Effect for Your Videos Using Wondershare Filmora with These Easy-to-Follow Steps for 2024
- Some Effective Slow Motion Video Editors You Can Try for 2024
- Thousands Already Know What Ezgif Is and So Can You for 2024
- New In 2024, Best Ideas on Using Green Screen with Filmora
- 2024 Approved Do You Find Choosing a Good LUT to Color-Correct Your Media Files Difficult? Discover some of the Best Professional LUTs From 3D LUT Creator to Download
- Updated In 2024, 15 Free Cinematic LUTs for Your Film
- New In 2024, In This Article, We Will Discuss What Lens Distortion Is, How It May Be Fixed, and the Factors You Need to Pay Attention to Avoid Lens Distortion when Taking or Recording Videos
- Updated Want to Make a Fun and Cinematic Video with an Introductory Text Title? Learn the Stages of Editing with Filmora for This Effect Here
- New 2024 Approved Learn About some of the Best Apps for Photo Collage for PC
- In 2024, Looking for the Different Ar Video Effects to Include in Your Film? Check Out This Article for the Best 10 Augmented Reality Effects and the Fun Ar Effects in Filmora
- Updated How To Change Text In Premiere Pro
- Are You Finding It Challenging to Convert GIFs Into JPG or PNG Images? Do Not Worry! The Best Free Online Tool and Software to Change Your GIF Into PNG or JPG Images Are Below for 2024
- Updated 2024 Approved Green Screen YouTube Videos
- Basic Knowledge About WMV Format and Best WMV Video Editor for 2024
- New 2024 Approved How to Add Filter to Video in Premiere Pro?
- New Do You Want to Apply LUTs Using Open Broadcaster Software? You Can Download Free LUTs for OBS and Apply Them to Your Files. There Are Many LUTs Available for 2024
- New In 2024, Basic Introduction for LumaFusion Color Grading
- New 15 Best Free MP4 Video Rotators Windows,Mac, Android, iPhone & Online for 2024
- Updated In 2024, The Power of Music in Videos (+Filmora Editing Tricks)
- Updated Lets Look at Four Different Ways of Merging Audios and Videos. The Tools Will Help You Craft High-End Videos without Involving Any Complex Steps. You Can Make Your Videos Beautiful by Using the Following Easy to Use Tools
- New 2024 Approved Are You Looking for Funny Discord Emojis to Massively Improve Your Discord Experience? Using some Fun Bots for Discord Is an Excellent Way of Doing That! Thus, We Compiled a List of 10 Fun Discord Bots You Need
- New Guide Adopting Lumetri Color Presets in Effective Color Grading for 2024
- In 2024, Ultimate Guide on How to Film Better in Public
- How and Where to Find a Shiny Stone Pokémon For Oppo Find X6 Pro? | Dr.fone
- In 2024, Easy Guide to Vivo X Flip FRP Bypass With Best Methods
- How to recover old call logs from your Galaxy A24?
- How to Fix It OnePlus 12 Wont Turn On | Dr.fone
- Where Is the Best Place to Catch Dratini On Honor Play 7T | Dr.fone
- In 2024, Installation and Registration
- How to Reset your Samsung Galaxy Z Flip 5 Lock Screen Password
- Huawei Bypass Tools to Bypass Lock Screen(Huawei Nova Y91)
- In 2024, How To Bypass iCloud By Checkra1n Even From iPhone 11 Pro If Youve Tried Everything
- Guide How To Unbrick a Bricked Poco C65 Phone | Dr.fone
- In 2024, How to Fake Snapchat Location without Jailbreak On Apple iPhone 14 Pro | Dr.fone
- How to add my signature to Word 2016
- In 2024, A Quick Guide to Itel P55+ FRP Bypass Instantly
- How to add a digital signature block to .dot file
- Repair broken or corrupt video files of Realme GT 5
- How to Reset your Samsung Galaxy S23 Tactical Edition Lock Screen Password
- In 2024, Unova Stone Pokémon Go Evolution List and How Catch Them For Poco X5 | Dr.fone
- A Quick Guide to Motorola FRP Bypass Instantly
- In 2024, How to Unlock Xiaomi Redmi Note 12T Pro Bootloader Easily
- Process of Screen Sharing Vivo Y78 5G to PC- Detailed Steps | Dr.fone
- In 2024, How to Fake Snapchat Location without Jailbreak On Samsung Galaxy S24 Ultra | Dr.fone
- 4 Most-Known Ways to Find Someone on Tinder For Oppo A2 by Name | Dr.fone
- Here are Some Pro Tips for Pokemon Go PvP Battles On OnePlus 12R | Dr.fone
- Best 3 Realme GT 5 Emulator for Mac to Run Your Wanted Android Apps | Dr.fone
- How To Activate and Use Life360 Ghost Mode On OnePlus Nord N30 5G | Dr.fone
- Title: Updated Best Ideas on Using Filmora Green Screen
- Author: Morgan
- Created at : 2024-05-19 05:12:12
- Updated at : 2024-05-20 05:12:12
- Link: https://ai-video-editing.techidaily.com/updated-best-ideas-on-using-filmora-green-screen/
- License: This work is licensed under CC BY-NC-SA 4.0.
