

Updated Change Background Color in After Effects for 2024
Change Background Color in After Effects
Adobe After Effects is a powerful video editor. After Effects is particularly popular for its special effects that you can add to your videos and blow the mind of your audience. In any video, the background plays a major role in enhancing the overall frame and scene. If you are planning to change background color After Effects or add special effects, you must shoot your video with a solid color background.
During the post-production phase, you can change the background uniformly to any color scheme or special effect as per the requirement of the scene. Since the learning curve for After Effects is slightly steeper, you should know the exact steps to change After Effects background color. We will explain the process in simple steps and provide you with an alternative way to change background color.
Part 1. How to change video BG color in After Effects?
After Effects is widely used for professionals to add animations and special effects to videos during video editing phase. Starting from editing social media videos and YouTube videos to short films and even movies, After Effects finds its application in every field of video editing. Changing background color in After Effects is super simple even though other video editing techniques could be slightly complex for beginners. Here are the steps on how to change background color in After Effects.
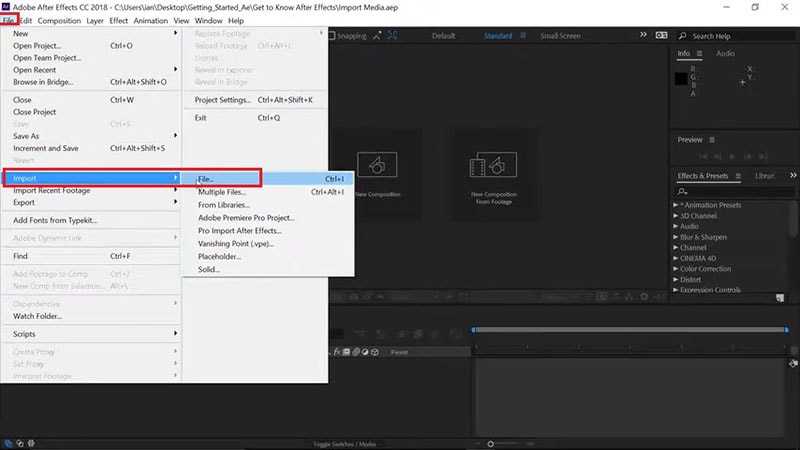
Step1 Open After Effects on your computer. Go to File> Import> File. Select the video file from your hard drive and it will appear under Project tab.
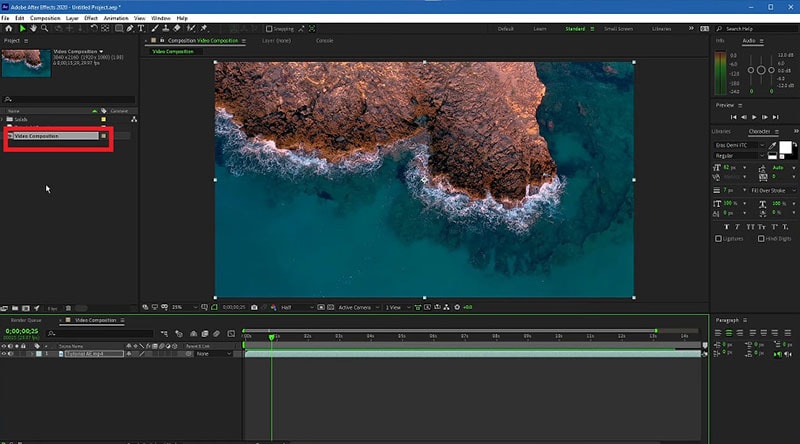
Step2 Drag and drop your video into Timeline. Select the video clip and right-click on Video Composition option located below Project tab.
Step3 From the menu, click on Composition Settings option. You can also use Ctrl + K(Windows) or Command + K(Mac) key combination to open Composition Settings directly.

Step4 On Composition Settings window, go to Background Color and set the color as per your preference. You can also use a color picker as well to select any color from the video directly.
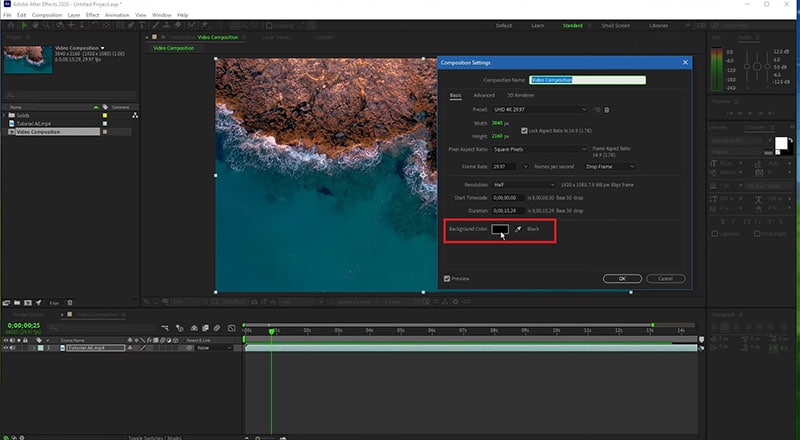
Step5 Click on Ok to set the new background color. Depending on the transparency of your video scene or the transition effect such as fade in and out, the background color will be more prominent.
Part 2. Alternative way to change background color
The best alternative to After Effects is Wondershare Filmora as Filmora has a wide range of special effects and animations. Filmora is a professional video editor where you can perform all basic as well as advanced video editing work. Most importantly, Filmora comes with an intuitive user interface so that even amateurs can use it easily.
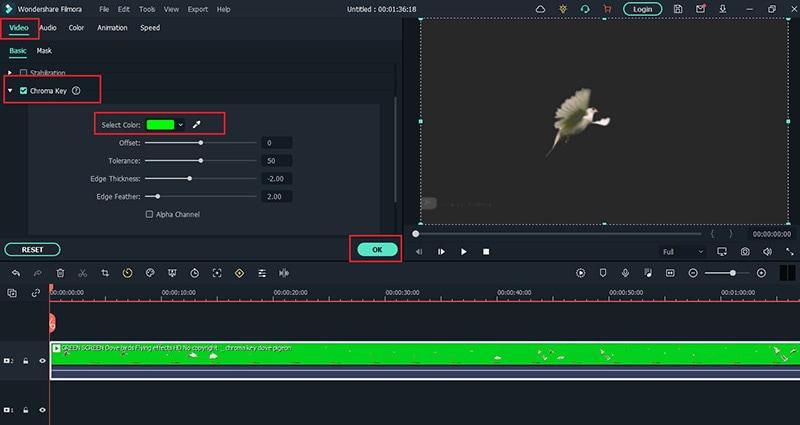
There are several ways you can change background color in your video. For example, you can remove background color even when you do not have a solid color. If your video has a solid color, you can change background color to any color or graphical element using Chroma key. Here are the steps to change background color in Filmora .
Free Download For Win 7 or later(64-bit)
Free Download For macOS 10.14 or later
Step1 Download and install Filmora and it is available for Windows and Mac. Launch Filmora and click on New Project.

Step2 Import your video under Project Media folder and drag and drop into Timeline.
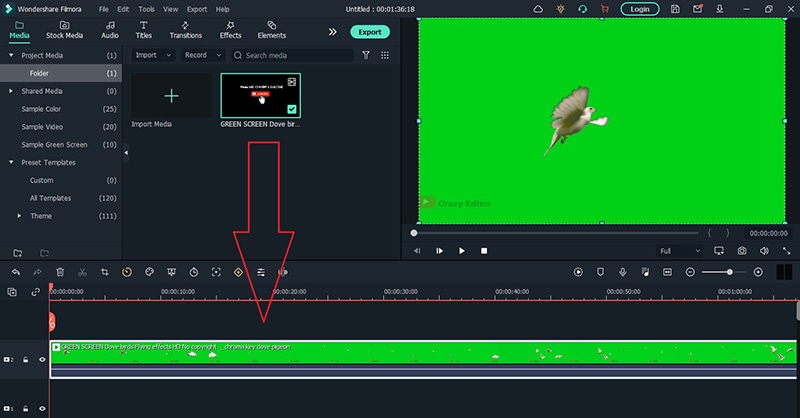
Step3 Double-click on the video clip and go to Video tab and turn on Chroma Key option. Select the solid color present in the background of the video and click on Ok button.
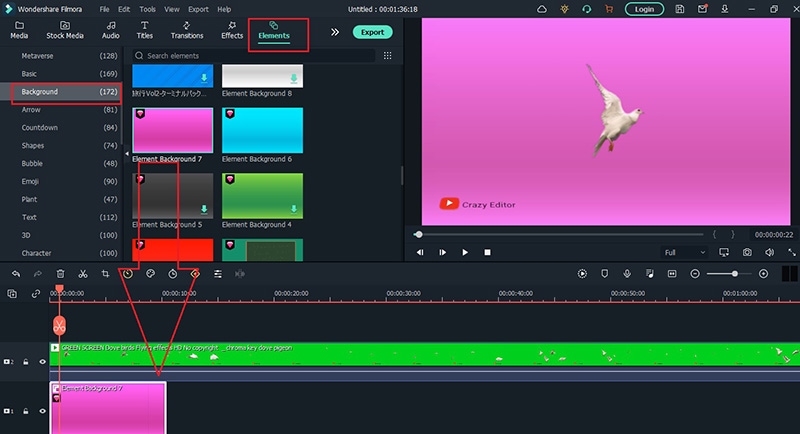
Step4 You will see the background color of the video disappear. Go to Elements> Background and drag and drop any background into Timeline. Make sure it is placed below the video clip and extend the duration of the background color as per your requirements.
Step5 Finally, play the video and click on Export button to save the video.
Part 3. FAQs about Video Background Colors
1. How do I remove background color in After Effects?
Import your video clip with a solid background color and place it on Timeline. Go to Effect menu> Keying> Keylight option. In Effects window and under Keylight, you will see Screen Colour option. Click on the eyedropper icon and select the background color you want to remove.
2. How do I change a solid background in After Effects?
The steps for After Effects how to change background color solid involve removing the background color and adding a layer of solid color to replace the transparency of the video. Go to Layer> New> Solid. Under Solid Settings window, go to Color and select the desired color from Color option and click on OK button. The new color will get reflected in the background of the video.
3. How do you add a white background in After Effects?
Go to Layer> New> Solid and add a white color solid first. However, this white color layer will not be visible unless you turn the background of your video transparent. Go to Effects & Presets and search for Luma Key and drop Luma Key on your video. Set Key type as Brighter and the threshold of the Lema key as per suitability on your video to see the white background appear.
Free Download For macOS 10.14 or later
Step1 Download and install Filmora and it is available for Windows and Mac. Launch Filmora and click on New Project.
Step2 Import your video under Project Media folder and drag and drop into Timeline.
Step3 Double-click on the video clip and go to Video tab and turn on Chroma Key option. Select the solid color present in the background of the video and click on Ok button.
Step4 You will see the background color of the video disappear. Go to Elements> Background and drag and drop any background into Timeline. Make sure it is placed below the video clip and extend the duration of the background color as per your requirements.
Step5 Finally, play the video and click on Export button to save the video.
Part 3. FAQs about Video Background Colors
1. How do I remove background color in After Effects?
Import your video clip with a solid background color and place it on Timeline. Go to Effect menu> Keying> Keylight option. In Effects window and under Keylight, you will see Screen Colour option. Click on the eyedropper icon and select the background color you want to remove.
2. How do I change a solid background in After Effects?
The steps for After Effects how to change background color solid involve removing the background color and adding a layer of solid color to replace the transparency of the video. Go to Layer> New> Solid. Under Solid Settings window, go to Color and select the desired color from Color option and click on OK button. The new color will get reflected in the background of the video.
3. How do you add a white background in After Effects?
Go to Layer> New> Solid and add a white color solid first. However, this white color layer will not be visible unless you turn the background of your video transparent. Go to Effects & Presets and search for Luma Key and drop Luma Key on your video. Set Key type as Brighter and the threshold of the Lema key as per suitability on your video to see the white background appear.
Find The Best LUTs for Lightroom
Colors play an essential role in our lives. They add emotions, create moods, and set the tone for our experiences. Using colors in media is significant as they help create an atmosphere that improves your story. That’s why filmmakers and photographers focus so much on color grading and adjustment. For this purpose, they use different tools like LUTs.
You can use LUTs in your images and videos to achieve a particular look or feel in Lightroom. With LUTs, you can make fantastic color grading in Lightroom. Many paid and free LUTs for Lightroom are available to download and use for your media. Moreover, LUTs can save time and give your story perspective and emotion.
Part 1: How Are LUTs Influencing Video Editors?
There are many ways in which LUTs can help and influence content creators and video editors. From Lightroom presets to Premiere Pro presets, you can download any. However, you need to learn the many ways in which LUTs are helping editors.
Efficiency
LUTs (Lookup Tables) are a powerful tool that can help you in many ways if you are a video editor. First, they can make your editing process more efficient. You can apply color grading and correction to your footage, saving you time and increasing productivity. Instead of manually adjusting the colors for each clip, you can use LUTs to achieve a particular look.
Creativity
In addition to efficiency, LUTs also offer a wide range of creative options. You can use LUTs to explore different styles and moods, from vintage looks to modern cinematic ones. It can help you create a unique style for your videos and make them look more meaningful. With LUTs, you can experiment with different colors and effects to achieve the perfect look for your footage.
Consistency
Another benefit of using LUTs is consistency. With LUTs, you can maintain a consistent look and feel across different video clips. It gives all clips in a project a cohesive and professional appearance. These LUTs can be especially helpful if you work on a long-term project or with multiple editors. It will give a uniform look and feel throughout your project.
Accessibility
LUTs are also becoming more accessible than ever before. With free and paid online options, video editors of all skill levels can access these tools for their video projects. You don’t need extensive training or experience in color grading to use LUTs for your videos. Moreover, anyone can use LUTs with simple steps and make their content look more professional.
Part 2: Top Free LUTs for Lightroom
You don’t need to search for free LUTs for Lightroom for your media content. Here is a list of 5 Lightroom LUTs free to download to color grade your media in different tones.
1. 50 Vintage Cinematic Lightroom Presets and LUTs
It is a pack of 50 Cinematic-style vintage LUTs you can apply to your media files. This LUT pack has a warm and orangey tone to give a golden hour and warm color scheme touch. You can use it to create a vintage, nostalgic look for your content. Furthermore, you can use your travel photos or outdoor adventure videos to give them a dreamy rusty vibe.

2. Free LUTs Ciné Green
If you want to add a cool and moody feel to your content, try using this LUT. It has a greenish-blue tone that can give your photos and videos a mysterious and cinematic look. Moreover, this LUT is excellent for nighttime cityscape shots or dramatic portrait photography. Furthermore, you can use it to create a dark and edgy vibe for your content.

3. Urban LUTs
Urban LUT is a pack of 10 rich-color LUTs you can use on your photos and videos. This pack has a bright and cheerful feel to it. It enhances the colors in your photos and videos, making them pop and look more vibrant. Additionally, you can use it to create a fun and lively atmosphere for your content. Moreover, you can try this pack for your vacation photos or family videos to give them an energetic feel.

4. 90’s Vintage LUT Presets
If you want to add a vintage and retro look to your content, 90’s Vintage LUT Presets are perfect. It has a yellow and orange tone that can give your photos and videos an old-fashioned and nostalgic feel. Moreover, it gives your media a 90s feel with ten different LUTs. This pack can create a vintage feel for your content and give your project a throwback look.

5. 8 Free Pastel Day Lightroom Presets and LUTs
This LUT offers eight paste color-grade presets for photos and videos. This pack has a soft and pastel tone to give your media a dreamy and romantic look for your content. It’s excellent for portrait photography, especially for outdoor shoots with natural lighting. Additionally, you can use it to create a soft and gentle vibe for your content with a more delicate touch.

Bonus Part: Wondershare Filmora: A Great Haven for LUTs
Wondershare Filmora might just be what you need to give your videos a cinematic touch. This powerful tool has over 200+ LUTs in its library to give your videos the perfect tone and color grading. You can even adjust the intensity of the LUTs to match the mood of your videos. Furthermore, you can tweak with basic options like hue, saturation, exposure, white balance, and more.
In addition, Wondershare Filmora offers over 10 billion free stock media for you to use in your photos and videos. Moreover, you can even save your music videos up to 4K resolution with sharper and more detailed results. Additionally, you can use the audio visualizer to match the sound of your video automatically. You can choose from different transitions and effects for your videos as well.

Empower your videos with a new mood using different LUTs. Filmora now offers 100+ top-quality 3D LUTs cover a broad range of scenarios. Transform your videos with Filmora’s powerful 3D LUTs.
Apply LUT on Videos Apply LUT on Videos Learn More


Conclusion
In conclusion, LUTs are a powerful tool for video editors who want to give their videos a cinematic look. You can easily achieve the perfect tone and color grading for your videos and pictures. Moreover, LUTs can save you time and effort in video editing. With many paid and free LUTs for Lightroom available that you can use to create professional-looking videos.
Part 1: How Are LUTs Influencing Video Editors?
There are many ways in which LUTs can help and influence content creators and video editors. From Lightroom presets to Premiere Pro presets, you can download any. However, you need to learn the many ways in which LUTs are helping editors.
Efficiency
LUTs (Lookup Tables) are a powerful tool that can help you in many ways if you are a video editor. First, they can make your editing process more efficient. You can apply color grading and correction to your footage, saving you time and increasing productivity. Instead of manually adjusting the colors for each clip, you can use LUTs to achieve a particular look.
Creativity
In addition to efficiency, LUTs also offer a wide range of creative options. You can use LUTs to explore different styles and moods, from vintage looks to modern cinematic ones. It can help you create a unique style for your videos and make them look more meaningful. With LUTs, you can experiment with different colors and effects to achieve the perfect look for your footage.
Consistency
Another benefit of using LUTs is consistency. With LUTs, you can maintain a consistent look and feel across different video clips. It gives all clips in a project a cohesive and professional appearance. These LUTs can be especially helpful if you work on a long-term project or with multiple editors. It will give a uniform look and feel throughout your project.
Accessibility
LUTs are also becoming more accessible than ever before. With free and paid online options, video editors of all skill levels can access these tools for their video projects. You don’t need extensive training or experience in color grading to use LUTs for your videos. Moreover, anyone can use LUTs with simple steps and make their content look more professional.
Part 2: Top Free LUTs for Lightroom
You don’t need to search for free LUTs for Lightroom for your media content. Here is a list of 5 Lightroom LUTs free to download to color grade your media in different tones.
1. 50 Vintage Cinematic Lightroom Presets and LUTs
It is a pack of 50 Cinematic-style vintage LUTs you can apply to your media files. This LUT pack has a warm and orangey tone to give a golden hour and warm color scheme touch. You can use it to create a vintage, nostalgic look for your content. Furthermore, you can use your travel photos or outdoor adventure videos to give them a dreamy rusty vibe.
2. Free LUTs Ciné Green
If you want to add a cool and moody feel to your content, try using this LUT. It has a greenish-blue tone that can give your photos and videos a mysterious and cinematic look. Moreover, this LUT is excellent for nighttime cityscape shots or dramatic portrait photography. Furthermore, you can use it to create a dark and edgy vibe for your content.
3. Urban LUTs
Urban LUT is a pack of 10 rich-color LUTs you can use on your photos and videos. This pack has a bright and cheerful feel to it. It enhances the colors in your photos and videos, making them pop and look more vibrant. Additionally, you can use it to create a fun and lively atmosphere for your content. Moreover, you can try this pack for your vacation photos or family videos to give them an energetic feel.
4. 90’s Vintage LUT Presets
If you want to add a vintage and retro look to your content, 90’s Vintage LUT Presets are perfect. It has a yellow and orange tone that can give your photos and videos an old-fashioned and nostalgic feel. Moreover, it gives your media a 90s feel with ten different LUTs. This pack can create a vintage feel for your content and give your project a throwback look.
5. 8 Free Pastel Day Lightroom Presets and LUTs
This LUT offers eight paste color-grade presets for photos and videos. This pack has a soft and pastel tone to give your media a dreamy and romantic look for your content. It’s excellent for portrait photography, especially for outdoor shoots with natural lighting. Additionally, you can use it to create a soft and gentle vibe for your content with a more delicate touch.
Bonus Part: Wondershare Filmora: A Great Haven for LUTs
Wondershare Filmora might just be what you need to give your videos a cinematic touch. This powerful tool has over 200+ LUTs in its library to give your videos the perfect tone and color grading. You can even adjust the intensity of the LUTs to match the mood of your videos. Furthermore, you can tweak with basic options like hue, saturation, exposure, white balance, and more.
In addition, Wondershare Filmora offers over 10 billion free stock media for you to use in your photos and videos. Moreover, you can even save your music videos up to 4K resolution with sharper and more detailed results. Additionally, you can use the audio visualizer to match the sound of your video automatically. You can choose from different transitions and effects for your videos as well.
Empower your videos with a new mood using different LUTs. Filmora now offers 100+ top-quality 3D LUTs cover a broad range of scenarios. Transform your videos with Filmora’s powerful 3D LUTs.
Apply LUT on Videos Apply LUT on Videos Learn More
Conclusion
In conclusion, LUTs are a powerful tool for video editors who want to give their videos a cinematic look. You can easily achieve the perfect tone and color grading for your videos and pictures. Moreover, LUTs can save you time and effort in video editing. With many paid and free LUTs for Lightroom available that you can use to create professional-looking videos.
How to Correct Lens Distortion With Filmora
The distortion in your video may irritate you when you’re working on the video’s edit. When you take images or record sound, you frequently end up with distorted results due to lens distortion. In this article, we will discuss what lens distortion is, how it may be fixed, and the factors you need to pay attention to avoid lens distortion when taking or recording videos.
Part 1: Basic introduction to lens distortion
1. What is lens distortion
Distortion means that the straight rectilinear projection is not straight. In the pinhole camera model, lens distortion is measured by how far from the image’s ideal projection is. From a geometric optics point of view, the scene’s straight lines don’t look straight in the image.
When you take a picture, the camera lens can somehow change the shape of the image. It is called camera lens distortion. In simple terms, we can tell you that this is the case because distortion in-camera is when the lens makes curved lines in an image and doesn’t show the straight lines from the scene.
2. What cause it
Lens distortion happens with all lenses. It is because of several things, such as how the lens is curved, how far away the subject is, and the angle at which the photo was taken. Furthermore, it changes the image in many ways, but you can see it most when straight lines at the frame’s edges are no longer parallel.
Most geometric lens distortions happen when the focal distance is short (barrel distortion), long (pincushion distortion), or when a fish-eye lens is used to take a picture from a low angle (keystone distortion).
Part 2: How to correct a distorted lens?
A lot of times, with lower-end wide-angle lenses, especially action cams like GoPro, you get pretty gnarly distortion when you’re filming. As we know, the Earth is round, but it shouldn’t look like this when you take a picture. Indeed, it’s very distorted, it has the horizon line bending all over the place, and basically, all of the lines in the video have some level of curvature.
Hence, follow all the steps below to know how to fix it:
Step1 Import your video to Filmora .

Free Download For Win 7 or later(64-bit)
Free Download For macOS 10.14 or later
Step2 Click on the clip and head over to the lens correction. Choose the “Camera model” based on what you used, but in this tutorial, the video was taken with a GoPro Hero 7. However, you can choose some other camera model options there.

Step3 To adjust the distortion, you can slide the bar to the left or the right. If you slide the bar to the right (maximum level), there will be no adjustment. However, if you slide the bar to the left, you can see it pulling those lines as high up as possible.
You can see a bit of curvature, but it looks much more natural, and all of the lines in the video look so much better.

Step4 Lastly, if you play the video back, you will see the video look much better than before.

Part 3: How to avoid distorted lens while shooting?
1. Avoid very wide-angle lenses
The more distortion there is in a lens, like a 15mm prime, the wider it is. Sometimes you need a very wide-angle lens, and distortion is unavoidable. If you have room to move back, you could try using a lens with a different focal length.
2. Avoid getting too close
Doing so will enhance optical distortion in many lenses and the likelihood of perspective distortion in all lenses.
3. Be mindful of your composition
There are numerous instances where distortion is acceptable or even intended. Others must be carefully examined, such as utilizing a wide-angle lens to photograph a row of people. When you get too close to a group, the distortion makes the people at each end appear considerably wider! Therefore, consider your composition. Stand back and add space around your group; if necessary, you can trim the image afterward.
4. Use a 50mm lens
50mm lenses are often called “all-purpose” lenses. There is a good reason
for this. A 50mm lens is great for portraits, street photography, and many other kinds of photography, including architecture. If your subject is big, you just need space to stand back. You will see that a 50mm lens rarely distorts the image.
Free Download For macOS 10.14 or later
Step2 Click on the clip and head over to the lens correction. Choose the “Camera model” based on what you used, but in this tutorial, the video was taken with a GoPro Hero 7. However, you can choose some other camera model options there.
Step3 To adjust the distortion, you can slide the bar to the left or the right. If you slide the bar to the right (maximum level), there will be no adjustment. However, if you slide the bar to the left, you can see it pulling those lines as high up as possible.
You can see a bit of curvature, but it looks much more natural, and all of the lines in the video look so much better.
Step4 Lastly, if you play the video back, you will see the video look much better than before.
Part 3: How to avoid distorted lens while shooting?
1. Avoid very wide-angle lenses
The more distortion there is in a lens, like a 15mm prime, the wider it is. Sometimes you need a very wide-angle lens, and distortion is unavoidable. If you have room to move back, you could try using a lens with a different focal length.
2. Avoid getting too close
Doing so will enhance optical distortion in many lenses and the likelihood of perspective distortion in all lenses.
3. Be mindful of your composition
There are numerous instances where distortion is acceptable or even intended. Others must be carefully examined, such as utilizing a wide-angle lens to photograph a row of people. When you get too close to a group, the distortion makes the people at each end appear considerably wider! Therefore, consider your composition. Stand back and add space around your group; if necessary, you can trim the image afterward.
4. Use a 50mm lens
50mm lenses are often called “all-purpose” lenses. There is a good reason
for this. A 50mm lens is great for portraits, street photography, and many other kinds of photography, including architecture. If your subject is big, you just need space to stand back. You will see that a 50mm lens rarely distorts the image.
How to Make a Custom Slide Show in PowerPoint
How to Create a Custom Slide Shows in Powerpoint
An easy yet powerful editor
Numerous effects to choose from
Detailed tutorials provided by the official channel
Designing custom slideshows in PowerPoint is an absolute fun to do activity for infotainment and information sharing needs. Stay here to get an insight into creating the same, all in a wink!
In this article
01 [How to Create a Custom Slide Show in PowerPoint?](#Part 1)
02 [How to Show a Custom Show in PowerPoint?](#Part 2)
03 [How to Hide Slides in PowerPoint?](#Part 3)
Part 1 How to Create a Custom Slide Show in PowerPoint?
PowerPoint presentations are an already elusive and captivating media of information delivery and content sharing, be it a personal entertainment need or a high end professional requirement, PowerPoint presentations can do it all! Responding to the day to day IT upgrades of modern times, the aforesaid MS Office utility program has introduced its custom slideshow feature, which you can work upon to expand your creative skills in graphic design.
Custom slideshows are a convenient means of abstracting a required set of contents from a rather detailed slideshow presentation to address the needs of a specific audience, instead of distracting them with showcasing the entire content, most of which turns irrelevant to their exclusive requirements.
Talking about the knowhow to work with the feature, the following section encompasses a comprehensive understanding of the custom slide show creation process with the finest details:
User’s Guide to Create Custom Slideshows in PowerPoint
Step 1: Launch the PowerPoint Tool
Start the custom slide show PowerPoint creation process with launching the PowerPoint tool in any of your preferred devices. It would be better to work on a desktop or a PC. Proceed to open the presentation that you wish to create a custom slideshow from.
Step 2: Custom Slide Show Option
In the welcome interface of PowerPoint, navigate to the ribbon at the top and hit the ‘Slide Show’ tab, followed by clicking on the ‘Custom Slide Show’ button from the ‘Options Panel’ that appears. As you tap the aforesaid button, a dropdown menu follows next, from where you need to choose the ‘Custom Shows…’ option.

Step 3: Custom Shows Dialog Box
The completion of Step 2 brings up the ‘Custom Shows’ dialog box, with a blank area at the left, indicating the absence of any custom slide show as yet. To create one, navigate to and click on the ‘New’ button at the right side within the dialog box.

Step 4: Define Custom Show Dialog Box
As you tap the ‘New’ button, the ‘Define Custom Shows’ dialog box pops up with a display of the following fields and buttons:
● Slide Show Name Box
Use this field to assign a name to your custom slideshow. In case you don’t add a name of your choice, PowerPoint will assign the name ‘Custom Show 1’ to your custom presentation.
● Slides in Presentation
Below the ‘Slide Show Name’ box, appears a list of slides in the chosen presentation which you can use to create the custom slide show. To add slides to the same, click on the respective slide names.
● Add Button
The ‘Add’ button in the middle of the ‘Define Custom Show’ dialog box is used to include selected slides from the main list explained above to the ‘Slides in Custom Show’ list at the right. The ‘Add’ button however, remains disabled until you make a selection from the main slides list to include within the custom slides list. Take note that you can choose to repeat the slides within the custom list.
● Remove Button
You can use this button to select and delete specific slides from the ‘Slides in Custom Show’ list. The button however, remains disabled till you make a slide selection to be removed.
● Slides in Custom Show
This is a list of slides that you have selected from the main slides list to include in the custom slideshow.
● Re-Order Buttons
These are ‘Up’ and ‘Down’ arrows at the right side of the ‘Define Custom Show’ dialog box, which are active only if the ‘Slides in Custom Show’ list has more than one slide to its credit. In such a case, you can use these arrows to change the sequence of appearance of the slides within the custom presentation.

Step 5: Back to Custom Shows Dialog Box
When you have finished making all the required entries in the aforesaid fields, click on ‘OK’ to create your custom slideshow, which is visible in the ‘Custom Shows’ dialog box. You can preview the just created custom presentation by selecting the slideshow in the ‘Custom Shows’ list, followed by clicking on the ‘Show’ button at the bottom right of the dialog box.

The ‘Custom Shows’ dialog box has an additional list of buttons, which are explained as follows:
● The ‘New’ button, which you can click on to continue creating as many custom slideshows as you like.
● The ‘Edit’ button, which allows you to make changes to a specific custom slideshow.
● The ‘Remove’ button, which you can use to select and delete an existing custom presentation.
● The ‘Copy’ button, that lets you create multiple copies of a selected slideshow. This utility comes handy when you need to work on creating similar custom presentations with an affordably small number of differential elements.
When you are satisfied with your work, navigate to and hit the ‘Close’ button to finalize and save the custom presentation within your device.

Part 2 How to Show a Custom Show in PowerPoint?
When working to share any kind of information through slideshow presentations, creating a custom show is just half the job, with the significant part of a flawless content presentation remains still under the line. Having understood the process of creating a custom slide show in PowerPoint in enough detail, let us now move ahead with learning how to show the same in PowerPoint in the following section:
User’s Guide to Play a Custom Slideshow in PowerPoint
Step 1: Launch the Parent Presentation
In any suitable device of your preference, proceed with opening the presentation in which you have worked on creating the custom slideshow, followed by hitting the ‘Slide Show’ tab in the PowerPoint ribbon at the top. From the list of options that appears next, click on the ‘Custom Slide Show’ button.

Step 2: Custom Slideshow Dropdown Menu
Clicking on the ‘Custom Slide Show’ button in step 2 causes the latter’s dropdown menu to get displayed, with a list of all the created custom shows within the currently accessed parent slideshow presentation. Navigate to and click on the name of the custom presentation that you wish to play.

How to Set a Custom Show as the Default Slideshow?
If you are interested in playing the custom show as a default presentation, see through the following stepwise tutorial guide to go ahead with the process:
Step 1: Set Up Slideshow Button
After you have launched the parent presentation, navigate to and click on the ‘Slide Show’ tab within the topmost PowerPoint ribbon and tap the ‘Set Up Slide Show’ button from the list of options that follows.

Step 2: Set Up Show Dialog Box
Clicking on the aforesaid button makes the ‘Set Up Show’ dialog box to appear, where you are required to hit the ‘Custom Show’ radio button. You can now click on the dropdown arrow below the radio buttons to select your specific one from the list of custom shows that pops down. Hit ‘OK’ at the bottom right corner of the dialog box when you have made your choice.

The custom show is now your default slideshow. In your future launches of ‘Slide Show View’, only the selected custom show slides will appear to be used as a presentation.
Part 3 How to Hide Slides in PowerPoint?
In case you have worked on a detailed slideshow presentation in the PowerPoint tool, that consists of selective contents for different audience groups, all within the main presentation, it is a wise step to hide the content slides that are not useful to particular audiences, lest your viewers might get distracted with the irrelevant content.
By far, you must have developed a significant understanding of the custom slideshow PowerPoint creation and presentation procedure in much detail. Moving further into our discussion, let us now work on hiding slides within a PowerPoint presentation through the following step by step guide:
How to Hide or Unhide a Slide in PowerPoint?
Step 1: Launch the PowerPoint Presentation
Start with opening a desired PowerPoint Presentation in your preferred device.
Step 2: Make Your Selection
Visit the slide navigation pane at the left to select slide you wish to delete. Your selections will be highlighted as you tap on them. You can either delete the slides one at a time, or make multiple selections to delete them all at once.

Step 3: Hide Slide Option
When you have made the required selections, right click on the same, followed by choosing the ‘Hide Slide’ option from the dropdown menu that appears next. The selected slides will now be hidden and you can recognize them in the ‘Presenter View’ with lighter thumbnails as compared to the included slides, in the slide navigation pane.


Step 4: Unhiding the Presentation Slides
If you wish to unhide a previously hidden presentation slide, reach to the slide navigation pane in the left and right click on the hidden slide thumbnail. The dropdown menu in Step 3 pops up again, and you need to tap on the ‘Hide Slide’ option. The selected slide will now be included in the presentation.

An alternative to show a hidden slide within a running presentation, while remaining in the ‘Presenter View’, make a random right click anywhere within the currently running slide. The ‘Options Panel’ pops up, and you are required to choose the ‘See All Slides’ option.

All the slides of your presentation will now get displayed in the slide navigation pane, with the hidden ones being grayed out with a crossed slide number. Click on the thumbnail of the respective hidden slides that you want to present before the audience.
asterpieces crea

Creating PowerPoint Presentation Slides in Filmora
The Wondershare Filmora Video Editor franchise of graphic editor software is a pioneer in creating stunning masterpieces of content presentation alternatives. Talking of slideshow presentations, you can work with the software program to create and edit slideshow presentations in high end professional quality. The inbuilt library of the program is a vast trunk of features, effects and tools that allow you to explore your graphic creation abilities to your heart’s content and design top quality slideshows.
For Win 7 or later (64-bit)
For macOS 10.12 or later
Apart from creating slideshow presentations, you can use the software program to convert the same into video edits and customize them to suit your needs. As an example, you can work with removing the slideshow background, overlaying the slide contents; add tons of audio-visual effects and transitions to the slides and supplement them with pleasing background music.
Additional advantages of the application are a welcoming and user cohesive interface, high speed output response characteristics, high end, professional quality slideshow output and an extensive device compatibility. The bottom line is, the Filmora graphic editor package is an all in one solution to your most diverse and specific slideshow creation needs.
● Ending Thoughts →
● Custom slideshows are an important part of PowerPoint presentations, especially when you need to showcase selective contents of a detailed project.
● Apart from creating, you also get to play the custom slideshow, make it your default presentation and hide the latter’s slides using the PowerPoint tool.
● If you are searching for a PowerPoint alternative to create custom slideshows, picking the Wondershare Filmora slideshow creator tool is indeed a smart choice.
Designing custom slideshows in PowerPoint is an absolute fun to do activity for infotainment and information sharing needs. Stay here to get an insight into creating the same, all in a wink!
In this article
01 [How to Create a Custom Slide Show in PowerPoint?](#Part 1)
02 [How to Show a Custom Show in PowerPoint?](#Part 2)
03 [How to Hide Slides in PowerPoint?](#Part 3)
Part 1 How to Create a Custom Slide Show in PowerPoint?
PowerPoint presentations are an already elusive and captivating media of information delivery and content sharing, be it a personal entertainment need or a high end professional requirement, PowerPoint presentations can do it all! Responding to the day to day IT upgrades of modern times, the aforesaid MS Office utility program has introduced its custom slideshow feature, which you can work upon to expand your creative skills in graphic design.
Custom slideshows are a convenient means of abstracting a required set of contents from a rather detailed slideshow presentation to address the needs of a specific audience, instead of distracting them with showcasing the entire content, most of which turns irrelevant to their exclusive requirements.
Talking about the knowhow to work with the feature, the following section encompasses a comprehensive understanding of the custom slide show creation process with the finest details:
User’s Guide to Create Custom Slideshows in PowerPoint
Step 1: Launch the PowerPoint Tool
Start the custom slide show PowerPoint creation process with launching the PowerPoint tool in any of your preferred devices. It would be better to work on a desktop or a PC. Proceed to open the presentation that you wish to create a custom slideshow from.
Step 2: Custom Slide Show Option
In the welcome interface of PowerPoint, navigate to the ribbon at the top and hit the ‘Slide Show’ tab, followed by clicking on the ‘Custom Slide Show’ button from the ‘Options Panel’ that appears. As you tap the aforesaid button, a dropdown menu follows next, from where you need to choose the ‘Custom Shows…’ option.
Step 3: Custom Shows Dialog Box
The completion of Step 2 brings up the ‘Custom Shows’ dialog box, with a blank area at the left, indicating the absence of any custom slide show as yet. To create one, navigate to and click on the ‘New’ button at the right side within the dialog box.
Step 4: Define Custom Show Dialog Box
As you tap the ‘New’ button, the ‘Define Custom Shows’ dialog box pops up with a display of the following fields and buttons:
● Slide Show Name Box
Use this field to assign a name to your custom slideshow. In case you don’t add a name of your choice, PowerPoint will assign the name ‘Custom Show 1’ to your custom presentation.
● Slides in Presentation
Below the ‘Slide Show Name’ box, appears a list of slides in the chosen presentation which you can use to create the custom slide show. To add slides to the same, click on the respective slide names.
● Add Button
The ‘Add’ button in the middle of the ‘Define Custom Show’ dialog box is used to include selected slides from the main list explained above to the ‘Slides in Custom Show’ list at the right. The ‘Add’ button however, remains disabled until you make a selection from the main slides list to include within the custom slides list. Take note that you can choose to repeat the slides within the custom list.
● Remove Button
You can use this button to select and delete specific slides from the ‘Slides in Custom Show’ list. The button however, remains disabled till you make a slide selection to be removed.
● Slides in Custom Show
This is a list of slides that you have selected from the main slides list to include in the custom slideshow.
● Re-Order Buttons
These are ‘Up’ and ‘Down’ arrows at the right side of the ‘Define Custom Show’ dialog box, which are active only if the ‘Slides in Custom Show’ list has more than one slide to its credit. In such a case, you can use these arrows to change the sequence of appearance of the slides within the custom presentation.
Step 5: Back to Custom Shows Dialog Box
When you have finished making all the required entries in the aforesaid fields, click on ‘OK’ to create your custom slideshow, which is visible in the ‘Custom Shows’ dialog box. You can preview the just created custom presentation by selecting the slideshow in the ‘Custom Shows’ list, followed by clicking on the ‘Show’ button at the bottom right of the dialog box.
The ‘Custom Shows’ dialog box has an additional list of buttons, which are explained as follows:
● The ‘New’ button, which you can click on to continue creating as many custom slideshows as you like.
● The ‘Edit’ button, which allows you to make changes to a specific custom slideshow.
● The ‘Remove’ button, which you can use to select and delete an existing custom presentation.
● The ‘Copy’ button, that lets you create multiple copies of a selected slideshow. This utility comes handy when you need to work on creating similar custom presentations with an affordably small number of differential elements.
When you are satisfied with your work, navigate to and hit the ‘Close’ button to finalize and save the custom presentation within your device.
Part 2 How to Show a Custom Show in PowerPoint?
When working to share any kind of information through slideshow presentations, creating a custom show is just half the job, with the significant part of a flawless content presentation remains still under the line. Having understood the process of creating a custom slide show in PowerPoint in enough detail, let us now move ahead with learning how to show the same in PowerPoint in the following section:
User’s Guide to Play a Custom Slideshow in PowerPoint
Step 1: Launch the Parent Presentation
In any suitable device of your preference, proceed with opening the presentation in which you have worked on creating the custom slideshow, followed by hitting the ‘Slide Show’ tab in the PowerPoint ribbon at the top. From the list of options that appears next, click on the ‘Custom Slide Show’ button.
Step 2: Custom Slideshow Dropdown Menu
Clicking on the ‘Custom Slide Show’ button in step 2 causes the latter’s dropdown menu to get displayed, with a list of all the created custom shows within the currently accessed parent slideshow presentation. Navigate to and click on the name of the custom presentation that you wish to play.
How to Set a Custom Show as the Default Slideshow?
If you are interested in playing the custom show as a default presentation, see through the following stepwise tutorial guide to go ahead with the process:
Step 1: Set Up Slideshow Button
After you have launched the parent presentation, navigate to and click on the ‘Slide Show’ tab within the topmost PowerPoint ribbon and tap the ‘Set Up Slide Show’ button from the list of options that follows.
Step 2: Set Up Show Dialog Box
Clicking on the aforesaid button makes the ‘Set Up Show’ dialog box to appear, where you are required to hit the ‘Custom Show’ radio button. You can now click on the dropdown arrow below the radio buttons to select your specific one from the list of custom shows that pops down. Hit ‘OK’ at the bottom right corner of the dialog box when you have made your choice.
The custom show is now your default slideshow. In your future launches of ‘Slide Show View’, only the selected custom show slides will appear to be used as a presentation.
Part 3 How to Hide Slides in PowerPoint?
In case you have worked on a detailed slideshow presentation in the PowerPoint tool, that consists of selective contents for different audience groups, all within the main presentation, it is a wise step to hide the content slides that are not useful to particular audiences, lest your viewers might get distracted with the irrelevant content.
By far, you must have developed a significant understanding of the custom slideshow PowerPoint creation and presentation procedure in much detail. Moving further into our discussion, let us now work on hiding slides within a PowerPoint presentation through the following step by step guide:
How to Hide or Unhide a Slide in PowerPoint?
Step 1: Launch the PowerPoint Presentation
Start with opening a desired PowerPoint Presentation in your preferred device.
Step 2: Make Your Selection
Visit the slide navigation pane at the left to select slide you wish to delete. Your selections will be highlighted as you tap on them. You can either delete the slides one at a time, or make multiple selections to delete them all at once.
Step 3: Hide Slide Option
When you have made the required selections, right click on the same, followed by choosing the ‘Hide Slide’ option from the dropdown menu that appears next. The selected slides will now be hidden and you can recognize them in the ‘Presenter View’ with lighter thumbnails as compared to the included slides, in the slide navigation pane.
Step 4: Unhiding the Presentation Slides
If you wish to unhide a previously hidden presentation slide, reach to the slide navigation pane in the left and right click on the hidden slide thumbnail. The dropdown menu in Step 3 pops up again, and you need to tap on the ‘Hide Slide’ option. The selected slide will now be included in the presentation.
An alternative to show a hidden slide within a running presentation, while remaining in the ‘Presenter View’, make a random right click anywhere within the currently running slide. The ‘Options Panel’ pops up, and you are required to choose the ‘See All Slides’ option.
All the slides of your presentation will now get displayed in the slide navigation pane, with the hidden ones being grayed out with a crossed slide number. Click on the thumbnail of the respective hidden slides that you want to present before the audience.
asterpieces crea
Creating PowerPoint Presentation Slides in Filmora
The Wondershare Filmora Video Editor franchise of graphic editor software is a pioneer in creating stunning masterpieces of content presentation alternatives. Talking of slideshow presentations, you can work with the software program to create and edit slideshow presentations in high end professional quality. The inbuilt library of the program is a vast trunk of features, effects and tools that allow you to explore your graphic creation abilities to your heart’s content and design top quality slideshows.
For Win 7 or later (64-bit)
For macOS 10.12 or later
Apart from creating slideshow presentations, you can use the software program to convert the same into video edits and customize them to suit your needs. As an example, you can work with removing the slideshow background, overlaying the slide contents; add tons of audio-visual effects and transitions to the slides and supplement them with pleasing background music.
Additional advantages of the application are a welcoming and user cohesive interface, high speed output response characteristics, high end, professional quality slideshow output and an extensive device compatibility. The bottom line is, the Filmora graphic editor package is an all in one solution to your most diverse and specific slideshow creation needs.
● Ending Thoughts →
● Custom slideshows are an important part of PowerPoint presentations, especially when you need to showcase selective contents of a detailed project.
● Apart from creating, you also get to play the custom slideshow, make it your default presentation and hide the latter’s slides using the PowerPoint tool.
● If you are searching for a PowerPoint alternative to create custom slideshows, picking the Wondershare Filmora slideshow creator tool is indeed a smart choice.
Also read:
- New Vlogs and Travel Content Are Incomplete without a Fast-Motion Effect. Learn Step-by-Step How to Make Fast Motion Video on an iPhone in This Article for 2024
- New 2024 Approved How to Make Audio Visualizer in Filmora Easy
- Updated In 2024, Best 10 Tools to Convert a GIF Into a PDF
- New In 2024, 10 Best Text to Robot Voice Generators Windows, Mac, Android, iPhone & Online
- Updated Looking for the Best Way to Create Stunning Video Animations? Here, We Look at some of the Best Animated Video Maker Solutions to Use
- How to Create a Freeze Frame Sequence Effect for 2024
- Top 6 Best Alternatives to Clownfish Voice Changer
- New In 2024, How to Upload the Video to Twitch? Well, if You Dont Know the Process, This Detailed Guide Will Help You. While Explaining the Process, This Article Will Also Let You Know some Twitch Video Upload Guidelines
- 2024 Approved Stop Worrying if Your Adobe Premiere Playback Slows Down. This Guide Will Show You the Best Solutions to Resolve This Issue and a Perfect Alternative
- Updated 2024 Approved Free Ways To Split Video For Whatsapp Status On All Platforms
- Updated 2024 Approved Create Glitch Text Effect
- Updated In 2024, Progressive Solutions to Add VHS Effects to Video with Ease
- If You Are Looking for an Open-Source, Cross-Platform Video Editor, Shotcut Is a Great Choice, In 2024 But Is It Truly the Best Video Editor or Is There a Better Alternative Available?
- Updated 2024 Approved How to Create a Freeze Frame Sequence Effect
- How to Add Echo Effect to Video for 2024
- Simple Tricks Make 3D GIF Production of Inspiration Pop up Constantly
- Detailed Steps to Rotate Videos Using Kdenlive for 2024
- Updated Here, You Will Get the Basic Steps to Use the Speed Ramping Effect in Your Videos by Wondershare Filmora Software. In This Article, You Get a Guide to Adding the BCC Glitch Effect to Give Your Sports Montages a More Professional Look for 2024
- Updated In 2024, How to Make A Jaw-Dropping Time Lapse Video? Full Guide
- The Benefits Of Using Video For Social Media Marketing
- Updated If You Are Looking for an Open-Source, Cross-Platform Video Editor, Shotcut Is a Great Choice? But Is It Truly the Best Video Editor or Is There a Better Alternative Available?
- Updated How to Create A Freeze Frame Sequence in Video
- Updated Turn Your Blog Content Into Audio Podcasts to Reach a Wider Audience and Increase Reader Participation for 2024
- New 2024 Approved How to Zoom in on PowerPoint Easy Ways
- New 2024 Approved Free Ways To Split Video For Whatsapp Status On All Platforms
- In 2024, How to Create a Light Sweep (Shine) Effect
- 2 Effective Ways to Add Text Behind Objects
- Updated In 2024, Having Difficulty in Choosing the Most Affordable 3D Slideshow Software? Stay Here for the Best Application Choices of All Times to Create the Most Stunning Slideshows Ever
- New 2024 Approved How to Create Cooking Video Intro and Outro for YouTube Channel?
- New 2024 Approved Start Making Procreate GIFs and Take Your Editing Creativity to the Next Level
- Do You Use Premiere Pro and Want to Learn How to Change a Videos Frame Rate Using the Tool? Here Are the Steps that You Need to Follow for 2024
- 2024 Approved 4 Solutions to Crop a Video on Android Easily
- 2024 Approved 10 Top Innovative AR Video Effects to Check Out
- The Best Peter McKinnon LUTs for Perfect Video Editing
- Techniques You Never Heard of for Learning YouTube AI Marketing for 2024
- Updated In 2024, Rotate Video in iMovie
- In 2024, Want to Play a Video on Loop on Vimeo so that It Plays Again and Again? Here Are All the Different Ways to Loop a Video on Vimeo in Simple Steps
- Updated 3 In-Camera Transitions Tricks To Make Videos
- New What Is First Impression Review Video for 2024
- Updated Step by Step to Crop a Video Using Lightworks
- New 2024 Approved Wondering How to Rotate a Video in Windows at Any Desired Angle and Save It Permanently? Find Out All the Different Ways to Rotate Videos Temporarily as Well as Permanently
- Are You Looking to Remove Echo in Premiere Pro? Please Look at Our Guide for Advice and Suggestions on Getting the Best Possible Outcomes for 2024
- New In 2024, Confused About Deciding the Next Destination for Your Trip? This Article Features some of the Best Vloggers You Can Find for Gaining Inspiration for Traveling
- New In 2024, Best GIF to MOV Converters
- Updated In 2024, Speed Control Is Frequently Used in Video Editing. By Speed up or Slow Down the Video Speed, You Can Achieve Different Visual Results. This Article Will Show You How to Control the Speed of a Video
- End Screen Makers for 2024
- Updated In 2024, Top 5 Apps To Add Song To Video
- New Make Transparent Background Video Today for 2024
- Updated Use This Color Match Paint Technique to Find the Exact Shade of Any Hue You Have in Mind for Your Paint Project. Match the Paint to Your Desired Color Even without Knowing the Paint Name or Brand with Automotive Paint Matching
- How to Transfer Data After Switching From Tecno Camon 20 to Latest Samsung | Dr.fone
- How To Update or Downgrade Apple iPhone 15 Pro Without Data Loss? | Dr.fone
- How to play an MP4 on Samsung Galaxy A24?
- What is Geo-Blocking and How to Bypass it On Xiaomi 13T? | Dr.fone
- In 2024, Unlock Your Disabled iPhone 12 Without iTunes in 5 Ways | Dr.fone
- Apple iPhone 7 Plus Backup Password Never Set But Still Asking? Heres the Fix | Dr.fone
- In 2024, Hacks to do pokemon go trainer battles For Apple iPhone 12 | Dr.fone
- In 2024, How To Bypass Activation Lock On Apple Watch Or iPhone X?
- Can I use iTools gpx file to catch the rare Pokemon On Xiaomi Redmi 13C 5G | Dr.fone
- Here are Some Pro Tips for Pokemon Go PvP Battles On Motorola G24 Power | Dr.fone
- Pokémon Go Cooldown Chart On Vivo Y100 5G | Dr.fone
- Bricked Your Oppo Reno 11 Pro 5G? Heres A Full Solution | Dr.fone
- How to Cast Poco X6 to Computer for iPhone and Android? | Dr.fone
- In 2024, The Most Useful Tips for Pokemon Go Ultra League On Vivo V29e | Dr.fone
- In 2024, How to Remove Apple ID from iPhone 6 Plus without Password?
- In 2024, Where Is the Best Place to Catch Dratini On Samsung Galaxy S23 FE | Dr.fone
- 3 Solutions to Hard Reset Motorola Moto G24 Phone Using PC | Dr.fone
- The Most Useful Tips for Pokemon Go Ultra League On Tecno Pop 8 | Dr.fone
- A Detailed VPNa Fake GPS Location Free Review On OnePlus Nord N30 5G | Dr.fone
- Downloading SamFw FRP Tool 3.0 for ZTE Axon 40 Lite
- Forgot Pattern Lock? Heres How You Can Unlock Honor 80 Pro Straight Screen Edition Pattern Lock Screen
- In 2024, How to Bypass iCloud Lock on iPhone 14
- Wondering the Best Alternative to Hola On Apple iPhone XS Max? Here Is the Answer | Dr.fone
- Want to Uninstall Google Play Service from Infinix Note 30 5G? Here is How | Dr.fone
- How PGSharp Save You from Ban While Spoofing Pokemon Go On Honor Magic5 Ultimate? | Dr.fone
- What Does Jailbreaking Apple iPhone SE (2020) i Do? Get Answers here
- Complete guide for recovering music files on Vivo Y100 5G
- 4 Most-Known Ways to Find Someone on Tinder For Nokia XR21 by Name | Dr.fone
- Will iSpoofer update On Nokia C210 | Dr.fone
- 3 Easy Solutions to Hard Reset Vivo T2x 5G | Dr.fone
- How To Stream Anything From Samsung Galaxy A05 to Apple TV | Dr.fone
- In 2024, The Complete Guide to Nokia G22 FRP Bypass Everything You Need to Know
- Title: Updated Change Background Color in After Effects for 2024
- Author: Morgan
- Created at : 2024-07-01 13:02:21
- Updated at : 2024-07-02 13:02:21
- Link: https://ai-video-editing.techidaily.com/updated-change-background-color-in-after-effects-for-2024/
- License: This work is licensed under CC BY-NC-SA 4.0.
